Leaderboard
-
conedodger
Community Member3Points13,006Posts -

SpeedRoo
Community Member3Points386Posts -
EuroDat
Community Member2Points3,339Posts -
.jpg.017c2fbd9ed4c548138d9c6f6c49e029.jpg)
astrohog
Supporting Member2Points189Posts


Popular Content
Showing content with the highest reputation on 01/18/2026 in all areas
-
3 points
-
1 pointWell then, it looks like all my date theories are out in the trash. I guess it boils down to either you have the flap or you don't!! Simple!!1 point
-
1 point
-
1 pointHi Richard, I had a dent like that done by a angry jealous piece of Sh*t once, when i saw it i took a big rubber hammer and a towel over it so not to mess up the inside of the roof and hammered it back to it's original form. You can do this easely with a hairdryer make it a little warm and hammer the dent if it is like a drum-dent and clean the most of the dent back to normal. Keep circuling with the hairdryer over the dent and it surroundings and when it is warm, like 40-60 celcius (Just to hot to keep your hand on it) and hammer it upward. Never take a part out of the roof because it will be VERY difficult to weld a new part in without problems. (ask people with sunroof removed.. they always have problems early of later on..) I would like to see a picture of the dent.. or is this to revealing.. You can take out most of the dent this way. When there where sharp edges in the dent you need a special hammer with some tape on it to not damage the paint. And it will take some special skill to take out the last marks of the dent.. always take your time and do this slow! Good luck!1 point
-
1 pointMetal shrinking is doable but it takes a lot of practice and the results can be challenging. One thing in your favor is the metal has a memory and wants to go back to the original shape. A paintless dent guy would be a great choice even if it needed painting after it was fixed. PDR guys understand how to push metal around Do you have any pictures of the dent?1 point
-
First and foremost, WELCOME TO THE GROUP!!! Stick around long enough and you will find us a positive and supportive bunch, probably the best on the web. If your heart is set on a 240Z, expect to pay a premium price for a solid and well-sorted car. The one in your link seems to be very well done. Any 240Z under $15k is likely to be a project car to some degree and may require a serious commitment to complete it. If you are open to other model S30's, look into the more available 280Z's.1 point
-
1 pointShrinking sheet metal with heat and cold is a very effective method. There are a lot of auto body repair tutorials on YouTube that include sheet metal shrinking.1 point
-
1 pointBoth front and back have to be bled and rear shows adjusted correctly in order to get a firm high pedal. You can get a good idea on if the rears are adjusted correctly by how high the parking brake pedal rises. It should come up about a quarter to a third of the available travel. Since you were using the rears with the parking brake theyr'e probably adjusted correctly. Your brake guy should know all of this, the way they function is common across many brands of car.1 point
-
1 pointThe Datsuns don’t have an excess-flow preventer like the Spitfire, so that won’t be the issue here. If the braking system were hydraulically unbalanced, you should normally get a signal from the brake warning switch. That said, these switches can deteriorate over the years and may no longer operate correctly. I’d be more inclined to suspect a blockage somewhere in the brake line after the brake switch. This could be in the brake proportioning valve or in the single line running back to the rear axle. The car is now in the garage, and they should be able to find the problem. A simple step by step troubleshooting would be to loosen the brake line fittings one by one, starting just after the brake switch and working your way back to the T-piece at the rear axle near the fuel pump. At some point, when you crack a fitting with the brake pedal applied, no fluid will come out. The blockage will be located between the last fitting where fluid did flow and the fitting where it didn’t. The photo of the fuel pump is showing the bronze coloured T-piece just above it Sorry I didn’t jump in earlier; we might have found the problem sooner.

 1 point
 -
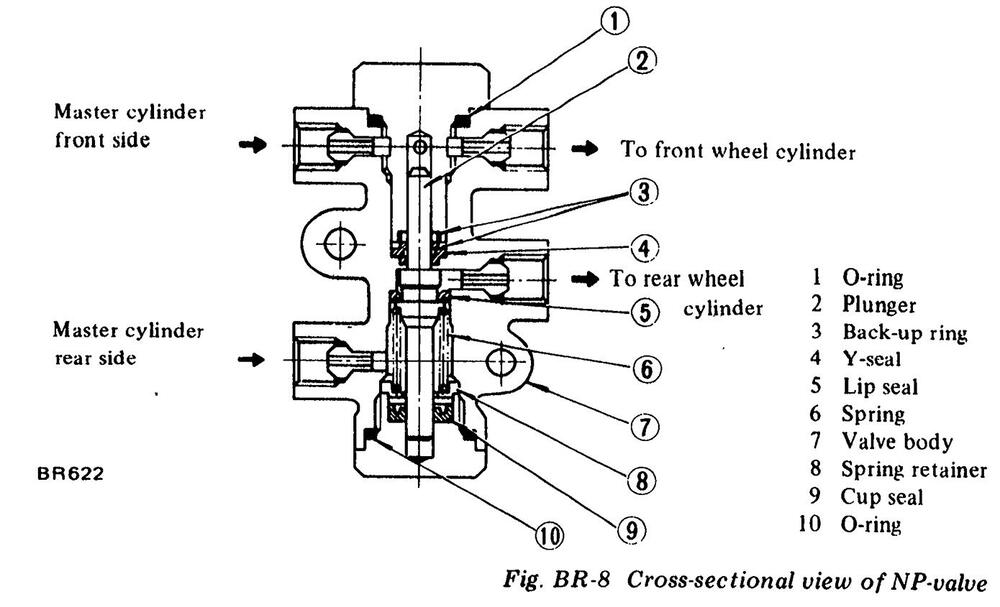
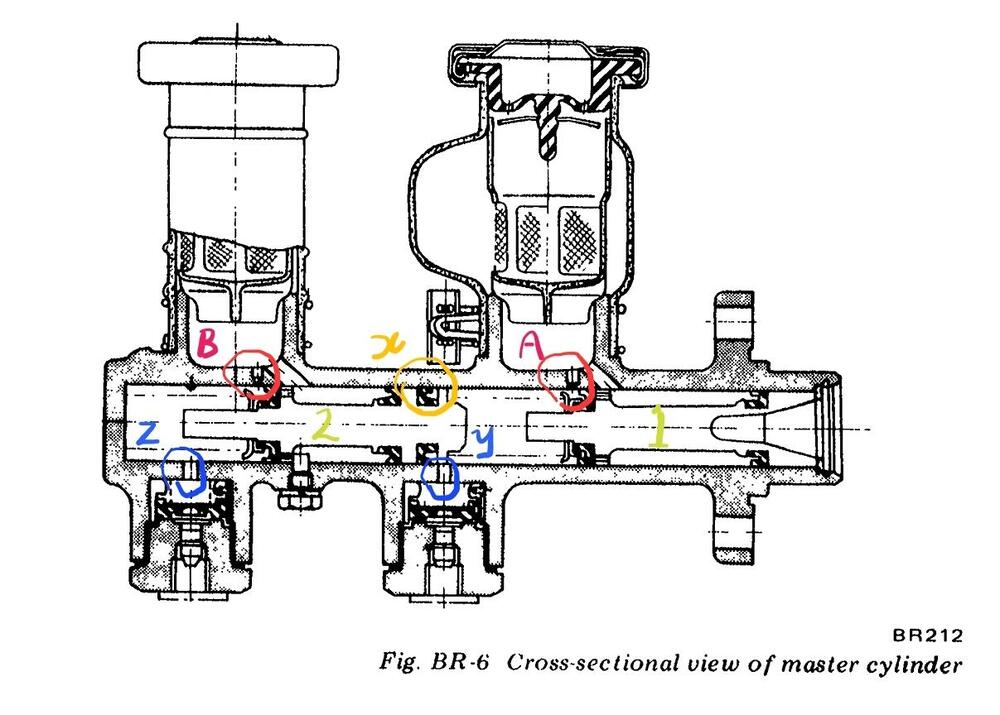
1 pointI’m not entirely sure where you’re seeing pressure. Under normal circumstances, there should be no noticeable pressure in the reservoirs. However, there are situations where a small pressure build-up can occur, usually when certain seals begin to fail. How it works - in a nutshell: When you apply the brakes, piston no. 1 moves forward and passes port A. Once this happens, brake fluid can no longer return to the reservoir, and pressure begins to build. Fluid then flows through port Y to the front calipers, while the pressure also pushes piston no. 2 forward. Note: Seal X on piston no. 2 prevents fluid from passing from the first (disc brake) chamber into the center section of piston no. 2. As pressure builds in the first chamber, it continues to drive piston no. 2 forward. Piston no. 2 then passes port B, which prevents fluid from escaping back to the reservoir. Fluid now flows through port Z to the rear drum brakes. At this point, the system is in balance. Leak scenarios that can cause pressure in the reservoirs The most likely cause is seal X. If this seal leaks, pressurized fluid from the disc brake chamber can pass into the drum brake reservoir. With each brake application, fluid is transferred from the disc brake reservoir to the drum brake reservoir, causing a gradual pressure build-up. You will also notice the fluid levels in the reservoirs changing. Another possibility is leakage past the piston no. 1 seal, located directly beneath port A. If this seal leaks, high-pressure fluid from the disc brake chamber can pass back along the piston and enter the reservoir. Because the chamber volume is much larger than the volume around the piston shaft, roughly half of the leaked fluid can end up in the reservoir, creating pressure. A similar situation can occur with piston no. 2 and seal B. There’s more going on internally, but this overview should help explain why you’re experiencing what appears to be pressure build-up in the reservoirs. The conditions that can lead to pressure build-up in the reservoirs: The reservoirs are completely full of brake fluid The rubber bellows in the reservoirs are in a compressed position Under these conditions, there is very little room for fluid expansion, which can result in pressure building up in the reservoirs.
 1 point
 -
1 pointOK. Just got the last of the plugs in. I like the M16 x 1.5 low headed plugs to fill the inside ports of the intake when one has removed the water heating. Purchased them from Belmetric.

 1 point
 -
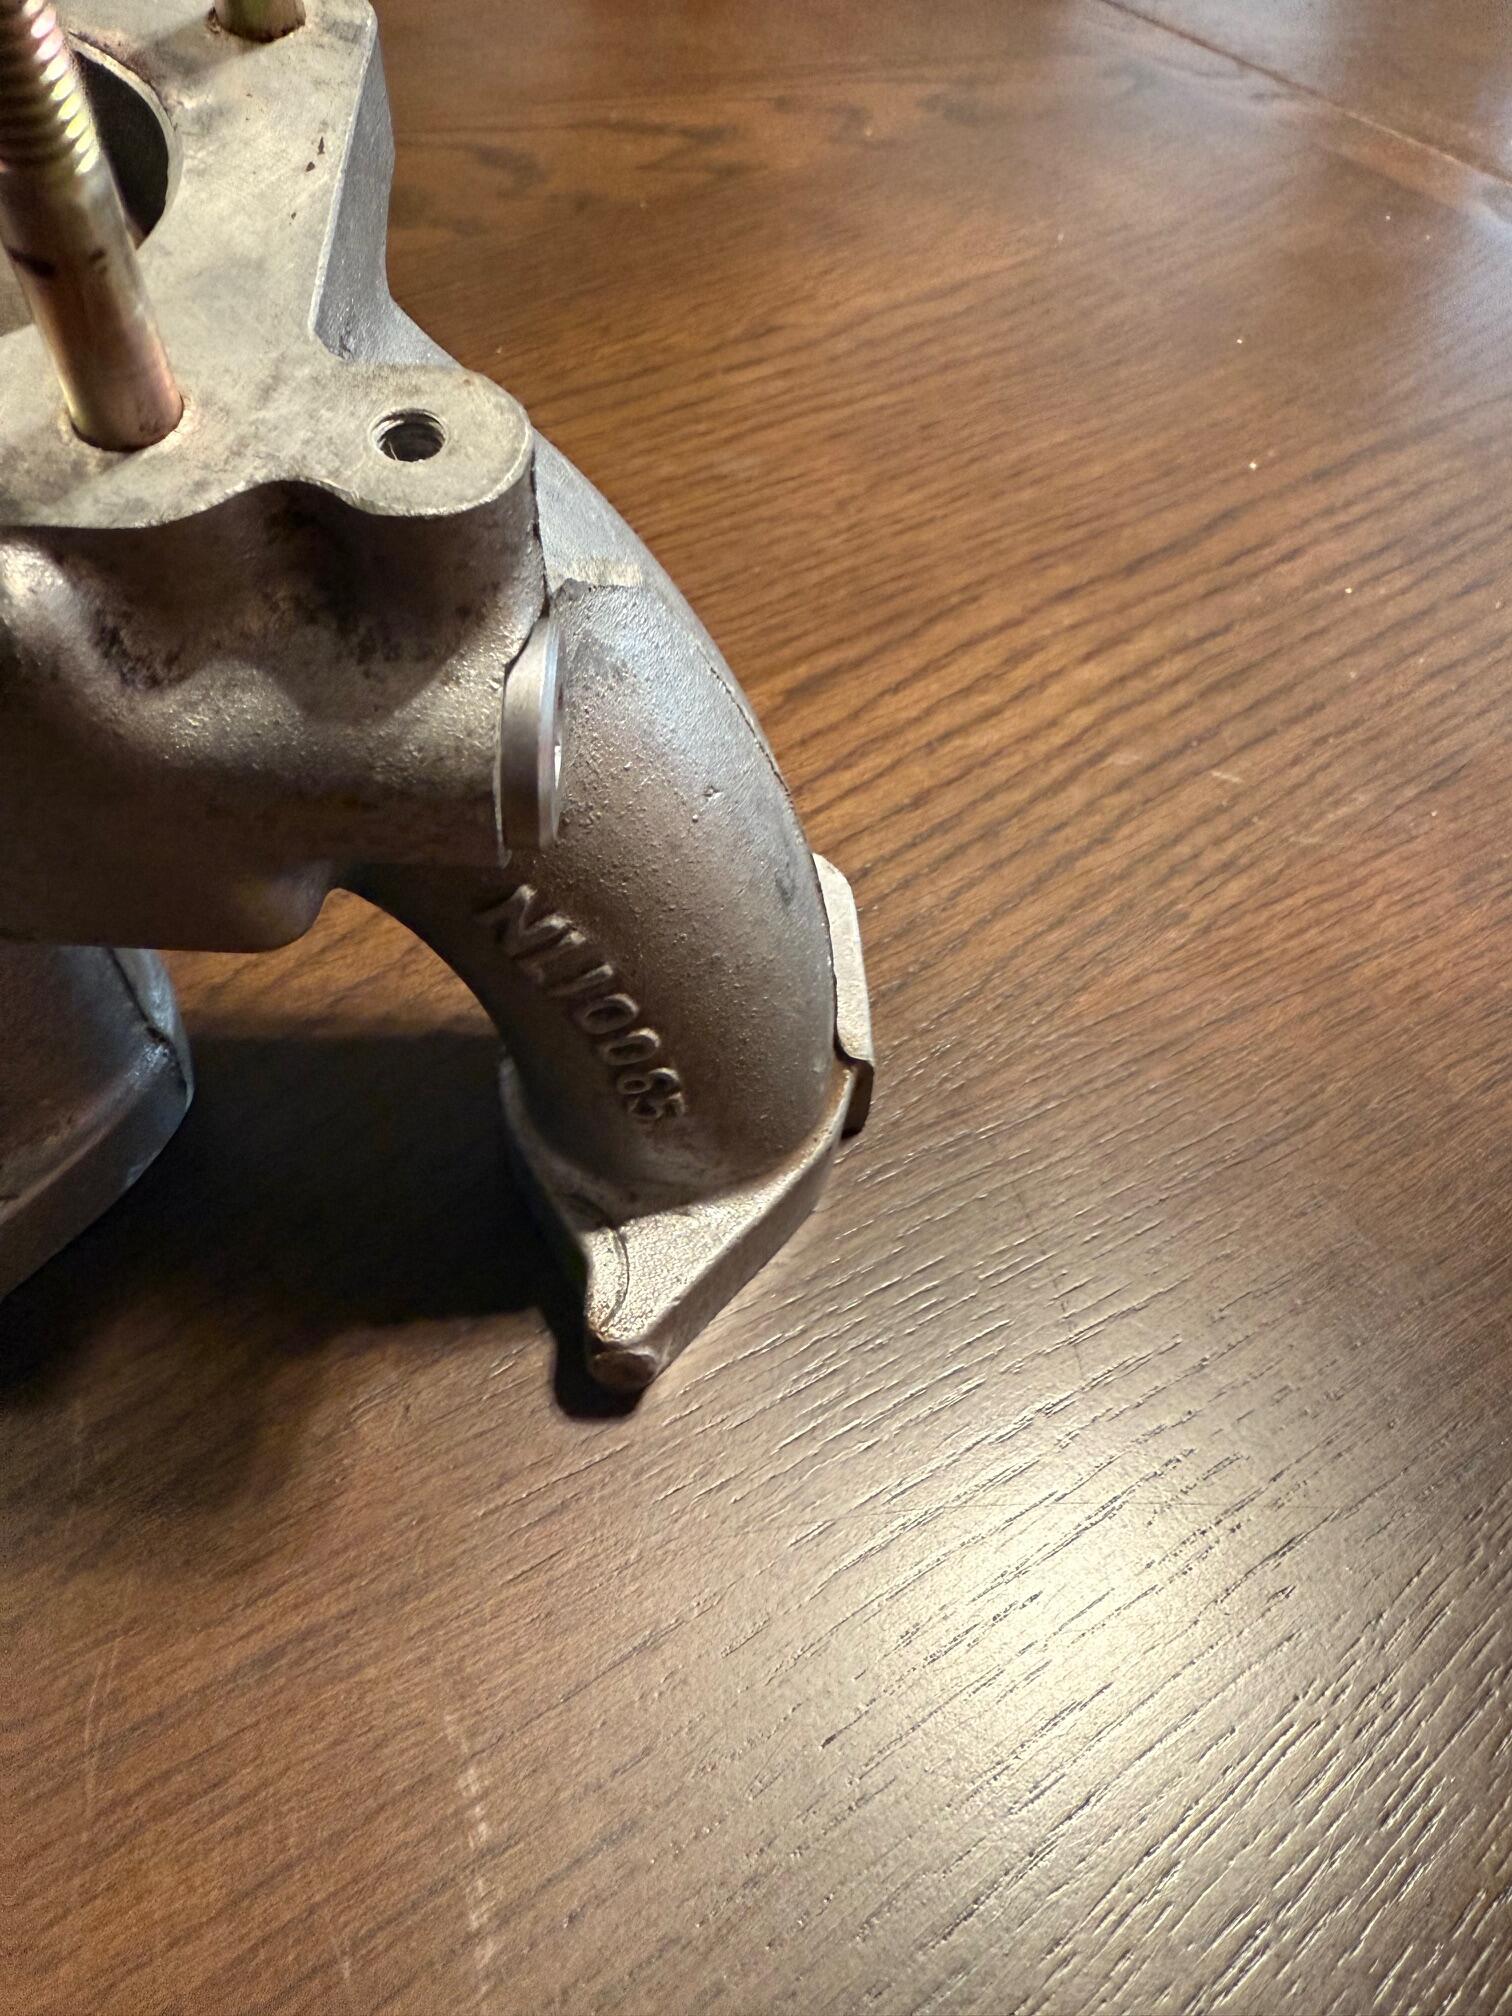
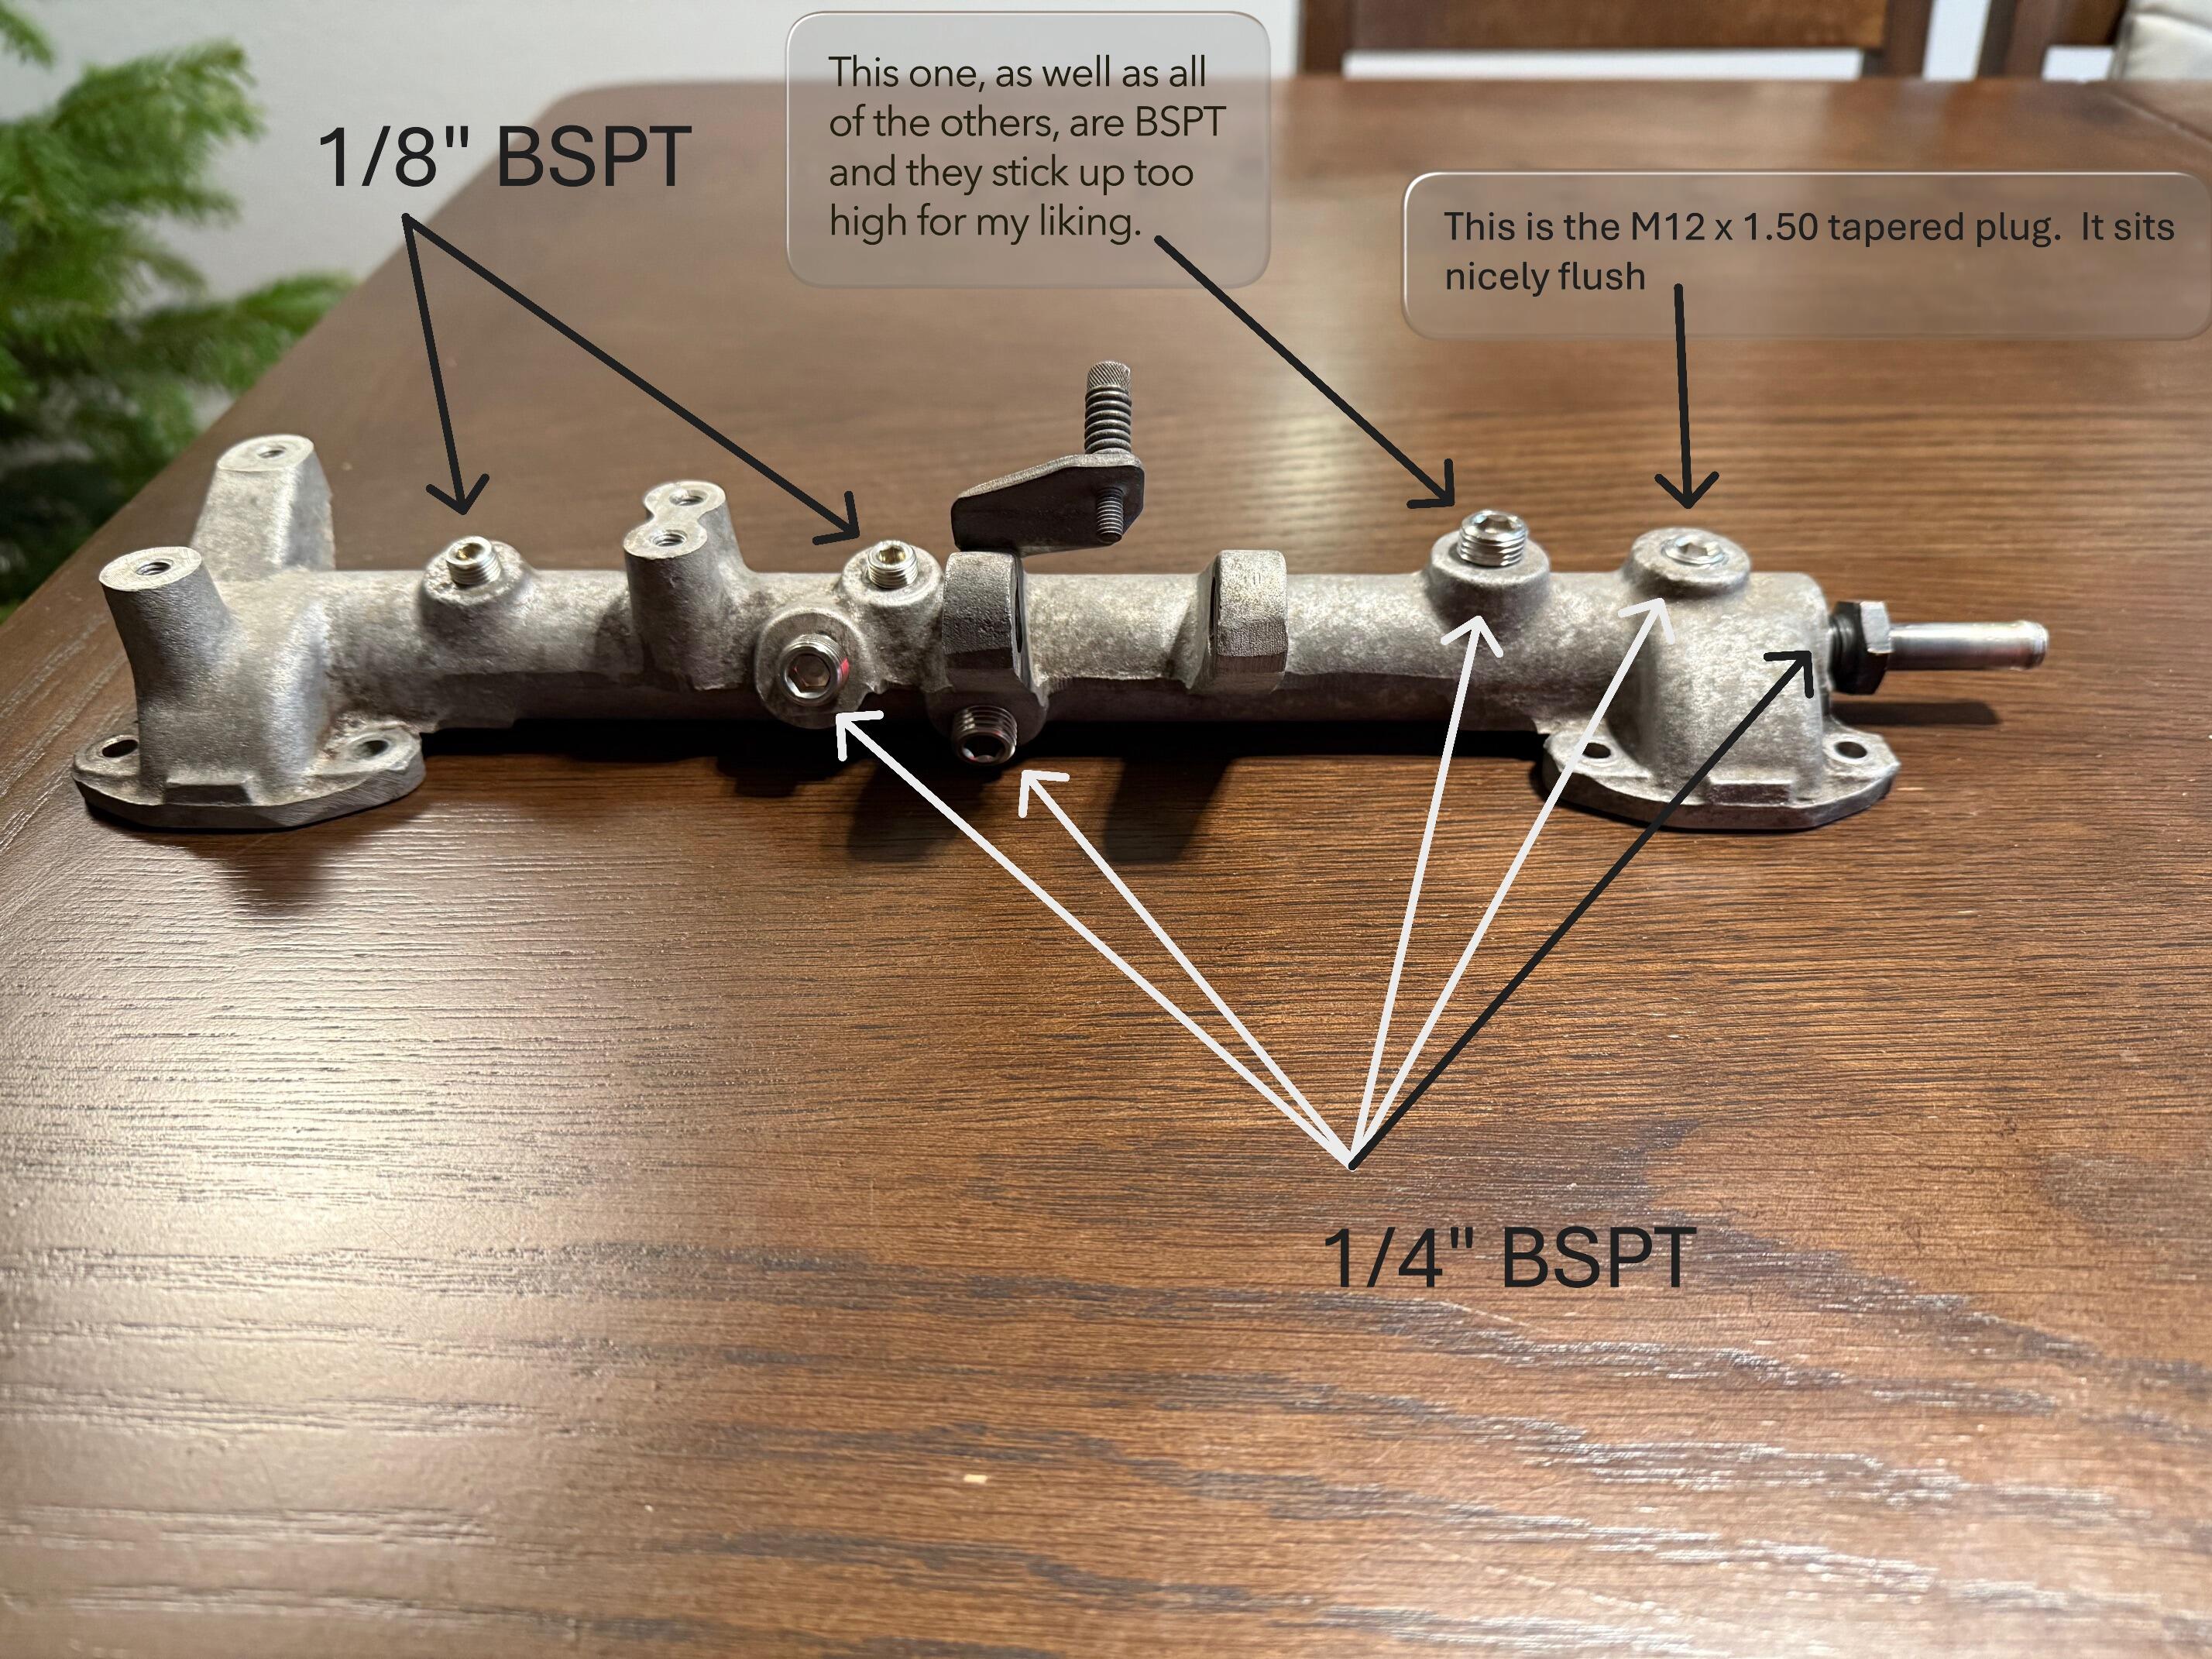
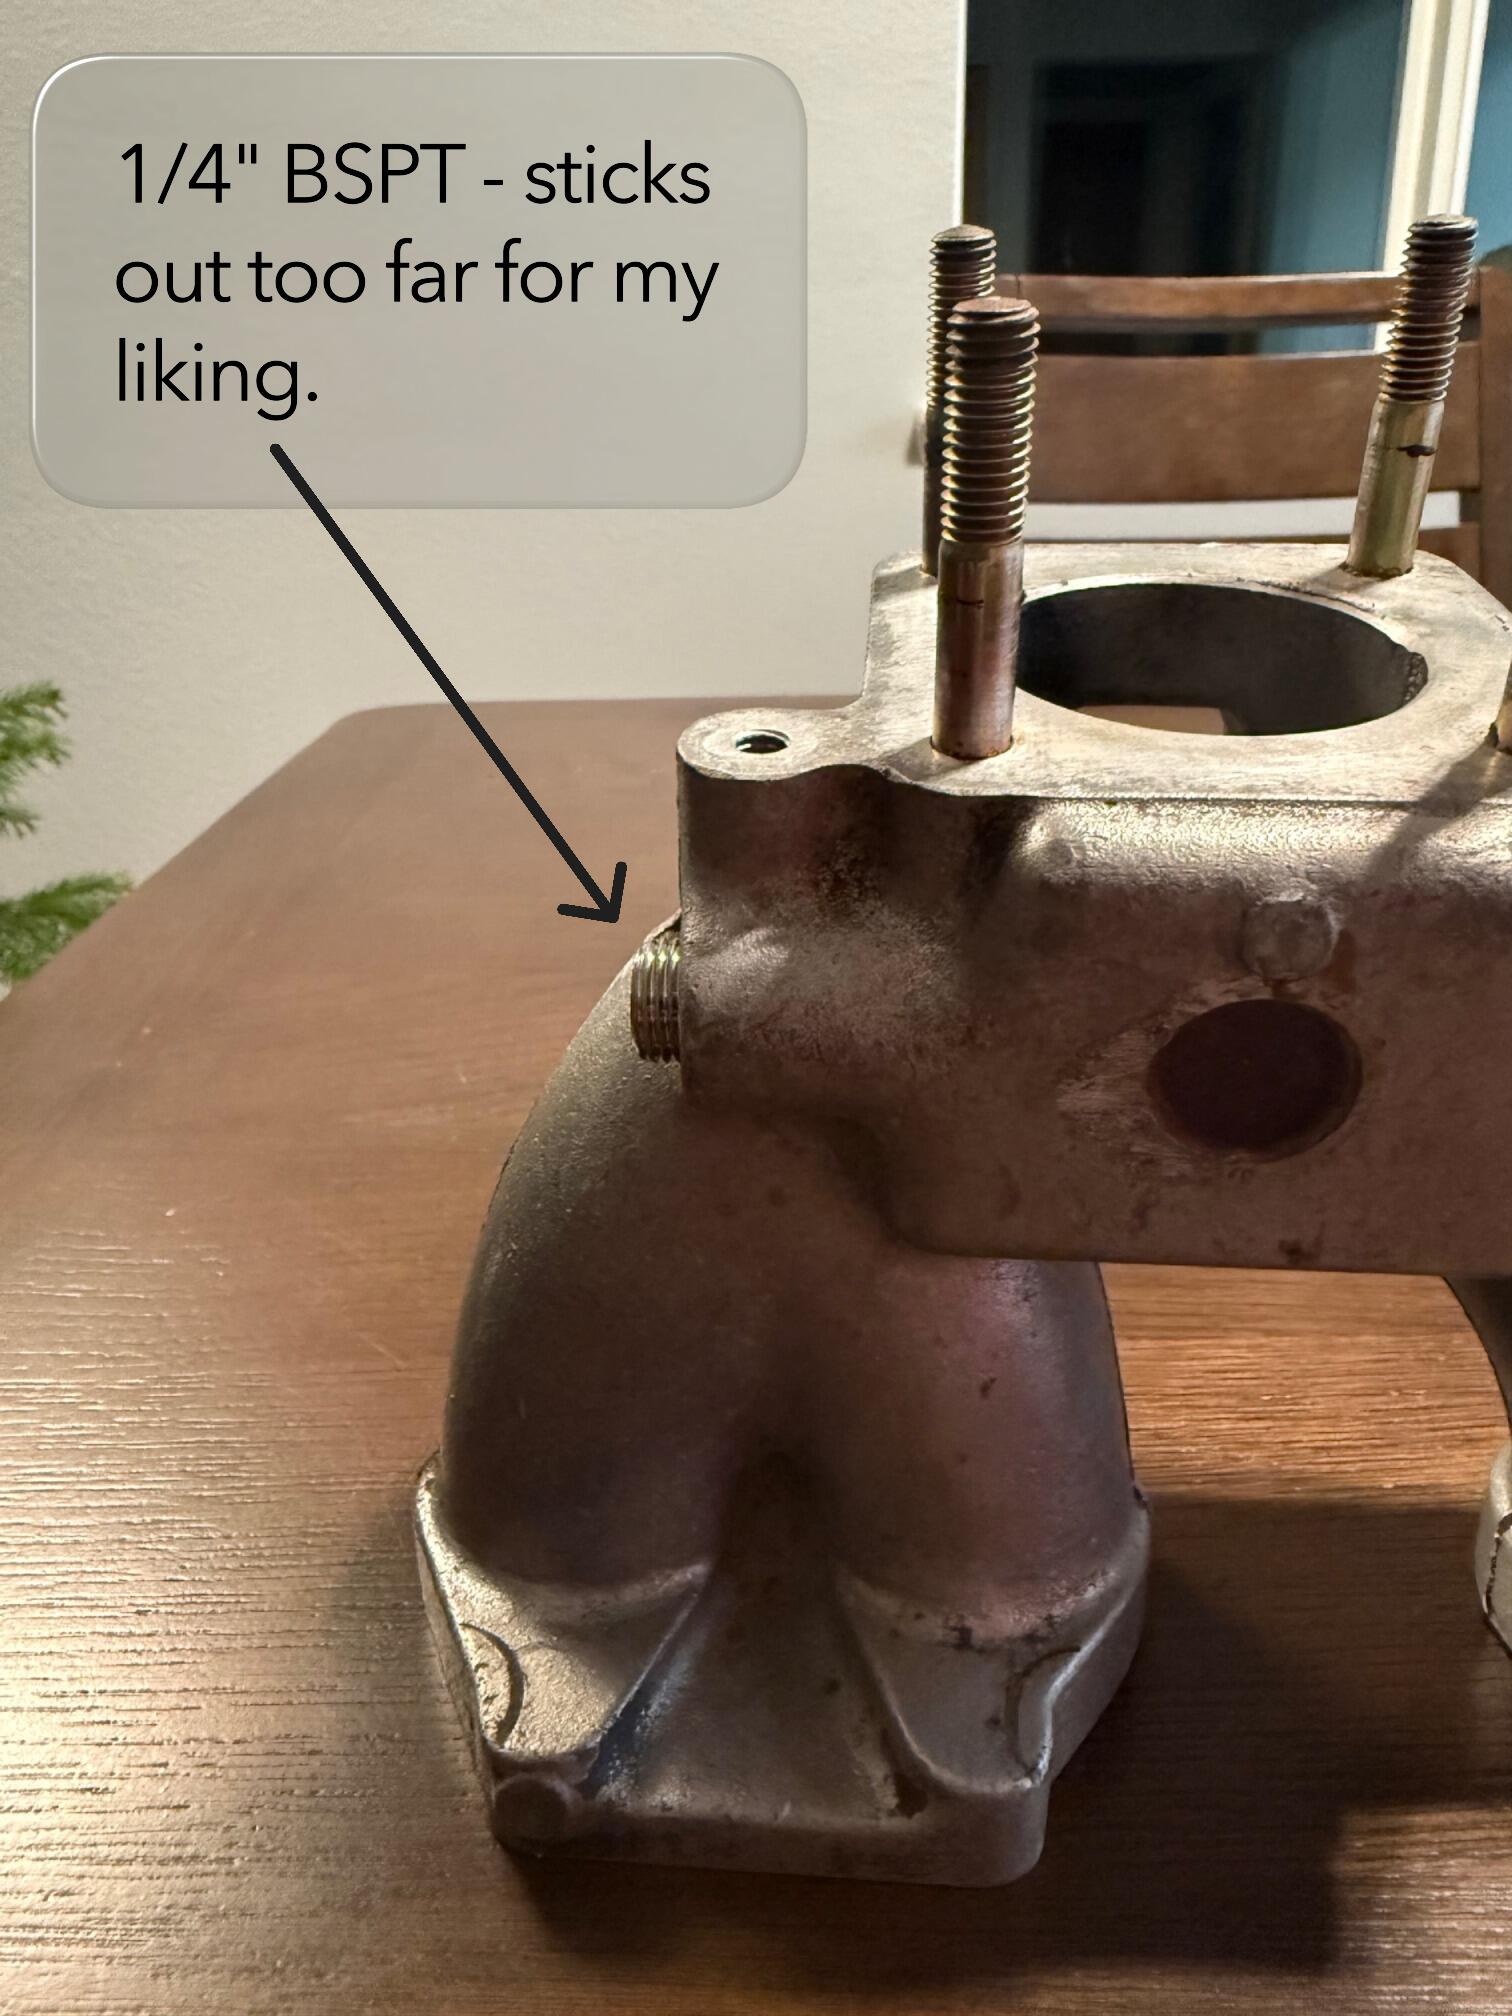
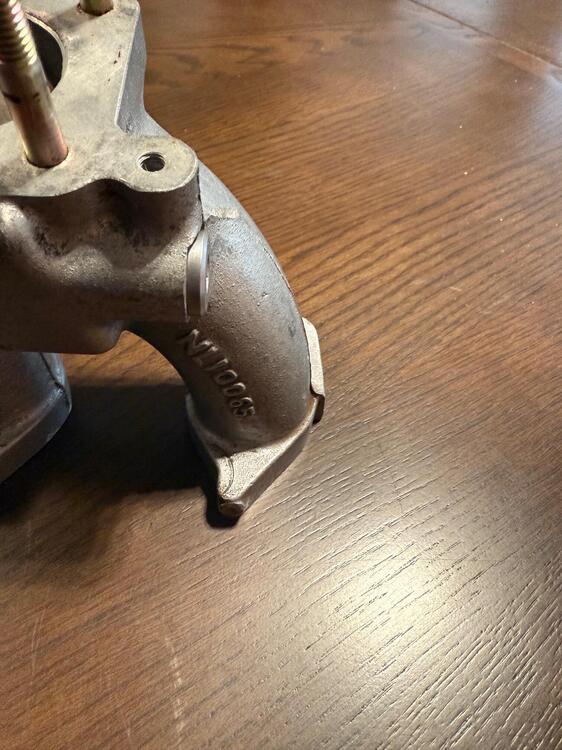
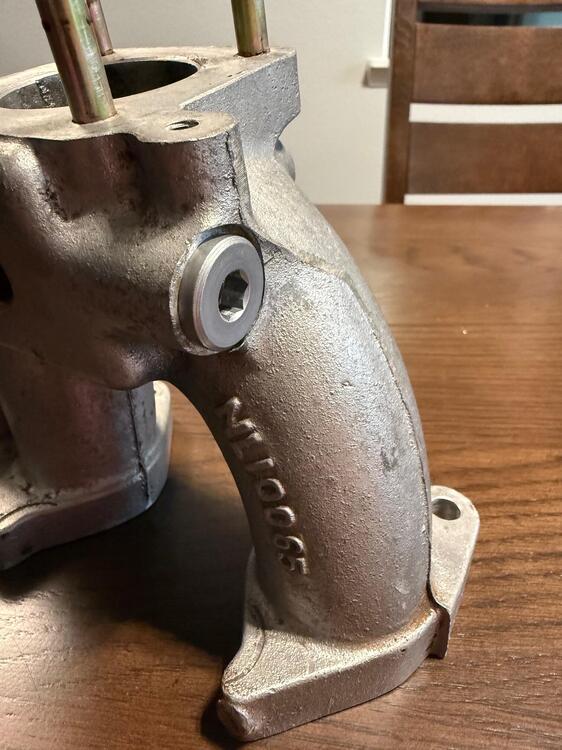
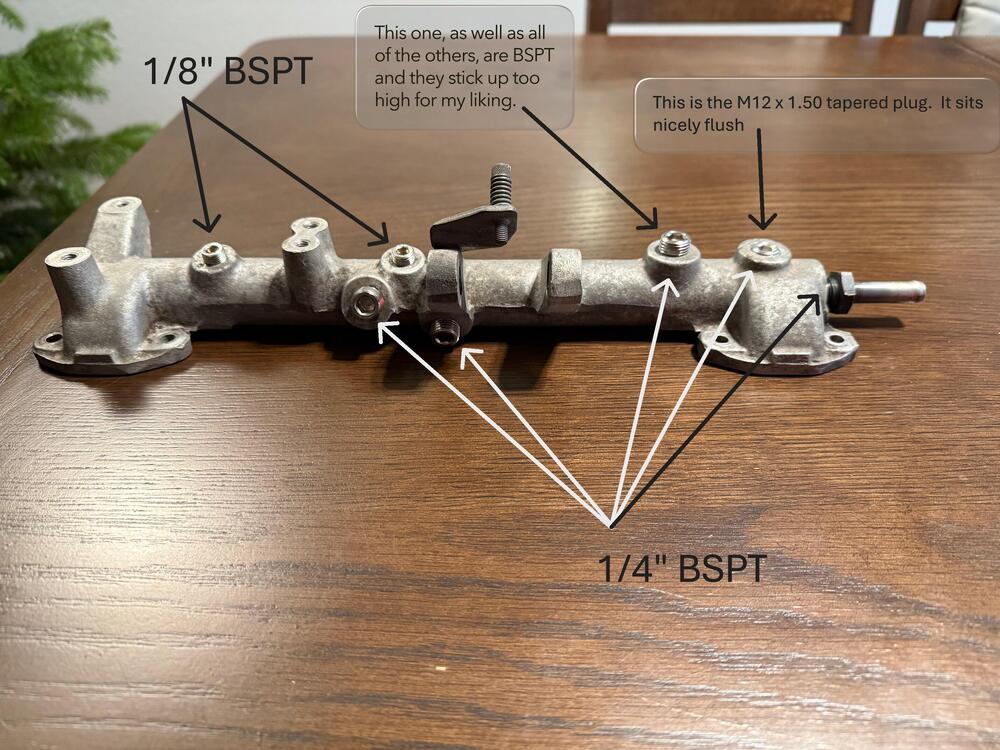
1 pointOkay, so I've received various plugs and set screws from both McMaster and Bel-Metric. I ordered 1/8 and 1/4 NPT, 1/8 and 1/4 BSPT, M12 x 1.50 straight thread and M12 x 1.50 tapered thread, and I am still a bit confused! I won't hold you hostage until the end, I'll give you what I THINK the holes were from factory, and then I'll provide some pictures and notes from my "testing". I think the factory balance tube (US market 240Z) came with 2 ea. - 1/8" BSPT and 5 ea. - 1/4" BSPT holes BALANCE TUBE 1/4" BSPT HOLES it was clear to me that 1/4" NPT is too big, couldn't really even get a thread to start, so it makes sense that, 1) One COULD force 1/4" NPT into the holes in the soft aluminum and create some sort of "seal", and 2) a hole that had been "buggered by a previous (or current!) owner could likely be salvaged by tapping to 1/4" NPT. The 1/4" BSPT plugs I have encounter resistance at 1-1/2 turns and are fairly tight at 1-3/4 - 2 turns. This leaves them sticking out farther than I would like for a clean, plugged look as I would like them to be as close to flush as possible. The M12 x 1.50 straight thread, socket set screw I tried fit very loose initially, and threaded quite a ways in (farthest of the three options I tried) before finally hitting resistance. I feel like it MIGHT have finally created a "seal", but not ideal in my opinion. The M12 x 1.50 TAPERED plug encountered resistance at about 3-1/4 turns and was fairly tight at 3-1/2 turns in. This left it pretty close to flush to the surface and provided a good seal and I think this is what I will be using to plug 1/4" BSPT holes. (see pictures below) BALANCE TUBE 1/8" BSPT HOLES it was clear to me that 1/8" NPT is too big, couldn't really even get a thread to start, so it makes sense that, 1) One COULD force 1/8" NPT into the holes in the soft aluminum and create some sort of "seal", and, 2) a hole that had been "buggered" by a previous (or current!) owner could likely be salvaged by tapping to 1/8" NPT. The 1/8" BSPT plugs I have, encounter resistance at 1-1/2 turns and are fairly tight at 2 turns in. This leaves them sticking out more than I would like for a clean look (see pictures below) now I want to experiment with M10 fine thread (both straight and tapered) in the 1/8 BSPT holes INTAKE MANIFOLD WATER HEATING HOLES The outside (inlet and outlet) holes come from the factory with 1/4" BSPT holes Again, the 1/4" BSPT plugs don't thread in very far and sit proud. The M12 x 1.50 TAPER thread plugs thread in farther and sit pretty flush for a clean look. the inner holes (two holes on the inside of each part of the two-part manifold that connects the manifold halves with "bushings" and metal tubing) come from the factory with M16 x 1.50 STRAIGHT thread. I have some M16 x 1.50 straight AND taper plugs coming to try in those holes. I'm now thinking that a straight-threaded plug with a low head and Loctited, may be the ideal ticket for this hole since there is a machined spot to accommodate a bolt head. Heck, any old M16 x 1.50 bolt will work here! Keep in mind that these holes, if not being used (not connected to water lines), can stay open, they do not need to be sealed/plugged, as they will not affect anything other than keeping the intakes warm on initial start-up in cooler weather/climates. I just want to plug them for aesthetic purposes. Here's some pictures to clarify my rambling!

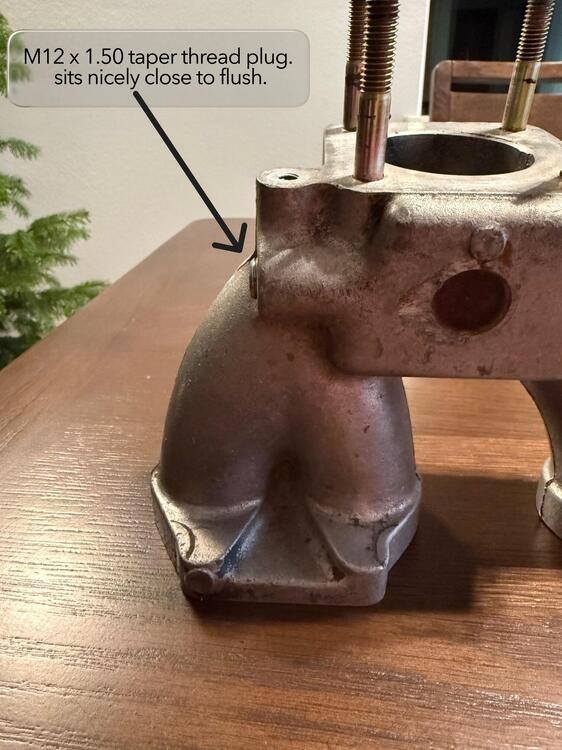 1 point