Leaderboard
-
grannyknot
Free Member8Points5,158Posts -
inline6
 Subscriber
 6Points1,282Posts
 -
zspert
Free Member6Points382Posts -
HS30-H
Free Member4Points5,509Posts


Popular Content
Showing content with the highest reputation on 01/08/2024 in all areas
-
6 points
-
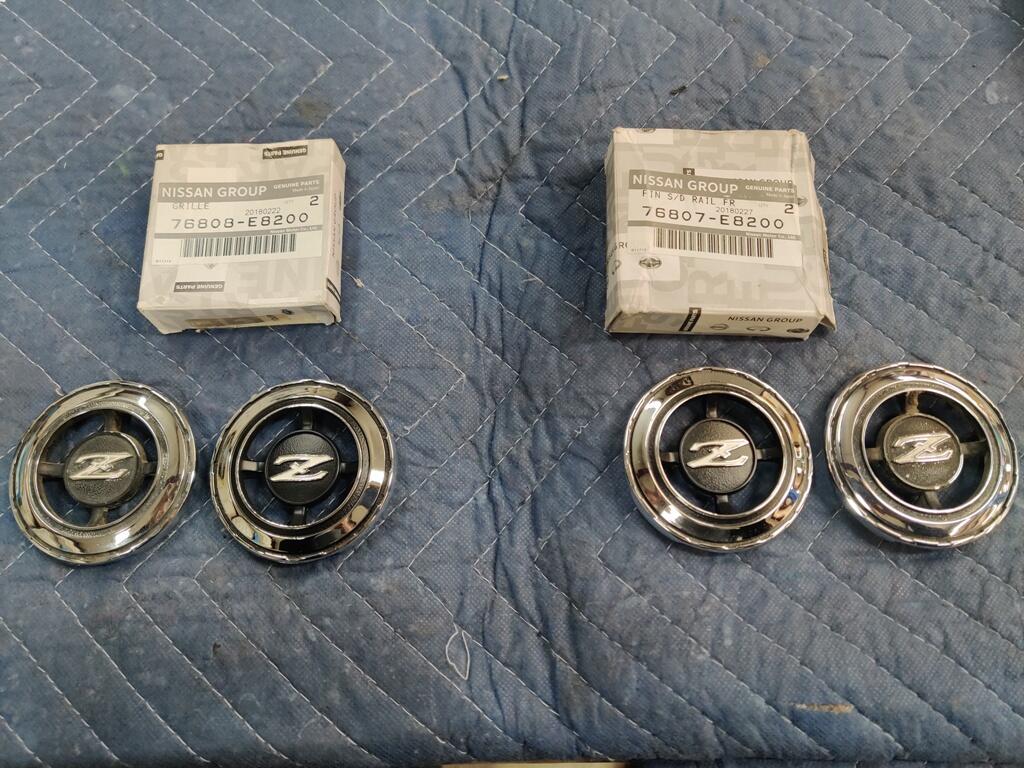
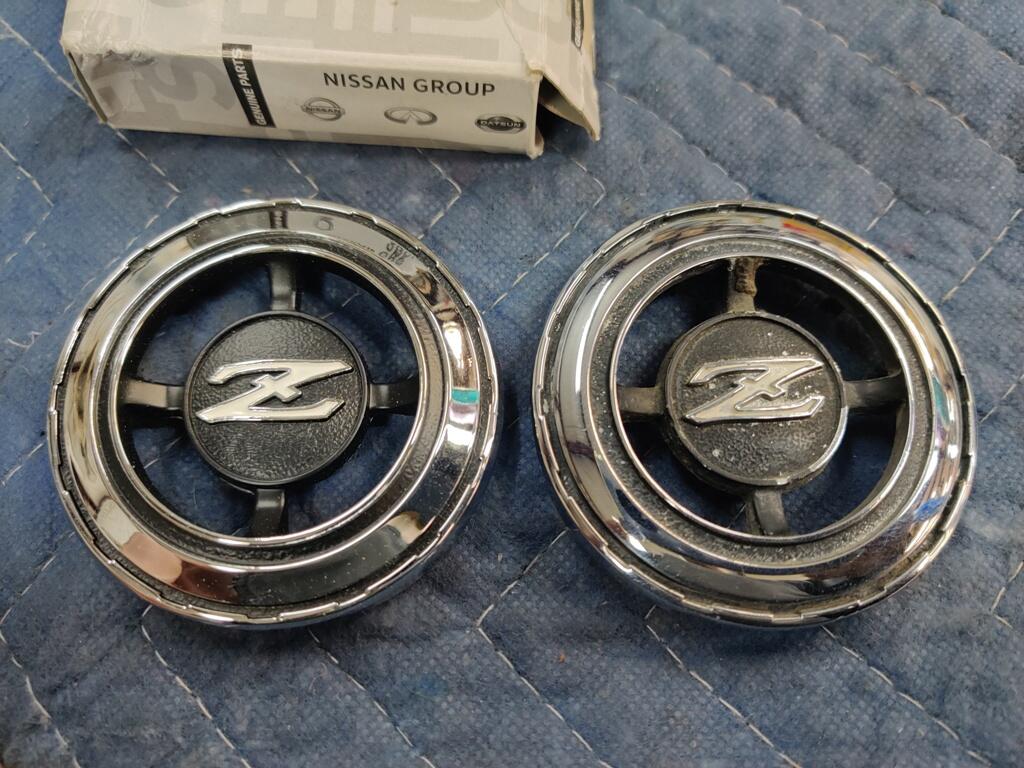
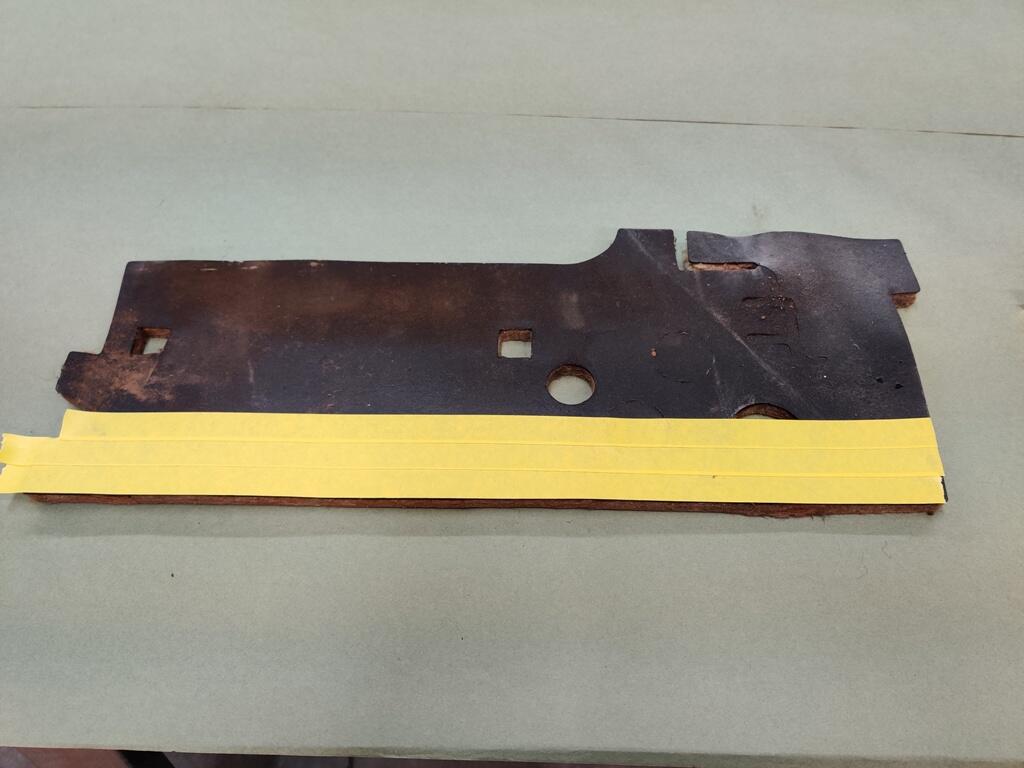
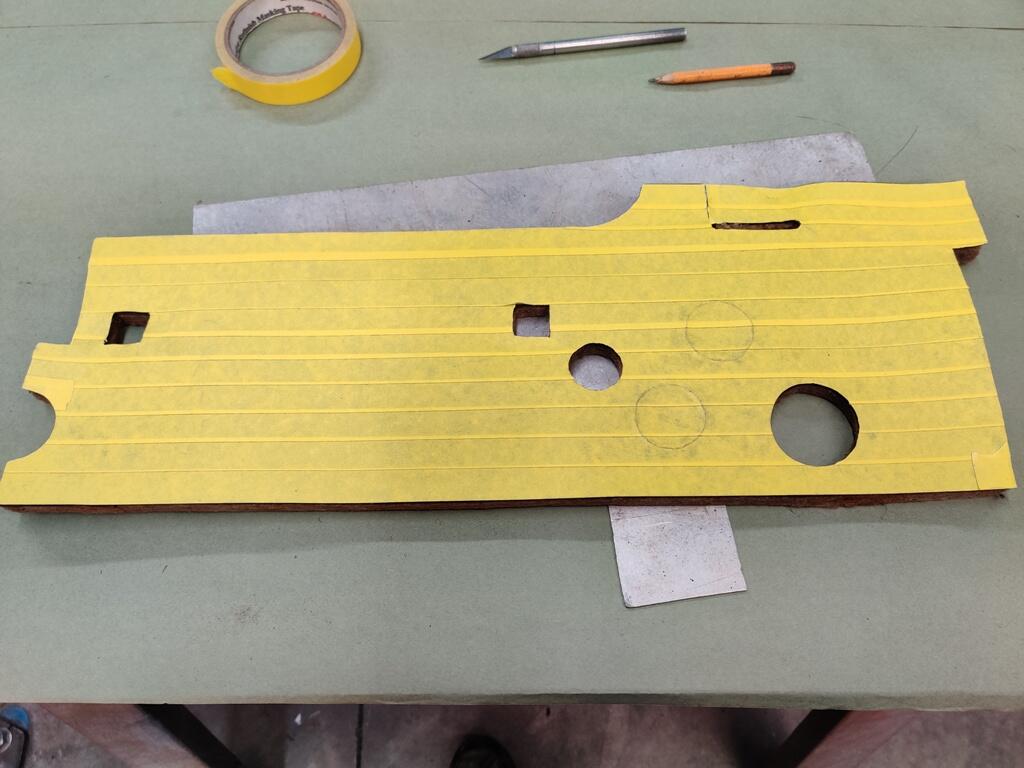
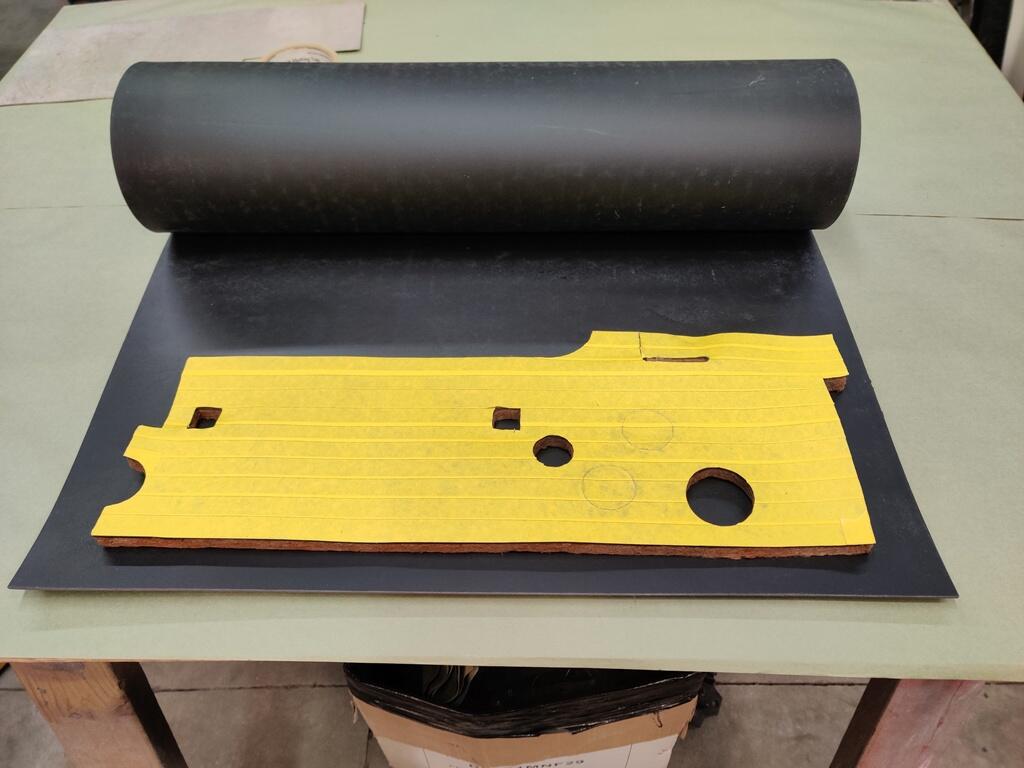
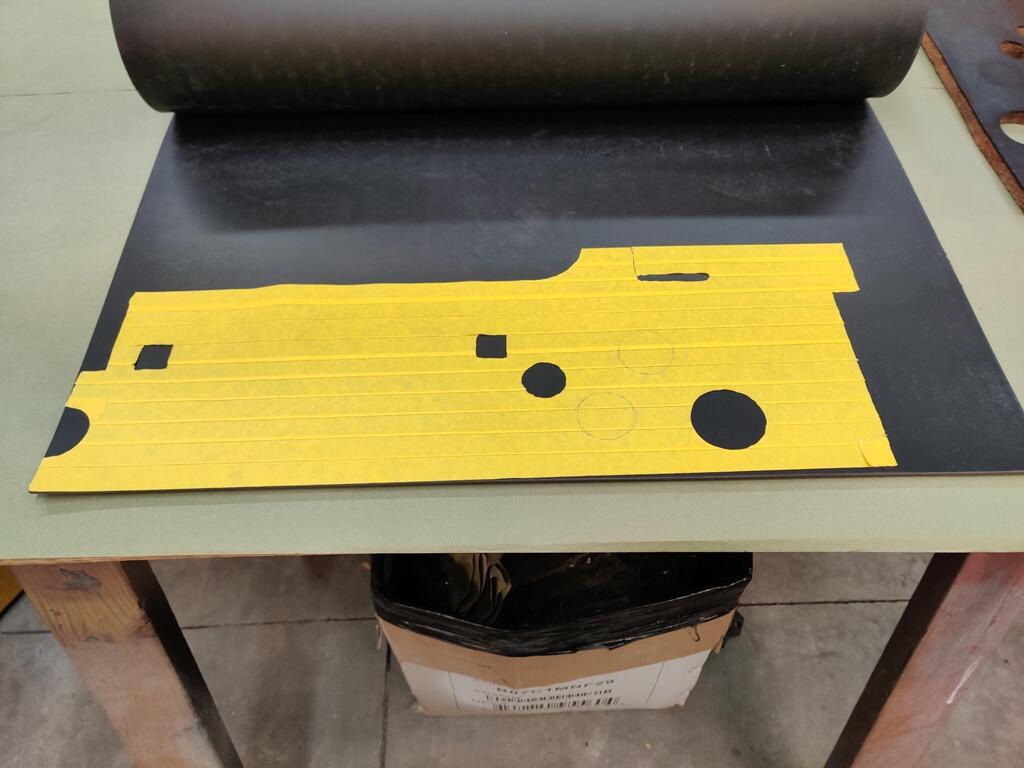
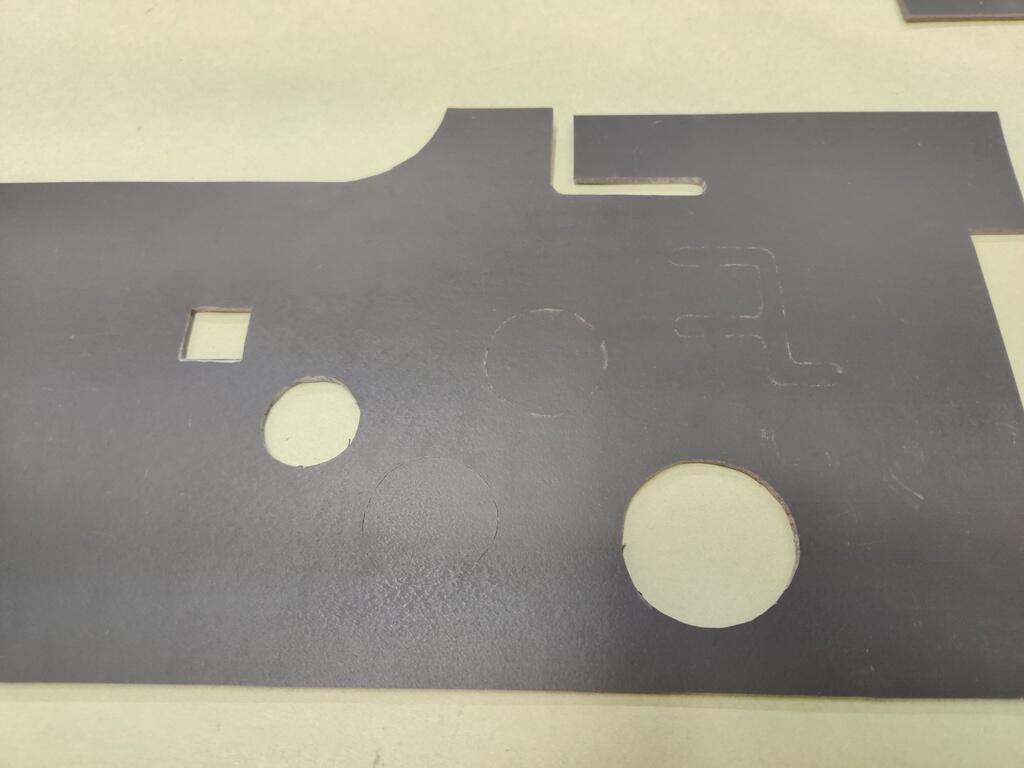
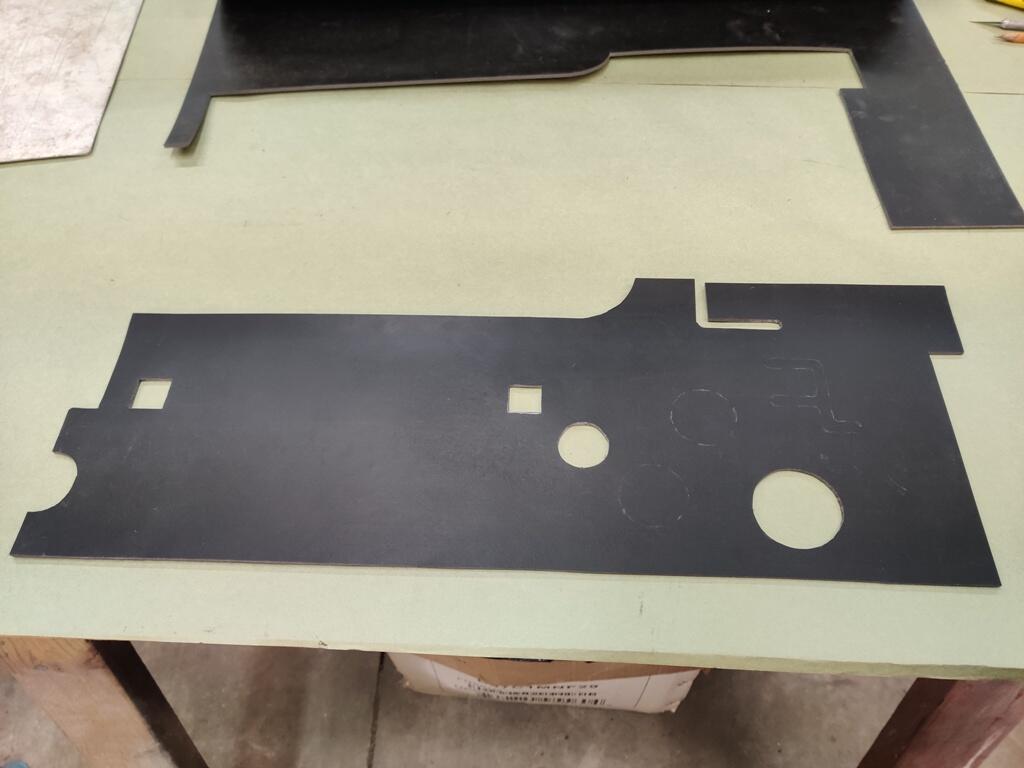
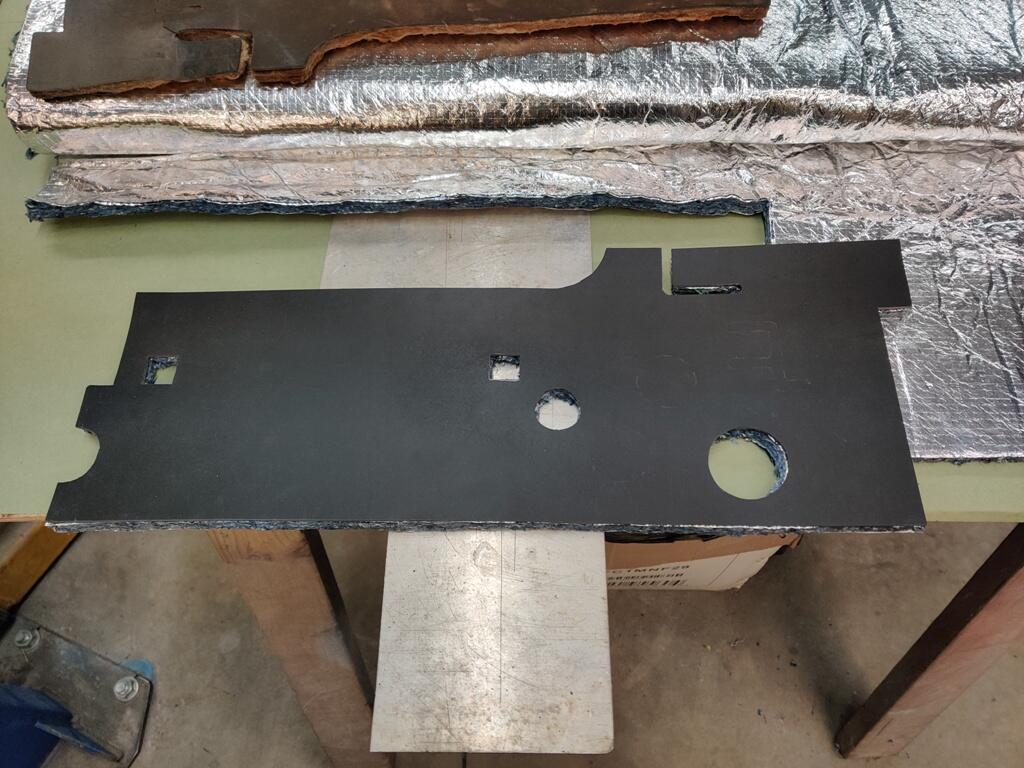
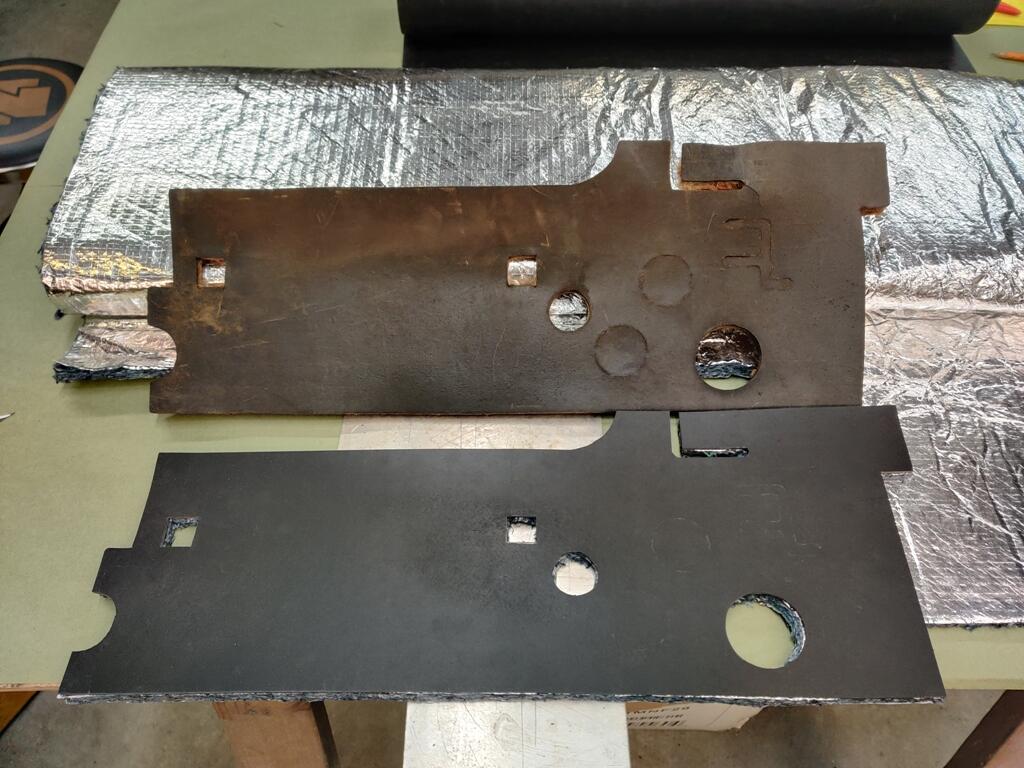
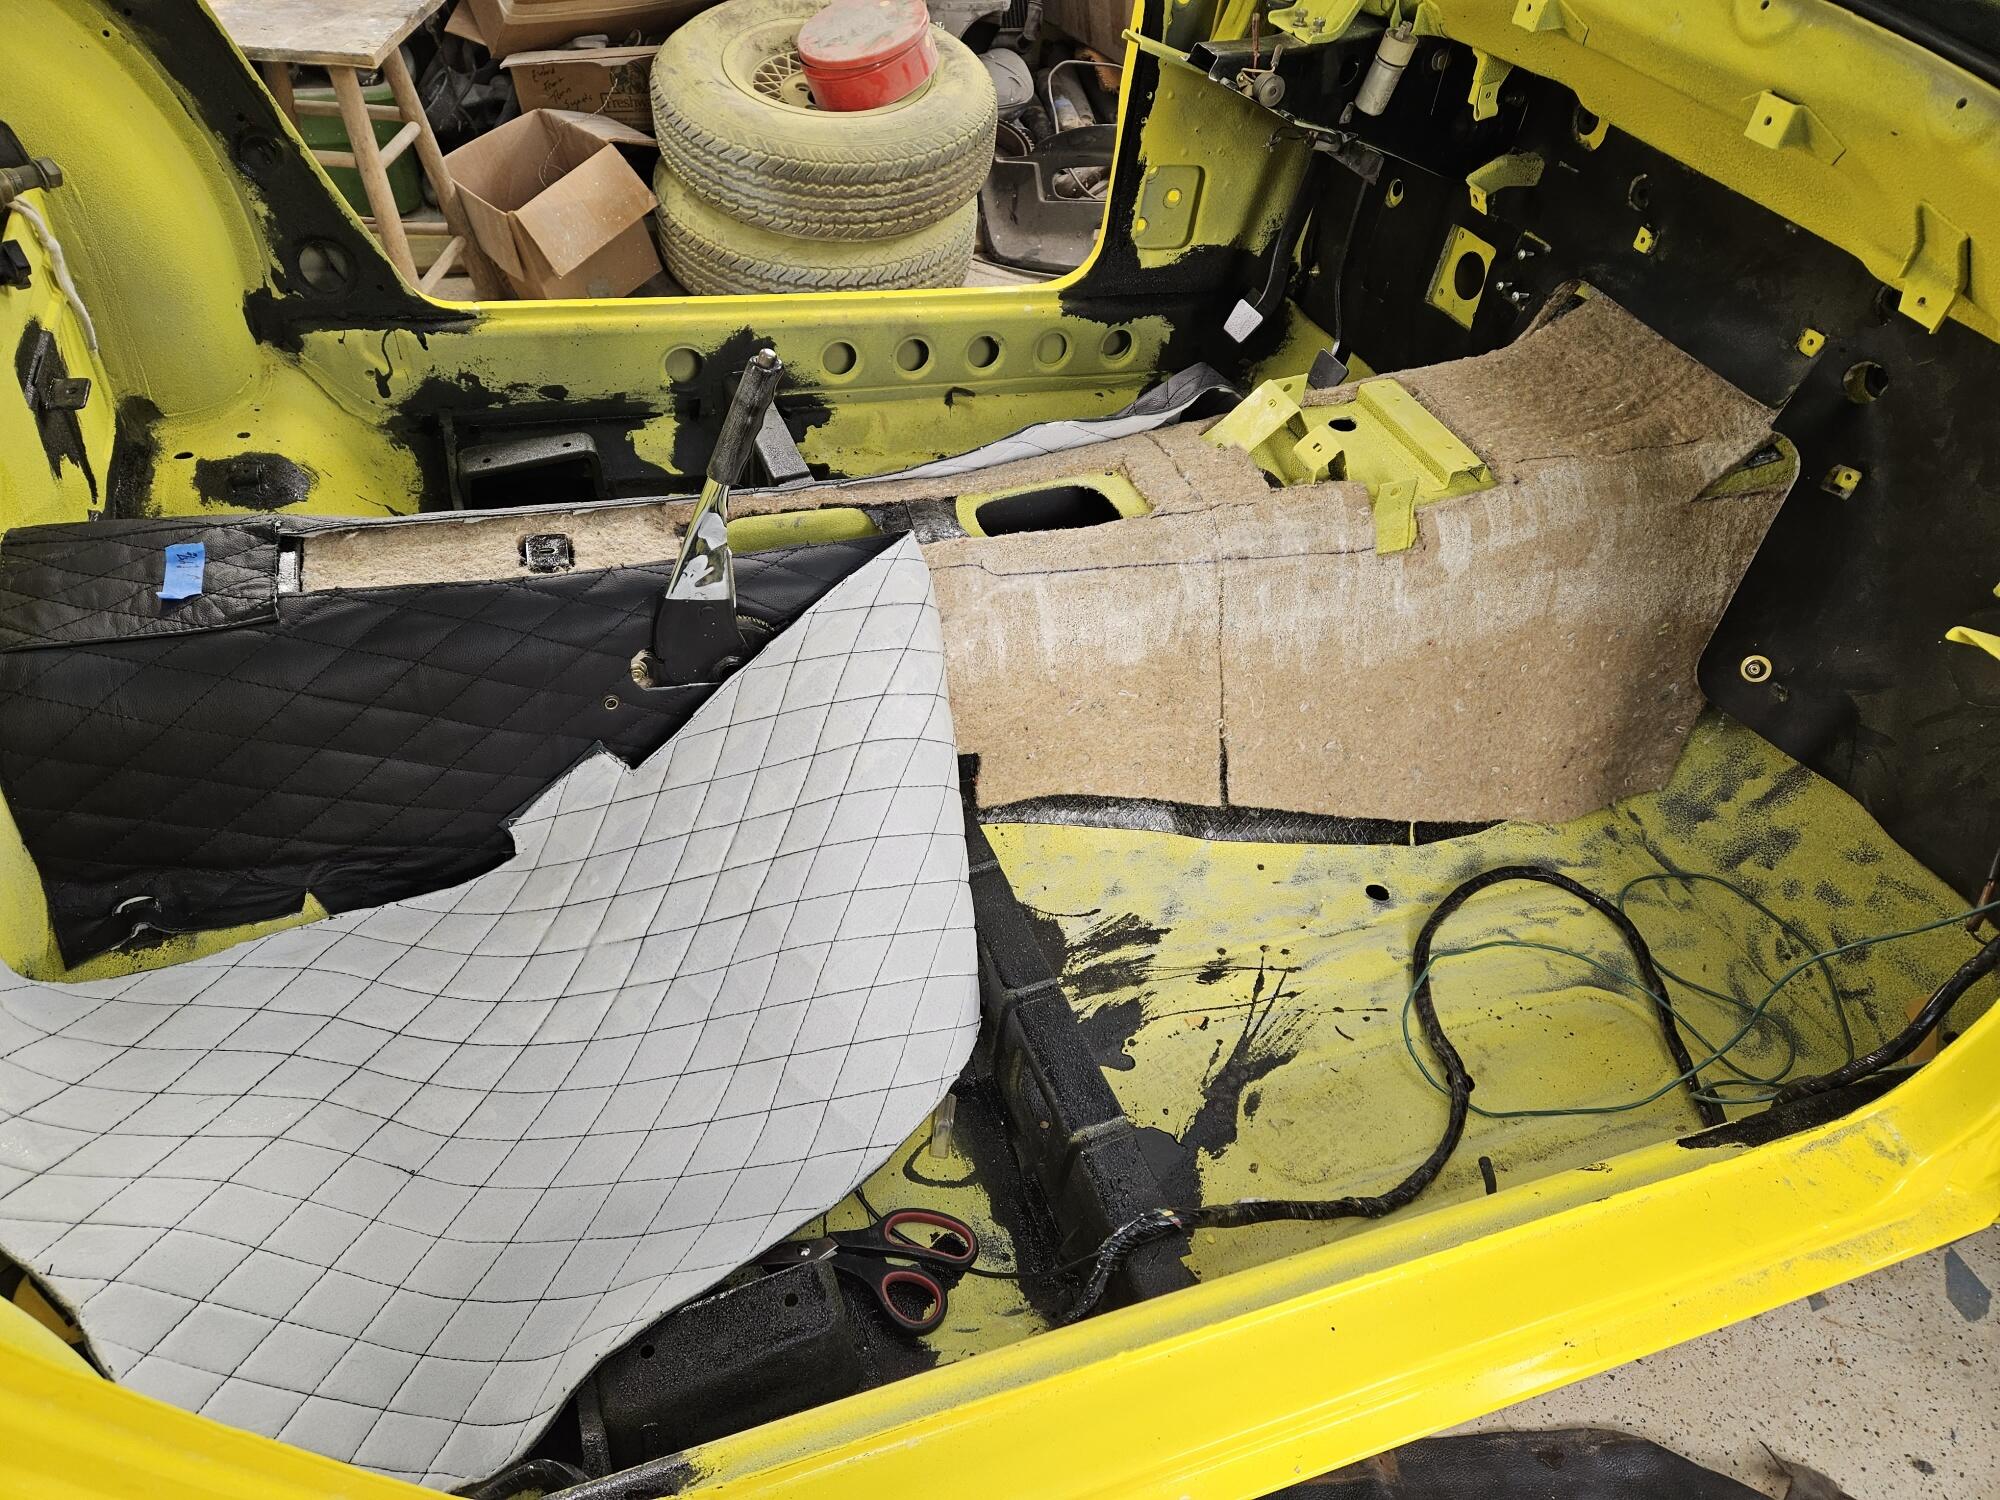
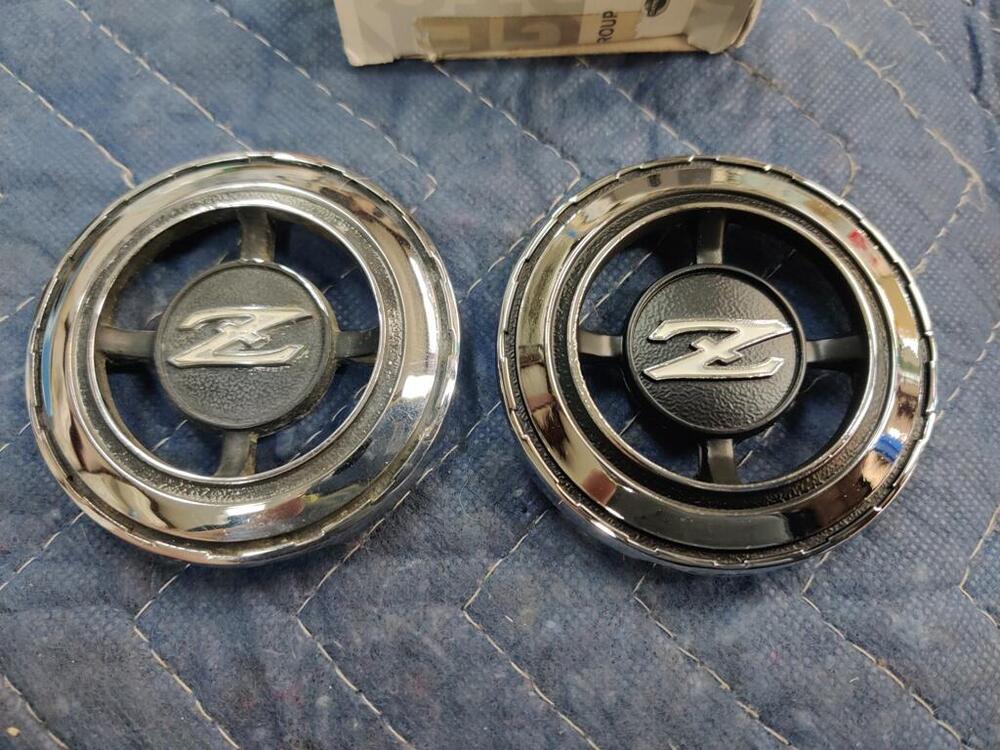
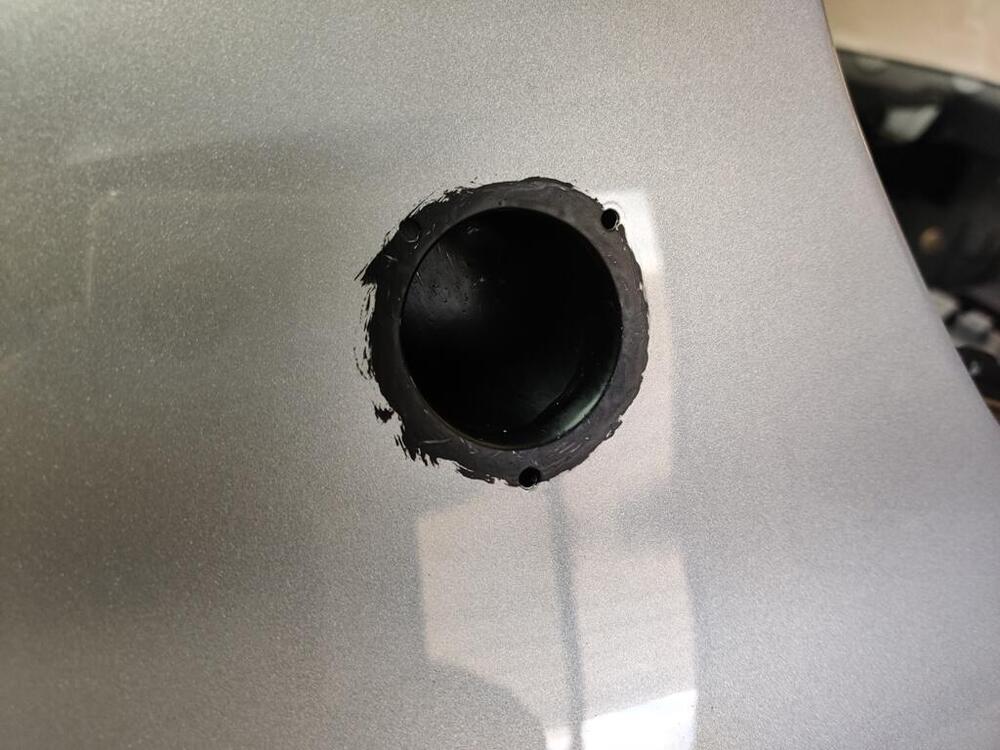
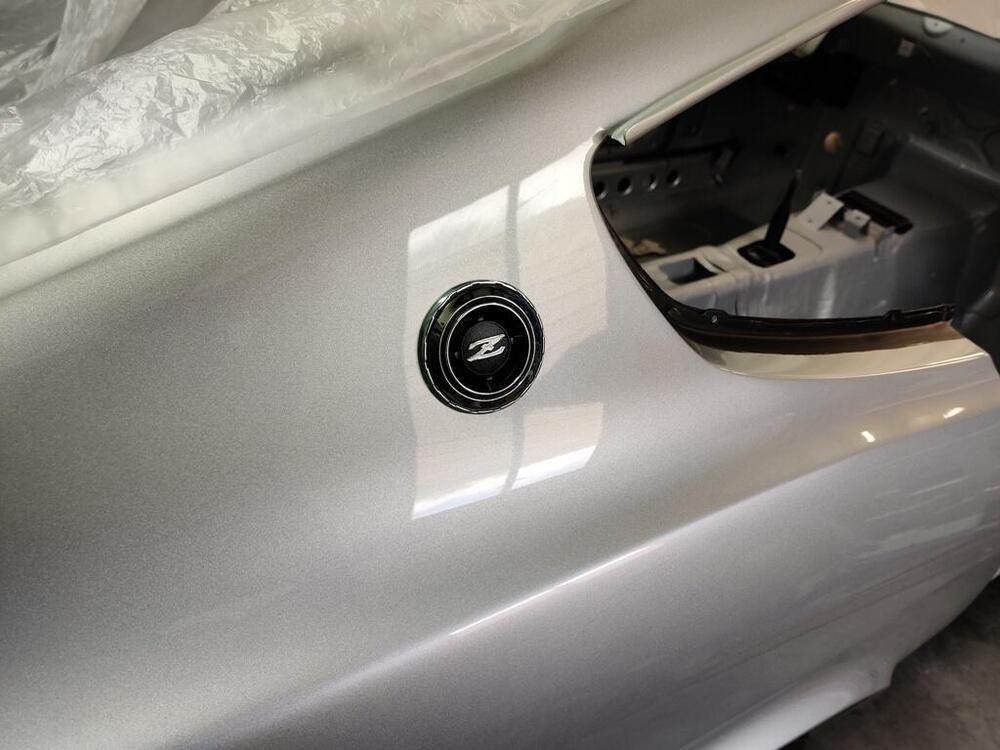
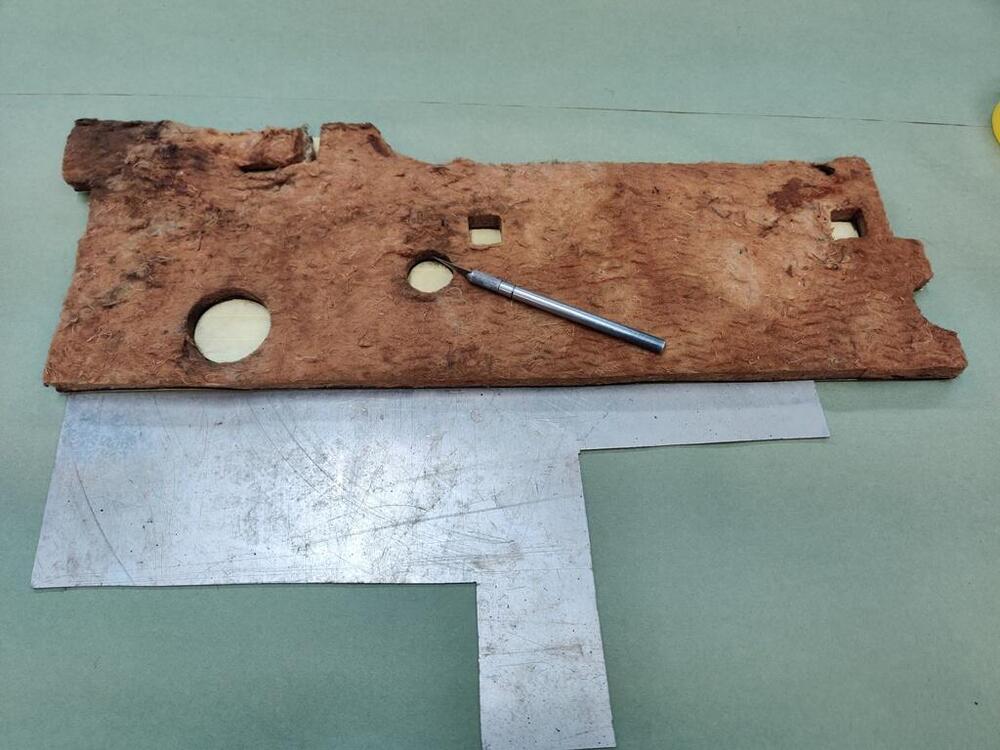
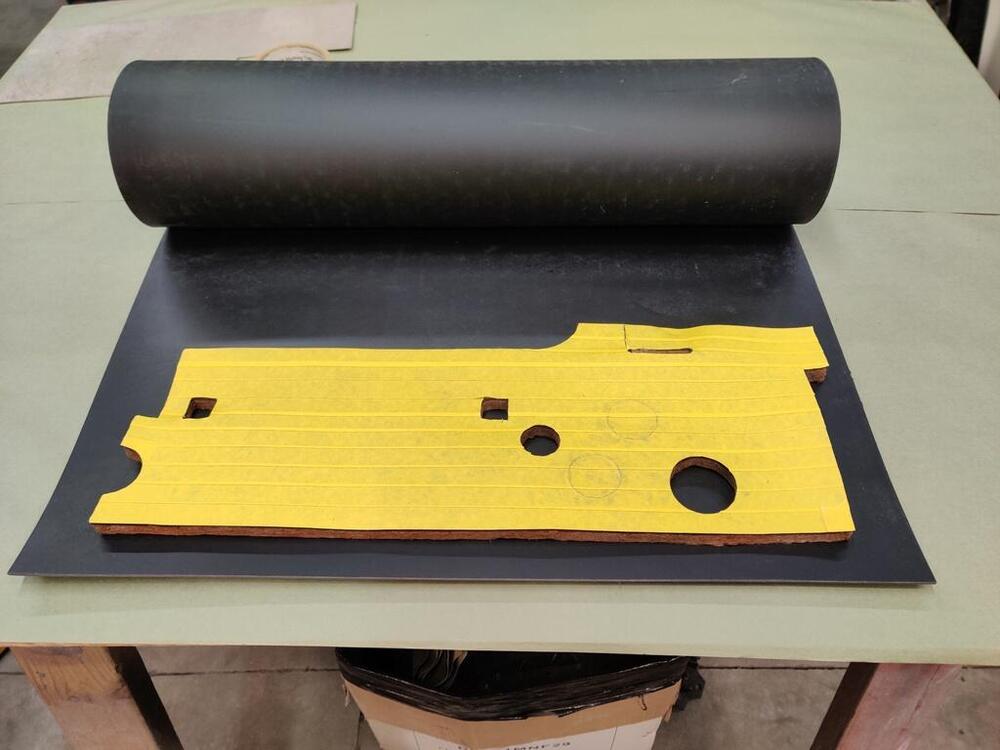
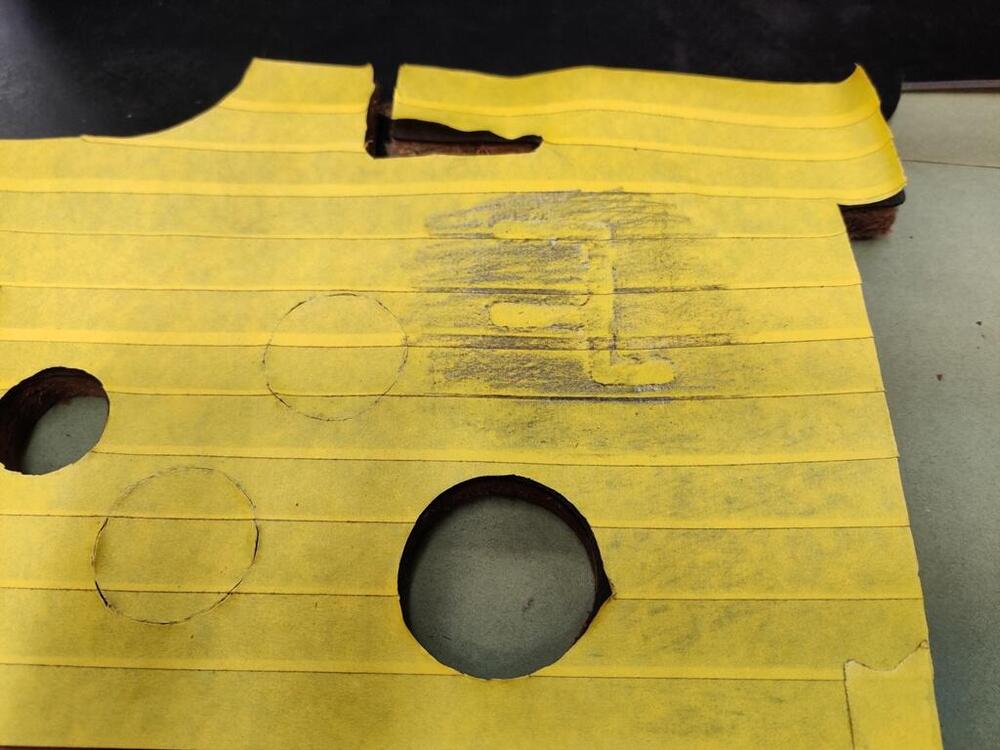
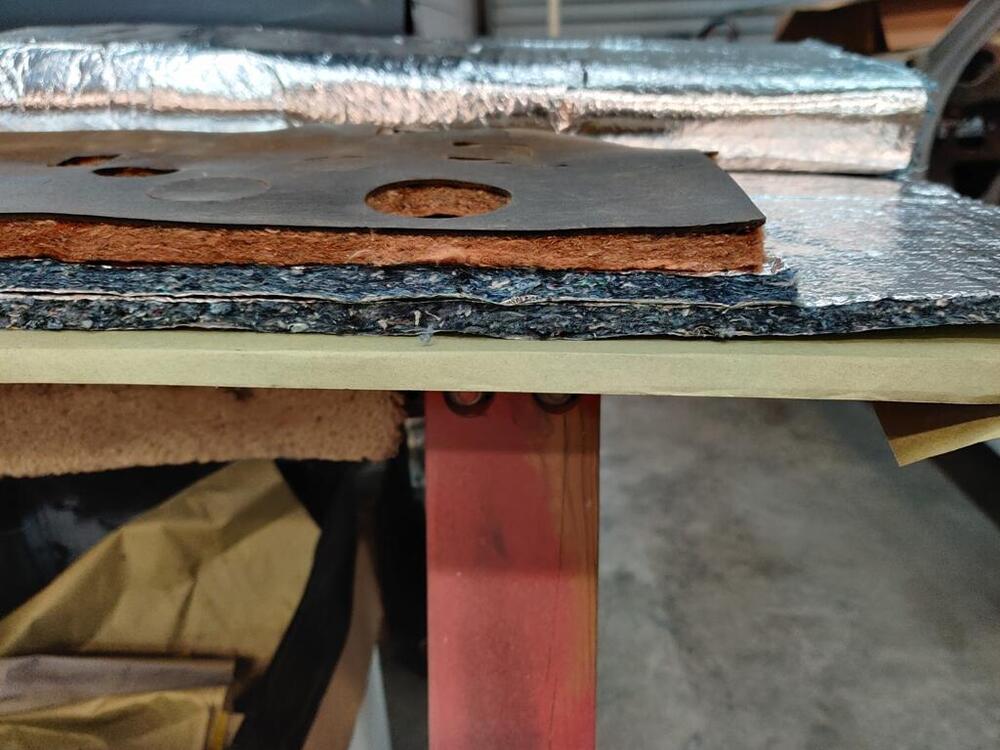
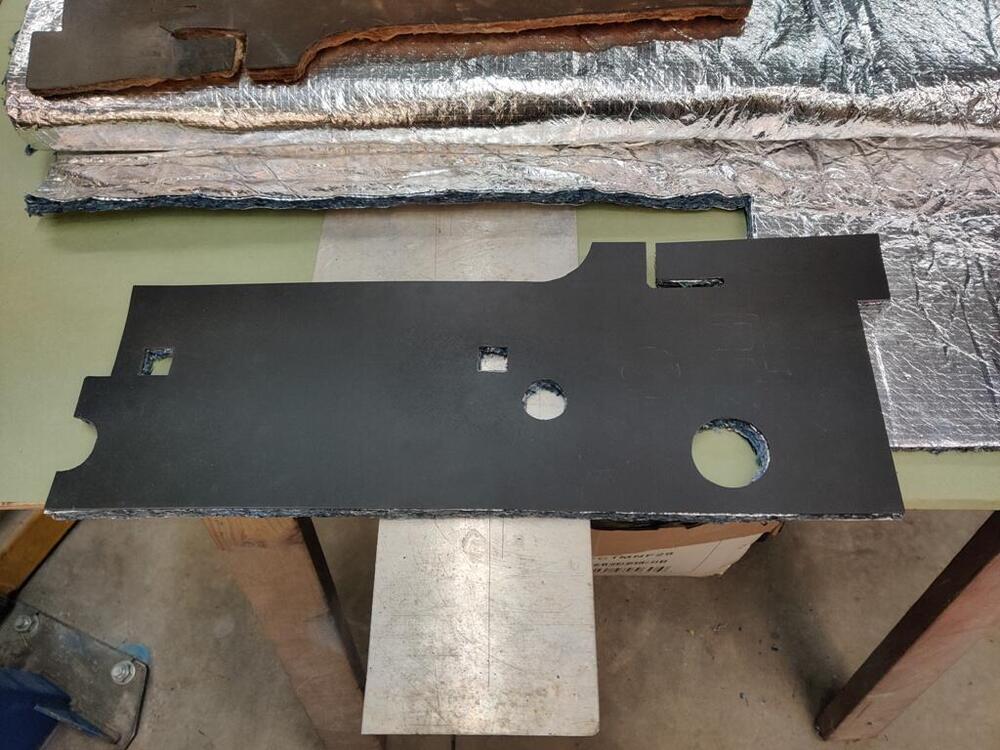
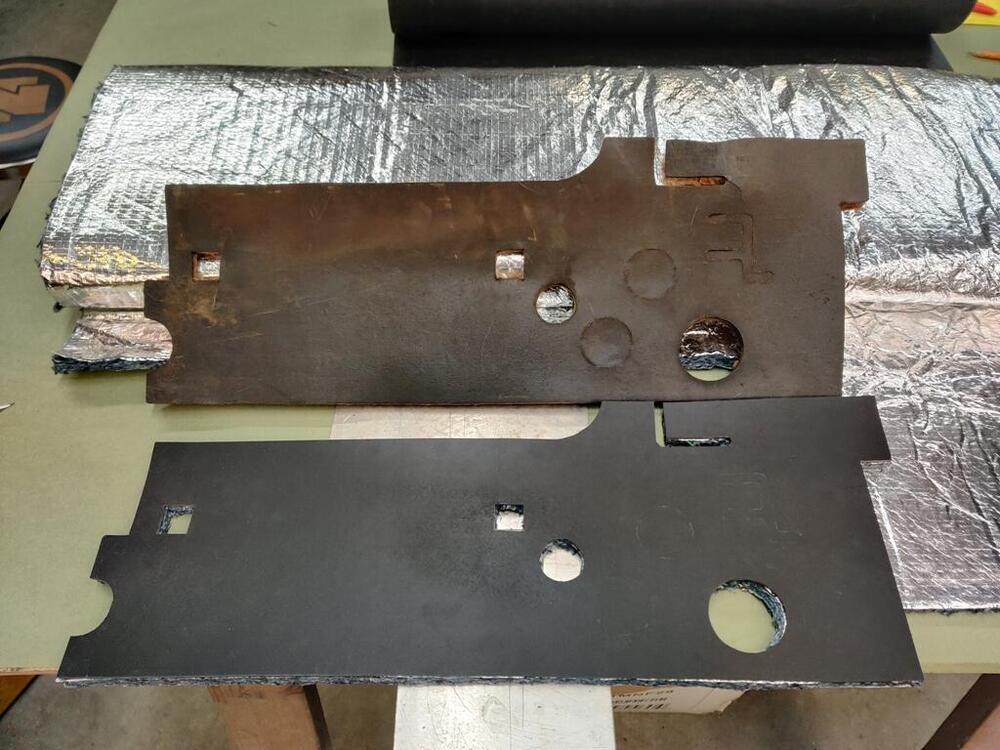
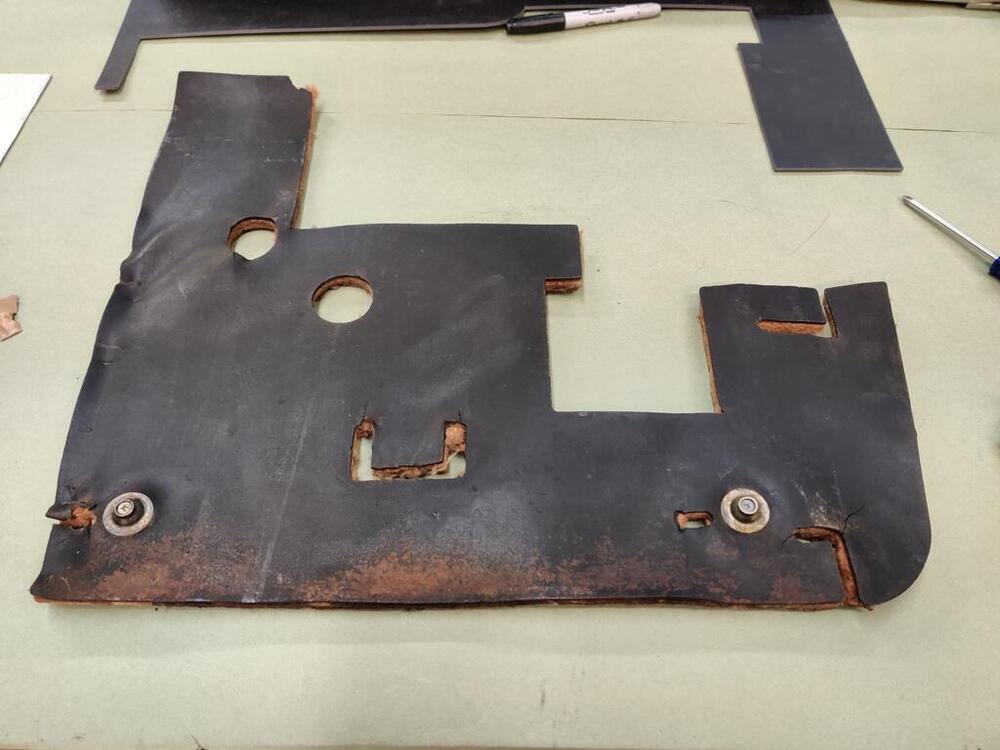
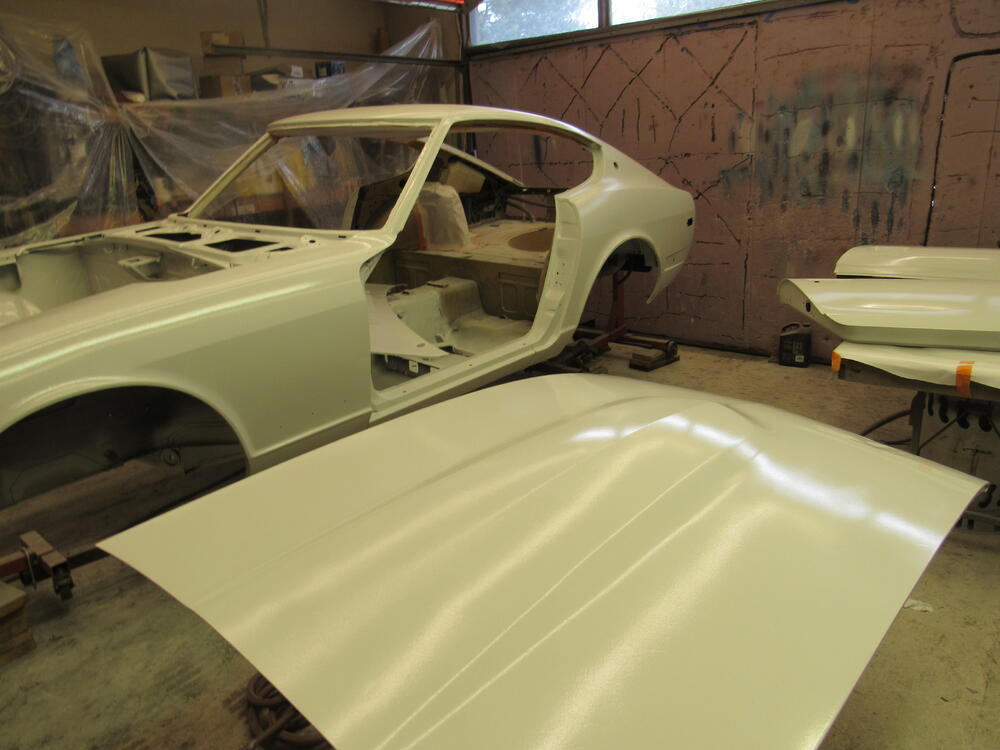
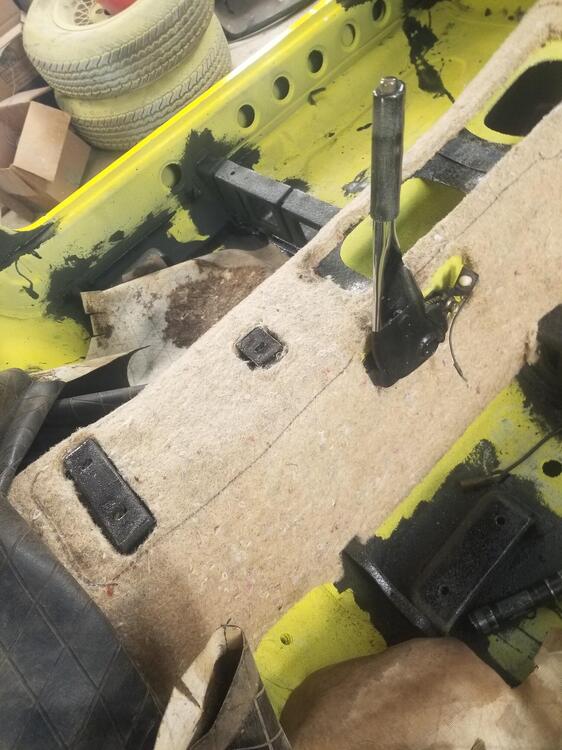
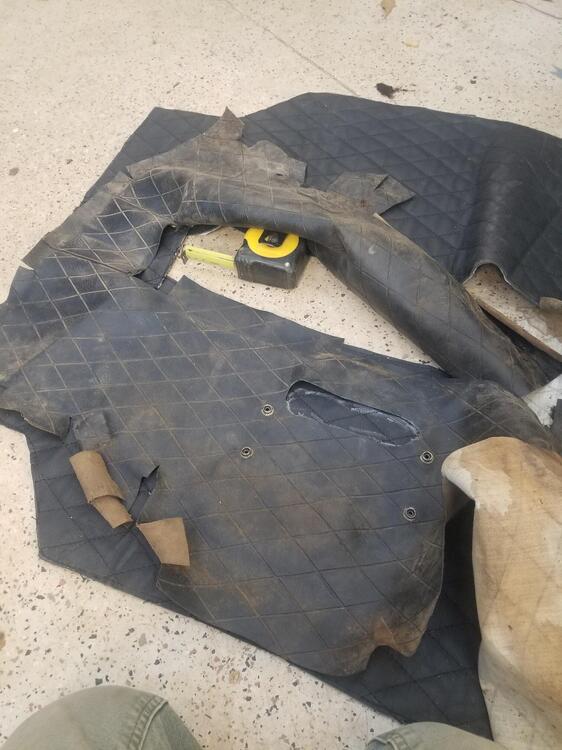
It was fun working on the car today. I started with putting quarter panel emblems on. Once again, I sprayed some Krylon flat black paint into a cup and used a brush to black out the vent hole. The original emblems are in pretty good shape. With a little polish and some repainting, they would have looked very nice, but I purchased new ones (these are also metal) a long time ago and it was less work to take them out of the box and install them. I did have to open up the emblem mounting holes a bit due to primer and paint build up. And I put a bit of silicon on each of the emblem posts before installing to seal up anywhere that I may have broken through to metal while cleaning up the holes. After that, I cleaned off one of my work areas to start a new project - the firewall pads. In a previous effort, I tried to revive my originals by using some mild thinner to clean the asphalt/bitumen surface... and using a heat gun to straighten out some wrinkles. But, neither effort worked well. And my right side pad has a fair amount of cracking/damage. So, I spent many hours looking online for a suitable product that looks like the original bitumen sheet. I found "bitumen" to be available only outside the US, and even so, I couldn't determine if what was available would look original. I did find a product from Second Skin that looked the part - this is the same company from which I bought the floor sound deadening pads. Today, I started with the small, center pad. I covered it with strips of good quality masking tape. When peeled away from the original part, this makes a nice template. Then I used a sharp Exact-o knife to cut where there were holes from the factory. For kicks, I also made partial cuts where the factory had partially cut, but not removed the bitumen. This didn't add that much time and was fun to do. After the new butyl rubber sheet was cut to look like the original pad, I grabbed the other product I got from Second Skin. It is some felt type padding with a type of foil on both sides. I thought about trying to use the factory felt, maybe after cleaning, but decided that even I have limits to my insanity. This product is about the same thickness and is a similar material, though a different color, obviously. When I purchased this, I was thinking I would have to double it up to achieve the factory thickness. However, I will not, and so, I have plenty of extra! Next up will be replicating the driver side pad... After spraying some contact adhesive to the back of the rubber and face of the insulation, the new piece will be done!


 6 points
 -
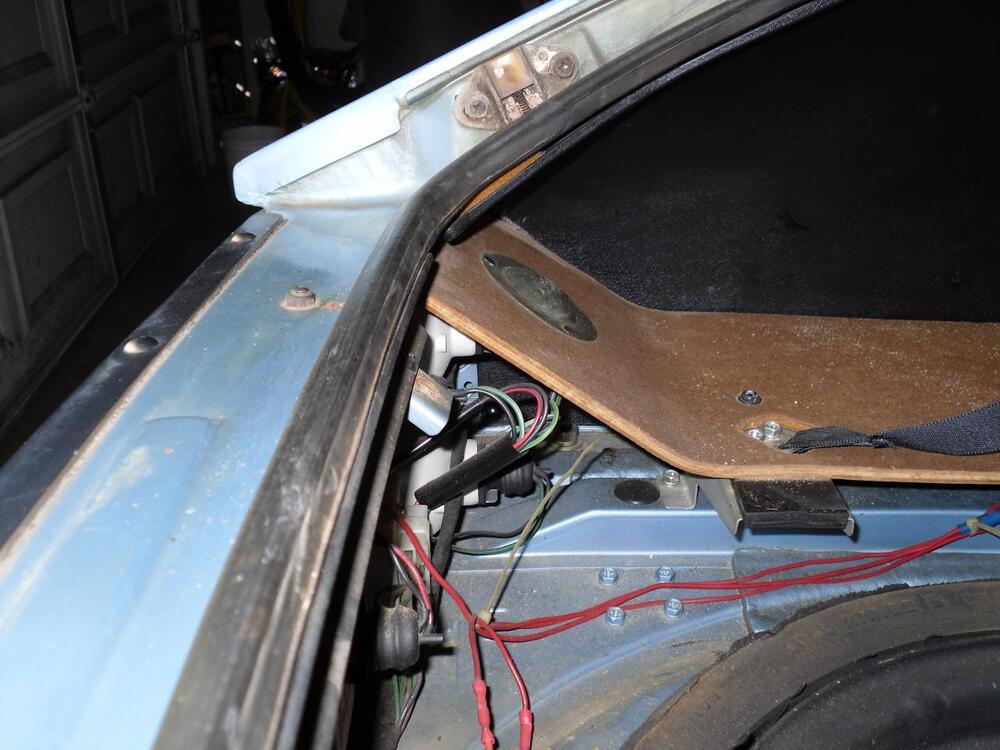
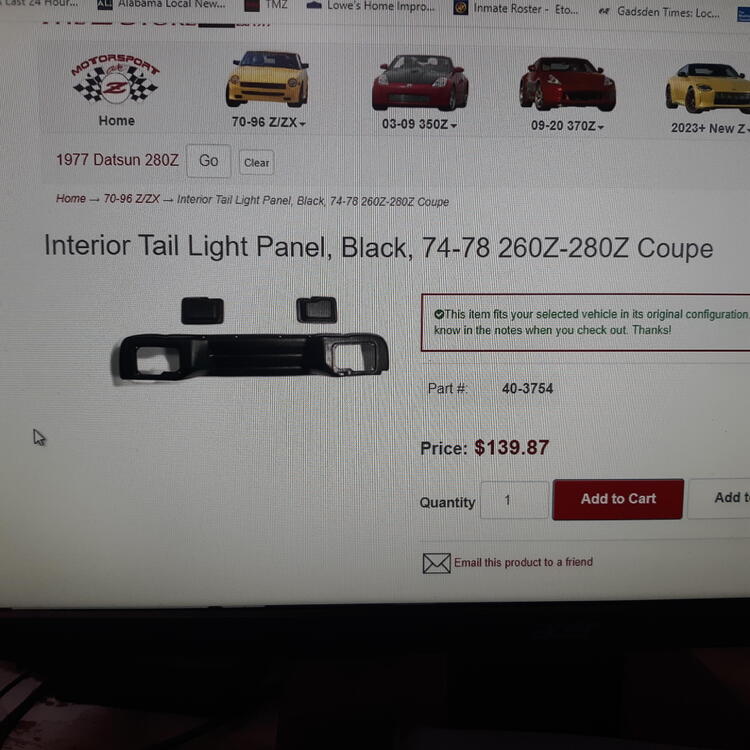
The '77 was an odd year for the hatch area. Like Cliff @siteunseen correctly stated, a plastic panel covered the tail light bulbs and wiring in all years except the '77 which had the sloped wood deck floor (the sloped floor didn't exactly follow the '77 model year either). For '78, they changed to a flat wood floor and used the plastic cover for the rear lights and wiring. The '78 floor is about 4" higher than the '70 - '76 floors which only had a cardboard cover for the spare tire well. The later cars had WAY less cargo volume due to the raised deck, but, at least, it was flat and there is room to hide stereo equipment under the wood floor. As for the original question, you don't use the plastic panel if you have the sloped floor. I can't remember the actual start and stop dates for the sloped panel, but I had a '77 about 35 years ago that didn't have the sloped floor. I believe it had the '78 flat wood floor. I have the plastic hook and I use it all the time while working on stuff. That wood floor is heavy!4 points
-
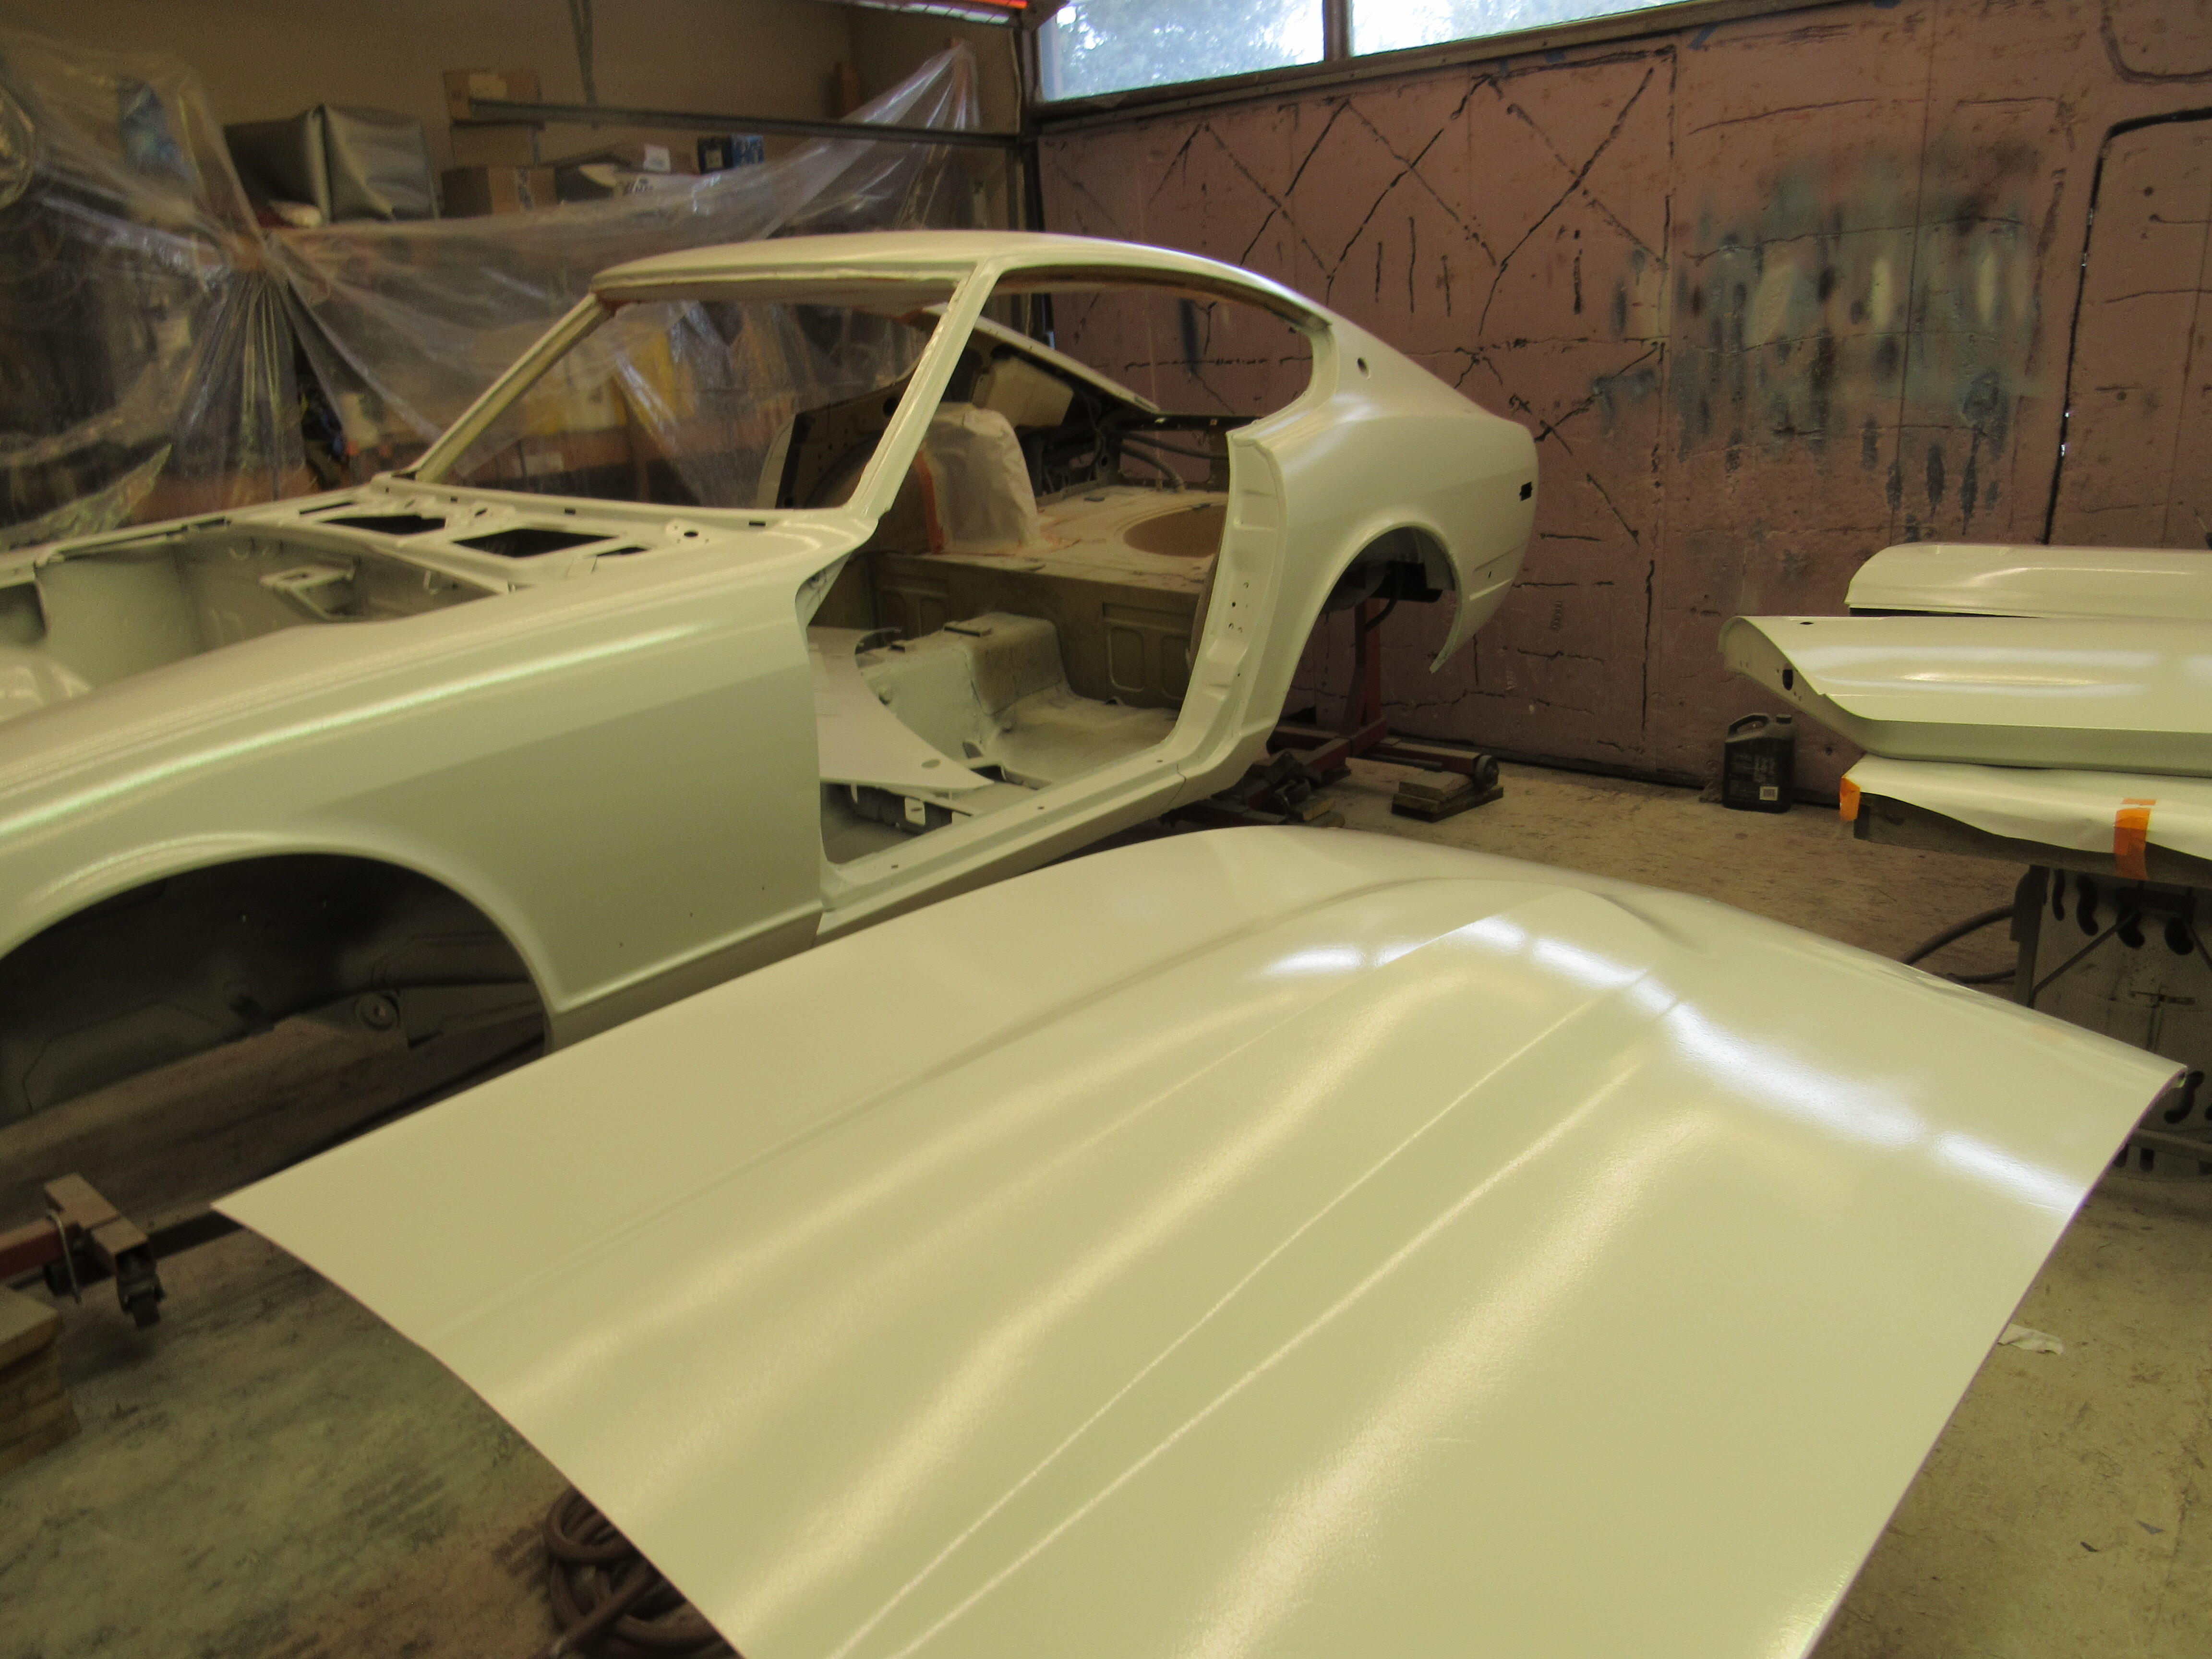
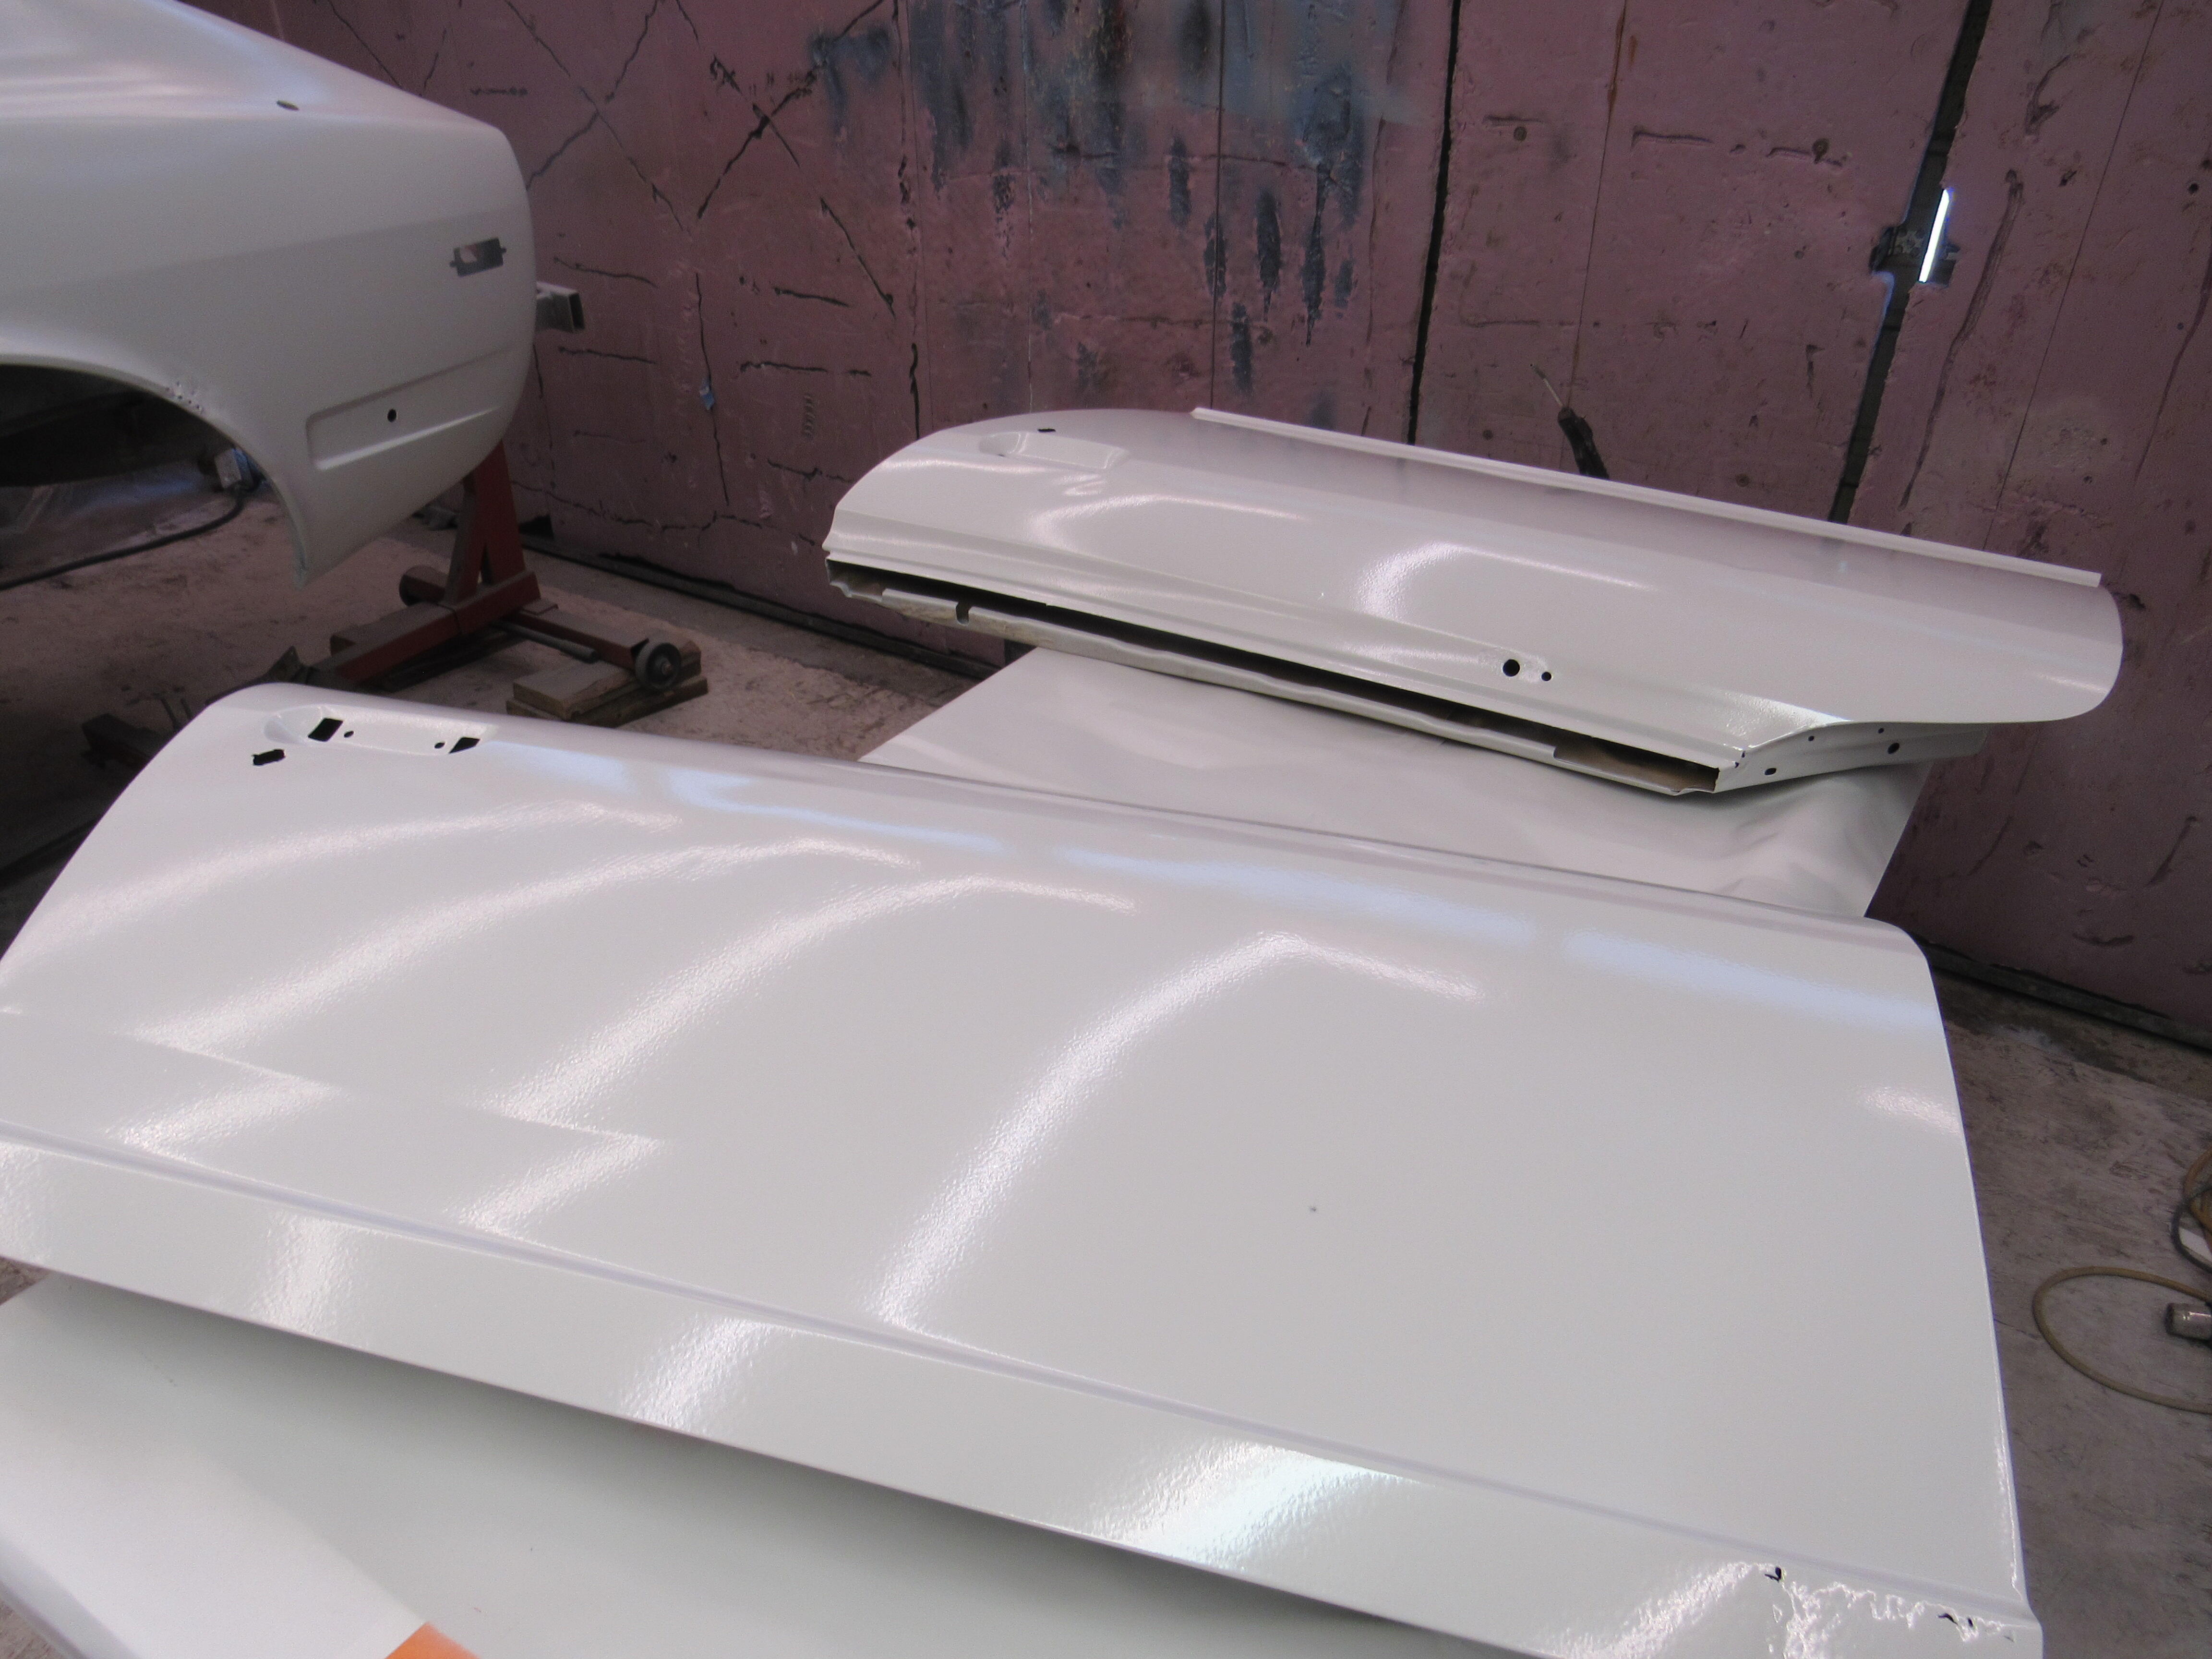
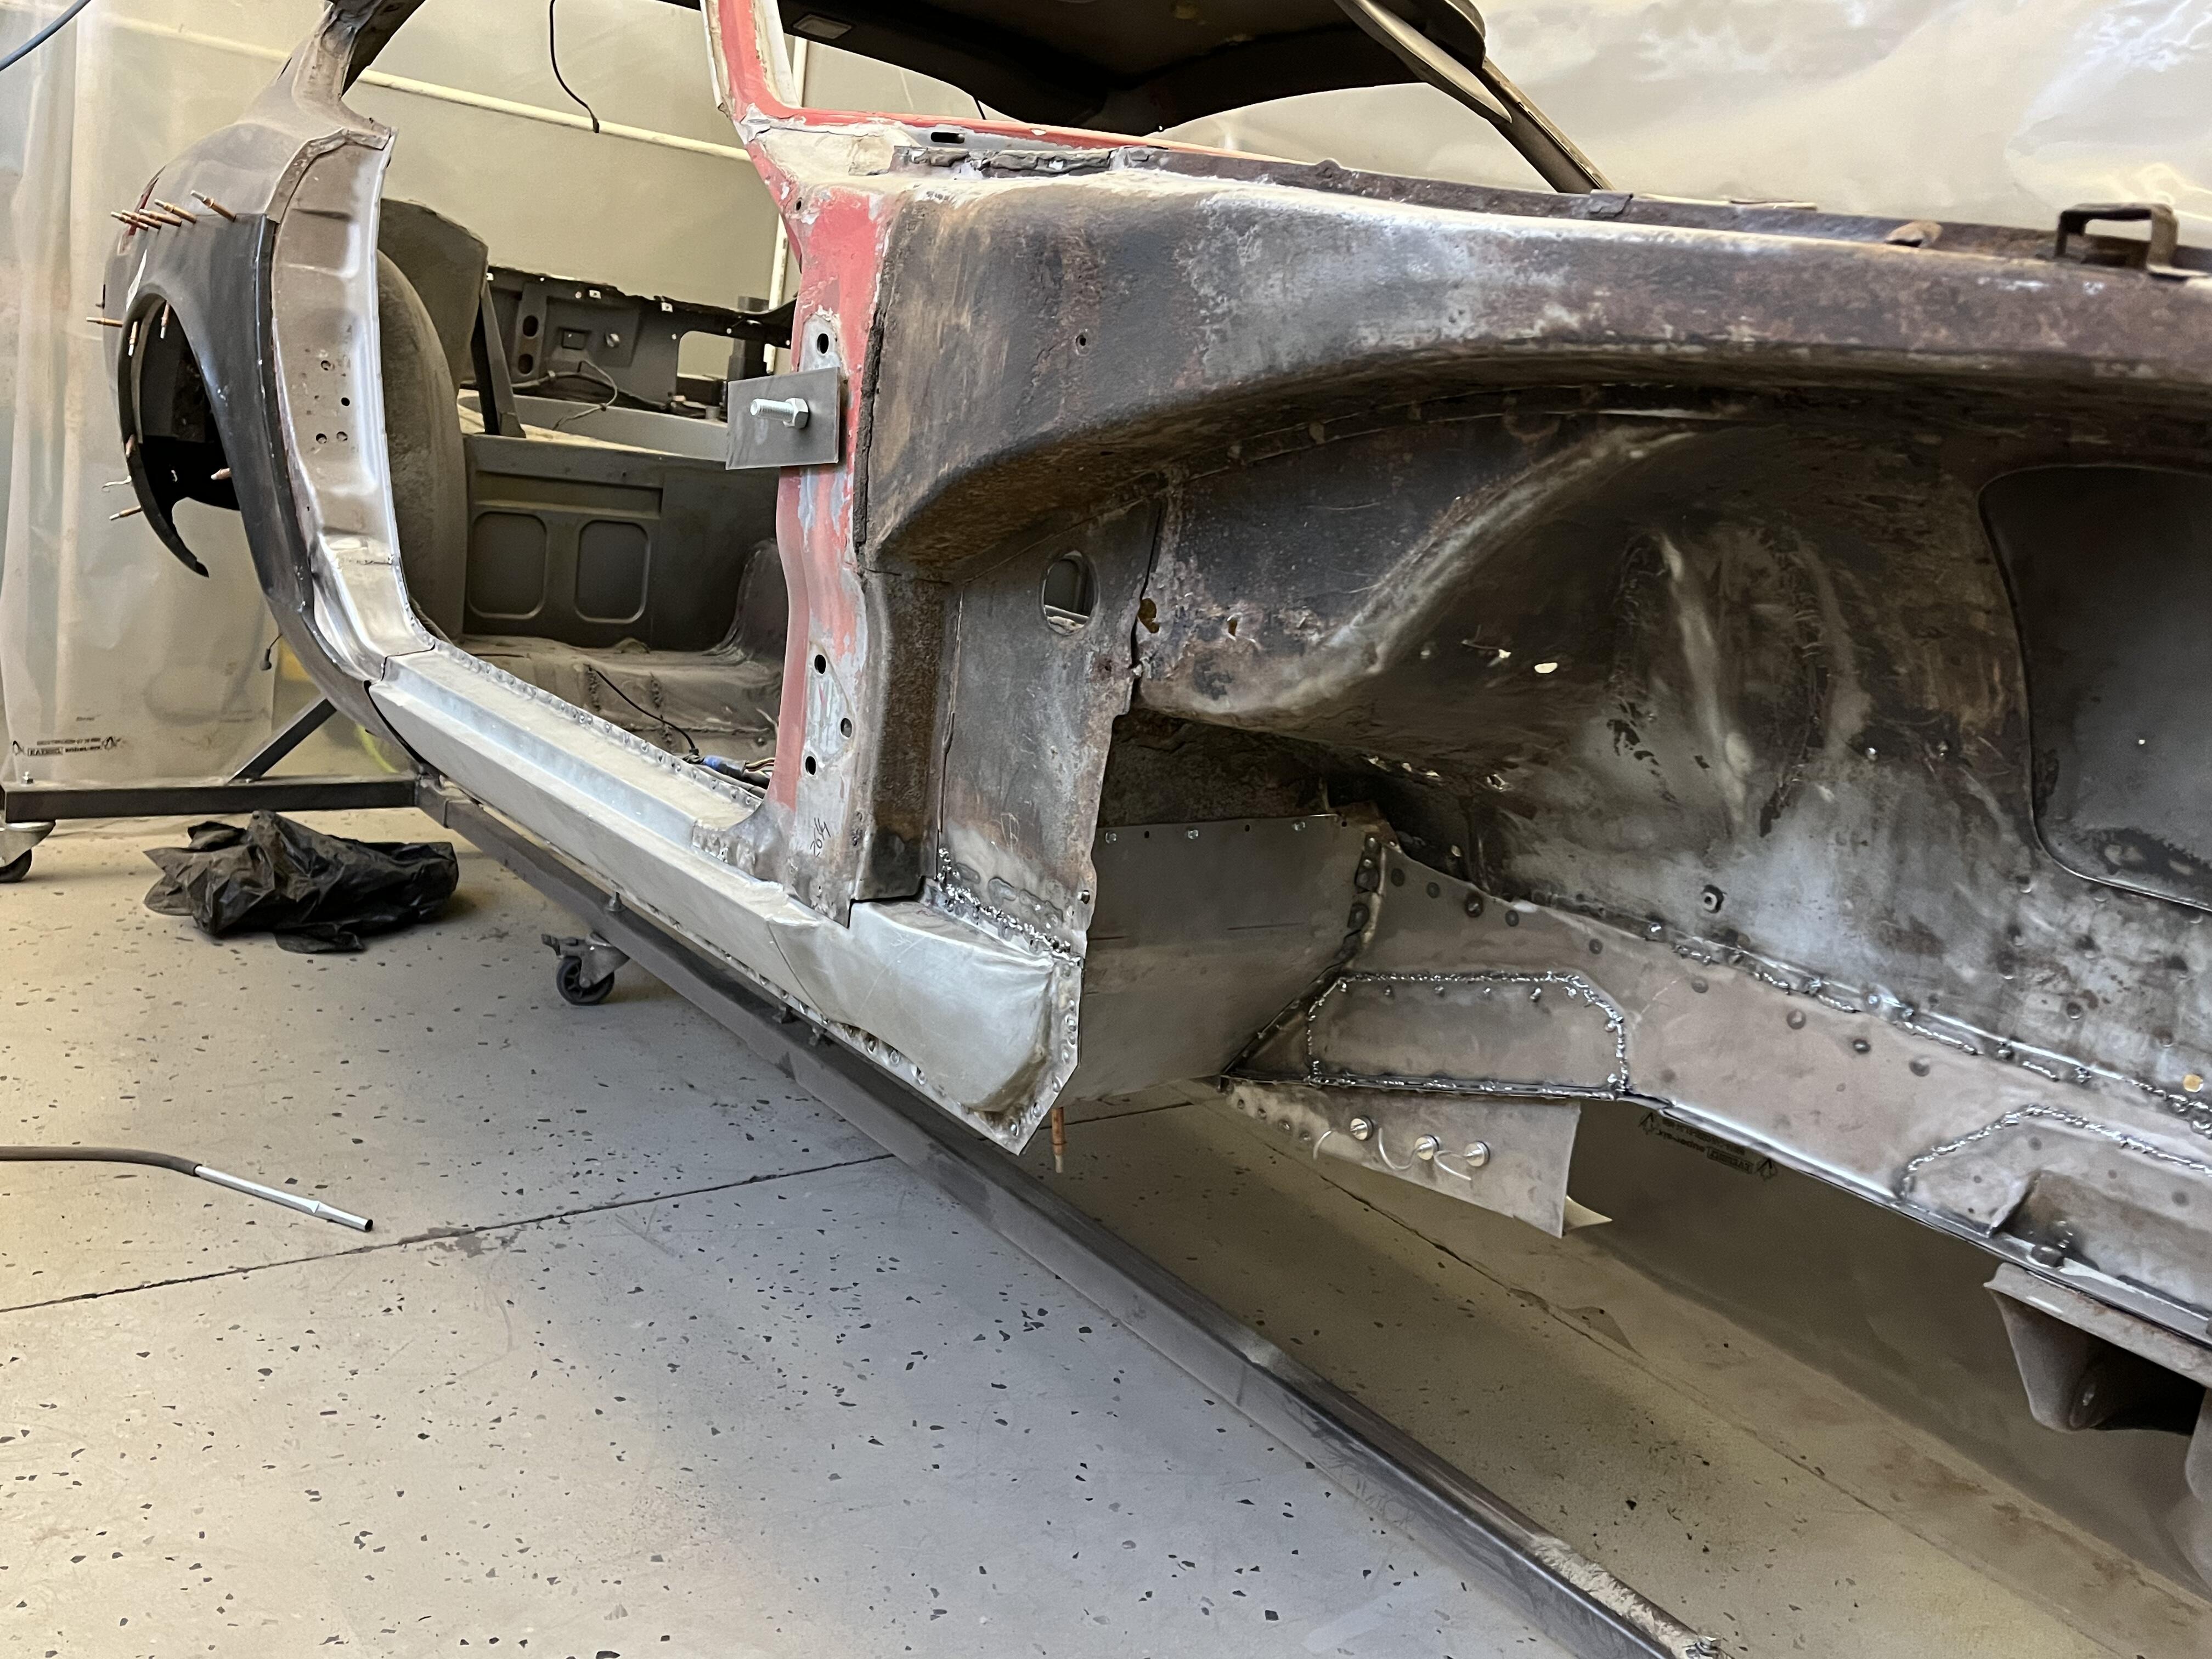
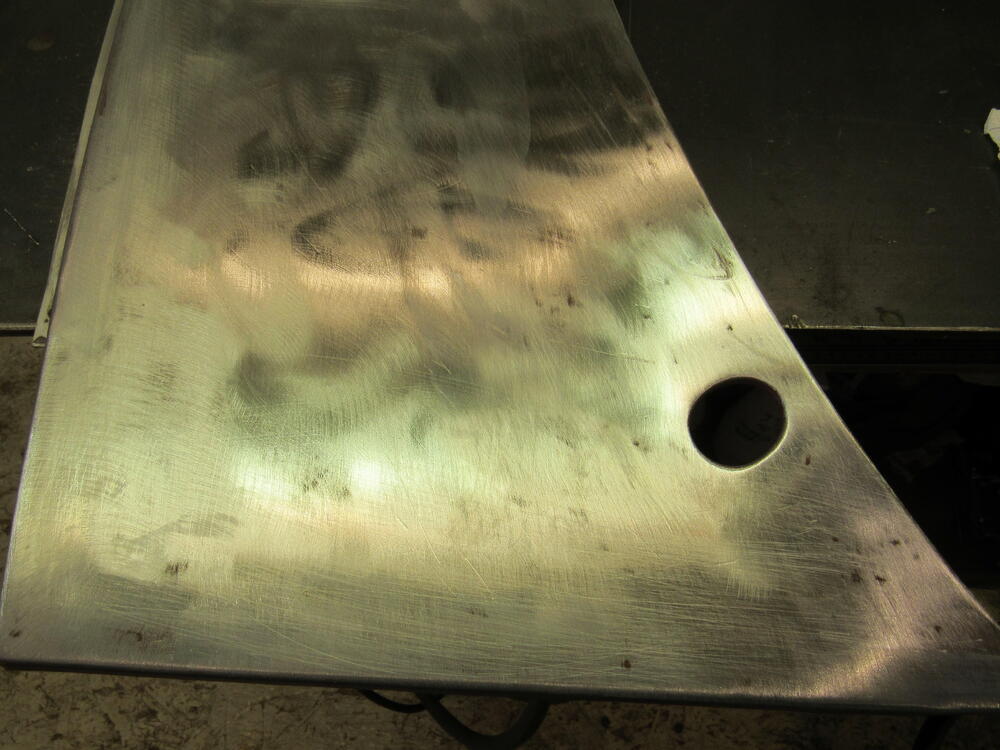
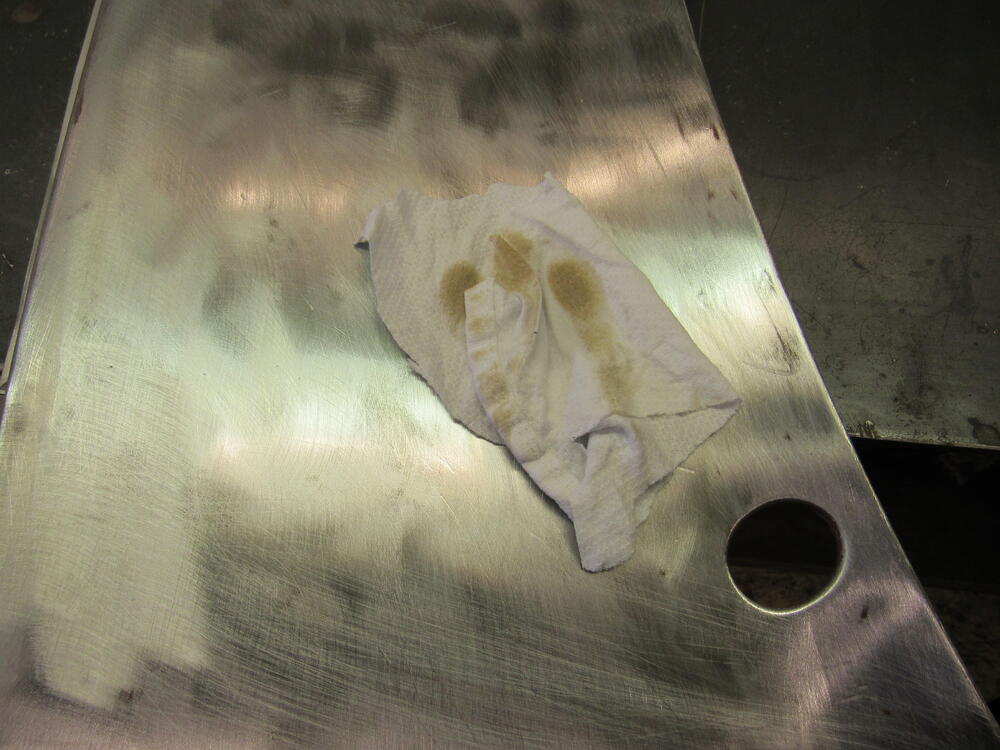
4 pointsI got 2 coats of epoxy primer on everything this morning, a good feeling having all that bare metal sealed up. I got the shop temp up 28 degrees C using both the infra red heaters and the big propane burner, and that was the perfect temperature to wake up all the mosquitoes that were hiding. Lots of bugs to sand out of the primer now. I rigged up a new exhaust fan so no more mist in the air, so effective that by the last shoot I decided it was safe enough to have the over head infra red propane heater on. No boom. I have mentioned this before on other builds but it still surprises me, this panel was freshly sanded, washed with a fine steel brush and Acetone, wiped clean with Acetone until a white cloth came away clean, then repeated with Methyl hydrate until the white cloth came away clean. Then I washed it again with an industrial Lye cleaner and look at all the dirt that was still on the metal.


 4 points
 -
3 pointsBringing this back for a special "happy new year" edition of this thread with one new observation. Much like the 240z's big orange carb filter's "winter/summer" switch, I've found that adjusting the AFM requires a 1 tooth adjustment depending on the season (in order to stay within those air/fuel numbers). When it gets cold, richen it one tooth (clockwise) and when it warms up in the summer, lean it one tooth (counter-clockwise). I'm assuming this is due to cold air being denser and thus leans out the car, but I'm no scientist it's just what I noticed on the gauge after all this time. For me this means that the summer tuning is 3 teeth to the left of the stock tooth (that you should have marked) and winter decreases that by 1 tooth meaning that the winter setting is 2 teeth to the left of the stock configuration. Happy tuning my friends. Let 2024 be the year of 14.73 points
-
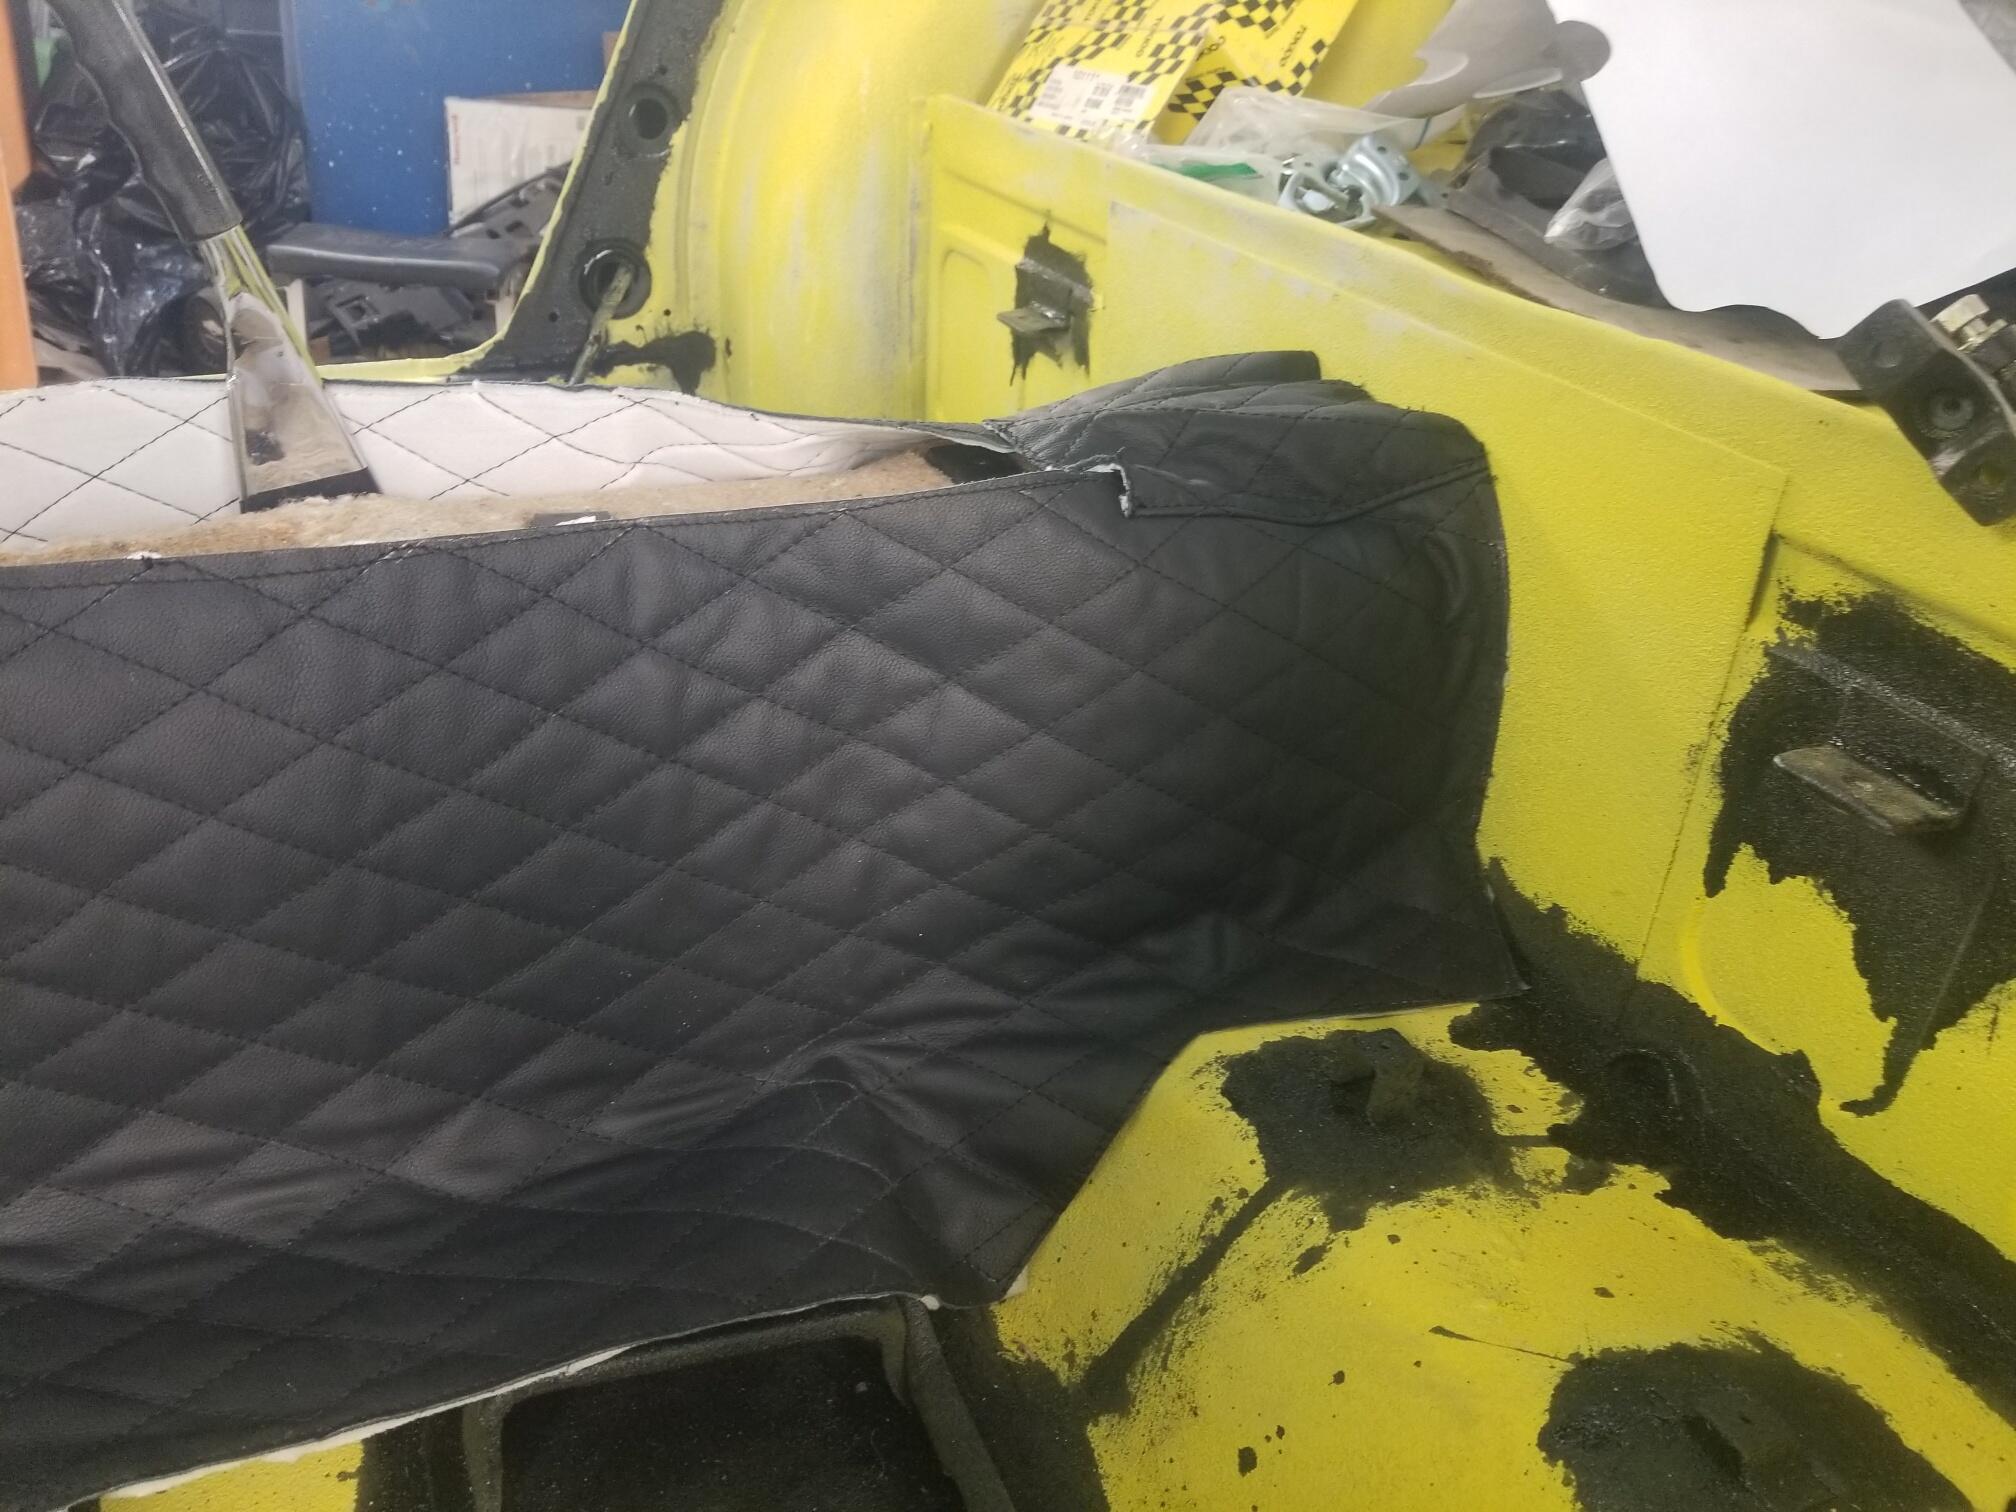
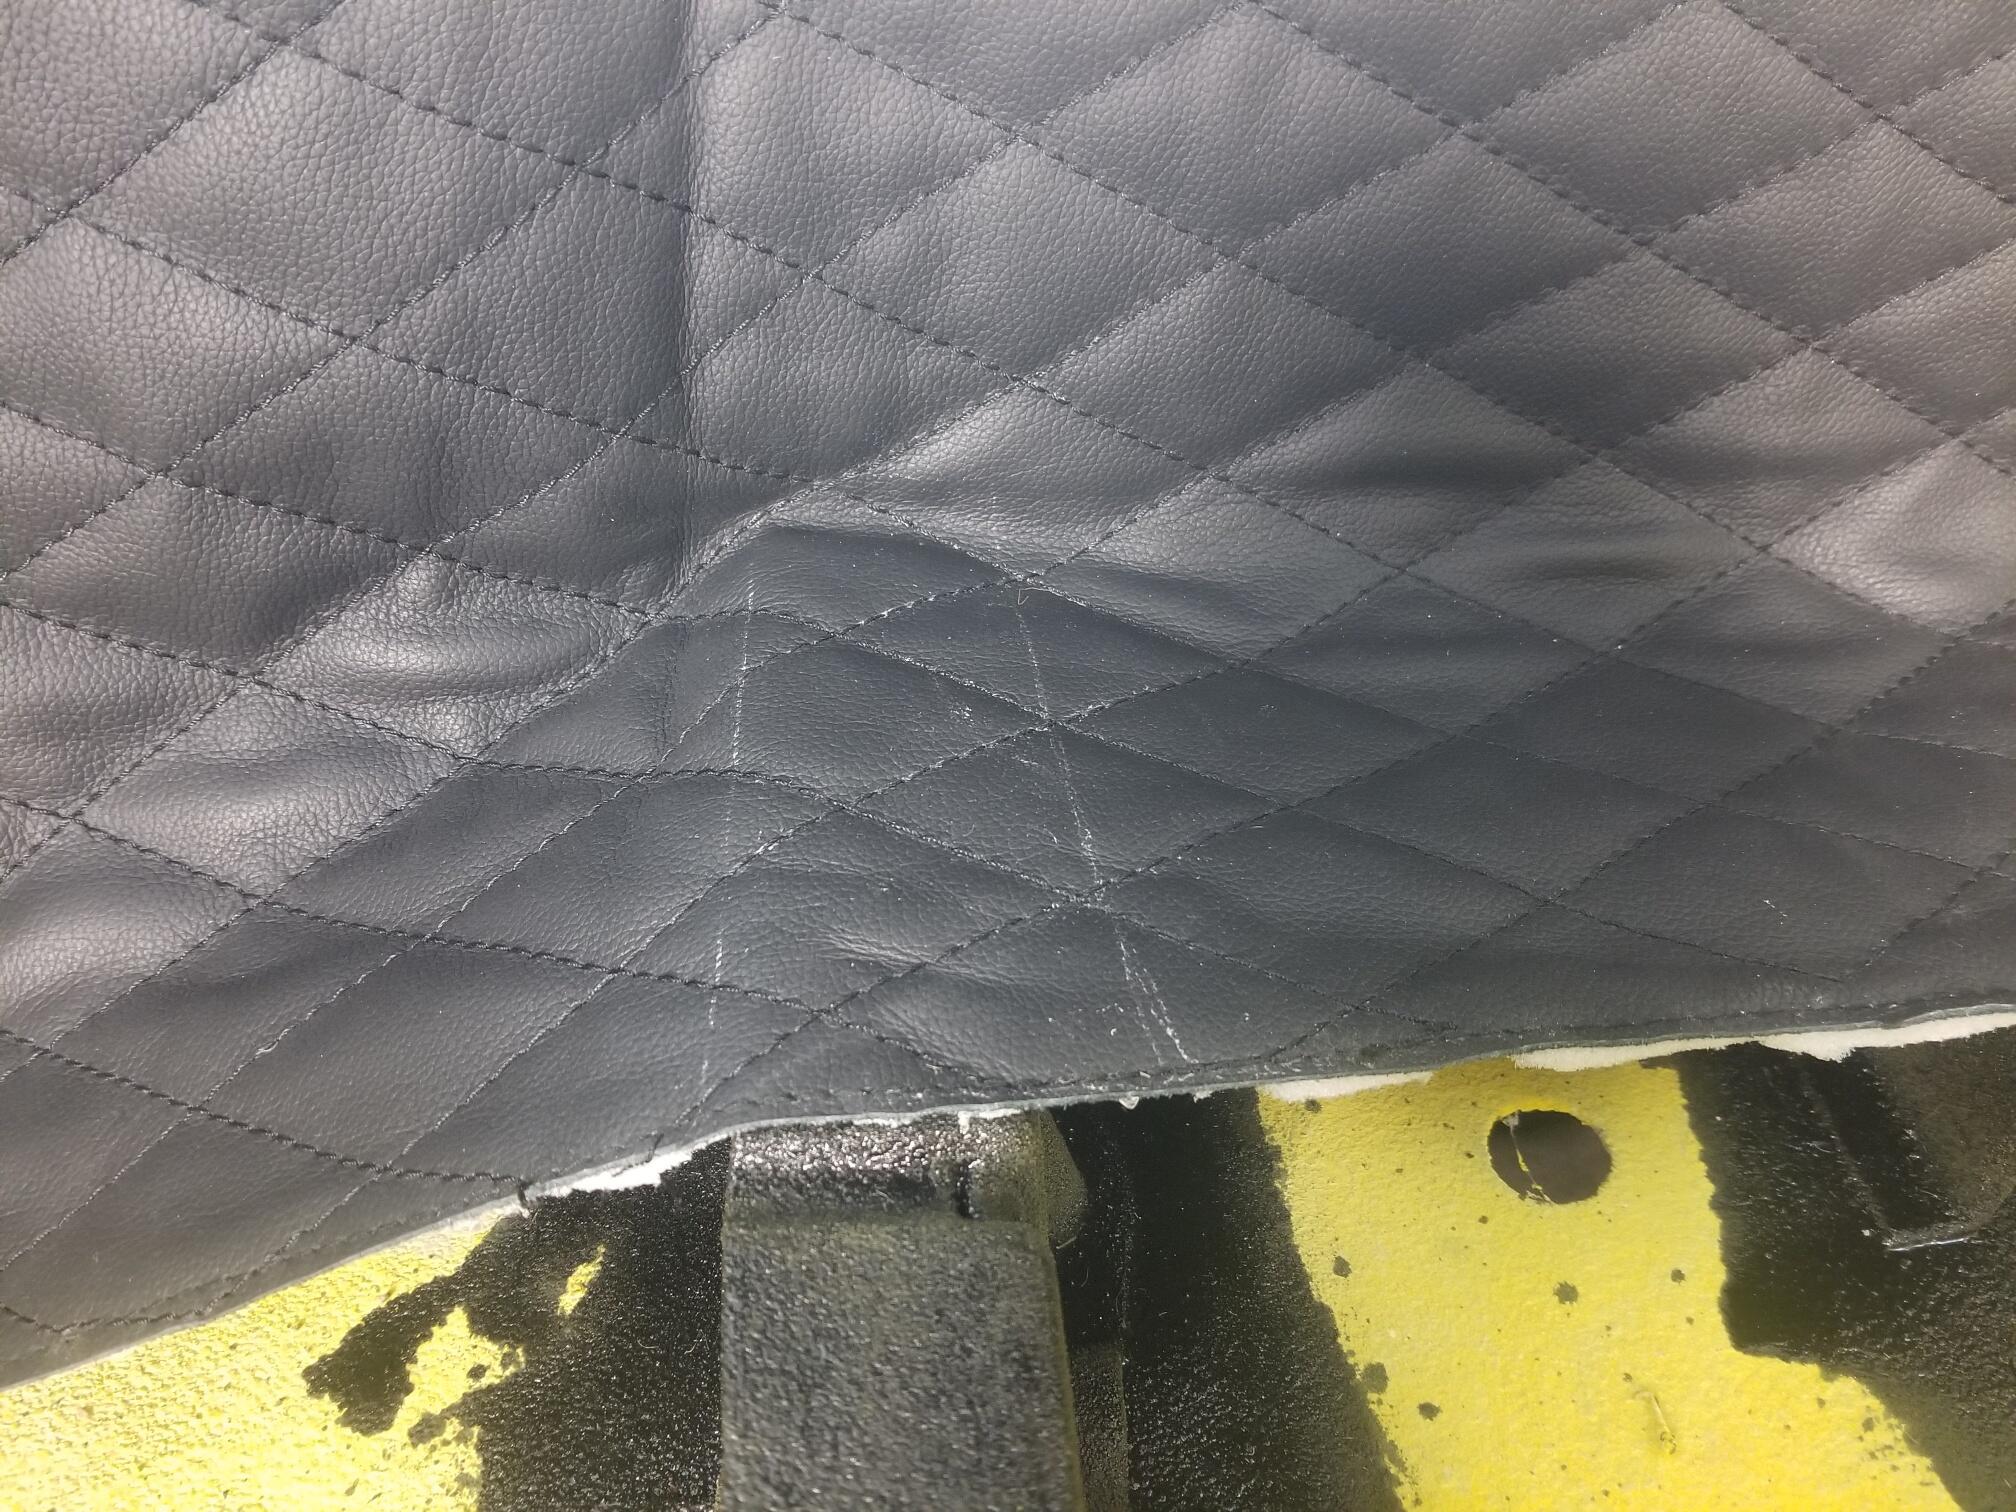
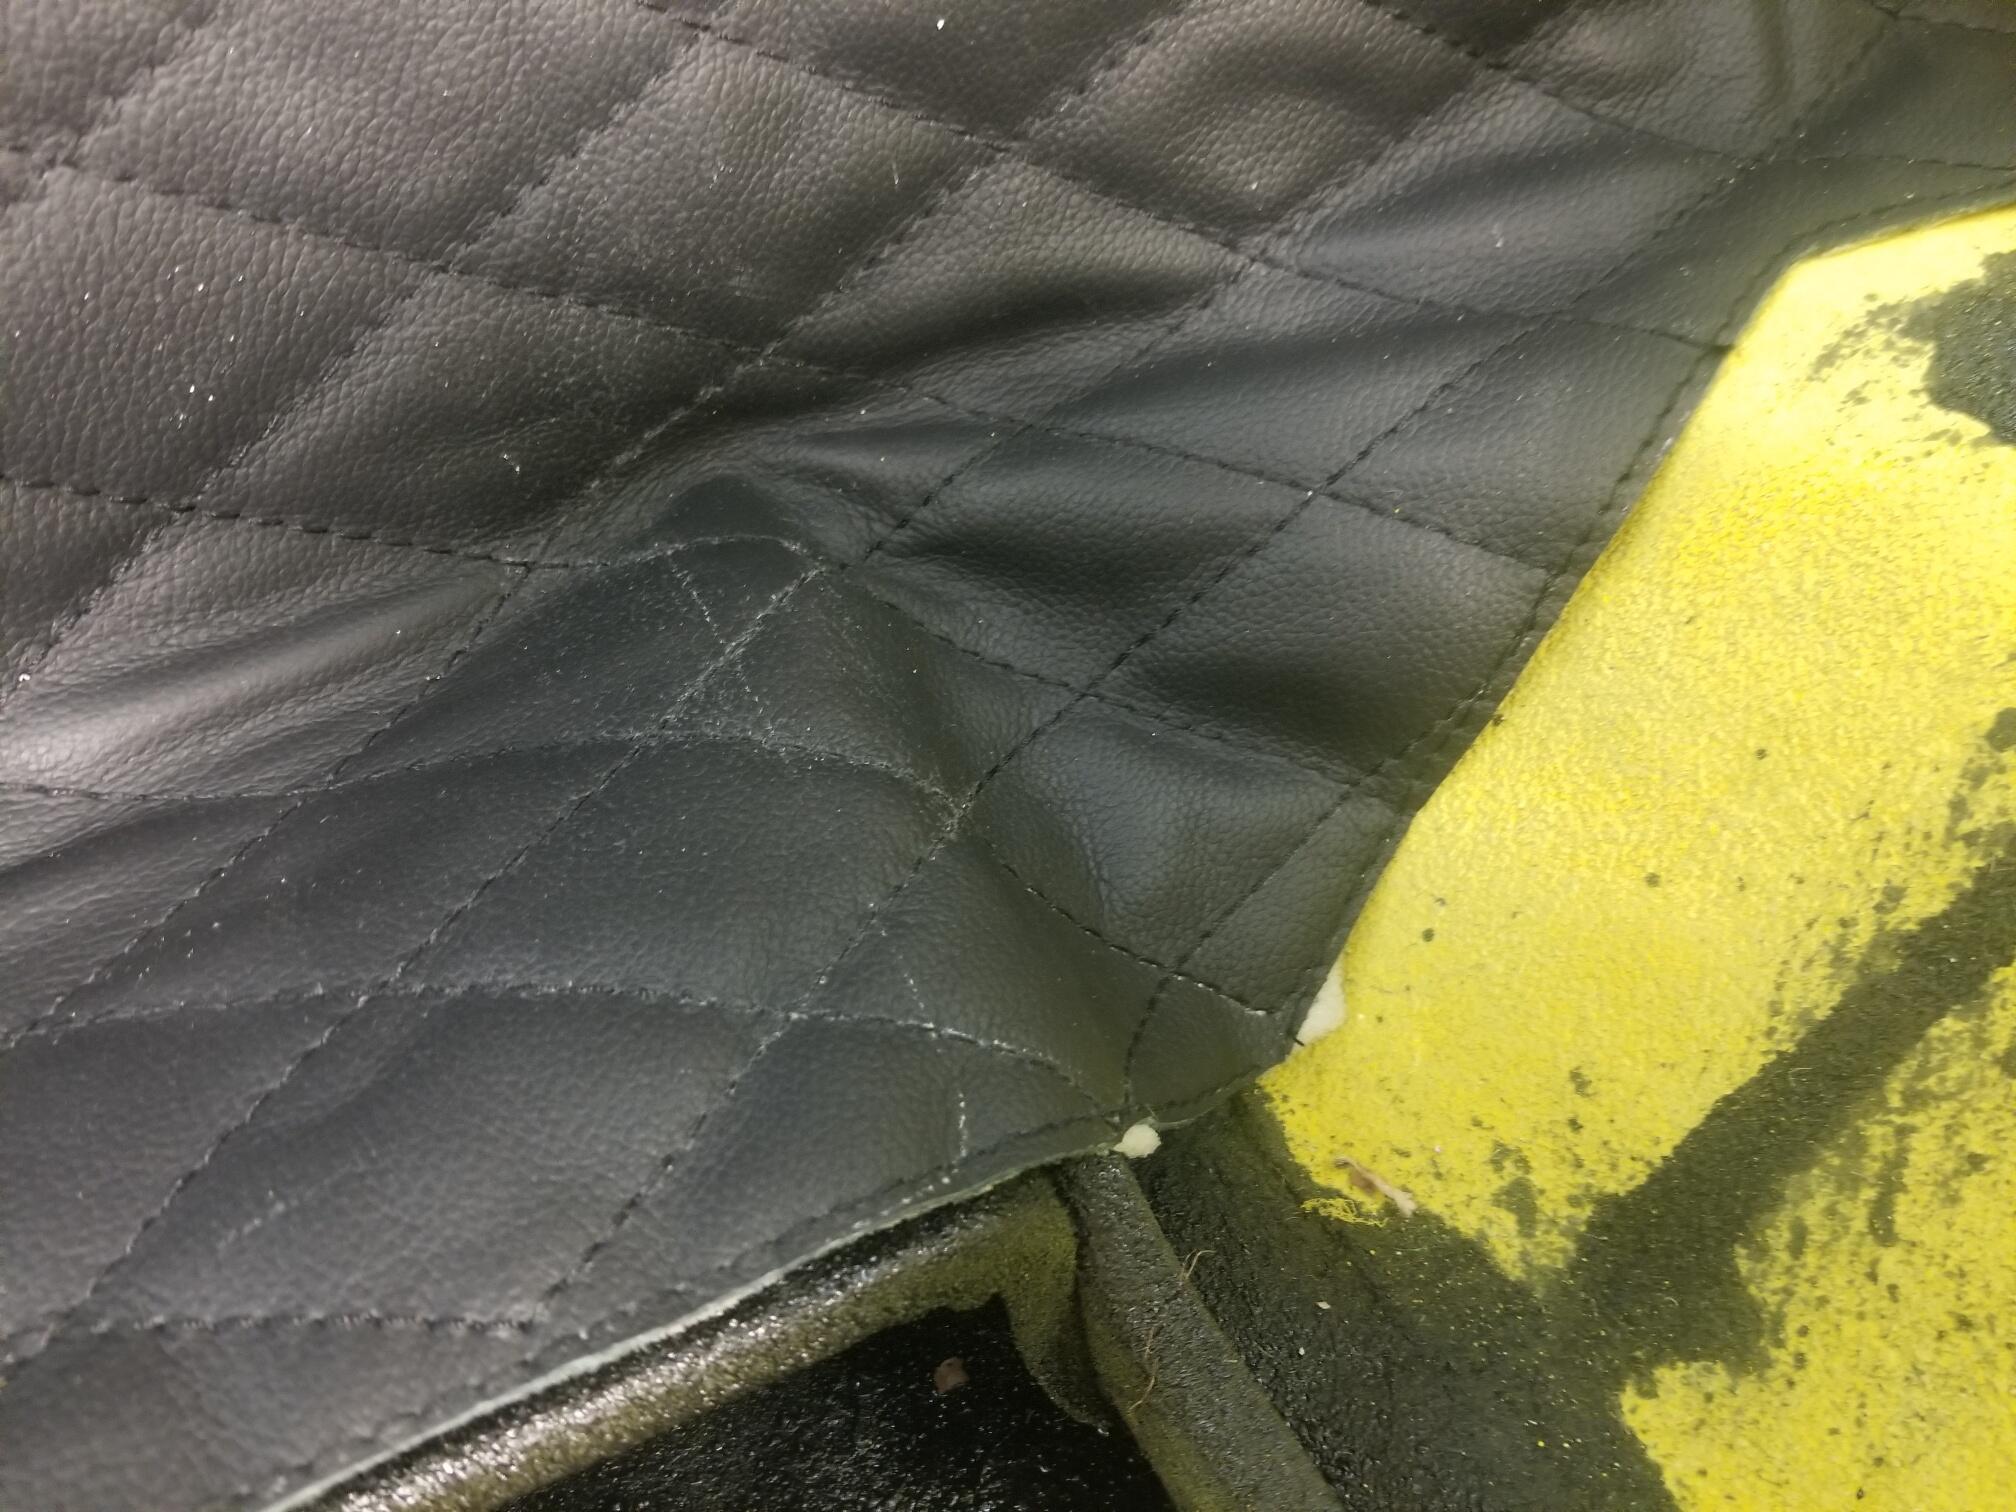
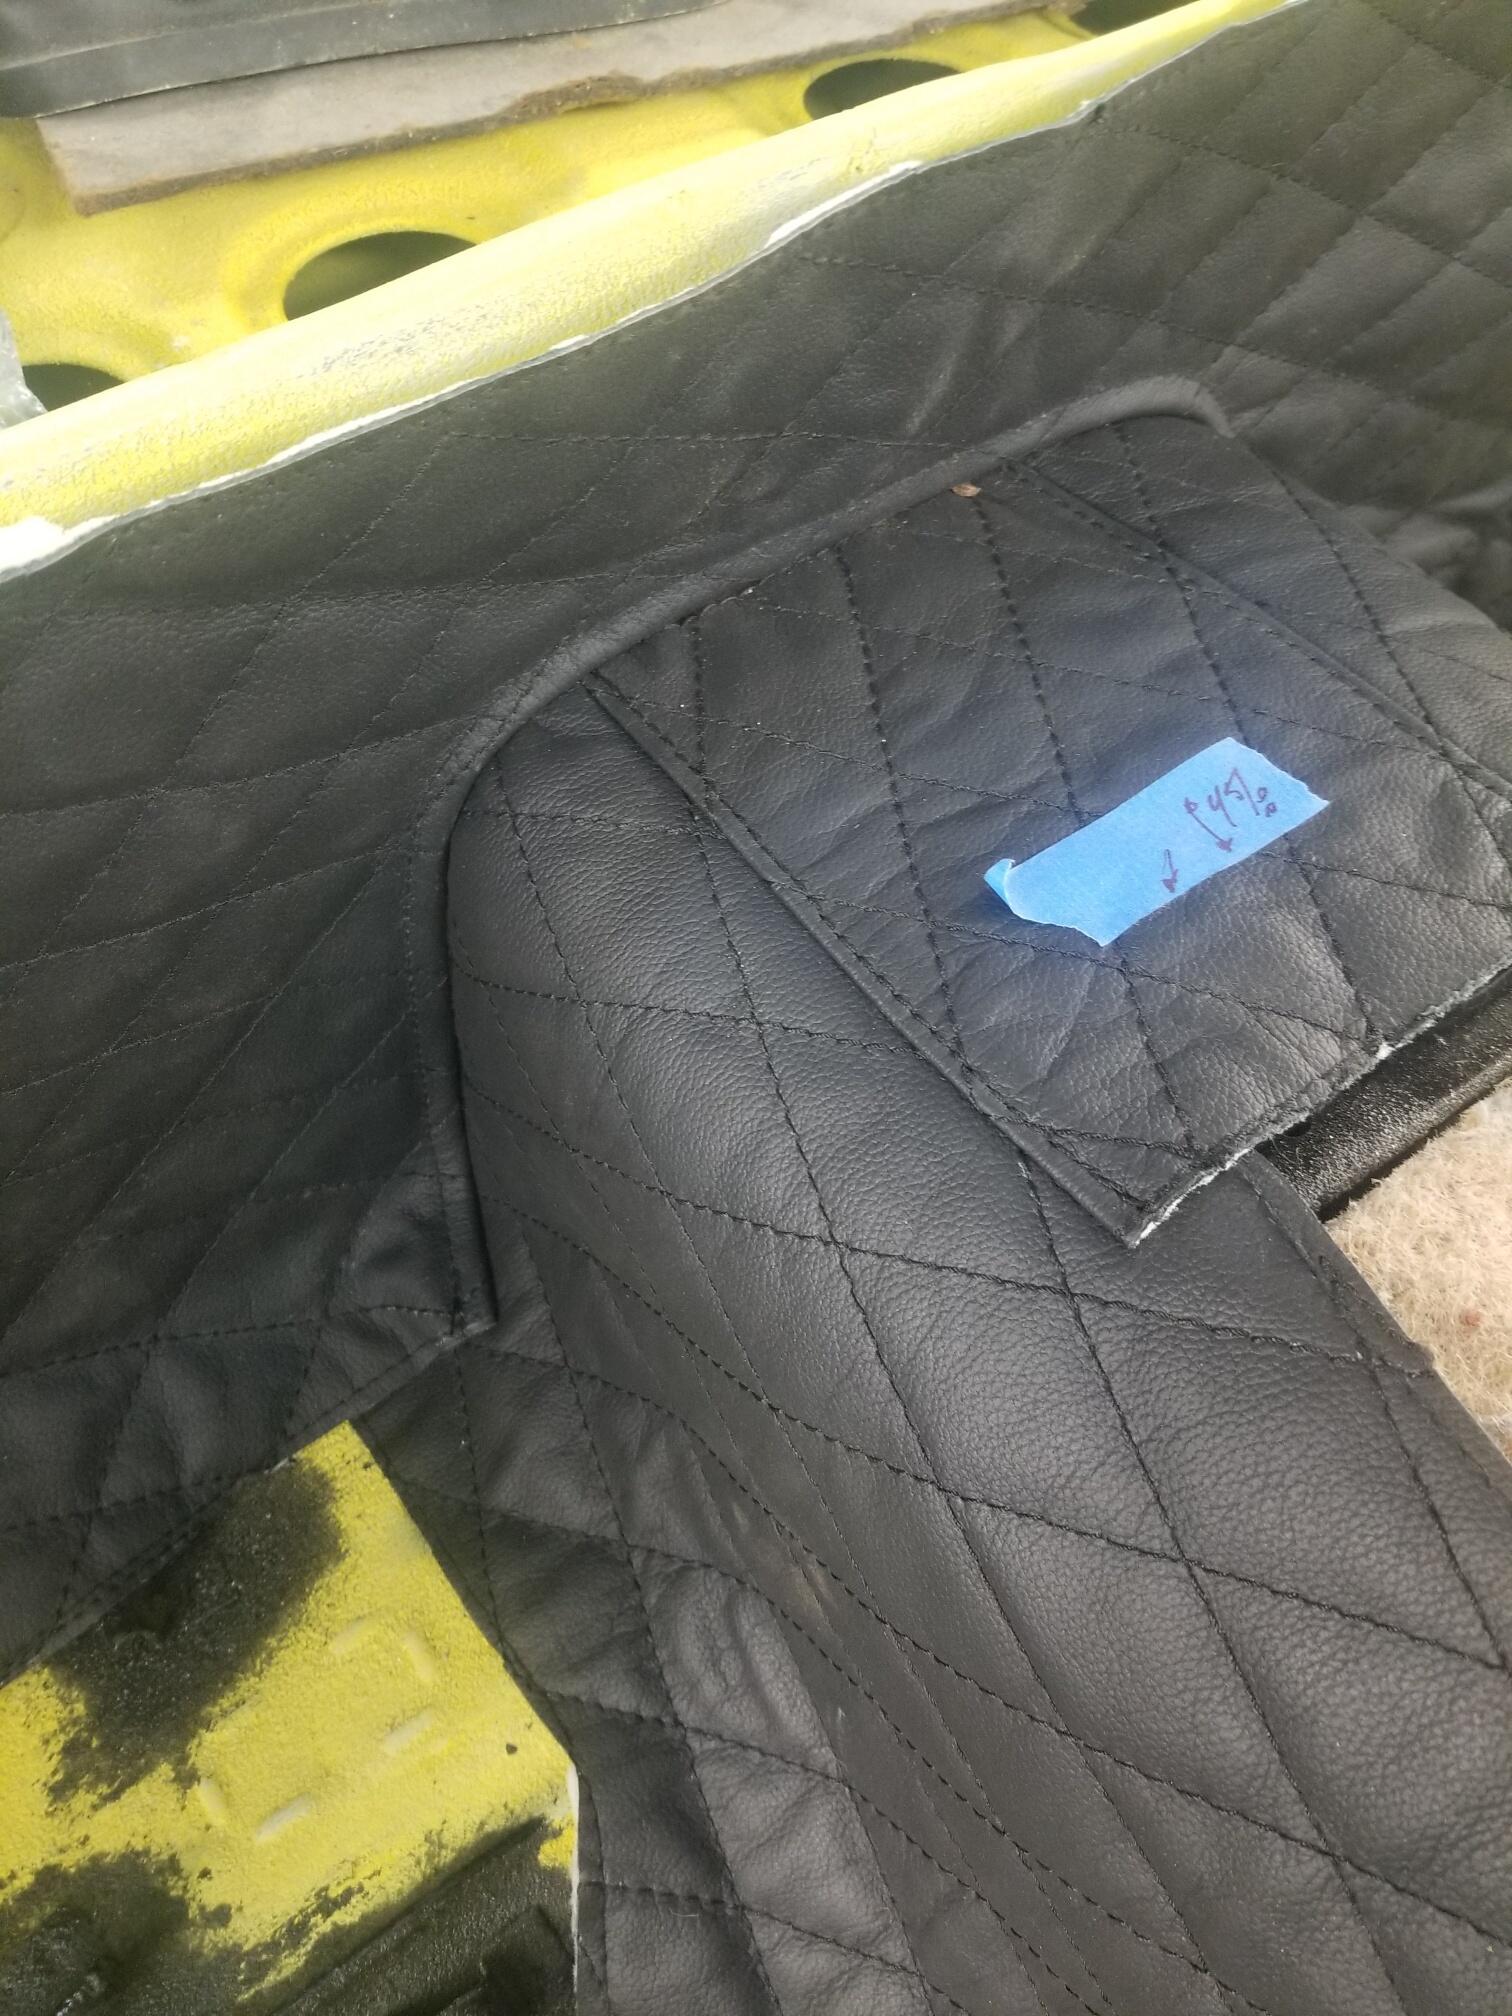
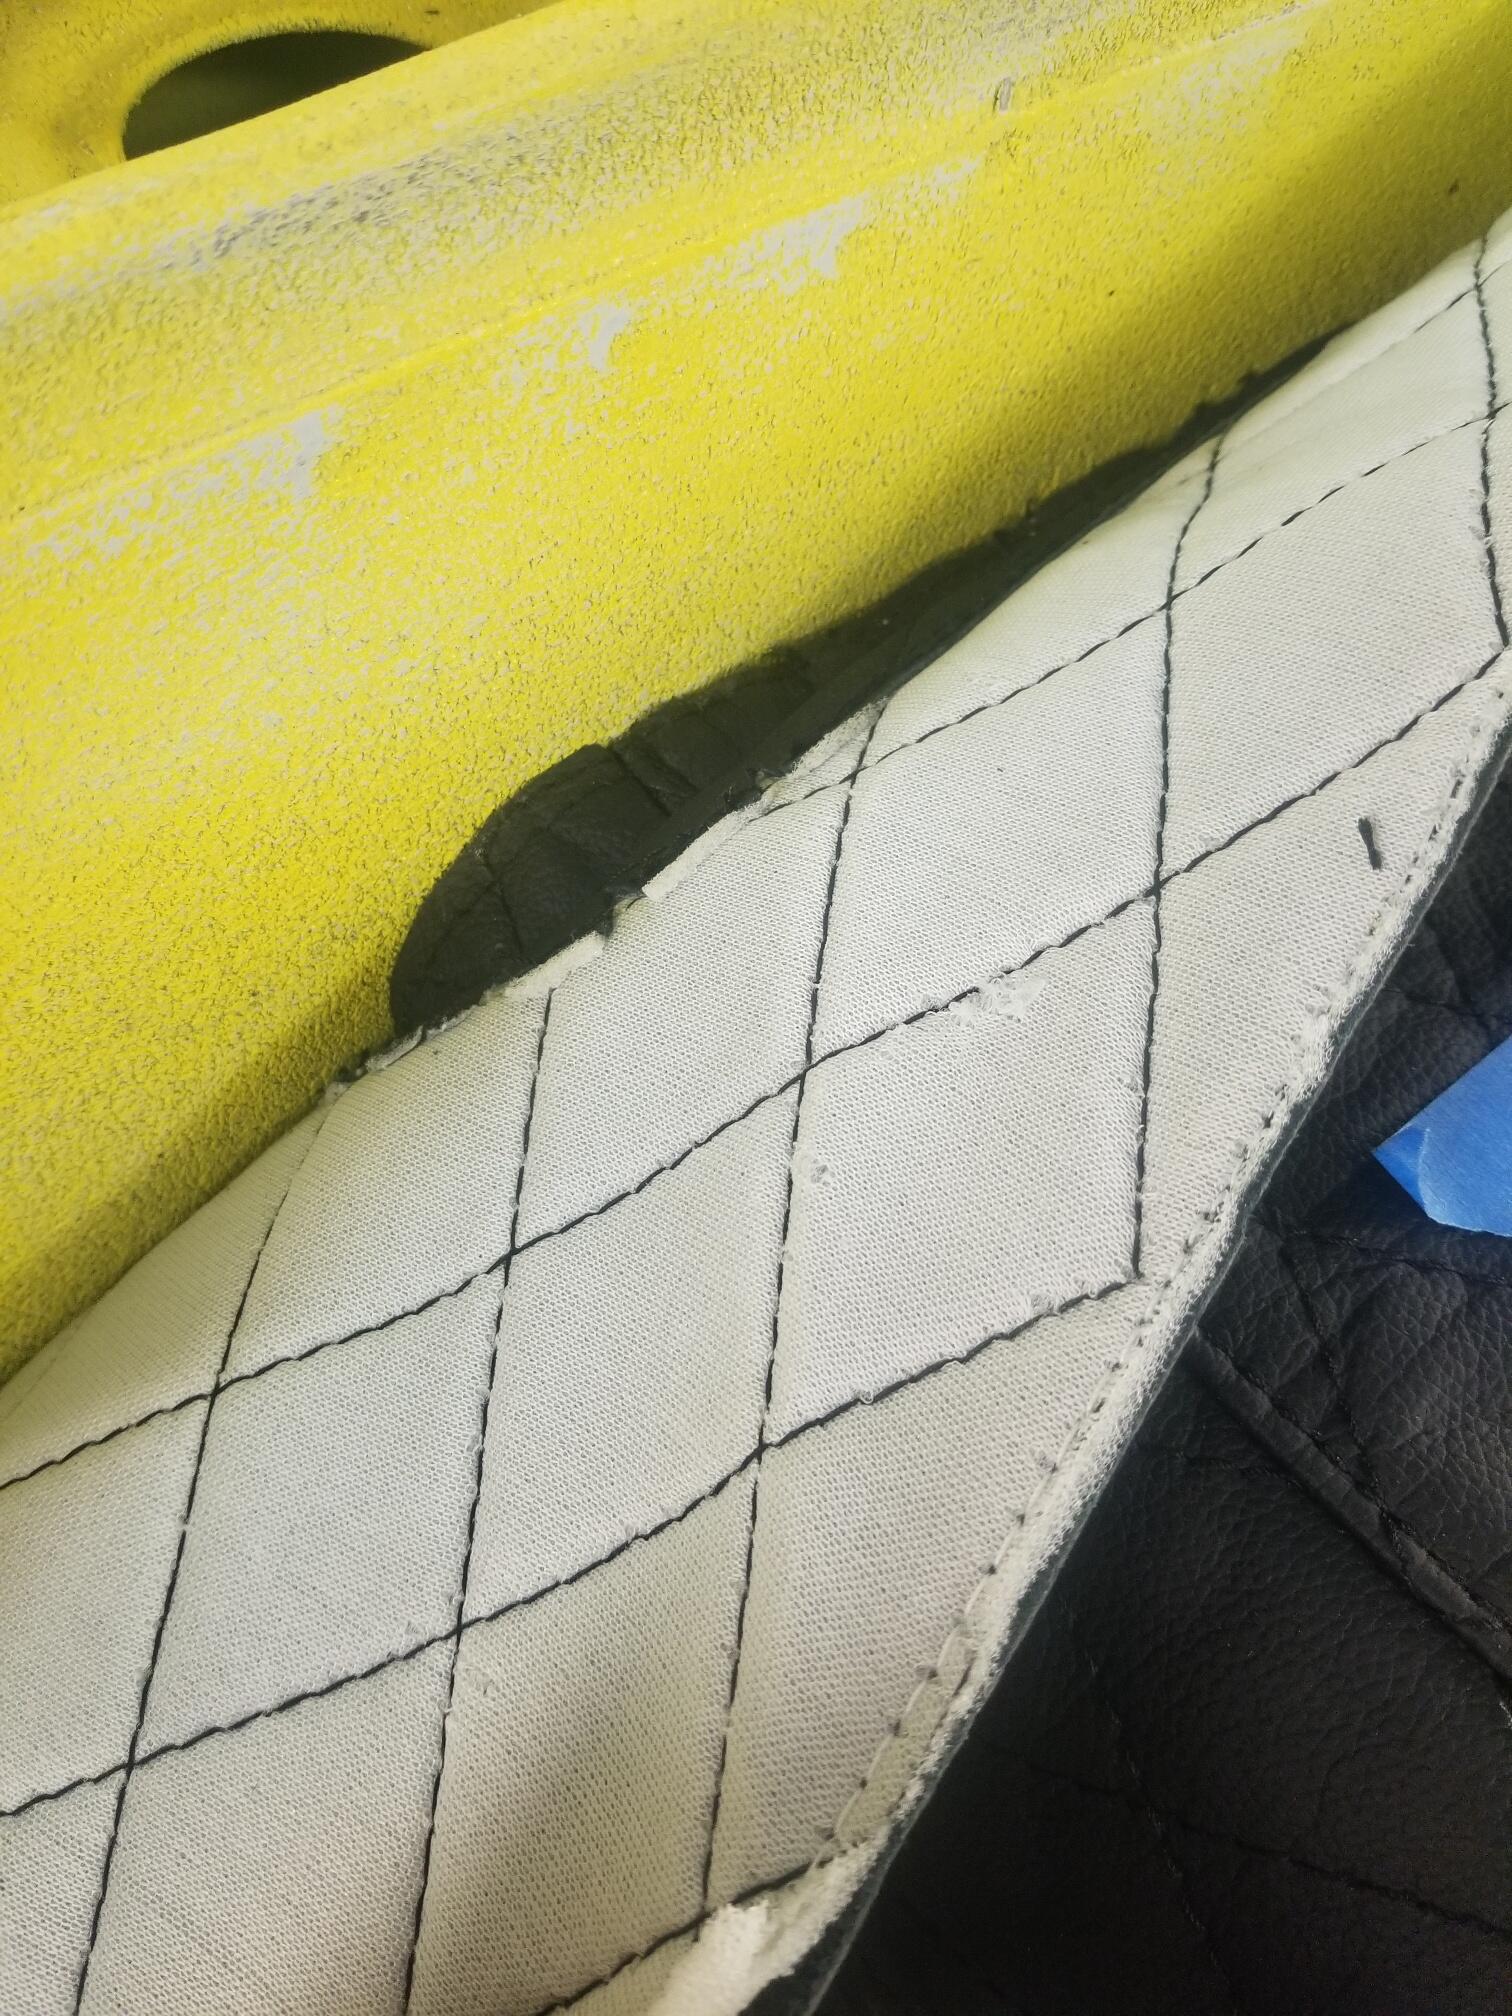
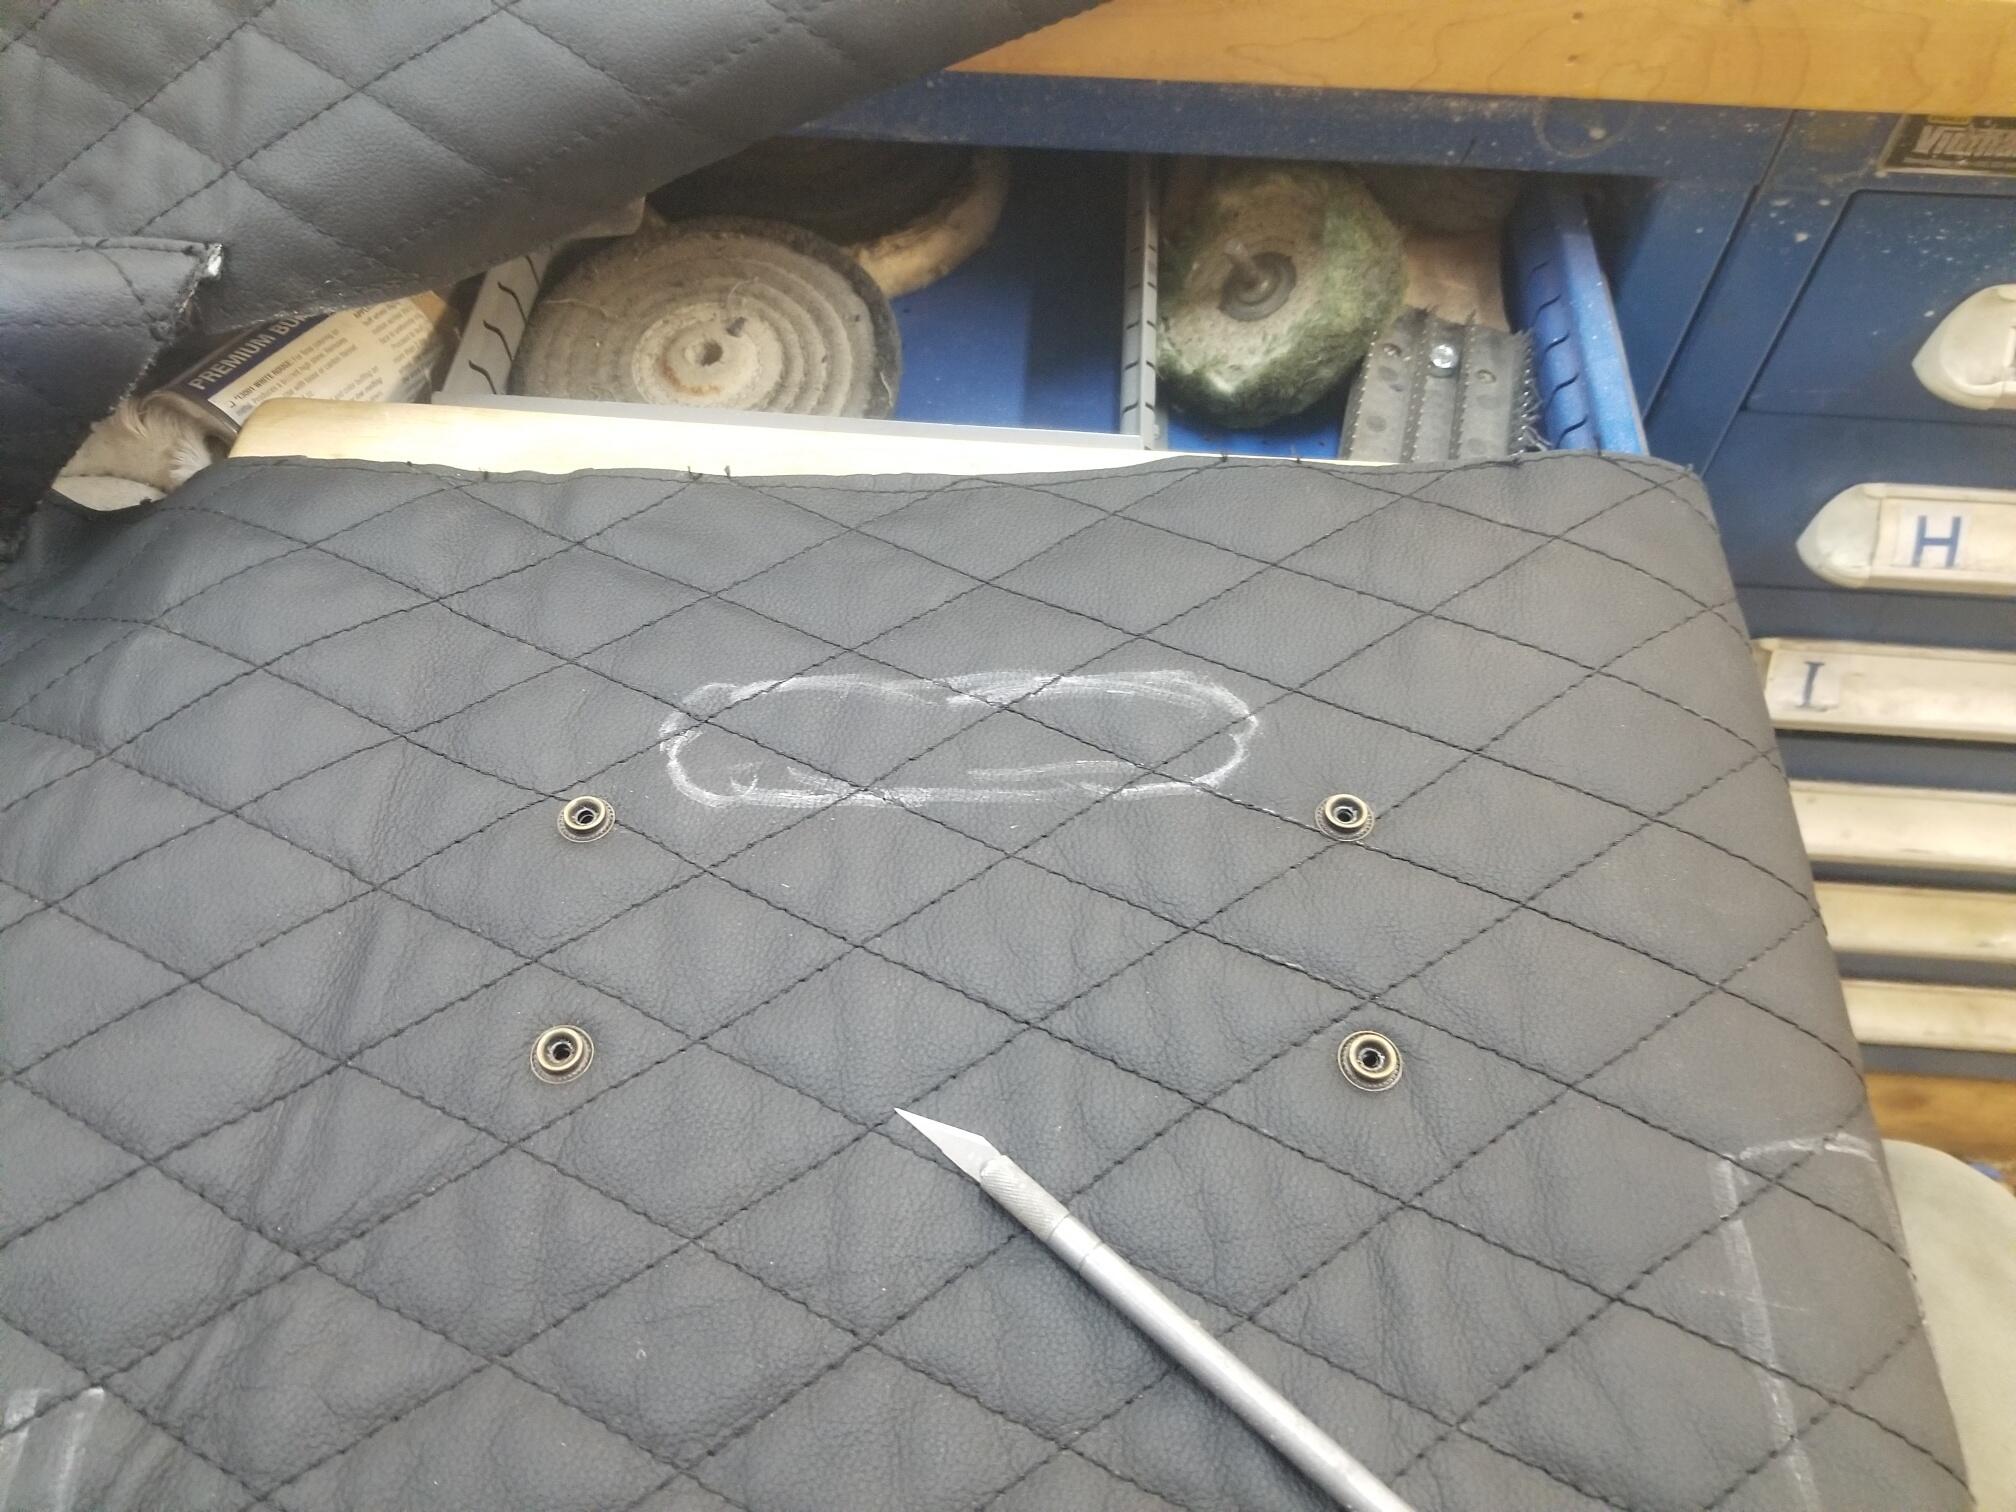
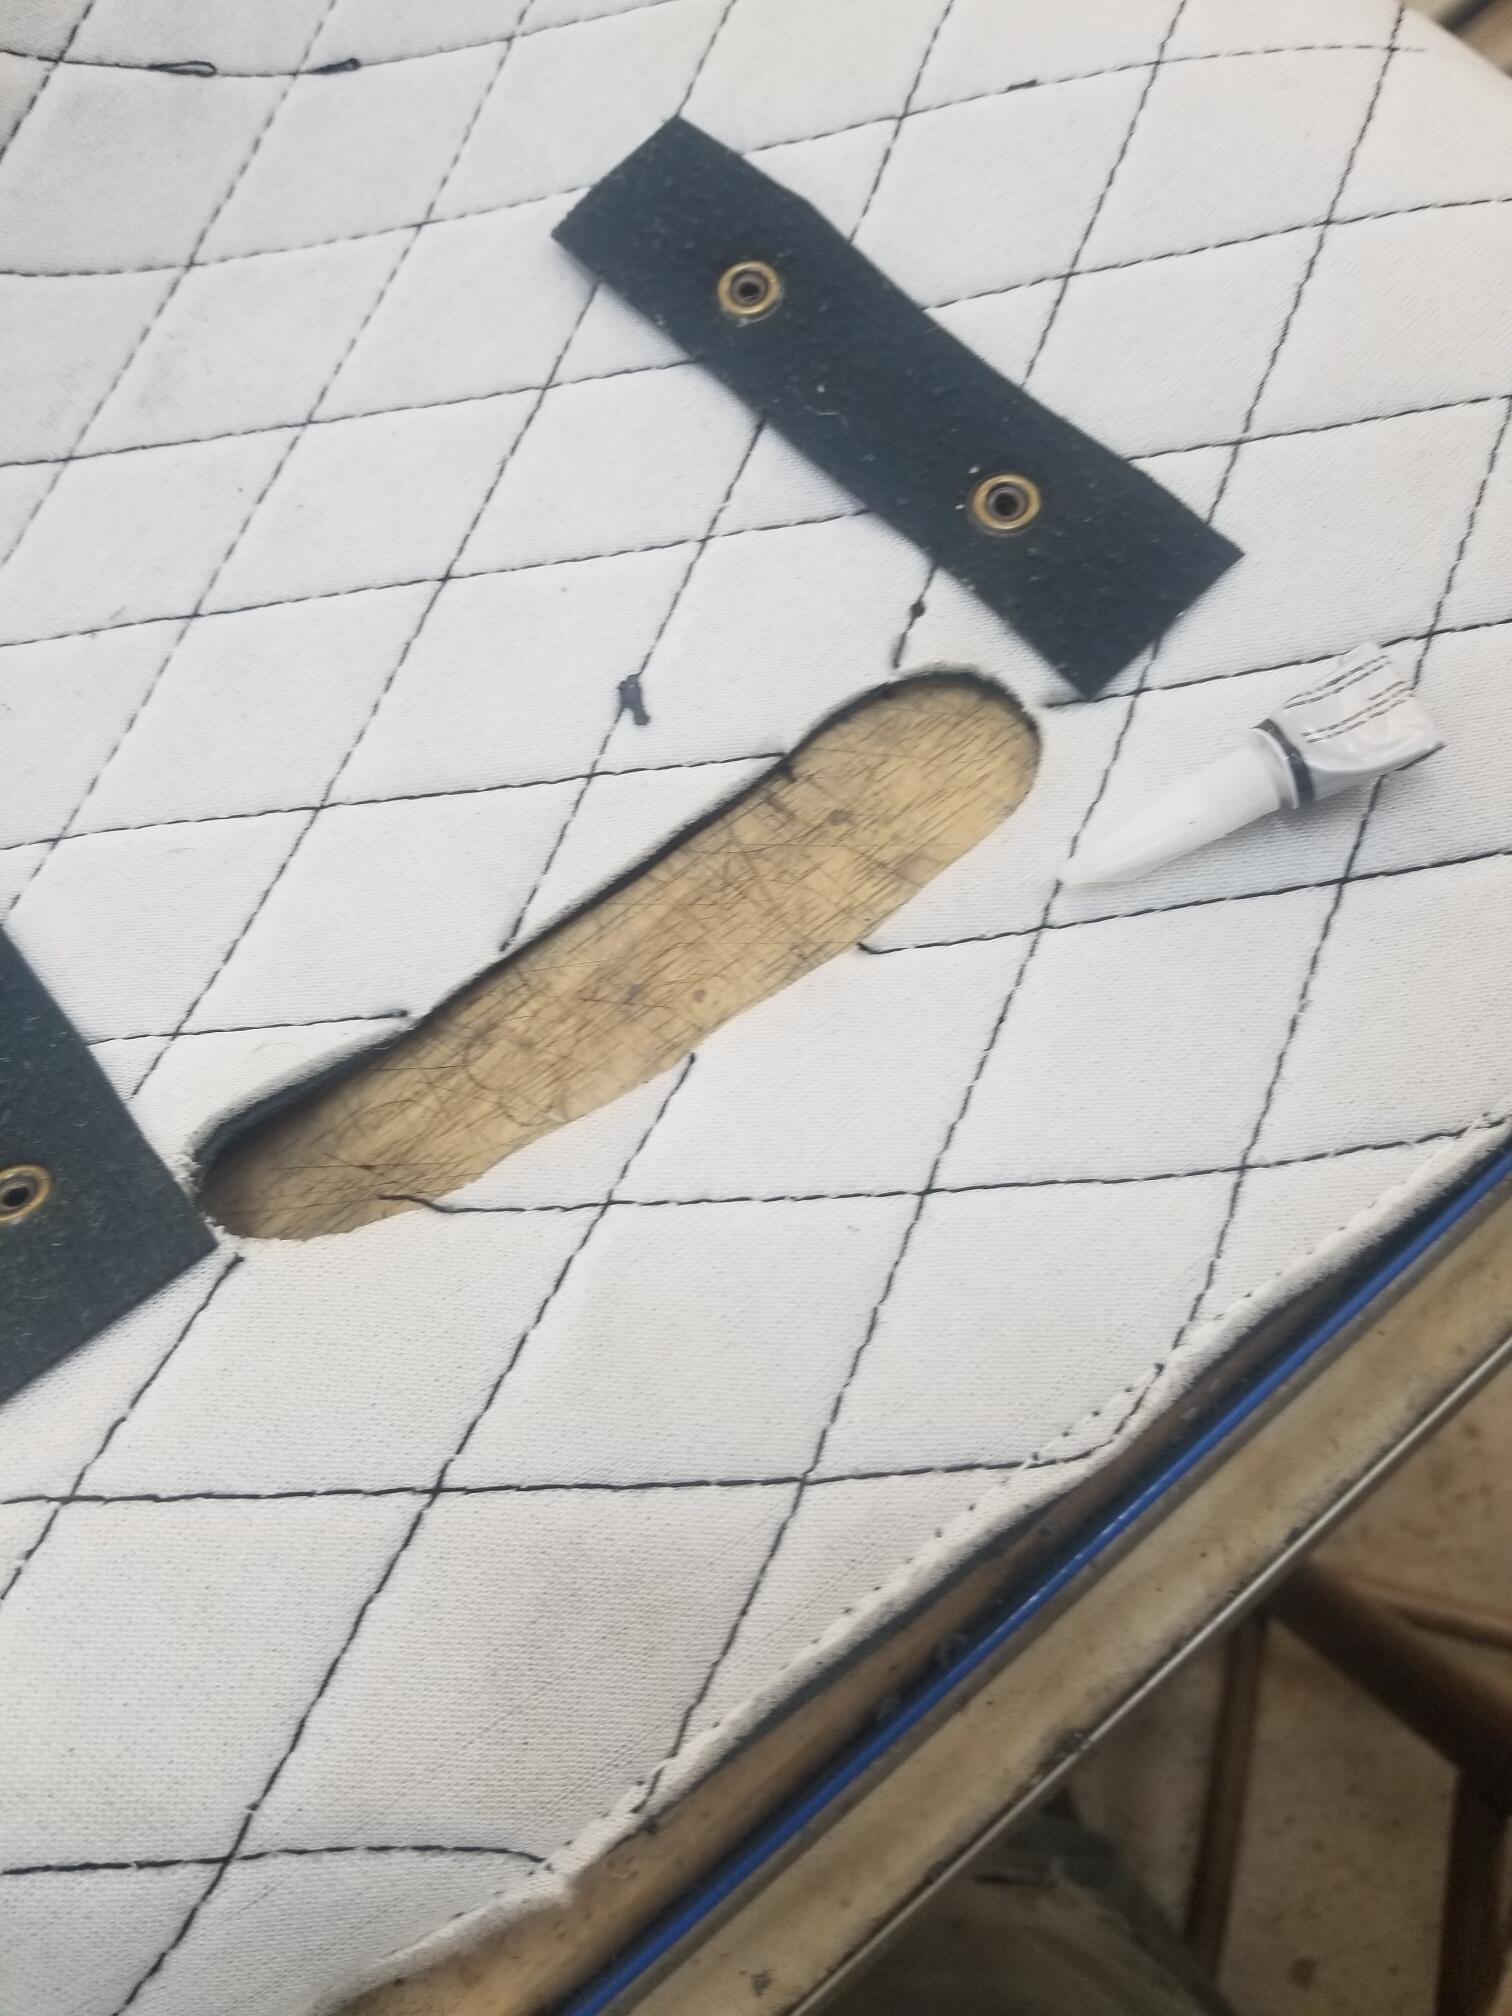
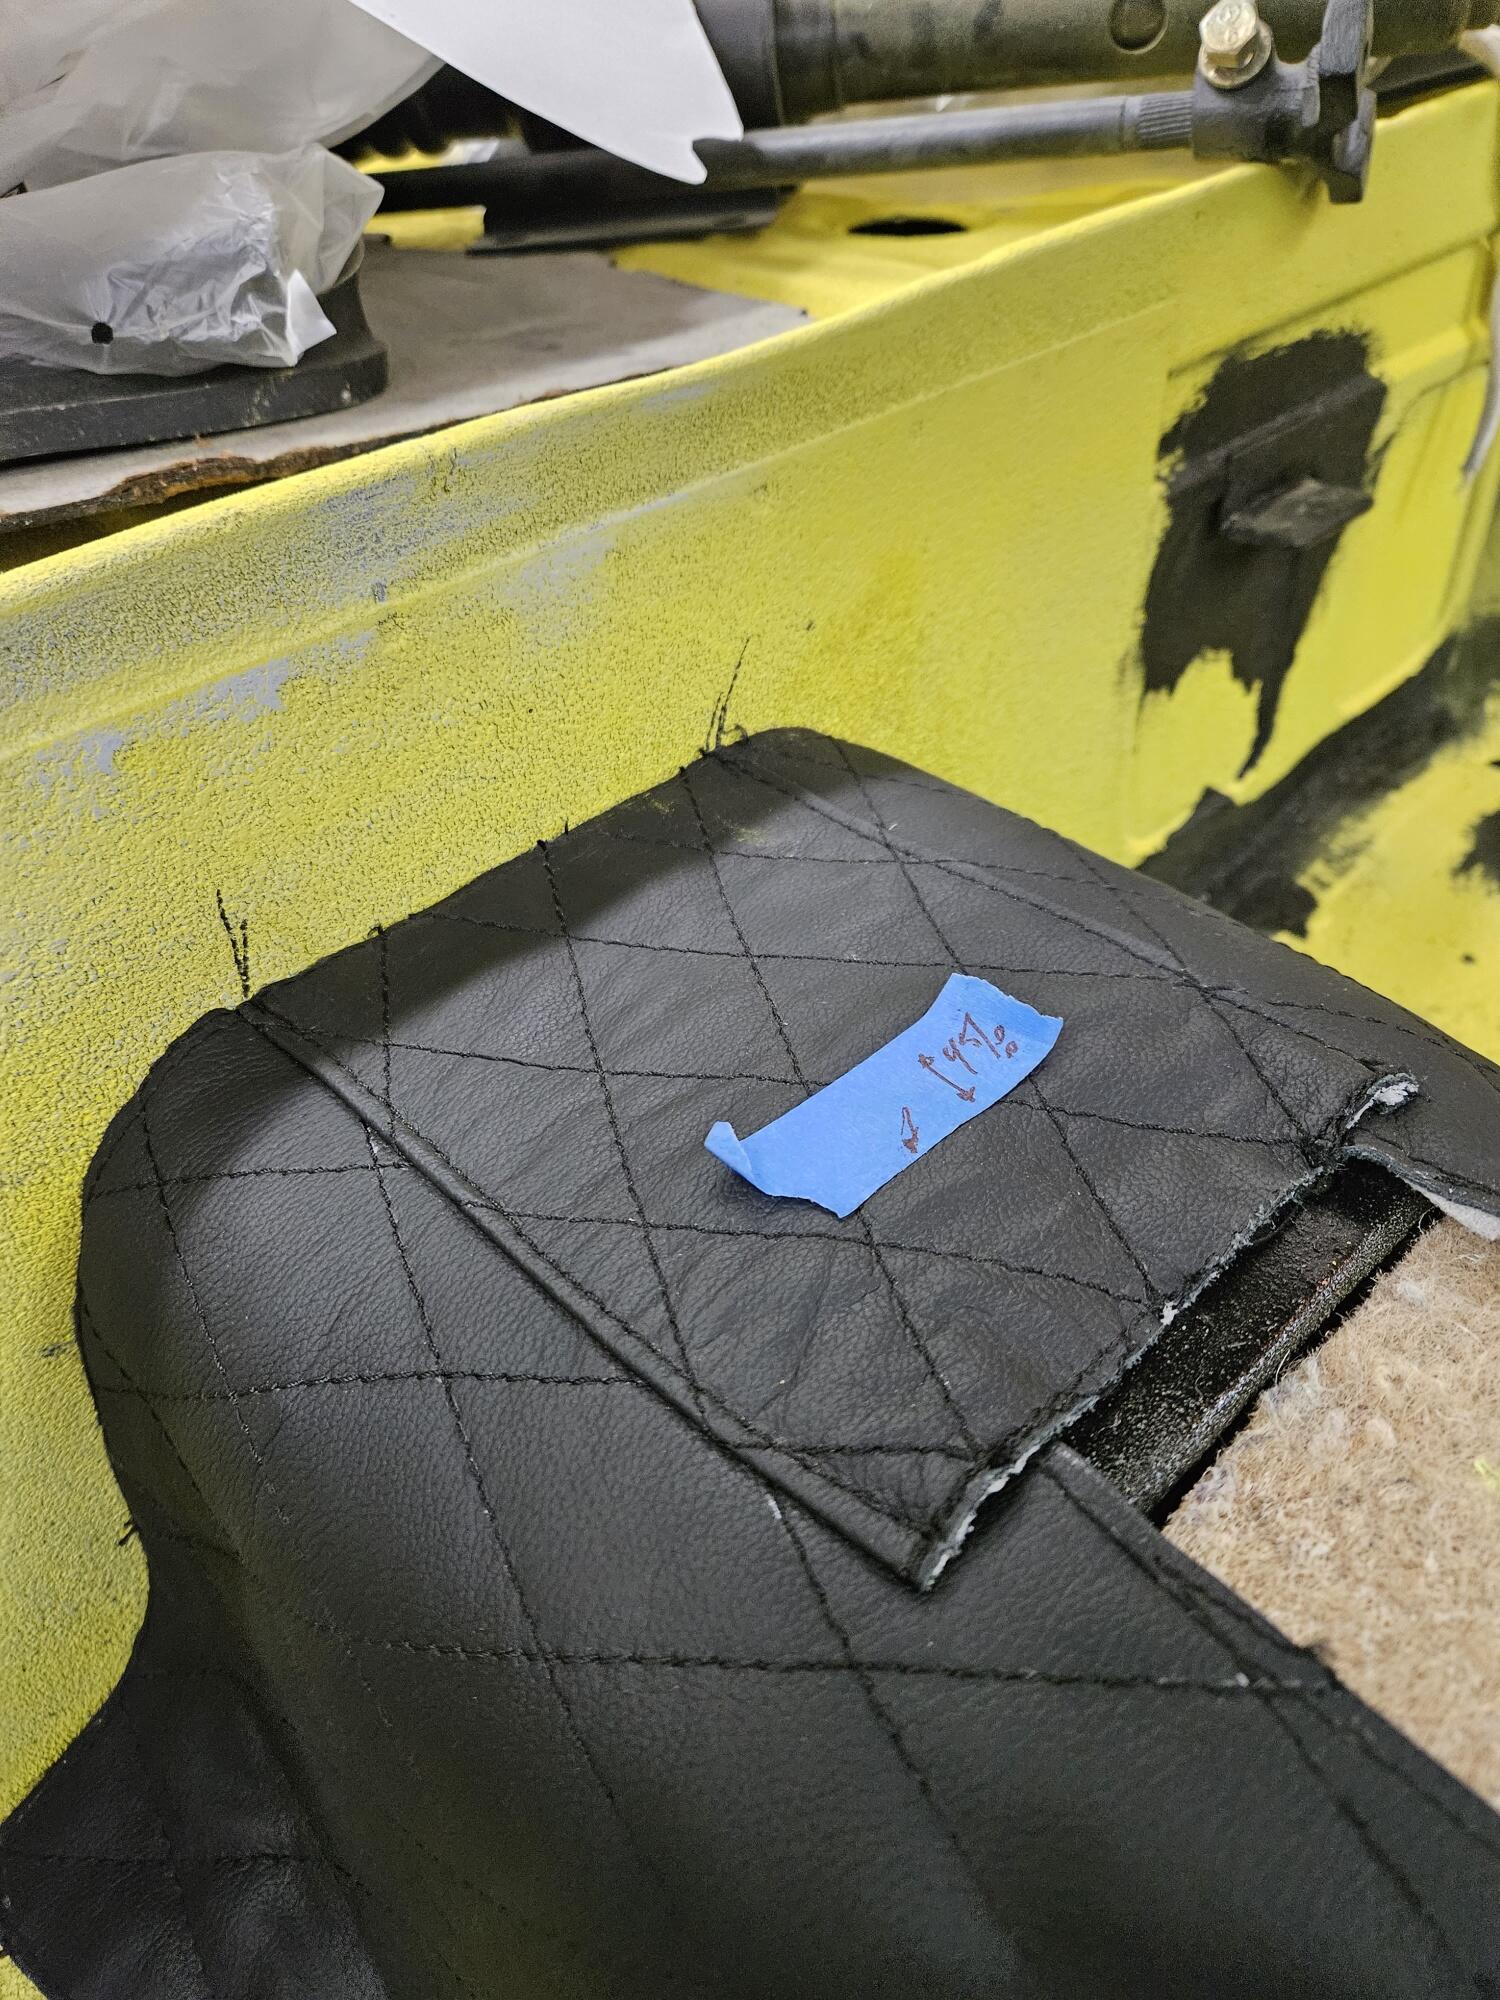
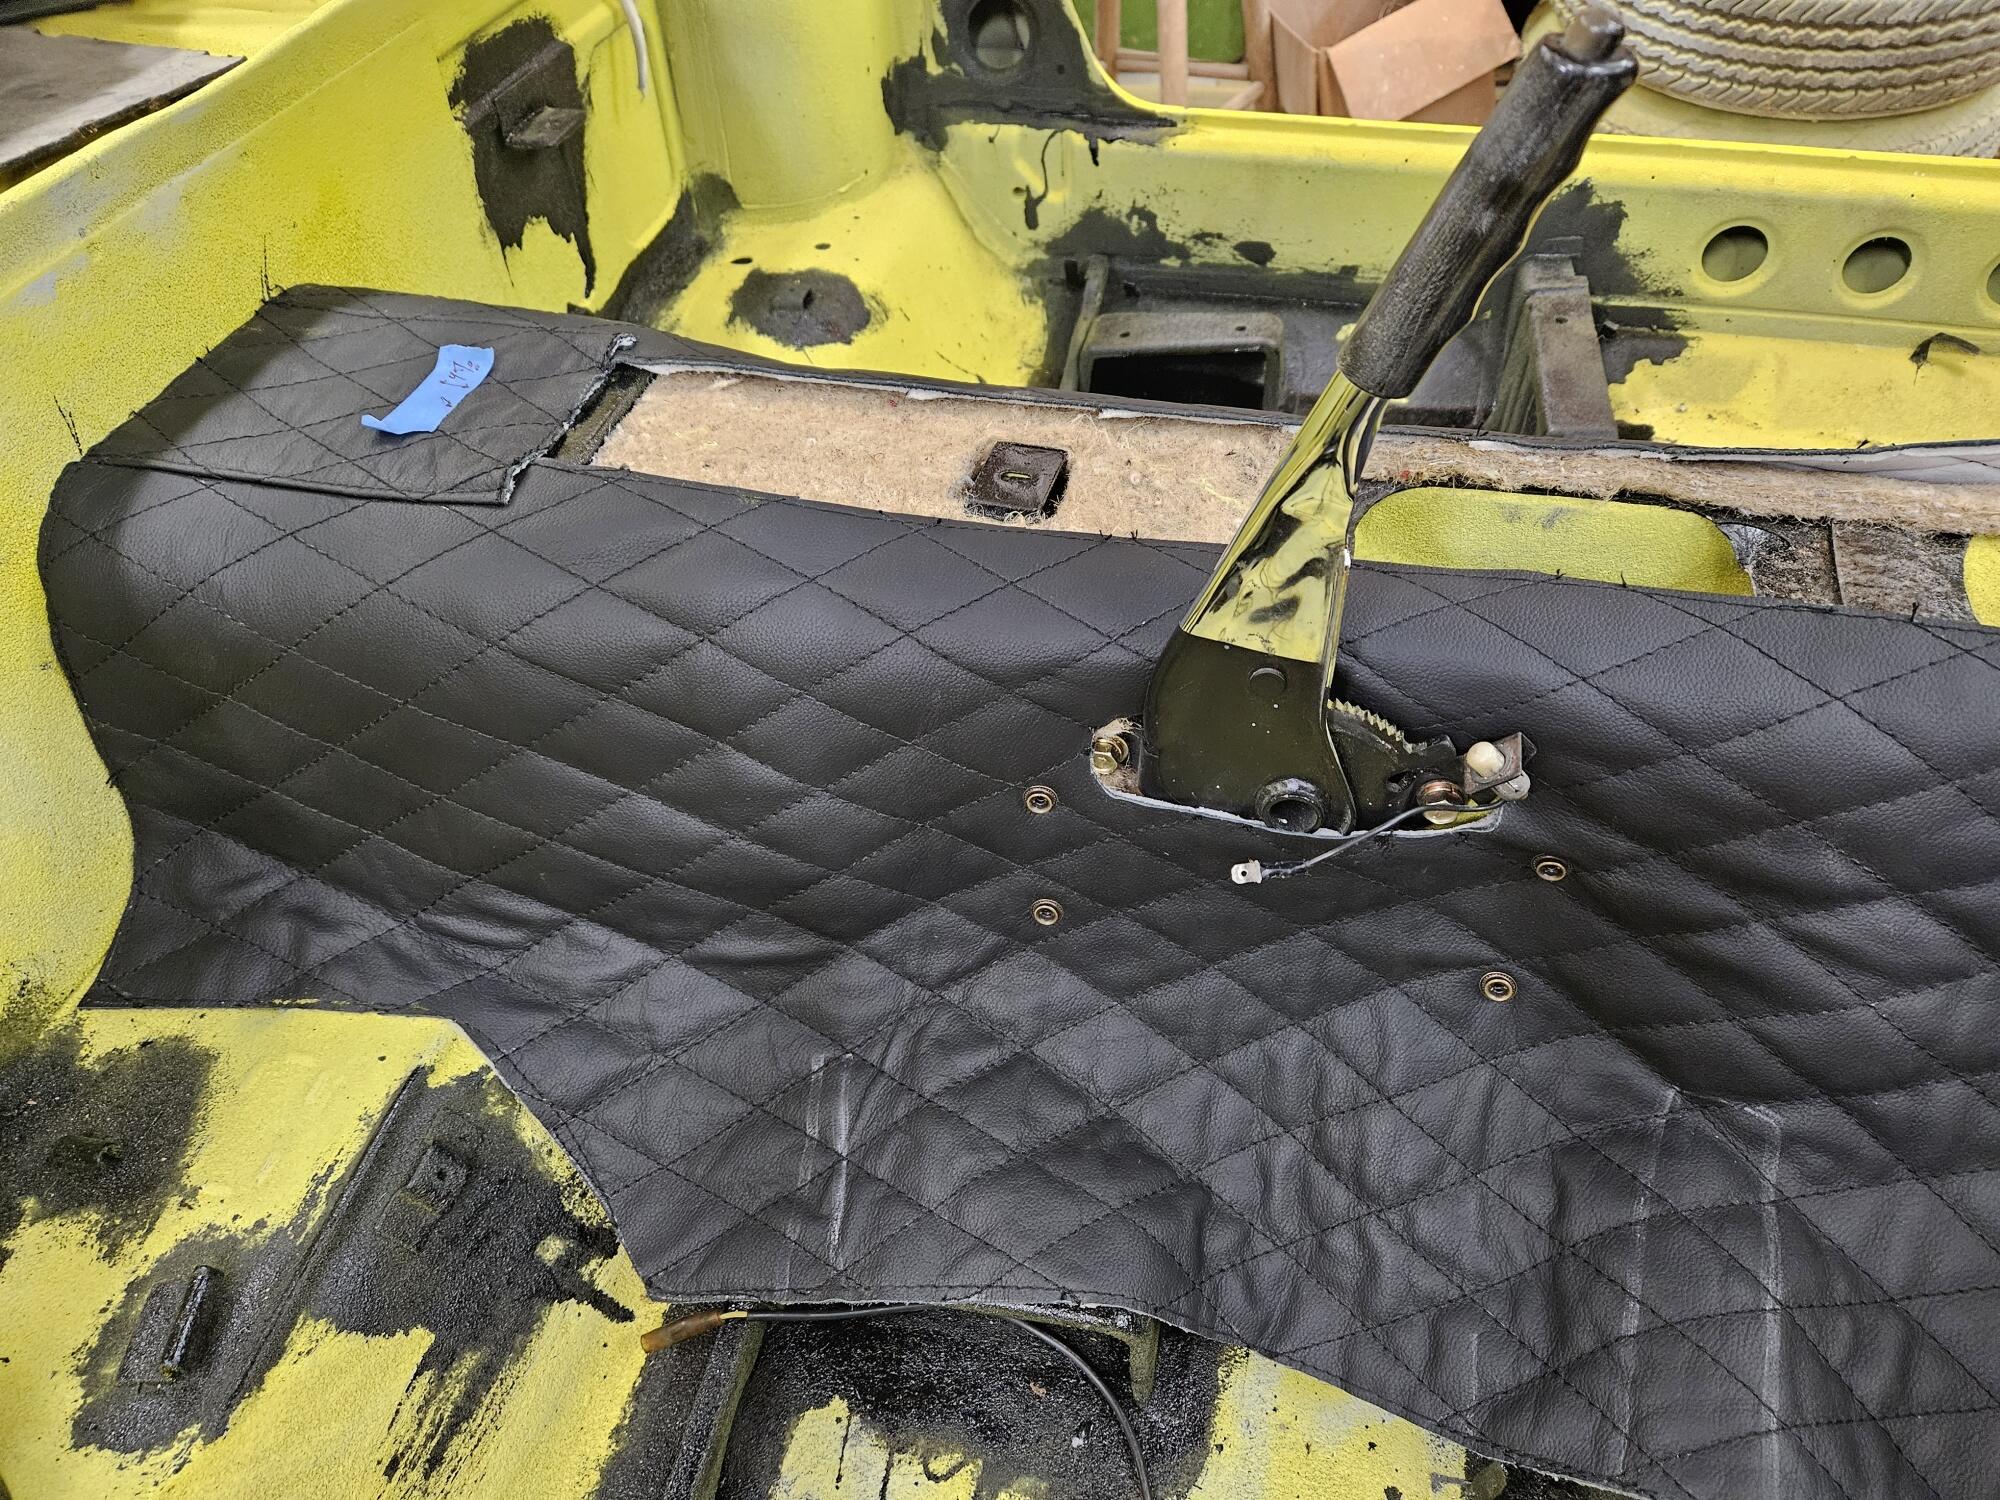
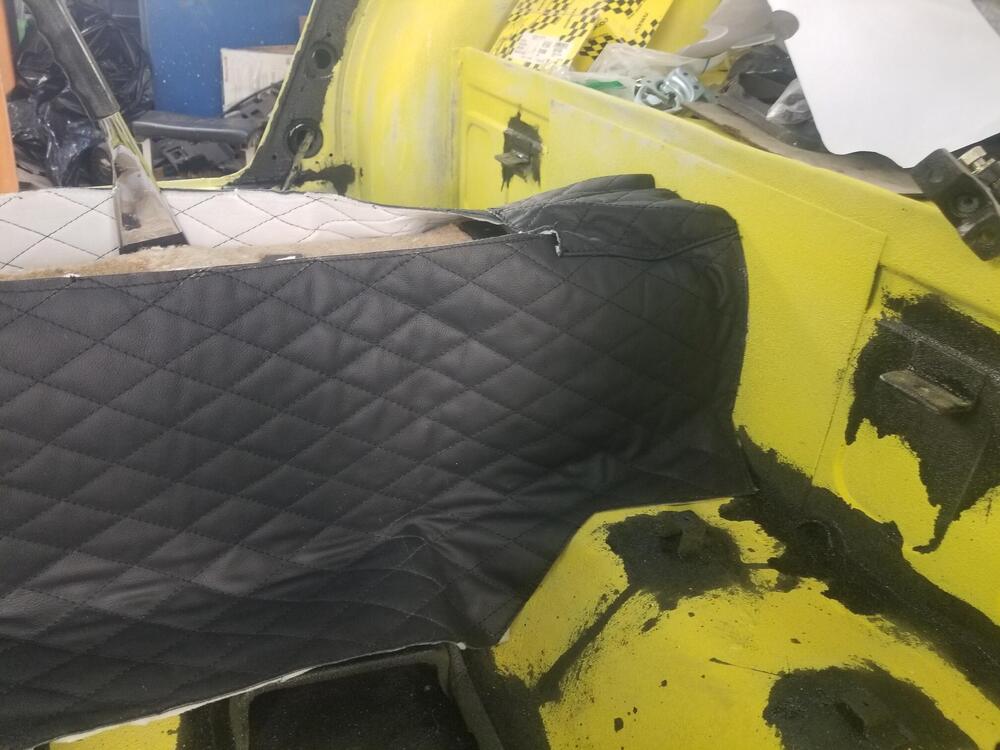
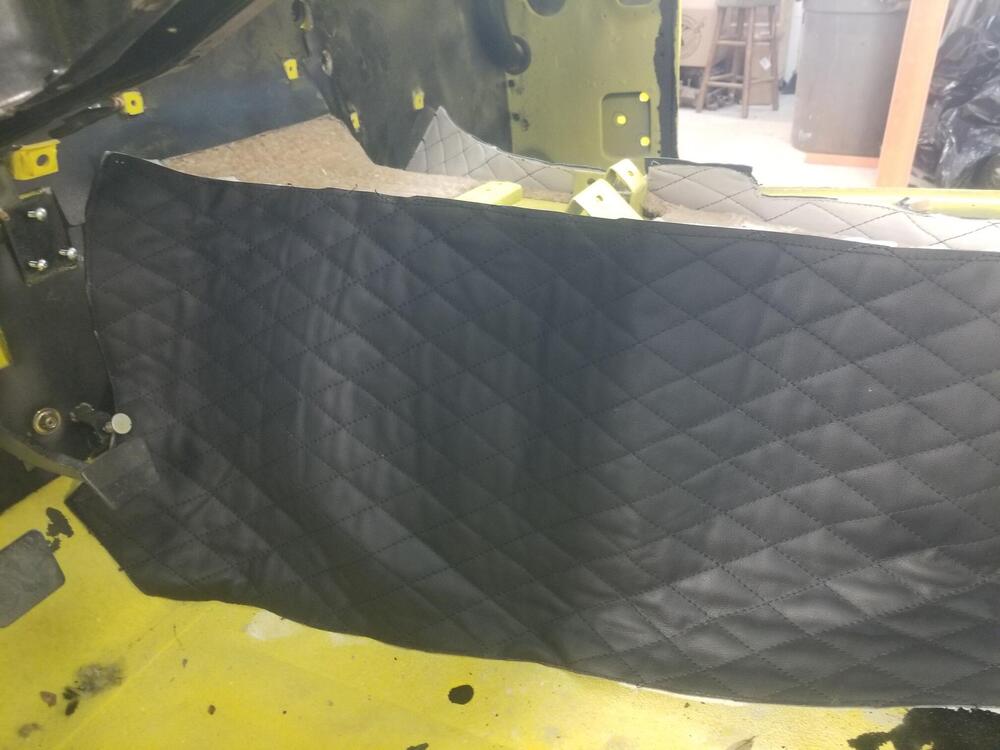
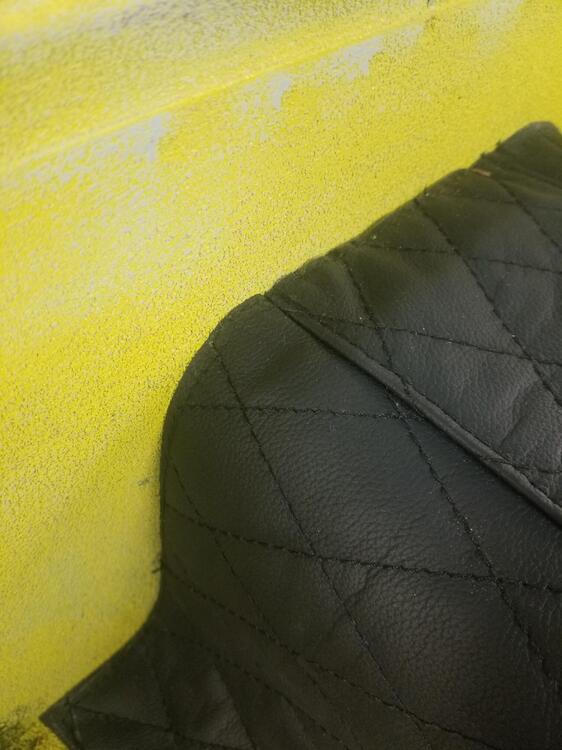
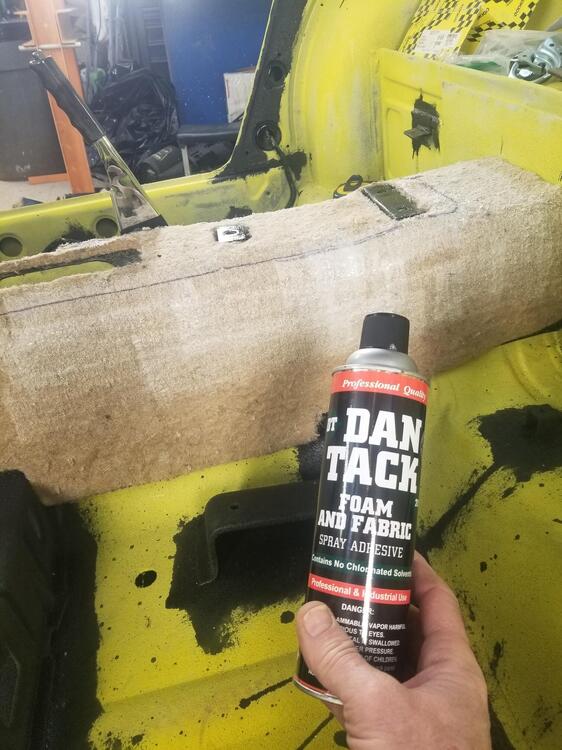
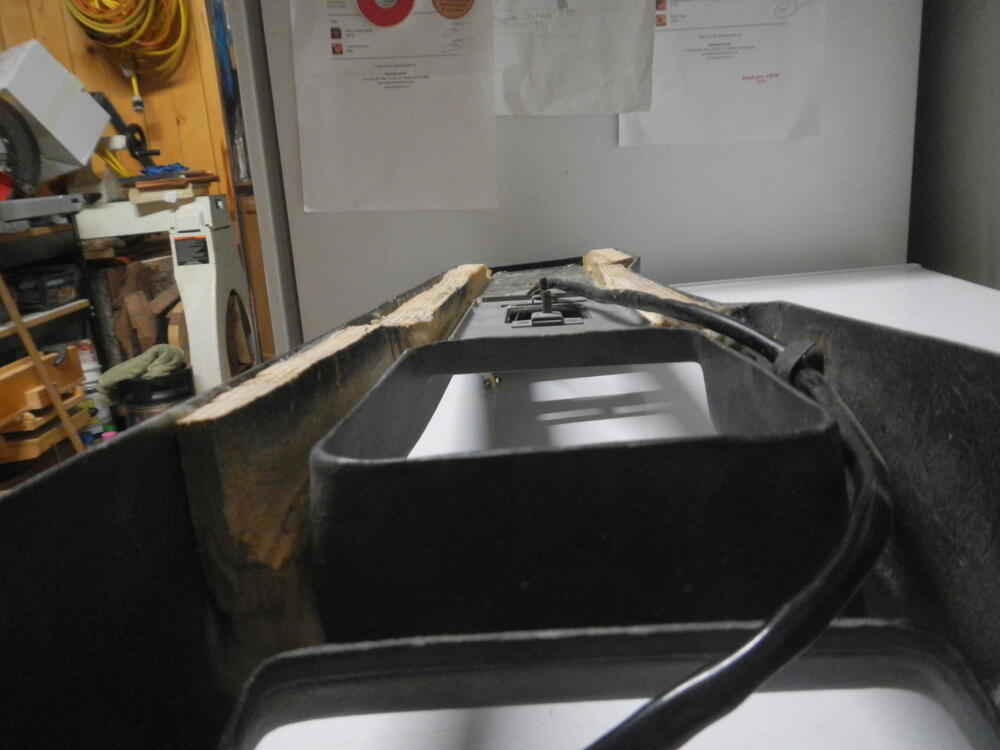
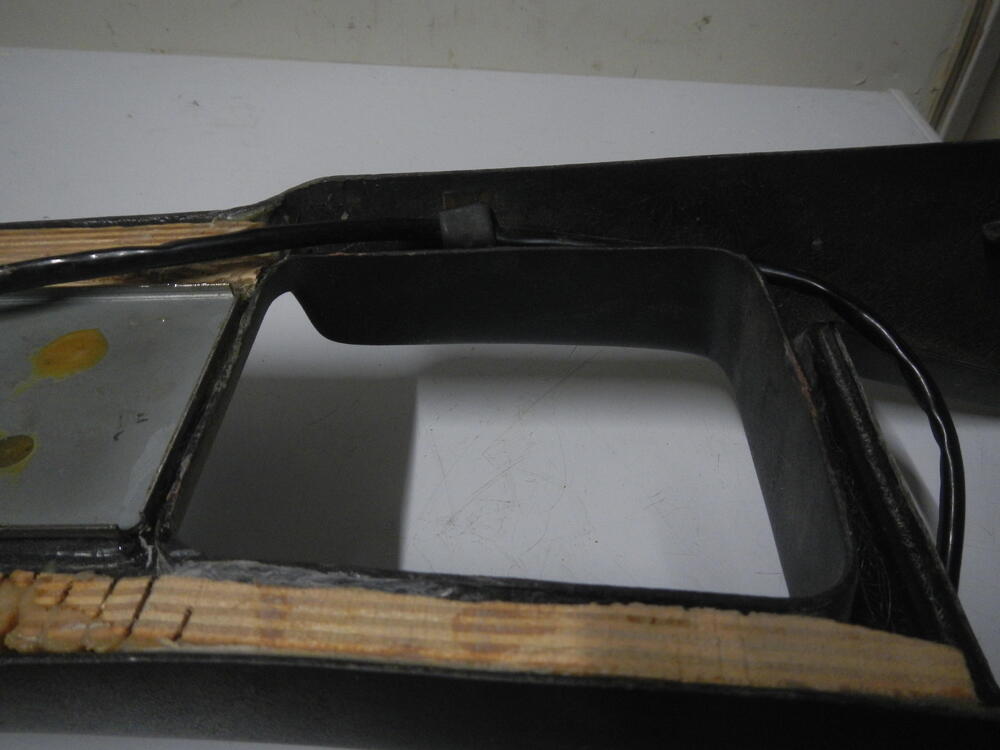
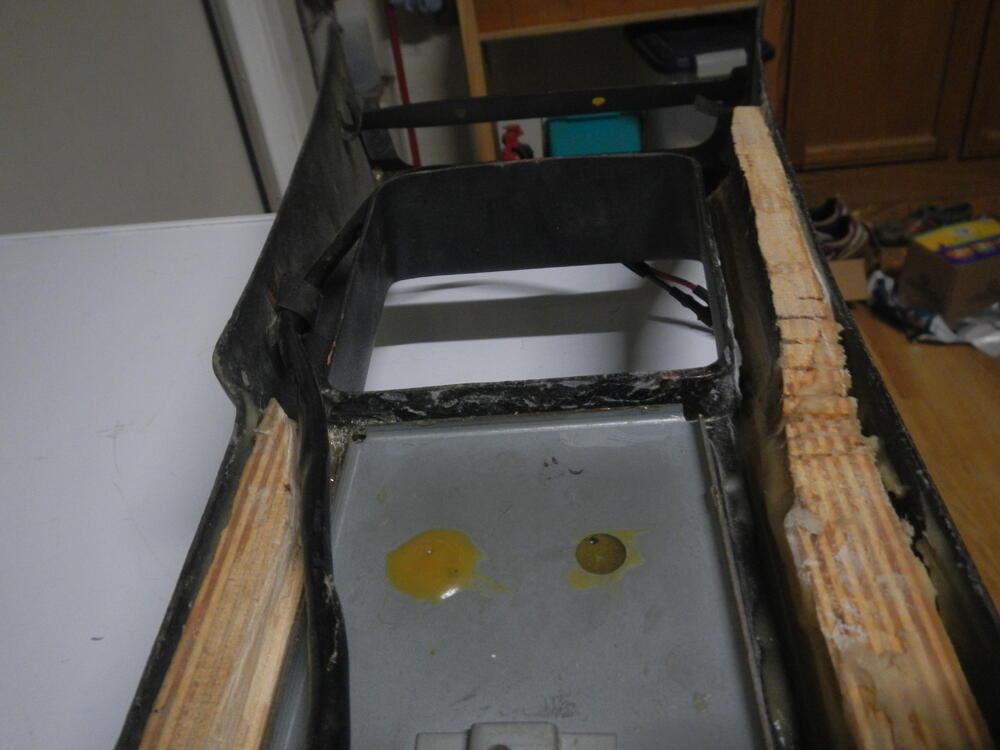
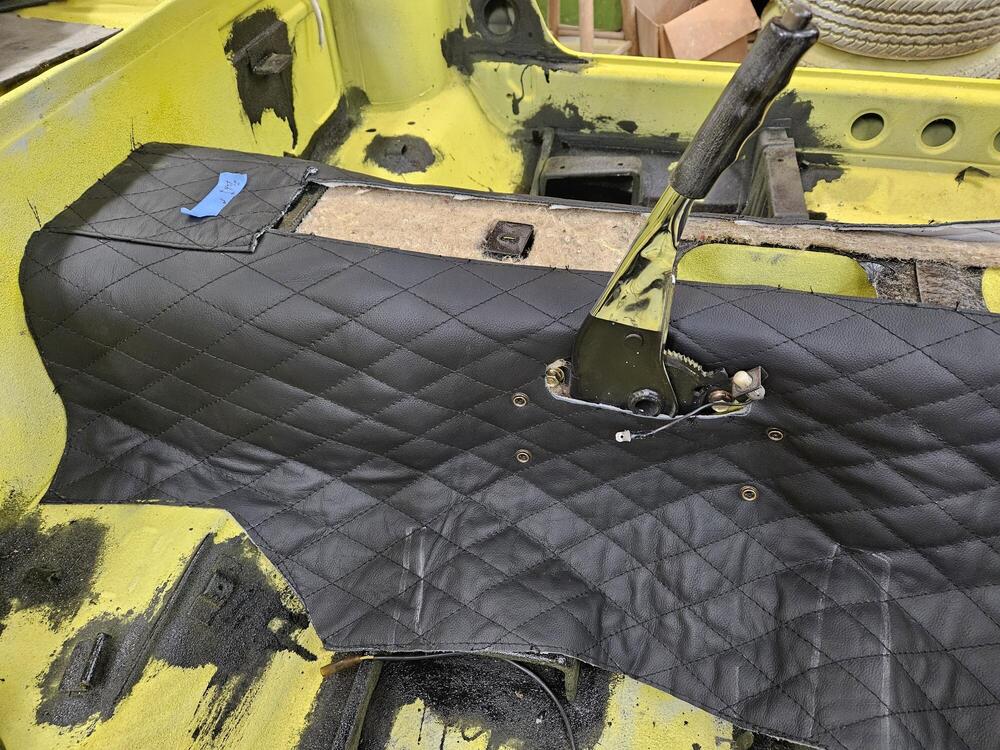
2 pointsSo I am going to start a leather interior trim thread. I bought the pieces from Interior Innovations and thought it might be helpful to document how I went about the install So I've been procrastinating on this a little bit. The factory vinyl laps up onto the luggage panel a little bit, I believe. I thought that would be hard to do with the leather thickness. Also it really needed to be shifted as far forward as possible to line up well with the parking brake and get under the fire wall mat. There was one set of marks for the seat rib. I will cut these nice and close later I put the original console in the car. It won't be the one I use long term but it shows whats covered up Outline it with sharpie I needed to layout the hole for the parking brake. It didn't come pre-cut. So I laid the old one over the new one, snap to snap, and marked it out with a soap stone I'm thinking this will all cover up very nicely when done. The thick hem on the firewall leather will help conceal everything. So I set the tunnel piece all the way to the fire wall but no extra It does lap over some of the center console brackets. So it will probably have to be trimmed there when I get to console install I didn't like this part. Taking the knife to your leather that came half way around the world!! I was going to trace some of the areas with the sewing machine to prevent the diamond stitching from raveling in the areas that I have to cut but I opted for a little super glue on each end instead I sprayed the rear top of the tunnel with Dan Tack. I also sprayed the corresponding area on the leather. I let it tack down pretty good. It sticks like mad! I tried to adjust it behind that brake leather but it was just tearing the jute all up with it. If I had not let it tack so much it would probably be a little more adjustable.


 2 points
 -
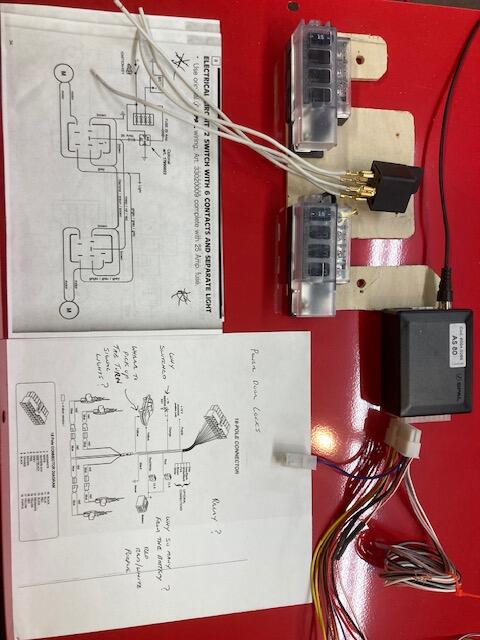
2 points@Patcon I purchased this kit many years ago. I do not think that SPAL sells these anymore. However I found other sources whice I think are the same thing. A1 Electric & Brock Universal Power window kit. I have run these with direct power from the battery and they work well. I did clean and lube all of the rollers and guides prior to installing. ( the windows worked very well witrh the hand crank) Installing is pretty easy with the hard part for me is figuring out the wiring and how I want that to look. Also there is no permant damage and can be put back to original. @grannyknot & @SteveJ Thanks for the reponses This is the rough layout for my accessory panel 2 fused power strips (one for constant power and one for switched power) relay for the power windows and control box for the door lock system (upper right) Steve I am assuming this is the Accessory relay? and that I would make the jumper to go between this and the dash harness? Do the black & the red wire just go staight through? and splice into the other two? I have a Vintage 2 wire connector that I could use. (further disscussion?) instead of 2 single connectors (for the output to the fuse panels. Also do you have a splice technique you prefer? Thank You Steve E

 2 points
 -
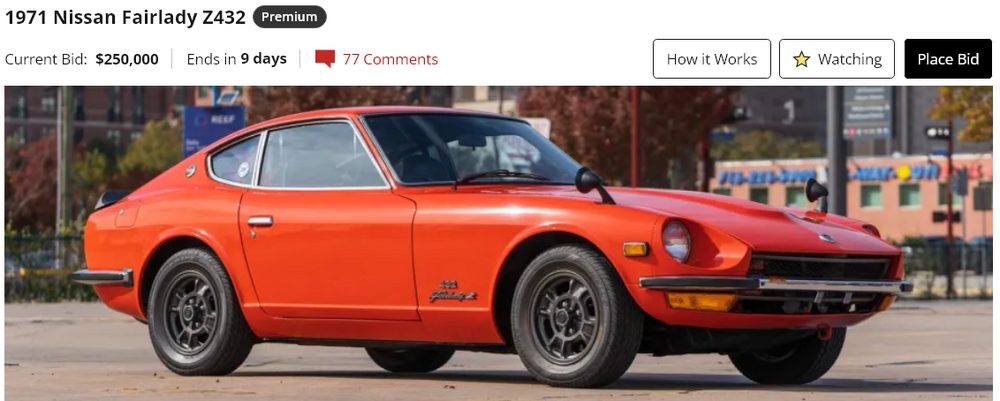
These are strange times. The Z432 is at a quarter millon bid with nine days to go. The top bidder has only been in the "game" since Feb 2021. He bumped it 120,000, from 130,000. Kind of scary. https://bringatrailer.com/member/ernestriggen/
 2 points
 -
Here's a hoovered pic that might answer the question. I don't think you use the plastic panel at all if you have the sloped deck:
 2 points
 -
The car was 'refreshed' (not necessarily fully 'restored') in Japan back in the early to mid 1990s. The panel was most likely replaced around that time as it was certainly installed in the car by 1997 when it was featured in Nostalgic Hero magazine's Vol.64 with a 6-page feature and centrefold. I believe at the time of refreshing the car that the correct RHD-layout panel was difficult to find whilst the AirCon-specific panel was still available from Nissan. The story may be as simple as that. I know that Nishi san of Revive Jalopy was involved in supplying parts for the car and it may have been the case that he couldn't get the PS30-specific panel. Easily put right today with the availability of reproduction panels and sticker sets. I see it as a fairly trivial detail. There are many other small details on the car which are not 'correct', but I don't believe the previous owner In Japan ever claimed the car was any kind of concours example. He was happy to modify it to his own taste (4-point aftermarket roll bar, Weber carbs, Takahashi exhaust manifold, oil cooler, Compe steering wheel and leather gear knob etc) and did plenty of miles in it* *By the way, the Bring A Trailer auction description mentions "33k Kilometers (~21k Miles) Shown." When the car was featured in that December 1997 issue of Nostalgic Hero magazine, mileage was quoted as being already 84,000 Km. I'd say it's been around the clock at least once. Good! Edited to add: The twin parking lamp switch on the console was still present in the car when I last saw it, but now appears to have disappeared - replaced with a blanking plug. I'm wondering if the whole parking lamp system was deleted when it came to the USA? The correct switches are quite hard to find.2 points
-
I went with Speedhut gauges on a previous Z because they offer so many different options for back ground colour, typeface, needle colour. It's not hard to put the combinations together to end up with a fairly stock looking gauge if that is what you are looking for. Their GPS speedo works perfectly.2 points
-
There is an early 70 for sale on our local " craigslist " Marktplaats.. ≥ Datsun 240Z Coupe 1970 Series 1 Matching Handbak HELE VROEGE — Oldtimers — Marktplaats1 point
-
1 pointArts & crafts stores carry that kind of mat board or even a frame shop, or, like everyone else I'm sure you have a dozen Amazon boxes kicking around🙂1 point
-
1 pointHere are the console pictures. Ignore the plywood pieces glued into sides, it was an attempt to stiffen the fiberglass.

 1 point
 -
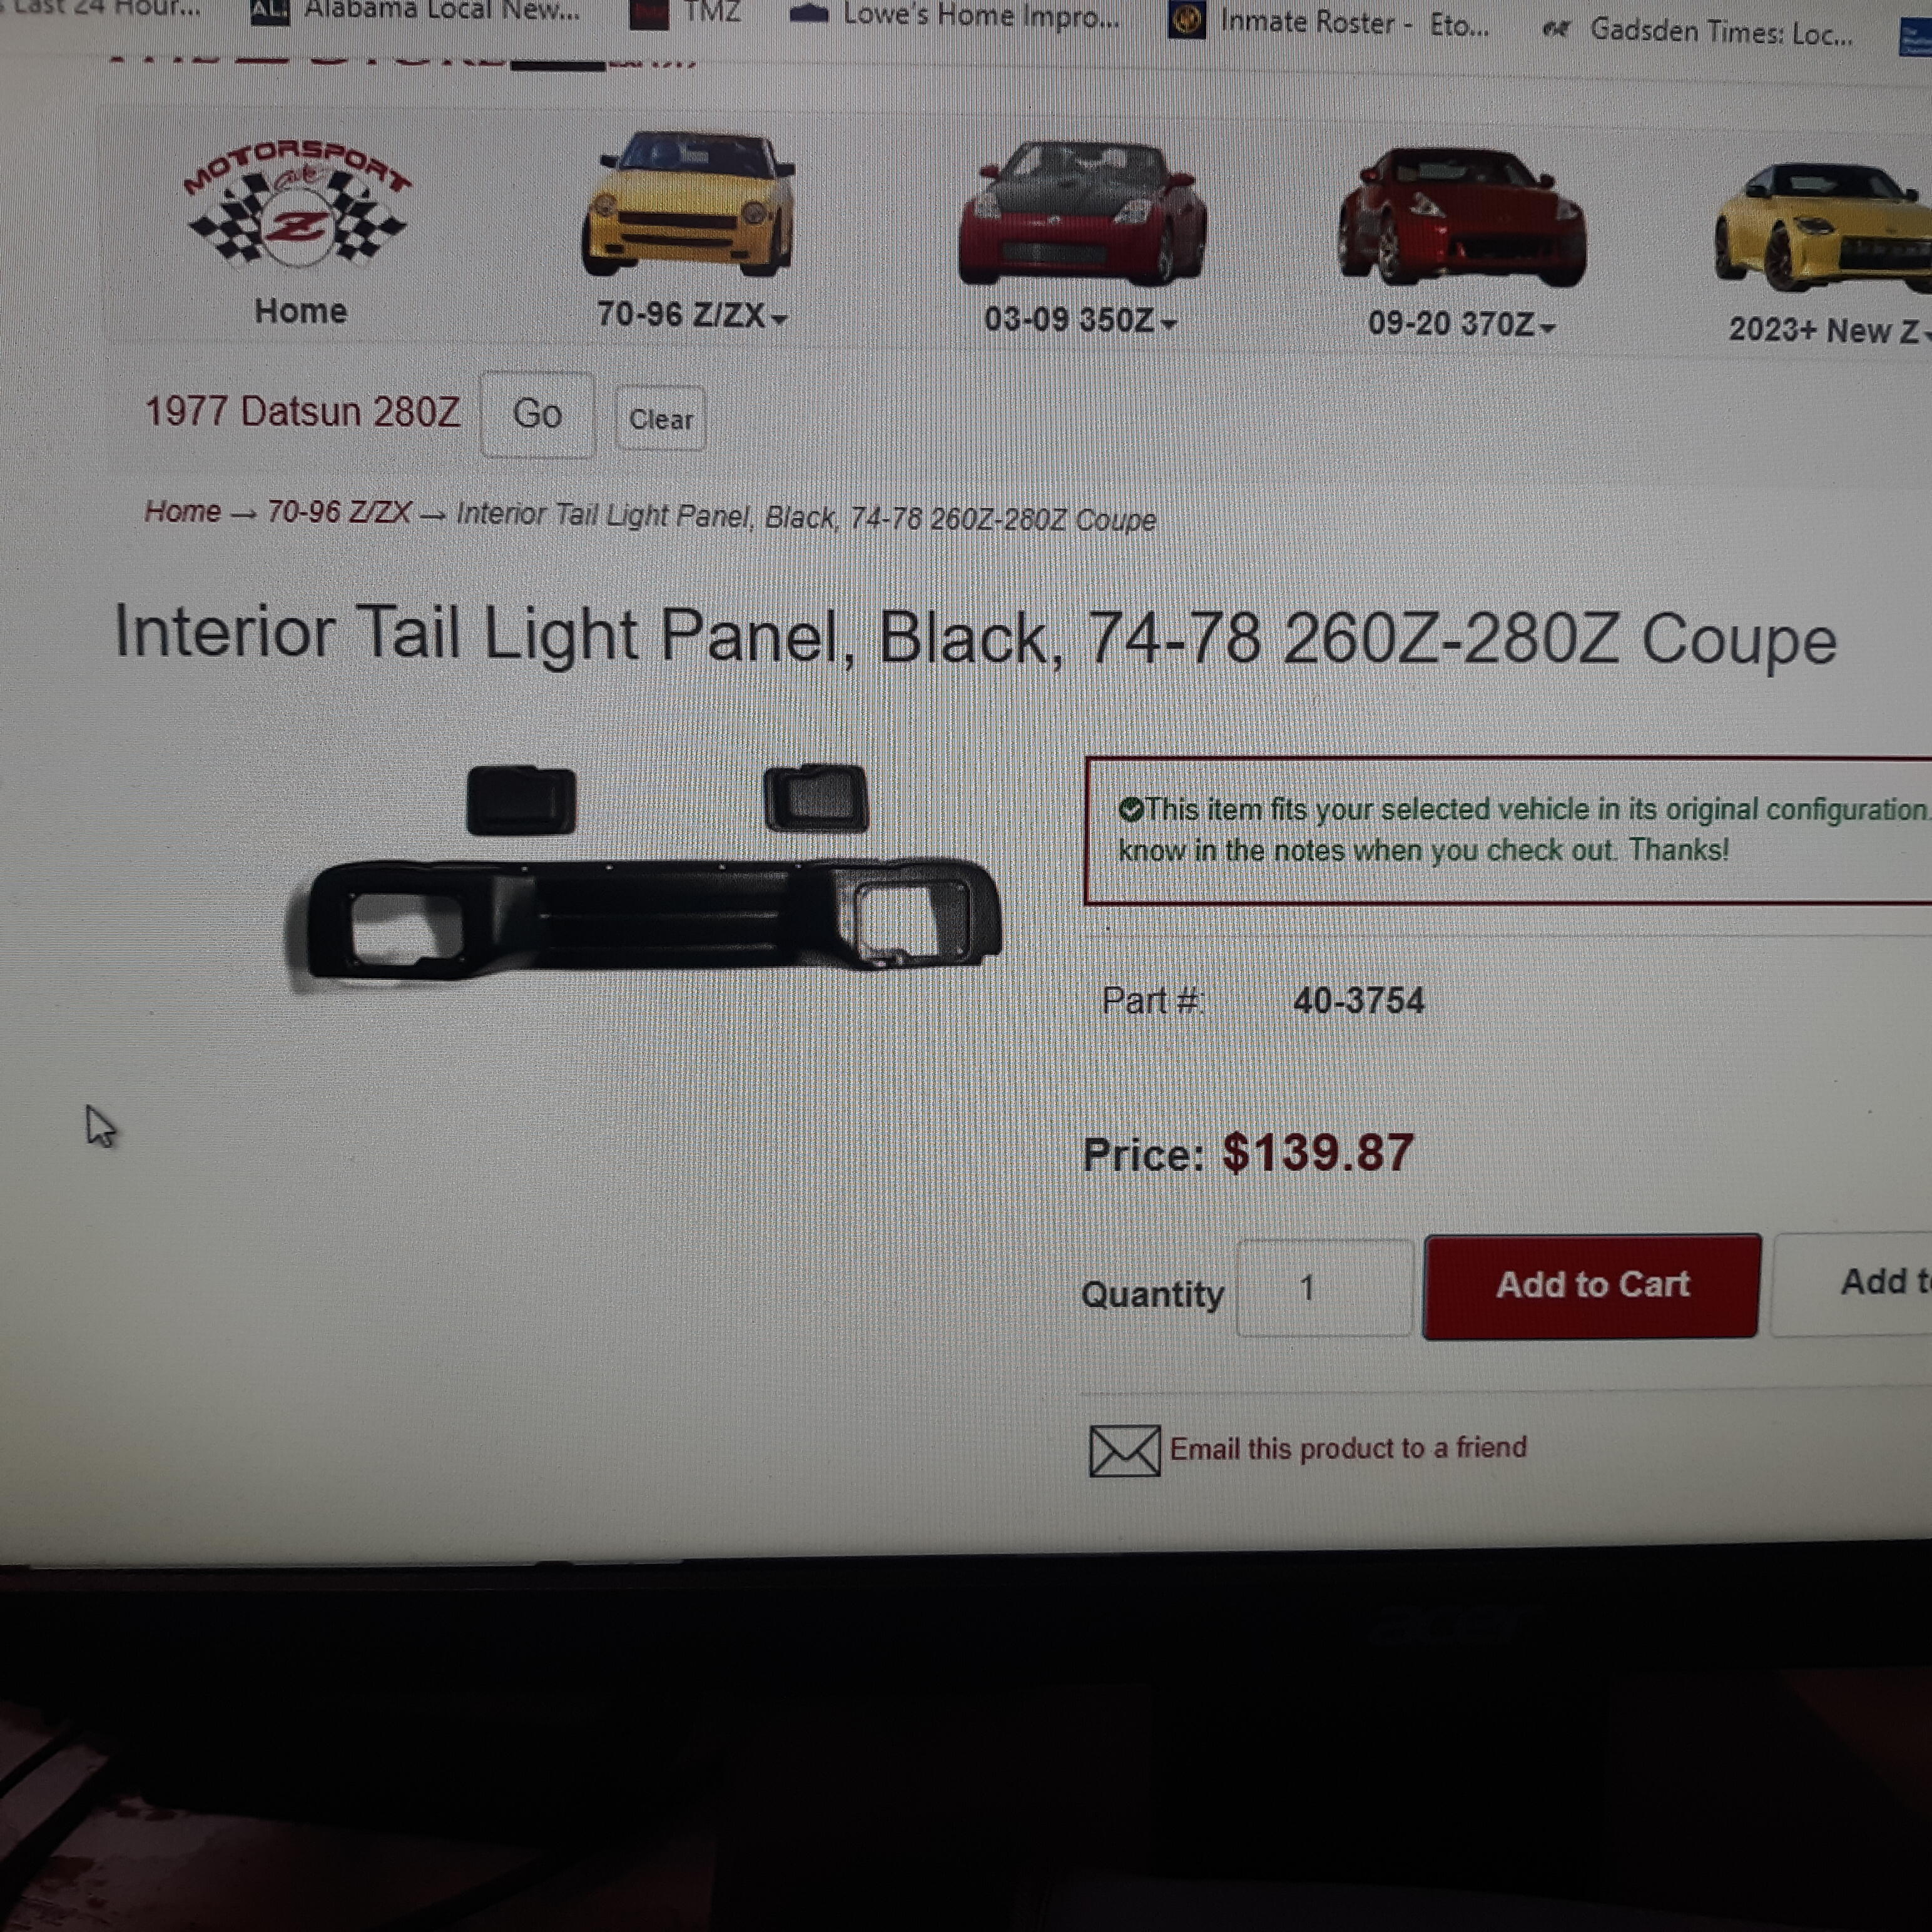
Look at the one MSA has. It's $10 cheaper and you could call and ask about the sloped deck fitment. I don't see how it would work on that deck. I have that deck too. thezstore.com P/n 40-3754
 1 point
 -
I was just on their site and they are now offering a stock looking Datsun 240Z face plate, wish they had that when I was buying from them. https://speedhut.com/gauge-applications/legacy-classic-street-rod/classic-led-tachometers/classic-led-standard-tachometers/4-1-2-classic-tachometer-8k-rpm-dash-mount-jdm-datsun-z-series/?dd-link=0kx6p31reeb1 point
-
1 pointI just took some pictures. The camera battery died right after I took the pictures, will post them after the battery charges.1 point
-
So before I started gluing, I made two sharpie marks for where the seams should meet the luggage panel Then I sprayed glue on the top edge about halfway down and put it in Today I worked on the front half. I sprayed both surfaces. I didn't let it tack too long so it was a little easier to position

 1 point
 -
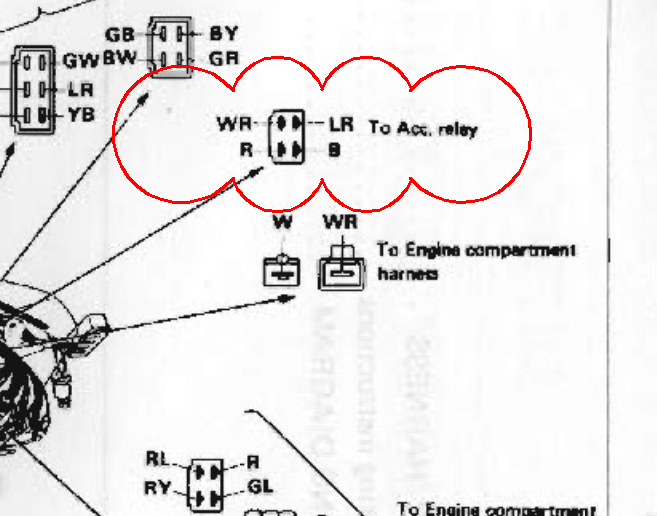
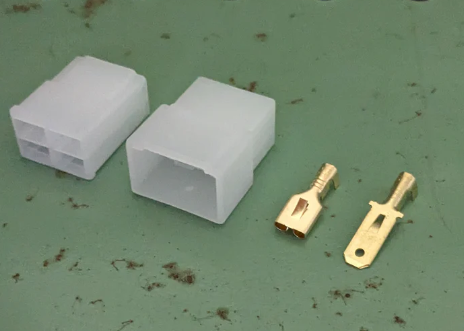
1 pointHere are my suggestions for power sources: Power door locks - Full time power Power windows - Accessory power 2 Power outlets - Accessory power Hatch popper - Full time power So now you need to know how to go about getting this power. I like to construct "jumper harnesses" myself. That is a short wiring harness that goes between two factory connectors that branches off to the new circuit. In the past I have used the "bullet" connectors in the jumper harnesses to branch off, but now I would add splices soldered into the wire of interest. In your case, there is a great connector to add a jumper harness, the accessory relay. The WR (white/red stripe) wire is constant power, and the LR (blue/red) wire is hot when the accessory relay closes the contacts. How would you make a jumper harness? Vintage Connections has most of what you would need, including wires with the proper coloring if you want to stay consistent with the factory colors. In this case I would suggest the following: A 4-pin non-latching connector 2 1-pin non-latching connectors (Note: you can also use 1 2-pin non-latching, but that is a discussion for later.) 2 inline fuses, probably sourced from Amazon, like this: https://www.amazon.com/Inline-VANTRONIK-Waterproof-Standard-standard/dp/B081YDV8PS for at the jumper harness and use the others for a couple of the branch circuits 14 AWG wire 16 AWG wire (for the power outlets) 2-pin non-latching connectors for each of the devices. 4-pin non-latching from Vintage Connections I would drop down the wire gauge on the power outlets and use 16 AWG on those. (Use 5 A fuses in the inline fuse holder.) I would use 10 A fuses in the fuse holder for the branches coming off the jumper harness. That should give your wiring adequate protection.
 1 point
 -
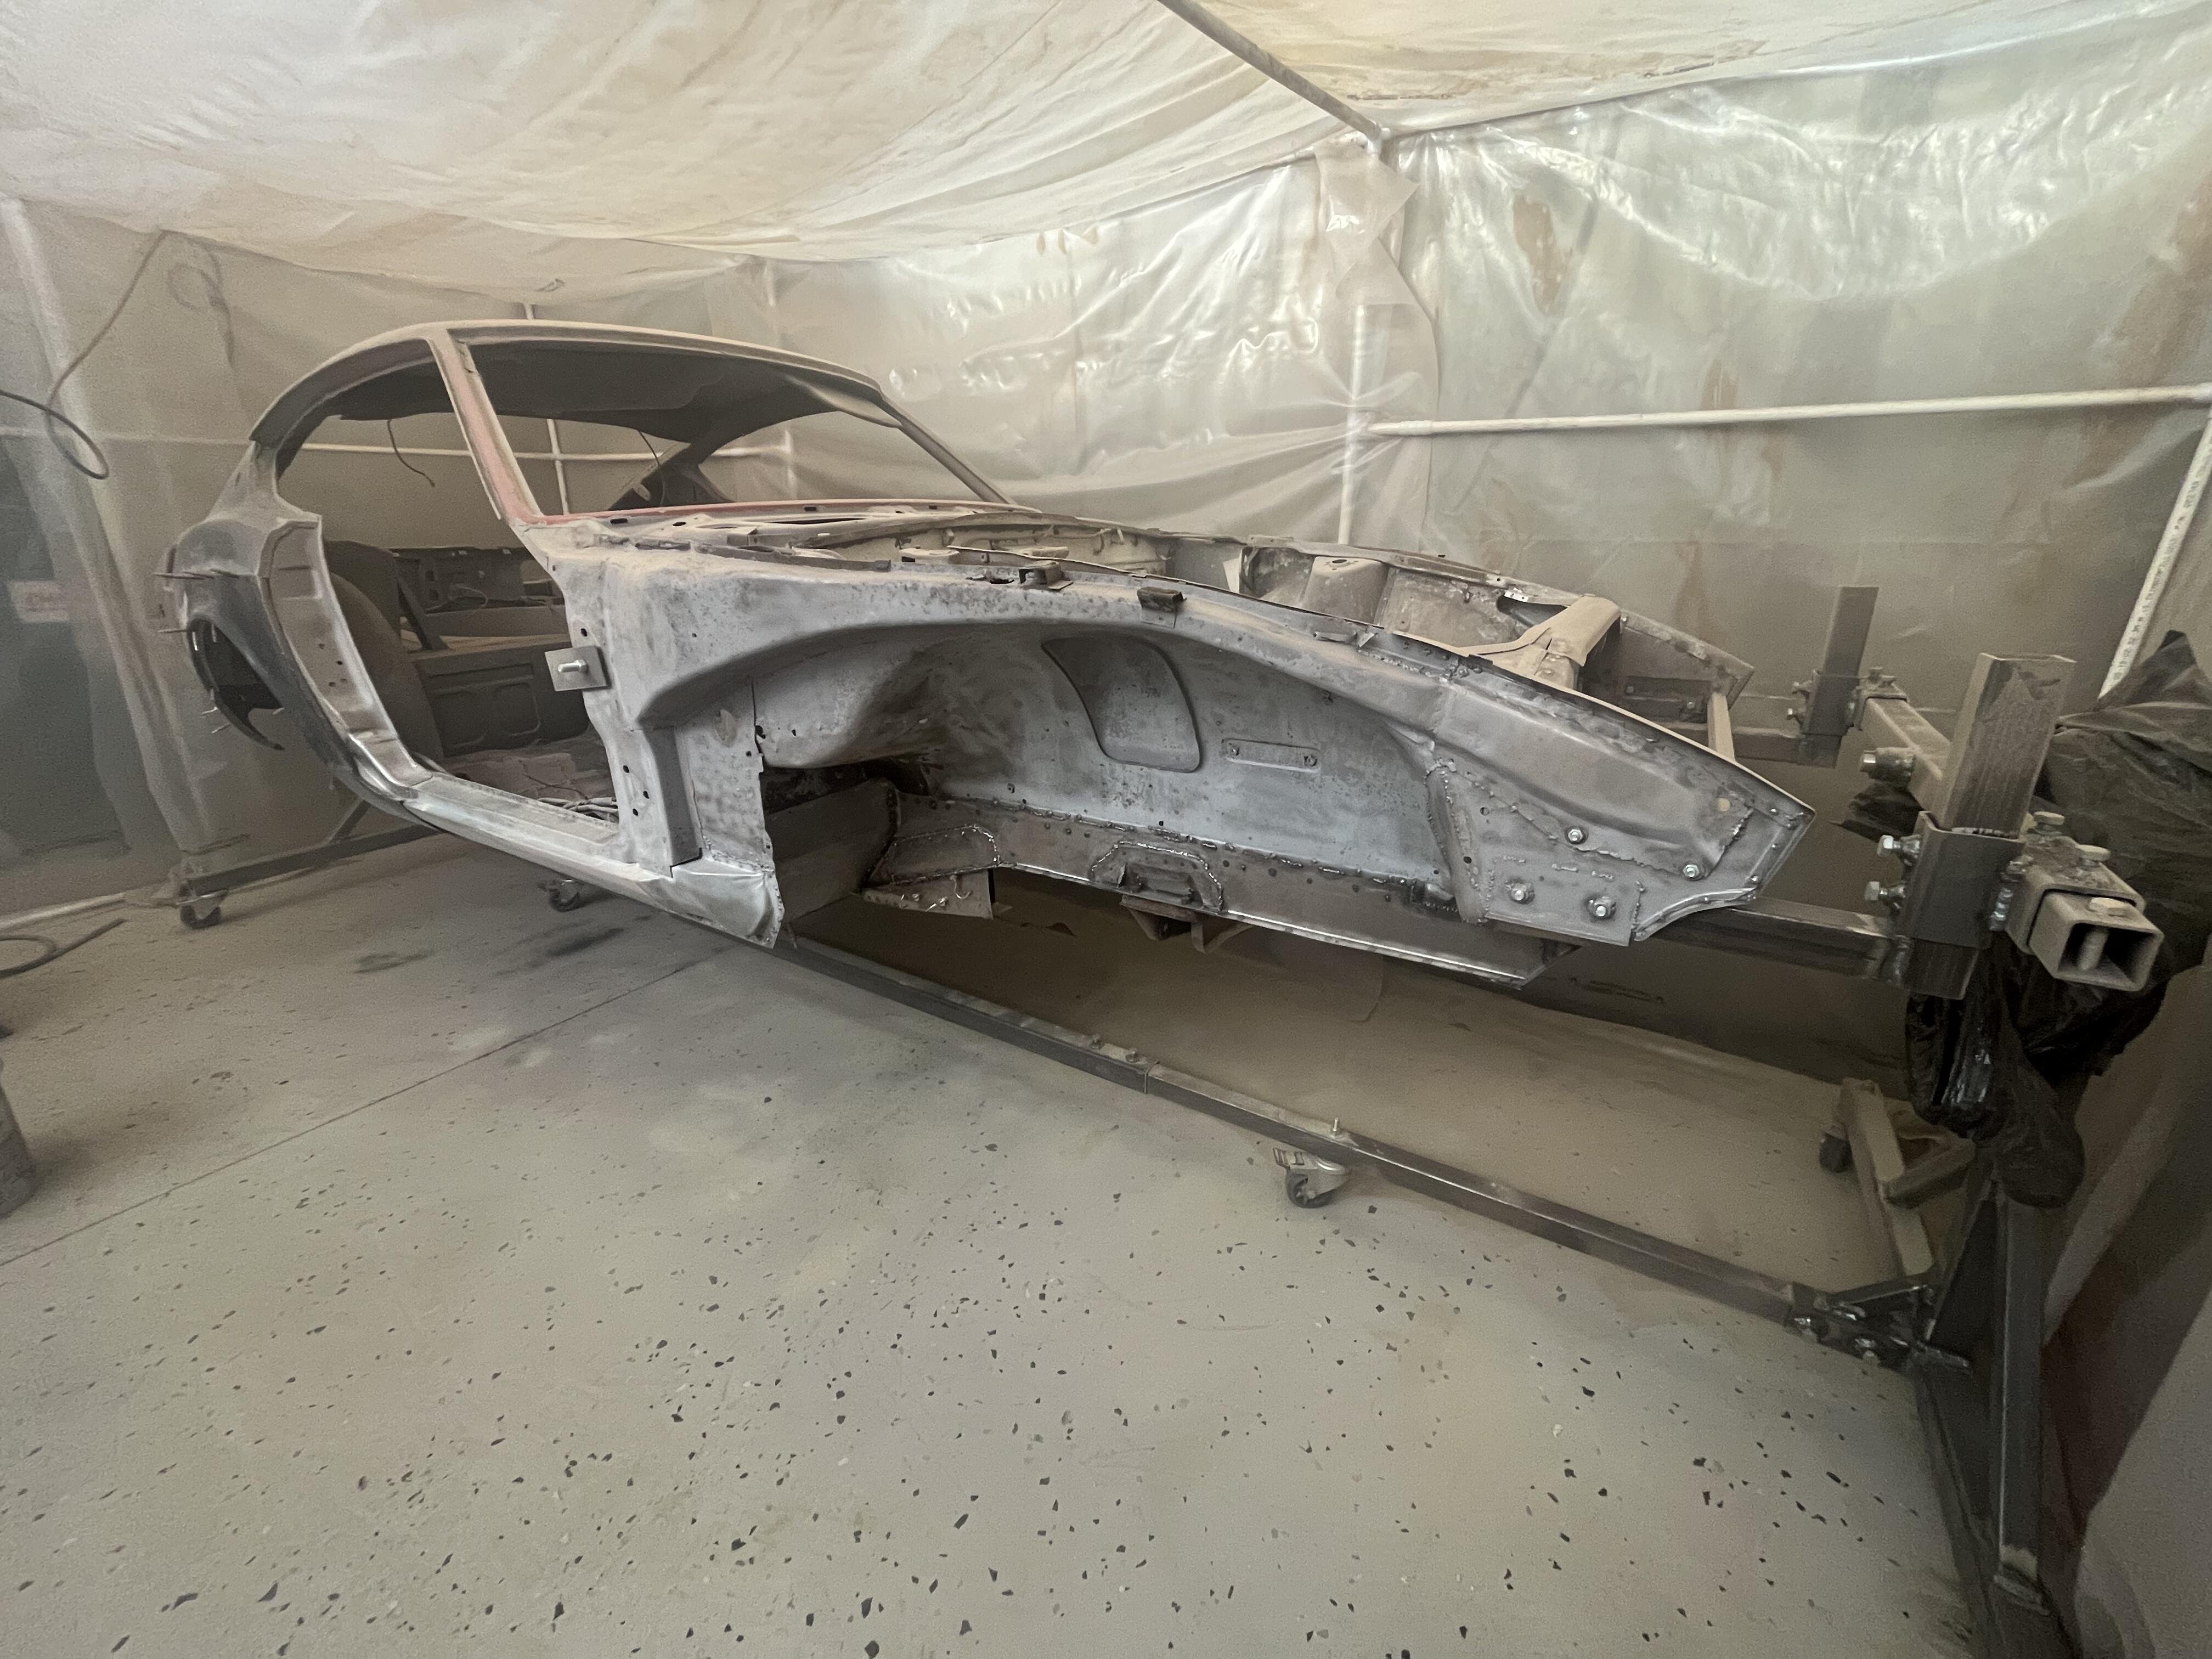
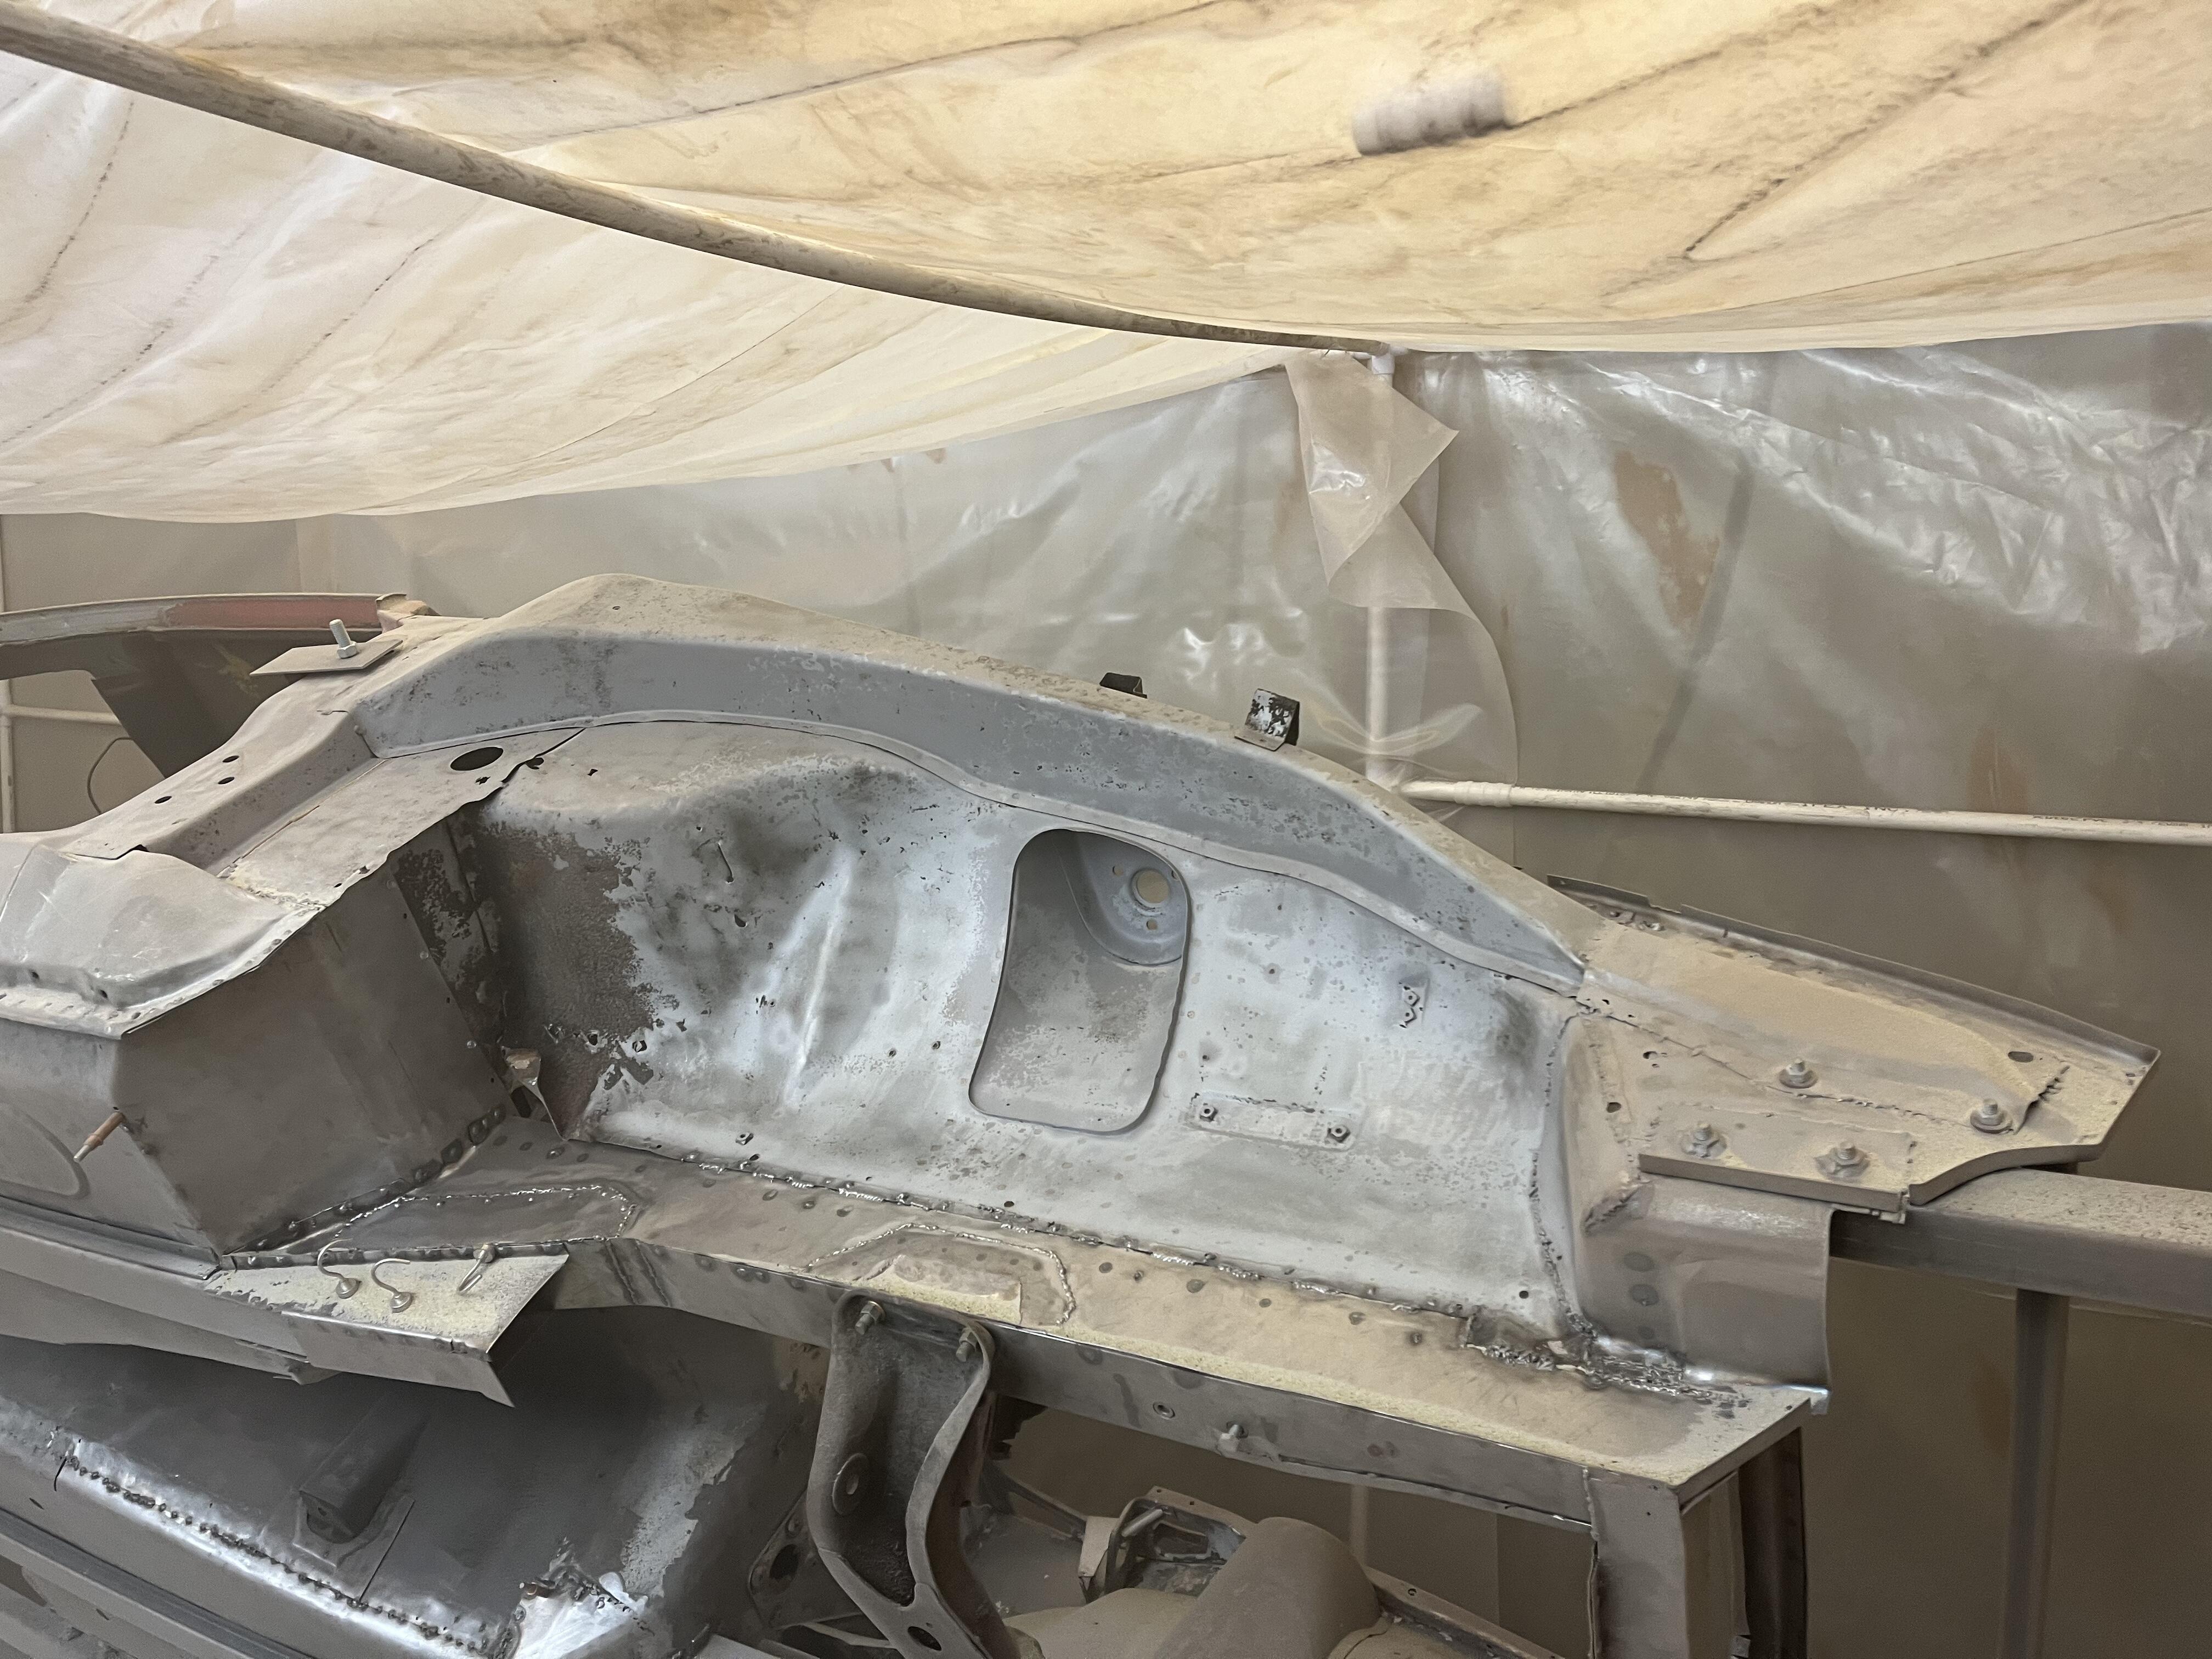
1 pointAnother 2.5 hours with the blaster...recycled glass this time. It cuts great but it's dustier. 2.5 hours is about the maximum even with full PPE because it gets dusty to the point where you can't see. I might add a slow downdraft fan (but trying to keep this booth cheap and temporary).... Again...super happy to see so much good metal. Looks like I've cut out most of the cancer already...(ran out of time before getting the last bit by the firewall. It should come right off next session) Before ... She's come a long way back ...


 1 point
 -
The car has been in the USA for the best part of ten years now. Plenty of time for that to have been addressed by the apparently much vaunted 'Collector' and 'Expert' who is selling it, don't you think?1 point
-
The car is - clearly - modified. Stock fitment on this car would have been triple N40PHH Mikuni-Solex carbs. The triple Weber 45 DCOE-9 carbs were a Nissan Sports-endorsed upgrade (Nissan even gave a part number for the kit) of the period. I have 45 DCOE-9s on both of my S20-engined cars. It is not all that unusual. No. 'Correct' (stock) fitment would have been the same wooden 5-speed knob, as seen on other 5-speed equipped cars of the period. The shift knob currently fitted is the 32865-RN200 'Datsun' branded, leather-bound NISMO anniversary edition item. Matching the... ...of the NISMO anniversary edition re-pop 'Datsun Compe' steering wheel.1 point
-
0 pointsLooking great - satisfying to see it with a uniform covering. Does the epoxy primer get coated with 2K, or it that all you need? Trying to remember what I used on the Fiat - that was a mix of steel aluminum & bonded fiberglass panels. I did not strip the bulk of the car to bare metal, so I'm thinking I used 2K, but that was 5 years ago, so my memory is foggy on details. That must have taken at least 4-5 hours to do the entire shell and all the take off panels, no? How much primer did it take for the 2 complete rounds? Hopefully I will paint again one day - still have to figure out where to buy an 80gal compressor that doesn't get buggered on delivery, so far I'm 2for2 on that....0 points