Leaderboard
-
grannyknot
Free Member7Points5,158Posts -
.JPG.cfcada9cf1c1b502df3f5f2f2ca3ff36.JPG)
SteveJ
Free Member5Points9,646Posts -
Captain Obvious
Free Member3Points10,081Posts -

Zed Head
Free Member3Points19,236Posts


Popular Content
Showing content with the highest reputation on 09/26/2023 in all areas
-
Finished replacing the front marker lamps and front signals with LED bulbs, that circuit is now the same temp. as the rest of them, at least as far as my finger can tell. Thank you gentlemen.3 points
-
Glad you got it running well. However, just to make my little brain good with the whole ordeal... That same coil ran just fine with the original dual point distributor? Some ideas? Been a long time since it ran at all and anything could have happened between then and now. The coil was borderline before and your moving stuff around and angered the electrons in the coil. Your car runs fine now and it just doesn't matter why changing the coil fixed it.2 points
-
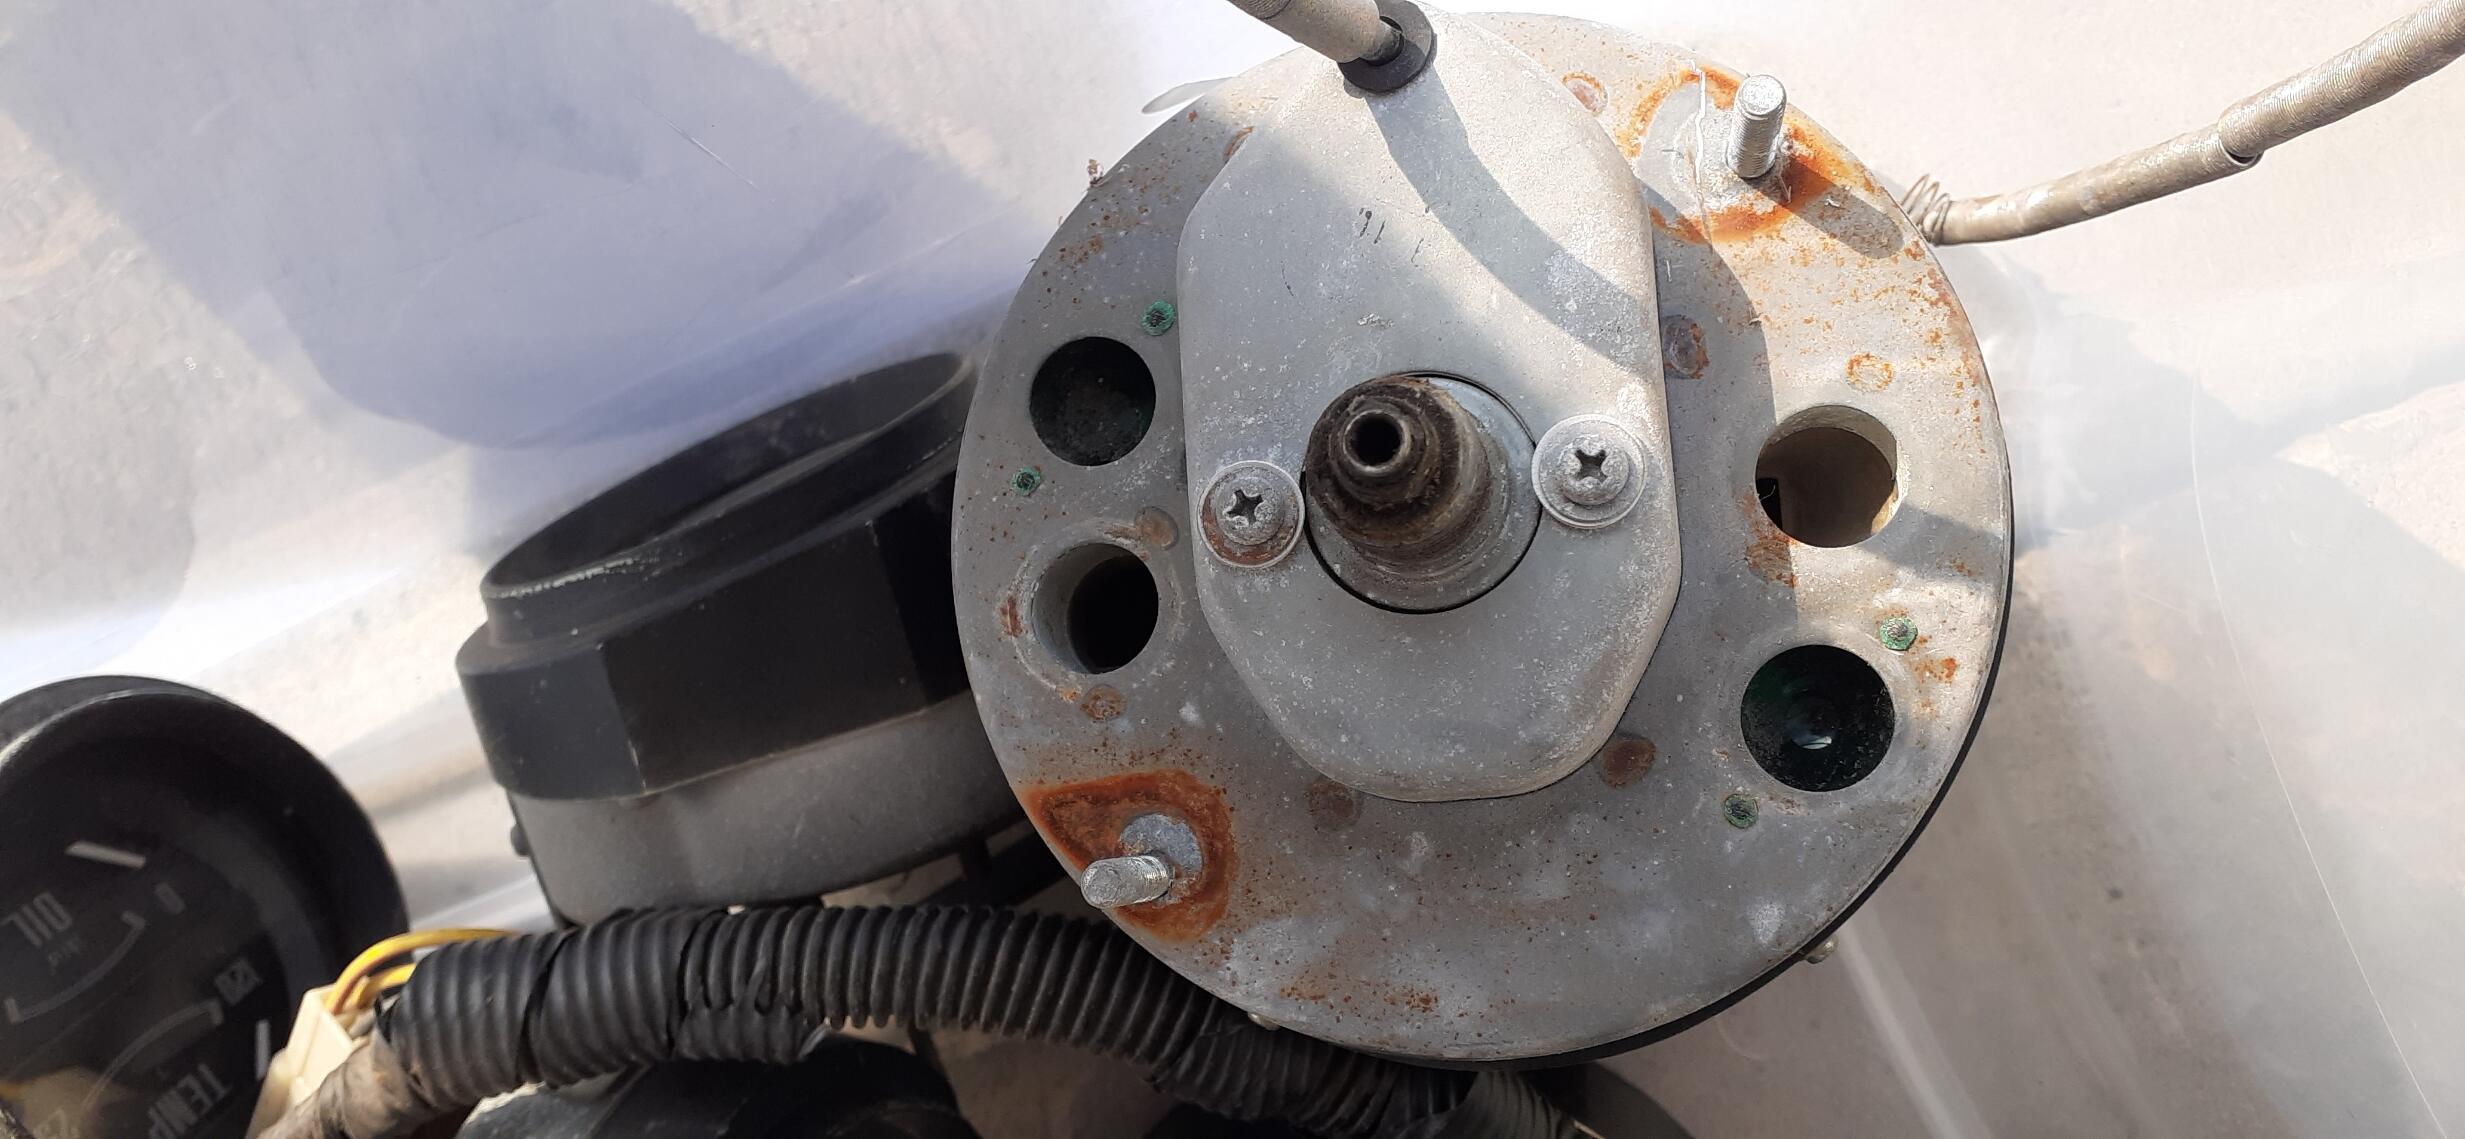
2 pointsThe gauge illumination and brake light sockets are next to each other. On the top, the high beam light and gauge illumination are next to each other. The brake light bulb has 2 wires, and the gauge illumination has 1 wire, grounding on the speedometer.
 2 points
 -
Steve, I want a copy of every site on your favourites list, it must be a thing to behold. You consistently come up gems that I've never seen before, and once seen I have to have it. Are you getting a commission from Amazon?😁2 points
-
1 pointAlmost done installing Vintage in my Z car. QZ16 has a good thread and it helped with some of my install. I had to use a bulkhead fitting because we had that side of firewall repaired due to a boom box or large speakers. A lot of holes, I also decide on using hardlines instead of rubber hoses. I like the look and less room. I installed the Vintage air controls into the original heat vent con


 1 point
 -
1 pointWell, the brake light was definitely in the wrong hole. I was able to correct that, and it now works as it should. The high beam indicator also works correctly. Now I have to try to find the open hole to insert the instrument light (by feel). It's times like this I wish I had smaller hands and less arthritis.1 point
-
I'll take a look sometime, but I hadn't registered any issues. Maybe I've just been of the mindset that I enjoy seeing the gauges at night.1 point
-
1 pointI went with S30world tank as mine was is very rough condition. It was a perfect fit, one of the best aftermarket items I have purchased.1 point
-
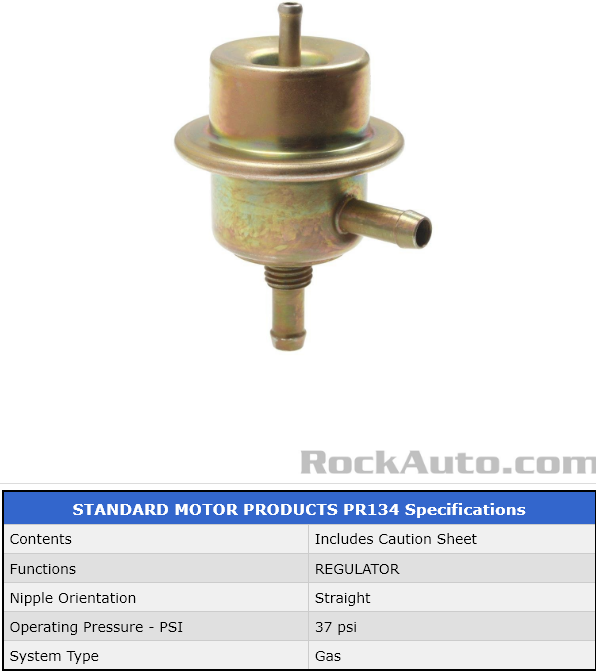
@HusseinHolland had some posts about the same problem. In the past I had modified an adjustable regulator to be vacuum modulated. Made me get on to Rockauto and look around. VW's Super Beetles had 2.5 bar EFI in the seventies. The FPR's are cheaper than the Nissan versions. Should be able to make it work. https://www.rockauto.com/en/catalog/volkswagen,1978,super+beetle,1.6l+h4,1423178,fuel+&+air,fuel+injection+pressure+regulator,6124
 1 point
 -
1 pointindeed, more details!! that is a very neat looking under hood routing going on.1 point
-
1 point
-
1 point
-
1 point%Oh yes, nichicon are the best, and get the 105c. I suppose modern caps are tighter tolerances as well so 20% was probably bad too. I was thinking of the old caps I used to run into on vintage electronics, they would often be like 100%+ 50%- rated, really wide ranges. This is stuff from the 1950's and 1960's. Tech has come a long way since then so I was off base on that 20%+-1 point
-
1 point
-
1 pointWhat's happen when you pull the parking brake lever with the key on? If a socket is swapped an instrument bulb should light up instead, and the warning light should stay off. Might need to try it in the dark.1 point
-
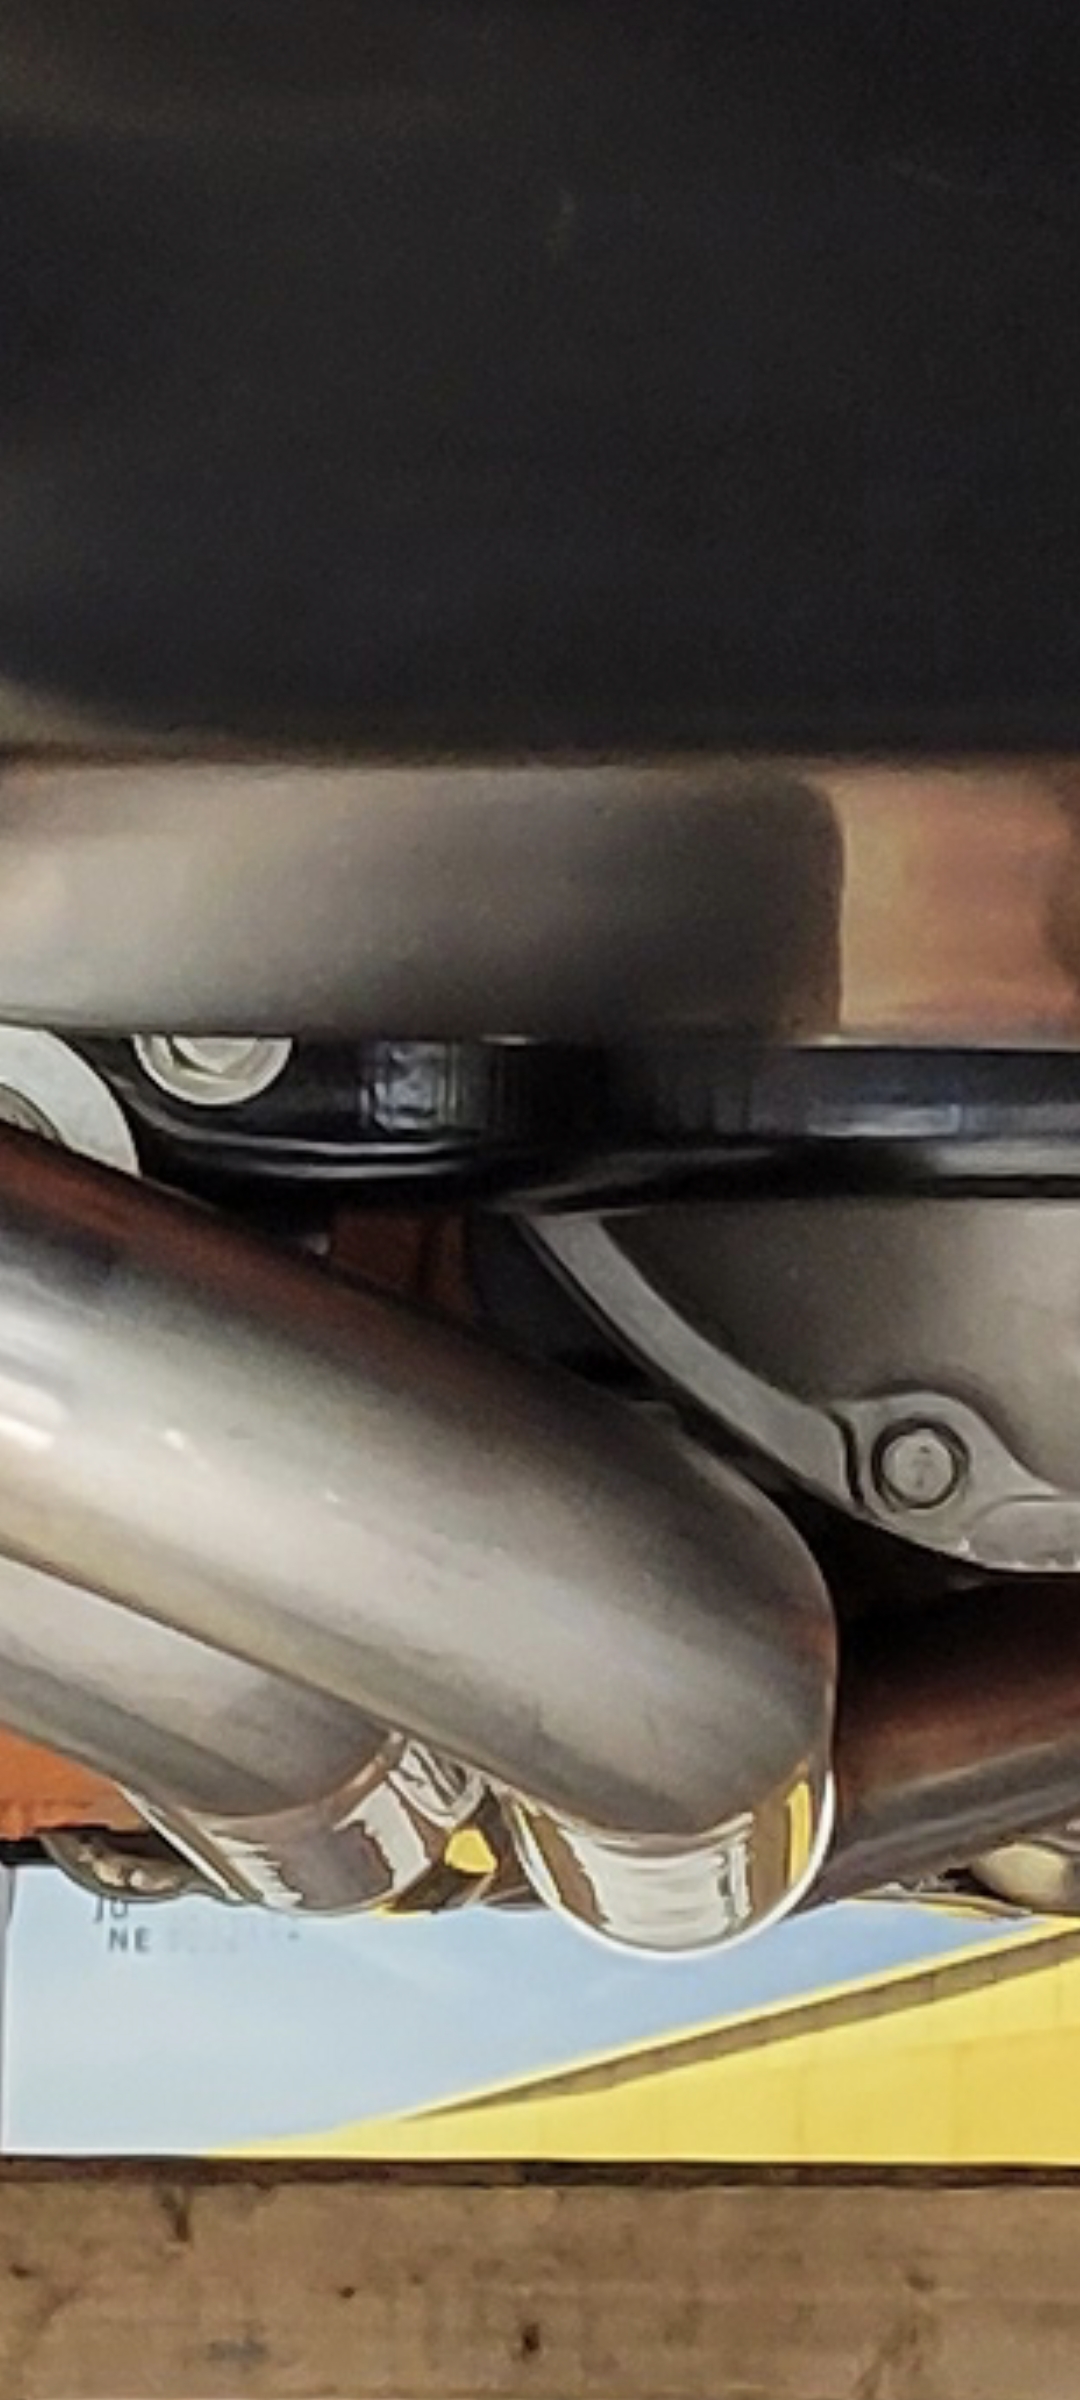
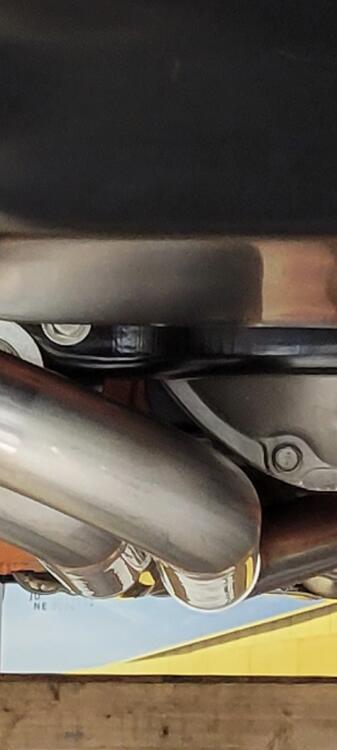
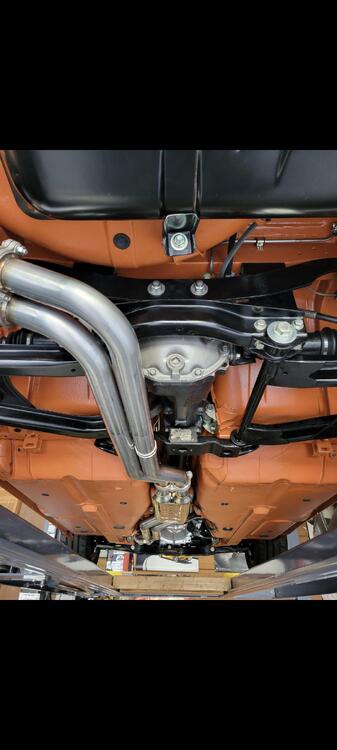
Exhaust is on, zero clearance issue around my r200. Fit ls perfect and sounds great. No need for a revised diff section for my 73 with an r200 at all. I went looking for rougher roads too no contact at all. You definitely need the Nissan rubber hangers but easy install and I'm way happier than with the Spirit Garage exhaust. I like flange vs slip fit you just need a helper to make sure the flanges are mated true, and don't over torque the hardware.
 1 point
 -
Fuel pressure should be 36 psi minus manifold vacuum (in psi). So for example, if manifold vacuum is 16 inches of Hg, then the fuel pressure should be (36 - 7.8) or about 28 psi. The conversion for inches of Hg to psi is about half. One inch of mercury is about a half psi.1 point
-
The only thing is that this will change periodically from vendors changing their offerings.1 point
-
Normally i would have said that, but these fuseboxes are to old for that. the plasic will brake.. you need to be very careful. clean contacts and LED lights are the solution. And a look with a infrared thermometer after 15 min. of "everything ON" over the fusebox and wireing is a good test!1 point
-
1 point
-
My complete list: Here is my current list of recommended LED bulbs: White LED (license plate and reverse lights) https://www.amazon.com/gp/product/B08XWWJ4N4 Amber LED (front side signals) https://www.amazon.com/gp/product/B08XWXXPN5 (fixed 10/27/23) Red LED (rear side markers) https://www.amazon.com/gp/product/B08XWX81ZD Red 1157 LED (rear turn signals and brake lights) https://www.amazon.com/gp/product/B08H4MXQMZ Amber 1157 LED (front turn signals) https://www.amazon.com/gp/product/B08CZ1GRJY (fixed 10/27/23) Green LED (gauge lights) https://www.amazon.com/dp/B092VNXS6H (Non dimmable but not too bright.) Red 1156 LED (rear lights) https://www.amazon.com/gp/product/B00WGAUIR2 Gauge Lights: Green LED (gauges and turn signals) https://www.amazon.com/gp/product/B0B9MGSX7K (For 260Z & 280Z) High beam LED https://www.amazon.com/gp/product/B08GS325N6 Brake idiot light https://www.amazon.com/gp/product/B08GRJGD5Y Flasher Relays (2) https://www.amazon.com/gp/product/B0811GTVH2 Hella H4 housings: https://www.amazon.com/dp/B001G76Q2W or Koito H4 housings: https://parts.toyotasouth.com/oem-parts/toyota-headlamp-assembly-8111060p70 Auxito H4 LED bulbs: https://www.amazon.com/gp/product/B07TQLK6SH1 point
-
I replaced every bulb in the back half of the car with LED today, $180.00 😵, the fuse holder was too hot to touch yesterday, after the new bulbs went in it was slightly warm and consistently warm over a 5 min period, heading in the right direction. Will replace the front bulbs tomorrow, I cleaned out my local NAPA so will have to raid the store in the next town over. Thanks guys.1 point
-
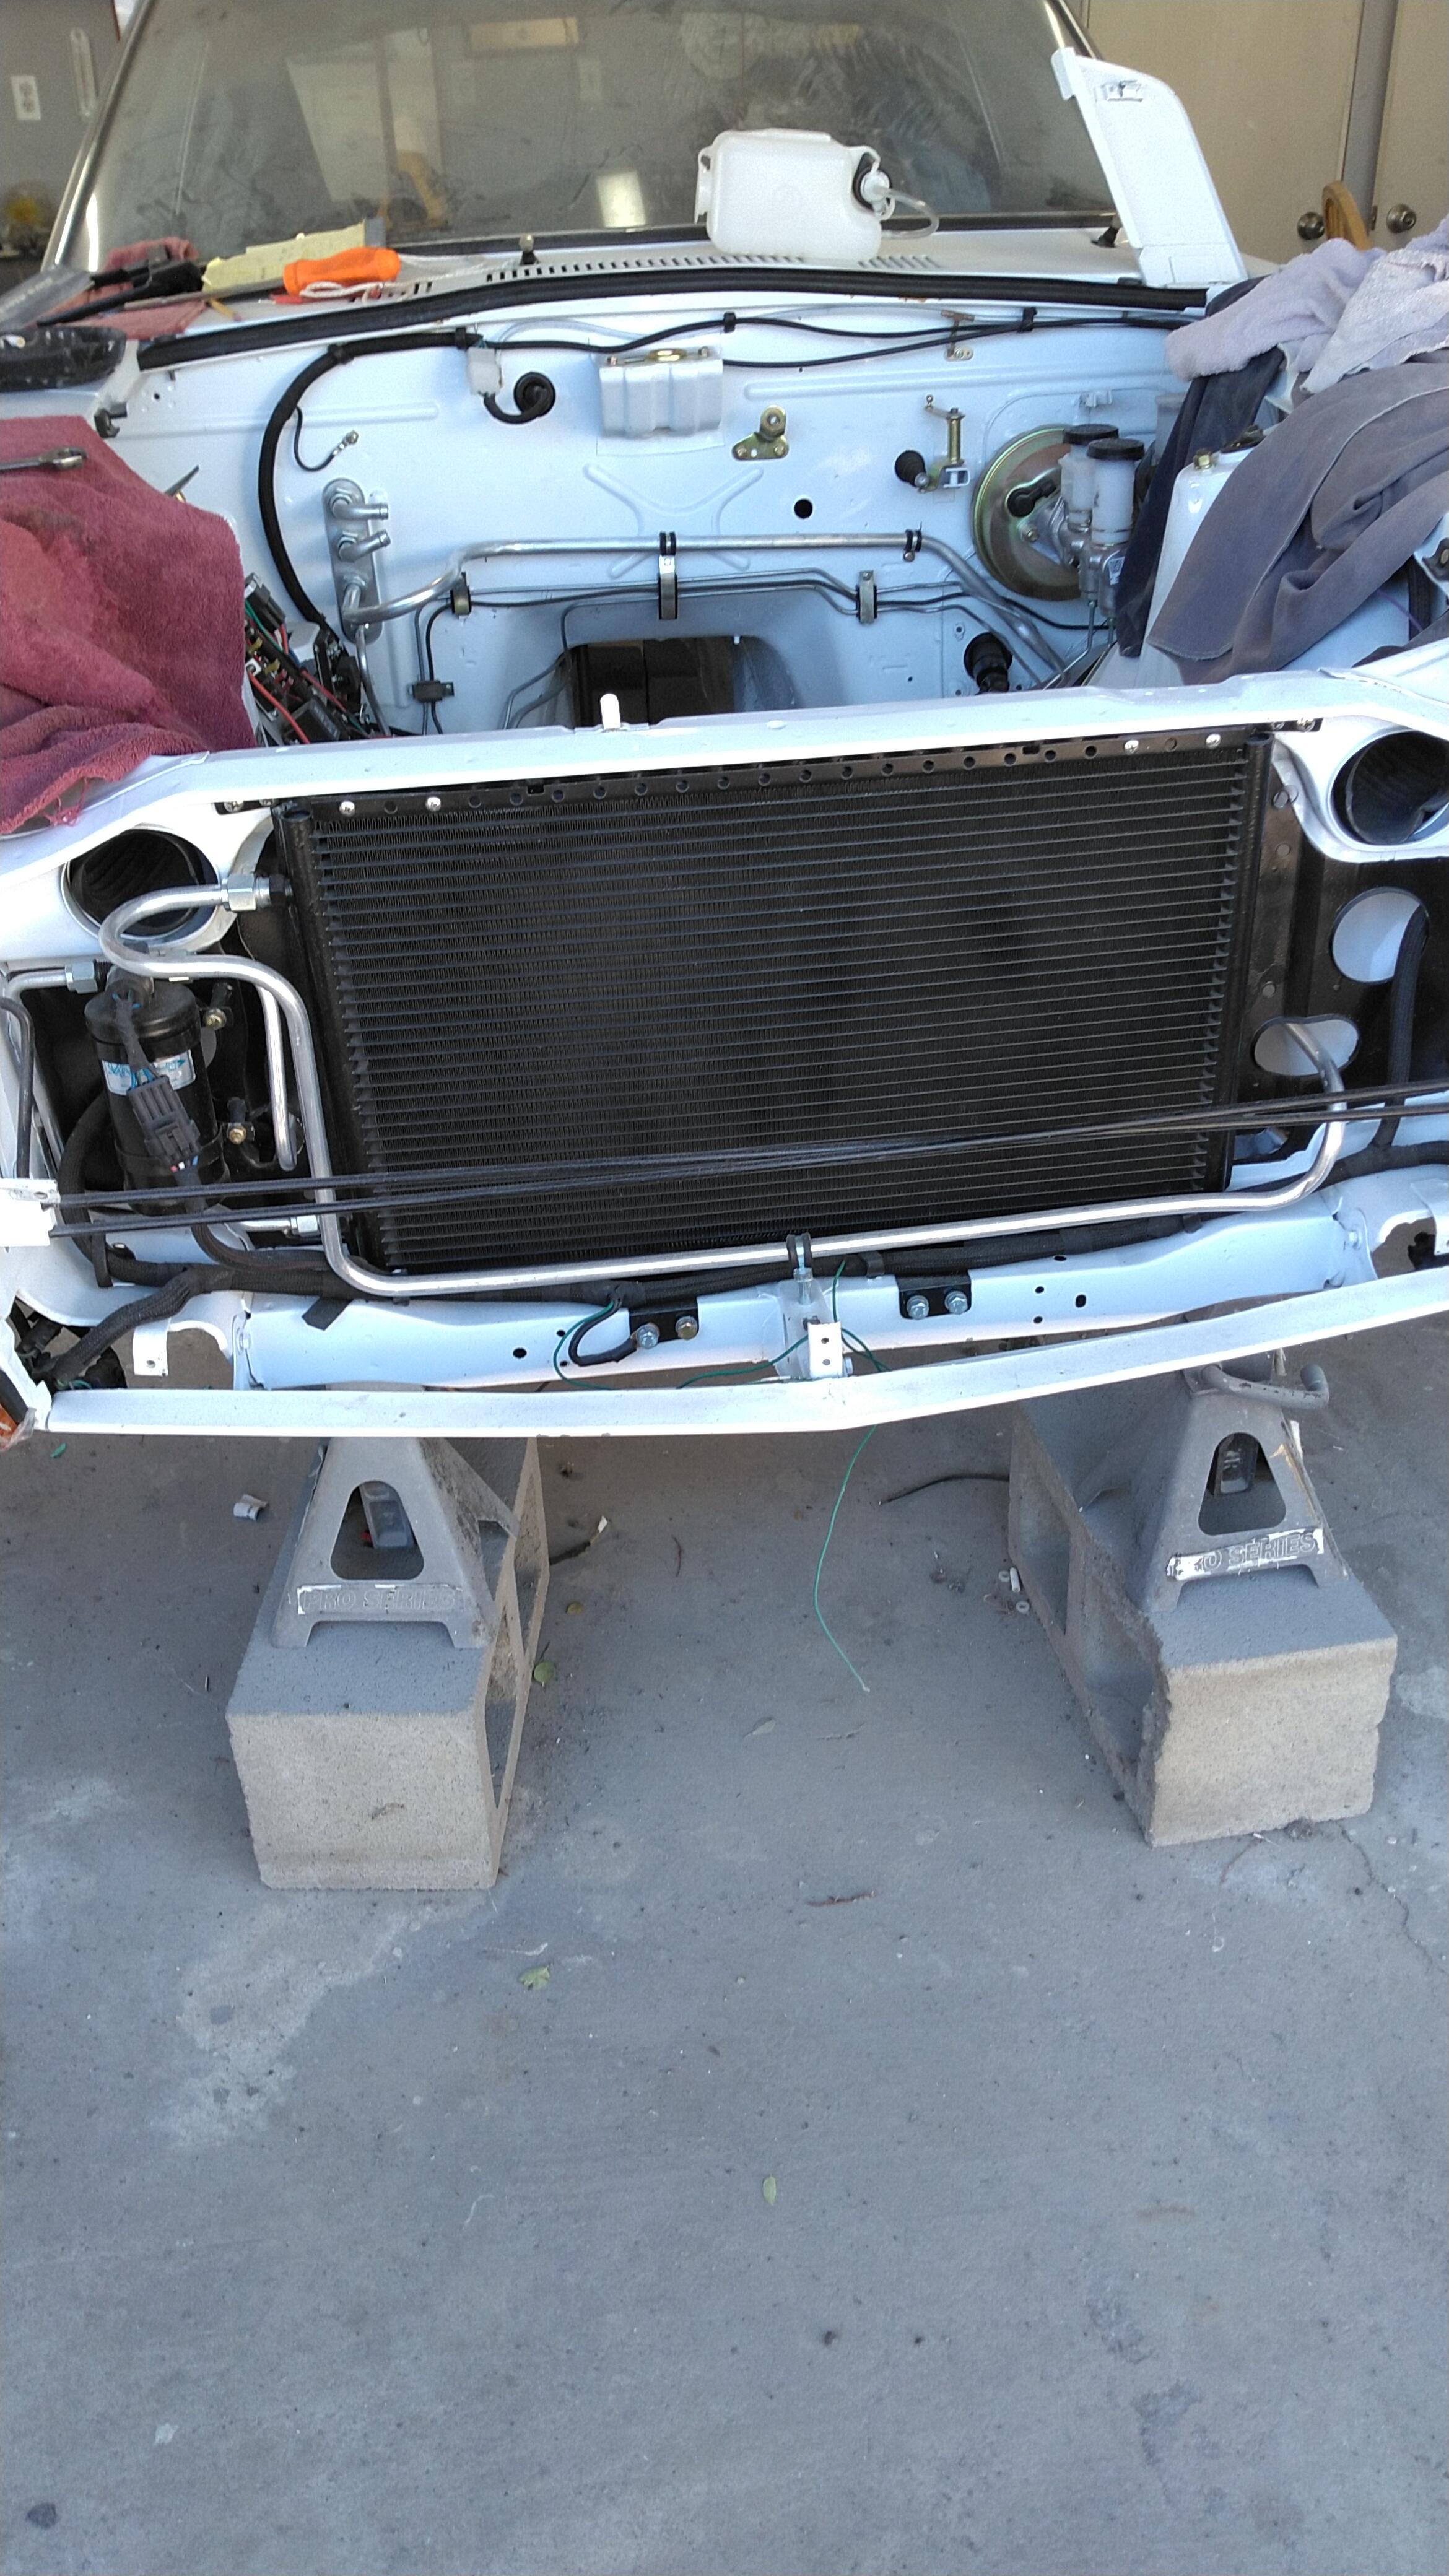
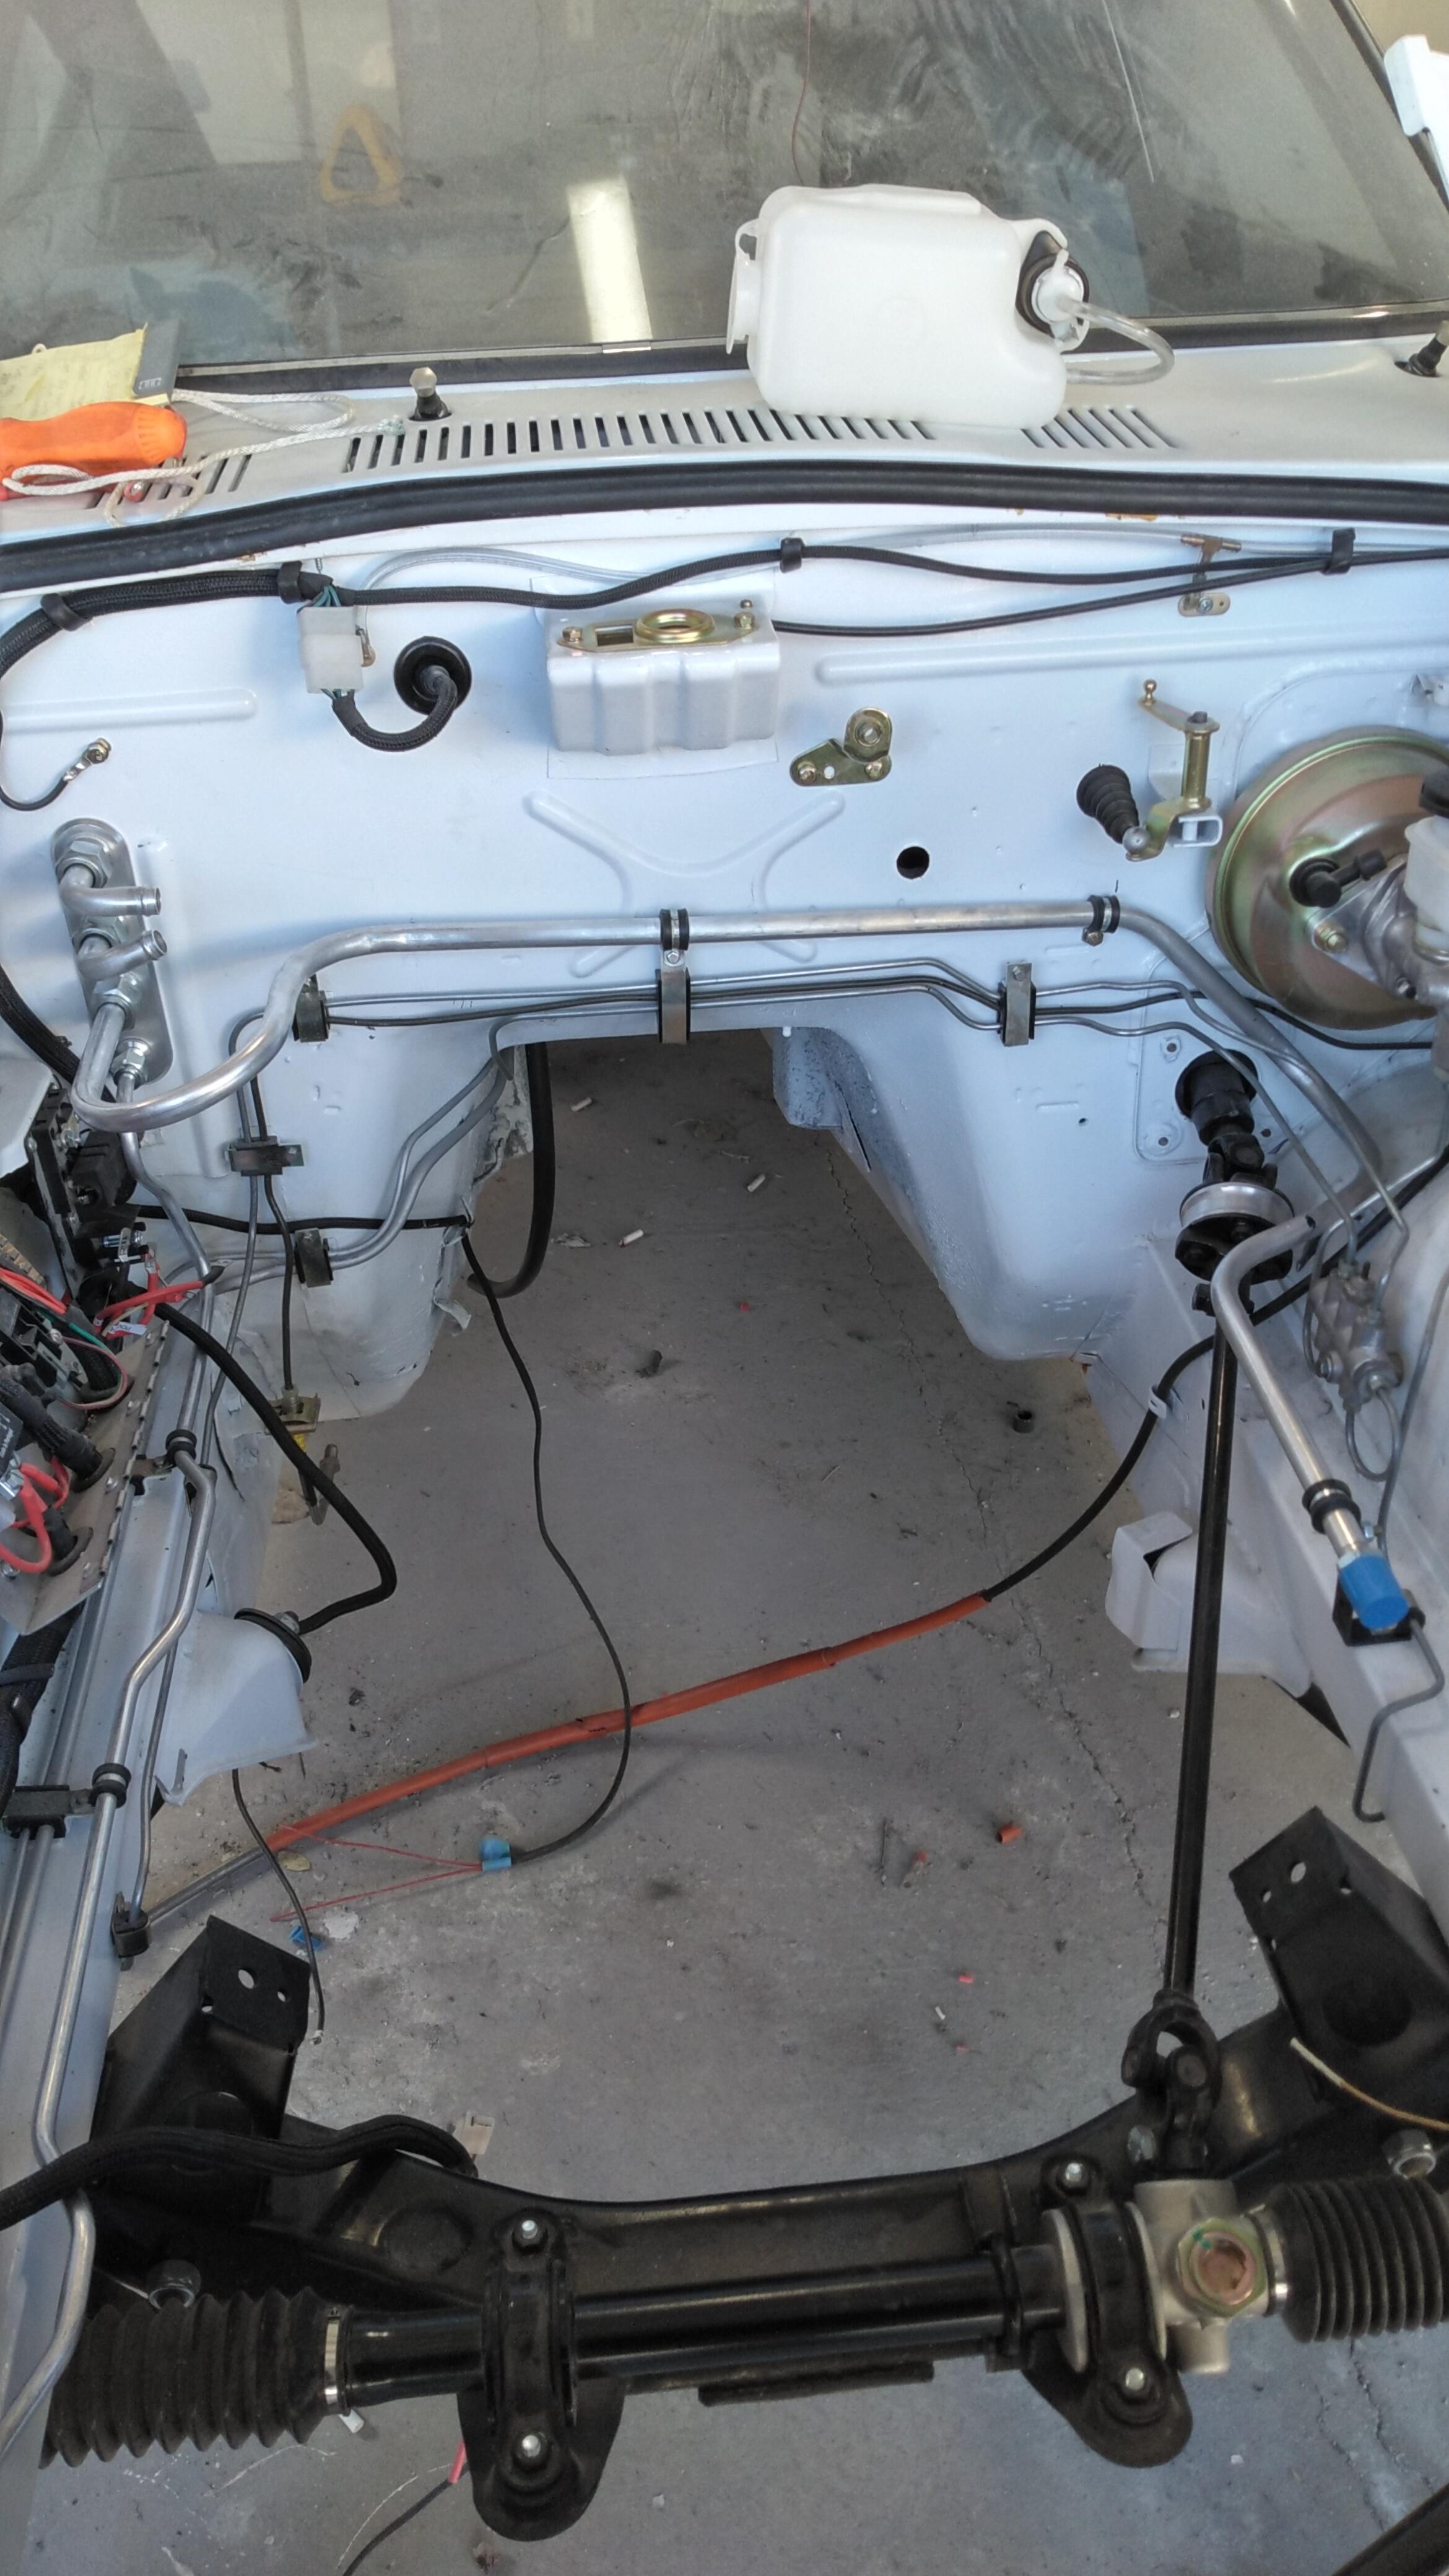
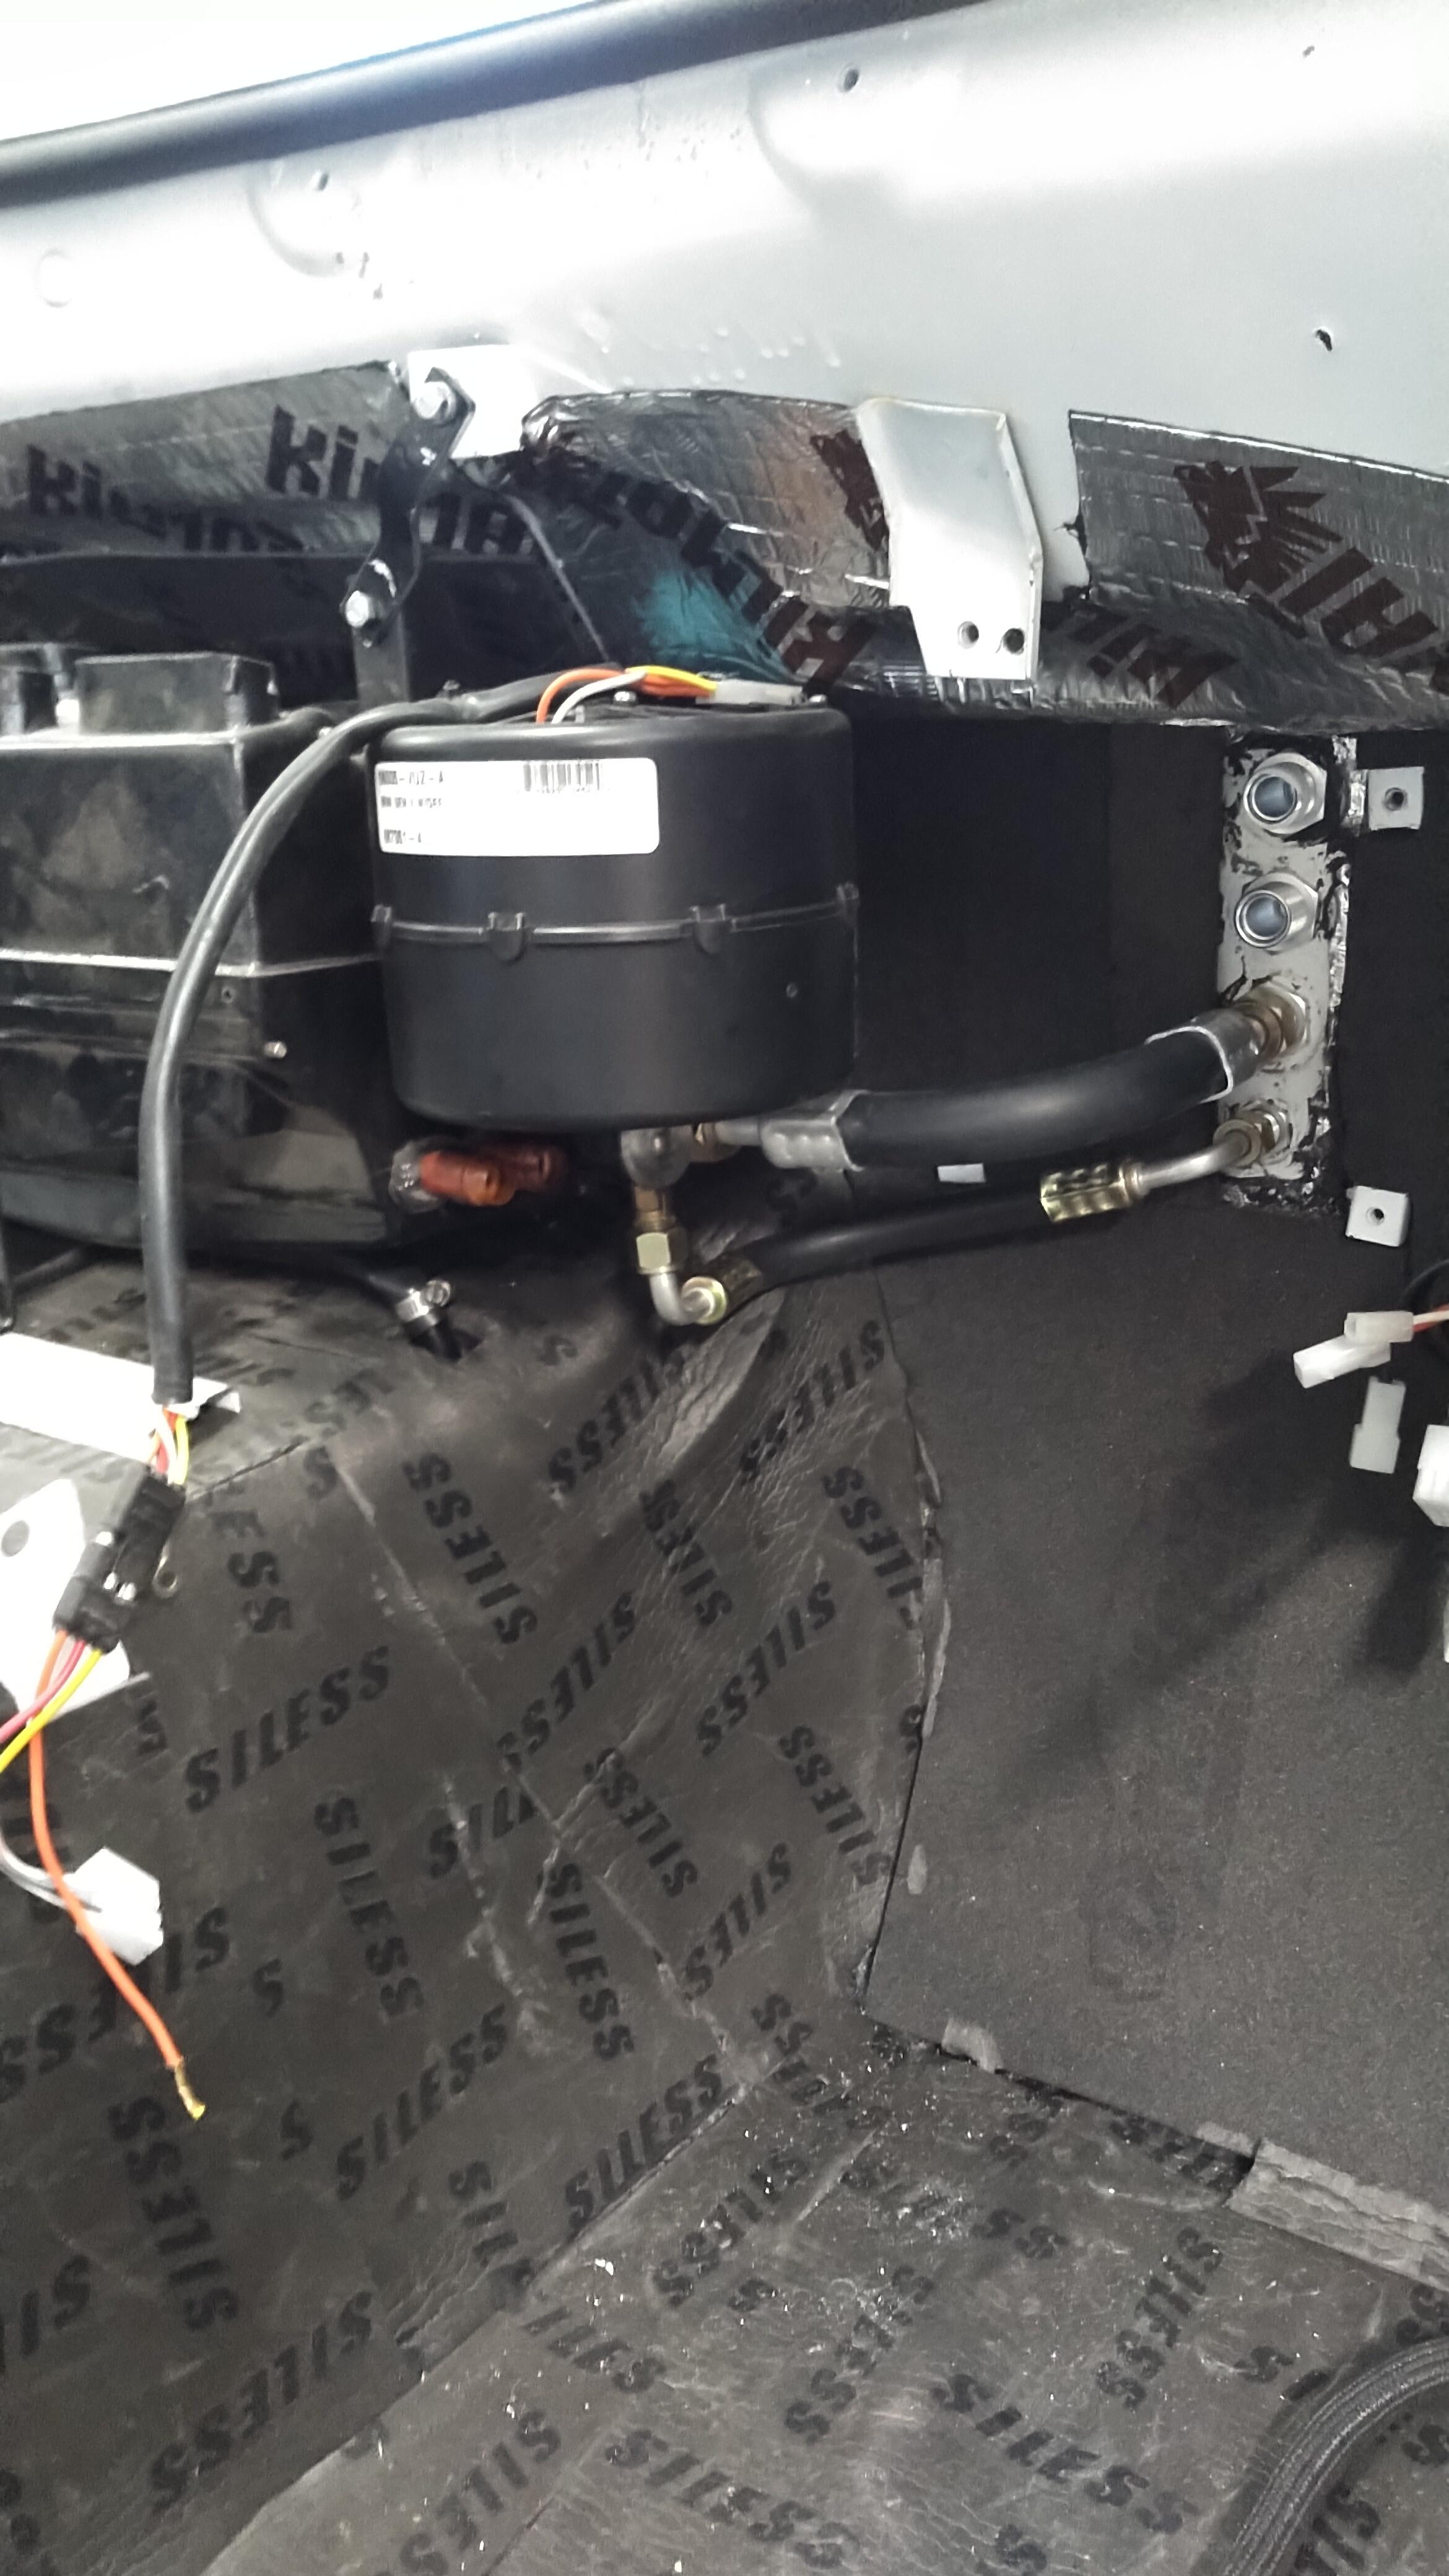
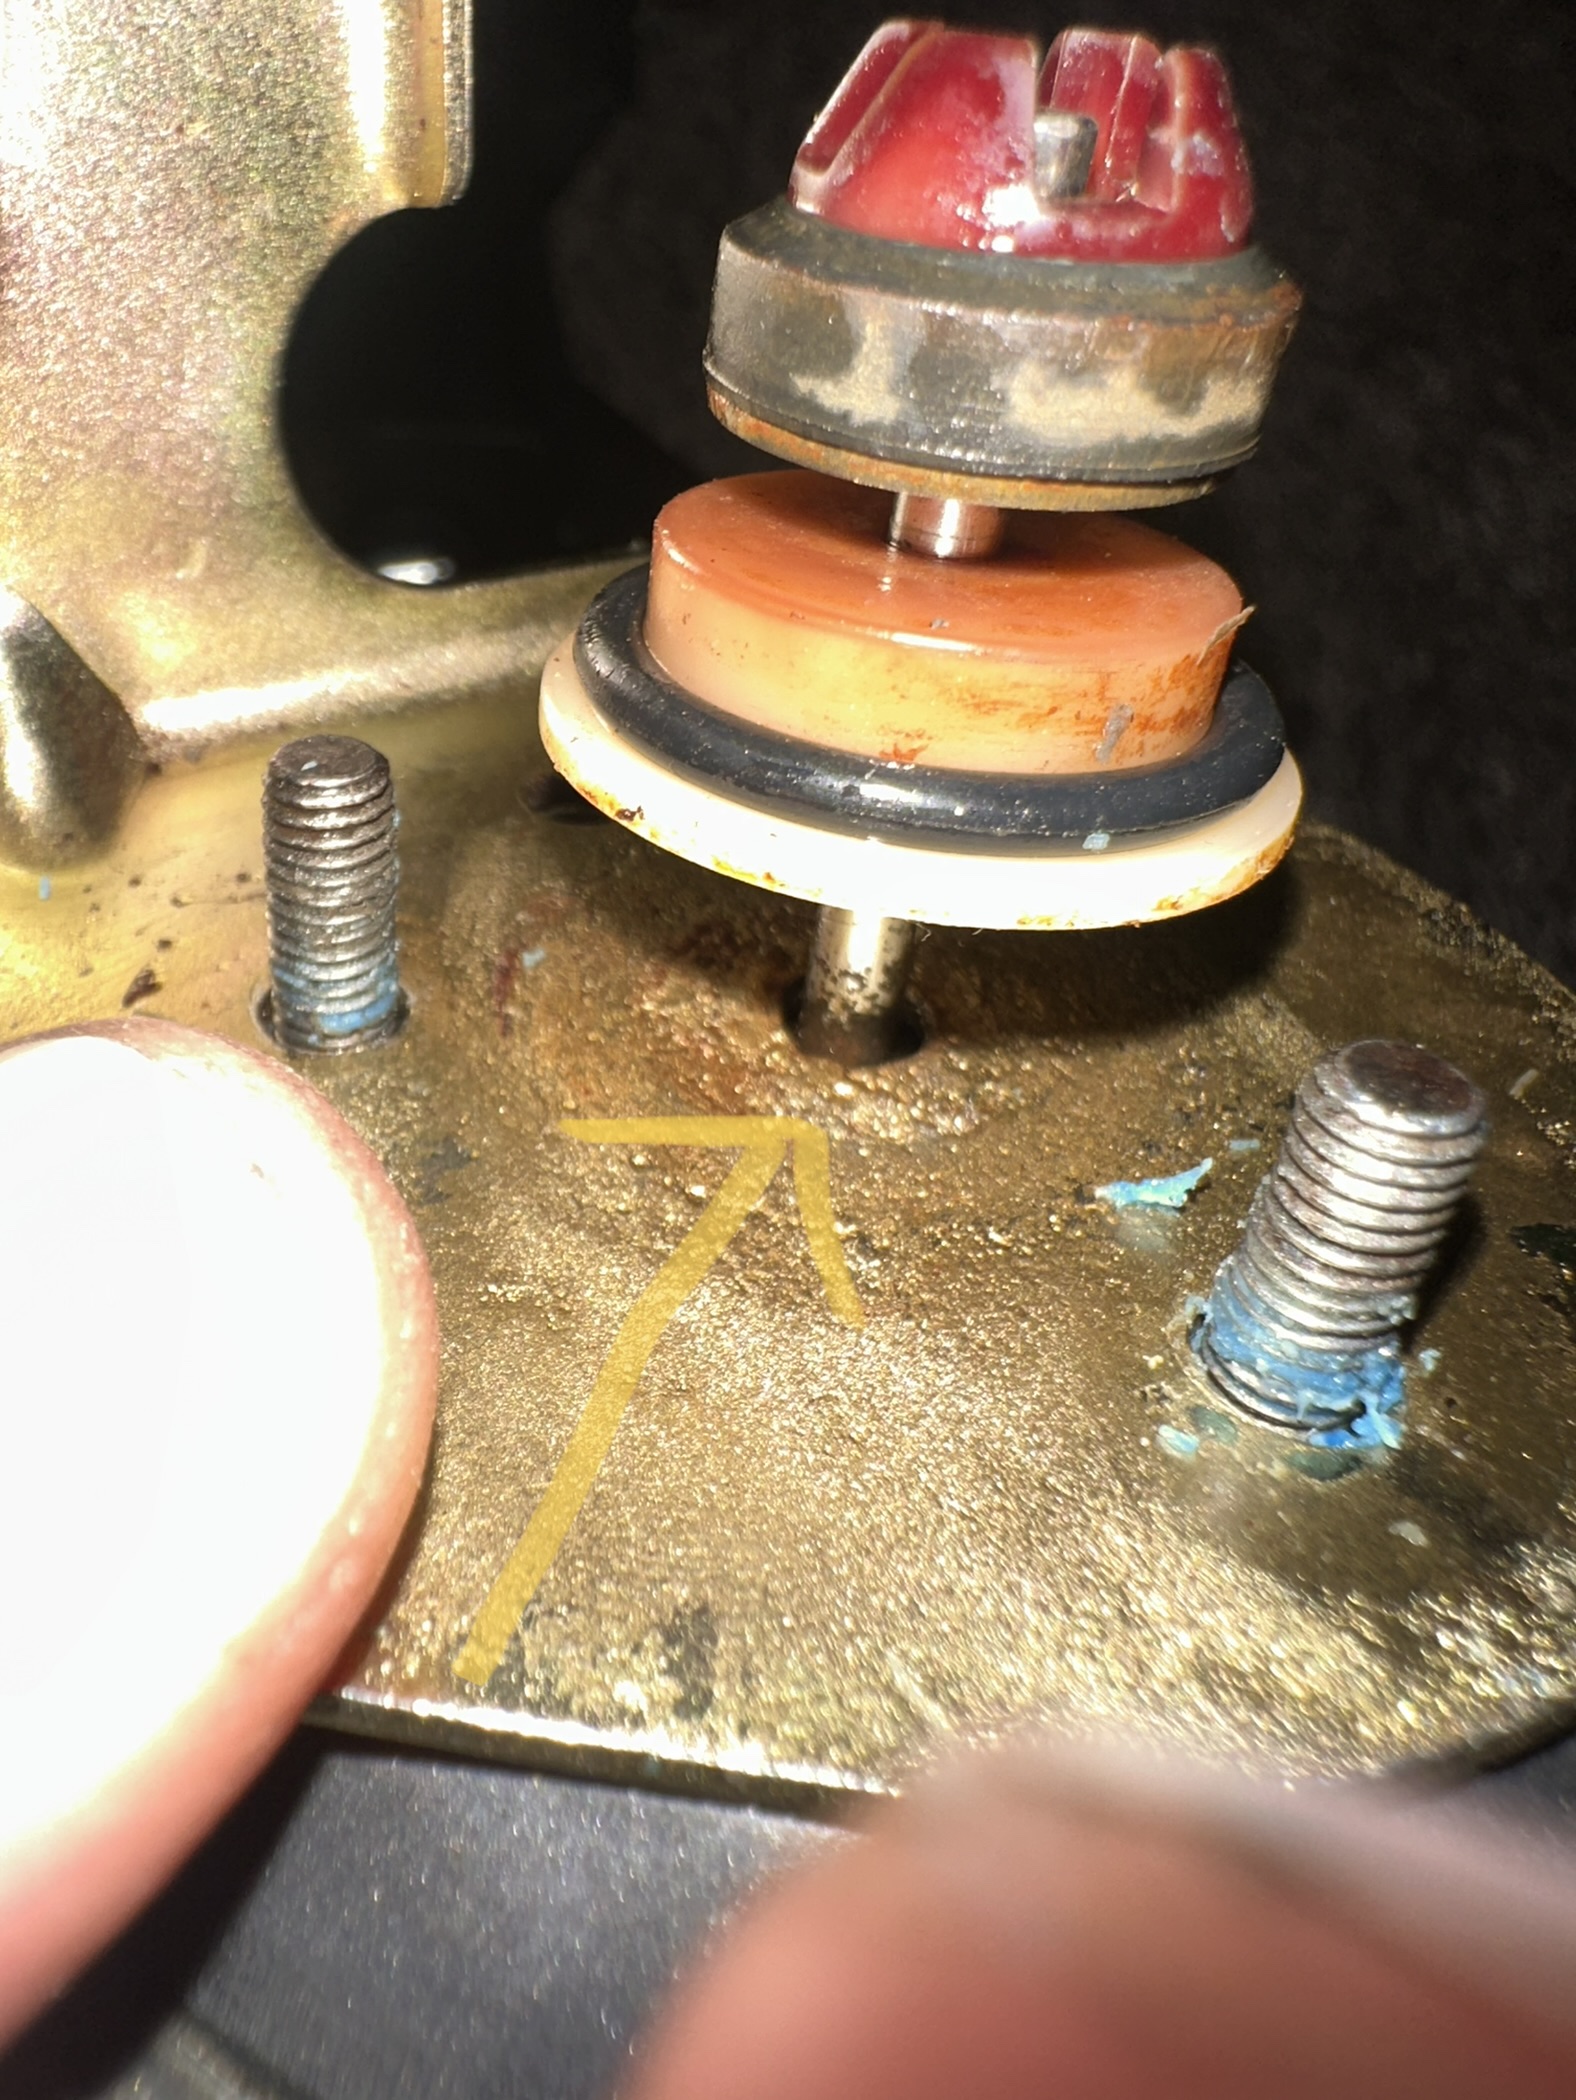
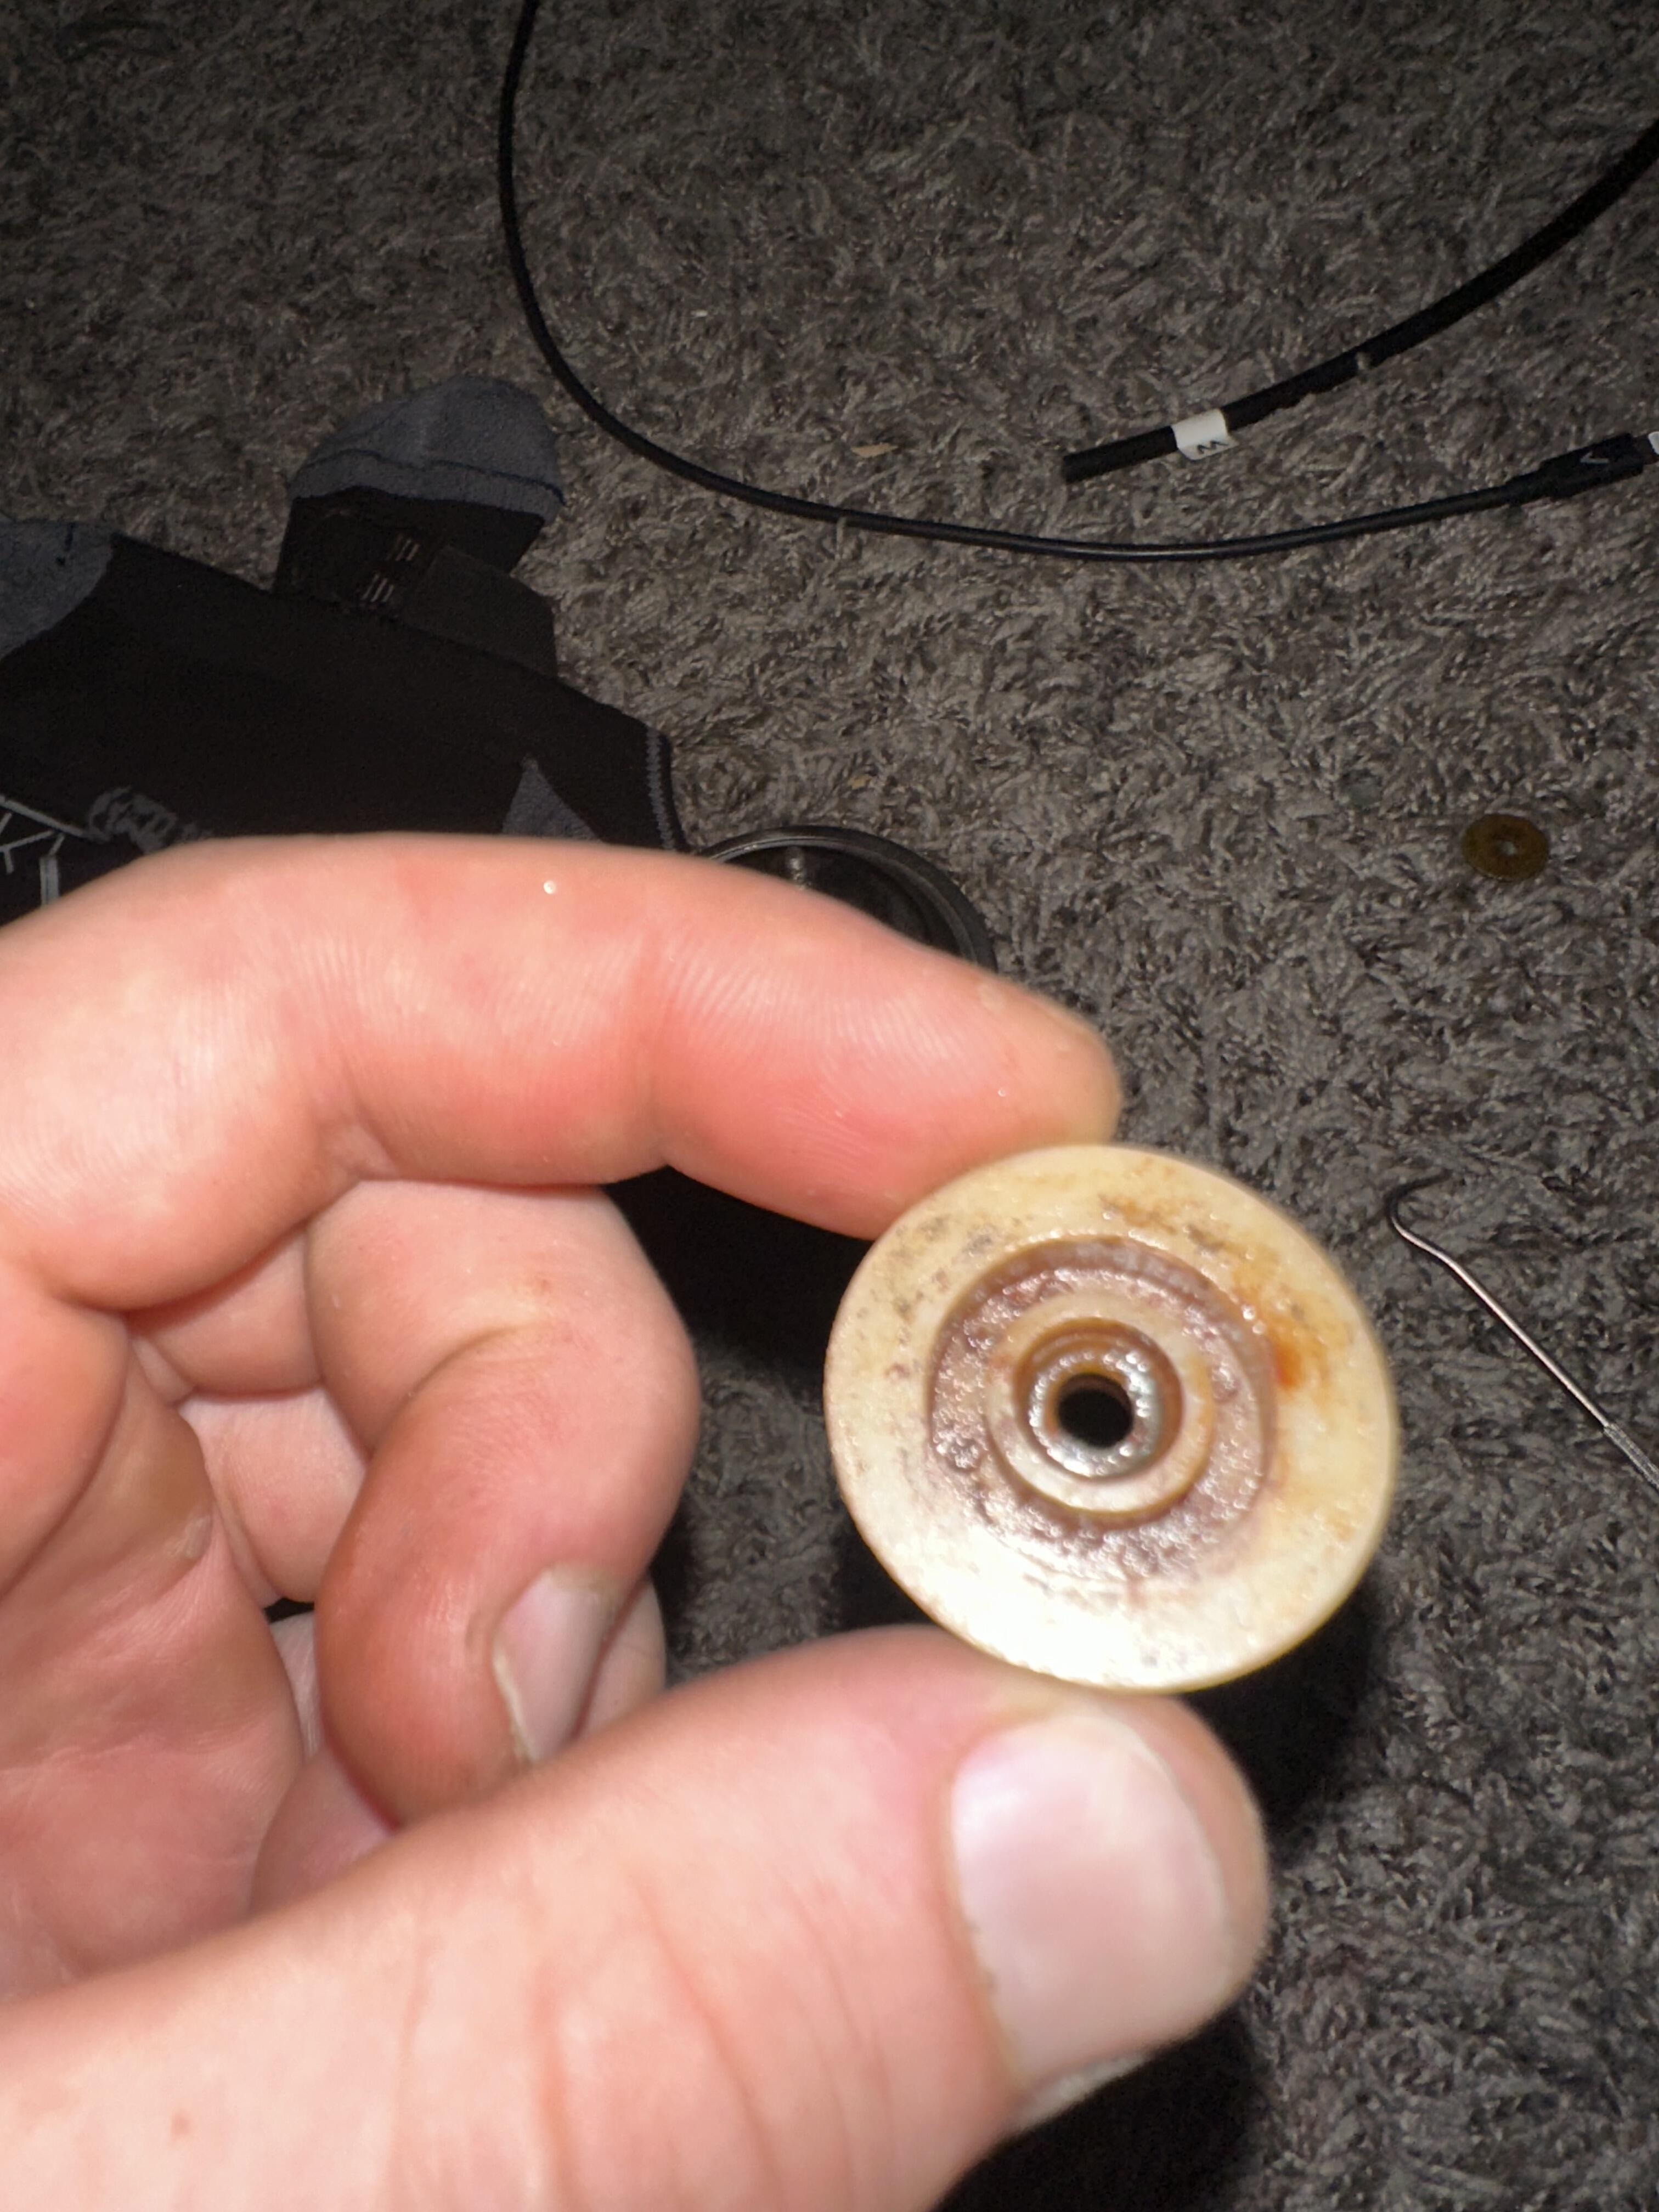
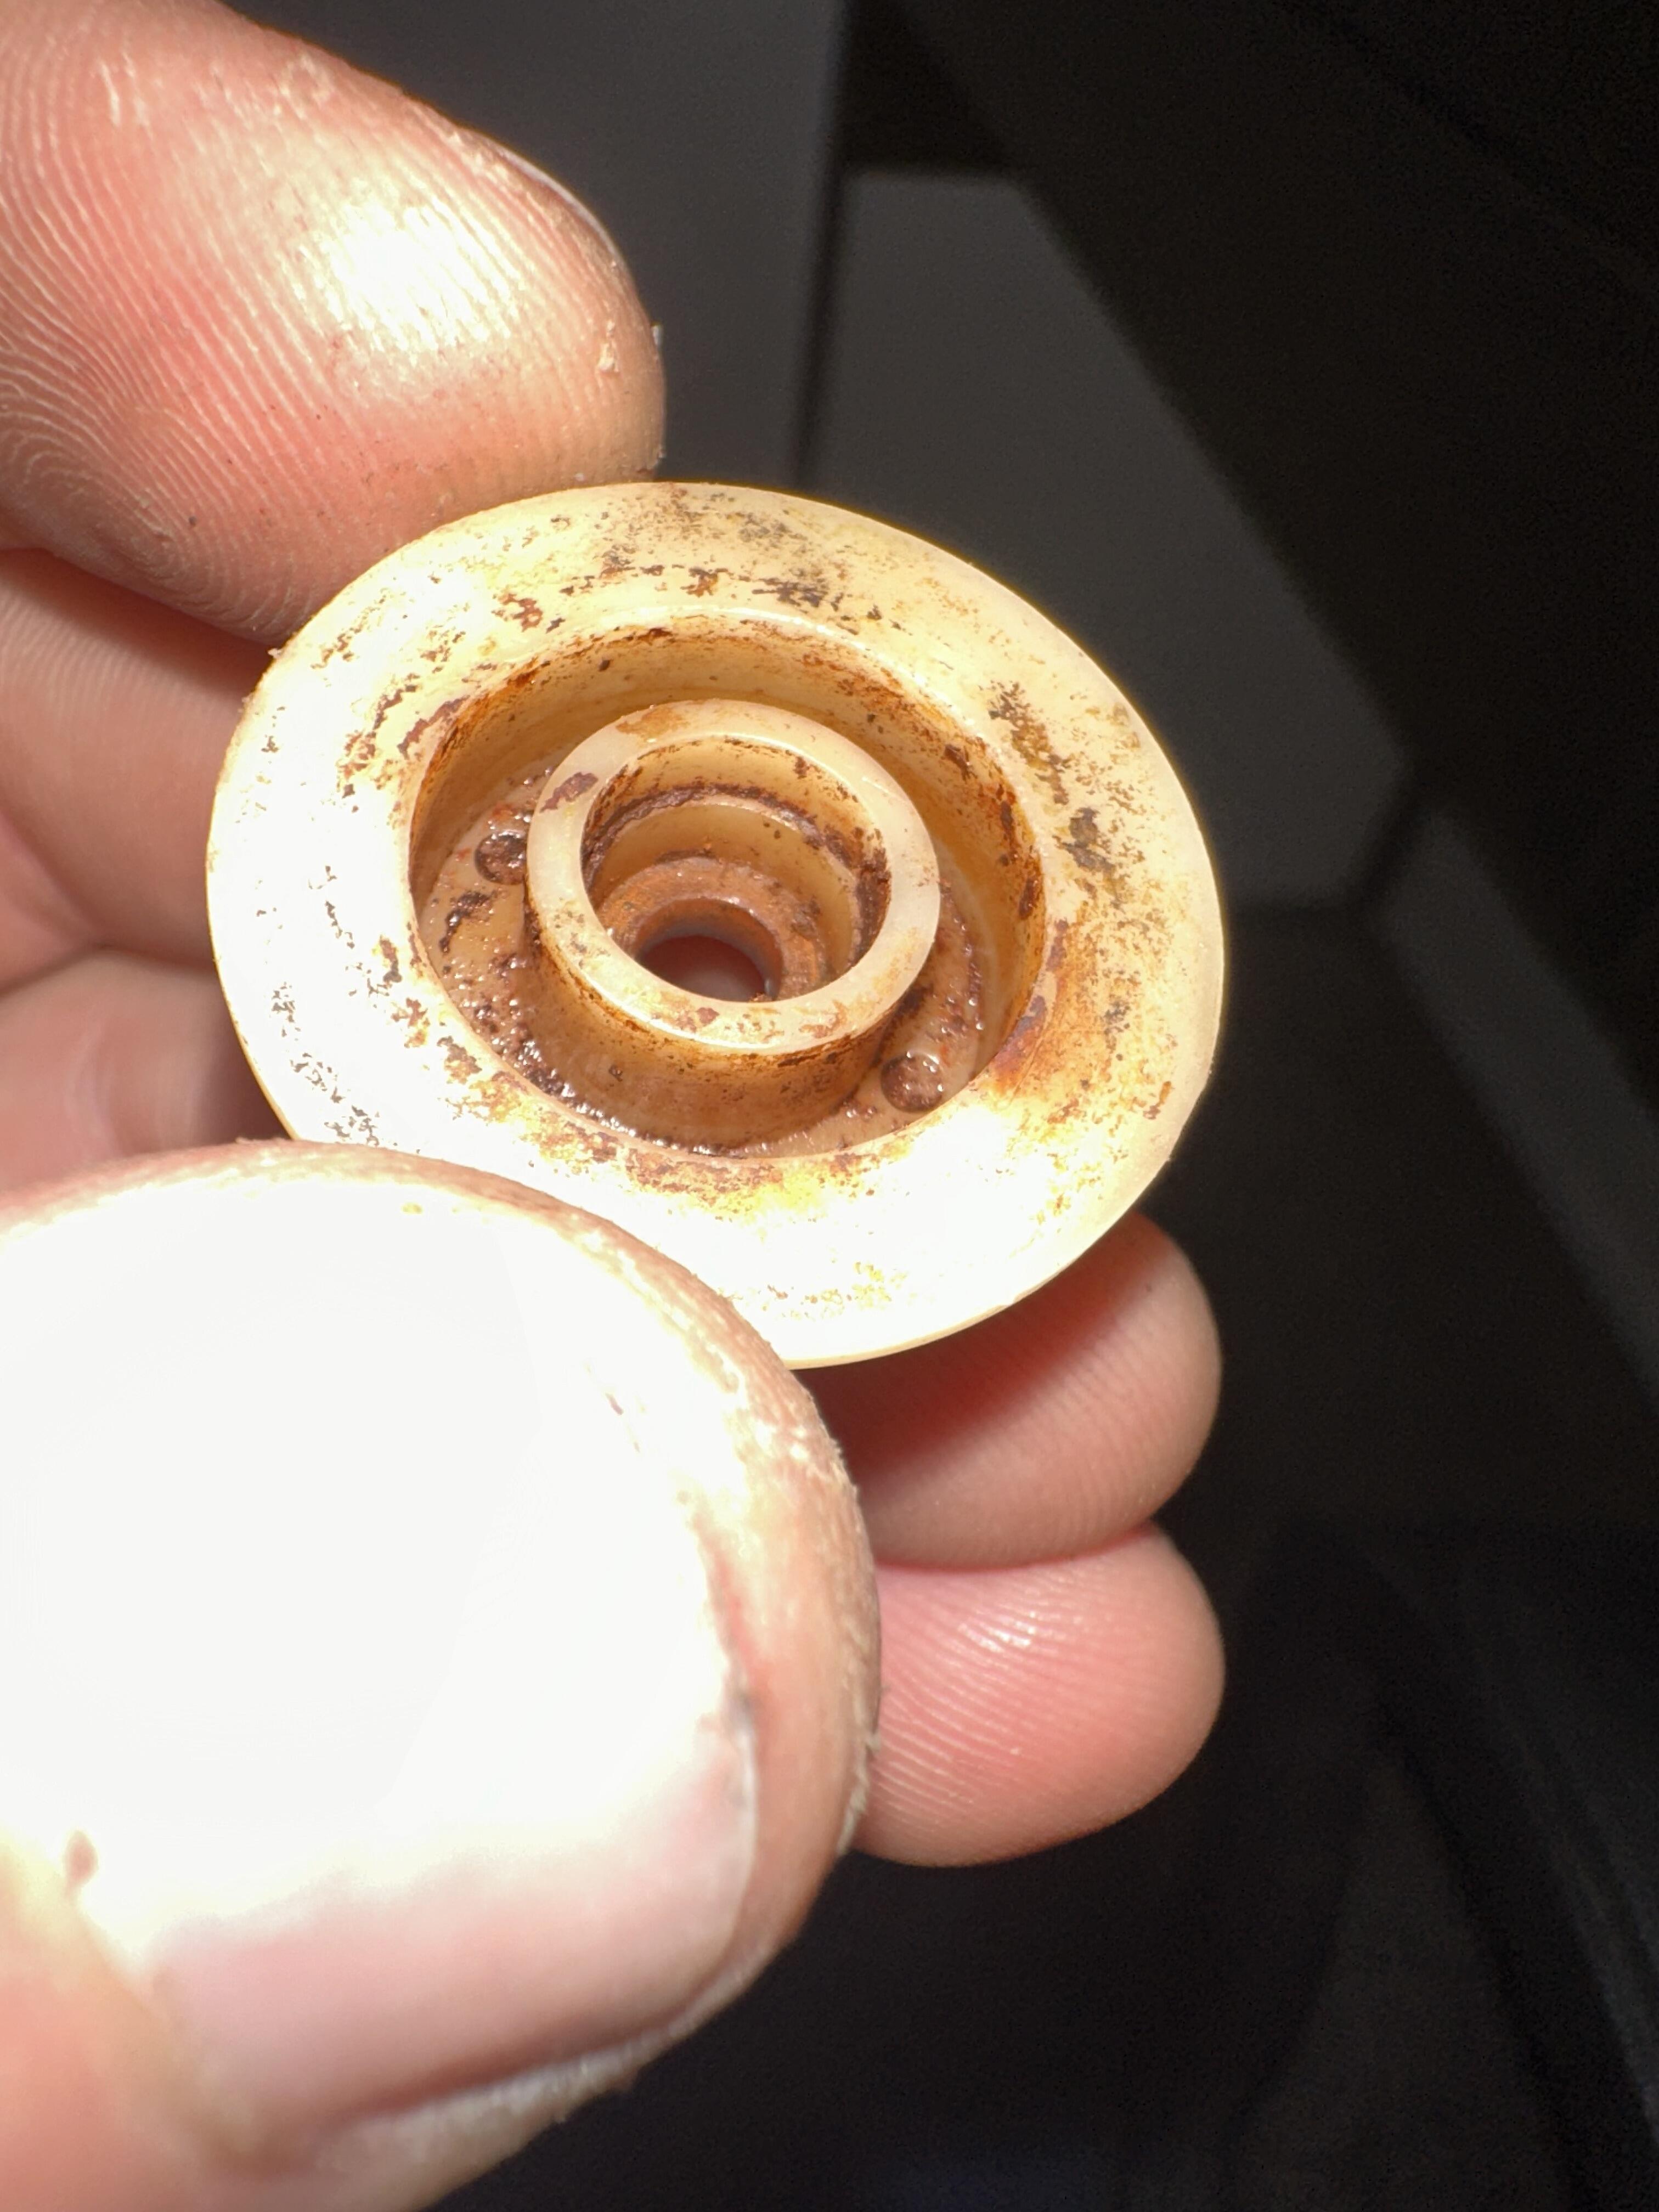
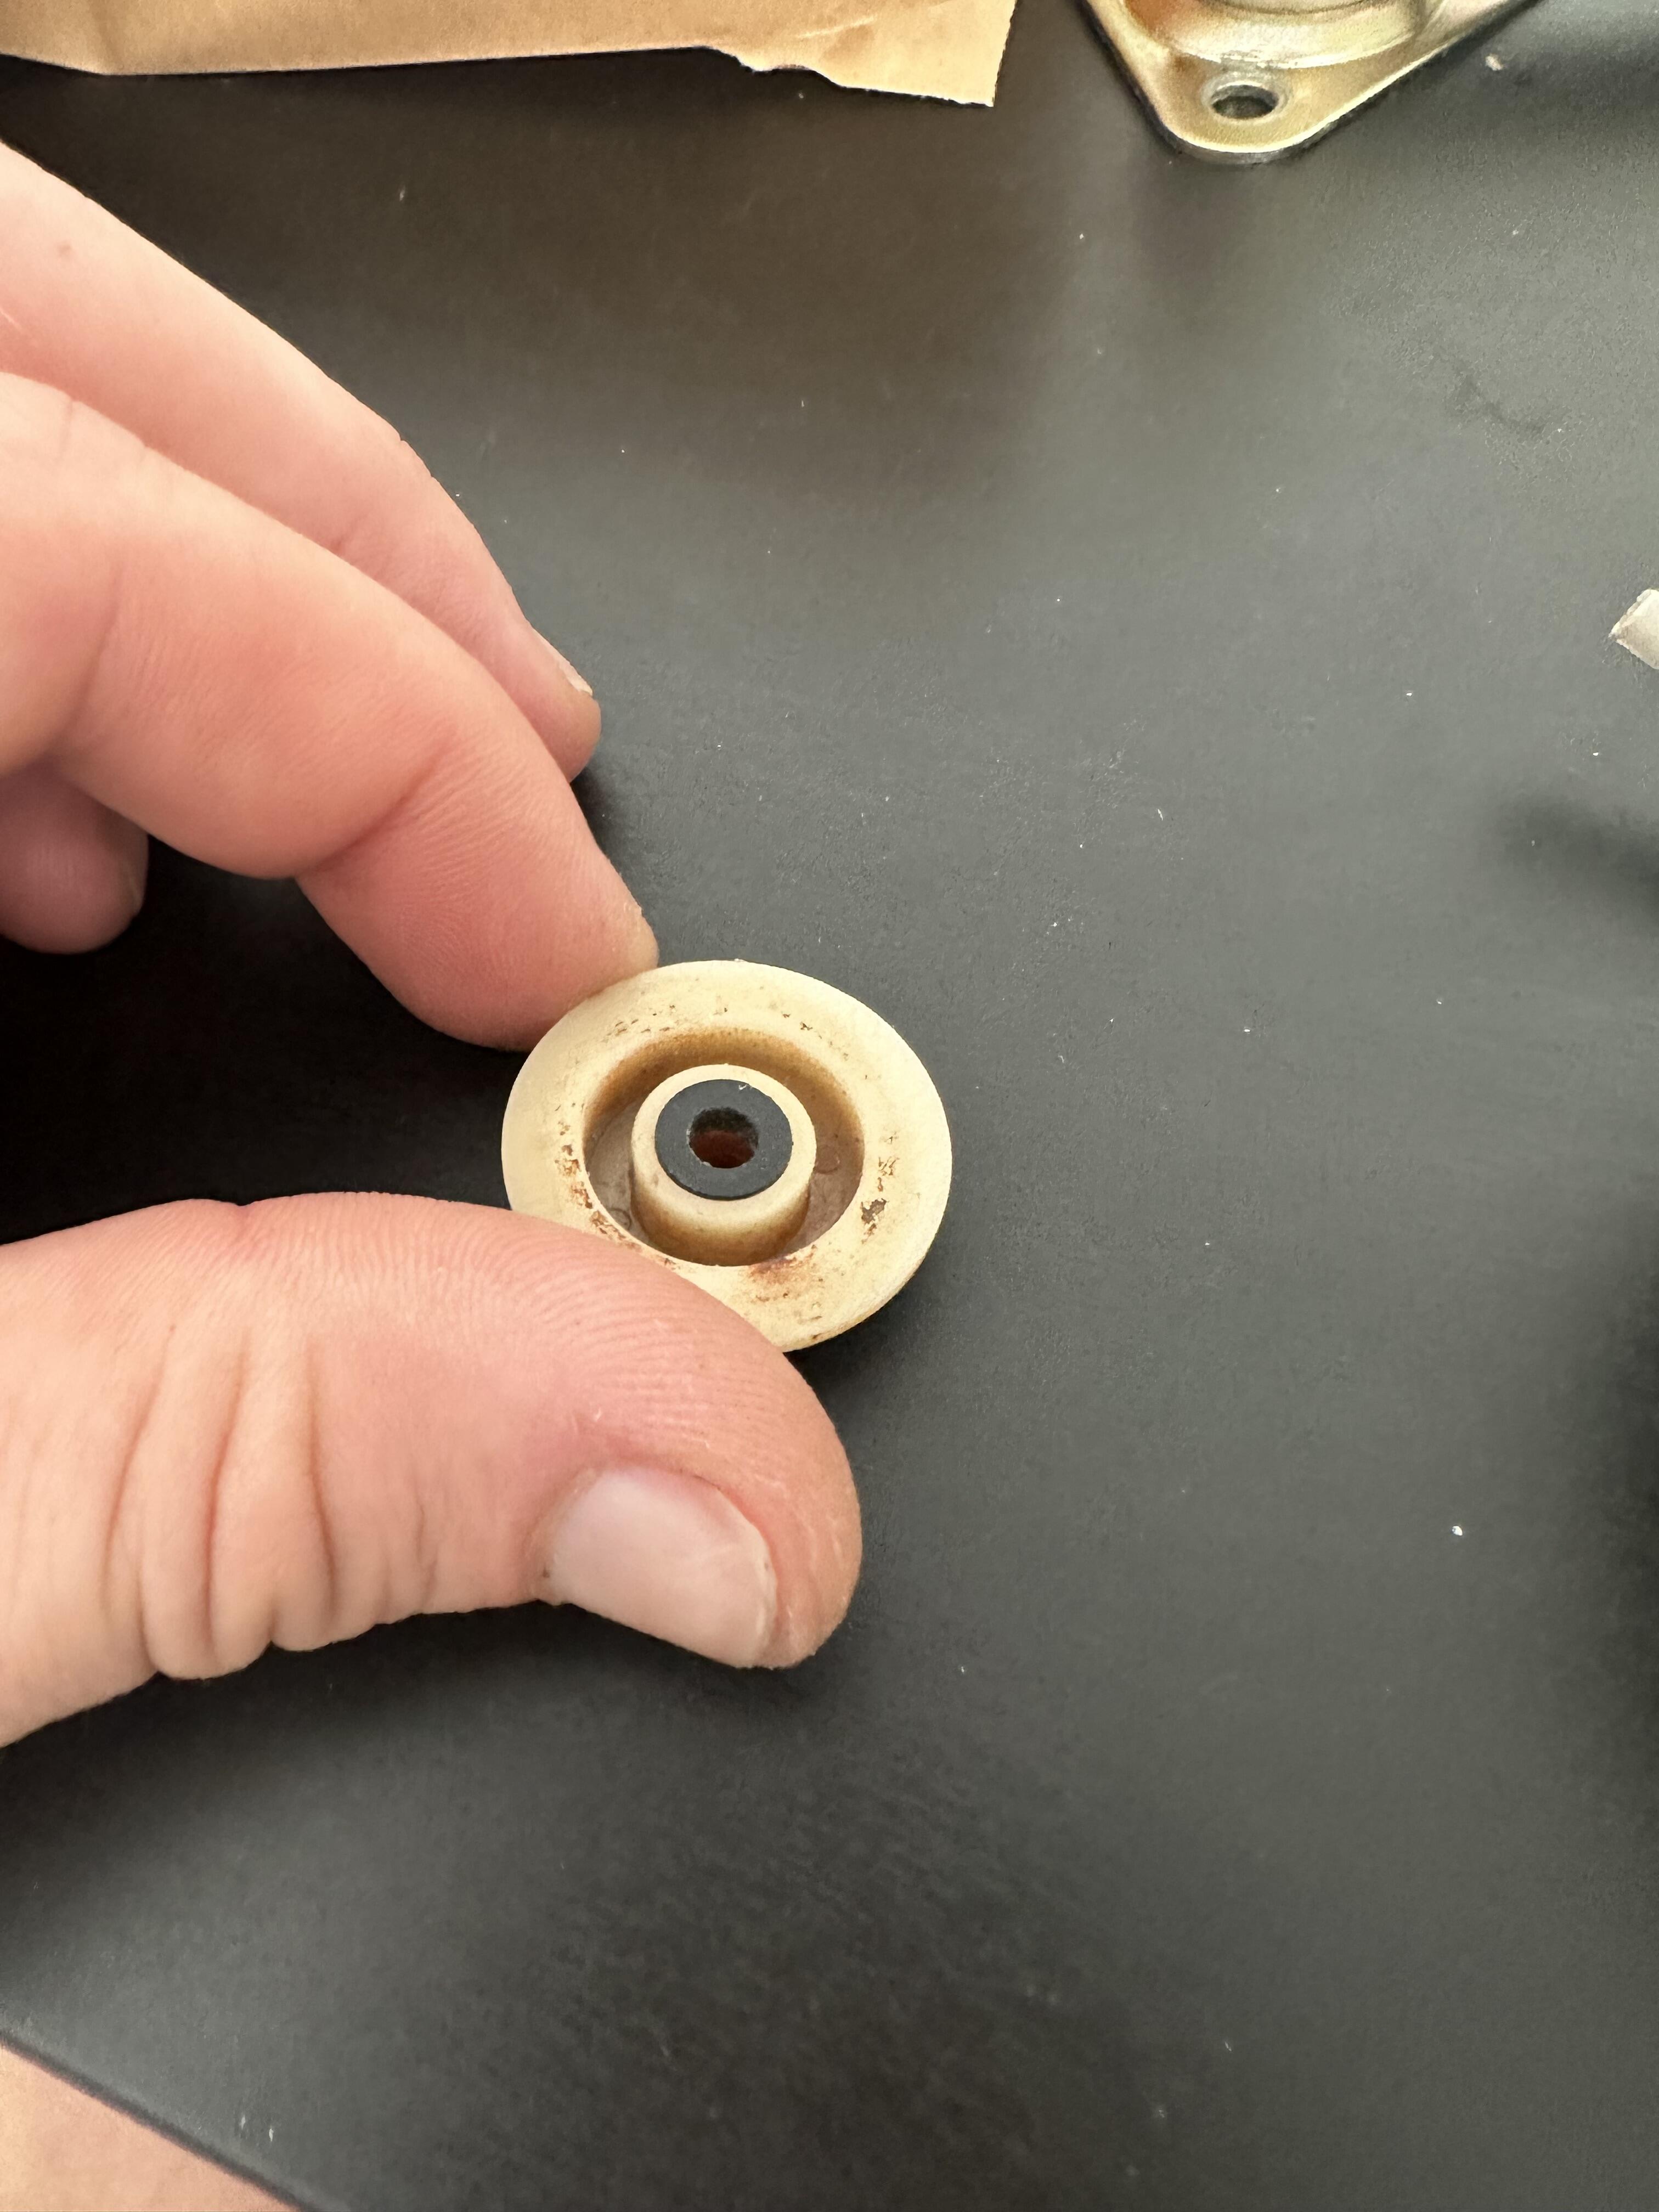
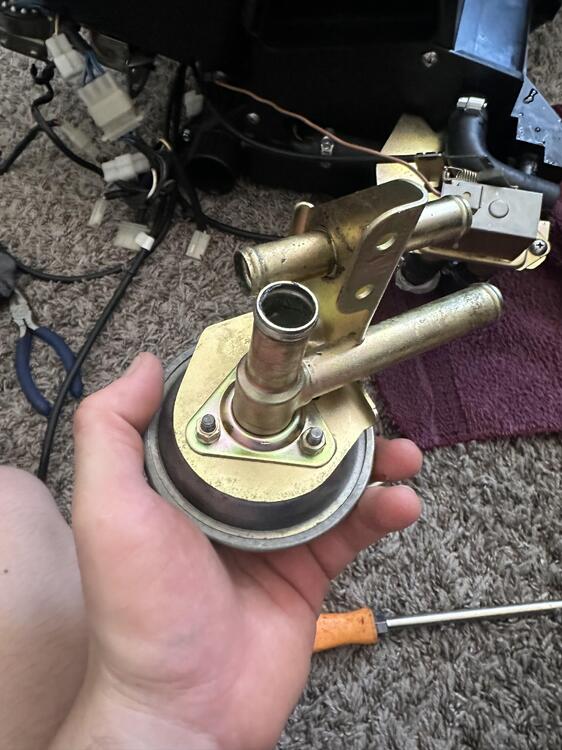
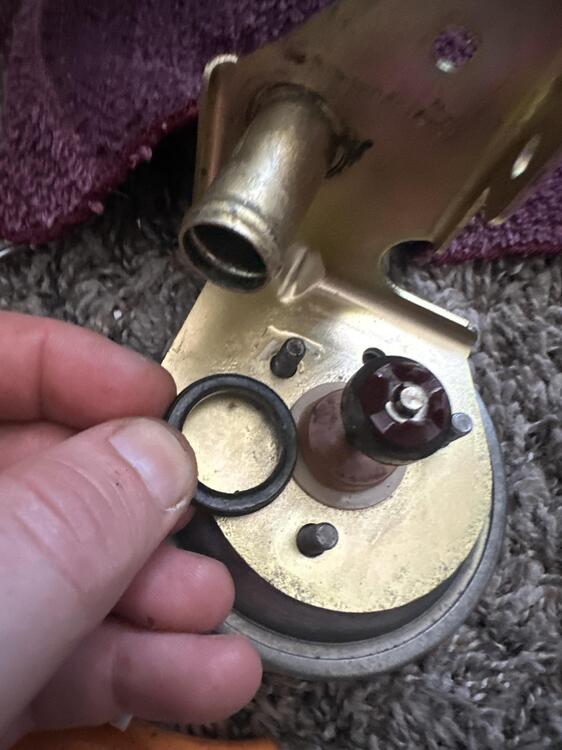
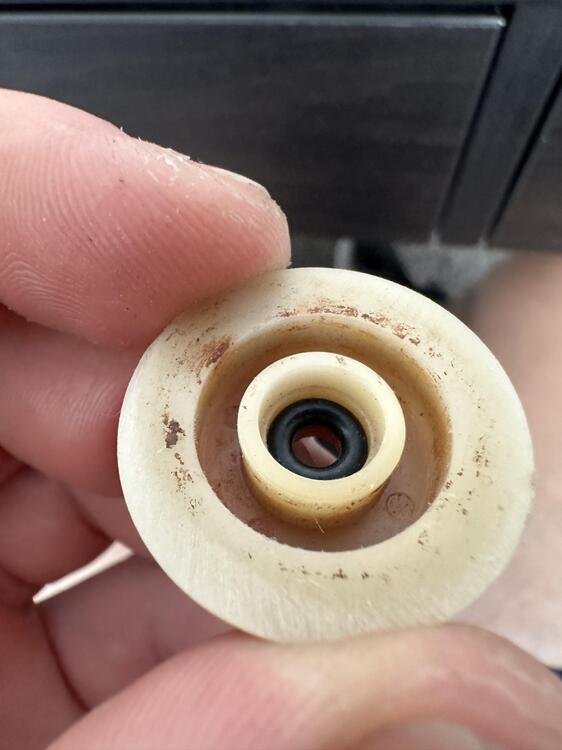
Hey guys, Just figured out how to rebuild the vacuum water valve on a 280z without having to send it off somewhere to be restored or buy a stupid expensive one online (If you can find it. I couldn't). This one is off a 1977 280z. The valve in question is the valve that is actuated when the climate control is put into the heat position and vacuum is sent to open the valve to allow coolant to flow to the mechanically operated coolant valve (That one is operated by the temperature setting). Anyways, mine was leaking super bad like a faucet. I did some research and came across this youtube video. Not sure why its age restricted. Here is the valve out of the car and off of the heater box. (I had it recently replated). Here is the outside seal the video explaned to remove/replace at the base of the valve. I replaced the seal with this O-ring. I found it at ACE hardware. Don't remember the size. Ignore the yellow arrow. I put back together the valve, put it back into the spagetti mess of hoses and vacuum lines on the HVAC unit, then put the whole HVAC unit back in the car. It honestly seemed to leak even more coolant. Wasn't stoked. Removed from the car again, tried a bigger o-ring, and then put everything back. I also torqued the three nuts down much more. Now it leaked even more. Took everthing out of the car again, and decided it must be leaking somewhere else. And then lightbulb, I realized it must be leaking through the center shaft, and not from that outside seal. There are two c-clips that hold the plunger together. Remove the bottom one first, slide the plunger down the shaft, then you can remove the top one. Everything slides off from then on. Sure enough, at the bottom of the plastic base peice at the shaft is another very small seal. Mine was rock hard. You can see that the seal just rides on the lower part of the plastic shaft. The o-ring has nothing to retain it, so I found that really odd. The o-ring in theory could just ride down with the metal rod and seal absolutely nothing when the vacuum is applied to the valve. To correct this flaw I went to ACE again and found an o-ring that fit the shaft tightly and fit inside the plastic peice snug as well. I also went into the hardware section and found a nylon bushing that I could file down to fit inside the plastic base. Thus, it would sandwich the o-ring in and not allow it to move down the shaft. Here is the nylon bushing placed over the oring. I put everything back together and it has sealed perfect so far. One thing I forgot to mention was that my shaft was slightly pitted where it had been leaking at the o-ring. As long as its not too bad it can be fixed. I lapped it with 600 grit, 1000grit, 2000grit, and then never dull. It smoothed the shaft out just fine. IF YOUR VACUUM POT DOESN'T WORK IT IS NOT FIXABLE. You will have to source a different one.


 1 point