Leaderboard


.JPG.cfcada9cf1c1b502df3f5f2f2ca3ff36.JPG)


Popular Content
Showing content with the highest reputation on 05/06/2022 in all areas
-
Rotating the seat belt harness around and adjusting the bracket a bit it fits with the seat all the way back. I'm not in love with it but I at least have something that works. The seat belt rubs against the rear storage lip a bit more than I'd like, so I'm still thinking about some alternate solutions, but I've at least got something working for now3 points
-
2 pointsI just complete the Eibach + Koni install on my 280z. I’m very happy with the ride height. I haven’t driven it yet because I’ve got to install the sway bar and trouble shoot a fuel pump issue that just popped up. Ride height is even front and back and I can fit two fat fingers between the tire and wheel well. Dan has got a lot of work ahead of him but the dirty part is done. Took me several months to do the entire front and back suspension rebuild. I did other stuff in that time period like a new dash and Fuel tank. Dan works fast….I have to do everything twice because I suck so he’ll be much faster is predict. Sent from my iPhone using Tapatalk2 points
-
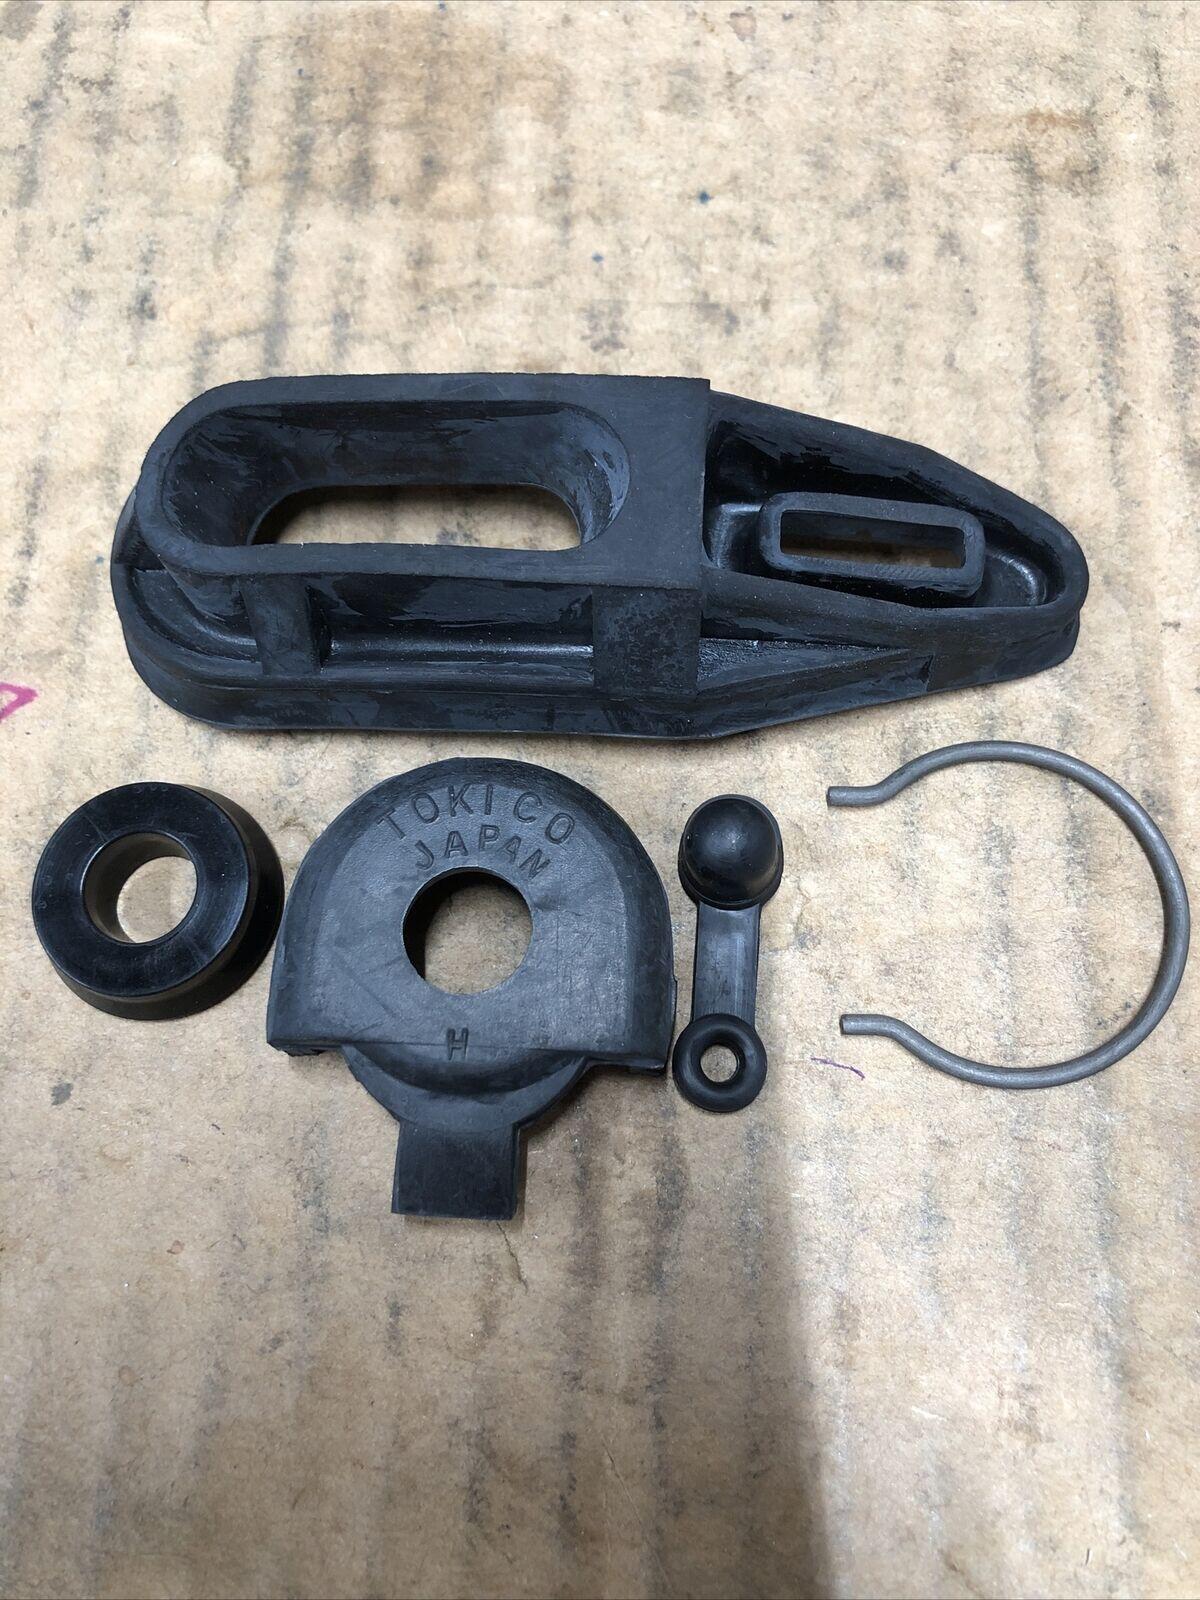
2 pointsYes, December 1969 production-dating QC stamps, and the top number will usually signify the day of the month. Many Japanese companies used a similar QC dating system in that period. In the case of the door catch mechanisms on these cars, they were usually made for Nissan by OHI SEISAKUSHO Co. Ltd. in Yokohama.2 points
-
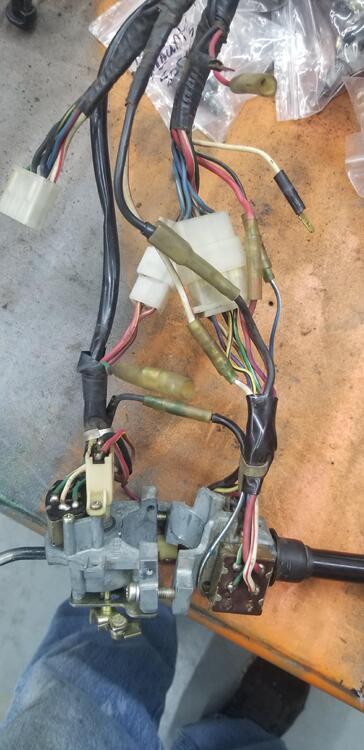
For the parking lights, the switch connects the green/blue and green/white wires together. In the fuse box, the white/red wire connects to the "high" side of the fuse. The green/blue wire connects to the "low" side. When everything is connected, you will have battery voltage on the headlight switch at the green/blue wire. When the switch is turned to position 1 or position 2, the green/blue is connected to the green/white. to send voltage to all of the bulbs. I suspect that you could see dim light in your parking lights when you bypassed the switch because there was enough current to flow through the bulbs as well as the short. If you jumpered the wire at the combo switch, you bypassed all fuses as the power for the headlights goes through the switch and out to the fuse box (That is the opposite of how the parking light circuit is wired.). If you saw 0 ohms from a wire to ground in the tests I described a few days ago, that indicates a dead short. Disconnecting the connectors in the passenger footwell was an effort to try to narrow down where the short could be. If the resistance went up after disconnecting part of the harness, you can reasonably expect that the disconnected harness is shorted somewhere.
 1 point
 -
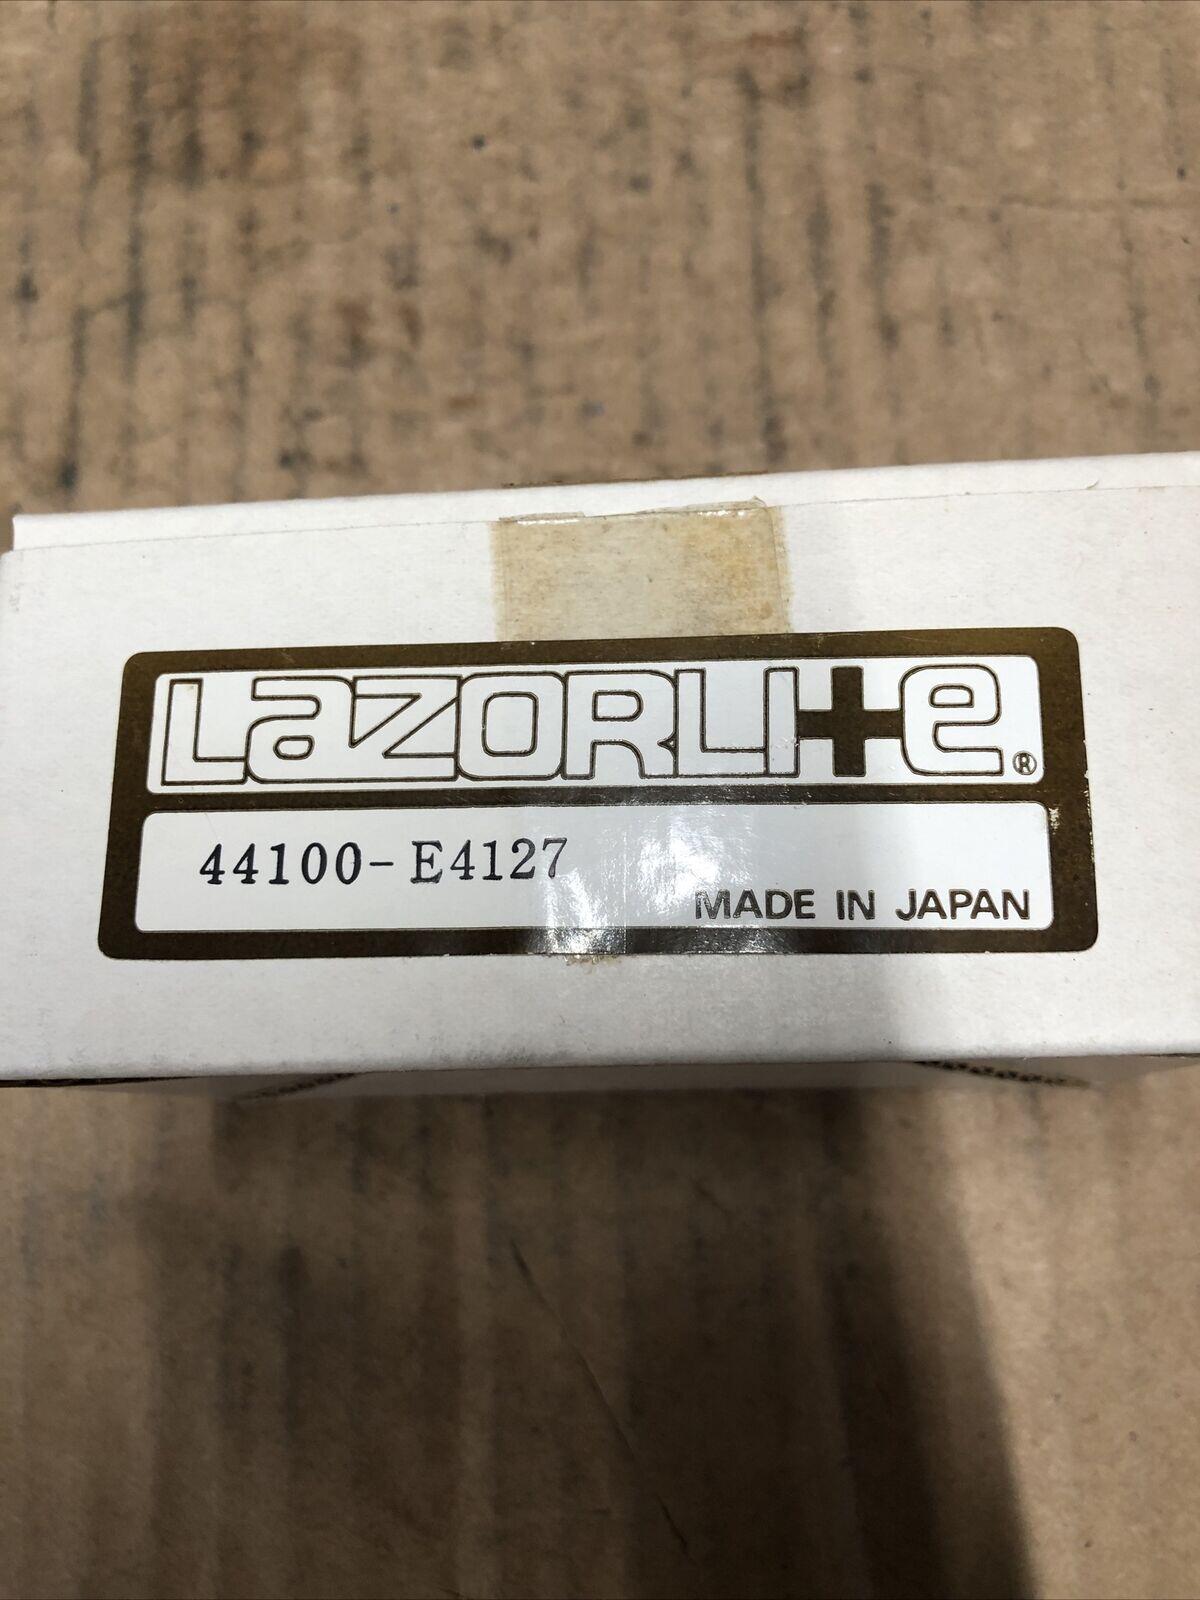
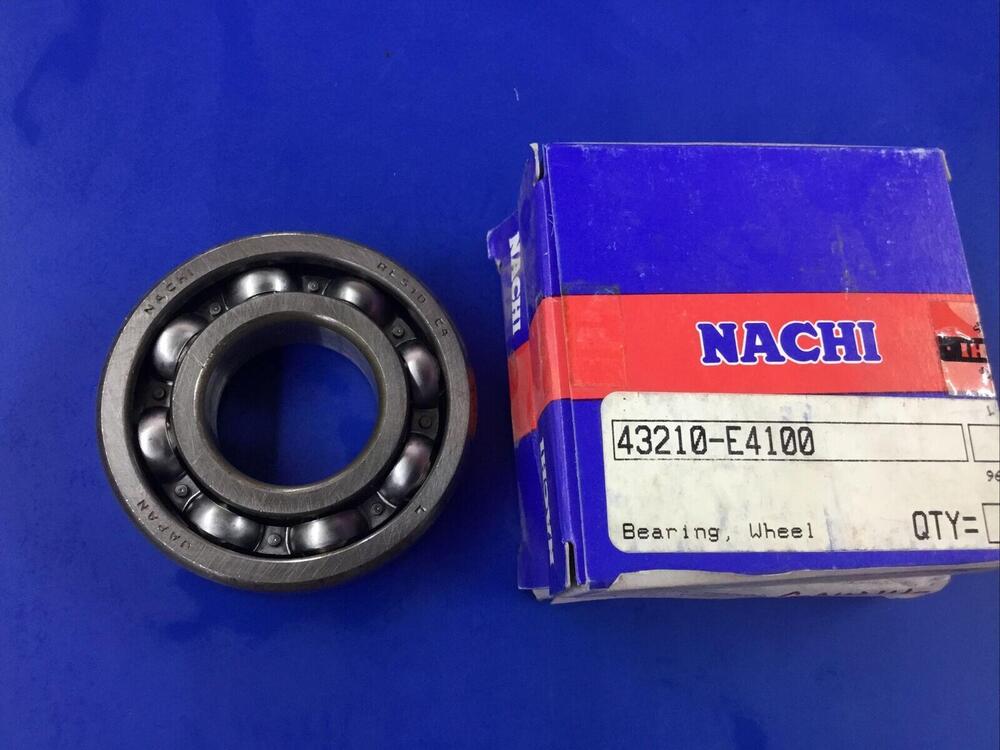
1 pointAs Nissan sourced many parts from outside companies it meant enterprising parts houses in the USA could source the parts directly rather than from Nissan. World Parts, Beck Arnley, Lazorlite were some of them that actively sold parts for the 240Z, and many others Asian cars, in the North American Market. Once you have the parts cross reference numbers its easy to find what you need through EBay and Craigslist etc. Sometimes the same Nissan part number is also used. The other day I got a rebuild kit for the rear brake cylinder on my 8/1970 240Z, Nissan # 44100 E4127, off EBay. The Lazorlite part number was identical to the Nissan one and in the box were Tokico parts just as were originally used on my 240Z. Amazing how you can still find NOS parts for our cars. I've also sourced suspension bushes, wheel bearings, seals, from Lazorlite. The front suspension ball joint on the 240Z was made by 555 and supplied to Nissan, they also sold to the US parts houses. I'm slowly building up a cross reference list of the part numbers for the 1970 240Z. I just picked up some inner rear wheel bearings for $15 each. Nachi make them and again they put the same Nissan parts number on the box, #43210 E4100. They are exactly the same as the original ones I just removed from the rear hub carrier.


 1 point
 -
here is another picture I found searching the net.
 1 point
 -
No, you're not on the right track. When you jumpered over the red/white to the green, you bypassed any fuse protection outside of the fusible link. If you're not putting any current through the fuse, it won't blow. I hope you didn't have an electrical fire. Your description of the results are confusing. Are both wires on your switch green/white? The resistance between the switch and fuse should be almost 0. With 0.7 ohms, it says dirty connection. Having the other side of the switch be 0 ohms to ground indicates a dead short. Disconnect the 6 pin connector at the steering column. On the dash harness side of the connector, measure resistance to ground on the green/white and green/blue wires.1 point
-
1 pointThank you both for the help, going to get it installed this weekend. My old antenna worked great until the day that I forgot to lower it and someone or something bent the mast. It's been bugging me ever since then. It's gonna be great to have a working antenna again.1 point
-
Well, as odd as these things can get, I actually found one, or so, but I found it, 'New' in United Kingdom at a Figaro, yeah a Nissan Figaro dealership. a Really nice young man running the parts department has them, but under a totally different part number and I decided to throw all concern to the wind and take a chance on it, what the hell, it's only 3000 miles away. but I was a little worried about the electrical connector, and he said it's only a two wire connector, so . . . . It'll be here next week ?
 1 point
 -
Not sure this will help, as I may be in your situation later on! I thought I took pictures of my steering column but I couldnt find them. I did put them together on the bench. There is a black wire that connects the headlight switch to the blinker switch. I cant tell if you have that one connected.
 1 point
 -
Thank you! Mine look very similar so I might just need a spacer to make it work. I have some other good news on the seat rail too I think because the retractor was blocking it a ton of gunk had built up so it seemed like the rail couldn't go back all the way. After using some persuasion and greasing it up I can get the rails to travel the full length now. With the retractor removed and the seat reinstalled I get much more reasonable leg room. I might try and adjust the pedals to be a little further back but it's much better than it was. I just need to figure out a solution for the seatbelt and i should be good to go1 point
-
1 pointLooks like you have a helper! Undercarriage bits look FANTASTIC. Dumb question: Do you need the camber adjustment kits when using lowering springs like the Eibachs? Absolutely! It's taken me 10x longer to reassemble everything than it did to take it all apart!1 point
-
1 pointThank you!! As I get older I try to forget these but the system sure doesn't forget!! 😉 Hope y'all are having a good time with your Z's. I need to dig mine out of the garage and have a little more fun this summer. Mike1 point
-
The gear needle bearing race bushing between the wide and close ratio are different. The wide ratio is very easy to slide in/out. Perhaps 1/100th ID bigger. You'll need some authority and firm persuasion to get it out on the close ratio. I had to warm it up/down couple of times to get it out. If you have impact gun, it help tremendously. Beside that, everything else is relatively easy. I highly suggest you to rebuild yours. Had I rebuild mine when I did the engine, I think I would not have this main shaft needle blown up that toasted the main output shaft. When I changed the transmission oil last time, the oil was clean as there isn't any noticeable metal on the magnetic drain nut. But only couple of thousand miles, the blown needle bearing shaved off lot of metal on the main output shaft.1 point
-
1 pointYour OE antenna switch has three wires: one for power into the switch, the others for power out to the antenna. Your FSM wiring diagram will identify the wire colors. One antenna lead is to power the antenna up and the other is to power it down. The OE antenna is grounded through the body to the car's body via the mounting bracket. Check the wiring diagram on the new antenna to confirm how it functions. Does it also self-ground thru the body? Do the two leads power the antenna up and power it down? Try a bench test on the new antenna to confirm how it functions. Many aftermarket antennas are designed to automatically power up when the radio turns on and then automatically retract when the radio is turned off. If the new Harada functions this way it will be tough to use the OE antenna switch.1 point
-
1 pointHere is the Konig Rewind in the 16" version - silver finish with machined lip, 0 offset. The tire size is 205/55X16 as per other's recommendations. This setup will closely match the OE tire diameter and avoid speedo errors. You can sometimes catch them on sale at MSA, try and watch for free shipping. Discount Tire is also an excellent source, especially if you negotiate a wheel & tire package discount.
 1 point
 -
1 point
-
Ha-ha once again I am late to the party. If Jim^^ S30Driver does not have what you need I believe I have a better one than you show in the pic. Although I like the plastic weld idea, I might have to give that a try on some other plastics I have.1 point
-
1 point
-
Folks, exhaust is in. I seal threaded the drain and filler bolts and fill the oil via the speedometer hole. I use the cheappo hand pump from harbor freight till the oil start creeping out the speedometer. Then I raise the engine up a bit to drain more oil out. The speedometer and filler holes are pretty close horizontal wise. fire up the car start immediately. Gosh I miss the clunker, old, noise sound. The transmission is so quiet. No more rattle noise took for a spin and it does feel smooth. Shifting gears are so nice. This is what driving car suppose to be. will do more drive test. Did I tell you I miss this old, manual, noisy car sound. The goddess, pleasant 3k+ internal combustion explosions per minute !!!


 1 point