


Leaderboard
.JPG.cfcada9cf1c1b502df3f5f2f2ca3ff36.JPG)


.jpeg.7e61781a506c5c75a3fd273235c27757.jpeg)

Popular Content
Showing content with the highest reputation on 02/27/2022 in all areas
-
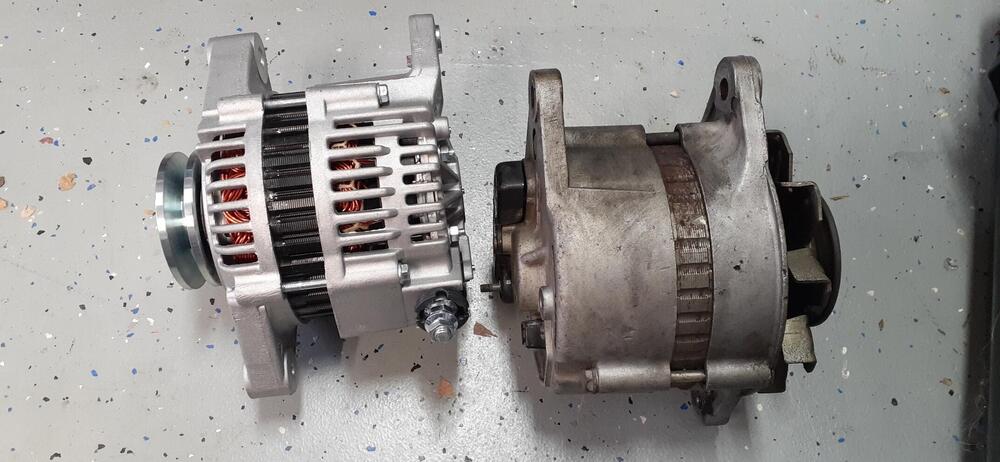
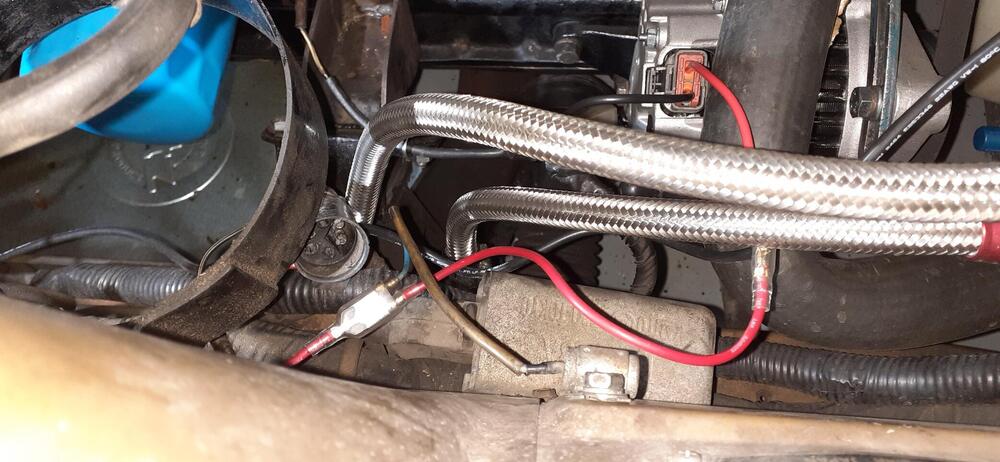
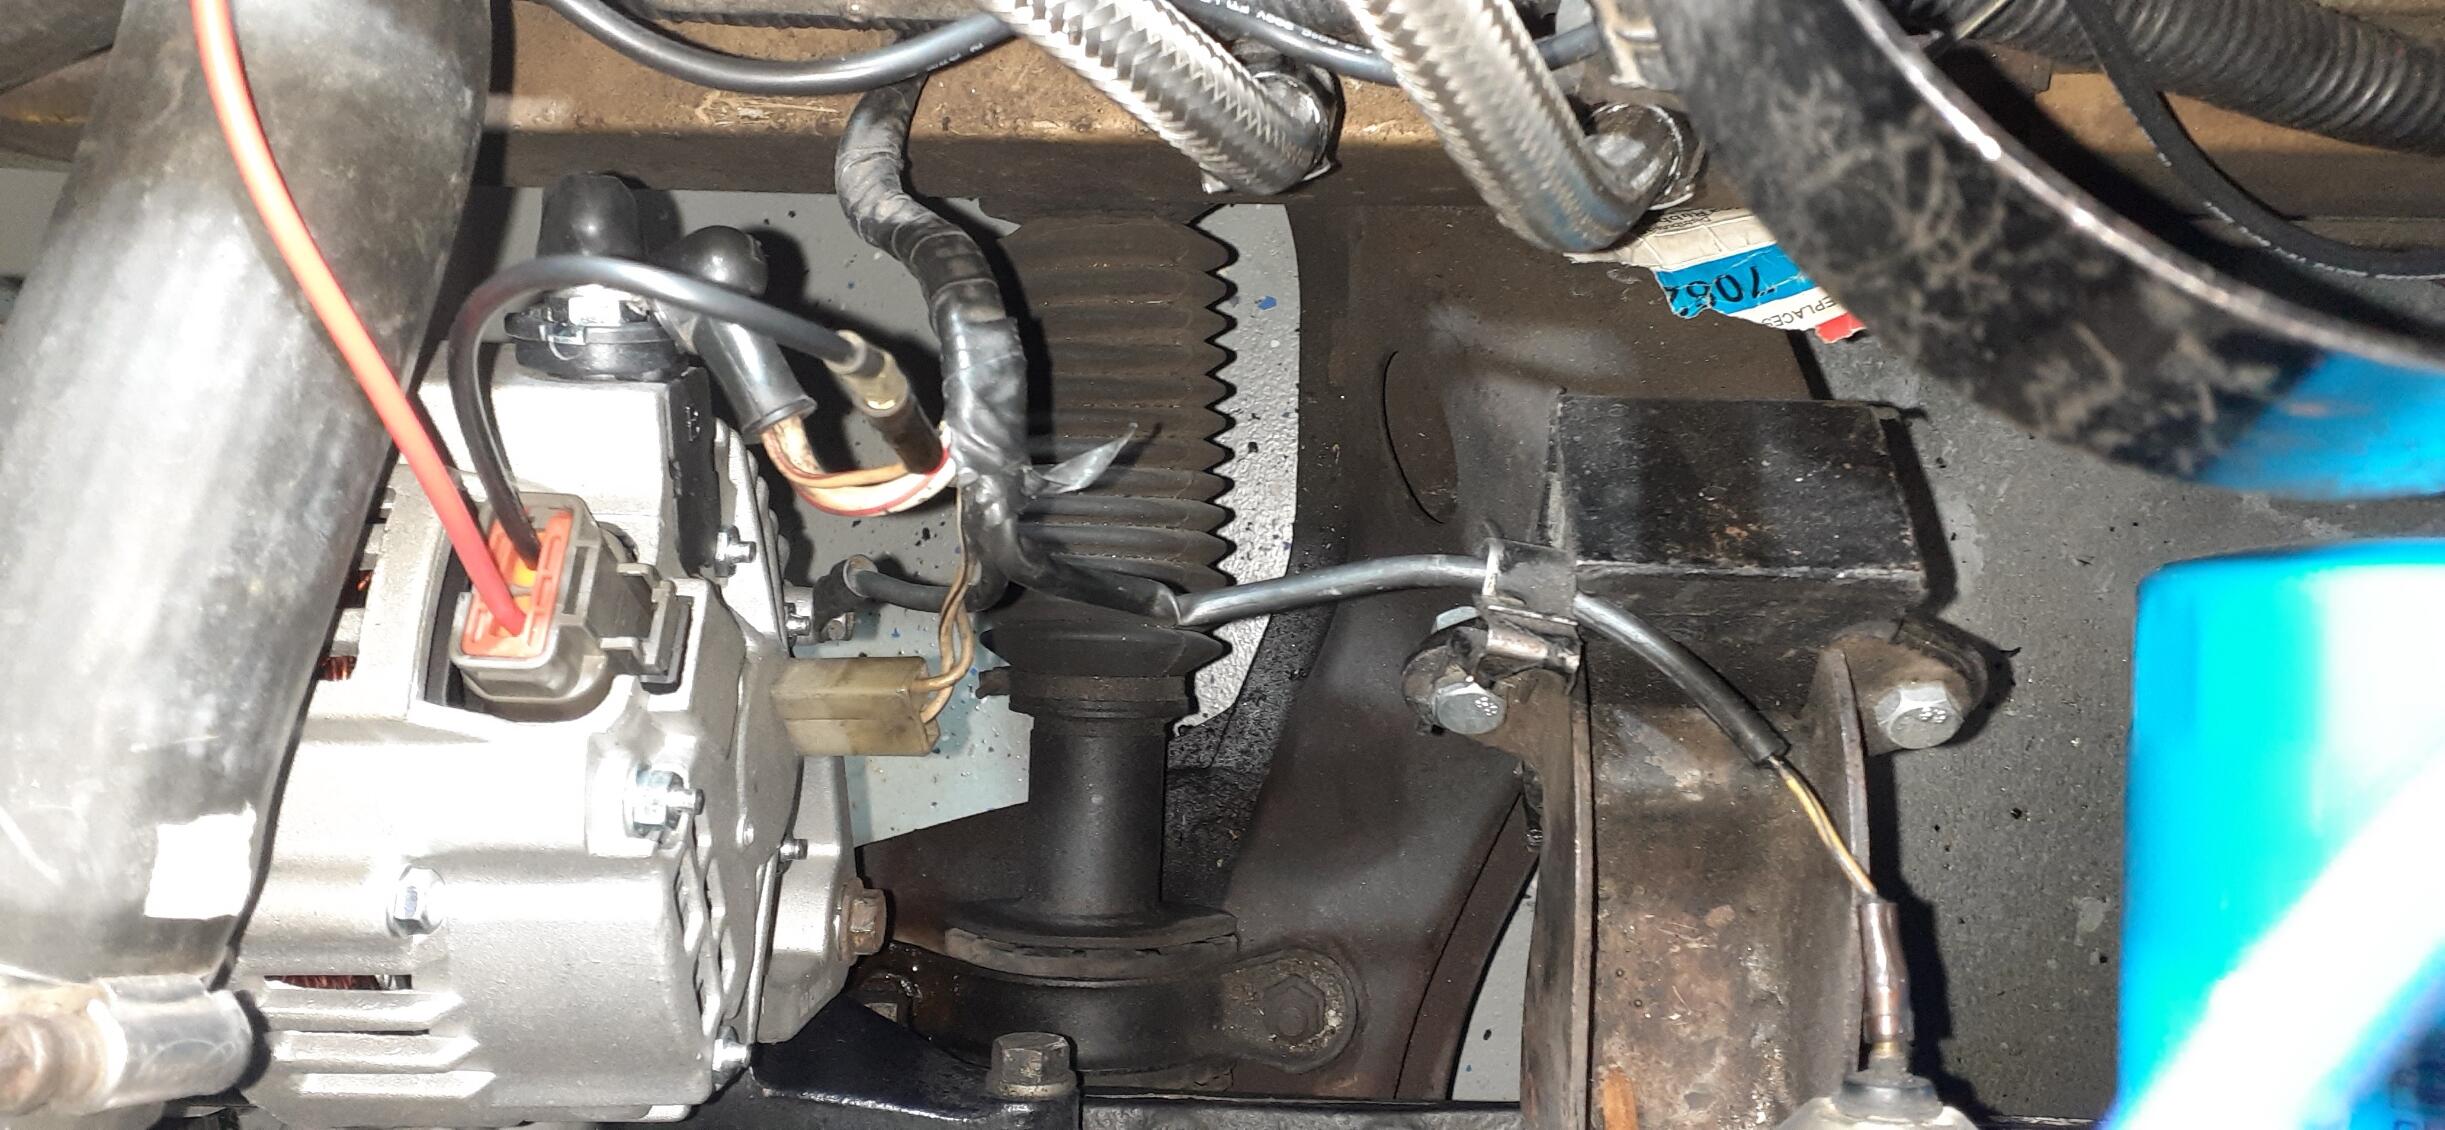
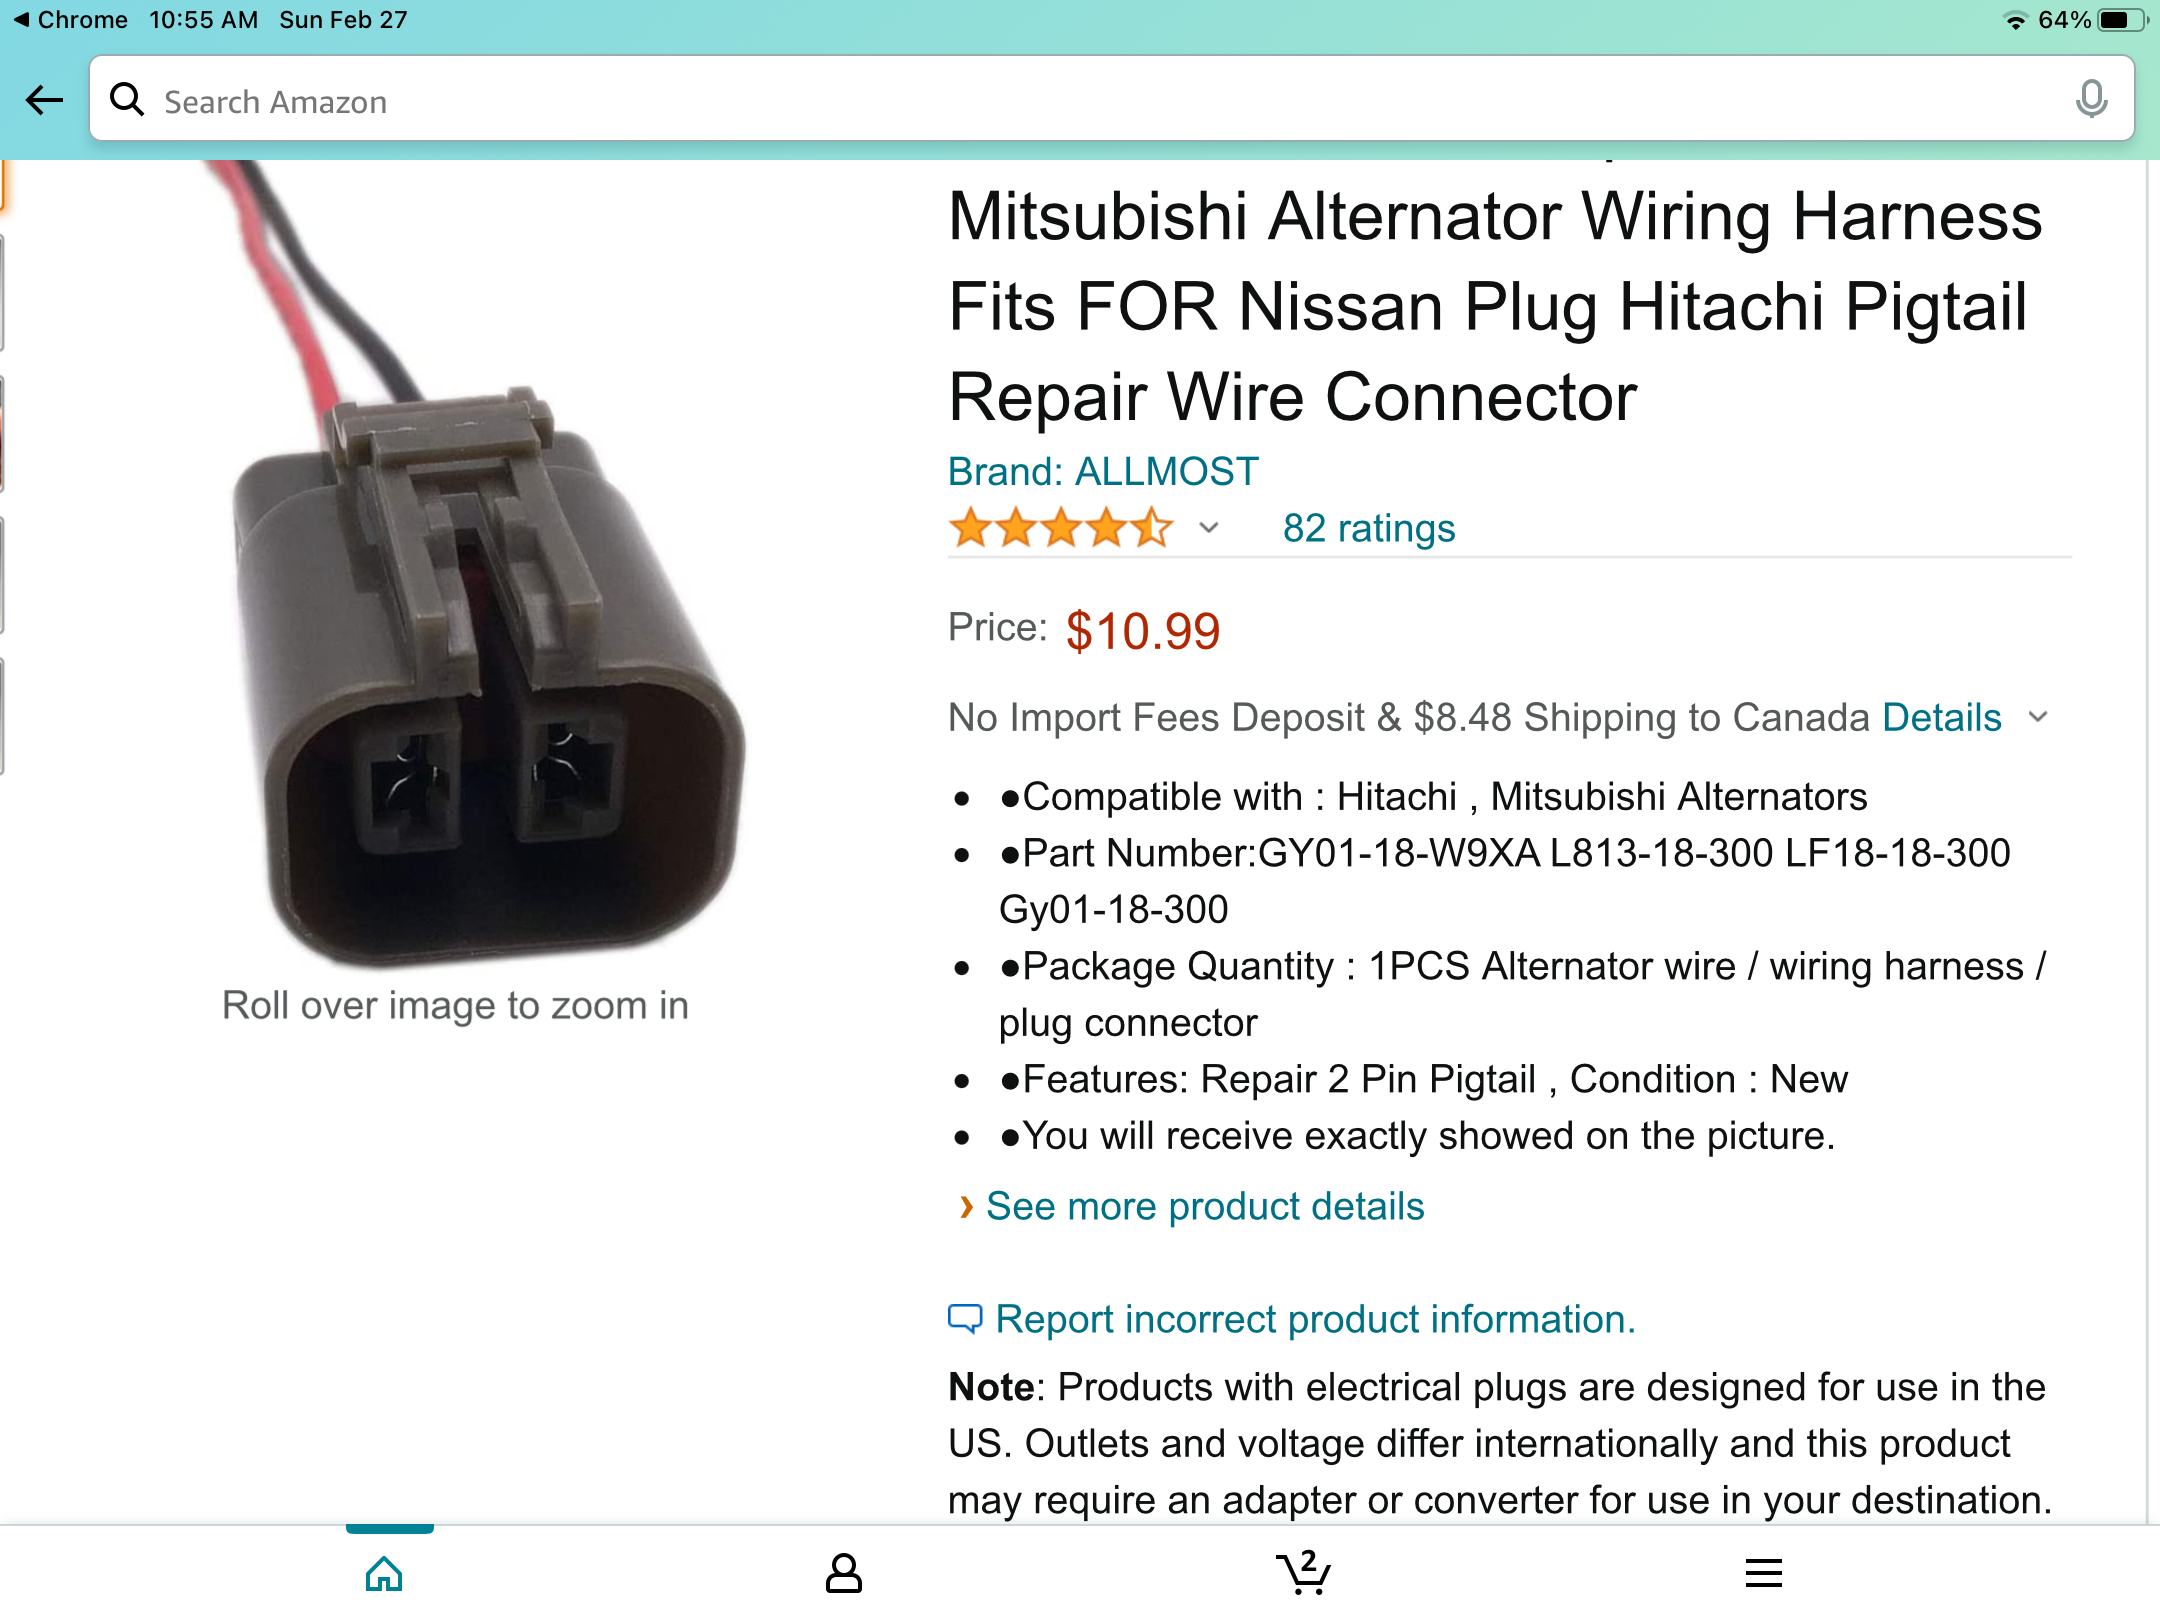
3 pointsI haven't been happy with the charging system in the 260Z for a while. At startup, the alternator output was fine, but after a while of driving, the voltage would drop down to only 12.8VDC many times. It was time to explore options. Since I converted the carburetors into throttle bodies for the Patton Machine GM TBI fuel injection, I wasn't using the neutral (yellow) wire from the alternator for the fuel pump relay #1. That meant I didn't have the limitation a stock 260Z owner would have. (Of course, I could have worked around that one if needed.) Because I like experimenting on my projects, I decided to look into the Nissan Frontier 70A alternator. Since I didn't feel like paying ZCarDepot $150 for their setup, I searched RockAuto and found a new SKP for $86.79 (minus 5% discount and plus tax and shipping) alternator for a 1999-2004 Frontier 4 cylinder. On Amazon, I found the pigtail for the alternator $10.99 + tax. I took out the old voltage regulator (still a points style - Sorry, @Dave WM, I didn't try to adjust it first. It looked bad on the bottom to me.) and found the bottom side full of helicopter seeds and somewhat corroded. I tried some different bullet lugs to see if I could connect wires to the engine harness to run to the pigtail. That was a no-go. However, I found some alternatives. The white/red wire to the alternator positive had a smaller white/red wire with a female bullet to connect to a condenser on the old alternator. I would prefer to have a different sense wire, but it would work. Then I noticed that the condenser at the VR was connected to the black/white wire. There was my switched source. I would just need to make a small jumper harness to connect the pigtail and condenser to the black/white wire. For the most part it was a matter of removing the old alternator and installing the new one. I did have to replace the lug on the white/red wire because the positive post on the new alternator was much larger. That was no big deal, though it took some time to enlarge the hole on a 1/4" lug to make it fit on the M7 (or M8?) post. I shot some video that I need to edit that may help others with the swap. I'll see how it turned out and post a link. Here the Frontier alternator with the 260Z externally regulated alternator. Here's how the wiring looked when I was done with the installation. Here's the pigtail on the alternator going to the positive post for sensing voltage.
 3 points
 -
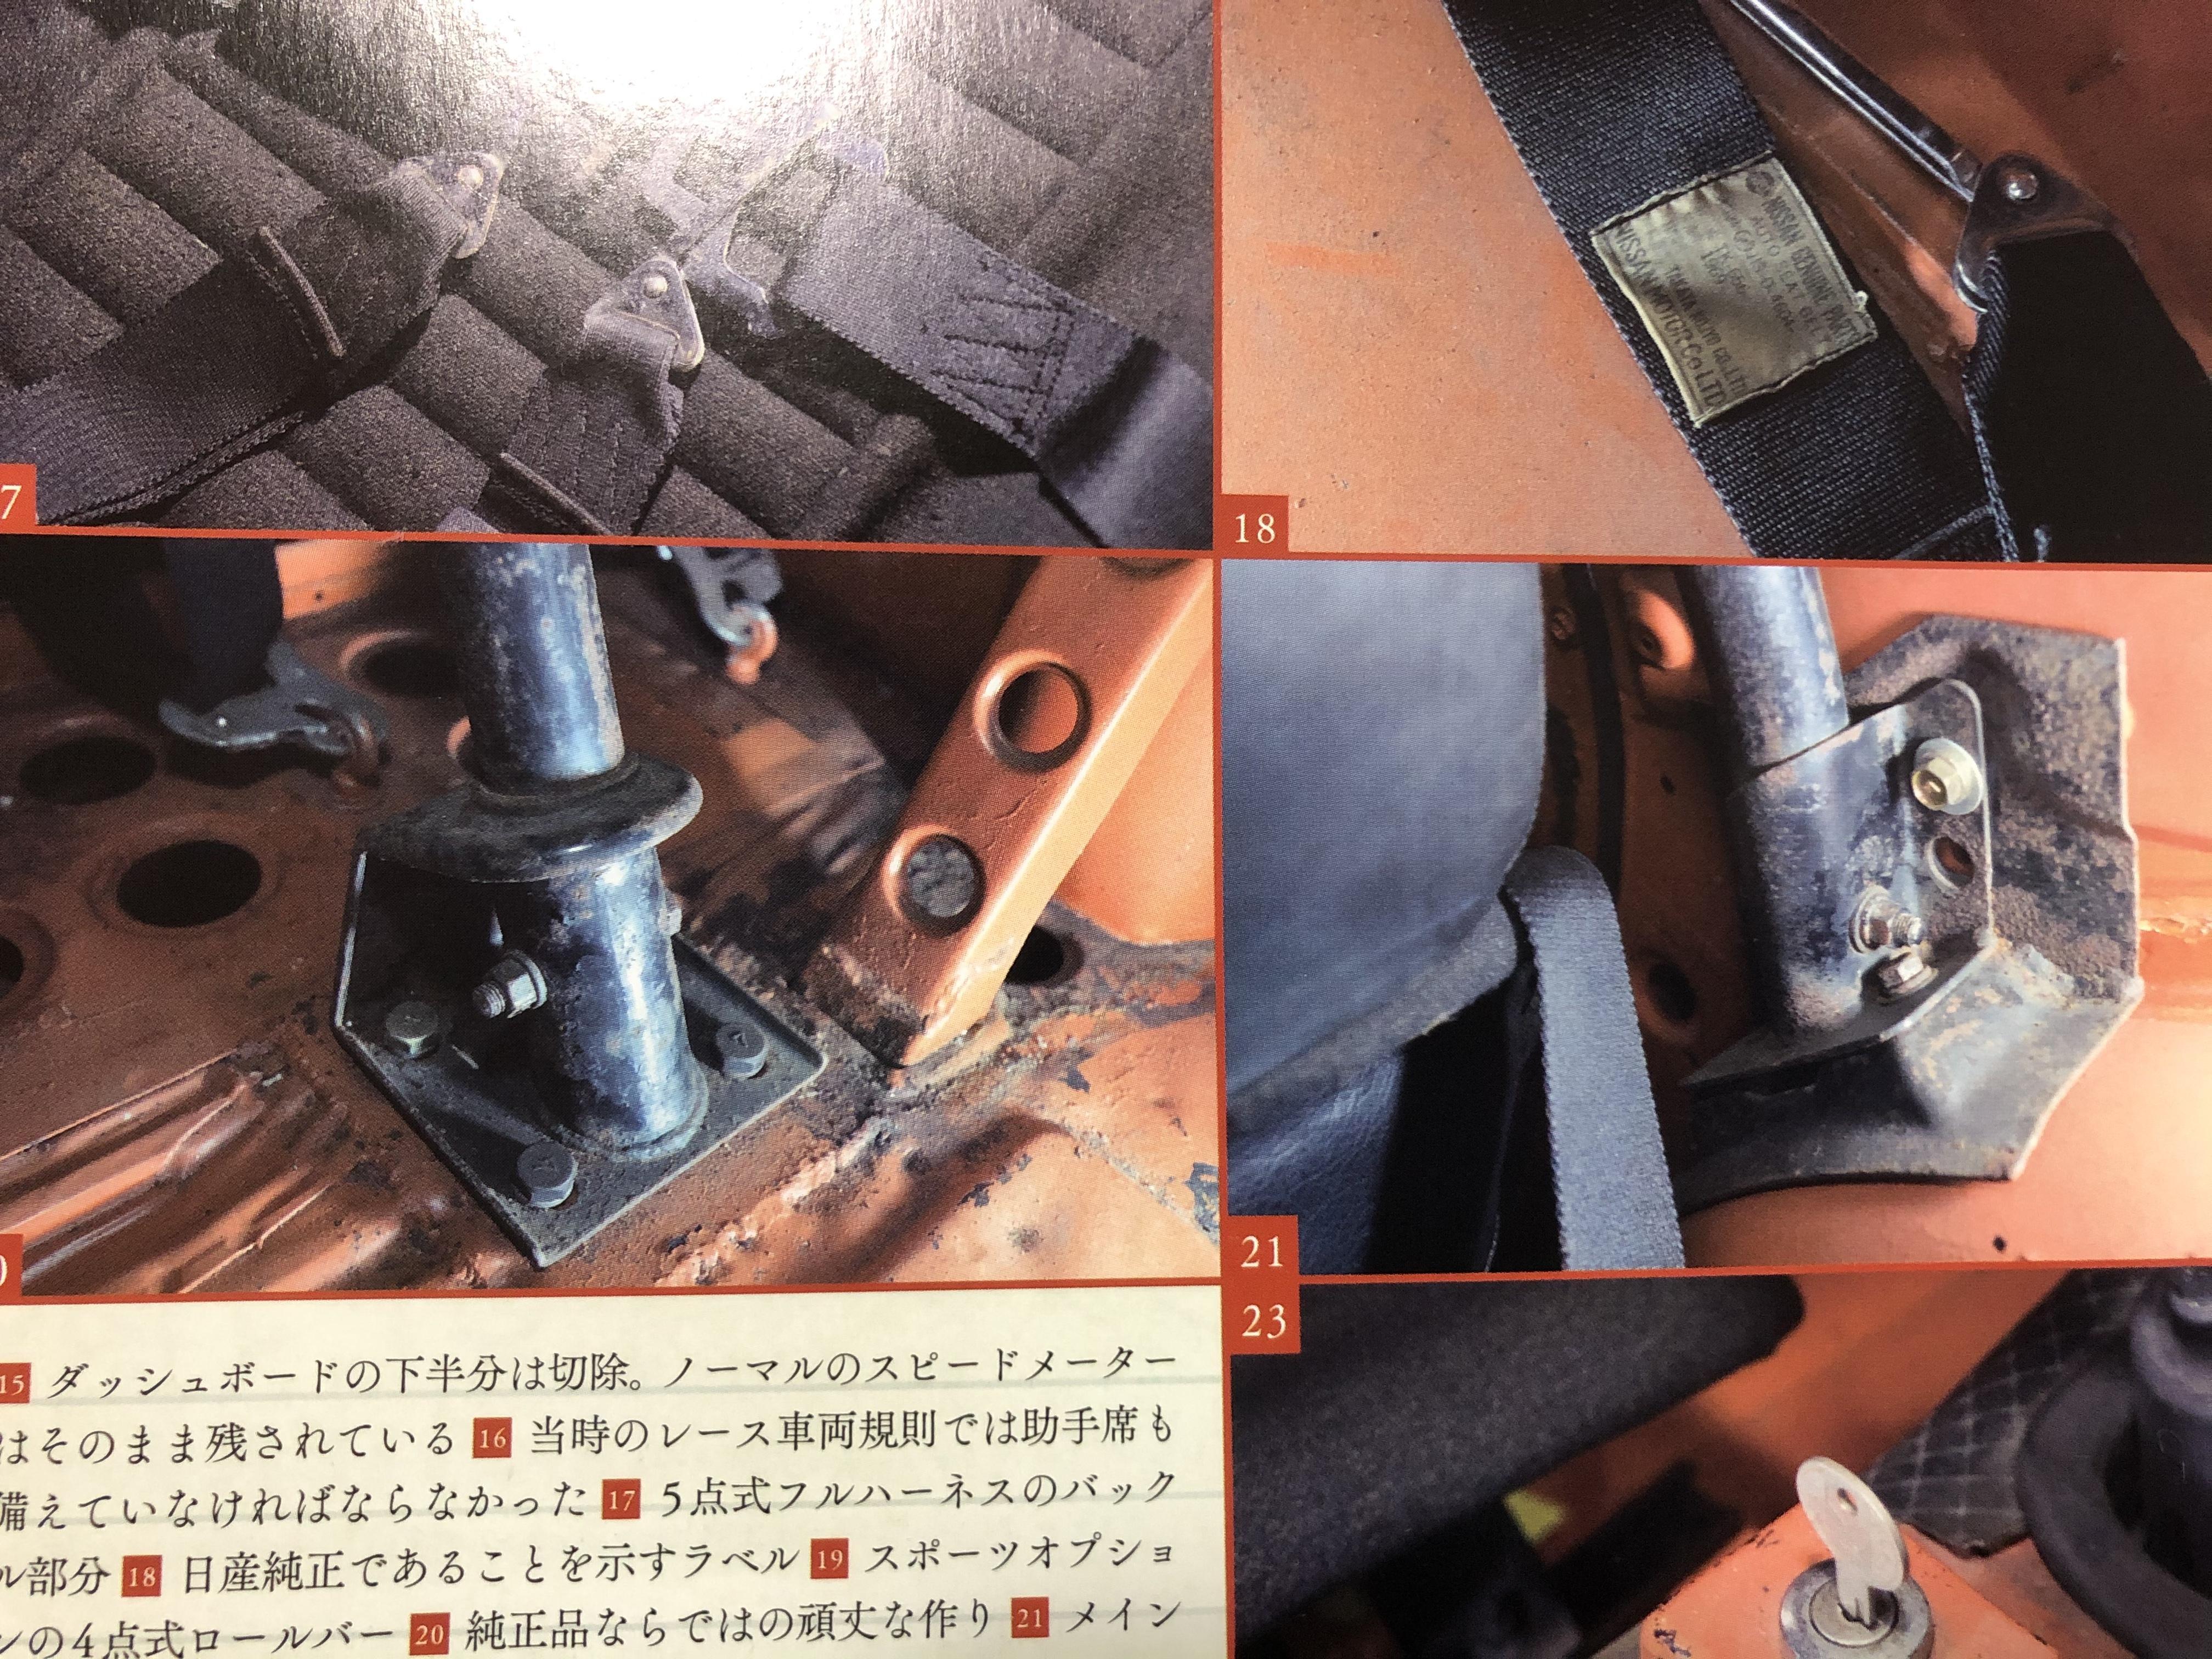
2 pointsMy thinking - and it is just a possibility, I have no evidence - is that because it was an early lightweight '240ZR' (featuring all the PZR lightweight tricks) it would have been fitted with the PZR type lightweight front fenders. I believe these required the side marker/repeater holes to be stamped out in a separate process, and it just may not have been done. I remember there being one or two instances of factory race cars like this. Australian market cars didn't have the holes stamped either, which perhaps shows us that it was indeed a separate process in the front fender manufacturing. Just a theory. I've seen evidence of hand-cutting features on other Works cars too. Yes, I saw it twice during the long restoration process. Amazing work by Ando san, and a real University diploma course in PZR-specific details for me. I have a huge amount of reference photos too. Fascinating stuff. I don't want to spoil the fun, so I'll keep quiet...2 points
-
2 pointsOk. So remove radiator cap, drive new car under, then replace radiator cap. Sent from my iPhone using Tapatalk2 points
-
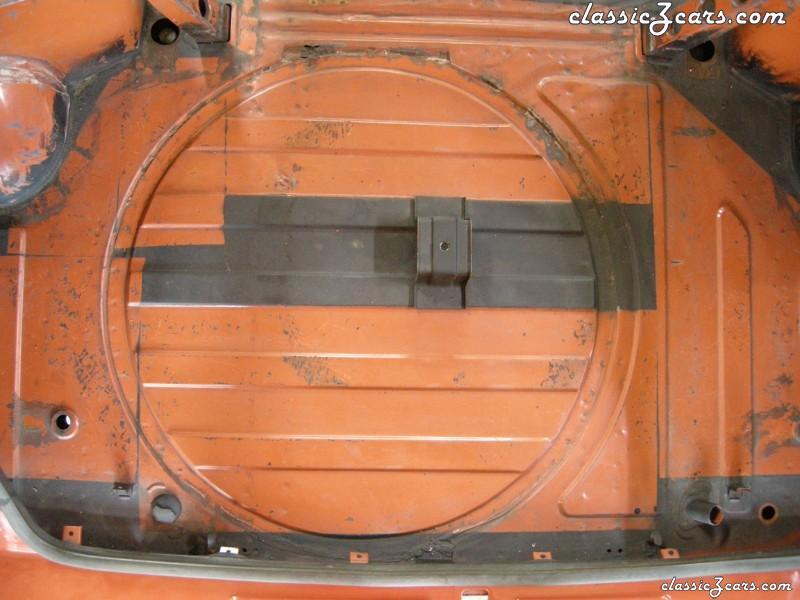
2 pointsHere is a good shot , what thing makes this car a Z432-R ? Kats
 2 points
 -
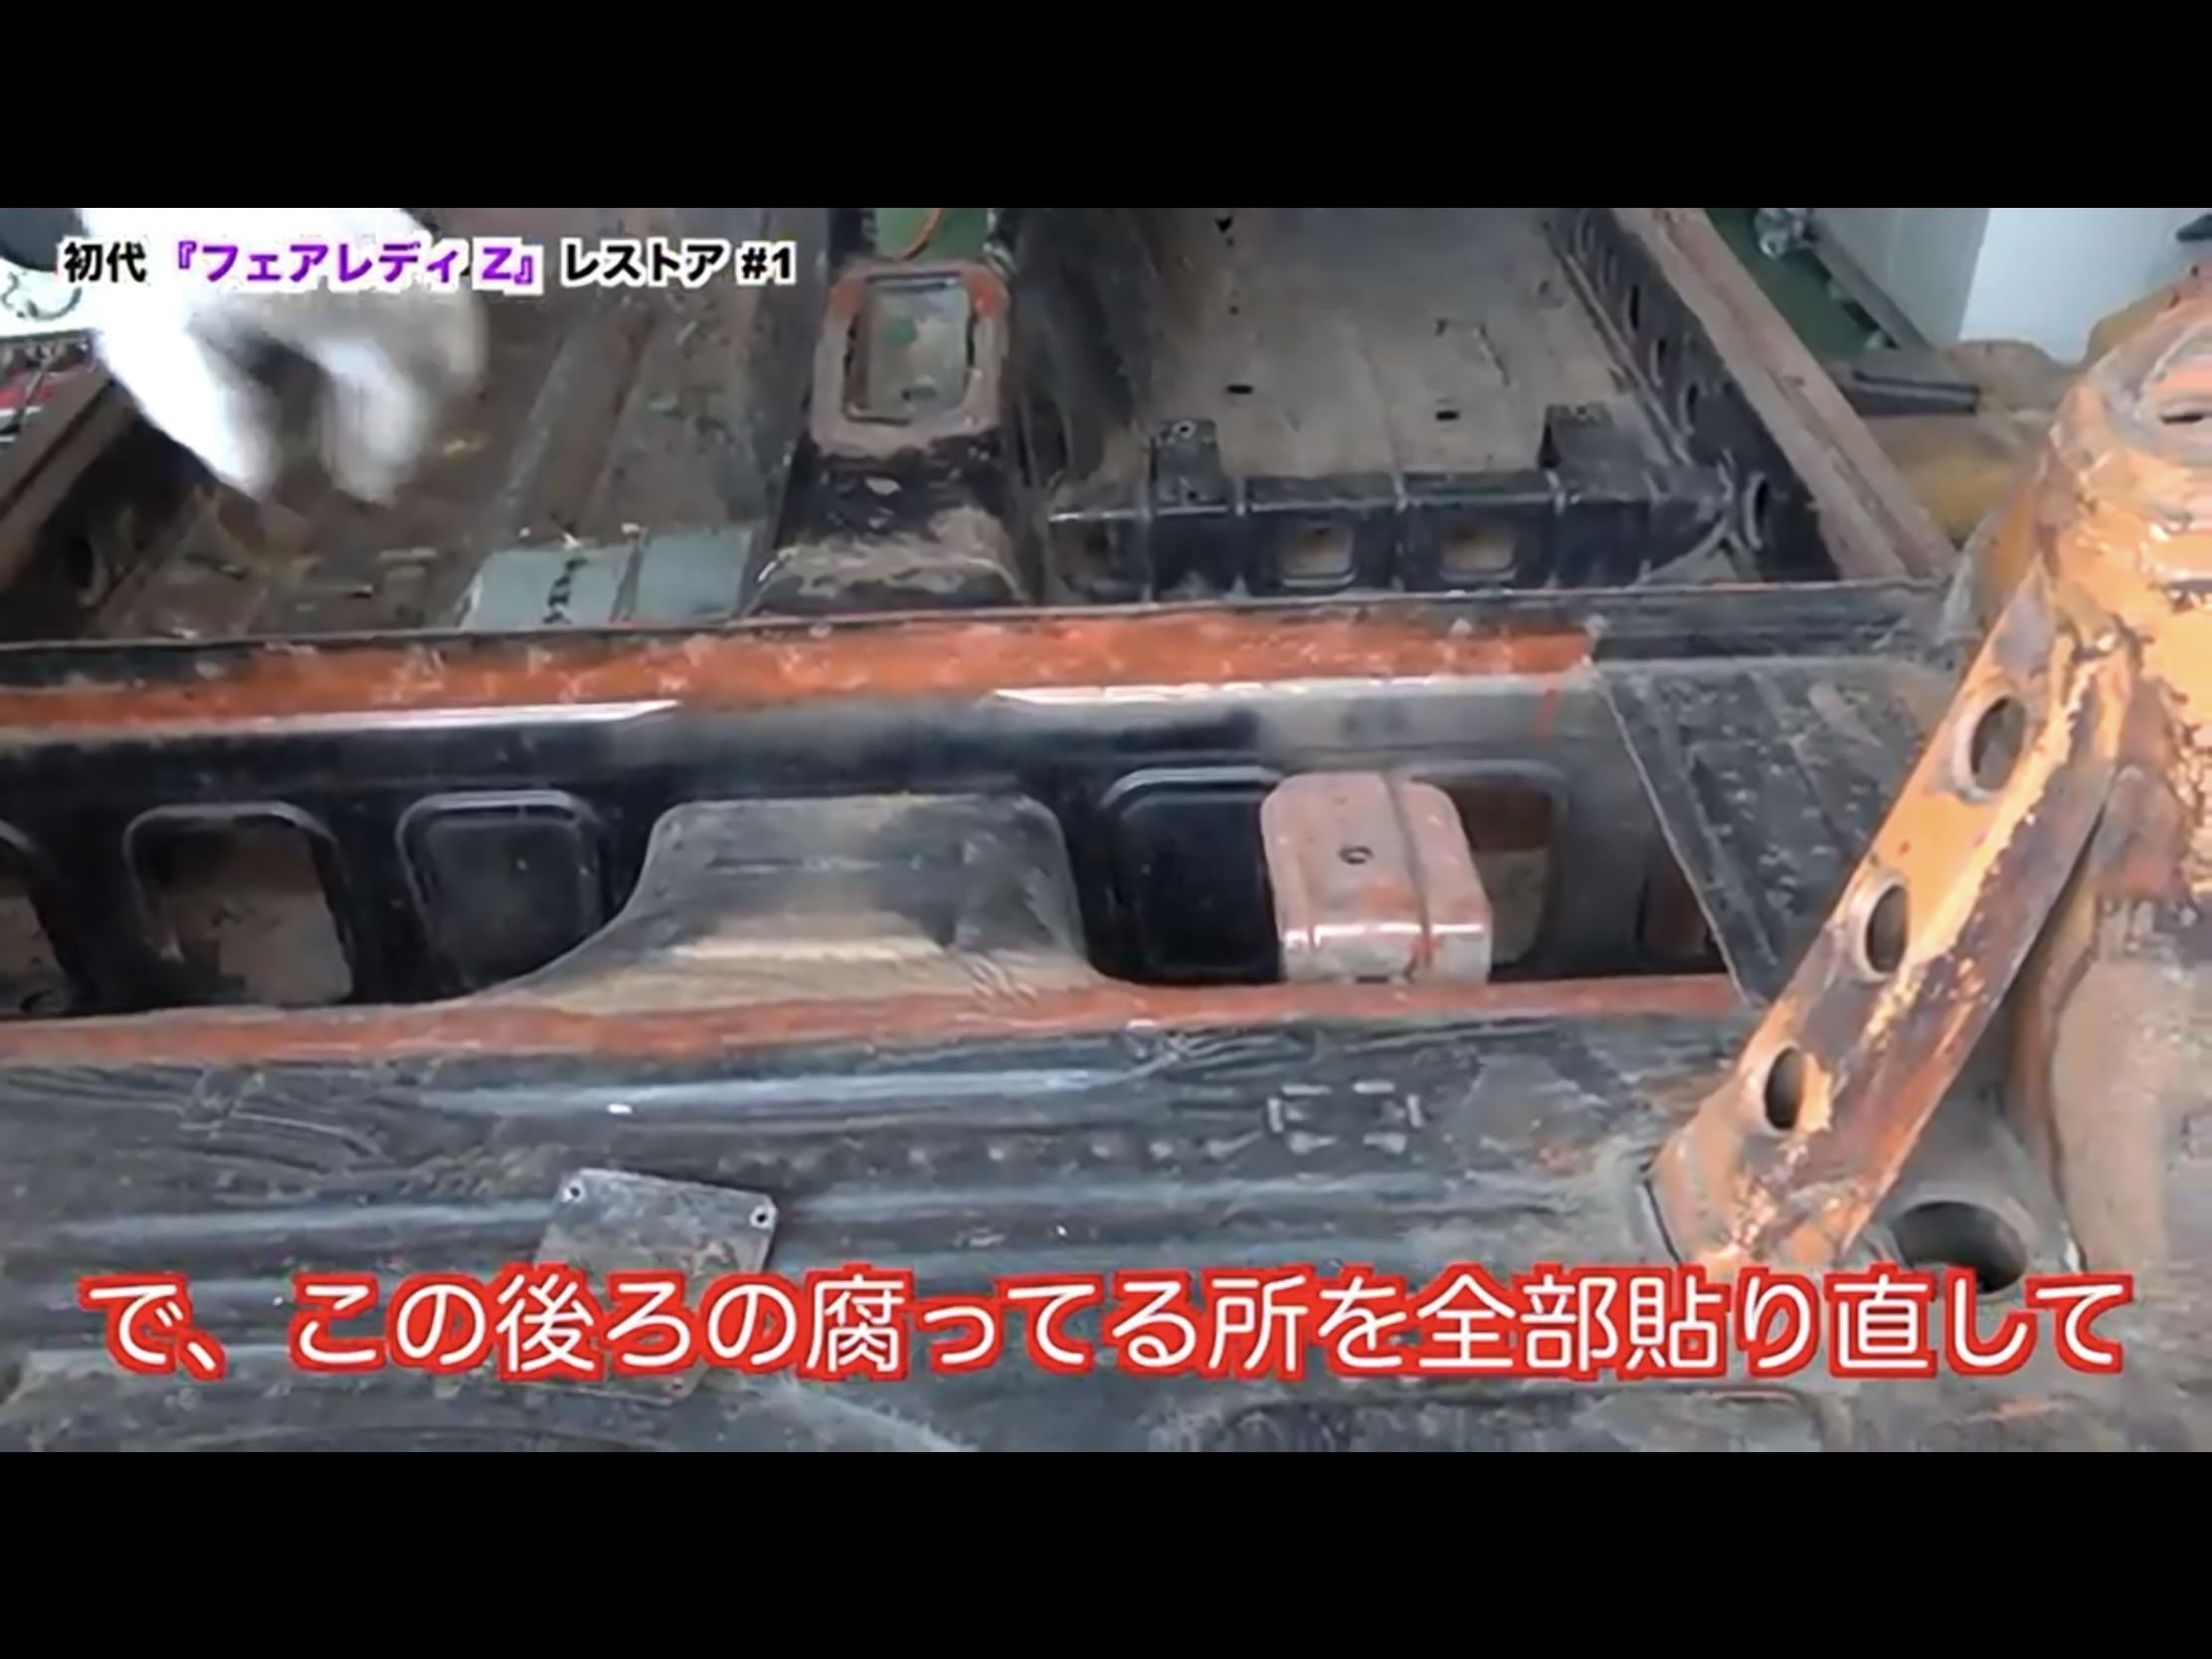
2 pointsHi Alan, I didn’t have this one , so I quickly bought the one ! Thank you. Today I found some new YouTube of Z432-R , they are very interesting to see. Both cars are not well known in Japan (World wide too) . But I believe the one in the Sunday car meeting must be the one which was restored at TA -Auto , Ando-san’s work . I visited several times and watched the progress, that was very interesting to me. Alan might see it too, might not you ? And the one is now restored in progress is now very “ hot “ in Japan. Mr. Saito ( owner and the mechanic) has got the car almost 20 years ago without knowing it was a Z432-R because the car was pretended to be Z432 . It had Normal seats , normal center console , aftermarket steering wheel, and painted red , etc etc. After stored it in his garage , he found 100 litter gas tank ! He suddenly realized it is Z432-R , PZR , PS30SB . Saito san has been showing his working progress on YouTube, his channel is now huge popular in Japan, but he never mentioned the car is Z432-R. He seems that he doesn’t want people get so excited about it and send him a lot of questions and comments which make him bother . But we already know the car it is ! Kats2 points
-
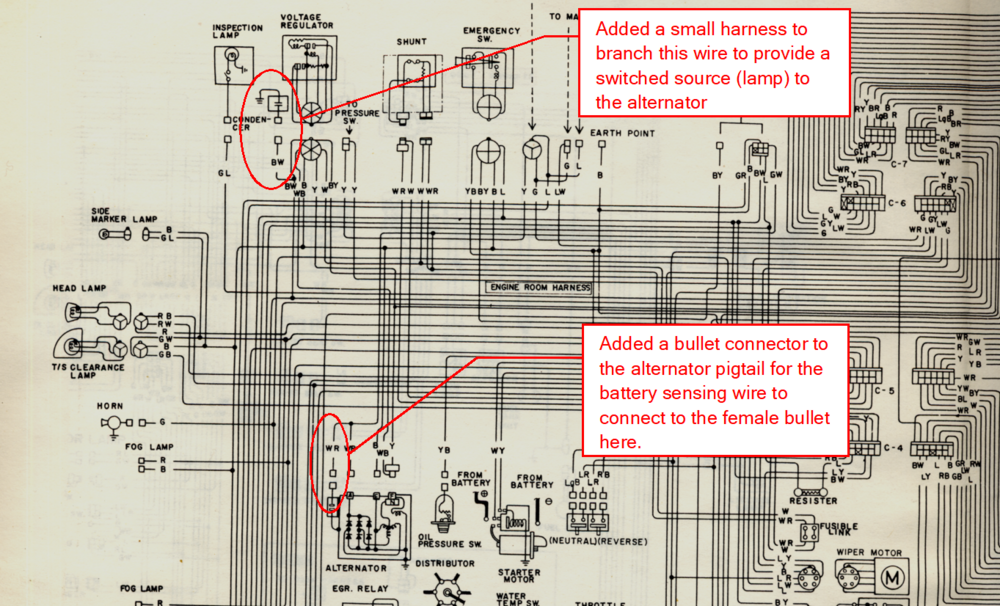
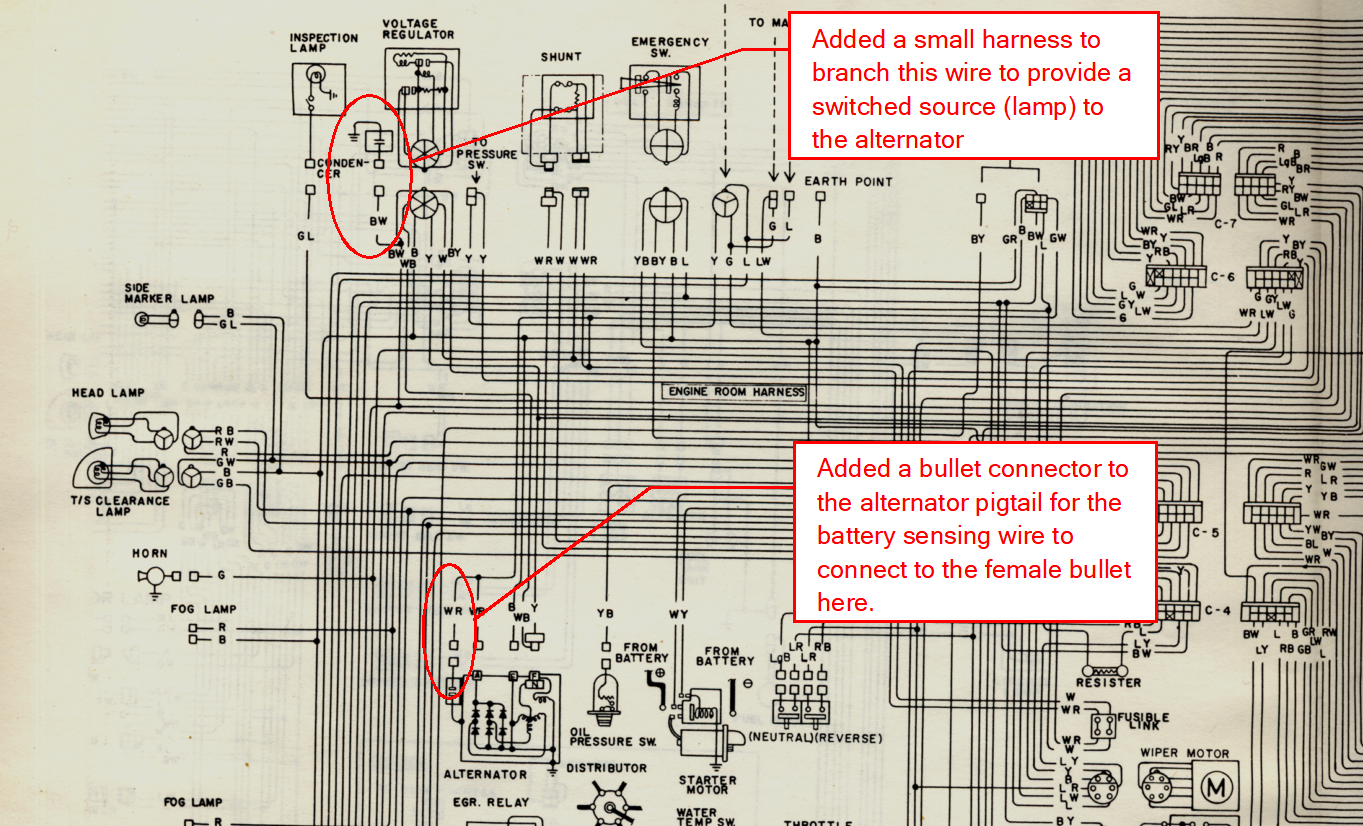
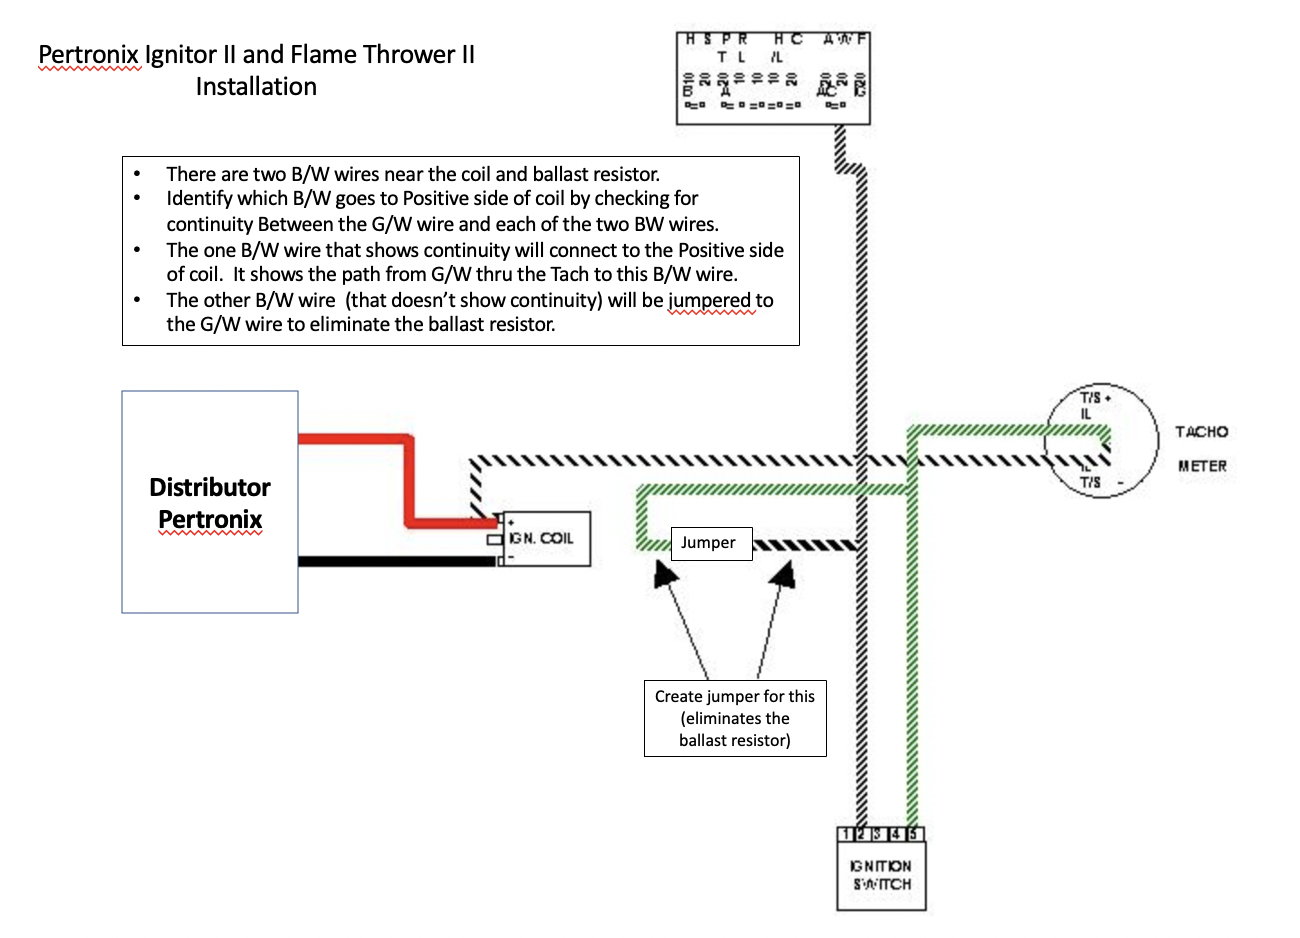
2 pointsFrom the wiring diagram to show where I got the sensing voltage and the switched source: The black/white wire is below the voltage regulator in the engine bay. The white/red wire branches off the 10 AWG white/red wire that goes to the positive post on the alternator.
 2 points
 -
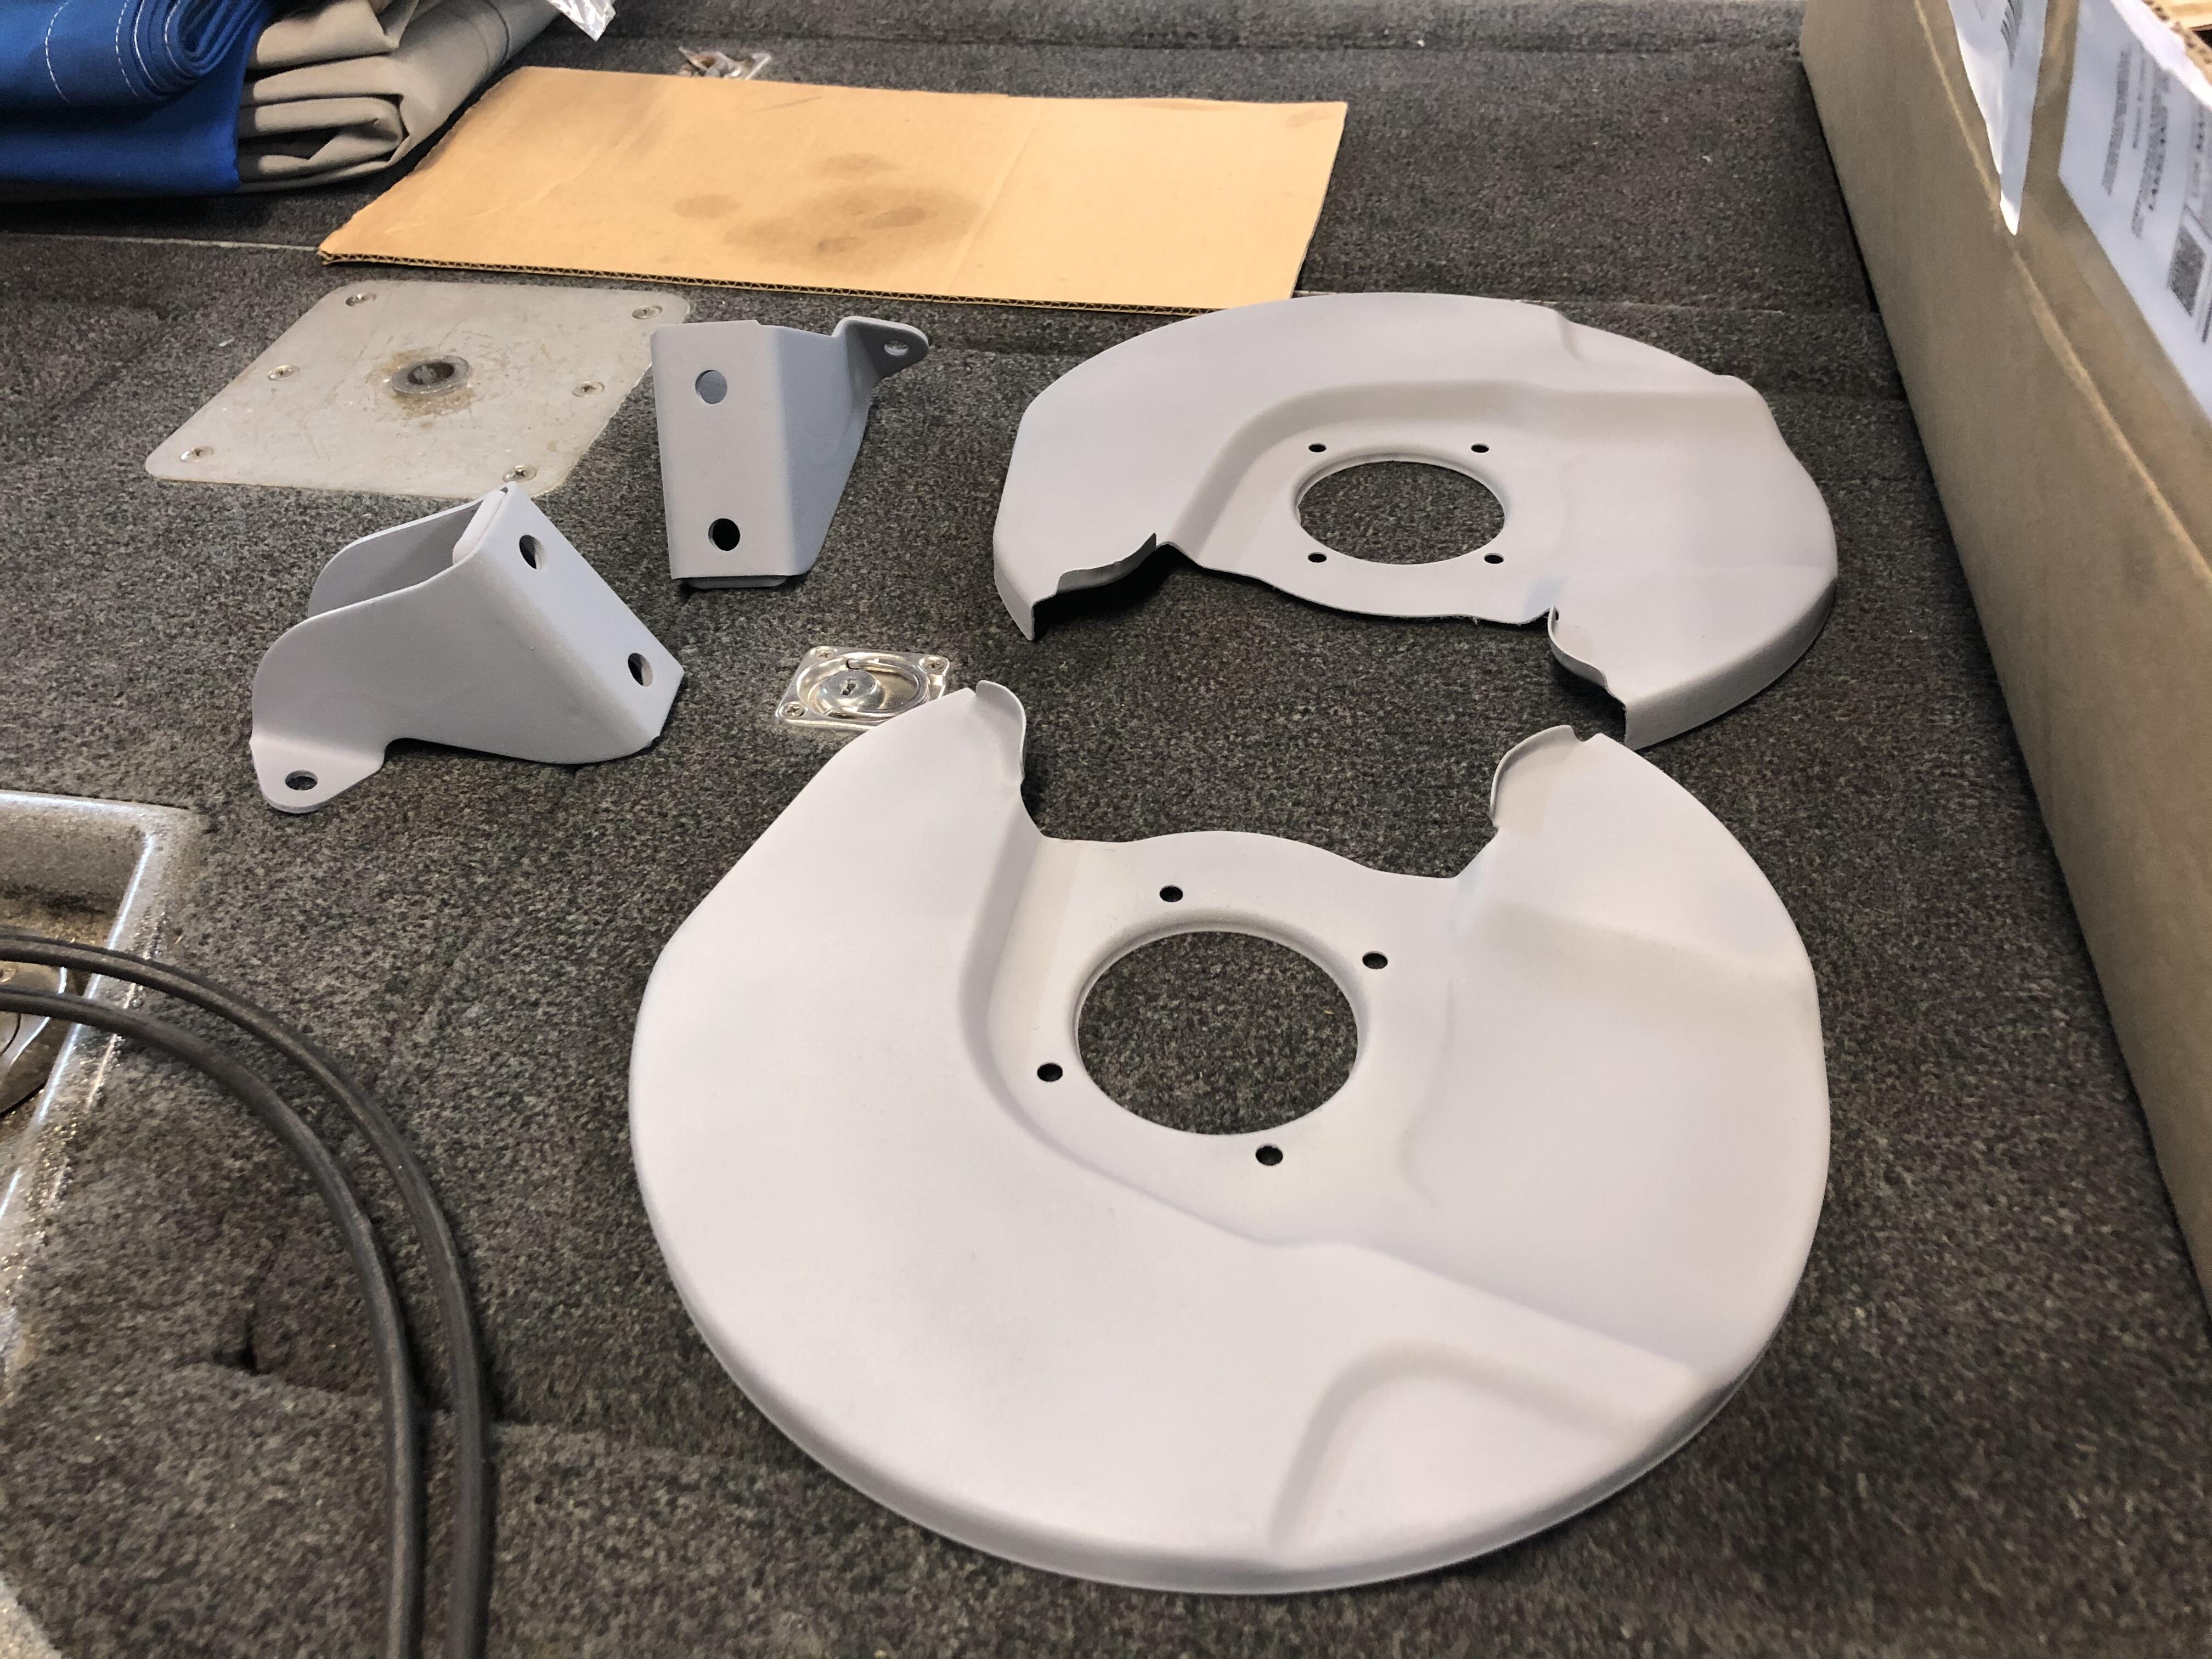
2 pointsCovers are available from MSA: https://www.thezstore.com/page/TZS/PROD/12-4355. Make sure you create an account at MSA (http://www.zcarparts.com/) and enter your ClassicZCars member number to get a 10% discount on a lot of different parts. You can find your member number by going to your profile on this site. It's in the URL.

 2 points
 -
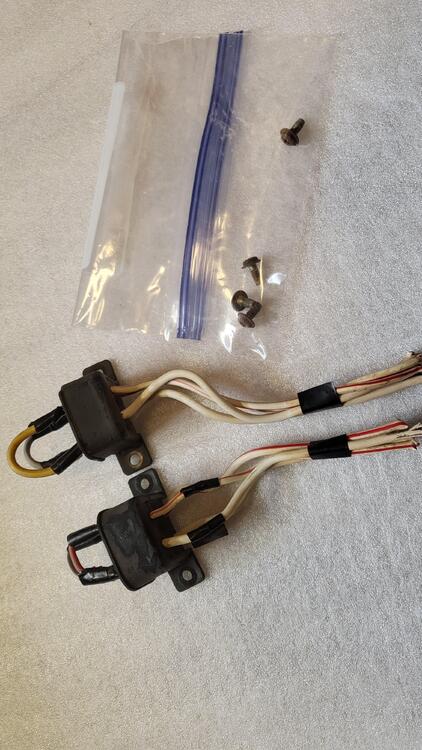
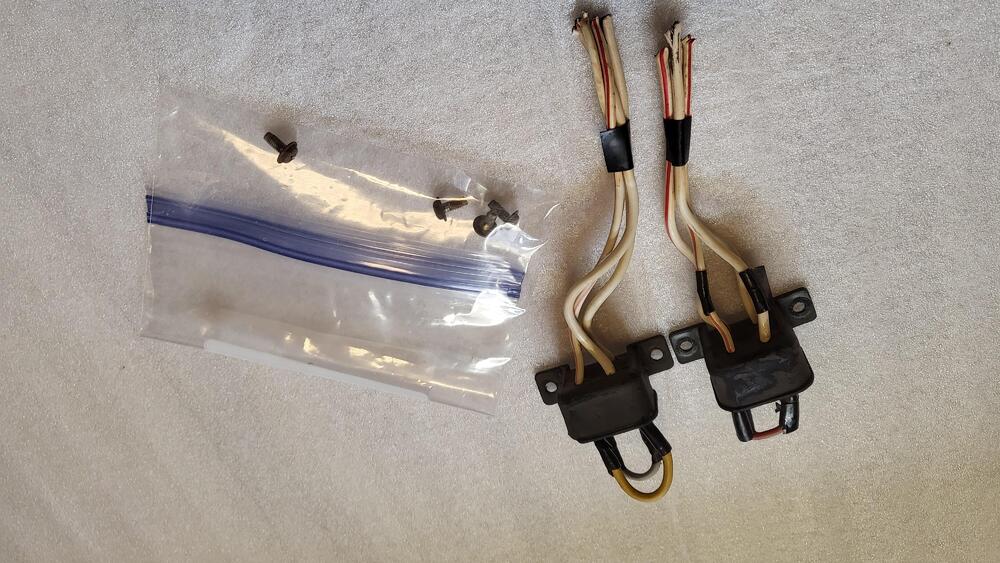
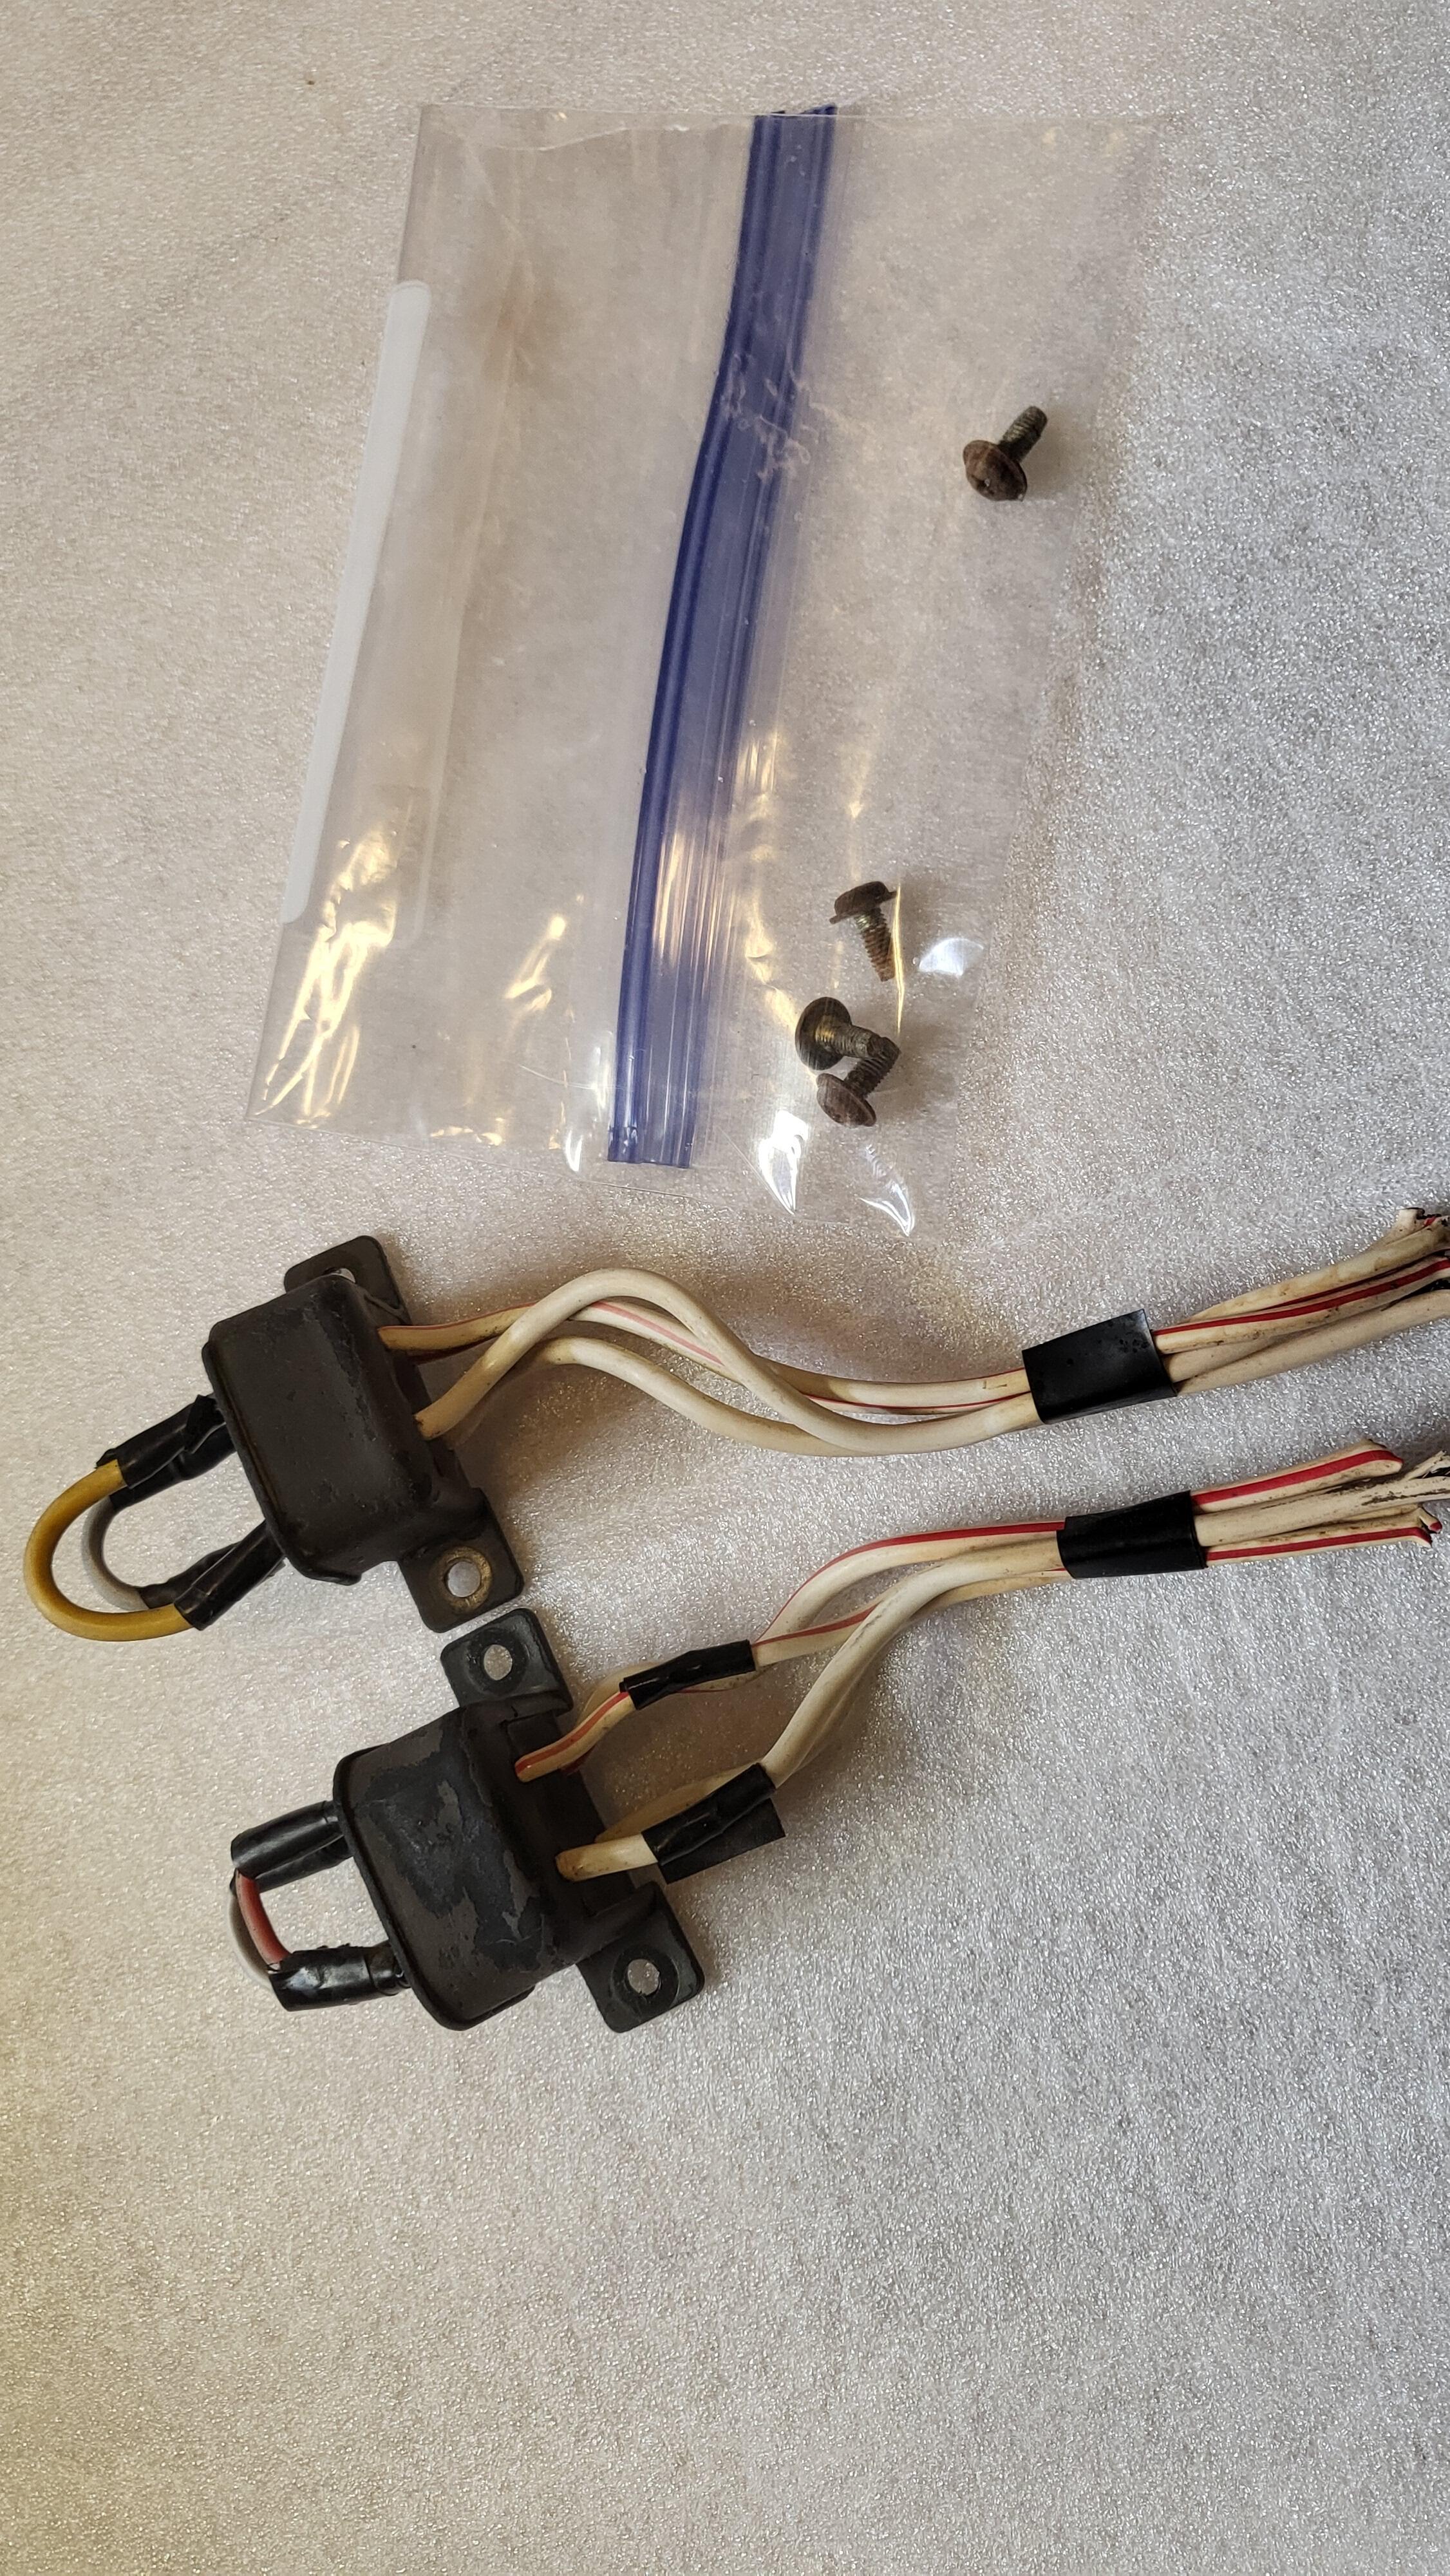
2 pointsPulled the two fusible link assemblies from the 78 parts car today. One was 100% intact - no cover. The other had a broken mounting tab, repaired it with super glue, should be fine, also missing cover. Includes 4 proper relay cover mounting screws. I would replace the fusible links and clean their connections. $45 including USPS shipping, pm if interested ...
 2 points
 -
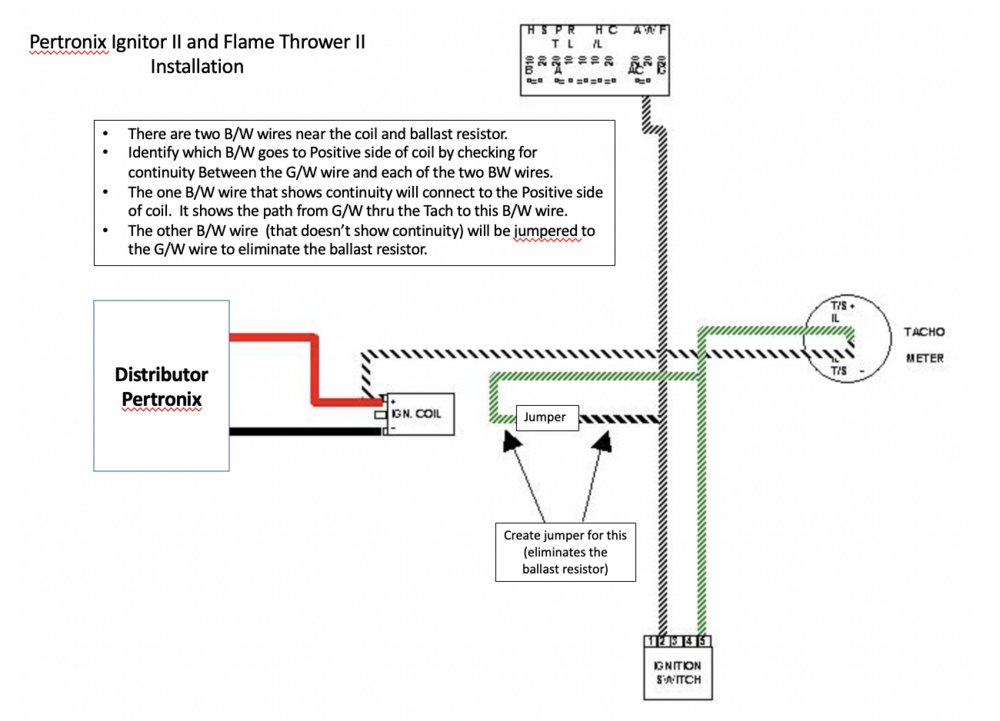
I just installed my Pertronix Ignitor II and Flame Thrower II. I'm not sure of the differences, but this is how I wired it. It eliminated the ballast resistor. I got the information from the video @SteveJ posted above and then updated a diagram previously posted on this site. I hope it helps. My tach does work.
 2 points
 -
1 point
-
1 pointGood for you. I too, worked my whole life for people who couldn't care less if I was Ok or not. And some big wig Politicians. Once I was able to retire I jumped at it. If I could do it all over I'd start my own business or whatever, working for others only pays if your in charge of who you work for and how much they pay you. Once I retired I relaxed and in a pursuit to end the useless clutter on life, I ditched the cable Tv and went back to an old hobby I enjoyed, Reading. Don't ever sell yourself short. In the end, only you, your family and reality have a worthwhile relationship. God bless and good luck !1 point
-
1 point
-
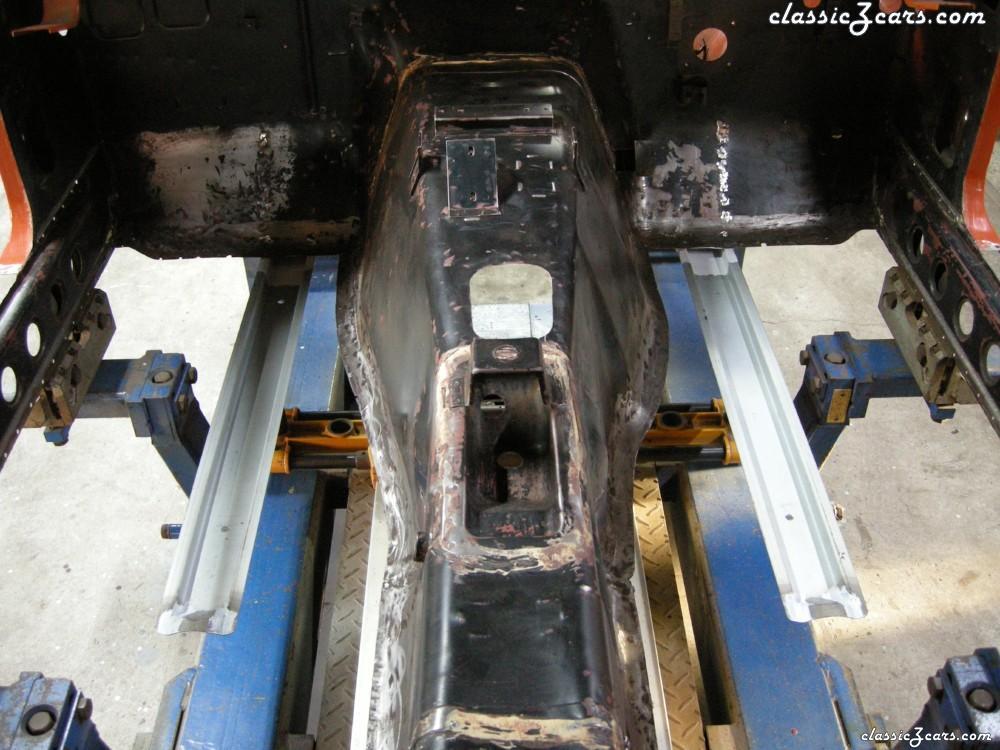
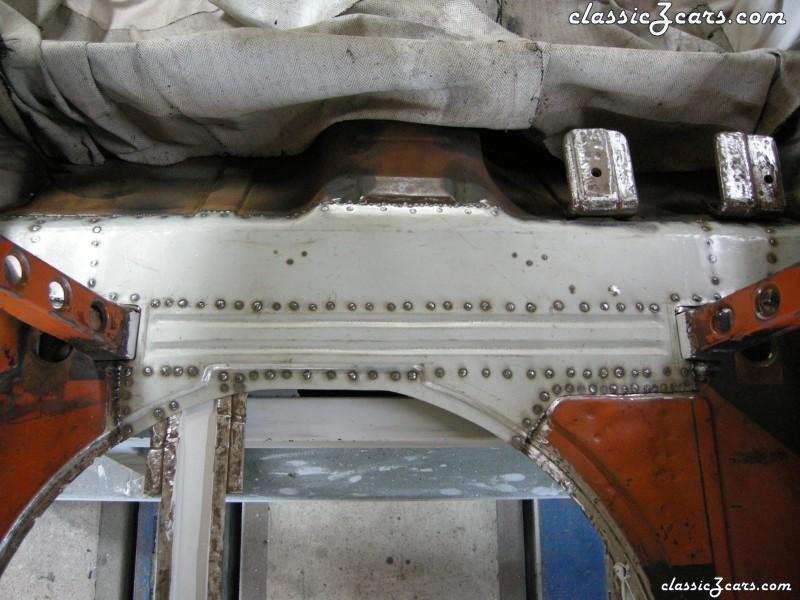
1 pointCouple of things could indicate it's a Z432R, first the pocket in the transmission tunnel with the holes for the ignition switch wiring. There is a metal cover bracket that goes above that for the switch. Secondly it has the threaded mounting bracket on the right hand side for the harness. Then of course the flat boot floor with no cutout for the spare wheel. Roo
 1 point
 -
1 pointY’all are awesome!! Thank you for all this support and advice!! So psyched to be able to source all this and complete this project!!1 point
-
1 point1 point1 point1 point1 point0 pointsHa. Here’s some of the rust spots. Mainly the usual places at the joints between the front and rear of the floor pans. One good one back in the spare tire well but not in the usual spot and possibly some “work” around it so it may have been previously patched. Maybe treated inside? Just poked it with my finger More rust on some upper body panel parts but no pics. Drivers door needs major work, both doglegs, and the right rear. Also some around the windshield which I really don’t want to remove. Sent from my iPhone using Tapatalk0 points


Important Information
By using this site, you agree to our Privacy Policy and Guidelines. We have placed cookies on your device to help make this website better. You can adjust your cookie settings, otherwise we'll assume you're okay to continue.