Leaderboard
-

Zed Head
Free Member3Points19,238Posts -
Patcon
 Subscriber
 3Points11,142Posts
 -

dutchzcarguy
Free Member2Points2,677Posts -

siteunseen
Free Member2Points15,115Posts


Popular Content
Showing content with the highest reputation on 11/10/2021 in Posts
-
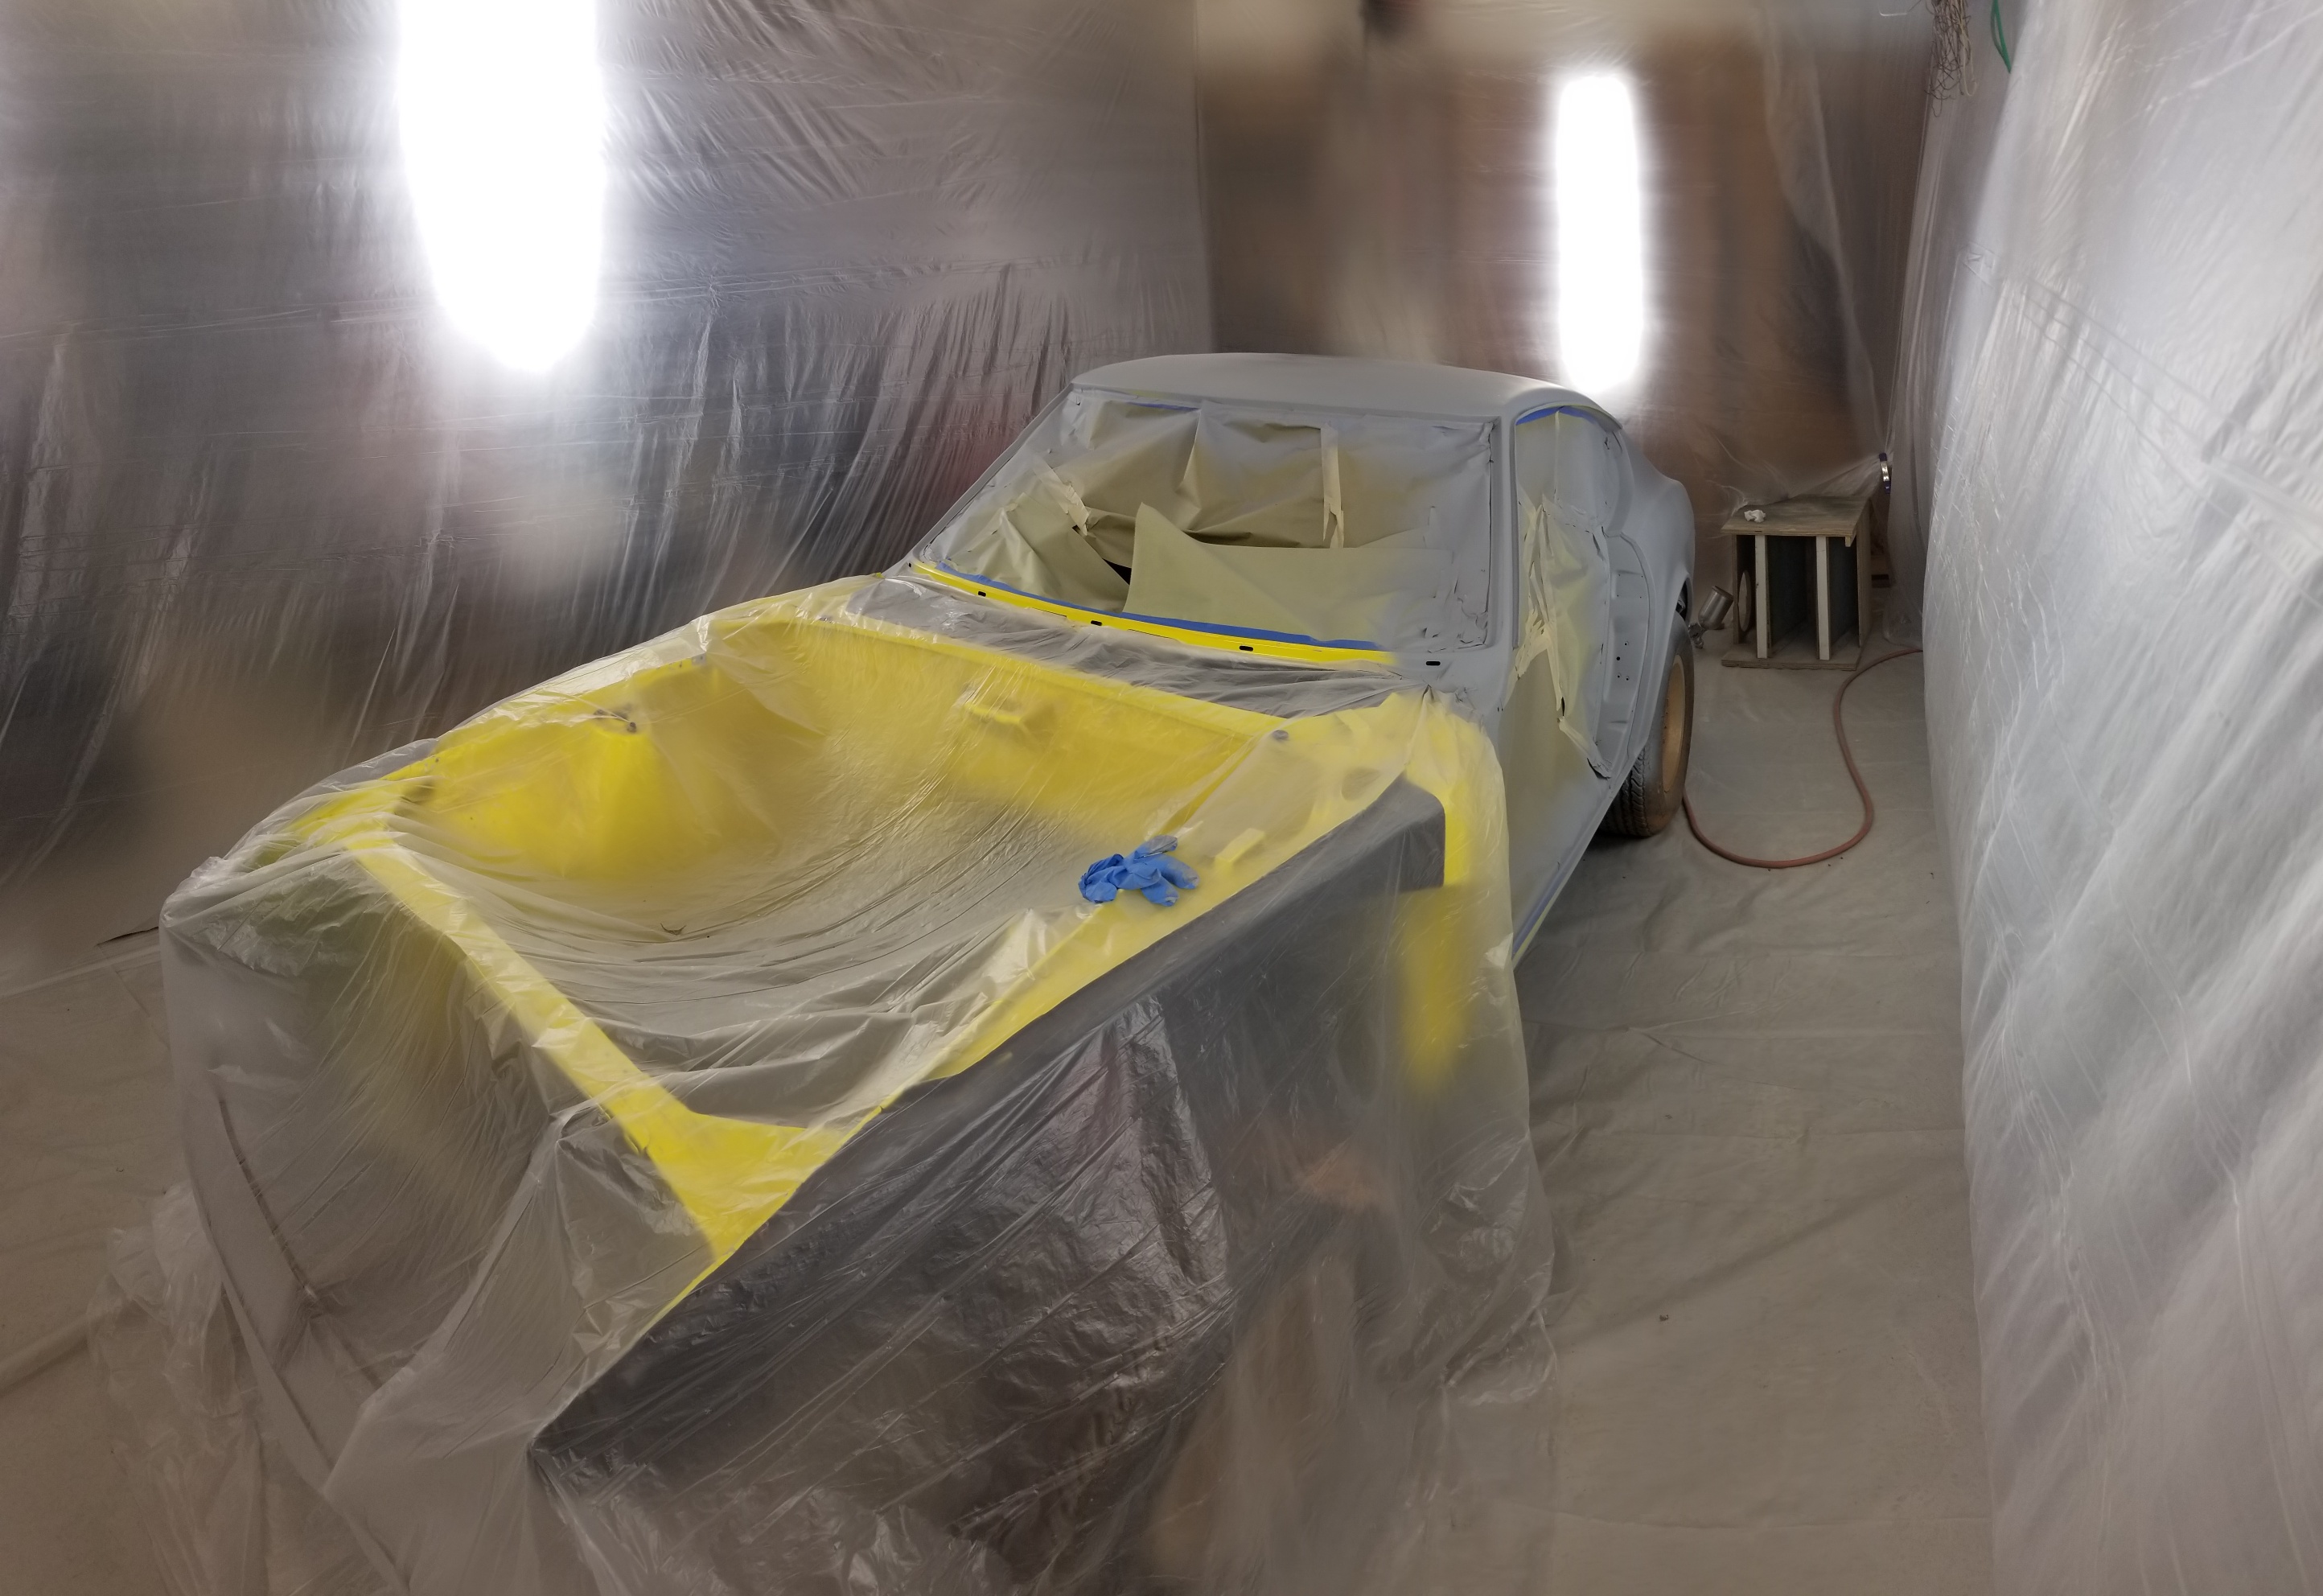
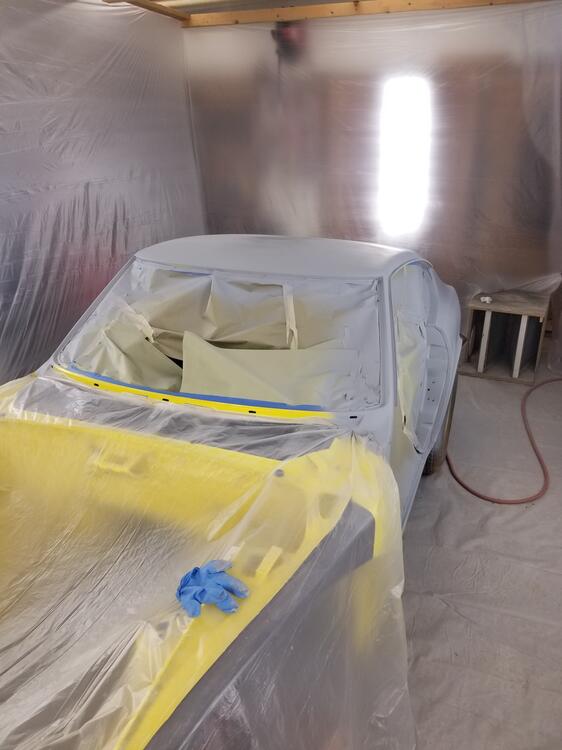
3 pointsGot my crew working this morning, then sort of took a half day off I shot some epoxy over the bare metal areas and then stacked some high build until the gun started acting up
 3 points
 -
You might check the tightness of the damper on the crankshaft snout. People often use the wrong combination of washer and bolt and end up torquing the bolt in to the nose of the crankshaft without actually clamping the damper down. Bolt too long, in effect. The key will keep the damper from spinning but it can still wobble around and cause damage. I think that @Diseazd might have a picture, if my memory is right. And, if you have AC, the AC belt idler pulley bearing is known for going bad and making noise.2 points
-
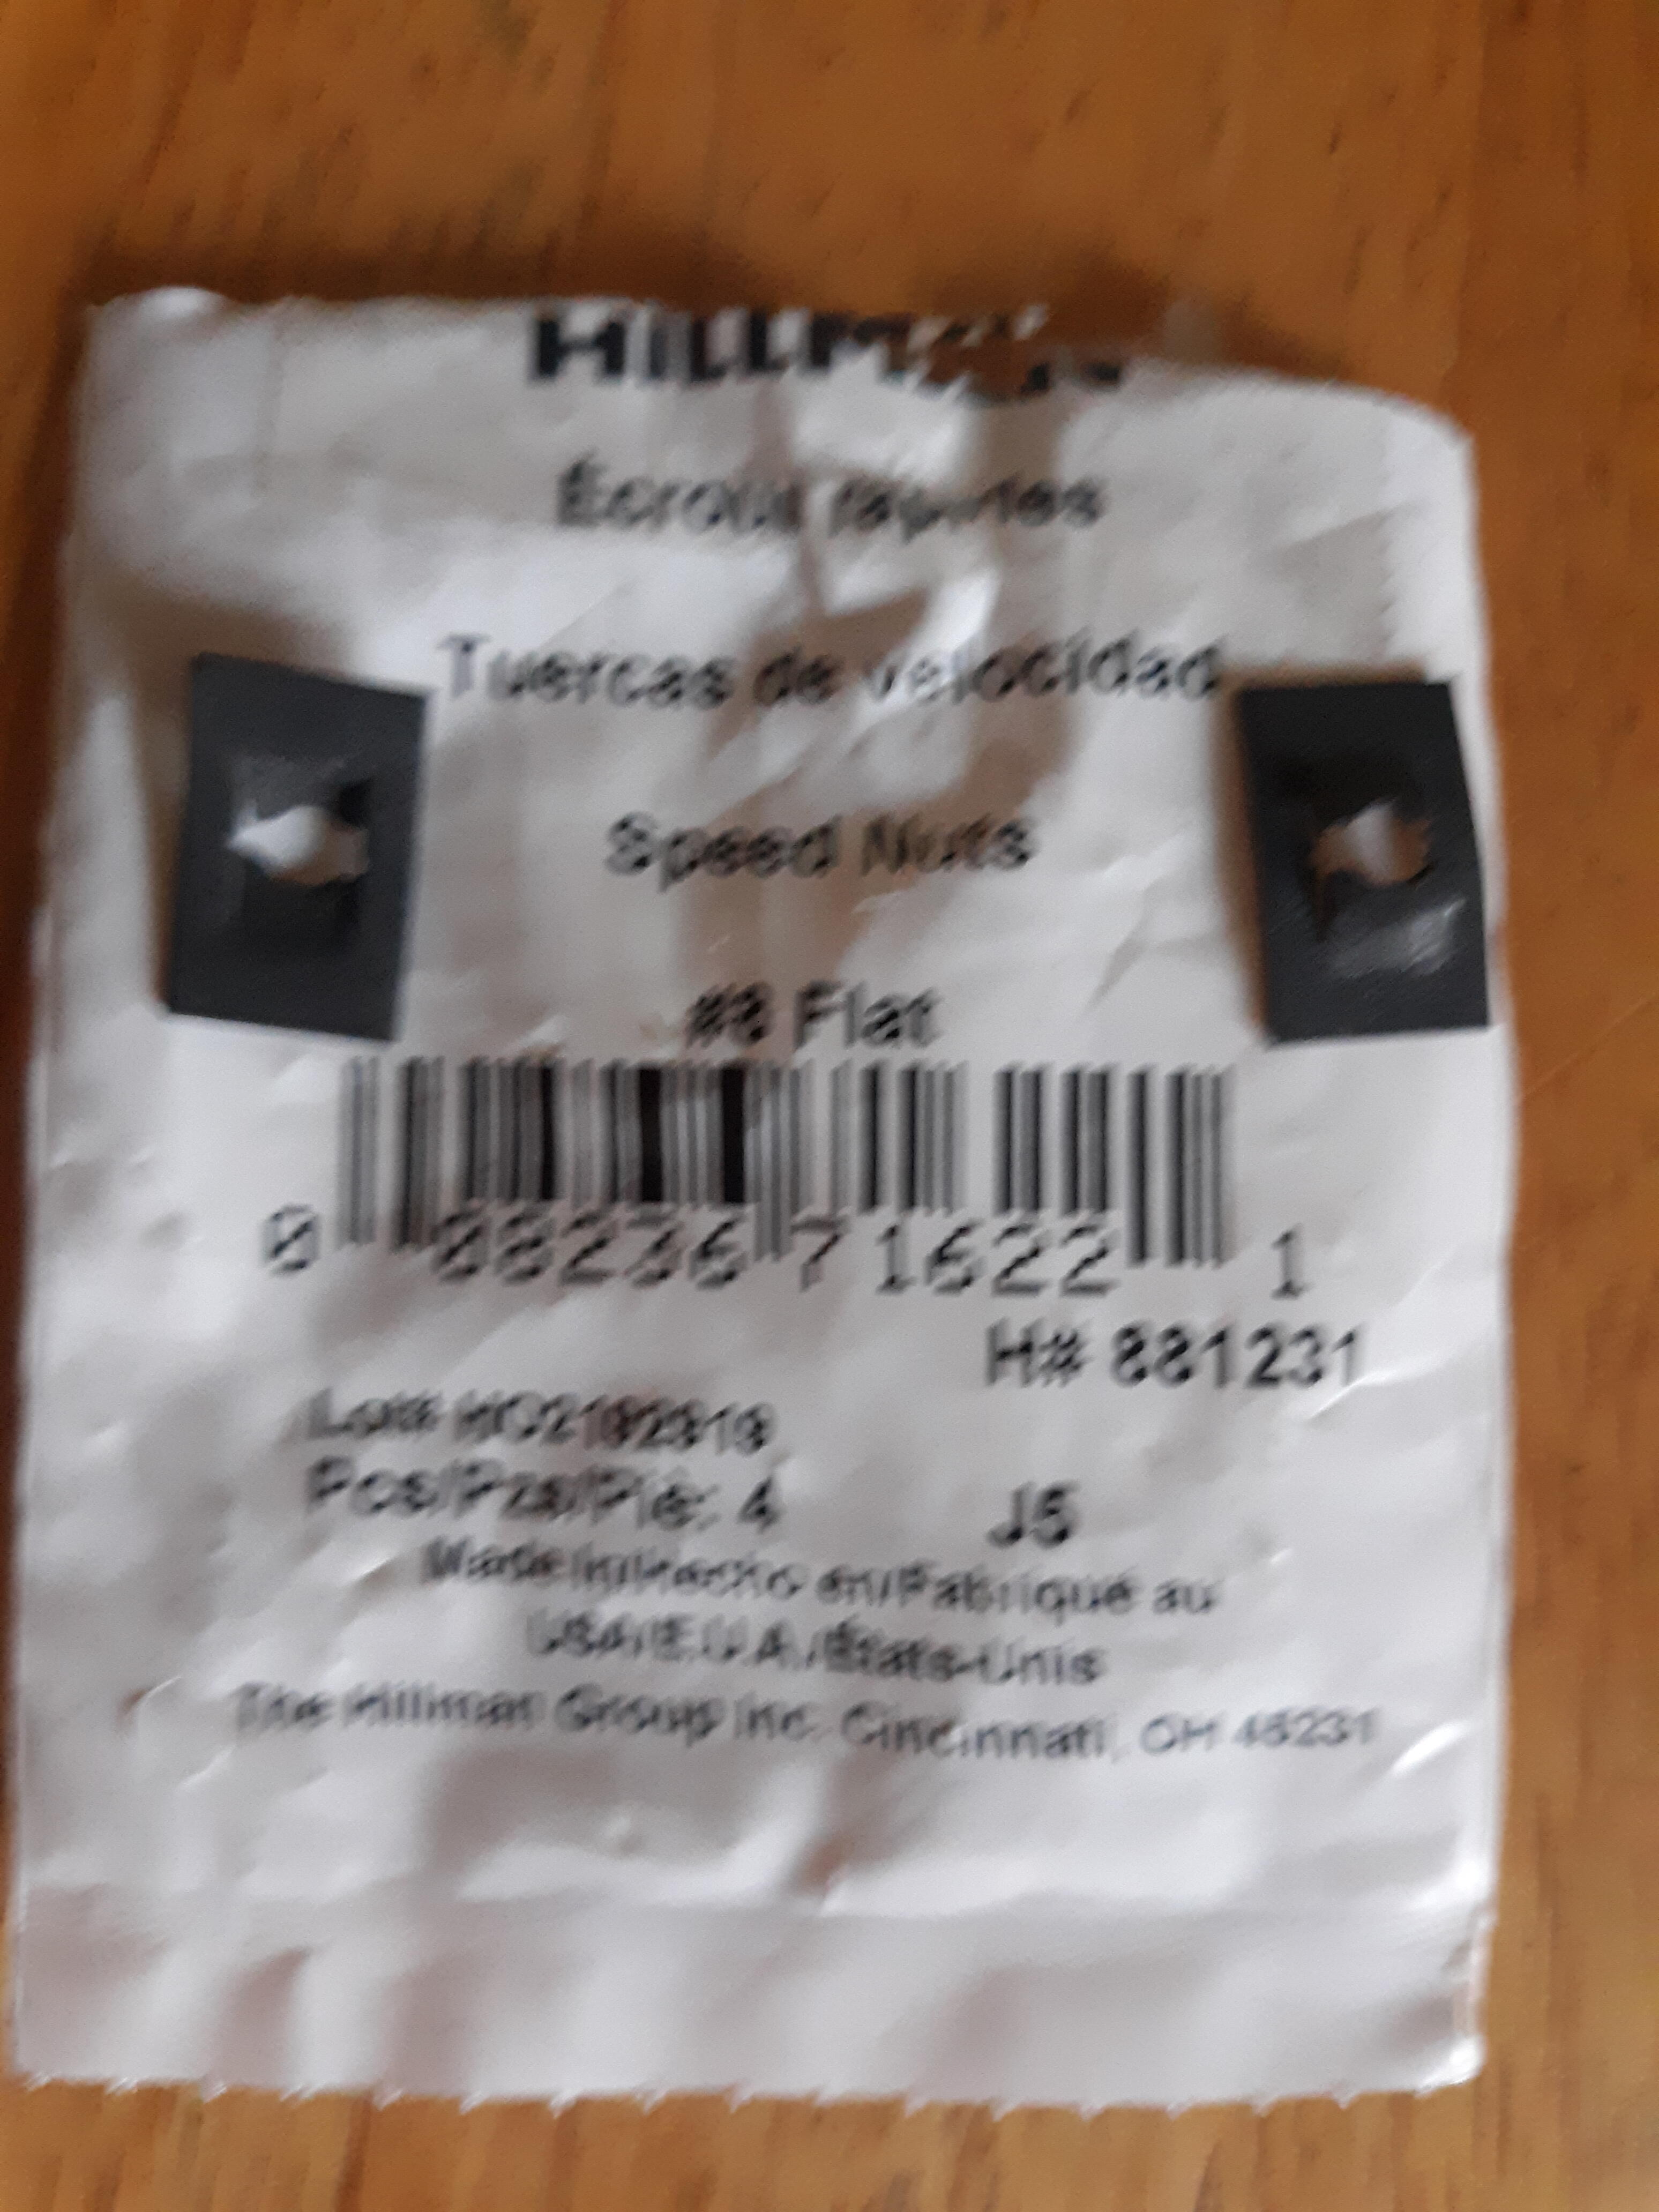
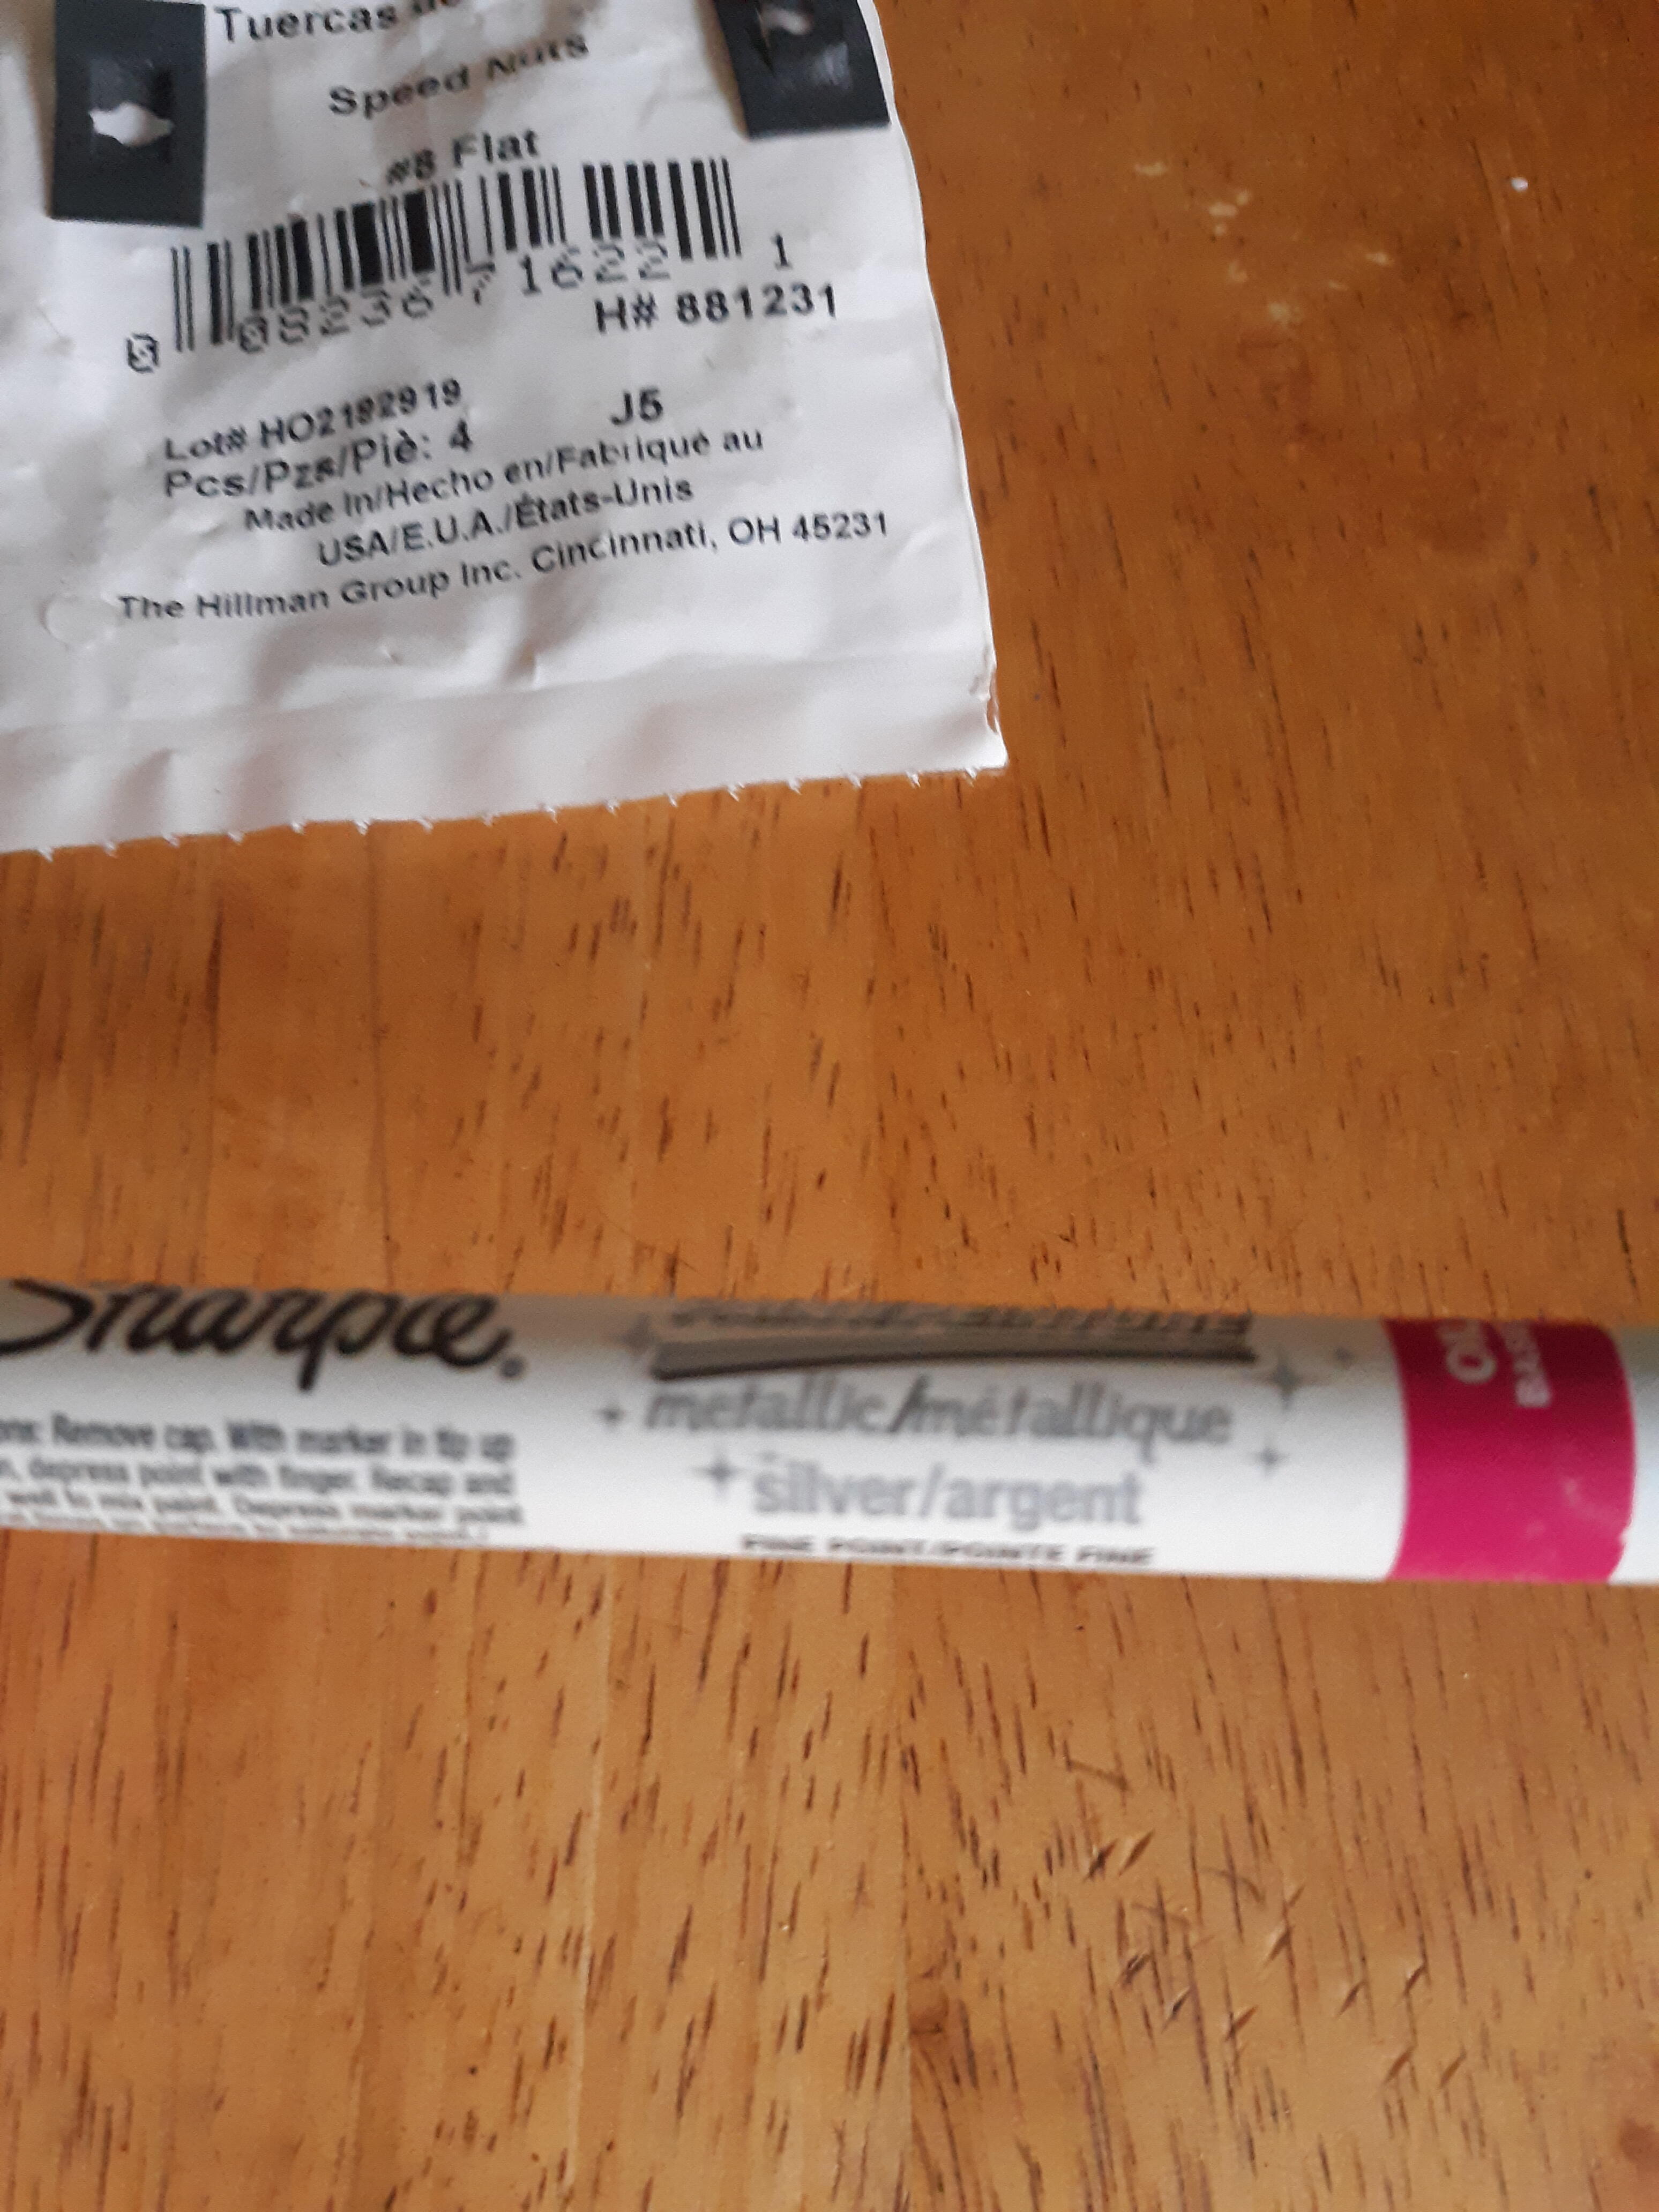
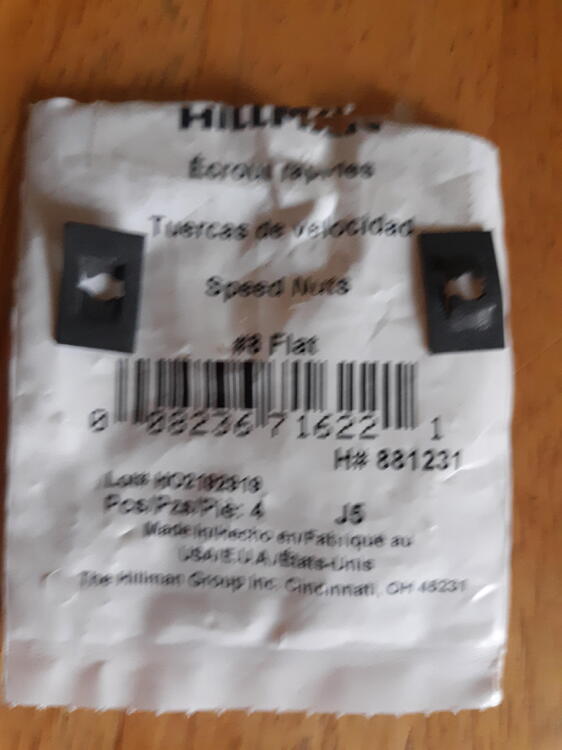
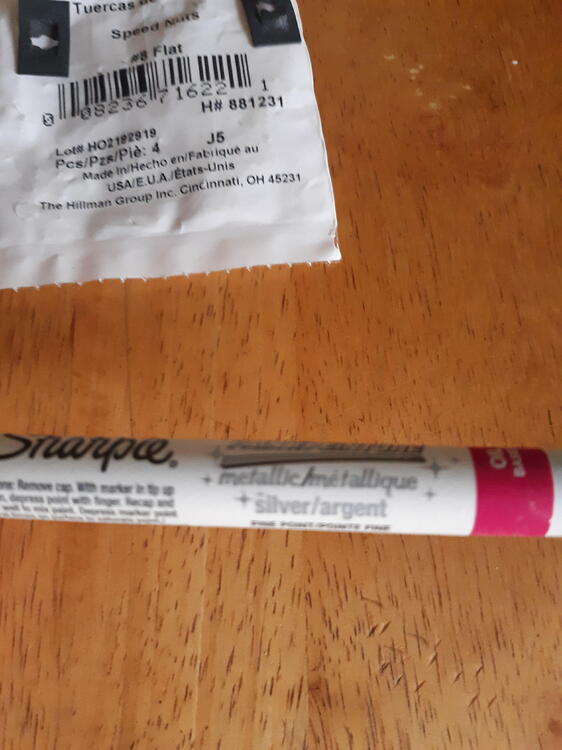
2 pointsThose backside clips are available at Lowe's in their Hillman drawer isle. I did the vaseline on my horn pad too. Another good tip thanks to @psdenno is a silver Sharpie for all the silver around the radio and console. I bought mine at Hobby Lobby fyi.
 2 points
 -
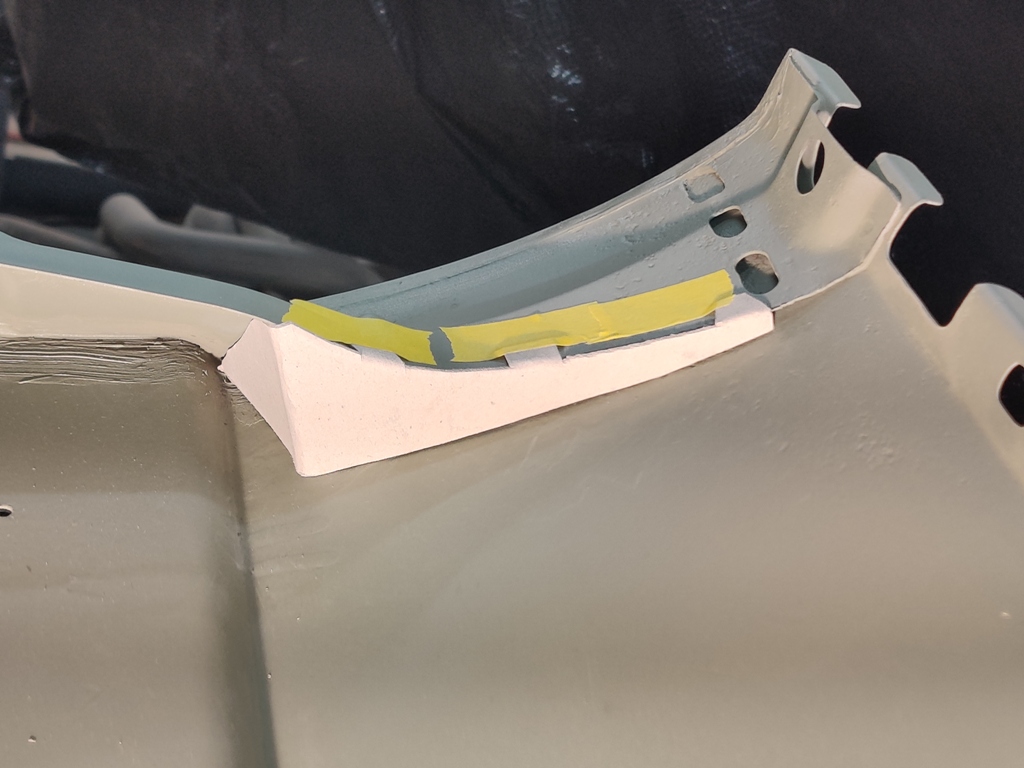
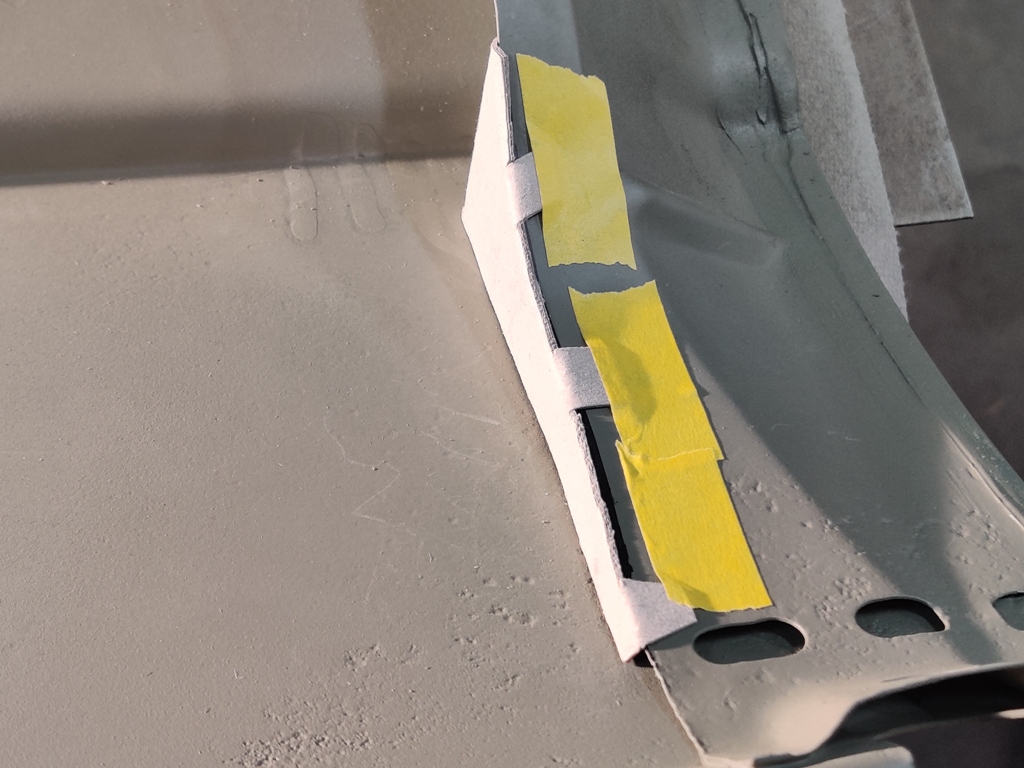
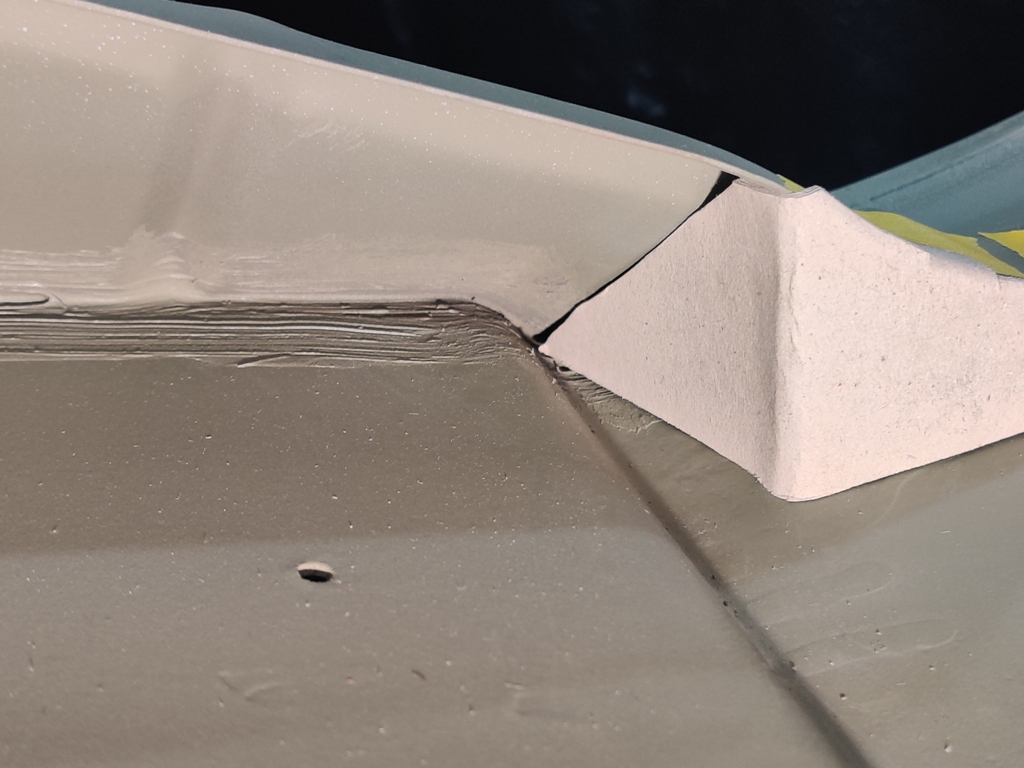
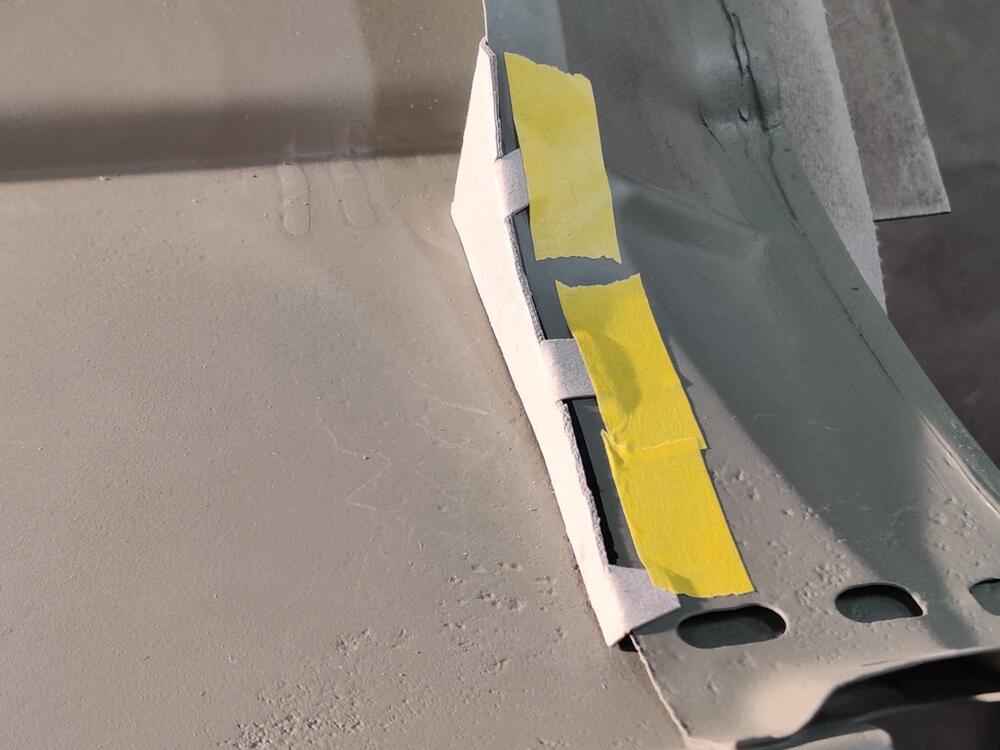
I've been thinking about how best to address one of the most common rust out areas on our cars, the bottom corner of the front fender. There is a reinforcement panel which is crimped into the back edge of the fender, and where it twists at the bottom of the fender, it creates a trap for dirt and debris, which over time, collects in the bottom rear corner. The debris which gets trapped here allows no air circulation so it holds moisture for extended periods of time, over and over again. Eventually, bare metal gets exposed and rust starts. On my first 240Z, I bought brand new OEM fenders, and I sprayed epoxy primer inside this area along with paint. That was in 1993. Even though that car has seen relatively little weather (it has been stored in a garage for most of the years since), the lower corner of the passenger side fender started showing some raised bumps (indicating rust through from behind around 2011. I also, unbolted the bottom of that cars fenders and blew out the debris and dirt a few times over the years with compressed air. Still, these preventative efforts did not work. With the 240Z I am restoring now, I want a better solution. Initially, I thought I would address this problem area by cutting some oval vents to allow additional drainage from this corner, and additional air circulation for drying. However, I think that would only be a slight improvement. Instead, I now have in mind fabricating a small metal panel which will seal off this area completely, and therefore, not allowing any dirt or debris or moisture to collect in the corner at all. Here is a cardboard mock up: I will extend the actual metal piece I fabricate a little further down than this cardboard template, so that the gap is closed. I may pop rivet this piece on using the little tabs. Once secured, I will use seam sealer to seal all the gaps. Of course, I now need to do something to seal up the oval holes that I cut into the reinforcement panel, or water and debris will enter there and I will still have the same problem for the bottom inch or so of the fender corner.

 1 point
 -
1 pointI ended up getting a Devilbiss FLG5, very versatile and has a low cfm requirement, I had to buy the 1.8 set up in addition to the 1.4 that came with the gun. I think I paid $340.00 https://sprayfinishingstore.com/spray_gun/devilbiss-flg5-gravity-feed-spray-gun/ Edit, I just checked the price and they have come way down from what they were, https://www.ebay.com/itm/203638824293?mkcid=1&mkrid=711-53200-19255-0&siteid=0&campid=5338830130&customid=devilbissflg5&toolid=10001&mkevt=11 point
-
1 point@Av8fergI plugged mine with Allen head brass npt pipe plugs from Ace hardware. Used Teflon tape, So far so good.1 point
-
1 pointYep, a lot of variables and the biggest is inexperience. Probably give a good painter a cheap gun and not optimally reduced paint and will still lay it silky smooth, then give a novice the best of everything set up perfect and not produce good results Sent from my iPhone using Tapatalk1 point
-
1 pointSo, I’ve mostly had a good experience with them. The reality is I’ve has some issues with all the Z retailers. Zcardepot sent my the wrong tie rod and it was a pain to get them to sent me a replacement. They wanted pictures and multiple detailed explanations. I finally sent them a video showing the treads were for the wrong side, the whole process took over 3 weeks. Then they asked me to send it back on my dime. I never did and won’t. Anyone need a drivers side tie rod 😁. I just want MSA to update their website to show things that back ordered or send you and email and ask how you want to proceed. It’s simple, be now we are living in a world where the customer is no longer as valuable as the past. You are almost a nuisance to some. It’s hard to find quality people. This is the new paradigm we have to live with. I see it everywhere I go. Prices are insane everywhere., workers are worse than ever…the sky is falling 🤣1 point
-
1 pointAh... painting a car is easy, you just have to put on paint everywhere with the same thickness.. Just kidding.. if you can do that it's far from enough.. many variables are trying to make a mess of your paintjob, first look A LOT of you tube videos about painting it helped me.. I painted a car and only had 1 bad spot.. and that one i knew what went wrong and came out easy.1 point
-
1 pointSiteunseen, Thanks for the tip on the silver sharpie. I'll try that. As for the hood emblem retaining clips, I had a s.o.b. time getting them off back when I was at the tear-down stage. Easy getting the nuts off and on with an 8mm socket if I need to ever touch up the emblem.1 point
-
1 pointI believe the straight threads are just normal metric pitch stuff. The tapered stuff is BSPT, but I think the straight threads are typical metric.1 point
-
1 pointNissan used BSPT on their tapered plumbing fittings. You could probably take the old piece that fits in the hole and "machine" it to look better. Chop the connector off. I think that they all have a sealed well inside for the actual sensing element. Or maybe find a plug on McMaster Carr. Check/uncheck the boxes on the side to change the display. https://www.mcmaster.com/standard-pipe-fittings/thread-type~bspt/brass-and-bronze-pipe-and-pipe-fittings/type~plug/ The straight thread is probably BSPP. https://www.ralstoninst.com/news/story/the-difference-between-npt-bspp-and-bspt-seals1 point
-
Great point @Zed Head. If he didn’t go back with the stock damper bolt, he may be having the same problem I had using the performance damper bolt from Motorsports. Like you said, the bolt and washer combo was too long, bottomed out in the snout and made a weird noise under load because it didn’t snug everything up. Pulled my hair out trying to find the noise. Make sure you use a washer and bolt that is short enough not to bottom out. You want the bolt and washer to snug everything up. Very, very important. I started a thread on the subject, but I think it was @Jeff G 78 that had the pic.1 point
-
If I were close I would. I've always wondered if you could get away with doing a restoration in a public storage rental...1 point
-
1 point
-
1 pointNice job with your solution. Another way to do it is to spray the entire emblem and then wipe a pad lightly soaked with paint thinner across the high spots before the paint dries - that's a process I've used in restoring lettering and emblems on vintage metal dealer style license plate frames.1 point
-
Btw.. it's a good way to prevent a robber from stealing your car while standing before the traffic lights! Pump the clutch 3 times and get out! He will not get away with it!!!1 point
-
I'd be very careful in trying to seal such an area. If it is not 100% effective - to include preventing air in/exfiltration as it will carry water vapor which WILL condense inside that space at some point - then you'll be certain to seal IN water that makes its way inside. Perhaps cutting out that reinforcing panel altogether and applying modified design - one that is open and self-draining. Sorry I can't be more specific about such a design. I've given no thought to it as yet, but that same problem is headed right at me. I have two new factory fenders to go on my car, and I am determined to prevent them from rusting. I am also extremely reluctant to start cutting them up or modifying them in any way. Right now it's an opportunity waiting for me somewhere deep inside that tunnel, the light of which I am unable to see.1 point
-
1 pointHatch Alignment Guide I have searched for a process/procedure, or guide to help me align a 240z hatch, but have not been able to find one. It may be out there, but It has eluded me. I am not a professional, just a do-it-yourselfer. I am restoring a 1973 240z. My hatch gave me a bit of trouble and this is the process that I used to achieve reasonable results. This is meant only as a guide, something that hopefully is a bit better than obvious. I think alignment is often considered daunting by some. It really is not rocket science. It takes effort, be patient, be careful, and be realistic. If you could look at a new Z coming off the line in the 70s, I think you would notice that they were great cars, but they were not perfect – for example their gaps were not always uniform. There is a phrase that I was taught on my first job after college – “The enemy of good is better”. There is another thread “Hatch Alignment” that has photos of my hatch, and its gaps. Please feel free to improve or correct any errors - thanks Install and clearance Check Remove the hatch striker to prevent the hatch from locking before it is aligned. Install the appropriate weather stripping. Tape the entire body opening of the hatch to protect it from scratches/chips while fitting the hatch. Install the hinges into the body. This requires two bolts per hinge. Adjust hinges upward toward the roofline. This will help if you have any issues clearing the roofline as you close the hatch for the first time. You might want to mark a line on the hatch body to define the position of the hinge. This occurred to me after I aligned my hatch. A good way to keep track is to make the most current line the longest. Installing the hatch is a two man effort. It requires two short screws per side. The hatch tab holes are beveled so there is no adjustment up/down, left/right. Placing shims between the hatch tab and the hinge move the hatch toward the front of the car closing the gap at the roofline. This is the only adjustment involved with the tab. My glass was removed during deconstruction of the car. The hatch is considerably lighter without it. I found it easier to handle the hatch without the glass. Some people recommend installing the glass before aligning the hatch. Do not install the hatch lift support strut. Do not let the hatch close, keep it propped open. There is only one strut for a 240z. The 260z and 280z had 2 struts, one on each side. Some, including me, believe that the single strut on the left (drivers) side causes the hatch to twist over time. The force of the strut when the hatch is in the open position forces the left side higher than it would be otherwise. I believe that this puts downward pressure on the right (passenger) side of the hatch driving it toward the body opening. Prop open the hatch with a stick. It should be high enough to be well away from the roofline. The hatch should move freely at this point. In addition to the tape I put thin towels along the body opening to protect everything. The next step is better with more than one person, especially if your glass is installed. Slowly start to close the hatch checking to make sure that it clears the roofline and the edges of the body opening. If you have sufficient clearance – congratulations you have passed the first hurdle. The next step is to align the hatch. If you do not have sufficient clearance, don’t panic yet. There are a few relatively easy things that you can do to help with clearance issues. You can add the second strut. This is probably a good idea anyway. Realize that the standard single 240z hatch strut has a force of 88lbs. If you add the second strut to the right side I would strongly recommend that you replace your original 240z hatch strut, with two 260z/280z hatch struts. Each of these is rated at 44 lbs. of force which is the equivalent of the original single strut at 88 lbs. The second thing you can do is to position your hinges to create sufficient clearance. The last thing that I can think of is to remove the hinge and enlarge the hole that the bolts go through to mount the hinge, this will increase the amount of adjustment that you can achieve. Adding a 2nd hatch strut To add the second strut you need a few parts including a body mount for the strut bracket. These body mounts were spot welded and they have a few bends that put them close to the quarter panel skin. The body mount bracket is not left/right side dependent. Most of the early S-30s that I have seen have broken spot welds. This could be due to the 88 lb. strut, or it could be due to the uneven forces applied from the hatch when closing and opening the hatch. Y You will also need the mounting bracket for the strut. This bracket comes in left/right versions. It screws into the strut body mount, and the strut is bolted to the bracket. The next piece to the puzzle is the strut itself. It is not right/left side dependent. Order a 260z/280z strut as it has half the force of the 240z strut. Make sure the mounting matches your hardware. I have seen these with either ball mounts, or shoulder bolts. The last piece is the bracket that is attached to the hatch and is the mounting place for the other end of the strut. This bracket is available from zcardepot. This bracket comes in a left/right configuration. I was not able to find new versions of the other brackets for sale commercially, which means you will have to get them from either a 240z/260z/280z. It is easy to remove them from a car with an air hammer or a hammer and chisel, without damaging the quarter panel skin of the donor. Adding the 2nd strut may help with clearance issues on the right side of the car. The location of the brackets is the mirror image of the left side. Since you can’t easily spot weld the body mount you can drill two holes and mount the bracket with screws through the channel of the body opening. Caulk these when done. If you need more specific assistance to install the 2nd strut I believe that there are directions either on this forum or on the internet. Hinge Positioning Positioning a hinge is not difficult. The hinge can be moved left and right as well up or down, within limits. There are two limiting factors. The first is that the captured nut in the body has a range of adjustment. The second is the size of the hole that the hinge bolt goes through. You should remove the hatch tab screws that hold the hatch tab to the hinge. After removing the screws you will need to prop the hatch on the right side so it does not collide with the roofline. NEVER remove the screws from both hatch tabs at the same time. The 88lbs of force in the strut/s can get the hatch out of control in a hurry. At one point I thought my hinge was adjusted as high up as possible, but it wasn’t. It actually was being restrained from going as high as it could by the rubber gasket that the hinge fits into. Enlargement of the hole in the hinge I was nervous about this alteration, but it is an option. I needed this alternative. Prop the hatch and remove the hinge from the car. Put it in a vice. With a small flat file or a small round file you can open up the hole the bolts go through. Figure out where you need the extra space and only open the area needed. Realize when you do this you will need a larger split washer and a larger flat washer. You do not want to remove too much material as this could weaken the hinge mount. Hatch Alignment I was told that if you separate everything, the hinges from the body and the hatch from the hinges that you turn a difficult task into a very difficult task. I wanted the best possible restoration that I could muster. Old hinges on doors, hatches, etc. usually have issues and I was concerned about rust issues in the hinge wells. Anyway, without realizing that I was making the problem more difficult I separated everything in order to refinish and substitute new parts. I also don’t know how you can inspect the hatch tabs without removing them from the hinge. If I had it to do over again I would mark the position of the hinges before working on the body. They ae left and right oriented and stamped with an L/R. If I was not going to do bodywork in the area behind the hinge then I would not remove them at all. If I were going to replace the hinge because it was weak or bent, but I was not going to need to do body work behind the hinge then I would wait until installing the hatch and replace one side at a time, after the hatch was installed. Bottomline: Even though I separated everything I was able to do a fairly good job of aligning my hatch. I do not believe that aligning a hatch is a very difficult job. Installing the hatch is definitely a 2 man job, especially if your glass has not been removed, but alignment can be done without help. Having said that 4 hands are better than two. The process is an iterative one. Make one change at a time and check your results. Protect your car with tape and towels. I will assume that you have achieved adequate roofline clearance, and that after every adjustment you check to see that you still have the clearance that you need. If you lose the clearance consider backing out the last change and see if there isn’t another way to achieve the alignment that you want. First step for me was to see if the hatch fit within its opening squarely. Another way to put this is to check if your right side gap (the space between the hatch edge and the body opening edge) is the same near the top of the hatch as it is at the bottom. If the gap is not uniform check the left side. If the left side has the opposite issue then you have an alignment issue. If it isn’t then you might have a more serious issue like the hatch or the body opening not being square. If one or the other is not square then you will not be able to get uniform gaps without doing body work. If you do not opt for bodywork then you may still be able to align the hatch to achieve the best possible result given the body issues. Assuming the hatch and the body opening are reasonably close to being square. Check the right side gap top and bottom. If it isn’t the same then you need to make a decision as to whether the top gap or the bottom gap is closer to the desired gap. If either the top or the bottom is too close to the body edge then this will be the point that you will want to affect. For example say the gap at the bottom of the right corner is too close to the body edge you have a few choices: i. you could move the left top side of the hatch closer to the roofline or ii. you could move the right top side away from the roofline. My preference is usually to avoid any action that decreases roofline clearance if possible. So I would put a shims behind the right side hinge under both bolts. This pushes the hatch top right edge toward the back of the car and the top left corner toward the front. I think it is best to loosen both sides of the hinge before inserting a shim under either bolt. I found it easier not to completely remove the bolt. Tighten both bolts a couple of turns at a time, until both are sufficiently tight. Check the right bottom corner if the gap is larger then we are moving in the right direction. Check the right side top and bottom gap. If they are more uniform then the adjustment was successful. I would check the left side gap top and bottom. If the gap is not uniform then you need to make an adjustment. Shims installed on the opposite side will move the side you are working on closer to the body at the lower corner. To affect the top corner of the side that you are working on shim the hinge on that side. When you have gotten the side gaps top and bottom sufficiently close to your liking you can move on to the next step. With the side gaps uniform top to bottom you will want to compare the left side gap to the right side gap. I am exaggerating to make a point, lets say the right side gap is 1 inch (at the top and the bottom) and the left side gap is .5 inch (top and bottom). It would be ideal to make both the left and right side gaps equal at .75 inches. You need to move the entire hatch (top and bottom) toward the gap that is larger (right side). To do this you will need to loosen both hinges. I was working alone so: i. I removed the hatch tab screws from the right side, and propped the hatch up with a stick. ii. Next I loosened the hinge bolts on the right side. This allowed me to move the right side hinge to the right, because it was not held in place by the hatch on the right side. You typically will not need to move the hinge very much. You can check that it has moved by lowering the hatch as if you were going to put the screws through the hatch tab. If the holes line up you have not moved the hinge, if the hinge is to the right by a small amount compared to the hatch tab hole then you have moved the hinge and you should tighten the hinge bolts. Make certain that you have not disrupted your previous changes to the hinge position or you will disrupt the progress made earlier on the side gaps. iii. Carefully, loosen but do not remove the left side hinge bolt (the left side hatch tab screws should still be tight at this time. Pull the hatch from the right side and push the left side hinge to the right. It will probably need some persuasion. My advice is not to hammer or rubber mallet the hatch. I did smack the hinge in order to move it. It is difficult because the hatch is still attached to it, and it would be best to have a second person to push the hatch top and bottom while you pull the hatch from the left side. Remember you do not need a lot of movement, and you don’t want to overdue it and have to reverse the adjustment. Keep checking the right side tab holes – when they line up with the right side hinge you have affected an adjustment to the right. Re-install the right side hatch tab screws and tighten the left side hinge bolts. Check your work and repeat as necessary. Remember the hinges have vertical adjustment and horizontal adjustment within limits. If you need more then they can provide then you will need to remove the hinges one at a time and enlarge the hinge holes to get additional movement. You will probably need to do this on both sides. Remember I said that hatch alignment was not that difficult, but it is work and it can be frustrating. Take your time, take breaks, if I can do it so can you. Now with the gaps uniform top to bottom on both sides and with the gaps relatively equal on both sides check the bottom corner of the hatch to see how it aligns with the edge of the quarter panel. If the body lines line up you can move on if not you can cause them to line up by adding shims behind the hinges on one or both sides – this drives the hatch toward the back of the car. If you need to move the hatch away from the back of the car you can accomplish this by adding a shim between the hatch tab and the hinge. I found it helpful to use double sided tape to hold the shims in place for the tab adjustment. Place the tape on the shim and stick it to the hatch tab then move the hinge up to cover the shim and insert the hatch tab screw. The last thing is to check the height of the hatch at the roofline. Adjust the hinges up or down. The best way to adjust the hinges is always to loosen both sides. Again, a friend comes in handy anytime you need to move both sides of the hatch at the same time. Hope this helps to make the job easier.1 point