Leaderboard


.JPG.cfcada9cf1c1b502df3f5f2f2ca3ff36.JPG)

Popular Content
Showing content with the highest reputation on 10/06/2021 in Posts
-
The explanation for the bid bump was that the 'value' of the car MUST be at least what it sold for previously, and thus, the $68,000 bid. The bid strategy was successful which leads me to believe that the 'value' wasn't necessarily what it sold for previously. But that's auctions. The comments during this auction 'from the peanut gallery' are simply typical of the stuff I read on BaT concerning Datsun Z cars. I'm constantly amazed by some of the things I read including the dressing down of people who challenge the 'experts'. The latest being about the "highest value in the world" comment by Bill himself. BaT is proving (to me) to be the disinformation yellow press of our times. So I watch, I laugh, I'm entertained and amazed at how naive some of these people are. And how passionately they argue their misguided position!4 points
-
3 pointsThe smoke could have just been vapors coming back from an open valve. You'll want to measure cylinder pressure before assuming you have a bad head gasket. The thrown rocker arm could happen because of a sticking valve, maybe a tight guide or valve seal. I'd just keep doing the small things to get it to run correctly and let the parts wear in and see where you end up. No need for panic.3 points
-
3 pointsShe’s in!!! My 14 year old son helped me. Just the two of us.

 3 points
 -
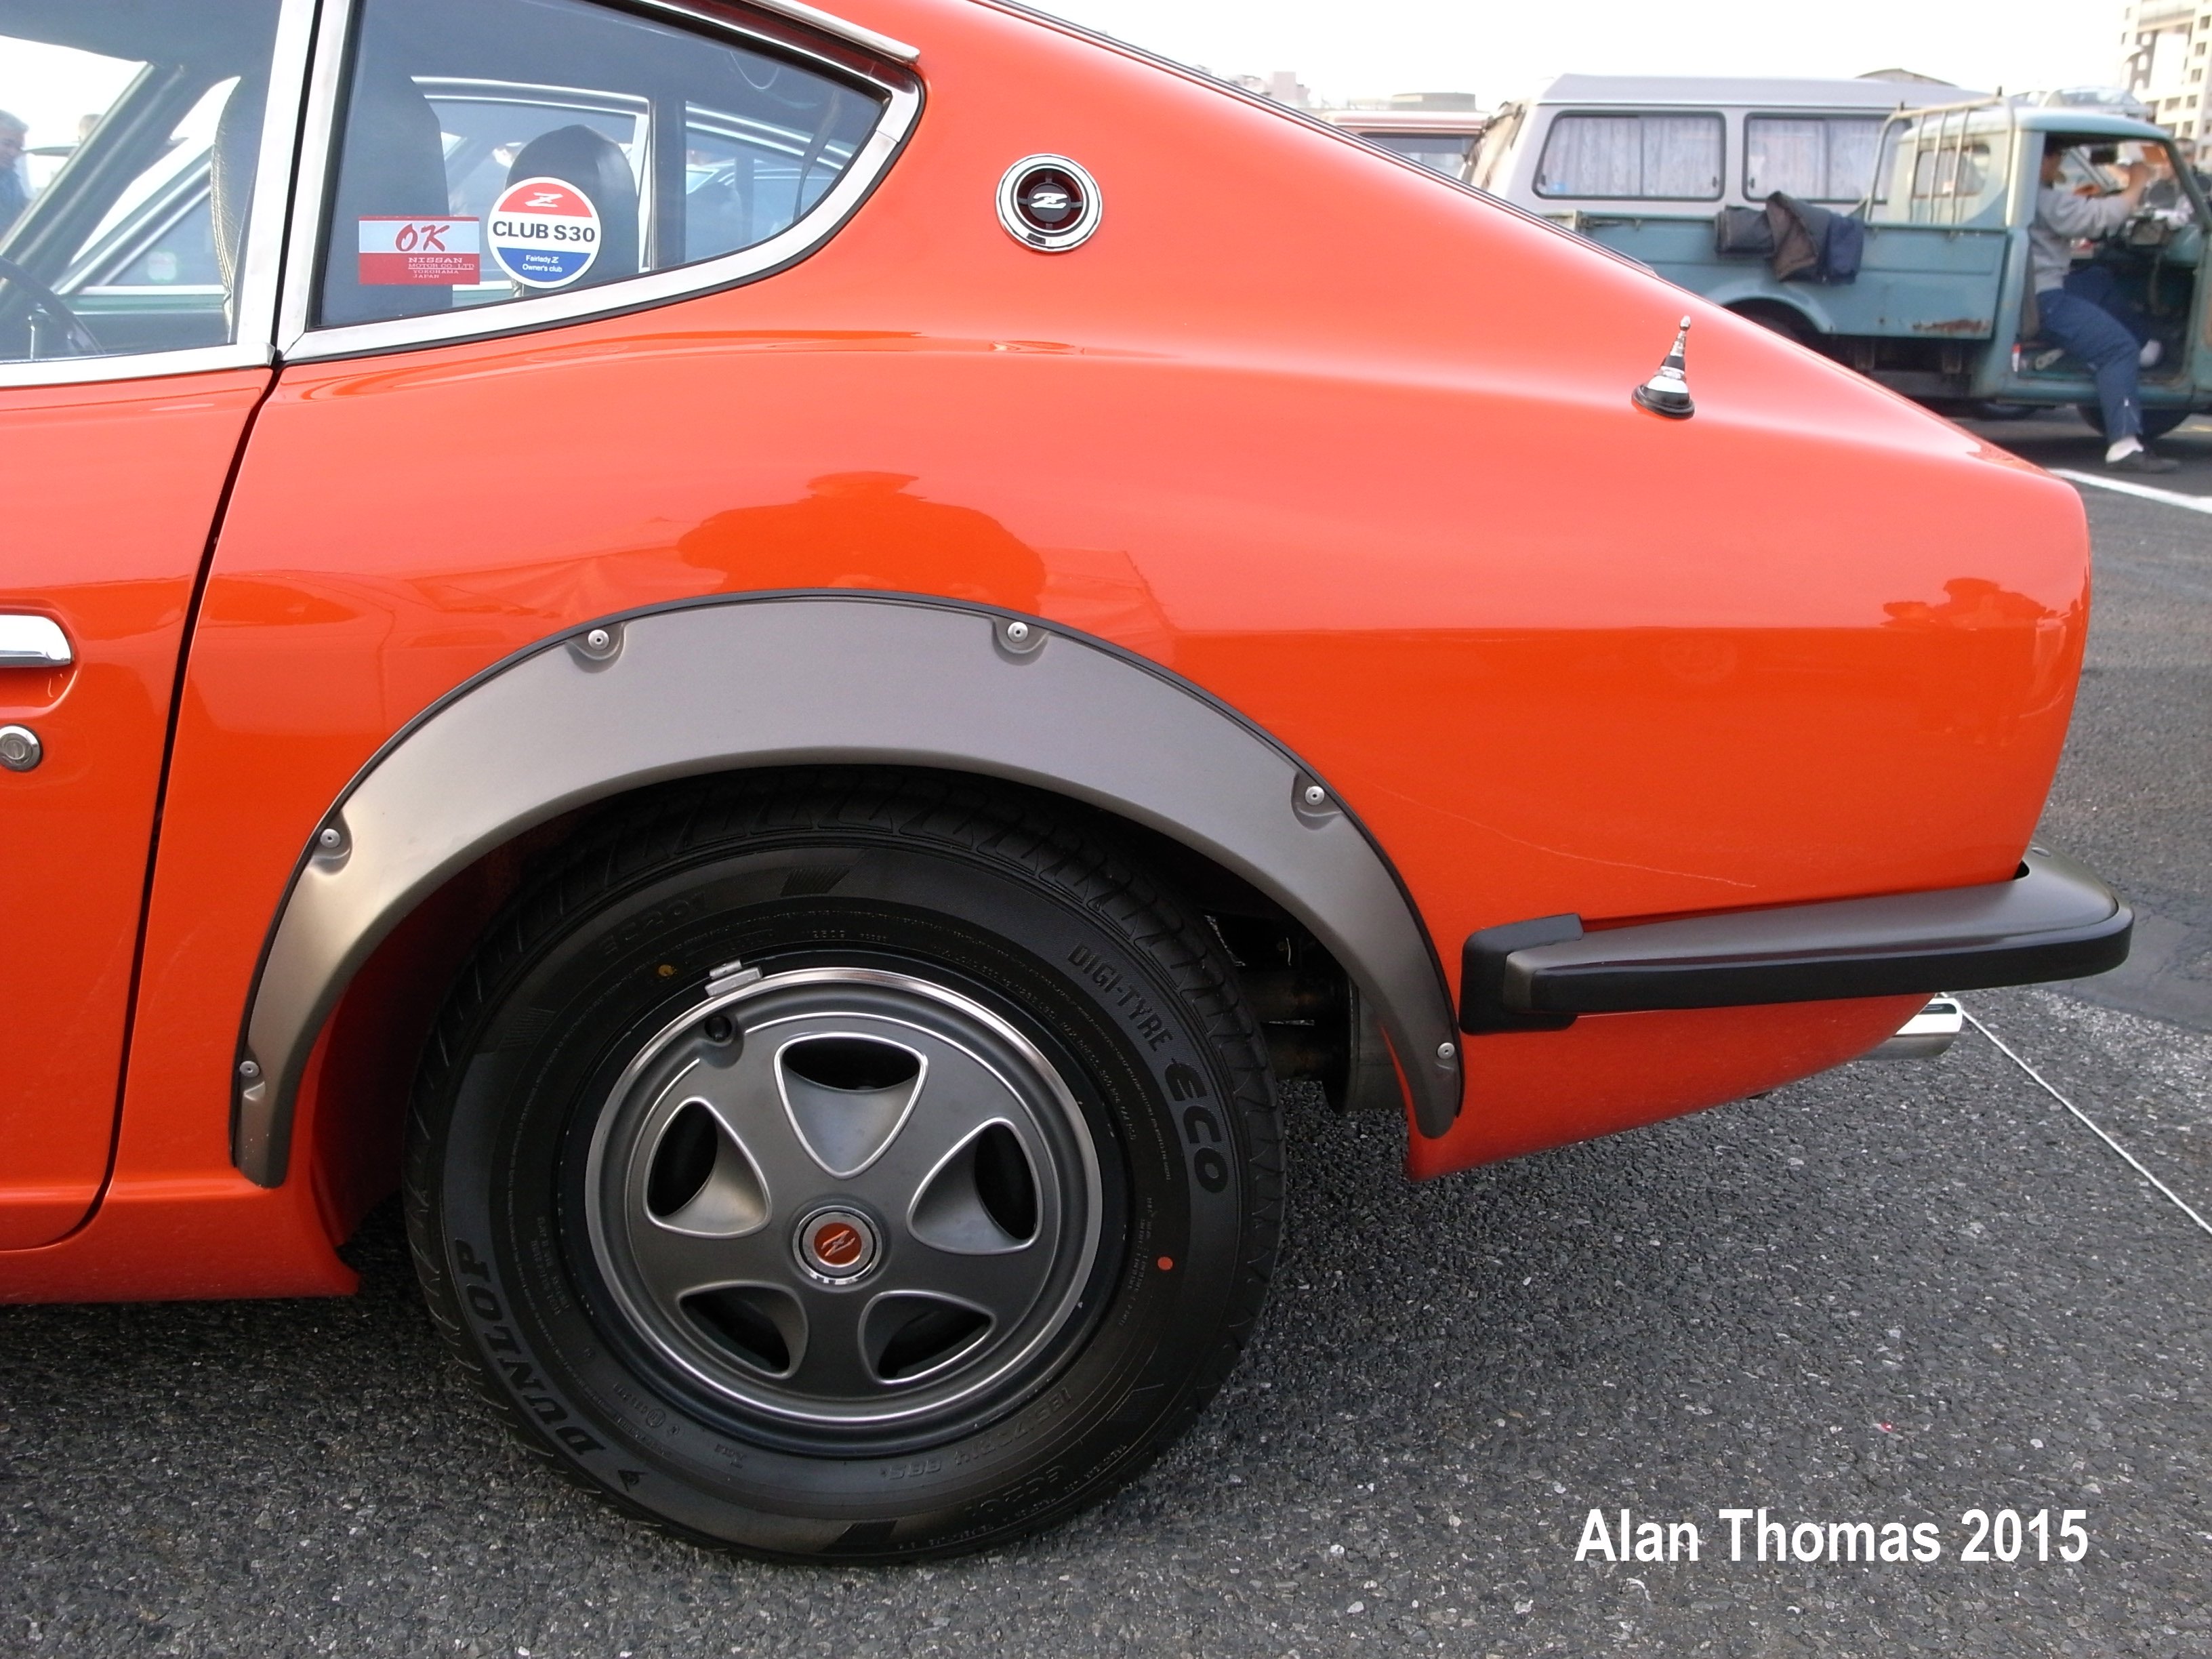
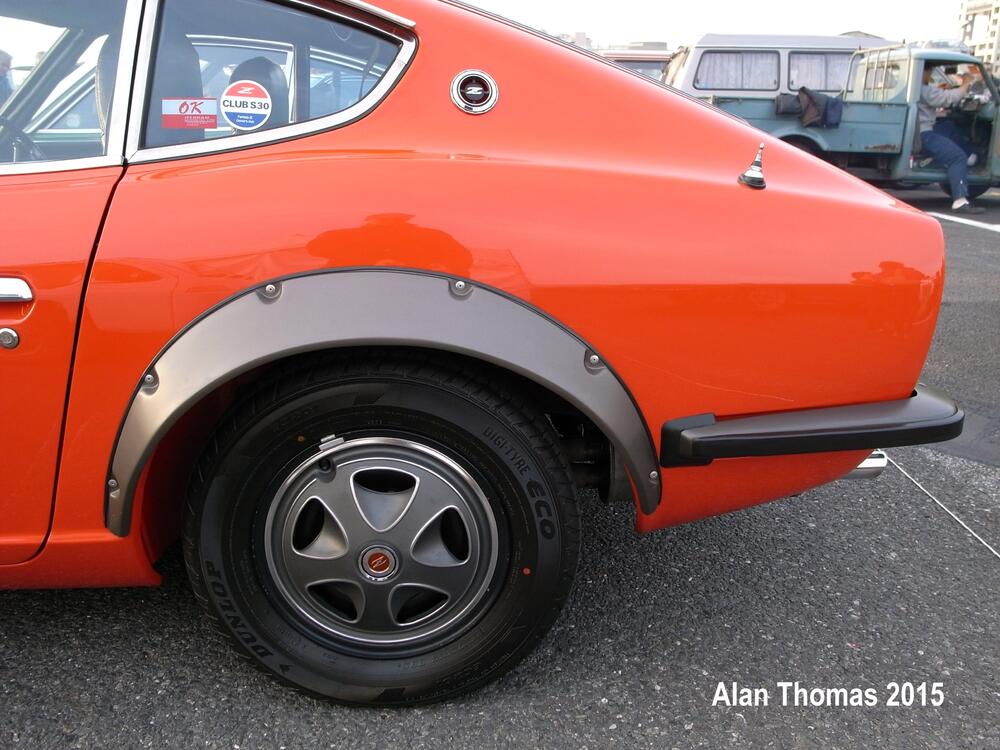
So you should have the swage line to work to, and the Overfender will pretty much find its own position once you find the reference points. Two of the fixing points (Nissan riveted the Overfenders onto the body, but you might want to use another fixing method) are almost ON the swage line, or are just below it. The Overfender overlaps the swage line at the uppermost peak of its curve. At the ends of the Overfender, the forward-facing end positions just above the dogleg and the rear-facing end drops down way below the bumper. Hopefully this photo will help. It is a genuine HS30-H model Fairlady 240ZG and the mounting position is the factory one. The owner chose to insert some black welting between the Overfender and the body - which the factory never did - but hopefully you can still clearly see the body swage line as it runs along the body, the overlap of the Overfender and the two uppermost fixing points which are your reference for the height of the Overfender on the body:
 2 points
 -
1 pointThanks sir, I will look into it! [emoji106] Interestingly, the online fuel flow calculators all converge on around 18-20 gph (imperial) for 240bhp, so the silver top at 30 should be OK I think. [emoji848]1 point
-
1 pointIf the jar is above the bleed screw, the thought is that the hose between the bleed screw and jar is also above the bleed screw. If that hose is filled with fluid, you are less likely to pull air back in through the bleed screw.1 point
-
Thanks. Frankly, that's the answer I was hoping someone with more experience would provide. None of us need more work to do.1 point
-
It is quite fascinating that someone would bid on a vehicle based on photos and seller‘s description. There is no substitute to actual in-person assessment by someone knowledgeable about body work, paint and mechanical operation. This examination can turn a potential disastrous purchase into a real pleasure. My estimation is a flipper of vehicles does not care, as they are concerned with turning a quick profit on “business” inventory. An enthusiast may very well relish the process of vehicle acquisition and ownership. Pressing a “Bid” button does not necessarily represent passion for a specific vehicle, only the financial wherewithal to trade money for metal. Keith1 point
-
1 pointThats a relief. Thank you. I was jumping to worst case scenarios and didnt even think of the vapors from an open valve. The valve lash of all other cylinders was in spec, so I think it is safe to assume this one was too. I'll keep an eye...or ear 😉 ...out for any strange sounds next time I fire it up. Open headers doesnt make it easy, so that could be my next project in the meantime.1 point
-
1 pointThanks madkaw but I'm not looking to have any work done to the car just info and advice.1 point
-
1 pointI just make sure the bleed bottle is higher than the bleed screw. I haven't had any issues with bleeding the rear brakes.1 point
-
1 pointLet's take this apart. All three systems are on different circuits. As long as you have a good battery, and your alternator is putting out over 13VDC, voltage would not be an issue. The current for the headlights passes through the combo switch. The current for the parking lights also passes through the combo switch but through a different set of contacts. Years ago @Zs-ondabrain developed nice relay kits for the headlights and parking lights (The dash lights are on the same circuit as the parking lights.). These relay kits are sold through Motorsport Auto. Here are the links: Headlights: https://www.thezstore.com/page/TZS/PROD/12-4651 Parking Lights: https://www.thezstore.com/page/TZS/PROD/12-4652 These relay kits take the load out of the switch. Also, swapping the bulbs in the dash lights for LEDs can make them much brighter. The downside for some people (not me) is that you probably can't dim the lights unless you change the rheostat for a PWM. I am good with the gauges being bright. Now for the horns...When I was waking up my 240Z after it's 9 year slumber, I was going through the different systems and found the horns weren't working well. I ordered some new horns and a horn relay, but I figured that I would also inspect the old horns. When I removed them, I found corrosion on the positive terminal and where they bolted to the car. The latter is the grounding point. I used a narrow wire brush on a Dremel to clean the grounding points, and I wire-wheeled the positive contacts, too. I reinstalled and found I had strong horns again. If cleaning the contacts does not improve things, it could be the horn relay. Apparently, horn relays for 240Zs are becoming scarce. ZCarDepot still has OEM relays. You can get the part number from CarPartsManual.com and try a Nissan dealer up in Canada, but the US dealers show these as NLA.1 point
-
1 pointAt first i thought you were refering to me (about the tire tube use) but .. not the case.. and.. me fast? i just started typing earlier haha1 point
-
1 pointYou can make one out of a inner tube of a car tire! I used those on more than one occasion. Ah.. it's from the aircon. thats why i had never seen it..1 point
-
1 point
-
1 pointWasn’t that bad. Took all of 45 mins. I gave my son a short safety brief and it started something like this. “This is a job you can lose a finger, so we’ll go slow and not force anything, make no assumptions and ask questions if confused….you need to pay attention”. His eyes got big. 😳 I felt the install was easier than the extraction probably because of the lessons learned pulling it. Like getting the load leveler set up right as well as the chain lengths correct. The chains on the front attach point need to be about 1/4 the length of rear chain . This is because the load level can’t angle the engine sufficiently at full throw with equal chain lengths. You can’t get the transmission snout low enough (into the tunnel) before you start running the oil pan into the engine front cross bar. So getting the chain lengths right was critical. Run the load leveler 70% toward the back of the engine so it can be lifted mostly level with unequal chains Once over the bay now you can run the leveler forward and drop the snout. I also couldn’t get the driveshaft installed at the same time. I tried, but just couldn’t get the internal splines to line up. I did try to rotate the engine with the crank bolt to move the splines but no dice, just couldn’t get it to go in more than 3/4”. So I’ll have to pull the shaft out later from the back. Getting the engine mount bolts aligned took a bit of finagling back and forth / up and down. The transmission mount isn’t fully in. After cleaning and painting the crossmember yesterday I discovered the bushing rubber was cracked on one side, I wont replace it right now, easy to pull later. The trans is still on a jack right now, I know these bushing are no longer available and read that poly ones really transmit the vibrations to the cabin, Will drive and see how it feels and cross that bridge later.1 point
-
1 pointI agree that you can install the sleeve either way but I believe that the only right way to install is with the wide section of the sleeve at the top....as shown in the drawing above. FIrst, the wide section of the sleeve gives the strut insulator a more firm surface to rest on. Second, if you install the sleeve with the wide section down, the bump stop could get damaged and it seems like the strut would bottom out against the sleeve instead of the spring perch top. J1 point
-
1 pointYou will need 7mm X 1.0 and 10mm X 1.0. Sorry, I can't remember which size is which for the calipers and the drums. I bought these from Amazon: Russell 639560 and Russell 639570, both are produced by Edelbrock and worked out very well.1 point
-
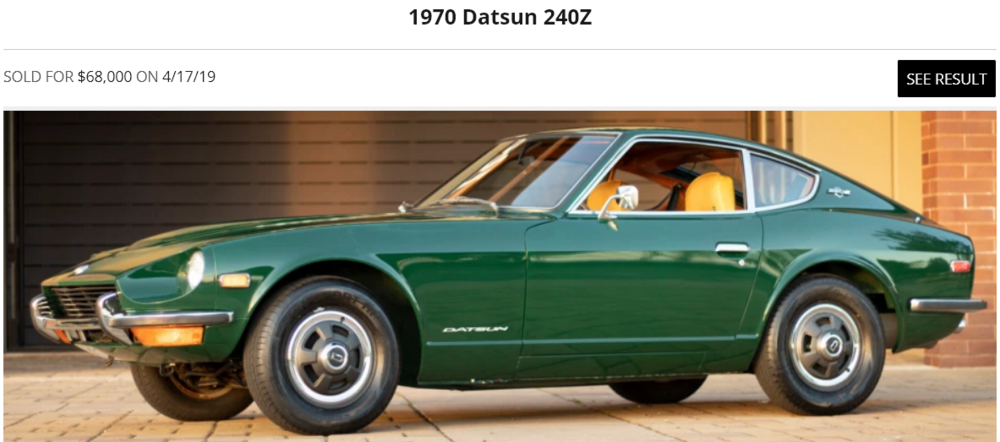
$68 seems like a really good price for a sub 1000# car in pretty good shape. Could be some unknowns going on behind the scenes like Zed said1 point
-
There's something fishy about that sale. Somebody artificially supporting the "value" I think. It sold for the same number back in 2019. Looks like a collector maybe inflating asset values. Might even be illegal, I don't know. Just talking, no offense intended. There's no logical reason to bump a bid by $20,750 when a typical bump is in the single digit thousands. https://bringatrailer.com/listing/1970-datsun-240z-36/
 1 point
 -
I think i found out the problem with the photographer... he is using my daughters Barbie Camera!
 1 point
 -
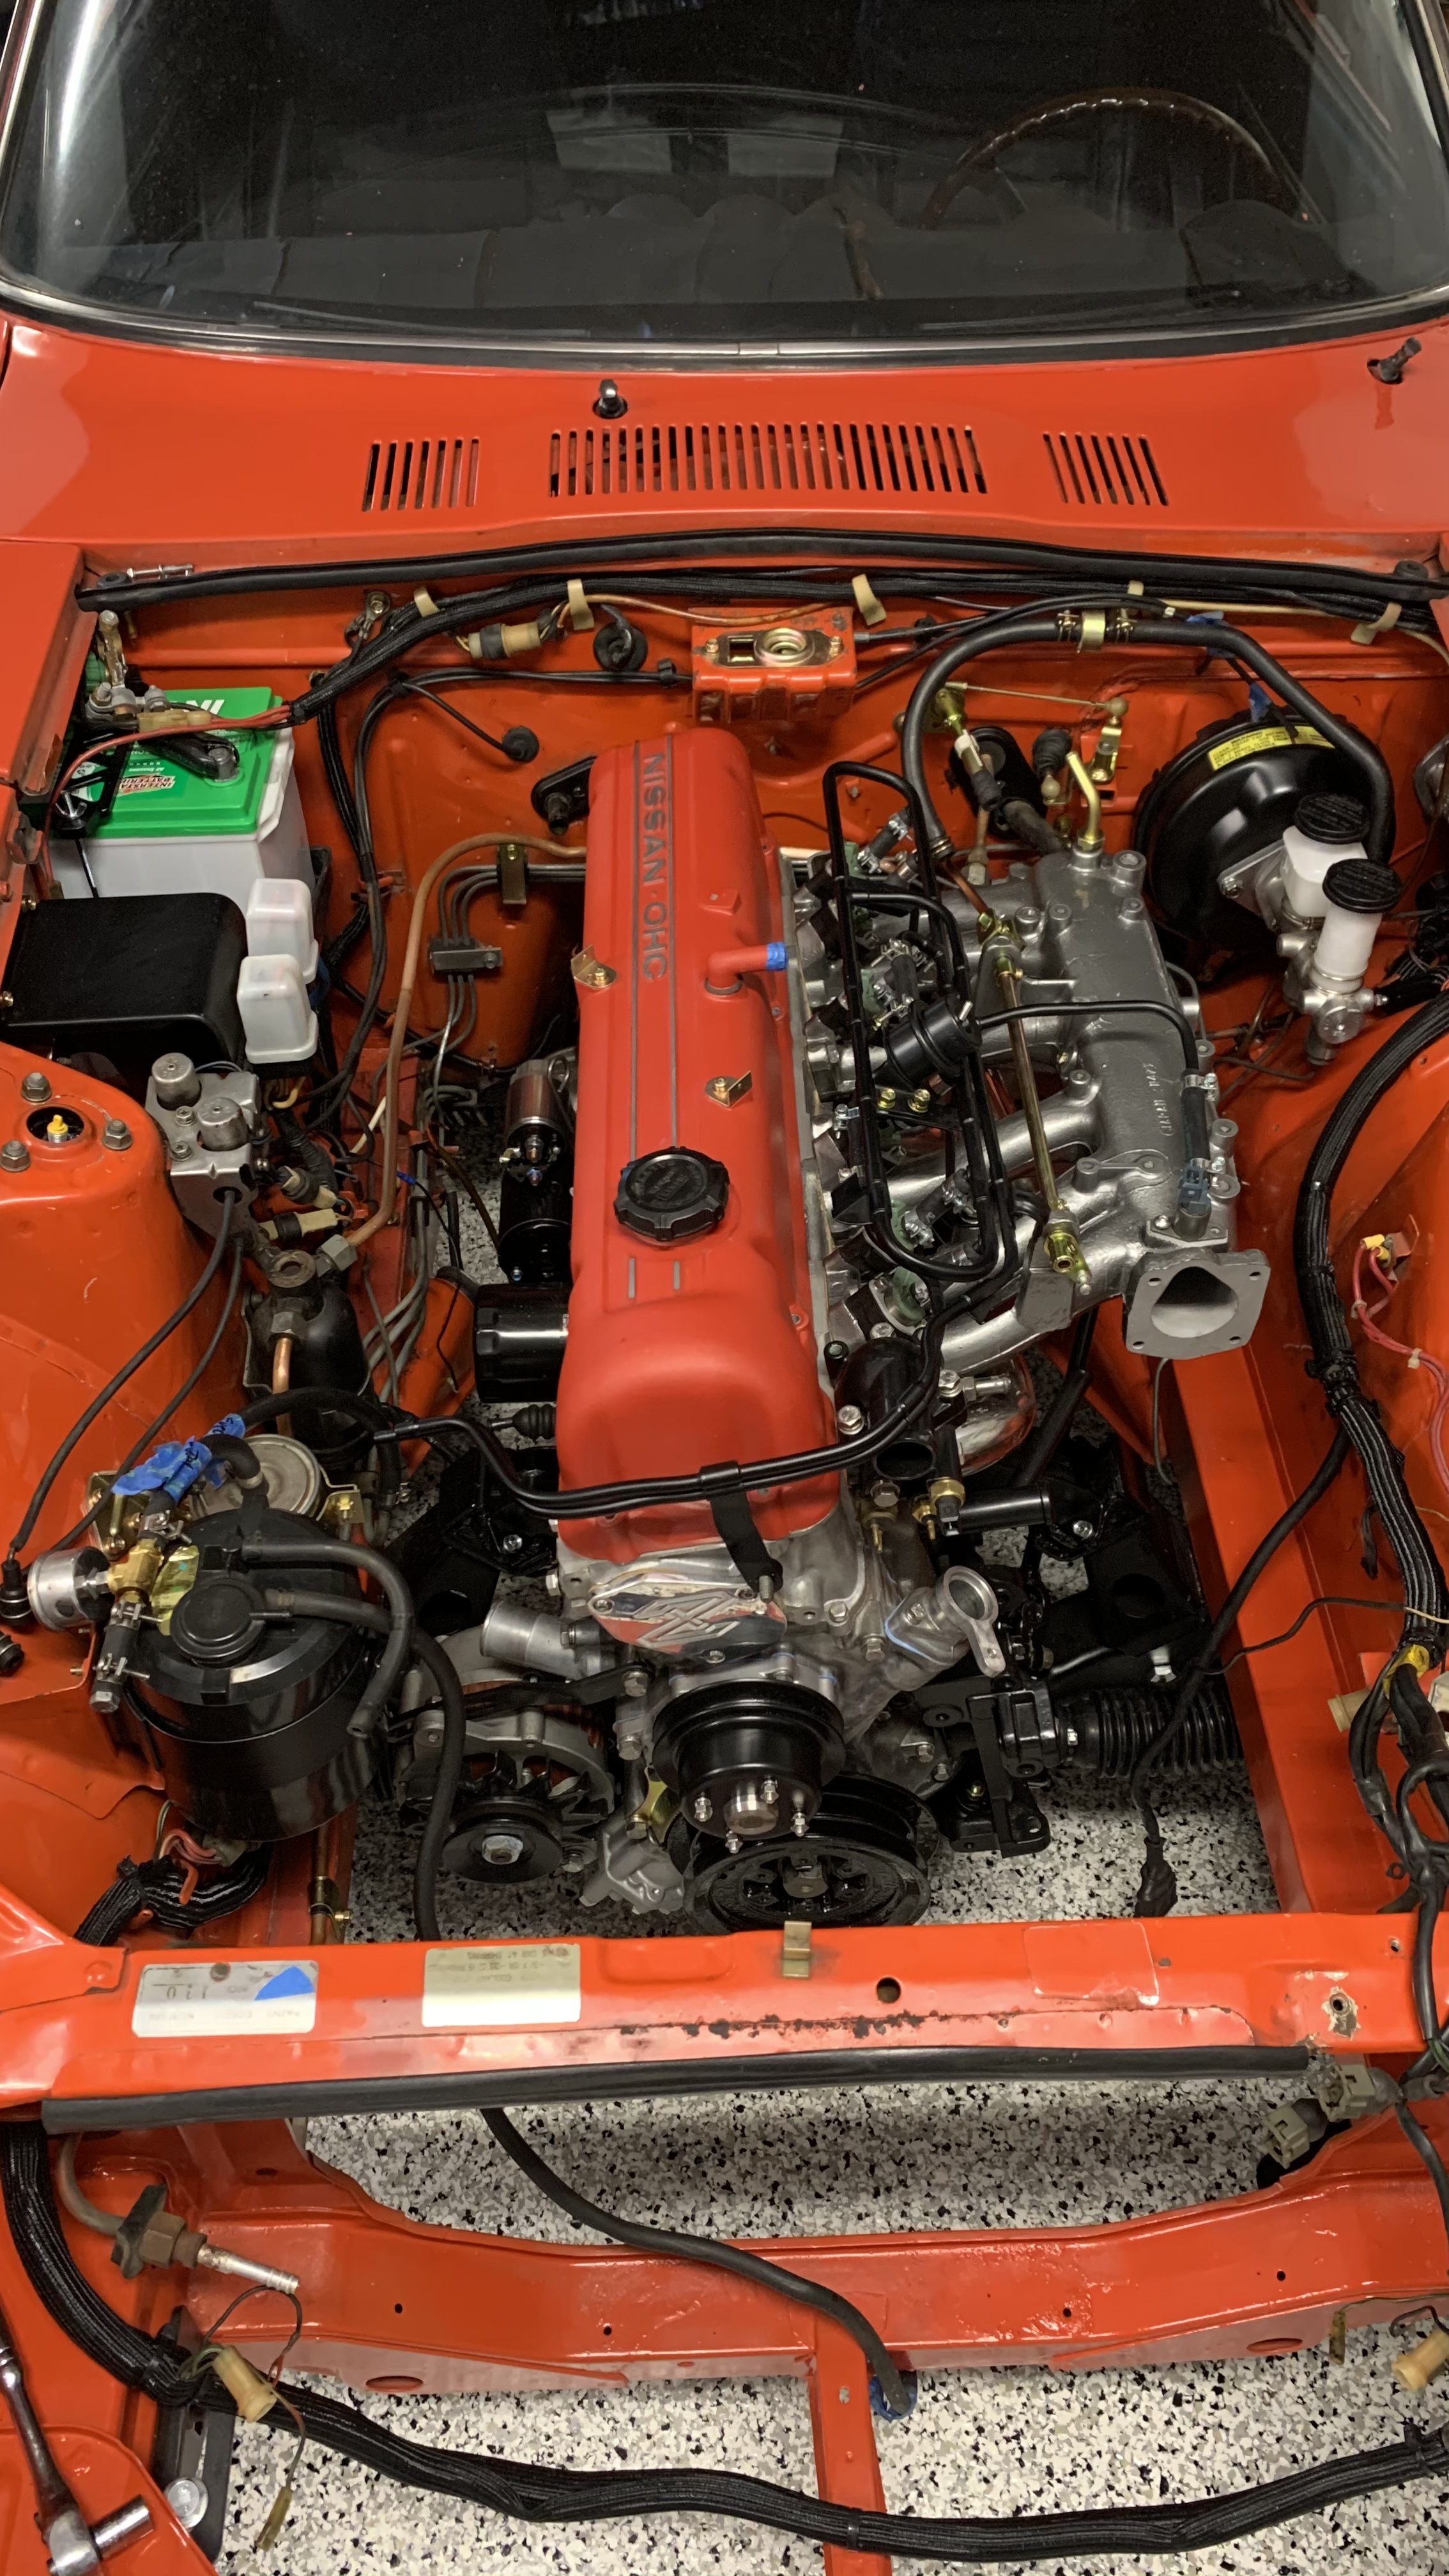
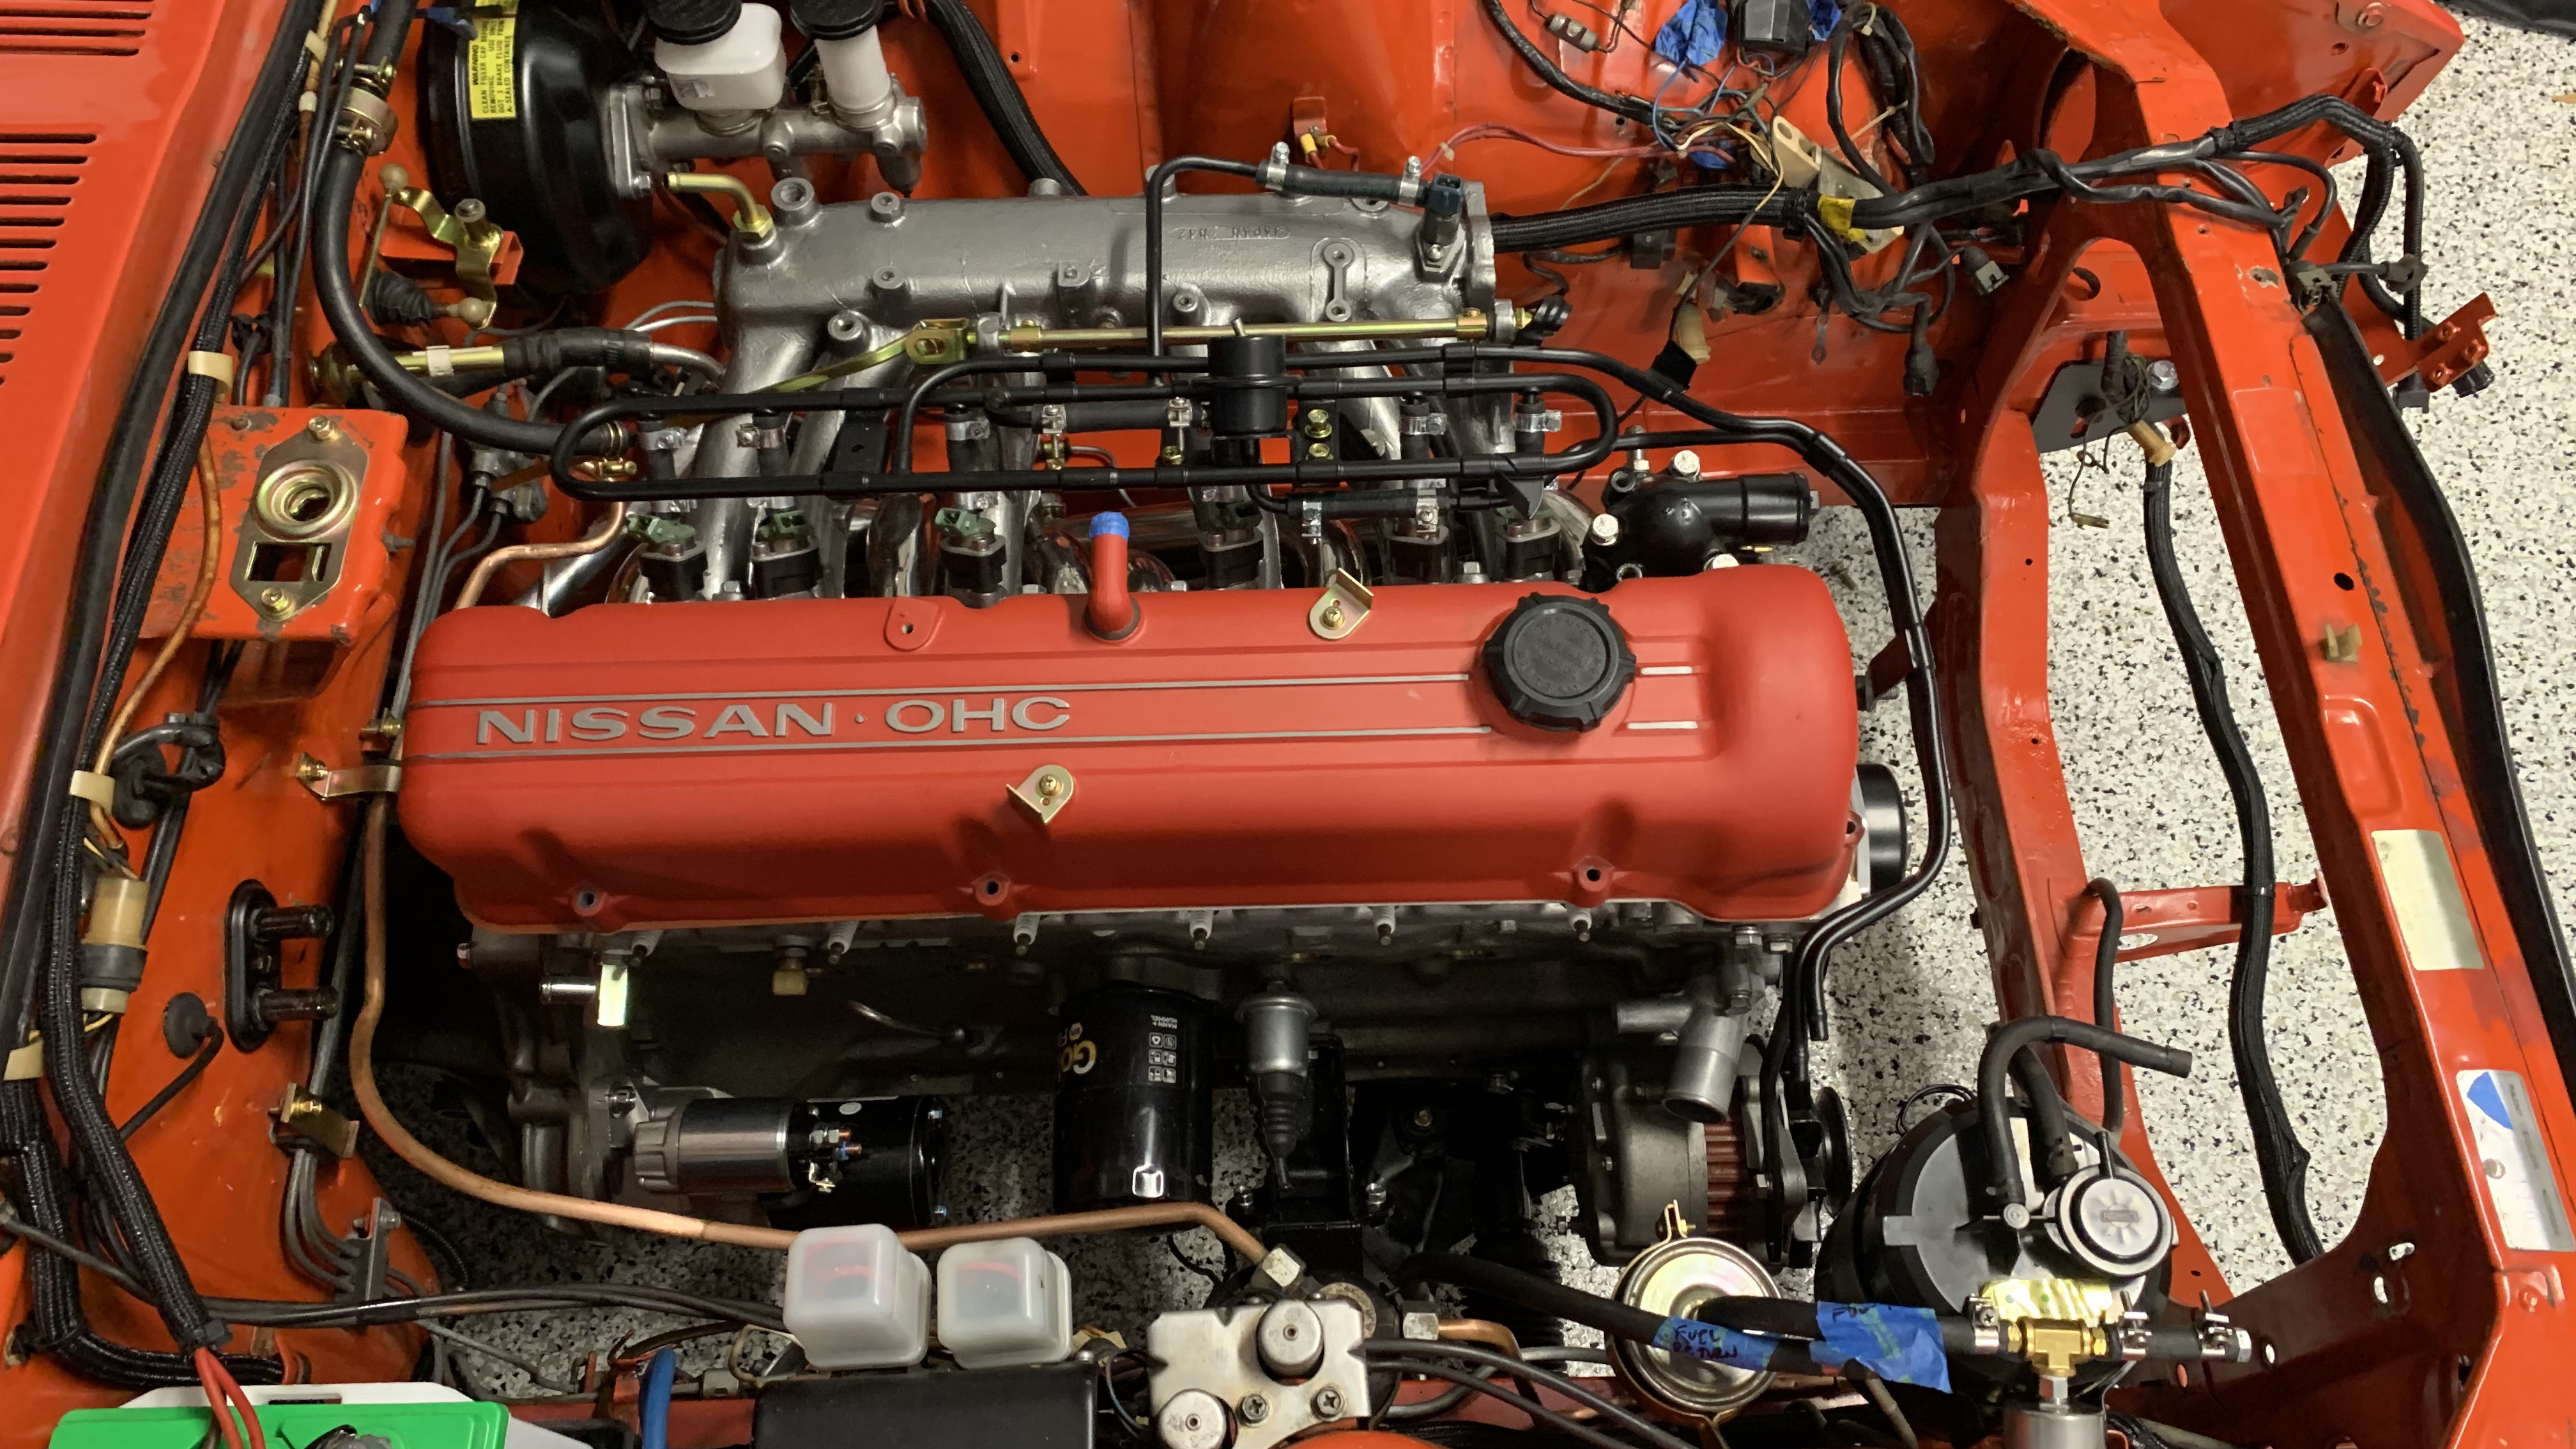
1 pointOkay, I think I’ve completed all the engine bay clean up and prep I need to do before the engine goes in. There is more work to do especially near the coil area but I think everything else can be completed after the engine goes in. See the below pics and let me know if anyone sees anything out of place or a missed. This has been a lot more more than I expected, definitely underestimated it. Sent from my iPhone using Tapatalk1 point
-
Pretty shady, to go through all that effort and no be hiding something. Has anyone called him out on BaT? If not someone should. I might chime in a see what he says. Great observation Dutchzcarguy! Sent from my iPhone using Tapatalk1 point
-
Those are the same photo. The top one has been reversed, and whoever did it also corrected the “240Z” on the poorly applied stripes. Look at all the details in each photo. The wipers. The scenery, i. e. The trees and gravel. mirror image of the bottom.1 point
-
1 pointWally, I did this resto myself and it wasn’t hard just time consuming. I did like the others mentioned (and filled the forum advice). I stripped the spikes to the metal, primed and the put several coats of satin. On the resin/wood portion just sand smooth, wipe off any dust and residue and then go with clear Poly. Clear poly isn’t a actually clear is has a light tint by it very nature. Puts a nice color on the wheel. I put about 4-5 coats of poly (spray). Darkens a bit with more coats. You don’t need any stain (this is a point of disagreement on the forum). I’d make it to your liking. Here’s techniques I used. Poly takes a long time to dry. I waited 12 hrs between coats, lightly sanded with like 600 grit sand paper between coats, wipe down between coats. Poly is fickle, it can sometimes lay uneven (it runs so lay it on thin) , it can get bubbles easily and dust can land on it during the long drying phase. The sanding in between should mitigate most of that. Be sure the area you are spaying is dust and wind free or else it will be a problem. Strip and paint the spokes first, then do the wheel. Good luck and post pics. He was mine, got from a junk yard. It was bad and the yard still charged me $40 or $50. Before: Middle: After: Sent from my iPhone using Tapatalk1 point
-
It's a Daughter selling it for her Mom whose husband apparently passed away from what I read. My youngest sister made similar mistakes selling my Dad's car on B.A.T. Her mother thought the car was worth $25K. After fees they got $13K. I got $0 and knew the car better than anybody except my Dad. But greedy women do stuff like that.0 points