Leaderboard
-
conedodger
Free Member4Points12,513Posts -
Patcon
 Subscriber
 4Points11,142Posts
 -
Captain Obvious
Free Member3Points10,081Posts -

jayhawk
Free Member2Points168Posts


Popular Content
Showing content with the highest reputation on 07/12/2018 in all areas
-
2 pointsIt's probably not oil. It is probably watery soot. My sons car does that sometimes when it's too rich and he revs it. Pull the choke to 3/4 and start it. Then push the choke down some but not enough to make the car stall. Let it warm up a few minutes. Don't rev the car while it's cold! When it warms up enough to rev with out acting up, drive it moderately until it warms up good...2 points
-
The only shop I know that might be available would be zcargarage.com up in San Jose. Currently, I am pretty booked and would not be available until sometime next year. Also, I know Les at Classic Datsun Motorsports in Vista is pretty booked as well. For reference: a restoration that looks like it just left the factory will most likely be in the $30K to $100K range, dependent on the current condition of the car. Also, it takes a little time and can be 6 months to 2 years to complete.1 point
-
1 point
-
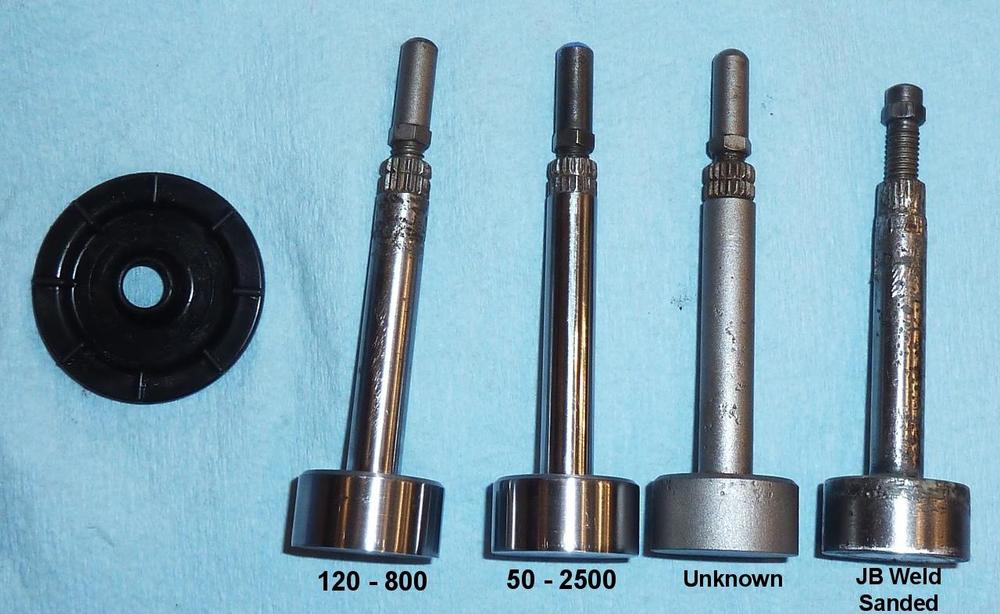
Nice work! Certainly can't be worse than the original pitted finish! From my brief foray into that realm, I found that front vacuum seal had significant compliance and held pretty snug against the shaft. You should be able to tell how much metal you removed by comparing your sanded one to the originals. The JB weld rod looks nasty. Like someone grabbed it with pliers at some point. And the one you have labeled "unknown"? I don't think that's zinc plating. I think someone sand blasted it. That one may clean up nice with the sandpaper treatment.1 point
-
1 point1 headliner, 2 front header (where the rear view mirror attaches) 3 side rails and A pillars. This is with the windshield and door seals removed.1 point
-
1 pointReplace that fuel filter, and at the barb of where the hose from The fuel rail goes into the float bowl, there’s a filter located inside the barb, I would take those out and make sure they are clean as well if the issue persists after that filter change. Sent from my iPhone using Classic Zcar Club mobile1 point
-
1 point
-
Good to see flat tops being utilised, I've heard they are actually superior to the early round top SUs as the idle circuit can be set independently of the rest of the throttle range. I think the flat tops suffered from the old grape vine, in that a lot of folks never actually took the time to understand them, restore or fix them so they work properly and just ditched them based on what "other people said". But many of these people would not have verified the facts for themselves. I would be very interested in the opinions of those who have had experience with them and got them running right! The only downside I see with them is that they make the engine bay look a lot more complex than the earlier simpler carbs.1 point
-
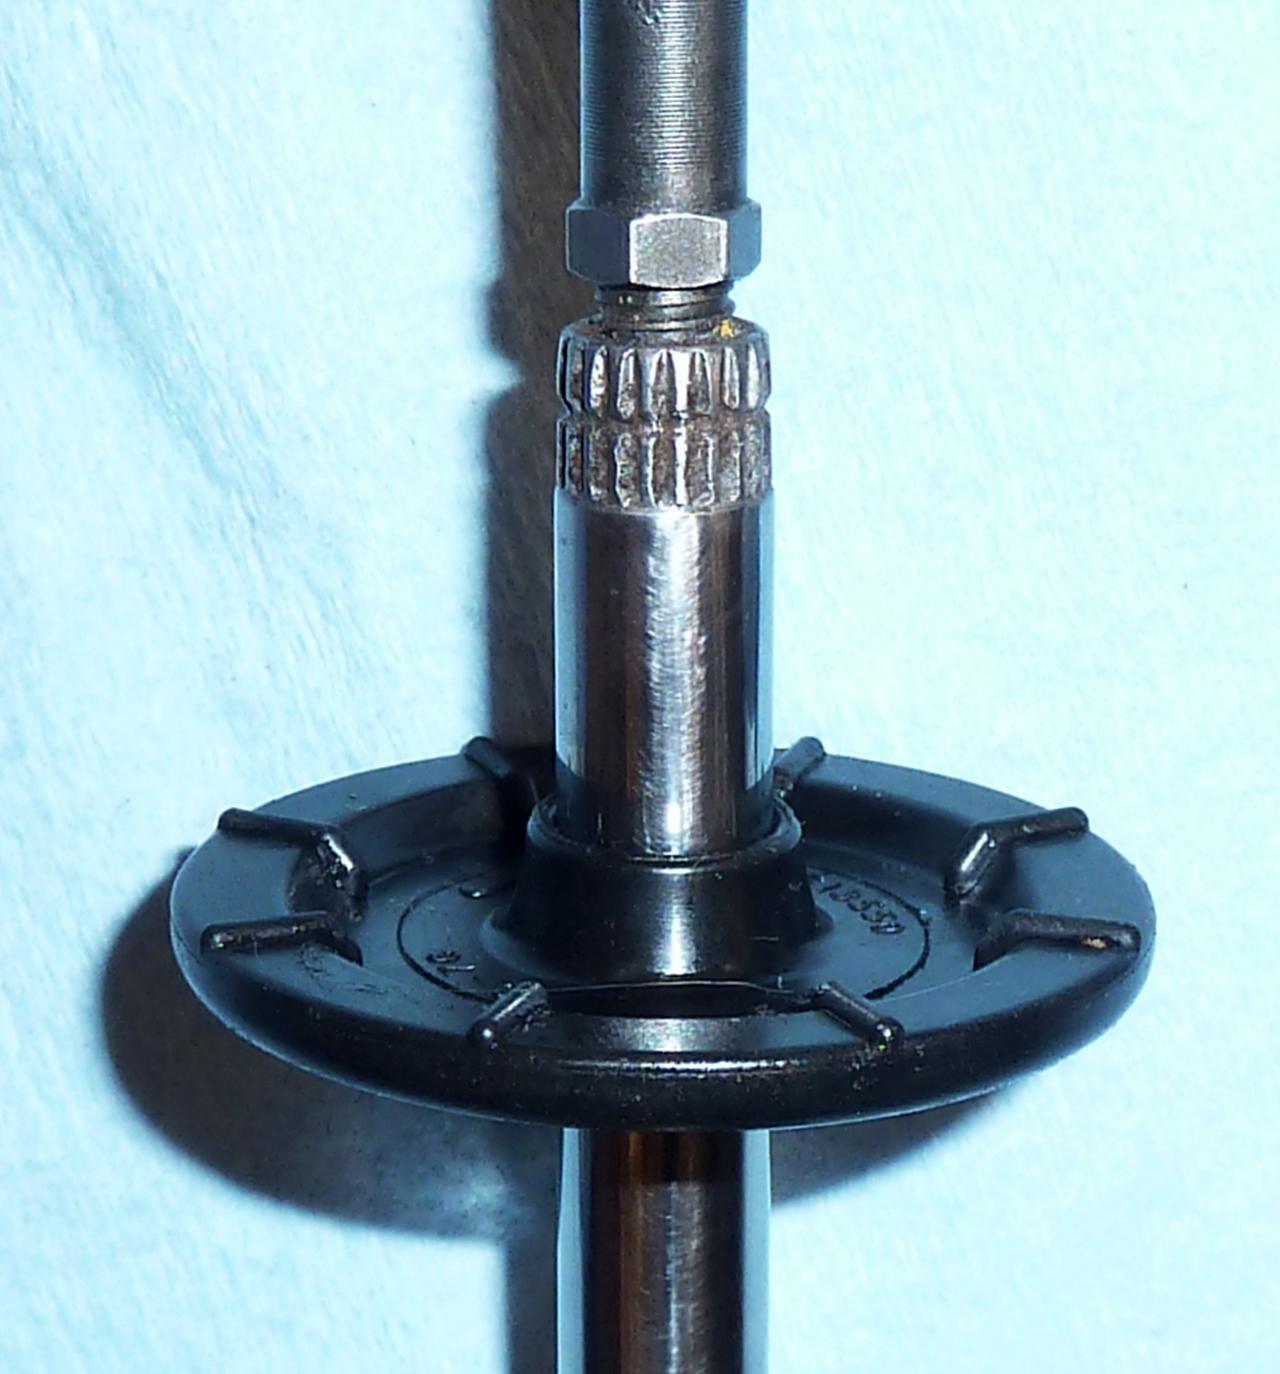
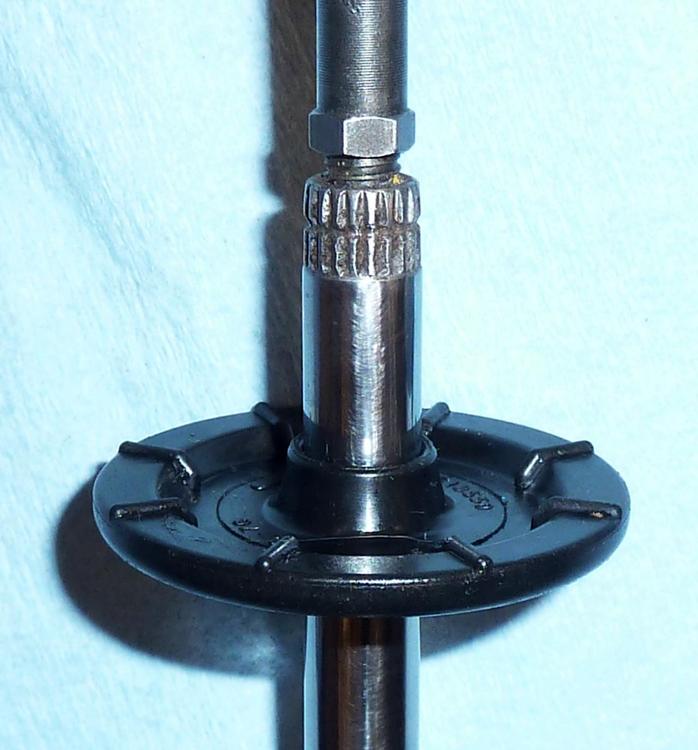
@Captain Obvious I just received a Cardone rebuilt booster like you and it had the same slathered silicon grease on the pitted push rod. I first experimented with a spare one (pittted) and chucked it in my drill press and gently sanded it from 120 grit all the way up to 800. I did not try to sand out the deep pits and they still show badly. I then spun the more pitted one (that came with the booster) but I hogged it at 50 grit until the pits were removed. I then finished it all the way up to 2500. It turned out very nice and worked very well at holding a vacuum even with the narrower shaft. Also in the collection below is an old one from a 240z that I tried to plug the pits with JB Weld then hand sanded. It worked just so-so. I'm not sure about the matt coloured one. I think someone may have zinc plated it. The rebuilt booster's seal works well with the hogged push rod.
 1 point
 -
1 point$100k? I don't see it. It would take $50-$75k to restore any of those cars to a $45k car. Are they valuable as part cars, yes if some of the early items are there and items like matching key set. Tracking parts down today will cost much more than 10 years ago due to the higher value on Z cars. But that higher value isn't bringing rusty vin tags to the price of running cars. If the shells were not as rough and way more complete, I would say they were worth $5k each imho. What would you ask for the pair of new fenders? I am in NJ also.1 point
-
I think I’d like to use the original carbs if possible. My goal is to restore it to the way it was when I drove it off the dealer’s lot. The only changes I made to the car over the years was to add the aftermarket a/c unit (that I personally installed. Maybe that’s why it never worked very well ?) , replaced the radio with a Blaupunkt, and the carb “upgrade” (which cost me $554 in 1980 dollars!) The Datsun shops back then made a lot of money off of gullible flattop Z owners like me who bought off on the supposed superiority of the round tops. For the record, I had never had any vapor lock or other problems with the car, and this was during a time I was driving all over southern California making sales calls. I just wanted to “improve” my car after listening to a presentation at the Orange County Z club meeting by the mechanic who I then went to for the conversion. Hmmm...1 point
-
My question is how many judges can tell the difference between early and late model flat tops??? There's Bruce and Jim, any others?1 point
-
Nice six-pack. The best flat top pair to put back on the car might not be the originals. There were a number of revisions of the flat tops between 73 and 74, and if you have different versions, I would absolutely use the later design. And since a lot of them were upgraded at the dealers in those years due to customer complaints I would contend that the later design should still be considered "stock" even on an early 73 car. Changes described in the 73/74 carb modifications documents and TSBs. (Ref TS73-38 and TS73-81) So I'm no carb expert or stock car show judge, but I would not ding a 73 in a stock class even if it had the later version of the flat tops on it. YMMV1 point
-
Hi, I’m the “gentleman” (Rich may be a little too generous ?) that is the original owner of the ‘73 Z of this thread. I’m happy I managed to hang on to my Z this long and yet ashamed I have let it sit so long. I bought it new from Gubrud Valley Datsun in Mt Vernon Washington shortly after returning from an 11 month deployment with my US Navy A6 Intruder squadron aboard the USS Kitty Hawk. ( which was a great way for a young ensign to save his pay to buy a Z!). I’ll post more info about the history of this car when I get back home after the 4th.1 point
-
Nice condition base to start from. Good to see that it still has the original intake manifold and balance tube. You just need to find someone who knows flat tops. And shift knobs.1 point
-
1 pointMy headliner "tricks" list 1. Clean the roof metal ceiling very thoroughly. Leave no fuzz from the old insulation. 2. put a bit of masking tape in the center of the headerliner so you can line it up with the mirror and room lamp to get the same width on both sides 3. The MSA headliner is a bit wide, but you CAN tuck it in to the edge all the way around the entire ceiling. Do this so it is completely tucked all the way around. Lots of rubbing with pressure to the outside. 4. Oh yes, my best trick. Make a piece of 1/8 plywood or 18-20ish gauge sheet metal, 33" x4". Once the headliner is up and tucked smooth and centered, stuff this slab up there and get it wedged up tucked in just like the headliner, front and back so it bowes upward and holds the headliner in place tight to the ceiling in the middle. Take a look at it and think "I could attach stuff to that bar! It looks cool!" 5. Bring down half of the headliner at a time. Apply glue to both sides. No wait! Apply masking tape to the perimeter of the ceiling at least 2", or even 3-4. the glue. IE, no glue around the edges! You will never get the edges tucked back in if there is glue near the edge! The MSA headliner is stiff enough so there is no need for glue on the edges. 6. After correct tack time, start pushing the headliner to the ceiling from the center outward. Once all the glue area is contacted, then tuck in the edges. 7. Repeat for the other side, remove the wood/metal spline. 8. Begin all this by going to a pro upholstry shop and ask for some "Helmiprene 4510" for your glue. It's brush applied and killer strong once set, but can be released when green with some heat. I use it everywhere on the Z and 510. Go Pro Joe!1 point
-
Welp, back from vaca and installed a new intake/exhaust gasket....still the noise. Got the bore scope out and the damn #4 intake valve seat came out again! Agh.0 points