Leaderboard
-
.JPG.cfcada9cf1c1b502df3f5f2f2ca3ff36.JPG)
SteveJ
Free Member3Points9,646Posts -
Metalman5151
Free Member2Points24Posts -
cbuczesk
Free Member2Points1,024Posts -
munters
Free Member1Points160Posts


Popular Content
Showing content with the highest reputation on 02/22/2017 in all areas
-
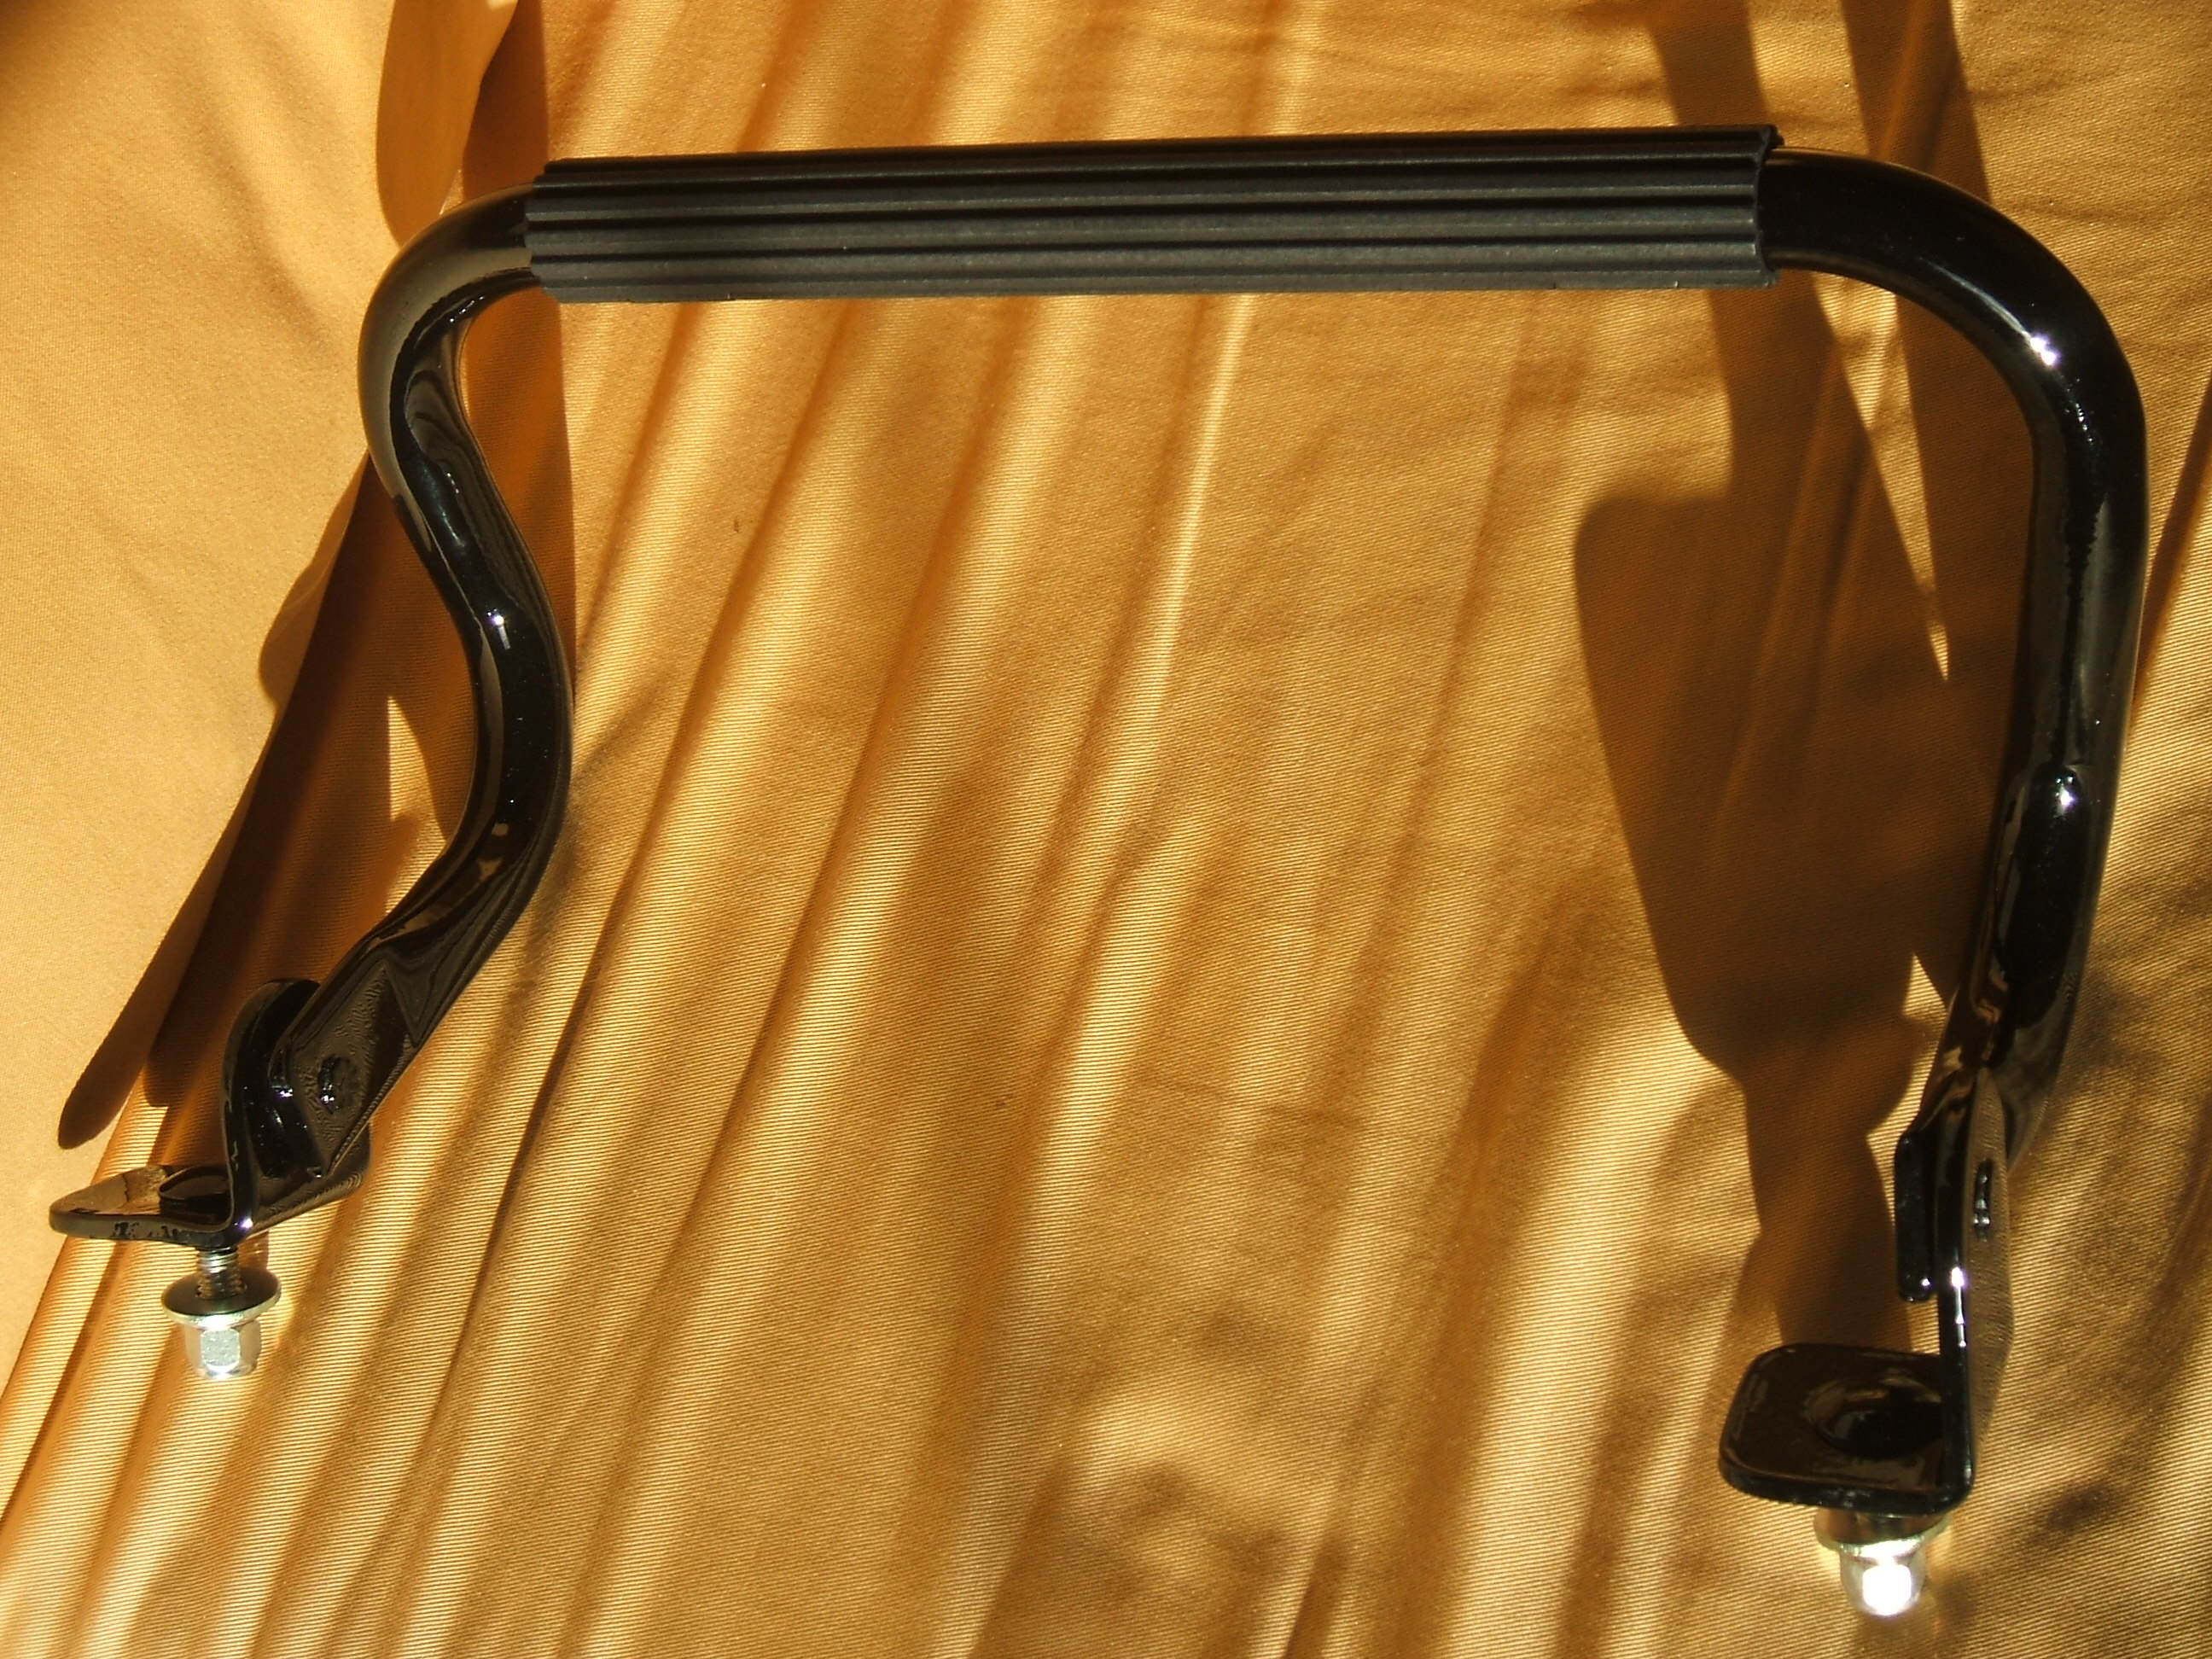
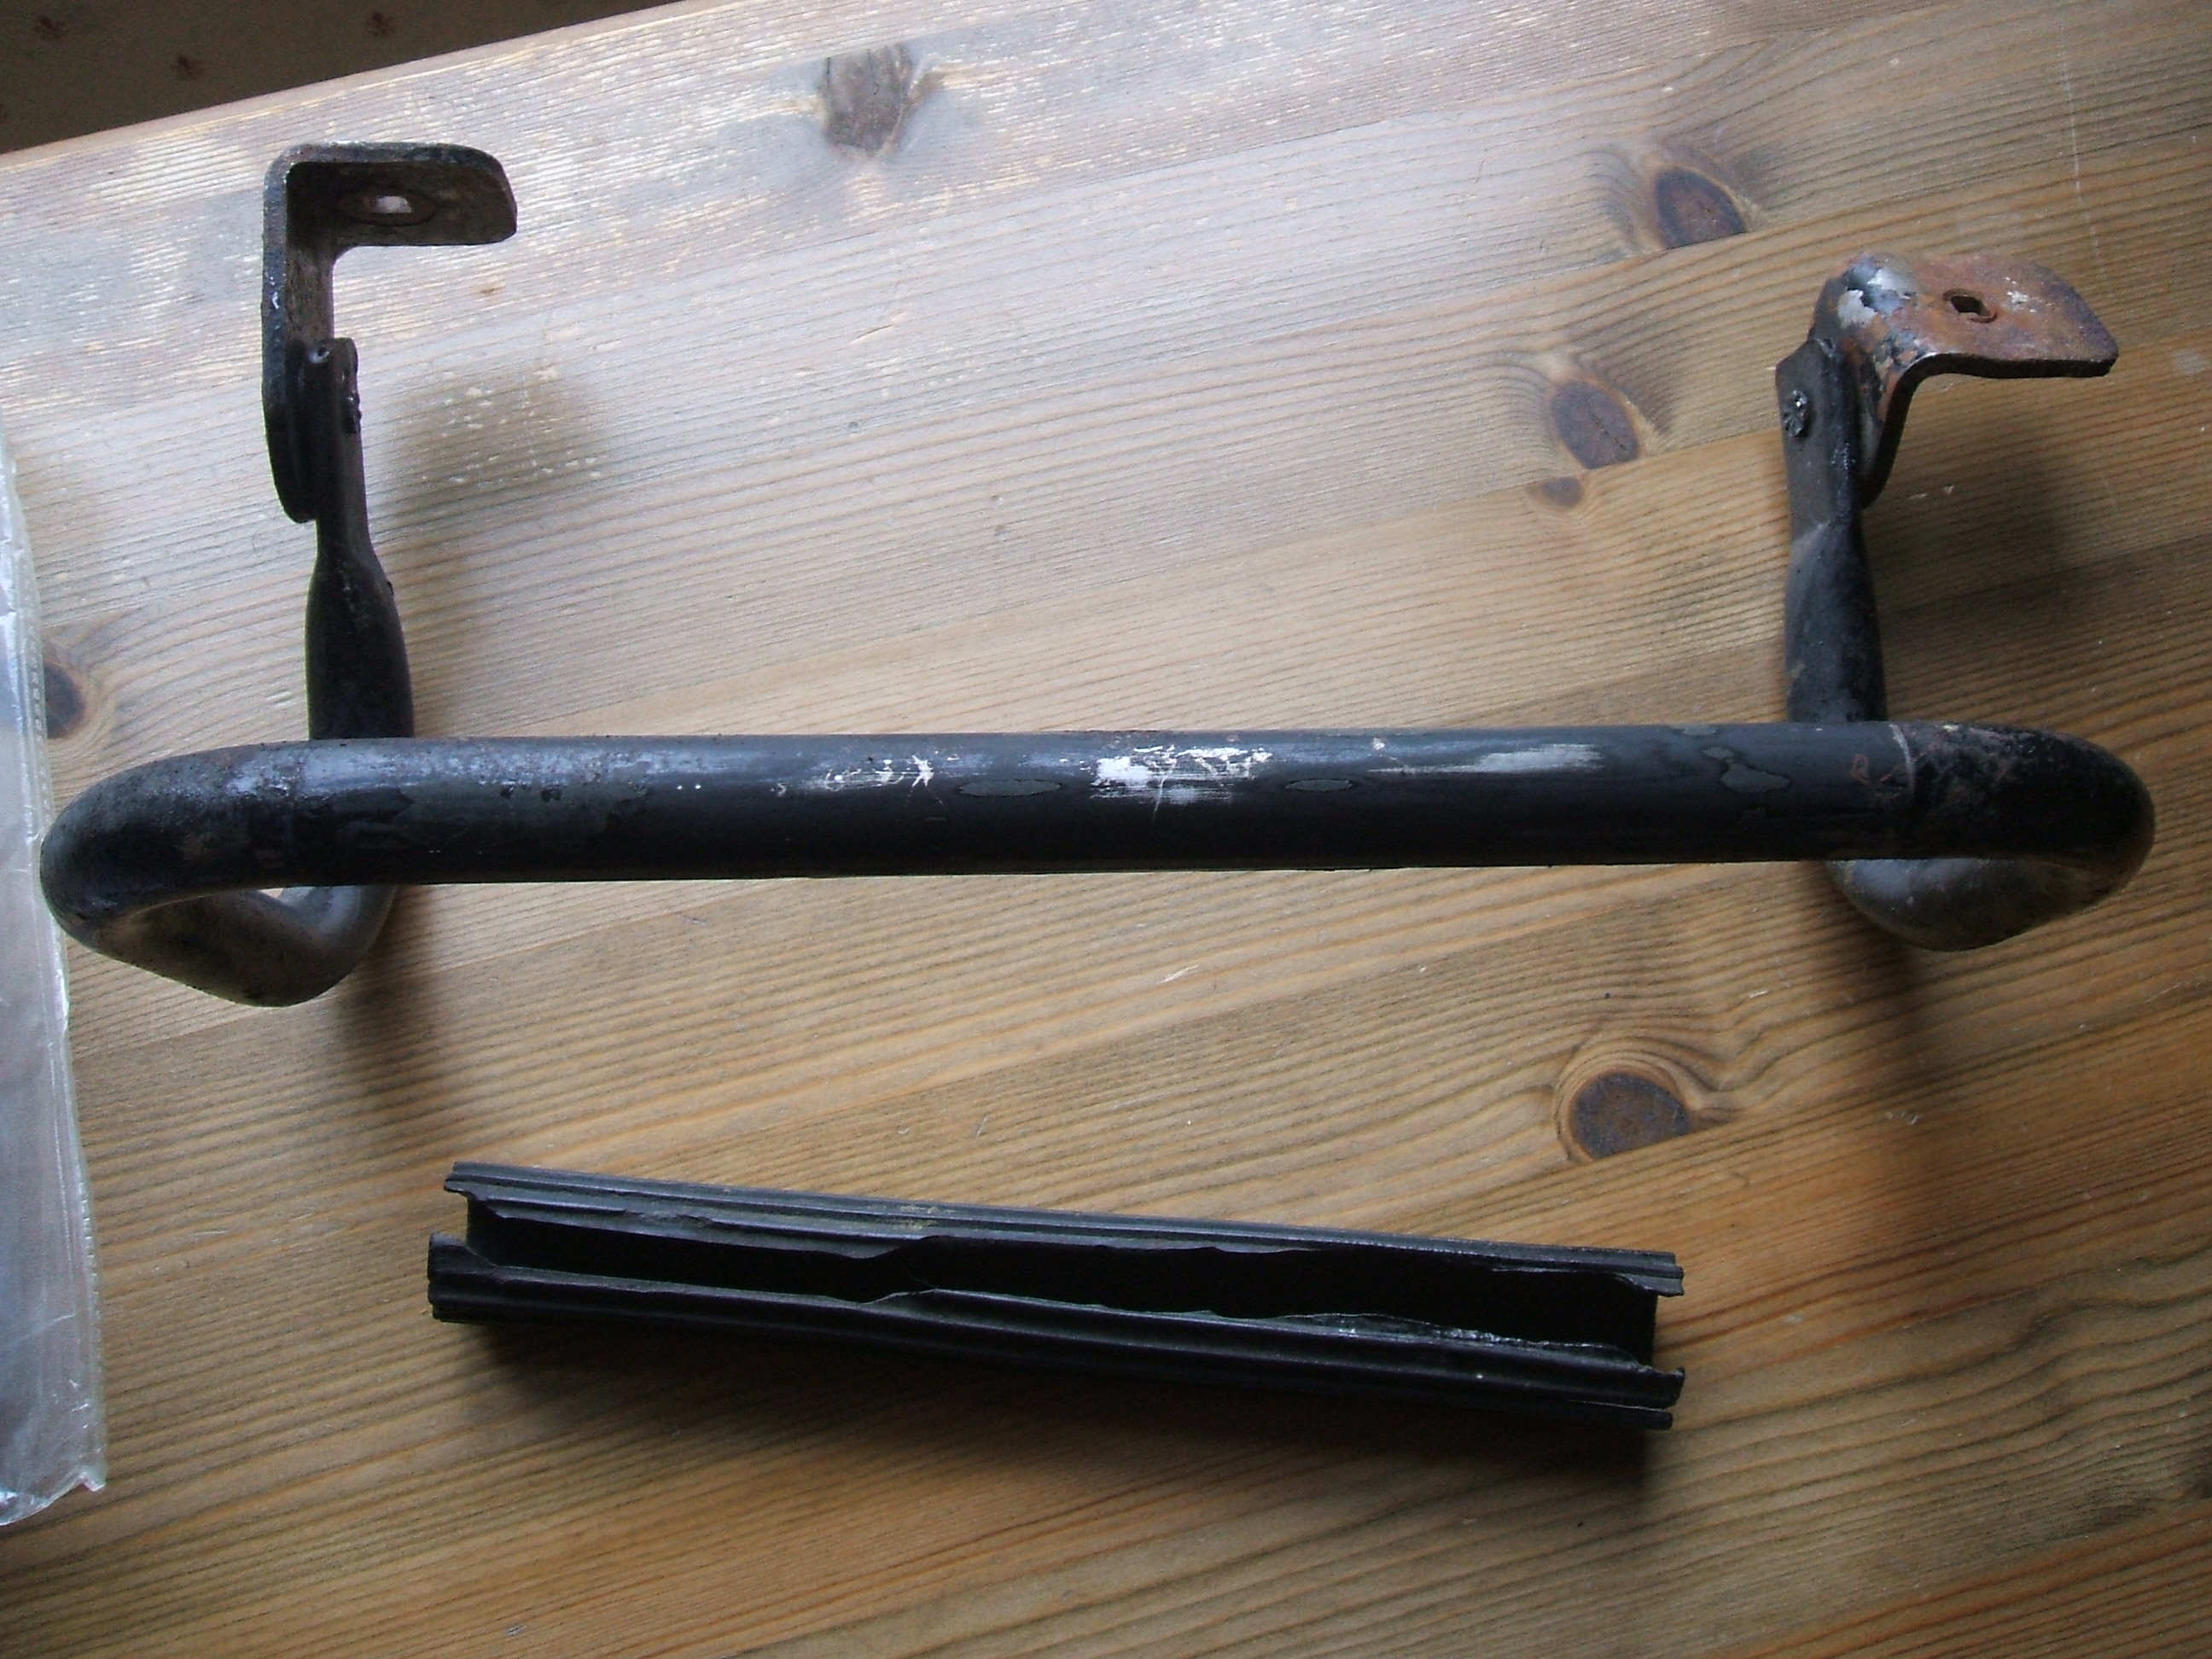
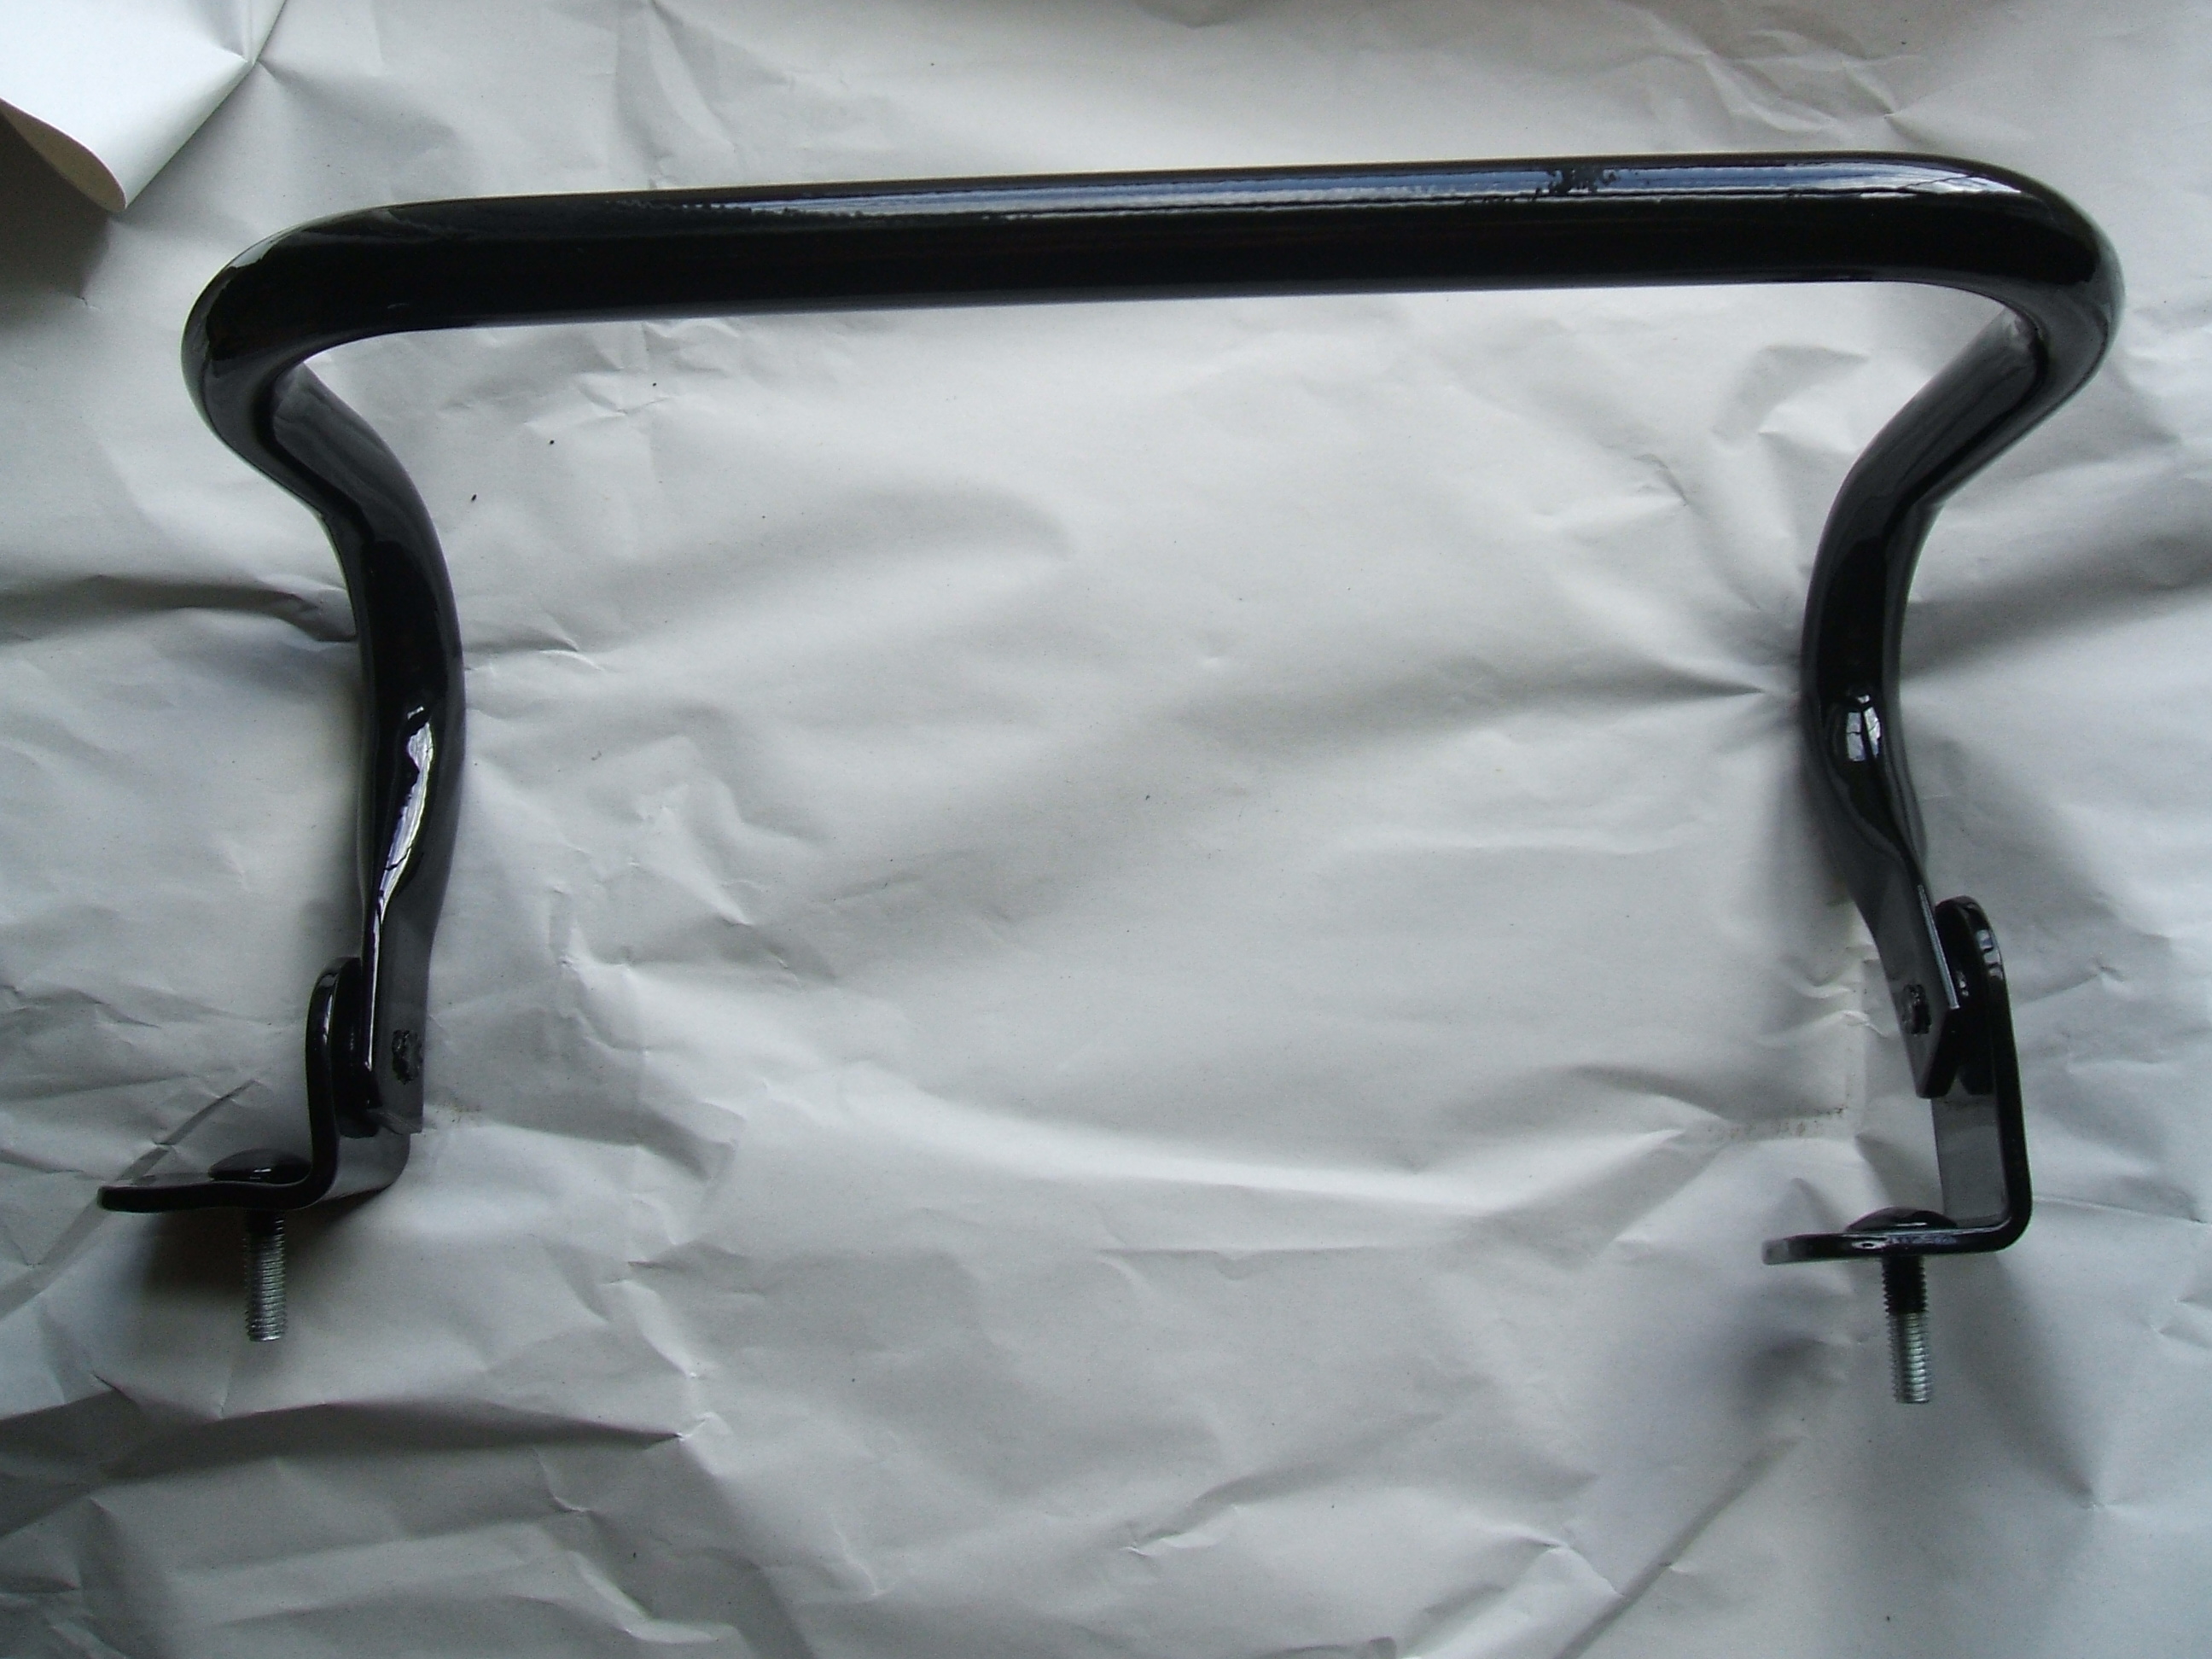
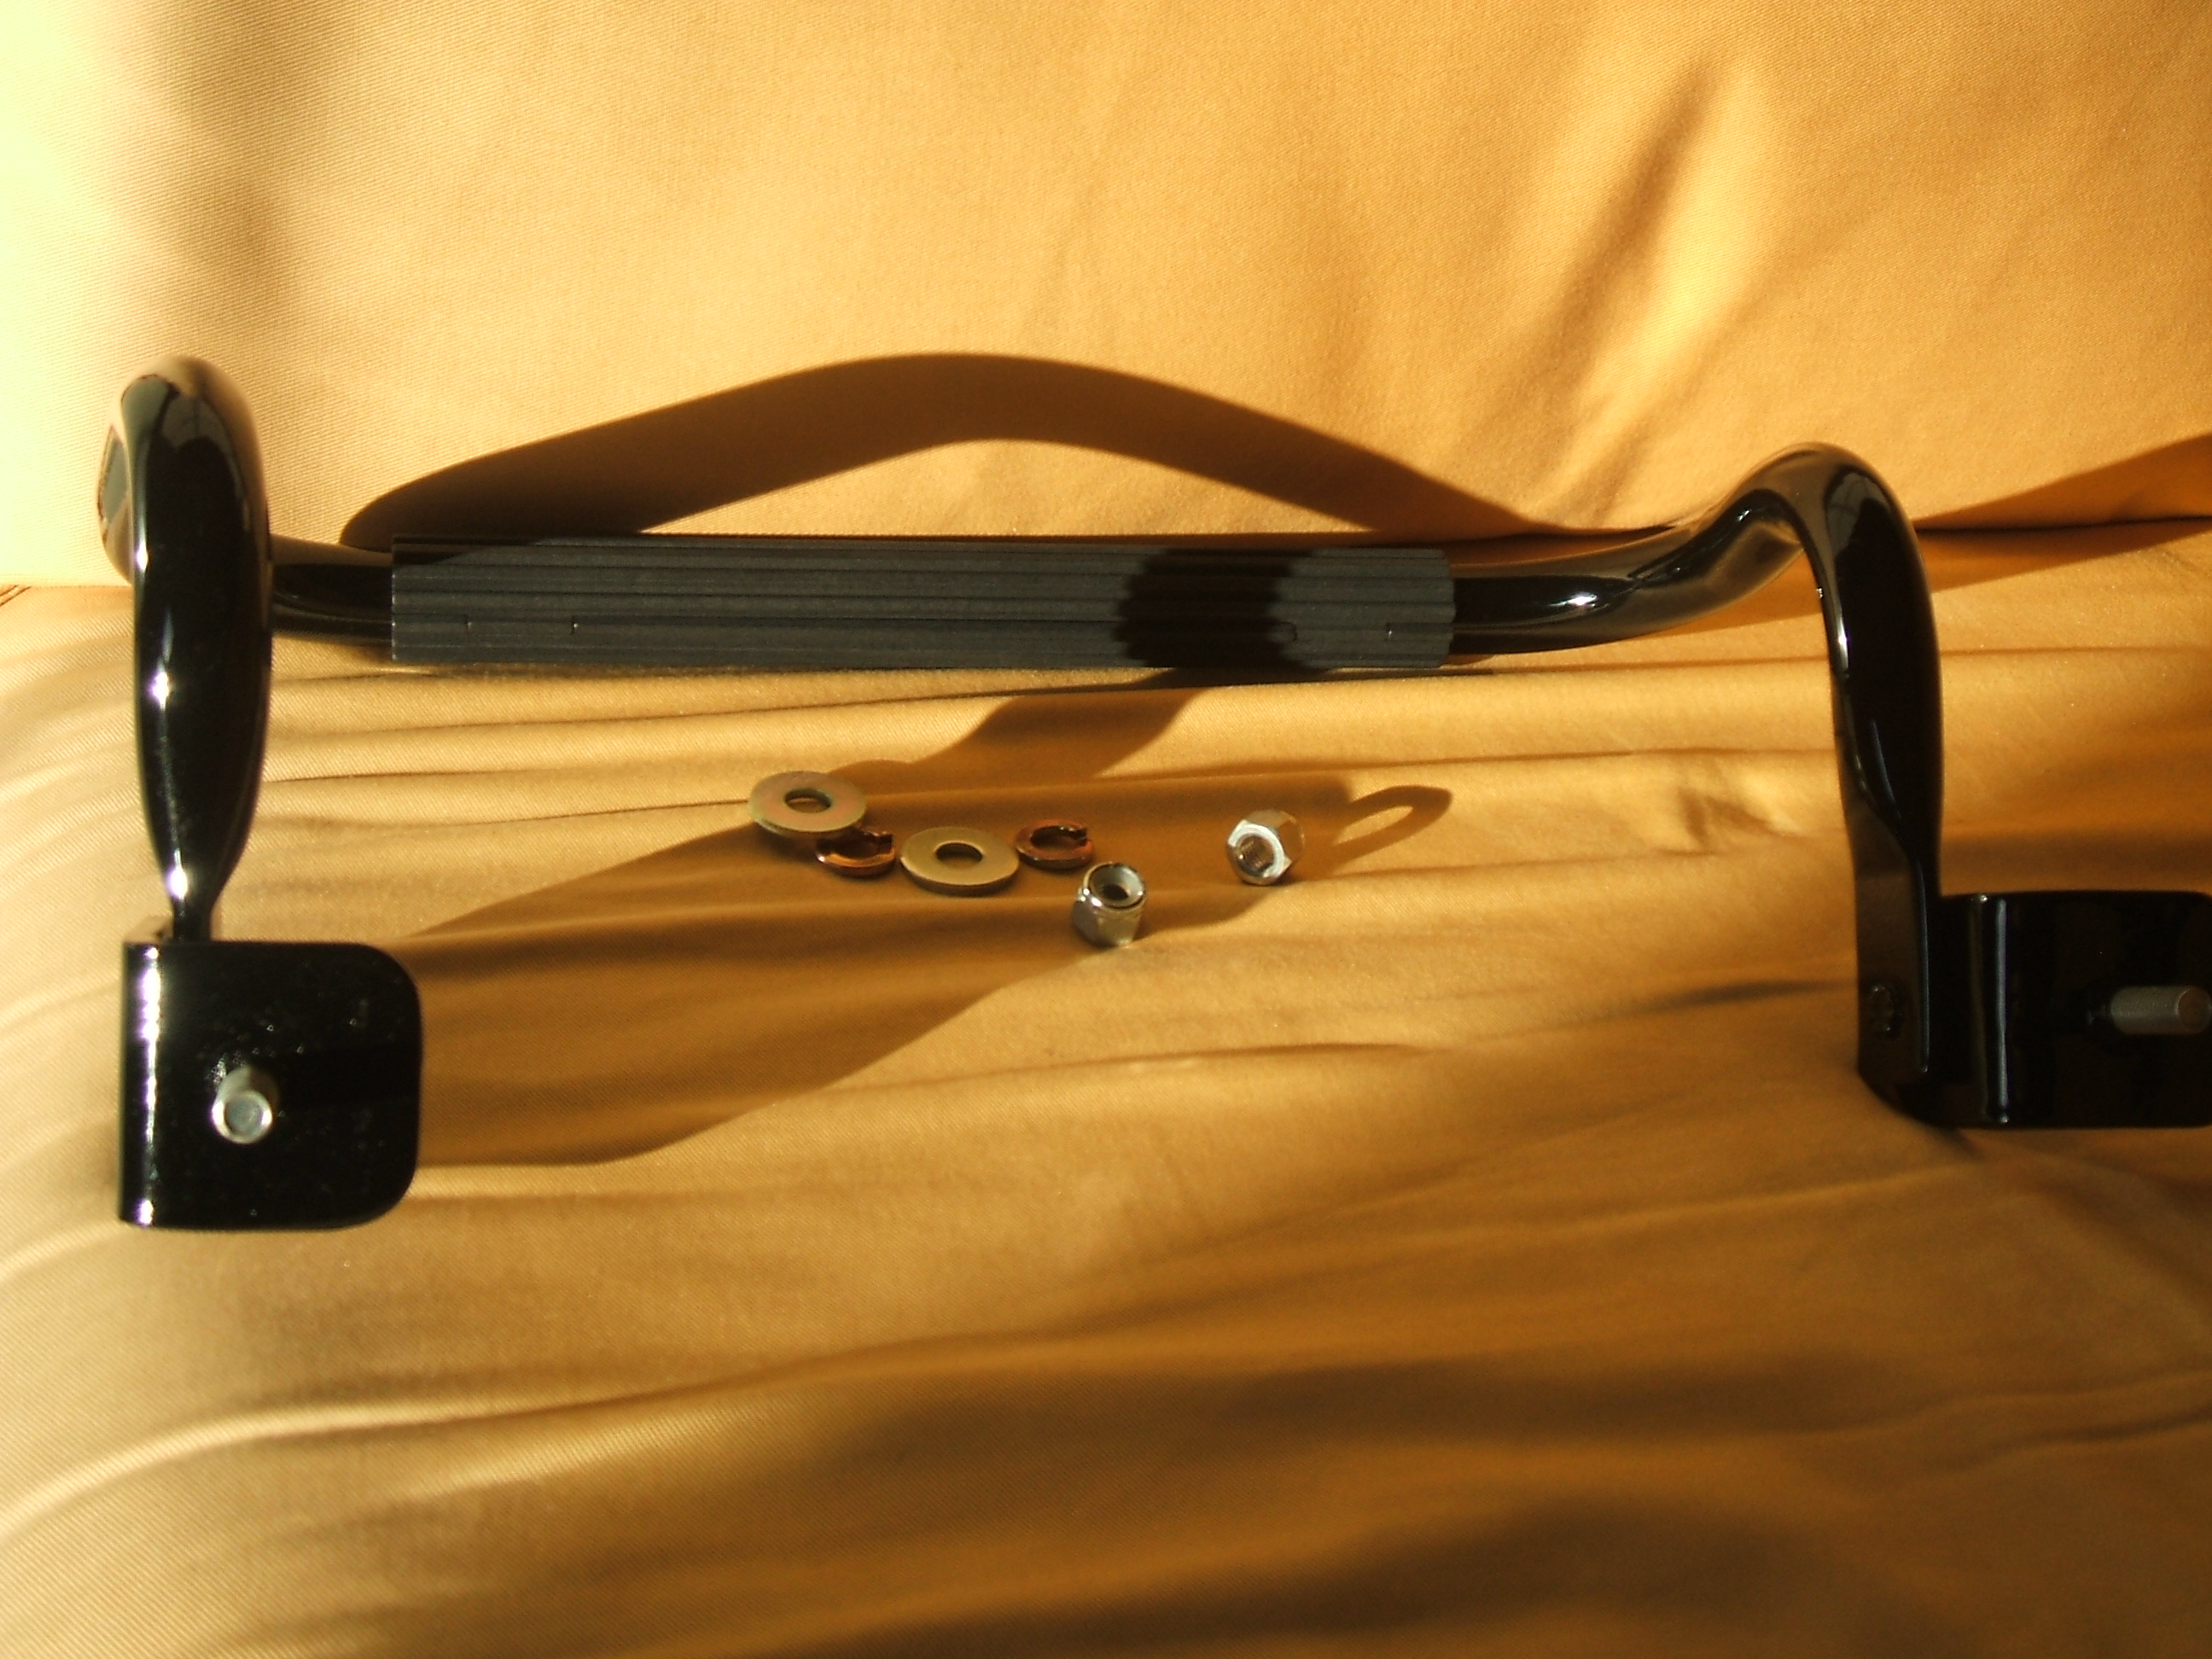
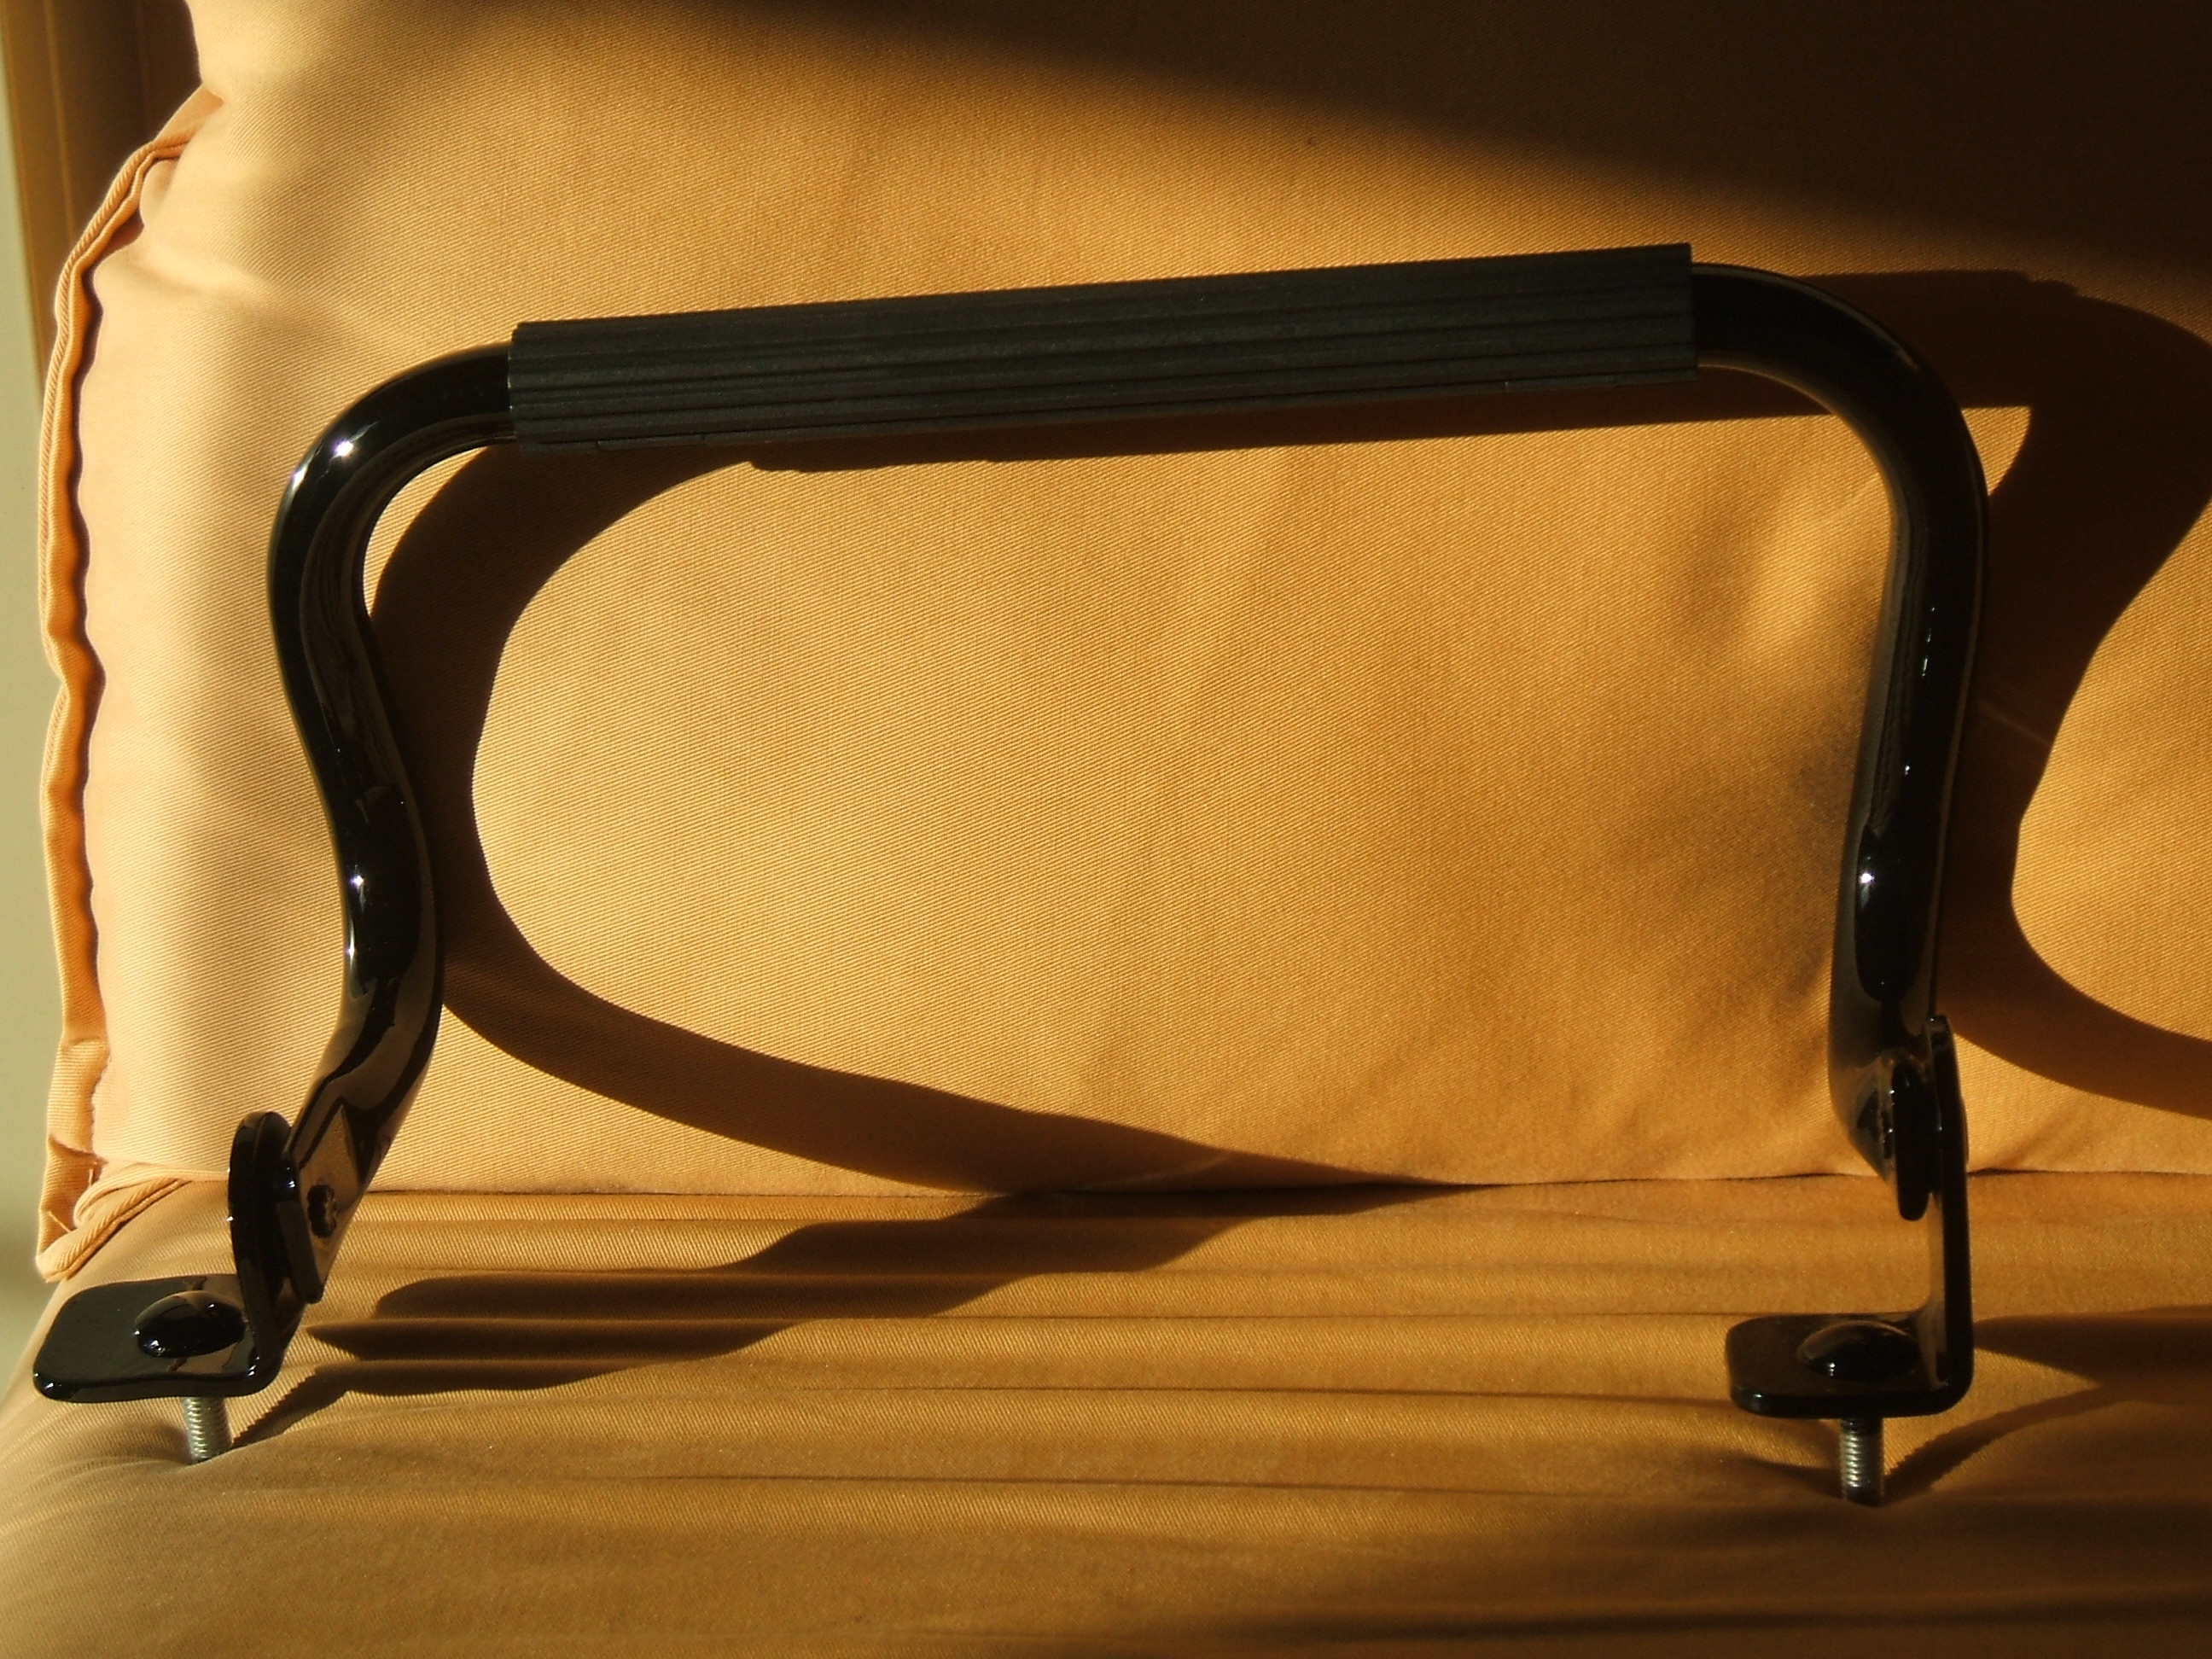
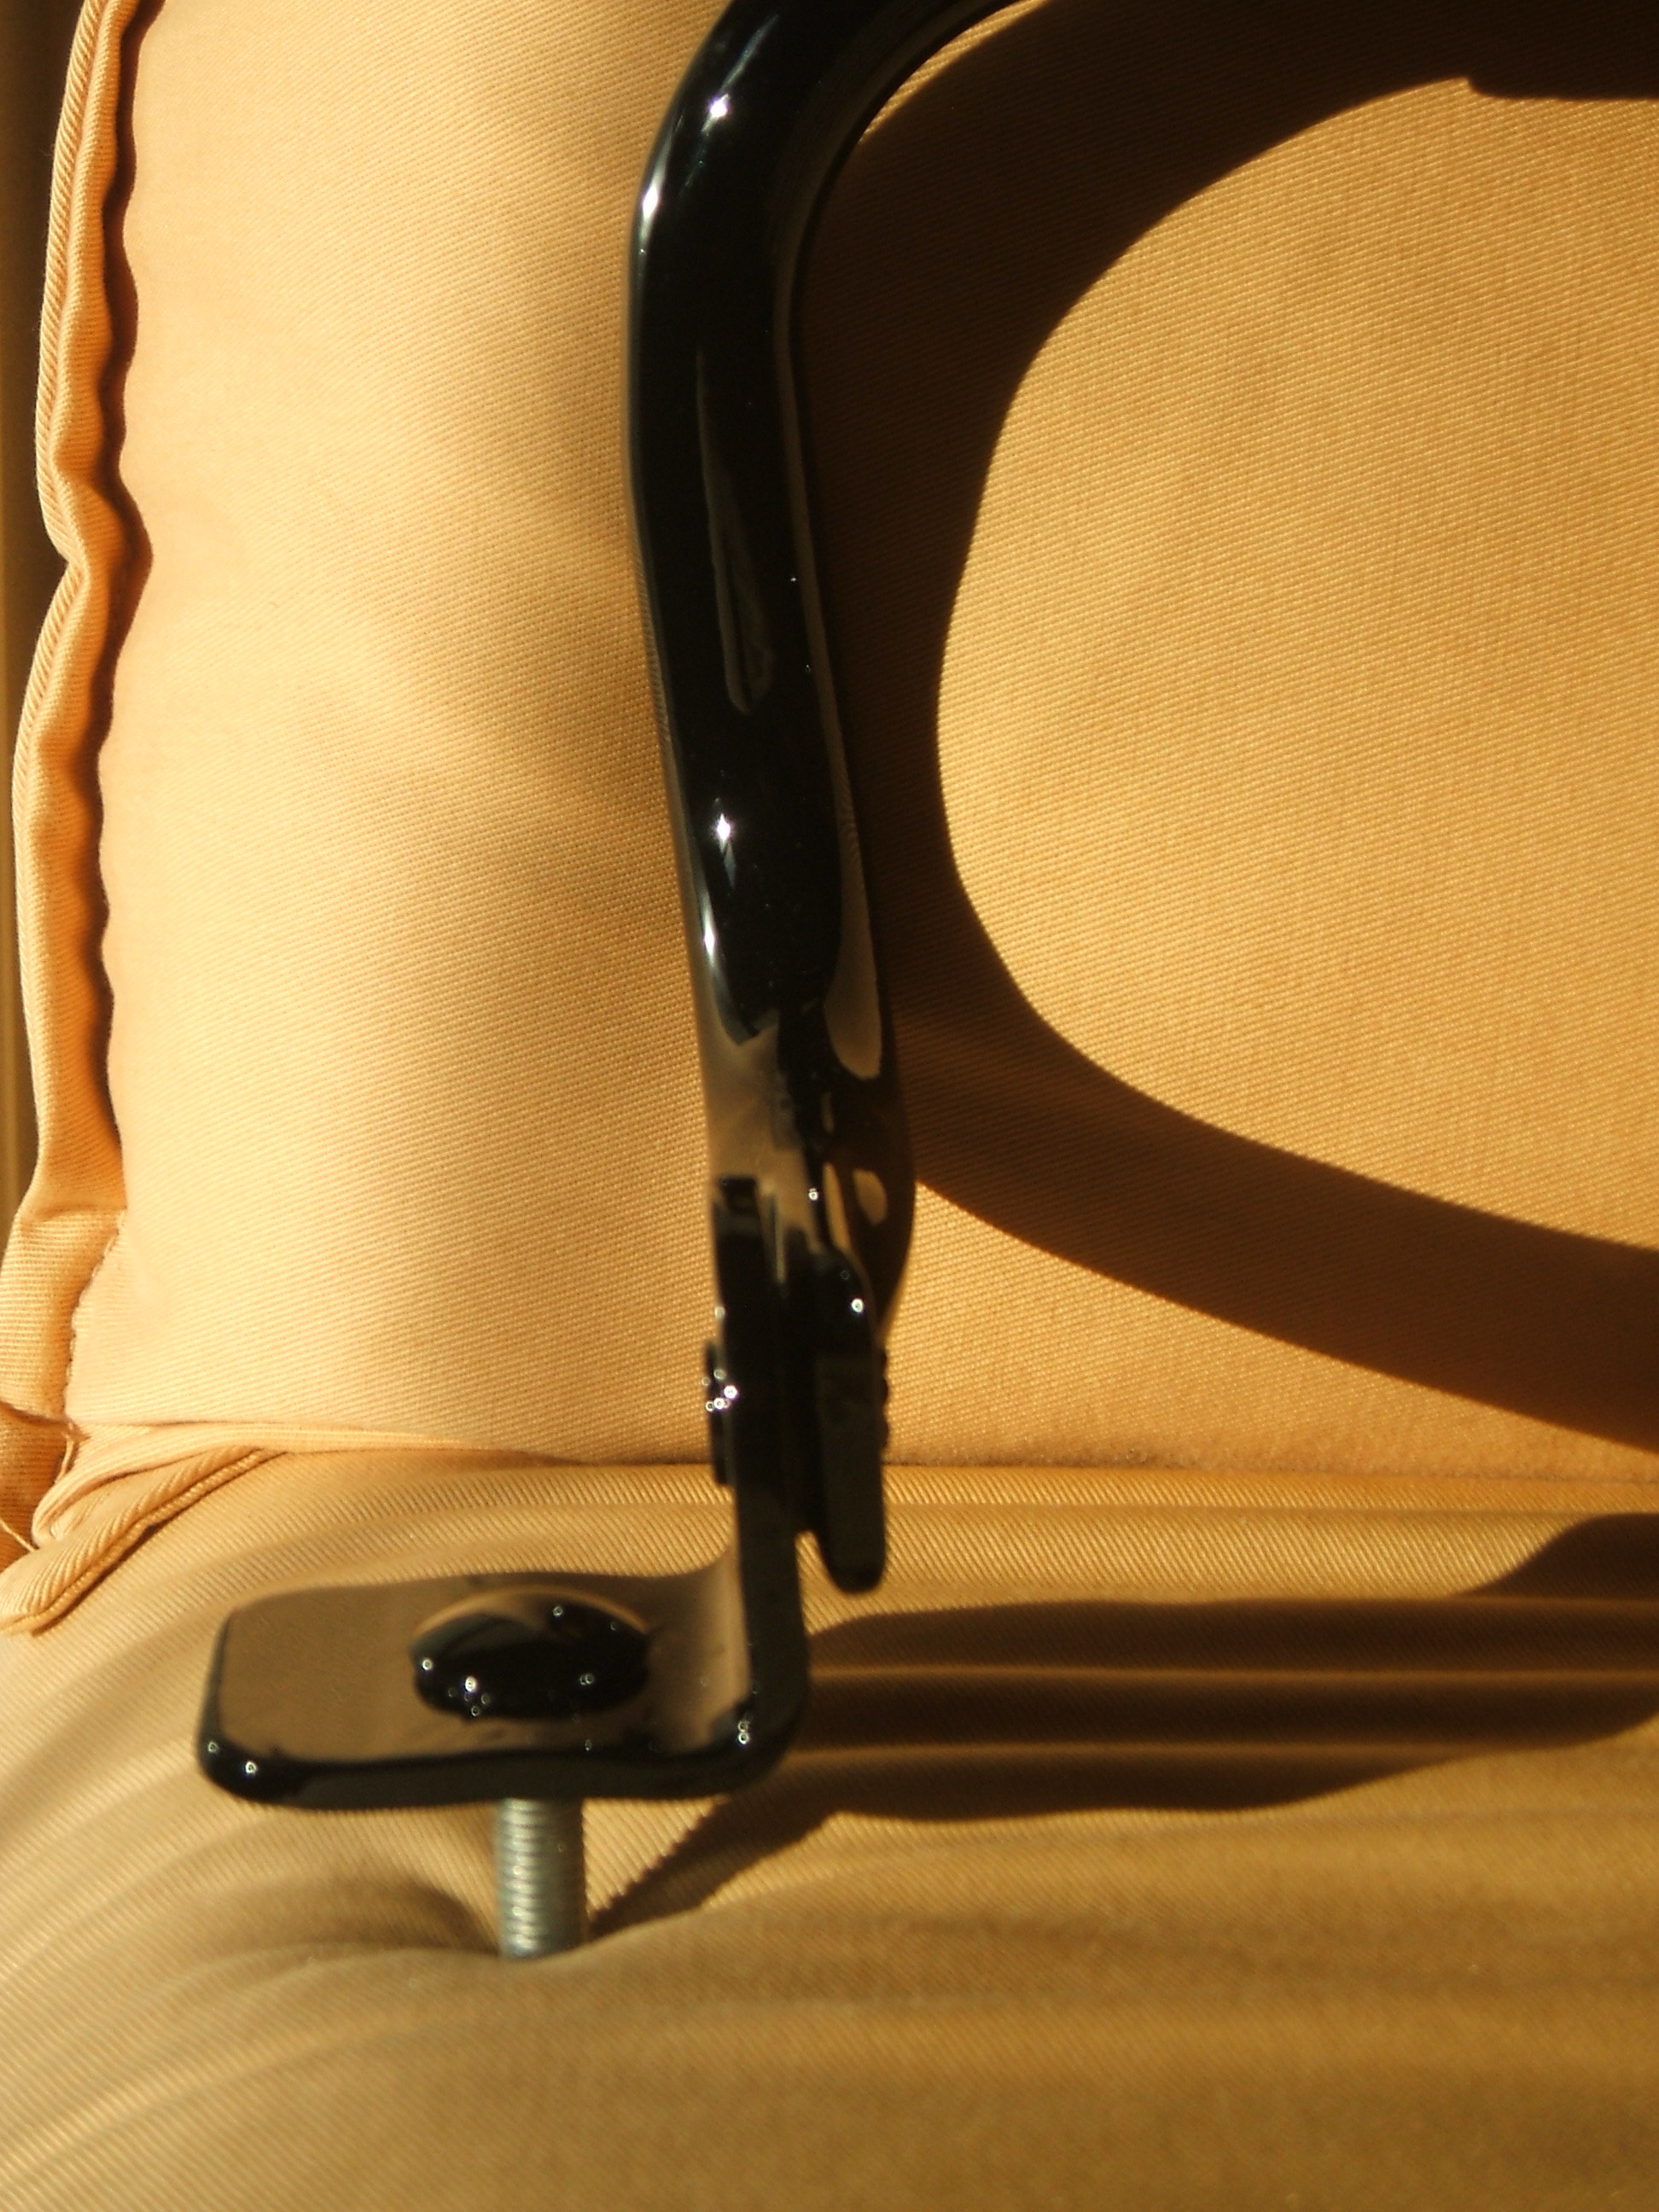
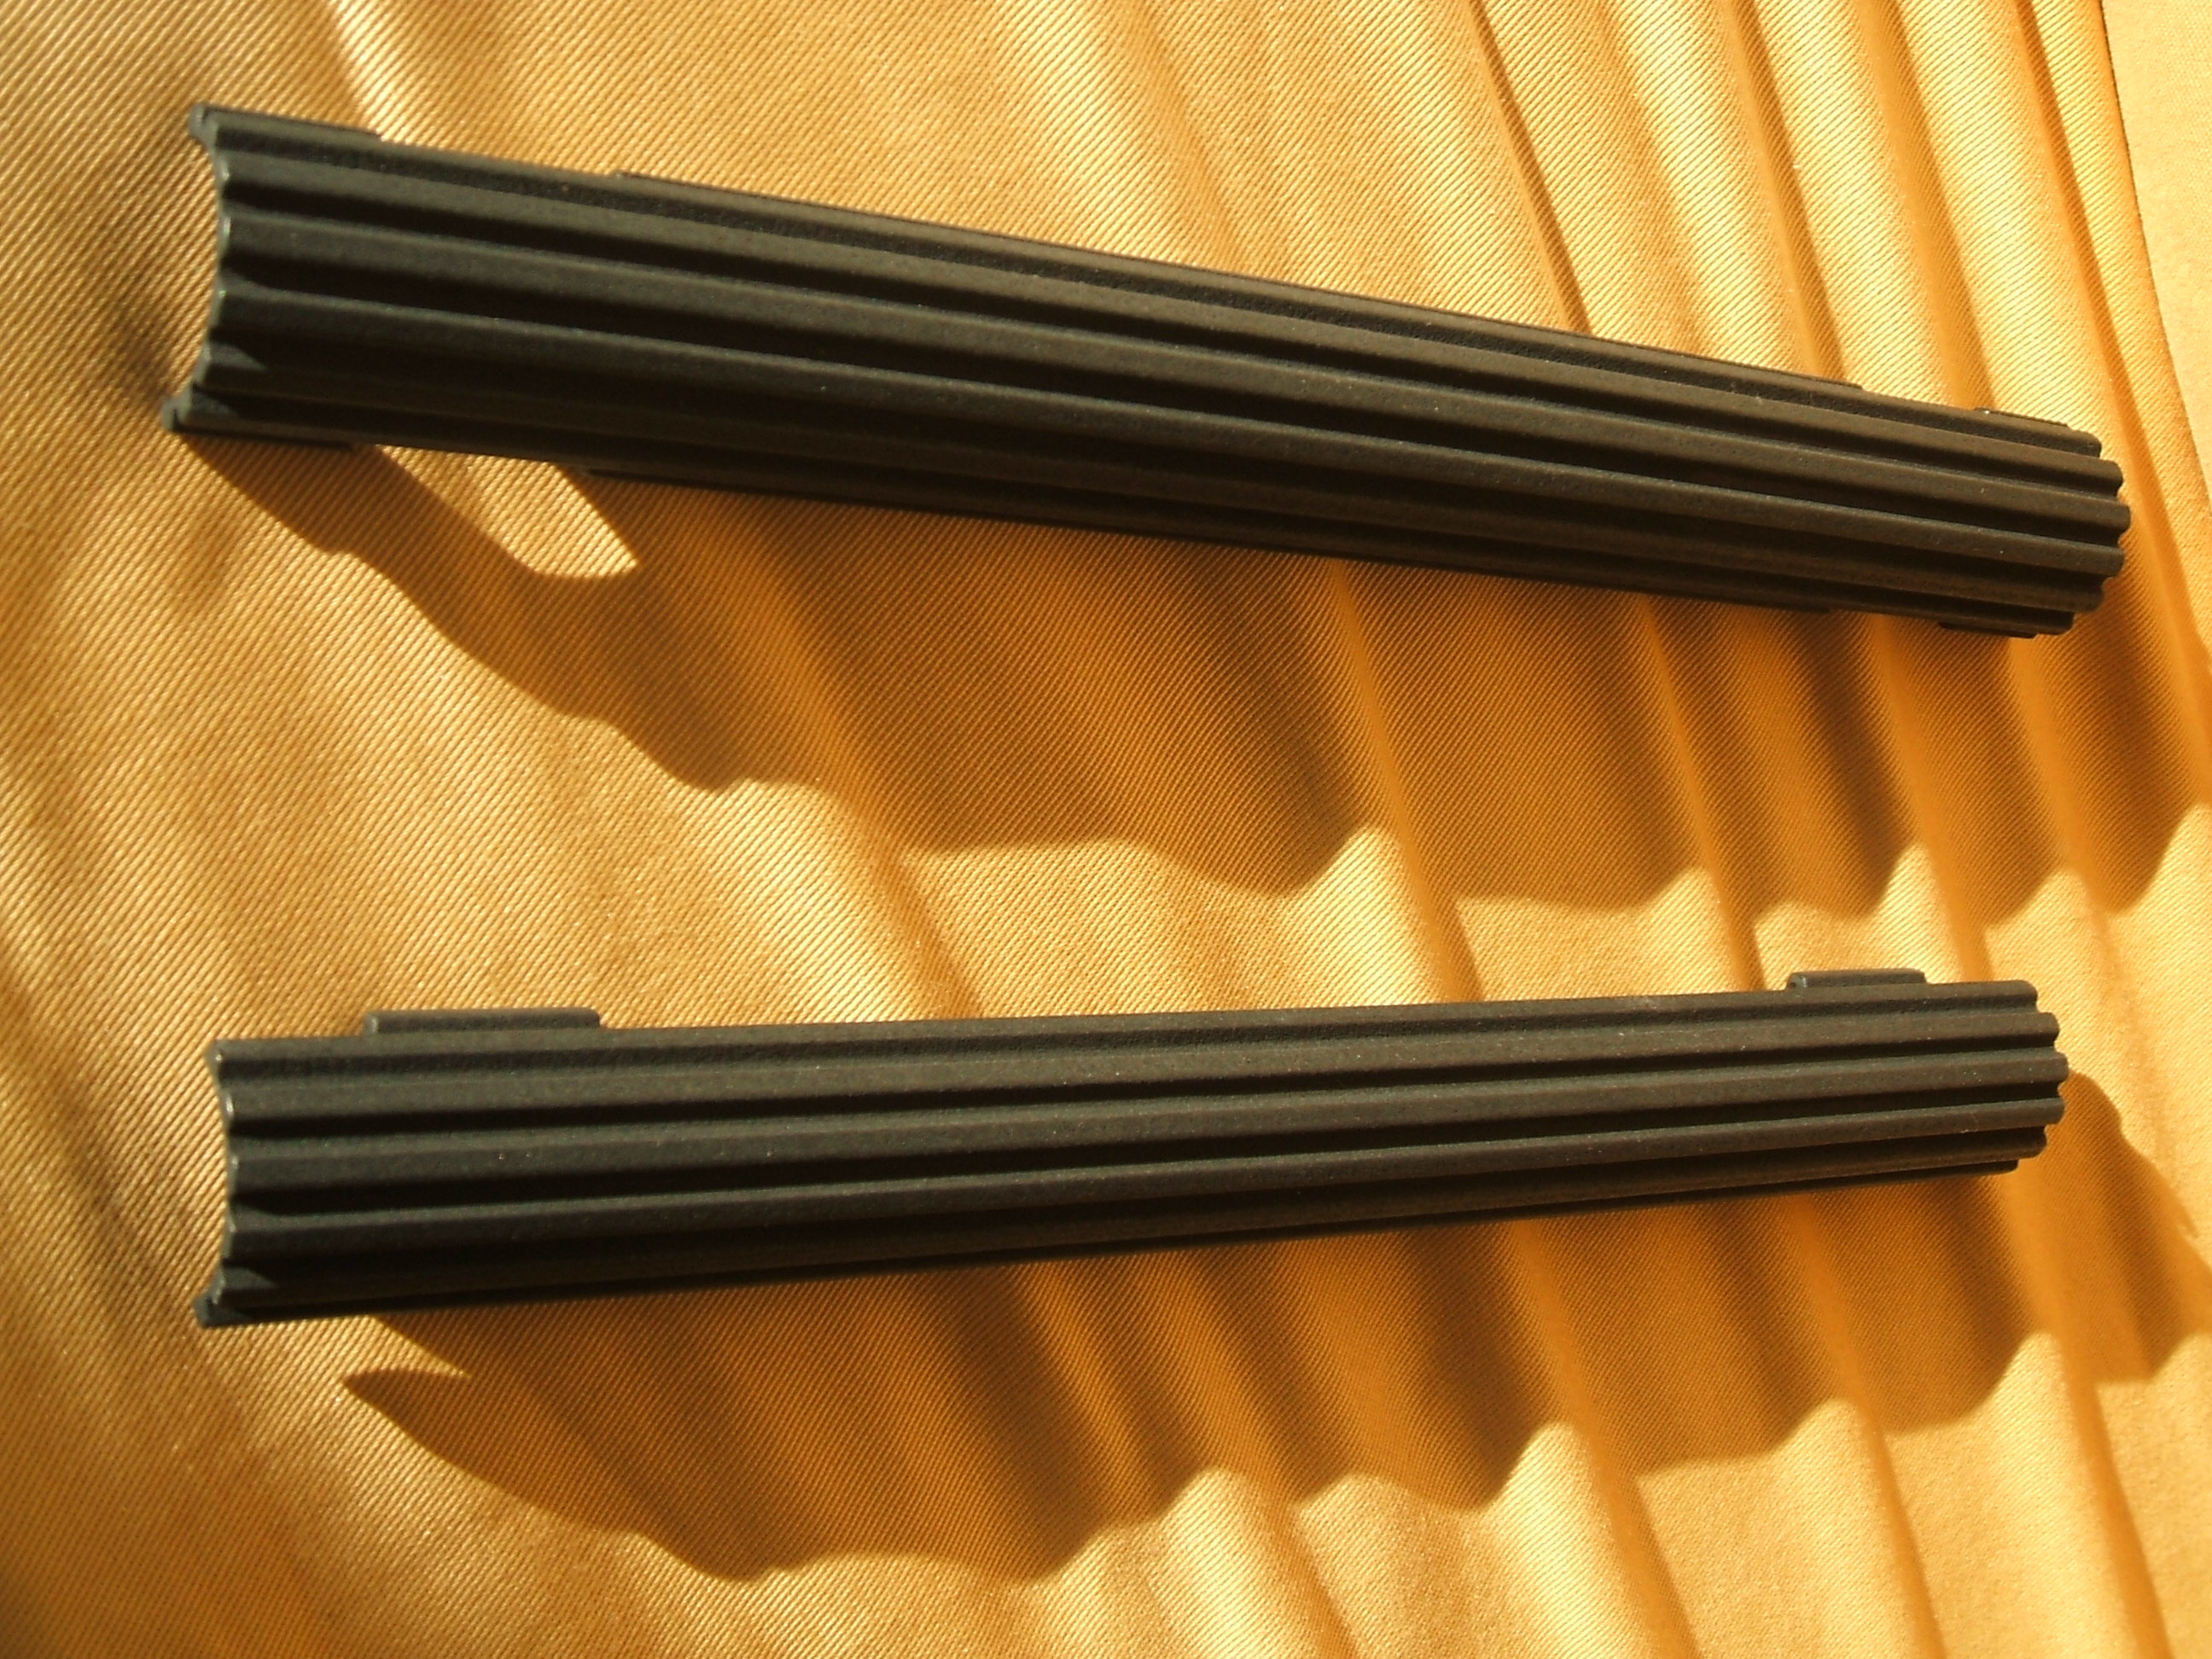
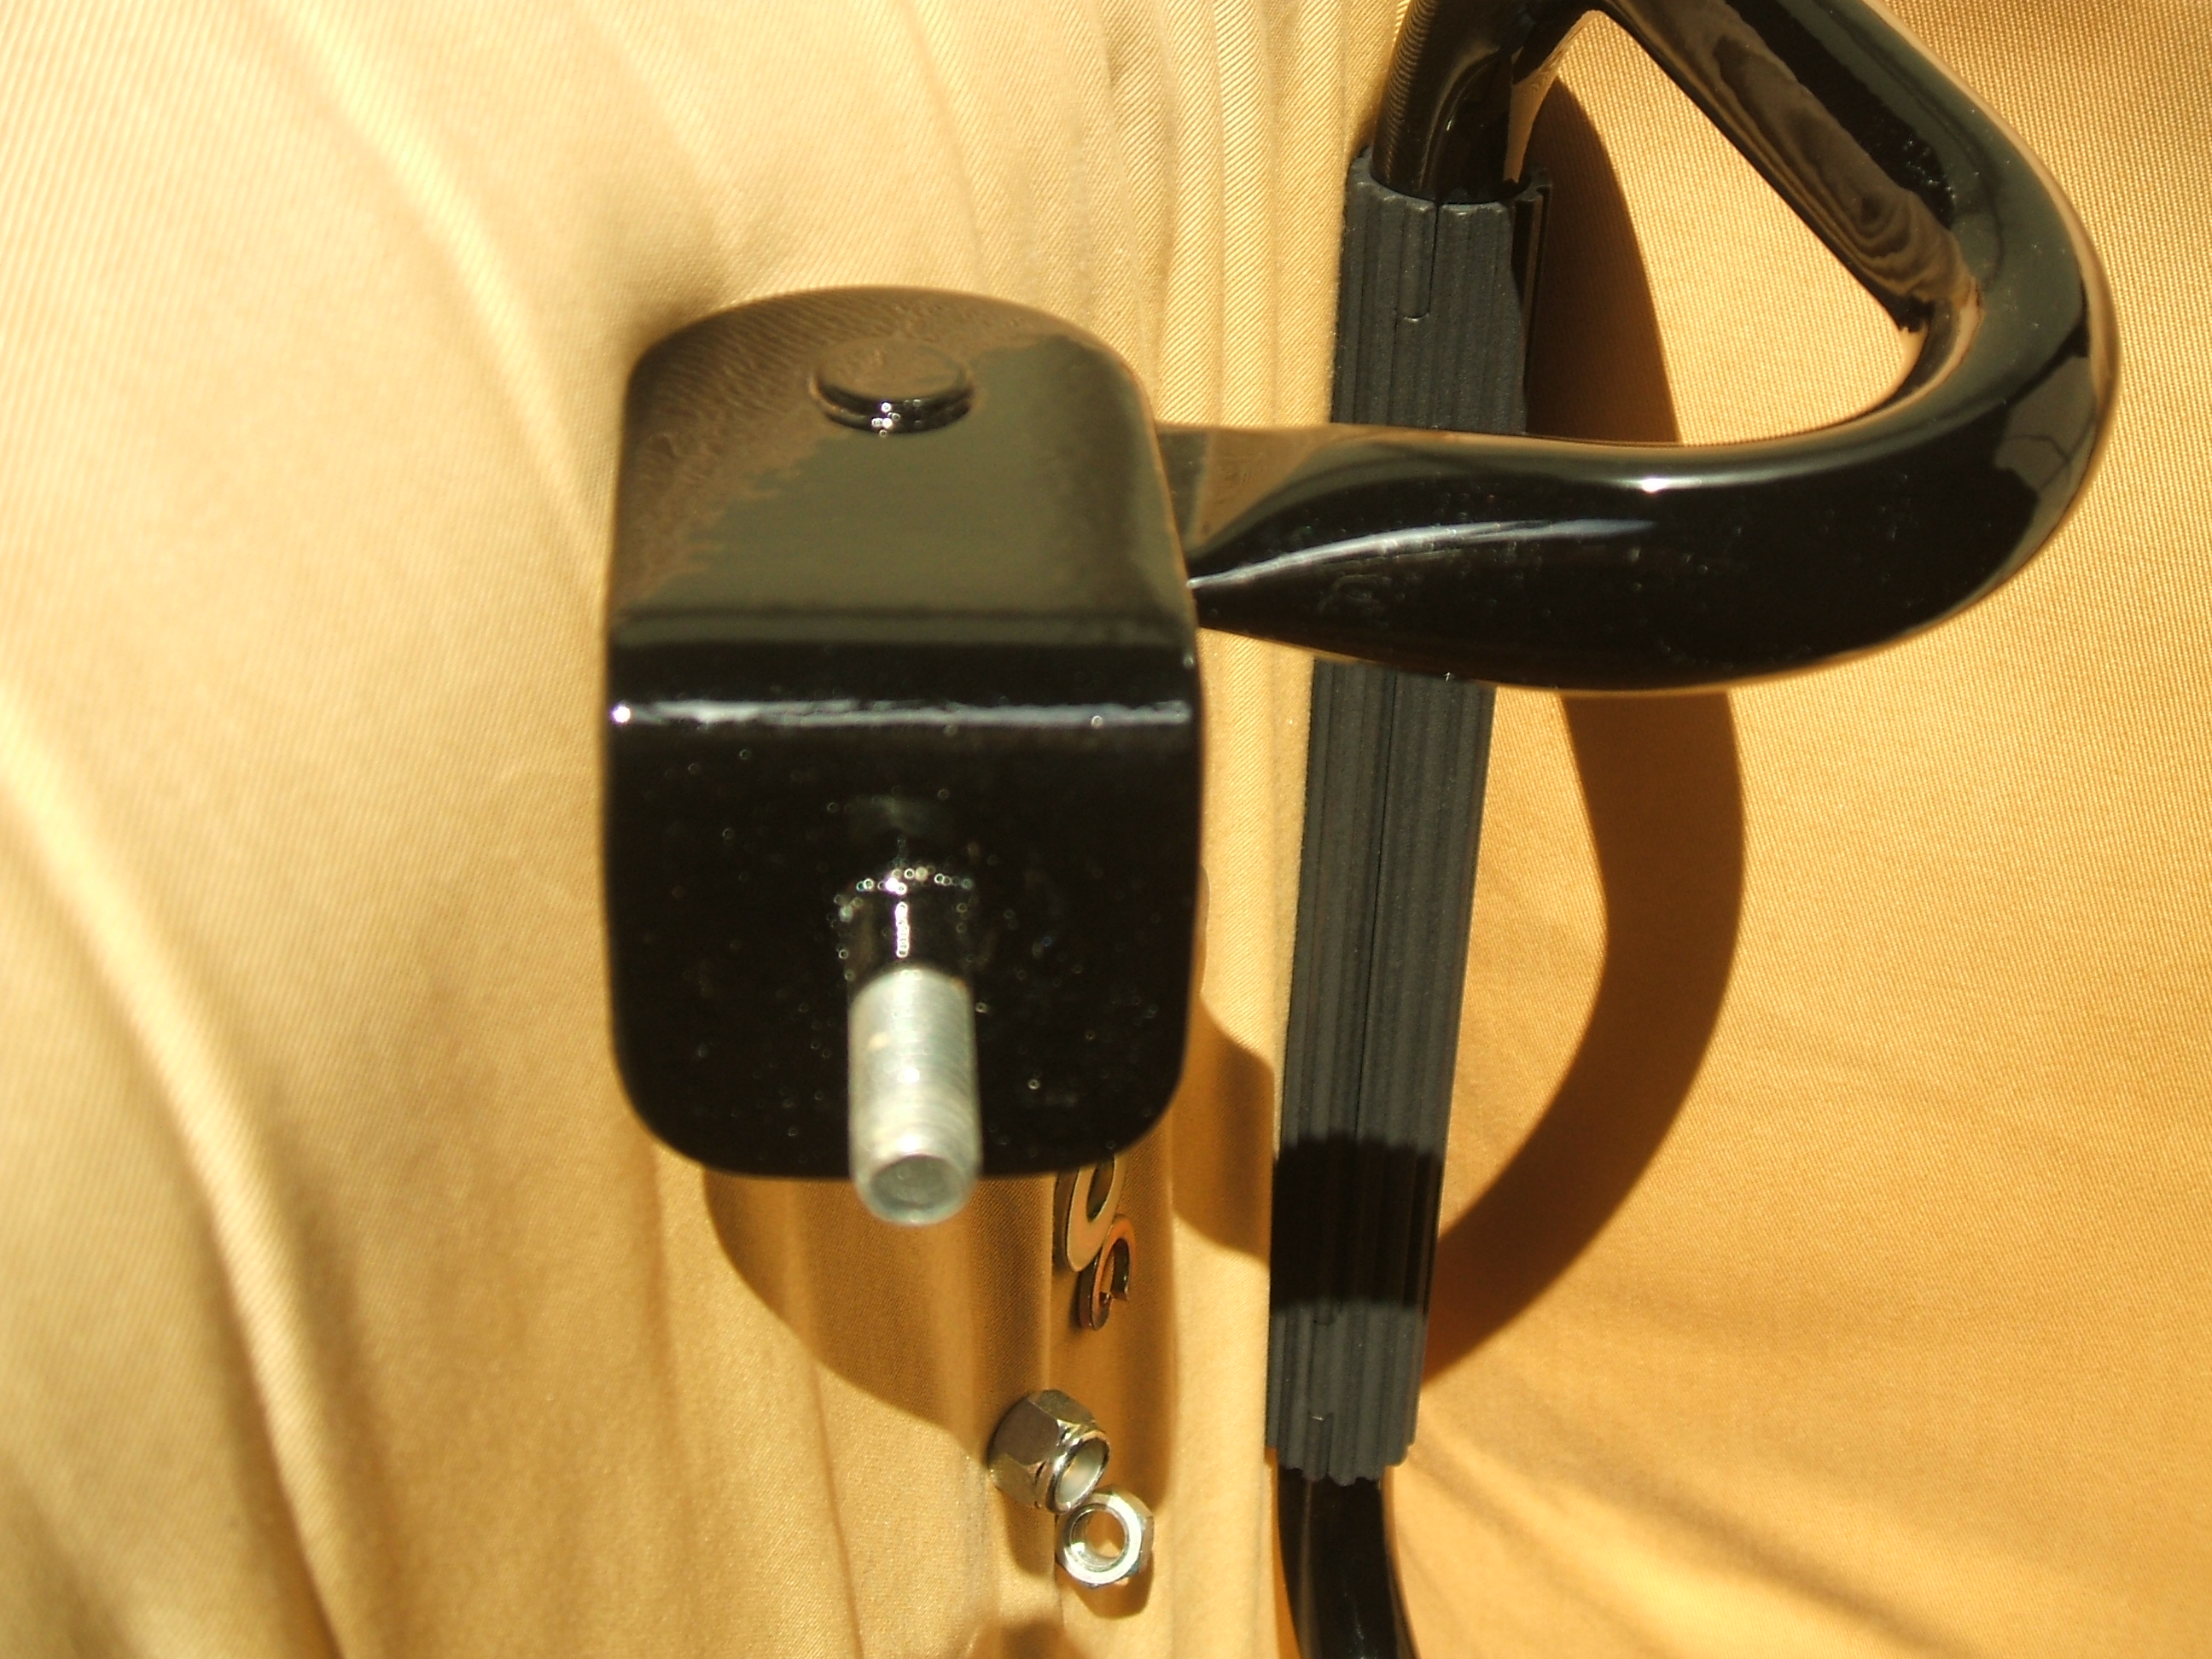
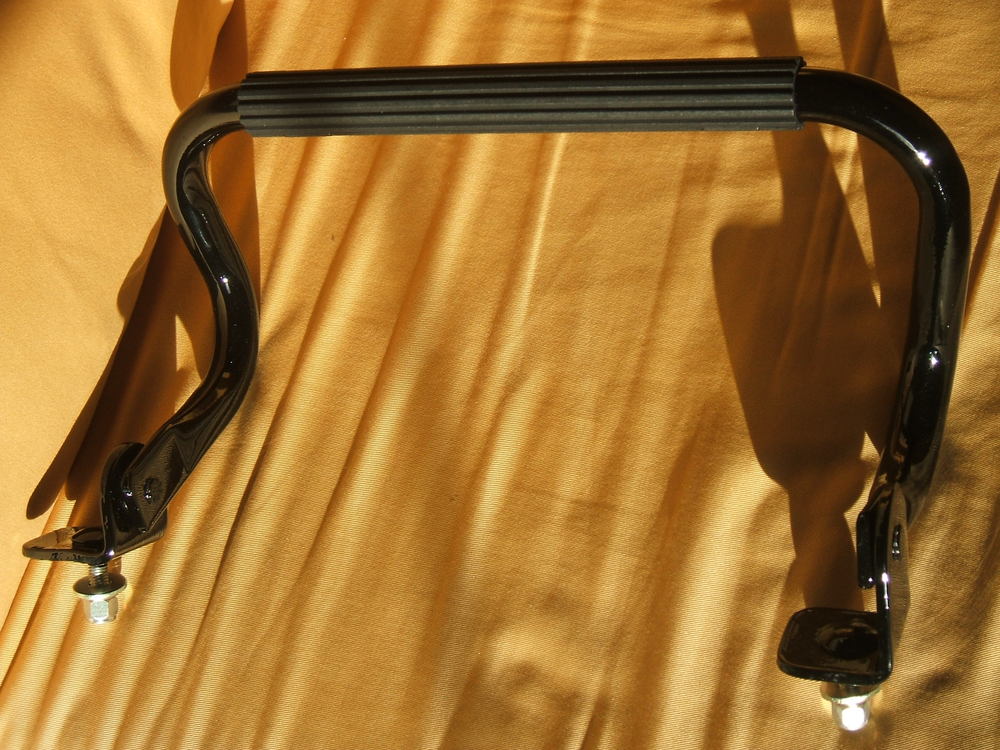
1 pointRare S30/S130 option factory footrest. Not an aftermarket fitment that some mistake these for, nor a re-production. These are rather useful for your passenger to use, especially to brace against whist the car is being spiritly driven. Your driver, gets to hold the steering wheel! My understanding is this for sale is the S130 option footrest, though I am only really going by seeing this type listed as such on Yahoo Japan. But it could easily be a different type for the S30 range, there are two different part numbers listed on the original S30 parts number book, and also I have seen about 5 versions of S30/S130 option footrest. So, it is not a done deal which model this one was originally for and very few people do with a good level of certainty. Thus it should fit the 280zx (known as the 280z in the Japanese domestic market), should also fit the S30 range. I take, though not fully sure, the main difference is the position of the feet, the S30 face in, whilst the S130 has one foot face out (see pictures). This means the fixing bolts (to the floor) are about 35mm further apart than the S30 (which is approx. 275mm centre to centre). The length (or width depending how you view it in your footwell) is approx. 345mm. This version has the inner foot higher than the outer (if fitted to a RHD car), where the hoop pivots from. Thus, the footrest will sit at an angle, so it may require spacer to bring to a more level plane (though the original floor may accommodate this). The new longer bolts will help with this. These are fairly common in Japan, but not often found outside in comparison. Very few export S30/S130’s had this option fitted, mostly find these on the Fairlady Z’s imported out of Japan (and obviously the home Japanese market). This footrest is not the option the Datsun Roadster SP/SR311 which is chrome with black feet, and the feet are attached in a different way, I know as have seen one and I am doing a reproduction of this footrest. I think you see chrome footrests on the S30 Japan show cars launched in 1969, but these are most like the option roadster one. This one was brought in from Japan as a used item (though still not a bargain plus handling fee from my proxy bidder, shipping and import tax). Paint stripped, then filed, wet and dry sanded to smooth. New bolts inserted into feet, with new Nissan nuts and washers. One of these feet was bent, and required bending back, but it left a slight wave in the bottom of the foot, though it sits flat. It’s difficult bending 5mm steel back into an exact shape without damaging the rivet and rest of the footrest. Once sanded smooth, it was powder coated in gloss black. Before coating I have also tried to smooth out the feet, as these rust, and pit, hence why there is dimples in the finish, mainly on the underside. Metal sitting in damp carpet and wet footwear is the reason for the rusting out over the years. Little bit of cracking of the new powder coating around the rivets, but that is to be expected, the hoop is designed to move. Even on the originals, paint is missing from the outer part of the rivet. The vast majority of the time you see these option footrests they are missing the ribbed rubber part, or its ripped. I have a footrest of my own, and as I restore it, I wanted it too look correct. There is a part number for this ribbed part, but that is NLA. After a long look at ribbed floor mats and other sources, (even tracing a lead when I was in Australia) for the correct look. Even asking a seller of "in the style of" S30 footrests didn't want to help. To no avail, as usual, do it yourself. The footrest rubber (from what I gather it is not made of rubber but PVC) is designed to fit on the round bar hoop, even if you find something close (e.g. a floor matting) it will change the look as the matting is designed to be laid flat rather than the tight circumference of the hoop. So I decided to make my own. Took the dimensions off an old broken one, drew a sketch, then I paid someone to make this design into a CAD drawing. After a couple of prototypes (one printed just with a slit in to allow attachment to the hoop) and short versions to work out the correct diameter) then finalizing on this two piece split version, with locating castellation’s. The number and style of the ribs is the same as the original, I did make the top (plateau) of the ribs about 0.5mm wider as I made the internal diameter slightly larger to aid gluing (see below- but you can’t tell unless you marry it up to an original). And thus 3D printed in plastic, it has a different feel than the original, I just updated it to last longer under your feet, but still look right and considering most would not use it as they take pride in having a pristine S30. I made the diameter of this ribbed part a bit bigger, as I didn't want a tight fit, so when glued (with two part epoxy Arildite) it didn't squeeze everywhere, between the joins, out the ends and then be a pain to clean. The photos should be self explainable..... So, for sale is a fully restored option footrest. To purchase, ship and restore, with no proportion of the CAD drawing but all the printing costs, all this mount up, this is why the price is what it is I am afraid. Many aspire for the JDM look, add the footrest to your look. $290 plus shipping. Europe, USA, Australia, shipped with courier within 4/5 working days. Shipping, about $40.


 1 point
 -
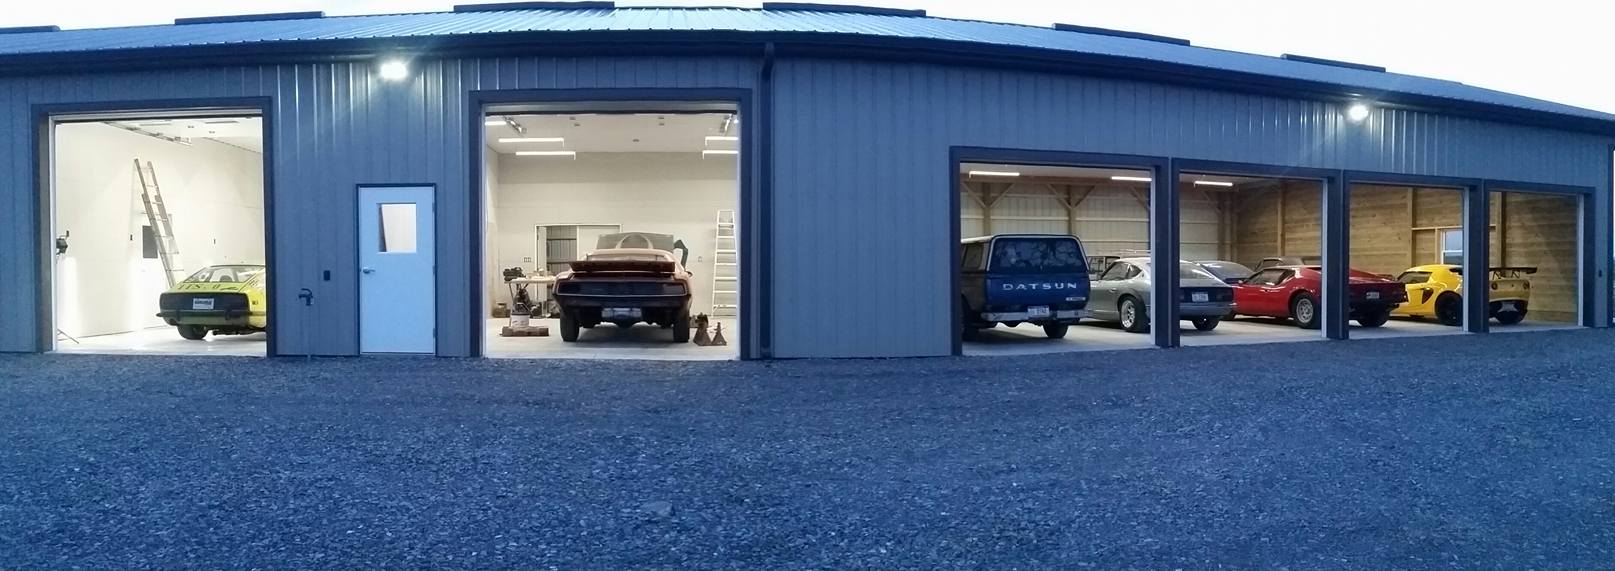
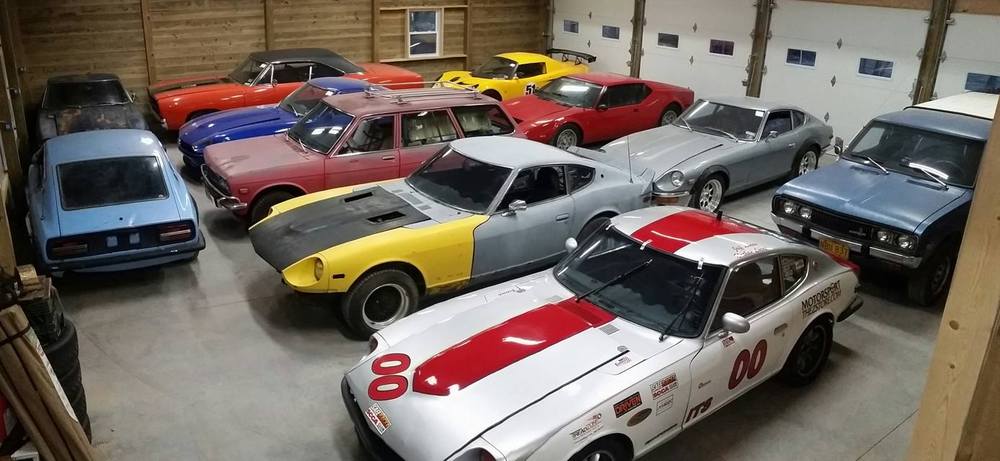
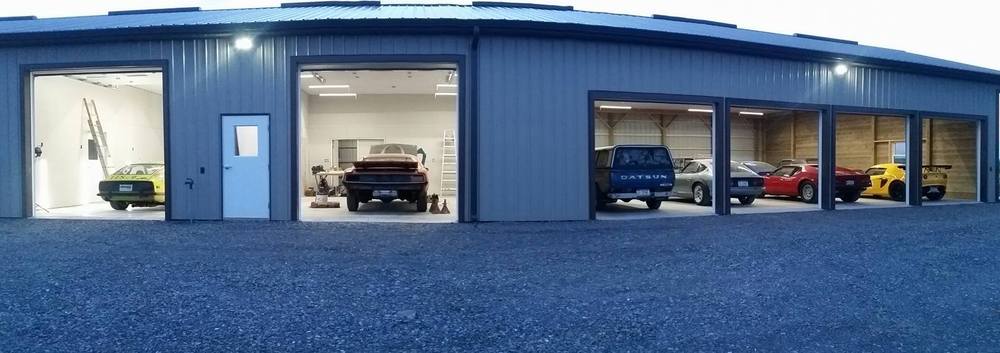
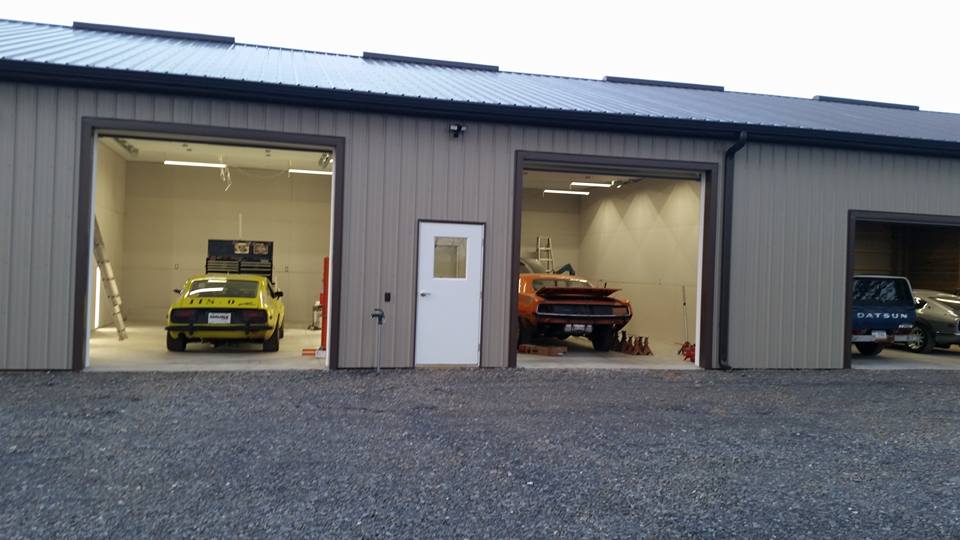
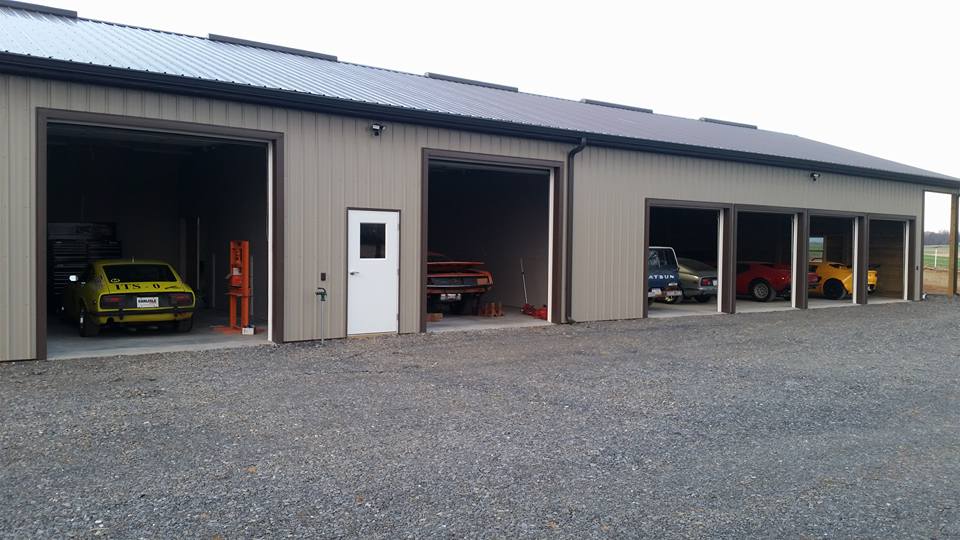
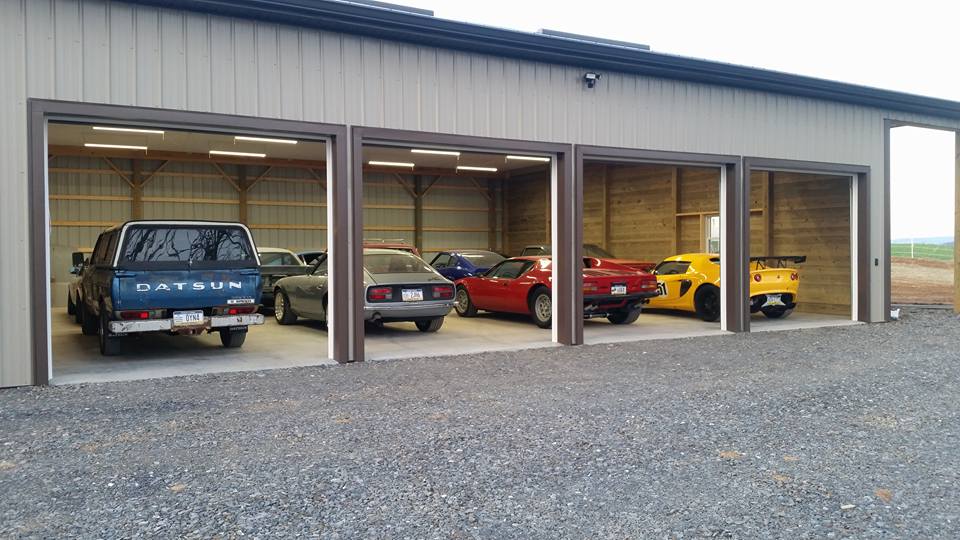
1 pointWe're almost done building our new garage and barn. On Saturday we moved 12 cars and 4 trailers. The #00 white w/red race car is my friends. I still have to buy or build shelving and move all of my parts. At some point I'll have to sell some cars so I move in 4 more cars. Chuck


 1 point
 -
Metaman, can't wait to see the finished product. I have a brother firefighter that had makes metal reproduction hoods (Hoosier Hoods) for early roadsters. They ship all of the world. It is amazing what he can do with metal. Once my FIA brakes arrive he is going to make backing plates for my z that look factory but fit the FIA brake calipers. I will post once made. Thanks for working on a project such as this for all of us owners. JLP1 point
-
I'm not trying to hustle anyone. I will only offer these for sale when I have each one completed, boxed and ready to go. I will post a video of me installing a set and going over the details of a set so that you can make a decision on whether you want to purchase or not. I also am planning to send a set to a member and he has stated that he would provide an unbiased review for the forum. Like most of you I have a family, a job, a second job, and other responsibilities that get in the way of doing "fun" stuff like trying to create these. I'm making them now, switched from using 20 gauge stainless to using 20 gauge CR steel because of the issues I had with the stainless work hardening as I was hand forming the trim ring. That switched then forced me to find a reputable chrome plater (harder than you might think with new EPA rules out there on chromium). It is not feasible economically to send off 5 or so sets at a time, so I am in the process of making 25 sets of the trim rings so that the plating costs won't be through the roof. To do that means I have to hand form each half of the trim rings, then metal finish them and weld each half together. After welding I planish and finish the weld area, then they will get sent out to the chrome platers. He advised me it would probably be 2-3 weeks to do them but could take up to 6 weeks. I'm just a guy, not a company, I've had to create them from scratch. it takes time.1 point
-
1 pointYou'd be better off using the choke lever mounts that Art Singer sales on ebay, $30-$40? They screw down on the transmission tunnel in front of the ashtray hole not the plastic console like the OE one in your 2nd picture. That's one of the best aftermarket Z parts out there in my opinion.1 point
-
1 pointchoke cable choke lever transmission crossmember bolts carb throttle rod mount - bolts onto firewall something to hold a hose ignition resistor by the coil brake booster check valve bracket - mounts to firewall pads that go under cowl at either end Chuck1 point
-
I don't think the OP is trying to Hustle anyone here. I have supported his initiative from the beginning, much as I have with others like Eurodat who manufactured a complete bumper mount kit without a proven product and shipped them after he test fit it himself rigorously. I would like to give Metalman the same benefit of the doubt. Looking forward to pics of the finished product and hoping it turns out as well as we all expect!1 point
-
Not only that but, considering comments made by the OP more than 16 months ago, it would seem wise to see the level of fit, finish and 'feel' before parting with money for something that is not necessarily going to be an accurate reproduction of the OEM items. Quote from Metalman5151 from further back in the thread:1 point
-
Buy list for "Vaporware"? Might be a little premature. No one has seen a finished product. I applaud anyone who can make this project happen. But, Datsun forums are littered with project promises of quality headlight covers at an affordable price that never materialized. Maybe, just maybe, we should hold off getting in line to buy until a product actually exists. Dennis1 point
-
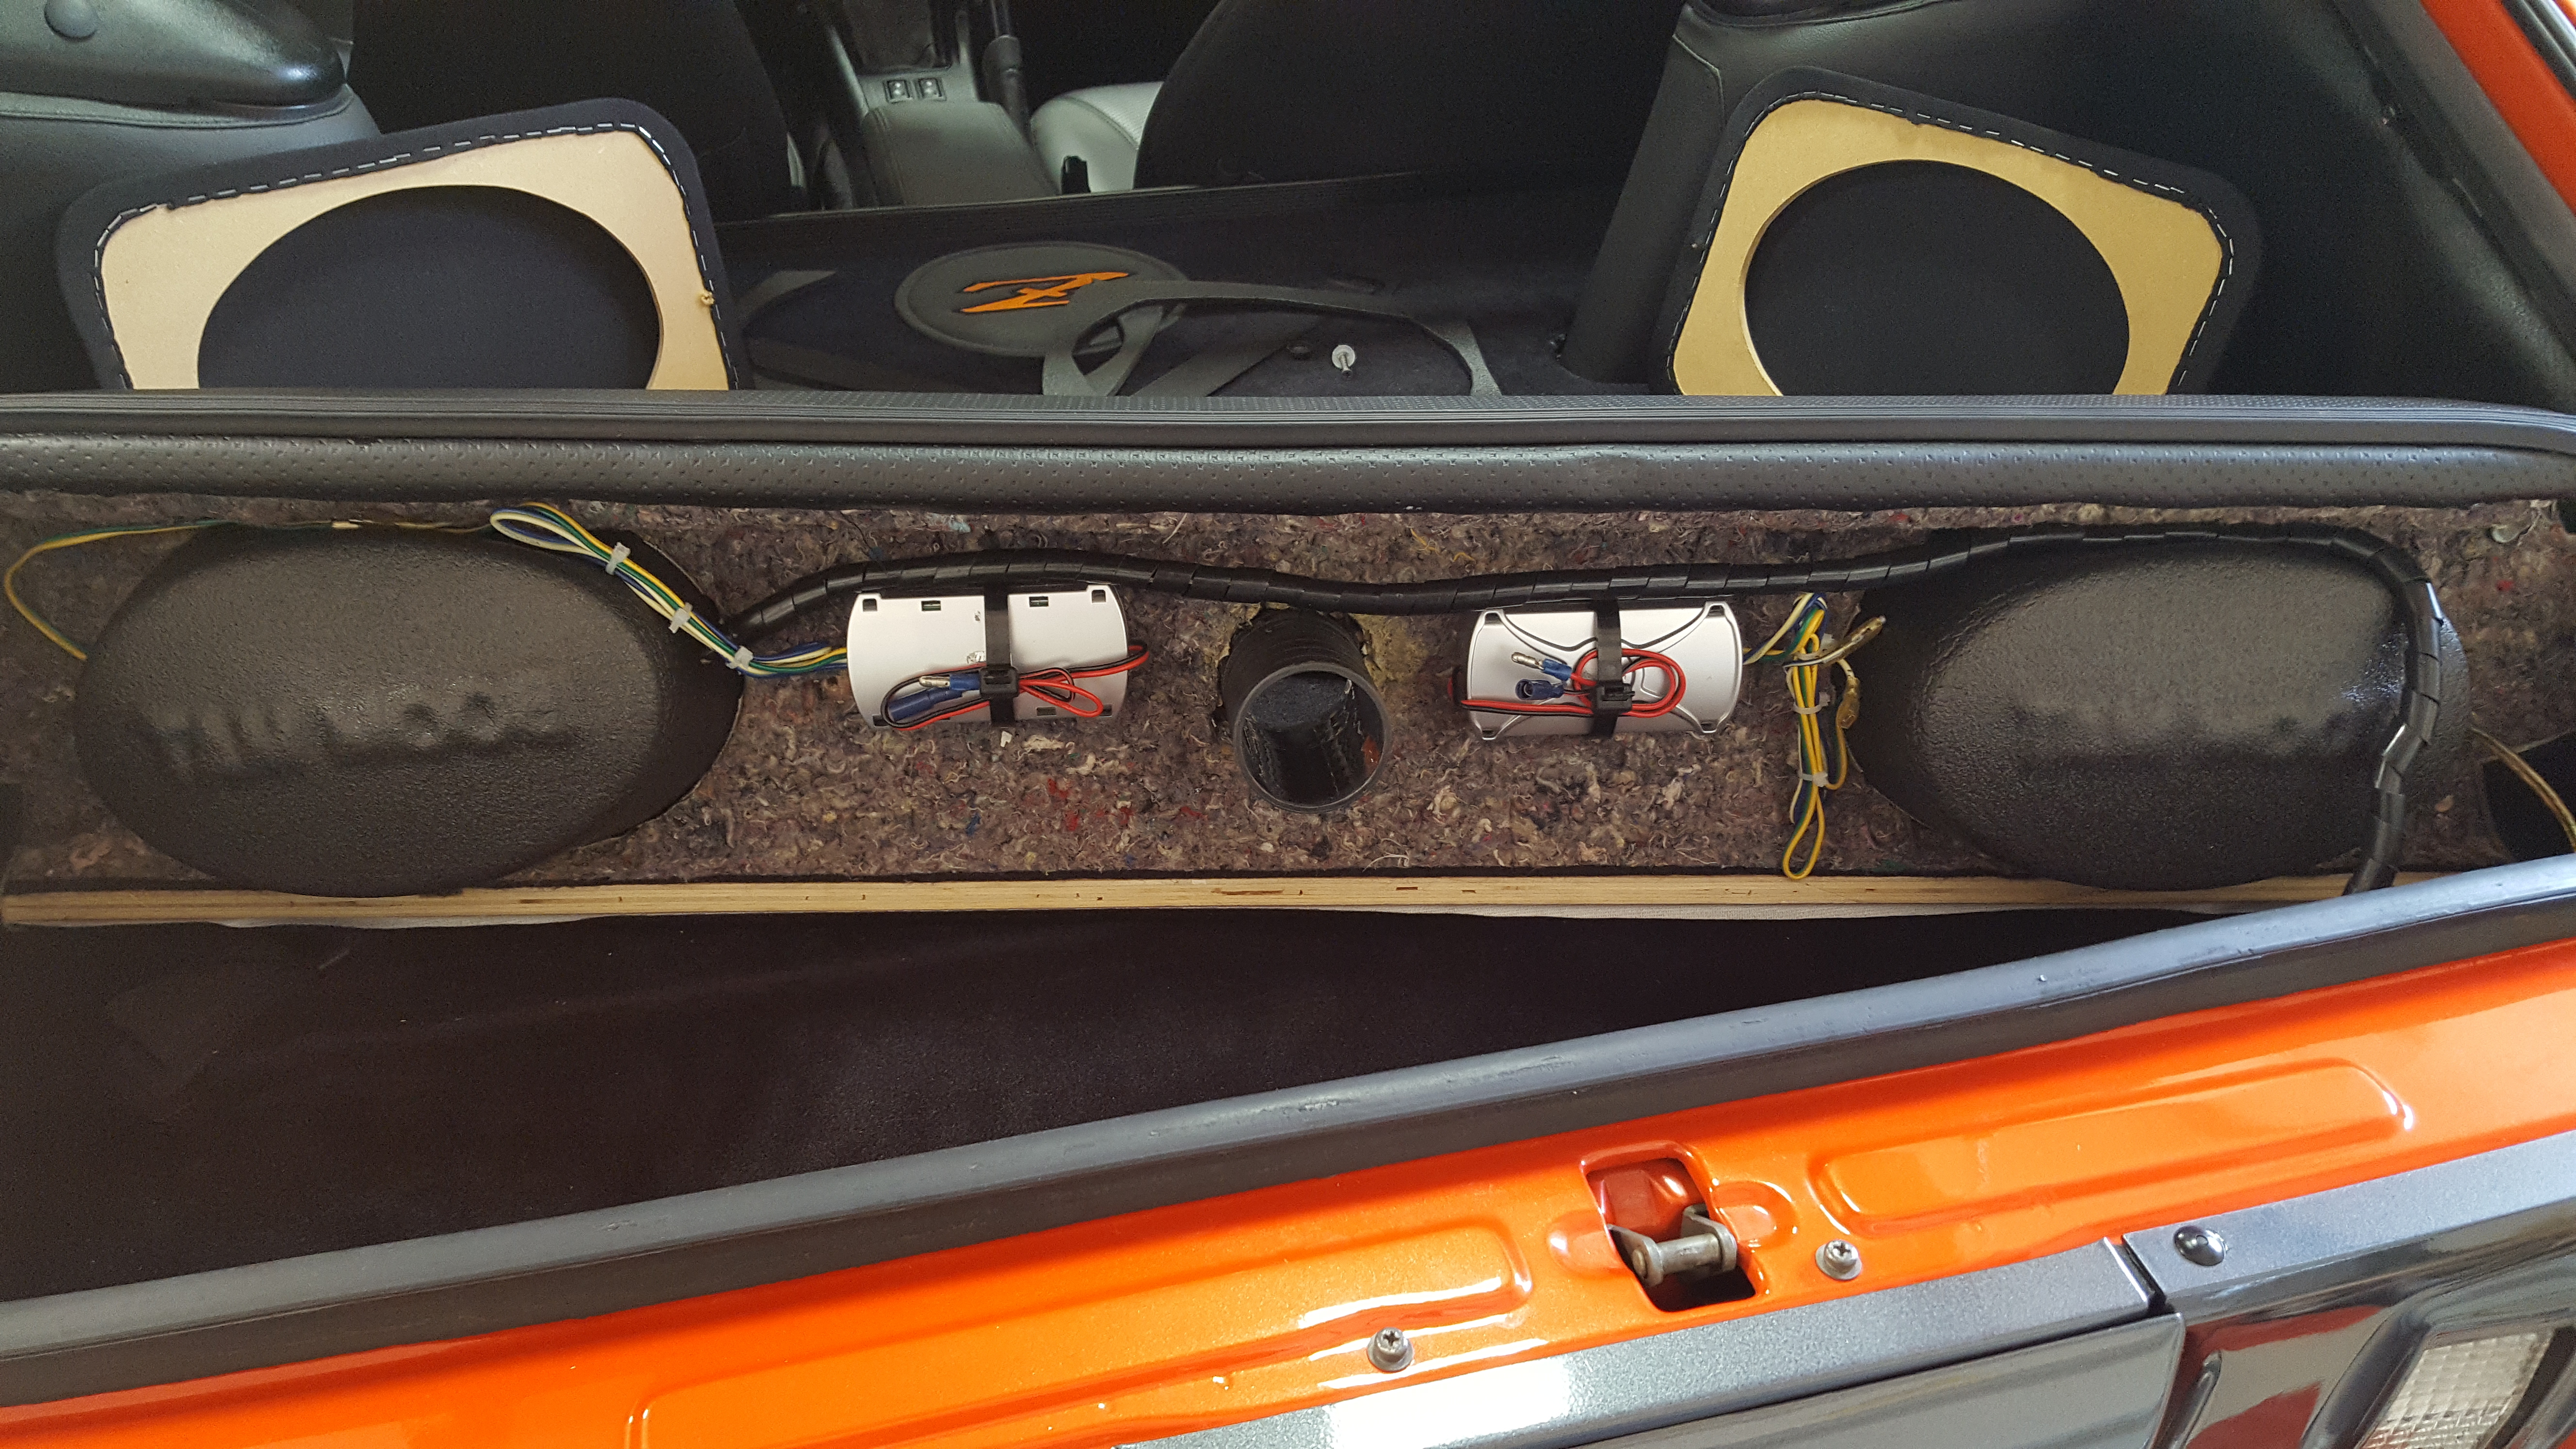
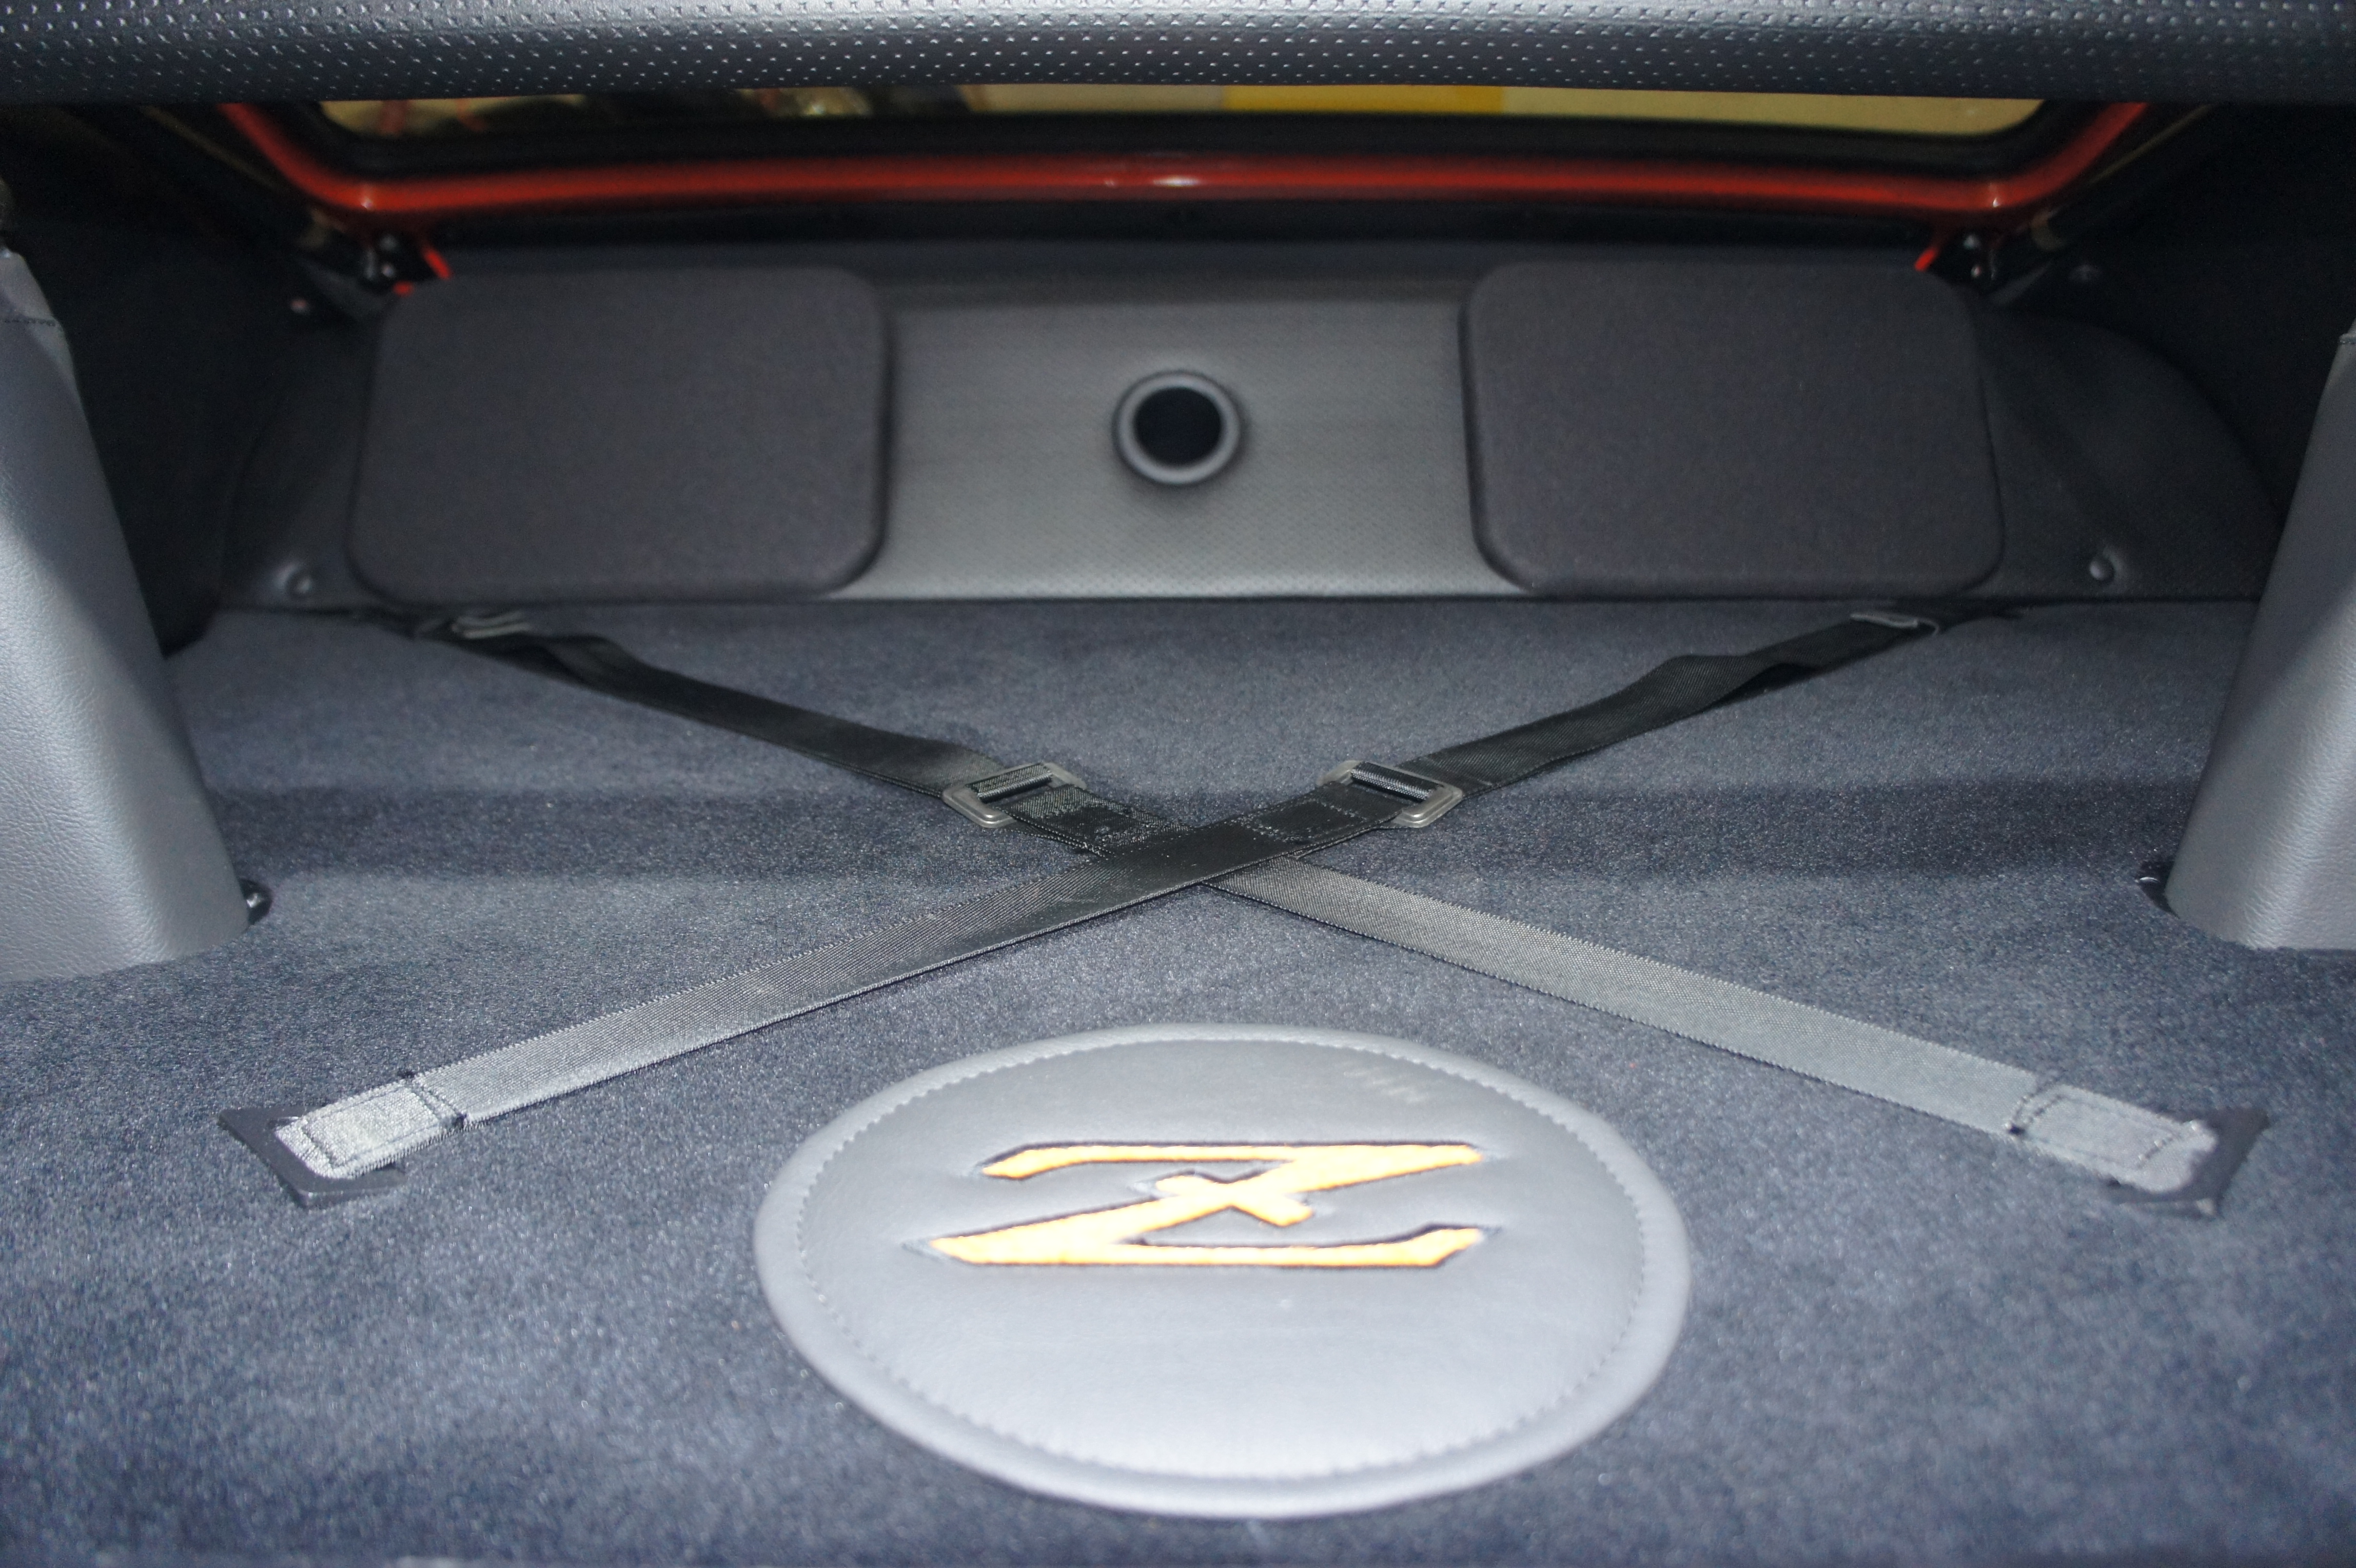
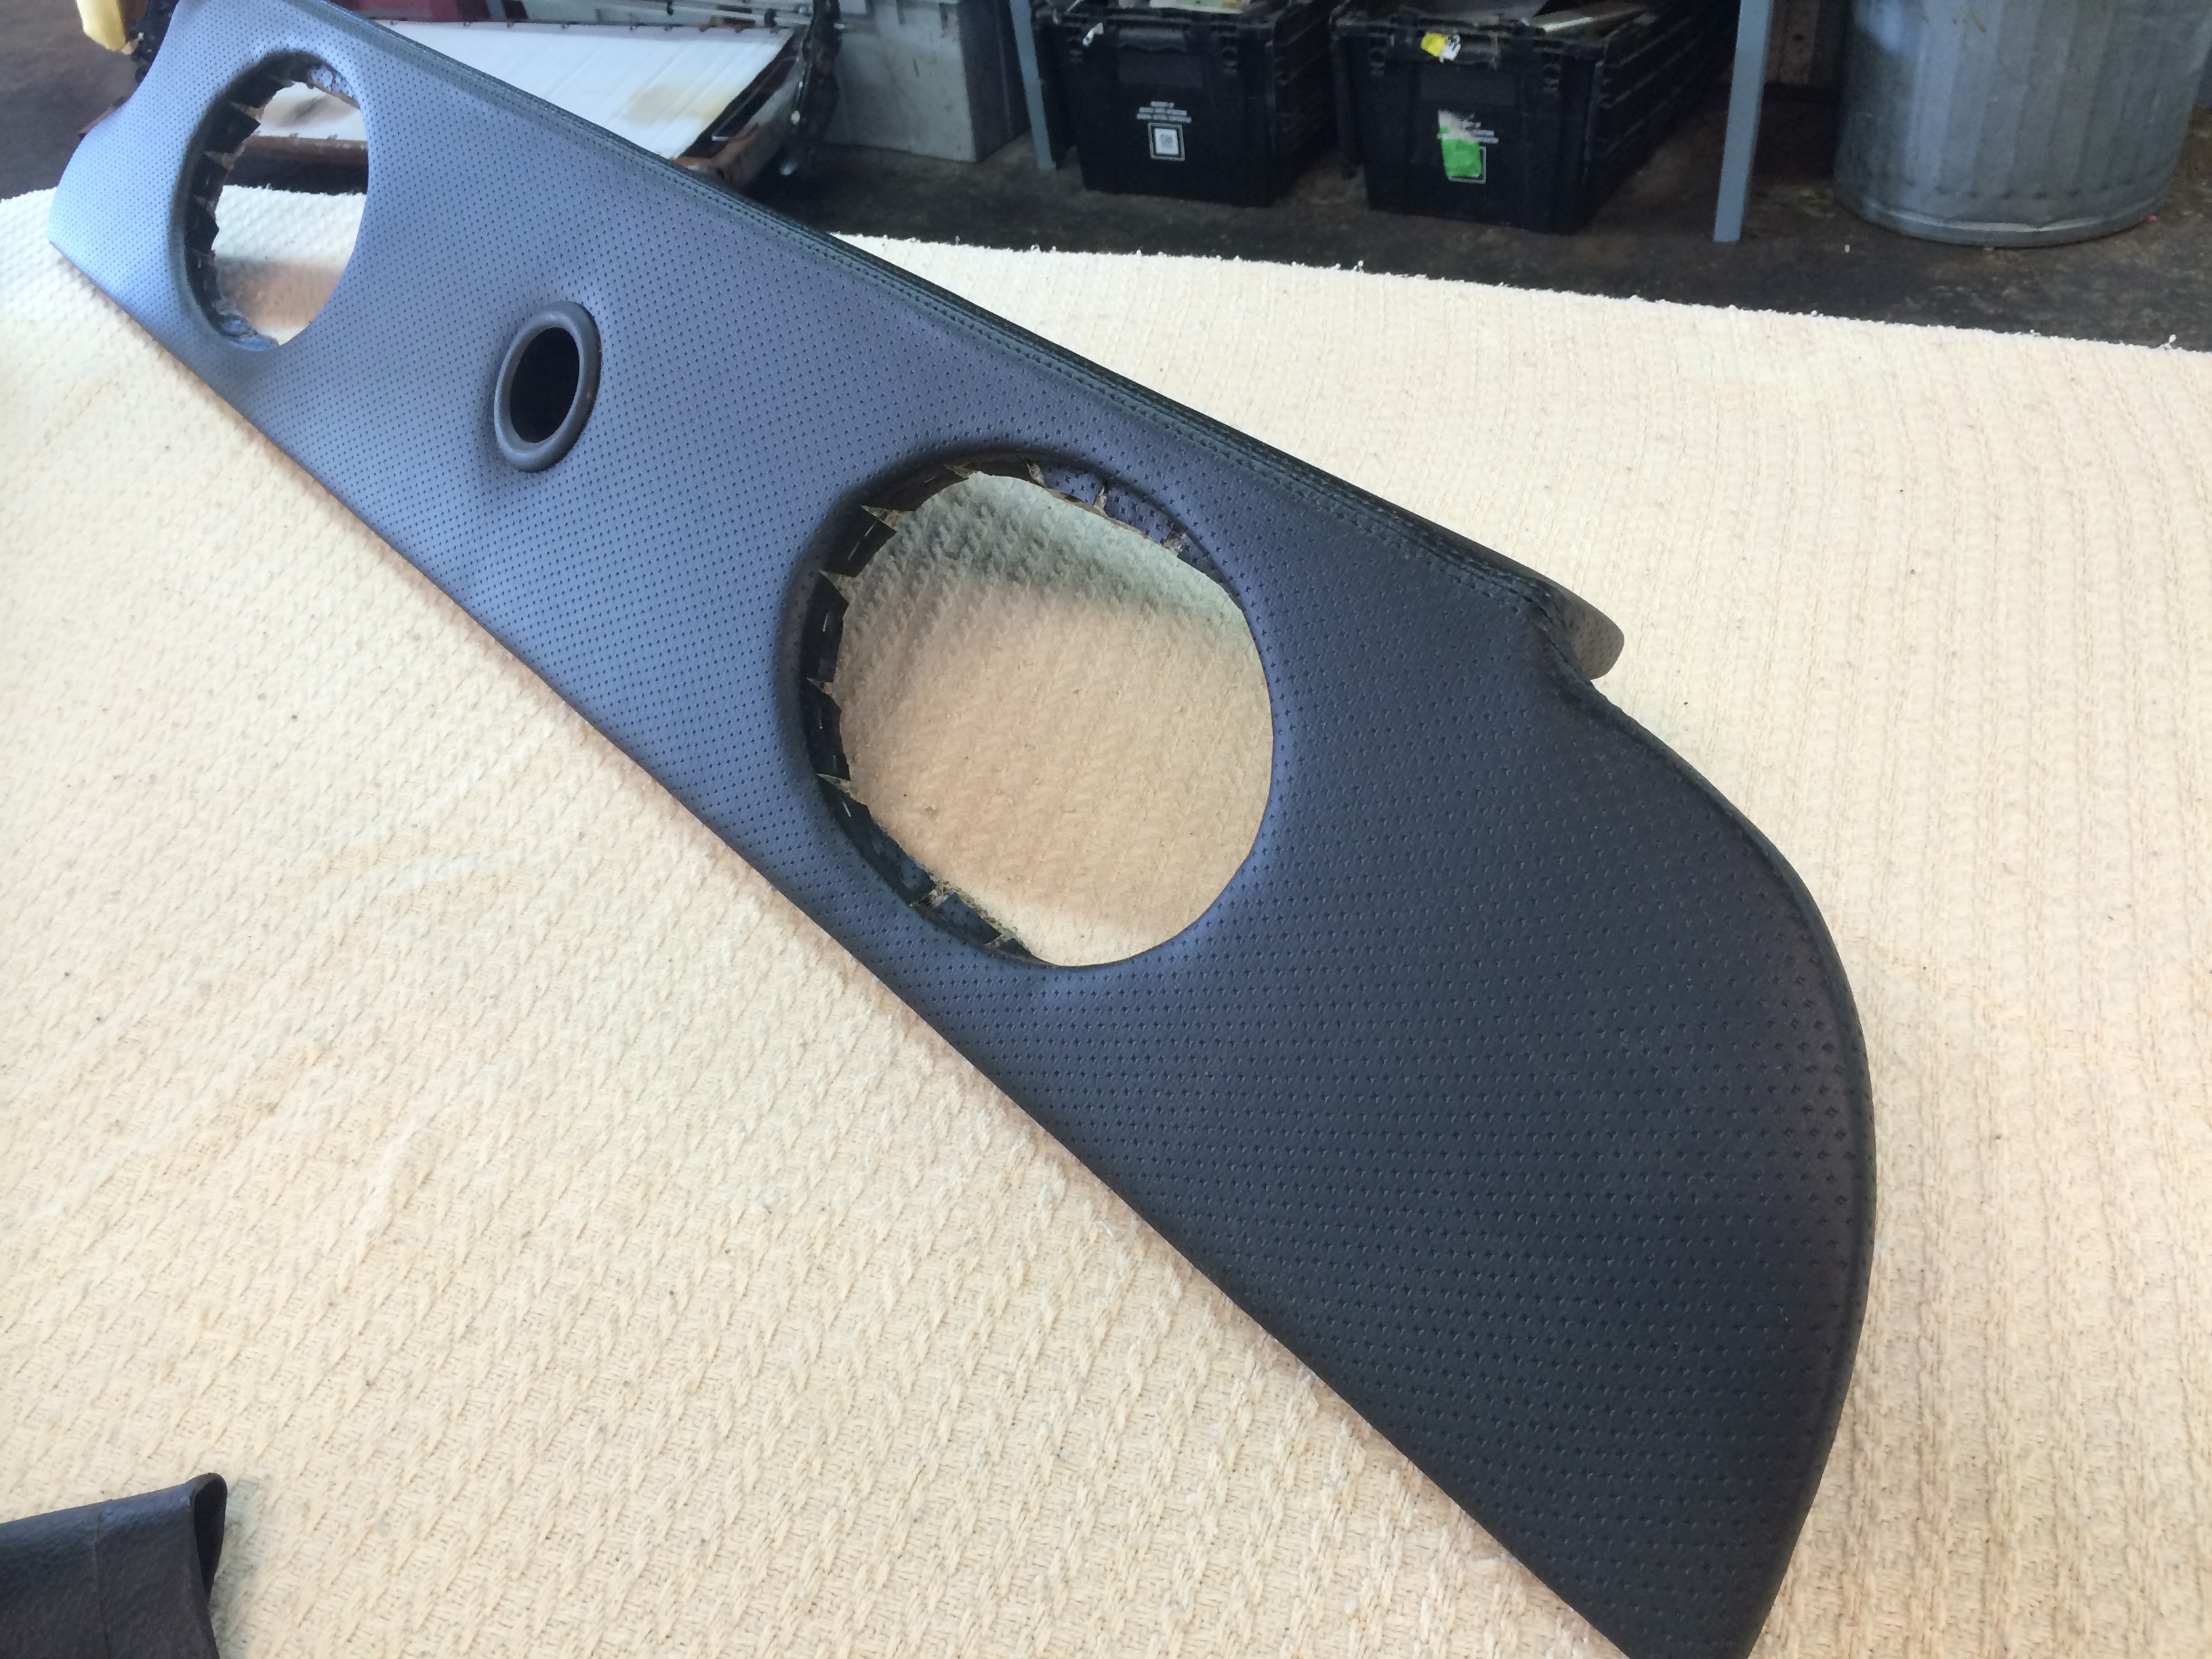
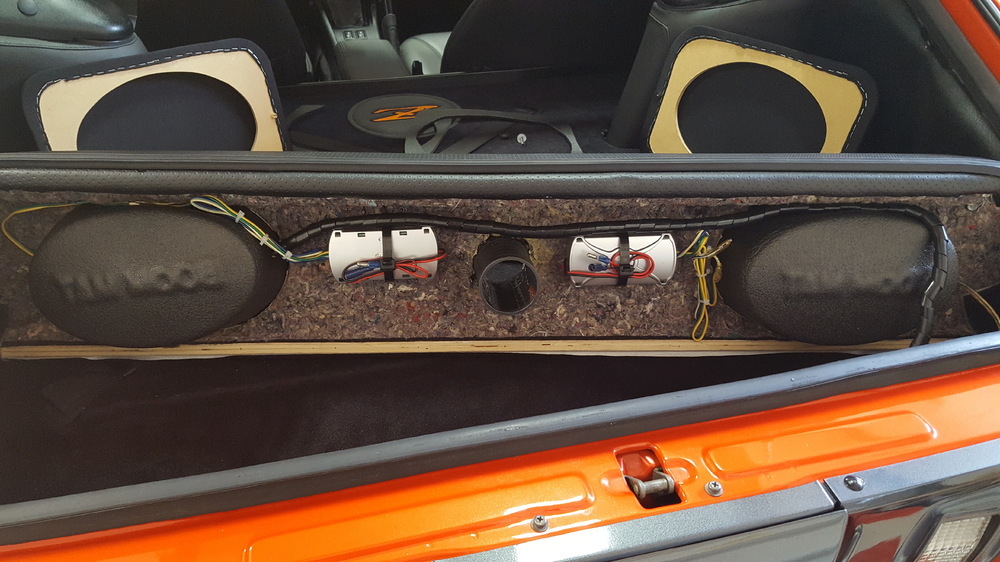
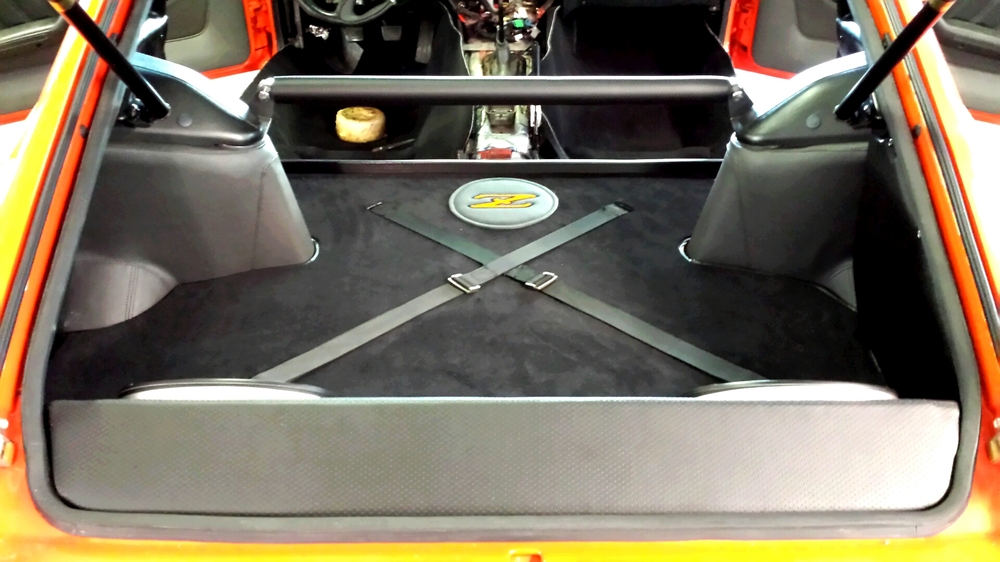
1 pointThis might be a little late for you but my '78 280Z came with the MSA speaker panel from the PO. I swapped the original carpet material covering it for the same material I used to reupholster my seats. Here are some pics including the "inside" of the box with my speaker set up.


 1 point
 -
1 pointNo way would this even be possible in NYC or it's related suburbs without paying millions. Dream garage right there! good job!1 point
-
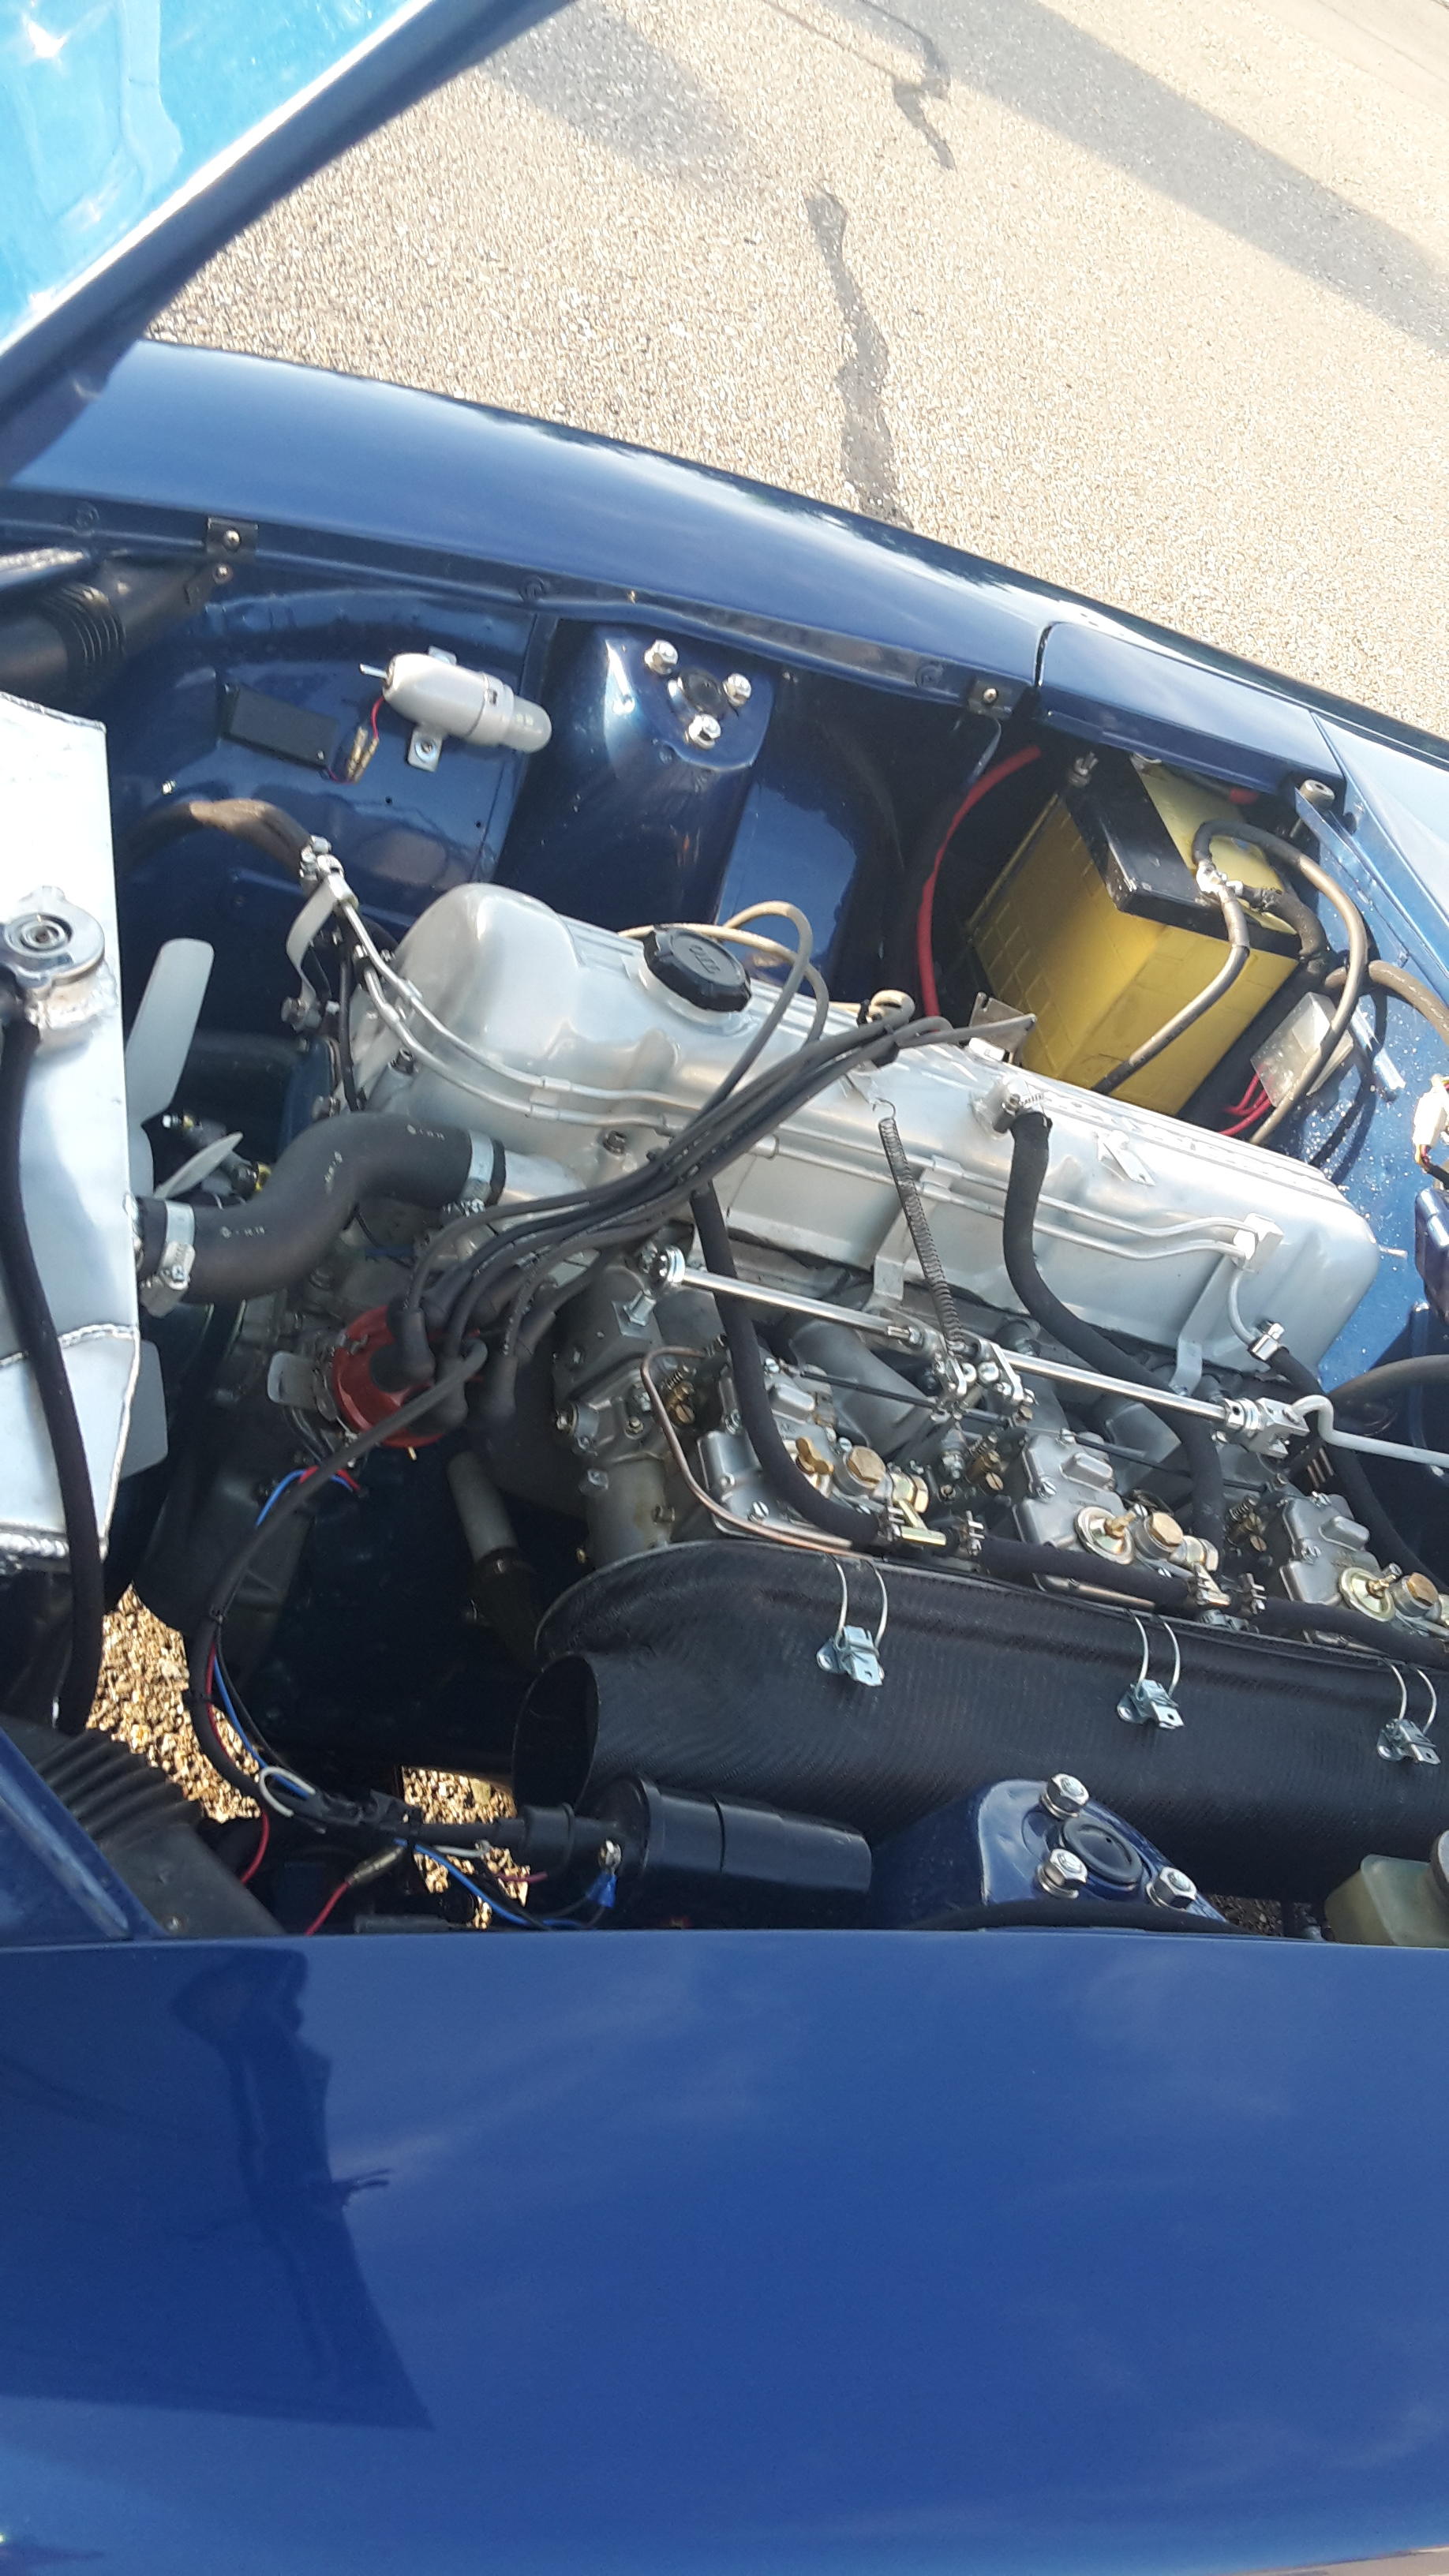
1 pointThere is a new Input I was never overall happy with the 123Ignition. The main reason was, when the Engine was hot and I stopped it for just a minute, it tooks a few seconds to start... Annoing. Now I added a Crane 6300s. (low rpm Inductive with a longer dwell and changes in the higher RPMs to multispark.) Result... Perfect. Now I know, the 123 is a weak ignition. Good for programmable Stock replacement. My webers are now happy in every situation. cold or warm. always a good low idle at 600-700rpms1 point
-
It's a challenging to know what exactly a previous owner did. It's even more challenging when you aren't that familiar with the cars to begin with. Last month I went to a guy's house to help him with his 260Z that he thought had stock ignition components. I looked at the ballast resistor and saw it was a 240Z resistor. Plus there were a couple of minor wiring issues. Once everything was sorted out, he was in a position to fix his car. It looks like someone could have taken a later motor and put the 280Z distributor on it. The wires to the ignition module could hide under the hoses and plug wires in the area. That was the discussion we were having in some of the earlier posts. I hope Jim is able to find someone who can go out to see what you have. Once that is understood, we can probably put you on a path to getting the car back to running.1 point
-
1 point
-
After the vinegar, I suggest a solution of baking soda followed by a rinse of denatured alcohol. The baking soda neutralizes the vinegar, and the denatured alcohol will help get rid of residual water.1 point
-
1 pointI do have another idea. Has anyone looked. Is her distributor the Federal model with the dual pick-ups under the cap?1 point
-
Since he showed us a photo of the E12-27 TIU, I thought it was a 280ZX engine in a 1978 280Z with the original distributor. The EFI harness doesn't include the ignition system, so that is quite feasible. The terminal block in front of the coil is still intact which would also indicate the 280Z distributor. The top view of the distributor doesn't give any view of the module. Based on the photo's posted above my conclusion was the engine has a 280Z distributor with E12-27 TIU and a 280ZX EFI system. I think The Wondous made a error quoting 260Z. It looks like a 280Z to me. Unless someone has done a lot of frame modifications for brackets like AFM mount.1 point
-
1 point+1 on what @siteunseen said regarding float bowls. The first most fundamental adjustment to make is to set the floats so that they maintain the fuel level at an appropriate height in the nozzles. There are multiple techniques that have been written about and documented on this site, in fsms, and in books, to set the floats. The ZTherapy SU carb tuning video is a pretty good place to start. There are other techniques though that, in my opinion get you to a place where you have even more accurately adjusted floats: namely setting the floats so that the fuel level hits the top of the fuel nozzles when the mixture adjuster is 10 turns down (involves removing the domes, pistons, so you can see the fuel at the top of the nozzle). Point is, I would suggest investing time into reading and learning how these carbs work if you haven't already. When your floats are adjusted correctly, you end up in the ideal situation where you can turn the mixture screws down between 2 and 2.5 turns and be very close. In addition, at this position you have adjustment range where you can turn down farther and be more rich or turn up higher and be more lean. Once the floats are adjusted, everything else gets easier in my opinion. Note that I didn't say that getting the floats really well adjusted is easy. I can do it now but it took me a long time to really figure out a way that gets it right. Once your floats are adjusted, I find that using two colortunes, one for each side, helps....along with the technique well documented where you lift each piston slightly and note what happens to idle. Also, as Site said, having something that shows you the rpms right in the engine compartment is really helpful. -1 point
-
1 pointI saw this guy Mike Holmes when I was on vacation in Canada and watched his ultimate garage build. Its way over the top but i was able to keep some of the basic concepts in my own dream garage build. It's certainly worth a watch http://makeitright.ca/tv-shows/mug1 point
-
1 pointIf you have removed the old bushing and take out the metal by mistake you can always put a shim in. That bar is not trash. Remember that the 240 and 280 bars fit differently (in front or between) the diff/suspension bracket support legs. That is enough room to make the holes line up or in your case not line up. I ended up making a note to myself where the bar goes (in front or behind) and have marked the bars accordingly, as I swap out diffs for different tracks (R180 - 4:11, 4:38, 190 - 4:44, 200 - 3:90). It would be nice if I had all the ratios in one type of diff.1 point
-
Sorry again for the delay in posting. I have had some issues. I thought that I would make these in stainless, but I failed to take into account how easily stainless work hardens. If I had dies and a press this would not be a real problem but since I'm hammer forming them trying to shrink the stainless around the form was an issue. So I'm in the process of doing a run of 25 sets in regular cold rolled steel and then will send them out to a high quality chrome plating company in Richmond VA. This has morphed into more work than I imagined as I originally only planned to make a few at a time. So far I've made 12 sets and have 13 to go. Then I have to weld the two halves of each ring together. When I complete them I'll do some finish work on each set to ensure they are nice and straight so that the chrome plating looks nice. After I have them prepped Owner of the plating shop says it'll be a 2-3 week turnaround depending on how busy he is. Hopefully some of you will still want a set when I get them done. I'll post some pics of what I'm doing soon.1 point