Topics Last Week
Showing topics, images, events and files posted in for the last 7 days.
- Past hour
-
 Stock wire? How green (or brown, I mean oxidized) is the copper? That's a long run between the ignition switch and coil. Oxidation = increased resistance. If you take the ballast out of the circuit is it better?
 -
First thing - the AFM does indeed have a wiring connector, it's of Bosch design (as is the entire EFI system in your Z) and it's, like most Bosch connectors of that era, a PITA to remove. If your AFM is in place it will be difficult to see as it's underneath all that. Second thing - you really need to make sure the injectors are opening. It's sort of easy if you have the right stuff, and can be done in place IF you know how to release and remove the BOSCH injector connectors... If for instance you HAD a spare Bosch injector connector with a pigtail, you could put it on each injector in sequence and use a 9-volt battery to quickly apply and remove voltage to the pigtail wires. Yes, a 9-volt battery will open an injector. If you hear the distinct CLICK of the injector opening you can immediately rule out the "crapolla, the injector is stuck closed". (here I have to say: one side of the battery needs to be permanently connected, the other (doesn't actually matter which) needs to be loose so you can just tap the exposed wire end to the bare pole quickly. You DO NOT want to hold voltage to the injector except for a very brief period of time - that's how they work, milliseconds... IF STUCK they in truth need to be pulled and cleaned (and flow balanced) by a professional shop OR replaced - BUT most of the time I can get a stuck injector opening again by rapidly tapping the wire for awhile (several seconds or more) until I hear it clicking. That may help you in your effort to get it running even if things are not all perfect. The injector is a coil (an electromagnet) so both of those spade connectors are actually tied together by the coil. You should see that when testing with an Ohm Meter - leads placed on the two should show a steady Ohm value. If that circuit is OPEN, the injector is bad and you can't fix it. Now, you can also test that the injectors are getting voltage - they should ALWAYS show battery voltage if the Ignition switch is in the ON (or Start) position. And, because it's a coil, you WILL see voltage on BOTH sides IF the harness wiring is connected to the injector. If the injector connector has been removed you will see battery voltage ON ONE SIDE of the connector an not the other. The ECU asserts a ground to the other side of the connector to open the injector and, like I said, this happens FAST. You will never see this activity with a meter (oscilloscope yes). Because they are basically a coil IT DOES NOT MATTER which side gets power and which gets a ground signal. Most people wire the "hot" side consistently to one side of the connectors, BUT they don't have to! There is NO "+" side or "-" side. If there was, the injector would tell you.
- Today
-
 I would like to know the casting code, please, on the 1973 OEM exhaust manifold ? Are you selling a '73 downpipe ?
 -
Hi all and with my profound apologies for not having replied sooner - somehow windows was blocking my logon ! siteunseen and zed head, thanks for your negative assomptions - great attitude between Z owners in the community ; seriously, if you having nothing constructive to say - stfu please or at best - DM the guy with your unfounded fears. :-) Kind regards, Sean
-
 That's a late one. Never heard it. I was listening to them on vinyl on a cheap record player with a penny taped on the stylus.
 -
 Never mind! Coffee kicked in. 3 outer and only 2 inner shims. I read back through that and this doesn't make sense. Diseazed do you know how many valve spring washers Eiji uses? I don't know him like you do and kinda scared to call and ask a bunch of questions until I am actually ready to do mine. I know he's a busy man. Because .080" longer valves are now in the head the springs must be shimmed up to from the bottom to retain the same spring tension. The washers are hardened steel and are there to prevent galling of the aluminum head...don't get them from the hardware store. The stock head came with only one shim under each per spring is exactly .040" in thickness. So just add 2 more under each outer spring (total fo three) and you can achieve the desired increase of .080". Washers used to be available at MSA and were inexpensive. The single stock washer under the inner spring is also .040" thick. But you can only add a total of 2 washers under the valve seal instead of 3, as it won't let the valve seal lock-ring seat properly. The inner spring is more of a "helper" spring and won't be adversely affected, I've had no problems using only 2 washers here and I rev my engine to 7,300.
 -
 I do, I ordered another from Nissan to replace mine. When I get back in town from Boston, I’ll post the p/n. Can’t remember if it was superseded.
 - Yesterday
-
p.s. Neutronics Enterprises is still out there. Check out the email addresses here - https://neuracing.us/brushless-motor-engineering-and-manufacturing-based-in-sand-diego-ca/ Phone numbers - https://dieselnet.com/com/85.php Stop by and say hello - https://www.mapquest.com/us/california/neutronics-enterprises-inc-366412161 Here's a book that references the patent - https://link.springer.com/chapter/10.1007/978-981-10-5903-2_124
-
 I live in arizona... i bought it and it just arived in less than 24 hrs. fastest turn around for a relay i thought i would have to wait 1-2 months for.
 -
 Im in good company!!
-
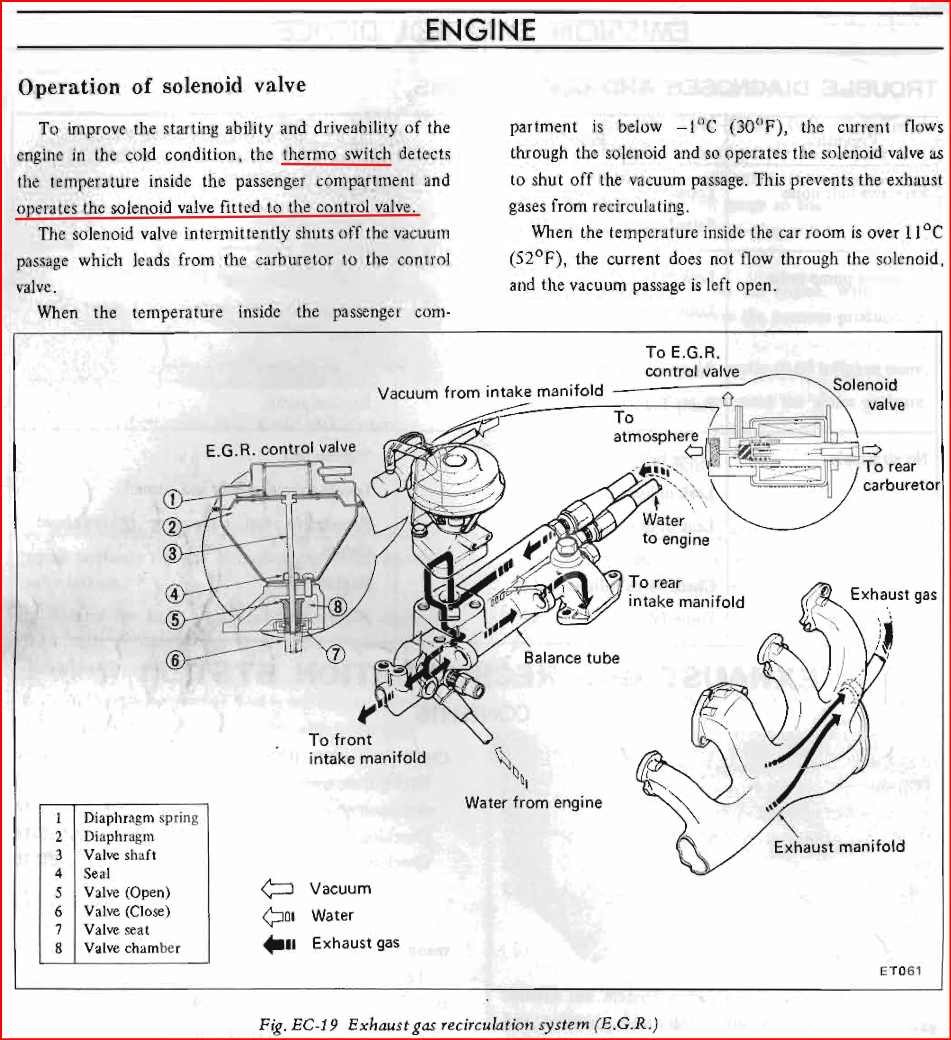
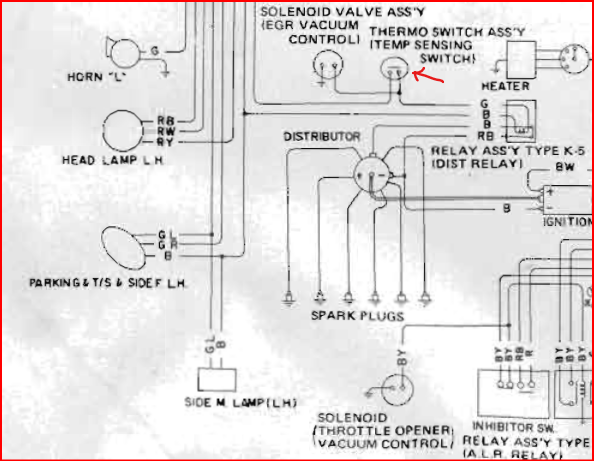
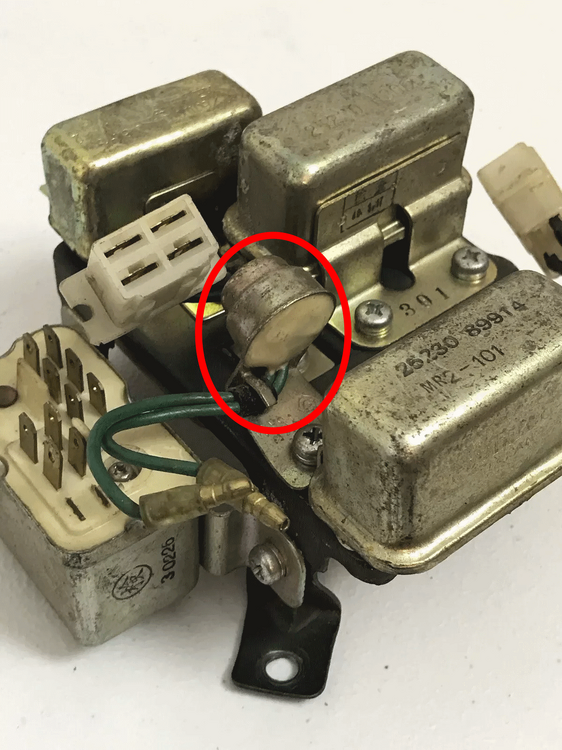
 Thanks Matthew for a great write-up =) Here is my tiny contribution to it: You were wondering about the Thermal switch 22110-E8000 and stating that it's probably for the automatic model only. I found information which connects it also with the manual model, with the emission control device (EGR) to be more precise. It can also be found from the -73 wiring diagrams (both manual/auto). Please see pictures below: Keep up the good work!
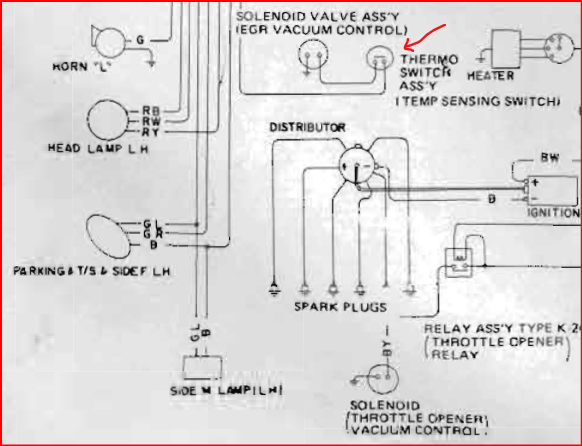

- Last week
-
They look better wet.😁 Mine has water allergies though. Now for some windshield time.

-
 It's a EX-mouse.. 🤣
 -
 Thanks for the mention! I just updated the thread as I’m diving head first into the AFM rabbit hole. Some tips I picked up on my journey: - Clean all the electrical connectors to the sensors (also the bullet connectors in the harness). - Measure the resistance to the AFM air temperature sensor and the coolant temperature sensor to make sure there within spec (coolant sensor is one of the most important sensors in the EFI system!). - Buy or borrow a timing gun and make sure the timing is set correctly. - Verify you are getting enough spark (right type and gap spark plugs, distributer contacts in good condition, ignition coil resistance within spec (0,8 to 1 Ohm)). - Install a wideband O2 sensor with gauge (cheap Chinese one is good enough for now) or if you don’t have a bung in you exhaust buy an exhaust sniffer so you can measure you AFR (Air Fuel Ratio). Idle should be around 14,7 and wide open throttle 12,5 I believe. - Try and see (while monitoring the AFR) if only you idle or the entire rpm range is out of spec. If it’s only idle maybe try and play with the idle air screw on the AFM to get the idle AFR back into spec. And If nothing work only then take the AFM off the car and start testing the resistance values. The number 7 pin is hard to measure the resistance so you must hook it up to a battery (9 or 12V) to test the output voltage on the number 7 pin. If you determine that that is your issue then welcome to my world! As you are based in the US maybe an AFM rebuilt offered by jdm-car-parts or Z-store is an option for you. Unfortunately I am not so it would cost an fortune to do so for me in postage and import tariffs.
 -
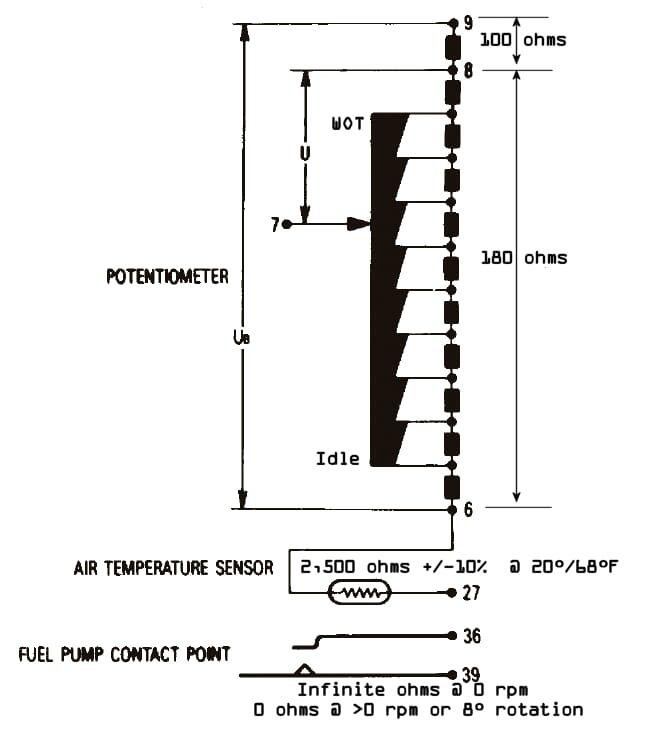
Little update as I don’t have much time to work on the car. After connecting the AFM to a spare battery and testing the voltage on pin 7 I noticed very inconsistent voltage readings and a lot of gaps in the carbon track even though it doesn’t look damaged. And yes I know the AFM has a logarithmic scale with a range of 0 – 9 Volt, Its basically just a voltage divider and a potentiometer in one. Here is a picture I found together with the link and some other useful links (last one is for a Range Rover but it’s the same concept and same Bosch style AFM). https://www.atlanticz.ca/zclub/techtips/afm/sizeupgrade/index.html https://www.atlanticz.ca/zclub/techtips/afm/index.html https://www.gomog.com/allmorgan/AFMadjust.html After a bunch of searching I did fine more reference pictures of the Datsun 7 pin AFM’s and other Bosch AFM modules of the same type, that bend is 100% not supposed to be there. I did notice that if I press the copper part of the wiper hard against the carbon track I do get some sort of reading but so maybe somebody tried to “fix” the AFM by bending the wiper. Unfortunately the track has failed in its entirely and I can’t find anybody that can fix the circuit board. Enlarging the bolt slots and moving the wiper to a fresher part of the track also didn’t work. This lead me deep into the Bosch AFM rabbit hole that is the world of Datsun / BMW / Porsche forums. I found an Australian forum post that mentions a slightly larger 90’s Toyota AFM being plug and play for his L28E 280Z(X?) with the part number F201 13 210 (197100-3420). This is also a 7 pin style AFM With the same internal (and pin) layout as the Datsun 7 pin AFM’s. When looking if I could find this AFM in Europe I actually found one at a local junkyard from a 1988-1992 2.2i GT Turbo 12V Ford (USA) Probe for €25,- so I ordered it immediately to try and test this theory (same AFM was also used on the Mazda 626 and 929, also found a part number from Standerd "MF9107"). The original post did mention you need to loosen the tension on the flap by 3 teeth as the flap is bigger than the Datsun AFM’s. https://www.viczcar.com/forums/topic/6951-larger-afm-for-a-280zx If this doesn’t work I will continue to look for an replacement Datsun AFM that doesn’t break the bank (I know, that’s a tough one). I might also look into making a custom plug and play MAF swap. I found a US based company called Split Second that makes MAF to AFM conversion modules and MAF conversion kits for BMW’s. They also have a 0-9 Volt module (PSC1-009) that might work with the stock Datsun ECU in theory. https://splitsec.com/product/psc1-009-programmable-signal-calibrator-afm-to-maf-hv-output https://splitsec.com/wp-content/uploads/technotes/TN2_AFM_to_MAF_Conversion.pdf And yes I will post all my findings online as there isn’t much information to be found about AFM sensors and there alternatives. Also no I don’t want to carb swap my car, I want to stay EFI but don’t want to spend thousands yet to upgrade the entire EFI system. If anybody has a 0-5 Volt (or 5-0 Volt) AFM module that needs a rebuild / modernization I found an interesting company in Switzerland called SyncroSweets that swaps the wiper potentiometer for a modern programable potentiometer that’s plug and play. https://www.syncrosweets.ch/en/luftmengenmesser
-
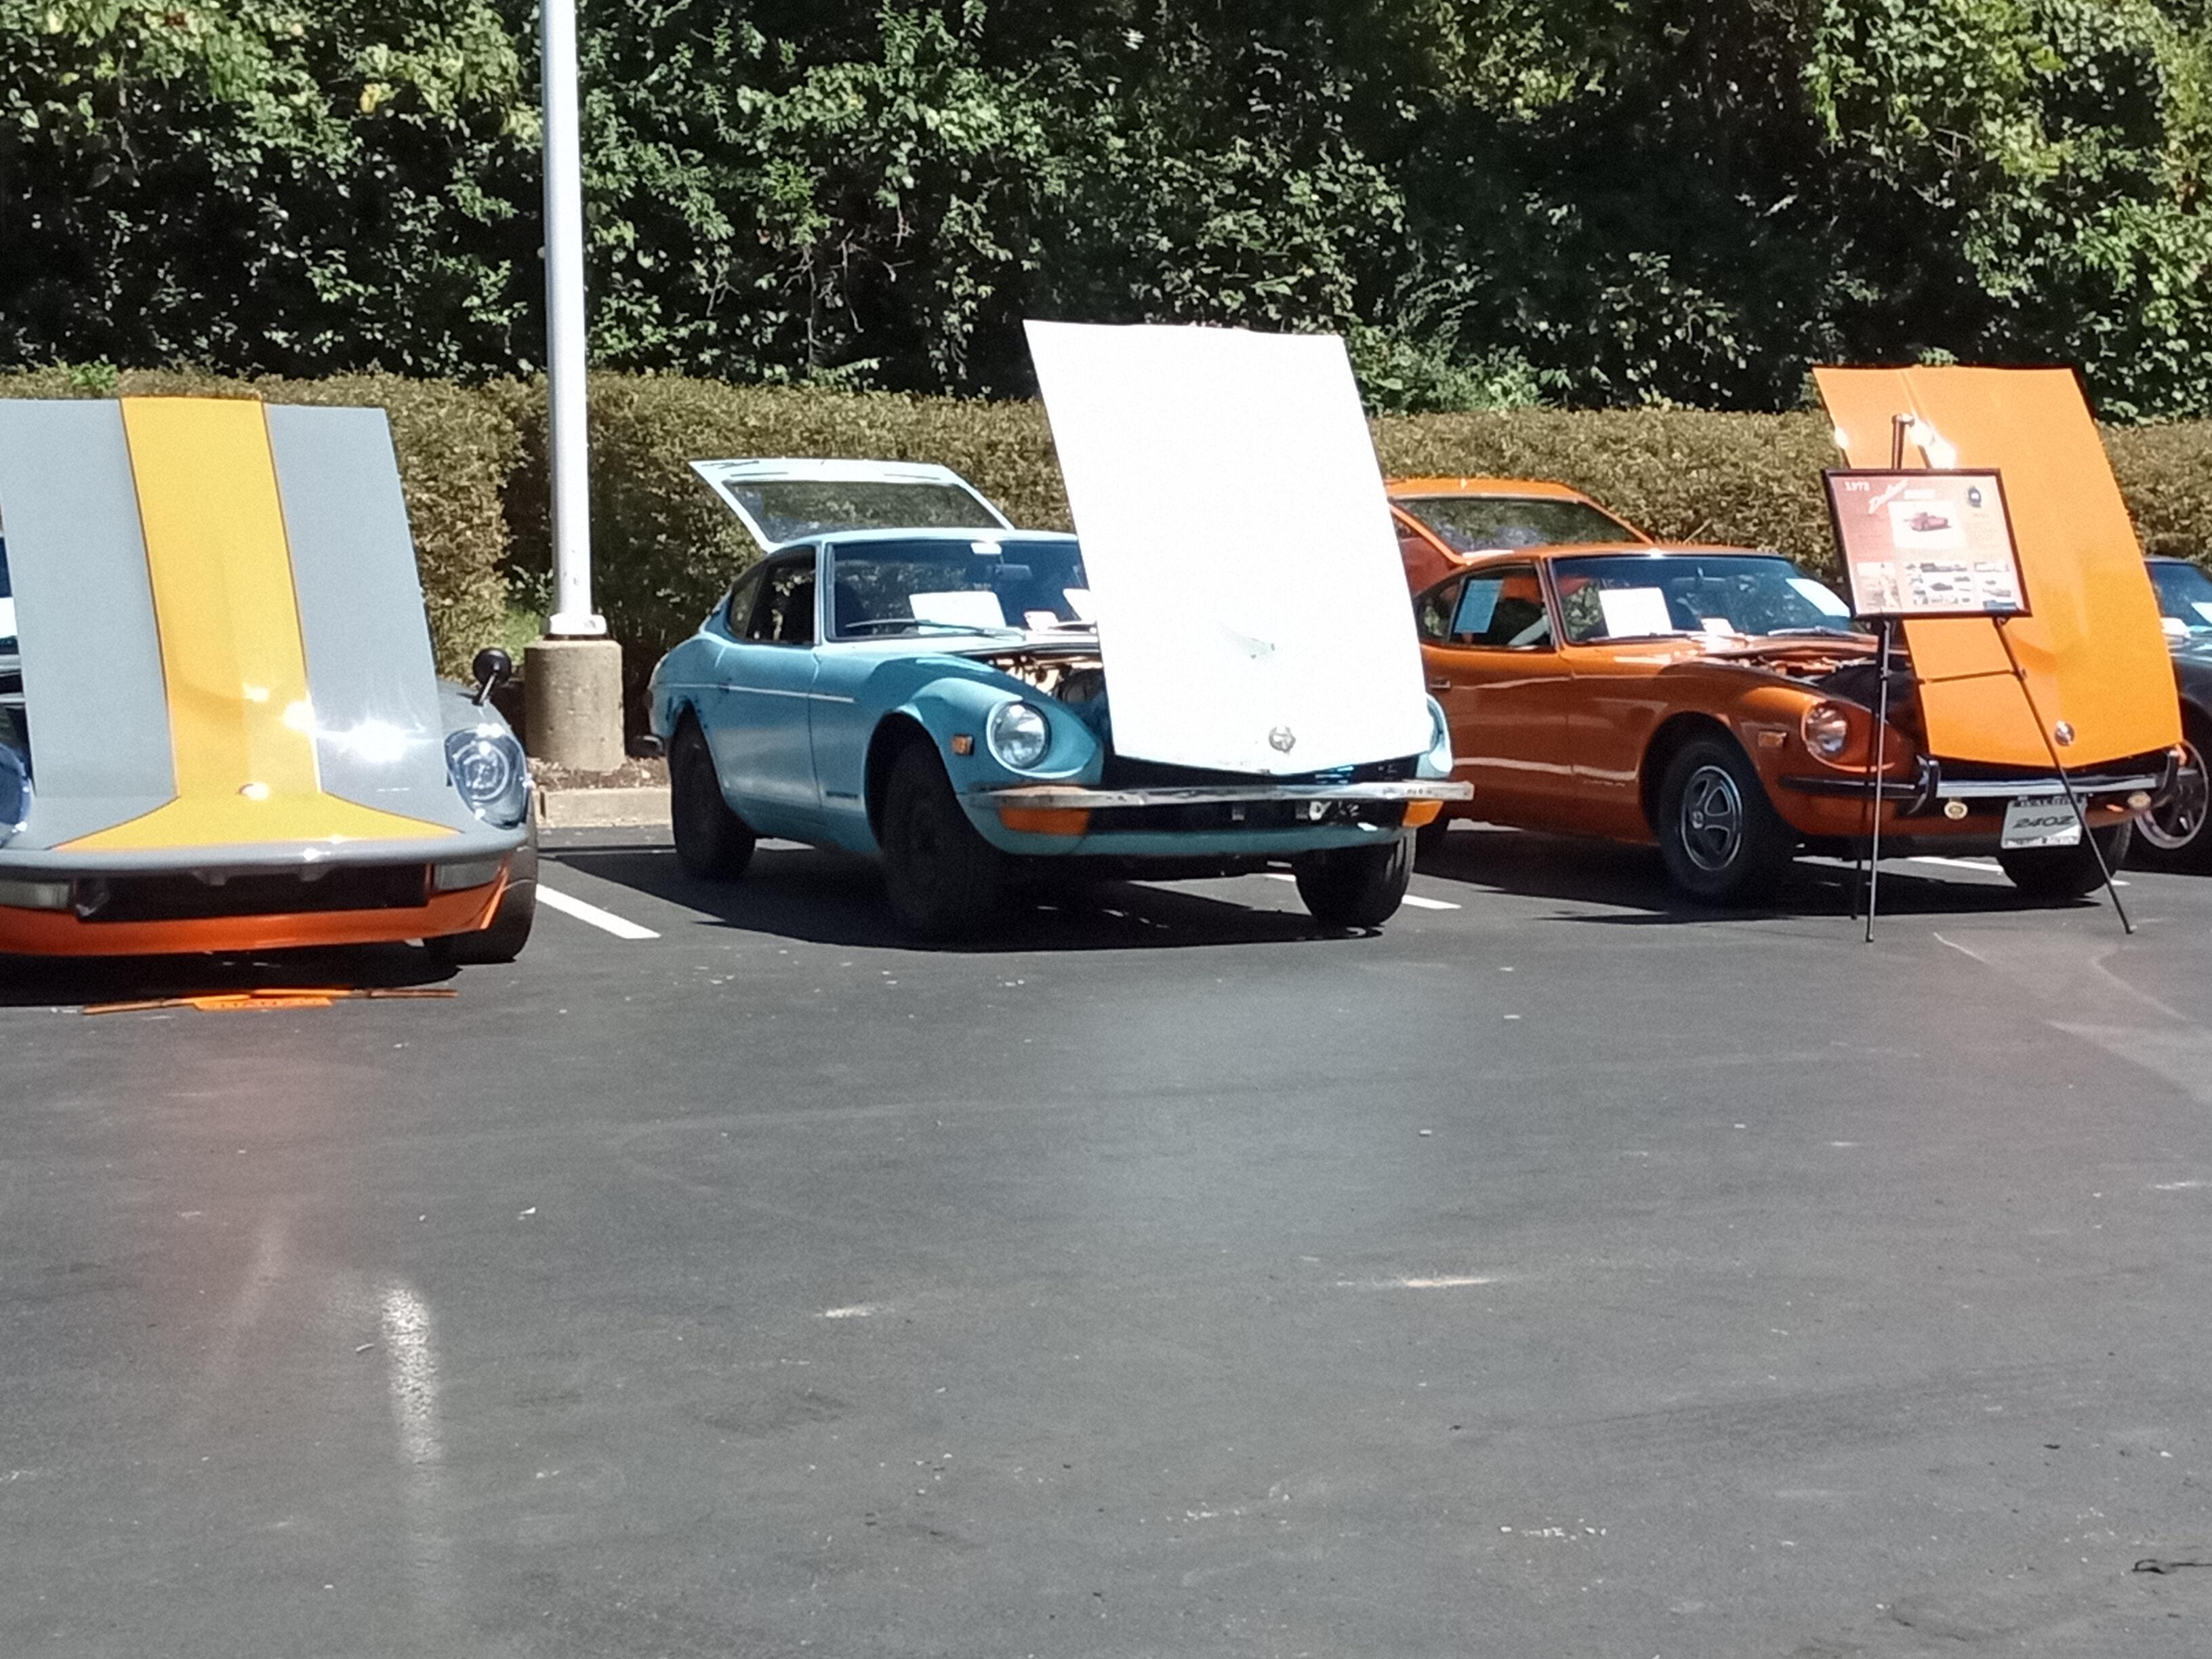
 http://www.zcarblog.com/wp-content/uploads/2025/09/893619B6-2B18-4EA9-A444-44828A910742.jpgPhoto by Emma Lai On Saturday, August 30 we attended the Tokyo Calling 5 event hosted by Breakfast Club Rally. Z Car Garage participated with a group of client cars and enjoyed a wonderful day of driving through the foothills of Northern California. The event featured 280+ Japanese classics and 90’s-era wonders to appreciate during the morning social gathering and rest stops. Enjoy our report with mega-photo gallery and video! http://www.zcarblog.com/wp-content/uploads/2025/08/IMG_8045.jpg Breakfast Club Rally http://www.zcarblog.com/wp-content/uploads/2021/06/IMG_7693-1024x768.jpeg The Breakfast Club Rally (BCR) started 5 years ago as a small group enjoying weekend drives. It blossomed into monthly events with one hour of hanging out followed by several hours of driving. I highly recommend it for anyone looking to enjoy the beautiful Northern California roads and scenery. You can see our previous BCR reports HERE! http://www.zcarblog.com/wp-content/uploads/2024/08/IMG_4871.jpg http://www.zcarblog.com/wp-content/uploads/2025/07/TC5anim_lg.jpg The initial BCR Tokyo Calling event, Tokyo Calling 2, Tokyo Calling 3 and Tokyo Calling 4 were all a blast. We did not want to miss their fifth all-Japanese, mostly-vintage rally so I assembled a group of Z Car Garage clients and friends to participate in TC5. We left the shop at 6:15am heading to Sonoma, here is a preview of our cars: Jim’s 1971 Datsun 240Z http://www.zcarblog.com/wp-content/uploads/2022/01/IMG_3873-e1641173598875-1024x674.jpeg Jim’s 1971 Datsun 240z is now sporting a Rebello 3.2L with Jenvey ITB EFI, Recaro Specialist seats, CD009a 6-speed transmission, our Z Car Garage Big-Brakes and Z Car Garage CV Axles! http://www.zcarblog.com/wp-content/uploads/2022/01/IMG_3798-1024x768.jpeg http://www.zcarblog.com/wp-content/uploads/2025/09/Screen-Shot-2025-09-07-at-8.52.56-AM.png Frank’s 1978 Datsun 280Z http://www.zcarblog.com/wp-content/uploads/2025/07/IMG_6836.jpg Frank’s 1978 Datsun 280Z features our Z Car Garage Big-Brakes, full suspension refresh, 240Z bumper conversion and Panasport wheels. http://www.zcarblog.com/wp-content/uploads/2025/08/IMG_7898.jpg http://www.zcarblog.com/wp-content/uploads/2025/07/IMG_8416.jpg Mrs. Butters http://www.zcarblog.com/wp-content/uploads/2025/09/Screen-Shot-2025-09-07-at-8.52.38-AM.png I drove Mrs. Butters, our Series 1 shop 240z. This Series 1 S30 features a 3.2L with triple-Mikuni induction, Z Car Garage Big-Brakes, Z Car Garage CV Axles, ZCG Heat Shield, 6-speed transmission and full KW Suspension. http://www.zcarblog.com/wp-content/uploads/2020/10/9ADEE0F2-6EBB-45B1-AF78-1BD386E91A6F.jpeg http://www.zcarblog.com/wp-content/uploads/2023/08/IMG_8614-1024x768.jpeg John’s Datsun 240Z It was great to see our client John Enjoying the Ride in his 1971 Datsun 240Z featuring our the Z Car Garage Big-Brakes and Z Car Garage CV Axles. http://www.zcarblog.com/wp-content/uploads/2025/08/IMG_7940-1.jpg Linda’s 1972 Datsun 240Z Linda Williams drove her 1972 Datsun 240Z OMS Pace Car Duplicate. Z Car Garage revived this historically-significant Z from its slumber to make it a nice driver for Linda while retaining its survivor status. She loves driving it everywhere. http://www.zcarblog.com/wp-content/uploads/2022/09/IMG_0744-1024x768.jpeghttp://www.zcarblog.com/wp-content/uploads/2025/08/IMG_7976.jpg http://www.zcarblog.com/wp-content/uploads/2025/09/Screen-Shot-2025-09-07-at-8.53.08-AM.png Our morning caravan of 6 cars enjoyed cruising up I-280 and the Golden Gate Bridge. Nothing beats driving with fellow Z car owners! http://www.zcarblog.com/wp-content/uploads/2025/08/IMG_7951-e1757201967243.jpghttp://www.zcarblog.com/wp-content/uploads/2025/08/IMG_7890.jpg http://www.zcarblog.com/wp-content/uploads/2025/08/IMG_7912.jpg Tokyo is Calling before the Rally! http://www.zcarblog.com/wp-content/uploads/2025/08/IMG_8069.jpg Our crew arrived at the rally start in Sonoma and it was already filled with fabulous J-Tin parked at a local airport. BCR hosted a “social hour” from 7:30-9am so we could take in all the glorious cars. The vibe was tremendous, and as usual it went by too quickly. Let’s go through some of the highlights, with more photos in the gallery below! http://www.zcarblog.com/wp-content/uploads/2025/08/IMG_8058-e1757357460531.jpg Over 20 S30 Z cars were present! http://www.zcarblog.com/wp-content/uploads/2025/08/IMG_7973.jpg http://www.zcarblog.com/wp-content/uploads/2025/08/IMG_8090-e1757227325898.jpghttp://www.zcarblog.com/wp-content/uploads/2025/08/IMG_8004.jpg http://www.zcarblog.com/wp-content/uploads/2025/08/IMG_8069.jpg I am always on the lookout for Nissans and Datsuns, and roadsters get my attention. There were at least 10 in attendance including a genuine 1967 2000. One of the most sought after Datsuns, these “half-year” models were introduced mid-1967 offering a 5-speed transmission and 150hp twin-Mikuni carb’d 2L engine…hot stuff for the era. http://www.zcarblog.com/wp-content/uploads/2025/08/IMG_8199.jpg Ian’s SRL is #601 (out of ~1000 cars) and it was fully restored years ago by Les Cannaday in San Diego. Ian is meticulous about maintaining this car, but it is no garage queen, attending monthly rally events. The (655) Off-white paint with red interior is one of my favorites. Yes, it even sports a factory Nissan hardtop with all the stainless trim! http://www.zcarblog.com/wp-content/uploads/2022/03/IMG_8903-e1648257348668-1024x768.jpeg http://www.zcarblog.com/wp-content/uploads/2025/08/IMG_8200.jpg Another ’67 2000, this one is #077! http://www.zcarblog.com/wp-content/uploads/2025/08/IMG_8025.jpg http://www.zcarblog.com/wp-content/uploads/2025/08/IMG_8028.jpg Mark’s right-hand drive ’69 2000: http://www.zcarblog.com/wp-content/uploads/2025/08/IMG_8079-1.jpg High and low-windshield roadsters models were present: http://www.zcarblog.com/wp-content/uploads/2025/08/IMG_8083.jpghttp://www.zcarblog.com/wp-content/uploads/2025/08/IMG_8082.jpg http://www.zcarblog.com/wp-content/uploads/2025/08/IMG_8075.jpg Datsun 510 There were several Datsun 510s in wagon and sedan form. Our client Jay installed a set of our Z Car Garage CV Axles on his Green 510, and this time he brought the entire family in their mint 510 Wagon! http://www.zcarblog.com/wp-content/uploads/2025/08/IMG_8020.jpghttp://www.zcarblog.com/wp-content/uploads/2025/08/IMG_8002.jpg http://www.zcarblog.com/wp-content/uploads/2025/08/IMG_8091.jpg More 510s: http://www.zcarblog.com/wp-content/uploads/2025/08/IMG_8064.jpghttp://www.zcarblog.com/wp-content/uploads/2025/08/IMG_8062.jpg http://www.zcarblog.com/wp-content/uploads/2025/08/IMG_8013.jpg Back to Z cars, Lora joined us with her recently acquired 1971 Datsun 240z. This one-owner S30, affectionately known as “Buttercup” has been with Z Car Garage for many years. Excited to share her Z-car journey on zcarblog. http://www.zcarblog.com/wp-content/uploads/2025/08/IMG_8009.jpghttp://www.zcarblog.com/wp-content/uploads/2025/08/IMG_8007.jpg http://www.zcarblog.com/wp-content/uploads/2025/08/IMG_8175.jpg It was a pleasant surprise to see our client Geoff in their rally-inspired 1972 S30 . Over 5 years ago we installed our Z Car Garage Big-Brakes and Z Car Garage CV Axles!. They are returning to ZCG for a 6-speed transmission swap and triple carbs! http://www.zcarblog.com/wp-content/uploads/2025/08/IMG_8021.jpg Jason Dove’s 280z featuring Z Car Garage Big-Brakes. Jason is a long-time friend and client, full report coming to zcarblog.com. http://www.zcarblog.com/wp-content/uploads/2025/08/IMG_8024.jpg See the gallery below for more S30 Z car photos! http://www.zcarblog.com/wp-content/uploads/2025/08/IMG_8068.jpg A Z31 300ZX attending, in turbo form! http://www.zcarblog.com/wp-content/uploads/2025/08/IMG_8033.jpg Our client Cameron’s Z32 Twin Turbo visited Z Car Garage for maintenance work, downpipes, inlet piping, larger intercoolers all from Specialty Z. Cameron has been bringing his 300 to us for many years and we we are really glad to see him driving. There were several Z32TTs in attendance! http://www.zcarblog.com/wp-content/uploads/2025/08/IMG_8035.jpg http://www.zcarblog.com/wp-content/uploads/2025/09/9F9A7C46-F4F8-445F-B51D-A49B93632348.jpg http://www.zcarblog.com/wp-content/uploads/2025/08/IMG_8050.jpg Paul’s B13 Sentra S-R http://www.zcarblog.com/wp-content/uploads/2025/08/IMG_7989.jpg There were a handful of S13, S14 and S15(!) 240SX: http://www.zcarblog.com/wp-content/uploads/2025/08/IMG_8031.jpghttp://www.zcarblog.com/wp-content/uploads/2025/08/IMG_8077.jpg http://www.zcarblog.com/wp-content/uploads/2025/08/IMG_8056.jpg Leo’s Nissan Pulsar GTi-R http://www.zcarblog.com/wp-content/uploads/2025/08/IMG_8071.jpg Super happy to see Leo and his Nissan Pulsar GTi-R at Tokyo Calling 5. This RHD, JDM hot-hatch is known as “Baby Godzilla”, sporting all-wheel drive and an SR20DET drivetrain. What’s wild is that this Pulsar used to be owned by our very own Gary at Z Car Garage! Leo purchased it back in 2017 and drove it all the way from Reno, NV. http://www.zcarblog.com/wp-content/uploads/2025/08/IMG_8070.jpg http://www.zcarblog.com/wp-content/uploads/2025/08/IMG_8141.jpg Nissan Skyline http://www.zcarblog.com/wp-content/uploads/2025/08/IMG_8140.jpg It was great to see Miles (Rays wheels) and Kurt W.. Both will be getting updated zcarblog features. http://www.zcarblog.com/wp-content/uploads/2025/08/IMG_8046.jpg http://www.zcarblog.com/wp-content/uploads/2025/08/IMG_8048.jpg Mike’s R32 is looking sharp, now wearing silver TE37s: http://www.zcarblog.com/wp-content/uploads/2025/08/IMG_8061.jpg http://www.zcarblog.com/wp-content/uploads/2025/08/IMG_8188.jpg Fred’s R34 GT-R in Bayside Blue: http://www.zcarblog.com/wp-content/uploads/2025/09/6A673CE7-0215-4AFE-B917-02C45FFAD2BA-1.jpgPhoto by Emma Lai A Hakosuka (C10) Skyline: http://www.zcarblog.com/wp-content/uploads/2025/08/IMG_8018.jpg http://www.zcarblog.com/wp-content/uploads/2025/08/IMG_8019.jpg Enjoy this walk-around video from Tokyo Calling 5: Rally On! http://www.zcarblog.com/wp-content/uploads/2025/09/D96180CA-BC70-4E8D-8189-00E49A79F3DE.jpg Photo by Zack Hubbell The rally started at 9am and I was tasked with leading our group. I really enjoyed hustling Mrs. Butters through the backroads. This route was a bit longer than previous TC events at a 130+ miles. http://www.zcarblog.com/wp-content/uploads/2025/08/IMG_8112.jpghttp://www.zcarblog.com/wp-content/uploads/2025/08/IMG_8106.jpg http://www.zcarblog.com/wp-content/uploads/2025/08/IMG_8130.jpg One of the perks of BCR events is their team of professional photographers at various stages capturing epic rolling and detail shots so people can focus on enjoying the drive. I encourage you to visit each of these SIX photographer’s photo albums to see shots of your rides:Nathalie Mossberg, Kevin Lee, Alex Nibyt, Zack Hubbell, Emma Lai and Chris Friske. http://www.zcarblog.com/wp-content/uploads/2025/09/C00443AE-510B-4A3D-8694-68E95A9A8306.jpgPhoto by Emma Lai We took a midpoint break from the heat in the historic town of Winters. Lots of cars to see and great chatting with fellow enthusiasts. http://www.zcarblog.com/wp-content/uploads/2025/08/IMG_8168.jpg The rally concluded back in Sonoma airport, where BCR arranged for lunch from Kinoko Japanese Home Cooking. We enjoyed Japanese comfort food surrounded by J-Tin and vintage aircrafts. http://www.zcarblog.com/wp-content/uploads/2025/08/IMG_8183.jpg http://www.zcarblog.com/wp-content/uploads/2025/09/Screen-Shot-2025-09-07-at-8.52.56-AM.png http://www.zcarblog.com/wp-content/uploads/2025/09/8C6704AB-4DCD-4DBC-82D5-DEFC321DDA79.jpgPhoto by Kevin Lee There were so many cool cars, please check the gallery for more photos! Next, let’s check out some non-Nissan/Datsun action… Honda http://www.zcarblog.com/wp-content/uploads/2025/08/IMG_8189.jpg Honda was well-represented including late model DC2 Integras, a few NSXs, lots of S2000s, CRXs and EF/EG hatches rounded out the display: http://www.zcarblog.com/wp-content/uploads/2025/08/IMG_8080.jpghttp://www.zcarblog.com/wp-content/uploads/2025/08/IMG_8010.jpg http://www.zcarblog.com/wp-content/uploads/2025/08/IMG_8192.jpg Mazda http://www.zcarblog.com/wp-content/uploads/2025/08/IMG_8039.jpg A rare Mazda Cosmos was a real treat to see. First-gen, FC and FD RX-7s, and many Miatas attended: http://www.zcarblog.com/wp-content/uploads/2025/08/IMG_8015.jpghttp://www.zcarblog.com/wp-content/uploads/2025/08/IMG_8087.jpg http://www.zcarblog.com/wp-content/uploads/2025/08/IMG_7983.jpg Toyota http://www.zcarblog.com/wp-content/uploads/2025/08/IMG_8190.jpg Some of our favorite Toyota’s including Supra (A60, A70, A80), first gen MR2s, and AE86s! The Lexus IS300 SportCross with A80 Supra wheels was sweet! http://www.zcarblog.com/wp-content/uploads/2025/08/IMG_8196.jpg http://www.zcarblog.com/wp-content/uploads/2025/08/IMG_8067.jpg http://www.zcarblog.com/wp-content/uploads/2025/08/IMG_8088-e1756659717330.jpg I don’t think I’ve seen this many 2nd-gen A60 Celica-Supras on one place! http://www.zcarblog.com/wp-content/uploads/2025/08/IMG_8073.jpghttp://www.zcarblog.com/wp-content/uploads/2025/08/IMG_8146.jpg http://www.zcarblog.com/wp-content/uploads/2025/08/IMG_8147.jpg Trucks and Vans Let’s not forget the Japanese classic trucks and vans! Generations of Land Cruiser: http://www.zcarblog.com/wp-content/uploads/2025/09/Screen-Shot-2025-09-08-at-4.29.16-PM.png http://www.zcarblog.com/wp-content/uploads/2025/09/Screen-Shot-2025-09-08-at-4.30.41-PM.png Thanks BCR! http://www.zcarblog.com/wp-content/uploads/2025/09/8EC92A65-5750-4B51-BBE9-35E66E7C5D41.jpg Many thanks to the Breakfast Club Rally organizers, we had a blast and I urge you to register for their next event, especially if you are in the South Bay area like me and want to see what driving bliss lies North. http://www.zcarblog.com/wp-content/uploads/2025/09/1943265B-982C-4CDF-A7BF-1420C4DBD47C.jpgPhoto by Chris Friske Thank you to all of the Z Car Garage clients that made the journey with us and braved the heat! Huge thanks to BCR for extending their hospitality to our crew, everyone was thrilled. Here’s to the next rally and always, always #DoitInADatsun! More photos in the gallery below… http://www.zcarblog.com/wp-content/uploads/2025/08/IMG_7985.jpg View the full article
 -
 I agree with Namerow that there will be extensive welding required. To answer the original question: If the doors seem to fit well with decent gaps, i would weld a tube on the inside of the car down low on the door opening. Remove all the drivetrain and any other dead weight. Then replace the rockers first. Inners and outers as needed. Be sure to use the doors to ckeck fit and door gaps before welding it all up. Then do the floors next. After the rockers are done, your temporary door brace can be removed. If the doors don't fit well, the body will need to be manipulated or jacked up until they do and then weld in your temporary bracing