.JPG.cfcada9cf1c1b502df3f5f2f2ca3ff36.JPG)

SteveJ
Community Member
-
Joined
-
Last visited
Everything posted by SteveJ
-
For future reference, you can put the fuel pressure gauge on the line between the fuel rail and the carburetor. I found it easier than trying to connect it to the fuel pump.
-
The heat sink should be bolted to the fender. That should be an adequate grounding.
-
I have a 20 ton press and plenty of sockets. I may be able to push out the old rubber. I did see videos on using fire to have one's way with those bushings.
-
On the advice of a friend, I bought a transmission jack from Harbor Freight to hold up the differential. The nice part is that my 20% off coupon was good to use for buying it. The coupon said jacks were excluded, but I guess it meant hydraulic jacks. I also took the opportunity to buy a set of 3/8 impact sockets, and at Home Depot I picked up a compact 3/8 impact gun. Now to find what bolts are uncooperative.
-
I'm kind of thinking it reminds me of a Dino with fewer curves. Maybe it's just the orange.
-
I actually saw that helping a friend with his 280Z. He bought a fancy FPR from the company that employs Corky Bell. The fancy FPR was supposed to work with the stock FPR to increase the fuel pressure even at higher vacuum. Well, when my friend got someone to install the FPR, the installer didn't bother reading instructions (Sometime instructions aren't for sissies.) and removed the stock FPR. When my friend brought the car to me, he had Corky's number, and I confirmed what was needed. My friend got a stock FPR, and I installed it, but I didn't put a vacuum reference on it at first. On the first test drive, the car stumbled at tip-in, and I could even see it with the AFR meter. I found an available port for the vacuum reference, and the car ran a lot better.
-
And the oil pressure looks good, too.
-
Use a conductive adhesive between the HEI and heat sink. https://www.amazon.com/Conductive-Adhesives/b?ie=UTF8&node=401542011
-
@siteunseen was referring to the return side of the fuel pressure regulator.
-
YouTube does that to videos under a minute now.
-
Here is what I suggest to help your project. For the terminations, either for the HEI or matchbox, buy a kit like this: https://www.amazon.com/HUAREW-Connecto-Terminal-Insulating-Electrical/dp/B098DX41Y8/ and a crimper like this: https://www.amazon.com/ProsKit-300-035-Multi-Purpose-Crimping-Tool/dp/B002PI8D4K I like open barrel terminals more than single crimp since they clamp onto the insulation and the wire. With the proper crimping tool, the open barrel terminals rarely come off. The kit includes insulators so you can reduce the chances of shorting something out.
-
I purchased the Energy Suspension bushing kit a LONG time ago. (I'm thinking it was about 8 years ago or so.) I put the car up in the air earlier this year, but I realized the scissor lift made it where the exhaust was in the way. I finally put the car up in the air with the QuickJacks. (Don't buy a lift that has a crossmember at the top.) So I was looking it over carefully since this is definitely not an area of expertise for me. I sprayed some Kroil on various bolts and nuts that will need to be turned, and I think I worked out my plan of attack. Lower the exhaust and support it out of the way. Remove the rear sway bar. Attack the moustache bar. Attack the crossmember, supporting the differential with a jack as needed. Remove the inner LCA bushings Replace the bushings on the mustache bar, crossmember, and inner control arms. Pray and contemplate developing a relationship with alcohol. Attack the spindle pins. Assembly is the reverse of disassembly. (In the Haines manual tradition) Thoughts, criticisms, advice?
-
Let's start with the obvious. The car isn't getting fuel at tip-in on the throttle. Has your friend thought about getting the injectors cleaned? What is the fuel pressure during this time? Is the vacuum line connected to the fuel pressure regulator? I couldn't pause the video in time to see.
-
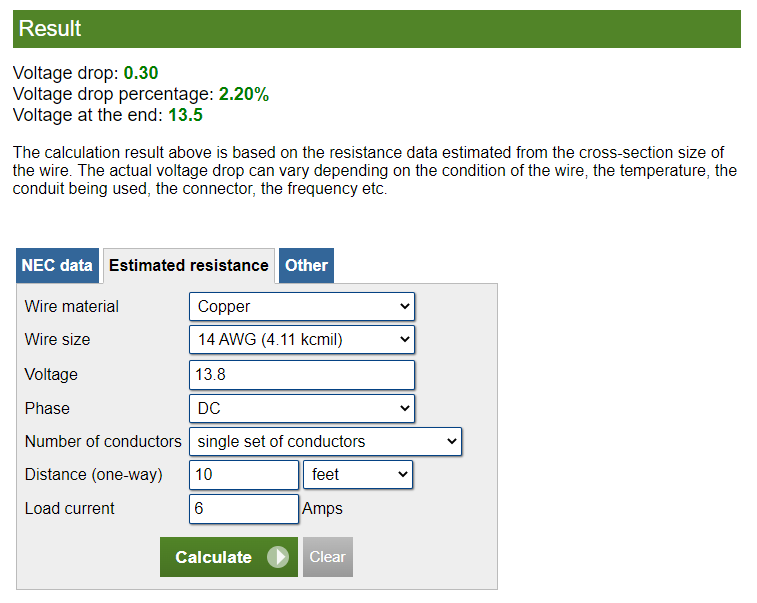
Just be aware of what gauge wires your terminals are designed to take. Doing some quick resistance calculations, you are upsizing a lot of wires with little to no benefit. You may end up with an issue getting your engine harness through the hole in the firewall. (Keep in mind that it will probably be easier if you put the pins in the connectors after you get the harness through the firewall.) You may want to check out a voltage drop calculator like this: https://www.calculator.net/voltage-drop-calculator.html Choose estimated resistance. I did a quick calculation for the headlights with a swag for the distance and used incandescent sealed beam ratings. The voltage is 13.8 because that is toward the low end of operating voltage while the car is driving. Many of your circuits for the engine harness are grounded close to the load, so this calculator would overestimate the voltage drop. The battery/charging system are your highest current circuits, so the larger gauge can easily be justified. No other circuit comes close especially if you change the parking light circuit to LEDs, as that is probably the biggest continuous draw you would see. Other high draw circuits: Fan (14 AWG is fine, but you might be better off with 12 AWG) Fuel pump (This is about 10 A or less. 14 AWG would work.) Headlights (depending upon whether or not you switch to LEDs. LEDs would drop this circuit to about 3 A.)
-
Low impedance would translate to more current. More current means more power. More power means more heat.
-
Search many dealers. Some say NLA, and others say they have them. Here's a Google search on it: https://www.google.com/search?q=toyota+81110-60P70&oq=toy&aqs=chrome.0.69i59j69i57j69i59j46i131i199i433i465i512j69i65j69i60j69i65l2.4904j1j7&sourceid=chrome&ie=UTF-8 Here's one dealer that says they have them: https://parts.toyotasouth.com/oem-parts/toyota-headlamp-assembly-8111060p70
-
I found an inexpensive 600mA analog ammeter on Amazon. I should get it tomorrow. @Captain Obvious, you make it difficult to ignore these intellectual experiments.
-
How about an oscilloscope for voltage readings at the resistor? I blew up my last analog ammeter many years ago. Even replacing the fuse in it didn't bring it back to life, and SWMBO would not be happy if I went out and got the Simpson meter I have wanted for a long time. (Maybe I could get away with it after she's been working for a while. Shh!)
-
I'm thinking probably not. There is still a Ger Brock automotive in Portland. https://gerbrock.com/ They talk about starting out at the address on the cover of that catalog you posted. They don't mention Peter in their history.
-
They look to be the same housings, and the Toyota kit was... $63.80 with tax and shipping, so it's just a little less than what Mr. Stern is asking (if you think $100+ is a little less). And as I mentioned before, the relay kit is included with the Toyota part number, but it would have to be worked on some to work with the Z.
-
It would be about as difficult as replacing a sealed beam headlight. Wait! There's a video for that...
-
-
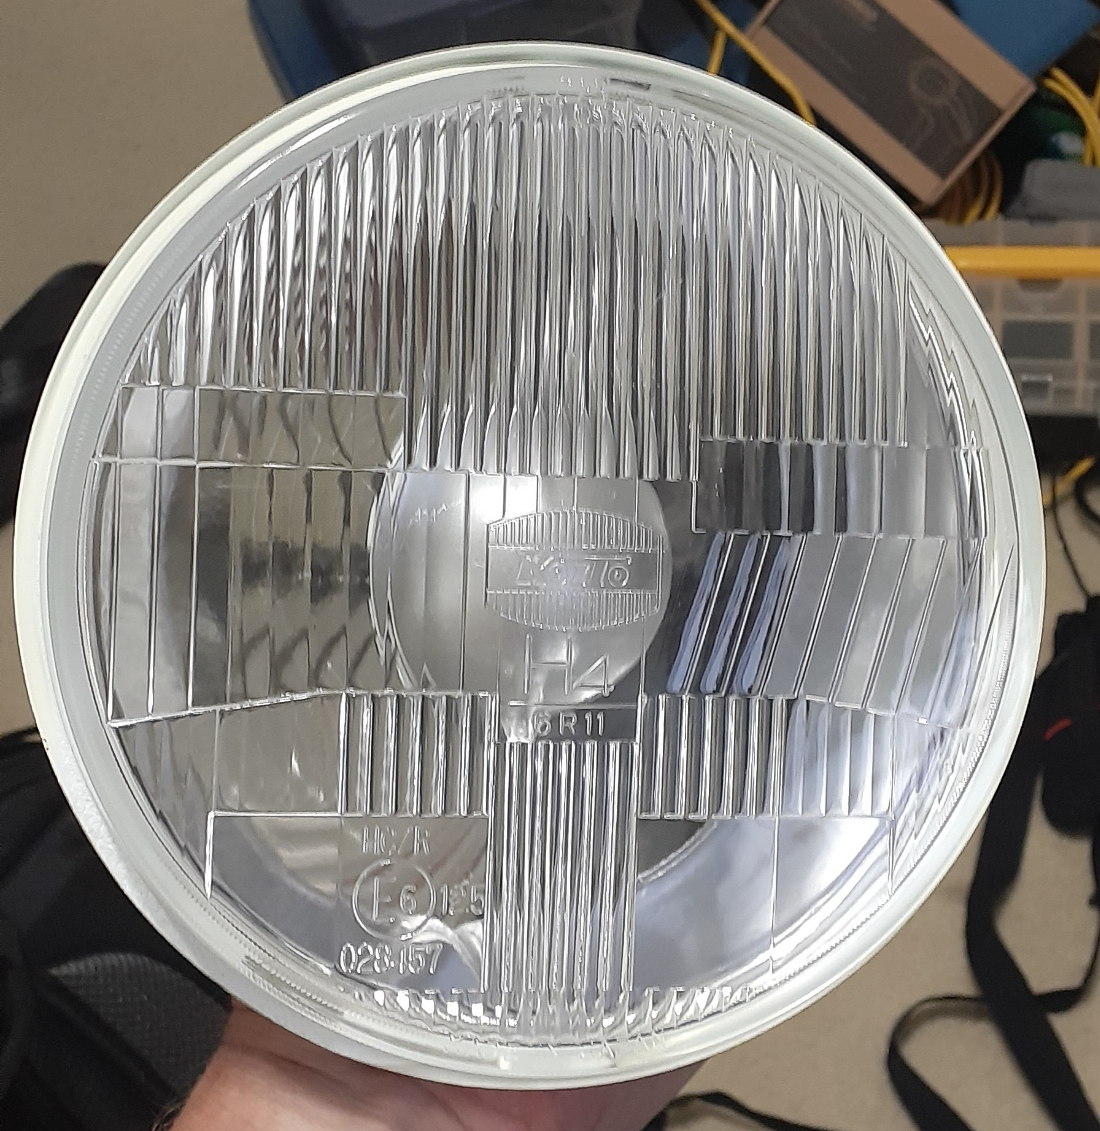
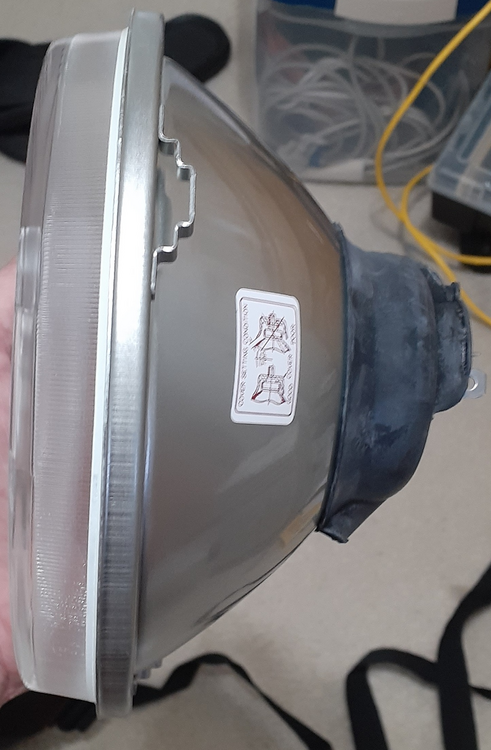
It's relatively flat. That's not unusual for H4 housings.
-
A while back I found that there was an H4 headlight kit for the Toyota Land Cruiser that used Koito H4 housings. This got my attention since Koito supplied many bulbs to Nissan, including sealed beam headlights. The website I found with the best price said they were sold out, so I put myself on the waiting list. Earlier this week I saw a post on Facebook where someone said he bought this kit from Toyota for his Z cars and supplied a part number. Using that part number, I searched dealerships online that said they had the part. One of the dealerships is on the other side of town, so I pulled the trigger and ordered a set. The kit arrived today. It has a nice relay harness that I won't need. I am just after the H4 housings. I'll put H4 LED bulbs in them and install them in the 260Z. If you're interested in a set of Koito H4 housings, the Toyota part number for the kit is 81110-60P70.

-
Try ACE Hardware. Maybe Lowe's or Home Depot may have spring that would work.