


.JPG.cfcada9cf1c1b502df3f5f2f2ca3ff36.JPG)

SteveJ
Community Member
-
Joined
-
Last visited
Everything posted by SteveJ
-
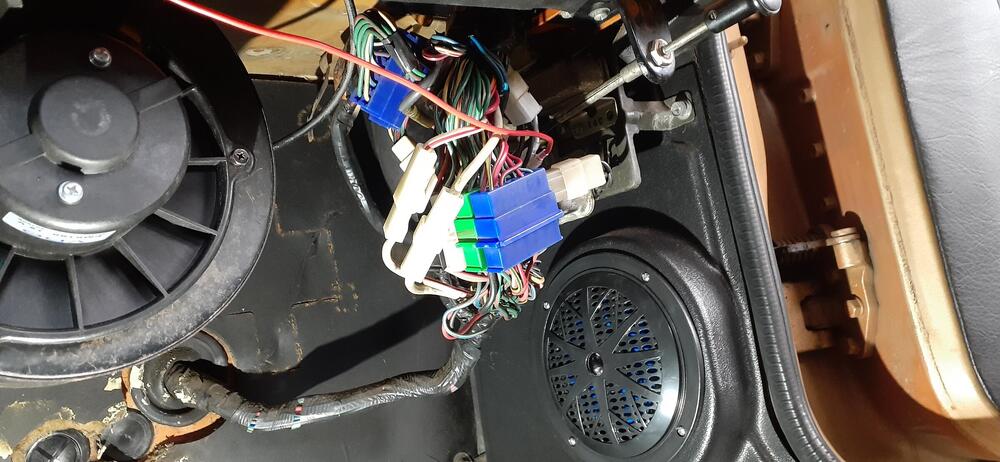
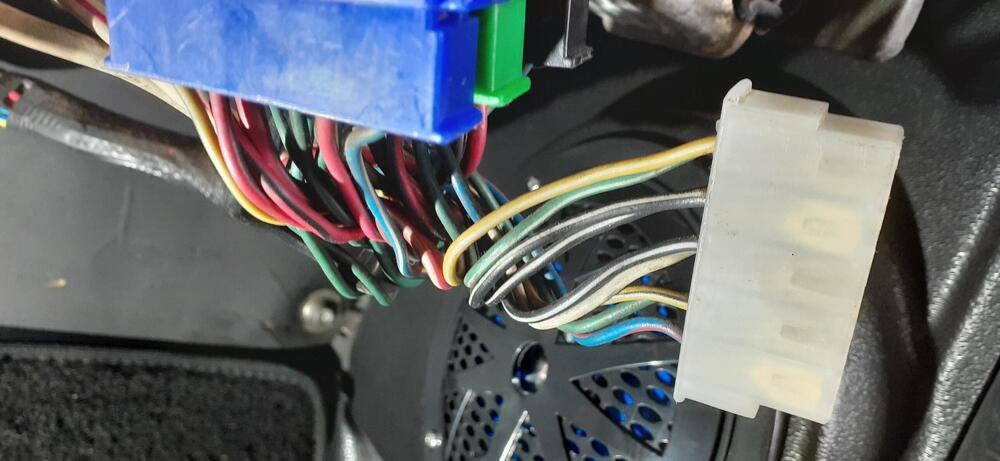
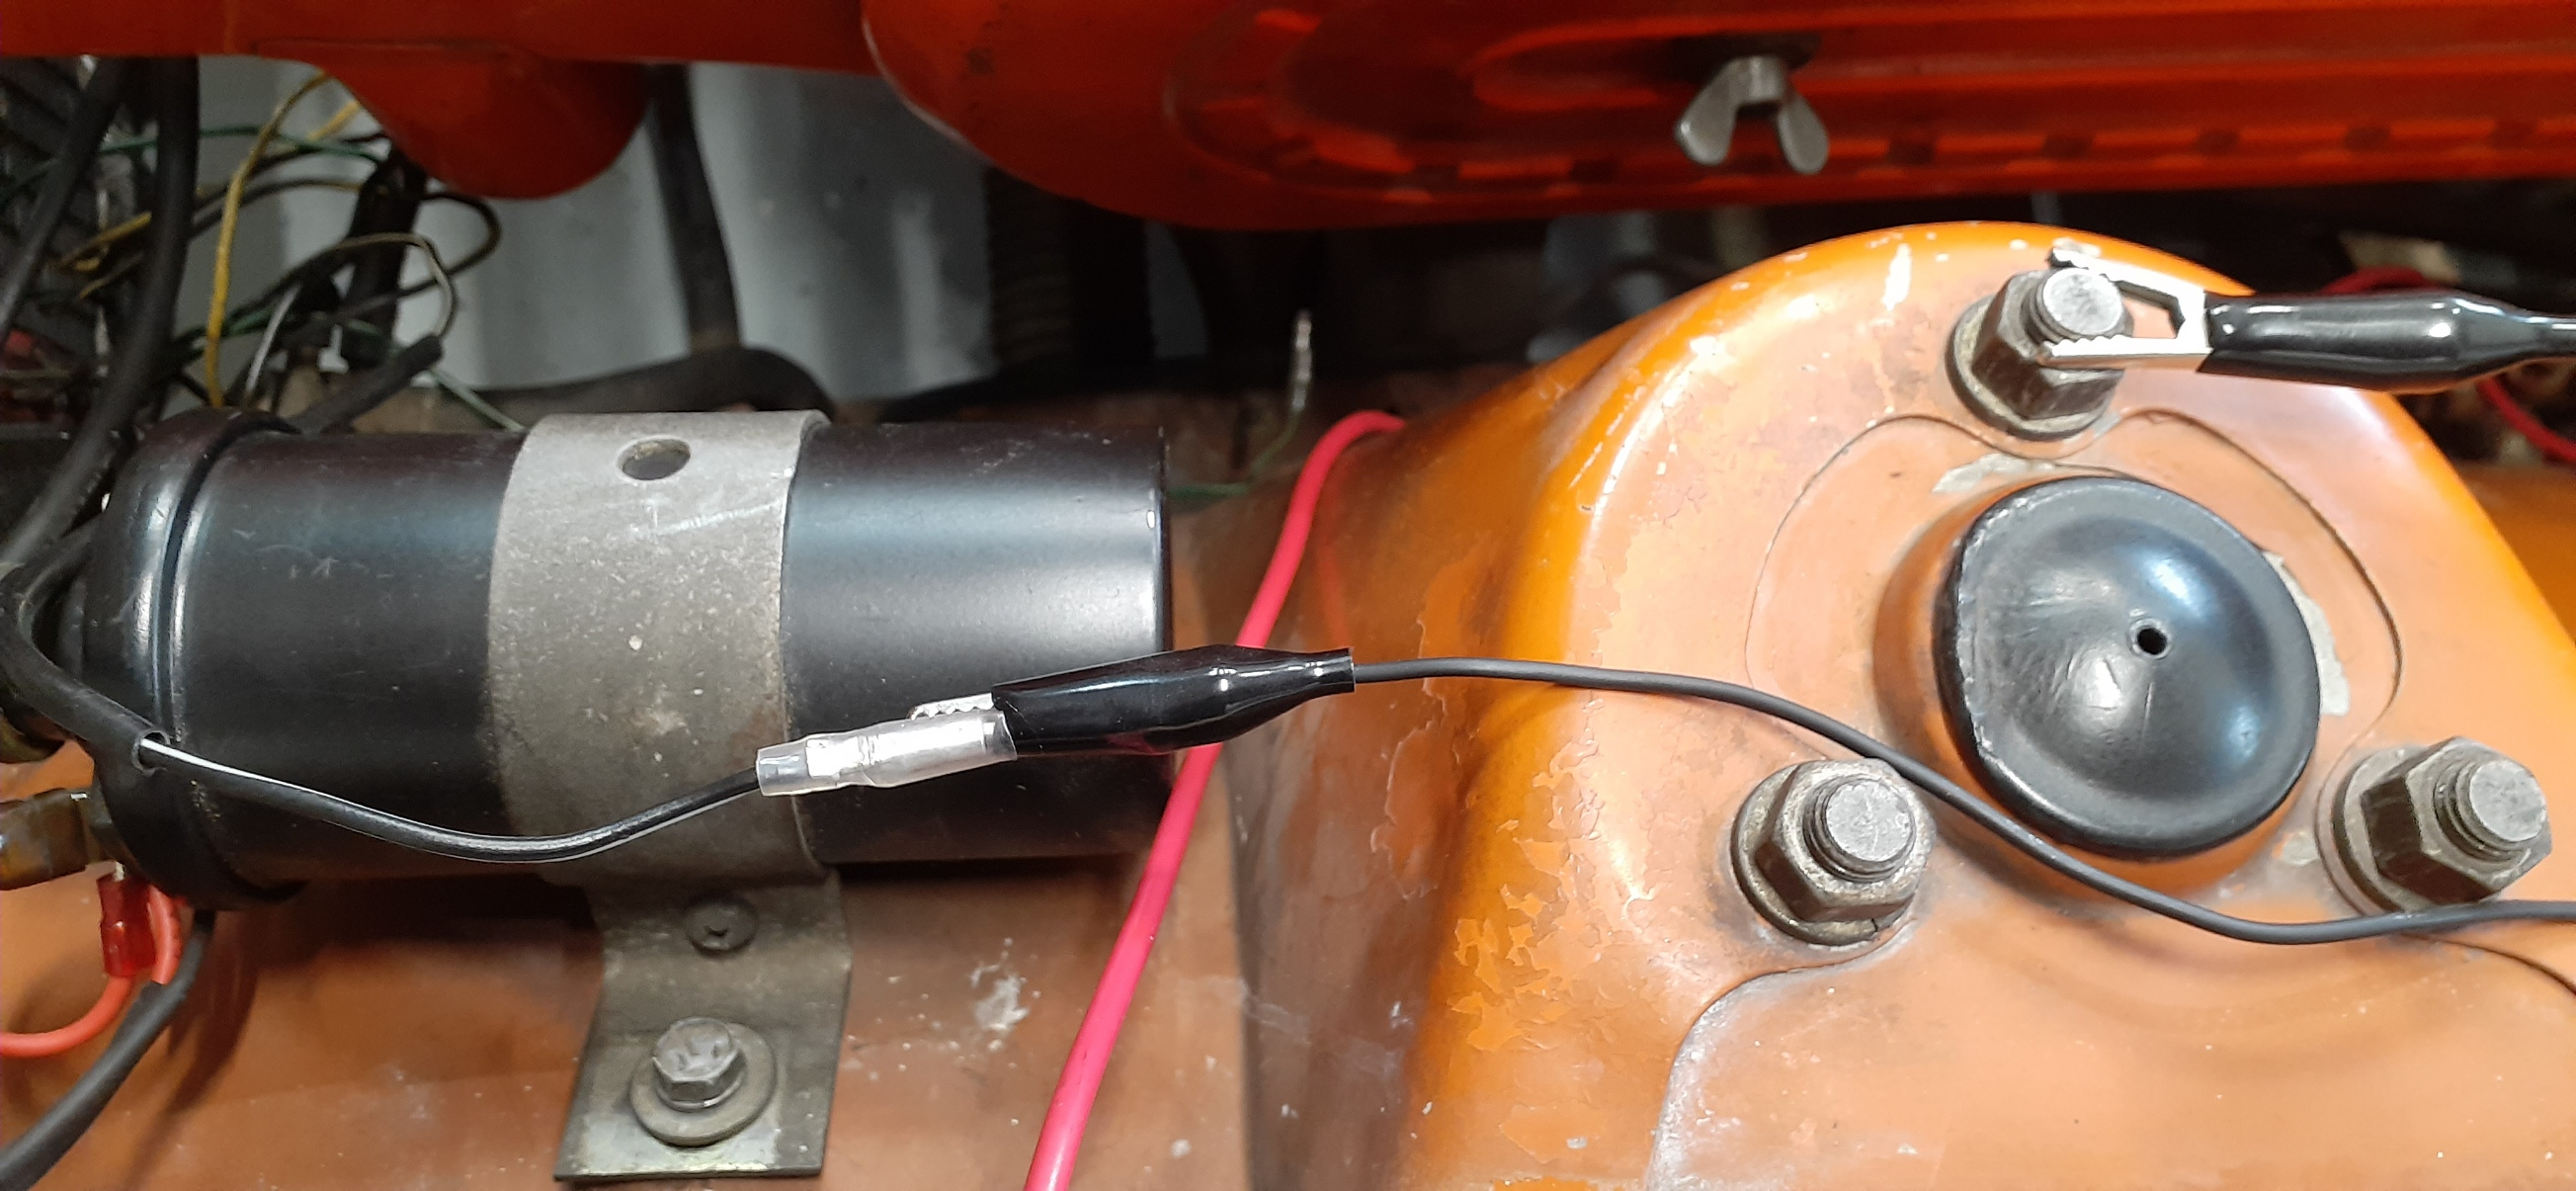
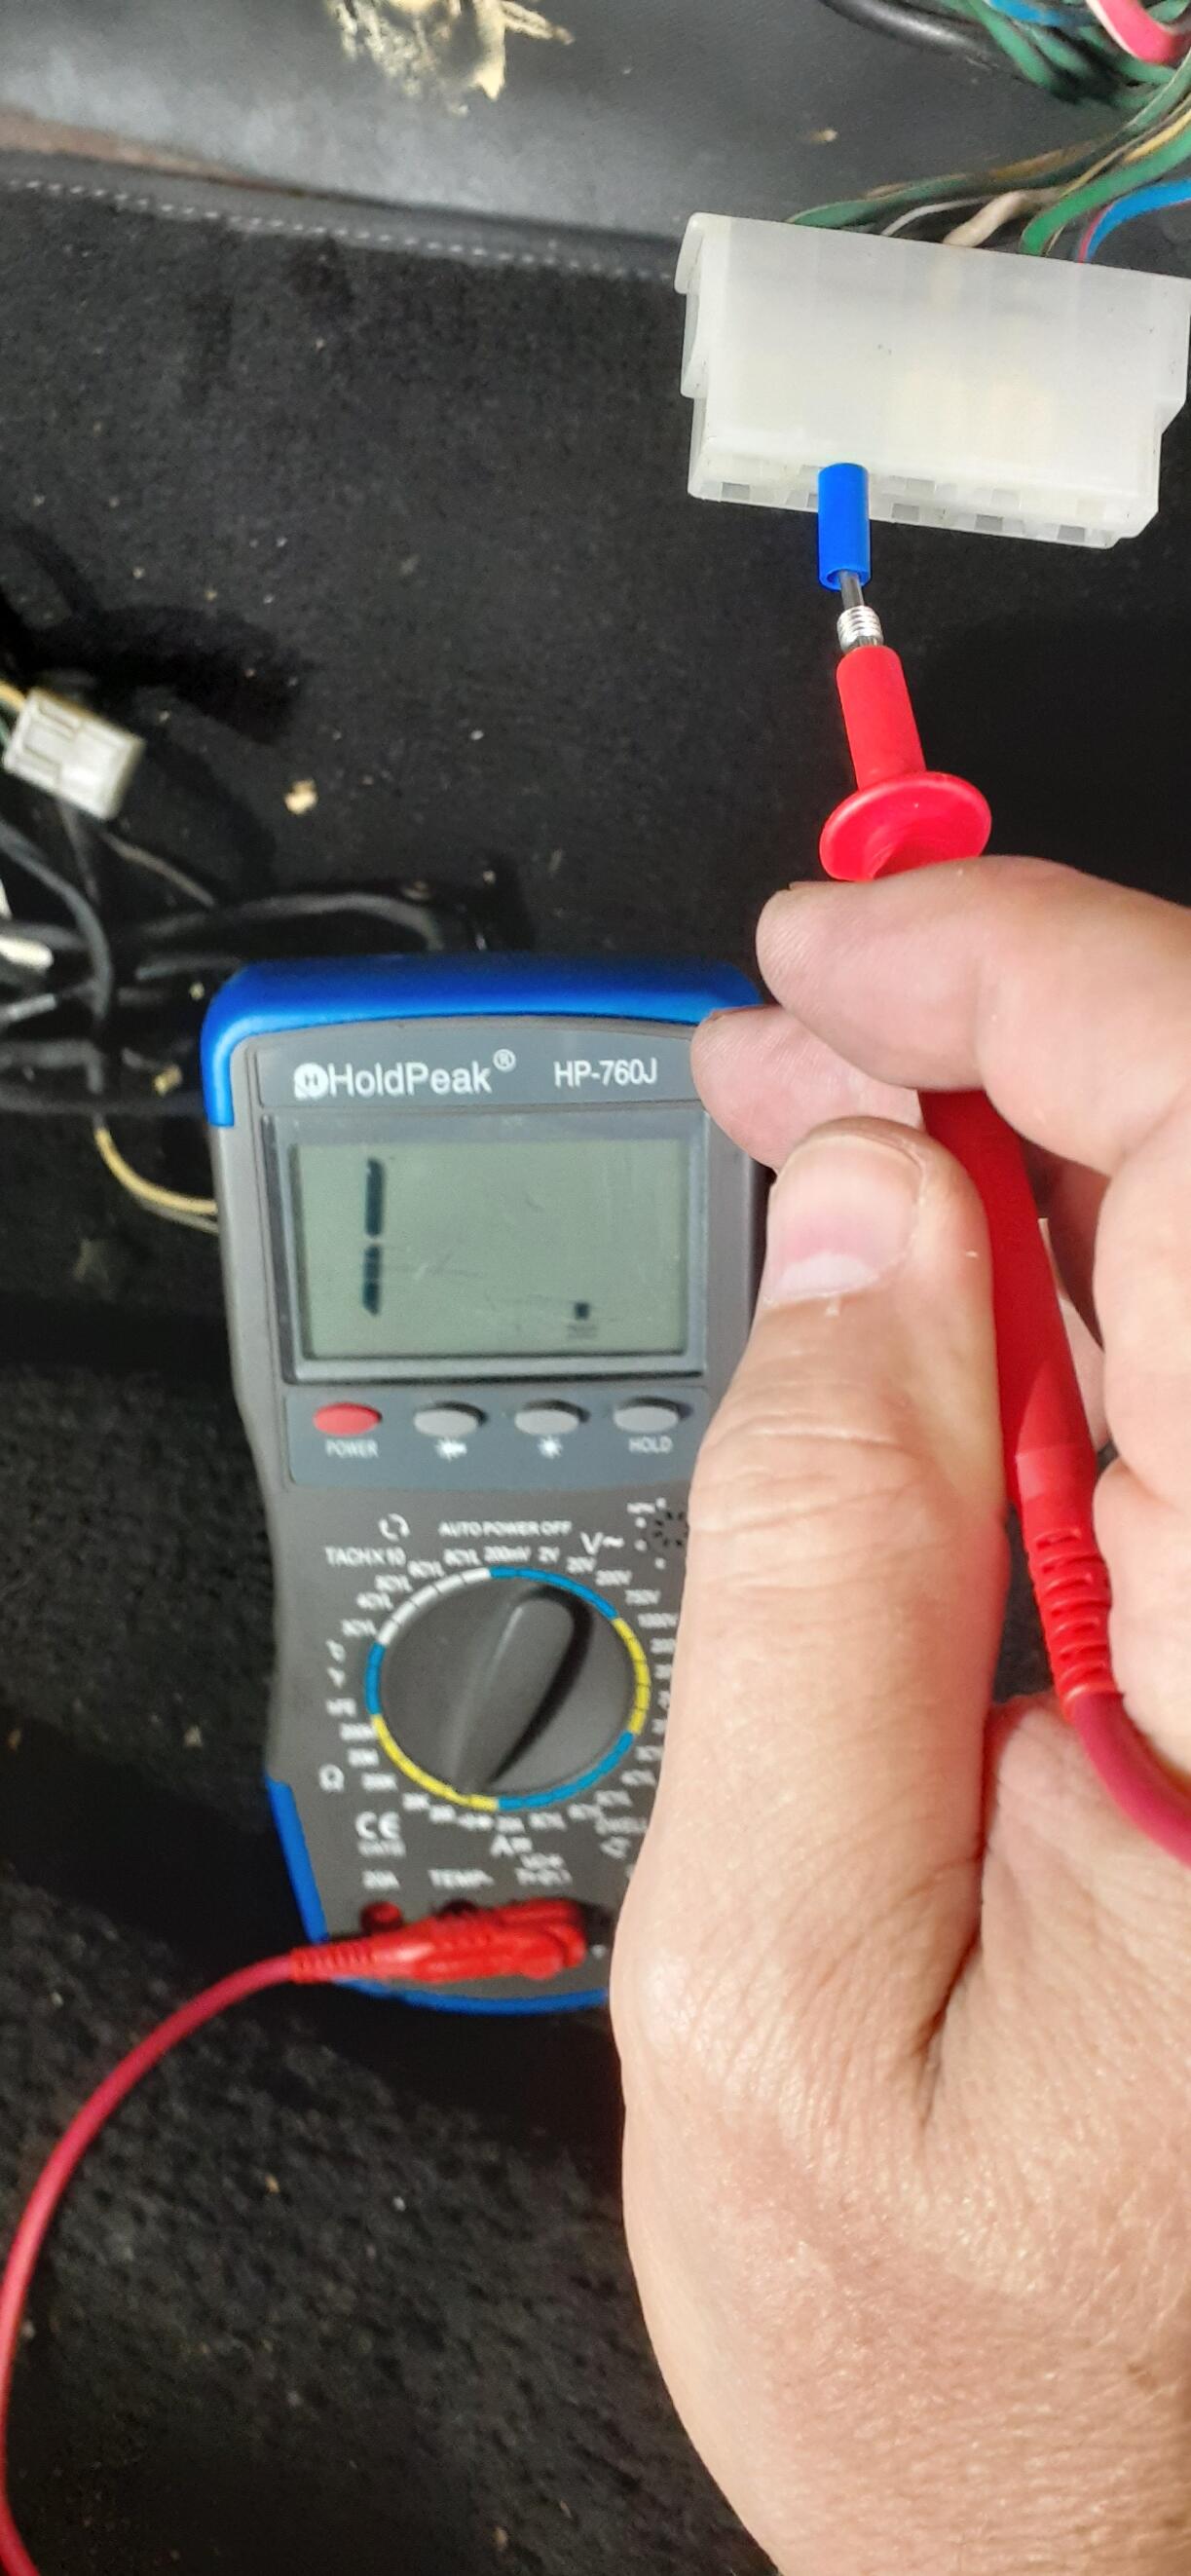
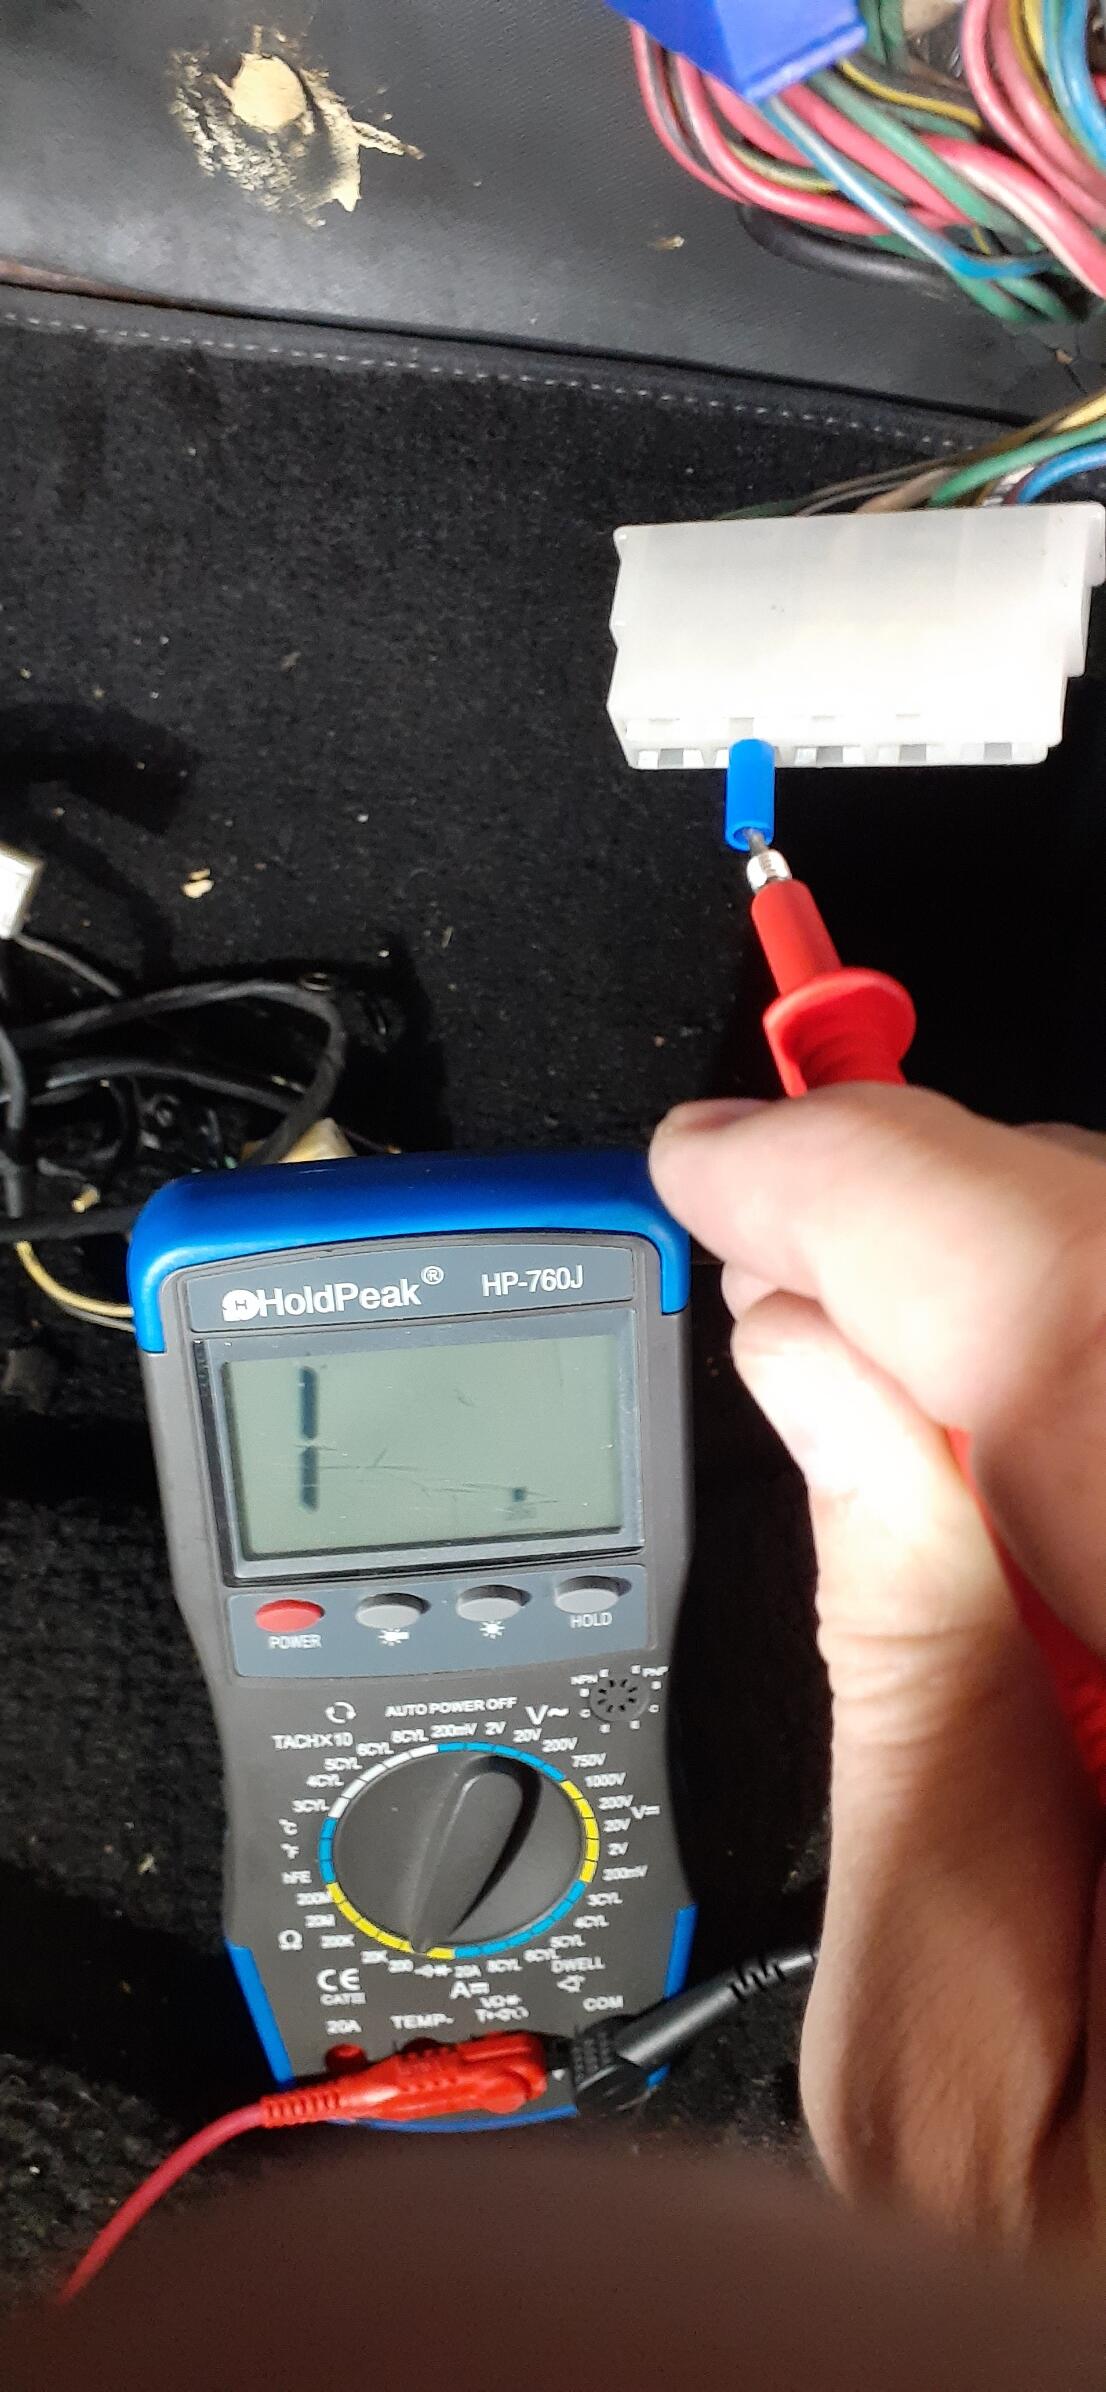
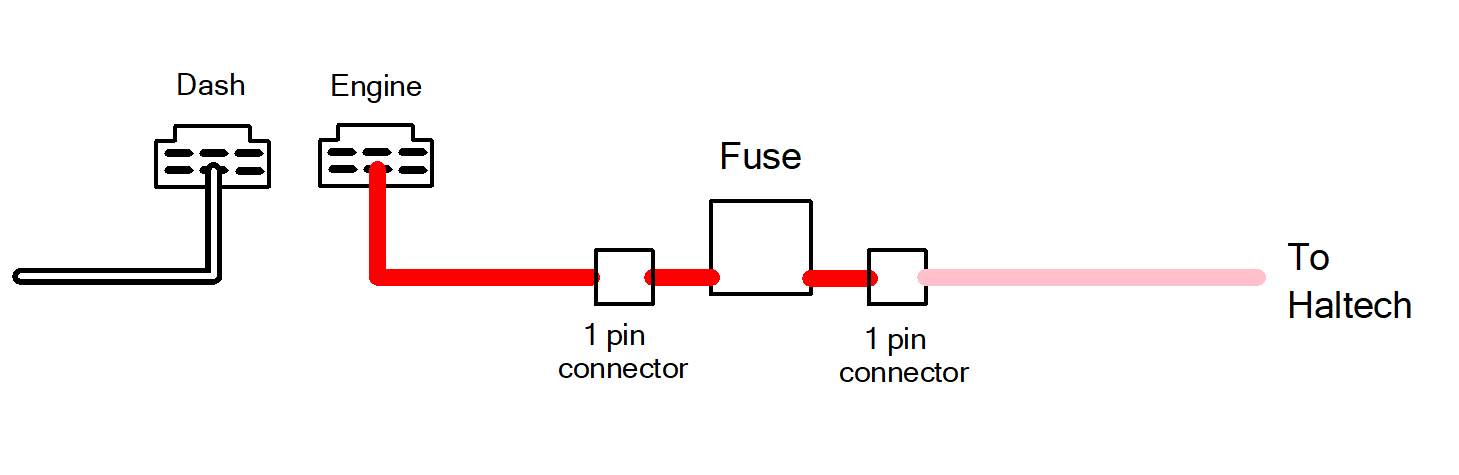
Going back to my detailed instructions, here is how you find the wire I suggest you use. First locate the wire junction in the passenger footwell. (Mine looks different because it's a 73.) Find the connector(s) that have BW wires. When you find it (them), disconnect the engine side from the dash side. (You can see the engine harness going through the firewall. Make sure the BW wire is disconnected from the ballast resistor and use a clip lead to ground it to the shock tower. (I have a bullet connector on the BW in my car due to modifications I made.) Ground the black lead on your meter. Take a spade lug and plug it into the connector where there is a BW wire. Check resistance. If you aren't seeing low resistance, (My meter is displaying the 1 well to the left of the decimal to indicate "open line") move the spade lug to another BW wire and test again. Eventually you should find the correct wire. (It's a little blurry, but I hope you get my point.) You can back out that pin and create the circuit I described earlier. The reason for the short piece of wire and connector before the inline fuse is in case you ever need to pull the engine wiring harness, you can still pull it through the hole in the firewall just by disconnecting between that wire and the inline fuse. This is how the circuit would look as I described it earlier. I just selected a random pin on a six pin connector to represent what you might see. The actual pin location may be different. You can just leave the old BW wire that went to the Engine Harness connector dangling if you want. It's dead. Is this more work than what you proposed? Certainly, but with this there is little risk to the wiring harness or Haltech wiring.


-
You said before you are driving the tach from the coil on plug. That is the signal, but the tach needs 12VDC to power the discrete components to read the signal, unless you have another wire from the Haltech providing 12VDC switched to the tach. I suggest you consider my solution detailed earlier rather than splice into the harness. It's more work the way I suggested, but there is sound reason behind it.
-
Easy solution for the parking lights - LEDs all around (gauges, front markers, rear markers, and side markers)! It might even keep the connector at the steering wheel from melting.
-
What? You don't want to try casting?
-
-
Yes, I'm out of my mind. Is that important? With a lathe, there is less chance of burning something/catching something on fire. Where's the fun? Now with molten metal, opportunities abound! Seriously, I might just buy the delrin rod.
-
By removing the BW wire from the ignition switch, you also remove power from the following: Tachometer positive Turn signals Voltage regulator (If you did the internally regulated alternator swap, this is used as the switched source for the alternator.) You'll either need to use a Haltech switched source and find a place to connect into the wiring (Please don't hack the wiring.) or take a path like my directions.
-
I would think that friction resistance is probably most of the reason. Also the parts supplier may have had access to injection molding equipment that would allow them to knock off a bunch of the plastic parts as opposed to machining the metal bits. (Dang it, now you have me thinking about the possibility of casting with brass. You are evil, @Captain Obvious!) I am tempted to see about getting a 4mm delrin rod to play with to see if I could make the plastic part.
-
It is the BW wire. However, if Duffy connects the pink wire at that point, there is no protection for the wiring. That's why my instructions are as detailed as they are. Mind you, I do controls engineering for emergency power, so I do look at how to prevent the magic smoke from escaping from the wires.
-
If I was doing the wiring, provided the following conditions are true. There is no need to make the wiring easily reversible. There is no need for the wiring on the old ignition circuit. You are just needing the main 12VDC switched source for the Haltech. Here is my thinking. Buy two latching 1 pin connectors from Vintage Connections. Buy some extra male and female pins for this type connector. Buy an open barrel crimping tool if you don't already have one. (Amazon link for a crimping tool) Buy an inline fuse holder. Identify which BW wire at the engine harness/dash harness is the one on the ignition circuit, noting the connector and position. (I'll detail how to identify the wire later.) Back out the pin for that BW wire from the connector on the engine harness side. (Vintage Connections tool) Cut a short length of wire, maybe 3 to 4 inches. On one end, crimp a female pin onto the wire and insert into the female 1 pin connector. On the other end of the wire, crimp a pin that matches the type you backed out in step 5, and put it into the engine harness connector to replace the wire you backed out. Strip, crimp the pins, and put the male and female connectors onto the wires of the inline fuse holder. On pink Haltech wire, crimp on a pin and attach the remaining connector to plug into the one on the end of the inline fuse holder. Use no larger than a 10A fuse in the inline fuse holder.
-
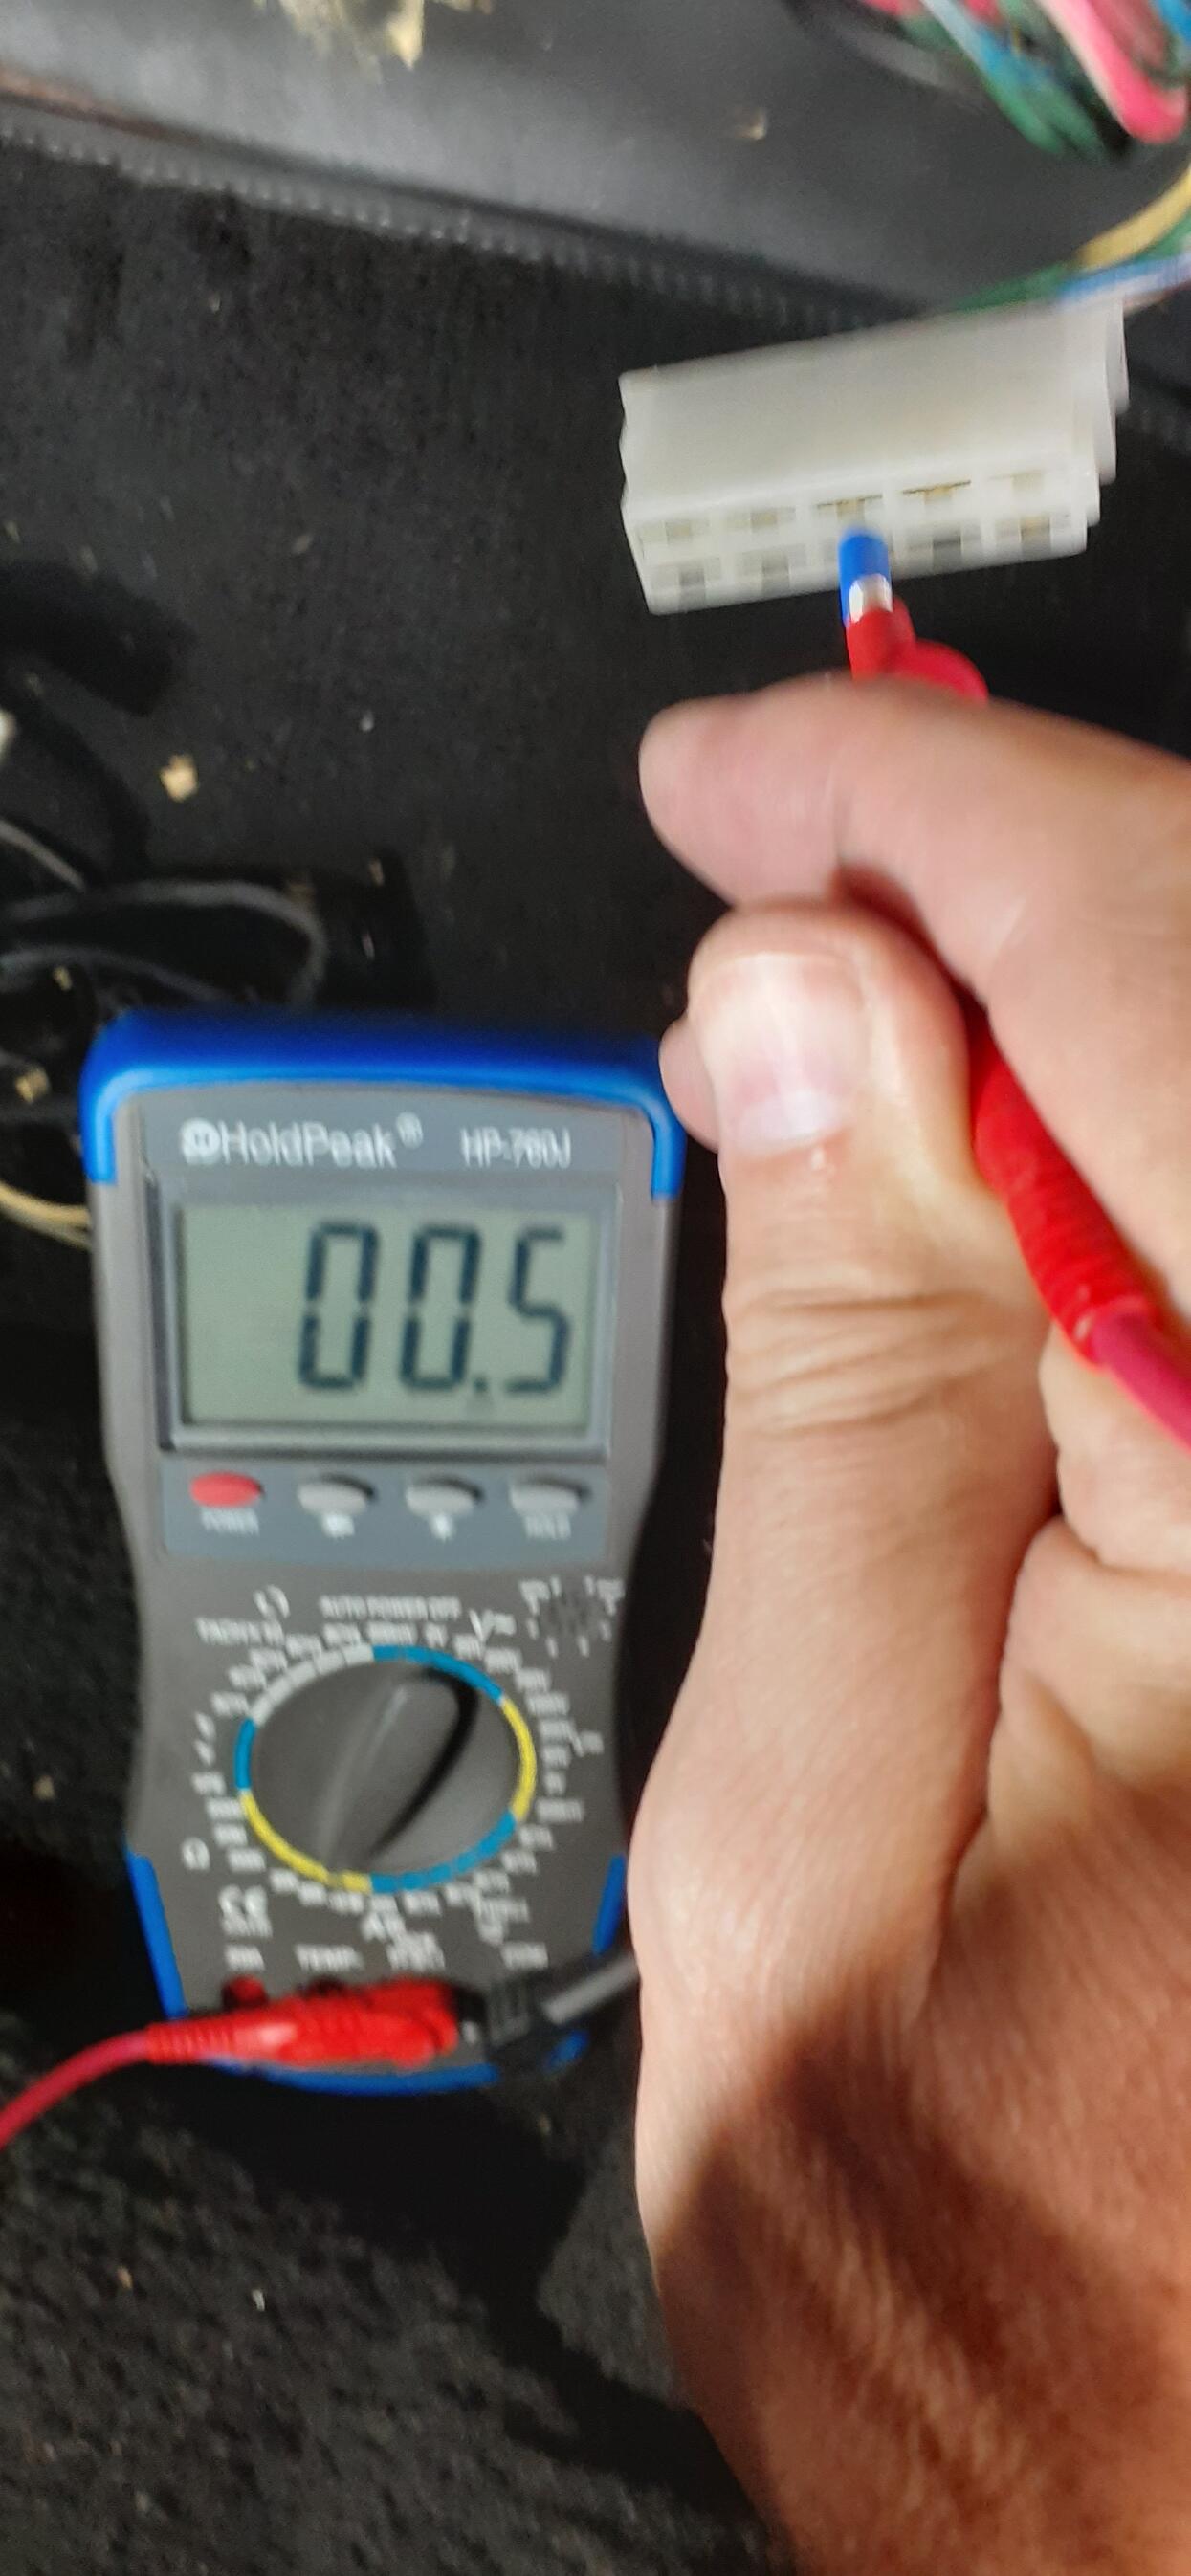
Now THIS is something I can work with. The good news is that this wire is not shorted to ground. While 15 ohms is low resistance, you could be reading through other branches on the circuit. That resistance would equate to less than 1A of current when energized. You just don't want the end of the wire floating around in the engine bay where it could short while you're driving.
-
The connector changed to a round connector.
-
It's possible. The problem with most relay installations is that the owner hacks into the wiring. Now, @Captain Obvious provided me key information that would allow a relay kit to be created for the 78 that does not involve cutting any wires and could essentially be tucked away nicely. Unfortunately I don't have an unmolested 78 at my disposal to see that scheme to fruition.
-
So tell us the OD and height. My mind is formulating evil plans as we type!@gotham22Do you have a micrometer that you could measure the dimensions of the tab in better condition?Yep, that's a problem. It melts down/wears down because of the heat from all of the current flowing through the switch. Don't try to get a 3D printed version. It will only melt down faster than the original piece. @Captain Obvious You're better with plastics than I am. Can you think of a hard plastic that could be drilled/milled/lathed into a replacement?That's a good piece of the puzzle. Did you have the points ignition or a first gen Pertronix in the car when he did that? The worst case scenario is that I can probably walk you through making a replacement for that wire that you can "graft" into the dash harness. You know you wanted to have a reason to pull the dash. 😉I don't know if I've ever heard anyone say they weren't happy with Ron's work. @zclocksGet resistance readings, not tone. I think I have mentioned in one of my YouTube videos that you can get a "false positive" with a tone. Also please be more descriptive with your measurement techniques and testing procedures. Where you put your probes is important. Here's an example, for the B/Y wire, it goes through the solenoid and on to ground. If the wire is connected at the solenoid, you could read the resistance of the wire in the solenoid when doing a measurement. Depending upon how your meter is set up, that may set off the tone. If you're not too experienced with multimeters, these videos may help.You might want to read through this thread:


Important Information
By using this site, you agree to our Privacy Policy and Guidelines. We have placed cookies on your device to help make this website better. You can adjust your cookie settings, otherwise we'll assume you're okay to continue.