.JPG.cfcada9cf1c1b502df3f5f2f2ca3ff36.JPG)

SteveJ
Community Member
-
Joined
-
Last visited
Everything posted by SteveJ
-
Connect them together.
-
Fortunately Jim, this will be more of a comfortable Ratsun than a show car.
-
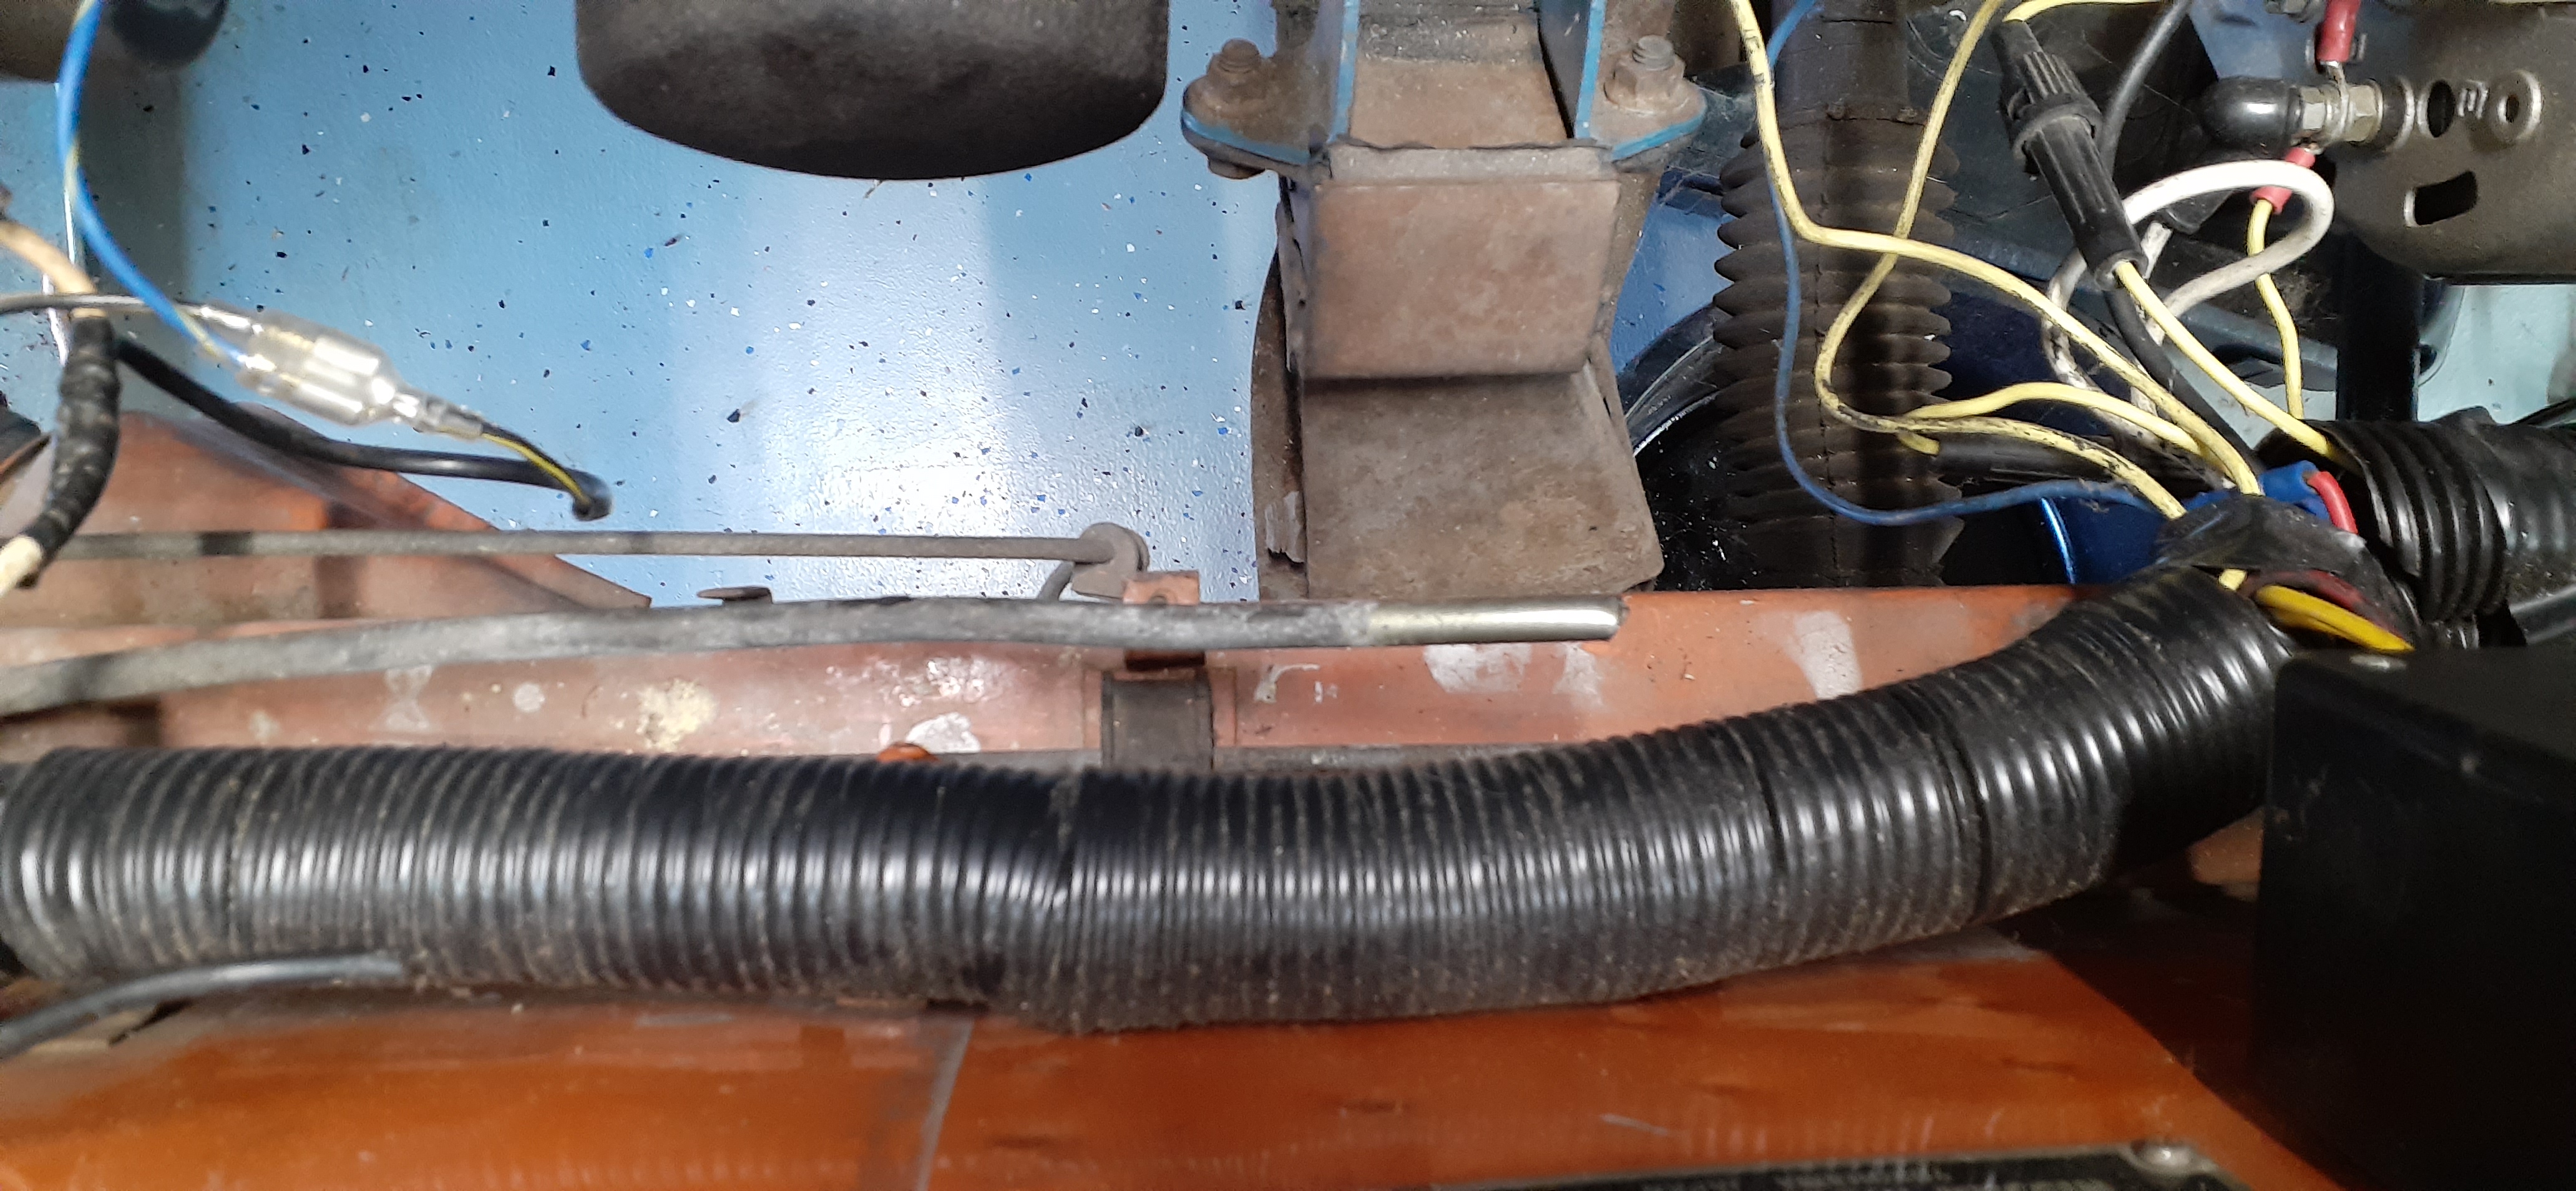
It's the weekend, so progress was good. I bypassed the electric fuel pump for now. I took off the old hoses in the back and had the wife blast air through the lines in the engine bay. There were no signs of blockages. As a matter of fact, there was still old, stinky gas in the supply line. Then I went to replace the hoses in the engine bay. I noticed a while back that one of the blocks that holds the fuel lines in place was damaged. When I removed the hose from the supply line to the fuel filter, I found this. I'm not sure why someone would cut off the fuel line like that. Anyway, the new fuel hoses are in place. Next up: Get a new battery. Remove the valve cover and pour some oil over the cam. Remove the spark plugs and put some oil in the cylinders. Turn the engine to circulate the oil. Add some gas to the fuel pump, carbs and gas tank. Attempt to start.

-
It should have, but diodes can fail, or someone could have installed the diode backwards. If you have an ohmmeter, I can tell you how to test the plug later. Right now it's time to work on my car.
-
Has the alternator ever been changed out for an internally regulated alternator? The lamp (switched) wire can backfeed into the ignition. The solution is to use a diode in the alternator circuit on the appropriate wire to prevent the backfeeding from the alternator to the ignition circuit. http://www.zhome.com/ZCMnL/tech/280Alt.html
-
Short update today. Yesterday I replaced the bad air cylinder on the Quickjack. It was a fairly easy task. Today I drained the gas tank. First I siphoned about 4.5 gallons out via the filler neck. There was some junk in the gas that came out, but not too bad. The gas wasn't too much darker than what you get from the pump. I then deployed the Quickjacks to finish draining the tank via the drainplug. I got another 4.5 gallons that way. There was less junk than I got from siphoning the tank. The gas smelled bad, but again, it wasn't too dark. Tomorrow, I'll blow some compressed air through the hard lines in the fuel system, remove the electric fuel pump in the back, and replace the fuel hoses. They have been on there for over 25 years now.
-
The full story helps. Bench test per @Dave WM's instructions. Could a previous owner have changed the bulb?
-
Failed thermistor
-
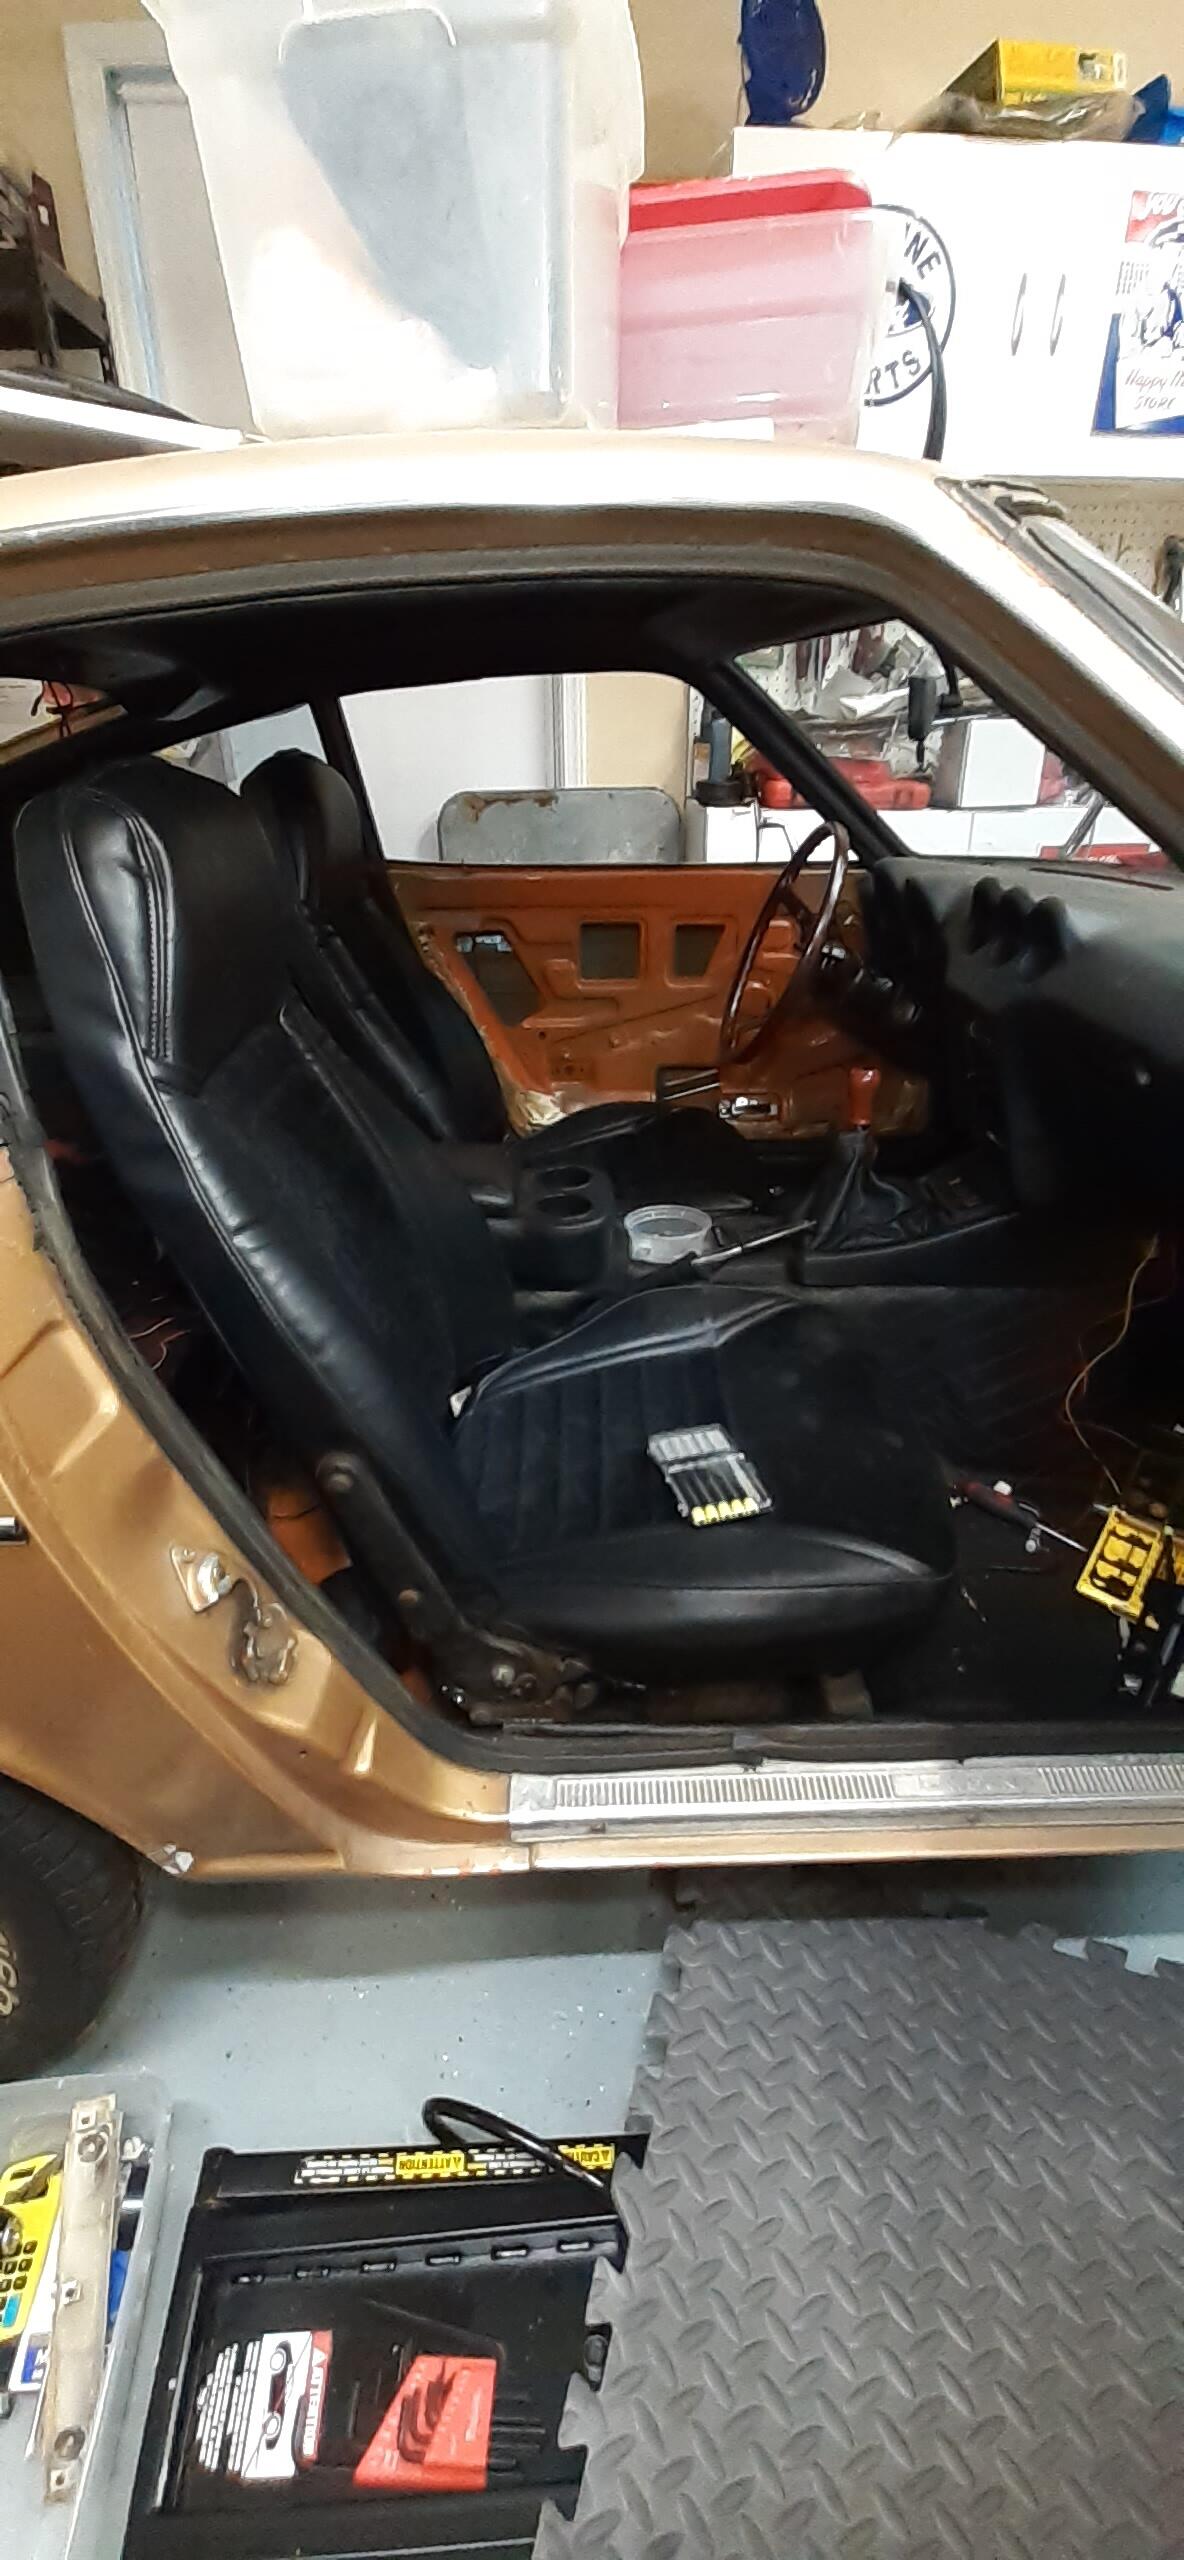
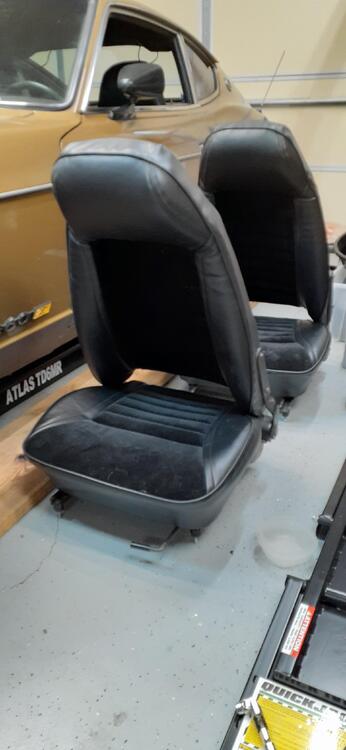
I thought things went well tonight. I got the center console prepped and installed. The biggest challenge was trying to figure out how the fuse box lid should be attached to it. Having never seen it attached properly I had to guess. I know I didn't it differently from stock, but I was happy with the result. It looks less redneck than what a previous owner did. With the quick install of the center console, I turned my attention to the seats. I got them in and secured. I couldn't help but just sit in the driver's seat for a little while. I haven't been able to do that for a few years. After enjoying the view and thinking of what is left to do to actually get the car on the road, I finished off the evening holding up the window channel rubber to the frame and putting the steering column cover back on. It's starting to feel like a car again instead of a collection of parts taking up a bay in the garage.

-
Was the fuse pulled when you tested? The readings sound like it wasn't. Likely, the green wire is the one that goes to the back of the car where the fuel pump would reside. @cgsheen1 was giving you good direction. You can get the inertia switch here: https://www.amazon.com/gp/product/B07RBK4873, but you will probably need to modify it. I bought one, and like the reviewers on Amazon said, the switch is wired to a normally open contact. It should be on a normally closed contact. It wasn't too difficult for me to move the pin, but I'm used to doing things like that. You might want to look around a little more for a green wire with an inline fuse. It may be covered with electrical tape. That is how it was wired from the factory. I'll see what I can find with poking around in the wiring of my car this weekend. I have a sneaking suspicion I know where the wire for the fuel pump is routed in the wiring harness.
-
-
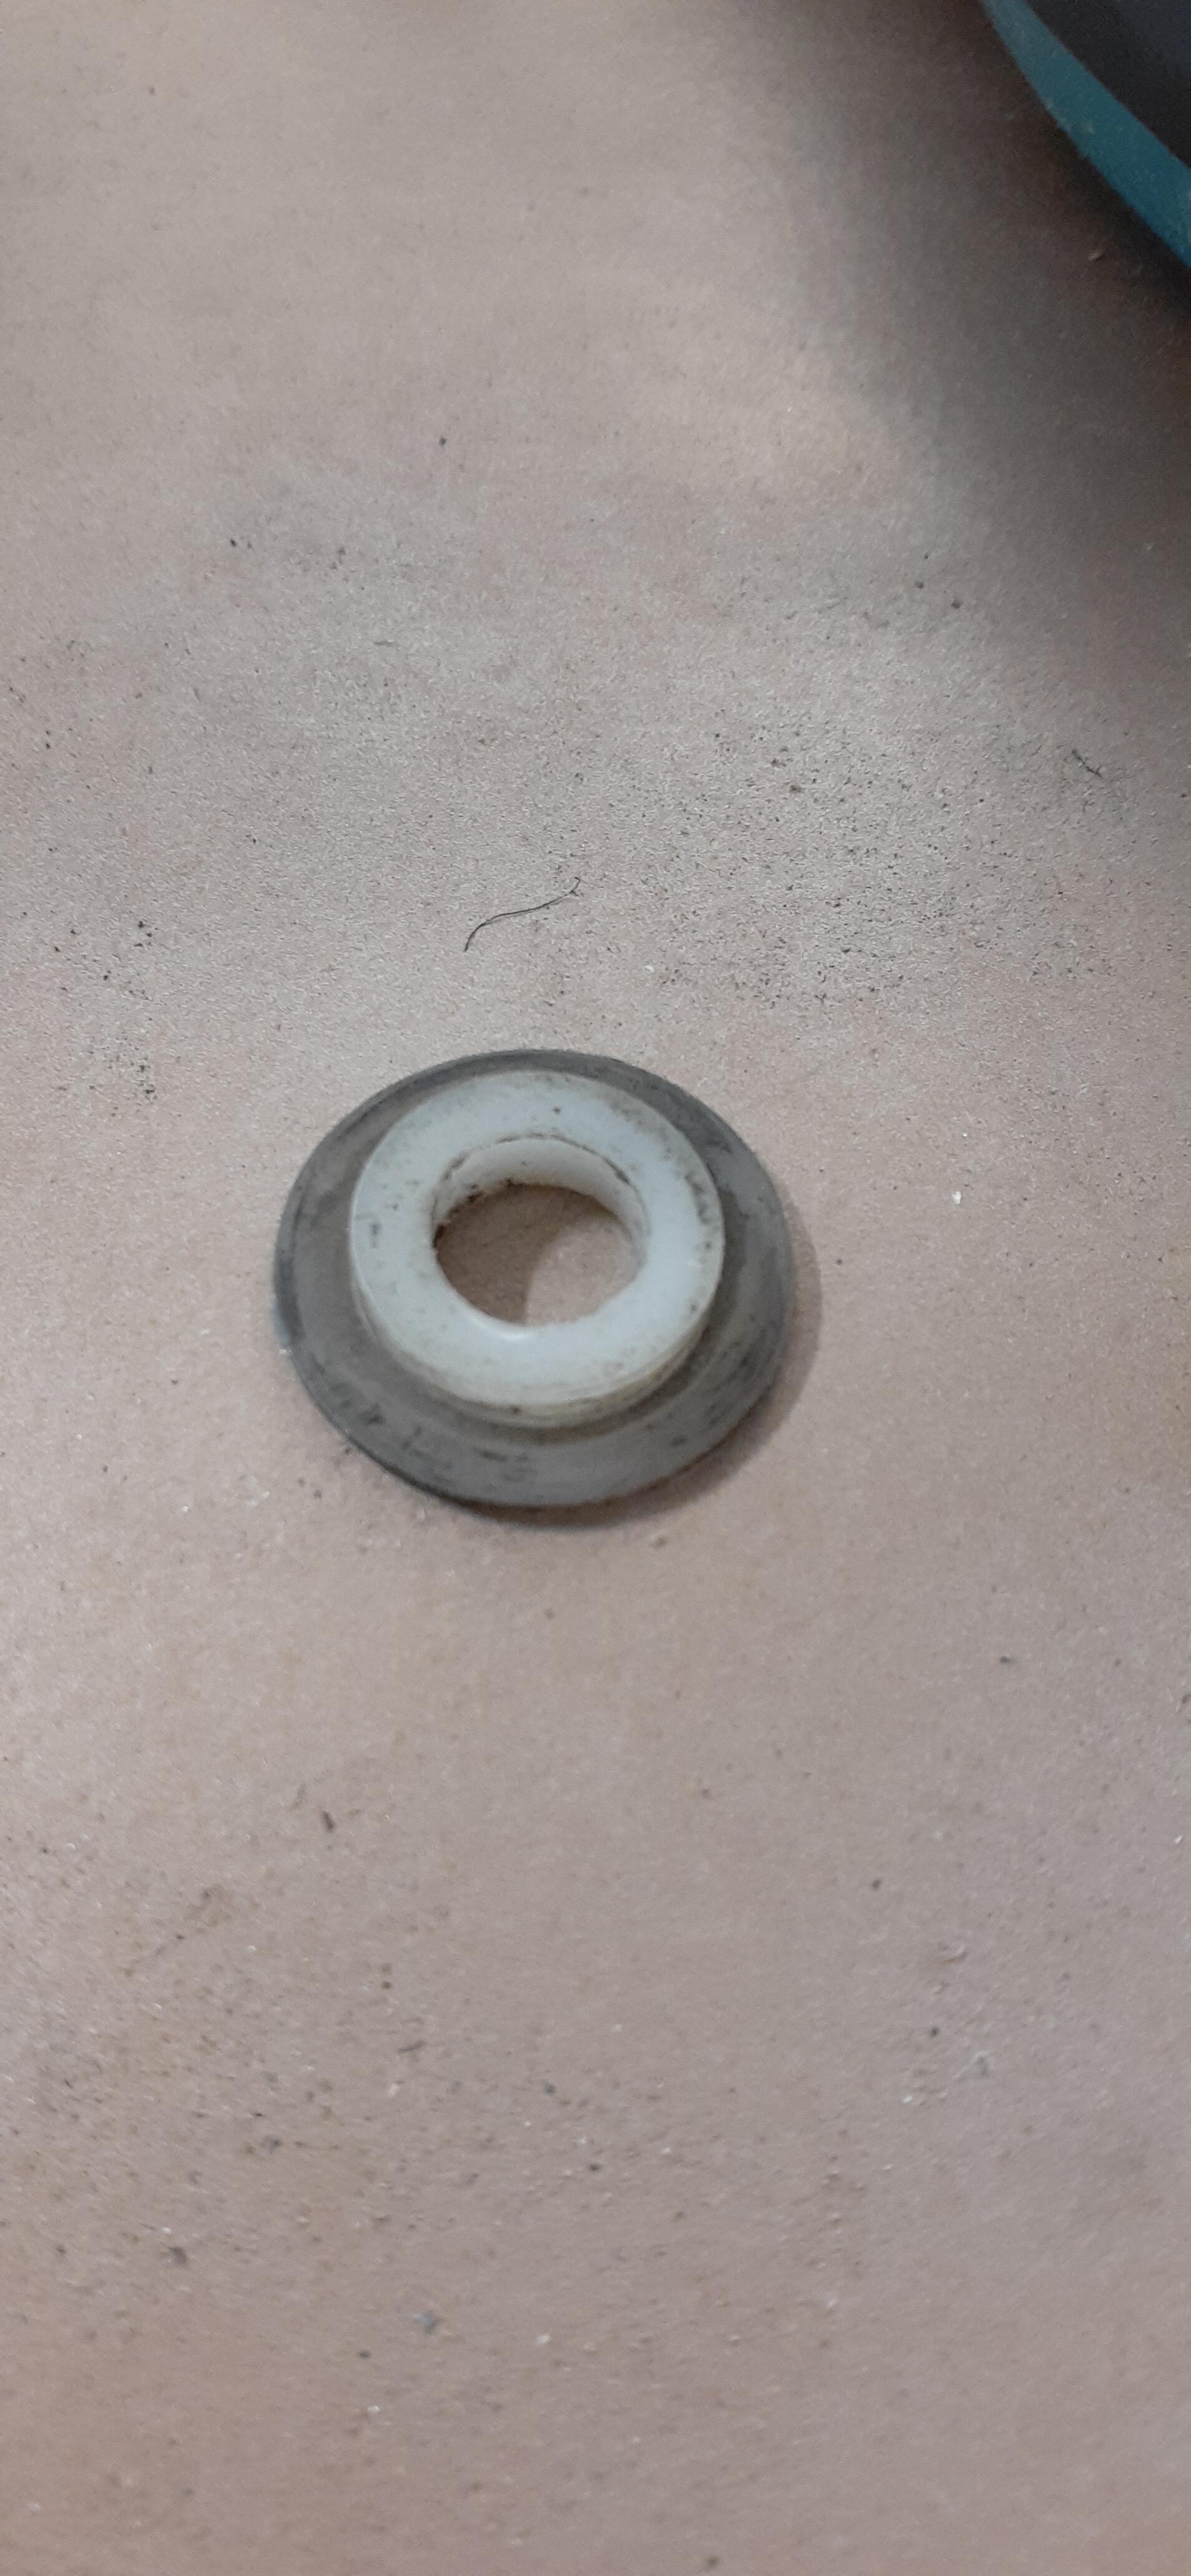
I don't think the trim ring was intended for that type switch. Unfortunately the type switch that used the trim ring went NLA many years ago. I last bought one 8 years ago. It was a Beck Arnley 201-1179, and inside the box the switch was bagged with a Nissan part number label. The switch you have should work. It just won't look the same.
-
"eh" is Canadian for "You know what I mean?"
-
Can you post some photos?
-
Today's episode is "While I'm at it..." Since the seats are still out of the car, I figured it would be a good time to replace the center console with one I've had lying about for 8 years or so. I removed the console and removed the ash tray cover. The cover was pretty dirty, so while I'm at it, it would be good to clean it. I transferred the clean cover to the replacement console, and then I proceeded to remove the outer shift boot. Well, it was pretty old, and some of the threads broke. Then I looked at the rubber shift boot. It was torn. While I'm at it, I might as well find the replacement boot I bought many years ago. (Okay, so the wife found it for me. She knows the spare parts room better than I do.) I also found another outer boot during the search. The shifter was pretty sloppy. The bushings were MIA when I bought the car in 93. While I'm at it, I'll find the brass bushings I bought 4 years ago and install them. It only took searching the same places twice to find those. I followed the tech tip on Blue's ( @240260280) page (link below) and used my vice to press in the bushings. I even had Wendy shoot a video of me pressing in the second bushing. Well, I couldn't crank down hard enough with the vice to get the bushings flat enough to fit inside the fork. So I took the shifter to the 20 ton press. THAT got the bushings flat enough. The shifter slop is gone. During all this, I got the drawstring out of the old outer shifter boot and threaded it into the new boot. Tomorrow I will attach the rubber boot to the transmission tunnel, attach the outer shift boot to the center console, and get the center console back in place. If it all goes quickly enough, I might start getting the seats back into the car.
-
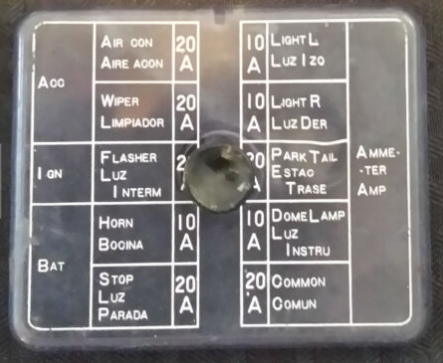
Yes, the fuses are in the same locations. The outer labels on the stock fuse box cover (Acc, Ign, Bat, Ammeter) give the power source.
-
There is wiring in place for an electric fuel pump. Follow what I posted, and we can help you. I haven't messed around with the electric fuel pump wiring on the 240Z because my 240Z has the modification that Nissan designed for that year. However, I do understand the FSM, and I'm trying to guide you on how to figure out how to wire it in. Please go back and read post #6.
-
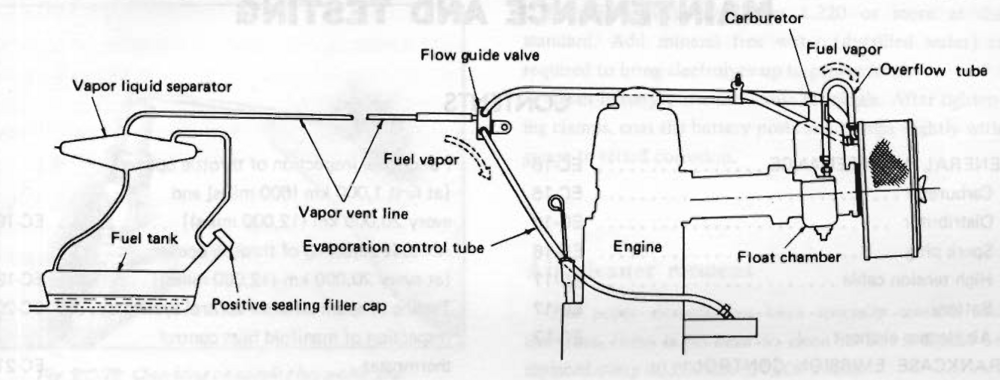
I believe it goes to a hard line to the engine bay. If I'm correct, it's represented in this drawing by vapor vent line. This is from EC-15 in the 72 FSM.
-
I started putting the seats back together last night, but I ran into a glitch. I counted and recounted the screws, and I found I was 1 short. The wife made a Home Depot run today to get a M8x1.25 machine screw and some 5/16 star washers. I used the new screw on the first seat, and as was putting the second seat together I noticed I had an extra screw. Apparently my counting skills were not what they should have been yesterday. So the seats are together and ready to go into the car. I'm going to pull the center console first because I want to replace it. The replacement console is sitting the hatch area of the car.
-
@Tirnipgreen Is this something you're looking for?
-
Here's an alternative: https://www.amazon.com/Jack-Sealey-Valve-Spring-Compressor/dp/B000R9ZITC It was mentioned in this thread:
-
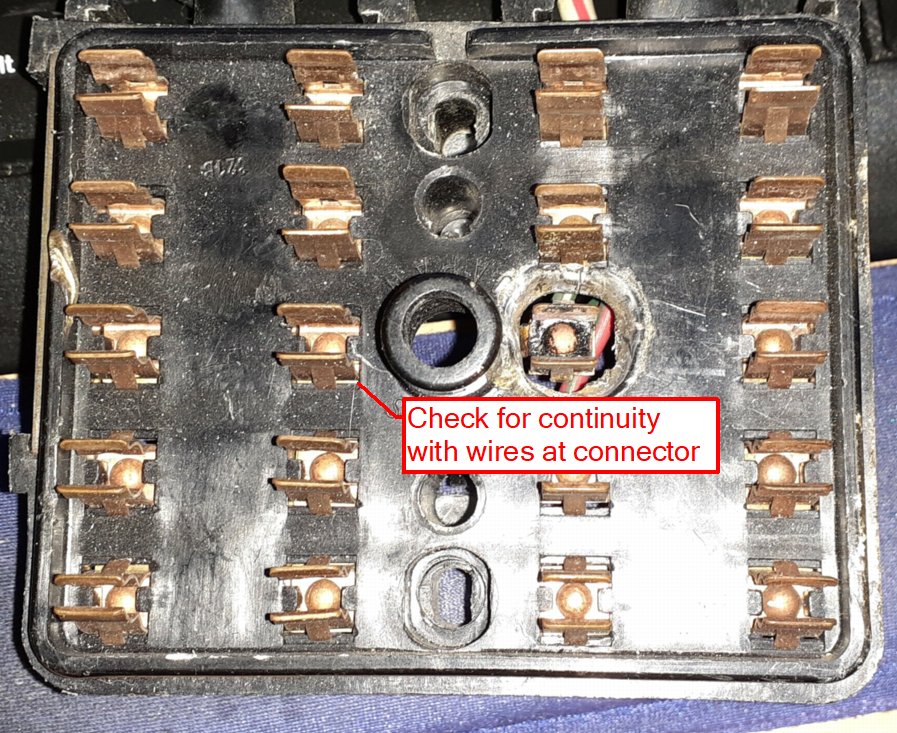
The green is usually related to the black/white. There is one green that is downstream of the fuse for the black/white in the fuse box. There is another green that branches off the black/white for the fuel pump. So, how can you tell which green wire this may be? Pull the middle fuse on the left side of the fuse box. Set your meter to continuity. Check each wire for continuity at the connector with the black/white and green wires to the right side of the middle fuse. See photo. For each wire that did not have continuity with the fuse box, check again but with the left side of the middle fuse. If the wires had continuity with the right side of the fuse, that means they are downstream of the ignition fuse. If the wires had continuity with the left side of the fuse, that means they are part of the circuit that feeds the fuses for the ignition fuse and fuel pump. Post the results of your test, and let's continue from there.
-
Here's a photo of the 240Z version of #13. I don't know why the parts catalog says you need 4.

-
If you want to know why the Z32 looks the way it does, the best thing to do is go to a ZCON where Toshio Yamashita (aka Yamasan) is presenting his story of the design. If you saw the competing designs, you might say that Nissan picked well. Anyway, Nissan did have a more affordable sports car (sports coupe) at the time. The 240SX/Sylvia slotted in well to the old 240Z role except for the lack of an engine in the North American market to keep up. Of course, with the strong Yen at the time, it was about impossible to have a sports car built in Japan that was "affordable".
-
Well, the ammeter is also held in by the wires going to it. Make sure you try this with the battery disconnected.