Leaderboard
-

kats
Free Member7Points2,215Posts -
HS30-H
Free Member6Points5,509Posts -
Patcon
 Subscriber
 5Points11,142Posts
 -
conedodger
Free Member4Points12,513Posts


Popular Content
Showing content with the highest reputation on 02/26/2024 in Posts
-
5 pointsJapanese People don’t care about cars which were sold outside of Japan. My US 240Z has never been invented to Nostalgic Hero magazine. I know some people still think it is a fake of S30. The average sales price is backing up what I am saying. A Fairlady-Z 2/2 is now pricing double or triple of an US 240Z. Am I sad looking at those things? Maybe. But anyway I have my beautiful US 240Z which makes me so proud. People living in overseas don’t care about Japanese Fairlady Z cars. I have seen a lot of people don’t like G-nose because simply it looks ugly to them. Also people don’t like 2- liters cars, Z432 is not an exception. People don’t need information because they don’t use it for their cars. That is why I am here, and my friends here. I want people to know whole range of our cars. I believe looking into various types of our cars make us fun to enjoy better. Kats5 points
-
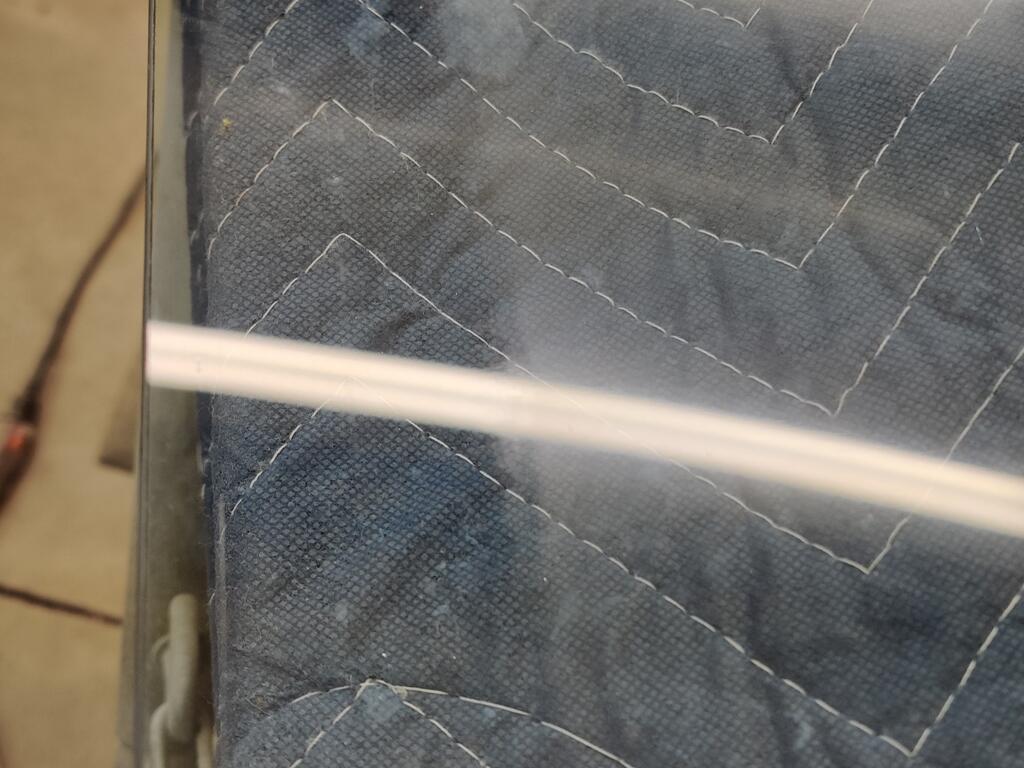
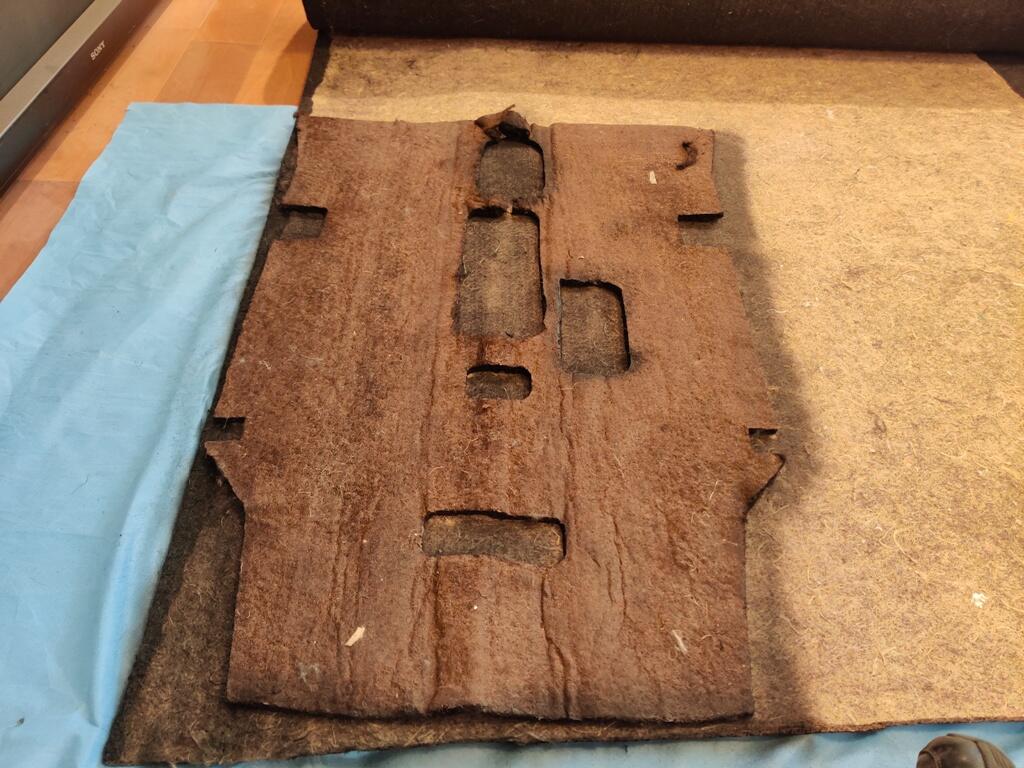
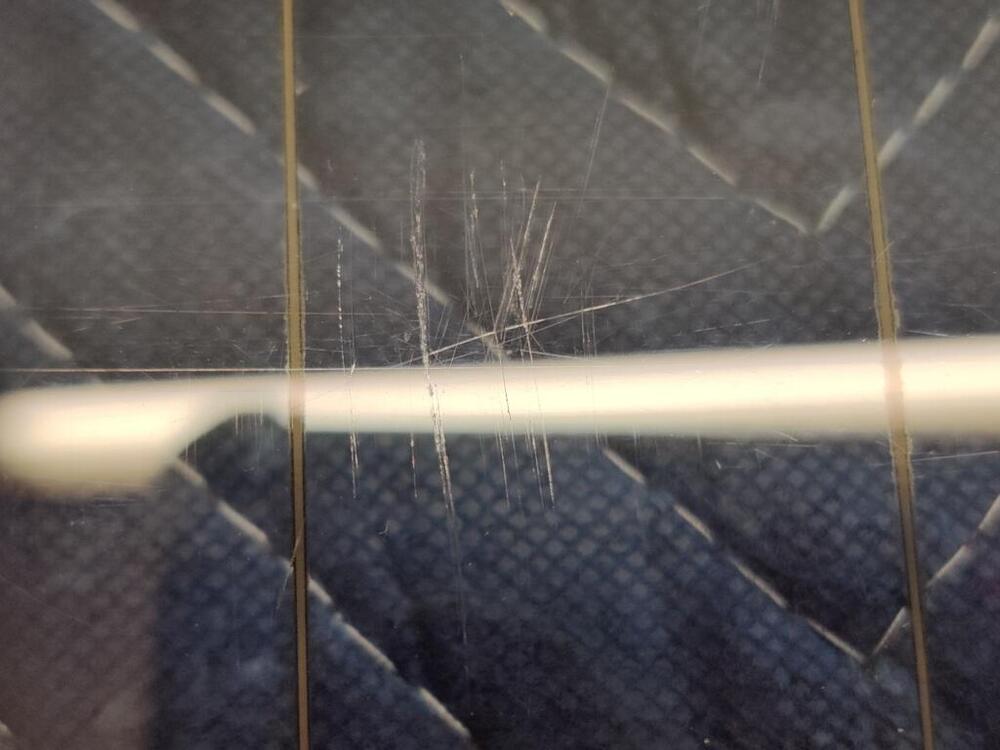
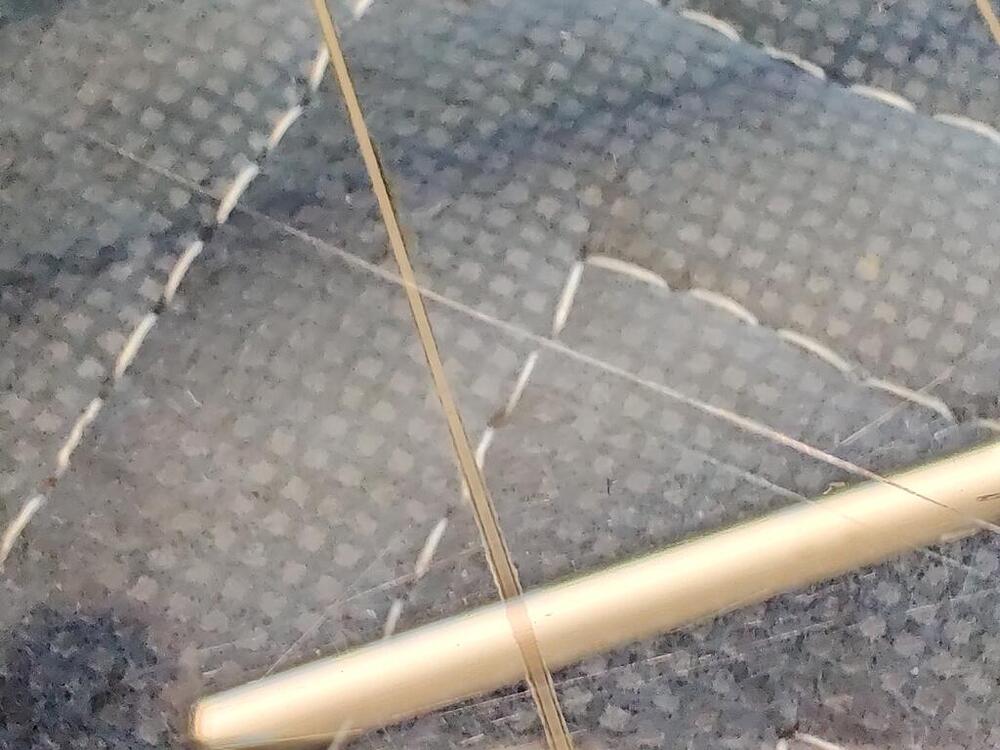
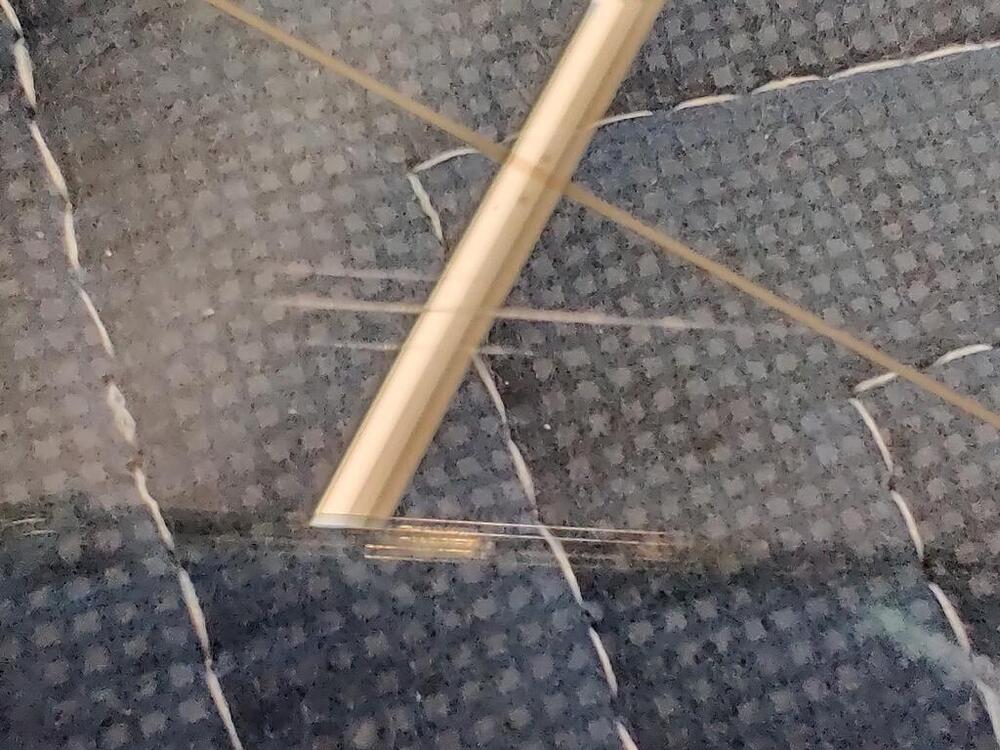
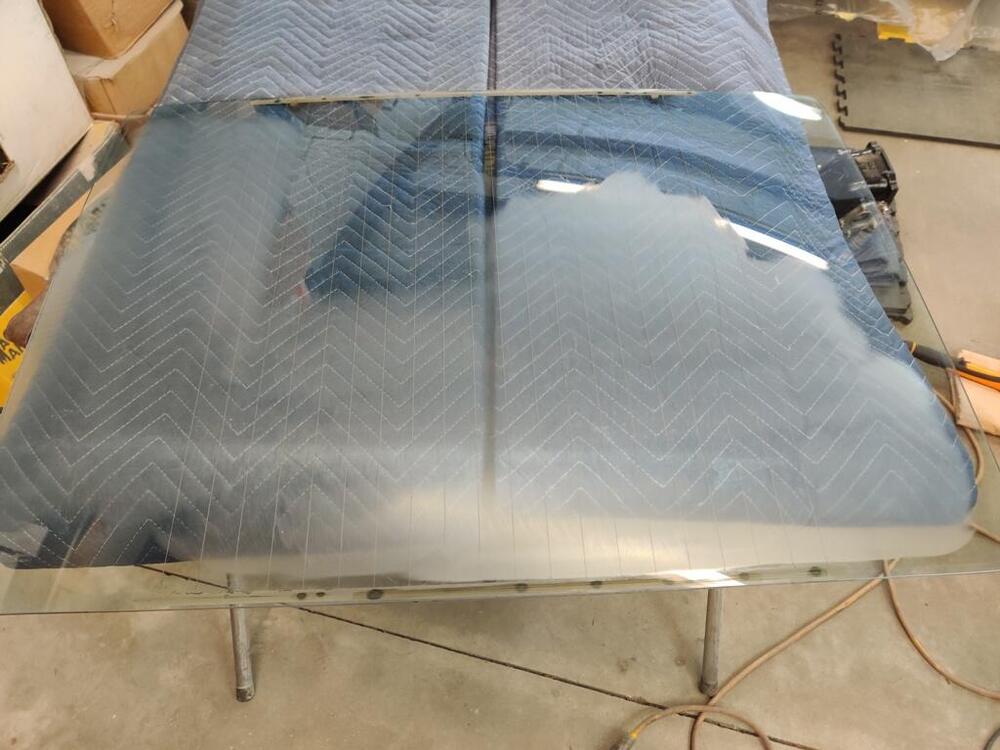
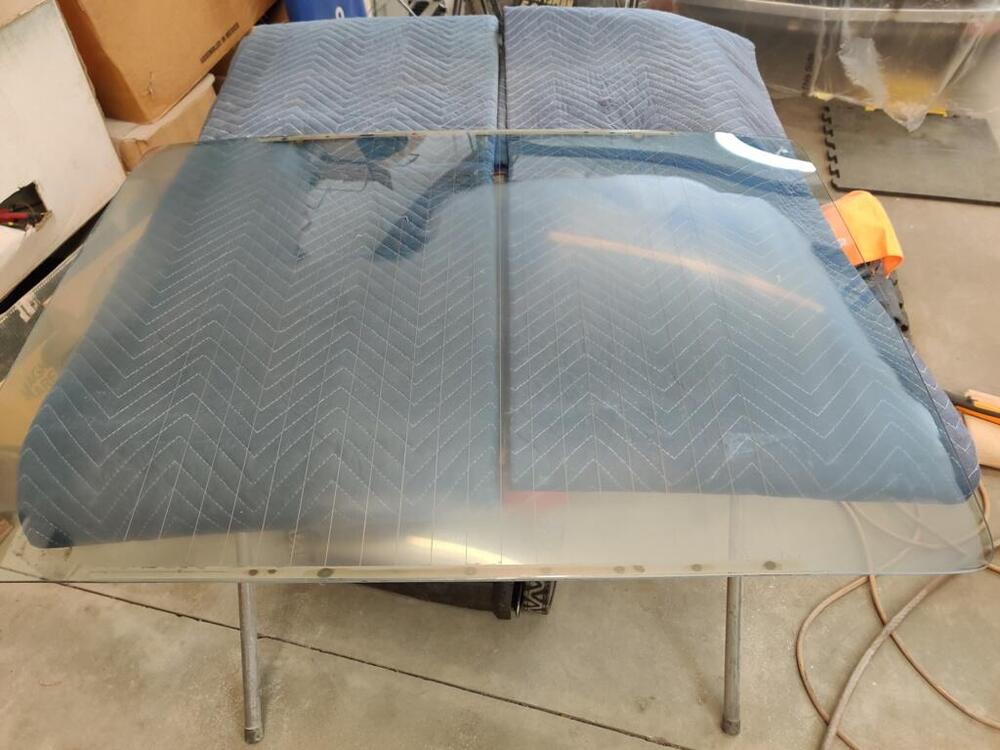
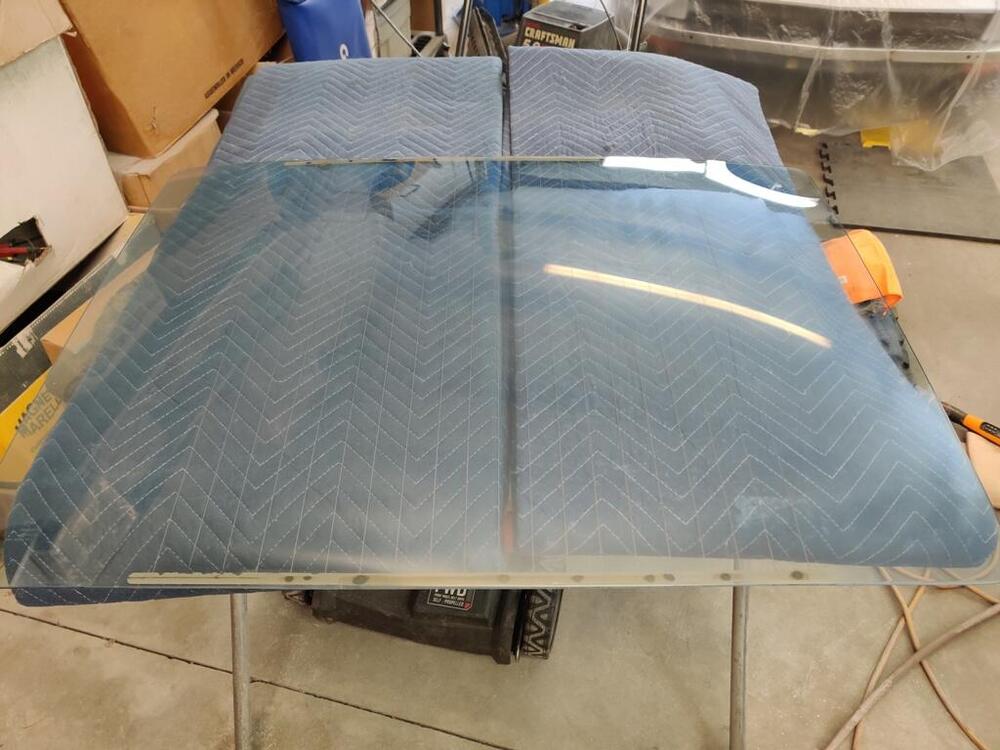
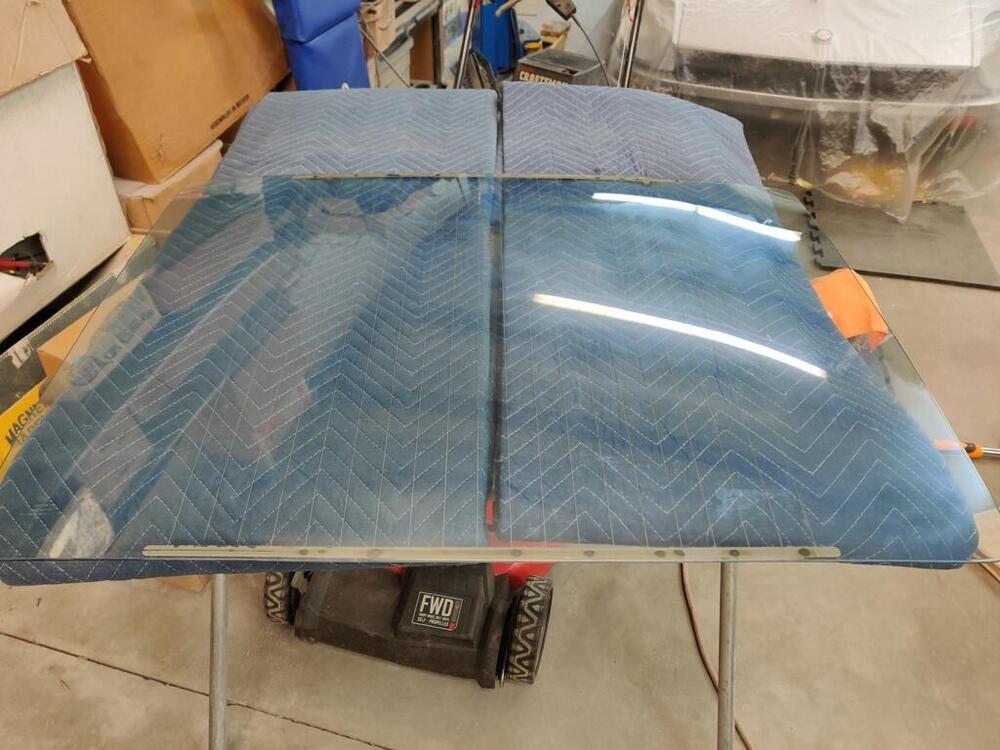
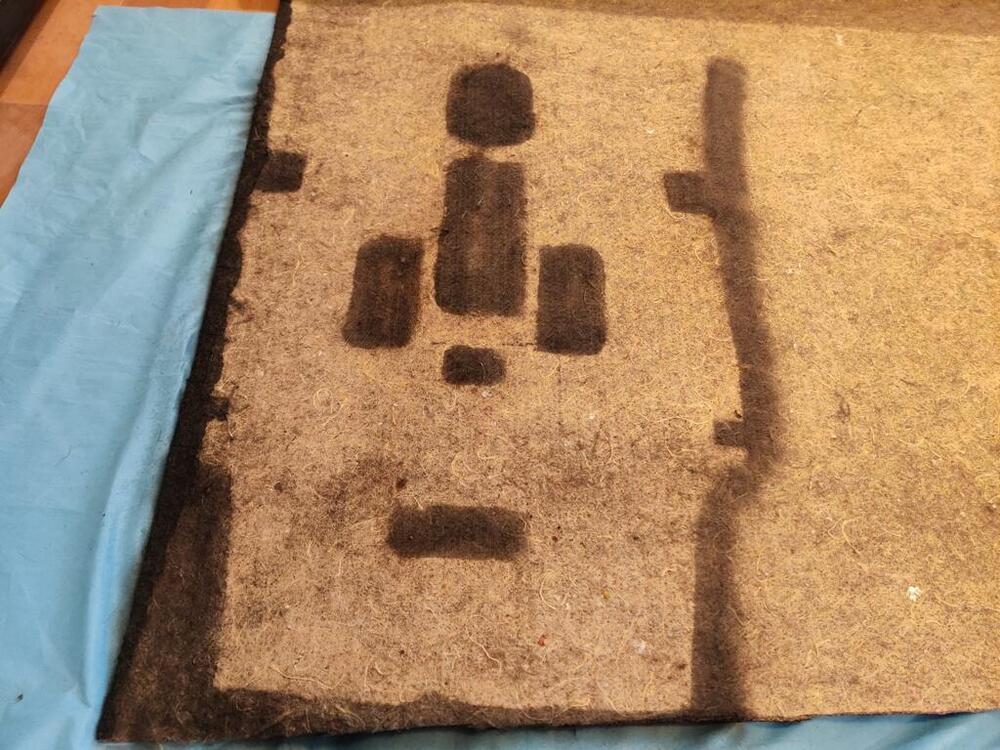
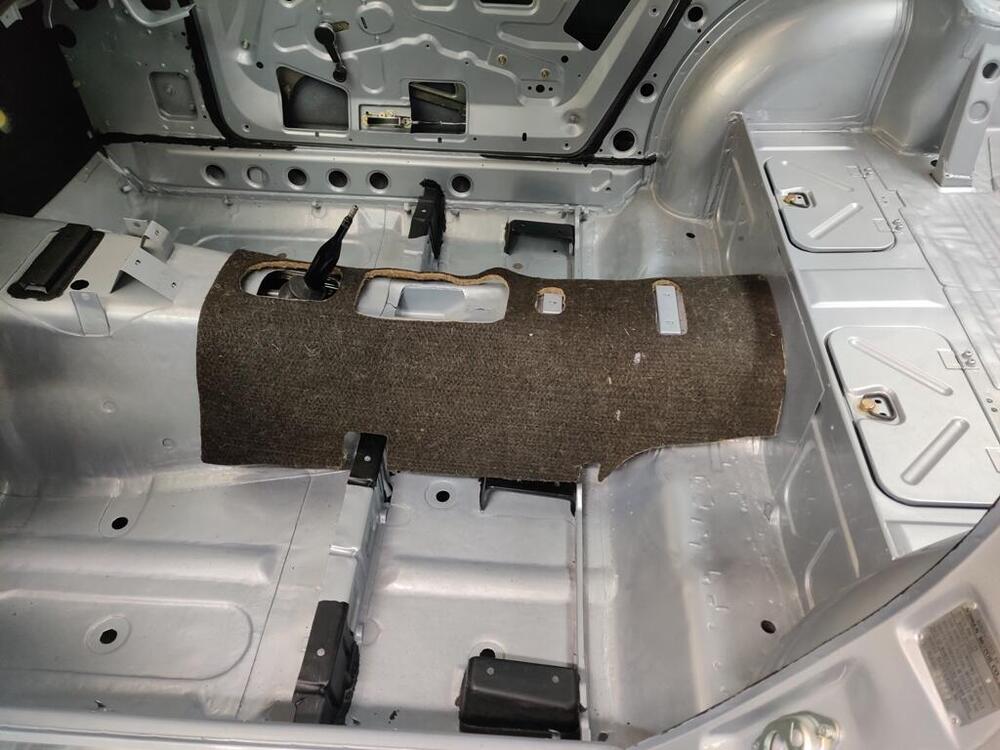
With the windshield in, a significant barrier to installing the dashboard had been passed. However, there are still a few things that need to be done before it can go in the car. One of them is installation of the tunnel jute and trim. And that will need to be followed by installation of the heater core and housing and the fan its housing. I started on the tunnel jute today. As I mentioned before, I bought a roll of jute from England that looks similar to the original. It is dark brown on one side and tan on the other. I placed an old piece of jute on top of the new, and used black spray paint to mark where I needed to cut. I got mixed up for a minute on which side needed to face up, and marked the wrong side for the handbrake cutout at first. But, I realized what I had done before I began cutting and flipped the old piece over. After marking the correct side for that, I used my upholster shears to cut the jute. I nice pair of upholstery shears is a necessity for cutting this - they cut through without difficulty. So, I got the rear one made today, and just set it in the car for this one pic (third pic here). After that, I decided to tackle the job of removing the scratches from my rear hatch glass. As you can see, there are a few - the white beam is the reflection of a florescent light in the shop. I opened up the kit I received recently, and put the attachment on my rotary buffer. The kit I bought has three different sanding grades and a liquid polish solution. I started with the heaviest grit, putting it on the backing pad. Kind of scary to use this grit as it is super aggressive. One thing to note, I think that out of the box, the heaviest grit "pads" had some oversized grains on it. During the first 20-30 seconds of use, it put some swirl scratches in the glass that took a bit of work (with the same grit) to get out. The kit came with two of the heaviest grit pads. I think it would be wise to run fresh ones very lightly at first to knock any unusual bits in the surface of the pad down a bit before you go to town with it. That, or run it on a piece of glass that doesn't matter to you first. Anyway, with the first grit, glass removal is relatively quick. I could catch my finger nails on some of my scratches, however, there was not much time investment in cutting the surface of the glass down to past the scratch depth with this grit. When I was done with the first grit, I took a picture. As you can see, a portion of the glass towards the top, center and right side, did not need heavy scratch removal, so I left that area alone: Next was grit number two. I went over the entire area that I had hit with grit one. It was easy to see the difference in surface finish of grit two compared to grit one. Like the first grit, the second grit cut pretty quickly, but more time was involved in getting all of the areas I had worked with grit one to "grit two" level. When done with grit two, I took another picture: I repeated the procedure with grit three. I want to say that I getting the surface of the ground area to "grit three" level took a quite a bit longer. Again, I could see the difference pretty well. So, I kept at it until everywhere that had been ground looked uniform, and I couldn't see any heavier scratches from the prior grit. I took another picture: At this point, I had about 2-3 hours invested. And I switched over to the liquid polish stage. This stage did not go great. Based on my efforts today, getting rid of "grit three" hazing is going to take a very large time investment. I think there are a couple of areas where I did not sufficiently remove grit two, mainly on the right edge in the pics above. So, I may have to hop back to grit three for that area. However, I am confident that for most of the area I have worked, I did a good job of using each grit to remove the prior grit's marks. And unfortunately, this last stage of polishing is going to be a bitch - like maybe 4 or more hours of intensive polishing. I wish there was another grit between grit three and polish. Of course, I could be doing something incorrectly also. So, I will look at the company's website for some tips and watch some of their Youtube videos to see what I can find out. Latest pics - second one is that right edge ( I took the picture from the opposite side of the glass) where I think I will need to rework with grit three.


 4 points
 -
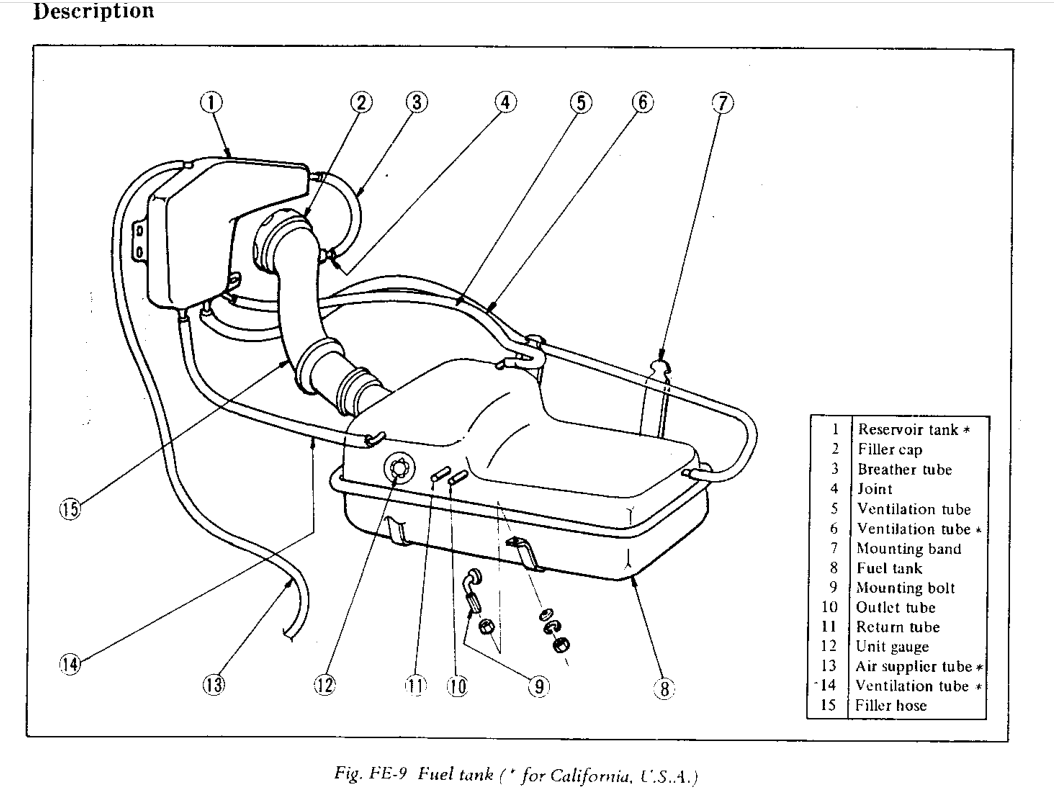
I'm not 100% on this but next time your tank is full and it starts acting up, pull over and remove the gas cap. If I remember right it shouldn't have a "whooshing" sound as it trying to pull in air. Your gas cap could be bad, the top vent line could be stopped up? I have blown into my filler neck, cap removed, and could hear the gas gurgling around. That was my way of testing the hoses after a tank and hose refresh on my '72. @Mark Maras might have an idea to add. Good luck, it could be a lot worse of a problem.3 points
-
2 pointsWhen time permits, please explain your process for installing the hood (and bumpers) as a one-man job without damaging the paint. These pix are deceptive b/c they make it look easy (and I I know it isn't). Also: For everyone else, please take another look at GK's workspace. It's really not very big. The quality of his work deserves extra respect, given how challenging it can be to operate in a small space like that. I'm still amazed by how he managed to paint the car in that little garage. Too bad we don't have a video so that we could study how he managed the gun and the hose.2 points
-
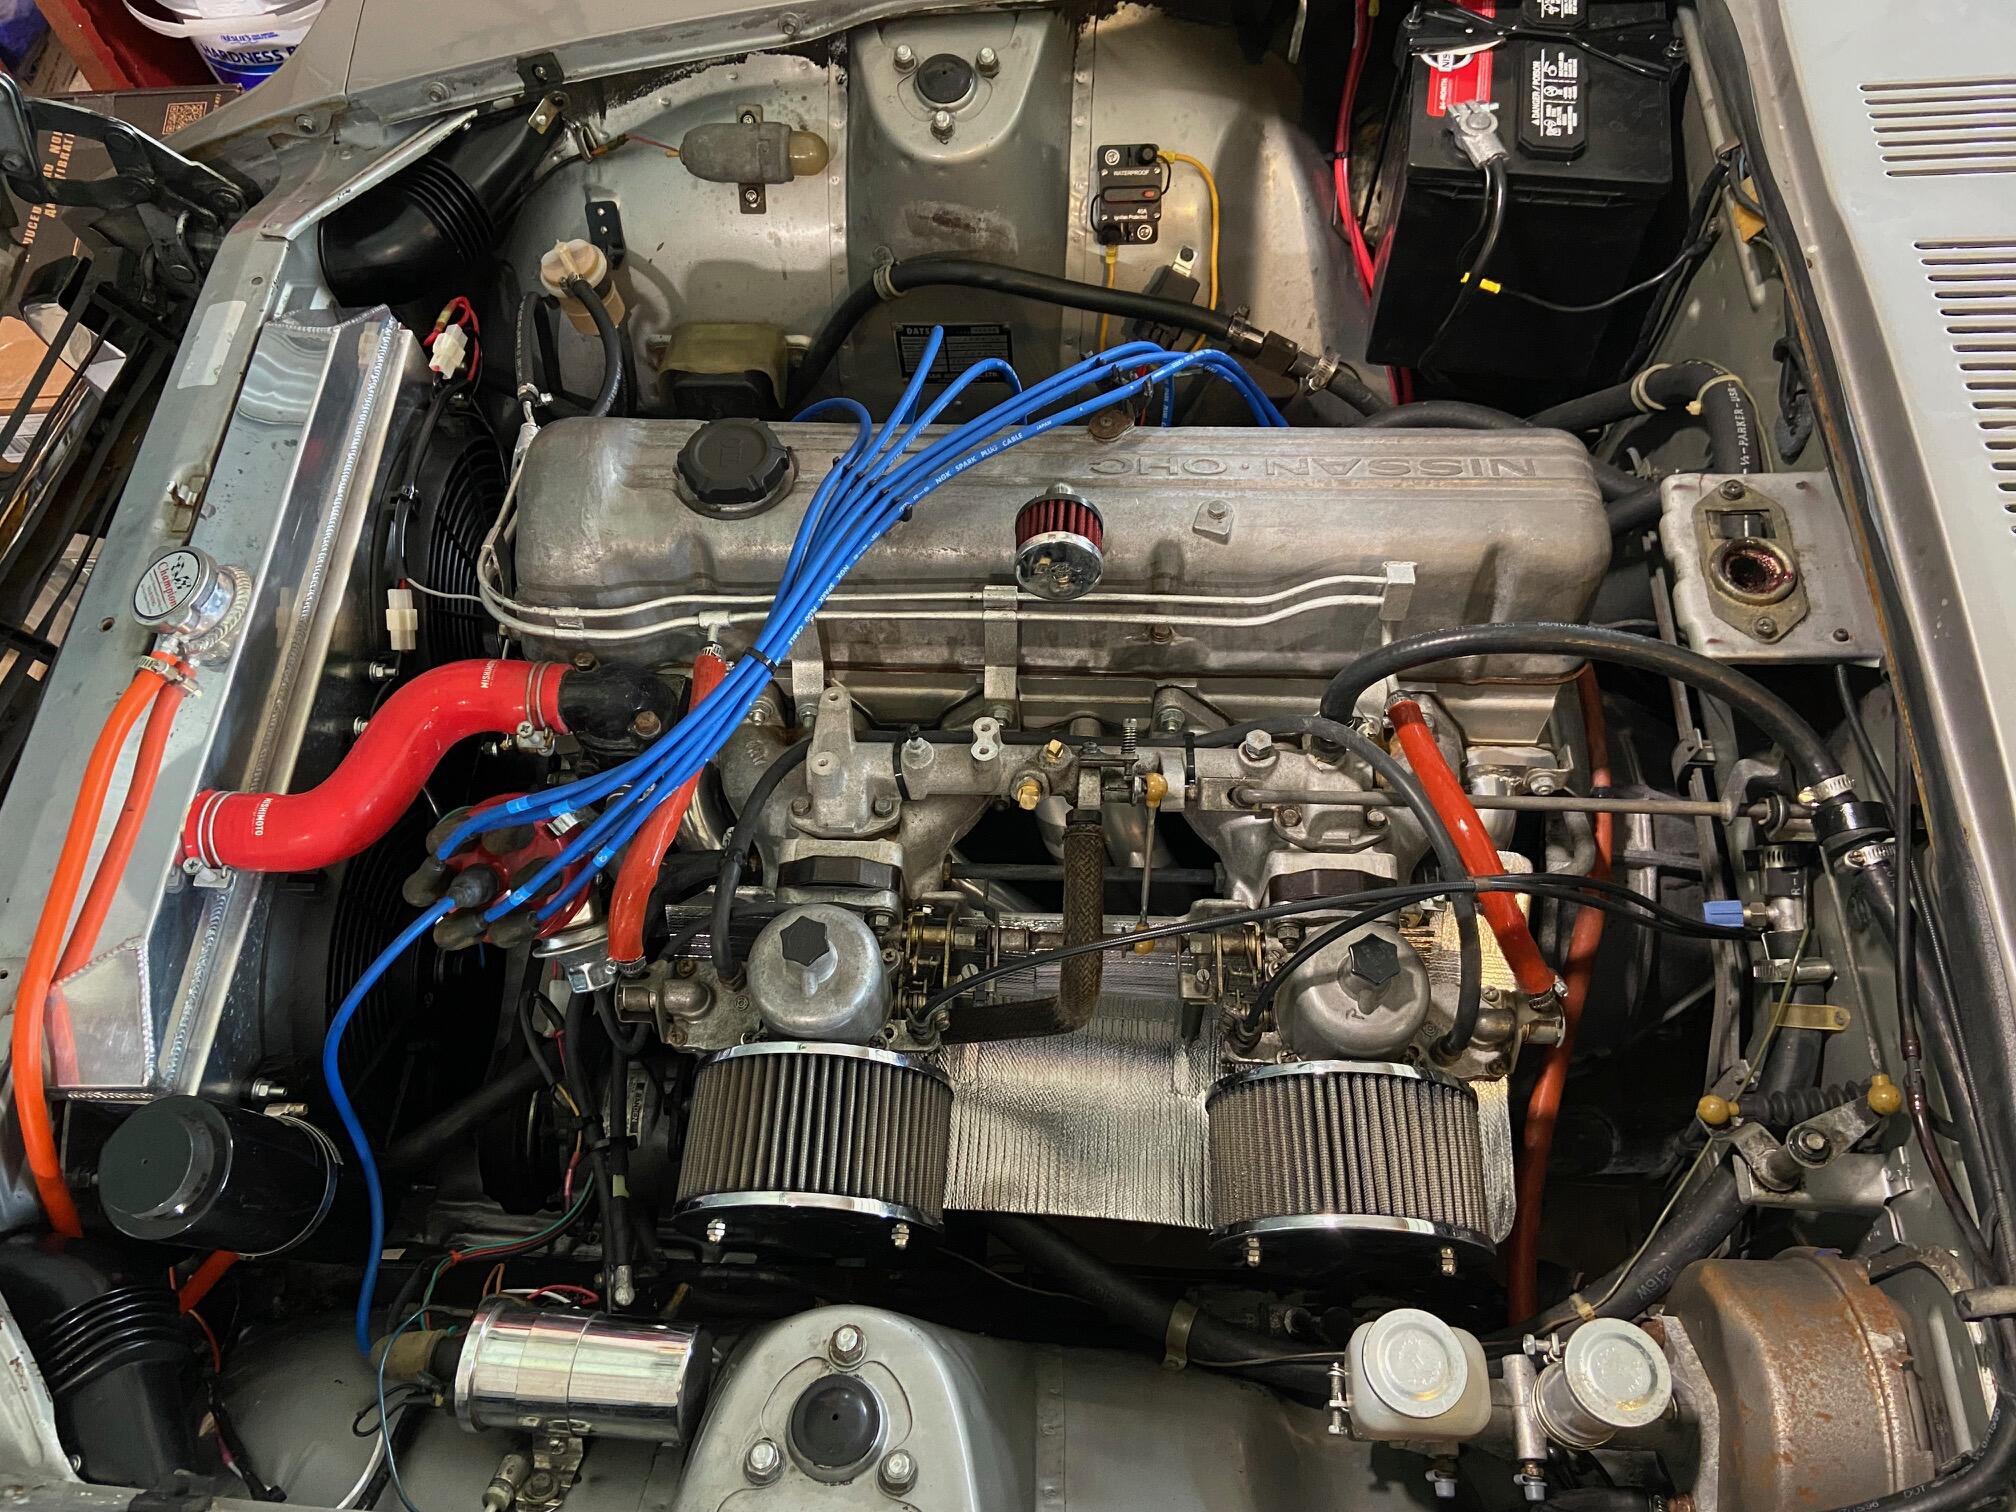
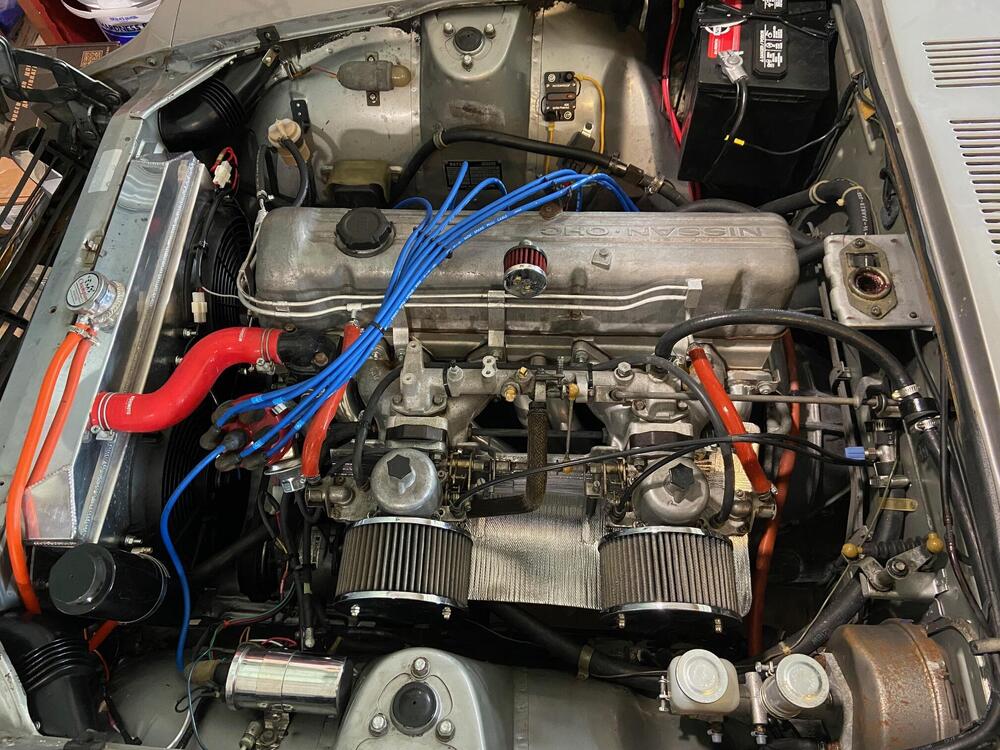
So, you guys are so helpful!!!! Thank you so much for the great advice and possible tactics. I'll definitely try some of that stuff (next fill up) I promise! This is very helpful!!! Here is a shot of the engine. I took off the K&N filters for now, and just have short horns on it. But man when it's running right, it's a blast to drive!
 2 points
 -
I'd check the air supplier tube and/or the gas cap. And the breather tube. (Edit - actually all of the ventilation tubes. There seem to be many. Must be important.) I see that siteunseen has just replied. Same thought... . . .
 2 points
 -
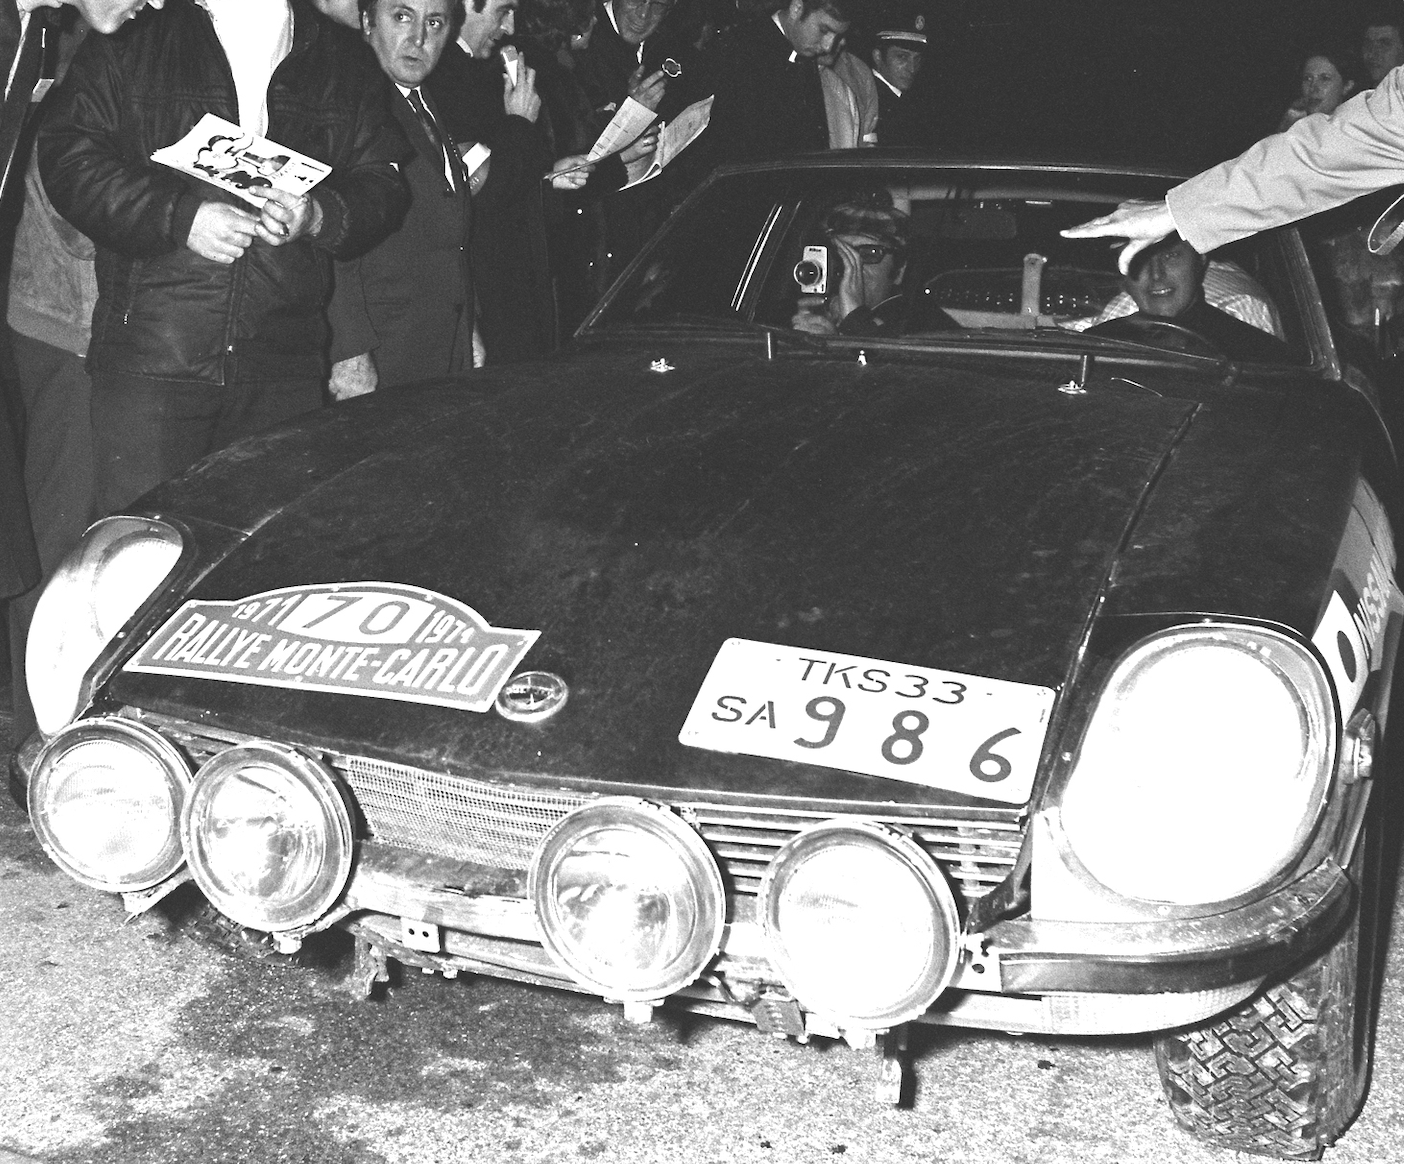
Lancashire Automobile Club have uploaded another of navigator Mike Wood's films to YouTube. This episode covers Mike's participation in the 1971 Monte Carlo Rallye with driver Tony Fall in Nissan Works 240Z rally car 'TKS 33 SA 986'. This very car...2 points
-
2 pointsHi, I would like to share this, Alan made a great post in another thread. I have always wanted people to know why our cars had been going to have a six-cylinder engine at some point in the development process. That was because of S20, Prince oriented way advanced technology for the time. One more thing. Uemura san includes a quote of some paragraphs from Teiichi Hara's own book (recommended, BTW). Hara san was manager of the First Design Department at Nissan and Uemura san quotes Hara san because he relates a KEY stage in Nissan's Go/No Go stage of the Maru Z project. Without passing this stage, Nissan's senior management simply would not have given clearance for the engineering and styling work to proceed. What was the deciding factor? The deciding factor was the inclusion of the road-going version of the Prince GR8 twin cam engine (the Nissan S20 two litre 24v twin cam six) as an option in the engineering and styling of the Maru Z project. Hara san described this as "A complete victory". Without it, they would not have got the go-ahead for the whole family of variants. It is a very revealing anecdote, the kind that automotive journalists and marque/model scholars set great store by. Thanks Alan! Kats2 points
-
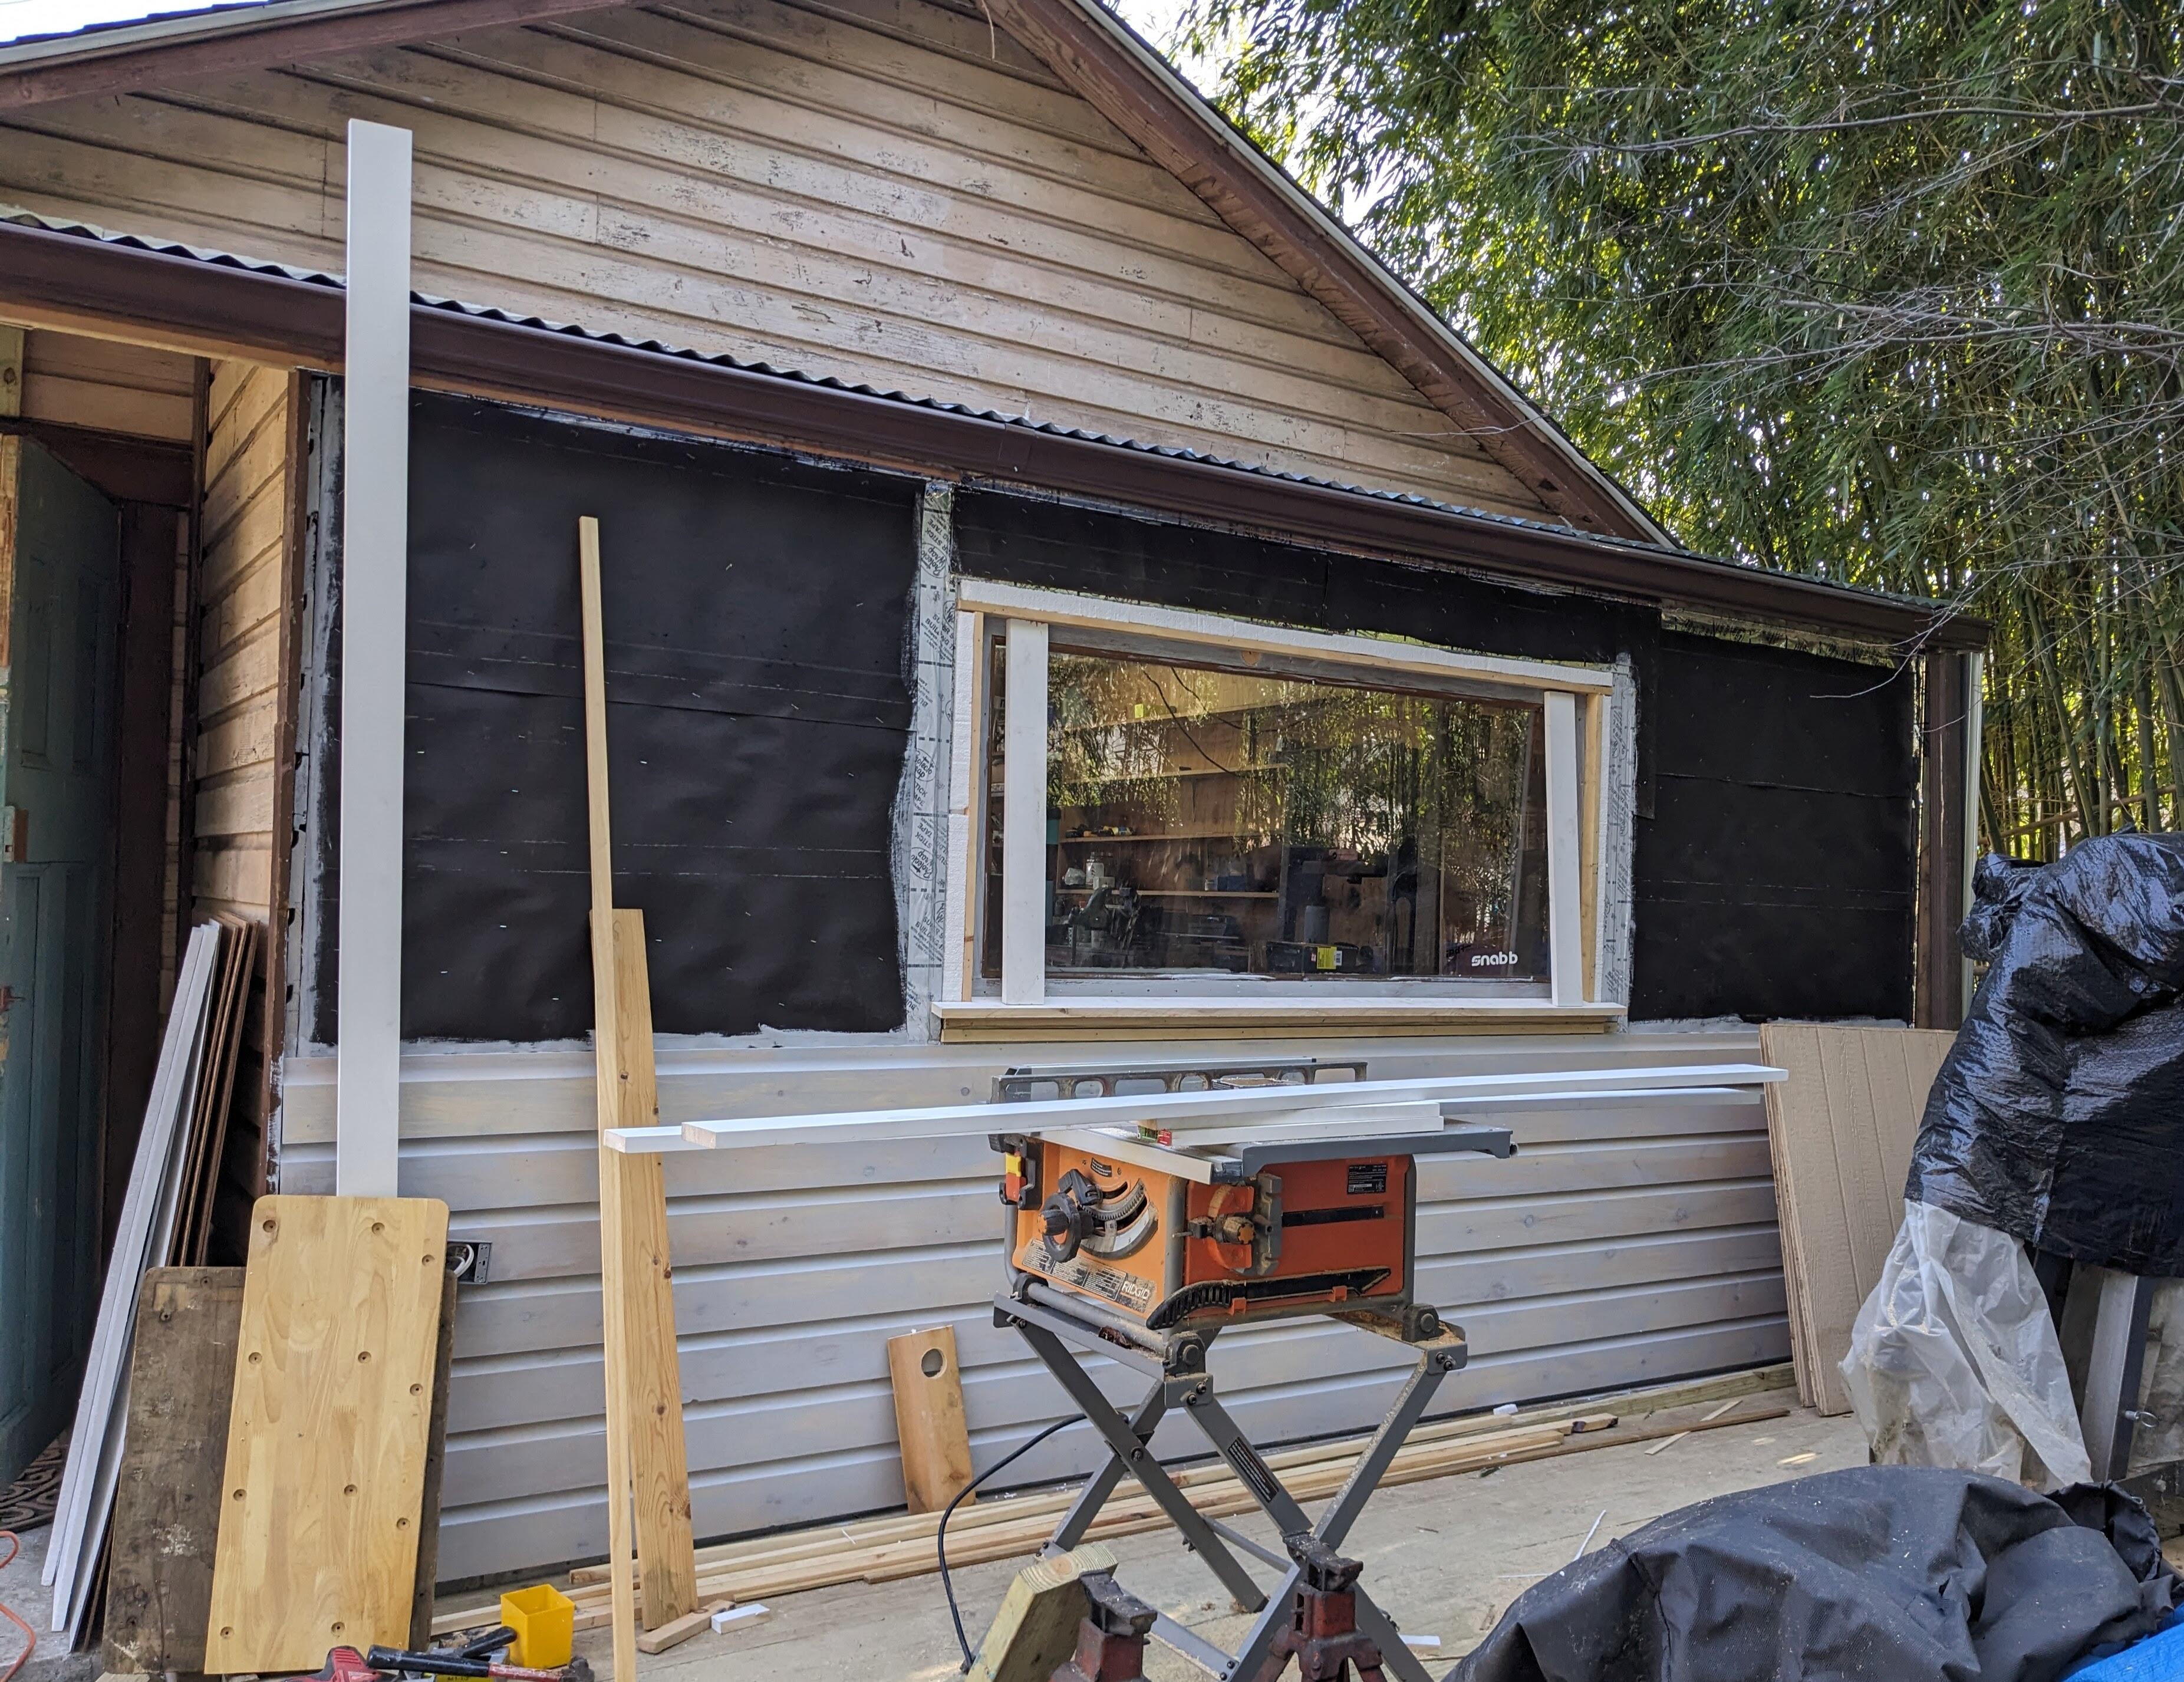
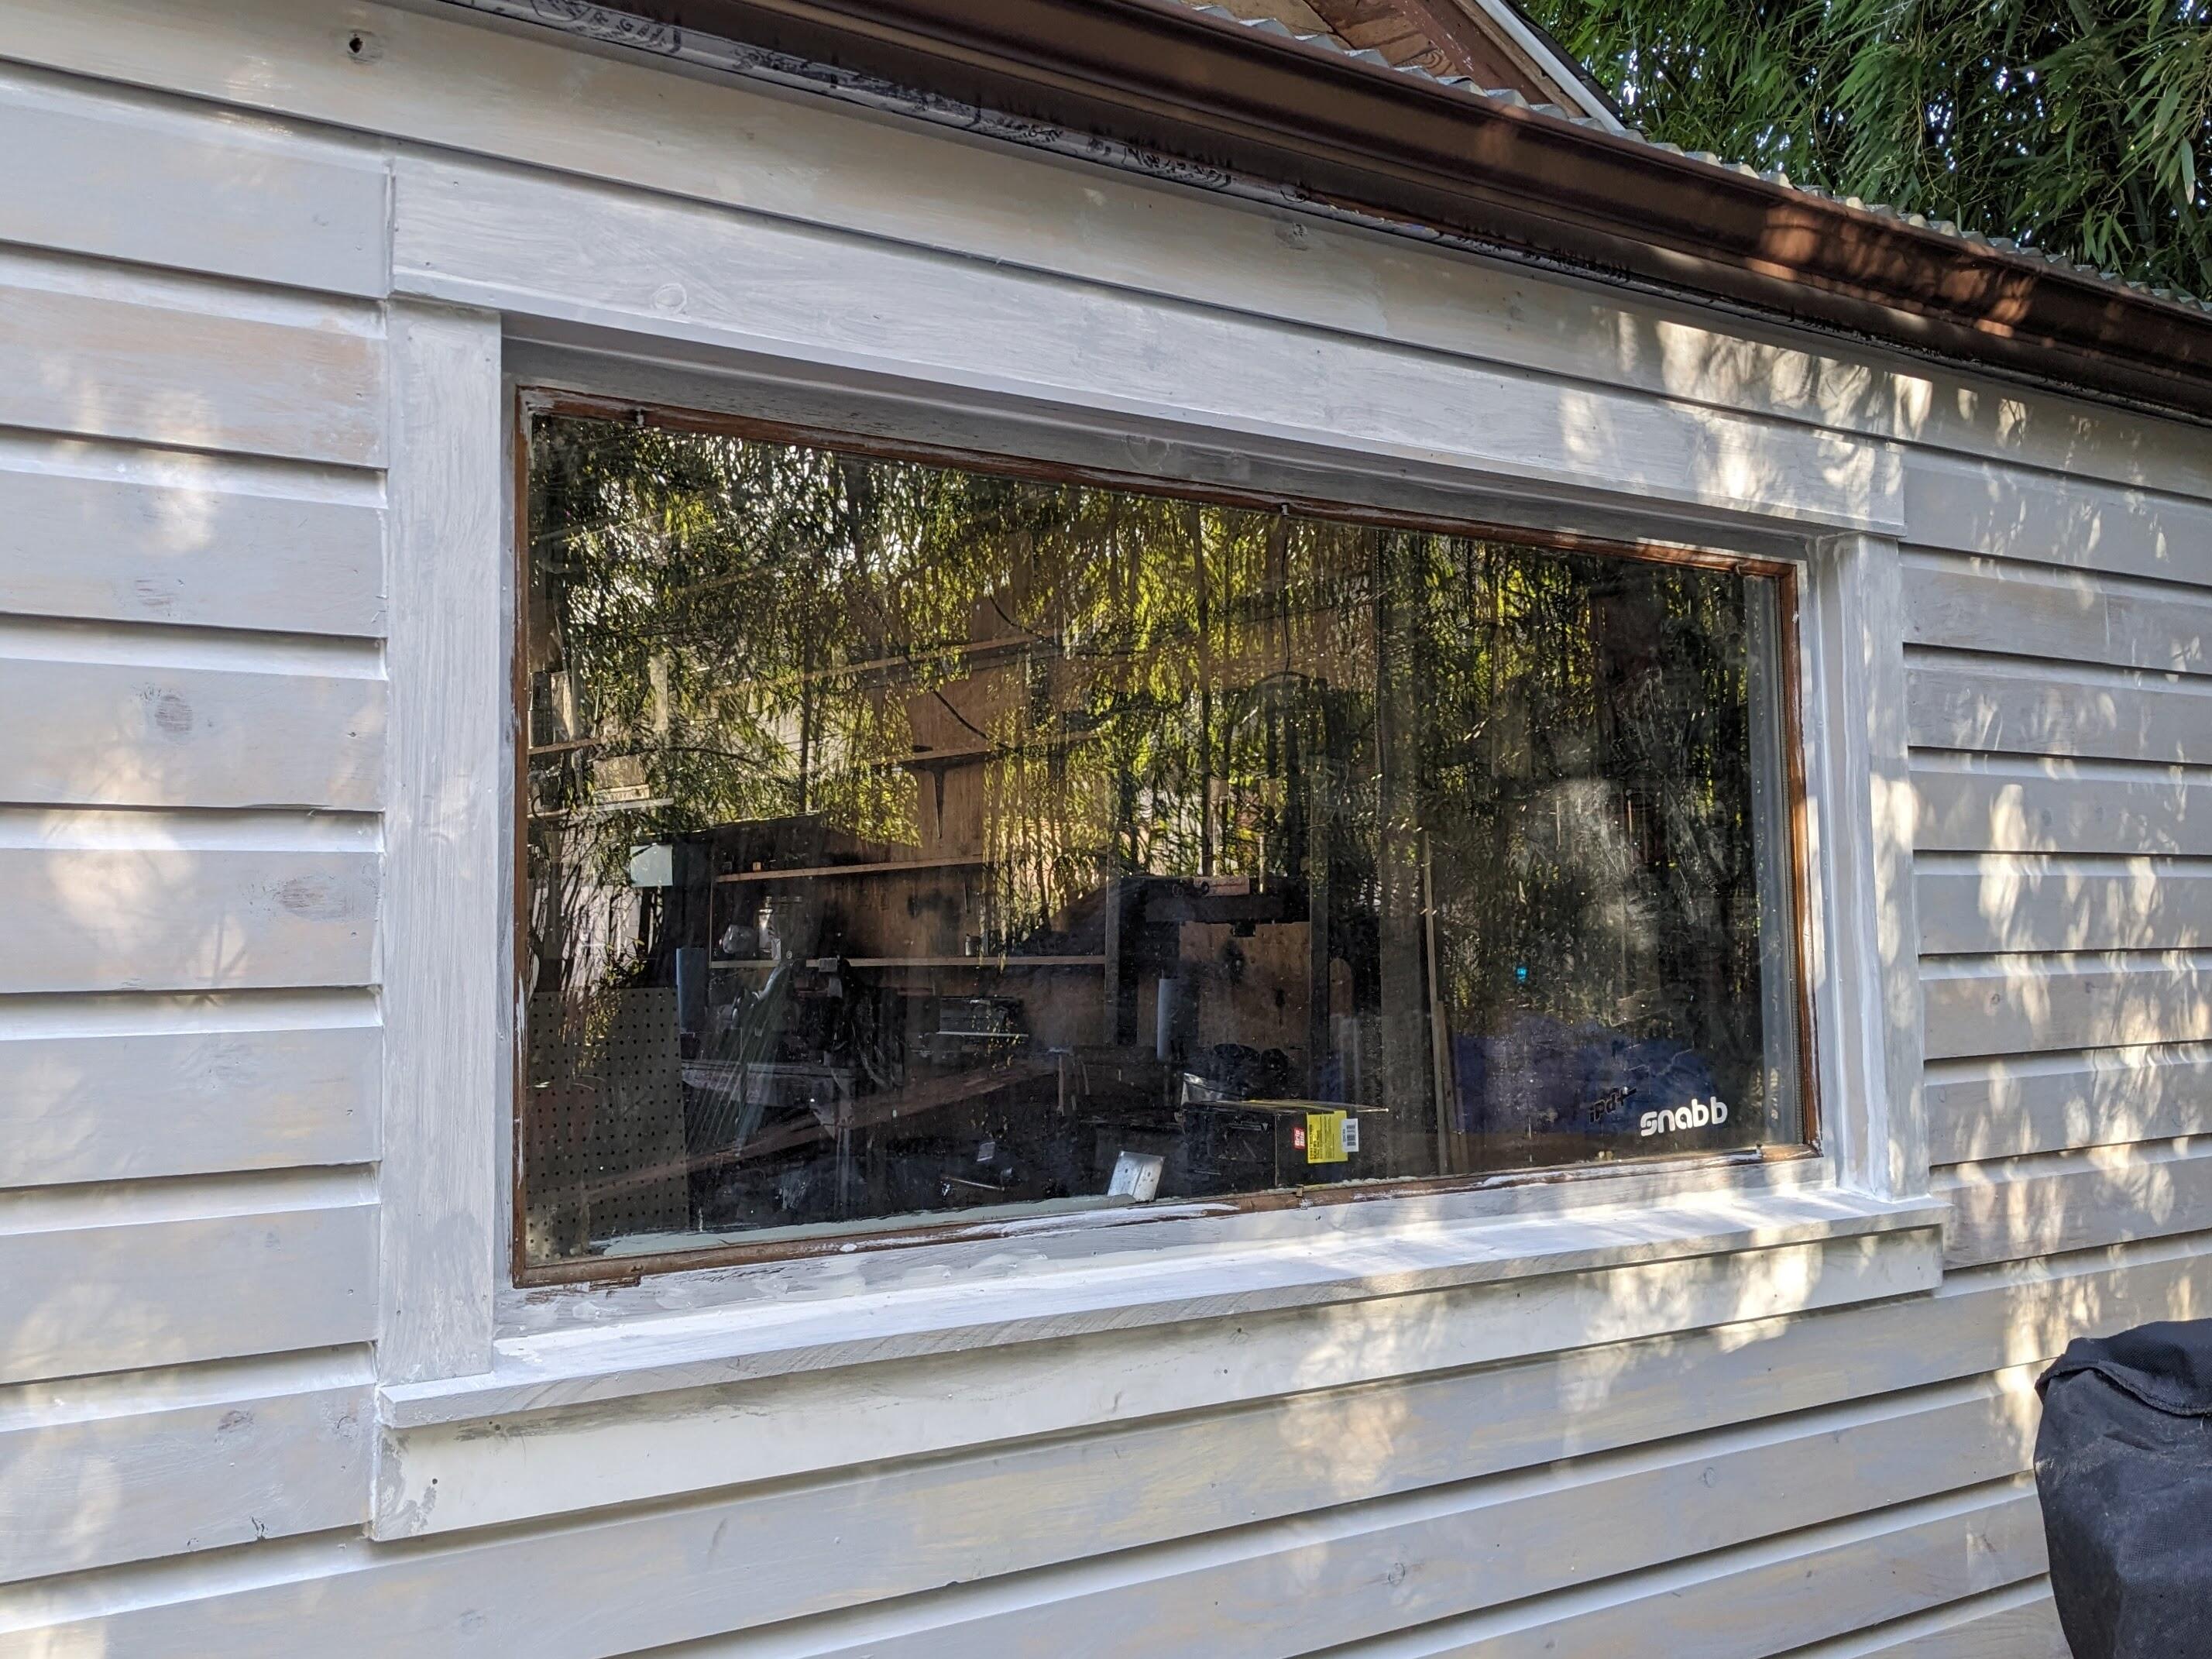
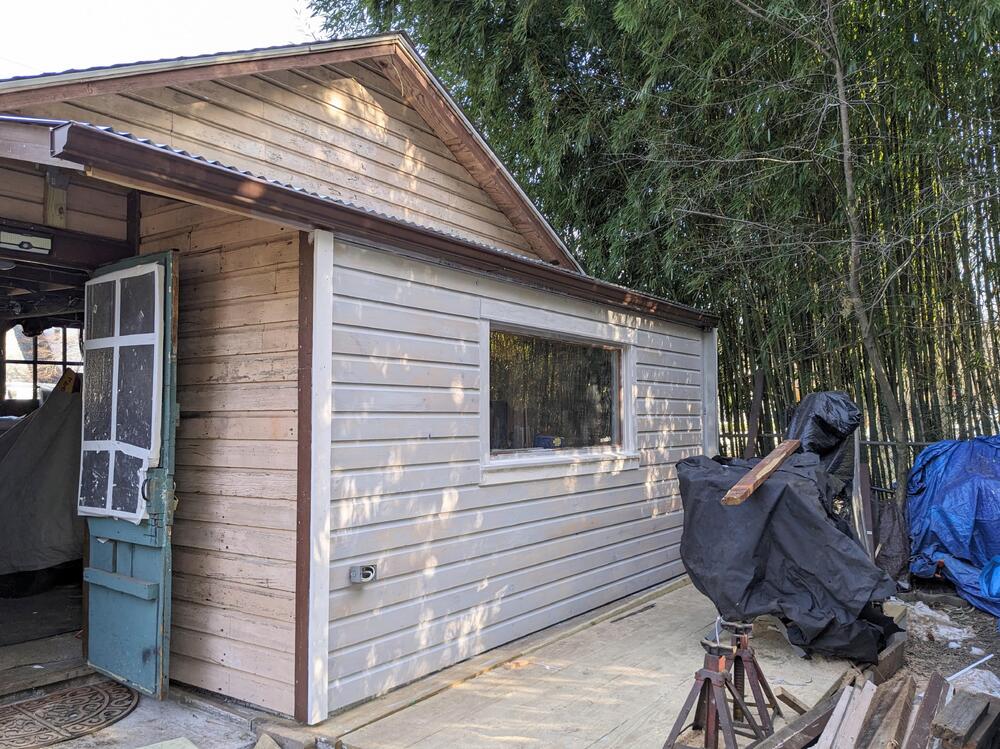
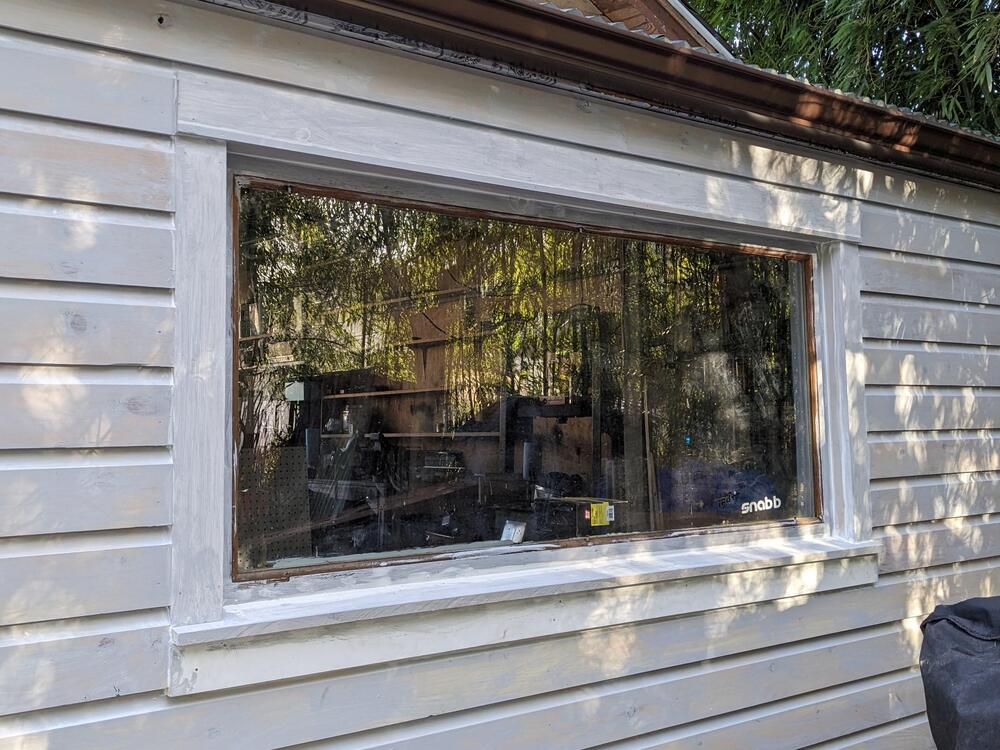
It was in the 20's this morning, but the sun was out. I framed out the casing on the window, and got the rest of the siding up & primed before it was time to clean up for the day. I cut the sill to 12º, and back-caulked everything. Have to get done with the exterior soon, I'm tired of looking at the tarped wood pile

 2 points
 -
I believe the long-term previous owner of your car was an amateur aviator? My impression was that he stuck the Works key tag Kanri number on the car's dash in the way that a civil aircraft's registration ID is often seen on its dash: Using it to cover the hole left by the Grayston pen holder would kill two birds with one stone. Here's a photo of one of the Works cars from the 1971 RAC Rally of GB. Key fob tag just about visible under there, and with rounded corners like yours: Works 'Kanri' (maintenance) numbers are a tricky topic by their nature. These were Nissan's internal ID codes for the individual Works cars, not for us to use or necessarily to understand. Even the service barges had them, but sometimes they did not appear on the cars. Here's a photo I took of the Kanri number on the '71 East African Safari winner, before the car was 'refreshed' a few years ago (in my opinion it didn't need half of what they did to it, but there you go...). The number is on a clear oblong sticker with the letters and numbers in a kind of golden reflective material:

 2 points
 -
2 points
-
I'm a professional pilot flying Boeings, but spent many years as an A&P mechanic on the DC-8 and DC-9s for a couple different airlines. I used to fly DC-9s, which was another fantastic Douglas product. That's one tough airplane to work on, but have fixed many with a Leatherman.2 points
-
Tank venting is a possible cause. Do you know if it's running rich or lean when it's acting up? I always checked mixture problems with the choke first. Ease it on during the problem. If the problem improves or goes away, it is running lean.1 point
-
Unbelievable - what a treasure trove. Thanks to Mike Wood and his trusty 8mm camera!
 1 point
 -
1 pointUnderstood, I figured the design would still have relevance because of the need to get either out of a mold.1 point
-
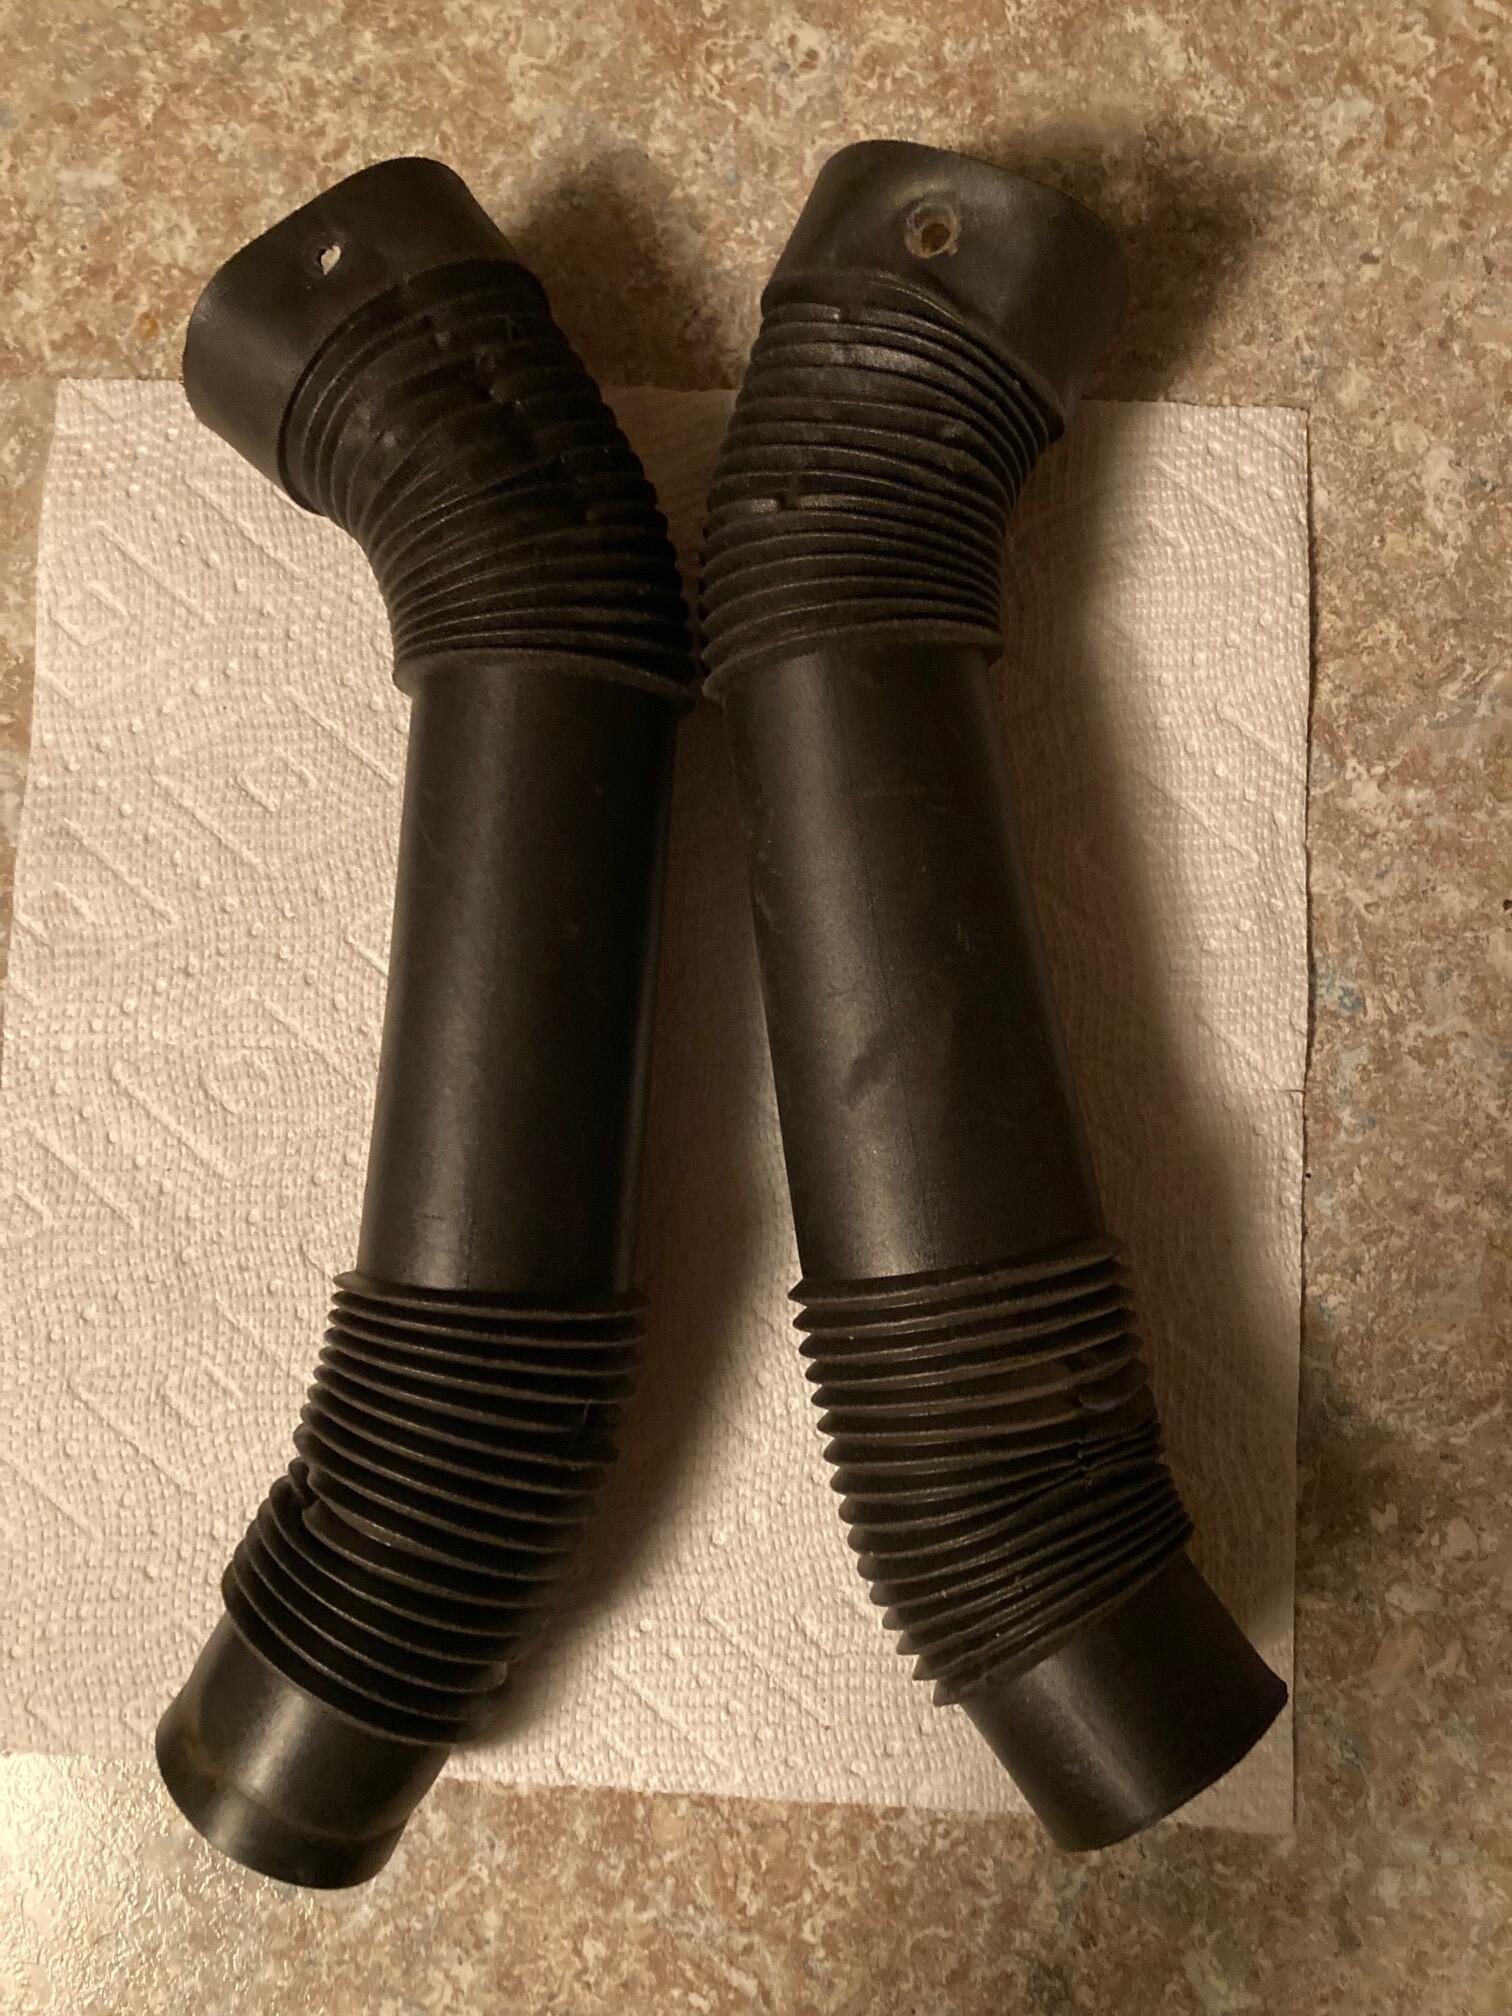
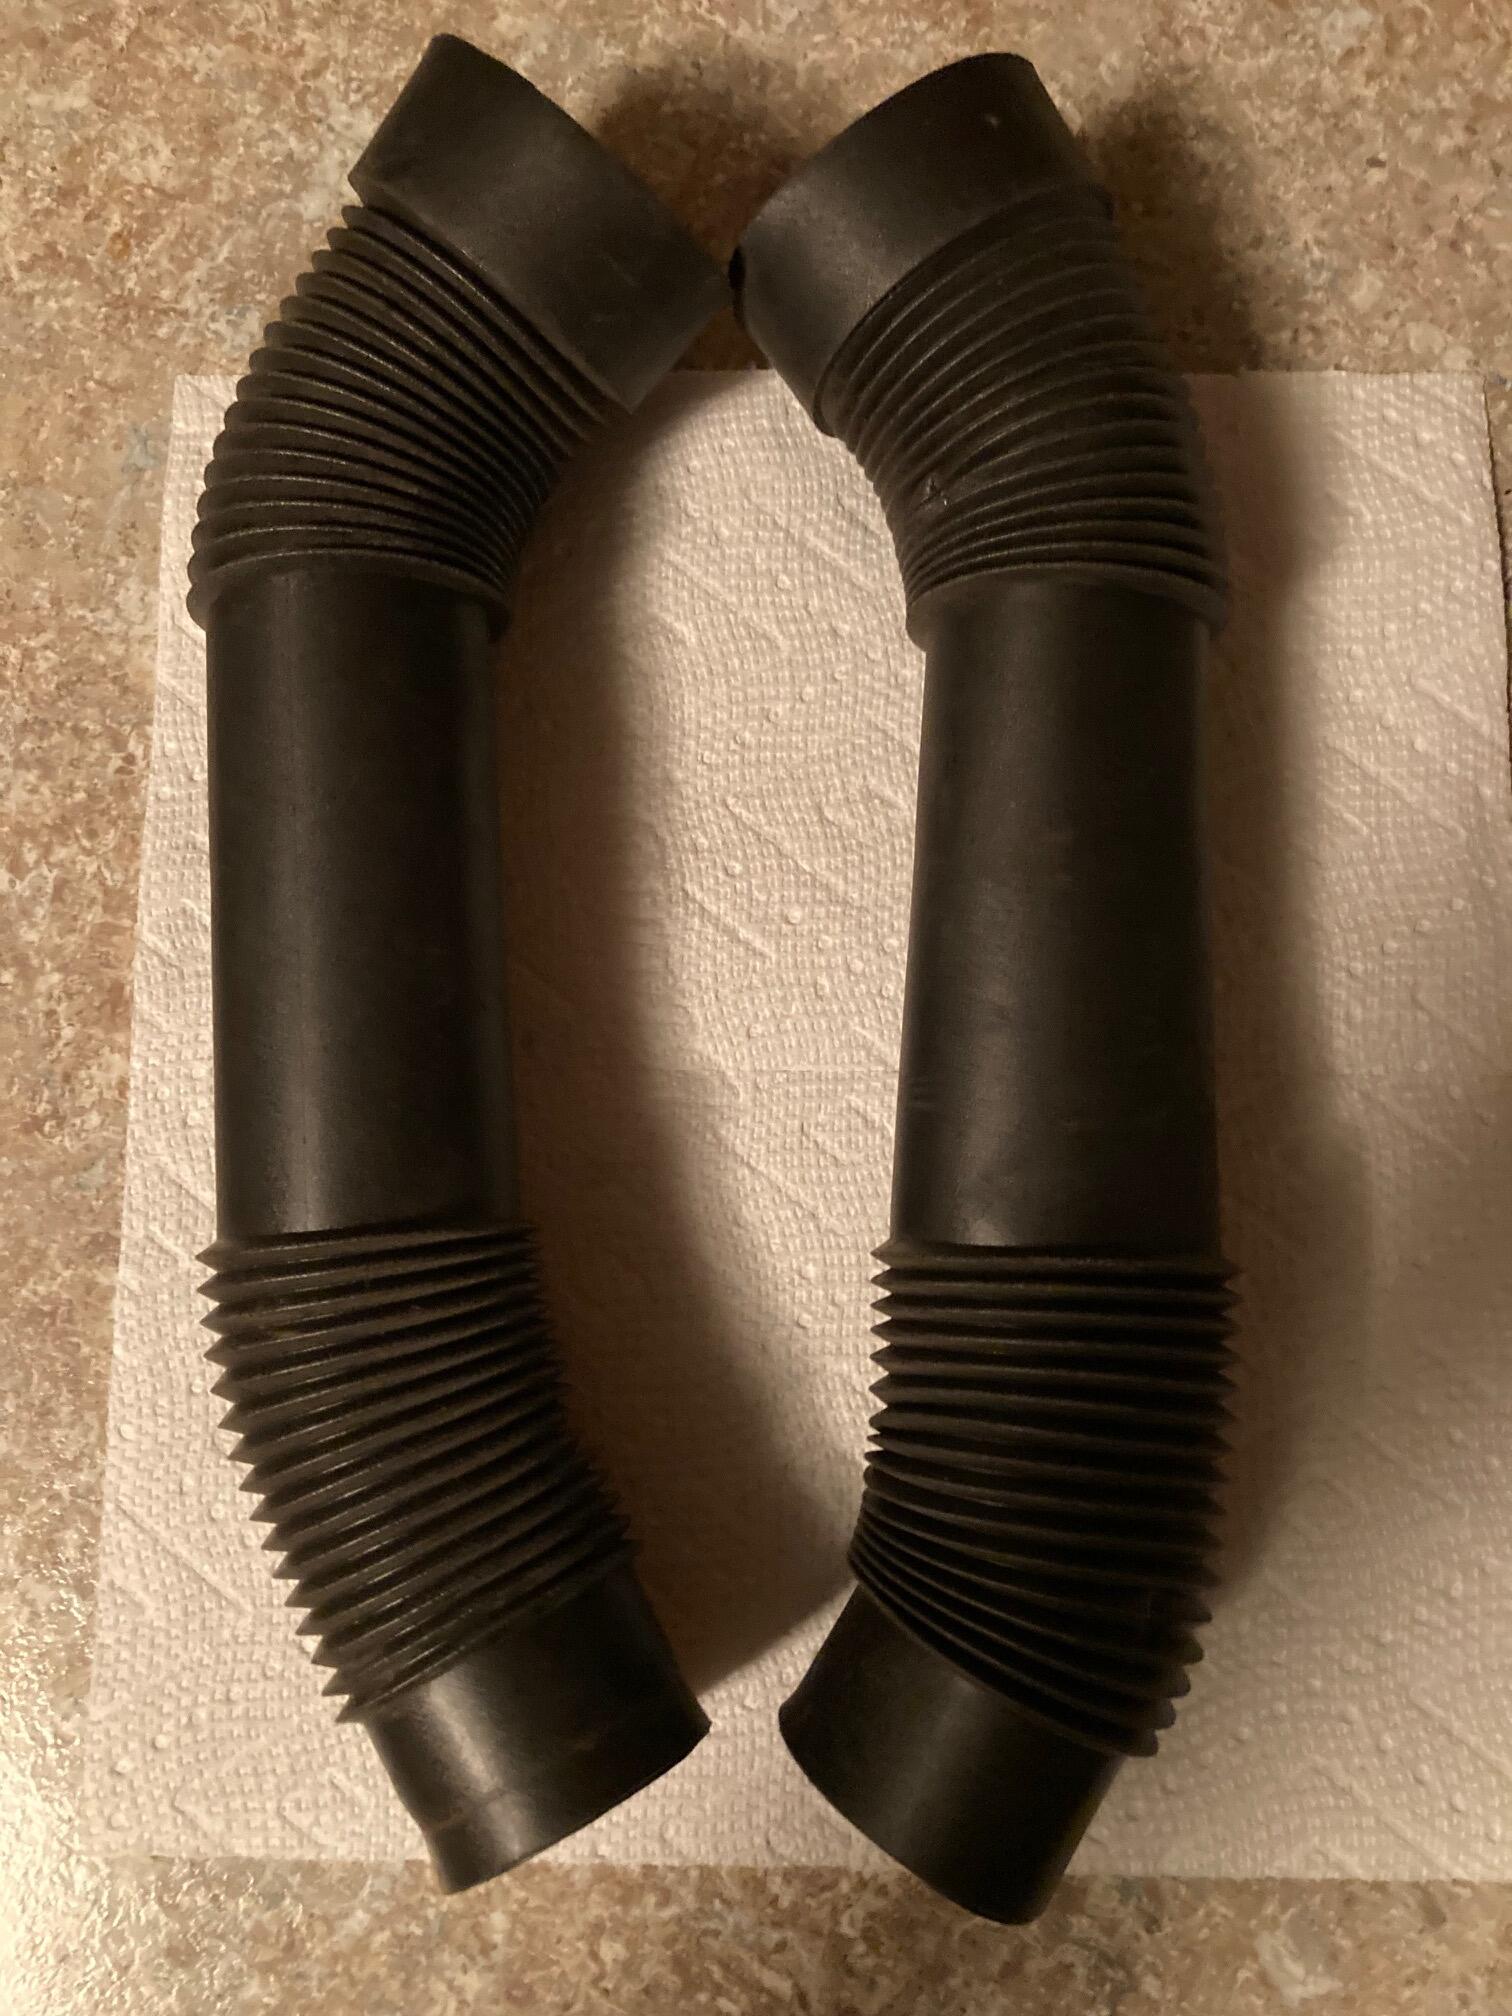
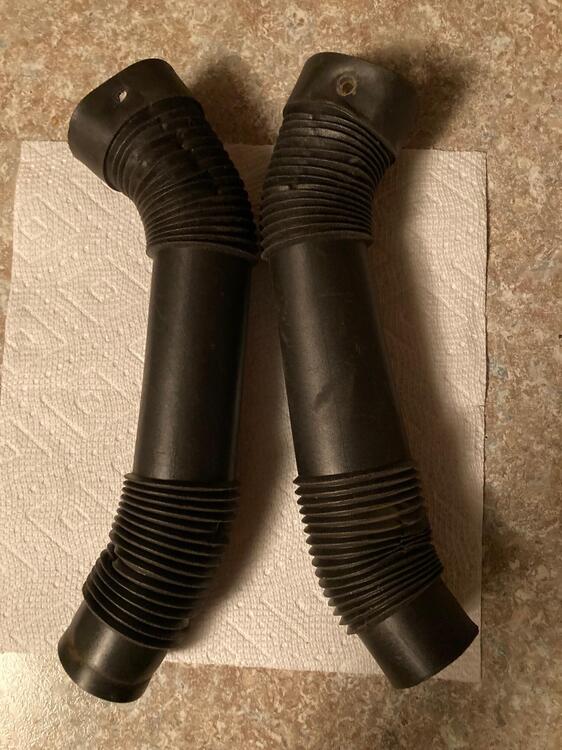
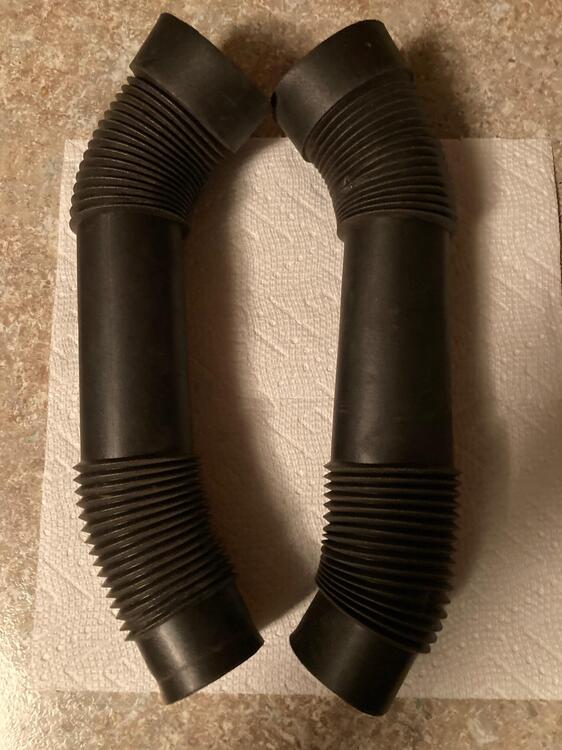
1 pointI have this pair. CPM shows only one part number for both, But being used the have the screw hole on opposite sides. This is a L/R pair. There are some dimples in the pleats but no holes or mice chewings.

 1 point
 -
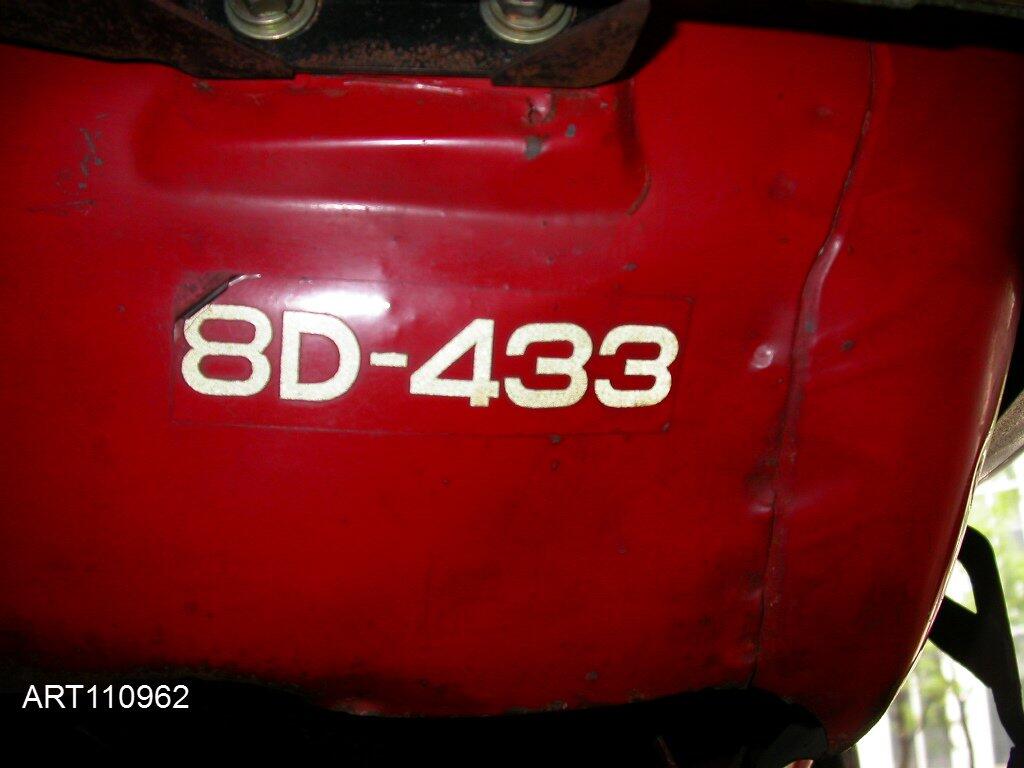
I'd go so far as to say that there's nothing in the blurred text that rules out "8D-424" as an option, mostly based on what appears to my eye to be two "4"s. This is the "wishful thinking" component of my reasoning. I can only hope to retrieve a clearer photo at some point in the future.1 point
-
It's a nice car, I'm lucky to have it. It waited its entire life for me to drive it, and I do.1 point
-
Lovely Datsun 240Z, love the airport setting. Used to fly 727, 757 and 767 in a previous career for a defunct airline down under. Know lots of pilots that had 240Zs. Still have 4 240Z but build drones now that go bang or peep!1 point
-
You are right. https://en.wikipedia.org/wiki/Delco_ignition_system1 point
-
The tag on the keys looks to be the same number. Having had exceptionally bad vision earlier in life I have gotten pretty good at reading letters that are badly out of focus...1 point
-
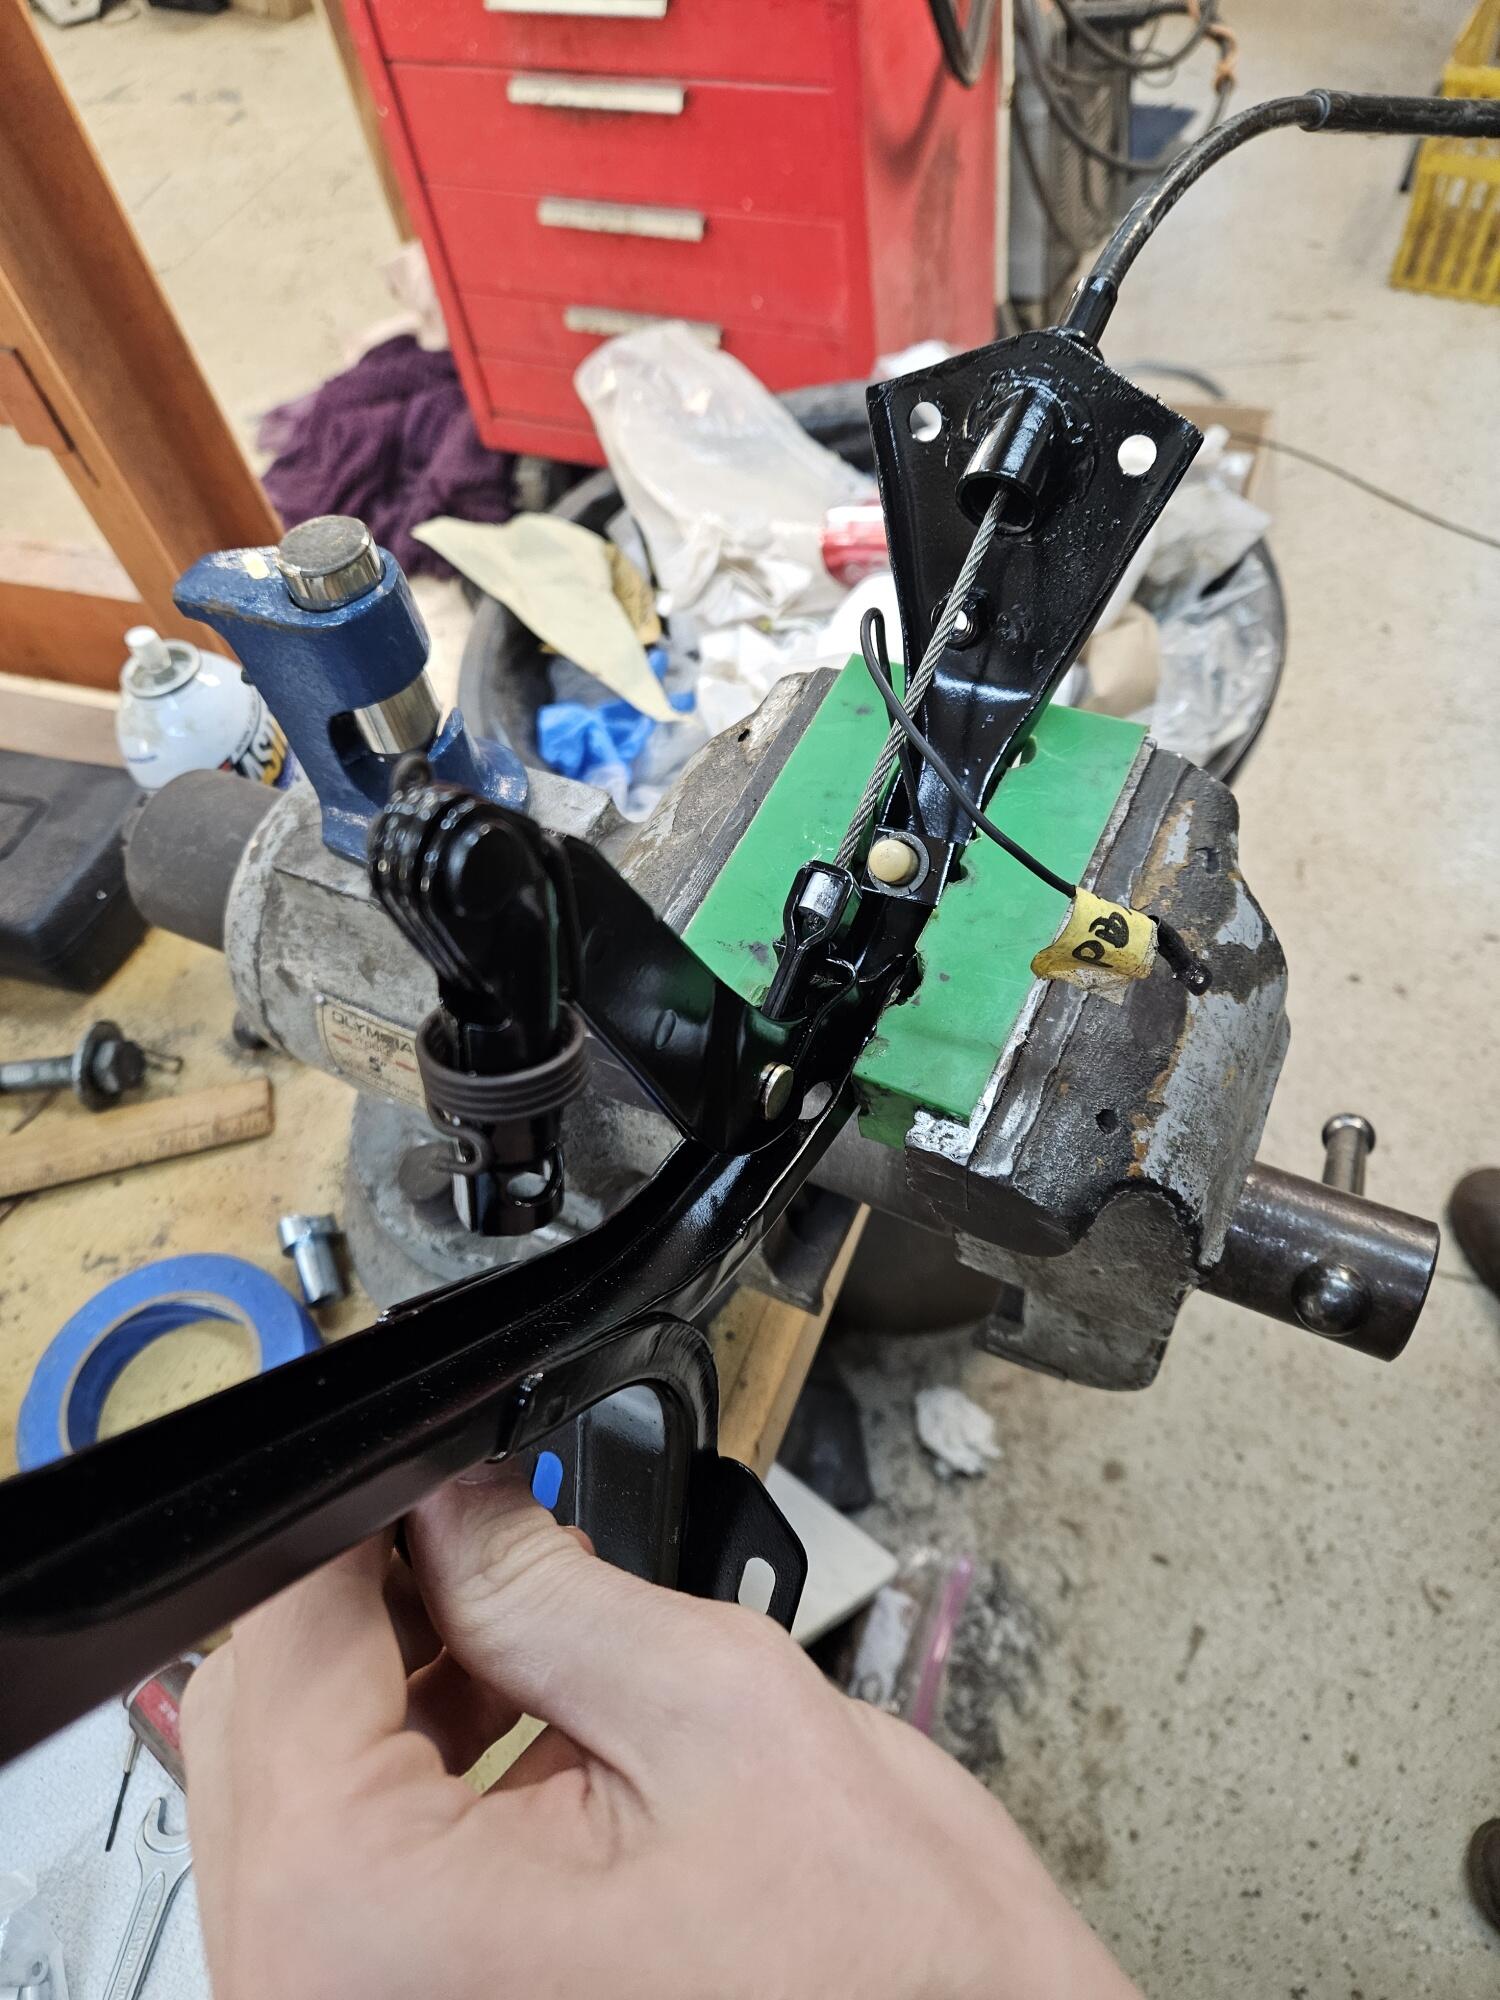
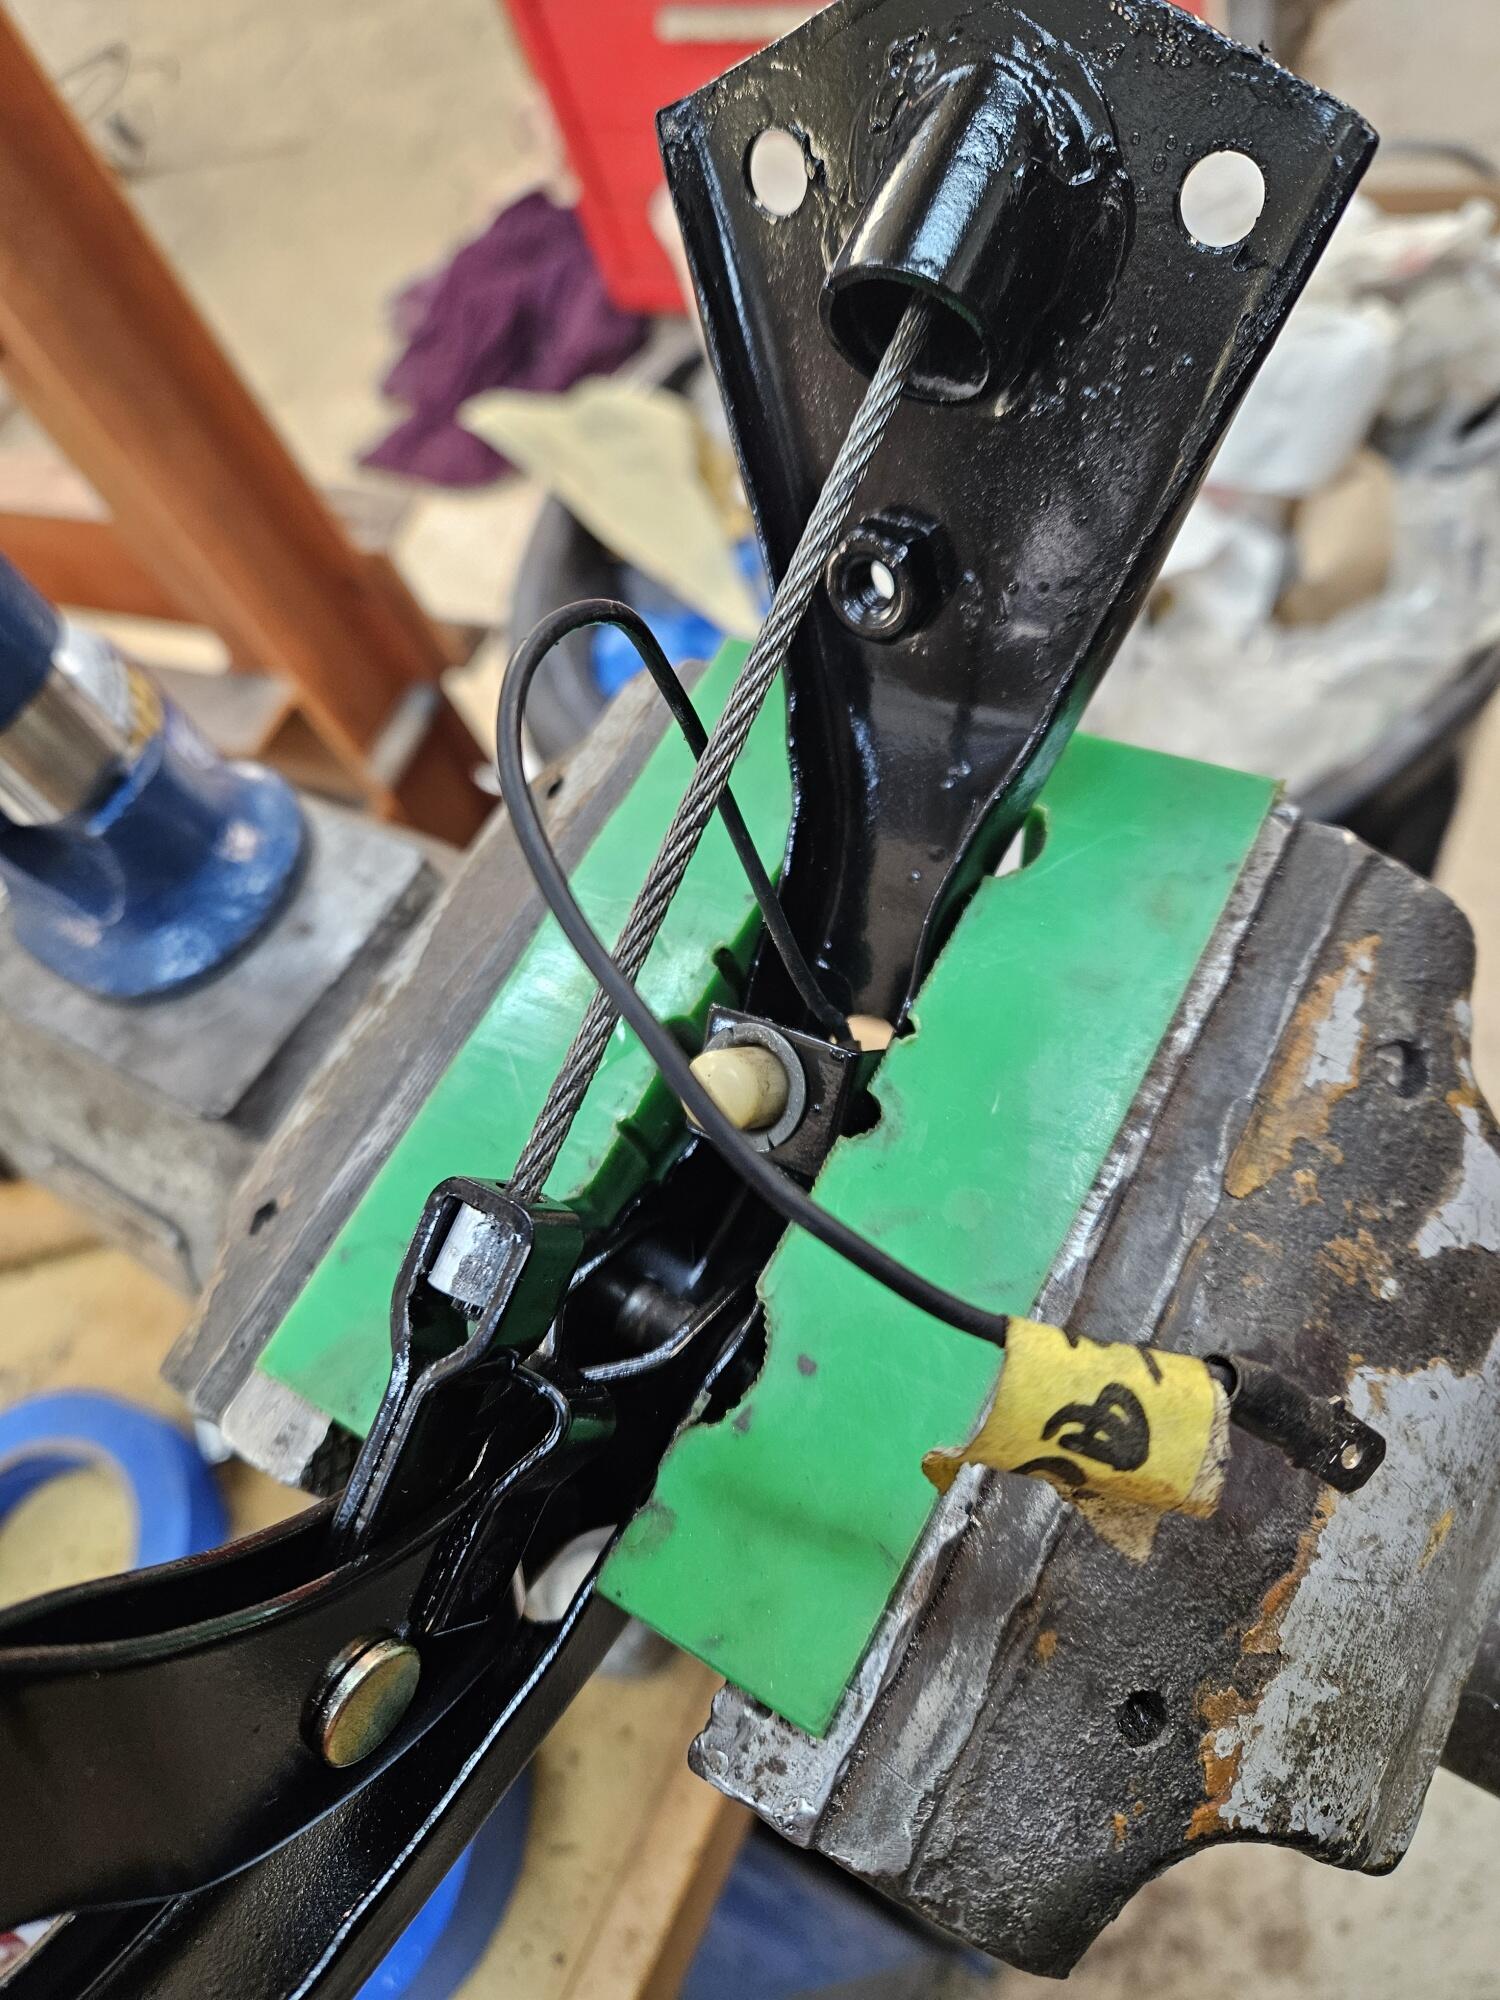
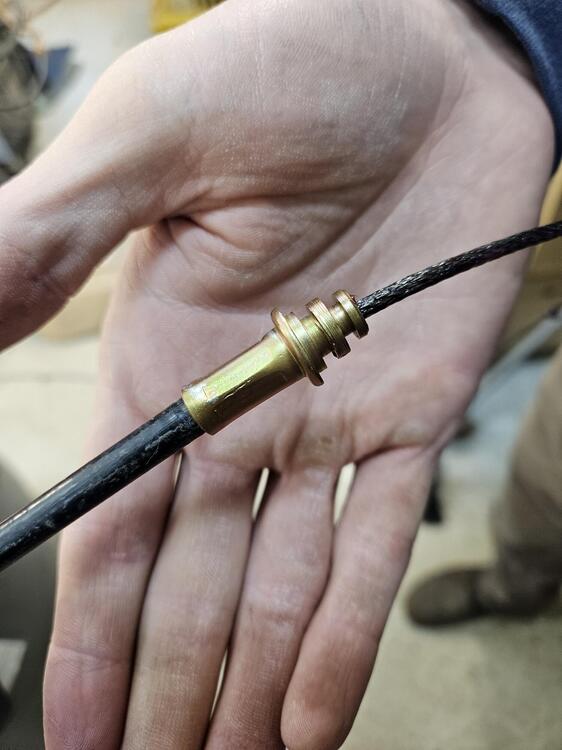
1 pointCody worked on the parking brake some more. We made some bushings. We took bushings and turned the outside down on sandpaper using a long sandper roll on an arbor and then we made to enlarge the ID to make them work. He also put a end on the cable \ He lost one of the clevis pins. Luckily his dad is a hoarder and had a freshly plated one that I made him a deal on. 😉


 1 point
 -
He said he's going to Pertronix II, so there won't be points.1 point
-
Sorry, but what a load of absolute bollocks. Alan has contributed a lot of useful insights over many years not just in this forum, but other forums, as well as on social media, BAT comments etc.. and many of us appreciate the insights, information and knowledge he's shared with us. If you care to look you'll find over 20 years of posts on this forum alone sharing a wealth of information with those open enough to receiving it, especially when it comes to the in period rally cars, the 432's and 432-R's, HS30-H models etc.. and the people involved with these cars at Nissan and beyond. The flat earth comments seem somewhat appropriate given the fact that despite all evidence some people chose to just ignore the facts and continue on believing what they want to believe. Or to quote Jonathan Swift "You cannot reason someone out of something he or she was not reasoned into". This is my opinion after observing many back and forth similar discussions of a similar nature over the years, on here and via other mediums. Over what Nissan's priority for these cars was, and if it was truly designed with an American market as #1 market in mind or not. But also the flat out refusal to acknowledge that series 1, series 2 labels are a very loose naming convention with far too many holes to hold factual weight when looking at these cars with any degree to accuracy or critical thinking in mind. If knowing the facts and understanding what these cars are about and their history with any degree of accuracy is going to put off folks from "joining the club" then perhaps the flat earth society is the right place for them anyway? Or maybe something that's a bit more safe like collecting stamps? I don't know of other car communities for other makes and models where getting the facts right is frowned upon? After all to the right collector/enthusiast the small details (and prices reflected) matter. Take for example the N1 versions of the R32/R33/R34 GTRs, which I view in a similar light to the 432-r's. They command bigger dollars due to their rarity and specialness and it's all the little details that matter. Prices paid, reflect this. Since this thread is about BAT, you can go look at prices on BAT to see what I mean. https://bringatrailer.com/listing/1994-nissan-skyline-r32-gtr-v-spec-ii-n1/ Or to draw another comparison with the Skyline segment, just because Nissan sold a few R32 GTRs into the Australian market (~100 or so), doesn't mean Nissan intended to build them with Australian's only in mind. I mean just typing that out seems preposterous to me. At the end of the day when most North American's refer to cars as being series 1 or series 2, I get what they are 'trying to say'. But the problem is, when you live in other parts of the world (shock horror) these labels are very problematic, because they effectively mean nothing and therefore if you ask 10 different folks what series 1 vs series 2 means you'll often get 10 different ideas (as seen from previous comments in here just recently also).1 point
-
I'm going to downshift to 2nd here - heel and toe of course. I was taught, by employees of Datsun US and several parts mgrs, to refer to all MODELS of their products by the production date. Vins only came into play in a VERY FEW ISOLATED cases. When I get a call from a Z owner who starts the conversation by calling his baby a Series 1.75 I cut him or her off and ask for the PD, just as I was taught by the persons already mentioned.1 point
-
You are - at least - consistent. A quality you share with The Flat Earth Society. A further example of EXACTLY what I have been pointing out. Where does 'Datsun 240Z' come from? You are either in denial or you have not even seen the original. Which is it? Chapter 2 title in original: "Fairlady Z no kaihatsu ni itaru made" (tr: 'Leading up to the development of the Fairlady Z'). Chapter 3 title in original: "Fairlady Z no kaihatsu" (tr: 'Development of the Fairlady Z'). You quote from the 'translated' English language version as though the original Japanese version doesn't exist. I'll keep saying it, the English language version is mis-translated to the level of Bowdlerization. Changing the all-encompassing 'Fairlady Z', 'Maru Z' and 'Z' terms that Uemura san uses to 'Datsun 240Z' completely subverts his original intention. I believe you had a hand in that. You have form. Even so, anybody who reads the English language version should easily see that Uemura san and his engineering team - also Matsuo san and his styling team - were engaged to design, engineer and develop a family of Domestic and Export market variants. The family of variants is mentioned time and time again. These processes took place contemporaneously, with engineering and design consideration for each variant having an impact on the other variants in the family. Uemura san's list of the 5 Chassis Test cars and the 11 Primary Prototype cars clearly show this. I think any engineer worth his salt would understand what this process involves. You simply cannot focus on one particular variant and treat the others as afterthoughts. One more thing. Uemura san includes a quote of some paragraphs from Teiichi Hara's own book (recommended, BTW). Hara san was manager of the First Design Department at Nissan and Uemura san quotes Hara san because he relates a KEY stage in Nissan's Go/No Go stage of the Maru Z project. Without passing this stage, Nissan's senior management simply would not have given clearance for the engineering and styling work to proceed. What was the deciding factor? The deciding factor was the inclusion of the road-going version of the Prince GR8 twin cam engine (the Nissan S20 two litre 24v twin cam six) as an option in the engineering and styling of the Maru Z project. Hara san described this as "A complete victory". Without it, they would not have got the go-ahead for the whole family of variants. It is a very revealing anecdote, the kind that automotive journalists and marque/model scholars set great store by. Will we ever read about this on zhome.com? I'm not holding my breath...1 point
-
This discussion might fit better in a different thread. Not the BAT one..1 point
-
Unfortunately the decision was taken - I don't know by whom - to alter the text in order to make it more palatable to a (presumably?) American audience in the English language version. There are some inexplicable omissions too. Changing 'Fairlady Z' to 'Datsun 240Z' in the title and the text is not a translation. The sense in which Uemura san uses the term 'Fairlady Z' encompasses the whole family of variants in the 'Maru Z' project on which he and his colleagues were working from 1966 through 1969 and beyond. Substituting 'Datsun 240Z' does not. Indeed, it renders some parts of the text illogical and subverts the original intention. It turns an inclusive into a divisive. It also serves to reinforce the mistruth of statements such as "The real story of the Z Car - is carried by the Datsun 240-Z - as specified, as designed, as built for the American market" when Uemura san's original text made it clear that this was not the case. Ironic isn't it?

 1 point
 -
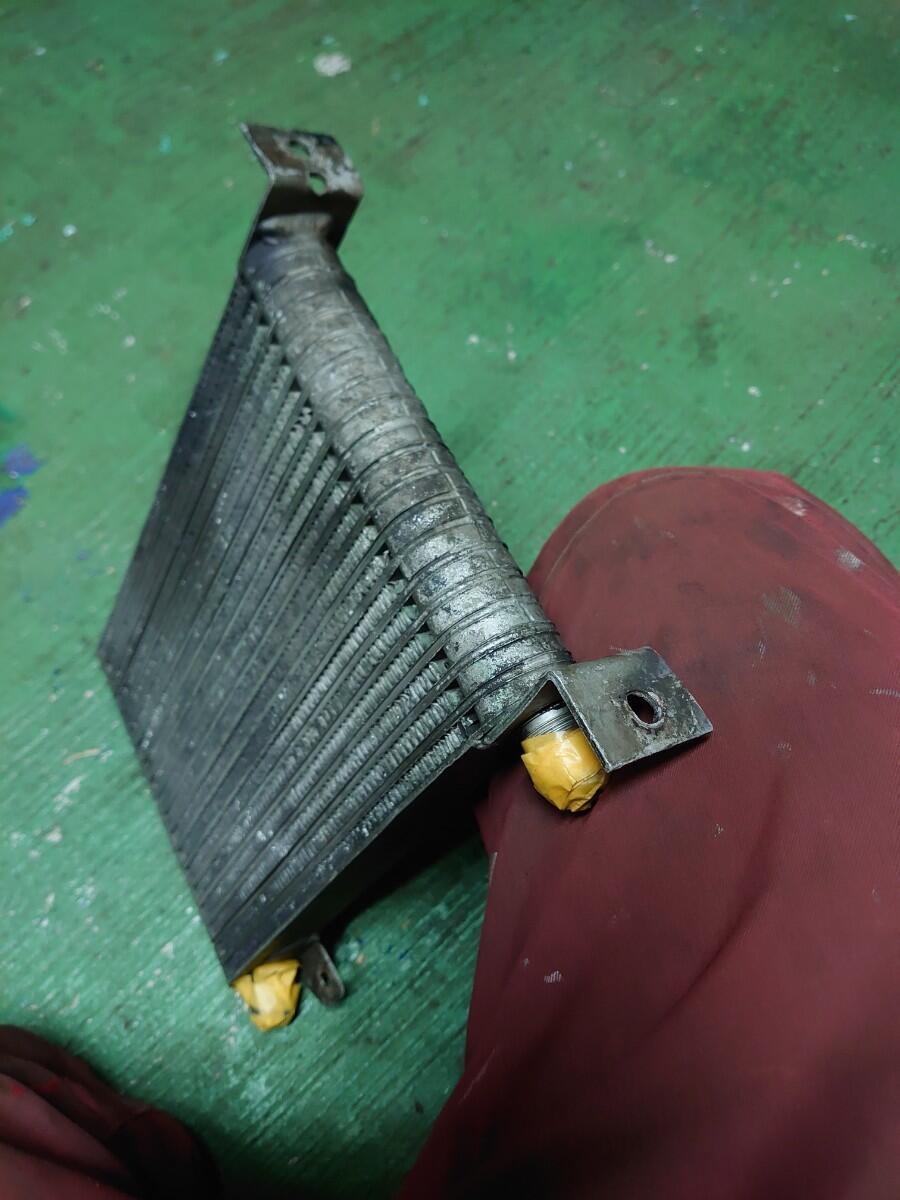
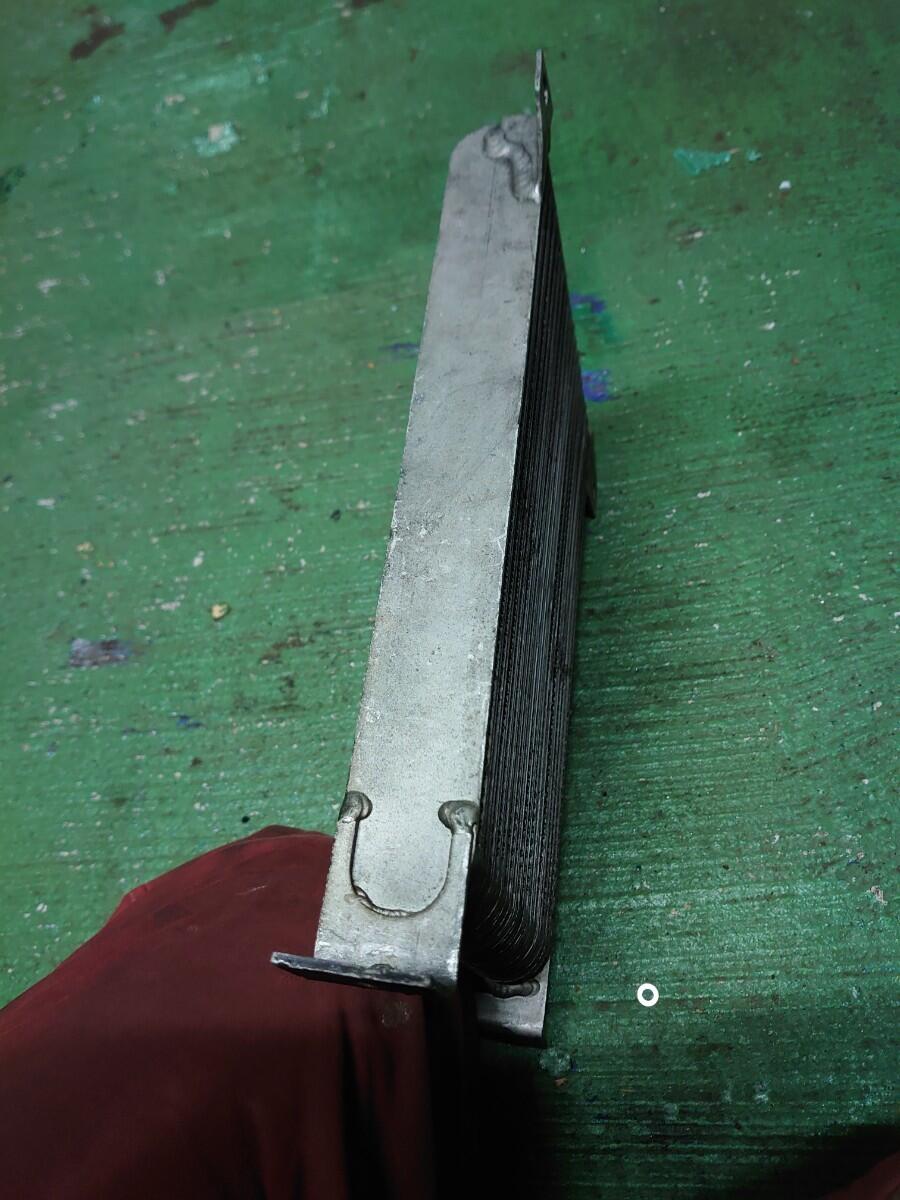
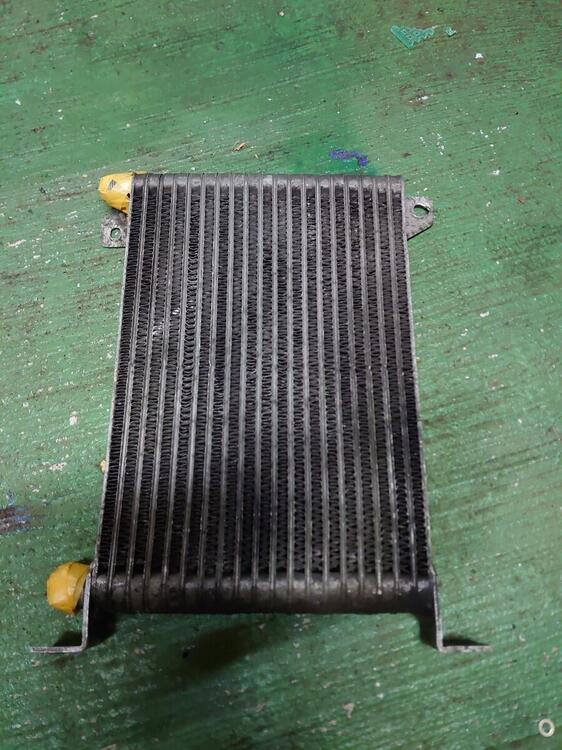
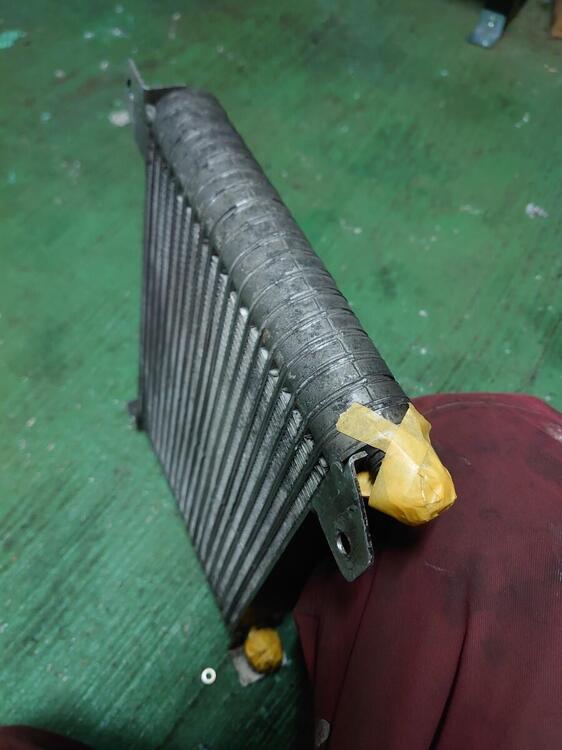
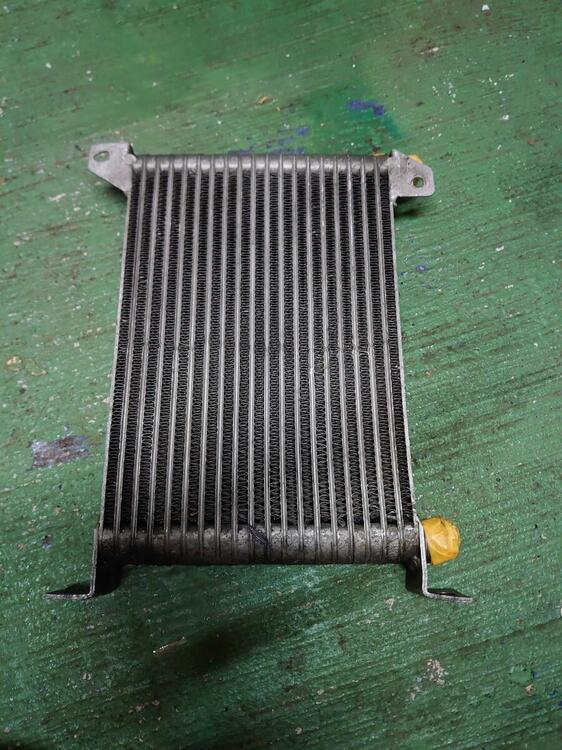
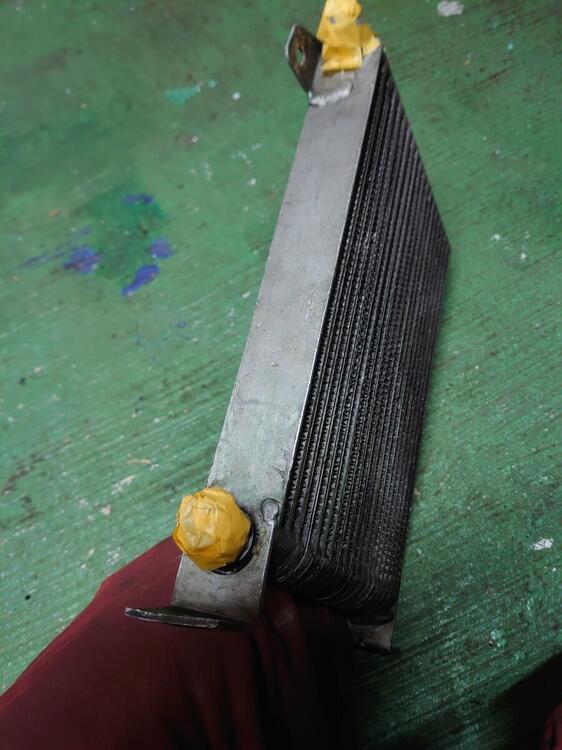
1 pointI suspect that vintage cooler is built as well as anything you could buy today. It's probably repairable and I'm sure it can be cleaned out1 point
-
1 pointOn the topic of the oil cooler, I see 1 on YAJ! at the moment. https://page.auctions.yahoo.co.jp/jp/auction/f1110675683 Saving the photos here so when the auction ends they will be visible in future. Do you know if anyone reproduces these coolers? They are cool, but not sure about using an old expired part like this - especially contaminated with old oil.

 1 point