Leaderboard
-

Zed Head
Free Member5Points19,238Posts -
Carl Beck
Free Member4Points5,043Posts -
zKars
 Subscriber
 4Points3,770Posts
 -
Marty Rogan
Free Member3Points1,617Posts


Popular Content
Showing content with the highest reputation on 11/05/2020 in all areas
-
3 pointsThanks to everyone for the help. Especially to @heyitsrama and @jonbill for the detailed analysis and suggested corrective actions. I passed them on to our Sys. Admin. and he was able to implement the cure. 🙂3 points
-
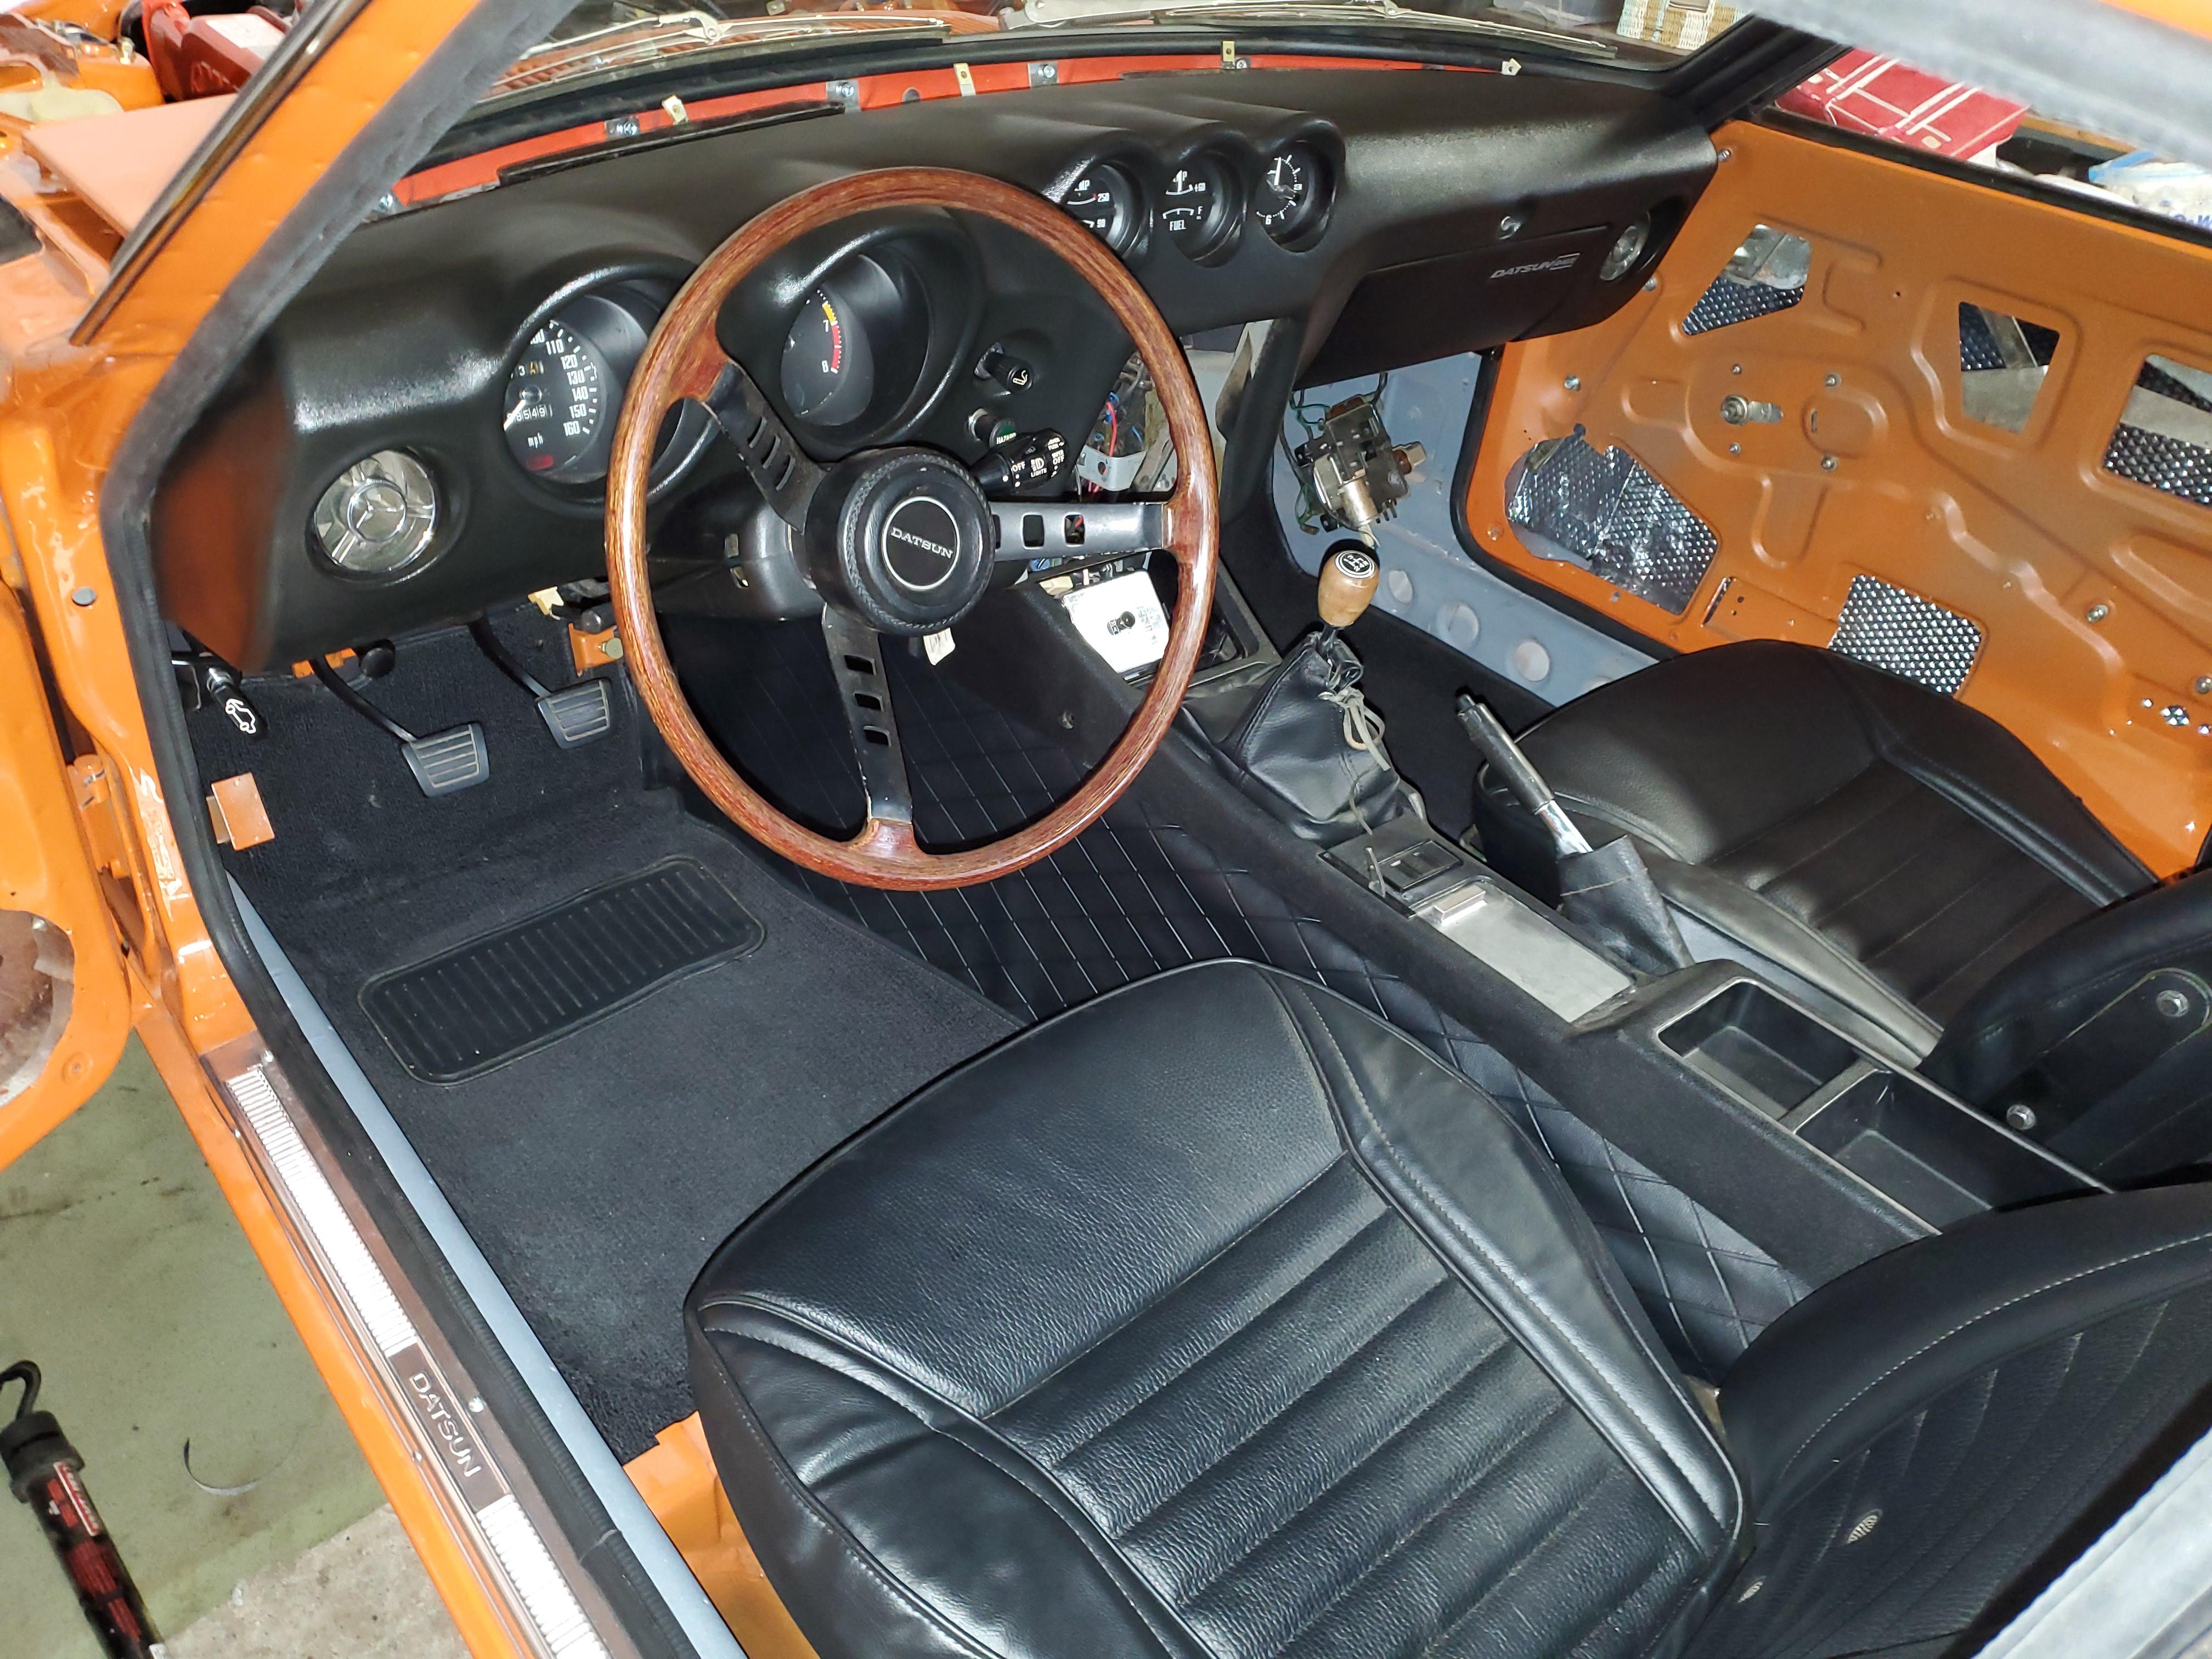
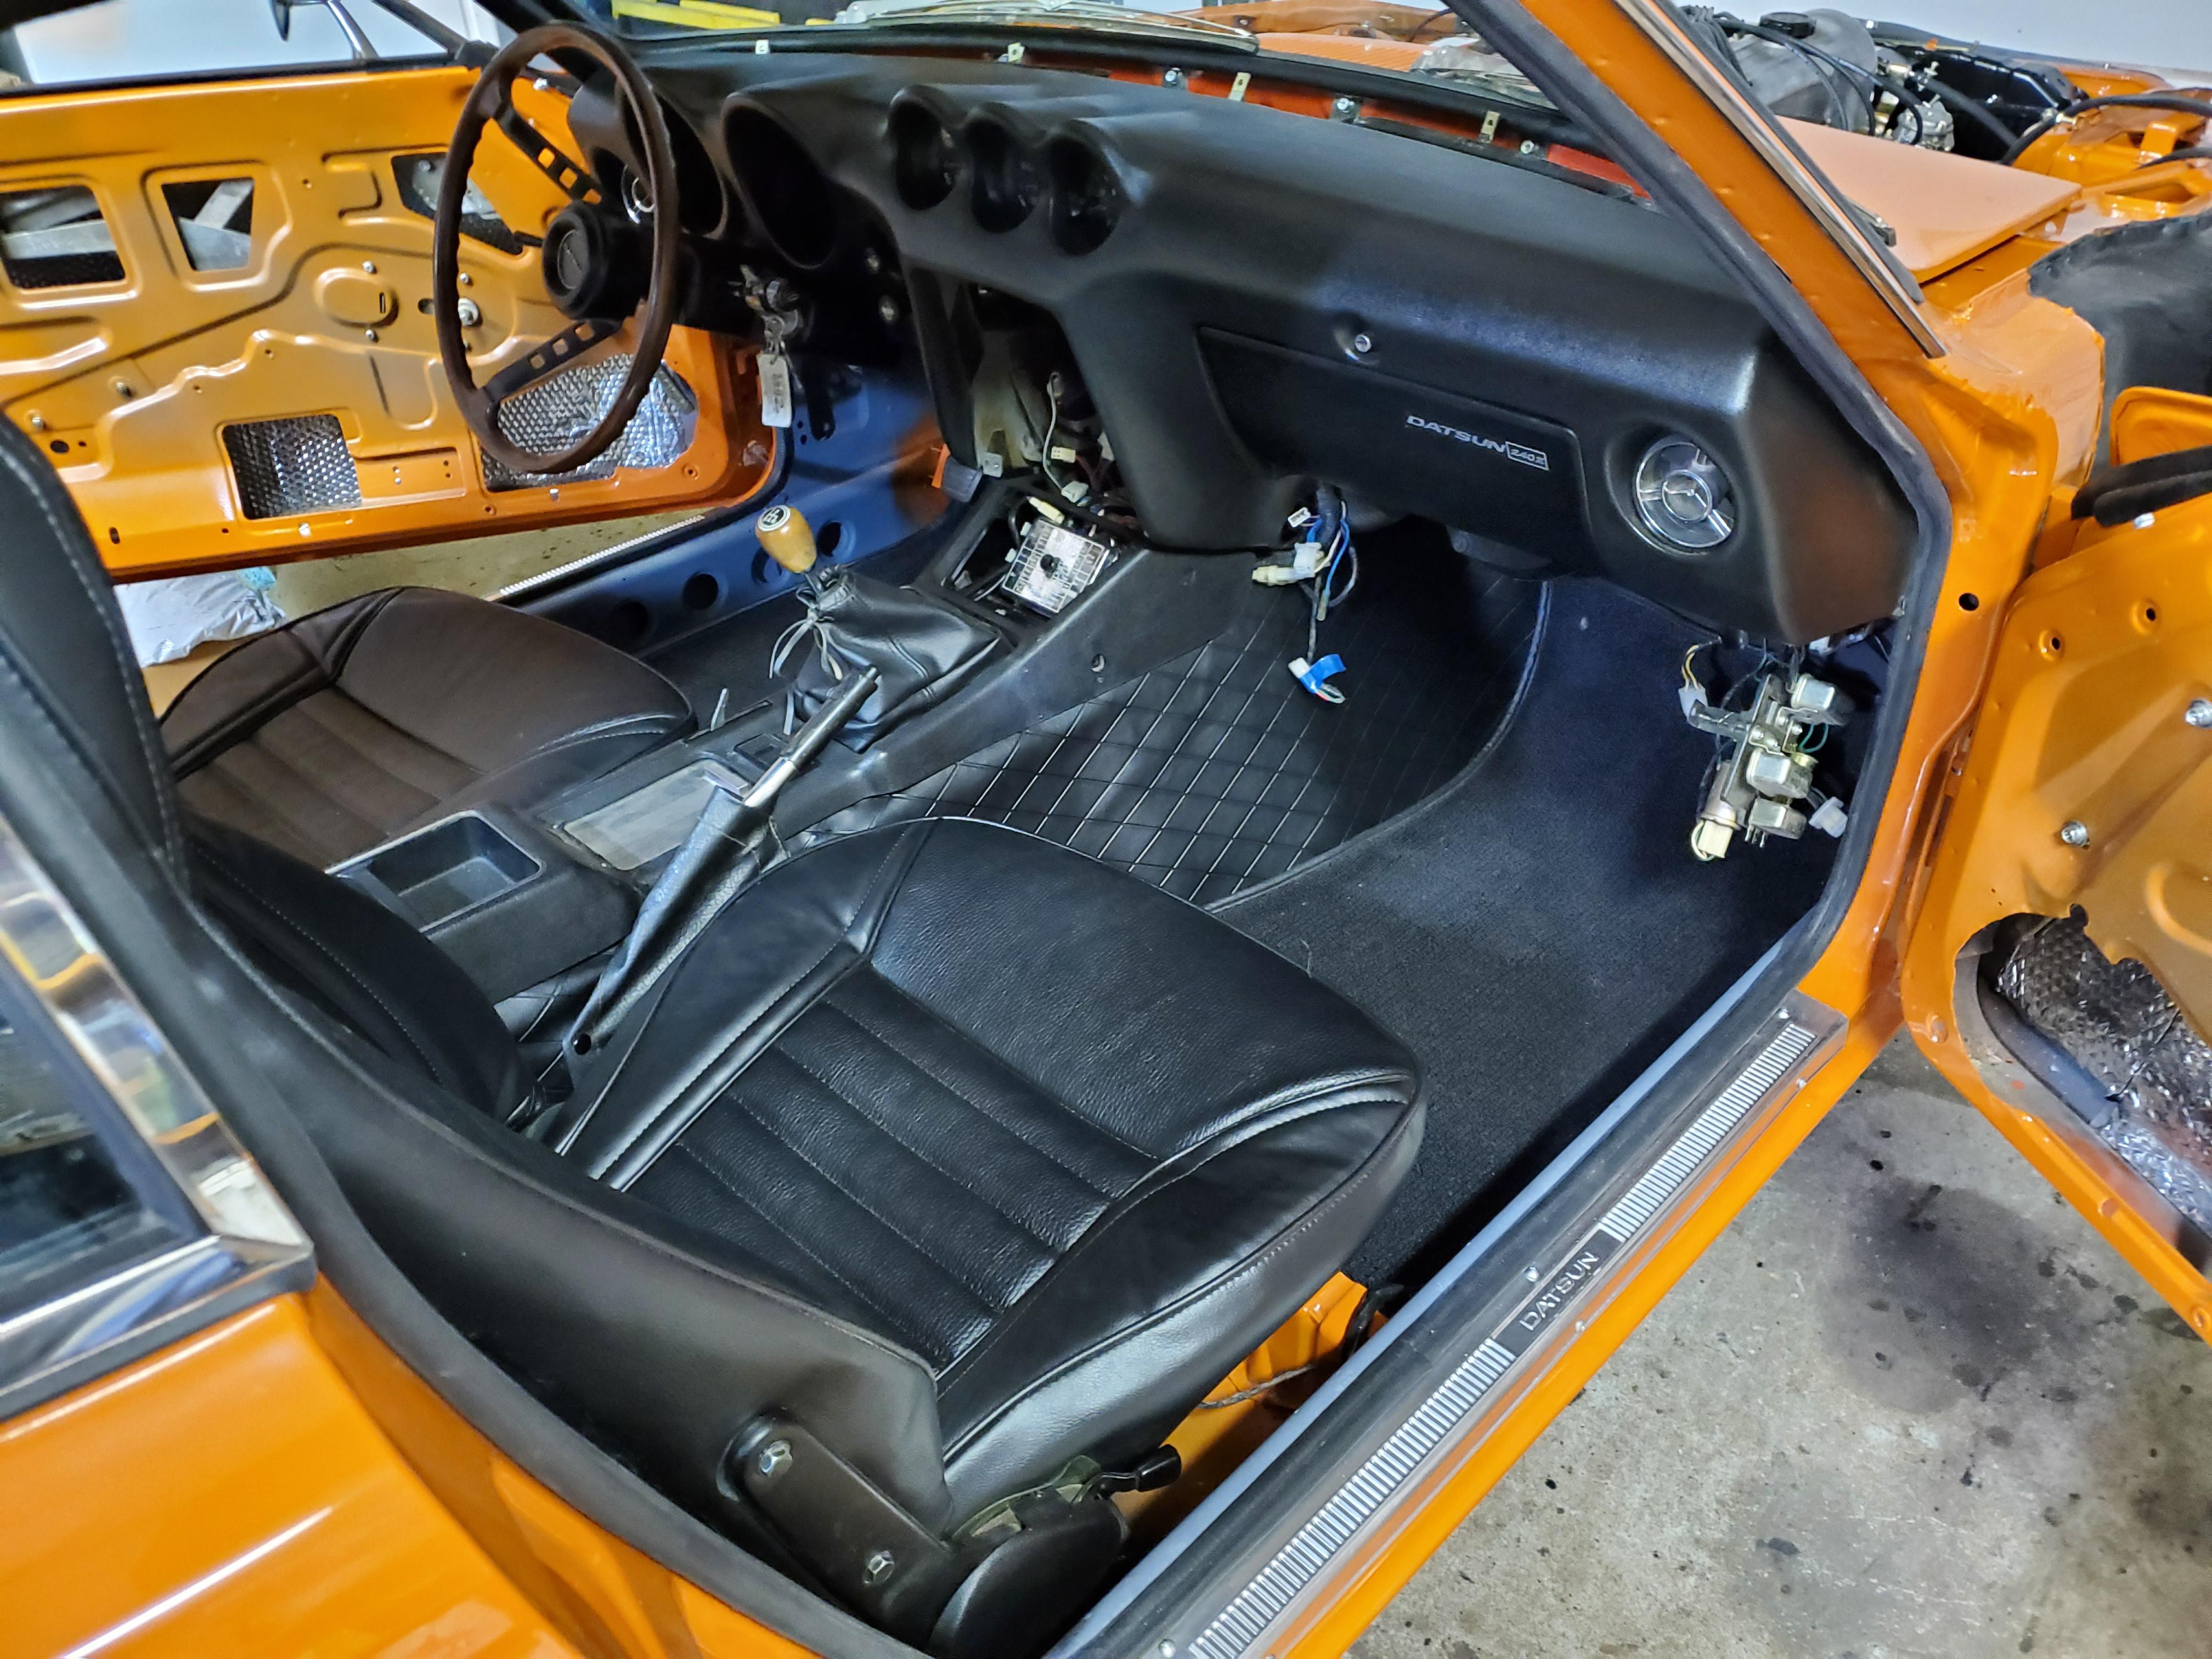
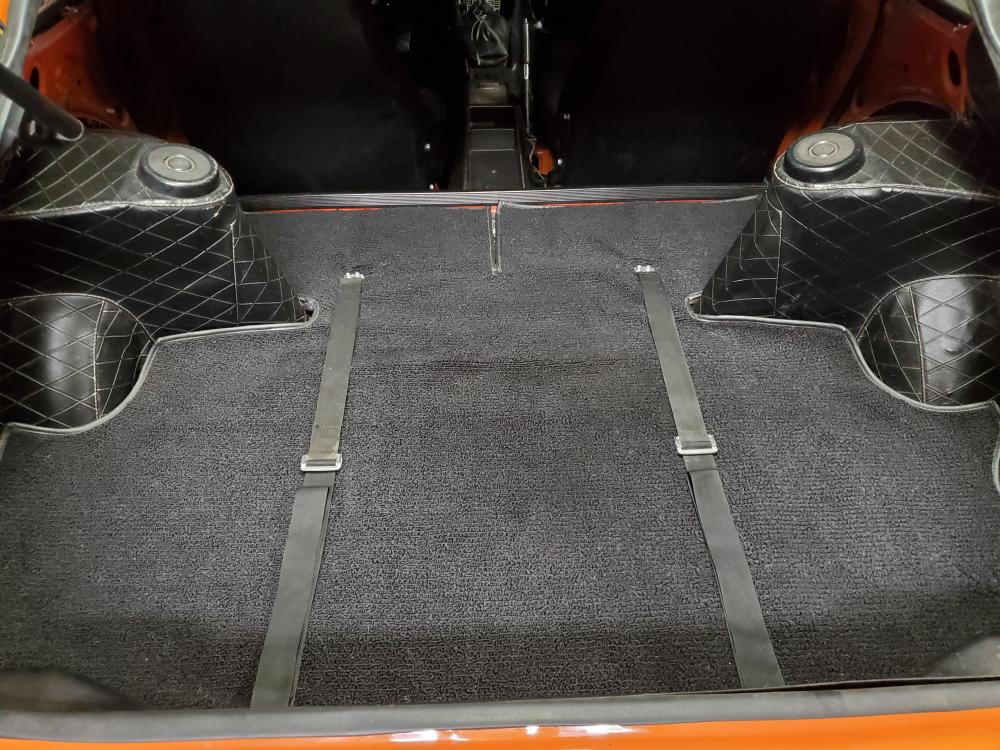
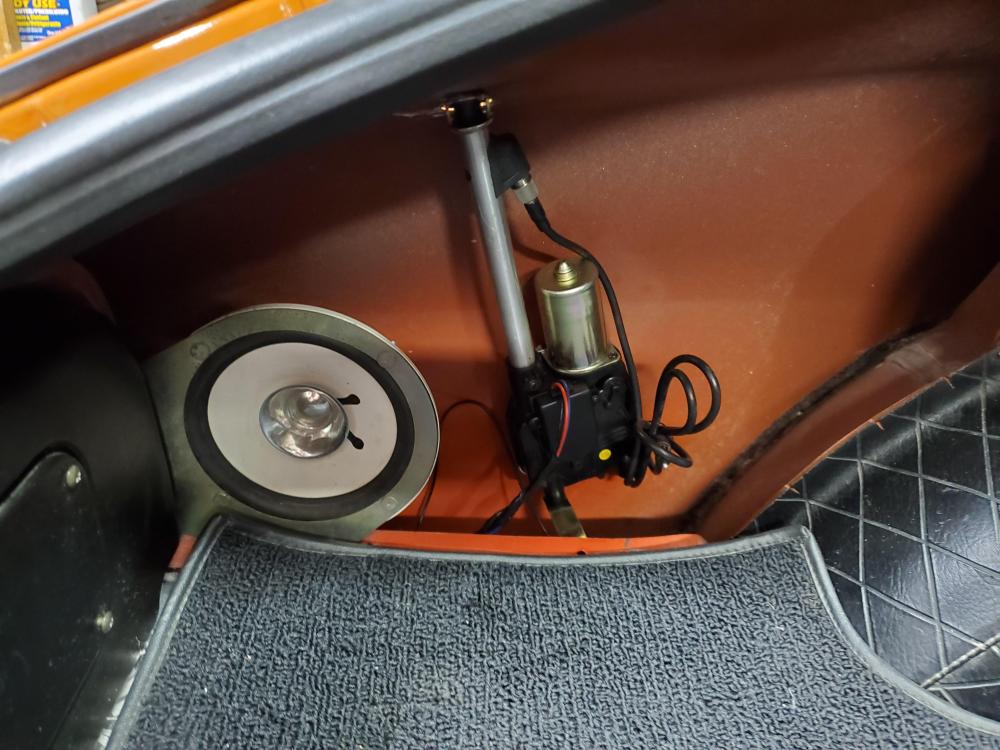
3 pointsContinuing the interior work. Got the center console vinyl installed along with the dash. Have most of the electrical connections made. Also installed rear hatch weather stripping, luggage straps and speaker. Finishing up the battery cables. Should have her running this Saturday.


 3 points
 -
So many Z's, of all numerologies, have popped up that I thought it might be good to collect them here. Feel free to add old or new stuff. There's a bunch out there right now, for some reason. https://bringatrailer.com/listing/1975-datsun-280z-26/ https://bringatrailer.com/listing/1976-datsun-280z-38/ https://www.classiczcars.com/forums/topic/64614-1270-on-ebay-barn-find/ https://www.classiczcars.com/forums/topic/62501-brand-new-280z/ https://www.classiczcars.com/forums/topic/64653-1970-nissan-fairlady-z-hs30-03647-on-craigslist/ https://www.classiczcars.com/forums/topic/64539-31k-miles-series-i-240z-up-for-auction-on-bat-over-100k-on-first-day/ Edit 11 9 20 A couple of new ones. https://bringatrailer.com/listing/1971-datsun-240z-158/11 10 A confused ZX is up... https://bringatrailer.com/listing/1979-datsun-fairlady-280z/ 11 11 Another 78 https://bringatrailer.com/listing/1978-datsun-280z-79/ 11 12 The 355 76 280Z - thanks ollie. There are a lot of Z's popping up. Reminds me of right after I got mine and the wrecking yards always had something. No more. https://bringatrailer.com/listing/1976-datsun-280z-39/ 11 21 https://bringatrailer.com/listing/1973-datsun-240z-145 https://bringatrailer.com/listing/1973-datsun-240z-137/ 11 25 https://bringatrailer.com/listing/1972-datsun-240z-141/ 11 27 https://bringatrailer.com/listing/1972-datsun-240z-151/ From lonetreesteve https://denver.craigslist.org/cto/d/henderson-1972-datsun-240z-low-miles/7225870950.html 11 28 From lonetreesteve's post https://kansascity.craigslist.org/cto/d/kansas-city-1973-datsun-240z-parts-or/7237380548.html https://bringatrailer.com/listing/1981-datsun-280zx-turbo-6/ 12 1 https://bringatrailer.com/listing/1978-datsun-280z-80/ 12 4 https://bringatrailer.com/listing/1972-datsun-240z-156/ https://bringatrailer.com/listing/1973-datsun-240z-146/ https://bringatrailer.com/listing/1974-datsun-260z-40/ 12 7 https://www.ebay.com/itm/1971-Datsun-Other/264964354469?_trkparms=aid%3D888008%26algo%3DDISC.CARDS%26ao%3D1%26asc%3D20200220090753%26meid%3Dae4f76d8b3594d12a34b0f7e4337eeb2%26pid%3D100009%26rk%3D1%26rkt%3D1%26sd%3D224263144994%26itm%3D264964354469%26pmt%3D0%26noa%3D1%26pg%3D2047675%26algv%3DDiscV1&_trksid=p2047675.c100009.m1982 https://www.ebay.com/itm/1971-Datsun-240Z/224254524928?_trkparms=aid%3D888008%26algo%3DDISC.CARDS%26ao%3D1%26asc%3D20200220090753%26meid%3Dae4f76d8b3594d12a34b0f7e4337eeb2%26pid%3D100009%26rk%3D1%26rkt%3D1%26mehot%3Dpp%26sd%3D224263144994%26itm%3D224254524928%26pmt%3D0%26noa%3D1%26pg%3D2047675%26algv%3DDiscV1&_trksid=p2047675.c100009.m1982 12 8 https://bringatrailer.com/listing/1978-datsun-280z-22-7/ 12 9 https://bringatrailer.com/listing/1973-datsun-240z-150/ (lonetree's #155 post) 12 10 https://losangeles.craigslist.org/wst/cto/d/torrance-1970-datsun-240z-low-vin-738/7244637837.html (lonetree #150) 12 11 https://bringatrailer.com/listing/1976-datsun-280z-41/ https://bringatrailer.com/listing/1971-datsun-240z-162/ 12 17 https://bringatrailer.com/listing/1977-datsun-280z-48/ https://bringatrailer.com/listing/1978-datsun-280z-81/ 12 21 https://bringatrailer.com/listing/1973-datsun-240z-143/ 12 24 https://bringatrailer.com/listing/1972-datsun-240z-157/ https://bringatrailer.com/listing/1971-datsun-240z-156/ 1 1 21 https://bringatrailer.com/listing/1979-datsun-280zx-21/ 1 14 21 https://bringatrailer.com/listing/1973-datsun-240z-149/ 1 19 21 https://bringatrailer.com/listing/1982-datsun-280zx-17/ 1 25 21 https://bringatrailer.com/listing/1972-datsun-240z-159/ https://bringatrailer.com/listing/1981-datsun-280zx-19/ 1 26 21 https://bringatrailer.com/listing/1978-datsun-280z-84/ 1 27 21 https://bringatrailer.com/listing/1972-datsun-240z-163/ 1 29 21 https://bringatrailer.com/listing/1978-datsun-280z-82/ 2 1 21 (look at the date!) https://bringatrailer.com/listing/1973-datsun-240z-151/ 2 2 21 https://bringatrailer.com/listing/1972-datsun-240z-161/2 points
-
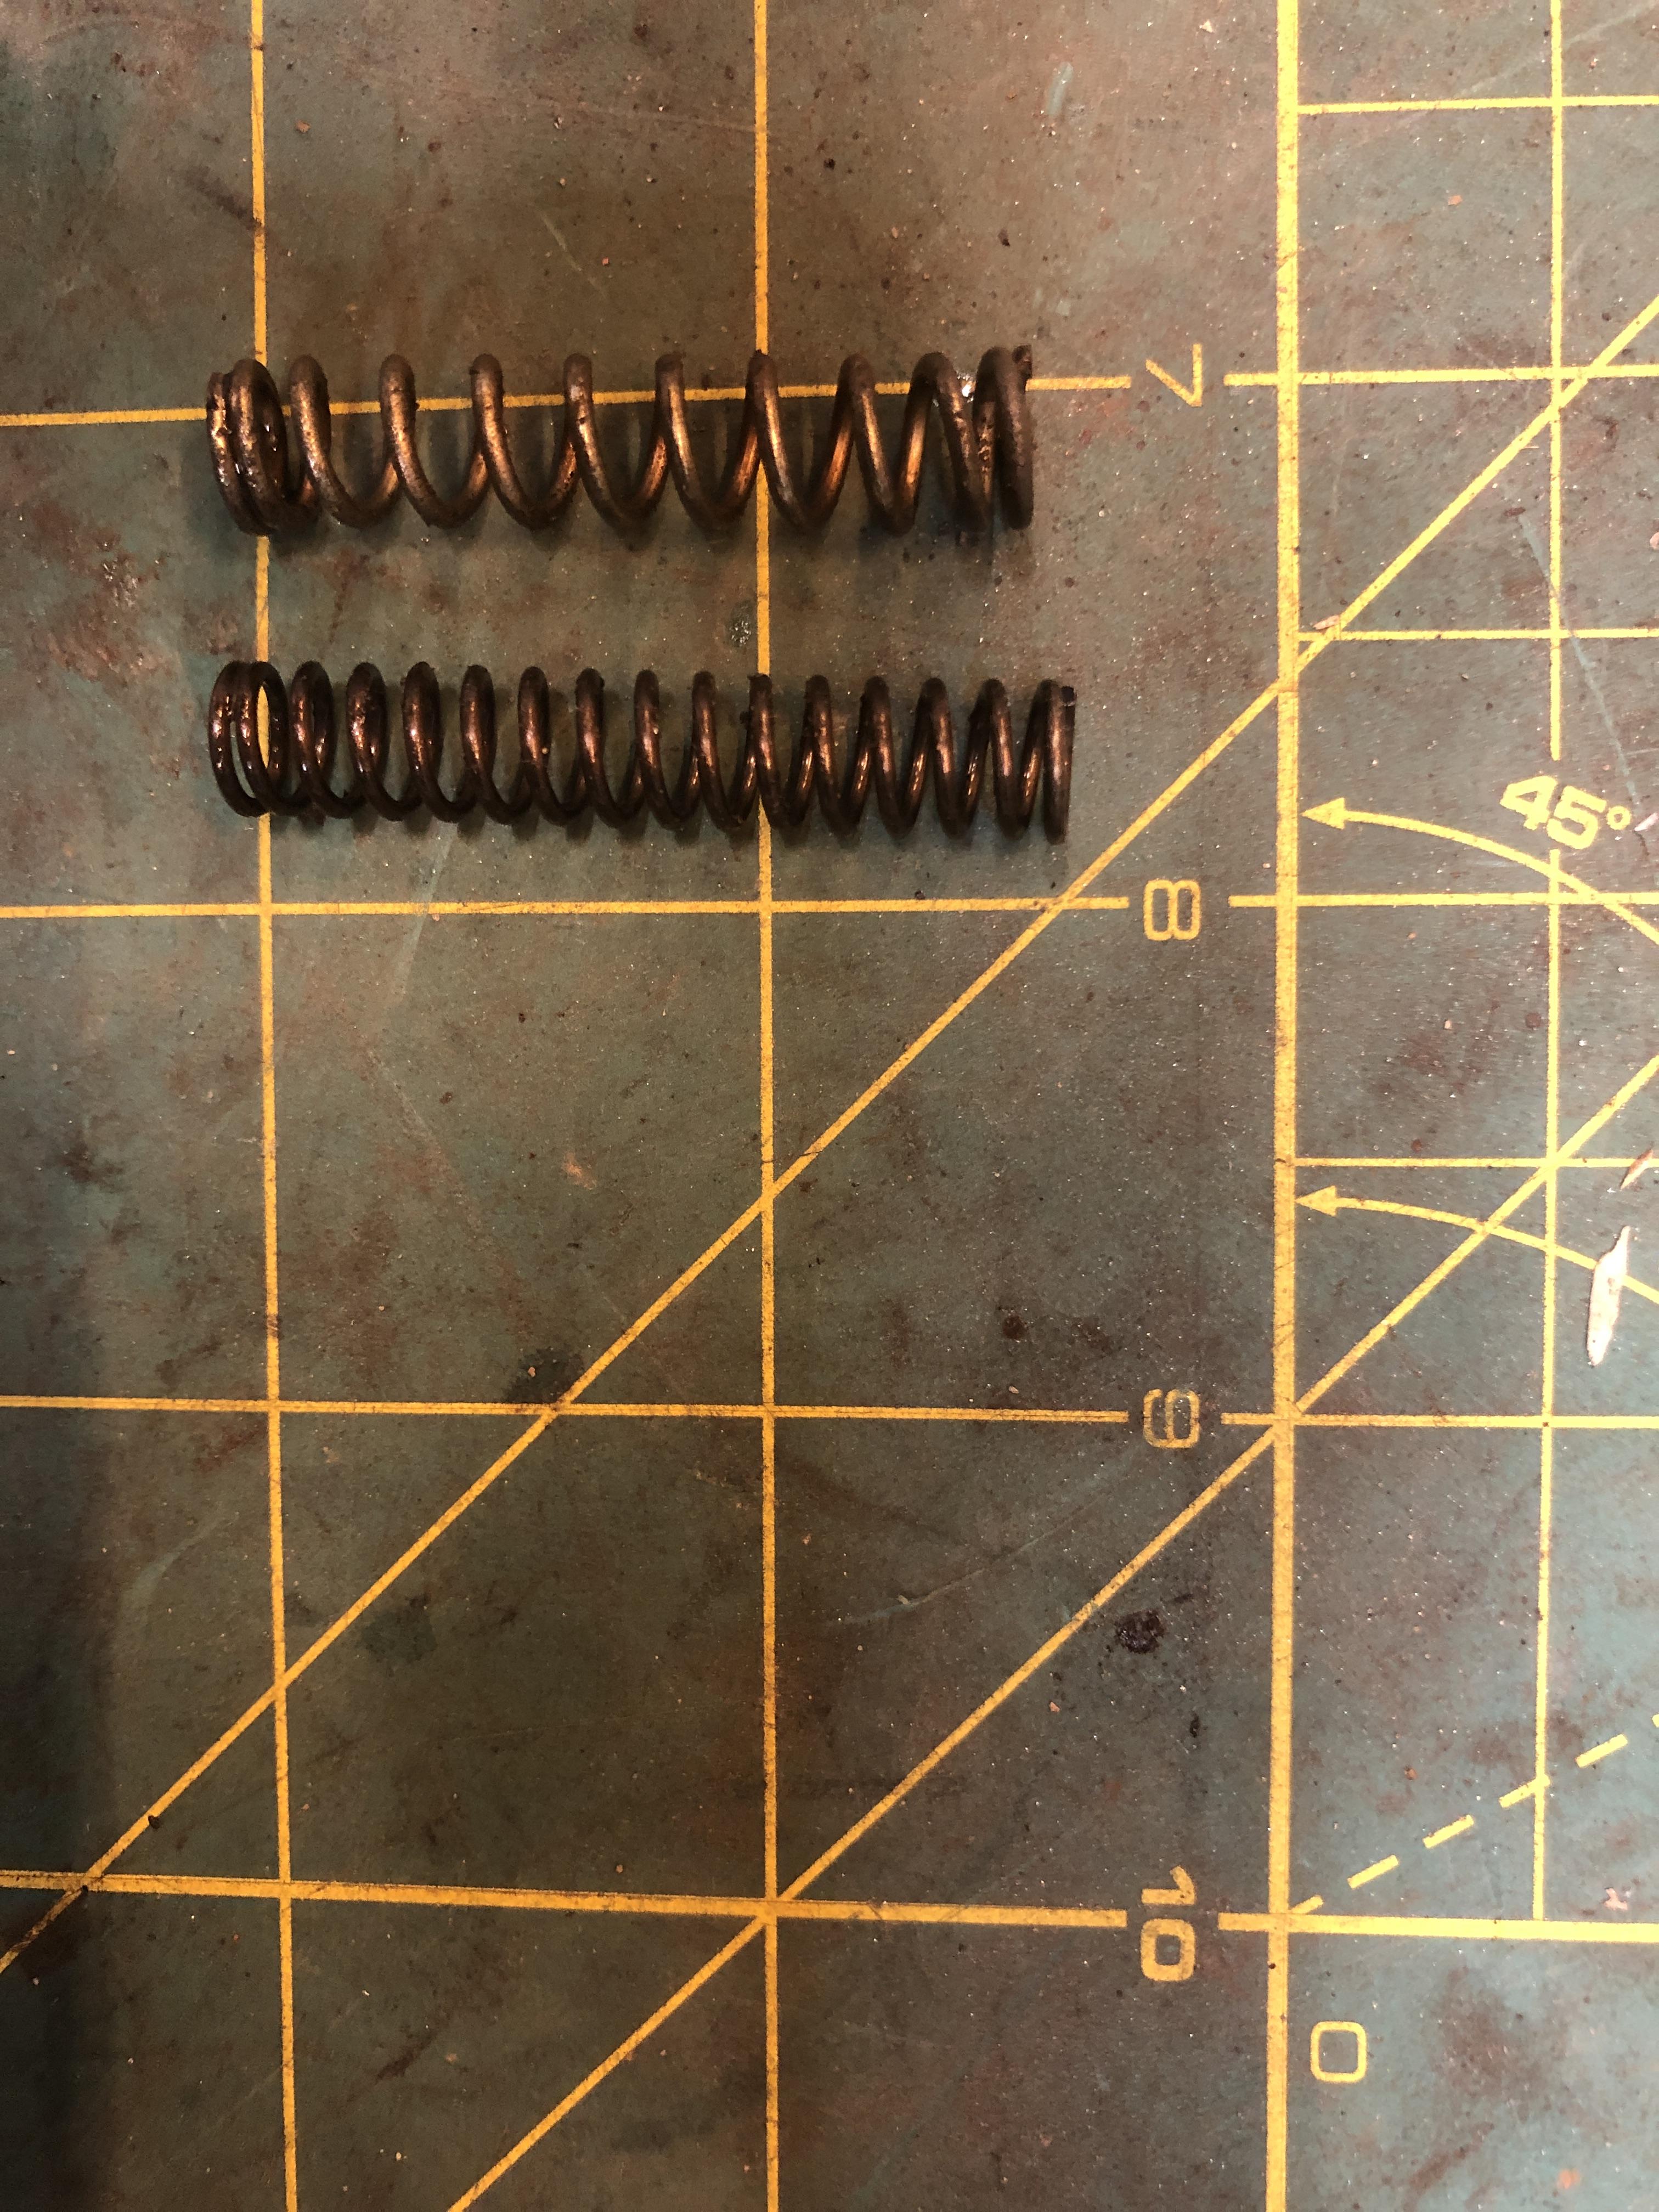
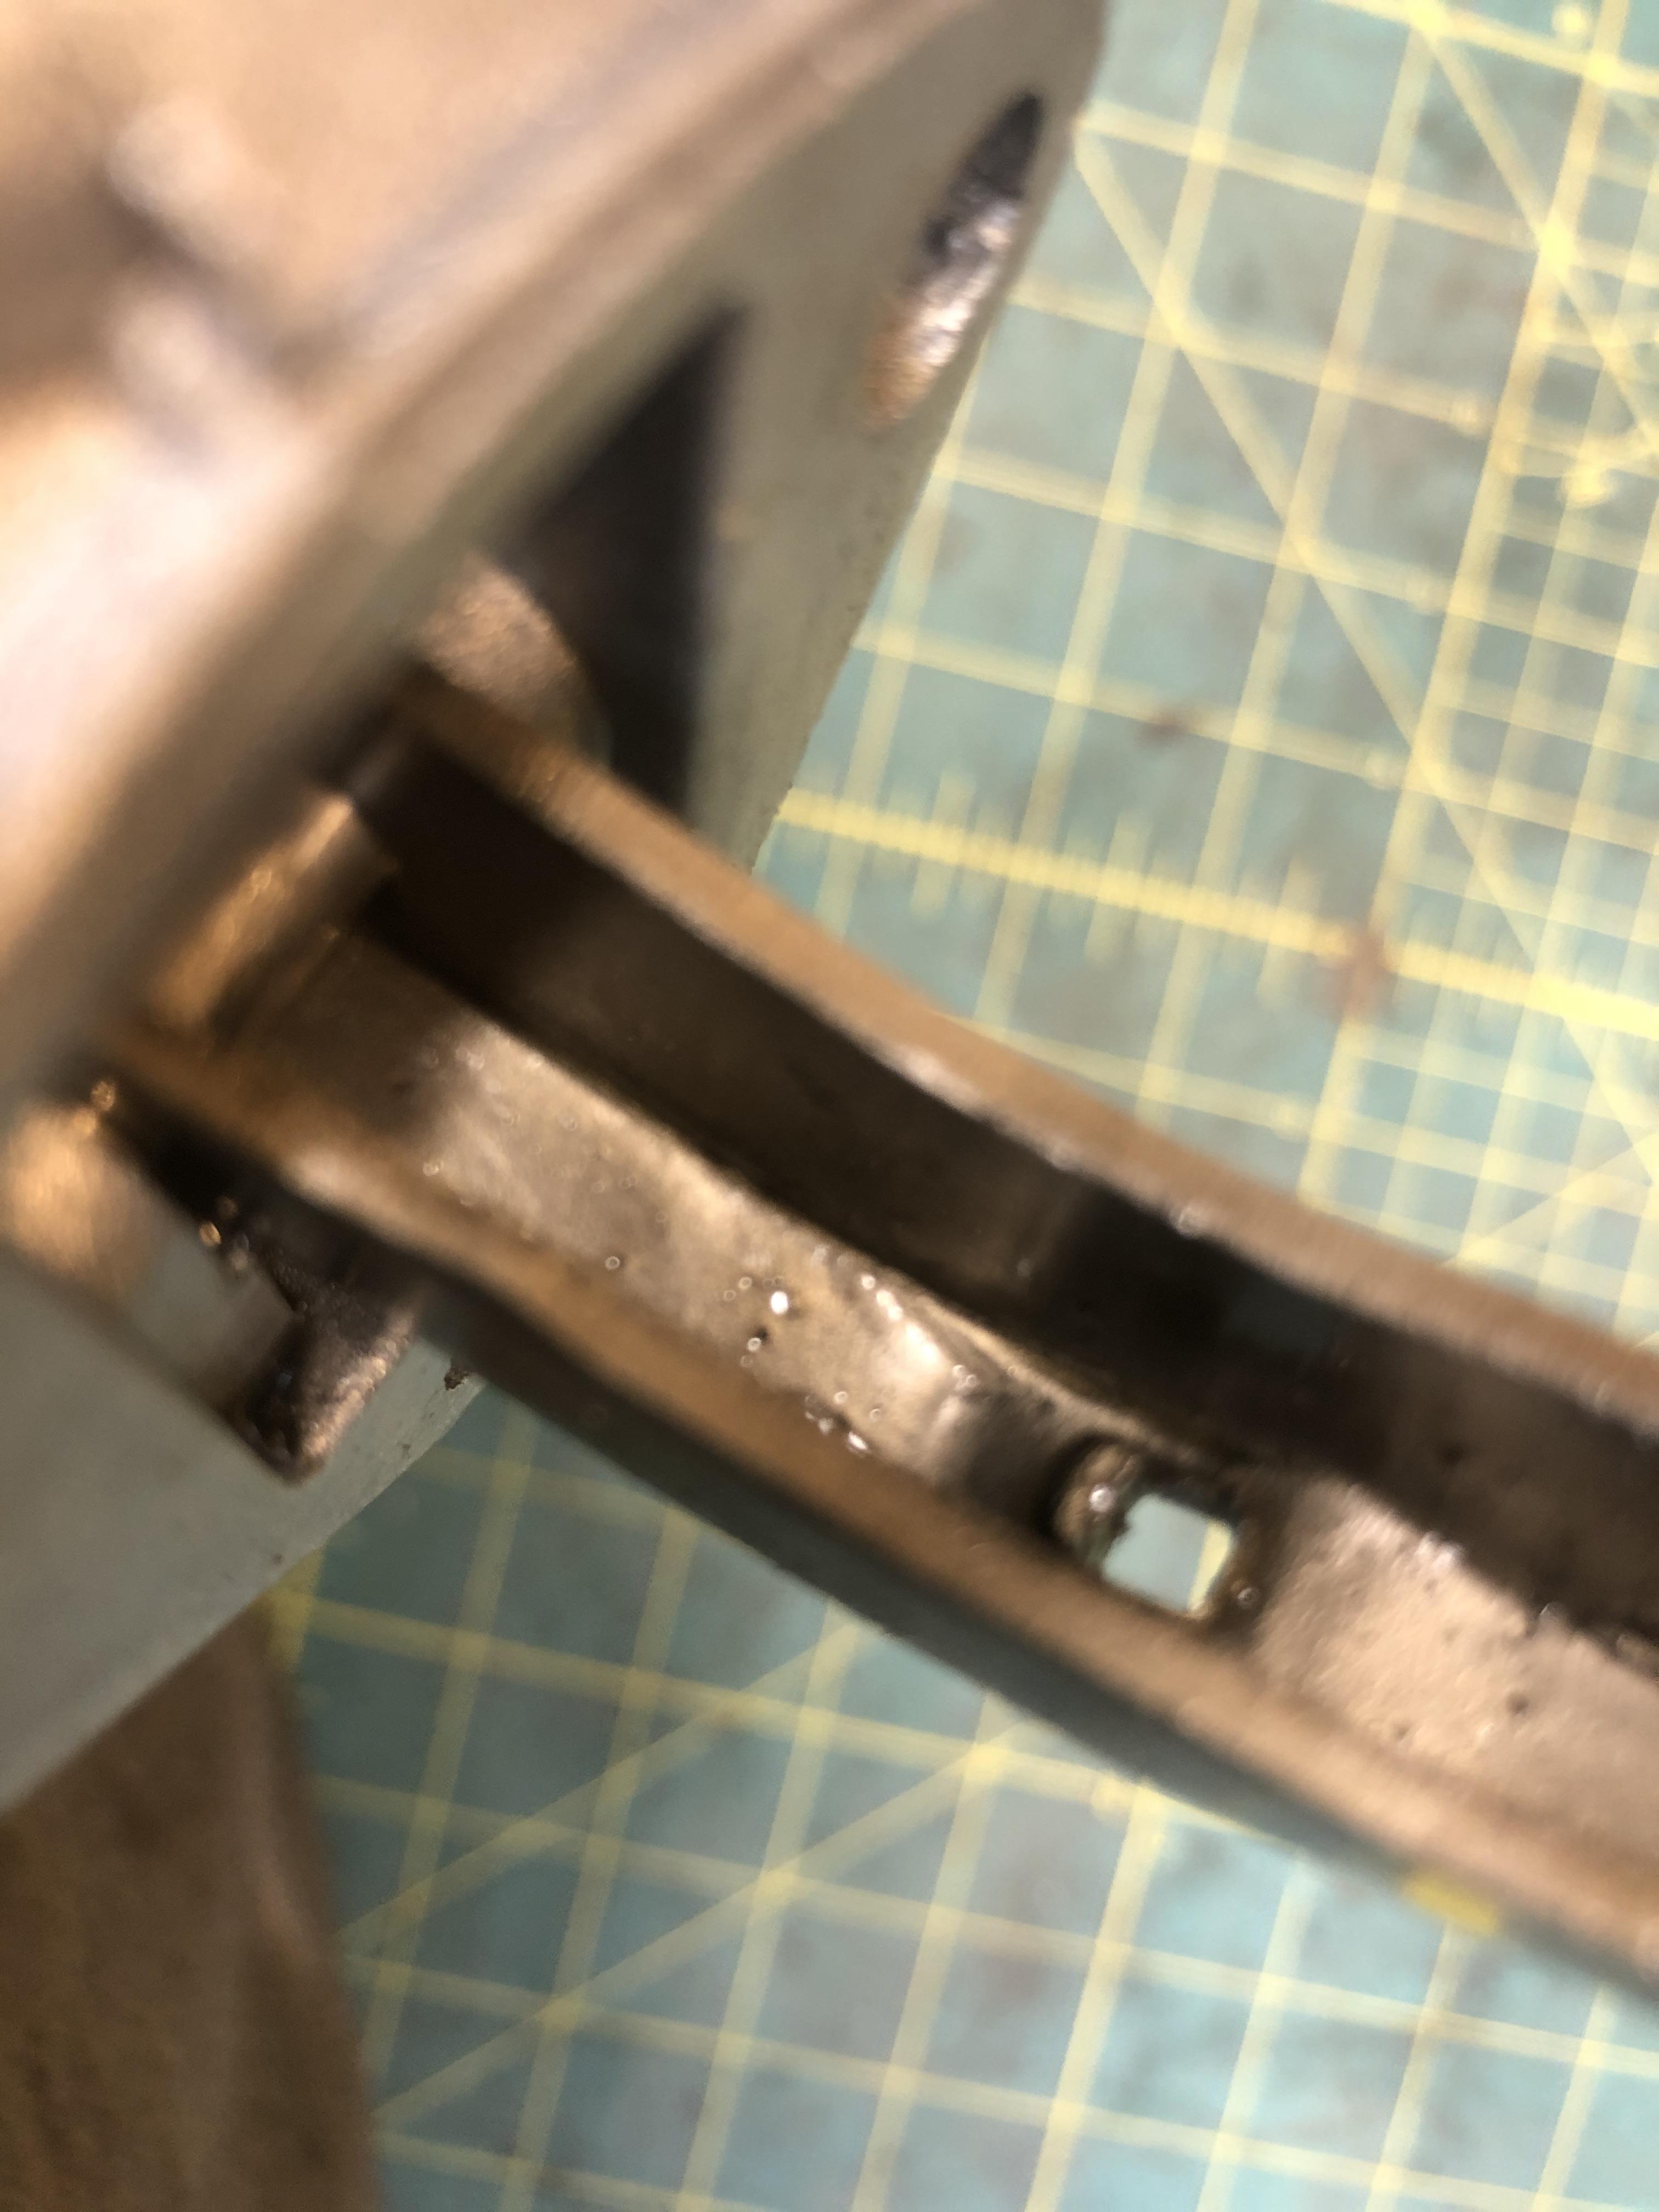
2 pointsI have addition news on the topic. This week I had reason to replace a stock pump on a very old and neglected 71 that i was trying to resurrect. I was just doing a quick job to try to get it running, so I grabbed one the new GMB’s I had laying around that i was previously investigating, Anyway, took them both apart, and slapped the top of the old Nikki (look fine) on the bottom of the new GMB and stuck it on the car. My prior guess about the GMB check valves being bad made me do that. It sucked fuel and I got the car started (another thread about Doing it for the first time in 40 years).... That was Tuesday afternoon/evening. Maybe ran the car for 30 minutes on and off. This morning I cleaned the carbs more and tried to start the car again. Guess what. No sucky, no pumpy. You have GOT to be kidding me. So long story short. The failure mode on this pump is no mystery. The pivot point on the mechanical arm seized up preventing the arm from being able to oscillate. It didn’t seize up solid, you can move it easily, but it was stiff for lack of a better term. The spring is not strong enough to push it back when it is in the up position. I have video of me moving the arm and having it stick/stay in the min and max position. The spring, when compared to an OEM spring is about 1/3 the compressive strength. This is a rough feel test, but it is MUCH weaker. I also found the spring laying loose in the arm, dislodged from its end points. It might be weak enough that it falls out after a bit of use, and the pump stops working as the arm has no ability to return to the “out” position. No amount of lube sprayed at the pivot point changed the friction one iota. The friction is smooth, is just much too high to allow the pump to operate what that wimp of a spring. I did put the stronger OEM spring in for a test, it was not strong enough to return it. An OEM pump arm is totally loose, nearly floppy on the pivot point. I have yet to check two other new GMB pumps I have to check if the rotation friction at the pivot is less or the same. I did initially put the pump in the vise and manually actuate it when I swamped the tops, and it felt normal and returned itself with the spring pressure. I’m also thinking that you are also actuating the diaphragm, stretching it up and down, as the arm moves which provides some additional spring pressure to the system. Is this enough to overcome the friction I have in this pump? No. Clearly without the spring in place, in this pump, it cannot and does not operate with the diaphragm spring effect alone. It worked initially, then quickly failed. 59DCDAF7-8D95-4CBB-BB6F-CDF83CDCDBBA.MOV OEM top, GMB bottom Little tab at the end holding spring The other spring perch is just a little bump. In its defense, the OEM pump uses more or less the same way to capture the spring. There is a geometric difference, as with the GMB spring, when you actuate the arm, the spring just BENDS as much as compresses. The OEM pump does more or less the same thing, just less bend, more compression. This contributes to the willingness to dislodge I believe.


 2 points
 -
Very cool (in a hot sort of way, that is). NHRA top-fuel class beckons2 points
-
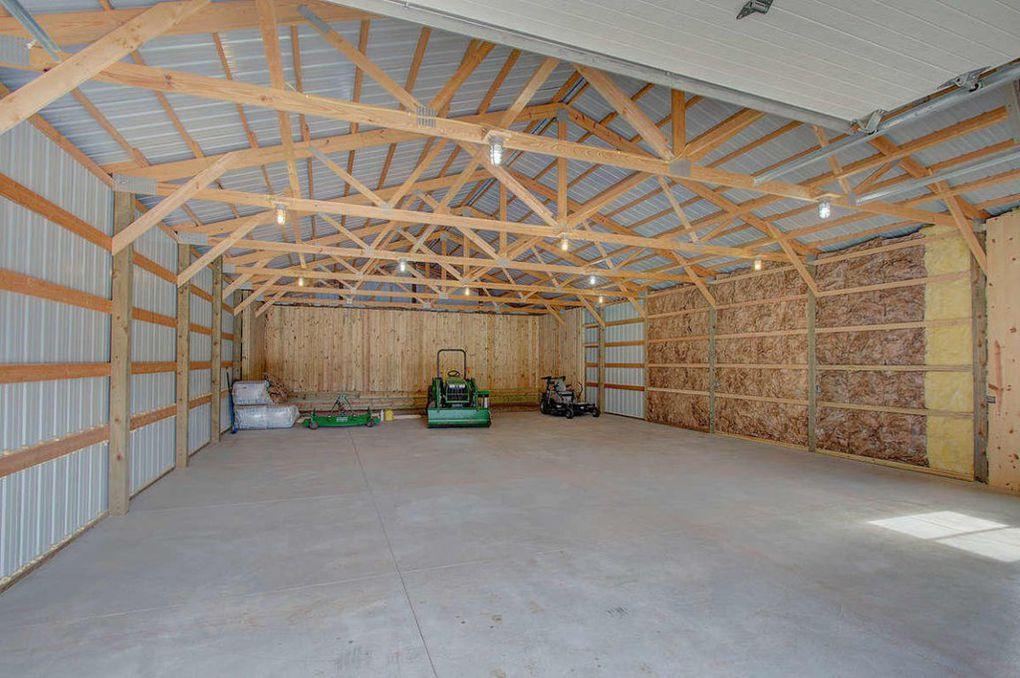
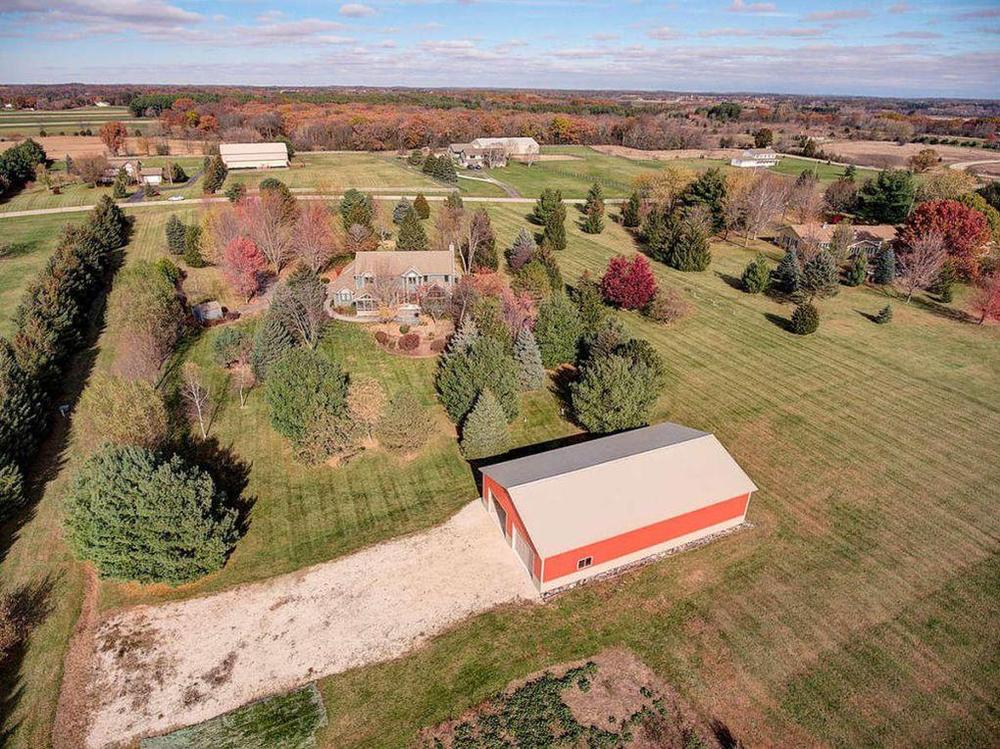
1 pointHey guys, It has been my dream for many years to move to a spot where I could build my dream garage. Well, this year my dream was realized. We moved to a new house and I did not even need to build the garage. It came with a 36'x64' Pole Barn!! The barn is a great space. It really is a blank canvas at this point though. I have the shell, but I need to finish the interior. The previous owner got a start on the wiring and putting up some insulation and walls. They also left an area at the back in gravel, with the intent of building in 3 horse horse stalls. The first thing I will need to do is to get that filled in with concrete. After that I want to have an asphalt driveway put in. I had a gravel driveway put in this year as a temporary step, so I could get to the barn without having to drive over the lawn. This year I was consumed with working on the house and getting it to a point where the wife is happy with it. Is that even possible, LOL!! She always comes up with more stuff to do, or things she wants to add. So, next year is the year of the barn. I am just getting serious about putting a plan together. This is where you guys come in. I know a few of you have built some pretty nice garages. I would love to hear all of your ideas on what I should build into the garage. I am particularly interested in what I should do now, before the walls and ceiling are installed. All ideas on nice features to add and the timing of the build process are welcome. Thanks, Marty
 1 point
 -
It annoys me when people in my life say I should sale my Zs while the market's up like it is. They look at BAT and ebay then advise me about cars I know better than they know their kids.1 point
-
1 point
-
https://www.google.com/search?q=240z+bumper+brackets+orientation+classiczcars.com&rlz=1C1BOFA_enUS494US494&oq=240z+bumper+brackets+orientation+classiczcars.com&aqs=chrome..69i57j0i333.22572j0j7&sourceid=chrome&ie=UTF-81 point
-
Well, learning is SUCH a complicated business, Trial, error, more trial, more error. So, it turns out that the U shaped arms are not changing shape and growing wider magically. It is the outer aluminum cast case that is changing shape, ie getting narrower, causing the arm to rub and stick. And it twas “I” that was causing the squeeze. In my vise. I was holding it as you see in a couple of pics above, very gently squeezing the case just enough to hold it. Well, the wall thickness of the sides of that GMB case is SO THIN that I was actually distorting the case inward, not just momentarily reducing the clearance when its in the vise. When it failed, and I brought it in to diagnose, I put it in the vise, THEN noticed the arm was binding. No surprise now. I then assumed that was the issue and the above couple of posts resulted. Note that I cannot cause the same distortion and tight arm motion when clamping an OEM pump body. Much thicker stuff. Big surprise. Thus we are back to square one. I have reassembled this pump with all its original parts and it sucks and blows just marvelously. It is not clear again what caused it to quit after my initial 30 minutes of use. Now I’m down to the diaphragm plunger getting mis-aligned in the arm hook, or the spring having fallen out of position causing poor return action. Hard to believe at cranking RPM’s that that would be an issue. Not check valves, I had the OEM cap with their check valves in place during the on-car failure. Has to be something mechanical. The search continues. Another lesson in forensics.1 point
-
There's no left or right to these brackets. I suggest you leave them a bit loose on the body during the install and make the final tighten after you have the bumper correctly positioned.1 point
-
1 point
-
Turbo engines have lower CR's. And gauges vary. It's the comparison of all six cylinders that really matters.
 1 point
 -
I was in need to getting out of my own head this evening, so I went for some Z therapy - a drive after kiddies’ bath time. Warming the car up in the driveway on the choke at 2krpm, in want was a very dark night I spotted the primaries glowing orange!!! The iPhone camera does over emphasise the colours and makes them look 500*c hotter!!! Super glowing primaries Batman ... Is anyone else up for taking a photo of their primaries at 2k rpm in near darkness and uploading here? Would be interesting to see! FYI - that’s a Z-Story race/sport stainless steel header. And before anyone asks, the AFR was sitting at 12.8ish + timing at 2krpm is set to 22 degrees.1 point
-
1 pointHi Guys - I think we have ZHome.com working... If everyone would give it a try - The broken links will be address a bit later - but 95% of the links in the Left Hand Frame should work with either http or https - thanks, Carl http://ZHome.com1 point
-
Final chapter for now. Had to clean the carbs more thoroughly than I initially hoped. The jet tubes were not moving on their own, so couldn’t set richness or chokes. It was massively lean, would bog terribly just blipping the throttle, so I took them off last night and cleaned them up. One jet tube had to be pin punched with a ball peen hammer to move it. No damage, after cleaning and lubing, they now work just fine. I drove it quite nicely into its parking spot in my yard under its own power. Clutch felt perfectly fine. Would have loved to take it around the block and get it in second, but with no brakes, no way. The master has a layer of probably the stickiest black goo in the reservoirs I have ever seen. Will have to soak for ever. It has the nice early “Front in the front” master, would like to keep it. The clutch slave soft line was plugged with crud. Couldn’t bleed the clutch initially, so I suspect the rest of the brake system needs more cleaning and work than I’m prepared to do this round. I have “peachy” to get ready by Christmas and there’s a storm-a-comin’ this weekend that will snow in the fleet for the winter. Thanks to Jitensha (Kevin) for helping with the car rodeo today and doing a great job of wheel chock placing when needed.1 point
-
Might as well tie things together. A plan will form eventually. Keep original engine (block) and get more power seems to the heart of it. I saw "save money" somewhere also. Moderate budget power increase seems like the goal. I would avoid using words like drop or slap or toss when thinking about modifying your engine. People write like that often but only the pros can really do any dropping swapping or tossing of parts in engine work. Even just removing the crankshaft and honing the cylinders, then using new rings on the pistons and bearings on the crankshaft, is a complex operation for the average weekend mechanic. You're not going to drop in a new crankshaft, swap some pistons, and toss the engine back in without spending lots of money and time. https://forums.hybridz.org/topic/131952-ld28-crank-stroker-market-rate/?tab=comments#comment-12246391 point
-
I have worked on it some this year. Mainly blocking panels. I need to post up my current progress. I've been hurt for much of the year and work has been busy, so progress slows down or stops. If I can get it painted things should pick up1 point
-
At that level of detail, my stainless plate is (nominally) four thousandths (.004 in) thinner than the plated original. So I guess it's a performance increase too. Not sure how much weight difference that would result in, however.1 point
-
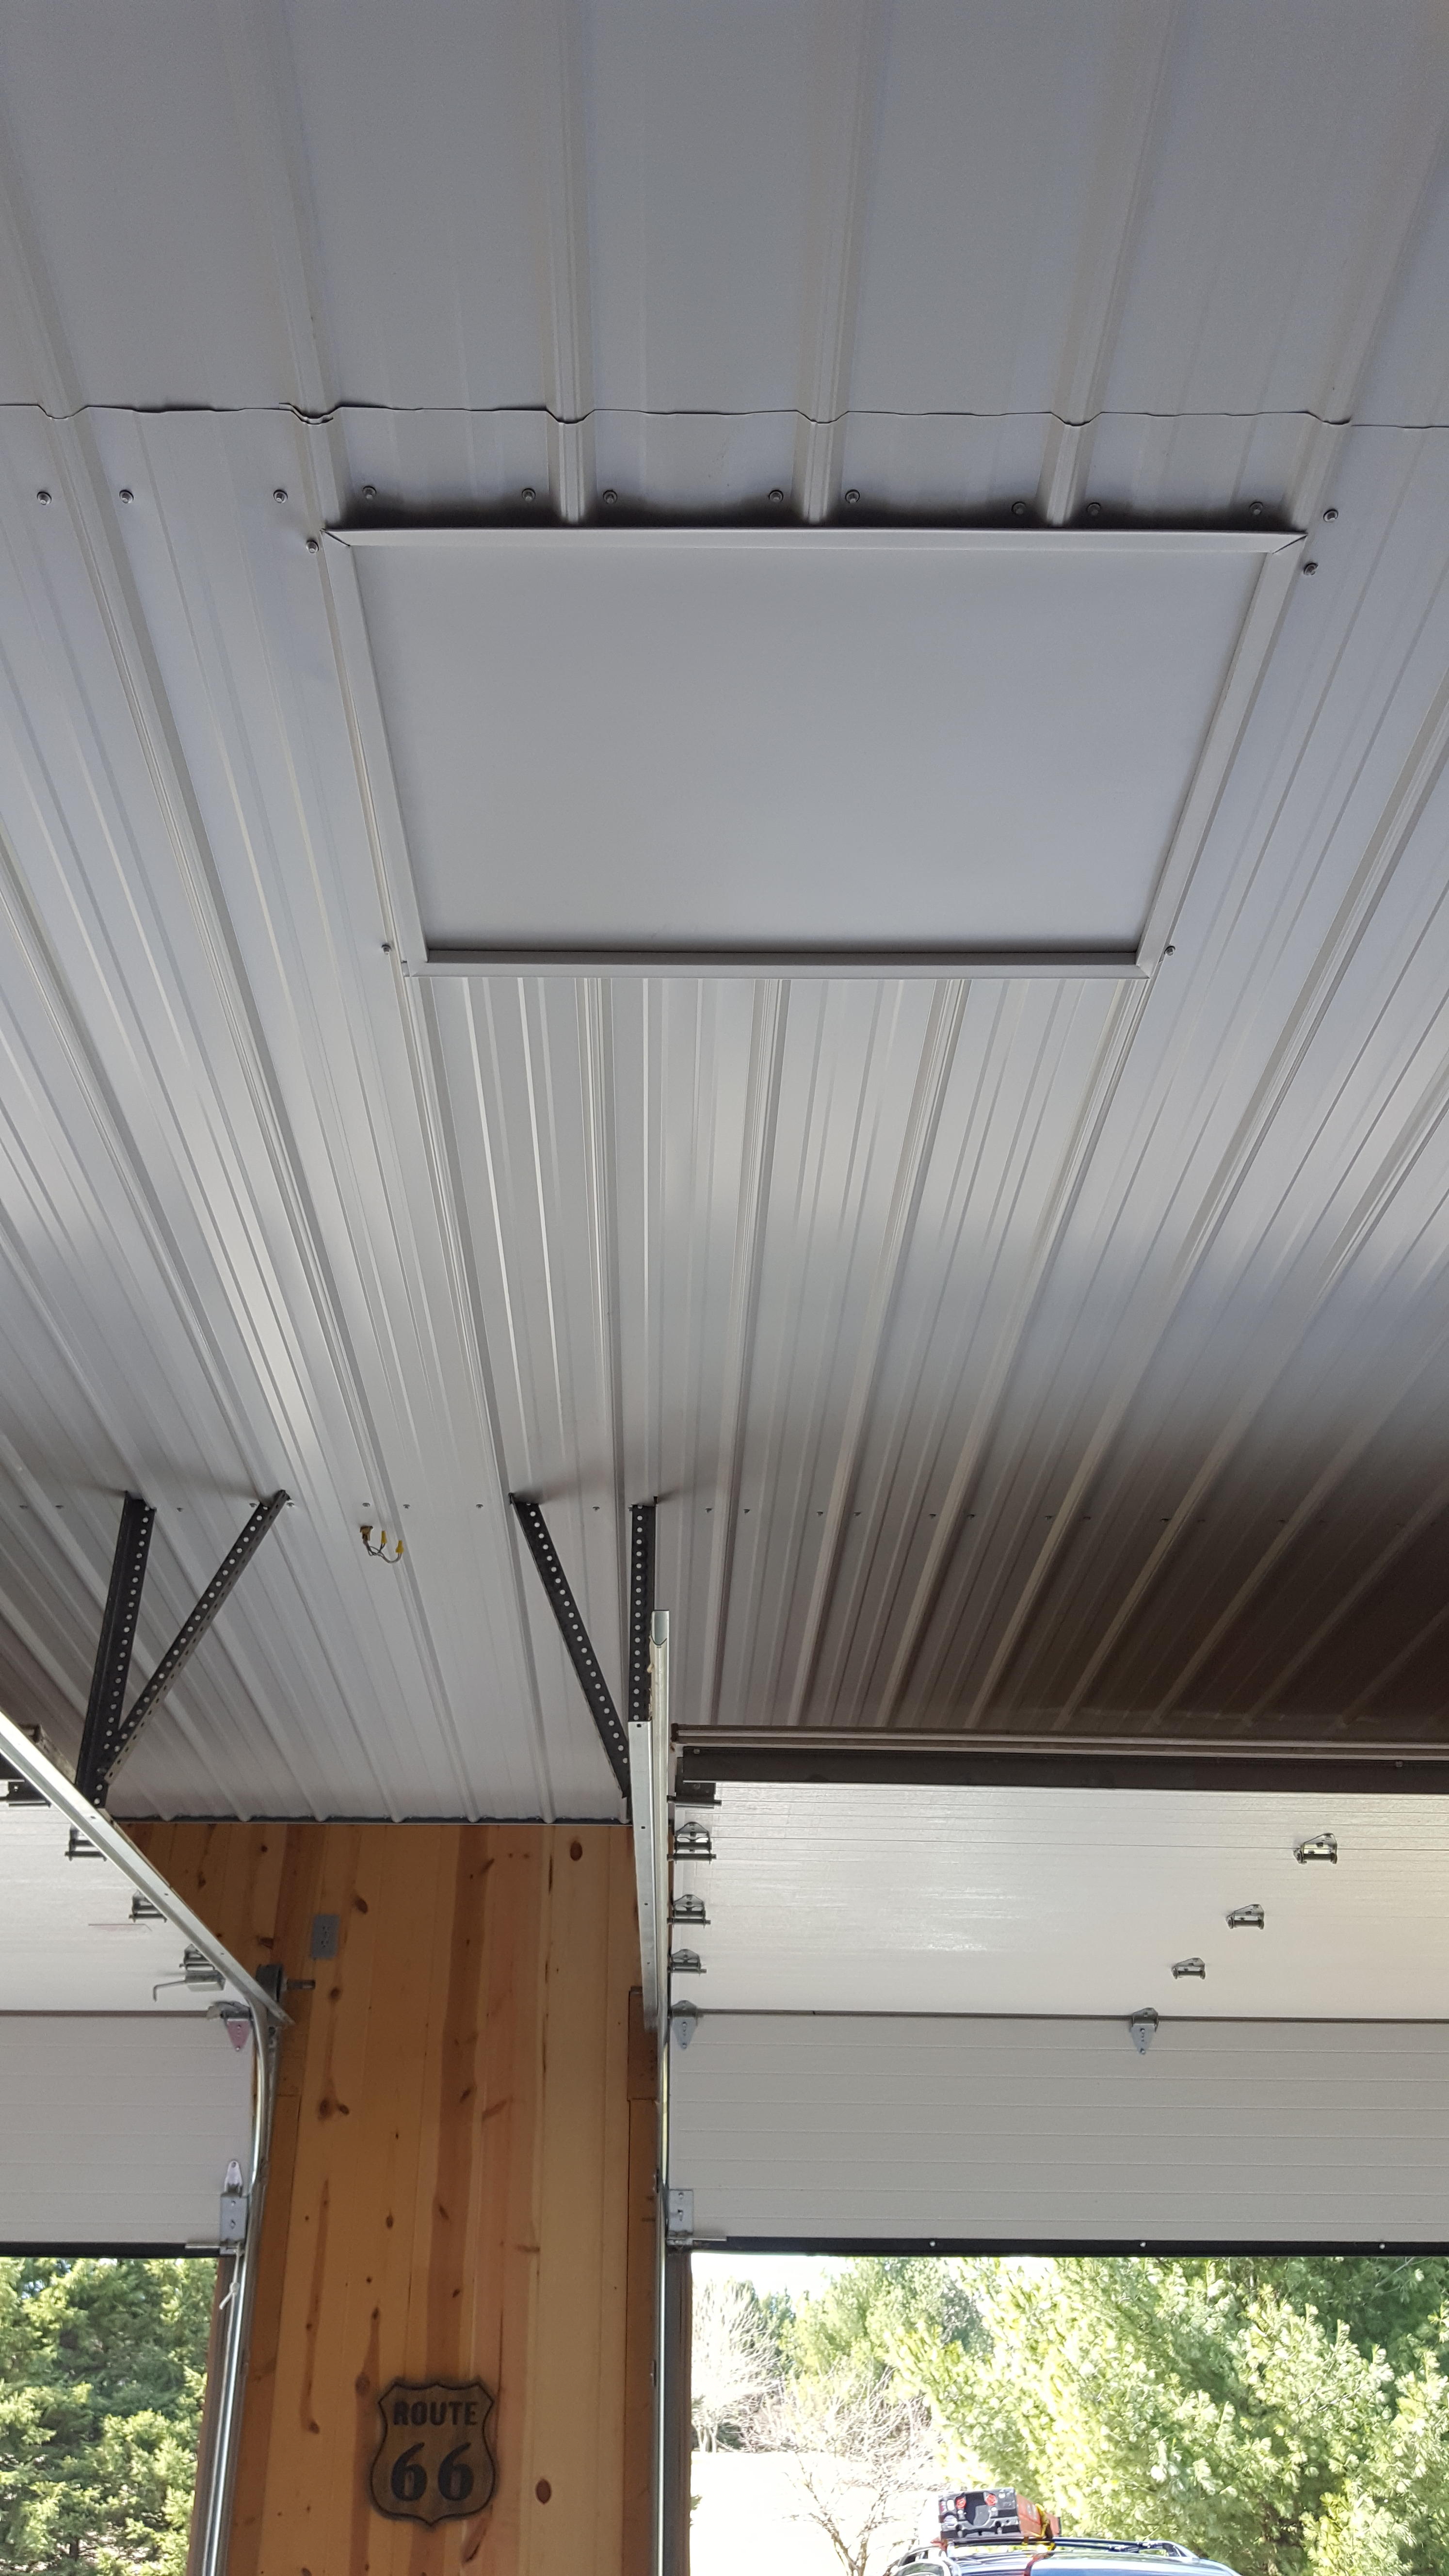
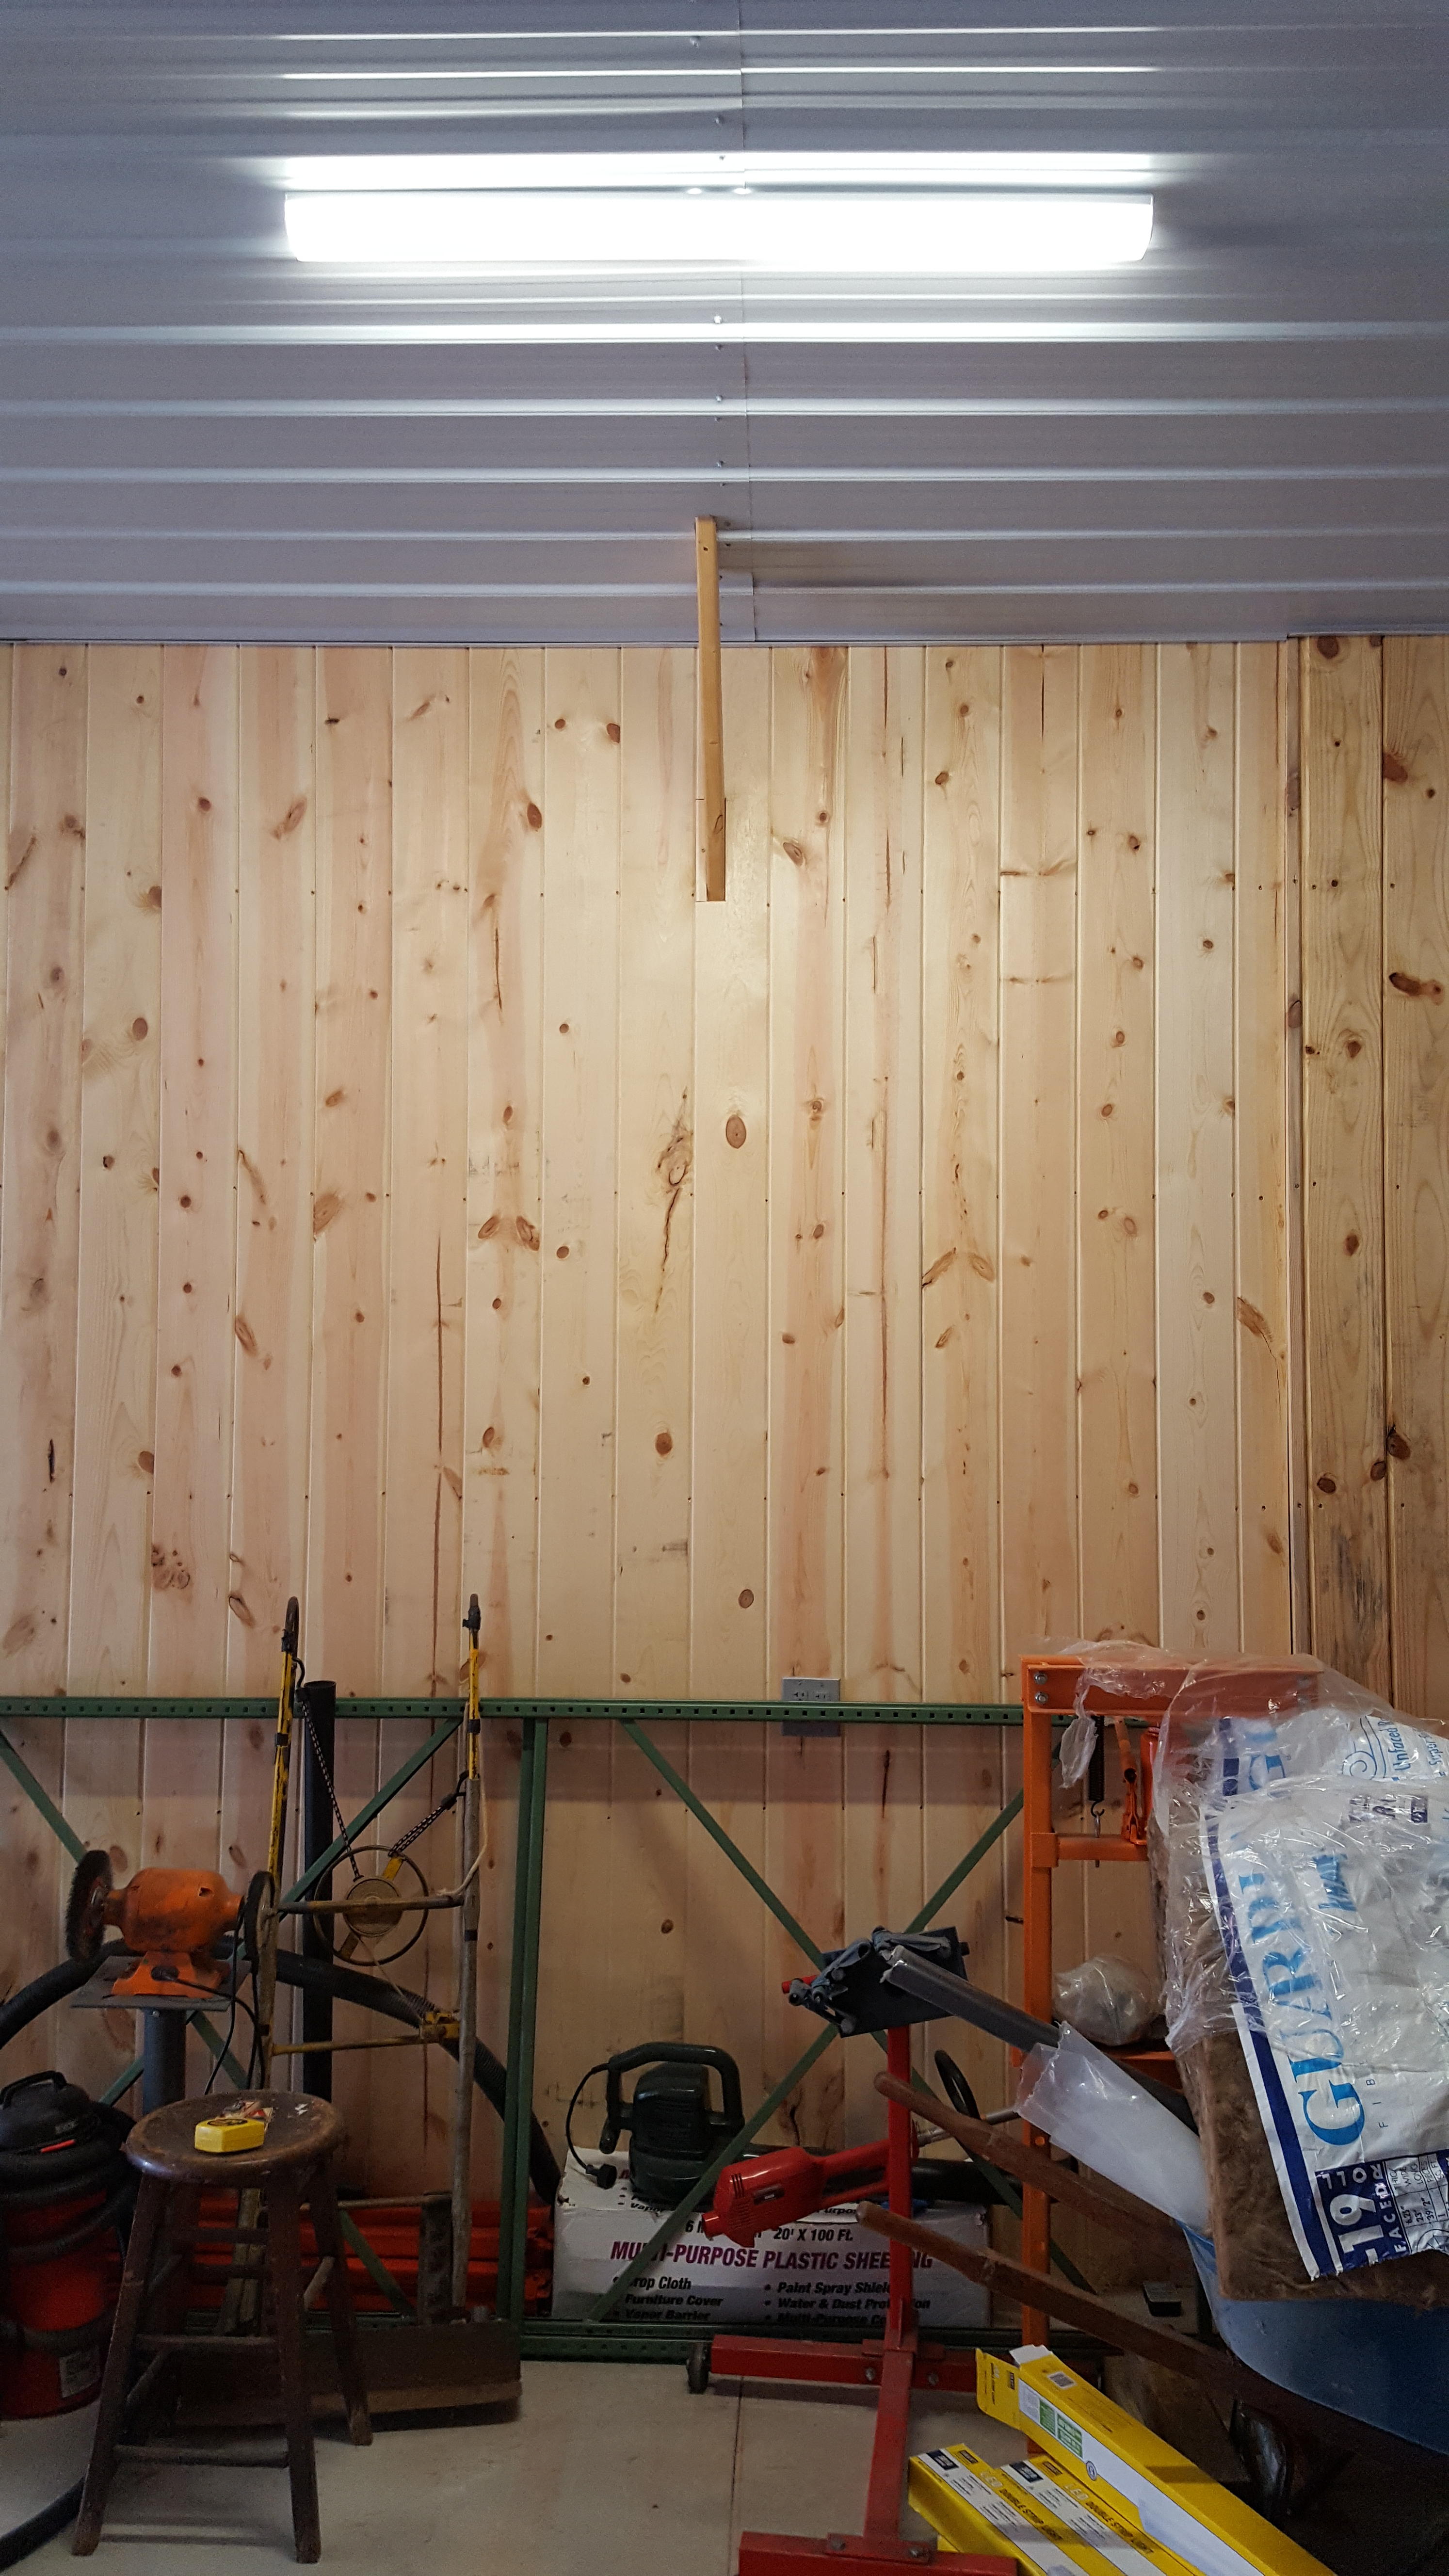
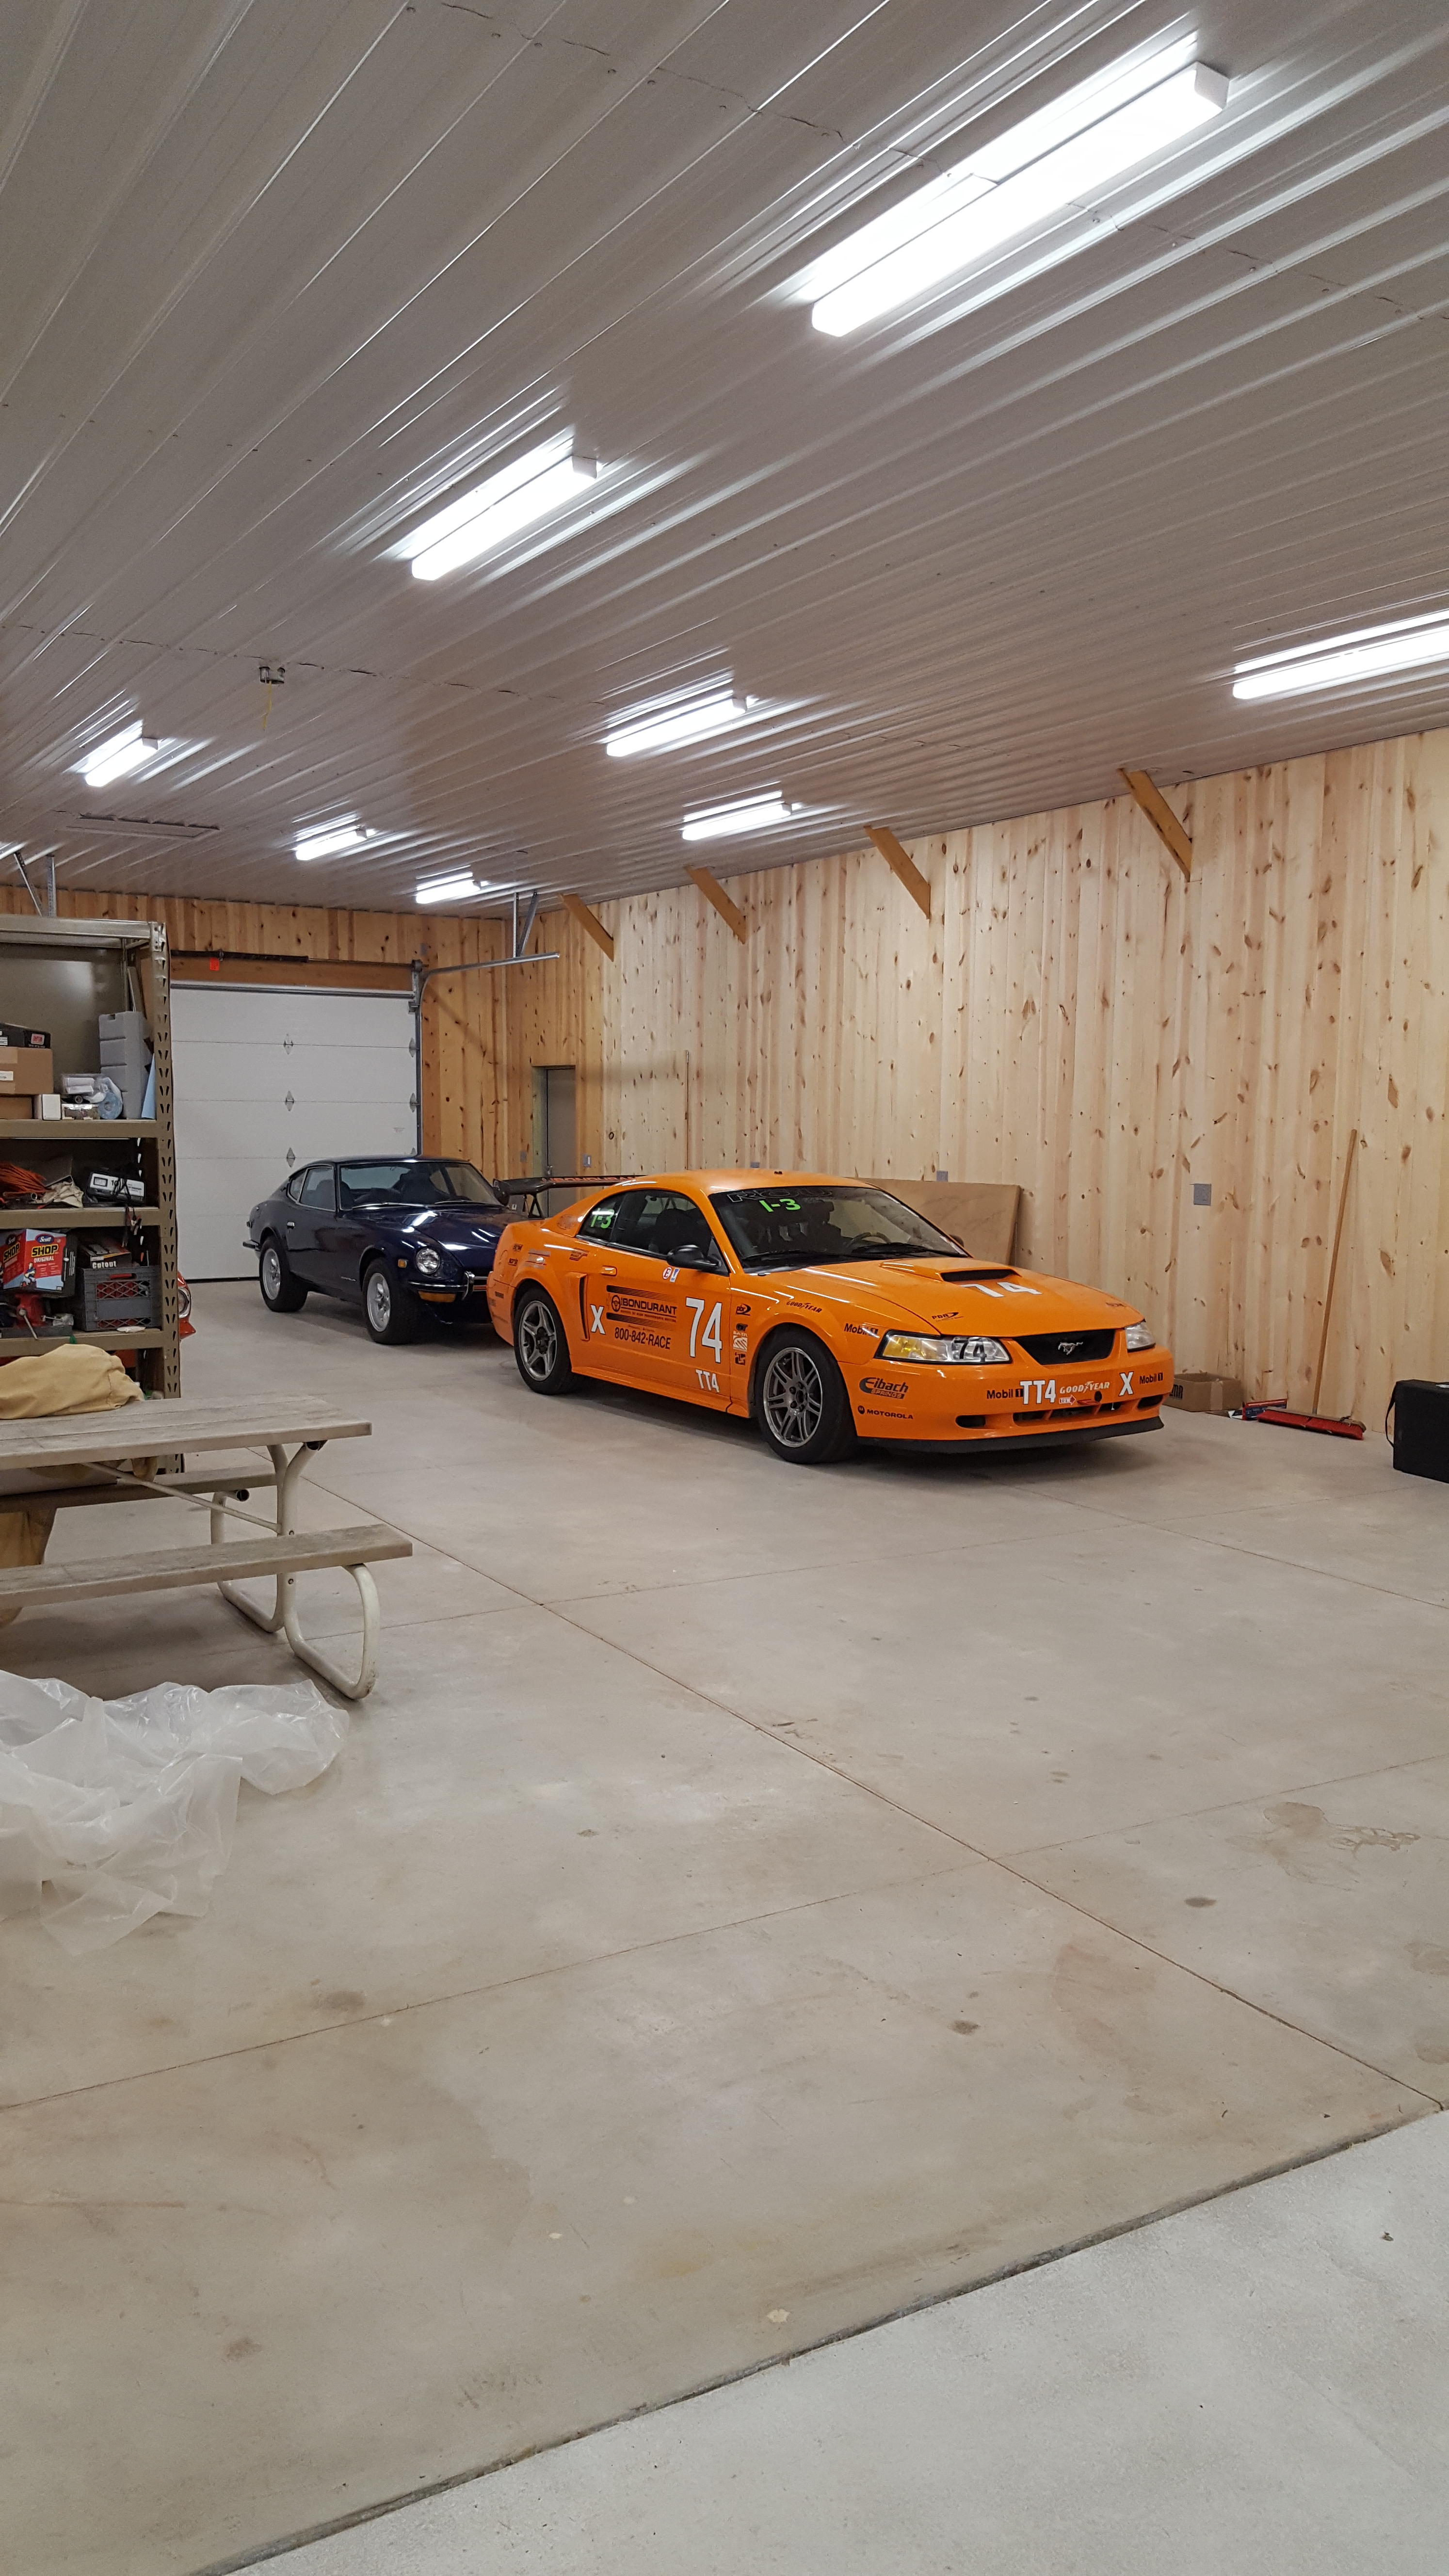
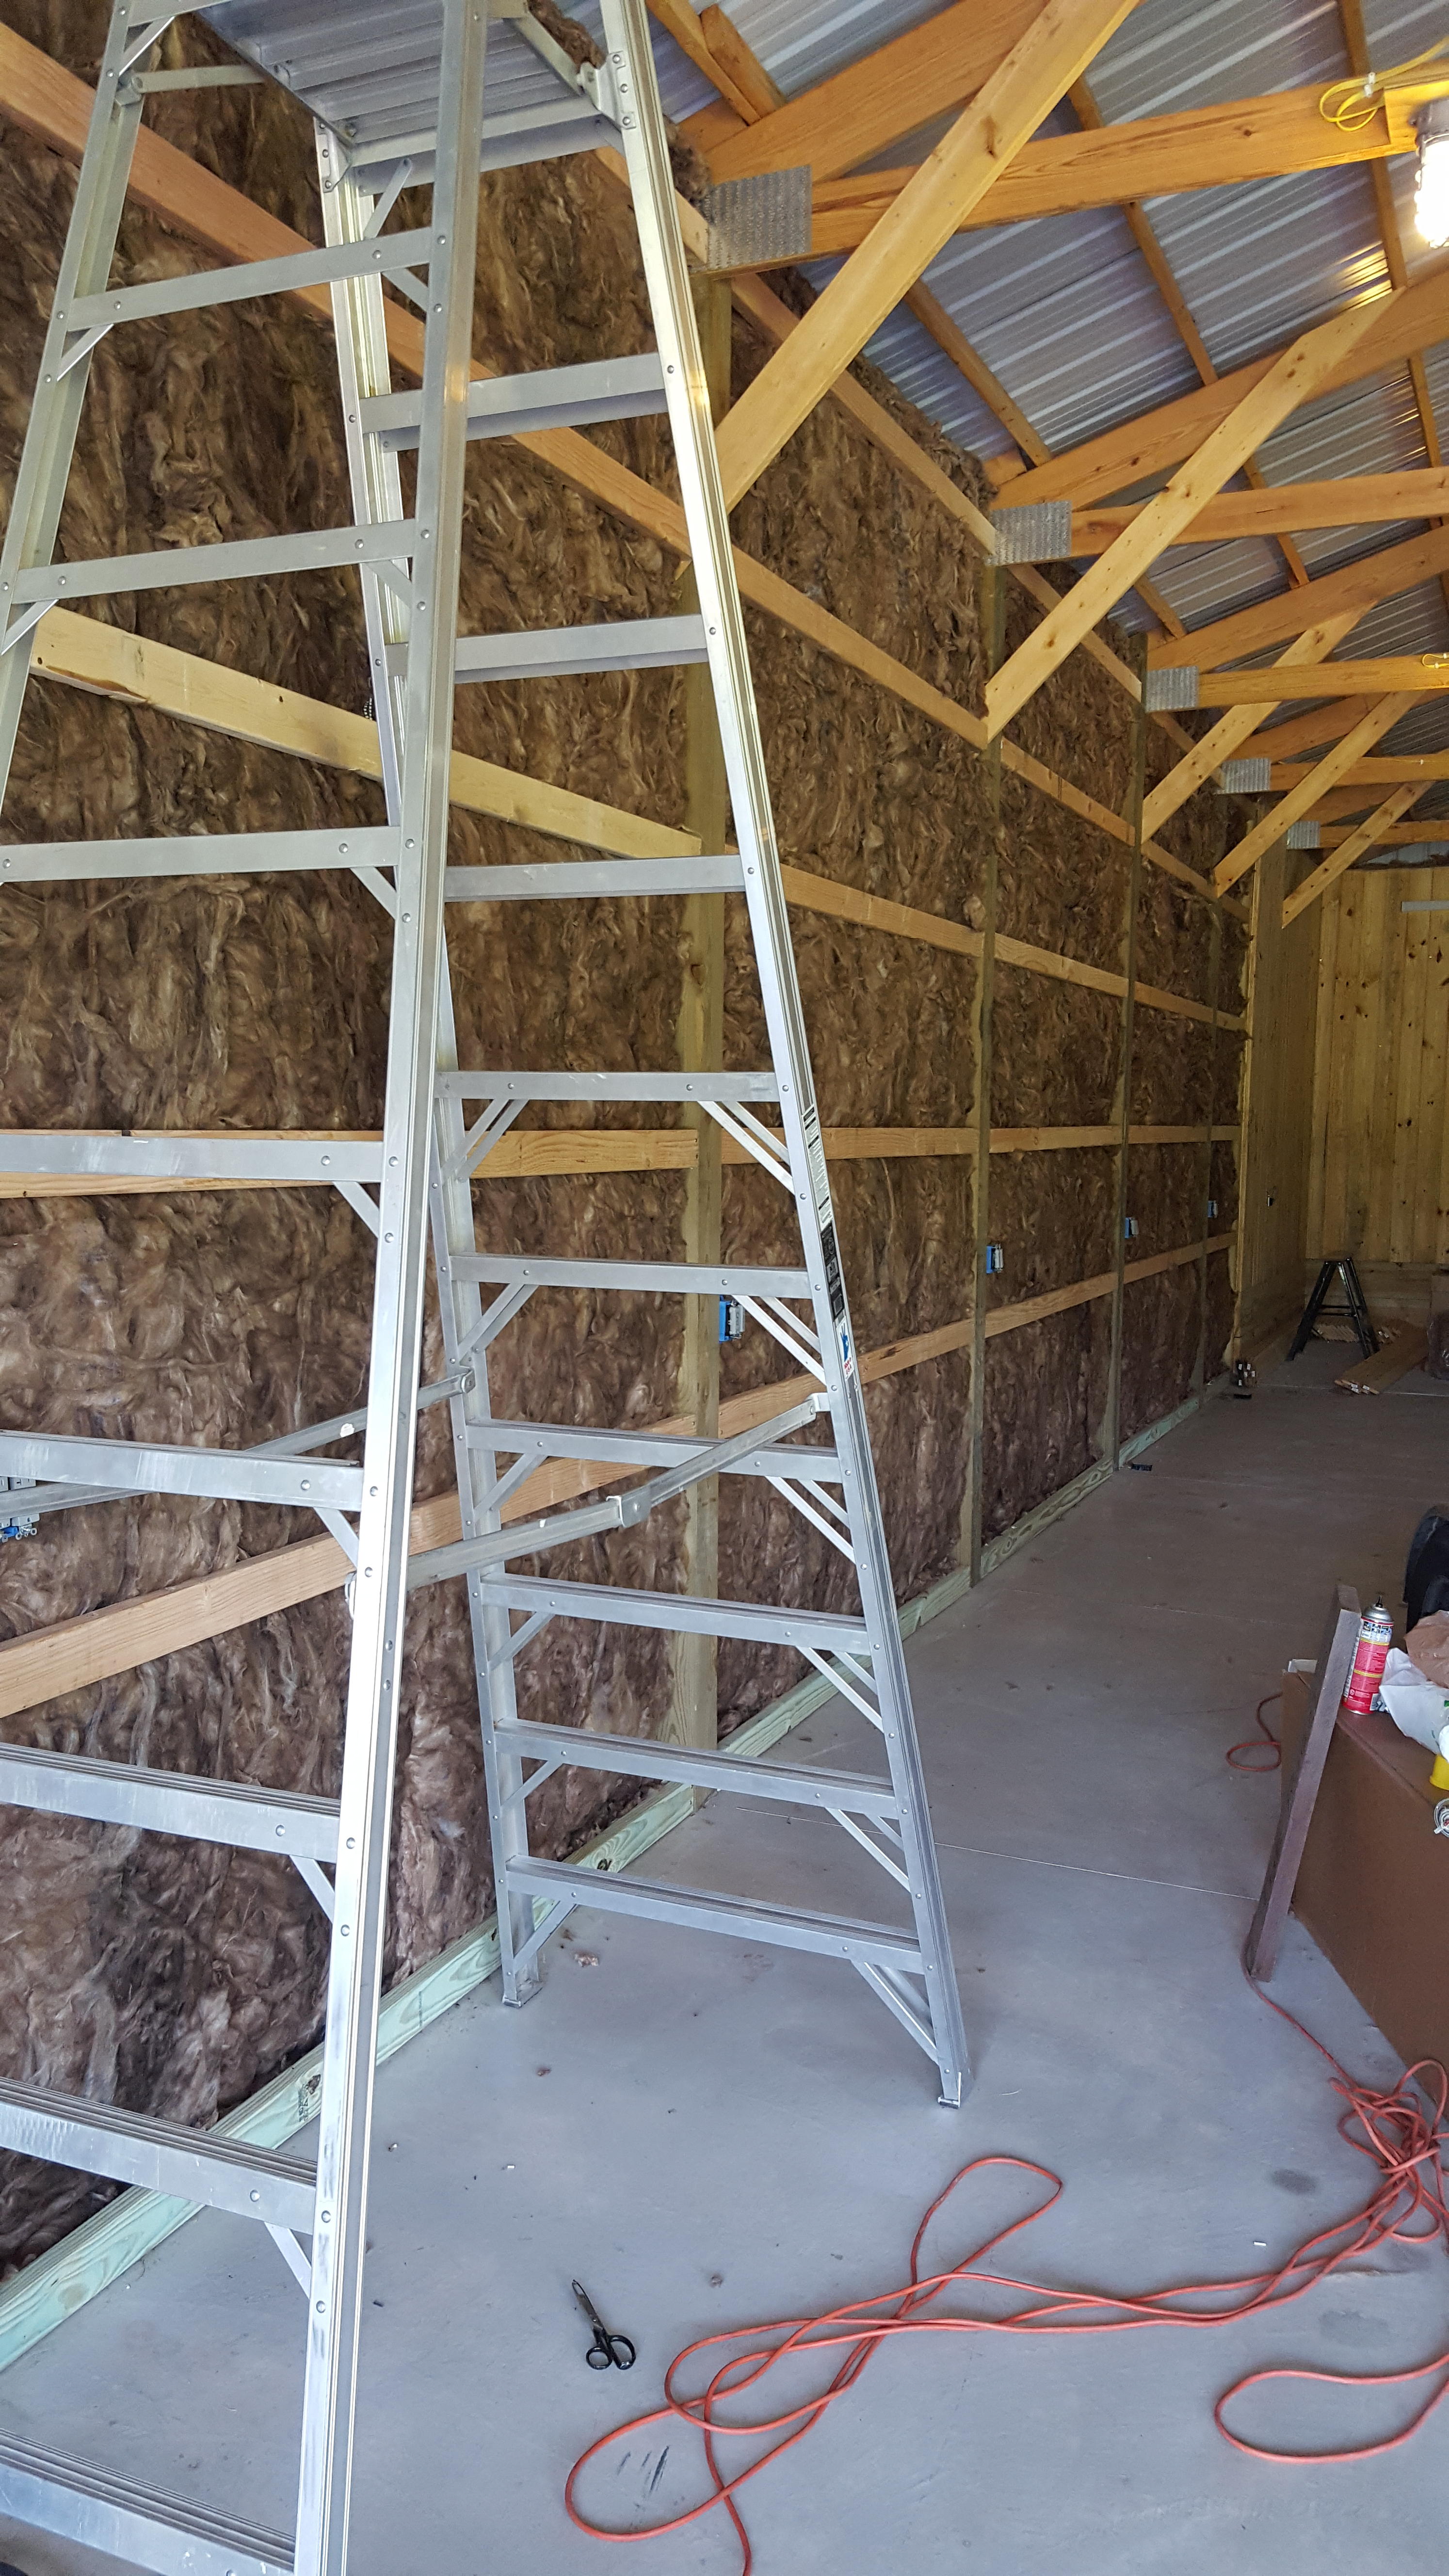
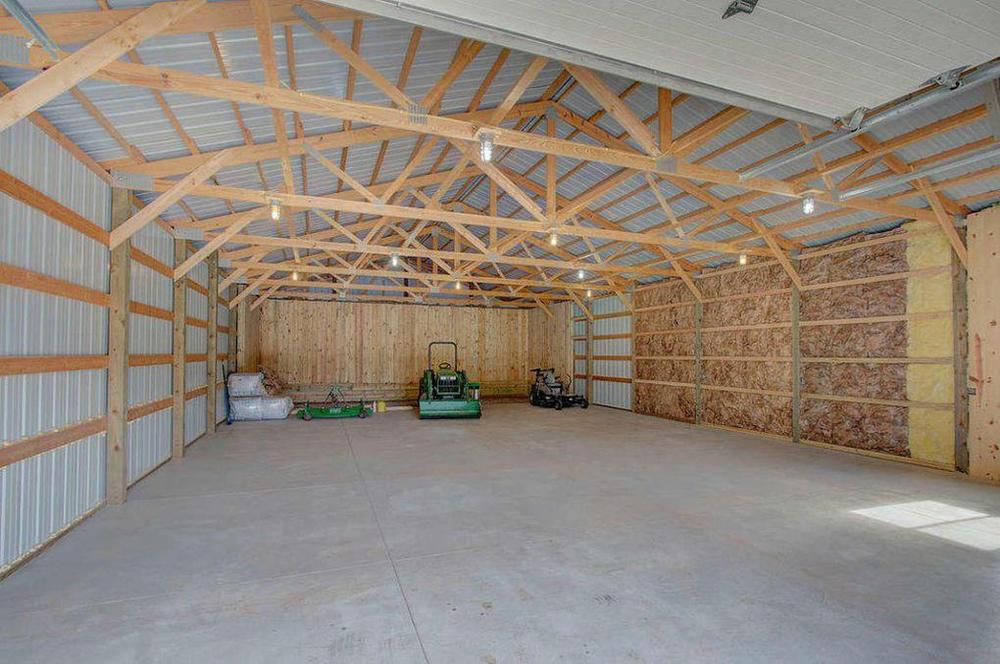
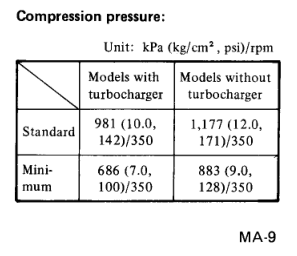
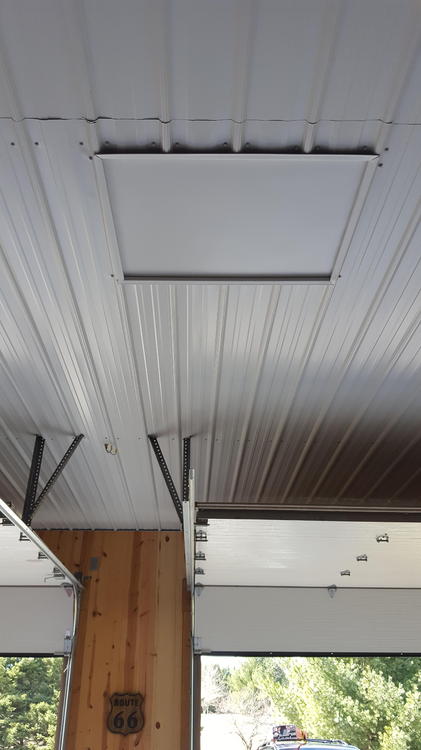
1 pointWell, the ceiling and insulation are finally done. I have been trying to get that scheduled since September. The guys are a little frustrating, but they do really nice work. Here are a few pictures, so you can be the judge. Over the weekend, I was able to get the rest of the lights installed and working. I have 24 LED lights at 3810 lumens each. The lighting is just about perfect. It is really bright and clear, with no shadows or dark spots anywhere in the shop. I am really happy with the way that turned out. My HVAC guy just had a double hernia operation, so he won't be able to put the heater in for 6-8 weeks. Another delay, but at least I can move forward with getting the place organized now.


 1 point
 -
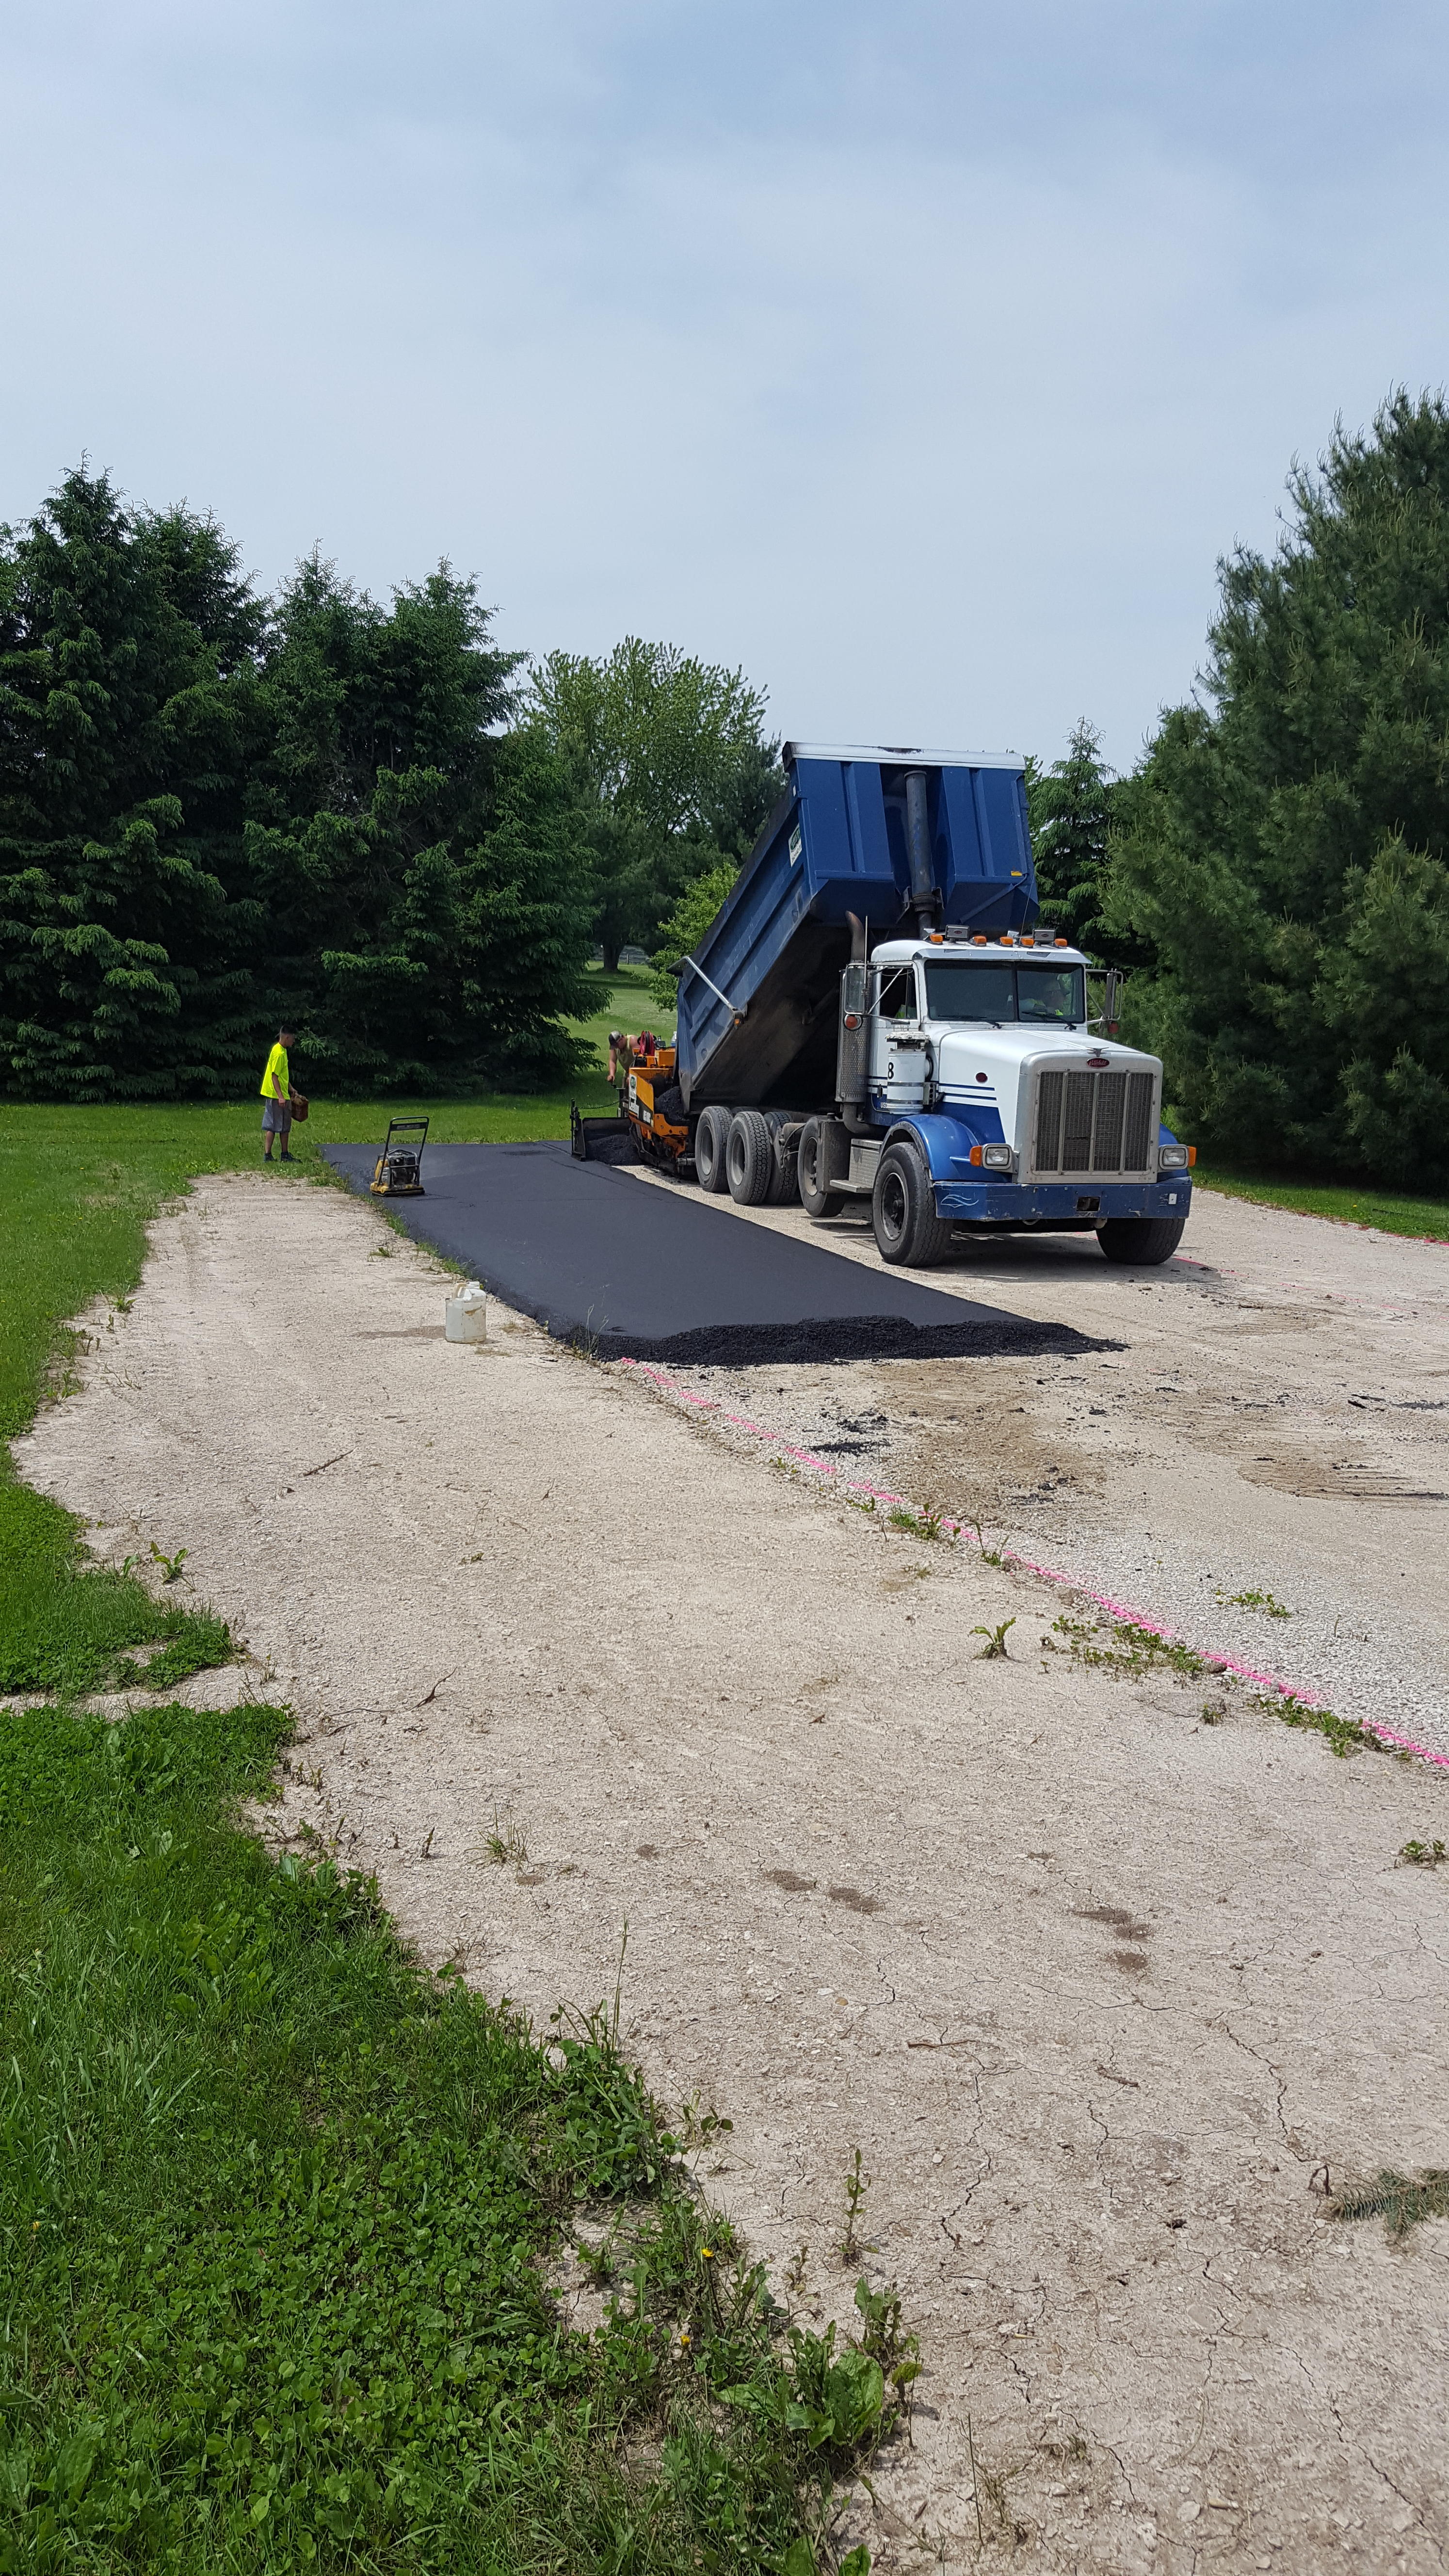
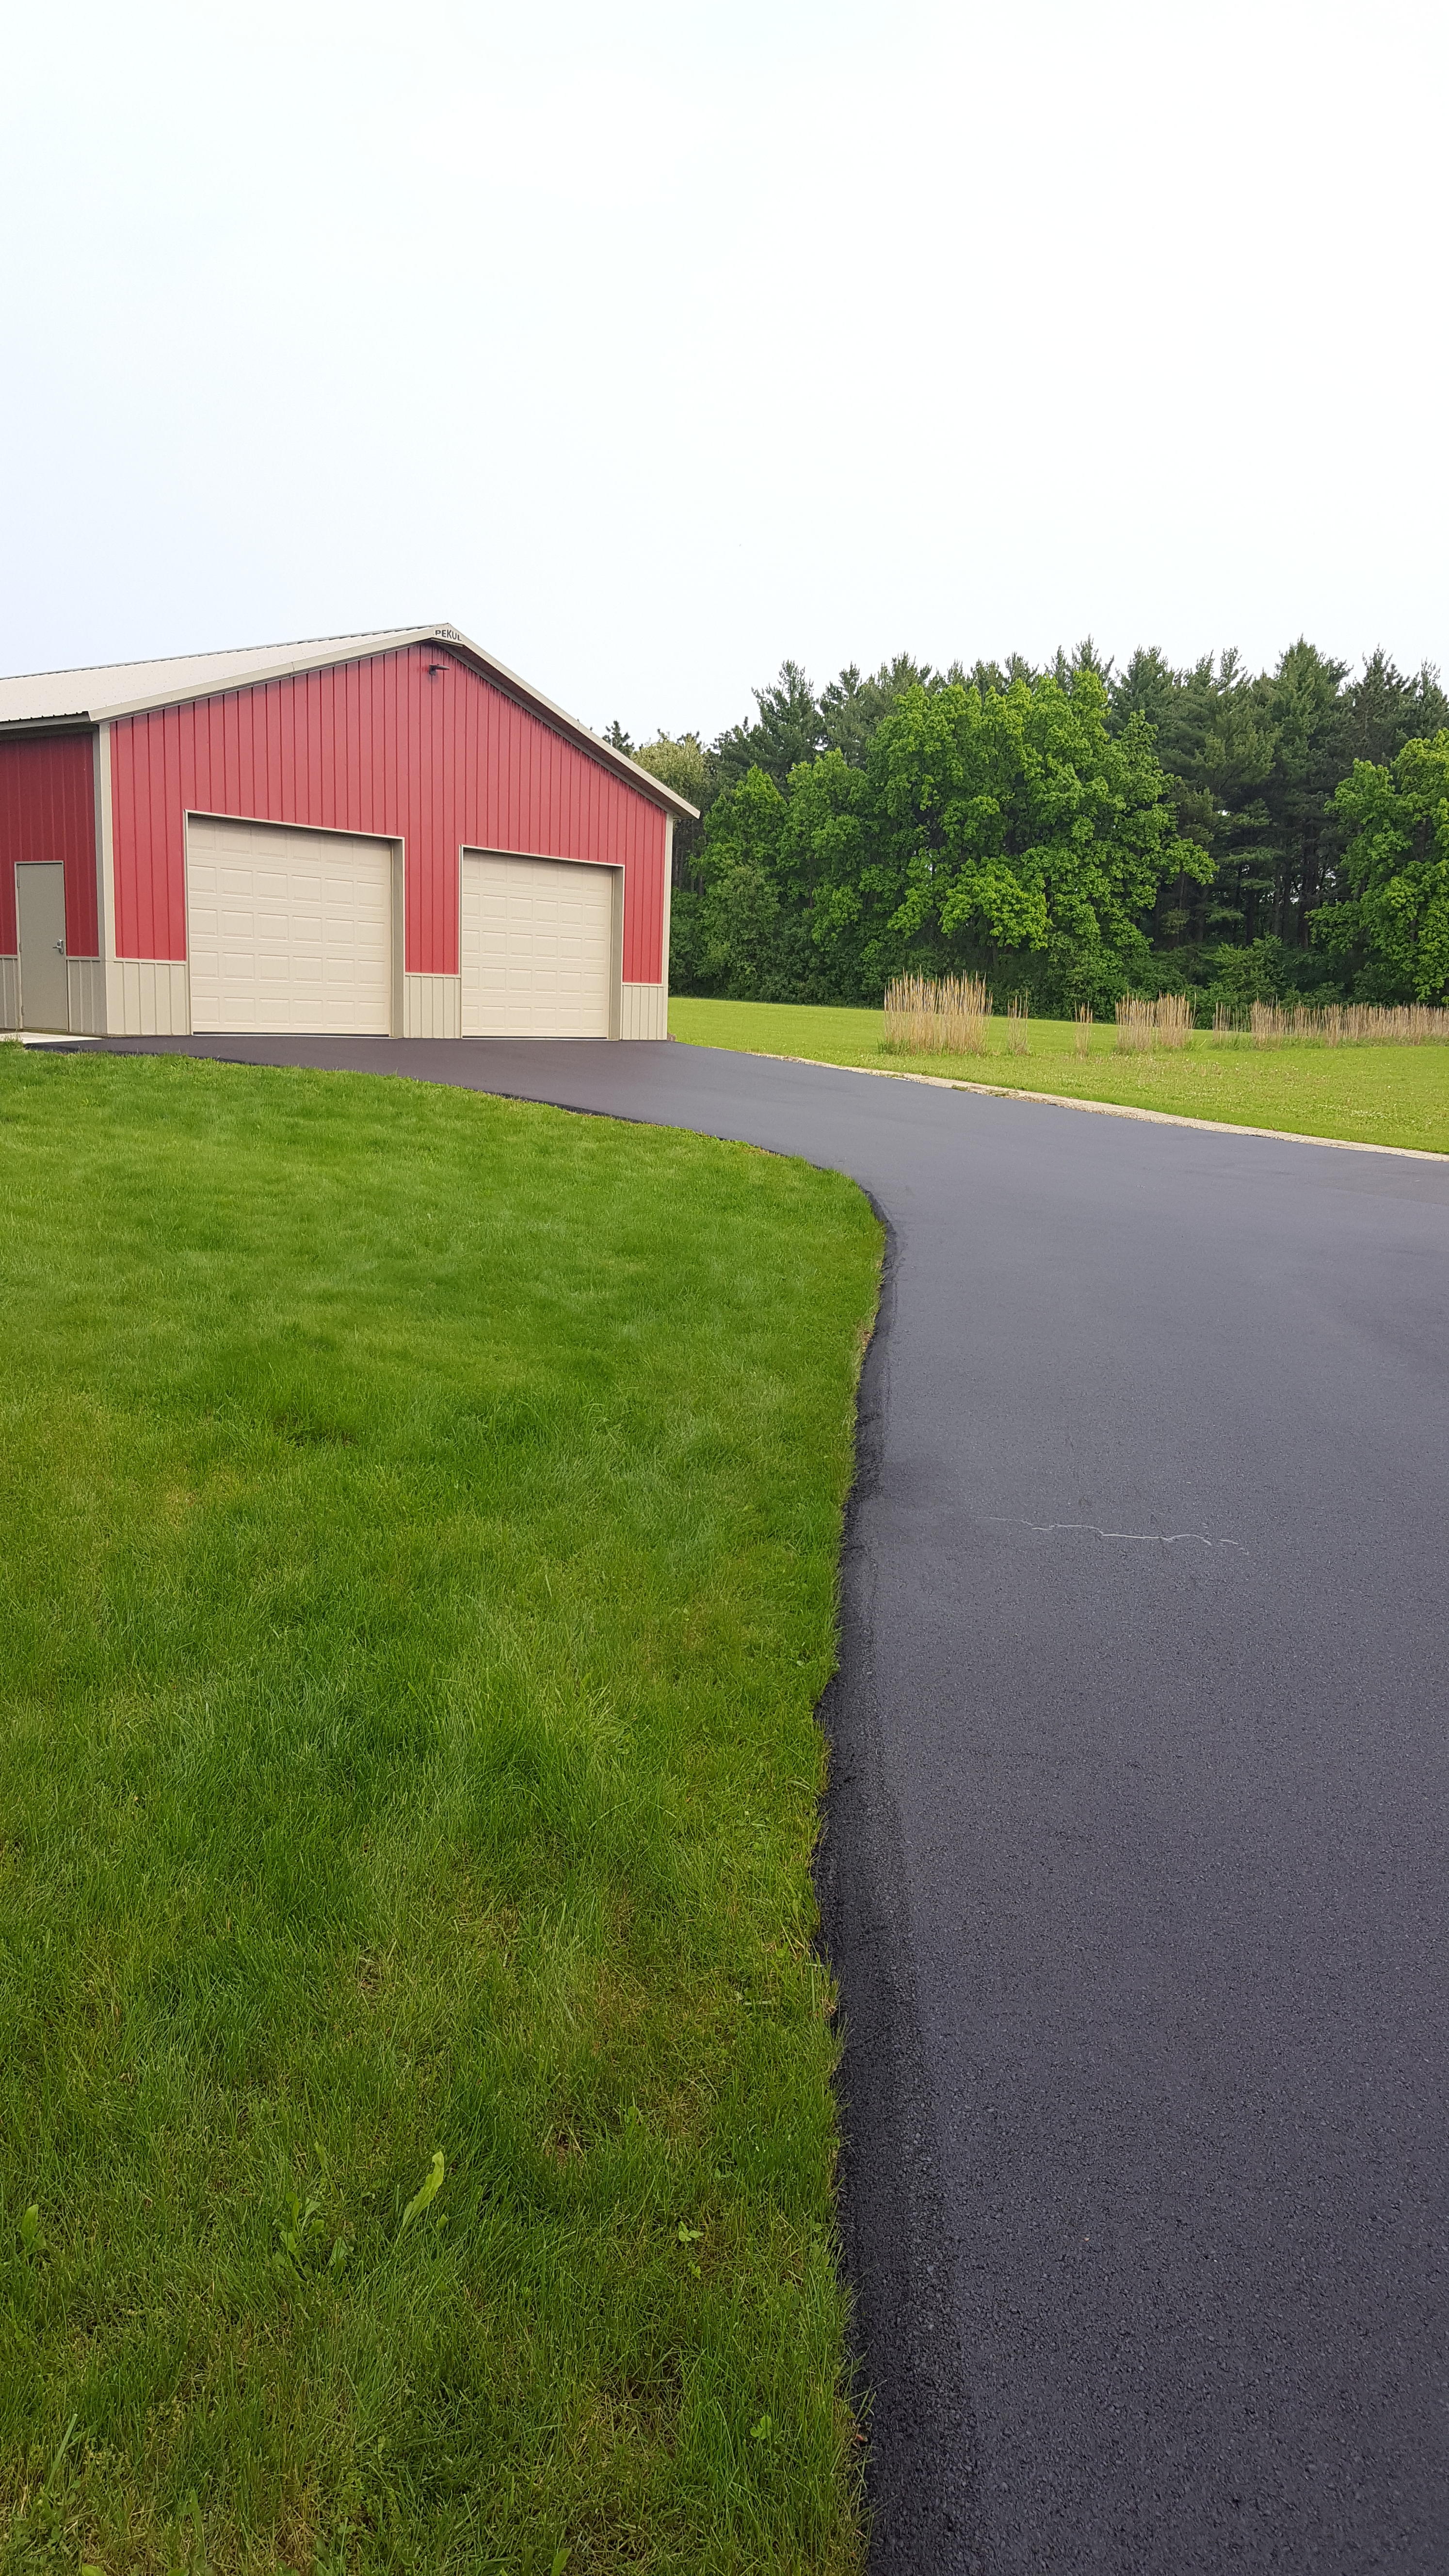
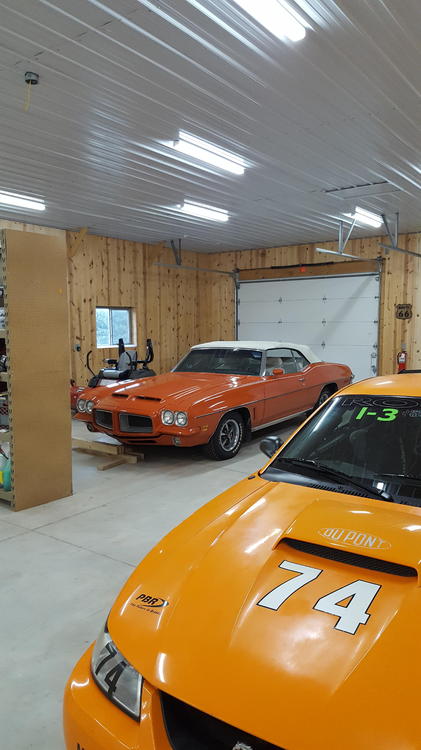
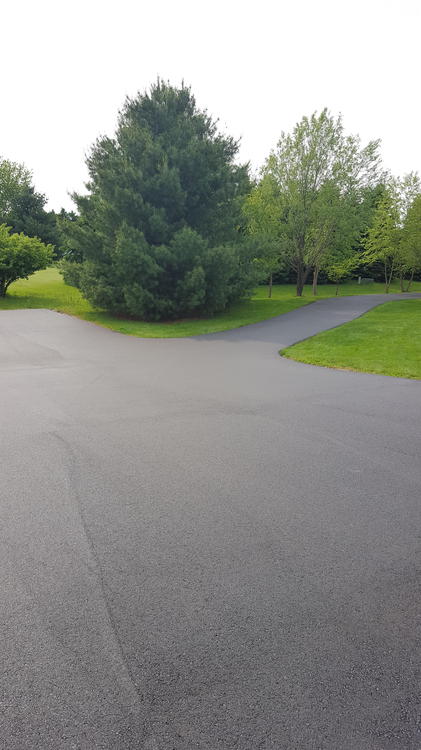
1 pointWell, it has been a while, so I figured it was time for an update on the Garage Mahal. I was able to get the horse stall area concreted in this spring, so I now have 100% of the floor space in usable condition. In the first week of June, I had the asphalt drive way put in. They did a great job. I now have a lot of parking area and space to turn around with the trailer to back the race car into the barn. I can back to the whole rig in, with the truck still attached, close the door and just walk into the house. No more 45-60 minutes to unload when I get home from a track weekend. That used to really annoy the wife. The original builder of the barn came out to give me an estimate on the ceiling. He said that the trusses would have no trouble supporting a steel ceiling with R38 blown-in insulation. I am thinking about going with maybe R49 for better heating economy. I got several quotes on heating. The 12' ceiling height was not quite enough to make radiant tube heating work. They said it could bake the paint right off the cars. It needed to be at least 16' to make it work. So, I am going with a forced air unit. I just need to finalize my research to decide if I go with natural gas, or LP gas. The local gas company said it would cost me $3K to trench the gas lines out to the barn. I have got most of the wiring done. All of the wall outlets are in. I also put in a 220 line. I wired in 6 more lights for the ceiling and added 4 lights along the back wall over the work bench area. All of the lights will be 3810 lumens, so I am hoping it is pretty bright. My wife is always giving me crap by saying "Do you want to do surgery in there!?' My response ..."Exactly!!" The brighter the better in my book. I still need to figure out how to install 2 ceiling fans on the trusses. A lot of the quotes were coming in higher than I anticipated, so I am giving up on the idea of running water out to the barn. It would be nice, but it is not a necessity. All of the wall insulation is in. About half of the vapor barrier has been installed. About half of the previously installed wall has been put back up, and the rest of the wall materials have been purchased. Over the long 4th of July Holiday (took Friday off too), I put in a lot of hard work to get stuff done. So, as a little reward to myself, yesterday afternoon, I got the Z out for the first time this year and went for a drive up Route 67 in Southern WI. 67 is a nice curvy road that goes through the Kettle Moraine Valley. The Kettle is a really beautiful area and a popular destination for a car or motor cycle cruise. It feels good to get this much progress. There is still a lot left to do. That's it for now. Later, Marty


 1 point
 -
1 pointOh that's a nice setup! But, will you ever have time to work on your car considering all that lawn you have to mow? ?1 point