.JPG.cfcada9cf1c1b502df3f5f2f2ca3ff36.JPG)

SteveJ
Community Member
-
Joined
-
Last visited
Everything posted by SteveJ
-
I would have to look through the manuals to confirm. My wiring changed when I swapped over to EFI. Prior to that, I was just using the stock wiring. You may have to back a wire or two out of a connector. At times like this, Vintage Connections can be your friend.
-
One thing to note about the inertia switch I linked: in the reviews, people note that you need to move a wire from the normally open to the normally closed contact. It is not difficult to do. I have done it to one of these that I purchased.
-
That is a little overkill for the 260Z. There isn't a need to prime on a 260Z with carburetors because the car will start with the fuel in the float bowls. If you are looking to cut the fuel pump when the engine isn't running, you can wire the car to use the ignition to power the relay coil and get a 78 oil pressure sender. Swap in a typical automotive relay and wire the negative of the new relay to the grounding terminal on the oil pressure sender. If the oil pressure drops too low (such as when the engine isn't running), the ground opens up, and the coil is de-energized. For additional safety, you could mount an inertia switch to kill power in case of an accident. Inertia switch: https://www.amazon.com/gp/product/B07RBK4873 Oil pressure sender: https://www.rockauto.com/en/moreinfo.php?pk=488596&cc=1209260&jsn=1305 As an aside, I found a mystery wire in my 260Z many years ago. It came off the ignition coil positive and was routed through the passenger cabin to the back right. Apparently it was an IPO's effort to hot-wire the fuel pump. I don't know why. The stock wiring was working. I just can figure out how the wire didn't short to the body since the insulation was in poor condition.
-
Copied from my post in the ZX Electrical forum: Use this code for a 20% discount with Vintage Connections: VCWinter20. It's good through Jan 31. By the way, I had issues with checking out at their site. Apparently the cart functionality isn't what it should be. I sent an email to sales@sparckmoto.com with what I was trying to order and asked them to bill my Paypal. Within minutes (during normal business hours), they responded, and I paid for my order.
-
Use this code for a 20% discount with Vintage Connections: VCWinter20. It's good through Jan 31. By the way, I had issues with checking out at their site. Apparently the cart functionality isn't what it should be. I sent an email to sales@sparckmoto.com with what I was trying to order and asked them to bill my Paypal. Within minutes (during normal business hours), they responded, and I paid for my order.
-
Not me, I just fill it with gas.

-
In the spirit of Zed's search: https://www.google.com/search?biw=1920&bih=937&tbm=shop&sxsrf=ALeKk03rnIbYG8K-MBMQhxcYtL6su6WCDA%3A1607019258459&ei=-irJX-DJG4rasQXUmY_YBw&q=fuel+pump+isolators&oq=fuel+pump+isolators&gs_lcp=Cgtwcm9kdWN0cy1jYxADMgQIABAYMggIABAIEB4QGFDSDFjSDGCEGGgAcAB4AIABa4gBzwGSAQMwLjKYAQCgAQGqAQ9wcm9kdWN0cy1jYy13aXrAAQE&sclient=products-cc&ved=0ahUKEwjgrrCgtbLtAhUKbawKHdTMA3sQ4dUDCAw&uact=5
-
A good light source for this is to get a regular garage work light like this: https://www.walmart.com/ip/Bayco-6-Incandescent-Work-Light-Plastic-Cage-With-Hook/16533149 Add a 100W equivalent LED bulb to it, and you can get it into the small places more easily.
-
https://www.google.com/search?q=rubber+isolators&sxsrf=ALeKk02RUHJ1WA2cTDb9lKNijzCXKkclDQ:1607004680379&source=lnms&tbm=shop&sa=X&ved=2ahUKEwih-oD5_rHtAhXst1kKHdQdDigQ_AUoAXoECB4QAw&biw=1920&bih=937
-
It's from Christopher Robin.

-
Actually, the bypasses that I suggested should not adversely affect the operation of the starter fuel pump relay. That fuel pump relay actually cuts power to the fuel pump while cranking.
-
I'm not sure what you mean by air gap. After the penetrant has had time to work (and I hope you are using something strong like Kroil), apply heat on the fill plug. The 3/4 to 1/2 adapter should fit on the plug. Then you can use the 1/2 pipe plug to fit a 1/2 drive breaker bar or impact. When I tried it before, the 3/4 adapter seemed to fit the fill plug well. If yours was abused, your mileage may vary.
-
I use one of these when I'm balancing carburetors and setting the idle. https://www.amazon.com/gp/product/B0002LZU7K It measures RPM and dwell, though I haven't played with the dwell function (despite the fact I should). There are lots of other meters that can perform these tests.
-
There's also this one in my neck of the woods: http://www.hampspeedometer.com/
-
Many years ago, a friend sent his 260Z tachometer to Bob's Speedometer for repair. He was pleased with results. https://www.bobsspeedometer.com/1/120/index.asp
-
To loosen the fill plug, I suggest heat with a 3/4 drive to 1/2 reducer (https://www.amazon.com/TEKTON-47823-4-Inch-2-Inch-Reducer/dp/B000NQ4R4G) and 1/2 drive 1/2 pipe plug socket (https://www.amazon.com/gp/product/B006L23ILO). That way you can use an impact gun or breaker bar safely on the fill plug. By the way, using the socket and reducer combo only works if the transmission is out of the car. There isn't enough clearance in the tunnel to do this with the transmission in the car.
-
I don't think that was a stock fuel filter in the tank. I can't find any mention of it in the parts manual or FSM.
-
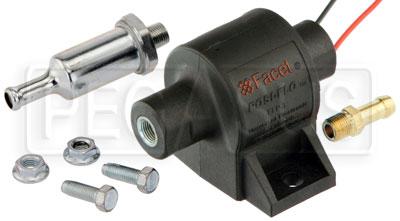
What amazes me about many of these aftermarket pumps is how often they undershoot their rated pressure. I put a fuel pressure gauge on a 240Z with the Facet labelled version of the K&N pump. The mechanical fuel pump was bypassed. My gauge was reading about 2 PSI. (0-15 scale) In my own experience, I had good results with a Holley Blue and a Holley 12-804 regulator, eliminating the stock rail. However, that is because I have an engine with a Maxima head that does not have the window open for the mechanical fuel pump.
-
I have to stop reading threads like this. Now I'm considering getting an AFR with a wideband and a 4 channel data logger. I could probably rig up the sender on my fuel pressure gauge to give me a signal, and I can tap into the TPS. ARGH! You guys are evil. I don't need to go down this path, but now I WANT to!
-
That's the great thing about owning an old car. There are LOTS of learning opportunities.
-
Document the process carefully. Take lots of photos. I'm curious, too. And let the people you work with at Nostalgic know that people are watching and interested in Datsun solutions.
-
https://www.carpartsmanual.com/datsun/Z-1969-1978/electrical/air-conditioner Note there are 3 illustrations at that link. Also cross-check against the FSM. Driers are NLA. You will need to source a condenser, and it is likely to be a generic one, so you'll have to adapt the fittings. The expansion valve is likely to be problematic as we noted earlier in the thread. Unless you can source a relatively intact parts car that has AC, you'll pay a pretty good amount of money for 40+ year old parts. I thought about going down that path before. I have a 260Z evaporator and control panel that a friend stripped out of a parts car. It has been sitting in my garage for several years now. There is a better chance that I'll strip off the control panel and do something like work with Nostalgic AC to fabricate the system. It will be newer parts. The AC will probably work with the defrost, and I'll have a new heater core. To me that's a win-win-win situation.
-
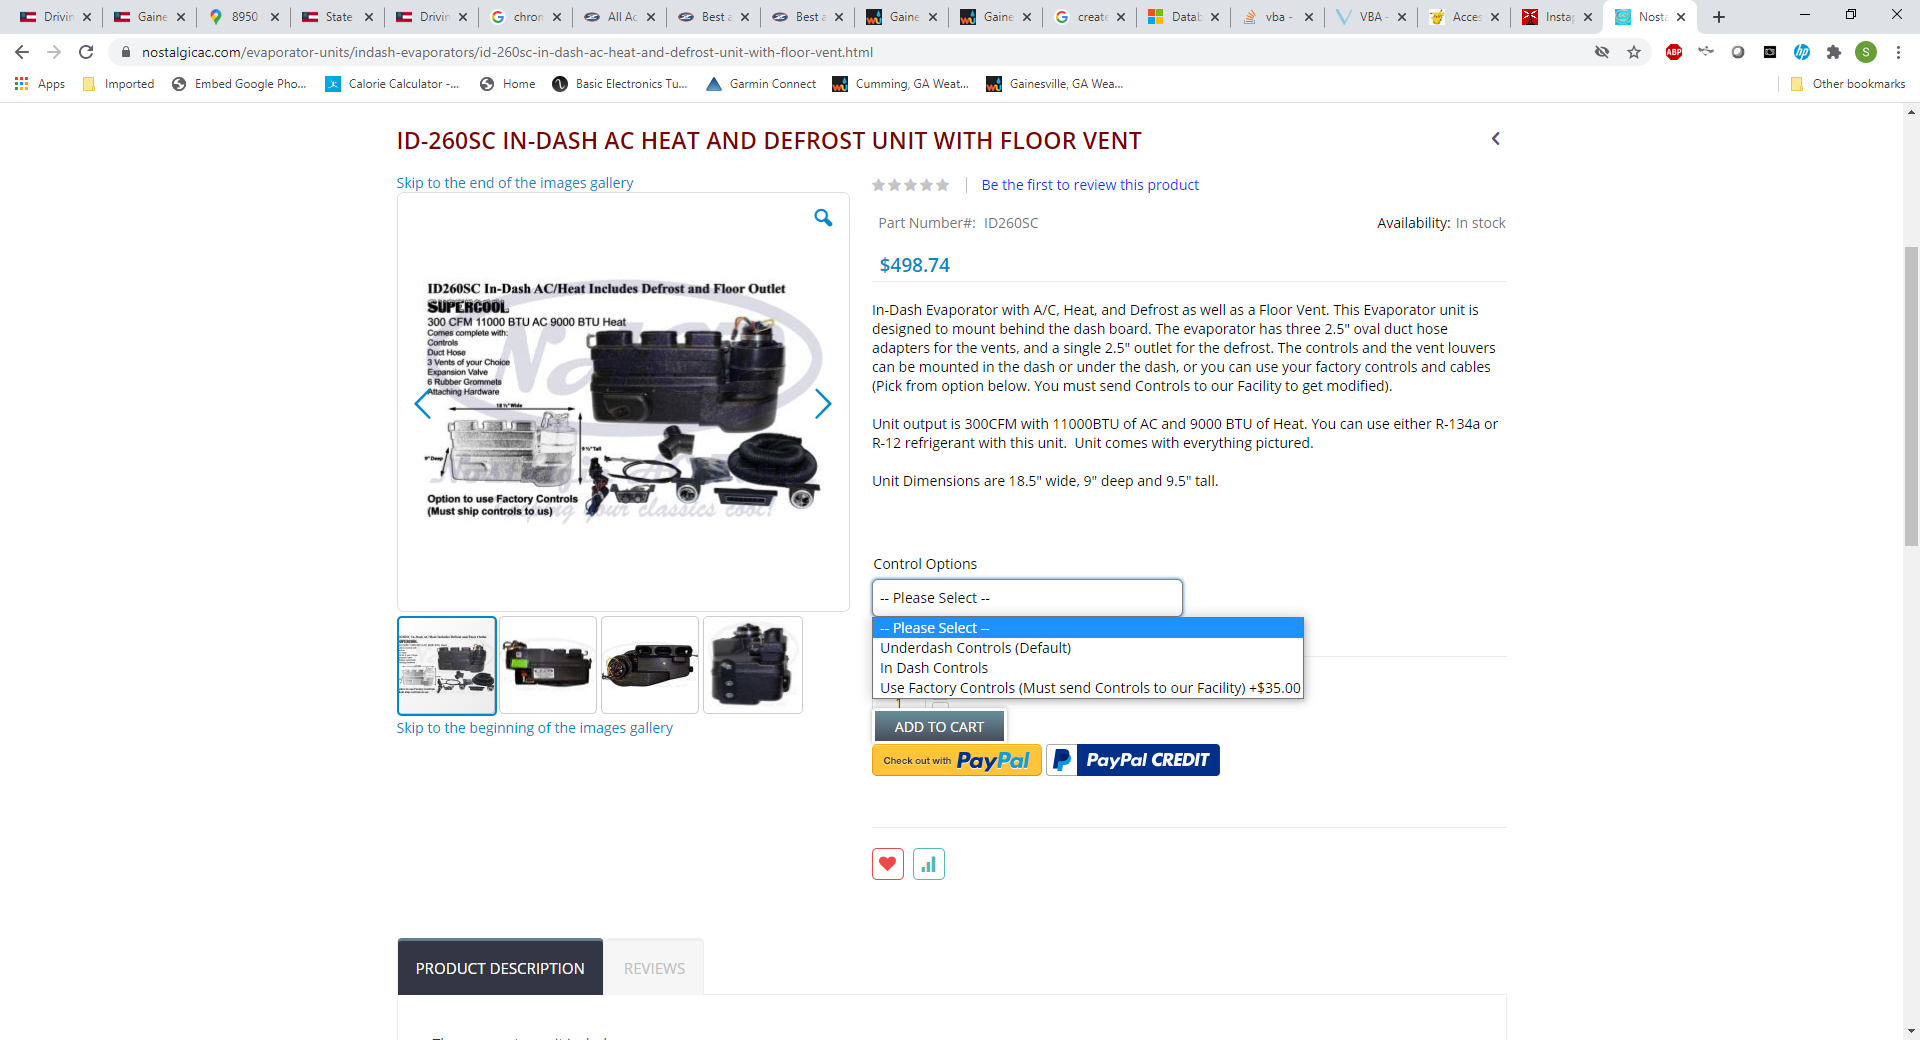
Make one more call. First, take a careful look at @qz16's article on the Vintage Air system. I linked it earlier in this thread. To me the evaporator he used looks almost exactly like the ID-260SC. Ask the person at Nostalgic AC if the dimensions are different. I'm just thinking that it might be easier to utilize what qz16 learned.
-
I went to here: https://nostalgicac.com/evaporator-units/indash-evaporators/id-260sc-in-dash-ac-heat-and-defrost-unit-with-floor-vent.html Under Control Options: Used Factory Controls (Must send Controls to our Facility)

-
One offering I noticed on the Nostalgic AC site is that they offer a service to convert your control panel to operate the AC controls of their product. That has me curious. For my 260Z, I have a spare vent control mounted to a stock evaporator. It would be nice to have the controls integrated.