Jeff Berk
Community Member
-
Joined
-
Last visited
Everything posted by Jeff Berk
-
Dutchzcarguy Thanks for the frank input. It wasn't too expensive to order a new one so I'm going to replace it Maybe I can get it right this time if the problem was an installer error. Jeff
-
No, not beat up. Just some grease, grime, bad picture. I won't say I didn't install it backwards. I cannot recall which way I installed it. This was the first time I installed a clutch so maybe I screwed up. I have a lot of firsts with this car. I'm getting really good at replacing transmissions (unfortunately).
-
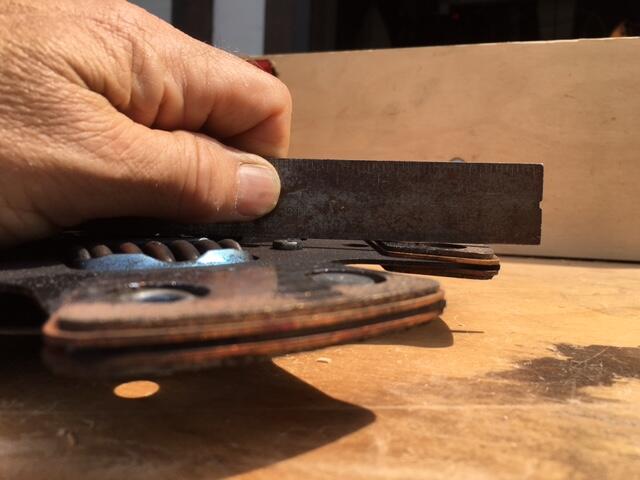
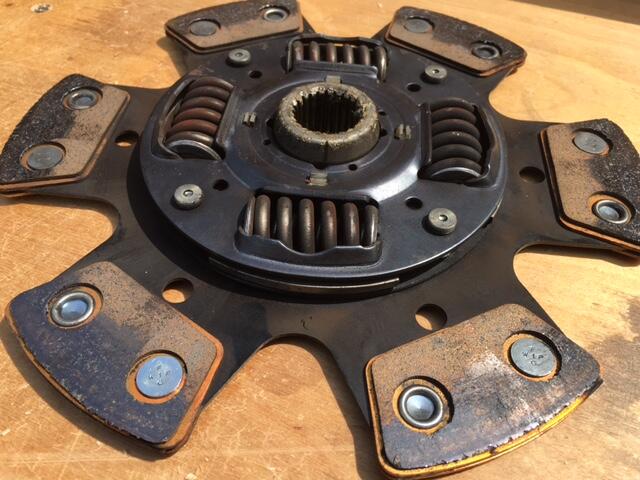
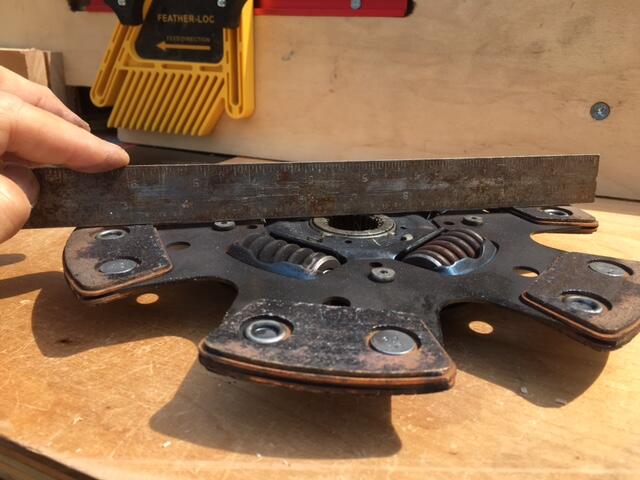
This was McLeod part no. 763701. The TSR at McLeod said it was an installer issue. : \ In the pics you can see the outer edge is glazed on one side and the inner edge is glazed on the other side. Holding a straight edge across the pads shows that the disc is cupped. Rock Auto shows an m-pact that should fit. I had to contact M-Pact directly to get the product number because it didn't show up on a Rock Auto search by car type (99536ST2) HD Ceramic Hi-Torque 6 Puck Assembly, 8-7/8" X 1" X 24T
-
Hi I had a McLeod clutch kit installed about 5-years ago but only put maybe 2-3K miles on the car and it is shot. That was using my 5-speed transmission which I just switched out to a 4-speed last year. Hopefully, whatever caused the issue with the clutch will be corrected now. From the looks of the wear, it seems that the disc was cupped slightly. McLeod only sells replacement discs for some of their American car products. Is there any reason why I couldn't just replace the disc with one from another manufacture? If so, any suggestions? Thanks Jeff
-
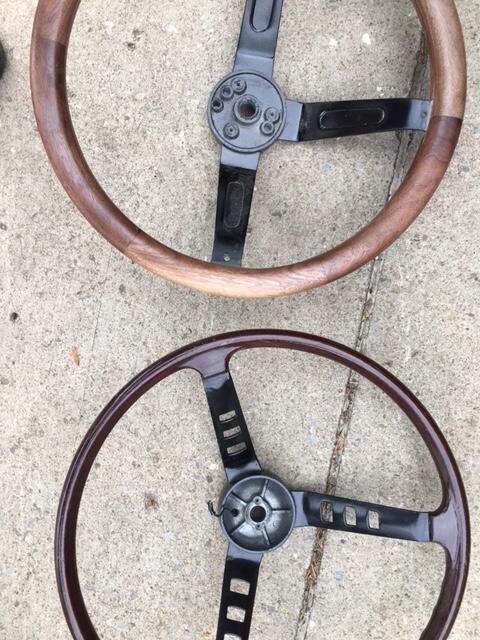
I found this comparison on the classicZcars site and it looks like my replacement wheel is off a 280z while my older wheel was from a 240z. I really prefer the 240z hub with my 280z wheel so I think I'm going to try and adapt it. Thanks for the input.
-
I just installed my real wood steering wheel in place of my simulated wood wheel and ran into a glitch. The wheel fits but not the hub and horn. If you look at the attached photos, the old wheel has a pair of holes on either side of the steering wheel shaft to hold the horn mechanism. The padded hub then snaps onto the horn mechanism. The wood wheel has a larger padded hub that clips onto three bolts threaded into the holes. I'm considering carving a center hub and incorporating a wireless horn button or designing an adapter to accept the old horn button. Any suggestions?
-
Blitzed... Glad it worked for you. The Remflex gasket saved me from having to machine the exhaust flange.
-
I based the steering wheel design on: https://www.mgexp.com/article/diy-wood-steering-wheel-part-1.329 Its black walnut with bloodwood trim, all treated with cactus juice heat-activated epoxy. I'm still working on the center "coin".
-
I put the "wood" steering wheel on my 260z but it was too thin for my tastes. I purchased an old Nissan wheel with heavily deteriorated foam covering and made a black walnut steering wheel out of it.

-
I had a mechanic that used remote listening devices like the one on Amazon and he did a great job of finding a rattle with it. I'm a bit surprised that they go for $100 or so as I thought they would be pricier. I was going to just live with all the noises from my Z but this give me a whole lot more I can tinker with.
-
Reading through this thread is like reliving my transmission nightmare about a year ago when my 5-speed failed and after buying a trashed 5-speed, I ended up with a 4-speed just to get my '74 back on the road. I later purchased a 5-speed out of a pickup which appears to be identical to my old 5-speed and was well taken care of. I might get around to installing it but I find that I rarely need 5th speed. BTW: I tried repairing a 5-speed using parts from a 4-speed and it worked, kind of. The gear noise sounded like I was using straight cut gears.
-
I had an issue with my exhaust flange being warped. My mechanic used an extra thick manifold from Remflex that sealed the leak.
-
One of the PO's installed a crate 280 engine so that explains the extra bolt holes.
-
Thanks for checking Steve
-
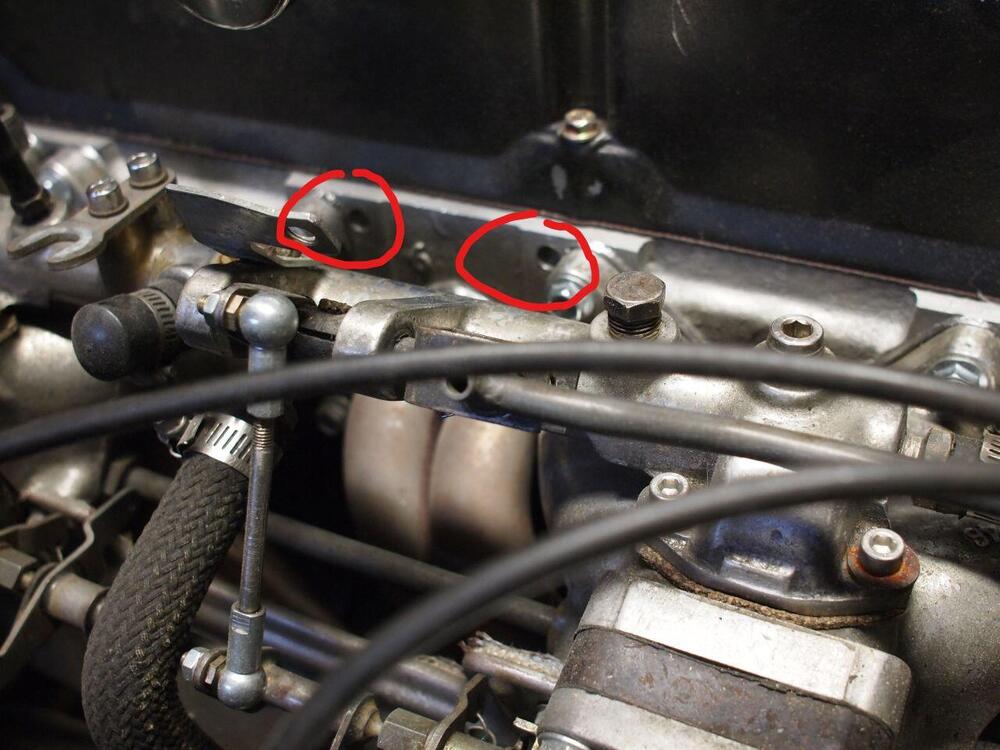
I circled the two bolt holes I plan on using.
-
There are a number of unused, threaded holes between the bolts that hold the intake/exhaust onto the head. I need to attach a fuel rail bracket to the engine and I wanted to use a couple of these unoccupied holes. They seem to accept an M10x1.5 bolt; however, it only goes a turn and a half in and then stops. I don't want to force it and strip the threads so can someone confirm what size these holes are tapped to? It's not a 1.25 pitch as that doesn't even begin to thread on.
-
Last year I removed my banjo bolts and installed some braided hose junk. Now you made me feel bad... : (
-
I like the clean engine compartment. Thanks for the picture. It looks like you used the intake manifold bolts to mount the extrusion. I'll likely do the same but come up with a thermal break somehow.
-
The fuel will enter the fuel rail at the front and has two ports for the pair of SUs. Excess fuel flows out the rear of the fuel rail to a low pressure regulator mounted on the firewall. Fuel then flows to the return line which hopefully has no leaks in it. As for insolation, I'll likely wrap it with something.
-
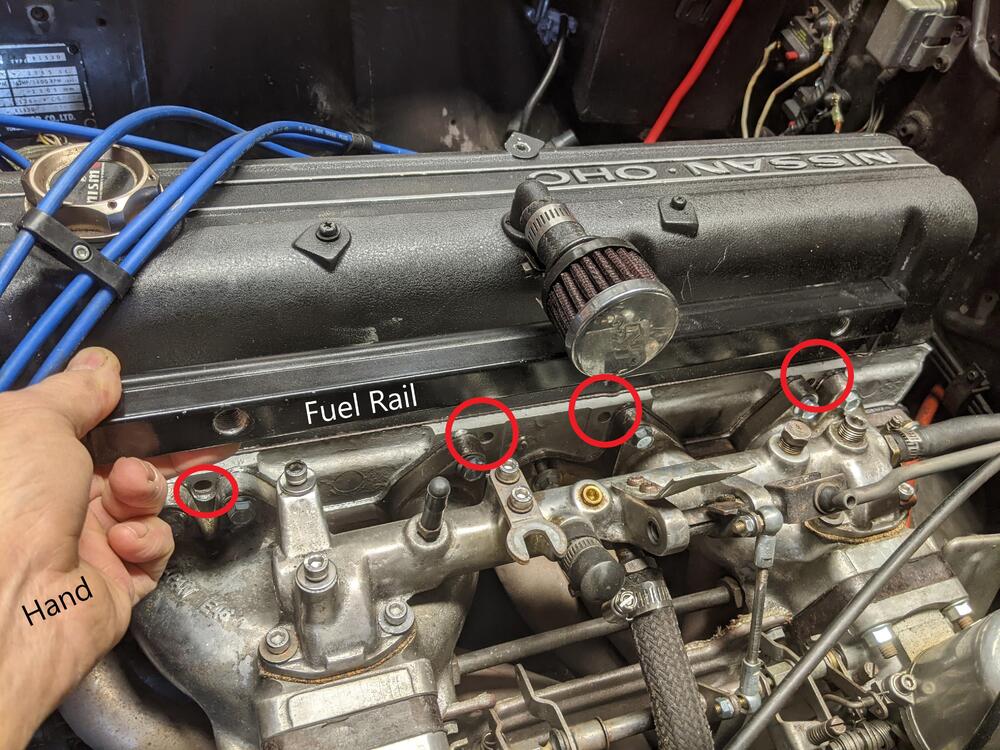
I'm installing a fuel rail with a gas tank return on an SU fuel system. A PO removed the original fuel rail and set the fuel system up as a dead head which is causing some vapor lock issues when the car sits between auto cross runs. The issue I'm having now is how to attach the aluminum fuel rail extrusion. There are four 10mm bolt holes on the cylinder head (circled in red), two wire loom screws, and valve cover bolts as possible mounting options. The cylinder head bolt holes would be a good option except that they are so close to the intake manifold flanges that I'm not sure they will be something I could use for mounting. Also, is there any off the shelf fixture for mounting the fuel rail extrusion or at least a design I can copy?
-
OK, found the right one to unscrew. It was next to the one I unscrewed first.
-
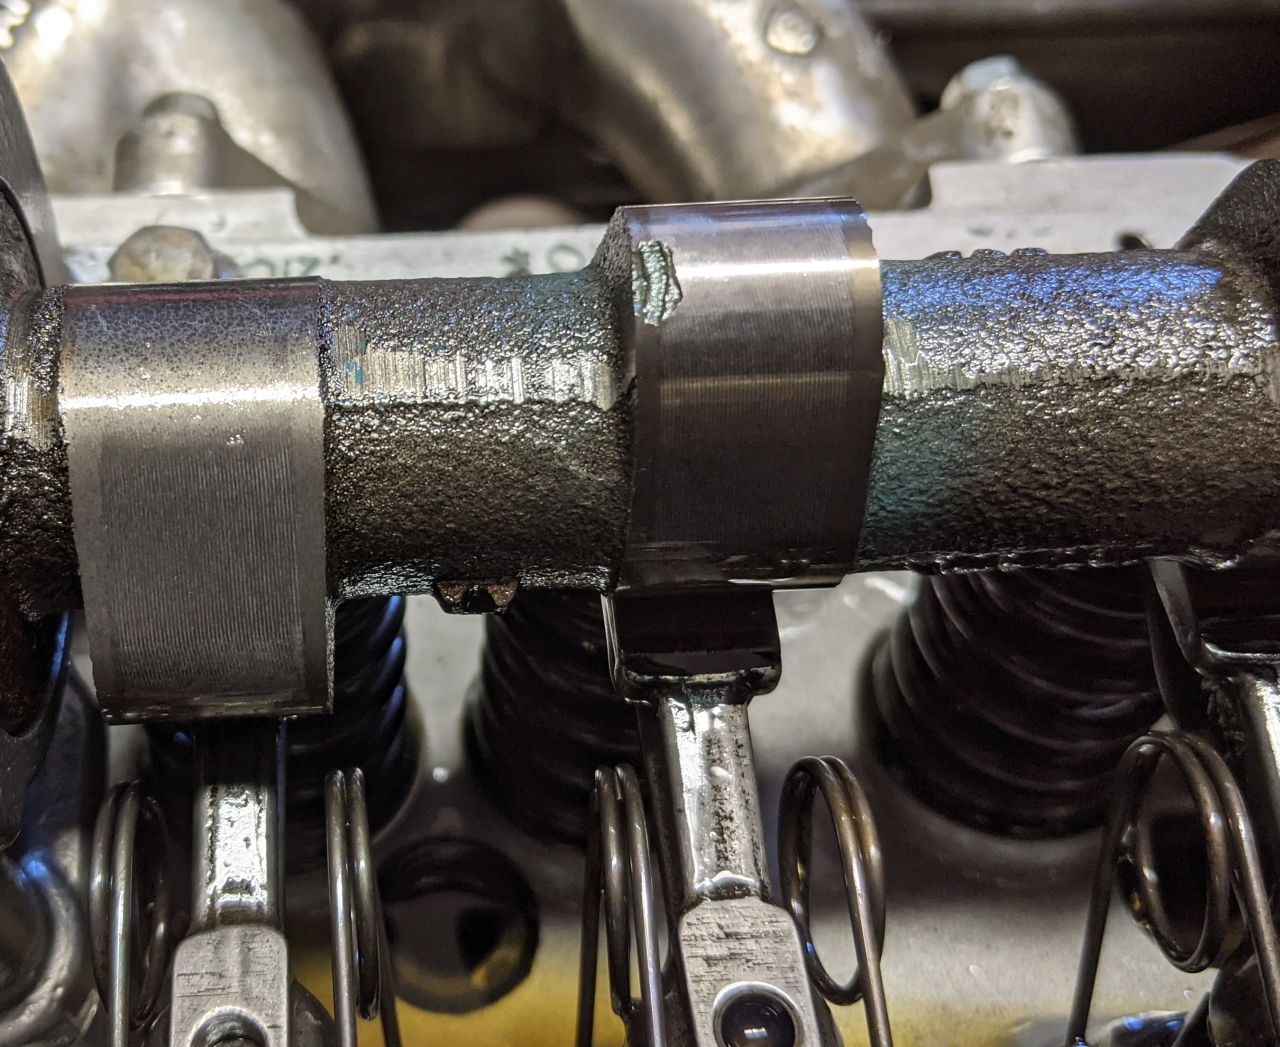
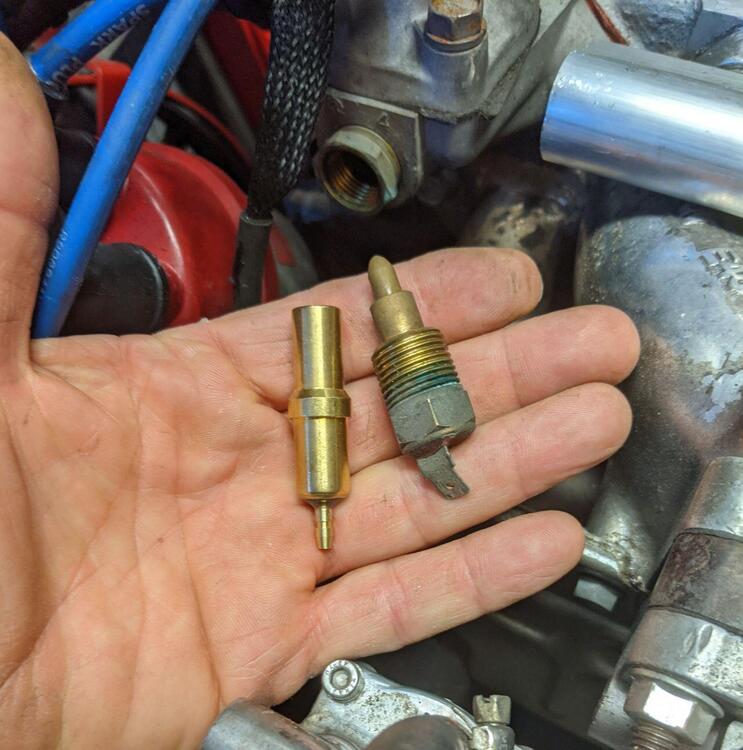
I just got my 260z back from the shop* just in time for winter storage and have a new issue to address. On the drive home, my temperature gauge showed +250 after a few miles. The engine was not hot so the mechanic suggested I install a new temperature sensor. Unless I pulled the wrong part off my car, something does not match up (see photograph). Just above the old and new sensors is the port it screws into. Do I just need to purchase a new retaining nut (https://www.thezstore.com/page/TZS/PROD/SCC13/16-7115) and switch out the blade connector to a female bullet on my wire? *Welded and reground failed camshaft, installed extra-thick exhaust manifold gasket due to a warped header mating surface.
-
I have the same problem with Pinterest and it's gotten to the point where sometimes I add -pinterest to the search to try and filter out Pinterest results.
-
I think if the clock has reached the point of requiring 21volts to run at all, there is a problem. Those old auto clocks, unlike modern quartz clocks, should be professionally cleaned and oiled (yes oiled) periodically. Oiling is needed at specific friction points and requires clock oil, not 3-in-1. I'd be a little concerned about dumping the whole clock in a cleaning solution. The clock has both a mechanical and an electronic part. In a clock, there are two plates with shafts holding moving parts pivoting or spinning on axils between the plates. Where the axils rest on the plates, there are holes that need to be kept clean and lubricated or the holes become elongated and would need to be repaired with bushings. If you have a grandfather clock sitting around, you'll notice that these holes in the plates actually have oil cups. You might want to try and clean these holes then use clock oil applied using a needle tip. A bit of advice, don't let the battery in the car run low. A low voltage can damage the "points" that trigger the winding mechanism. If all else fails, several people specialize in replacing original clock mechanisms with quartz which do not require maintenance. There is something about the tick-tick-tick which I like to hear (before I start the car and drown out all noise with my header exhaust). I was able to fix my '74 clock by cleaning and LIGHT oiling so repair is possible. This goes in depth and specifically shows where to oil and with what: https://www.oldcarsweekly.com/features/putting-the-ticktock-back-in-your-old-car-clock
-
Well, I only had 400 miles on that camshaft so the mechanic is not going to charge me for the reinstallation and Bonk is not going to charge him (as far as I know) so I'm going to wait for now on purchasing a substitute. This driving season is shot since it's almost time to put the car away for the winter. Come spring, if I don't have the camshaft back, I'm likely going to find another and absorb the loss.