Jeff Berk
Community Member
-
Joined
-
Last visited
Everything posted by Jeff Berk
-
You should check with the Erie agent. You might get lucky. So if you do get the VIN, are you going to try and do a CarFax to trace the owner?
-
ZH: I'll check it again in Fall and see what it looks like. Thanks for the help (once again).
-
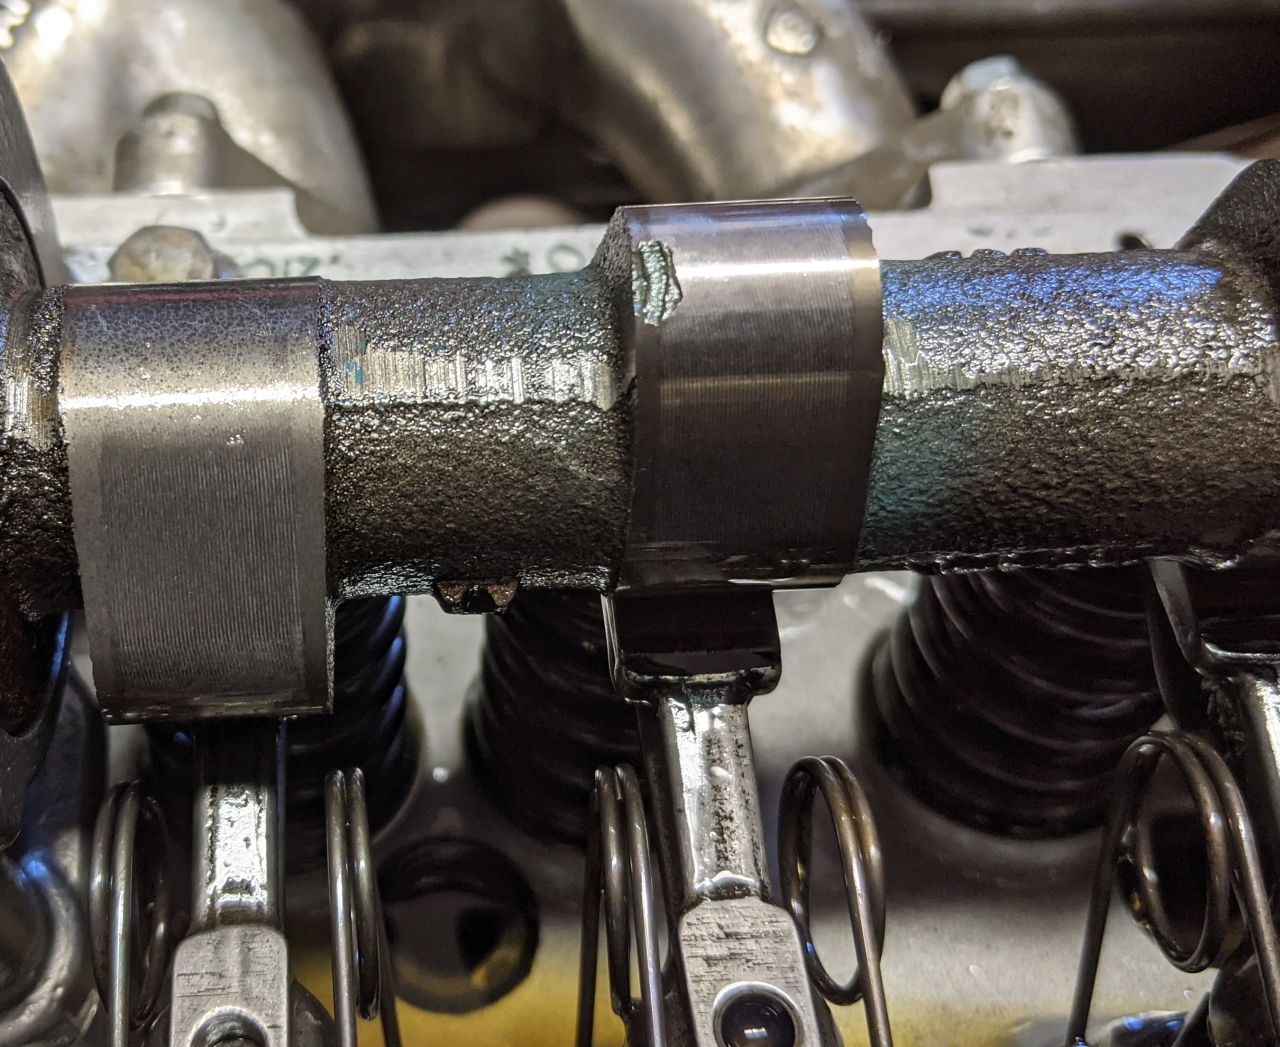
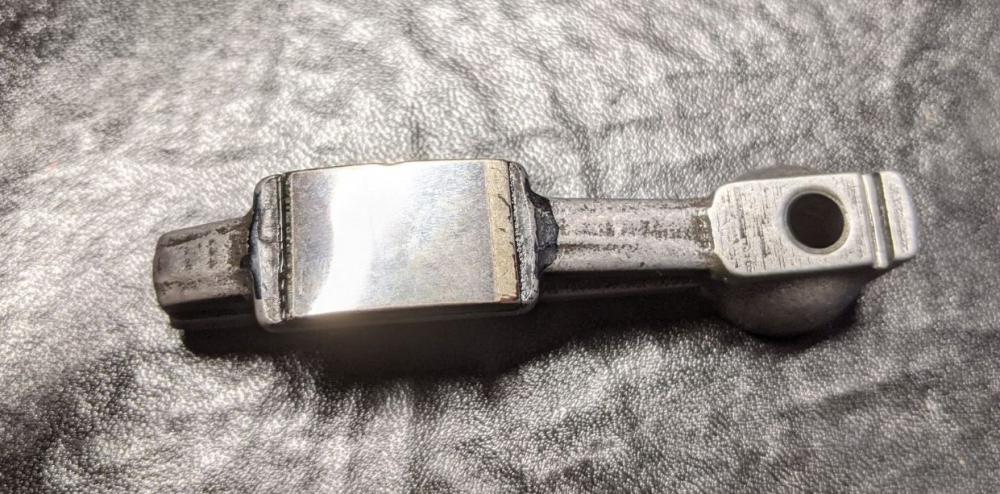
Jeff G, what does it mean to chuck a rocker. The lash pads look ok to my untrained eye. I'll clean the rocker in an ultrasonic cleaner, stain it with ink, and see if the apparent cracks are still there. ZH, There's 395 miles on it. I'm assuming the chip on the lobe occurred during the machining as it's not very noticeable. I'm not familiar with (or know) the machine shop and relied on the mechanic to select one he was familiar with. What I think might be happening is the lobe got chipped possibly due to a defect during machining. The rocker was chattering due to the uneven surface and created the cracks. Possible solution? I was thinking that I'd replace the rocker (they are inexpensive) and grind away just enough on the trailing edge to miss the chipped area of the lobe. Then I'd protect the area around the cam shaft with rags and smooth out the lobe chip with a small grinder to lessen the potential for propagation of the damage. I'm waiting for the mechanic to get back to me with his suggestion(s). This is my third shaft in 2 years. Jeff
-
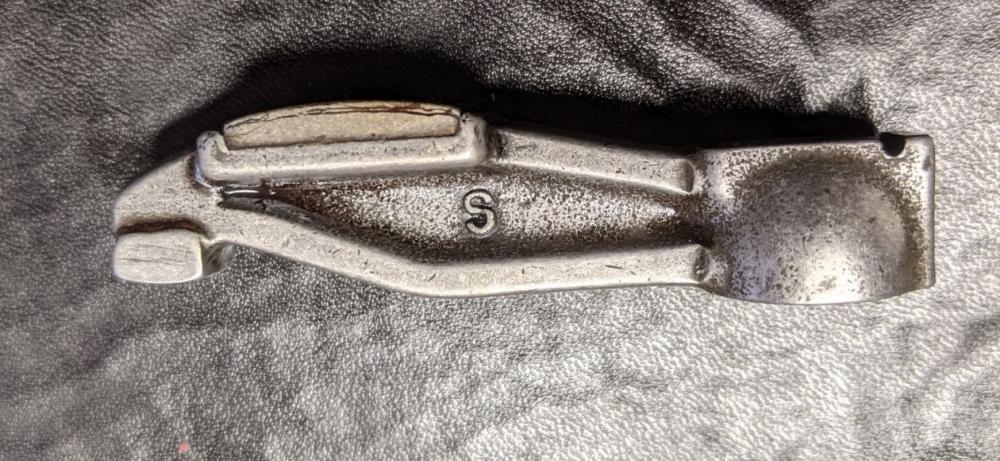
Jeff G 78, I looked at the Aug 2020 receipt and the rockers were shown as being replaced. That was 400 miles ago. (I need to get this out on the road more) The fractures on the "S" side of the rocker running parallel with the face don't bother you? Jeff
-
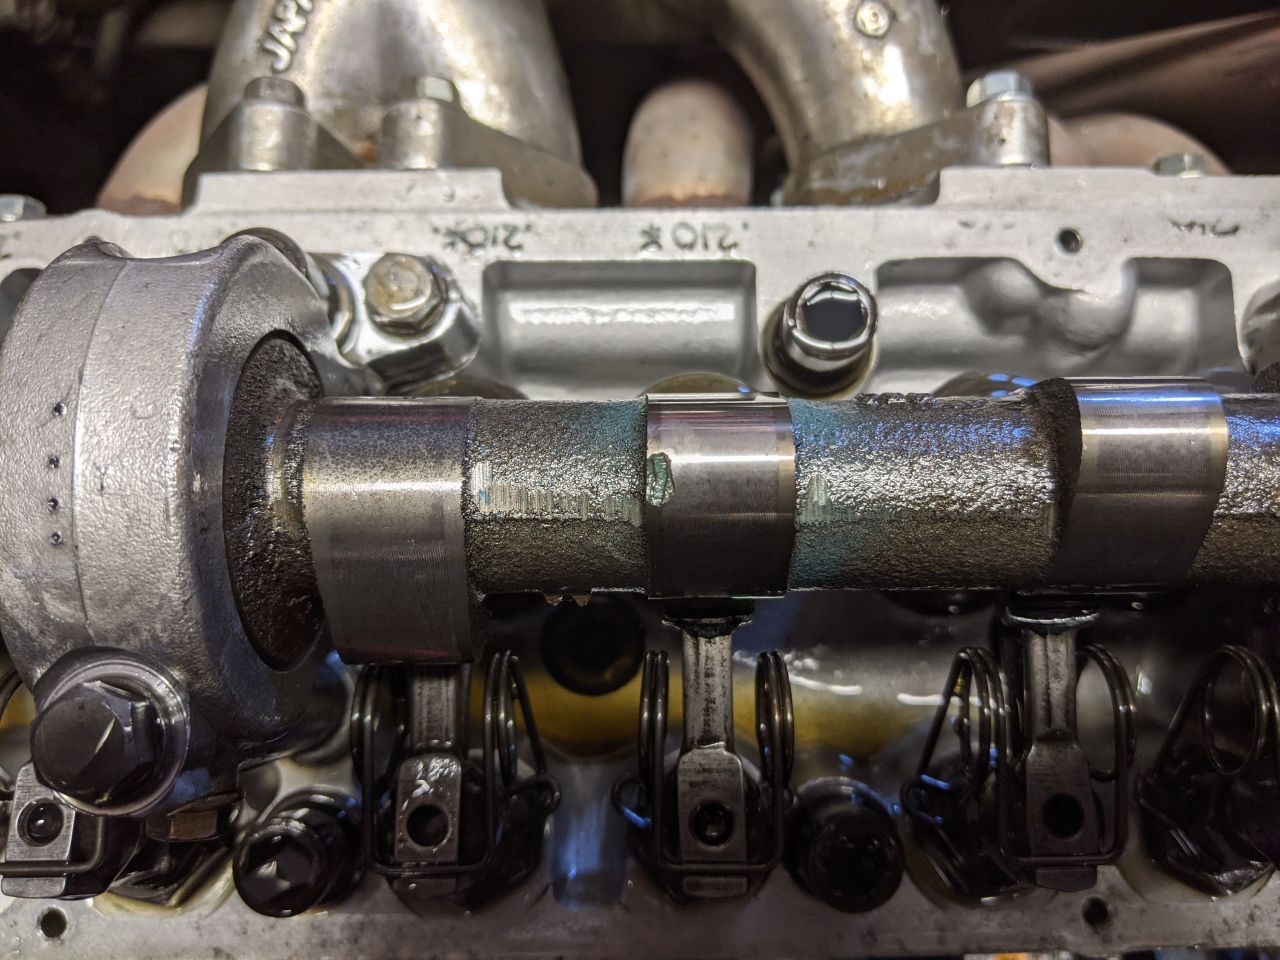
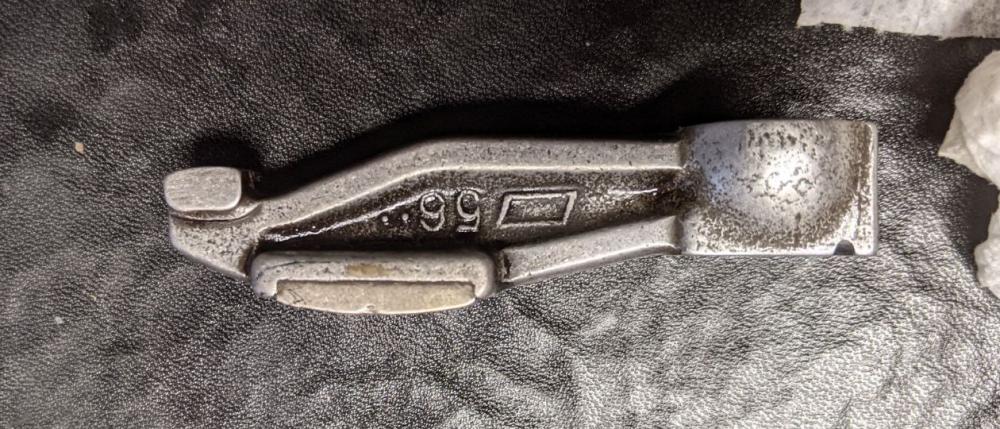
I pulled the valve cover off this morning to get a closer look at the rocker arm. I see something that worries me but what do I know. Keep in mind that the chip in the lobe is to the rear of the car when inspecting the photos. That would be the side marked "S" on the rocker.
-
Here's a closer look at the chip from a different angle. Yes, it is on the lobe.

-
I just sealed the valve cover back up so I can't check if it is contacting the wiper. Yes, there are spray holes, they just don't show up due to the position of the lobes. Yes, it was a new cam shaft (last year). The mechanic has been non-responsive lately as he's working as a crew on a Miata racing team and doesn't have much time for his shop. I think I'm going to treat this as a mole on my skin. I'll just keep an eye on it and check to see if there are changes.
-
It's been a year and I just completed a valve lash adjustment. It looks like the mechanic did not reinstall the spray bars and only went with the internally oiled cam shaft. One issue I notices was that there was a little damage to the cam on cylinder 5. I'm assuming that since the chip is off to the side, it will not impact anything.

-
Chrome has a really bad reputation for durability but it really looks great on the few cars I've seen it on. Everyone wants to touch it and unless there is no dust or dirt on their finger or the car, it will leave behind scratches. I have a little chrome wrap at home to experiment with and it IS IMPRESSIVE.
-
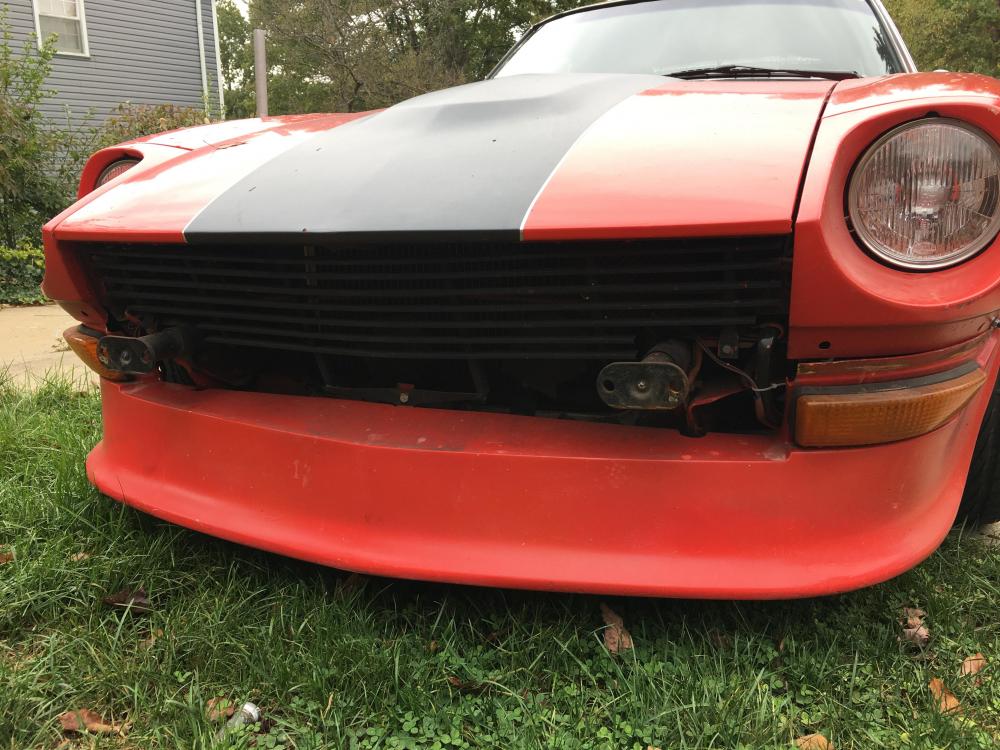
FYI, The wrap I ended up using was manufactured by Vivid. My son and I wrapped a second car afterwards with Avery material which we liked better due to it's stretch. We made several mistakes with the 260Z and had to go with matching paint on the headlight buckets. Now that we have a little more experience, I think will rewrap the car next year in metal flake red and include the headlight buckets by using knifeless-cut tape. The advantages of a wrap for us is that we can change the color, we can do it ourselves, the color options and special affect vinyl are numerous. Note that the black stripe on my Z was done because I wasn't able to smooth the vinyl out without a wrinkle on the hood. I'm attributing this to Vivid's rigidity and hope to do the hood in one sheet when I go with Avery. Note that the air dam on the car was paint as was the headlight buckets. It is definitely a two person job. Avery offers group classes in car wrapping for around $900. At the end of the class, you get a $900 credit for their wrapping material. I might take their class next year so I can get some training beyond You Tube.
-
Maybe I'm pessimistic, but unless the car left Pennsylvania for a dryer, snow-free climate, it is likely a basket case by now.
-
The electric fuel pump helps, some cars more than others. Without it, my 260Z periodically just stops running so I have to use it. My replacement pump and filter came from Rock Auto. The two relays are under the dash on the far right side attached to a metal panel packed with other relays. You can use the wire colors to pick out which two they are. I was never able to get mine running with the relay setup so I bypassed them and ran power to the pump from a circuit that energized when the car is on. For safety, I installed a kill switch that activates if it senses a significant physical impact. As for how to tell if the electric fuel pump is running, you can hear the whine from inside the cabin. If not, start the car and crawl under the right rear and put your hand on the pump. You should feel the pump vibrating or hear the pump.
-
just took it out for a test drive. The 4-speed worked great. Thanks all for the help.
-
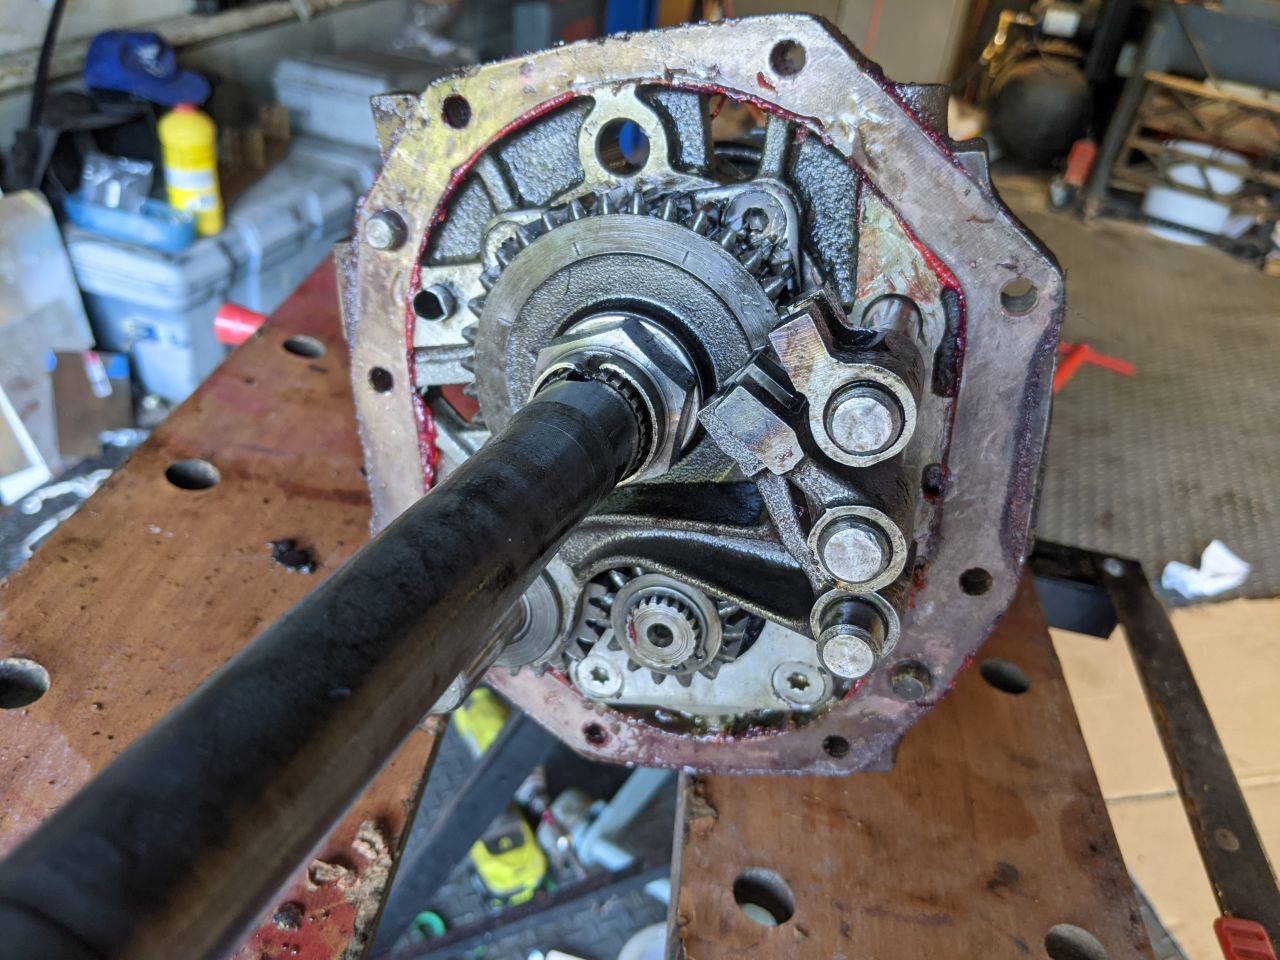
EuroDat is great at spotting fine details in photographs. He spotted an extra C-clip crammed between a couple of gears for me not too long ago.
-
Thanks EuroDat. I'm going to correct that. I'm going to hone the hole lightly because it shouldn't take a hammer blow to force the detent through the hole. I'm assuming there is some corrosion in the bore from year of sitting around.
-
I'm going to hold off working on this until my hone gets here on Friday so my detents move smoothly up and down. Right now, they are really tight in the vertical bore.
-
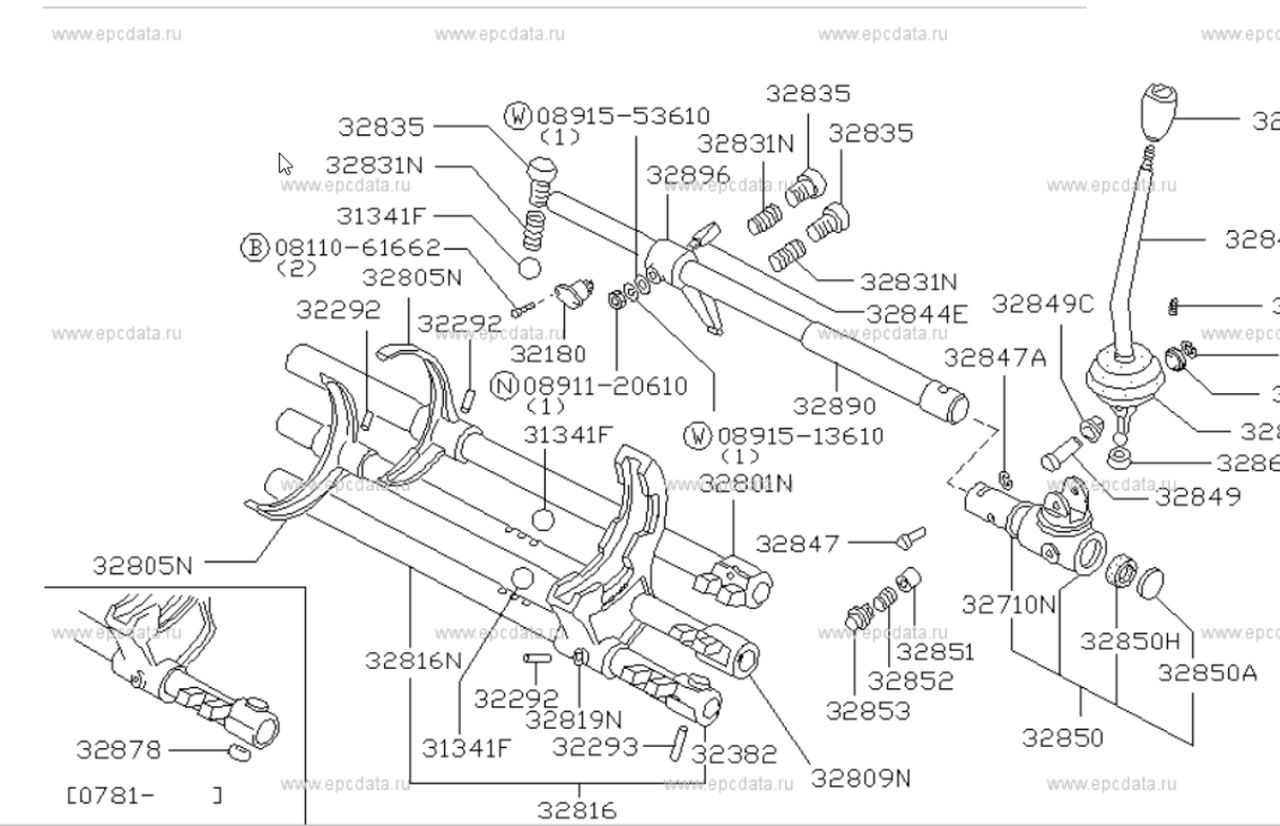
Keeping in mind that this is a 4-sp and the attached diagram is a 5-sp, it looks like I have it right although the alignment looks kind of off.

-
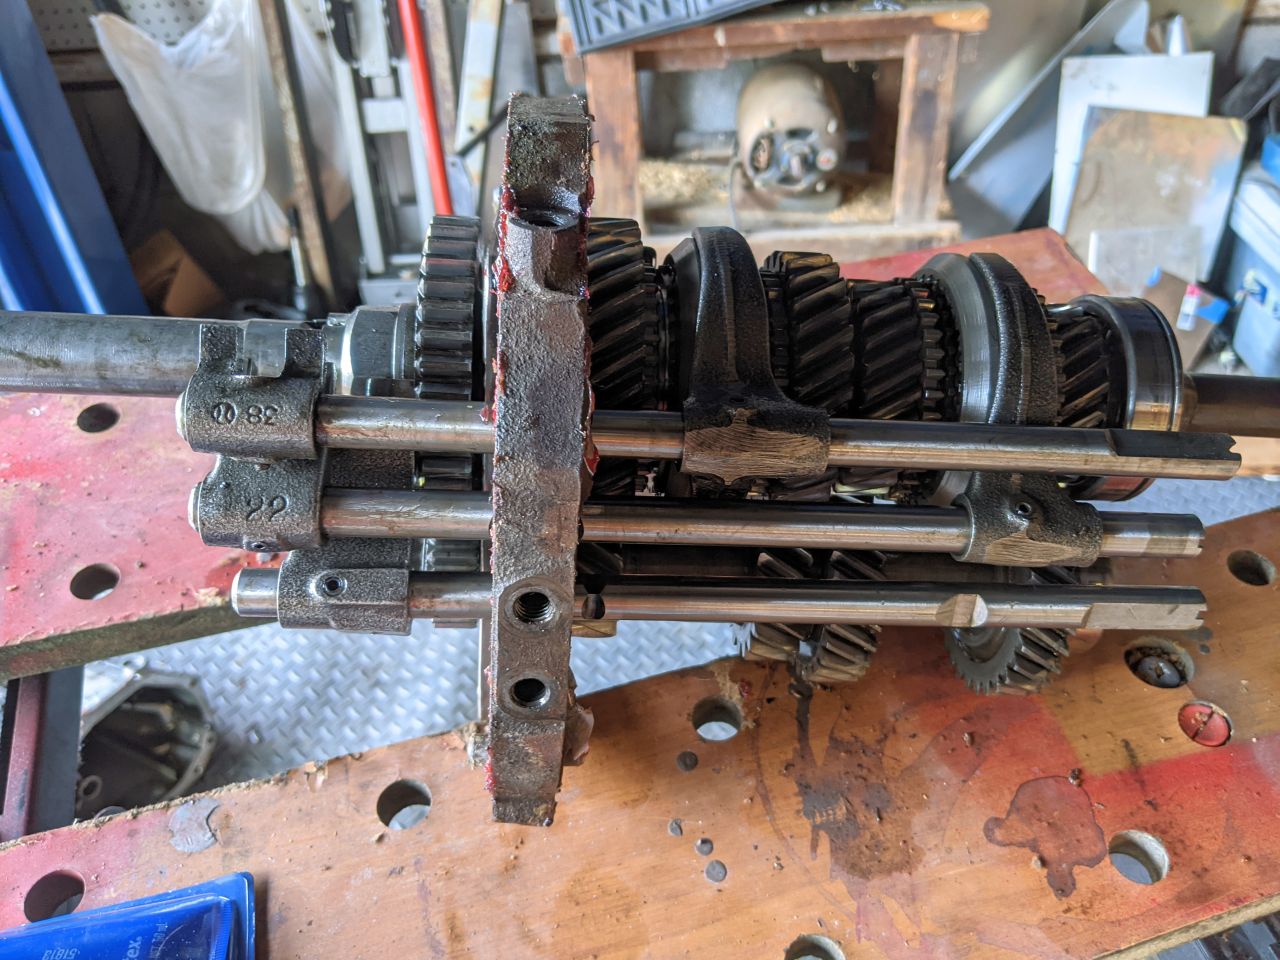
EuroDat: I'm not sure I'm understanding your last paragraph correctly. I've attached 2 photographs of the transmission showing the location of the forks and the striker end of the fork rods. The striker end does not look right but I think I have them in correctly. I'm not sure if I was able to shift the transmission into 1st or 2nd, but the transmission definitely did not seem to click into those positions. I might of been in neutral when I thought I was in 1 and 2 gears. Jeff


-
I just installed a used 4-speed to replace a 5-speed that is no longer functional (long story). I opened the 4-speed up to replace the input shaft bearing because it had been exposed since the transmission was stored without the front cover and I thought some dirt may of gotten into the bearing. I had to remove the three fork rods to pull the bearing. I noticed that the 3rd 4th rod seemed very tightly stuck into the adapter plate as were the detent balls in the vertical hole between the shafts. I reassembled the transmission and discovered no 1st or 2nd gear. I pull the transmission and checked to see if the roll pins were in place and they were. The 3rd 4th fork rod (middle rod) was still difficult to slide through the adapter plate and the detent balls between the upper and middle rods required a long punch and a lot of force to push them through the this section of the vertical hole. I've ordered an 8mm hone to try and clean up the vertical hole assuming that the detents are not moving out of the way to permit the 1st 2nd fork rod (upper rod) to move. Is there anything else I should check out. This is now transmission #4 so I'd like to make some progress on this one. Between this transmission and my chainsaw, I'm not sure which is more frustrating to get operating. Jeff
-
I looked up one of the old threads and saw where someone was planning on manufacturing these and gave up. That's why my plan is not as ambitious. From the photographs, it looks like the cross section is similar to what I have attached and the width is 3/4-inch. I'm assuming one leg is shorter than the other to accommodate a rubber gasket that would hold the cover in place.

-
I'm in the middle of some repairs on my 260z and am already looking towards the next challenge. I'm trying to understand how the lens cover frames are constructed or better, how to reproduce them. I'm assuming that they are stamped and then stamped a second time to form the curves and finally chromed. Can someone sketch for me the cross section through the frame or a good photograph of the back side of the frame to show the detail of its shape. I have some ideas on how to reproduce a pair without having to resort to having a mold made and using a stamping press that I'd like to explore. If I can figure this out, I'll publish the methodology but I do not plan on selling these.
-
From his documentation, it looks like PO2 took really good care of it. PO3 bought it for his son 😏, enough said. On a side note, my neighbor across the street recently purchased his college-age son a 26-yr old 300Z twin turbo. At least it's an automatic so he can't do too much damage to it.
-
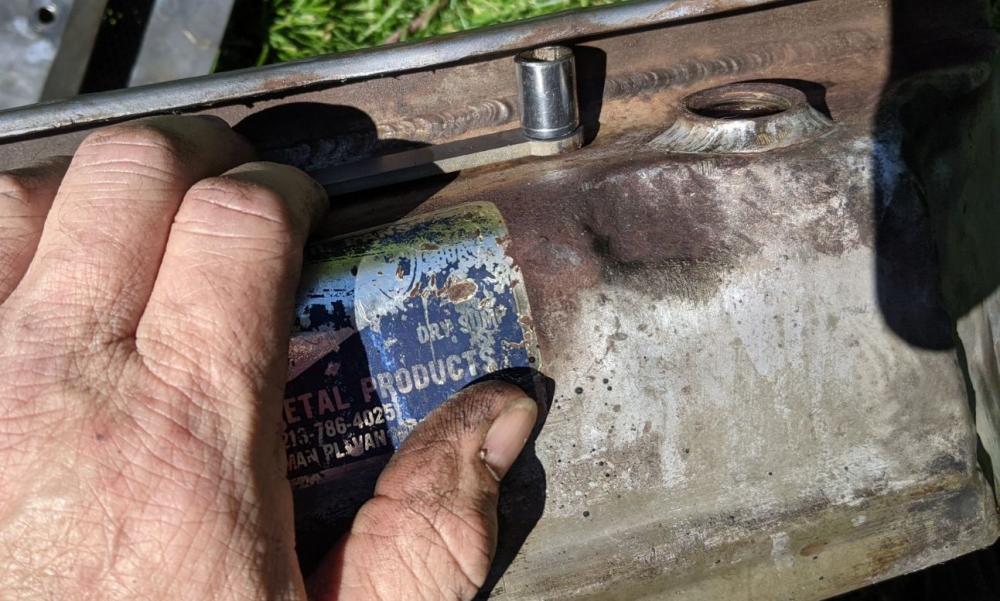
Grannyknot, In '86, the second owner installed the pan as part of a spare-no-expense overhaul. Since then, many of the parts were removed due to various reasons. The triple Webers, Recaro seats with 6 point harness, red high-pile carpeting 🙂, racing cam, and now the 5-speed are gone. The PO did invest in a new 280z engine (bored 20 over, new pistons, polished, balanced) and I'm almost positive it is still in there. Most of what was originally done is listed in a dot-matrix printed summary 2 1/2 pages long dated 1987 at 51,000 miles. The third owner hardly drove it and when I got it with 74,000 miles, the Centerforce clutch and flywheel were already shot. I don't know if I can bring it back to its glory days, but I'm going to make an effort at it. Jeff
-
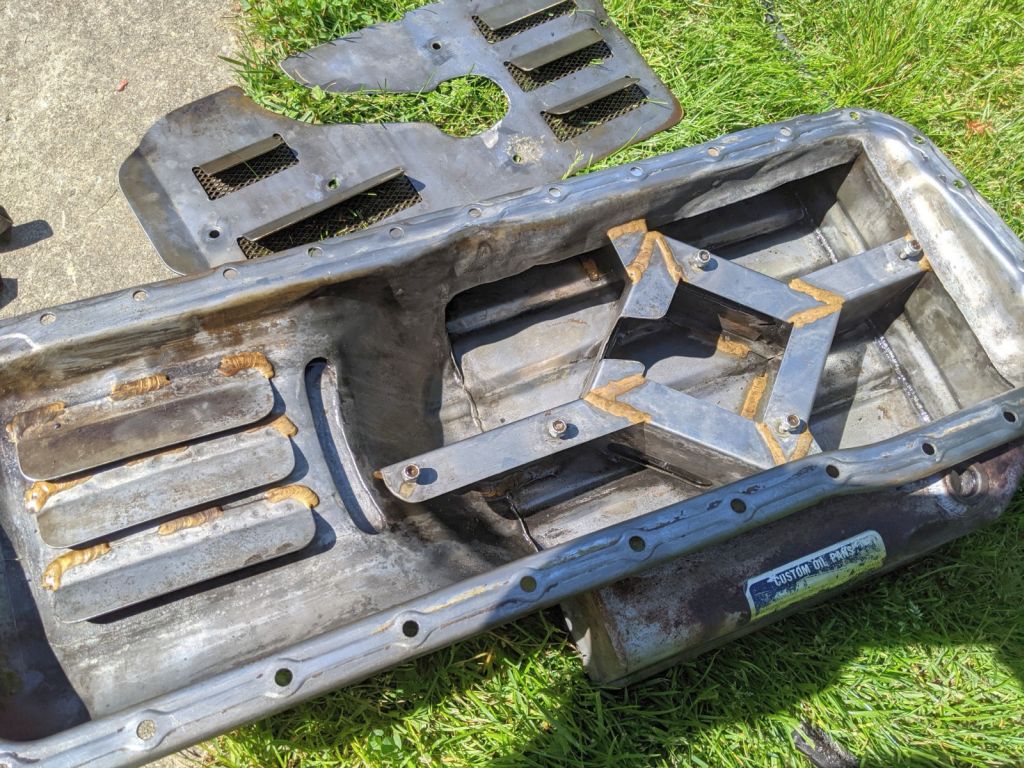
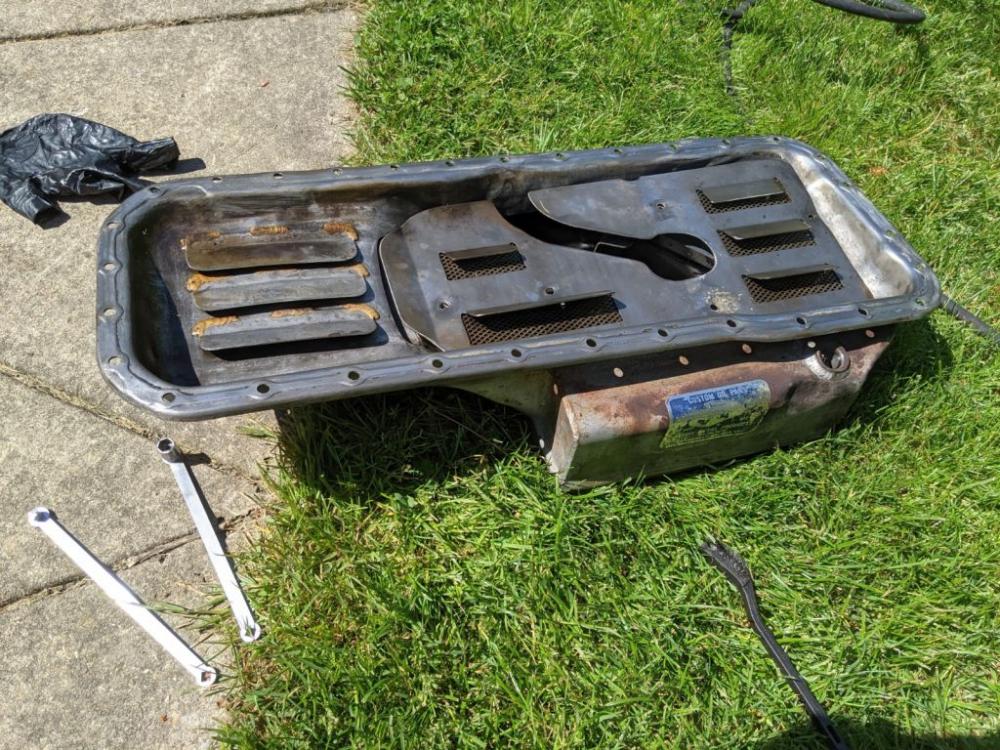
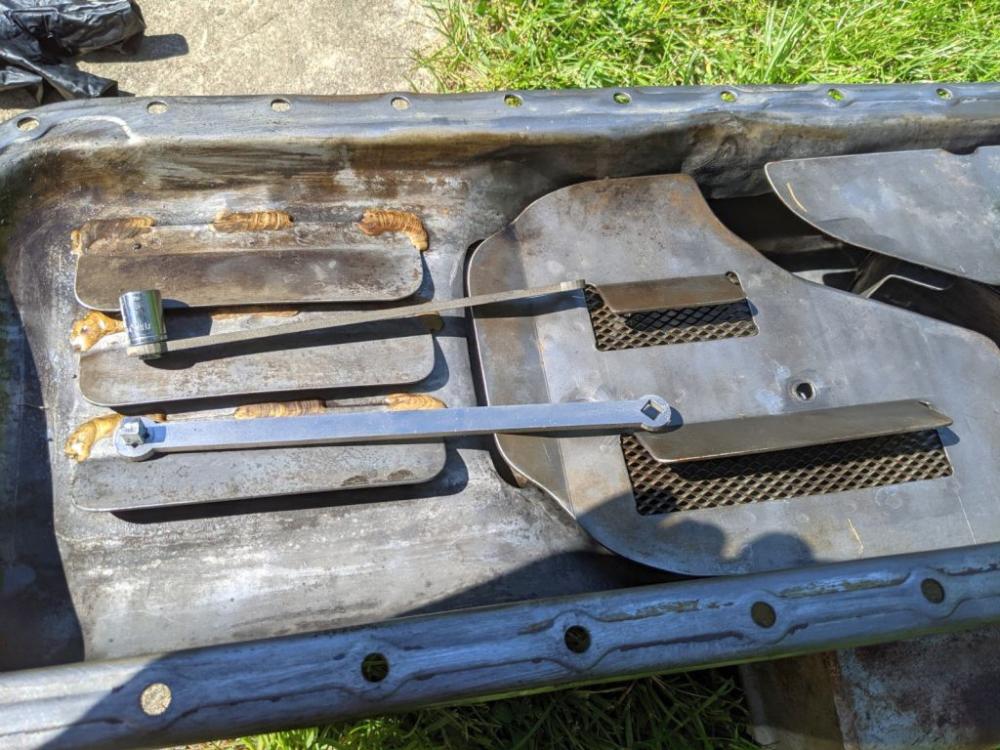
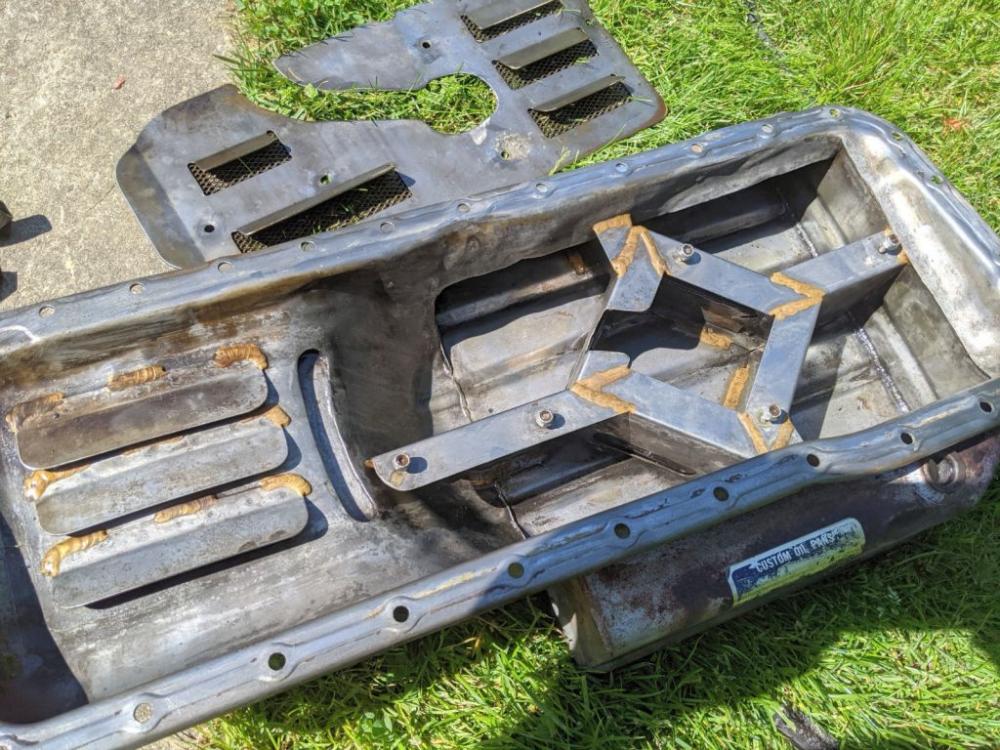
I got the oil pan off! The PLA wrench i printed didn't work but it gave me the dimensions I needed to get a couple of steel wrenches made. The oil pan is surprisingly complex with several baffles, screens, and 4 spring-loaded flaps. There was hardly any sludge in the bottom of the pan but the car likely had just 40K miles on it since the installation in the early 80's. I still see no reason for the second oil drain plug on top of the tank. I had to remove the plug to get even my modified wrench with a ground-down socket in there. I will need to cut or grind off some of the brim around the oil pan so that I can get that one troublesome bolt back in.
-
I have it up on a lift which makes the effort more tolerable. That extra-wide oil pan is a real PIA. I'm trying to get the maker space near me to make a couple of offsets but with C-19, I have to rely on students to fabricate the part. Their waterjet would cut these out in minutes. I might try a 3D printed wrench but I'm not sure a PLA wrench can hold up.wrench offset.pdf