Jeff Berk
Community Member
-
Joined
-
Last visited
Everything posted by Jeff Berk
-
My Captain, I saw a posting on cutting and rewelding the shaft to replace a damaged spline and I considered that and might end up going that route. I figure that a complete replacement should also be doable. I'll evaluate my options when I dig into the regulator in a few months. Thank you for the input.
-
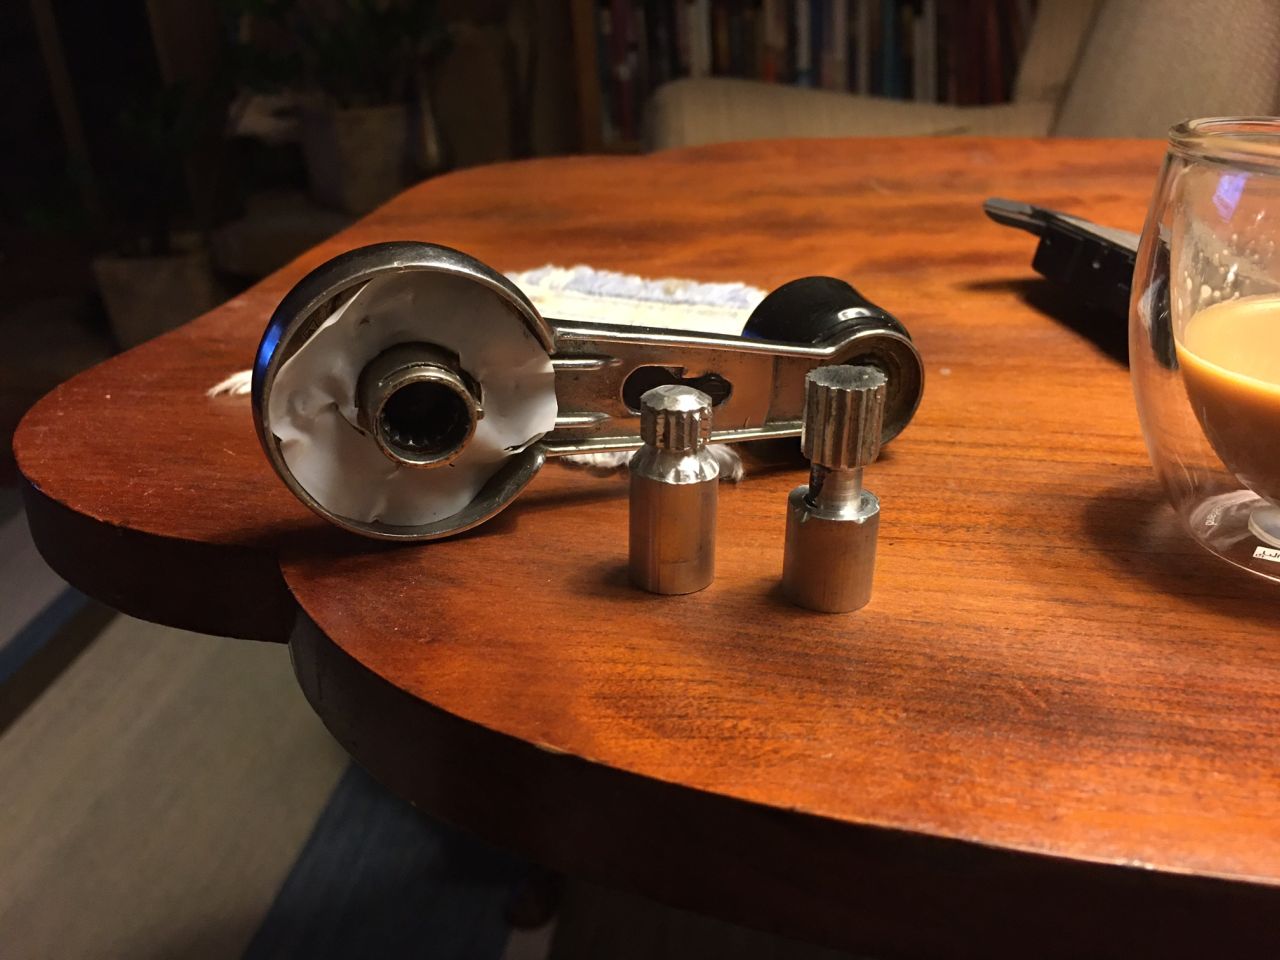
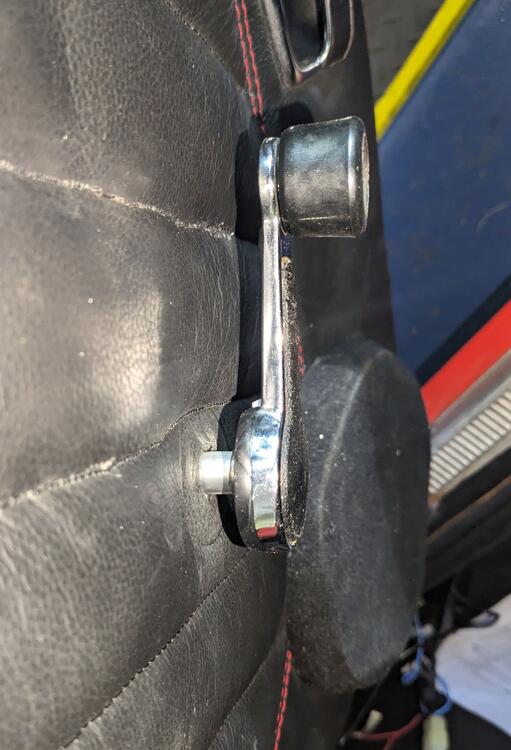
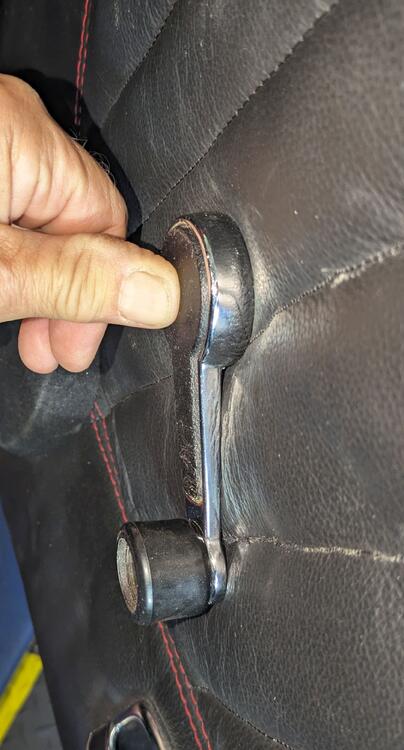
My Captain, I didn't purchase the aftermarket adapters because they were not the correct diameter and I wanted to try and make them myself. The aftermarket adapters were a two piece design with the sleeve and spline sections welded together. There was at least one complaint that the weld failed so I wanted to make it out of a single piece of metal. Billet seems to be a popular buzz word so why not. It was easy but a little time consuming and most importantly, fun to make them so that's what I did. I noticed a comment from the aftermarket part manufacture that they could not make them any shorter and I understand the reason for that statement after I figured out how to make them. I only needed to extend the shaft a short distance to clear the padded leather covered door panel. Even after I modified the aftermarket design to shorten the length, the crank handle extended too far from the panel. Creating an entirely new window regulator spline shaft should be as simple to make as these extensions however I don't have a picture and measurements of the other end of the shaft to design one and will have to wait for winter hibernation to make a few. I'll also likely have to switch to steel from aluminum.
-
Well after several tries, I came to conclusion that this may not be the best approach. The shaft extender extends the shaft too far for my application. Plan B is to replace the shaft entirely with one that is just slightly longer. That will have to wait until late fall when I put my Z in hibernation so I can pull the window regulator out for modification. I'll get back with the results of my experiment then.
-
Thanks Steve. I think I have it now.
-
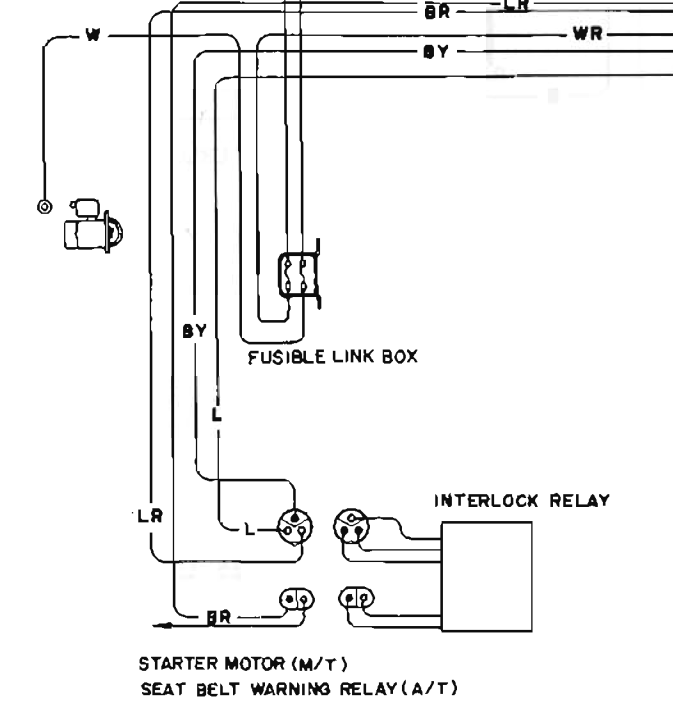
I'm trying to clean out my engine compartment of unused connectors and components. The emergency override button had already been removed so I thought I could just eliminate the seatbelt interlock relay and associated plugs. No luck. The starter solenoid wouldn't activate without the relay. Is there a means of removing the relay by jumping selected wires? It really serves no purpose at this point.
-
Yes, I agree. Only a real ding bat would install that nylon washer wrong.
-
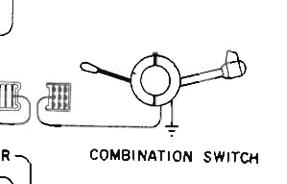
Dave! That was it!!! I too, maybe 5 years ago, repaired my combination switch to fix the headlight switch. I put the nylon washer in the same way as the guy in the video. I rearranged the washer and I can now wash my window, at least the passenger side until I find the clog. Thank you ALL for the help.
-
I found a spare intermittent wiper relay in my parts bin but substituting it didn't correct the issue. I noticed that if I press and hold the washer button, the wiper will wipe a couple of times so it looks like the washer is charging the capacitors in the wiper relay. Also, if I hold it too long, I blow the 20 amp fuse. I unplugged and cleaned the contacts for the wiper motor and all of the D-shaped color-coded connectors under the glove compartment. I used contact cleaner spray and a small-diameter nylon brush to clean the female and a small nylon brush wheel on a Dremel to clean the male contacts. I've seemed to have picked up about a volt so that I'm getting 4.0 volts at the washer motor contact when the button is pressed. I'm wondering if I should check resistance between wire segments or turn the power on and check voltage at various points?
-
With the combo switch plugged in and the LW at the washer unplugged, I get 0.7 ohms when the switch is pressed. With the two connectors on the amplifier unplugged, I get 0.9 ohms between the two washer pump wires when the switch is pressed.
-
Looking at BE-64 of the FSM and how the switch's stationary contacts are mounted, one of the circuits is a ground. I might have to connect the battery and turn the ignition on and probe around with a multimeter to figure out what's going on. I'm still confused as to why there is 12v going to both contacts on the sprayer when the sprayer button is not pressed. It seems like one contact should be a ground and the other only showing 12v when pressed.
-
I took the switch off and cleaned up the contacts with vf sand paper and contact cleaner spray. I'm still getting the voltage readings: ~12 volts on both connections when the button is NOT pressed, and ~3 volt difference between the two connections with the button pressed. If instead, one of the two contacts dropped to zero and the other stayed at 12 volts, it would work. One more question, should the wipers start wiping when I press the sprayer button because they don't. This is not a major issue since I don't intend to drive my car in the winter but its just one of those things that's on my list of things to fix.
-
I didn't realize there was a switch to view signatures let alone a way of generating one. I've written a short sig for now.
-
I'll need to figure out how to get to the button on the end of the wiper stalk to clean up its contacts. I might need to table this issue until fall when I attack other issues with the dashboard. As for the sprayer motor, it is new and will spray when I power it directly from the battery.
-
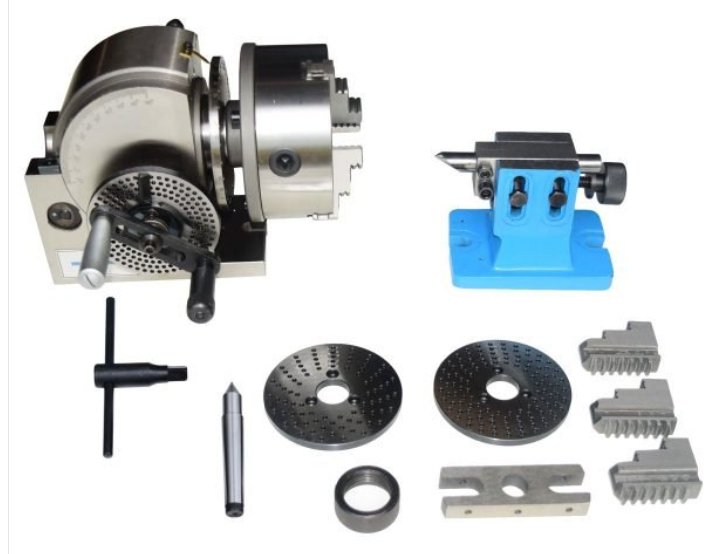
The splines are cut with an indexed fixture on a milling machine. You select the correct index disk, mount the part in the chuck, cut the spline with an endmill. Then turn the hand crank and engage the pin selector to advance in this case 22.5 degrees to the next spline slot. Repeat until you have 16 cuts, then change the depth of cut and repeat. Yes, its an absurdly, error-prone process. That's why I'm making a limited run and do not plan on selling them.
-
The following information us based on the orientation in the photograph: The one on the right is an early version. I realized the spline could be shorter and the hollow part on the bottom needed to be longer to accommodate two horizontal cuts (not performed yet) to fit a wire crank clip that attaches the adapter to the spline shaft on the door. A second crank clip attaches the window crank to the adapter. I decided that the long neck on the one on the right was not needed and extended the crank handle shaft too far. You are correct my Captain, a non-profitable job but an opportunity to get more proficient at using the lathe and mill along with learning how to use the indexed clamp to cut 16 splines, 22.5 degrees between each.

-
I have a new sprayer motor installed so no. Also, all the voltages I provided were read from the two wires that power the motor with the motor disconnected from them.
-
I made a set but they extended the crank out too far so I'm trying again. I think I can get it down to just over a 1/2 inch extension. These are hand milled so they take maybe an hour to create. I will likely become more efficient by the time I make 3 pair but please, no more requests.
-
I’m troubleshooting my windshield washer circuit and I’m stuck: 1) The wipers work but the washer motor has not run since I got the car ~5 years ago. 2) Voltage measured between the two wires when unplugged from the washer motor reads 3.8V when the washer button is pressed. 3) At individual wires I’m getting around 12V to relative to ground (11.97V and 12.31V) when the washer button is NOT pressed. 4) On one washer motor wire I’m getting around -0.56V to ground and +3.2V to ground on the other wire when the washer button IS pressed. I’m assuming that there should be +12V going to each contact when the sprayer is not used and then drops to 0 volts on ONE contact when the sprayer is used. However, when I press the switch, voltage difference between the two wires is only 3.65V which is not enough to operate the pump. I’m finding the wiring diagram a little confusing so can anyone offer me a starting point on my trouble shooting. BTW: I was at the Pittsburgh Vintage Grand Prix last weekend which had 4 Z's in their > 2 L sports car class. It was a lot of fun to watch and to check out the Zs and other cars in the car show lot.
-
I'll let you know if it works. I hope you are in no rush.
-
I decided to try and make a pair of them. I just received the mill bits yesterday from China and will try to mill the extensions next week. I figured if I tried to turn down the 11.18mm to 10.7mm, the splines would not be deep enough. CrankExtension.pdf
-
I think what I'll do at this point is try the car out with some recording temperature sensor I have when I next do Autocross. The suggestions I received are a good starting point. I also found this on the internet which might be of some help: https://www.zhome.com/Care/z_cooling.htm I'm tempted to try that oil cooler as I found a used one for $50. I'll have to read up on them more. I only recently learned that my G35 daily driver had one after it started leaking. I also might consider creating a shroud out of fiberglass based on a method posted by several hotrodders but that will have to wait until next winter when my Z hibernates: https://www.motortrend.com/how-to/1006sr-fan-shroud-fabrication
-
Dual electric fans connected to a thermostat, no clutch fan. There is no fan cowling. The fans are attached to an aluminum frame that is mounted to the radiator.
-
Thank you for your help Racer X. The radiator was replaced with an aftermarket aluminum unit in early 2017 just before I purchased the car. I flushed the cooling system last week after noticing the temperature issue appeared to still be with the car. When I refilled the radiator I noted that the coolant in the radiator would begin to circulate after the engine began to get hot. This suggests that the thermostat is opening when the engine heats up. Maybe the car is fine now. I'm thinking I should try an autocross in July and see if I can complete it without having to pull off to the side to cool off so I can limp home.
-
Mine's a '74 260z with a modified 280 engine, round tops, MSD ignition. I did have vapor lock problems early on. A PO had removed the fuel rail and ran the fuel to a low-pressure regulator=> fuel log => separate hoses to the SU round tops. No return flow. I changed that to a simple fuel rail made from an extruded off the shelf part and ran hoses to the two SUs and a regulator. The regulator sent excess fuel to the tank so as to keep a steady flow of fresh (cool) fuel to the SUs. I installed cork gaskets to reduce conductive heat transfer to the rail from its attachment points on the engine. I am assuming that I solved the vapor lock issue now but I'm concerned that my temperature gage is climbing while stopped in traffic.
-
I'm having overheating problems if my car sits in a traffic jamb or between heats when I previously did autocross. I've reestablished a fuel return line to replace the deadhead system installed by a PO and did some other minor changes. I don't want to add hood vents. I hesitant to wrap the header and exhaust due to possible overheating the exhaust and trapping moisture but I found a product by Termo Tec. It wraps loosely around the header so it likely will not trap moisture and heat as much as a tight wrap tape. Does anyone have an opinion on this product? https://www.summitracing.com/parts/the-14004#overview