


Captain Obvious
Community Member
-
Joined
-
Last visited
Everything posted by Captain Obvious
-
I don't think any of the bolts go down into any other cavity, but some of them are drilled and tapped slightly deeper than others. And if you're really worried about the possibility of a tip of an old bolt being broken off down in the hole, you should be able to get a look down there with a good light. The bottom of the hole is cone shaped like the tip of the drill bit that created it. If you see a ragged flat bottom, you might want to do some more cleaning and investigating.
-
Oh crap... So when I said crank revolutions, I meant cam revolutions. I was spinning stuff and counting, but in all the excitement, I kinda lost track myself. I changed the original post to fix that mistake. Thanks for the help guys!
-
Oh, it's still there. I had the head work done by Dr. Marcus Nichols at Plexicorp.
-
If that doesn't work, then maybe you'll need to try a tap. Not denying that there are circumstances where it's necessary... Just saying that I think it's an overused and often unnecessary procedure.
-
It's a plan. You just need the correct brush. And I've found it most effective to stuff the brush all the way in and then rotate it in the direction that unscrews it. That tends to bring the gunk out instead of driving it deeper. And then at the very end, give it a couple blasts of carb cleaner. Stick the straw down the hole and cover the hole with a rag while blasting And don't get any in your eyes.
-
I have heard it said that the bright links of the timing chain will "line up with the timing marks ever now and then" when you spin the engine over. Well... I'm here to put a number on it and that number is eleven. I lined up my timing marks and then rotated the crank to see how long it would be until the marks lined up again, and the answer is that they line up every eleven rotations of the cam (twenty-two rotations of the crank). Not being satisfied with only experimental results, I counted teeth and links and stuff. There are 20 teeth on the crank gear. There are 40 teeth on the cam gear (makes sense since the cam spins at half the crank speed). There are 110 "teeth accepting holes" in the chain. The common multiple (modulus maybe?) of all of those numbers is 440 and it takes eleven cam rotations or twenty-two crank rotations to move 440 link holes. The links of the chain will line up in the same position every eleven rotations of the cam. And because everyone likes pics... Timing chain and pulleys:

-
LOL. Absolutely. Never a doubt.
-
I'm no expert, but I wouldn't chase the threads in the block with a tap unless you really really have to. I wouldn't want to remove any metal, and running a tap in there has the risk of cutting out metal that does not need to be. I would use carb cleaner and a small round metal wire brush first before you resort to a tap. If, after wire brushing, the head bolt threads in easily all the way to the bottom, then you're good to go and it doesn't need to be chased by anything more aggressive than that. IMHO.
-
I'm not going to get into which direction is right for your application, but those two wires... the red and the green... Are polarity dependent and can certainly have an effect if reversed. Most (if not all?) ignition module systems use the falling edge zero crossing as the trigger. It's the most reliable point of the pickup signal.
-
I dug into the FSM's for the various years a while ago and here's some excerpts from my notes... 79 - is the same as 77 and 78 - 5th gear ratio is .864 80 - is different than every other year. 5th gear ratio is 0.773. But an interesting thing to note is that they got that ratio change from the main drive and counter drive gears, not from by using a different 5th gear set. This means that all of the other gear ratios are different than the prior years as well. 81 - has a 5th gear ratio of .745. They got that ratio change by adjusting the 5th gear set. The main drive and counter gears are the same as 80 so other than 5th, the rest of the ratios are the same as a 80. 82 and 83 - are the same as 81. So the bottom line..... If you put the tranny in 5th gear and turn the input shaft ten times: 77-78-79 output shaft will turn about eight and a half times. 80 output shaft will turn about seven and three quarter times. 81-82-83 output shaft will turn about seven and a half times. That ought to be enough distinction to tell them apart.
-
Frankly I'm a little disappointed. The zKars I know would have spent an unreasonable number of hours filing and measuring the POS pot metal spacer until it was accurate.
-
LOL!! Missed it by this much! No big deal. You ought to be getting pretty good at adjusting it by now.
-
Sorry for the delay. ID of the spacer tube is 1.290 inches. My assumption is that the original target was 32.75 mm OD of the spacer tube is 1.685 inches. My assumption that the original target was 42.75 mm Anything close to that would be fine. The OD of the stub axle where the bearings reside is 1.250 inches. This means that the 1.290 ID of the spacer tube results in about .020 inch (0.5mm) gap per side if you get the spacer centered. So reverse engineering the design, I'm theorizing they picked the size something like this... "ID of the spacer to be 1 mm larger than the OD of the shaft, and it should have a 5.0 mm wall thickness."
-
I think I see the divot from the original lock washer dug out of the one washer. Something has to go through the middle. I'm thinking you misplaced some parts? BTW, that float valve does not have anything to do with the power valve, right? It's only in those pics to show scale size or something?
-
I don't have the dimensions written down, but I will get them. I can tell you, however, that (within wide limits), those two dimensions aren't really important. It has to be big enough on the ID to pass over the bearing surfaces without binding, and it has to be small enough on the OD so it doesn't interfere with grease flow into the balls. Other than that, it doesn't really matter.
-
Sorry, we're using too many vague references here to "regulators"... There is a "main" voltage regulator on the alternator output that controls the whole car's system voltage. It's job is to maintain the alternator output voltage relatively constant under all conditions. Then in addition to that "main" voltage regulator, there are also other regulators built into each of the bimetallic dash gauge that compensate for changes in ambient temperature. And it was those "secondary" regulators that Dave was talking about. The regulators built into the gauges pulse width modulate the current to the sensor(s) by opening and closing a (second) bimetallic strip driven switch inside the gauge. It's job is to switch the current to the gauge sensor on-and-off at whatever pulse width duty cycle is necessary to keep it's "regulator" strip at a constant temperature. My supposition is that since it's more of a "power" device designed to keep the temperature of it's strip at a constant temperature, it may account for both ambient temperature AND system voltage. If the system voltage is lower, it takes longer for the strip to warm up. If the system voltage is higher, the strip heats up faster. Same with changes in ambient temperature. I haven't thought it all through thoroughly with my notes in front of me, but that's my theory. Which is mine.
-
That regulator is to deal with ambient temperature variations, not system voltage. Since the needle deflection is based on temperature of the bimetallic strip, ambient temp is an issue. So they address that in the gauge. I'd have to go back over my notes to figure out if system voltage would be a factor as well. It's a voltage divider, so system voltage variations may come out in the wash.
-
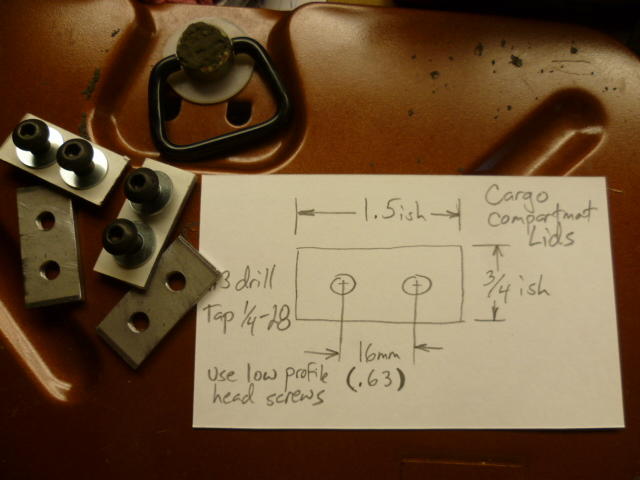
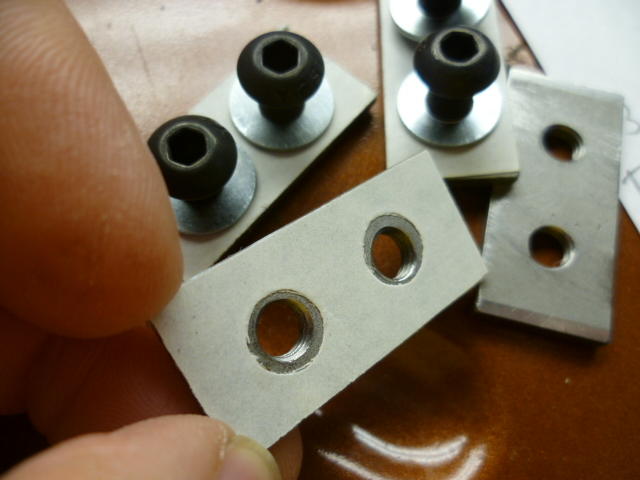
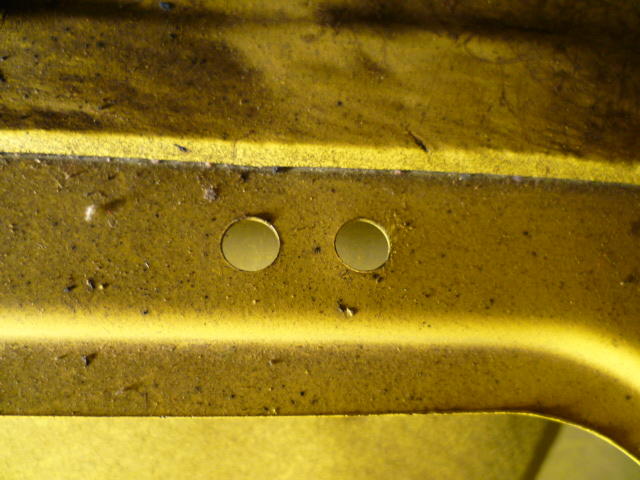
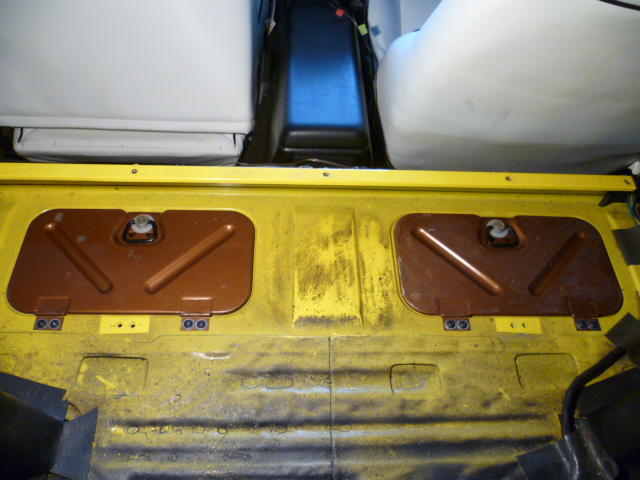
I don't know if I ever documented my storage bin mod. The basic story is that the bins are there on your car but there's no lids and there are no threaded inserts spot welded into place on the mounting holes. The holes are there, but no threads. I took some steel plate, cut small rectangles, and drilled and tapped holes: Some double back sticky tape to hold them in place until the screws are installed: And I stuck them to the underside of the sheet metal where the cargo bin lids attach. This is without the threaded plates: And this is with the threads in place. Double back sticky tape holding them in place: Then get yourself a pair of lids from an earlier car and screw the lids in place: How's that for a thread-jack?


-
Oh, I'm sorry... I saw VR and I interpreted as "Variable Reluctance". Since you were talking about distributors, I was thinking you had put in a later model distributor from a 280 and the VR (variable reluctance) distributor was causing the condenser to burn up. I completely glazed over the sentence before that when you mentioned the voltage regulator. I don't know if you would see changes in the oil pressure gauge tracking with system voltage. I doubt it, but in any event: In my best Emily Litella voice.... "Nevermind."
-
I didn't check out the car in this BAT auction, but some of the details about the one I posted about. Supposedly original owner and supposedly just 49K miles. There was some circumstantial evidence to support the mileage claim, and I assume there was a Pennsylvania title for the car that would confirm or deny the original owner claim. There had been some bodywork done on the blue one I posted about. The story was that something fell on the car while in the garage and mushed the hood a little bit. The owner fixed the hood and (if I understood the story correctly) painted it himself. It was unclear if the rest of the car had been repainted or if it was original paint. There were several blemishes in the paint where it appeared that the top layer of blue had come off showing a slightly different shade of blue beneath. There were some areas where it appeared there was a tape line, but it's unclear to me if it was a tape line, or a natural delineation. There was evidence of some "not crappy, but not great" rust repair on at least one of the dogleg corners. The blue one had some engine compartment modifications. Probably some sort of electronic ignition aftermarket mod. From what I heard, there was lots of electronic and electrical "thingies" around the house, so it appears the owner had some electrics experience. I would be willing to use the term "Survivor" for the blue one if it was original paint. I would use the term "good neglected condition" if it had been sprayed.
-
I performed all those changes you describe. I switched over to a skinny spare and lowered the rear false deck. I also put lids on the cargo bins and am using them for stuff that used to be located back by the spare.
-
I resisted the urge to suggest that might happen. I wasn't convinced that you found the root cause of the problem. Sorry that it came back, but glad you think you found the smoking gun this time. I also don't have any input into a correlation between a bad condenser and an oil pressure gauge, but anyway... So what type of ignition system did you have in the car when the problem occurred? You said you replaced the VR with an old mechanical style. Were you running an aftermarket distributor with a VR pickup?
-
Yeah, keep an eye on them and make sure they aren't falling apart. Could be compatible, or could be an issue. Here's to hoping they outlast the rest of the car!
-
How long will that grommet last? All depends on what it's made out of. If it's good quality Nitrile or Viton, then it might last a while. If it's something of unknown composition bought at the local hardware store, then who knows!? It could last 40 years, or it could disintegrate into pieces in a couple hours. I like the idea of the "splint", although it doesn't address the root cause of the problem.
-
Wow. I didn't even see the air cleaner. No idea what that's all about. So I heard from my buddy at the auction that there were a couple bidders from Canada. Anyone we know here?


