Zed Head
Community Member
-
Joined
-
Last visited
Everything posted by Zed Head
-
I assume that you want the fire ring thickness. I have an old 76 HG, that I'm pretty sure is the original. Don't know if it has any ID numbers on it though.
-
How big is the part?
-
Sorry REAP, but your communication skills have diminished dramatically from your first post; misspellings, punctuation, grammar, odd phrases like "no response to throttle acceleration". The throttle doesn't accelerate. I can't figure out what you're trying to say. Seriously, I know you're on a phone somewhere texting, hopefully not while driving, but your posts don't make sense anymore. Put time in to the message and you'll probably figure things out before posting. I've solved a lot of problems just by trying to describe them. Feel free to replace the AFM, but you're probably wasting money. You can spend time on testing, or time AND money on replacing parts. The first is cheaper and more effective.
-
The AFM would not affect just two injectors. Don't get drawn in to replacing parts before doing the testing work. Since the car is new to you, one thing that will help you greatly is to just examine all of the critical parts of the engine, the AFM, the distributor, the injectors, manifolds, etc., recording part numbers, and making sure everything is connected correctly and intact. One reason people sell their cars is because they messed things up so bad that they can't figure them out any more. Then they sell the car, still messed up. Make sure the injectors have the right part numbers, and are the correct color for an NA engine. I picked up a wrecking yard engine that had a mixed set of wrong injectors. People get desperate when their engines don't run tight and do crazy things. The Engine Fuel chapter of the FSM has a series of simple tests you can run to figure out what's wrong. The lack of acceleration and the backfiring could be the AFM, or fuel pressure, or clogged injectors (maybe four are clogged and the PO made everything rich to compensate), or timing, or crossfire between plug wires, incorrect firing order.....many possibilities. http://www.nicoclub.com/FSM/280z/
-
Does it actually come from MSA, in California, or somewhere else? Return address? I wonder if MSA doesn't contract this out and maybe they don't know what's happening. You should send that picture to them so they know. Doesn't seem like their style. Looks like crap.
-
Your description is hard to figure. It sounds like the engine still runs, and for some reason you decided to look at the spark plugs and saw that two were wet. Describe how the engine runs, in general. Does it have a miss? Do cylinders 3 and 6 not work, you're running on four? Need a more general idea of what you're trying to fix. I can't tell what "lose pressure when the throttle is opened" means.
-
I had a half cap and got mine out using the various tricks. Still took the cap off just to see what was under, and because the gauge removal was such a pain. Replacing lights, tach going bad, etc. Luckily my cracks are still in the "added character' stage and not hideous. In my opinion. Fits with the paint and the small rust holes in the door bottoms too. The car is is very fun to drive but not steal-worthy. Doesn't help you get it out but might help make a decision. Is the cap tightly glued on? Maybe you can take it off, do your work, and replace it. Mine came off relatively easily, the silicone adhesive the PO used wasn't very strong, didn't adhere well and he didn't use a ton. Got lucky.
-
These guys have them - http://www.bhjproducts.com/bhj_nav/nav_honePlate.php I think that they cost a lot.
-
I've wondered they're not used on the head. Cam swaps, tower alignment, valve guides, stuff like that.
-
If they really are original, odds are good that they're worn out. One easy thing you could do is to remove the plastic cover over the top of the strut and loosen the big nut. Don't take it all the way off because without a gas charge the shaft can drop down inside. But with the nut loose you can pull the shaft up and down and see if the dampers are shot or not. You can also get an idea of if things are loose in that area while you're there. You'll need to get in to that area anyway if you change struts.
-
When I installed a new Nissan brand 180 degree thermostat, my "normal" operating temperature increased a little bit also. But ti was rock steady at that temperature, whereas before the temperature fluctuated, always below the new "normal", but still enough to make me wonder. I attributed it to an old worn out thermostat that wasn't closing completely, or was getting pushed open by pump pressure, letting the engine run abnormally cold. If the temperature climbs steadily to the new spot then stops and just sits there, that's good.
-
Re-reviewing previous research and found a note from the pros (Chrysler Corporation, Fiat) about "heat soak". Doesn't really give any new ideas, although retrying old ones might be worthwhile, but nice to know that the injector fuel vaporization theory has some big company backing. Too bad though, that the problem still exists. Maybe why fuel system pressures are getting higher, up in the 50's and 60's now, I think. http://www.wjjeeps.com/tsb/tsb_wj_1803103.pdf
-
Found an interesting article on fuel blends by season, with a nice chart linked. Butane! Looks like June is when things change, from 9 to 7.8 RVP. Might rig up another cooling device in the meantime. Also looks like I should avoid Washington gasoline at all times in the summer, along with certain OR counties. Might explain why some people never get the problem, and others get it only sometimes. Plus, from what I've read, some formulation components are loosely controlled. Maybe there's extra butane in some batches of fuel. http://www.theoildrum.com/node/1776 http://www.epa.gov/otaq/regs/fuels/420b05012.pdf (from the article - 2005) And the web site with the latest revision (1/26/2015 as of this psot) - http://www.epa.gov/oms/fuels/gasolinefuels/volatility/standards.htm Here's another EPA article on basic blends. There's an oxygenation program also, from October to March. http://www.epa.gov/oms/fuels/gasolinefuels/index.htm Actually, all of these are linked at the top of the EPA page. There's even one on water separation, which EuroDat may have linked already. It's not just gas. http://epa.gov/otaq/regs/fuels/rfg/waterphs.pdf
-
If it's not mandatory then people can just carry on as before, right? As Leon says. Seems like it's offering a choice, unless there's a separate bill that says otherwise.
-
I've had the hot start issue come back recently, pretty bad. Everything engine-wise is essentially the same as when the problem was fixed originally. Might be fuel, might be my junkyard 0280150901 injectors going bad. Might be some other odd thing. My rail holds pressure, the weather hasn't been that warm. Not getting what's going on. Just filled up with a different brand of fuel from a different station, took a long drive to blend the fuel, and still have it. Anybody in the Pacific Northwest having similar problems? Many gas stations are supplied from the same big tank farms. Just checking before I start dinking around with the engine.
-
Catches the eye. The passenger is doomed in a rollover. Underneath it's just an old Z car. http://corvallis.craigslist.org/cto/4914105298.html http://en.wikipedia.org/wiki/Opel_GT


-
Probably would have hot $30,000 if the lights and gauges worked - "Please note that due to time constraints when the dash was put back in the car, not all of the wiring was plugged back in, so currently the lights, speedo, wipers, and turn signals are not active. "
-
Well, it is the car that started the Japanese car craze in 2010. We owe this guy. " In mid/late 2010 about 4 months before the SEMA Show in Las Vegas I was asked by Enkei wheels to finish the car and bring it to Vegas to be featured in there booth to re-introduce the world to there Enkei 92 model wheels. ...........................Loaded in a trailer and taken to Vegas, the car was a huge hit at the show and helped usher in this Japanese car craze we are still seeing at shows around the US today," http://www.ebay.com/itm/1971-Nissan-Fairlady-Z-S30-SEMA-Show-Vehicle-Enkei-Demo-Car-Datsun-240z-/291407099055?nma=true&si=EBNhPEOXz%252Fs5a482o81eWFeeA3o%253D&orig_cvip=true&rt=nc&_trksid=p2047675.l2557
-
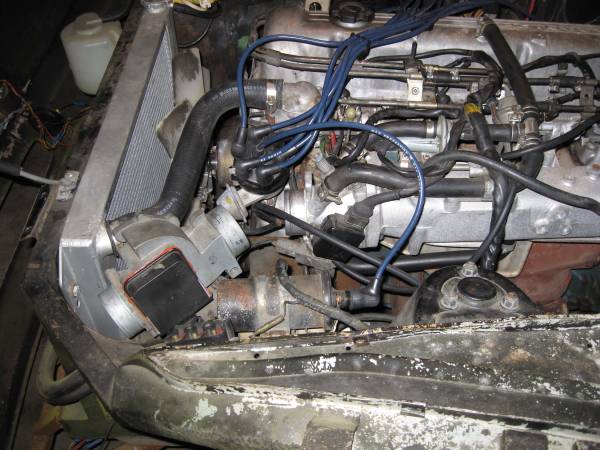
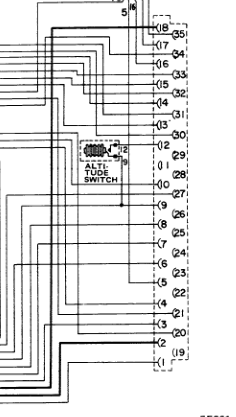
Yeah, while you're there. If you could measure resistance across the wire harness pins, the connector, that would tell something about the ECU also. Basically, I could tell if I have an "altitude switch" ECU. I measured three of mine and got differences based on part number but have no idea what the differences mean. Also learned that the ground pins in the ECU are not also grounded to the body of the ECU. They come through different paths. Good luck. Don't sweat if you change your mind, I'll figure it out eventually. My engine is running pretty good right now, but more tricks are always nice.
-
Mylar transparency sheet might work even better. Thinner.
-
Not to be a Debby Downer, but investing in classic cars is a crap shoot. "Value" doesn't count until you get the money. We've been posting about overpriced eBay cars for years, that never sell at their inflated prices. Anyway, you might have to wait and watch to find a decent car. Or, since you do have that $11K budget, if you found a dependable shop, you could piece one together. Buy the good body, then pick up a nice engine and transmission, have it all put together. Or buy a nice body with worn engine and have someone like Datsun Spirit or Rebello build you a motor. IT's very hard to find a shop that knows how to build these cars though. And lots of ways to lose money. Might have to get creative, depending on your time frame.
-
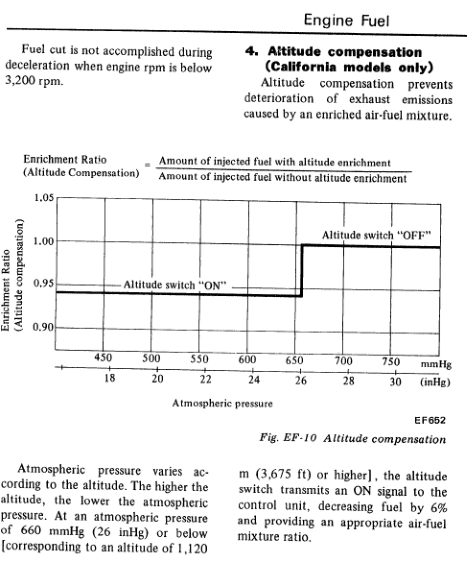
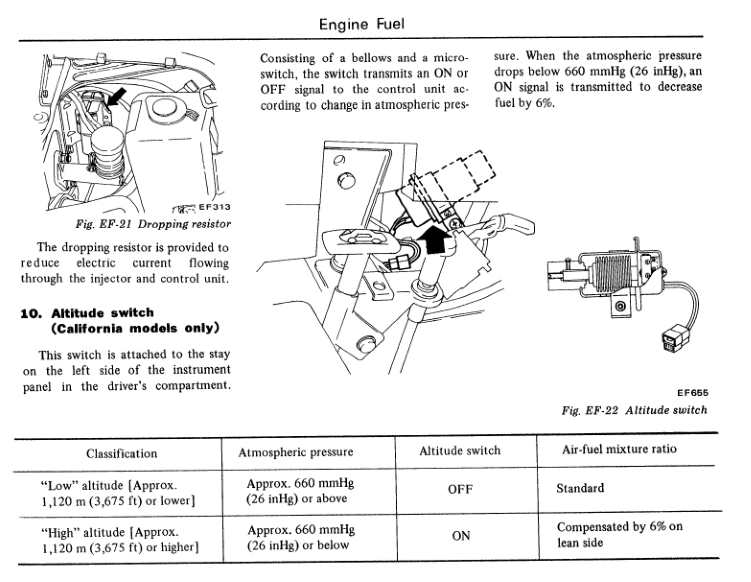
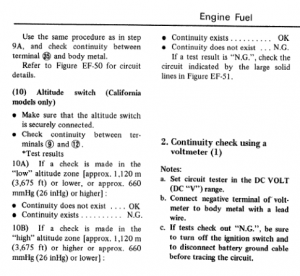
Actually, the altitude switch should be super-easy. First, unplug the switch. Then measure resistance across the switch terminals while sucking on whatever ports/holes are on the switch. I'll bet you get OL or open circuit normally, and zero or very tiny resistance while sucking on the port. If the switch is already very low resistance though, there's not much you can do, it's already activated. After confirming very tiny resistance when sucking on the port, just run a jumper, or short circuit across the two pins in the wiring harness. This will trick the ECU in to thinking it's at high altitude and cut fuel 6%. Or, figure out how to manually actuate the switch, plug it back in and do that. The key is that the switch be just a switch. Full open or full closed, open or closed circuit. If it is, you can't hurt the ECU by shorting the pins in the harness. Either way, it would be good to know if the switch is just a switch or if it has some designed in resistance. If you could measure that, I'll find a way to short my own ECU's just to see what happens. I have spares.
-
I had a later model (late 77, maybe 78 and up) fuel rail, with the single inlet FPR. I did have to make my own bracket for the new FPR and build a short piece of bent tube to make it work. It sat in the same spot as the factory unit though. It looked right. Just a thought. You might also consider what Fast Woman suggested on mjr45's thread about poor gas mileage, if you have the altitude switch ECU (California model). I've looked at it myself. Shorting pins 9 and 12, or the switch itself if you have it, should drop fuel usage by ~6%. You might even be able to just stick a pencil or stick of wood in to the switch and make it activate. All stock parts! If I was in your shoes, I'd try the altitude switch first. Edit - actually, and I think that Fast Woman suggested this (sorry, I didn't read the details of all of the posts in that thread), you might be able to fake out the ECU by adding a parallel resistance on circuit 9, as show in the diagram. It would be nice to know where Pin 12 goes, if it's just a low resistance path to ground or if it is actually part of an important circuit. Anybody got a CA ECU they could check (maybe I do and just didn't know it - anyone know the serial numbers?), Regardless, if you have the CA ECU, you're set. Easy to try.


-
I built one of these Bosch adjustable FPR's for my engine. Mainly because they hold pressure just like the factory FPR's do, unlike the blingy aftermarket units. And they look stock, not all shiny and multi-colored. Might be a way to drop your pressure to lean things out and still get past the visual. http://www.dune-buggy.com/turbo/fuelsystem.htm Drop down the page to see it. You don't need to cross-drill, you can just take that point out and drill straight through. It looks like a needle for a seat but it's not. I got the unmodified FPR on eBay, but it was only $40 then - http://www.ebay.com/itm/Bosch-0280160001-New-Pressure-Regulator-/321558063760?hash=item4ade5aaa90 There's also Standard's replica - http://www.amazon.com/dp/B000C81M3E/ref=wl_it_dp_o_pC_S_ttl?_encoding=UTF8&colid=30R38L6H5WA0Q&coliid=I2RUPSHCYBARDH Or you can just buy an already modified unit - http://www.amazon.com/dp/B00062ZGN8/ref=wl_it_dp_o_pC_S_ttl?_encoding=UTF8&colid=30R38L6H5WA0Q&coliid=I15L84TK8NOLHZ
-
Despite the fact that OReilly Auto is known as just another cheap parts store, I've been pretty happy with their return policy. I've even had parts replaced after they found the records on their own computer system. They have a record of all of the stuff I've bought on my phone number. You might try taking that injector in to wherever you bought it and asking for a replacement. In principle, the FJ707's should be more dependable than the FJ707T's. You could point that out when you take them in.