Zed Head
Community Member
-
Joined
-
Last visited
Everything posted by Zed Head
-
Didn't work well. Google thinks it's a transmission part.
-
Just trying something. Had to get an image on to "the internet" so Google can search it.

-
Those are diagnostic wires, apparently. The wiring diagram says "Control Unit Checking Terminal". I can feel the frustration in this thread but I still don't see any measurement of actual mileage, and can't see any problem based on the information supplied. If gas mileage was not raised as an issue, a person could look at all of the measurements, pictures and part descriptions and would say "congratulations, your engine is running as well as it ever will". I just can't see anything to fix. The plugs in Post #78 look fine, except for two that look rich. But the others will probably go too lean if you make changes to overall engine tune. If you could get to flat land, fill your tank, drive a 100 or mile miles, refill and calculate mileage, that would be a good "calibration" check against the rest of the world. You're up in the mountains, climbing some hills, and might have unrealistic expectations.
-
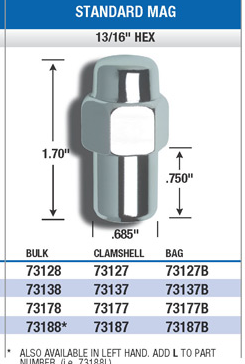
.685? I'm having invisibility problems.

-
I had a hard time finding nuts for my mags also. Finally found them at either a Baxter or an Oreilly's. Gorrila nuts. Looks like you might be able to get them on Amazon. I'm not positive on size, or thread, but Amazon says 73127 fits. Due diligence. http://www.gorilla-auto.com/lug-nuts-page-09 http://www.amazon.com/Gorilla-Automotive-73127-Standard-Thread/dp/B002801QO4
-
Thought of this a few days ago - maybe you have the wrong speedo gear in your transmission. Are you really getting a calculated 10 mpg, or just saying "wow it's on E already"? No offense, but 10 is a nice round number. The gauge hits E after about 12 gallons from Full. Also, I don't think you've mentioned your driving style on these bad mpg trips. If you're climbing a lot of hills and goosing it often, you could easily burn some extra fuel. It's a performance engine, designed to burn fuel if asked. Your plugs don't look like 10 mpg plugs, as noted. I took another look at your post 44 numbers and they look just like my old setup (except for the TPS NG) with stock injectors, that typically got 18-20 mpg. That's mostly flat land, but with goosing.
-
"Pulling" timing usually means retarding. But you said that you're pinging in the "4th gear test". I remember timing a 400 Pontiac engine by the punch-it-at-low RPM-in-a-higher-gear-test. But that was a big torquey low-mid RPM usage engine in a big heavy car. Even back then I thought it was not a good way to do things but I was just a dummy back then (no offense). I don't think that you can tune for power with that kind of method on these smaller engines, designed for high RPM power. One way to verify mechanical advance is tune turn the initial timing back to zero with the engine running, disconnect the vacuum advance, then rev the engine up until the timing stops advancing. The mark should stay on the indicator or be within a couple of degrees. I've only see up to 11 on advance weights (maybe it was a Spinal Tap car). On the .080". The ignition system can probably do it, but the problem with big gaps is that the spark takes the easiest path. .080" is hard to jump so you can get sparks grounding in places they shouldn't, through your wires or dirt in the cap, and other lower resistance paths. Plus .080 with a dense charge in the cylinder will be where it's most likely to miss. You don't really need more .040 or .045". You haven't mentioned anything else about the engine either. Higher CR will make it more likely to ping.
-
Here's something I just went through to pass emissions in Oregon. I have non-stock injectors that flow a little higher than stock and I failed my first time through. I tried my usual tuning tricks and failed two more times. CO was high,which means too much fuel for the oxygen supplied. So I dropped my fuel pressure by a few psi (I have an adjustable FPR) and turned the idle air bypass on the AFM out until I heard a change in idle quality. I had intended to lean things out until I got a lean miss, then dial it back up, but didn't get that far. But I did notice a distinct change in idle quality at a certain point, beyond which not much happened. So I left it there, went back and passed. My point is, I guess, that you could dial that AFM spring wheel tighter until you hit that idle change point, and try that. I just posted a thought on the spring in another thread, that I think is right, but I may be off. Since fuel is mostly low air flow at high RPM, the spring adjustment could be a big part of your mpg problem. I think that adding a resistor in parallel with the coolant circuit will change the slope of the curve and might really make things weird. It would make every temperature lower resistance (leaner), but have very dramatic effect at low temperature, where resistance should be very high, and little at high temperature where resistance is very low. Could get confusing. It might barely run cold because things look hot. You could put it on a switch maybe and only put it in-circuit when the engine warmed up.
-
I haven't been able to really define what it is about adjusting the spring of the AFM that bothers me. But I think I've narrowed to down to one thing - preload. Preload affects when the vane starts to move due to air flow and should be an exact number, matched to the idle air bypass in the AFM and the throttle blade idle air bypass. Any adjustment of the AFM spring wheel will affect that three way relationship. That's probably why the factory glues the wheel down when they've adjusted it. But preload does not affect spring rate so once the vane starts moving the change in injector time versus vane position goes to the original design goals. If you tighten the spring, the engine gets extra air before the vane moves and enrichment starts. But it's only a certain amount of low flow air. So you'll be leaner at the low air flow than at high air flow. If you loosen the spring you'll get extra enrichment at low air flow, but the effect will diminish at higher air flow. So you'll be richer at low air flow but little effect at high air flow. The spring is a spiral spring with essentially constant spring rate over the range of movement in the application. So, unlike the potentiometer on the coolant temperature sensor modification, the AFM spring adjustment really only has significant effect at low air flow conditions. The potentiometer affects the full range of conditions. Springs are weird things that are pretty simple until you try to figure out how to use them.
-
I have to say that I can't look at a potentiometer diagram and figure out what should happen. But I do notice that the air temperature circuit seems to be in series with the AFM circuit. I wonder if a broken air temperature sensor, either opening the AFM circuit, or shorted, removing the 2500 ohms of resistance, would cause everything to go rich? Where's superlen? Air temp would be resistance on 27-6. 2nd edit - I'm going to say that a broken air temp. sensor goes very rich, since higher resistance = lower temperatures.
-
If you've removed the fuel lines from a pressurized rail you know that there's quite a bit of fuel that comes out before pressure drops. The hoses and the filter expand slightly under pressure and hold some volume. If that pinhole was the source you'd smell a lot of gas. Actually, the car probably would have caught on fire by now. FPR's tend to leak down. You can clamp the return line to test that. Still unlikely, but injectors and CSV's can leak. Those would cause richness. You're kind of at the point where you just have to spend extra time being extra thorough on each component, with good accurate measurements. That's how the FSM procedures end up also, from quick measurements of continuity in the front of the chapter, to measuring actual numbers in the middle. On the numbers and details topic - are there part numbers on the injectors? And where did you get them, new? eBay, CL new may not be the same as parts store new. Details are the key, "slowly", "new", "working", etc., doesn't tell the story. eg, mechanical advance "works". 2 degrees or 20 degrees? The more detail you can add the clearer the picture becomes.
-
People have been known to loosen the screws that hold the board in place and shift it so that the wiper rides in a different spot. From what I've seen though, and my own experience with one AFM that ran lean, there's not much you can do to fix them once they start crapping out. I've never heard of a an AFM that went bad on the rich side though, usually they go lean. Have you confirmed that the mechanical advance in the distributor is working? Connect the light and rev it up. Also, not clear why you don't just connect the vacuum advance like it's supposed to be. There is no benefit to leaving it disconnected. And the fuel pressure dropping to zero is not right. You can test the pump versus the regulator versus the injectors/CSV by pinching the lines shut, one at a time then obth, and running the fuel pump. If the fuel hose is new enough to survive a pinch without splitting.
-
The EFI harness has its own ground wire, connected directly to the negative battery post using a plastic covered metal blade type connection, male to female. It's right next to the battery, off the firewall, in the stock configuration. Post #19 here shows it, with a little picture. Upper left of the illustration - http://www.classiczcars.com/topic/40658-fuel-pump-and-relay-problem/ After thinking about it, I think that somebody pointed out in the past that the EFI harness ground wire might actually just connect to the bolt on the intake manifold that is also a ground connection. Not positive. Multiple gorund paths would be good. Really though, ground paths should always be confirmed as low resistance paths back the battery, and the alternator body, using a meter. If the ground strap does the job, that would be enough. There are many pins in the ECU connector that can be measured to ground.
-
Where's 7-8? U? U = ?
-
Shows that it's worth a shot to let these guys know what's going on. I called a company once about "replacement CV shafts for the 240Z" and it turned out that somebody in the company had just assumed that all of the Z's and ZX's used the same drive system, because they were all IRS. They reproduced the later ZX shafts and started advertising for all cars. He was surprised too, but may not have been able to stop the bad info from spreading - http://www.discountautoparts.com/autopages/NISSAN-240Z-CV-Axle.html
-
I measured my two spare AFM's, which have both been on my engine and both run a hair lean (fixable with the potentiometer) and they both measure 175 ohms on 7-8. One was 180 and 100 on the other two circuits,the other was 202 and 112. Both divide out to 1.8, if that means anything. I don't have a good picture in my head of how the ECU uses the split voltage. Didn't connect the battery since there's no numbers, just a continuously decreasing voltage spec. Nothing obvious showing...
-
That's a good catch. I only see the 180 and the 100 when I look at people's AFM numbers. I have several AFM's I can measure just to see what my 7-8 numbers are. Might hook a battery and meter up too. The level of the problem, the rich mixture and super-low mileage, doesn't make sense, from the other information given. Edit - I don't find any indication of "should be low reading" on 7-8 in the FSM. Some would consider ~200 ohms to be low. 7-8 is only called out as continuity, but not detailed later in the FSM. Anyway, I'll see what mine show, they all worked.
-
Continuity is correct. It's a matter of degree. Actually, ohms. The solenoid itself passes current to actuate. Typically, resistance through a solenoid is about 60 ohms. You need to measure resistance, not just continuity.
-
Duralast and Powertorque appear to be the same company or use the same pictures - http://www.autozone.com/drivetrain/clutch-set/duralast-clutch-set/42731_121859_4121/
-
That kit shows that it came with the collar/carrier that should have matched the pressure plate. Did you use an old collar or did the kit only come with a bearing? The collar that came with the lit should have made everything work fine. IT's the collar and pressure plate that have to match, nothing else, not year, or transmission. http://www.oreillyauto.com/site/c/detail/PTQ5/KF53601/01351.oap?year=1971&make=Nissan&model=240Z&vi=5142639&ck=Search_clutch+set_5142639_-1&keyword=clutch+set Someone else just had this same problem (drawing a blank on the name) and ordered the complete kit with collar from OReilly. Measure from the surface of the flywheel to the surface of the collar that the fork rides on. It should be ~92mm.
-
I found this - http://perrinperformance.com/i-13324281-gasket-for-subaru-diff-cover-r180.html when I searched this in Google - nismo differential gasket R180
-
Pretty sure that I've seen johnc mention them. I think it might be a performance part. Maybe in a Nismo catalog somewhere.
-
Probably not the problem then. The fact that it only short circuits on Start is a giant clue though. I would focus on that. There's a only a couple of circuits that are different between Start and Run. If you can leave it on Run with no problems, but the wire burns on Start, those changes are the source of the short. Maybe the solenoid wire is shorting to the wire that burns. When you hit Start, there's enough juice to power the solenoid and burn the wire. I'd follow that solenoid power wire out and see what it's touching. I have old charred insulation in one of my wire bundles, ugly but no shorts. Someone's past mistake. Maybe you have one of those, but yours went too far.
-
It's not common but have you confirmed that the CSV is closed and not leaking while the engine is running? It's fairly easy to remove, pull it out and run the fuel pump and see what it does. Or block the hole and start the engine. I had a similar problem diagnosing my bad FPR and I've seen others with the same. The pressure will read correct, but the diaphragm leak allows fuel to pass through and in to the vacuum hose, on to the intake manifold. In my case, the FPR was only malfunctioning when it got hot. I never did figure out what, exactly, was causing it. But when mpg dropped to 15, in one day, I swapped FPR's and fixed it. Do you have a performance cam in that head? Head work, plus cam, plus no vacuum advance = low mpg, poor low RPM performance.
-
Measure resistance from the starter body (where the negative cable would normally attach) to the negative cable. That will tell you something about the quality of that ground path. You want a tiny number. If you want to take a chance you could run a jumper cable (the big wire kind, used to jump dead batteries) from the end of the negative cable to the starter bolt and see if the wire gets hot again.