Search the Community
Showing results for tags 'wiring'.
Found 34 results
-

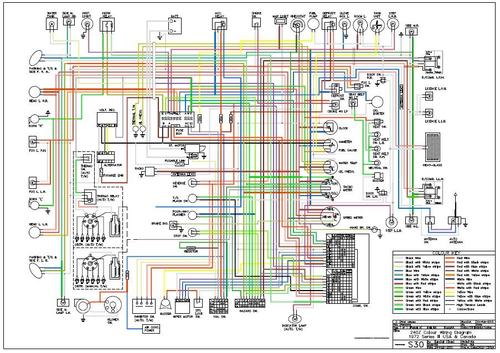 This is a color copy of the 1972 Service manual wiring diagram, Section BE Electrical. (For Manual transmissions)Free
 -
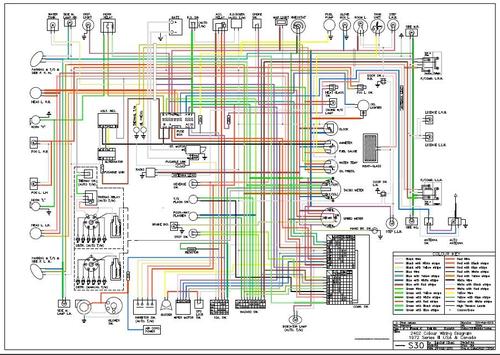
 This is a color copy of the early 1971 wiring diagram. Includes "Passing Relay" circuit.Free
 -
 So the headlights on my late model 260z are not working on brights or regular. The brights blue rectangle in the tach does not light up either. This car has a newer headlight switch and turn-signal switch and I think the headlight harness upgrade as well. It has worked in the past until last night when I was out late then expected and tried to turn them on...that was fun Does this car have a headlight relay(s). Fuse is ok. My electrical skill level weak so please keep explanations very simple. As always I appreciate any help
 -
 I know this is a long shot, but I am looking for recommendations for a shop to rewire my 260z datsun. The guy who previously owned it did some wire splicing and other shady stuff. I figured that it's better to just get the whole thing rewired with a better fuse block and just get rid of all the gremlins I've been facing. no turn signals dead gauges and some other tings. I was wondering if anyone in the Pittsburgh PA area knows of any god shops besides what good old google recommends. Any help would greatly be appreciated. I just do not have the time ore space to do it my self. Thank you in advance.
 -
 Alrighty, Ive got a stock 1978 280z and I'm currently installing an MSD 6A and Blaster 2 coil into the car. After reading any and all forum posts on the topic I came to the conclusion that I would need an MSD Tach Adapter 8920 in order for the MSD box to Communicate to the EFI by upping it to 12v. All my wires are in place and I'm getting a good strong spark. I put a voltmeter on the purple wire coming out of the MSD tach adapter and I'm getting 12v. Only problem is that I'm getting no fuel. It must not be communicating with the EFI somehow. Here's my Setup. MSD 6A: Heavy Red goes to battery + Heavy Black is going to battery - Red is going to Black wire with white strip (Ignition Key Wire) Orange is connected to blaster 2 coil + Black is connected to blaster 2 coil - White is not being used, I do not have a points system Violet and Green are connected to the Magnetic Pickups (I was told it didn't matter which way, I put green to green and violet to red) MSD Tach Adapter 8920: White goes to Tach Output on MSD 6a box Black is ground wire Red is connected to Black wire with white stripe (so two reds and black with white stripe all connected) Violet is connected to the blueish green wire that was connected to the coil negative terminal. Summary: I don't know what the **** I did wrong. Someone please tell me.
 -
 I have decided to rewire my aging wiring loom and upgrade it to execute all the little upgrades I have in mind. I am by no means an electrical master, but I know the importance even our 70's cars need. My plans for my '74 260z is to wire tuck, hide the wires in the engine bay to be nearly nonextant, and to also include motor sport techniques to make quality upgrades. All wires will be replaced by Tefzel wire and Raychem heat shrink. the point is to make a bulletproof wire loom and to have fun working on this project and making it special. Now for everyone's benefit i will be updating this with all the stock wiring specs as they are on my car with what ever has happened to this car in the past 45 years. I will come up with a Key to understand the small database i am trying to start. the end goal is to help others in their wiring projects. the github link: https://github.com/youztheclue/S30-Spec.git KEY: System name: Subsection Detailed description to-from/Route #gauge(American), Stock color, My new color for reference Stock length, New route with reasons for change, length of heat shrink for specific subsection Expected electrical load, name of oe connector/number of wires, new connector style and size Hopefully I can create something useful here: and I encourage others to comment, tips, hints, hidden secrets and their own data and I will add it to my data set. Update: I now have the entire front half from the firewall to bumper measured and mapped out. Will be updating soon. Lights: Exterior Headlights Detailed description to-from/Route #gauge(American), Stock color, My new color for reference Stock length, New route with reasons for change, length of heat shrink for specific subsection Expected electrical load, name of oe connector/number of wires, new connector style and size Turn Signals Detailed description to-from/Route #gauge(American), Stock color, My new color for reference Stock length, New route with reasons for change, length of heat shrink for specific subsection Expected electrical load, name of oe connector/number of wires, new connector style and size Taillights Detailed description to-from/Route #gauge(American), Stock color, My new color for reference Stock length, New route with reasons for change, length of heat shrink for specific subsection Expected electrical load, name of oe connector/number of wires, new connector style and size Brake Lights Detailed description to-from/Route #gauge(American), Stock color, My new color for reference Stock length, New route with reasons for change, length of heat shrink for specific subsection Expected electrical load, name of oe connector/number of wires, new connector style and size Lights: Interior Dash Detailed description to-from/Route #gauge(American), Stock color, My new color for reference Stock length, New route with reasons for change, length of heat shrink for specific subsection Expected electrical load, name of oe connector/number of wires, new connector style and size Map Detailed description to-from/Route #gauge(American), Stock color, My new color for reference Stock length, New route with reasons for change, length of heat shrink for specific subsection Expected electrical load, name of oe connector/number of wires, new connector style and size Wipers: Motor Detailed description to-from/Route #gauge(American), Stock color, My new color for reference Stock length, New route with reasons for change, length of heat shrink for specific subsection Expected electrical load, name of oe connector/number of wires, new connector style and size Fluid Pump Detailed description to-from/Route #gauge(American), Stock color, My new color for reference Stock length, New route with reasons for change, length of heat shrink for specific subsection Expected electrical load, name of oe connector/number of wires, new connector style and size Engine: Starting Fuel Pump Detailed description to-from/Route #gauge(American), Stock color, My new color for reference Stock length, New route with reasons for change, length of heat shrink for specific subsection Expected electrical load, name of oe connector/number of wires, new connector style and size Ignition Detailed description to-from/Route #gauge(American), Stock color, My new color for reference Stock length, New route with reasons for change, length of heat shrink for specific subsection Expected electrical load, name of oe connector/number of wires, new connector style and size Coil Detailed description to-from/Route #gauge(American), Stock color, My new color for reference Stock length, New route with reasons for change, length of heat shrink for specific subsection Expected electrical load, name of oe connector/number of wires, new connector style and size Electric Choke Detailed description to-from/Route #gauge(American), Stock color, My new color for reference Stock length, New route with reasons for change, length of heat shrink for specific subsection Expected electrical load, name of oe connector/number of wires, new connector style and size Engine: Constant for running Electric Fan(s) Detailed description to-from/Route #gauge(American), Stock color, My new color for reference Stock length, New route with reasons for change, length of heat shrink for specific subsection Expected electrical load, name of oe connector/number of wires, new connector style and size Alternator Detailed description to-from/Route #gauge(American), Stock color, My new color for reference Stock length, New route with reasons for change, length of heat shrink for specific subsection Expected electrical load, name of oe connector/number of wires, new connector style and size Fuel Injection Detailed description to-from/Route #gauge(American), Stock color, My new color for reference Stock length, New route with reasons for change, length of heat shrink for specific subsection Expected electrical load, name of oe connector/number of wires, new connector style and size Ignition Detailed description to-from/Route #gauge(American), Stock color, My new color for reference Stock length, New route with reasons for change, length of heat shrink for specific subsection Expected electrical load, name of oe connector/number of wires, new connector style and size Dash/Instruments: Gauges Detailed description to-from/Route #gauge(American), Stock color, My new color for reference Stock length, New route with reasons for change, length of heat shrink for specific subsection Expected electrical load, name of oe connector/number of wires, new connector style and size Switches Detailed description to-from/Route #gauge(American), Stock color, My new color for reference Stock length, New route with reasons for change, length of heat shrink for specific subsection Expected electrical load, name of oe connector/number of wires, new connector style and size Luxury: Heater/Fan Detailed description to-from/Route #gauge(American), Stock color, My new color for reference Stock length, New route with reasons for change, length of heat shrink for specific subsection Expected electrical load, name of oe connector/number of wires, new connector style and size A/C Detailed description to-from/Route #gauge(American), Stock color, My new color for reference Stock length, New route with reasons for change, length of heat shrink for specific subsection Expected electrical load, name of oe connector/number of wires, new connector style and size Radio Detailed description to-from/Route #gauge(American), Stock color, My new color for reference Stock length, New route with reasons for change, length of heat shrink for specific subsection Expected electrical load, name of oe connector/number of wires, new connector style and size Power Windows Detailed description to-from/Route #gauge(American), Stock color, My new color for reference Stock length, New route with reasons for change, length of heat shrink for specific subsection Expected electrical load, name of oe connector/number of wires, new connector style and size Power Door Locks Detailed description to-from/Route #gauge(American), Stock color, My new color for reference Stock length, New route with reasons for change, length of heat shrink for specific subsection Expected electrical load, name of oe connector/number of wires, new connector style and size
 -
 The 77 280z wiring diagram in color. PDF Support Topic in our forums:Free
 -
 A high resolution wiring diagram for the 280z.Free
 -
 This is a color copy of the 1972 Service manual wiring diagram, Section BE Body ElectricalFree
 -
 This is a color copy of the wiring diagram in the 1971 supplement Late model. No "Passing Relay" circuitFree
 -
 Hi everyone, I own a Hybrid 260Z (with a 280ZX turbo powertrain) with some issues that I'm trying to clear up. I believe the electrical harnesses are a mix of 260Z, 280Z and maybe 280zx so I can't look in a service manual to figure things out (I do have all 3 manuals though). I need to understand what's going on, and I need some help with this. There are a few issues I want to resolve, so I'm taking a baby steps approach, a little at a time to avoid being discouraged by the whole thing. First step, replacing the fuse links with some Maxi fuses. I'm not sure the wires that were in the fuse link holders were fuse links, so I'm replacing them with something cleaner looking and newer. I've read up on a few posts online about such a replacement. From my understanding, the fuse links were fed by 4 white wires, while the white with a red striped wires go on to other circuits after the fusible links. The white wires have been replaced by a 4 gauge cable going from my + battery terminal to my starter, then feeding into my maxi fuse holder. I have the 4 white with a red stripe wires to connect. The first one splits into 2, with one wire seemingly going through the firewall toward the fuse panel on the passenger side. The other splits into 2 again, with one wire going to the alternator on a T-shaped connector and the other to the alternator output. Doest this make sense? The gauge seems awful small, especially for the alternator output. Thanks in advance for helping me figure things out, one wire at a time if necessary. Gilles Lajoie
 -
 I am new to the forum and new to Zs. Please be gentle. My 1975 Z very likely has a rusty fuel tank and filter. Tried dropping the tank yesterday (with a broken right arm, in a cast, in the cold) so I could send it out for restoration. My nephew and I were unsuccessful in disconnecting the wires from the tank/sending unit. Is there a trick to disconnecting the female plastic part (to the sending unit) from the male rubber part (to the power supply)? Does it pull apart with force or does it require an intermediate step?
 -
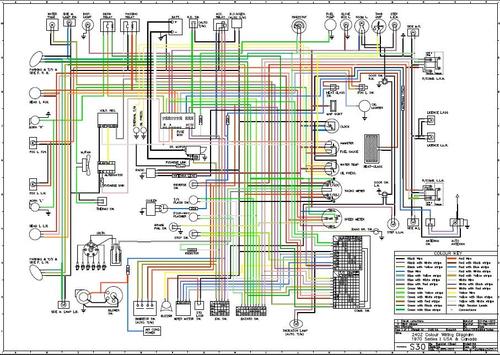
 well, after weeks of working on it, i'm finally done. and you can reap the benefits of all my work! below i've made available my new, full-color version of the 1976 280z wiring diagram. it is vector-based, so it can be blown up as big as you'd like without losing legibility. the text is copyable and searchable. i will warn you, i'm 110% sure that there are errors. you get a gold star if you point them out to me. a wire or object in hot pink denotes that i'm not sure of the true color of the item. i'll post updated versions on this thread as needed, so look at the most recent reply for the newest download. enjoy! download here: http://sridout.com/datsun/76circuit_COLOR v.1 edit: i thought i'd add an illustration that i just finished for Tim280z of his car. take a look at the thumb below...
-
 Hey guys, back again. 71 240z is running great, but I cant get the tach to work. I have a .3 ohm Pertronix coil and Pertronix Ignitor. I have tried the stock wiring, and various other wiring, but to no avail. I did notice that there is a GW wire, a larger BW wire, and the another smaller BW wire wich is conjoined with a B wire via a coupler. Right now I have the GW on the front side of the ballast along with the conjoined smaller BW and B wires, and the larger BW wire on the rear side of the ballast along with the R wire from the Ignitor. The B wire from the Ignitor is on the - post of the coil and a small B wire connecting the + coil post to the front side of the ballast. Sorry, I know it's alot so I will post pictures if needed. Any thoughts fine gentlemen? Thanks, C
 -
 I have a 1972 240z, and the guy I bought it from got a viper security system and a beefy sound system wired in (very poorly might I add). I need to rewire a lot of the engine bay and the wiring diagrams available are not helping, a lot of wires are spliced and replaced that don't match up or are just taped off and lead nowhere. If anybody has a diagram of all the 10 pin connectors that are located underneath the passenger side of the dashboard it would help a lot, or if anybody has any self made diagrams that are at all related to engine bay wiring please post them, anything might help me out.
 -
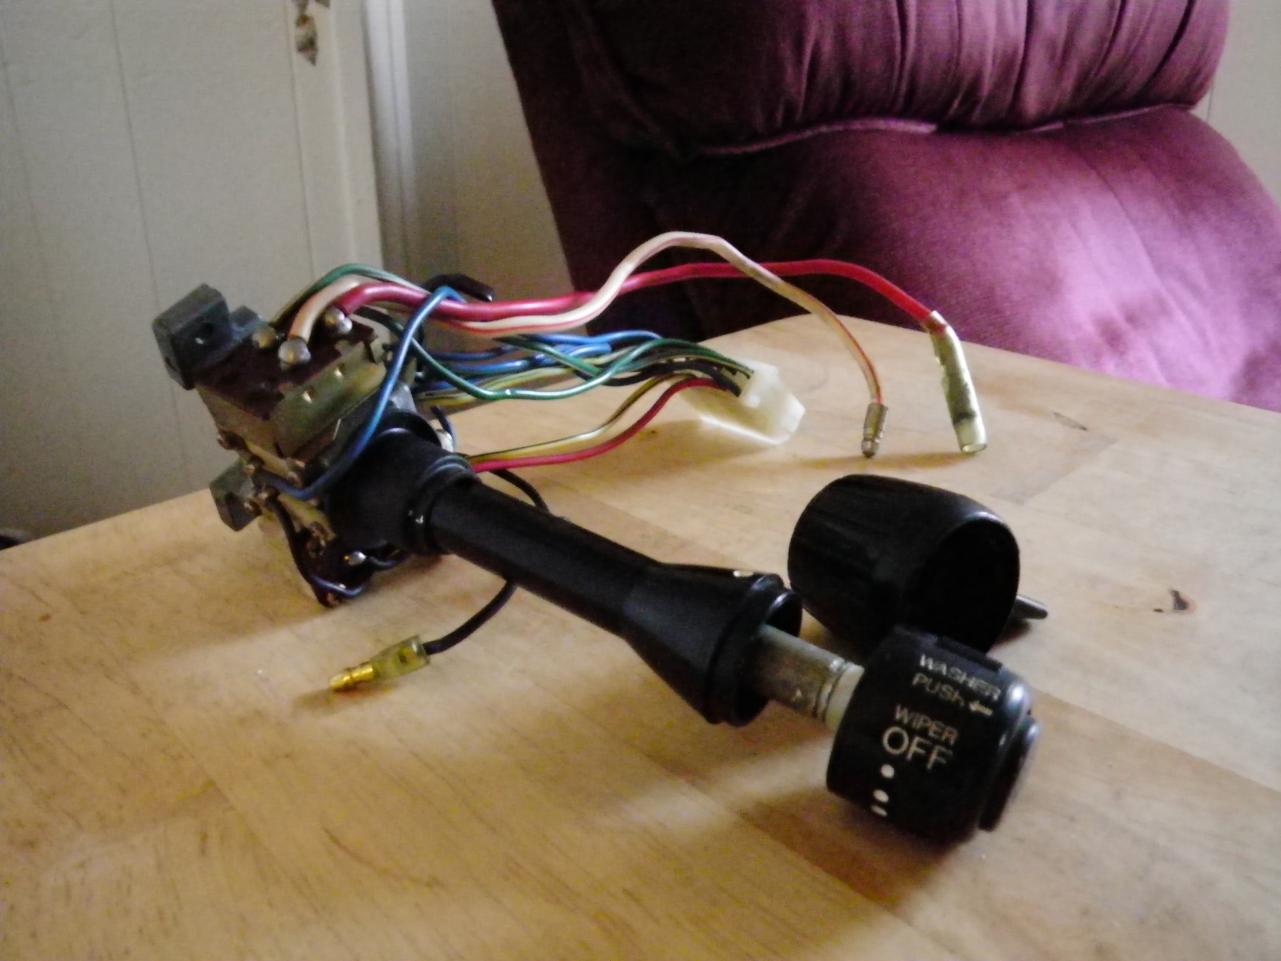
I have a short or something going on that when I pres the brake pedal the sidemarker lights and the dash lights come on in addition to the rear brake lights. Also when I have my headlights on the turn signal for the left signal lights up ...Anybody have an issue like this and how did you fix it. Thanks
-
 Hey everyone, I decided that popping the hood all the time to disconnect the battery was getting a bit old and I wanted to install a battery disconnect switch (one with the red removable key) and actually had one from a while ago. My question here is on how big the wire gauge needs to be (and still be safe), and how I should go about making or where I can but the wiring components necessary. I have a spot for it on the dash and thought I'd ask for some tips especially from the guys that have done this kind of thing before. Chris


-
 hi all, i replaced the stock 280zx distributor by ( Mallory ) p/n 4563901. after connecting wires the car wont start. i noticed there is a spark going to the plugs but no signal going to the injectors!!! any help , drwaing, appreciated. note, mallory wires ( red - green- brown) , the brown wire lookl ike the ground. do i need to put adapter in between the mallory and the coil?? i heared the GM adapter is ok !! is this true please help payusup@hotmail.com thx
 -
 ok, so I need some help here. I am working on restoring a '75 trans am, and recently took out the dash and all of the wiring from their corresponding resting places. In a lapse of judgement, I did not take any pictures, or label any of the plugs as to where they were to be returned. (incredibly stupid, I'm well aware) I've been in there for a day already trying to get everything plugged back in, but i'm still not sure where most of them are supposed to be plugged in, and all of the wiring diagrams I can locate might as well be in french. Does anybody have pictures or anything of where everything is supposed to plug in, or know of a site that might be able to help me? I definitely need to get a move on with this one.
 -
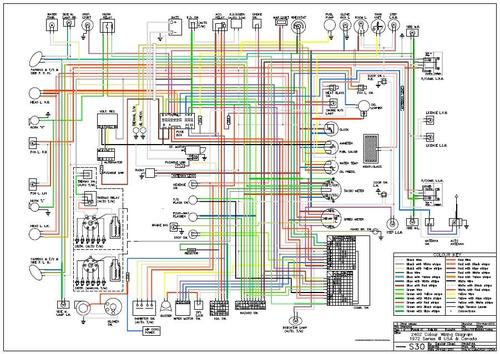
i've colorized another wiring diagram and am now making it available for download. this one was much less of a headache than the '76 diagram, being about 1/3 the size and complexity. download the U.S. 1972 240z here! special thanks to EScanlon for helping me iron out a few problems with it. stay tuned for more diagrams in the future. PS: though there isn't a lot of text on it to search, it IS searchable in a pdf viewer.
-
This is a scan from the 1974 wiring diagram manual.Free
-
 I have cleaned the corrosion off of the wires leading into my fusible links on several occasions and they still turn green with corrosion no matter what I do to them. Would upgrading to maxi fuses help this problem or do I need to replace part of if not all of the wiring harness? Car wants to turn over but will not start, replaced the fuel pump and checked the fuel pump relay. Always had a problem with my fusible links, but I let my car sit for over a year so now I can't exactly figure out whats wrong with it and I have nothing else to drive. Please help....
 -
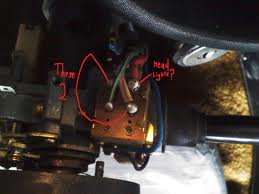
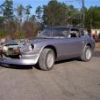
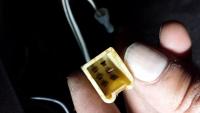
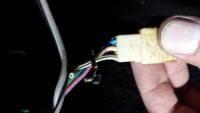
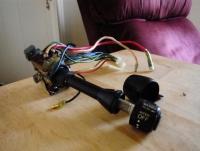
 Hey guys, New to the forum, new to the 74' 260z 2x2 as well. Long post, i do apologize but i figure i should provied a full picture to the best of my knowledge. Any and all advice is greatly appericated in advance, Thank You. My roommate basically has had this car since high school, and in the past 10 years it got neglected. I started working on it cause i was bored. Anyway not a car guy so lots of reading trying to make sense of things and ask other car people questions and advice. Car is now running, almost never need the choke cable engaged to get it started even in cold weather. It has other issues i will list below but im concerned about a spark that keeps happening anytime the key touches the door lock to lock or unlock. Ive been driving it for a week and hadnt noticed the spark but i wasnt paying attention. The shifter was very loose, did some research figured it was the bushing so i took the center console apart unplugged everything and sure enough no bushing. Bought a nylon piece that fit from OSH, Dremled it a bit slipped it in. All in all pretty happy, still have a lot of play in 1st and 2nd so figure i got more problems but atleast i can find 1st and 2nd now. So putting everything back together i reconnect all the wires, car turns on runs fine everything looks like it was prior to the take apart however i get this spark when i go to lock the door. So i walk to the passanger door and try to put the key in there and i get a spark again. (It cant be my body and clothes as i just discharged on the driver door). NOTE THE CENTER CONSOLE PICTURE PROVIDED SHOWS "FASTEN SEAT BELT", MY CARS SAYS "CHOKE" 1. I noticed a black ground wire in my center console, when i was taking it apart it wasnt connected to anything so i attached it to the silver bar under the rear defogger and throttle toggle switch (the bar is connected to the chasi, figured this would be a good ground). 2. Also im worried that the metal wire from the AC TEMP CONTROL dial between the REAR DEFOGGER and the THROTTLE TOGGLE might have gotten lose. I dont know what its for and there is no air conditioning unit in the car. (It was removed when it failed years ago). It does into the crazy mess in the dash, cant trace from there. 3. There is also a plug in my center console that doesnt connect to anything, ive attached pictures below of the outside of plug as well was the inside. 4. Earlier this week my tail lights/dash werent working, tried to resolder but it made no difference so i soldered them straight into the headlight. Pictures also below. 5. Last possibilty is that i removed the wind shield wiper motor and that plug under the hood has nothing connected to it and for some reason is creating sparks? So the above 5 things are what it could be cause the spark im assuming numbers 1,2, or 3 most likely. Being not so good with cars, and concerned and the fact that my gas tank leaks when i fill up all the way i decided i would disconnect my battery just because i dont want any charges sparking anything. I would love some guidence on this issue, i know the weather in the bay are recently has been very dry, wet and cold so i understand that static electricty gets generated especially with the warmer clothing but to spark twice in less then 1 minute is kind of scary. Other things done to car to get it running: -Replaced throttle cable. -New battery (the negative side also has a ground attached to it) -Turn singles were disassembled cleaned resoldered, added some solder to the inside of the switch also cause it just wouldn't catch. -Shifter bushing -Tail Light/Dash switch soldered directly into headlight Things i need to do: -New air conditioner unit -Suspension is shot -Fix leak with gas tank, (think its the neck leading to the tank) -Center console guages work, (clock is always off), They do light up -Speedo and Tach not functioning, They do light up -E-brake must be fully engaged in order to work, and when fully disengaged light always flickers on dash "Brake" -New light bulbs for interior of car (interior dome light, glove box, CHOKE, REAR DEFOGGER) -Wind Shield wipers dont work (the motor clicks once but no action beyond that) -Either axel or e-brake seem to lock up when car is cold, thus i get a jolt in 1st, 2nd, sometimes in 3rd. -Tranmission i think needs some work, shifting into second it grinds sometimes so i go into 3rd instead -RANDOM CLICKING NOSE WHEN CARS OFF FROM FRONT OF ENGINE, (between radiator and litterally front of engine) -Need battery clamp mechanism to hold battery in palce (bungie cord right now) -Door locks are a nightmare, and occasionally doors wont stay shut Questions: -In the driver side center console theres a toggle switch with no labels, assuming it was added post production. It has 2 blue wires coming out of it and goes into the steering column. Dont think it does anything, does anyone have any clues? (Roommate thinks it was cruise control switch added later) -Under the driver seat theres a silver box with tons of wires, 1 blue wire is split. It says PACESETTER with a number dial and on/off switch. Any clues? -A friend was saying maybe some SeaFoam into the gas tank, and engine, maybe the vacuum lines inorder to get junk out. But SeaFoam scares the **** out of me so i want to hold of on it till someone experianced can help with it.

-
ok, so I need some help here. I am working on restoring a '75 trans am, and recently took out the dash and all of the wiring from their corresponding resting places. In a lapse of judgement, I did not take any pictures, or label any of the plugs as to where they were to be returned. (incredibly stupid, I'm well aware) I've been in there for a day already trying to get everything plugged back in, but i'm still not sure where most of them are supposed to be pluggged in, and all of the wiring diagrams I can locate might as well be in french. Does anybody have pictures or anything of where everything is supposed to plug in, or know of a site that might be able to help me? I definitely need to get a move on with this one.
-
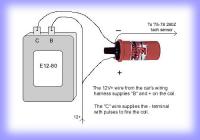
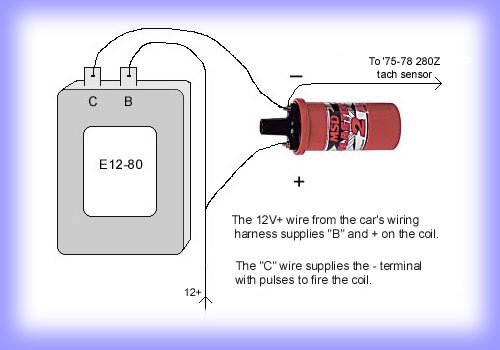
 Hi, so I just finished rebuilding the engine on my 1973 240z and it turns over, but no start. Its getting air and fuel so it seems logical the only reason its not starting is the spark. My car has an MSD blaster 2 coil and an e12-80 module. We used the multimeter and determined that both the positive and negative side on the coil are getting around 12v, is this right?? Same thing goes for the b and c on the module. I am assuming the negative is supposed to be grounded, so am I missing a connection on the wiring harness? Or is the module messed up? Thanks for the help! I have it hooked up like this diagram: