
Zed Head
Community Member
-
Joined
-
Last visited
Everything posted by Zed Head
-
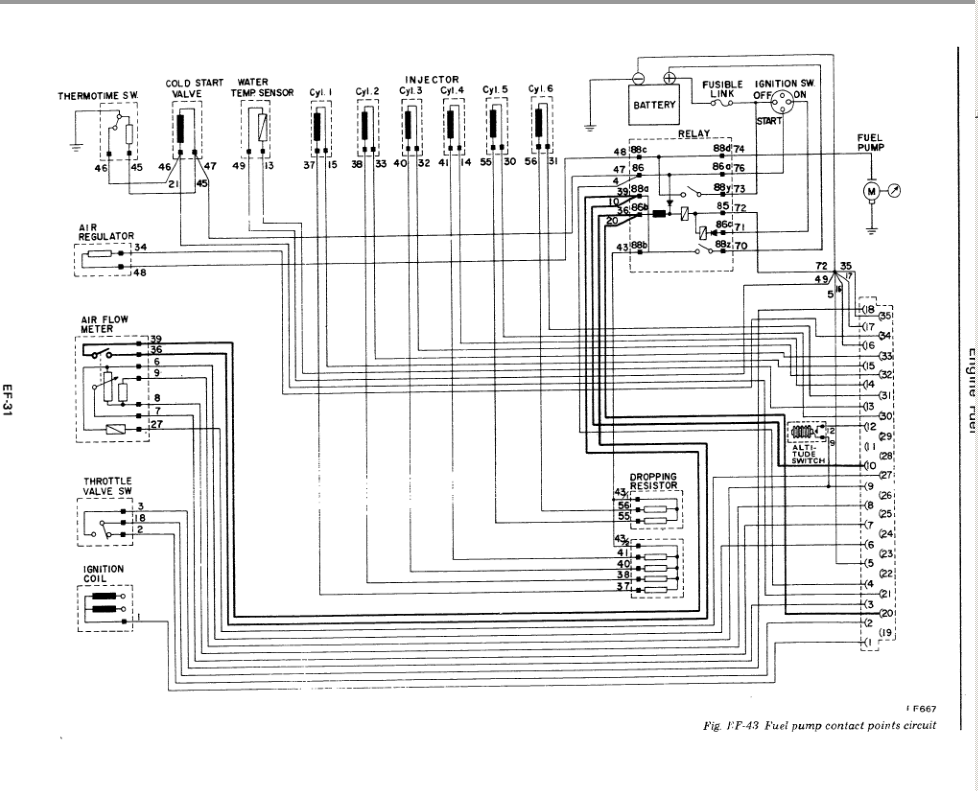
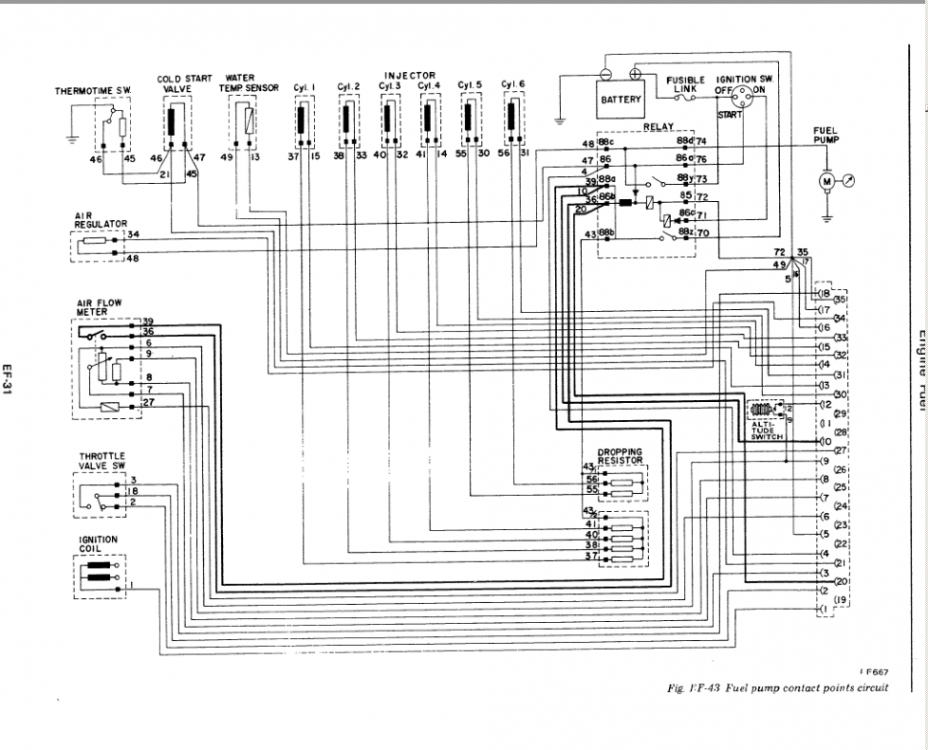
You decided to just hot wire the pump in the other forum. And it was more than just the AFM switch, you've left out some details. As I recall, your real goal was not to fix the car, but to understand the mystery of how it failed. More of a discussion about how it happened than an attempt to fix it. You already had a jumped AFM. You didn't test circuits and show your results, you just wanted a theory. Do you have a meter? Are you trying to find the failed part or figure out how it failed? Those are two different things. Maybe you installed the battery backwards and damaged some parts. Did you accidentally do that? Regardless, you can't make progress without those details you said you had. The one big advantage of this site over zcar.com is that we can post pictures here. Here's the 77 diagram. Can't remember but did you confirm that you have the 1x1x2 inch silver combined fuel pump and EFI relay up above the hood latch release lever? A18-000 001 or 002. That's where the important part is. And it's expensive. Might just be sticking.
-
If you're the same guy from the other forum, or ended up with his car, his fuel pump power had been fiddled with. The AFM switch was bypassed and he had some other odd things going on. So the Nissan wiring diagram and troubleshooting couldn't be applied. Are you that guy? I think it was zcar.com.
-
Haven't you already been on this forum or another with the same problem? Can't tell what you did. Seriously, the collection of words below just doesn't convey much information. Kind of like the Talking Heads song "Burning Down the House". Which they acknowledge is nonsense lyrics. You can even sing "connection/disconnection repeated sequence of fusible link power wire" along to the song. It fits! Provide the detailed write-up instead. "went through all electrical circuits to get car to start and run...until ignition turned off and restart attempted...connection/disconnection repeated sequence of fusible link power wire with key in "start" would get power back to pump"
-
How did you check spark from the coil? Just making sure that you were actually running power though the module. If you tested by tappng a jumper from coil negative to ground with the key On, you were bypassing the ignition module. If you spun (span?) the engine with the coil wire disconnected then the module was being used. I had a weak module. Orange-yellow spark, would start with starter fluid, but not normally. Killed it by running the engine with two plug wires off. I've written these words before. Sqwawk.
-
I tried to do that on mine but nothing happened. The clip could not be destroyed, not even a hint that it was yielding. Had to re-engage the brain.
-
Maybe you get free edits on the iPad. Nissan reviewed the whole "too much heat" problem and made several changes in 1974. The Fuel document in the Downloads section.. Maybe they went one step further for the 280Z.
-
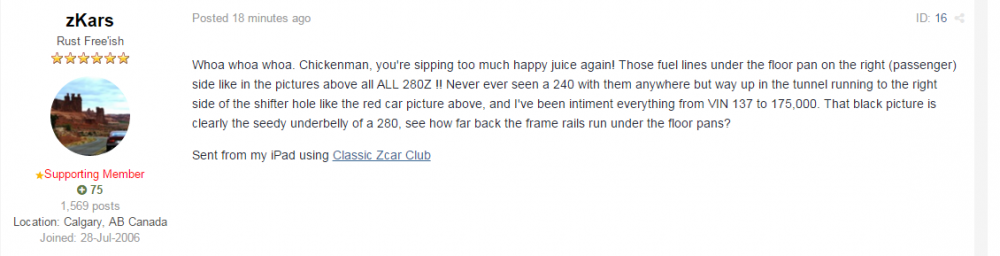
My mistake. Anybody notice the 24 Hour page summary is not the same as the post, even though the does not appear to have been edited. "on drugs" = sipping too much happy juice". Let's try it - I am not on drugs.

-
I wrote a whole thing about modules then realized that it's creating strong spark. If you're seeing two different spark qualities, it kind of implies a cap and/or wire problem. The spark has to get from the coil wire, through the cap button, down the rotor metal, across the gap to the wire electrode, etc. Maybe measure resistance along that path.
-
Why didn't you test continuity? That's the functional part. So the pressure in the tube would have to be more like a Bourdon tube in a pressure gauge. That might be reasonable. My initial thought was that it was a simple on-off switch controlling an on-off temperature control. Set to too cold and okay. If it covers a range of temperatures it's more like a true thermostat. You could test continuity when you pull it out and turn the knob until you lose it, then it should get continuity as it warms up (to trun on the compressor) until you turn the knob again. Maybe you'll get a click too. Turn, wait, click, meter indication, turn, wait, click, meter....
-
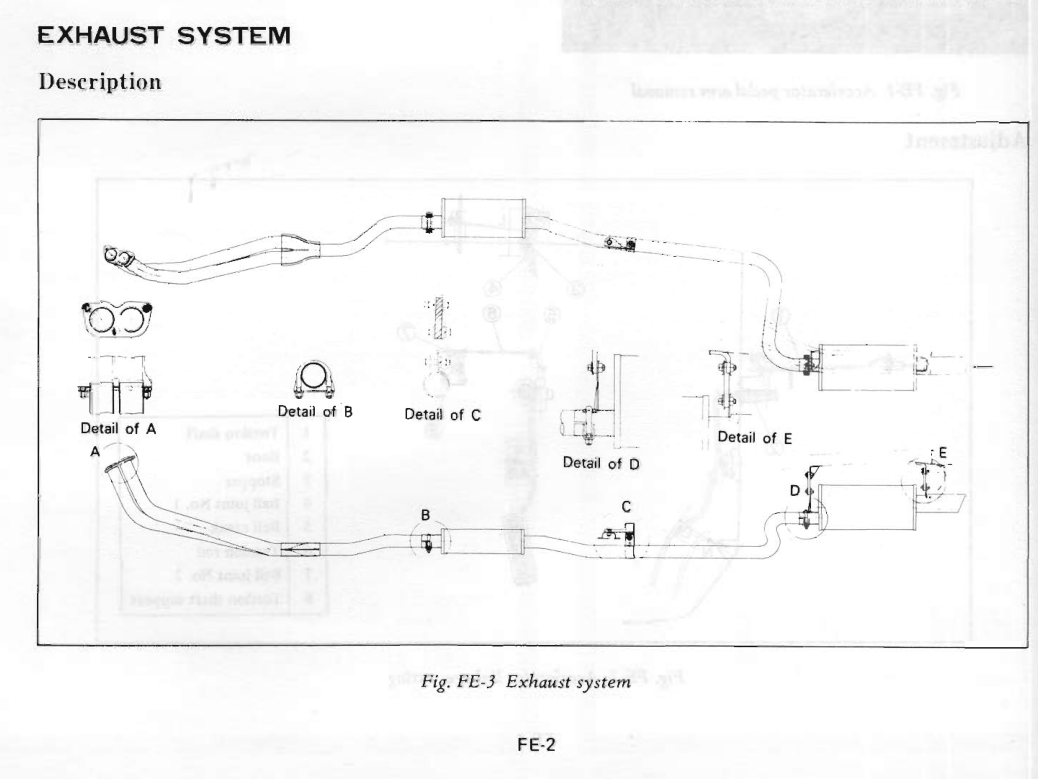
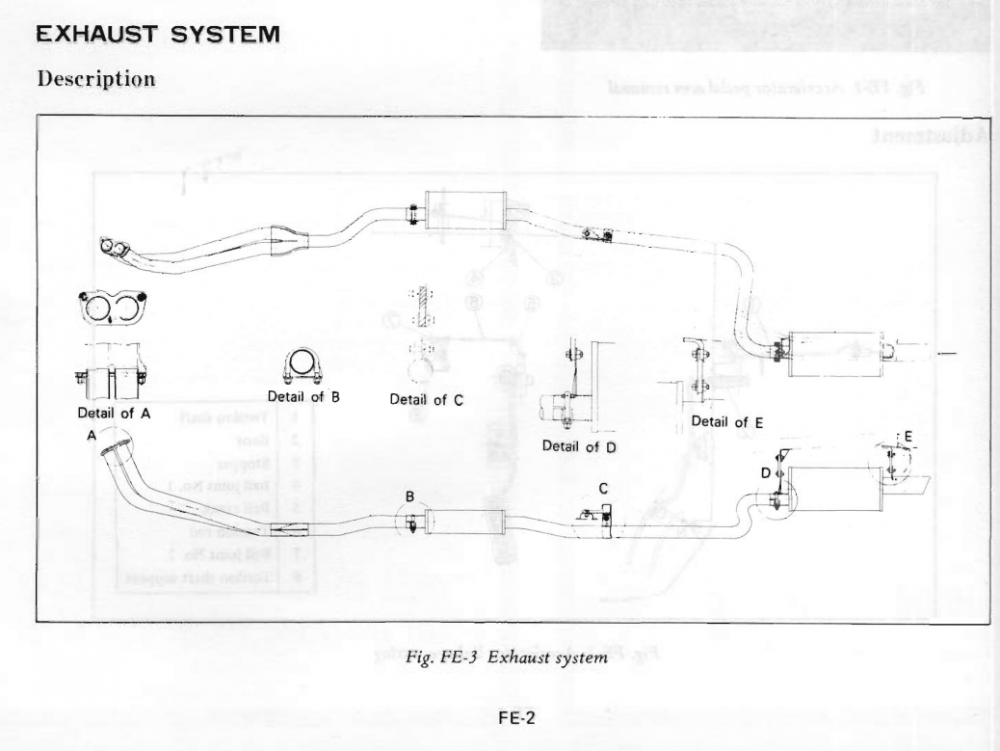
Just a reference. The majority of Z owners use the factory exhaust routing, left of the drivetrain. Picture from 1970, they're all like this.
-
I think I've seen this described somewhere and I wish I had thought of it when I was installing my engine and transmission combined - you can lift the tail of the assembly up from inside the car by wrapping a rope around it and pulling from the shifter hole. I would (have) wrap(ped) the inside part of the rope around a 2x4 or 2x2 and twist(ed) it up to hold it in place once lifted. I didn't though and struggled from underneath instead. Might be useful if you run out of adjustment on your leveler (I didn't have one) or just get stuck.
-
#1 here could give you some ideas. I assume that carbs are sensitive to the more modern fuel blends also. Even back in 1974 Nissan was going as far as cutting holes in the hood (template at the end of the document).
-
I'd guess that "On" would be where you're letting the tube control the switch, and the fact that you get continuity right away means the gas has leaked. Both "gas leaked out" and "gas cooled or condensed" would relieve pressure on the switch. Not a good sign, it's just a plain old switch now. I wonder f there's not a refrigeration equipment repair shop out there somewhere that can't refill those though. Seems simple, in principle.
-
It's a switch so it seems like you could test it with a meter and a freezer. Should be normally closed, then open to turn off the compressor when it gets cold.
-
The poly mustache bar bushings main complaint is differential noise (whine) transmission in to the cabin. If you don't have that, why change? You might go back to a "clunk". The spindle pin bushing is of the original rubber Nissan design. It doesn't rotate, the movement is taken up within the rubber. So dryness doesn't mean a lot, there's no lubricated surface to worry about. If you're happy with ride height, just the internals (shocks) might be the way to go. Shocks, springs and road speed (bumps) are really meant to be matched. You could wait until you get the struts out. If they're obviously blown and not dong much damping, then you can expect improvement. If they seem fine, maybe upgrade strut and springs to match your driving conditions. Your parts look rather stock so wouldn't be surprised to see the original internals, smelly oil and all. Grease your halfshaft u-joints while you have them out for sure.
-
I would cut it to give a normal length header and exhaust system. So that future aftermarket units will fit. Those v-band exhaust clamps look nice but they're not "normal".
-
You should post the name of the eBay sellers. Everybody knows the eBay ratings are worthless, and forums like this are one of the few places we can get good information. Is this head why you were asking about hydraulic pivots? Better take a look down the water passages. Corrosion can happen everywhere.
-
If I was in this situation I would work up a short list of "project stoppers". Bail-out points, where I knew I wasn't going to get the results I wanted. So far, it looks like the expectation is for something that shifts like the current 4 speed, but has an extra gear. But if you've only experienced your good-shifting 4 speed, you might not really understand how a simple thing like a 2nd gear that grinds at 3000 RPM can destroy your fun. Or a 5th gear that pops out while you're driving, or sloppy shifting from loose shift forks. That's your dilemma, how to evaluate the quality of the parts, without having tried them. Maybe we could come up with a list of specific things to check, like the detents on the shift rods, or the play and wear on the shifting forks. Some of these things are easy to examine, like the shift rod detents. If those are wasted from banging gears, the replacement cost might put you over the top. Another thing that cna hide but look fine, is a broken synchro gear. They can break in one spot but the break can stay closed. That's why you need to get bright lights and a magnifying glass and pry around or tear things down. That's how I look at these projects. Avoid sinking too much in to it until you can lay out the path to success.
-
I like the installation tool. "Brinelling" has been brought up as a potential problem when using the nut to pull the bearing races in. Just doesn't seem like the best way. Yours is better. You did use it for the bearing, or just the seal? How do you knock the center out of a bearing? Just beat it out? Didn't realize that you were going to use the ZX axles, and that you bored the hubs. The boring is interesting because I think that you could go a little deeper if you wanted more clearance for your axles. Use a shorter "distance piece" although that would probably make it weaker overall, leverage and loads and all that. Hope it all fits together well. Don't forget to leave a little note in a bottle for a future owner.
-
A good examination of just the 2nd and 3rd synchros might tell a lot. Not sure which are easiest to remove. If you know anyone or have a trustworthy shop nearby you might just take the whole gear assembly over as-is and let them take a look. A guy who's seen many transmissions could probably tell you if a new oil gutter and reverse idler is going to produce a driveable unit. The problem with banging the gears and working things hard is that it torques the shafts and bearings. People often find pieces of the bearing retainers on their magnets. The shift forks get worn and cracked, their retaining pins can break. There are just many small things to check, especially on an unknown unit. On the other hand, I've installed transmissions then pulled them back out a couple of weeks later. It comes down to what you're handy at.
-
Looking back over your thread, I would really recommend that you run through the inspection procedure in the factory FSM. You started out as just replacing a broken oil gutter, but now you're sinking money and time in to what looks like an abused transmission. I suggested the the chipped reverse idler was the result of an angry driver with a bad clutch but on second look somebody really had to pull hard to do that kind of damage. They didn't care. Looks more like they were banging gears and missed the 5-4 downshift, repeatedly. I stole a decent picture from duragg's thread showing new synchros and good dog teeth. You need to look at them straight on. Look for symmetry and sharp peaks. There are clearances you can measure to see if the synchros are worn. Described in the FSM. Also, from what I've seen, the broken gutter happens when people disassemble the transmission. Looks like somebody's already been in there. Still looks like a good time to pause and ask what you're really expecting. I get a queasy feeling looking at what you're seeing. What's the history on the transmission? You can see the end of the thread on that shaft. Follow it in and see which way it turns.

-
Seems like you're forging ahead and making good progress. But you might pause and digest what you've learned, while reading through the thread below, and the links inside it. You're at the pint where you can decide to just throw it together and hope or get into some very fine details to ensure it works well. Lots of good stuff and some good branches out to more -
-
I've used Hylomar Blue on the recommendation of others. It's non-setting so you can take several tries to fix your errors during reassembly. Like assembling the cases with the shift rods in neutral. http://www.hylomarsealant.com/ Forgot to say, it works well on the adapter to case seams also. That's where the errors happen. I think that I would use a Nissan gasket for the front cover. The gasket is actually part of the clearance stack for the countershaft bearing, which has a shim underneath. It seems that Nissan got their manufacturing act together and everybody ends up with the same clearance. but if you use a different gasket, your stock parts might be off. The 71C uses the same gasket and was around for much longer, so Nissan has them in stock, I'm sure.
-
Sounds like we followed the same path. I ended up shortening the tips on my old single-function pliers so they wouldn't bend, using a pair of small vise-grips on one side so the tip clamp wouldn't torque loose, and using a screwdriver on the gap created once I got an edge over. All kinds of tools involved for one little snap ring. It took many "snap"s and sparks as the tips kept letting go while I was trying to get over the edge. Maybe that's why call them snap rings.
-
I hope you have some good strong circlip/snap ring pliers. Nissan used a super strong clip on that gear, probably because that's all that's holding it on. Took me quite some manipulating and tweaking to get it removed.