Leaderboard
-
conedodger
Free Member8Points12,513Posts -

Zed Head
Free Member4Points19,235Posts -

Racer X
Free Member4Points1,877Posts -
Patcon
 Subscriber
 4Points11,142Posts


Popular Content
Showing content with the highest reputation on 07/09/2024 in Posts
-
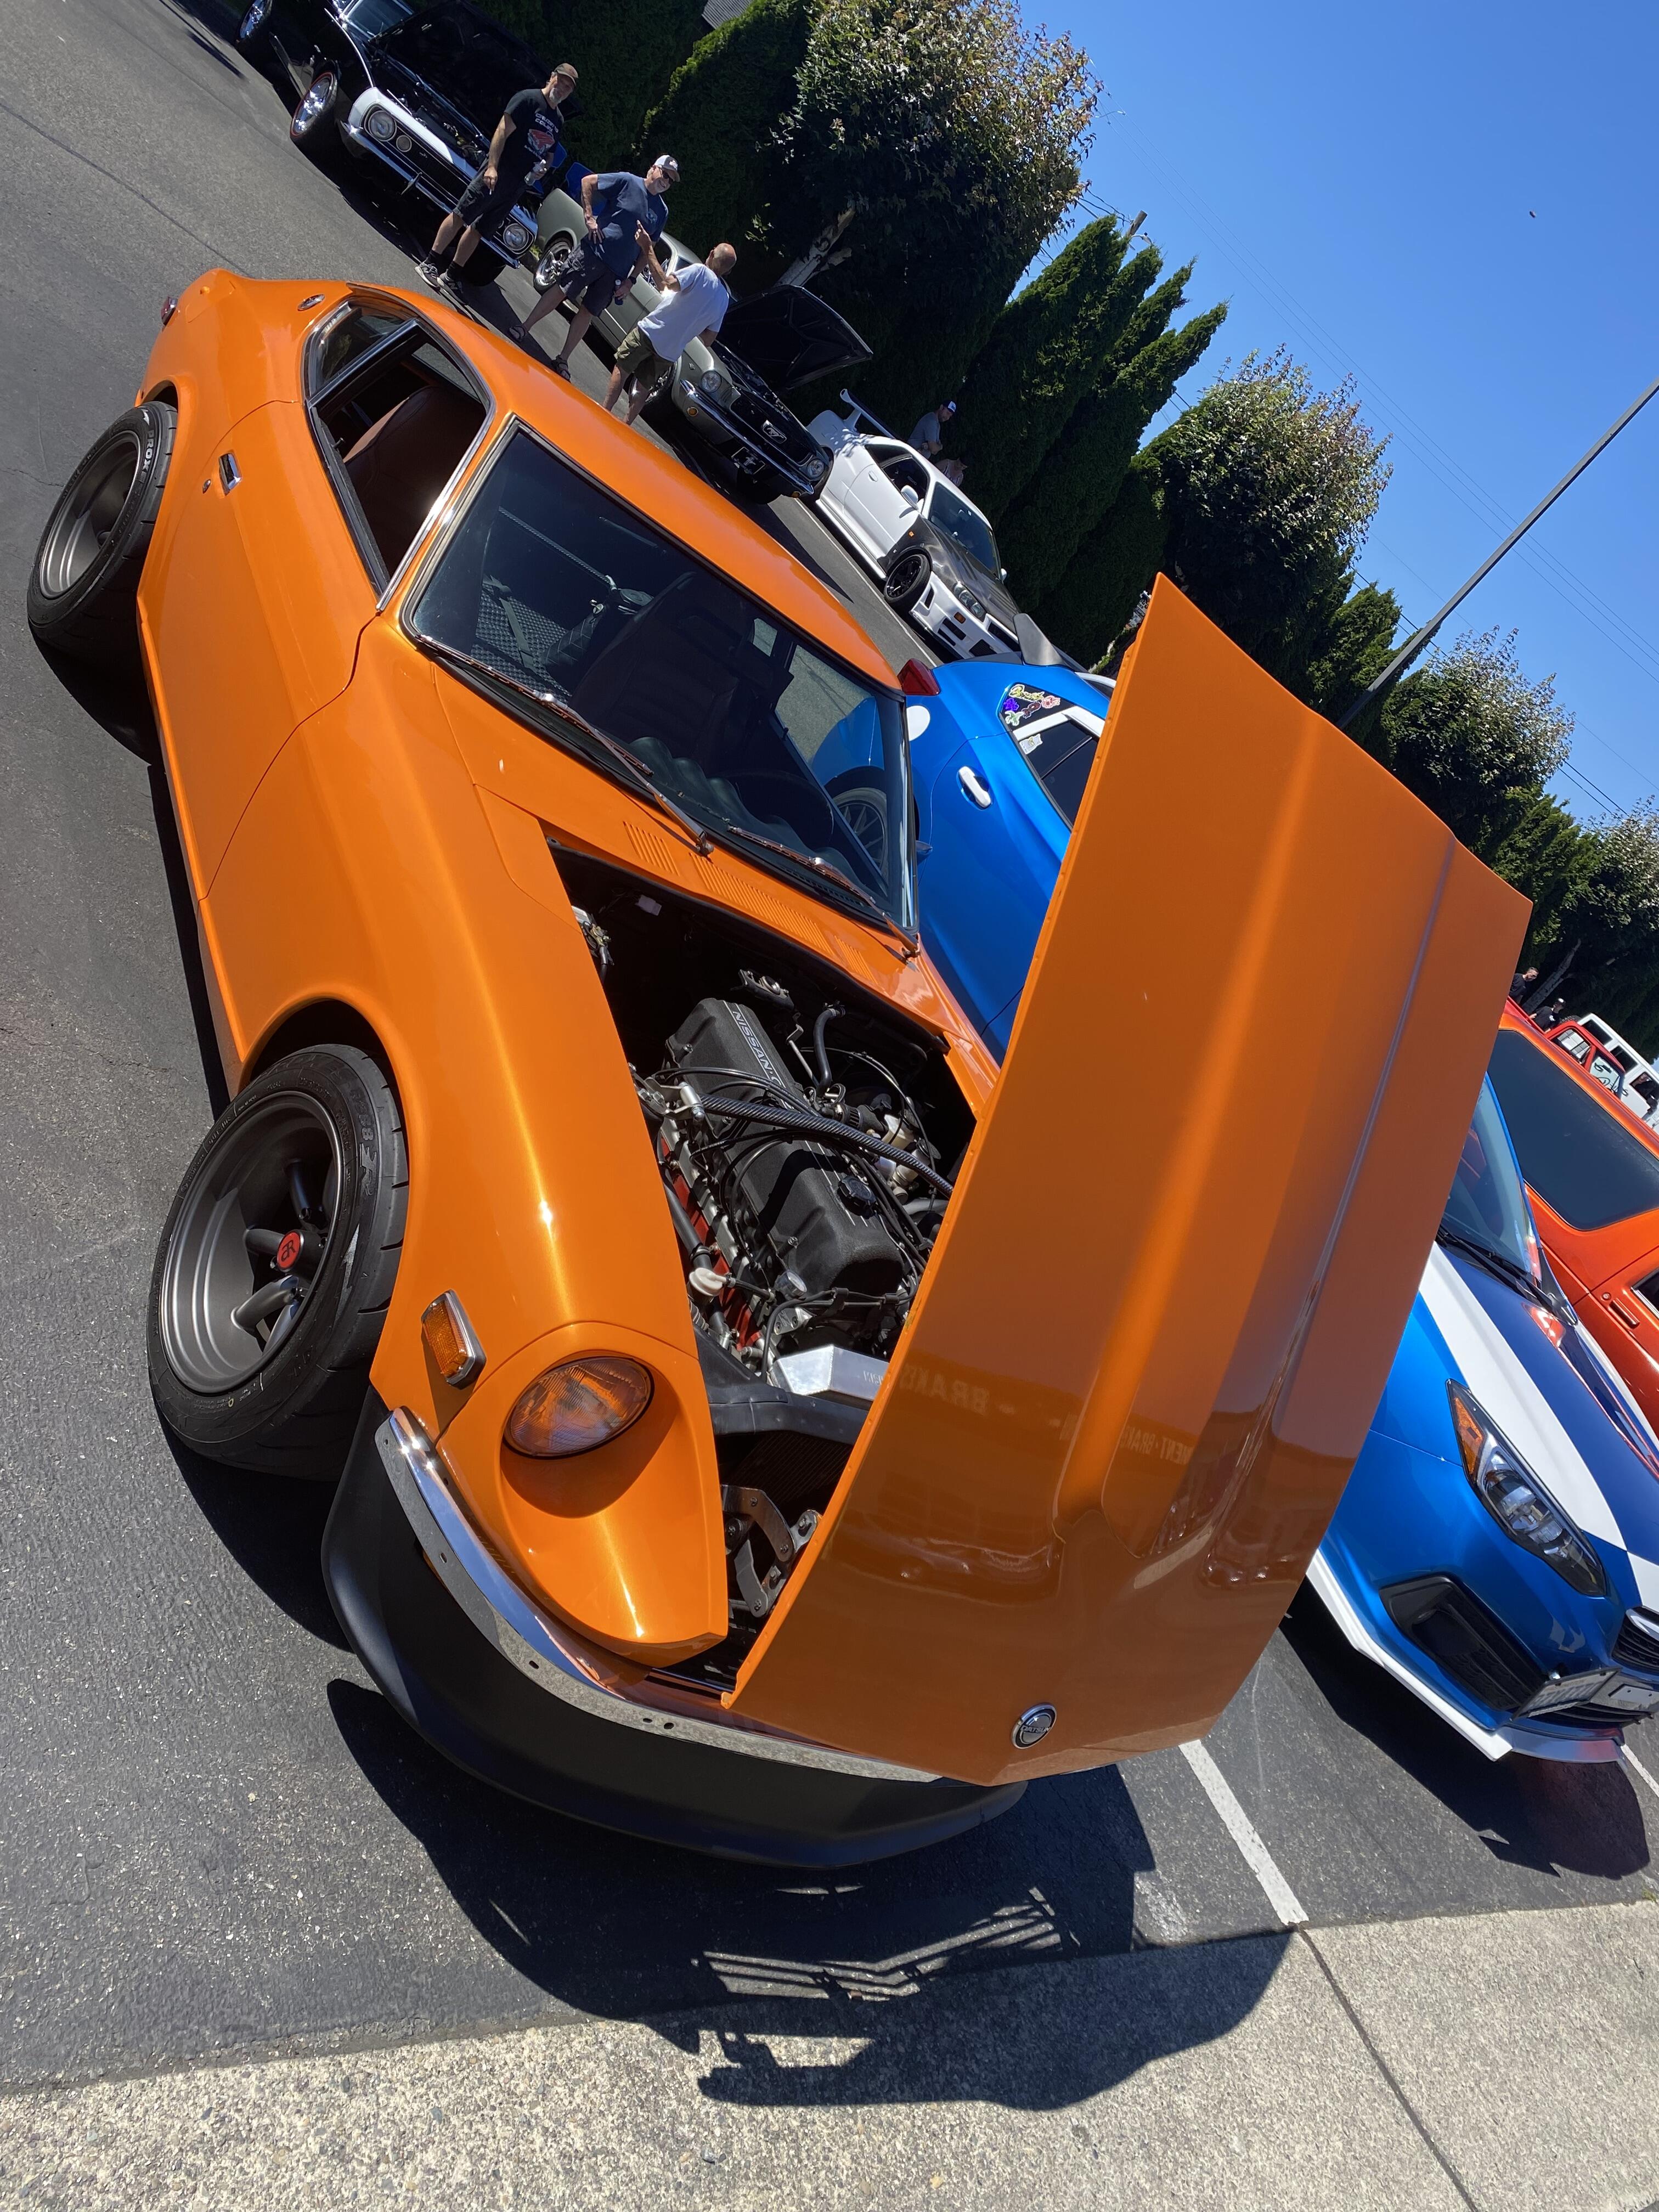
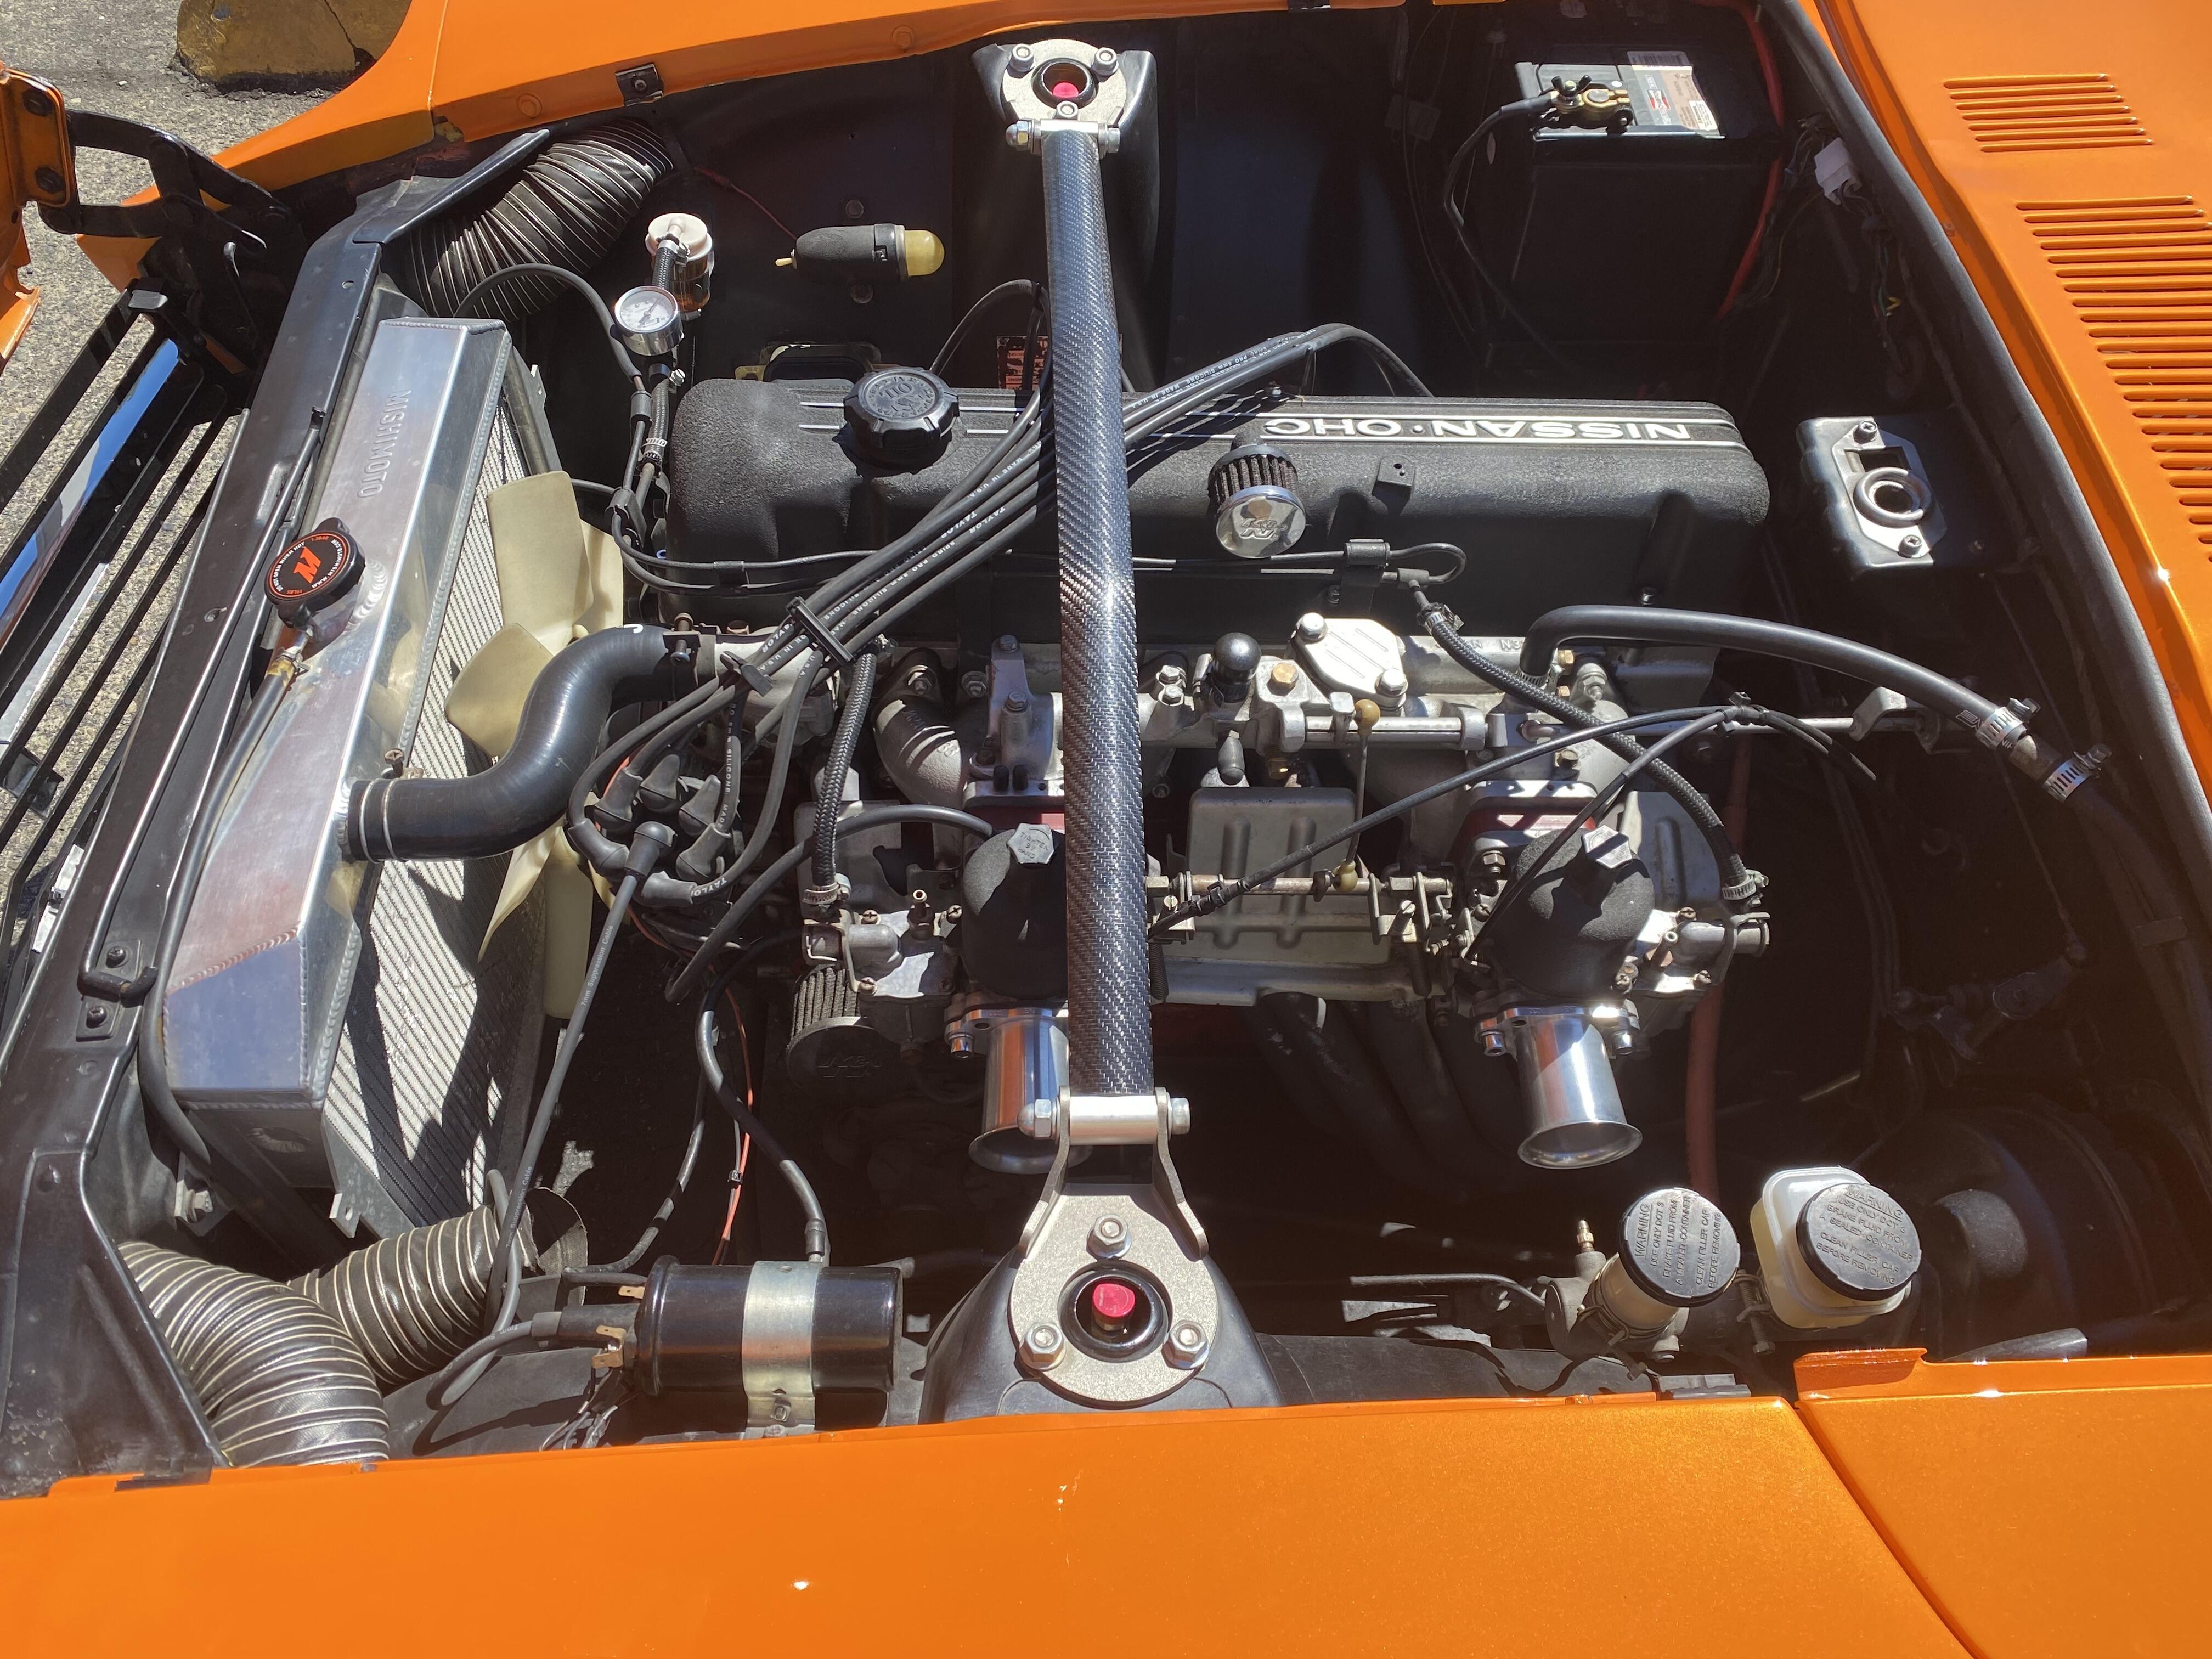
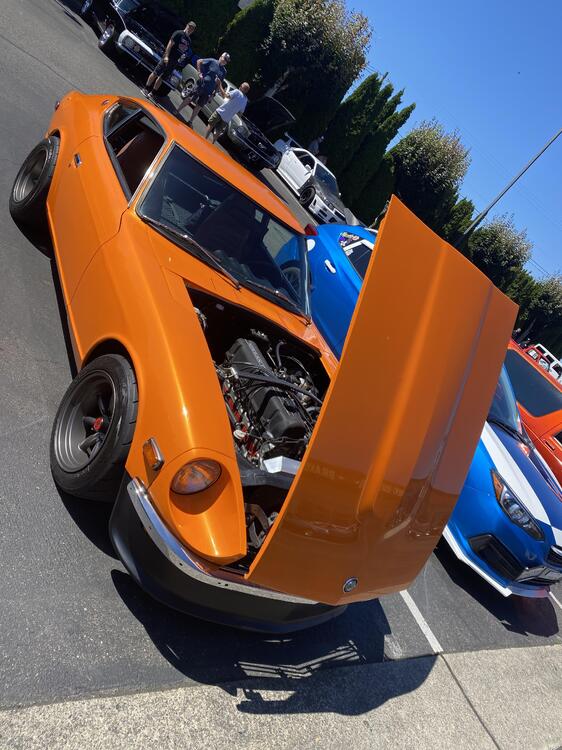
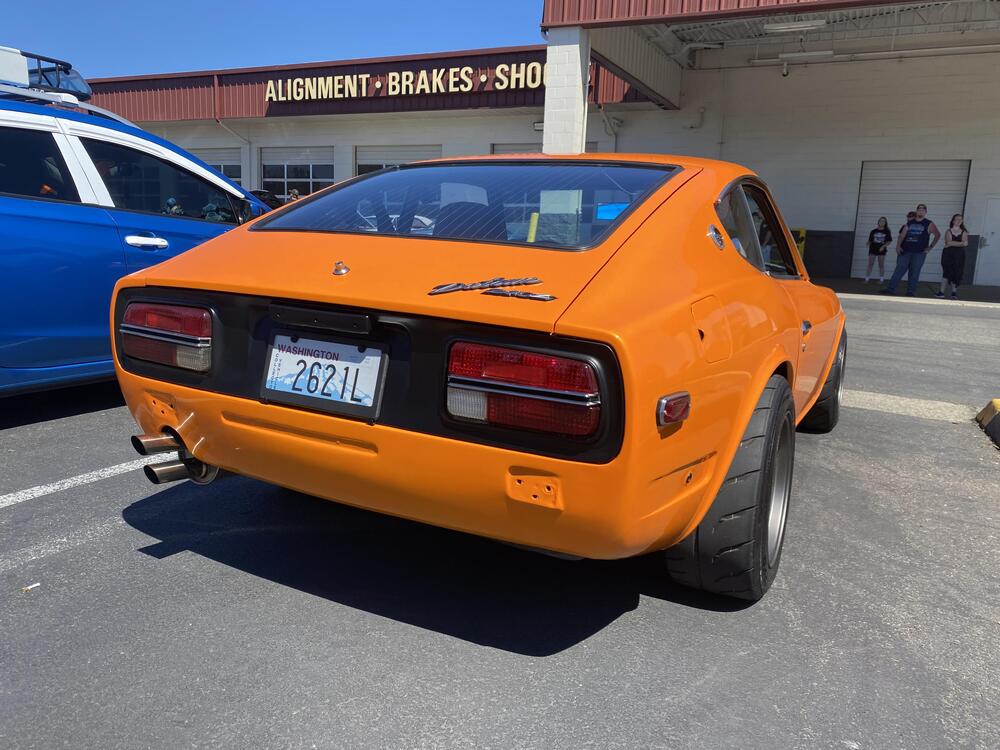
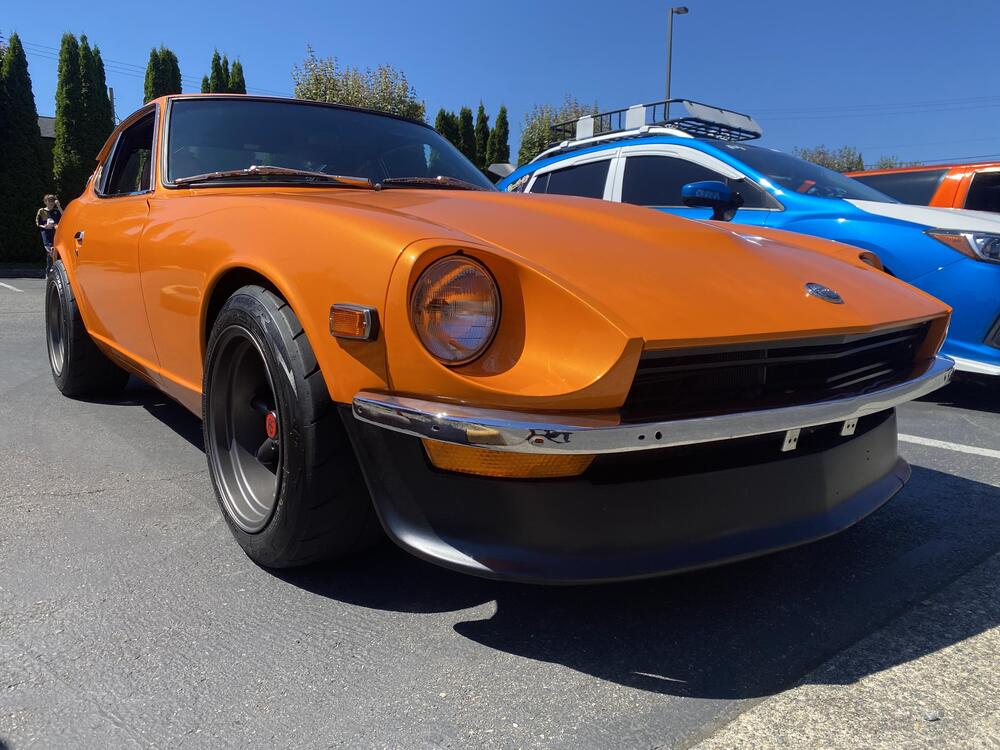
4 pointsWent to town Saturday for groceries and saw this in the parking lot of a tire shop near the store. A nice looking 72 with custom paint, Watanabe wheels, adjustable coil overs, nicely detailed engine bay. I talked with the owner, he assured me that he has air filters for the intakes, he just likes the look of open velocity stacks.

 4 points
 -
You will remove the heater controls or the back of the glovebox. Don't worry about tomorrow, today has enough worries of it's own! Deal with it if it happens...3 points
-
I'll double check what I have available after work. Supposed to get super hot here today (100+), so bear with me. I live in the NW because I like it colder. lol so much for that.3 points
-
Why are you hiding the serial number? Seems suspicious. . .2 points
-
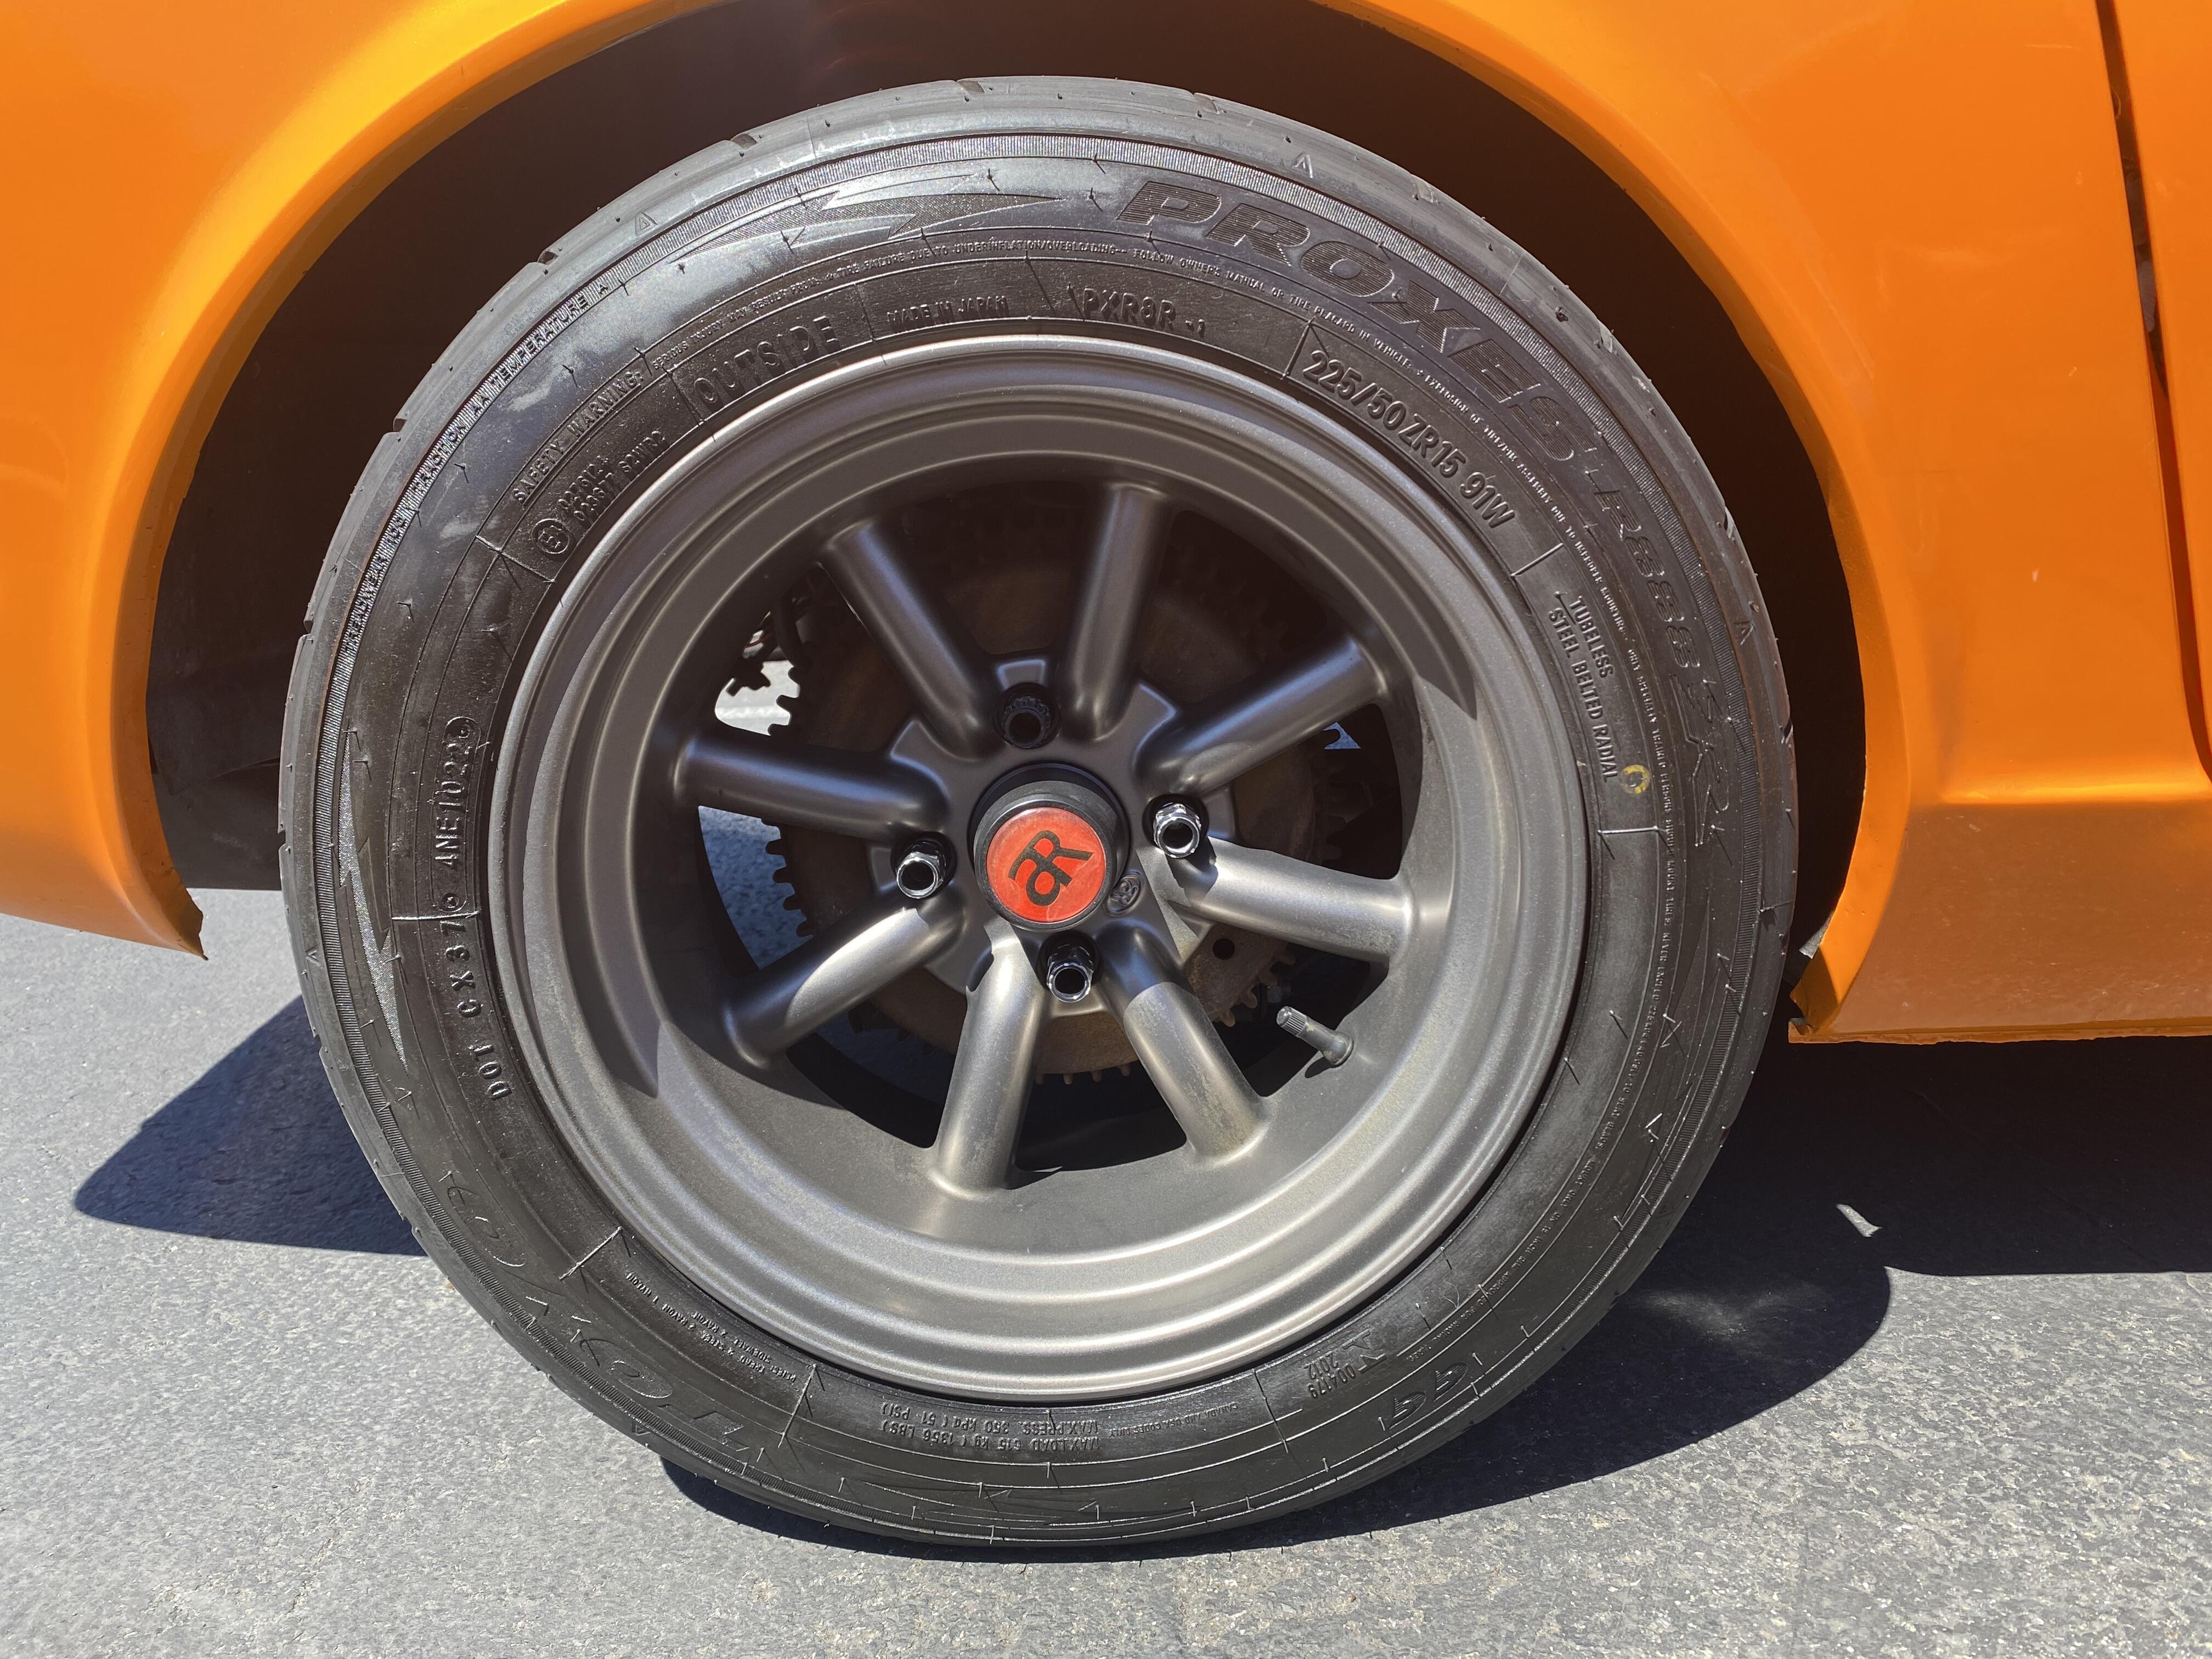
1 pointRota Grid 16x8 +10. I run 225/50 ZR16 (my fenders are rolled (as in: the inner flange with no pull, and as much as you can roll the rear inner flange as it gets pretty "thick" near the exterior...) I have coilovers and camber plates but I run the rears nearly flat)1 point
-
I can give you two options, the one I generated and another one posted here: https://www.thingiverse.com/thing:6152862 They are similar but the thingverse has the tabs to hold it in place located differently. You'll likely need to sand the final product to smooth it out. The chrome vinyl is available on Amazon or any vinyl wrap shop. Let me know if you need another file format. It was originally created in Autocad Fusion 360. Finisher Final.obj1 point
-
You gotta get into VIN numbers above 600 for engine blocks in the 3600 range.1 point
-
1 point
-
1 pointSome sort of mini car show at the tire shop where the guy pulled the filters after he opened the hood? I see a 67(?) Camaro, a Mustang, and a car that suffered an engine fire in the background.1 point
-
I did, including the glove box lock. For that one, you have to drive out a pin to access the wafers.1 point
-
Find as many Factory bushings that are still available. Try to stay away from poly IMHO.1 point
-
1 pointIf the smoke dissipates quickly it's most likely coolant. If it hangs in the air for a while it's oil smoke.1 point
-
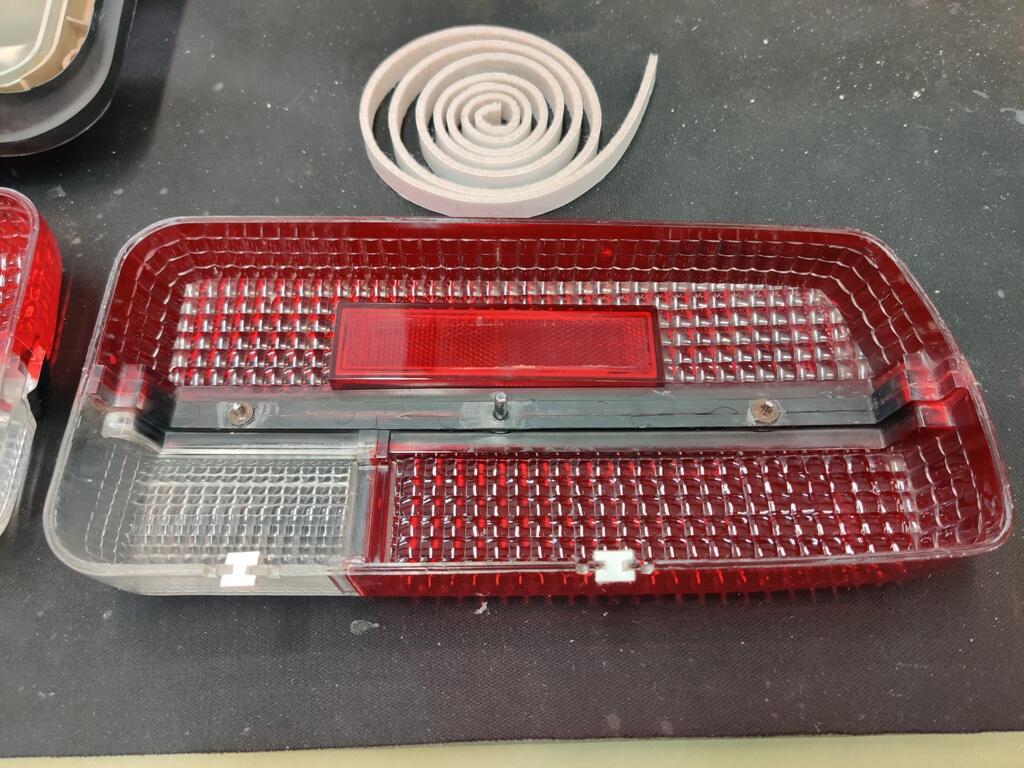
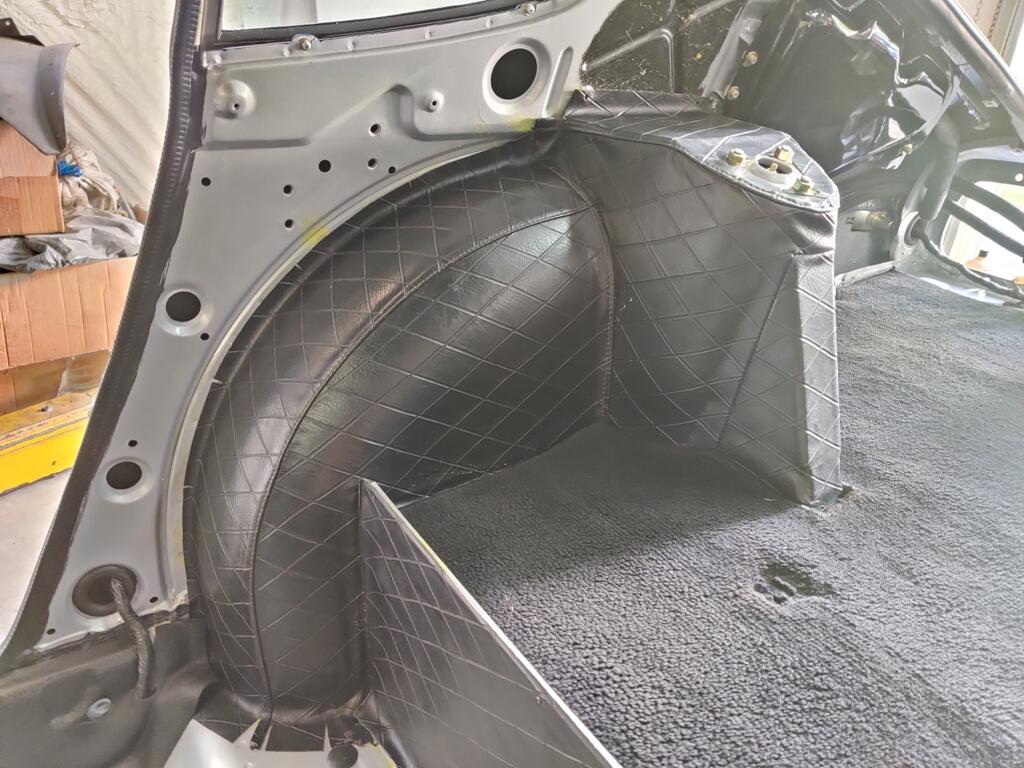
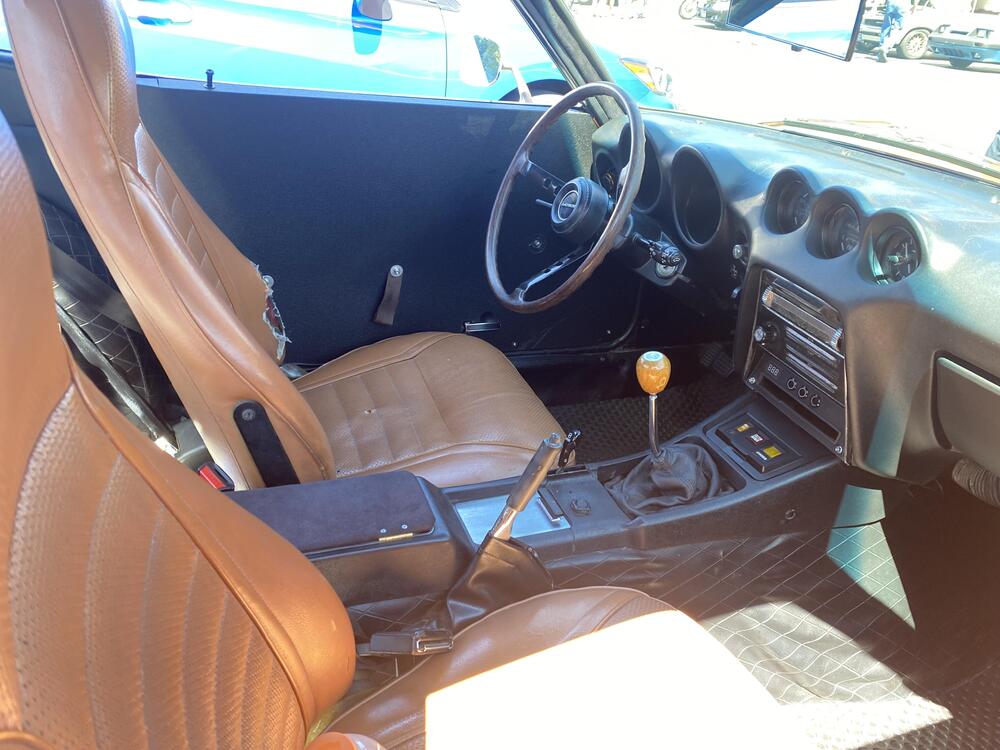
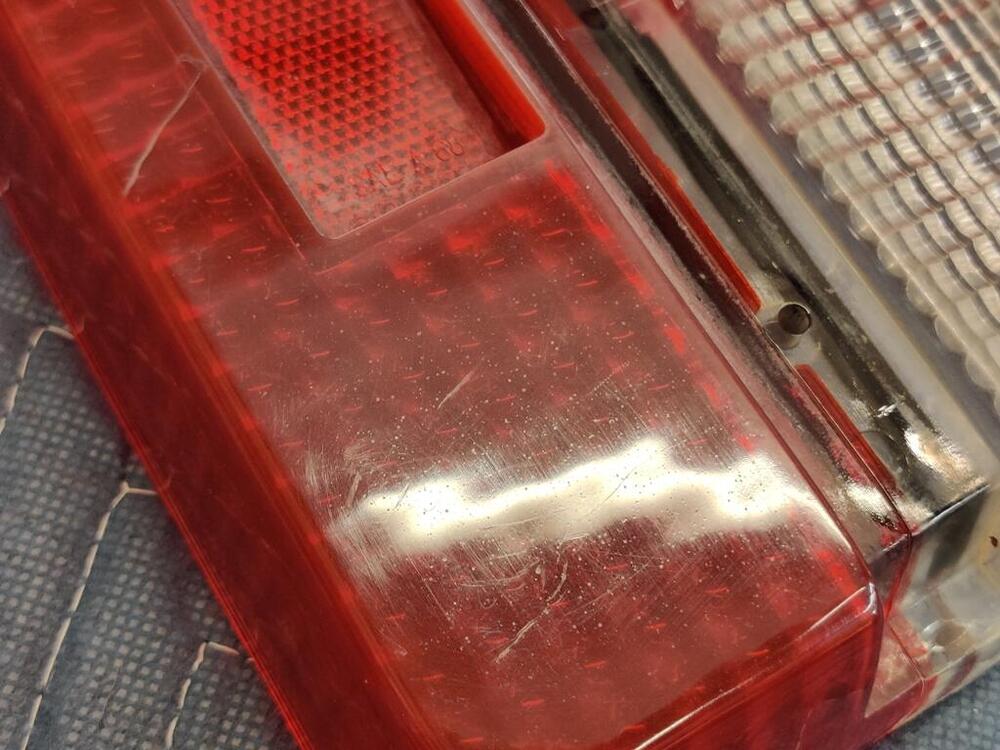
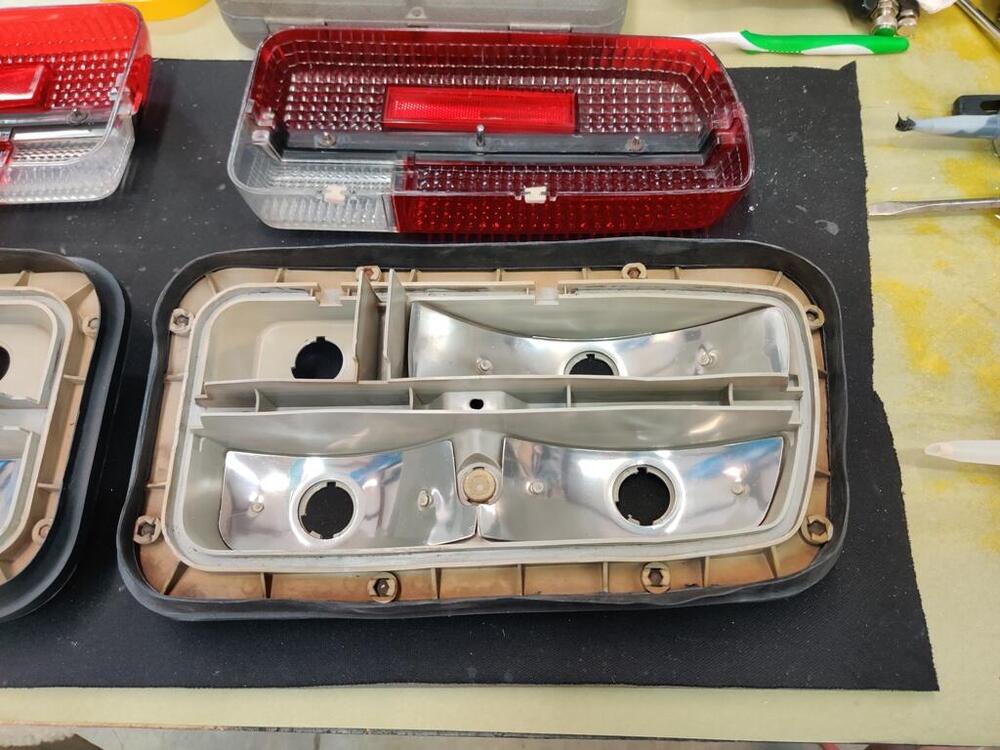
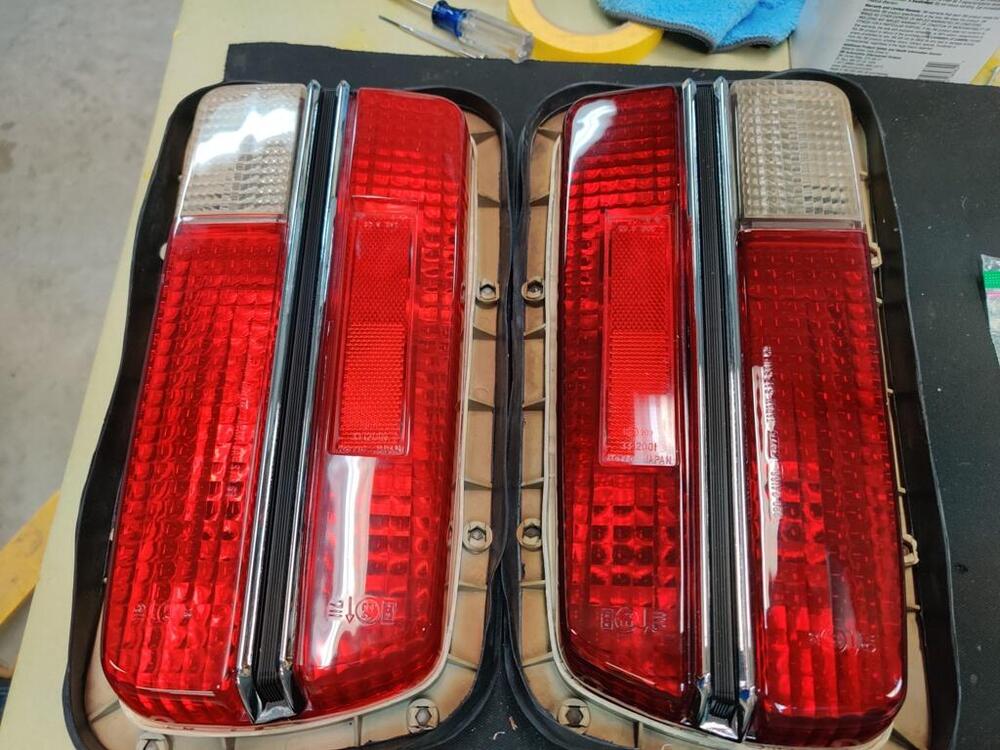
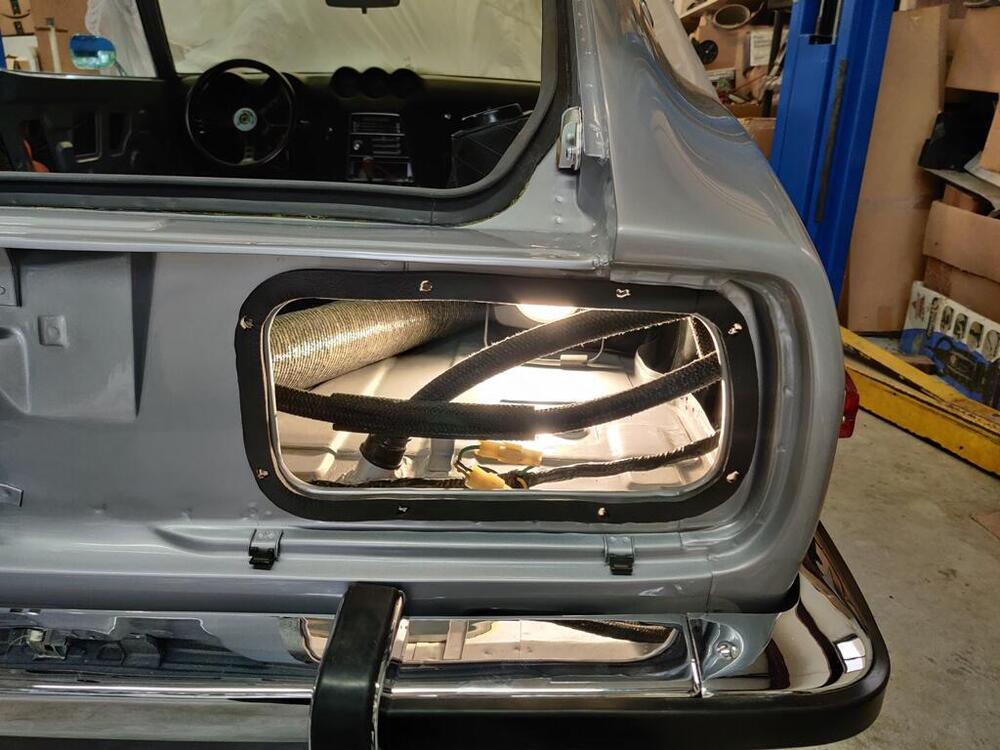
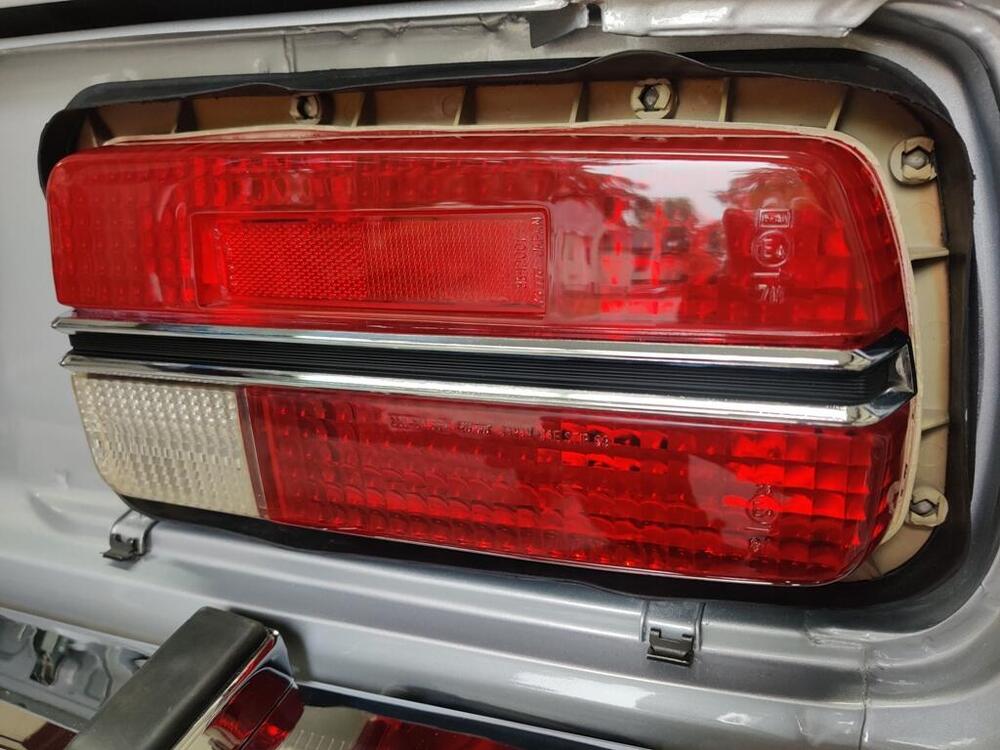
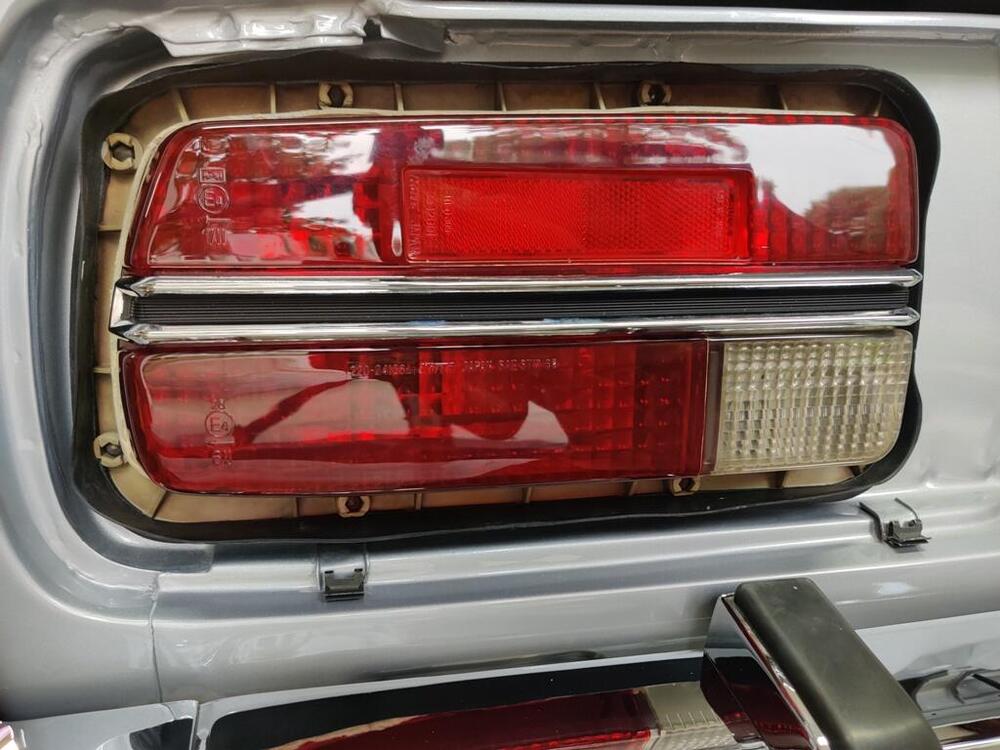
Correct, the tower and smaller rear wheel well are covered by one piece first. Then, you put on a second piece that covers the front wheel well. The "riser", behind the seats is installed last. Yesterday and today I worked on removing scratches from the replacement left door glass I got from @Patcon. I had to order some more discs and powder, so I set it aside for now. I went to install my tail lights and upon close inspection, determined that one of them needed more sanding and polishing to restore the proper shine to the lenses. After some more effort was expended there, I was able to glue the lenses onto the housings. For that job, I used auto body seam sealer. Seems like and odd thing to use, right? But, the old stuff that I removed from the housings when I pulled the lenses off looked like seam sealer. And, I had good luck with using it once before on the tail lights on my other 240z. My tail light lenses were in rough shape to start. Lots of pitting and scratches, some of them deep. I bought a small roll of felt from Home Depot and made little pieces to replace those that were originally in the bottom of the assemblies. I guess these are vents... to allow any moisture that finds its way into the assemblies to dry. While the housing were separate from the lenses, I used a heat gun to attempt to straighten the mounting flanges of the tail lights. These distort over time and prevent the stock rubber gaskets from sealing to the body of the car like they should. When "gluing" the lenses back to the assemblies, there is a need to use clamps (and boards and rags) to clamp the lenses to the housings, and let the sealant cure for 24 hours. Even with the housing flanges straightened somewhat, I used some self adhesive weather stripping (highly compressible) between the tail light assemblies and the body. These are now air tight - no exhaust fumes will be coming in through this notorious location. While not perfect, the lenses look very nice now.


 1 point
 -
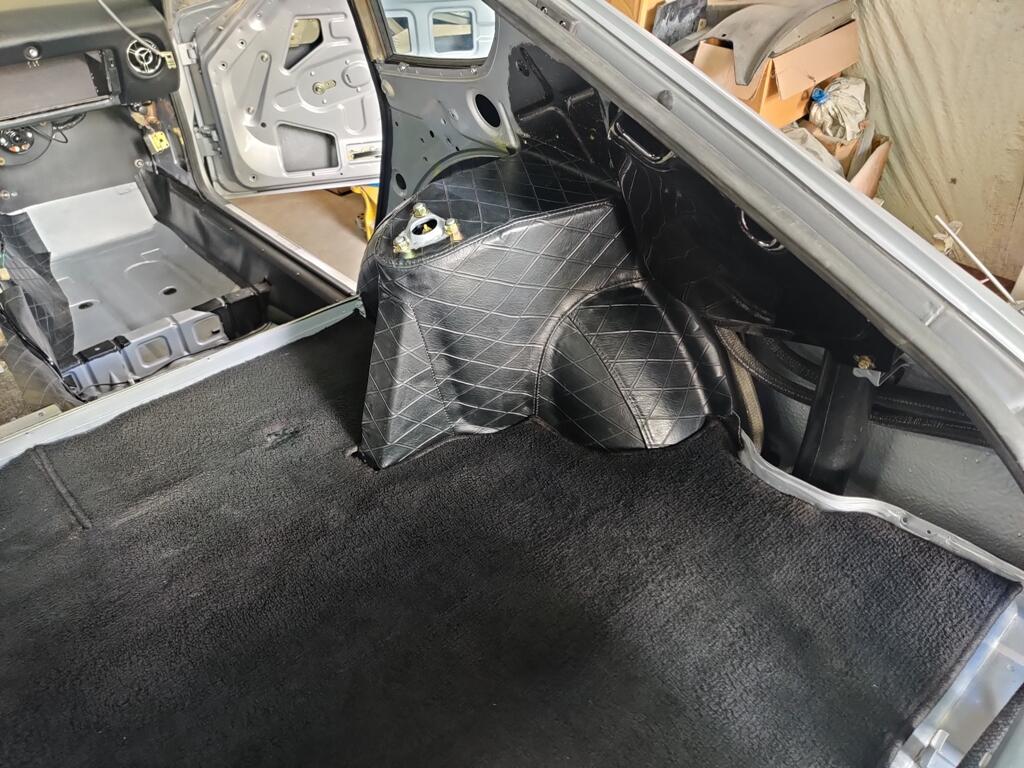
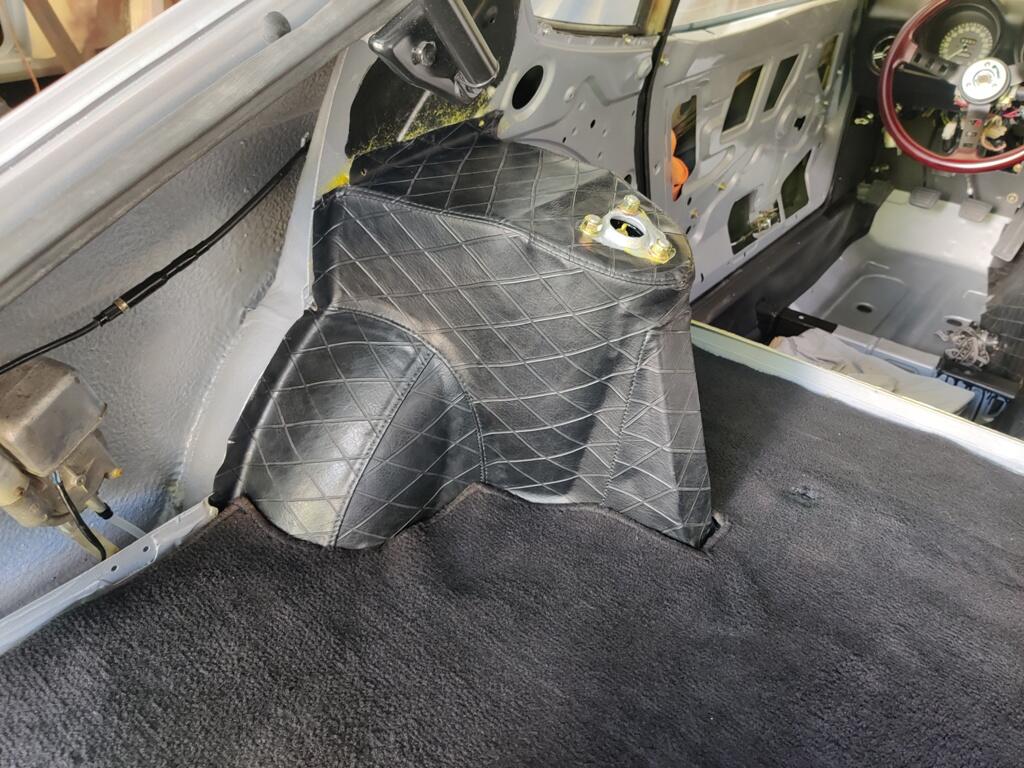
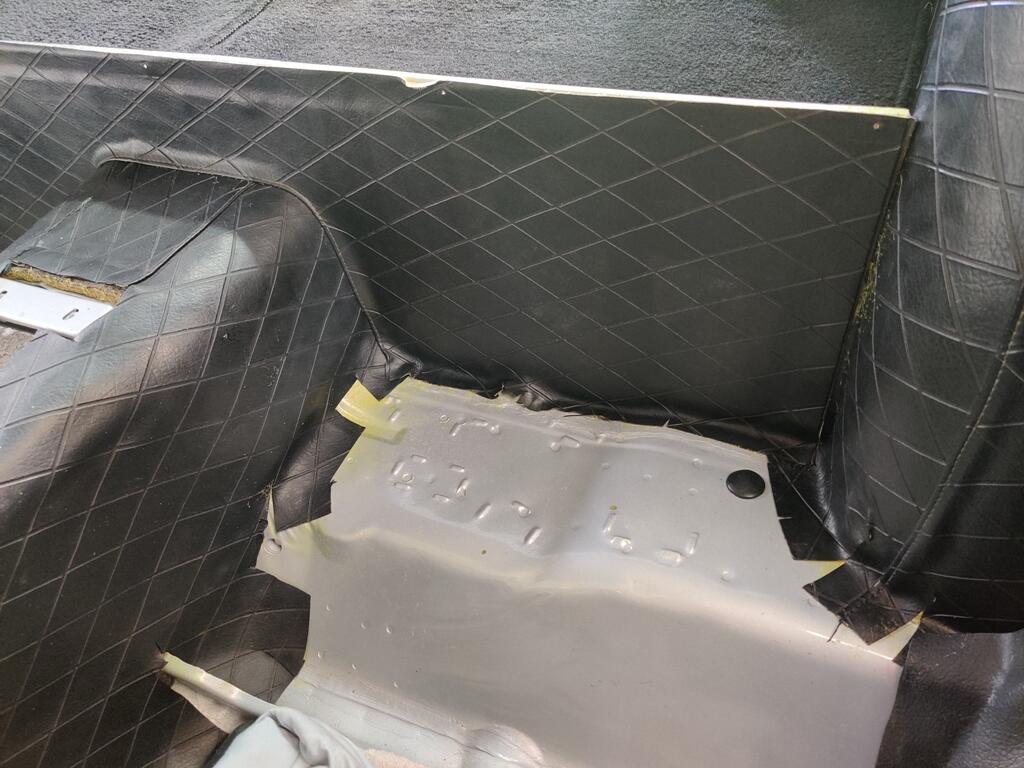
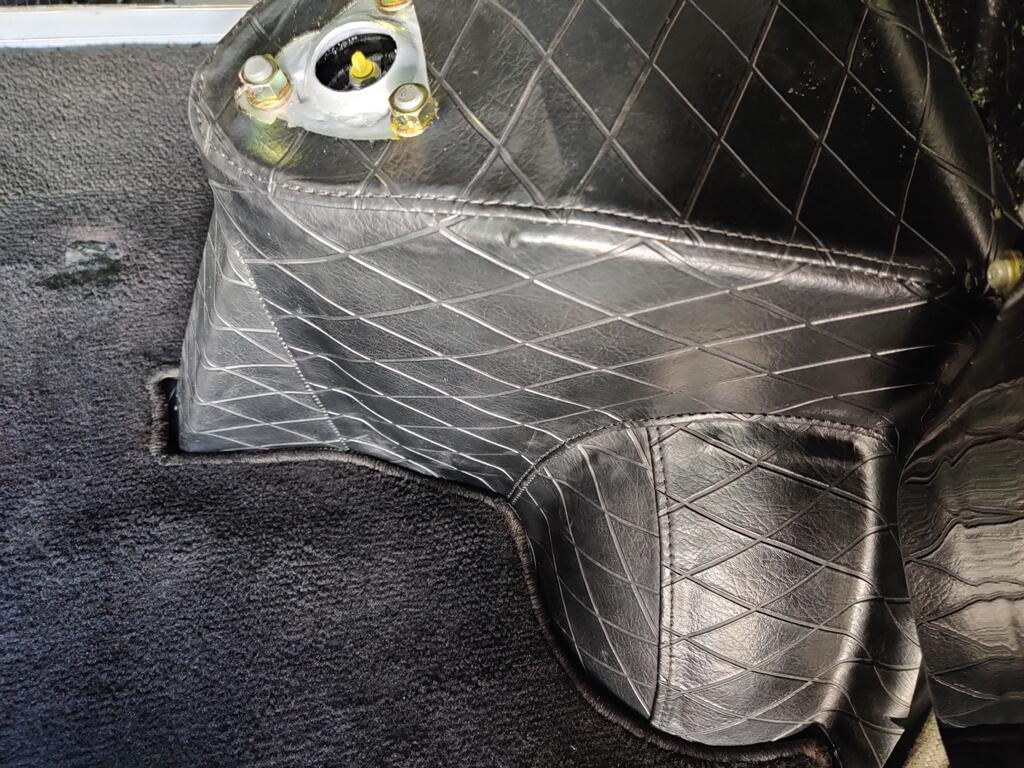
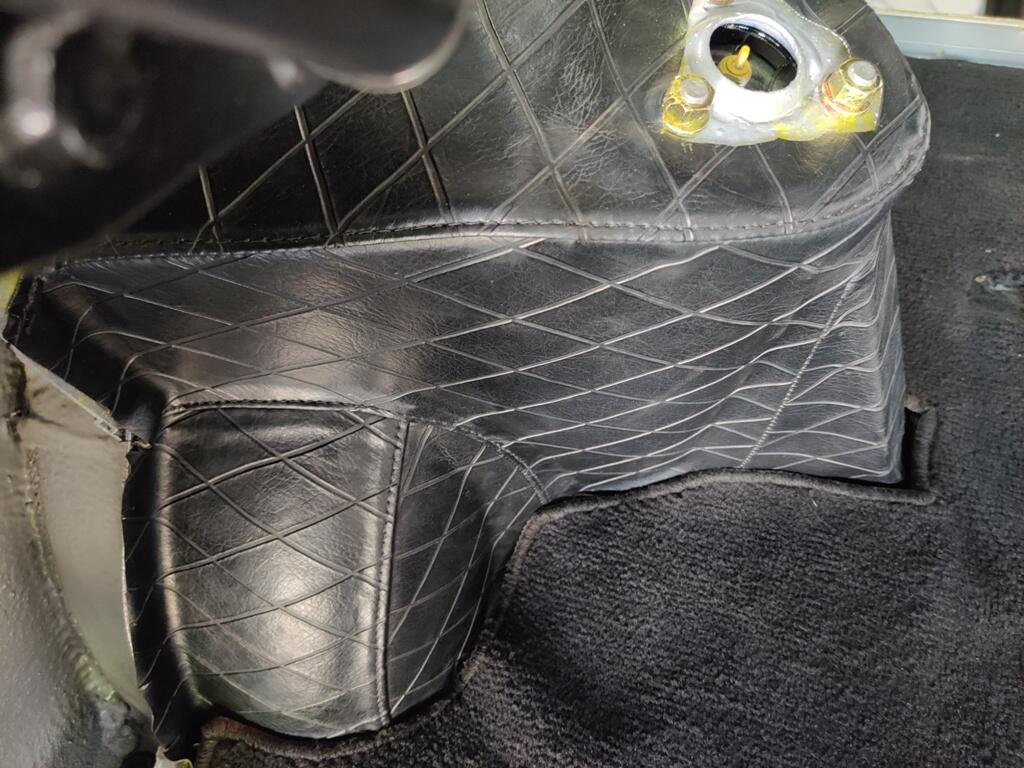
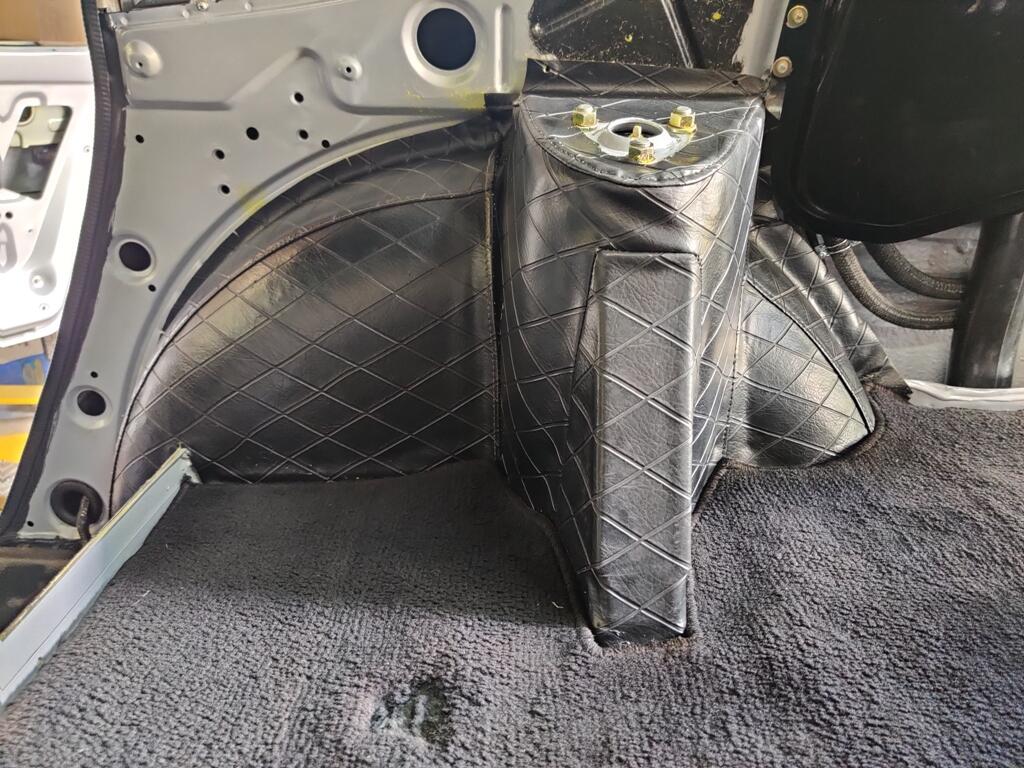
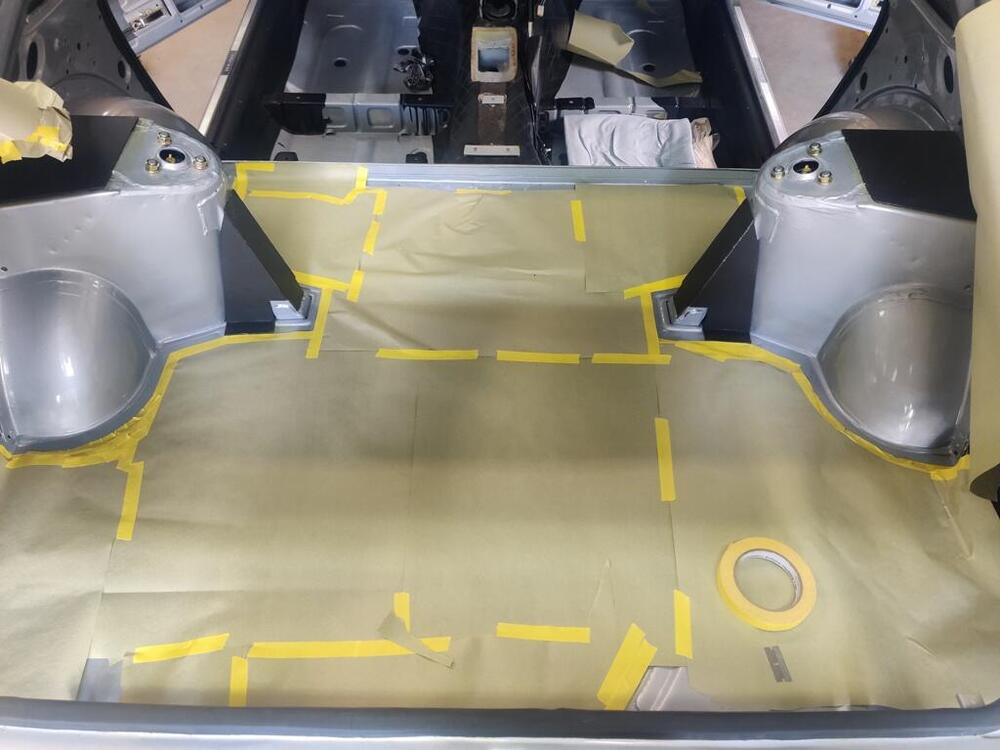
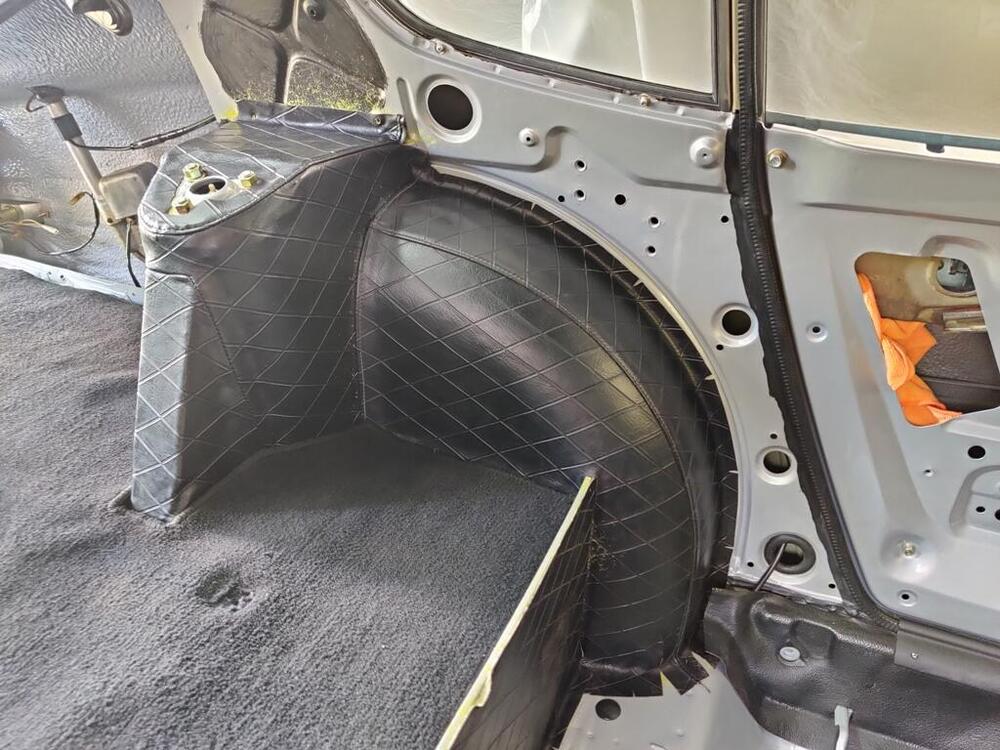
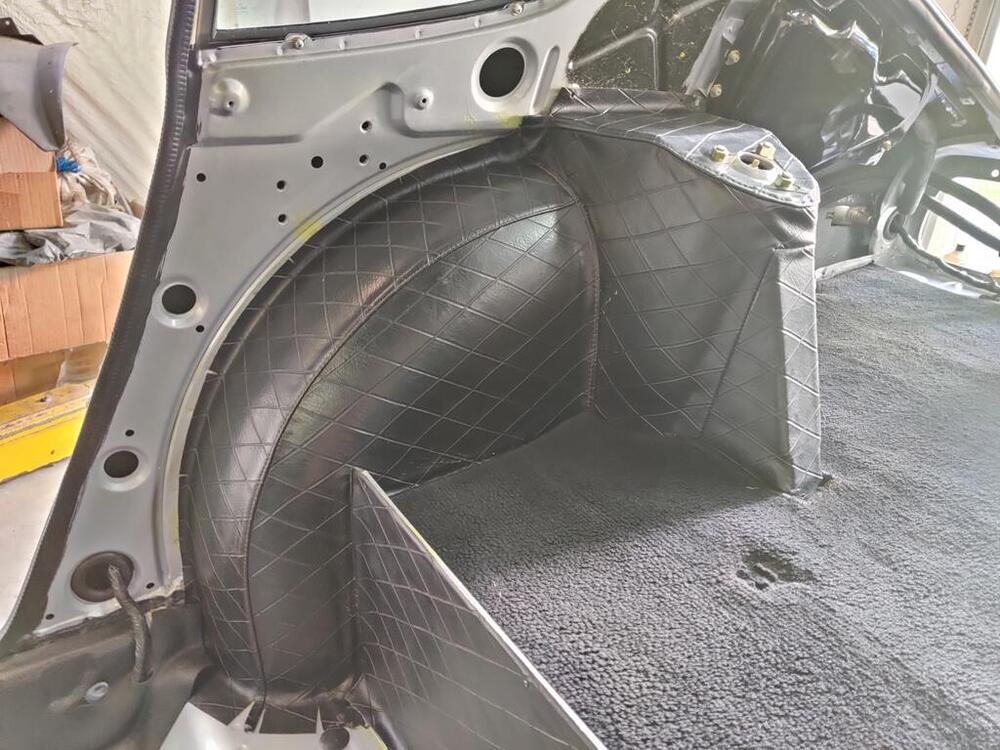
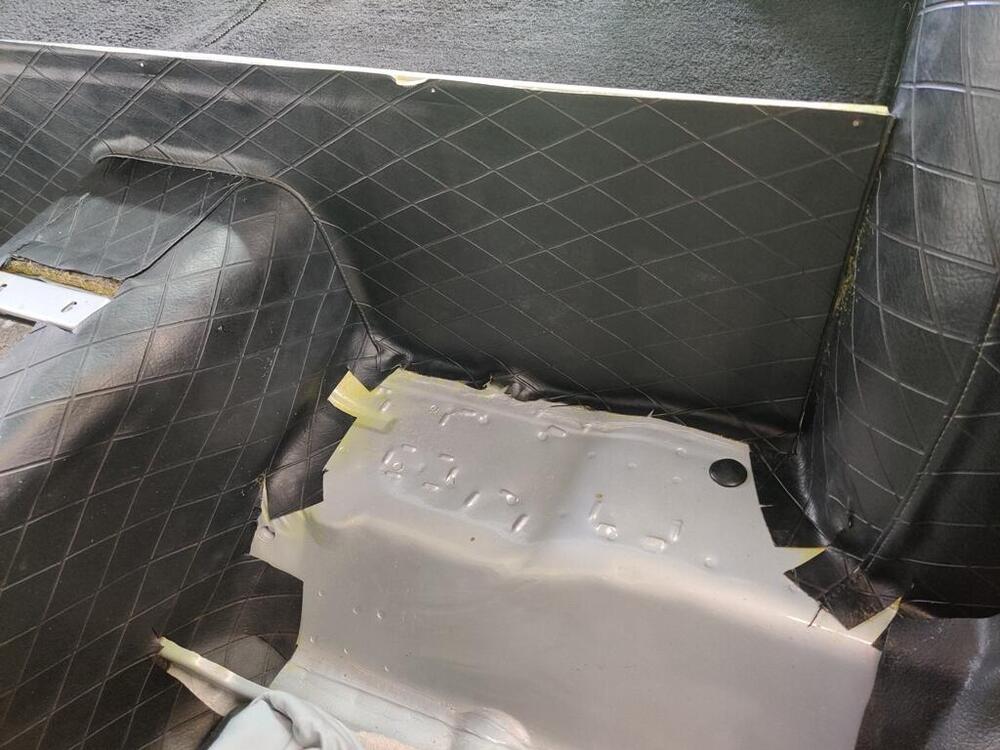
The time has come for me to install the rear tower and wheel well interior trim. The reproduction pieces have a "shallower" diamond imprint. I prefer the original. These pieces are often damaged, I think from putting in and retrieving things out of the rear hatch area, Objects nick and slice the vinyl, especially on the inner most portions that protrude. For the rear strut tower pieces, I took three complete pairs which I had accumulated over the past few years to a local auto upholstery shop. There, we determined the best sections for use. I left them with instructions to pull them apart as necessary and to re-stitch one complete pair using the best sections from the lot. Another "issue" I have noticed looking at 240z's over the years is that the vinyl covering the rear strut towers, if removed, often looks terrible when it is put back in. Whether, the wrong adhesive is used, or the installer lacks the necessary skills, or something else, the result often falls short vs. the other restoration work done on the car. So, as I started yesterday with my plan, one that included having all of the remaining diamond vinyl glued into place on the car before the end of the day, I knew I was in for some long, and stressful hours. First, I used Wesley's Bleche-White (an ancient bottle) to clean the backsides of the vinyl trim. Over the years, the white (I assume cotton) backing wicks up water and collects dirt with it. Wesley's Bleche-White that you can buy today appears to be a different chemical composition (based on a few minutes only) of searching online. The one I have appears to be the original stuff. I was amazed at how much dirt came out of the backside of the vinyl. I rinsed them thoroughly and then hung them outside in the GA heat to dry. While they were drying, I taped up parts of the back hatch area to protect from glue overspray. I once again used the Landau contact cement. When it is 90+ degrees, this stuff dries a bit quicker. That, and the very odd shape of the strut vinyl trim parts makes installation very challenging. On the first one, I struggled a bit because I didn't get the alignment right and it kept sticking to itself. With each passing second, the glue got drier and drier and more sticky. I screamed some obscenities and tried helplessly to reposition it without pulling it back off completely. Within two minutes, I realized I had failed, so I pulled it off completely. One important thing to note about contact adhesive is that it can be reactivated by applying more. So, before it dried even more, I grabbed the gun and went with a bit of a different plan. Instead of lightly coating the entire inside of the vinyl as I did before, I only sprayed the top (horizontal) section. I resprayed the corresponding top of the strut tower. Then, I positioned the top section so that the triangular cut out for the upper strut mount bolts was in the right location. From there, I put my attention at the portion of the top surface of vinyl that presses up against the inner quarter panel. I aligned the holes (those that accept the black plastic trim clips) that were in the vinyl to the holes in the inner quarter panel. I pushed the part contacting the inner quarter panel against it firmly. When I was sure those holes lined up, I lifted up on the triangle cut out area and pulled the vinyl taut as I repositioned the top (horizontal) section. You have a bit of work time, but you have to move quickly. At that point, I had only the top section in place, but the alignment looked good. From there, I lifted the other sections up so that I could spray glue onto the backside of the vinyl and onto the metal strut support structure. I applied more glue in areas where the factory workers had. Flat expanses got less, areas of transition from one surface to another, got more. From there, it was less challenging. I focused on getting the backmost section located properly against the inner quarter panel, making sure to put some tension on it as I pressed in into place. This is necessary to keep wrinkles from forming. I did have to lift back up some and reposition, but not a lot. Anyway, for the second one, I copied my successful second effort on the first. It went well. I still have some glue overspray, and the white haze that you see on the black vinyl to clean off. I think the white haze came from the Westley's Bleche-White, but it comes off. These pic were catching a lot of afternoon sun as well, so the black looks like it is washed out a bit, but it isn't. I think it will look nice when all cleaned up.


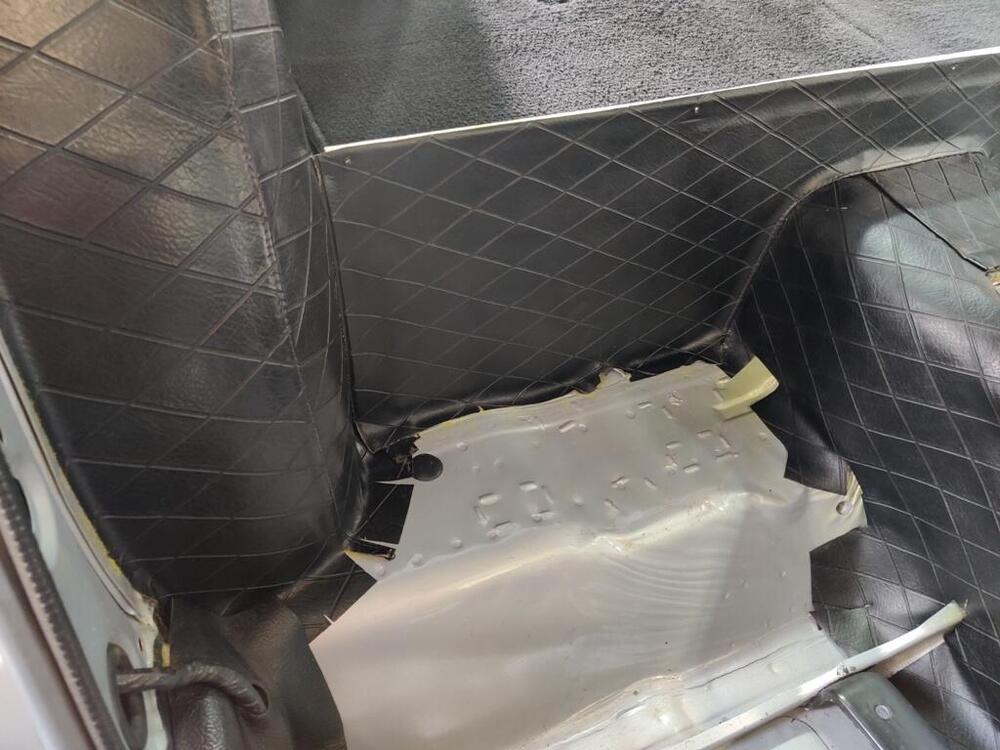
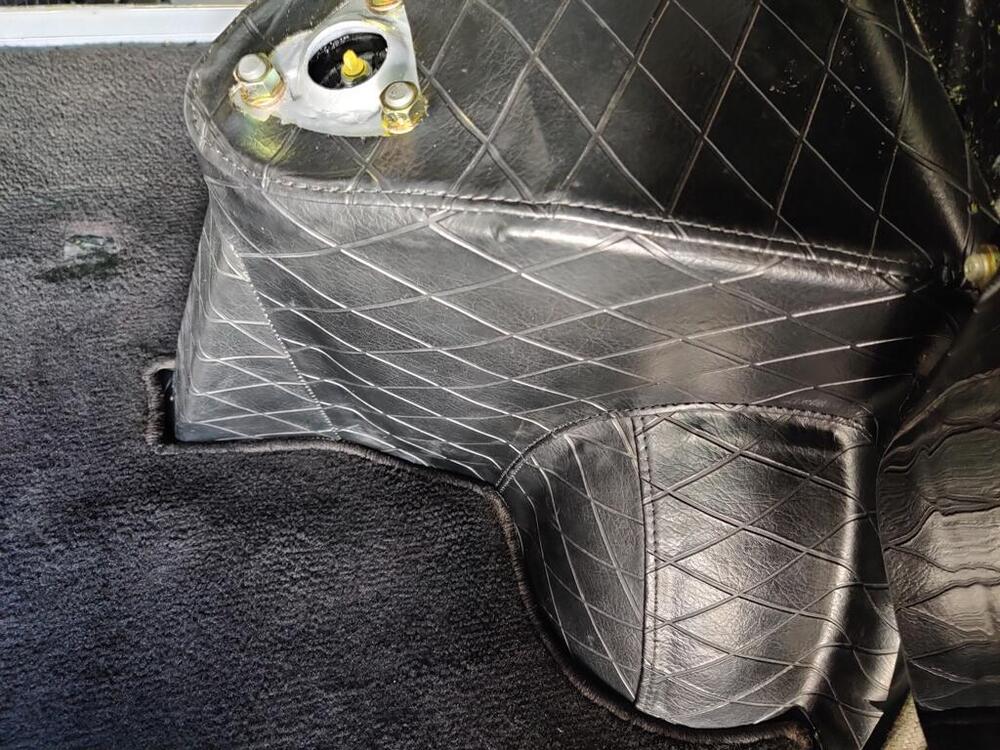
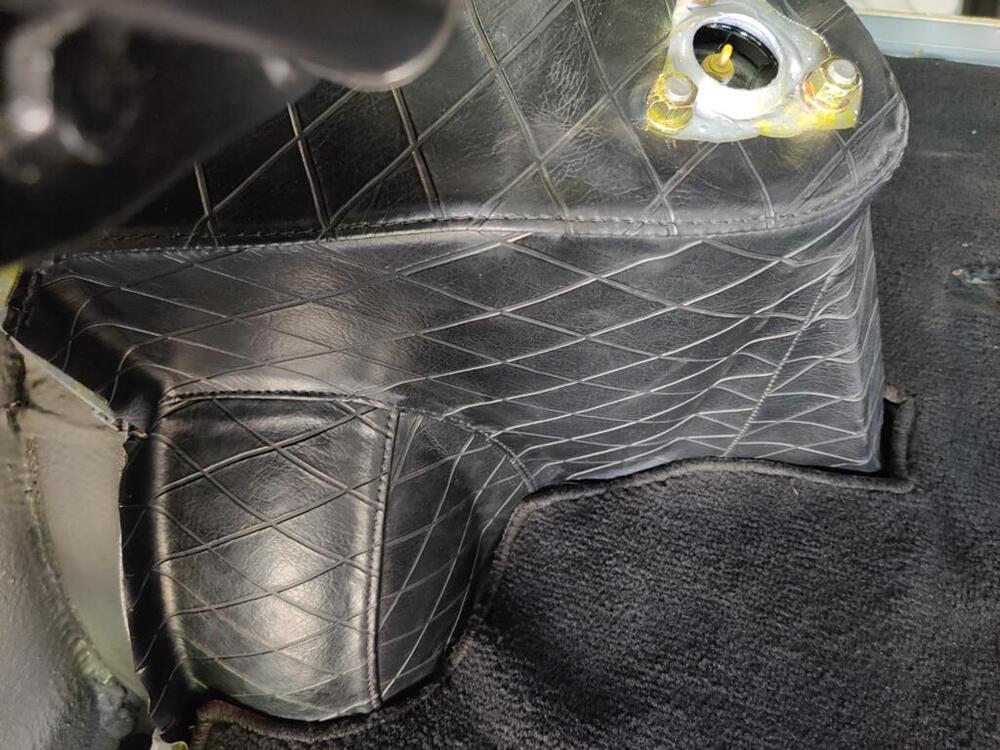

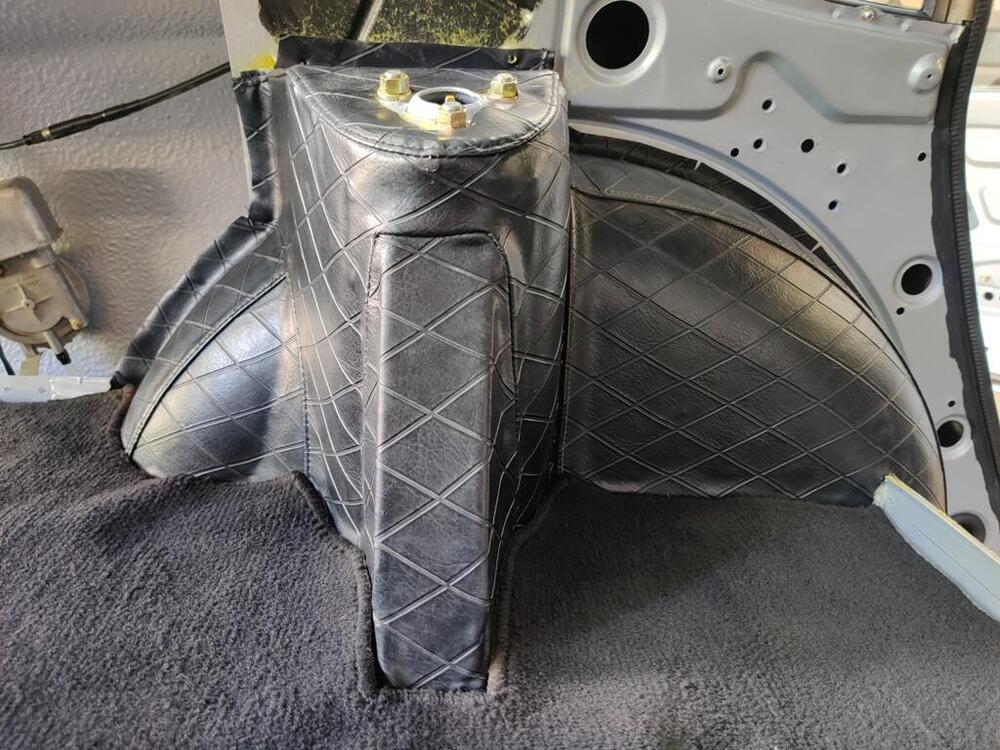 1 point
 -
The check valve might be stuck. Maybe you can poke it free, if so. On your puddle of gasoline - you got really lucky. I hope that is a detached garage. If not, you almost burned your house down, and killed your dog. People should stare at that picture for a while and imagine. It will be incentive to be cautious and think about consequences. You dodged a disaster. Sorry to be critical but sometimes we forget.1 point
-
My two cents as a relative newbie to all this. i have a 6/71 build HLS3036219 and am not the original owner so i don't know what was original or not. By date and VIN it should be a pure series 2. the PO did a terrible job of restoring and took so many shortcuts its shameful. trying my best to correct all that I can. As i'm doing this I realize that the most important thing is to make your car what you want with it. I had to address seat mechanism issues and took the ebay route. Well what I did was get a 72 pair of seats which isn't correct for the car but its correct for me since I like the idea of the better reclining function. I also had to replace the fan, the original metal one was a mess well I decided to get the 72 plastic one to save wear and tear on the water pump, and the list could go on. So enjoy your cars, build and tinker to suit your needs. We wont be here forever so enjoy it.1 point
-
I own a 1/71 car "Series 1", and I had someone approach the car and start pointing at all the incorrect things on my car. The fun part is , my car is all original and unrestored. I just said thank you.1 point
-
I don't find the Series 1 / 2 terminology offensive. I look at it as a general description that gives some idea of the traits the car could have. It's not normally used as a hard and fast rule or an absolute. I find the terminology very helpful and always have. If I want exactness I use production dates but it's very rare I care that much.1 point
-
I do it without lifting the car. I turn the front wheels all the way to the left and reach under from the bottom behind the right front wheel to connect a tube and bottle of brake fluid and loosen the bleed valve. I use a speed bleeder valve so I can do it without an assistant.1 point
-
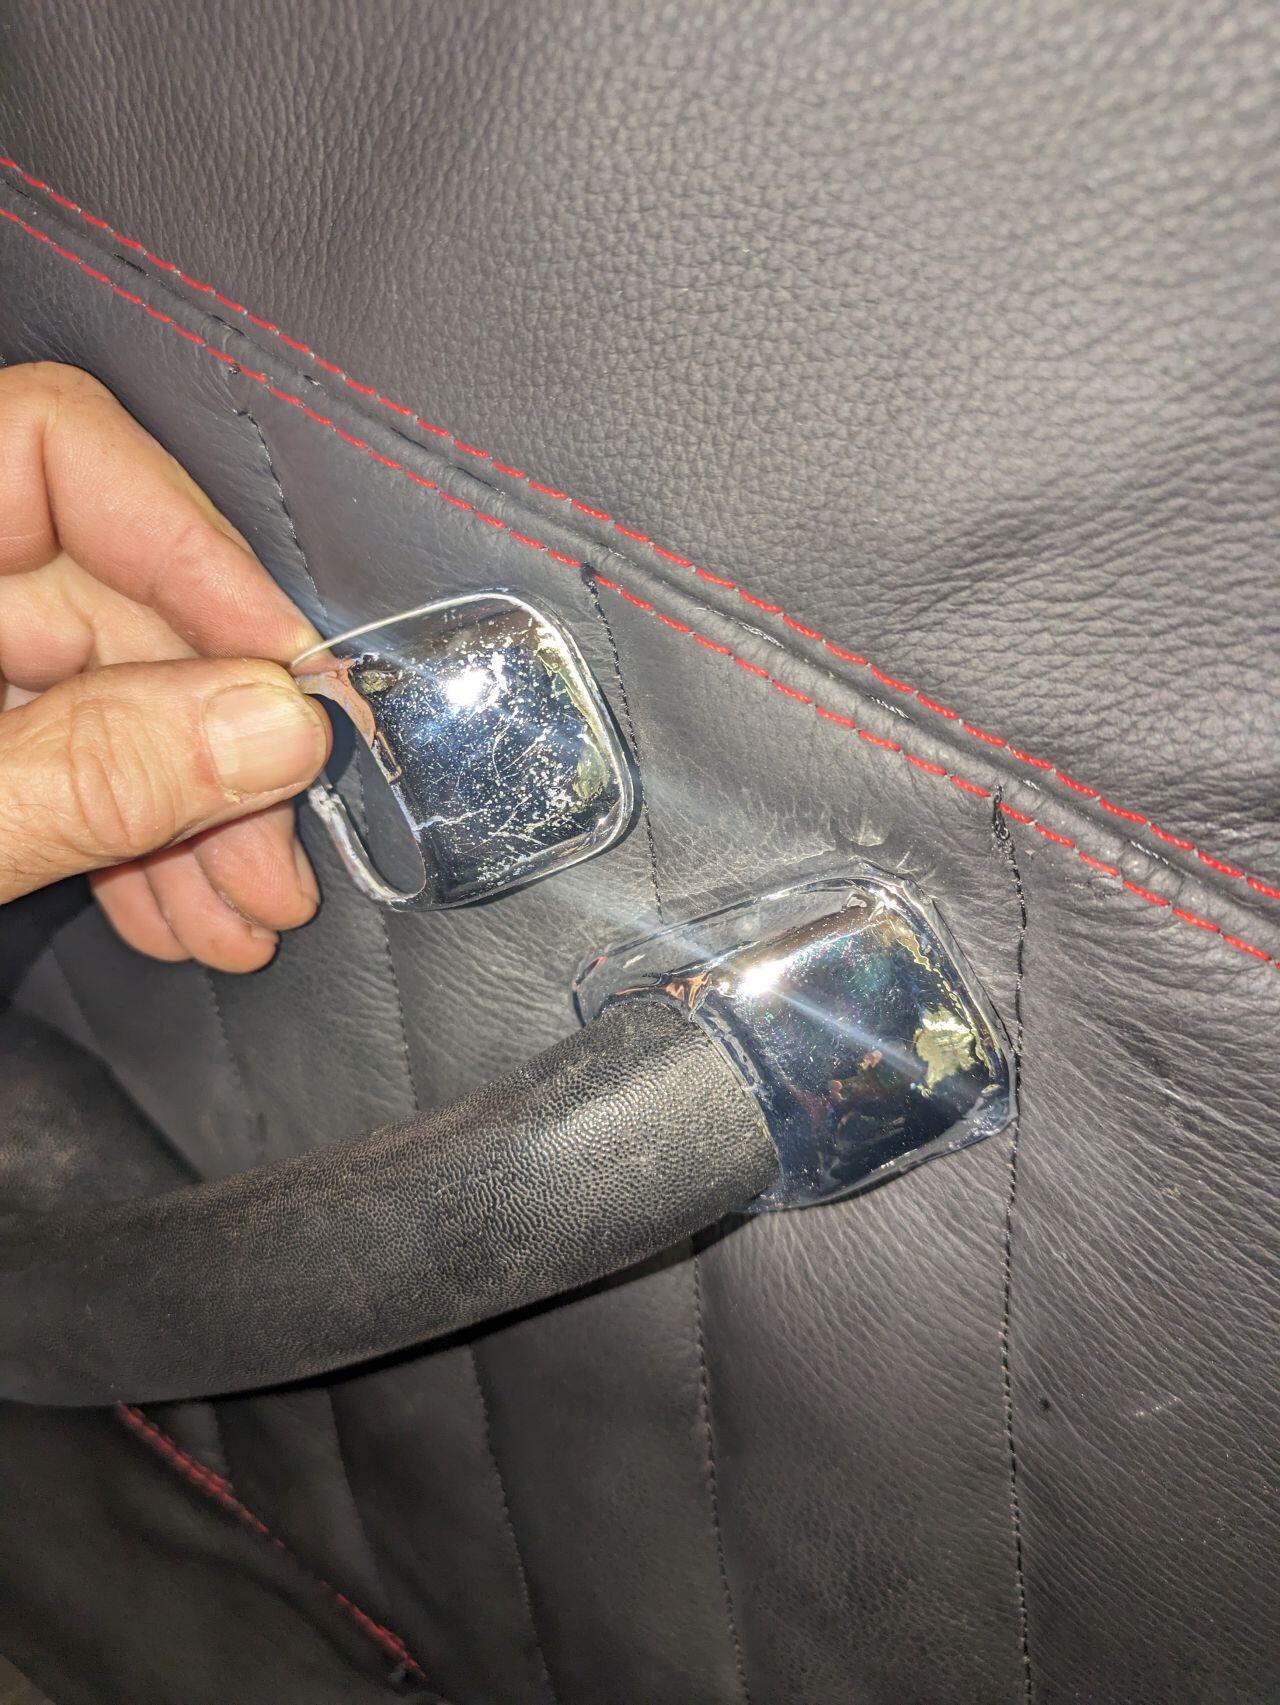
OK, not prefect but close. I'll post the obj file tomorrow if anyone wants to make one or two. I printed it in PLA, sanded it, sprayed it with a few layers of gloss, then stretched chrome vinyl film over it. I will print the next one in ABS because this one warped a little when I heated up the vinyl wrap to stretch it. The photo shows the original one in my hand and the printed one installed. It looks like a chip is missing in the printed one but that's just some strange reflection.
 1 point
 -
1 point
-
1 pointThey got the wheels, pillar emblems, and single side mirror right but missed the hatch vents. If this was Bring a Trailer that crowd would be trashing them LOL.1 point