Leaderboard
-
Namerow
Free Member5Points1,551Posts -
dspillman
 Subscriber
 5Points445Posts
 -
conedodger
Free Member4Points12,513Posts -

siteunseen
Free Member4Points15,115Posts


Popular Content
Showing content with the highest reputation on 05/03/2024 in Posts
-
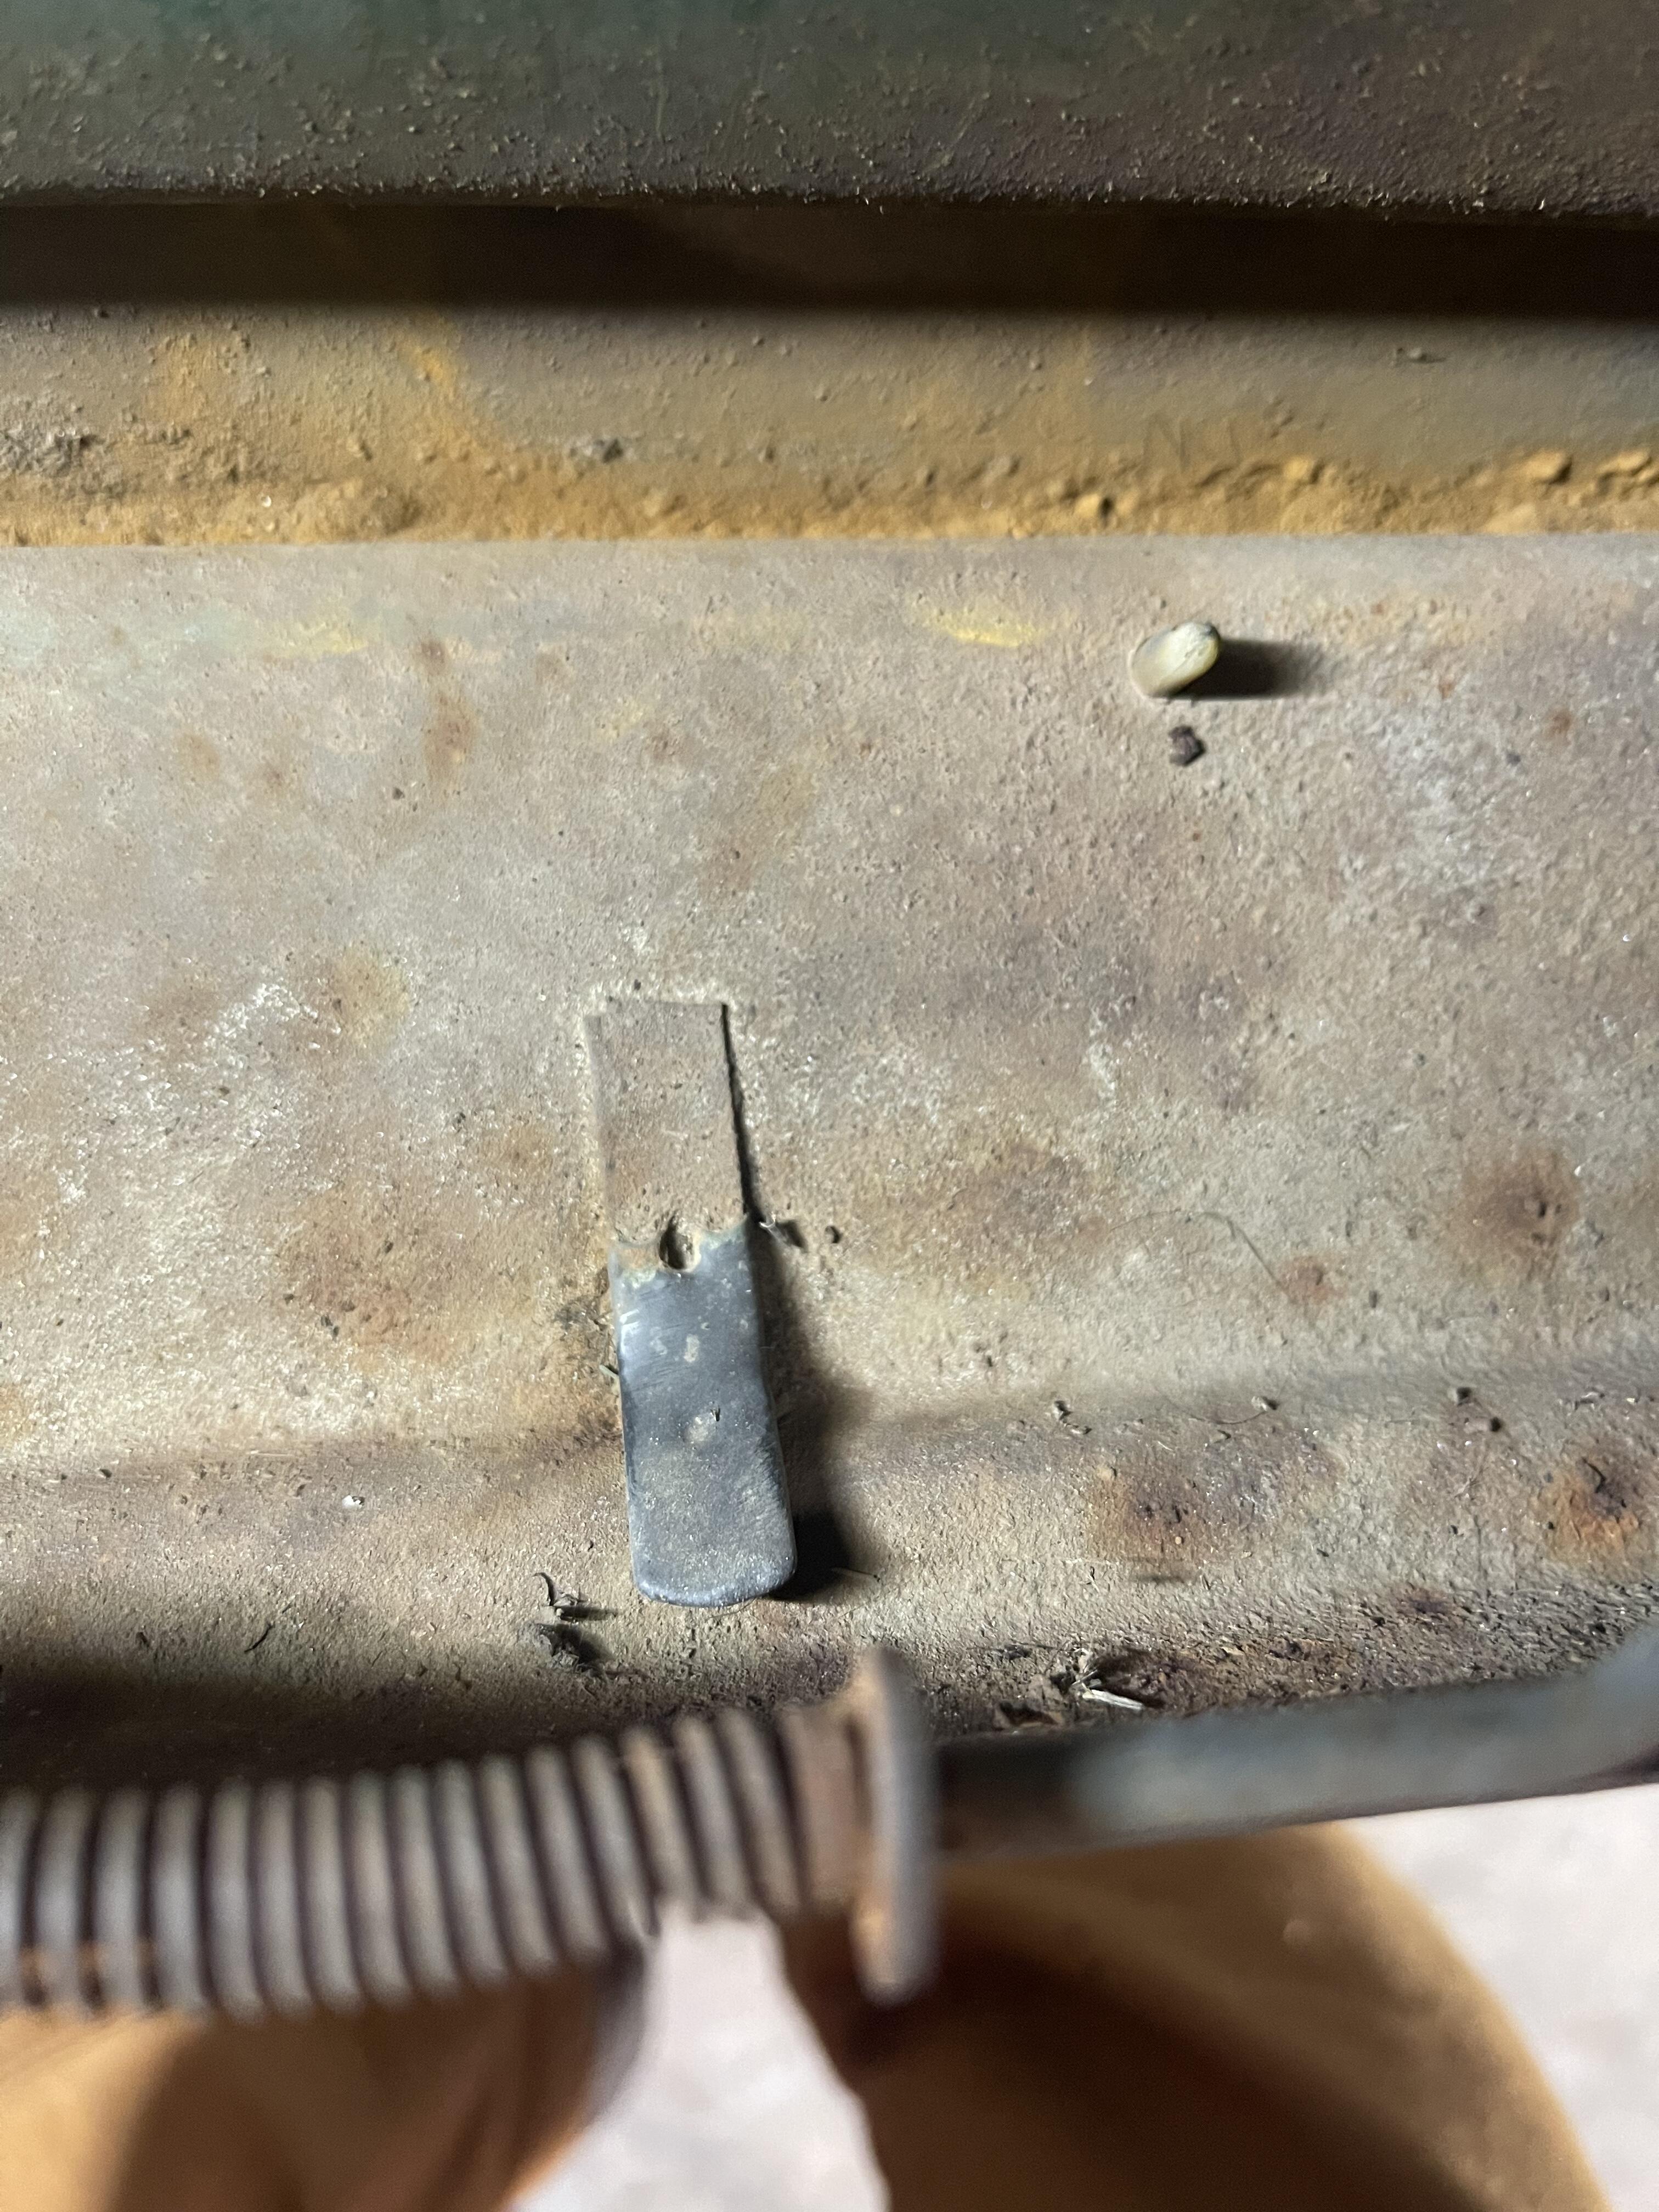
I'm going to speculate that these little 'dents' were used as master positioning markers. If so, were they created to guide the panel-stamping/forming process? Or, instead, were they used to guide and/or check the positioning of the stampings in their jig prior to welding? The latter seems more likely. One wonders, then, what prompted the change in orientation of the dent in the rear floor deck stamping after less than 100 units had been assembled. Perhaps the performance of the assembly jig in its original design iteration wasn't delivering adequate results, making this small-but-important change necessary before the production process ramped up to full speed.3 points
-
Hi, I didn’t know there is a tab! It is interesting. I want to check it if some proper early cars are in the middle of restoration in progress, but it is very hard to see those super early cars in person. So we get together here, I will wait someone shows up and posts pictures of the tab in question. Kats3 points
-
2 pointsSuccess...! (I hope) I was curious as to the wiring of the connectors associated with the wiper motor. I referenced the ABATE wiring diagram (excellent) and found a discrepancy in the configuration of the wires in the 6 wire connector that the wiper motor plugs into. Wish I had started there, but I could not be a happier guy right now...! Two wires were swapped...The Blue (L) wire and the Blue with Red Stripe (L/R). The intermittent relay still sounds like it is clicking on and off no matter which setting the switch is on, but I am elated that I can actually turn the wipers OFF...! I appreciate everyone's comments and suggestions. Persistance and beer work wonders...!2 points
-
26th has two of those dents on the passenger (right) side of the spare tire well. November car. I'll post a picture soon when I look at 27th.2 points
-
2 pointsDid you do that hotwire test yet? Once we know the results of the hotwire test and we are confident that everything from the ballast resistor, through the point, to the high tension coil wire is working correctly, we can focus our efforts upstream from there. Break the problem into small manageable pieces.2 points
-
2 pointsHey, pal! Yeah! Long time. No updates on the Z (thank Goodness) other than periodic maintenance, but no upgrades needed. I do enjoy it immensely. Drive it around on Sundays when it's not raining, of course! Also take it to some local meets on occasion. That Z is certainly one of my sources of pleasure. I do surf the forum now and then, and keep up with all you guys do. You never know when I'll be in need of all that unfathomable crowd source knowledge.2 points
-
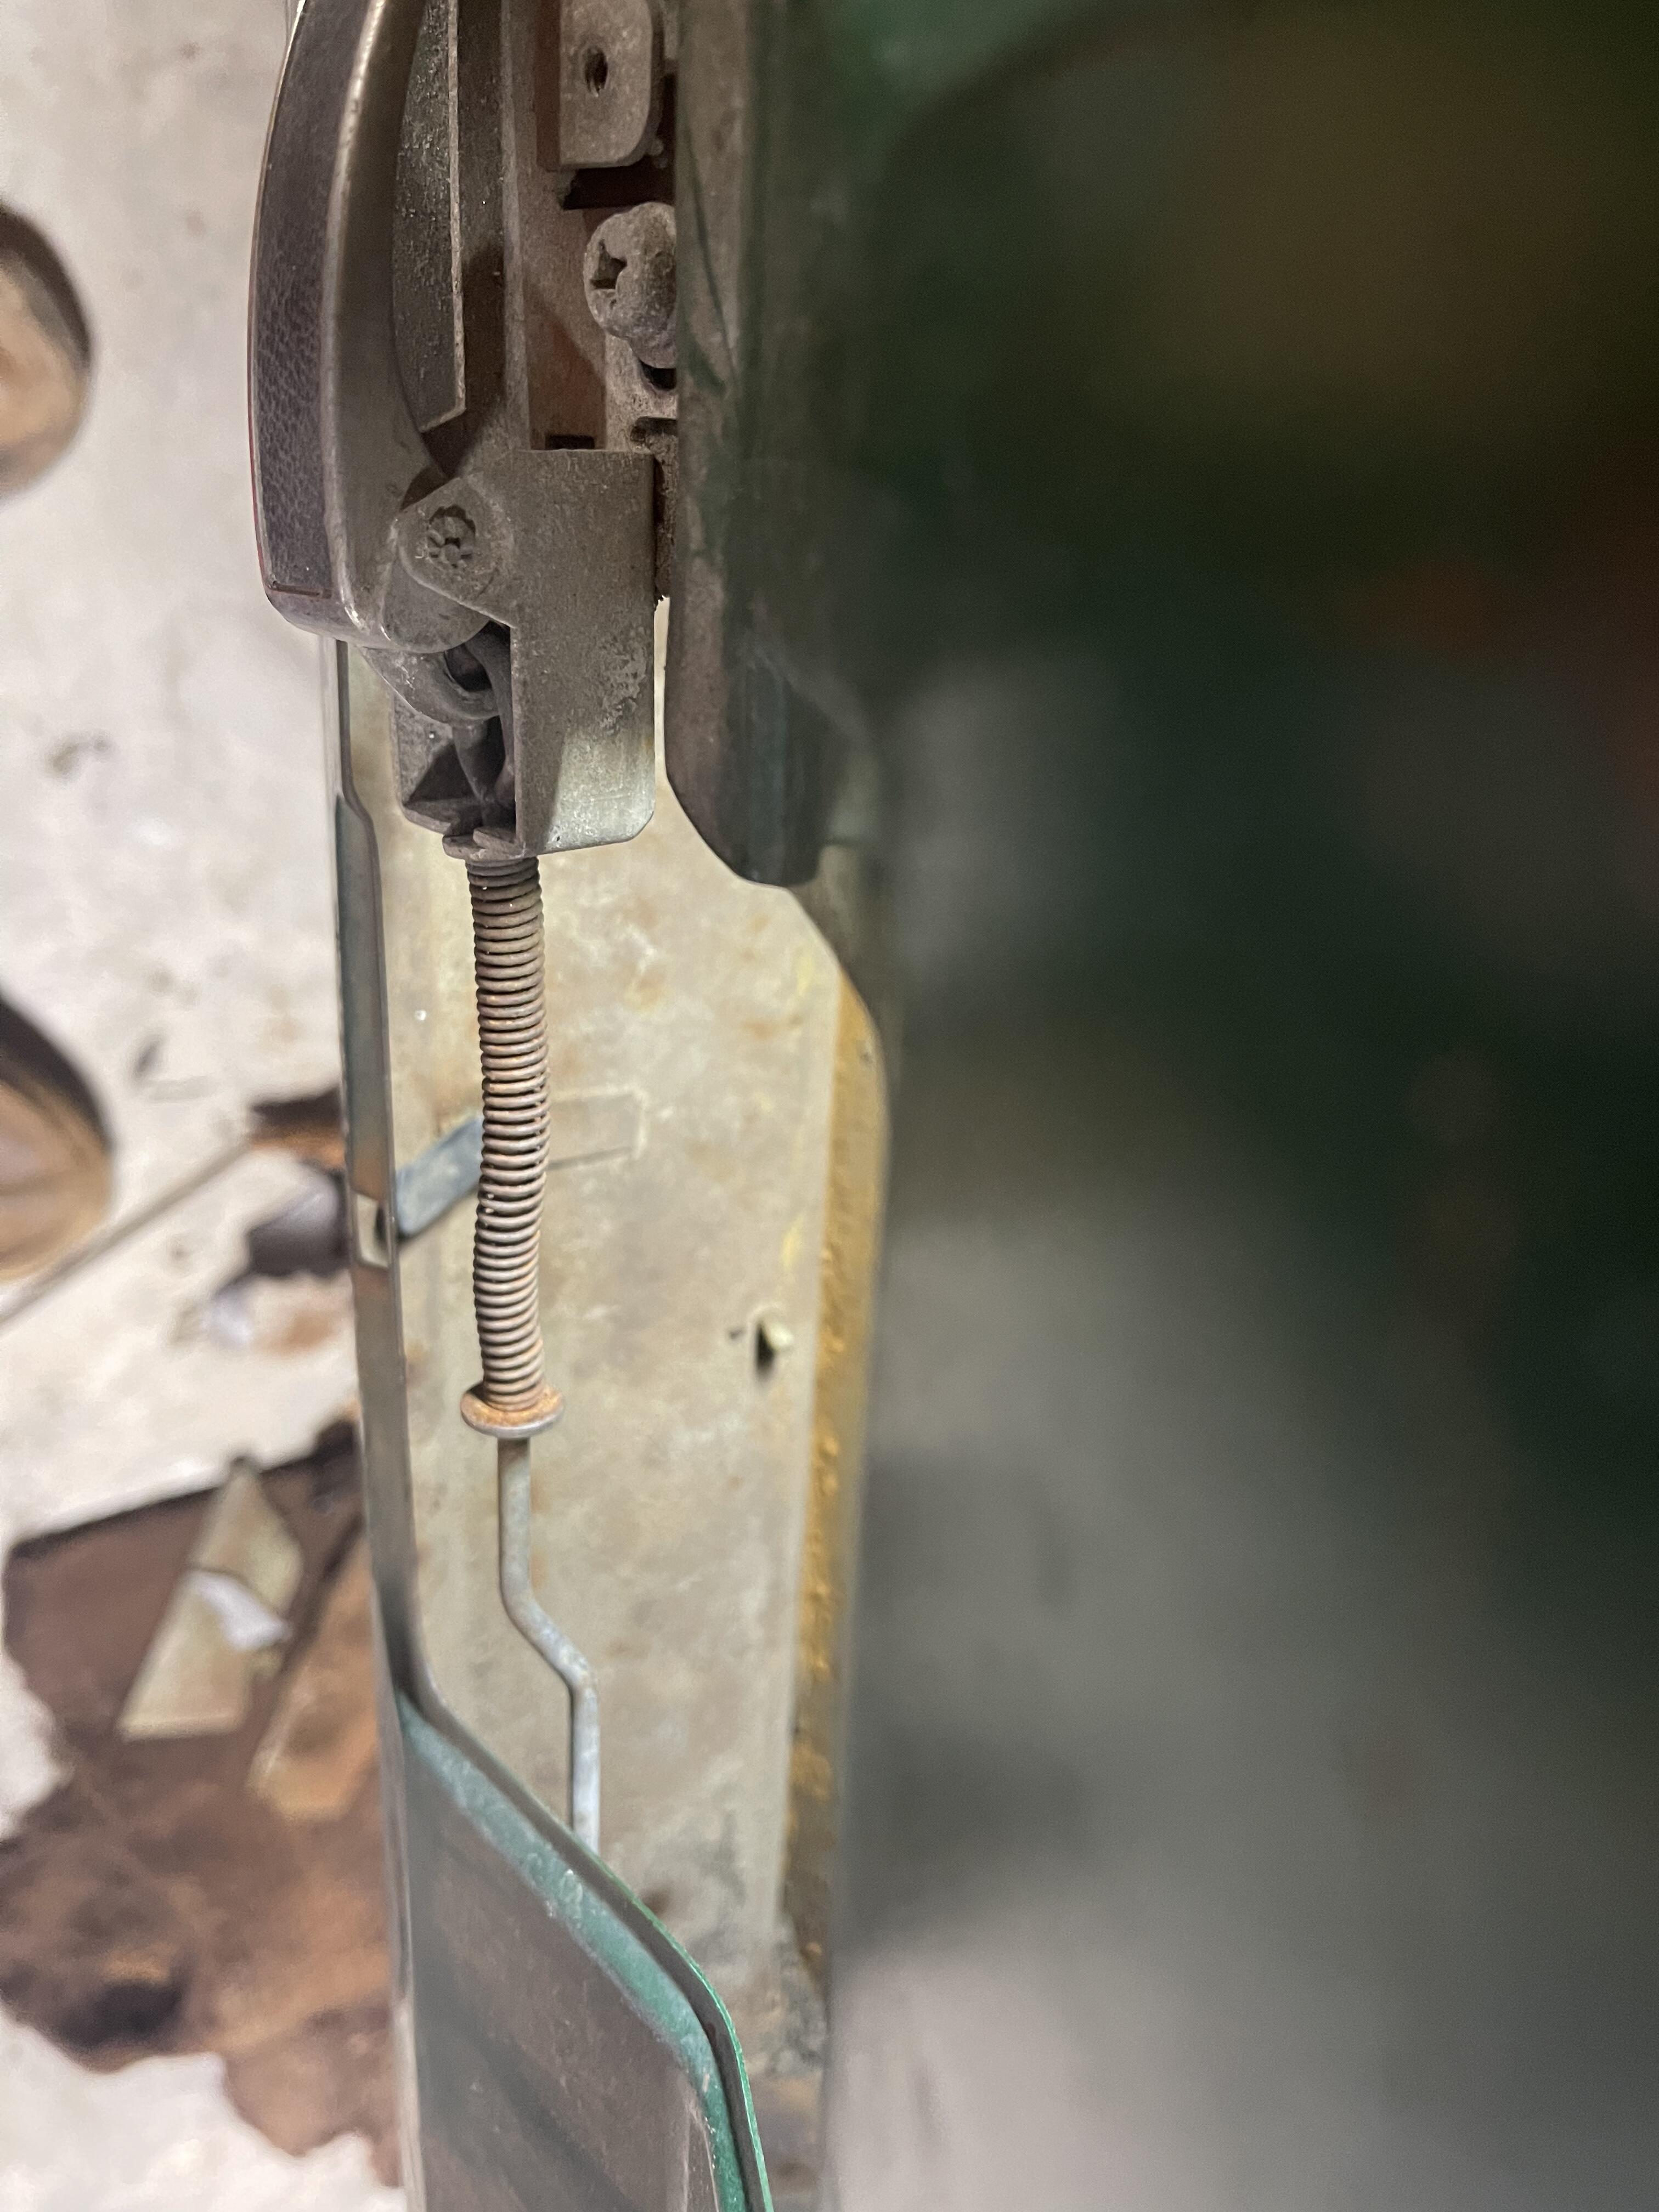
Recently, while disassembling a early 240z door, and noticed a tab welded on the bottom of the interior door, near the handle but inside the door, a Metal, plastic flexible tab that is used throughout our cars to maintain wiring. I”ve looked at vin 740, and 800 something, and tab is not present. Curious to those with one of the “first 550 cars in 69” who happen to have their door panel off to peak in and see if same tab is there…. Assuming it was for holding the aborted door light wiring? If this has previously been discussed in past 30 years please direct me to the conversation…. How far down the production line was this present? Picture attached

 1 point
 -
Ha! I stumbled right into that. Me and you, George and Lennie. See that^^^, I like bunnies.1 point
-
At least we have it sorted out. It was $2.05 for the bushing at the Nissan dealer I use.1 point
-
The wipers may lift at high speeds but at least they're slow too.1 point
-
There's a little difference on the sides up front. Look close when you put it on. I put one on upside down and the thermostat housing side was a little longer on the staight part before the cam sprocket hump.
 1 point
 -
I have that same spoiler and the same issue. The wipers start lifting off the windshield too.1 point
-
Years ago I had my bone stock 240 on a few race tracks. The rise and fall of the front end during acceleration and braking was annoying, but the rise at 120 mph + was frightening until I was confident the car wouldn't blow over backward. Part of that fright was PTSD from a previous experience in an Euclid dump truck that went down a collapsed bank in reverse and ended up on its top.1 point
-
1 point
-
I learn something everyday …thanks Kats!!!1 point
-
Wow!! I really like your green 1969 240Z. Thanks for sharing a lot of pictures. A tiny dent caught my eyes, which is on the rear deck floor, near the frame rib. The dent was pushed upward from underneath of the floor, that is a good sign of the super early cars. I don’t know why, the later dent was pushed down from above the floor. This is true for all the other dents in the rear deck floor and maybe for the firewall. I have been talking about this with an enthusiast Chris in Netherlands. He has been doing extensive work for his a lot of 1969 240Z. This leads me my curiosity about “which model is earlier than others in 1969.” I am not talking about the Nissan official report of the first 14 cars strats from S30-00001. I am talking about cars like made in October, November, December. HLS30-00051, HS30-00051, PS30-00051, S30-00051. I guess they would be like this (starting with the earliest) S30-00051, HLS30-00051, PS30-00051,HS30-00051. We don’t argue about HS30-00051 is a 1970 made. But other three are fun to discuss. (I know most of the people are not interested in talking about S30 and PS30) Anyway, PS30-00051 was not made in October like S30-00051 and HLS30-00051. I don’t know why, looks like Z432 was taking a rest for a while in October then re- engaged in the assembly line in November or even December. We can tell it by the dents on the floor. Even PS30-00028 is not made so early. I would say not in October. According to the data from NIPPON JIDOUSYA KOGYO KAI, 72cars were made as Z432(including Z432-R) in 1969. Most of them would have been made in November or December. Do you remember Nissan Shatai reduced production of export models (DATSUN 240Z) in December? I would guess it could be because of the test reports from the team ‘test ride in US & CANADA’. They reported steering kick back and rear axle vibrations. Nissan Shatai would have decided to make more PS30 cars in December instead of export models. Kats
 1 point
 -
Are these 'door lights' the ones that appear in the Parts Manual (Electrical - Step Lamp and Map Lamp) as PN 26420-E4100 ?1 point
-
If I had a set of early door lights, I guarantee they would be on my car!! 🙂1 point
-
1 point
-
1 pointAs yours has the intermittent wipers, it has a circuitboard with electronics.. could be there is a defect transistor that makes/has a shortcut and due to that the elec. motor keeps spinning. That's what i would look for after the pinched wires.1 point
-
Im hoping to get a couple of early car owners to peak inside their doors and see, and try to determine when this tab disappeared…. It disappeared earlier then vin 740. Kats was nice enough to share a wiring diagram showing the door lights path of “power” I’m tempted to use my set of door lights on a car one day….1 point
-
1 pointFirst things first, my car is a 1973 240-Z...the first year of intermittent wipers. So I am back on the issue of my wipers being ON whenever the ignition is ON. I turn the key ON with the wiper switch OFF and the wiper motor runs and the buzzer buzzes some of the time off and on. When I switch the wipers to the first detent (intermittent), the wiper motor runs and I can hear a relay clicking intermittently. I then switch the wipers to the next detent (low) and the motor speed does not change but continues to run. I then switch to what should be "high" and the wiper motor speed slows, but continues to run. SteveJ and I are going to be tackling this issue within the next few weeks, but any comments are always welcomed.1 point
-
1 pointI installed one on my '78 280 during the pandemic lockdown and it helped me keep my sanity. It's a relatively long process if you've never done it before. Probably a good 6 to 8 hours of labor to pull out the original dash, instruments, label and organize all the harnesses, and reassemble it all. It turned out pretty close to perfect. The Vintage Dash unit is a superb reproduction of the original, with better, more durable materials. With good care it should last several decades. The final result is well worth the effort.1 point
-
1 pointYes, there are metal inserts in the foam with holes and most are accurately placed. Have installed a couple 260/280 and a few 240. Not saying that they are entirely plug and play but well worth the effort and an extremely nice end result.1 point
-
1 point@Zed Headwill you make my life easier when you get done here? I know how helpful you are with Zs. I needs some help with more ZZZ'S.1 point
-
1 pointMaybe it would help to back up and do more of the basics. 1. Use your meter and set it to resistance or continuity. Place one probe on the engine block and the other on battery negative. This will confirm a good circuit from the battery through the engine block (Patcon's point above). You've already confirmed positive (power) but have not confirmed the return path, the ground. 2. Place a probe on the distributor body by the points and the other on the engine block, or even back to the battery negative. Confirm that the path is low resistance/continuous. This will confirm a good path from the distributor body back to the battery. 3. Place a probe on the negative side of the points (the side with no wire connected to it) and the other on the distributor body, the engine block, and battery negative. This will confirm an unbroken path from the points back to the battery negative. 4. With the key off and the points open, place a probe on the coil negative terminal and the other probe on the engine block or battery negative. Confirm that the circuit is open, non-continuous, very very high resistance. You might have a short to ground from the coil primary circuit. With the key off and points open the coils two posts should not have a path to ground. There will be no spark created if the coil is never de-energized (short to ground). There will be no spark if there is no current flowing (open circuit to ground). The presence of voltage does not guarantee current flow. An open ground circuit or a short to ground, on the coil circuit, will cause a no spark situation.1 point
-
1 pointThe G/W does not need to be connected at all if you hotwire it as I described. And about your other question... Some of the connections shown in the FSM diagram are made inside the harness. That diagram is a good functional description of how the system works, but it can be a little confusing if you are looking at the wires coming out of the harnesses. For example, the connection between the G/W and the tach is made in the harness and you don't have to tie that together manually. It's already done. When I get a chance, I'll try to whip up a sketch showing the connections in a different form. Still the same electrically, but drawn differently. In the meantime, just simplify stuff! Take all the wires off everything and hotwire the durn thing. Let's try to figure out if your distributor works!!!1 point
-
Hihi.. yeah that's a L.E.D. (Light emiting diode) as it probably chinese junk, they die.. I got a bulb in my car and after 53 years it still works.. put the standard bulb inthere it will work for many many years.. I;m not against led's but just against cheap junk led's.. 😉1 point
-
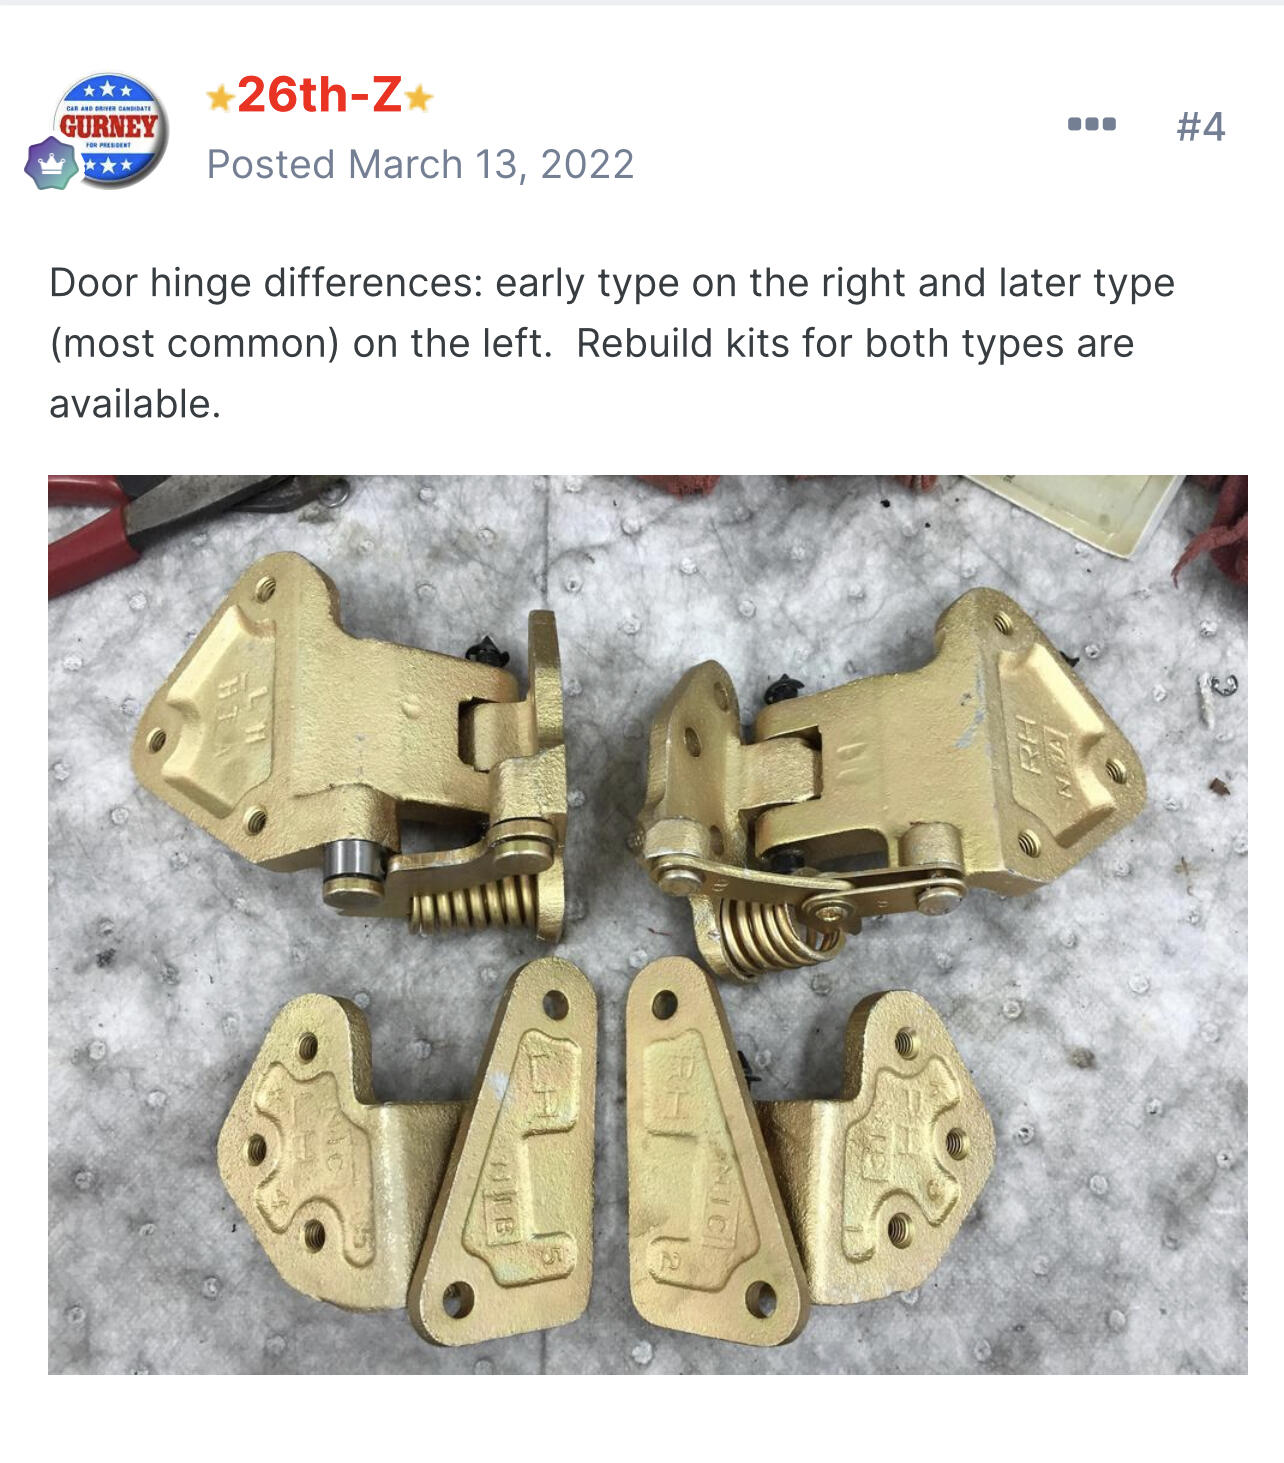
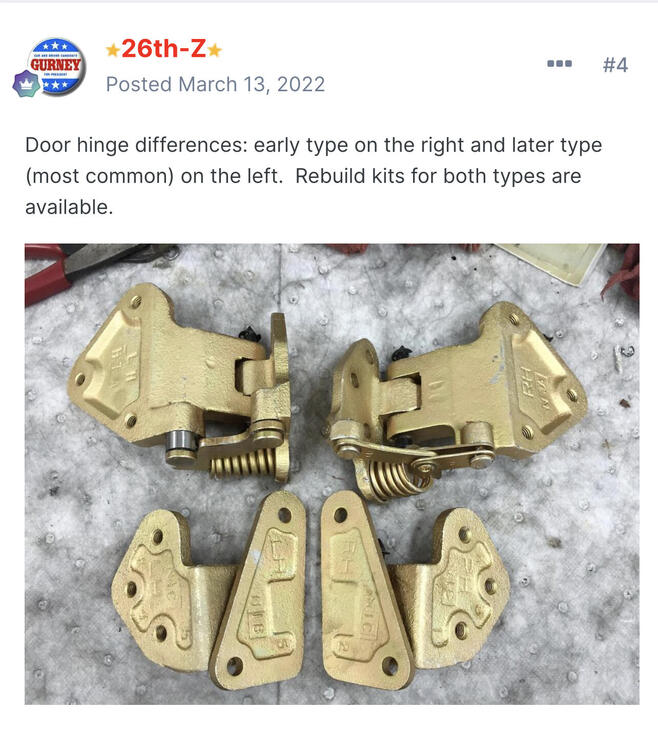
Yes, you found a good thread for that. I also have seen that if the early hinges get seized at all those little blades just fold up when you try to close the door.1 point
-
There's lots of discussion and photos available on this site concerning the Z's early and late hinge designs. The early design was a little crude (articulating 'leaves' or 'blades', with a spring that supplied a bit of resistance when closing the door) and lacked any type of provision for stabilizing the door in a partly-open position. More critically, the leaves could go over-centre if the door was forcefully thrown open by a gust of wind (I believe that the spring would pop out in the process, too). Once this happens, there's no convenient way to get the leaves to reverse back over centre. Any attempts at strong-arming the door to get it closed again would bend the leaves. The later hinge design works pretty well, although lack of maintenance (lubrication) will cause the roller pin to wear out prematurely. There's a thread here on the site that details the rebuilding process for the later-style hinges.1 point
-
I hope it’s alright to slide this here….
 1 point
 -
Many thanks to KATS for sharing years ago….1 point
-
1 pointI got the starter installed, 20 min job, and yes Zed I needed a longer bolt. Had them in my stash (45mm M10x1.50). What a night and day difference between this starter and that garbage AC Delco reman. Sounds totally different and I can tell is spinning faster also. Sounds like a modern starter. The AC Delco had a annoying whine and everyone always asked me if that was normal.1 point
-
You've hit upon the two options. The neatest way to carefully remove the contacts from the plug and pass the wires thru the grommet, then reassemble the plug. Each contact has a small barb holding it in place that must be pushed down to back the contact out of the plug. A very small jewelry screwdriver or knife point is a good tool. Be sure to write down what color wire goes to each position in the plug before you start. Be sure each barb is raised before you reinsert the contacts so they lock back in place.1 point