Leaderboard


 Subscriber


Popular Content
Showing content with the highest reputation on 11/09/2023 in all areas
-
5 pointsJust a follow up to let you guys know I took your advice and bought the belts from Wesco. I did not buy the hardware kit but did buy the angle bracket, which was available separately. Not sure about other models but since my 73 interior belts mounted to the trans tunnel, the angle bracket was necessary for attaching the inside portion of the new belts. They worked out well and were easy to install. I had a few pieces of carpet left over from another job so used it to cover over the cavity where the old retractors resided. Held it in place with carpet tape. You can't even tell the cavity is there. Thanks again for the advice. Paul5 points
-
2 points
-
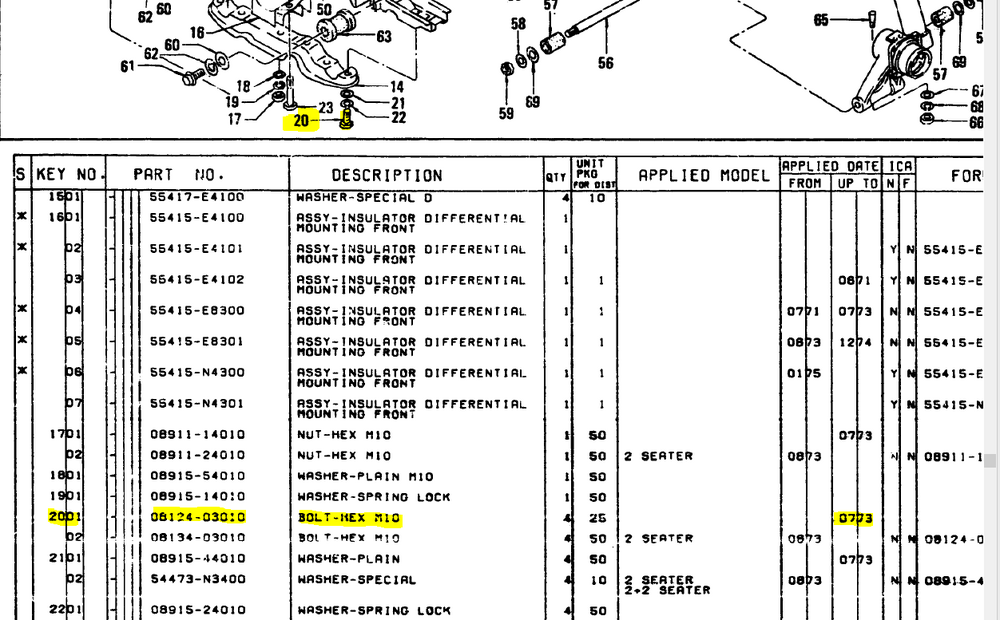
I will take that on in my spare time. To do it right, I will need to gather some more references and information first. I will include a tips and tricks section with things like using this decode method to help identify those "extra" fasteners that we seem to have leftover after assembly. When you have the 10 digit part number you can then use the parts book to see where a part is used. Here's an example with the bolt we've been discussing. This chart directs you to the correct micro-fiche and section showing places the part is used. 08124-03010 is also used on the rear engine/tranny mount as well, on micro-fiche 2

 2 points
 -
I think that info should be posted to the resource page! For me personally I will never remember what thread I saw that in when I want to find it later and I doubt I could craft a Google search to find it either2 points
-
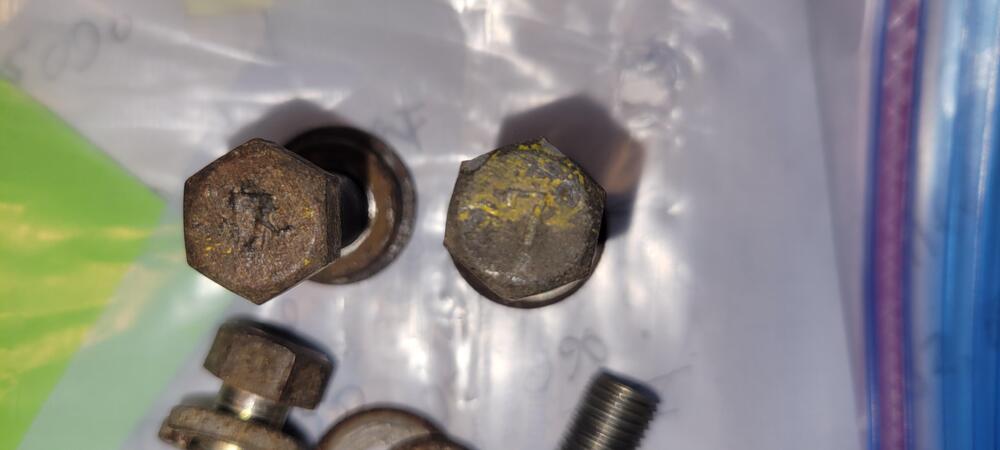
They are M10 x 1.25 x 30mm long with a 7 on the head. Thread length is 21mm. Here's a couple of pics. You can even see some yellow paint on them. 🙂
 2 points
 -
You are going to be limited on your front camber adjustment (more negative camber), unless: 1. You install lower control arm offset bushings (or use adjustable lower control arms) 2. You install some type of camber adjusting plate in your front upper control towers. I use Ground Control (along with their coilover kit) in my '73 autocross car, but there are many other options available since I did the conversion 10 or so years ago. Ground Control was the only player at the time. 3. Rear camber is not as important, but it helps.1 point
-
I've never touched the castor and camber, just the toe in using a tape measure and two aluminum plates. I'll need to read up on the other two adjustments.1 point
-
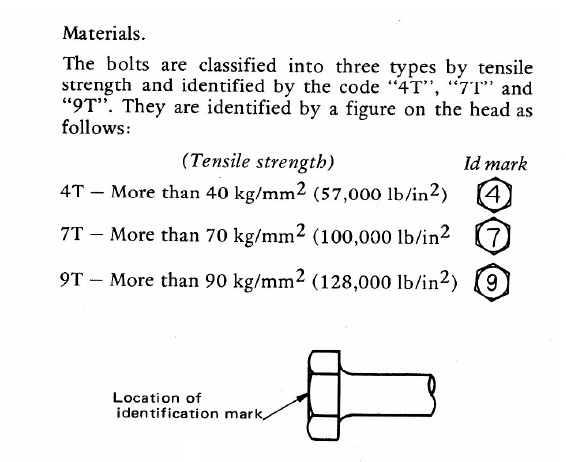
Here is my attempt at decoding the Nissan part number for this bolt, from the parts book the part number and description is: 08124-03010 BOLT - HEX M10 (UPTO 07/73) Here is the decode: 08124-03010 BOLT - HEX M10 08 = standardize hardware prefix 12 = Hexagon Bolt, Medium carbon steel 40 = 10mm diameter (M10) 30 = 30mm length 1 = Zinc cadmium coated 0 = Filler to complete ten digits Decode source: http://datsun1200.com/modules/mediawiki/index.php?title=NES_Part_Numbers Here is a snippet from an old Nissan technical publication about standard bolts, from this and info in the link above, my interpretation is that "Medium carbon steel" for this bolt would likely indicate a "7" marking on the head.
 1 point
 -
1 pointI suspect the internal specs are the same but the larger one is going to flow better and have more filter media1 point
-
Another thought is front castor and camber setups. This might be a challenge for a street driven car but I would expect alignment settings would help with the oversteer1 point
-
I think you have been running that thing way too rich. Lean that thing out more.1 point
-
Pretty sure the bolt does not have a number on it. If someone else doesnt post up, I will be working on my car Saturday and can pull that bolt and get you some measurements.
 1 point
 -
@jalexquijano Yes, carb cleaner and a brass brush will be fine. Don't change to new plugs of a different heat range yet. Let's concentrate on one change at a time. Raise both nozzles 1/4 turn, drive it for a few days, and report back with plug pics and a performance report. I'm still curious if you're using anti-seize on the plug threads and what color it is, silver or copper.1 point
-
Actually, I had considered that hole saw idea as a possibility since the metal around that hole is solid. Nice to get some confirmation of that approach. Why not give it a try?1 point
-
1 pointNo, it’s just a scratch. It’s shiny if you look at it from a different angle. There are a few of those. Thanks for looking out, though.1 point
-
1 point