Leaderboard
.JPG.cfcada9cf1c1b502df3f5f2f2ca3ff36.JPG)


 Subscriber


Popular Content
Showing content with the highest reputation on 08/14/2022 in Posts
-
3 points
-
I noticed that too. Plus they edited in footage from behind the car but didn't change the soundtrack. The guy said that he took four trips down the mountain to get the footage. Pretty sure I heard a gear grind in the video also. I think that they just over-produced on the video. It's in the "collector" zone, early car, very original, etc. Collectors don't want to see people beating on their dream car.2 points
-
No doubt that's what was involved in making it, but both Izumi and Nissan called them 'Wood Rim Steering Wheels' so I think it fair to follow suit. So, high-pressure moulded, heat-cured, oriented strand wood fibre (quite a mouthful), but certainly 'wood'.2 points
-
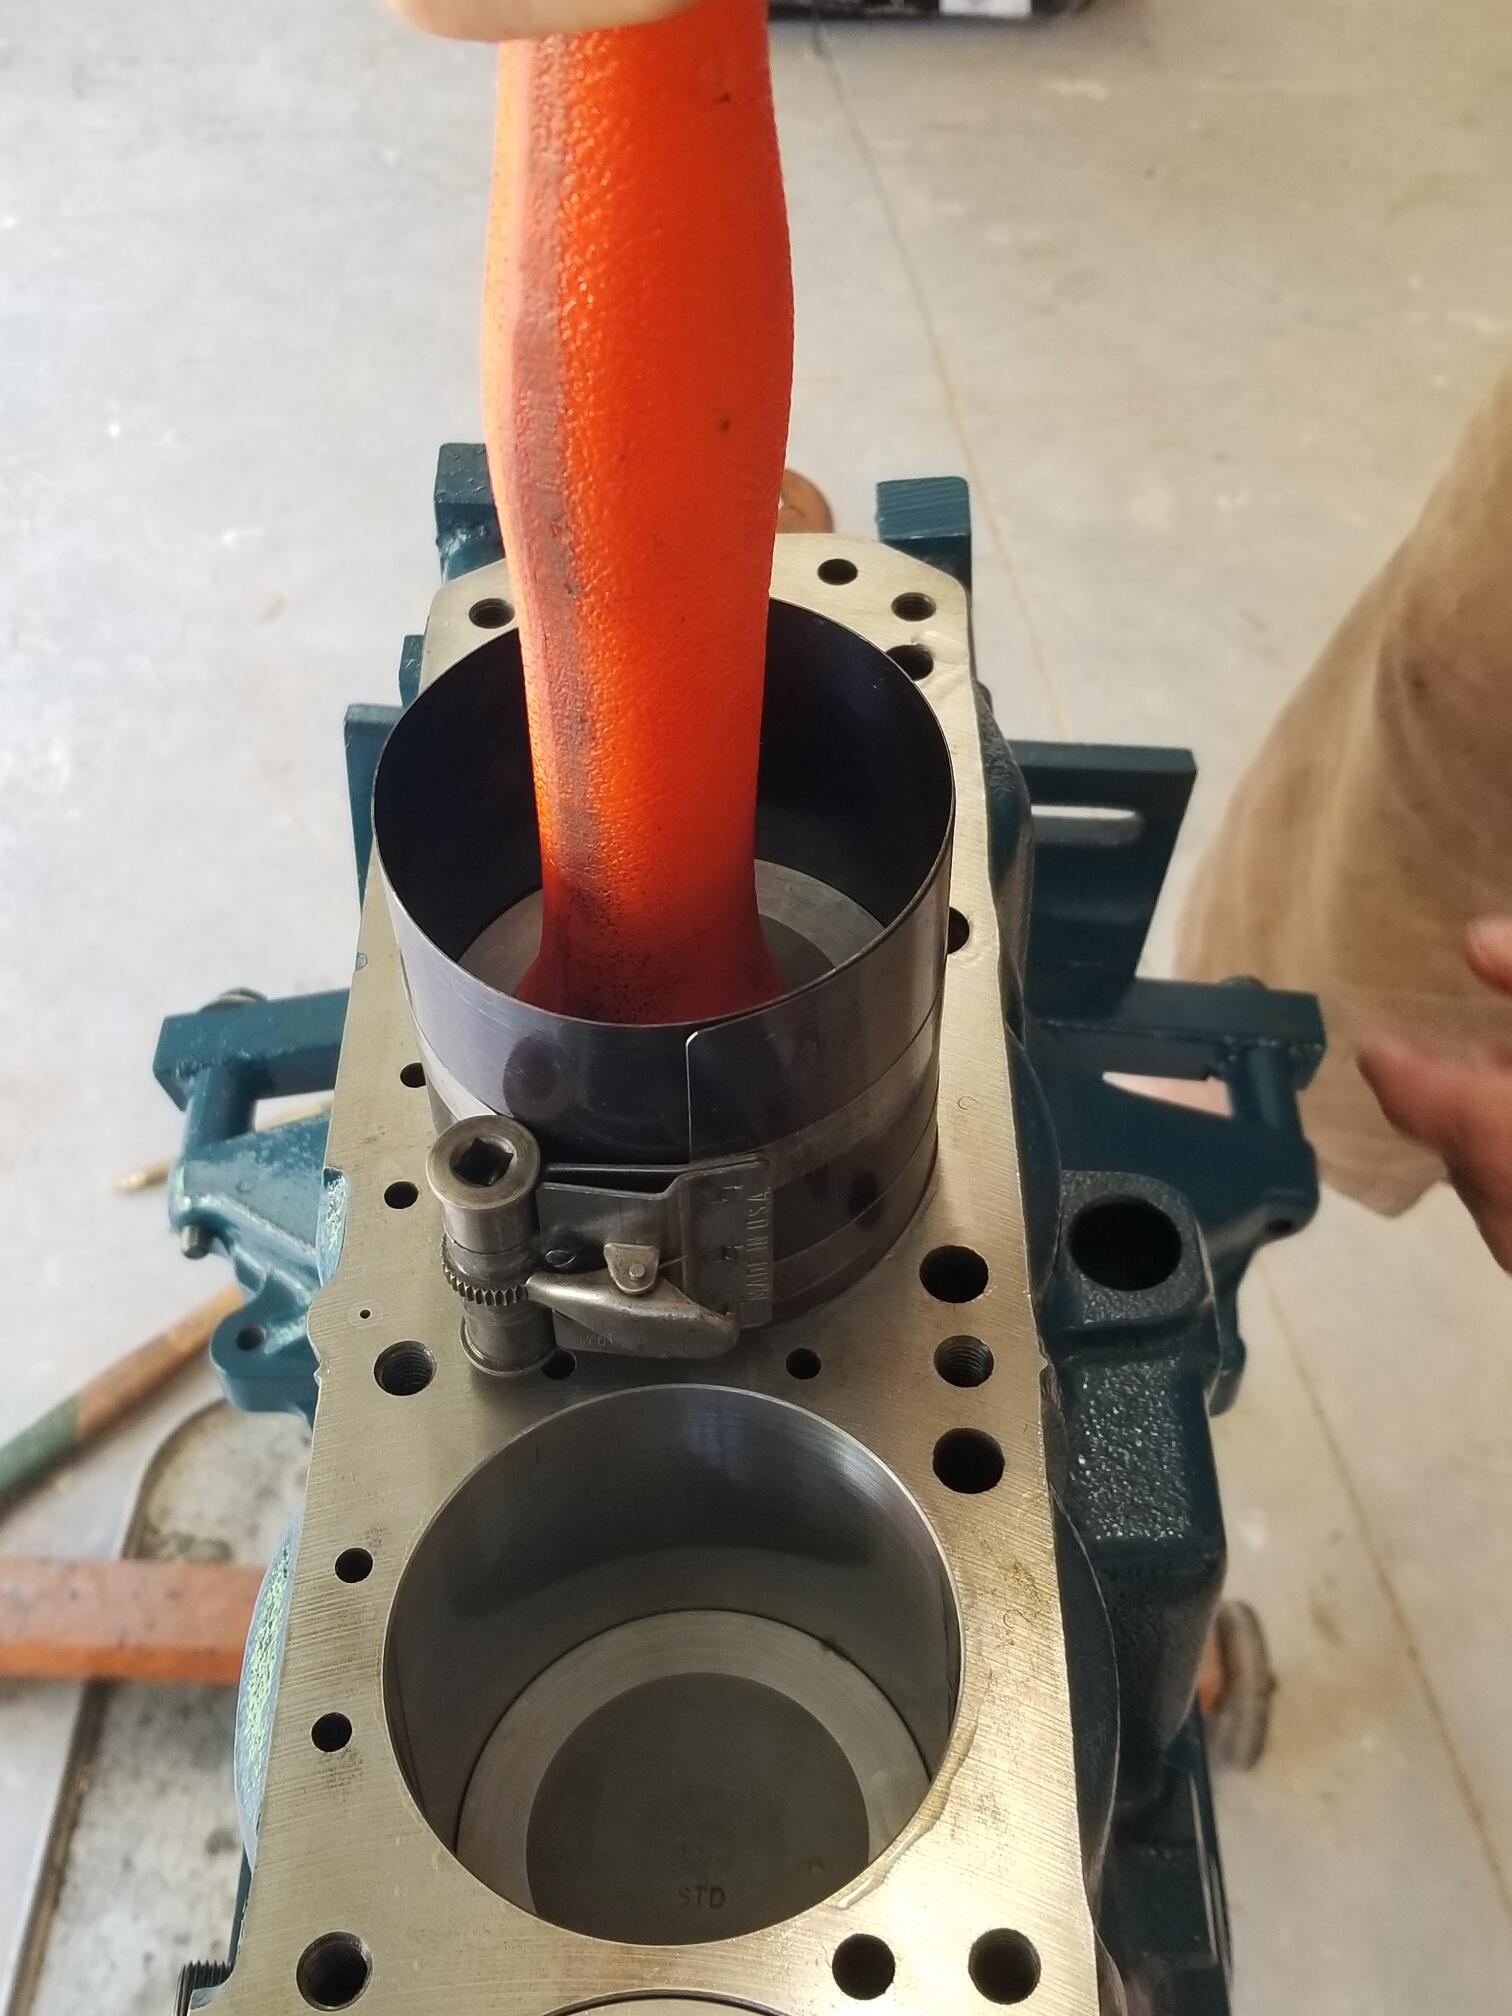
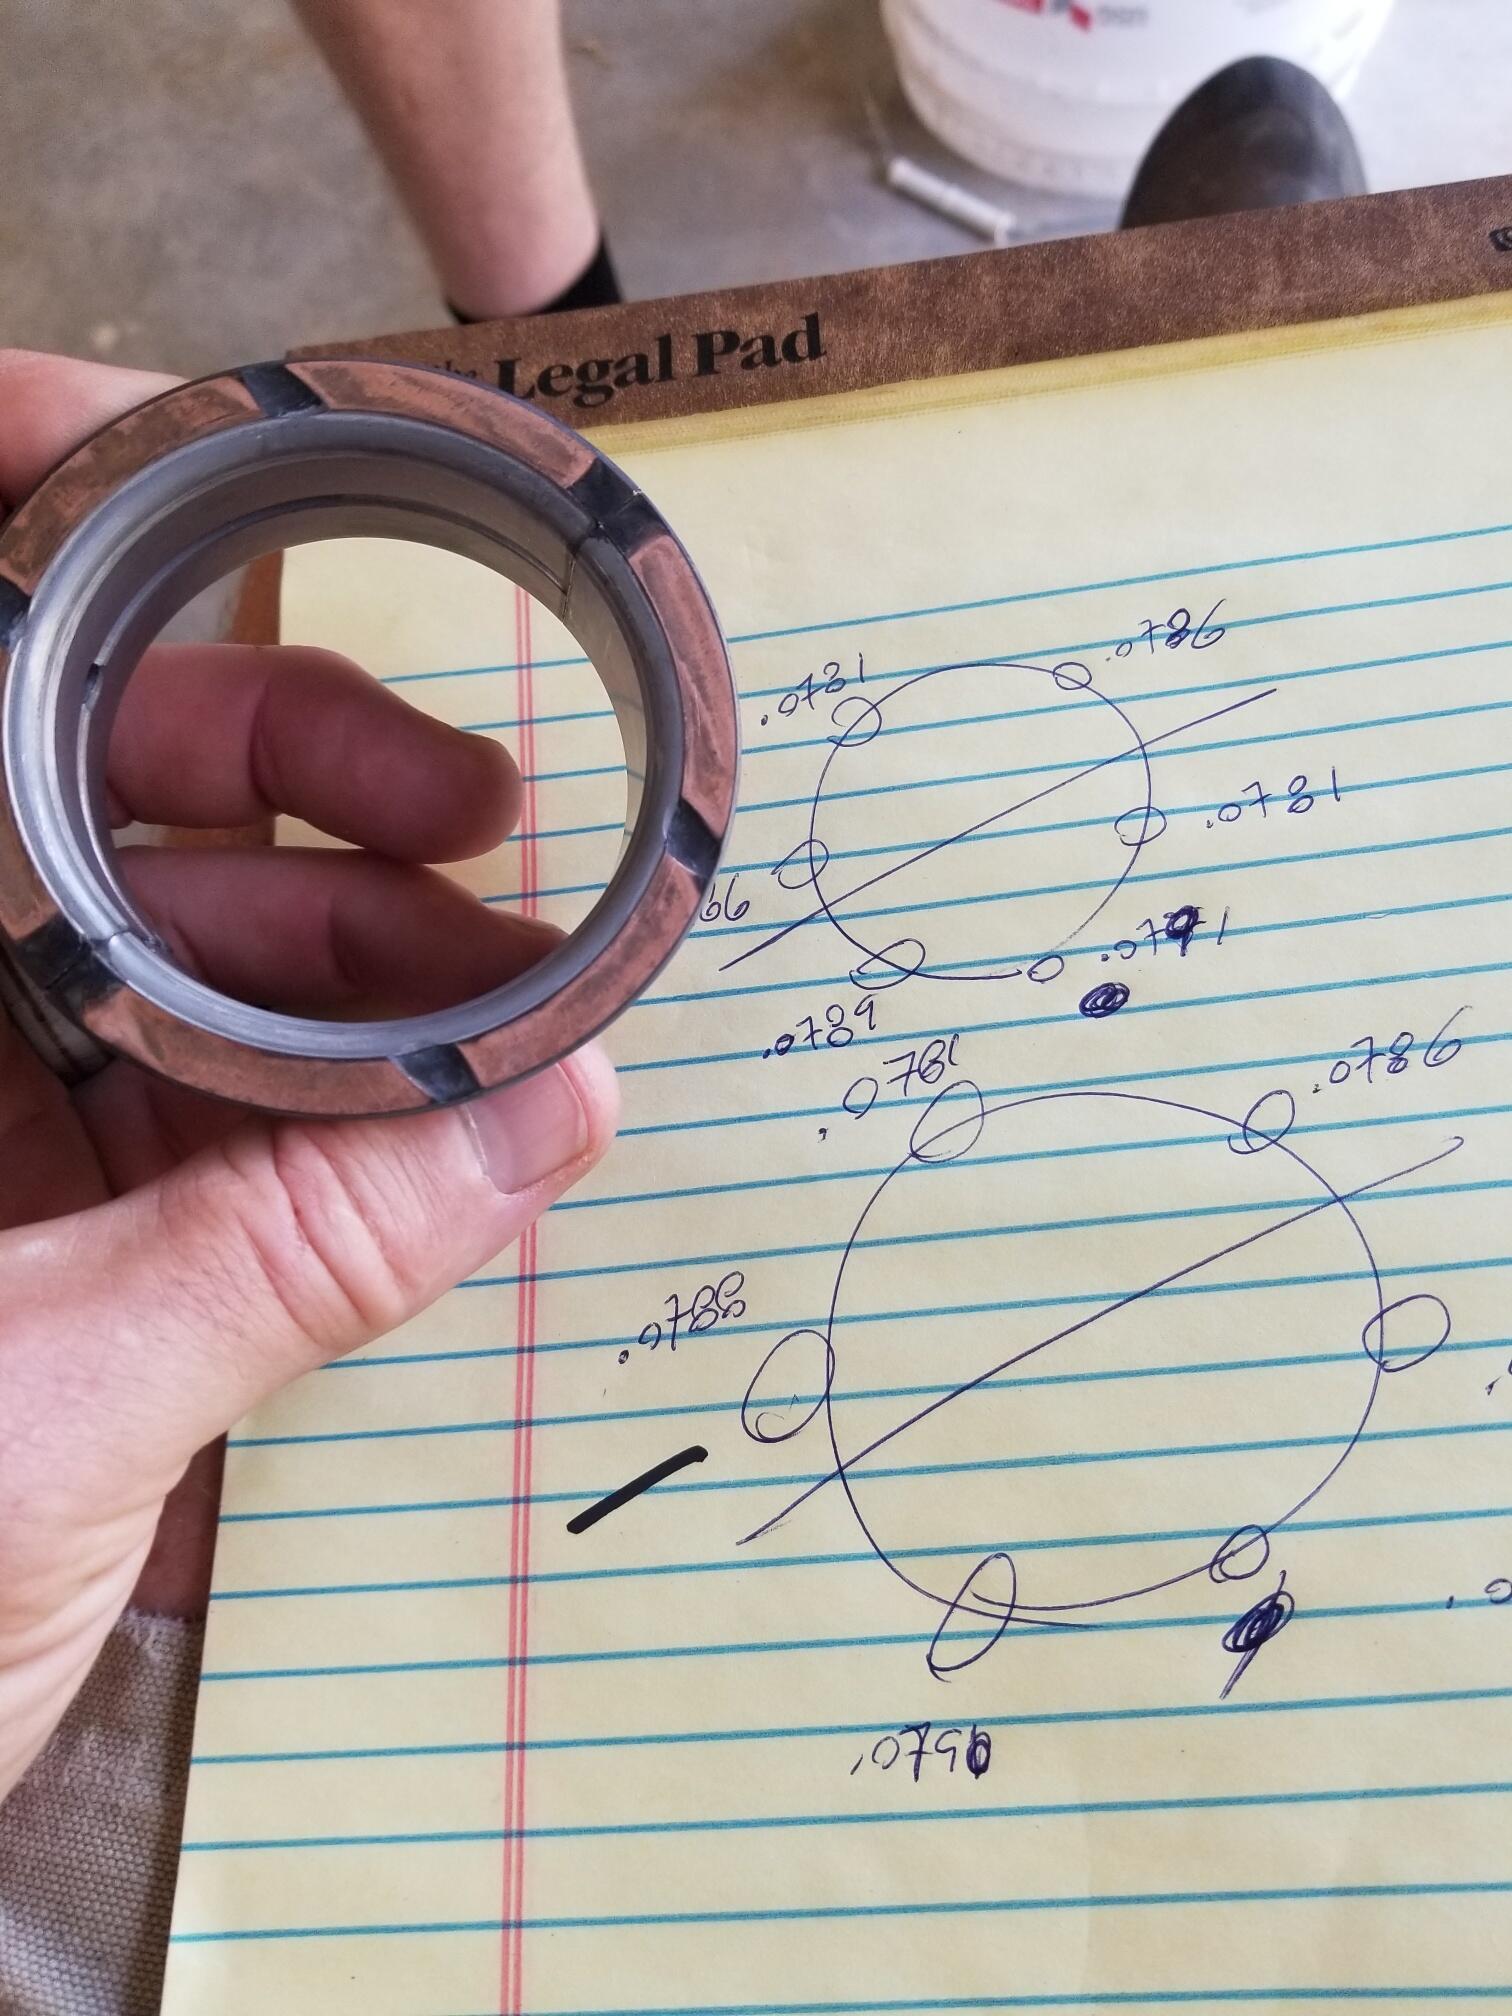
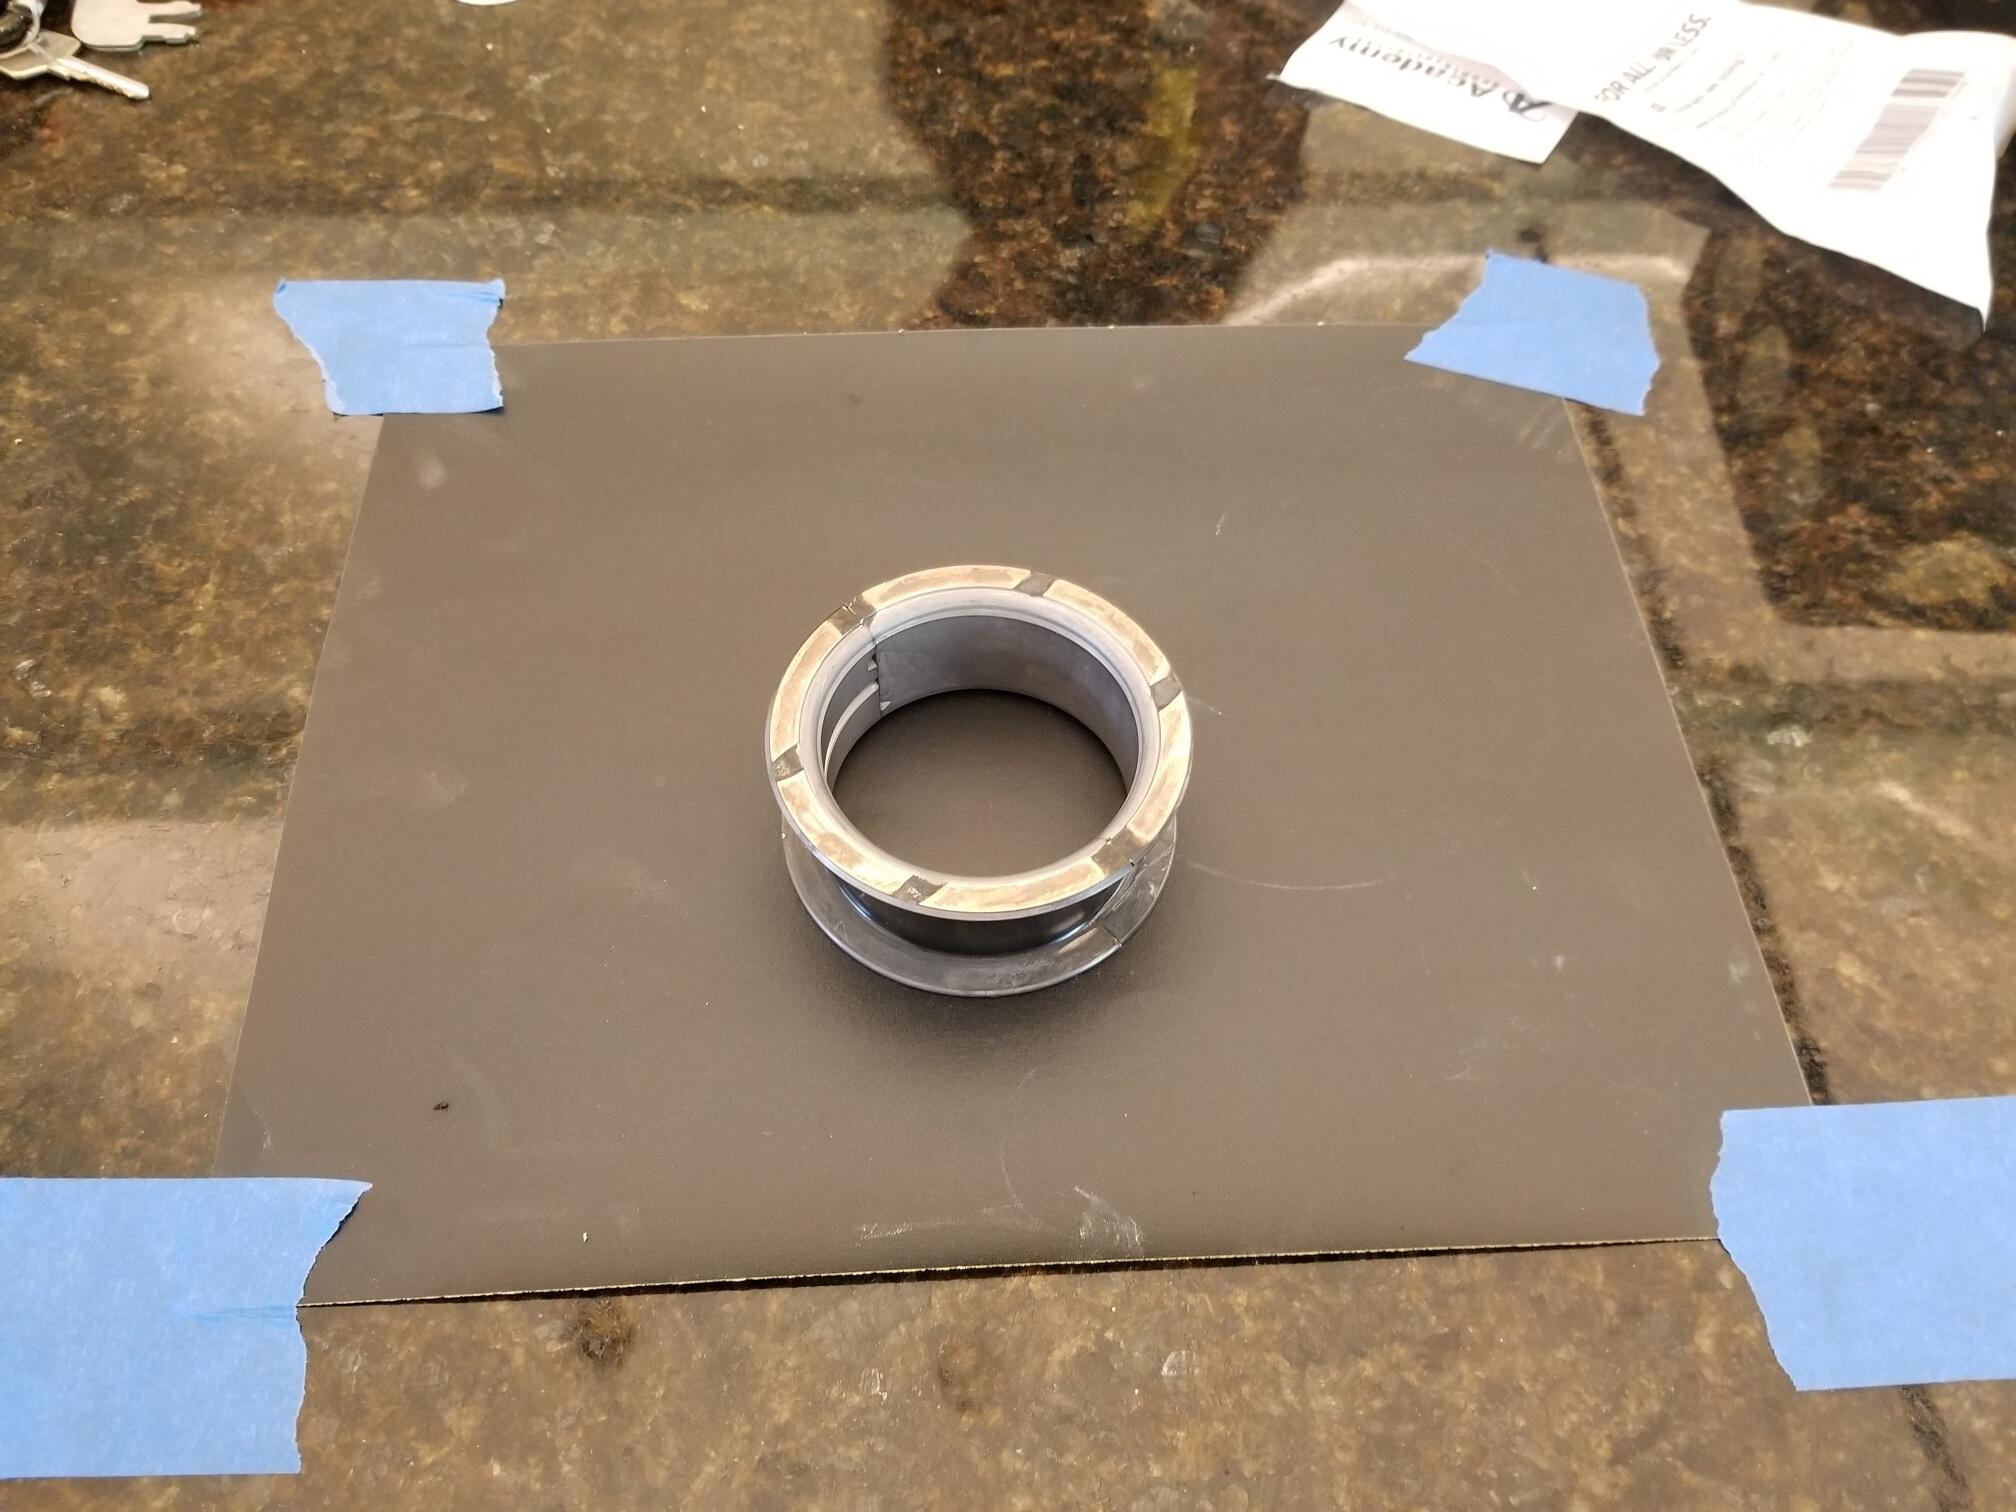
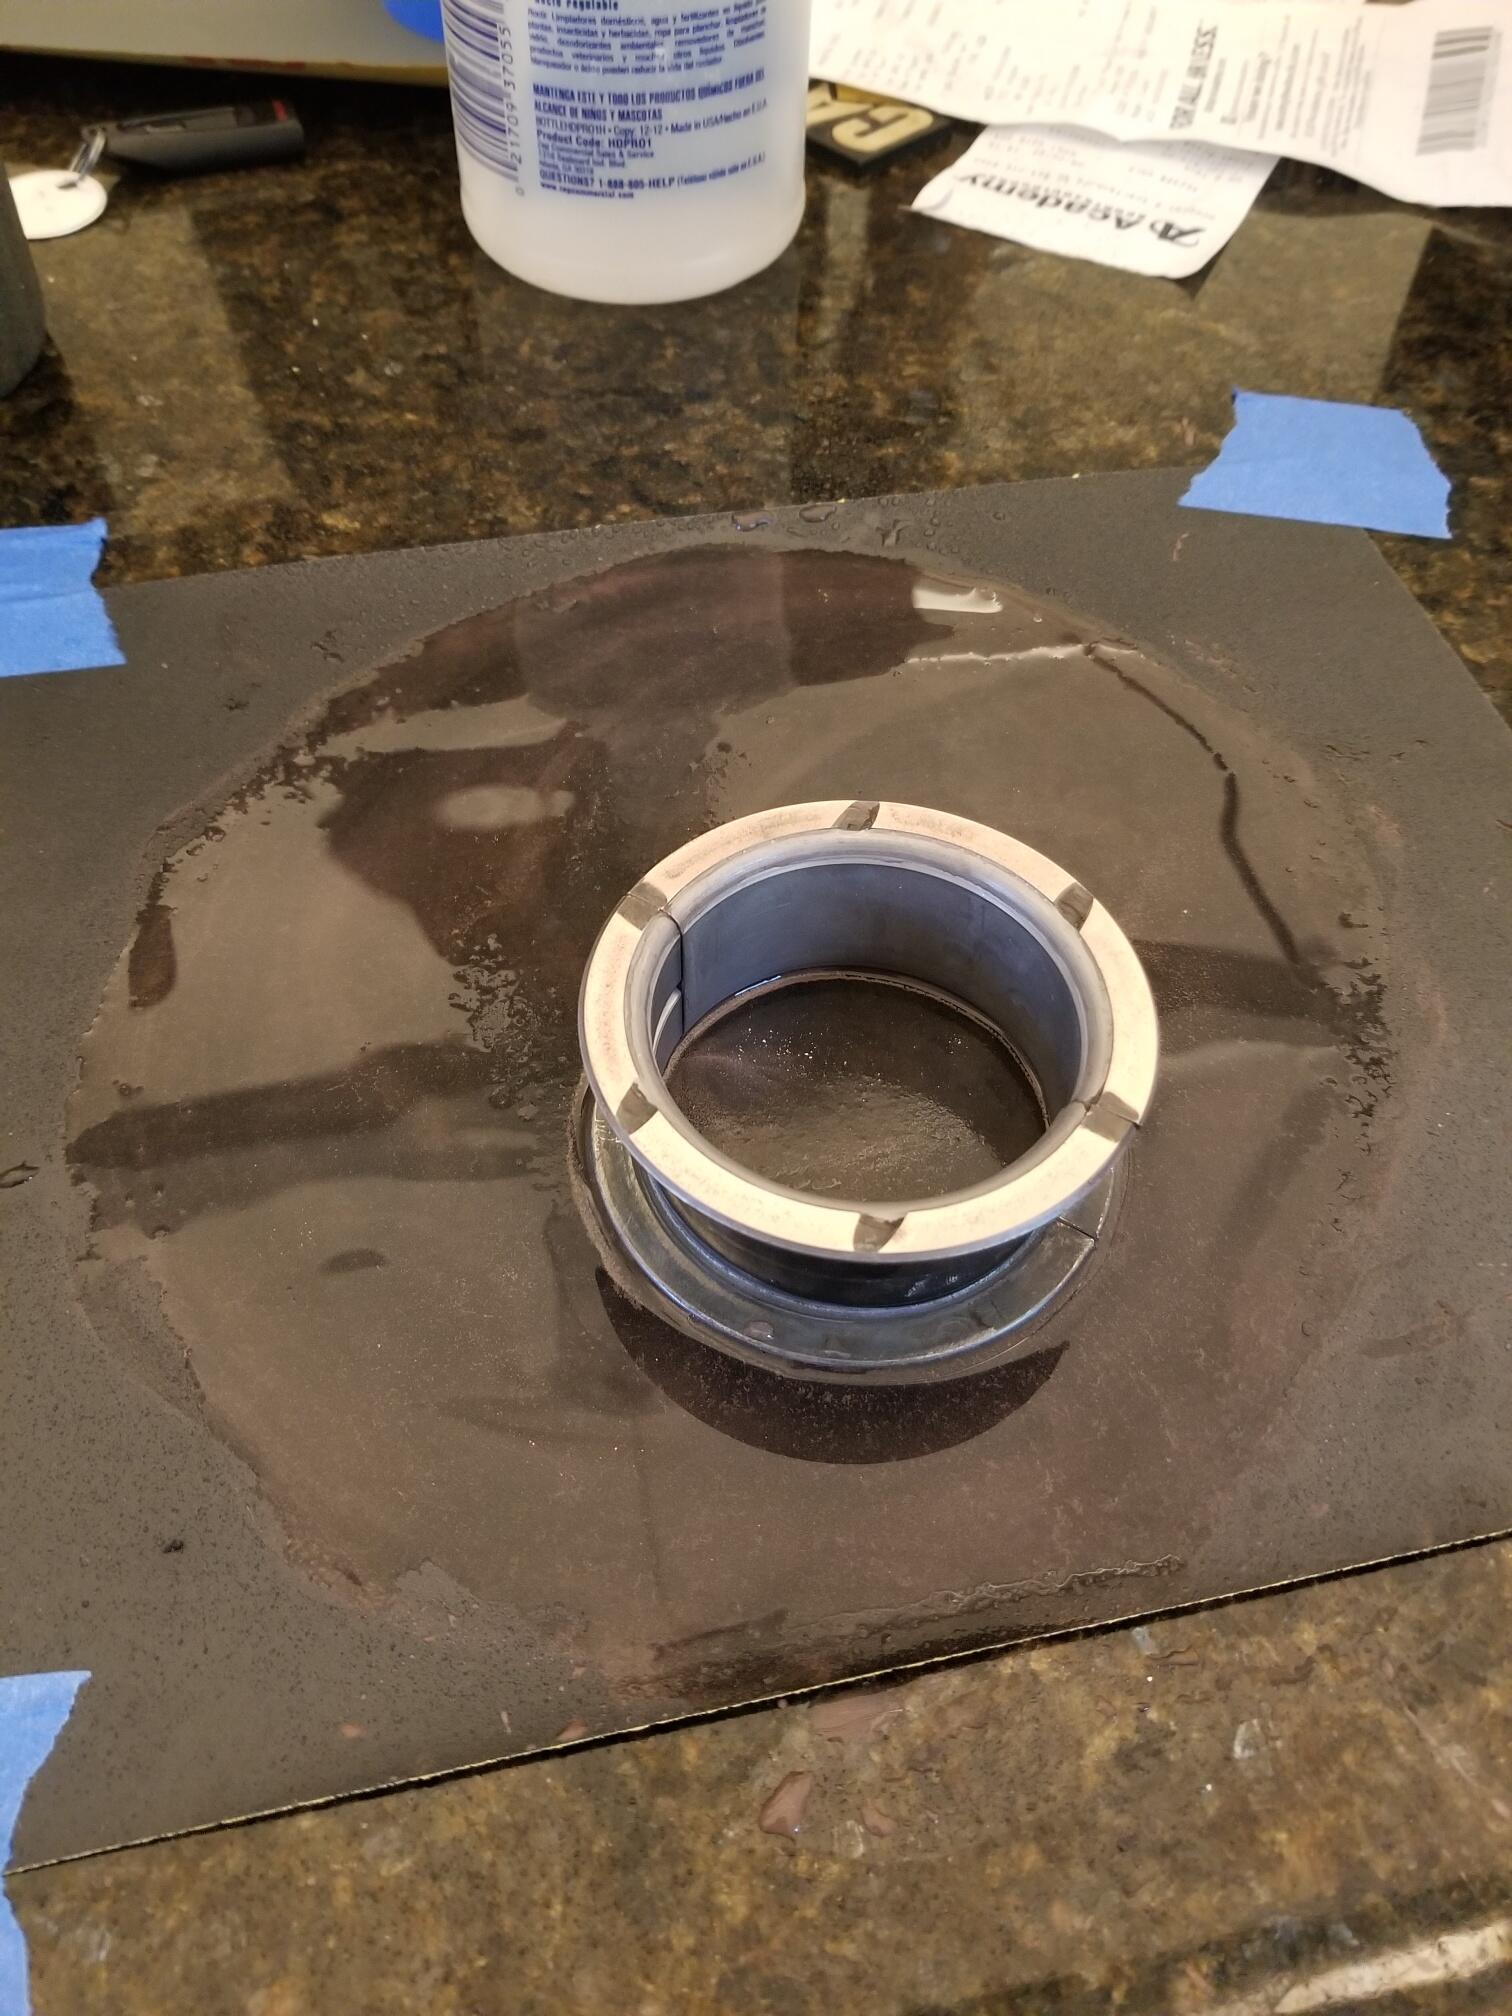
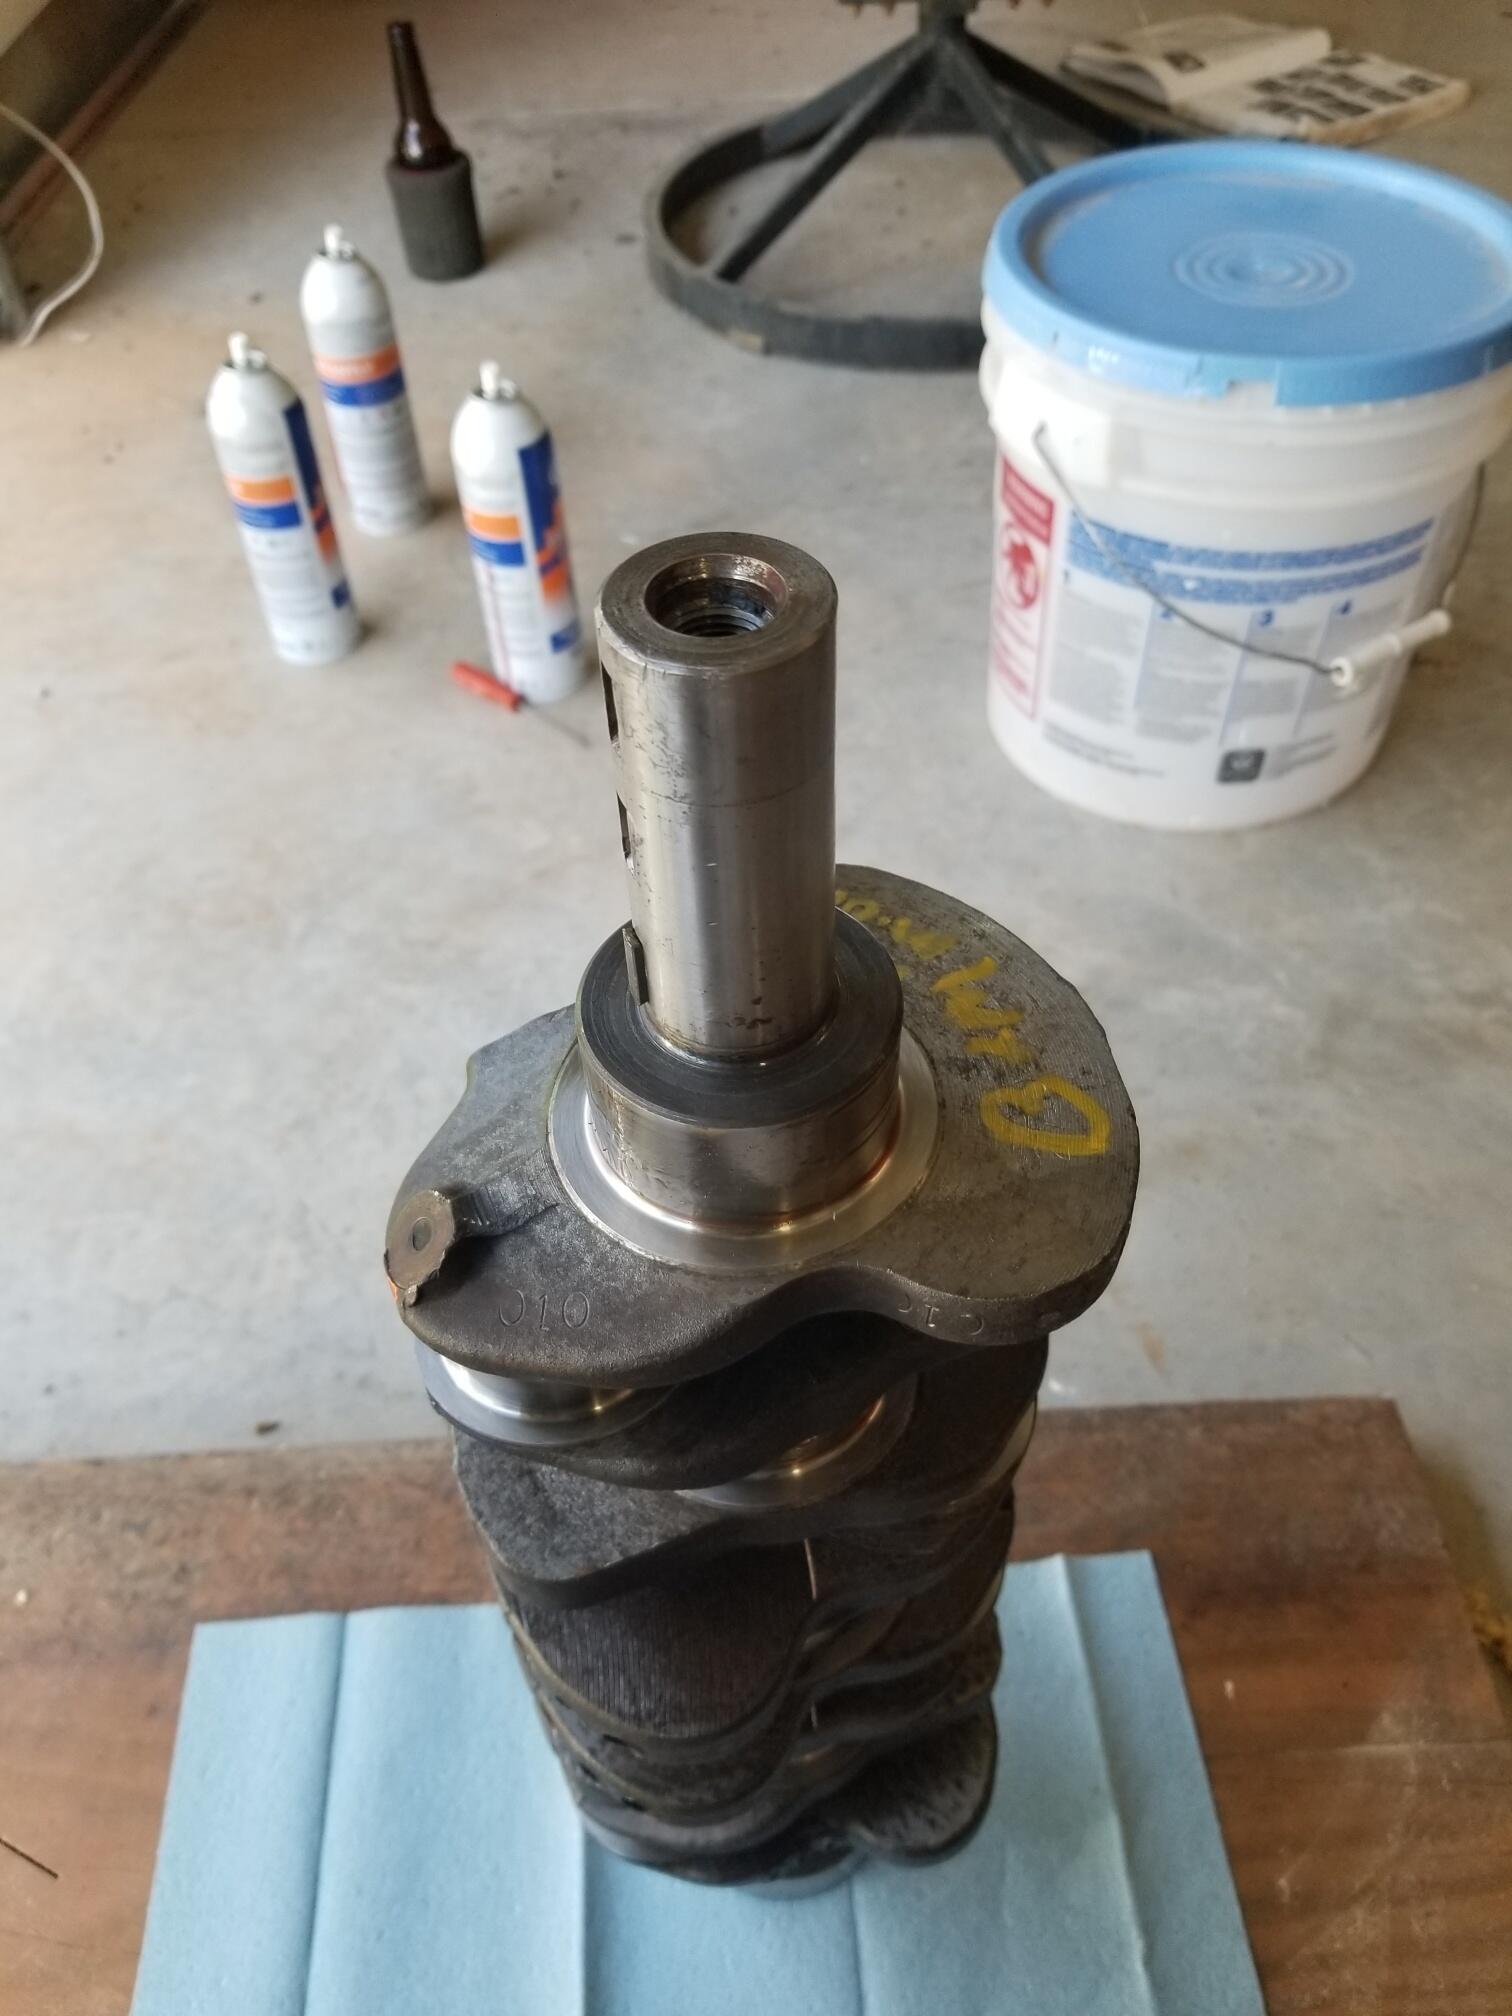
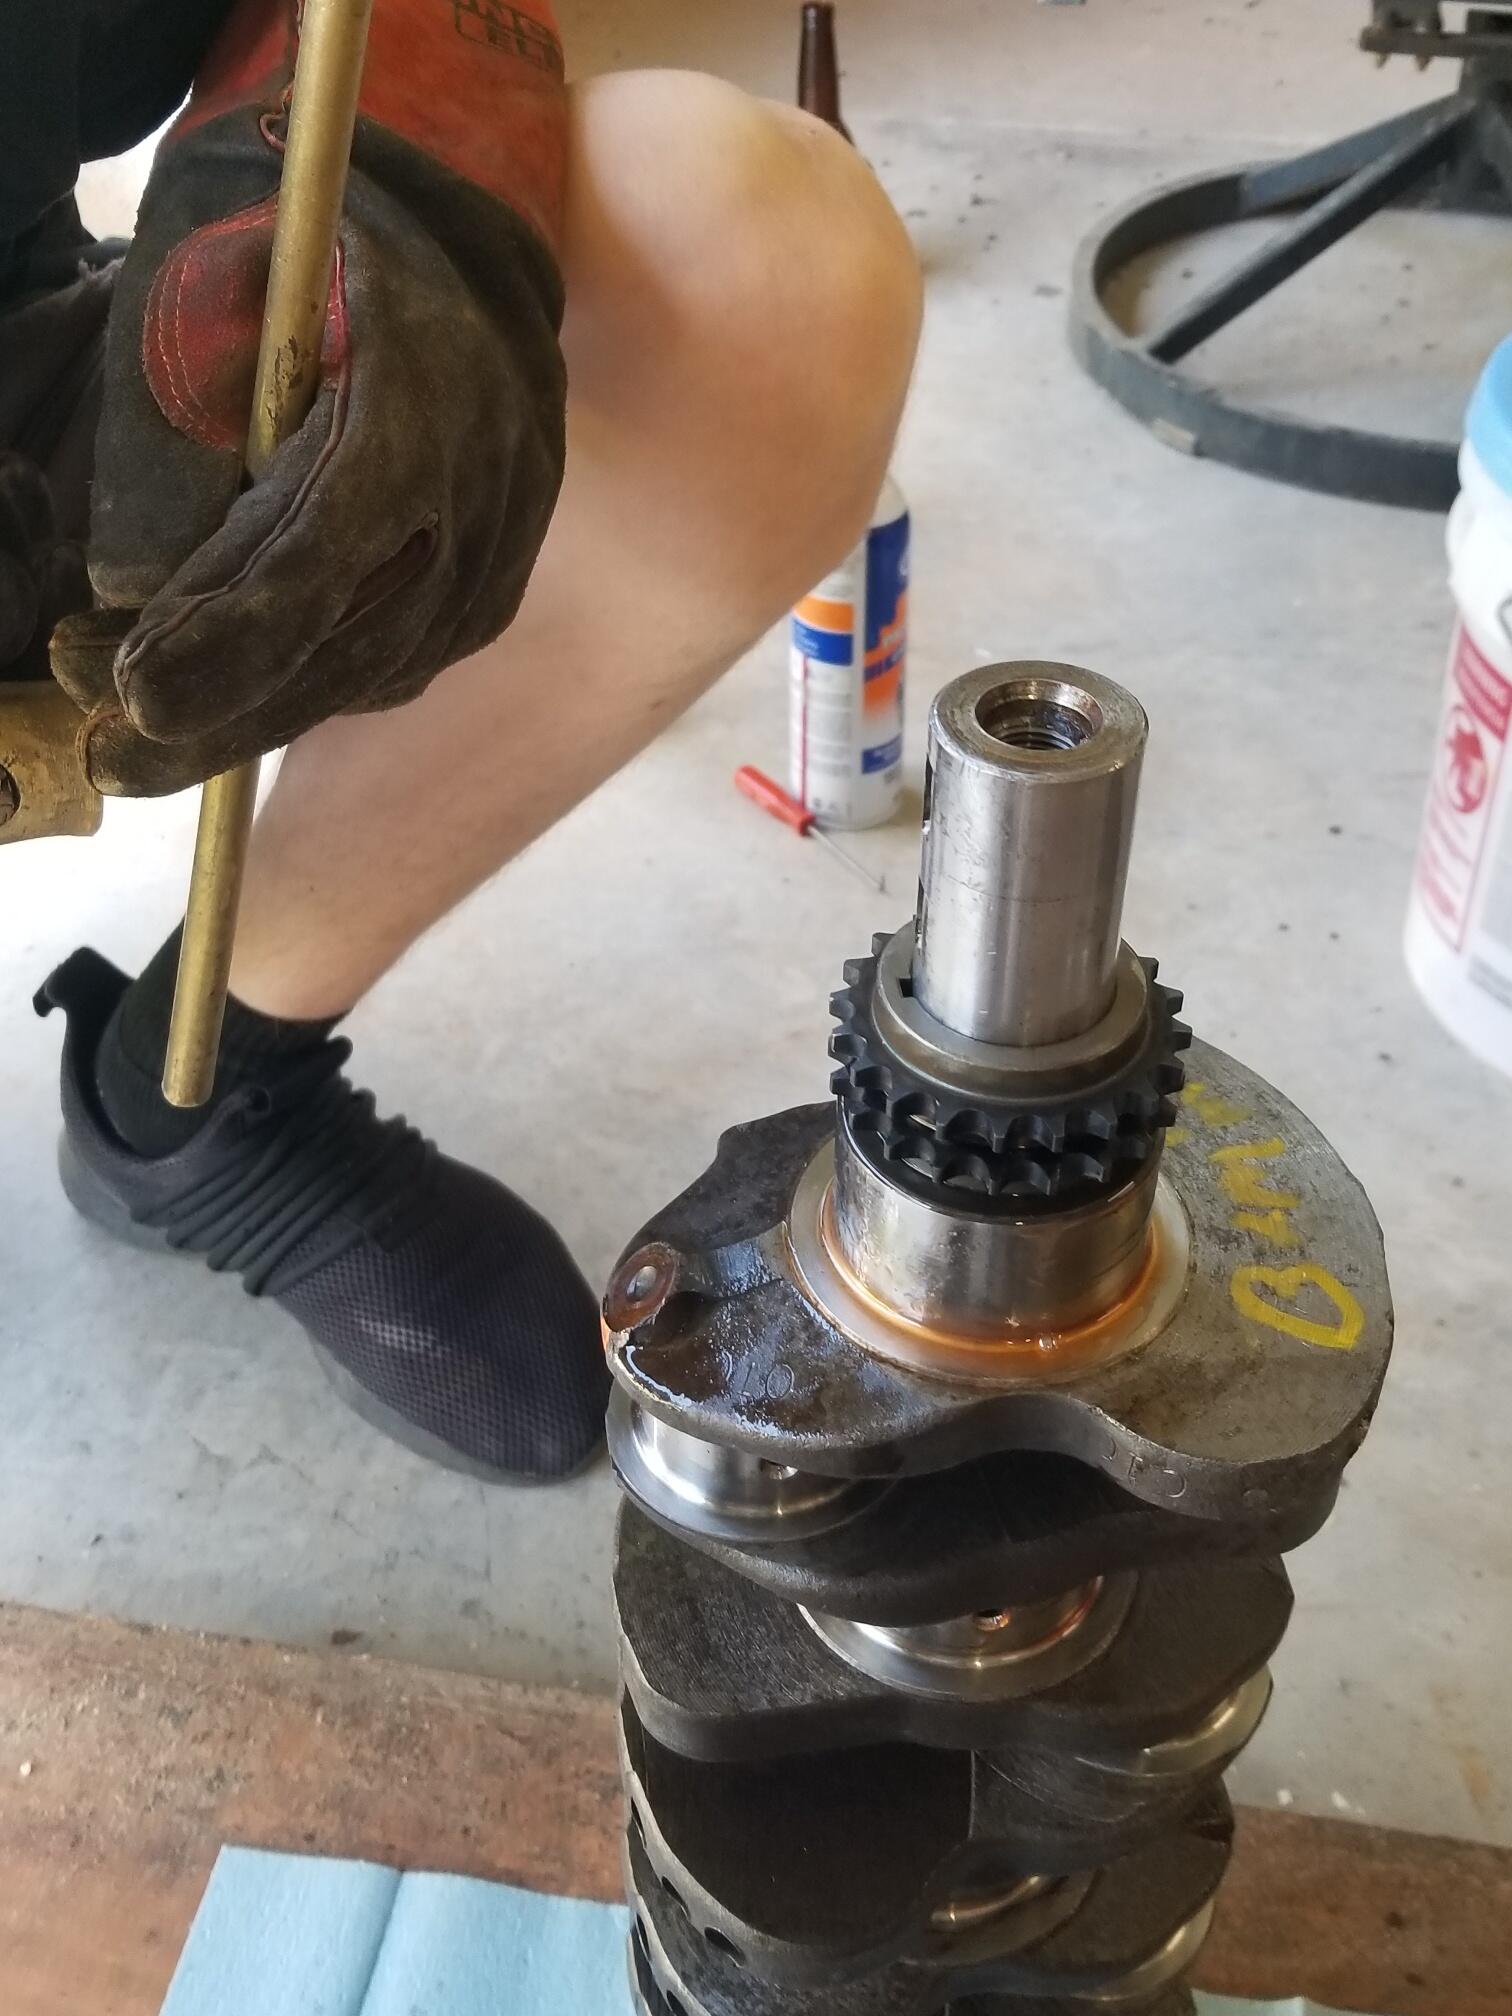
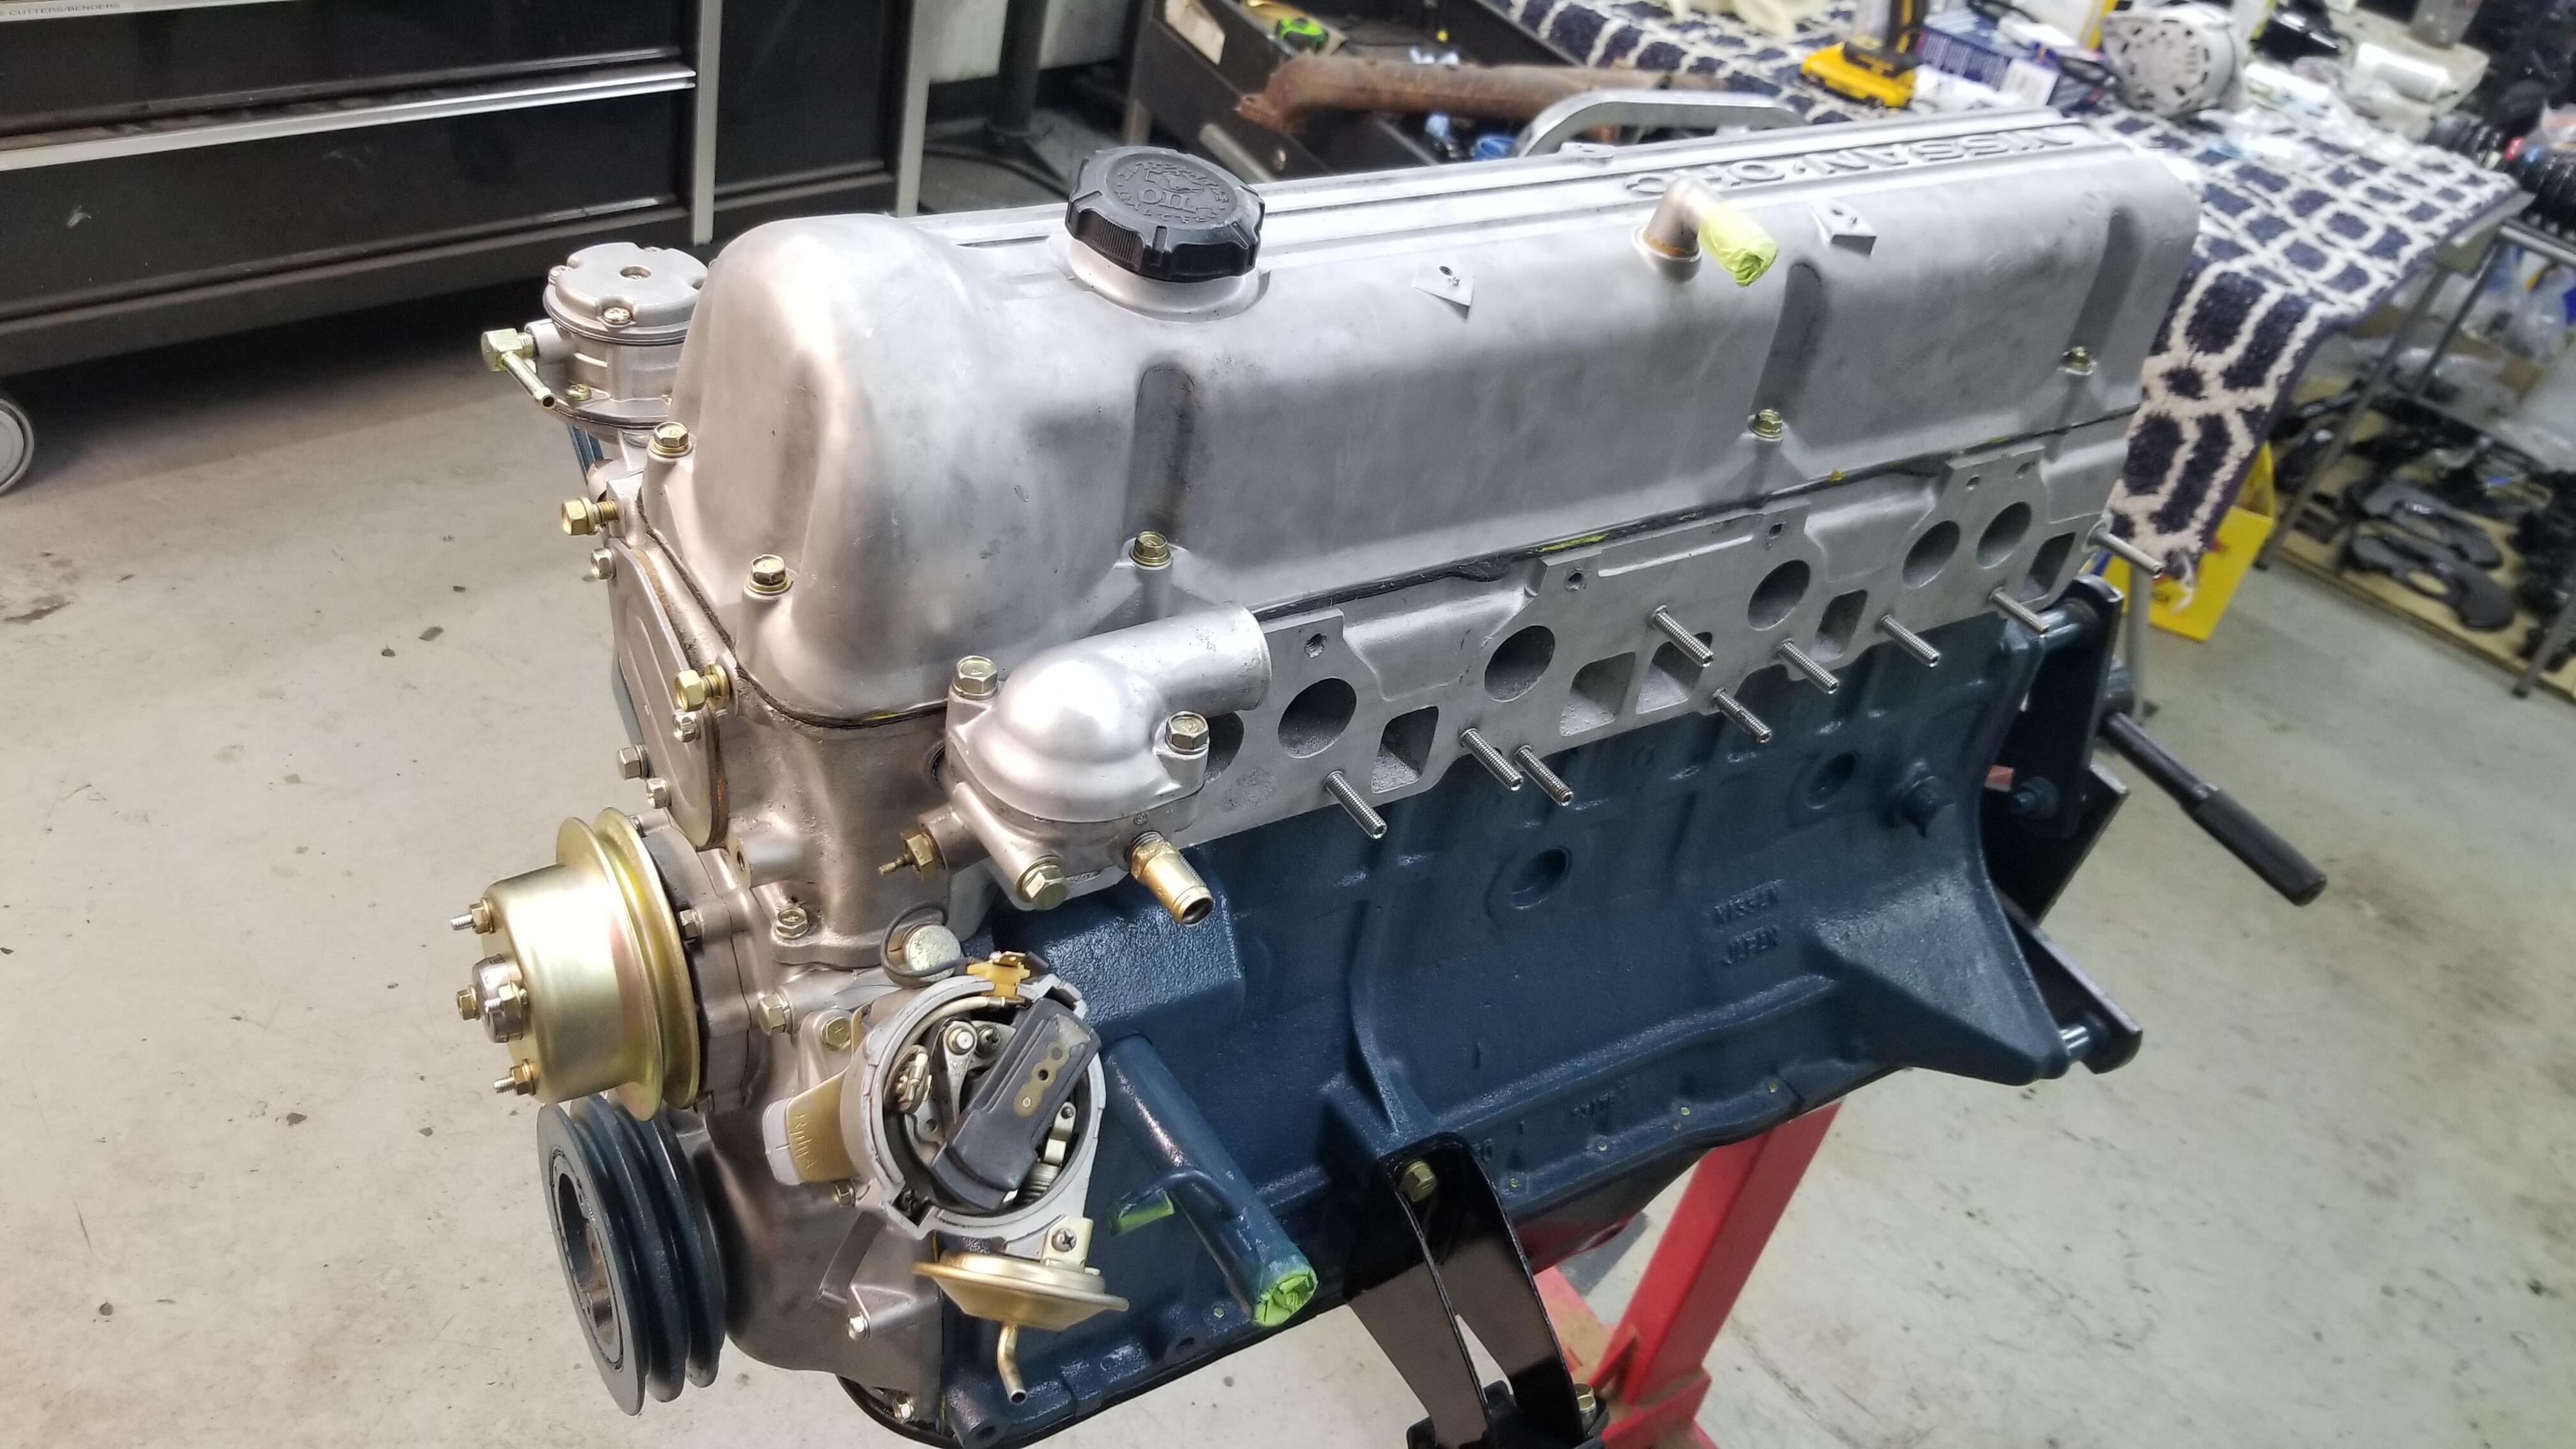
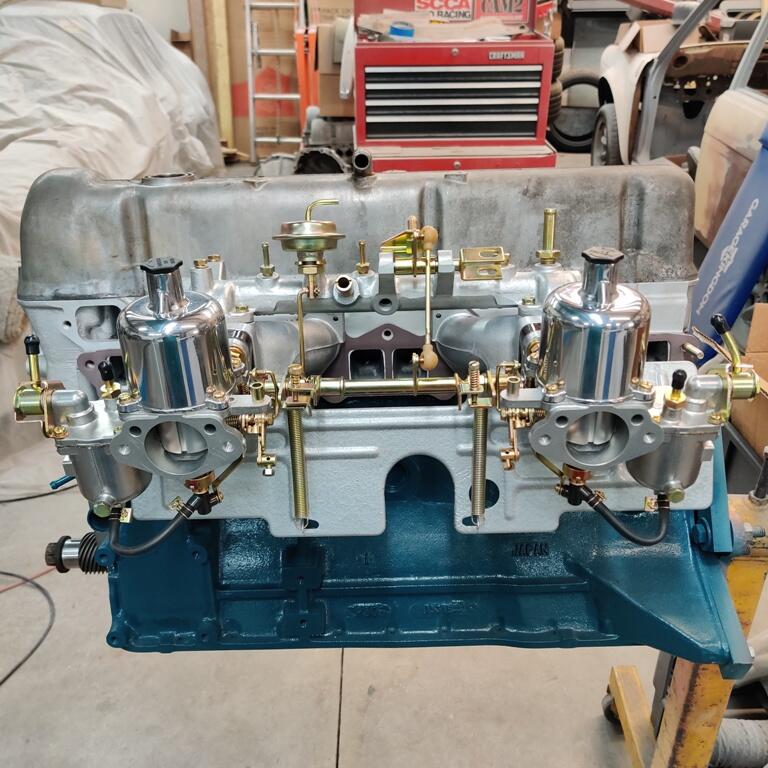
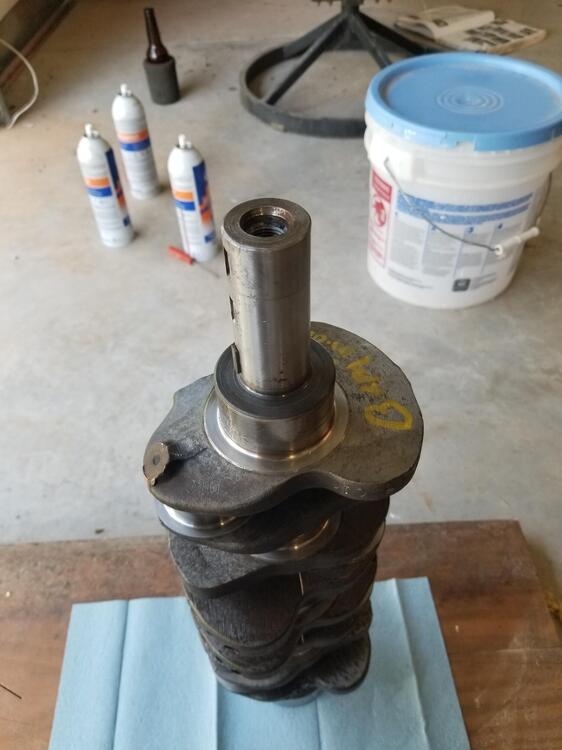
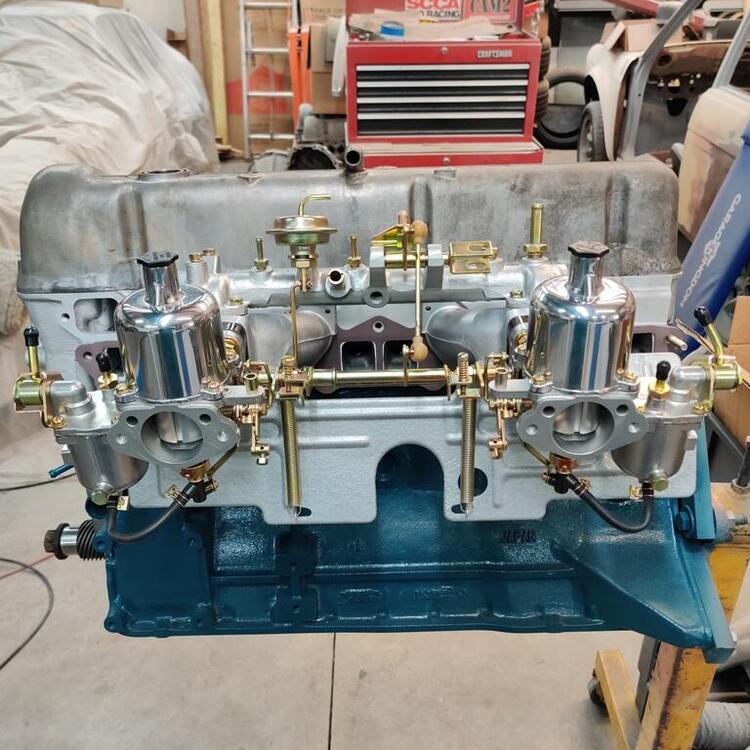
2 pointsSo we worked on the motor some more today. We started by checking end play float. We could force 2 thousandths of play be we really had more like 1-1 1/2. So we pulled the crank back out and we checked the thrust bearing thicknesses. I logged all of those down. Then we did some calculating and decided we wanted to add 1 1/2 thousands. So we removed half of that from each side of the bearing plus a little. Tom Monroe calls for using 320 grit paper but I used 600 wet. 320 seemed way too course. You need to be able to keep track of which side is which. I made a sharpie mark on one side and the oil hole gives a reference point to work from. Each pad is treated as a measured location. We set the shells against each other and wrapped with a couple of turns of electrical tape. We used the granite counter as a flattening plate but a piece of glass would work good too. I made circular motions when sanding and counted revolutions. I did 10 to the side and then mic'd. Then 10 more. It took about 30 to the side to take off 0.00075". After we reassembled we had 2 thousands that would indicate with no pressure applied. We could force it up near 3 thousands. While we had the crank out we heated the timing gear in the oven and installed it on the crank. Then we put rings on the pistons and installed them. The pistons are 7 thousands proud at TDC. Off my rough calculations we will be about 10.35:1 compression. So we may have to keep the timing down until we upgrade the head and cam. Now we need to get the timing cover cleaned and then work on the rest of it. I couldn't really turn the crank by hand before without the pistons, just the crank. I can now turn the whole assembly, pistons and all by hand. It's tough but doable


 2 points
 -
2 pointsHAHA! It is. My brother put that on. Shouldn't ever trust an attorney. Thanks for the heads up, I guess I would have noticed eventually.2 points
-
2 points
-
2 points
-
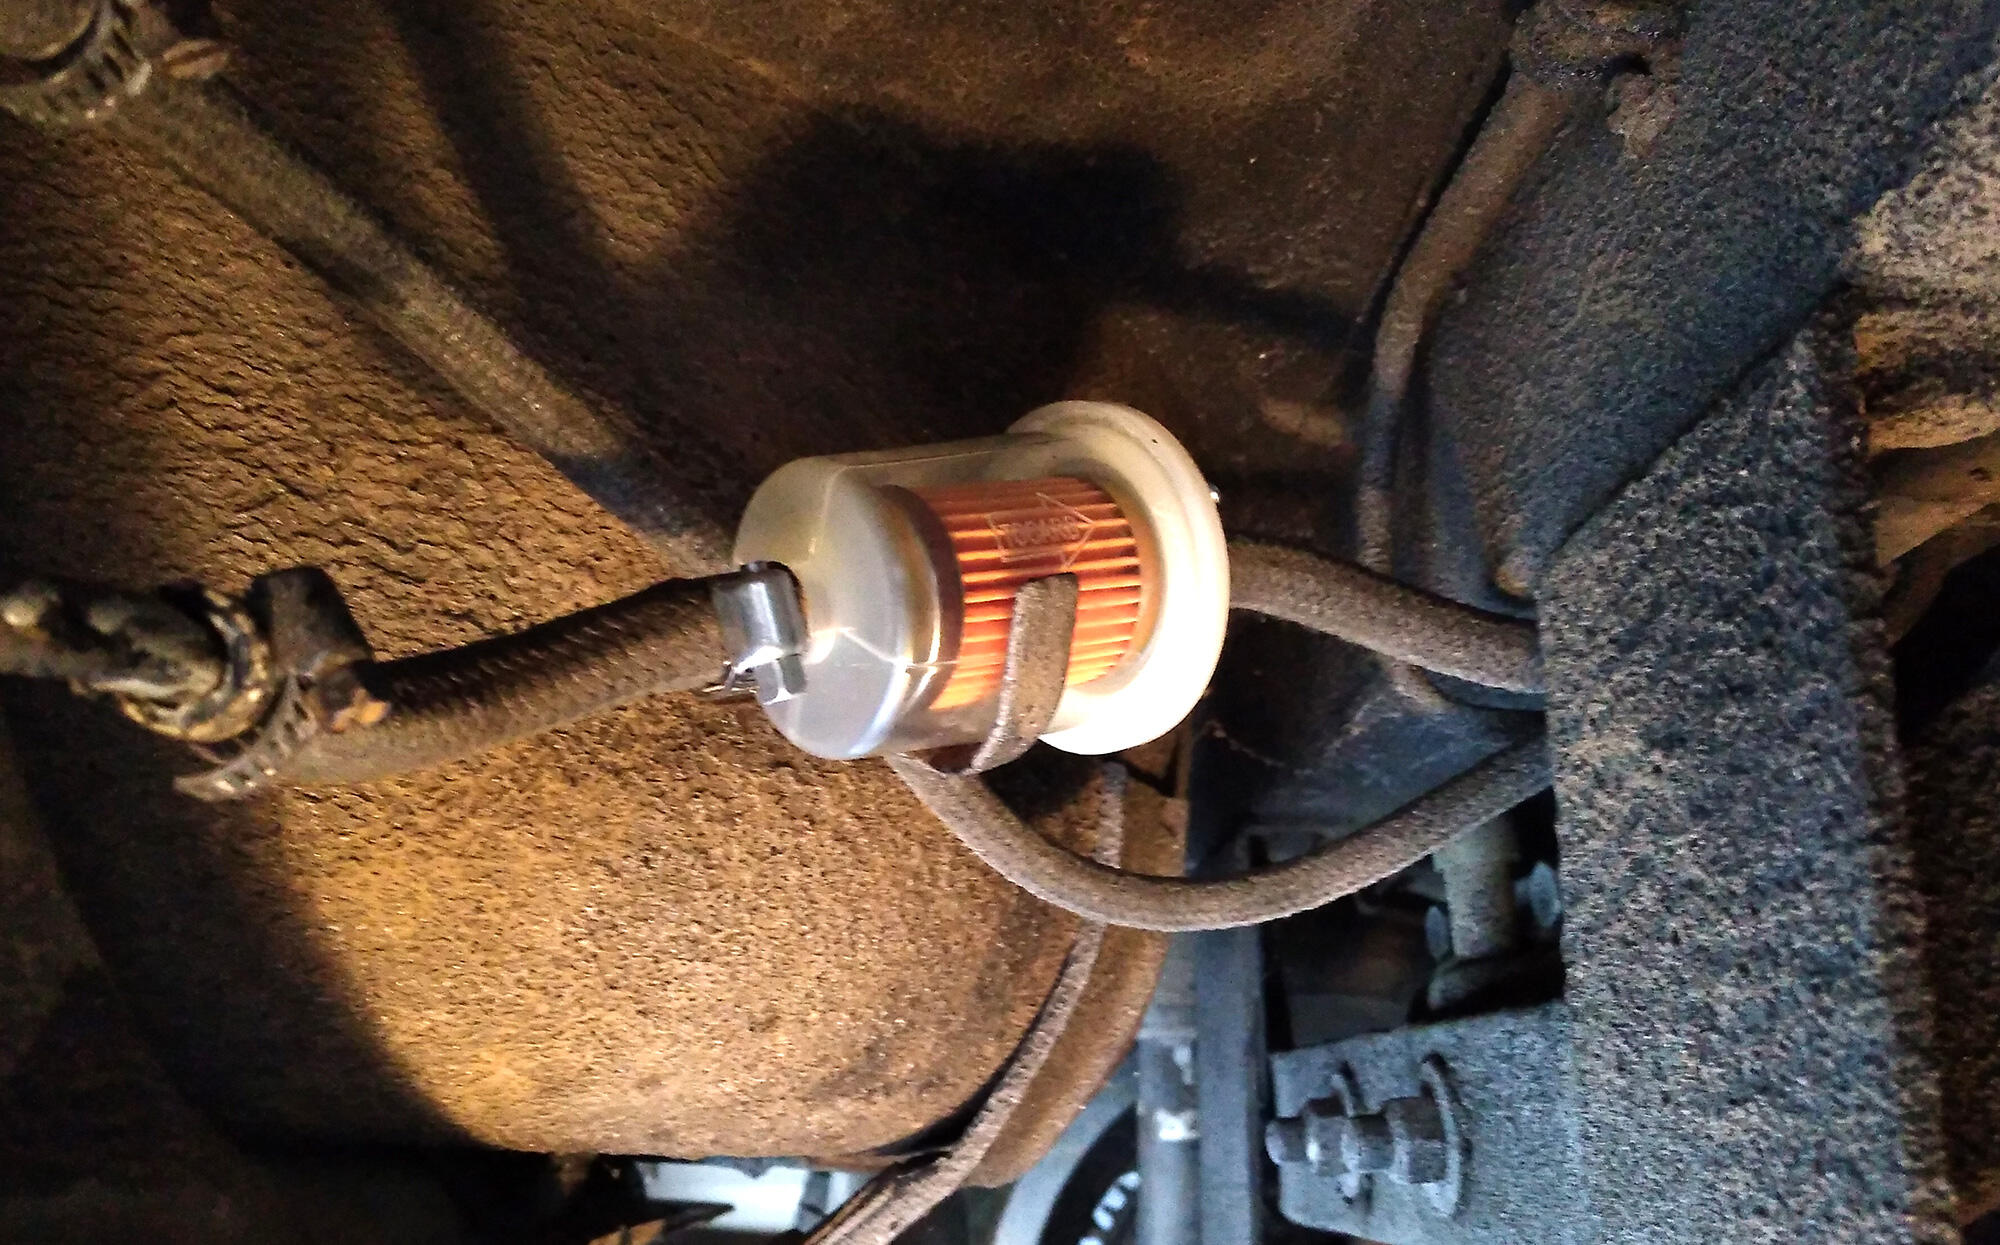
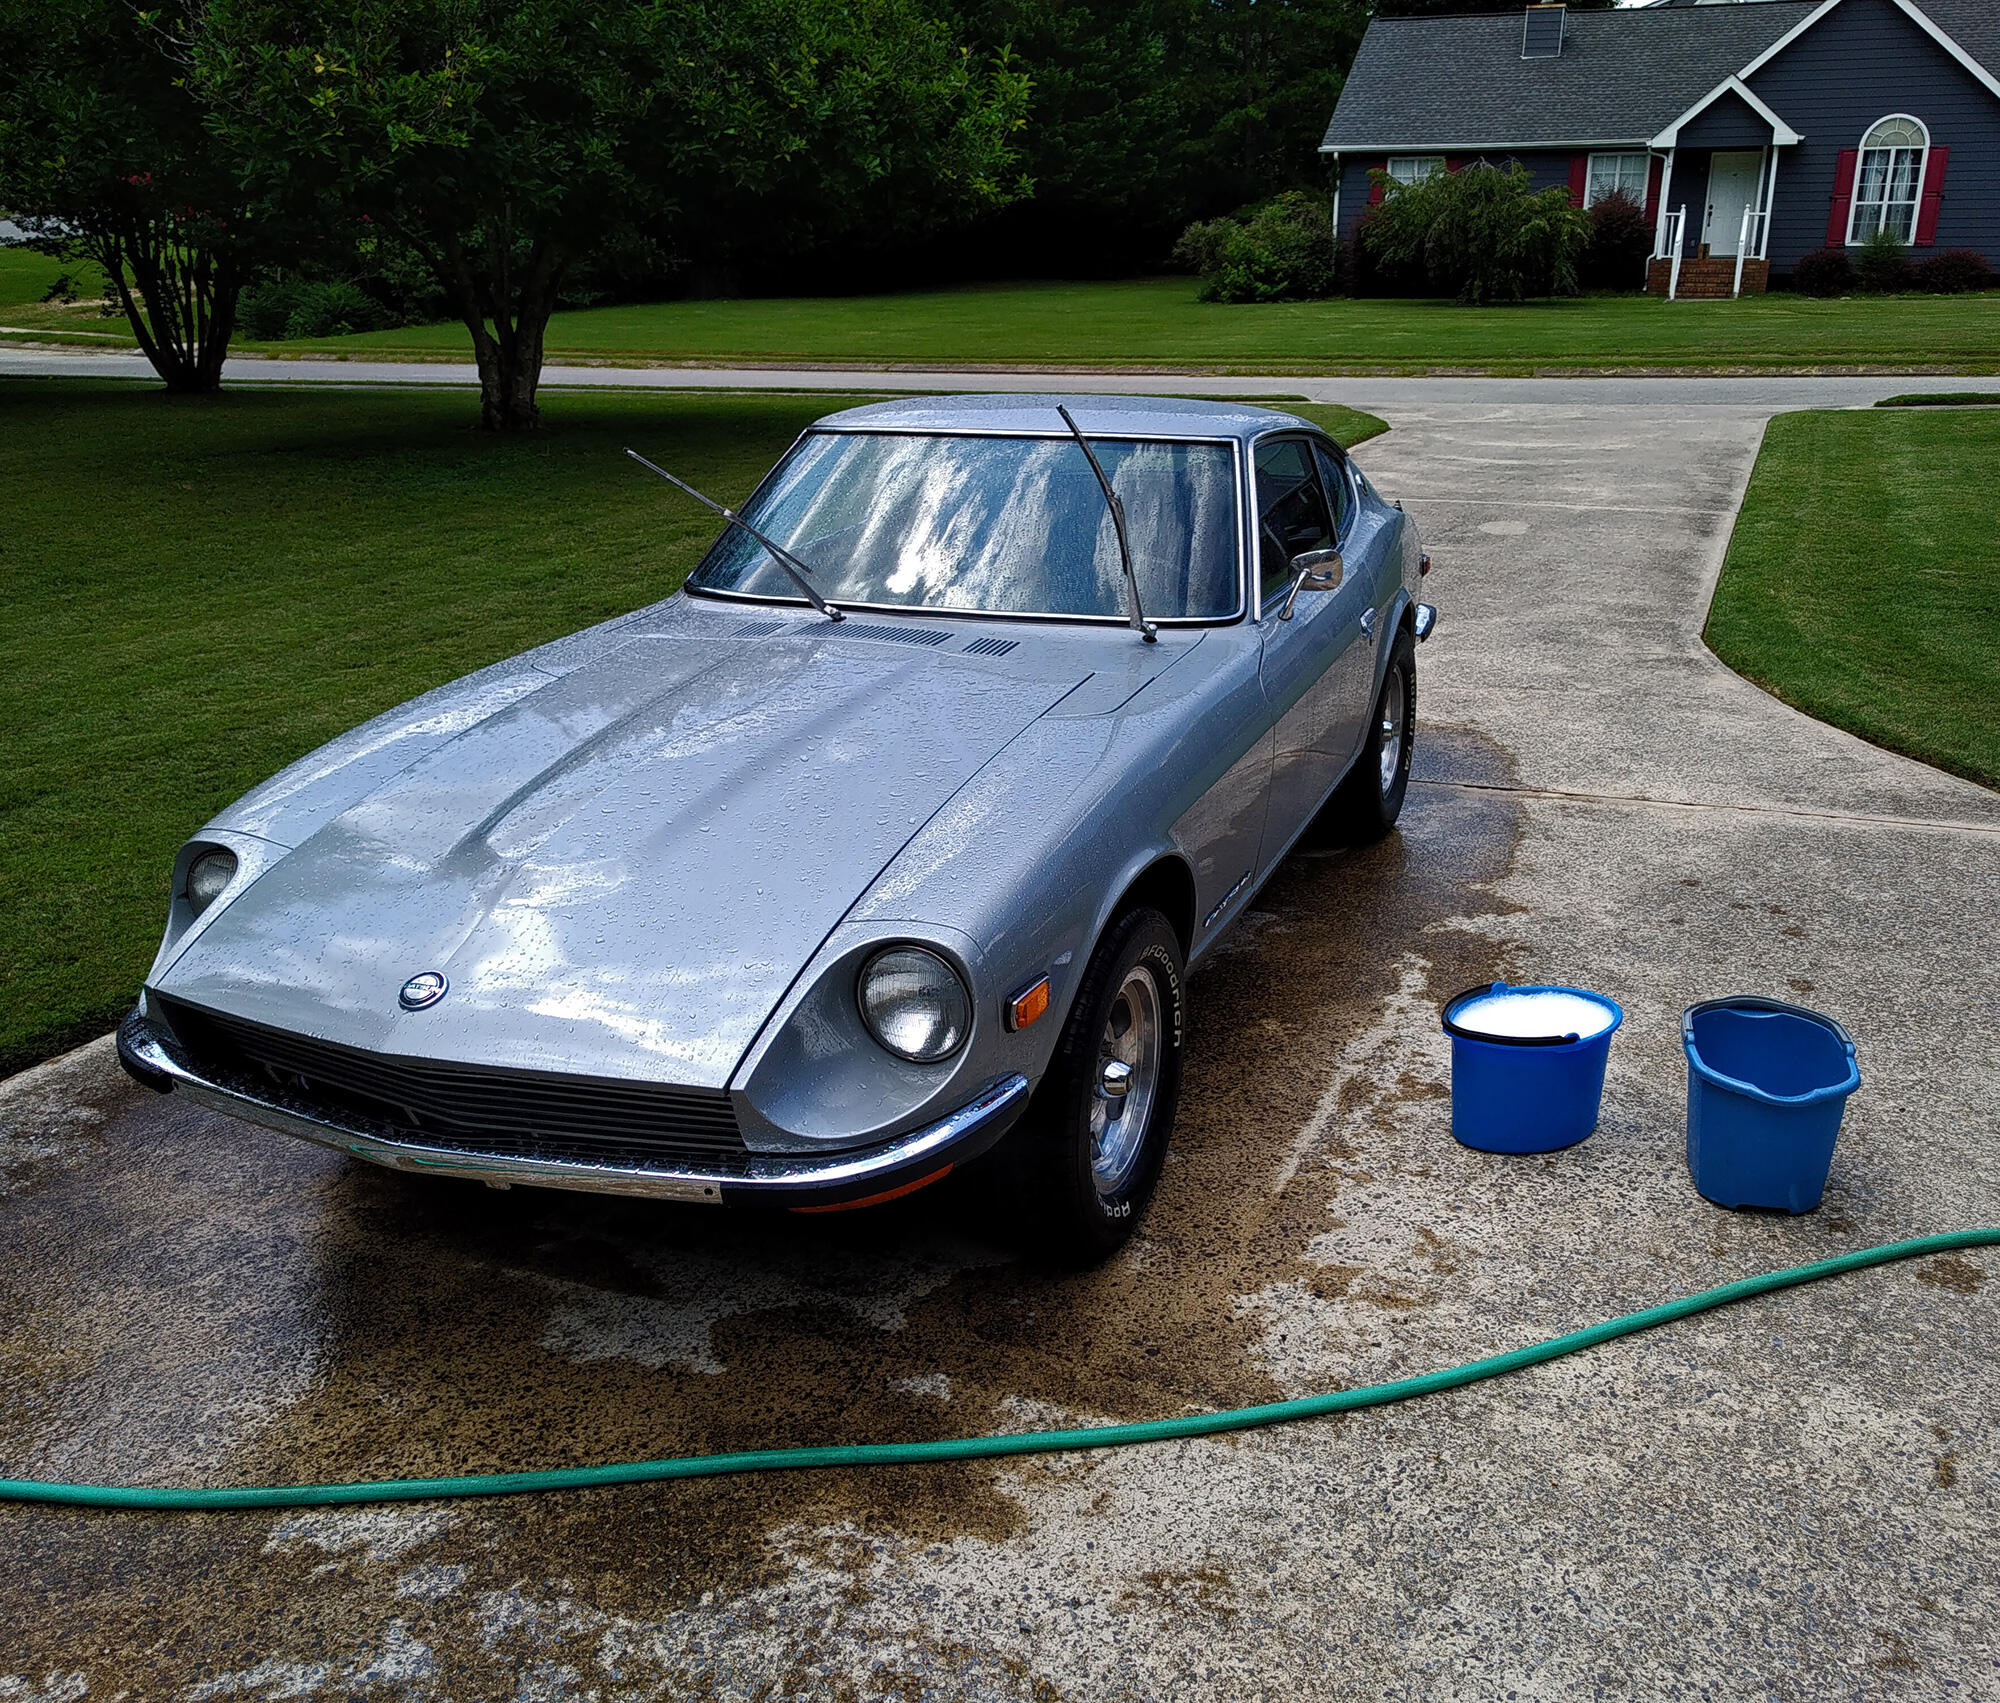
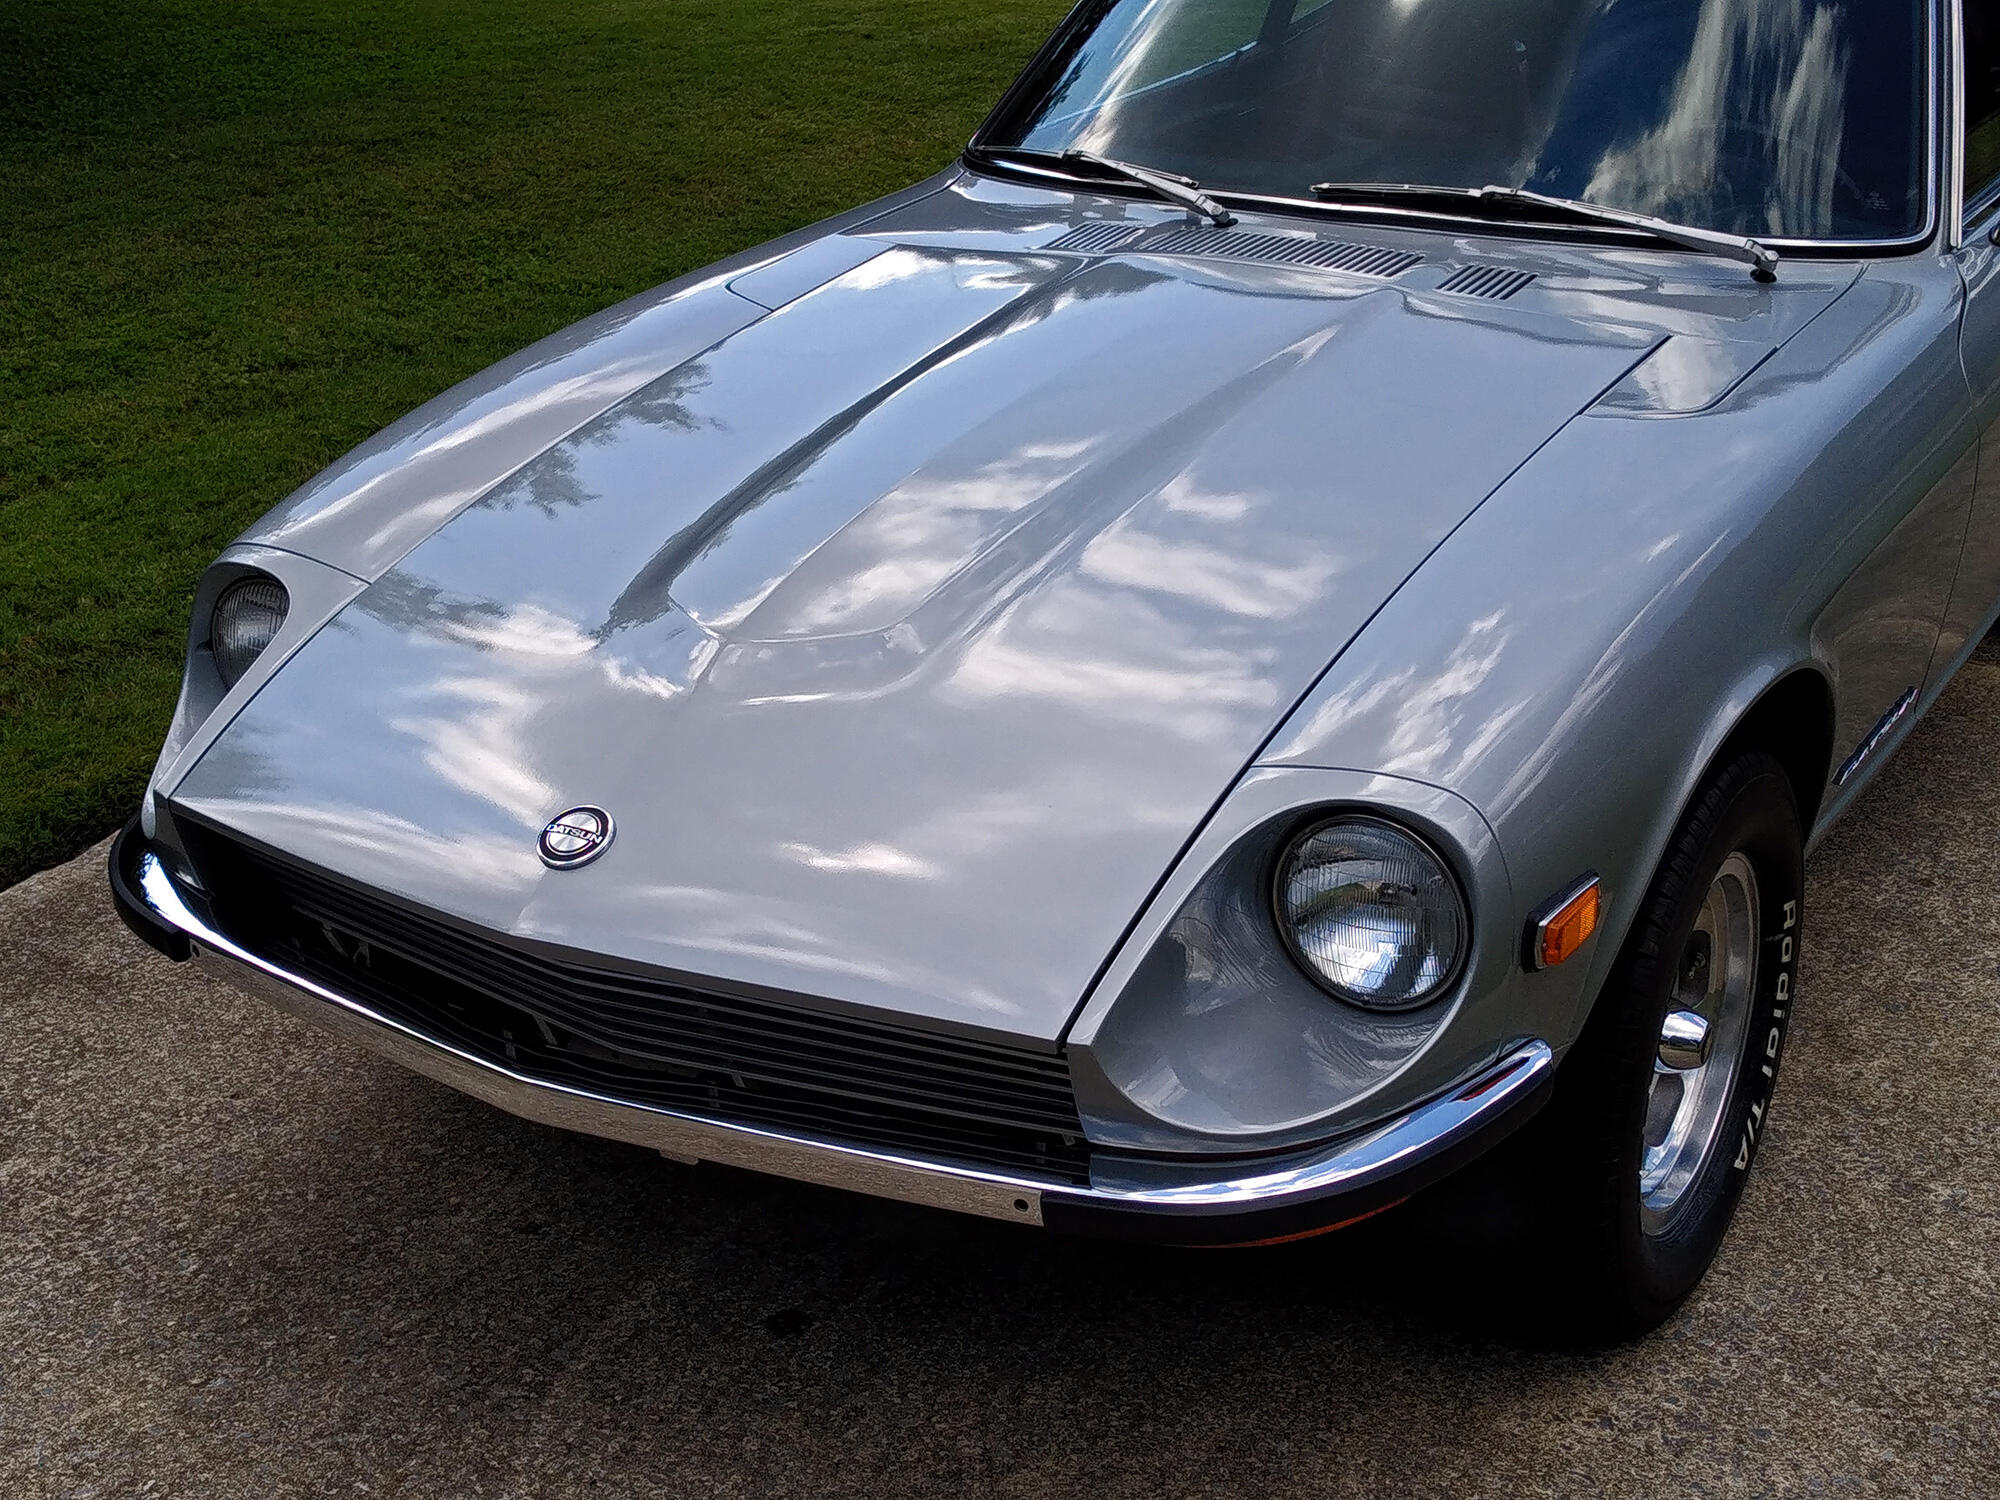
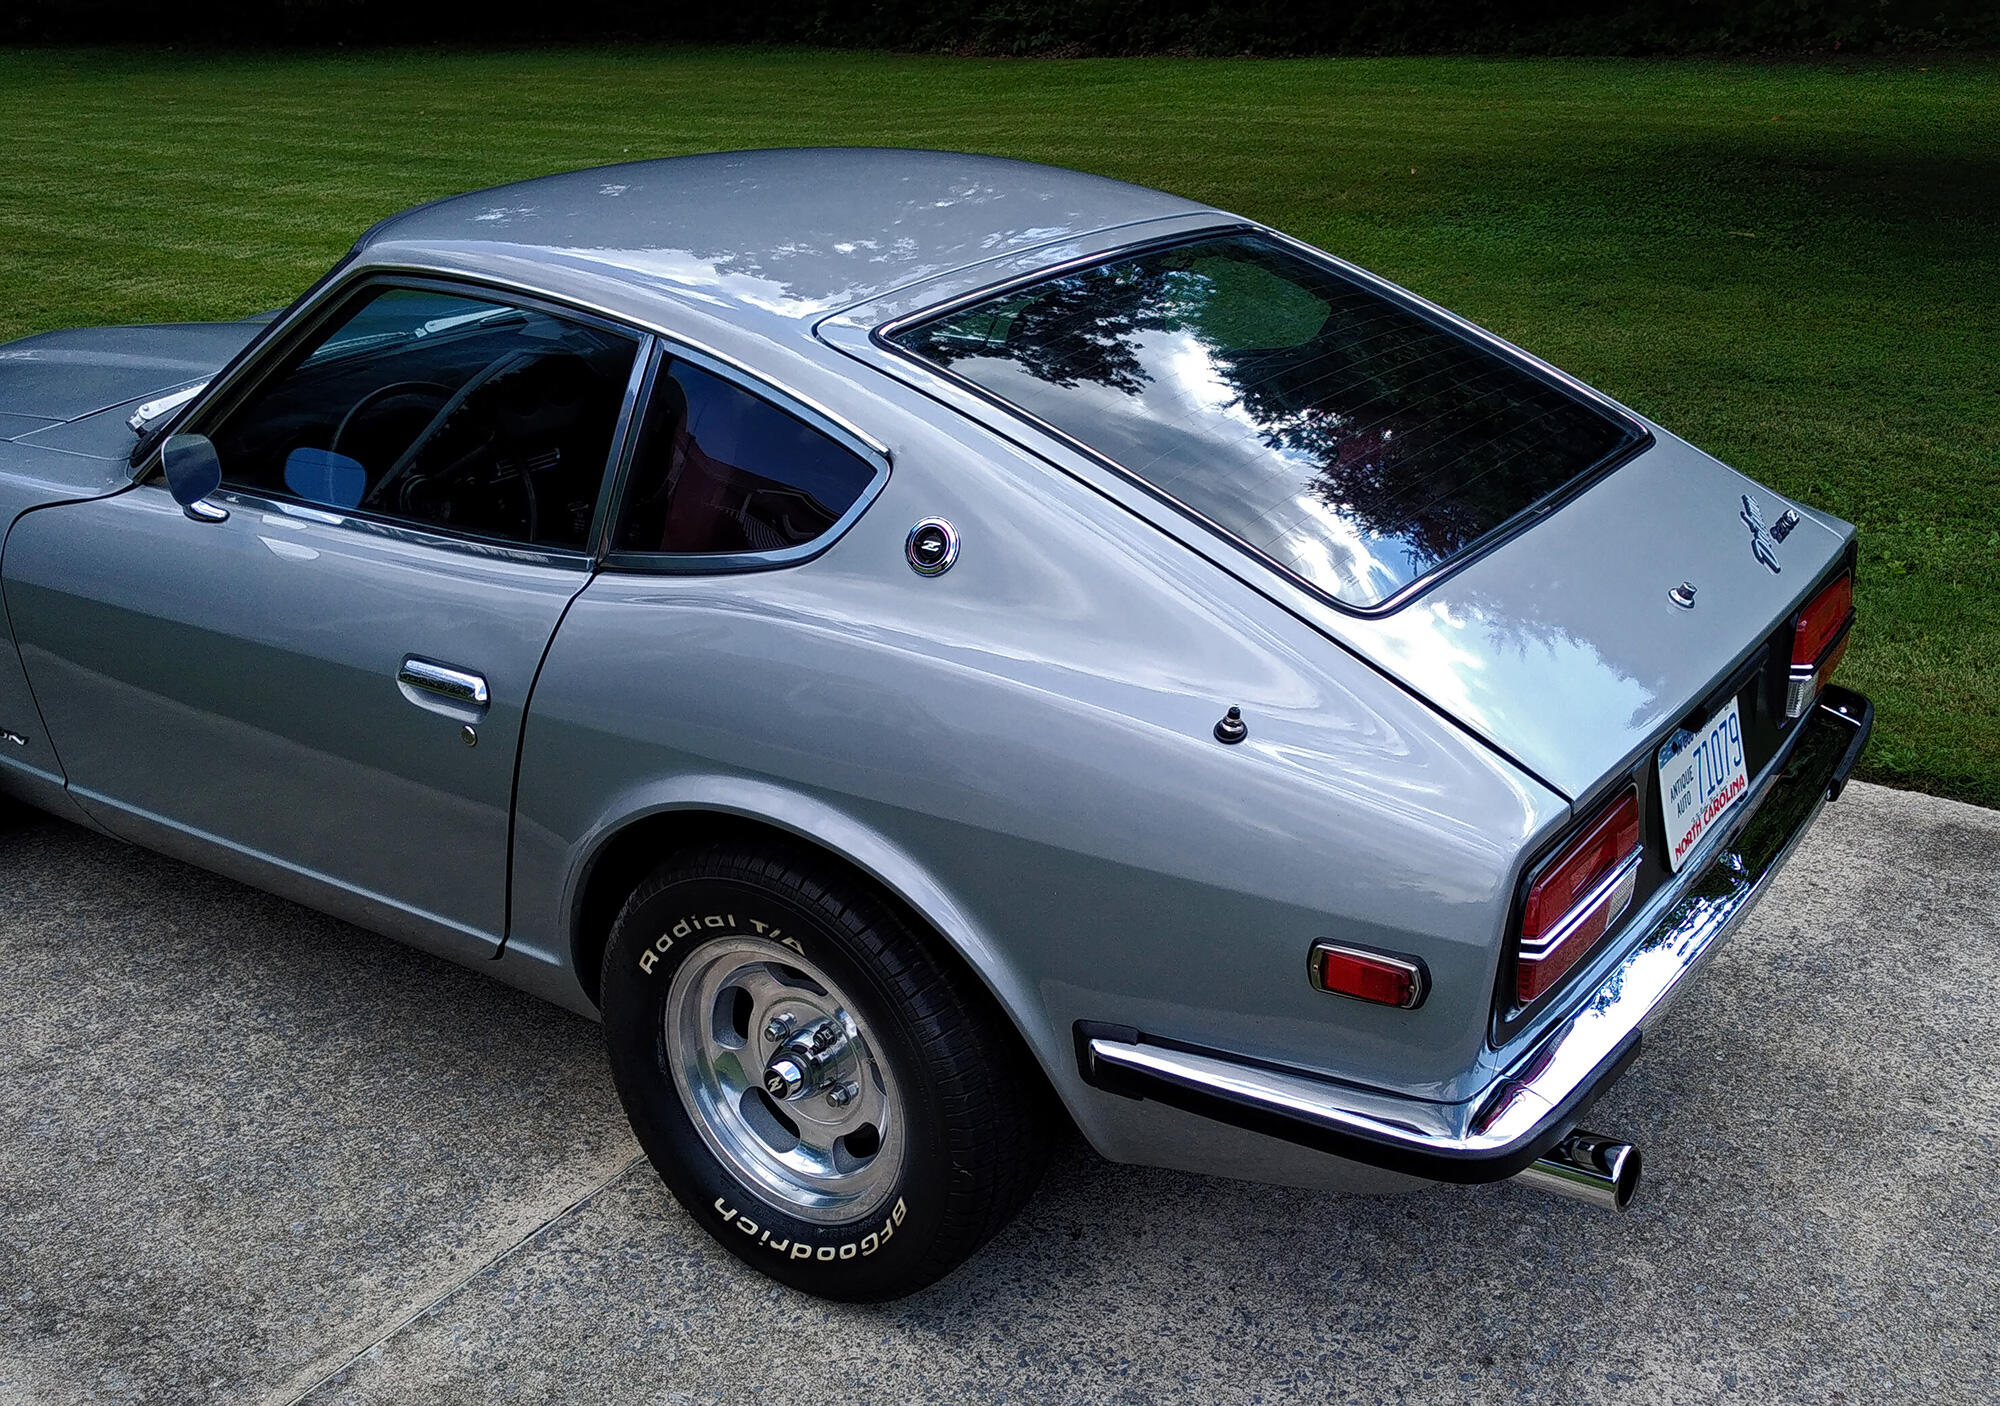
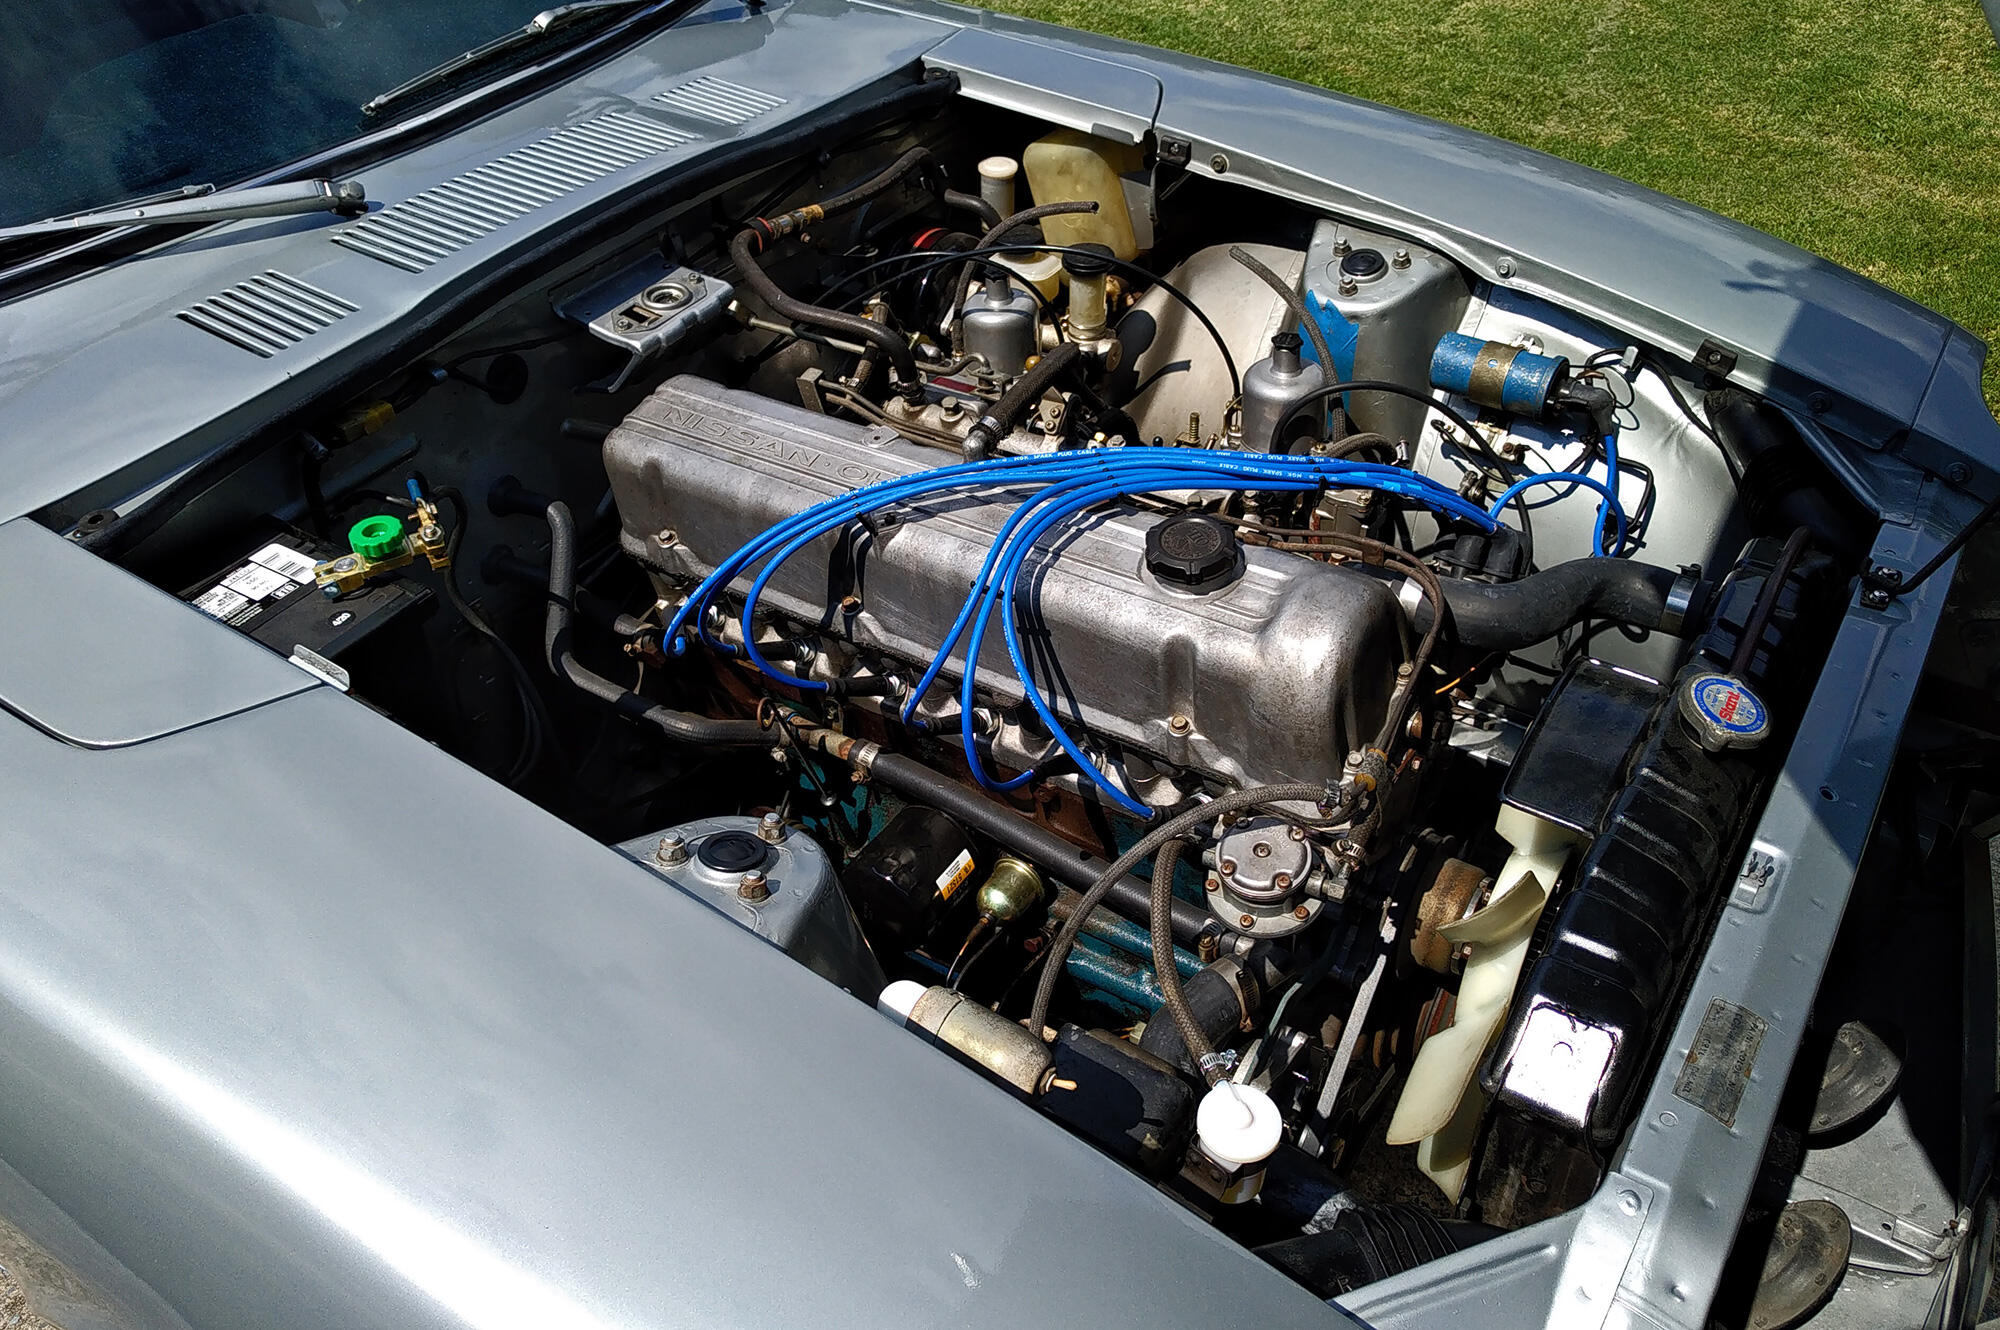
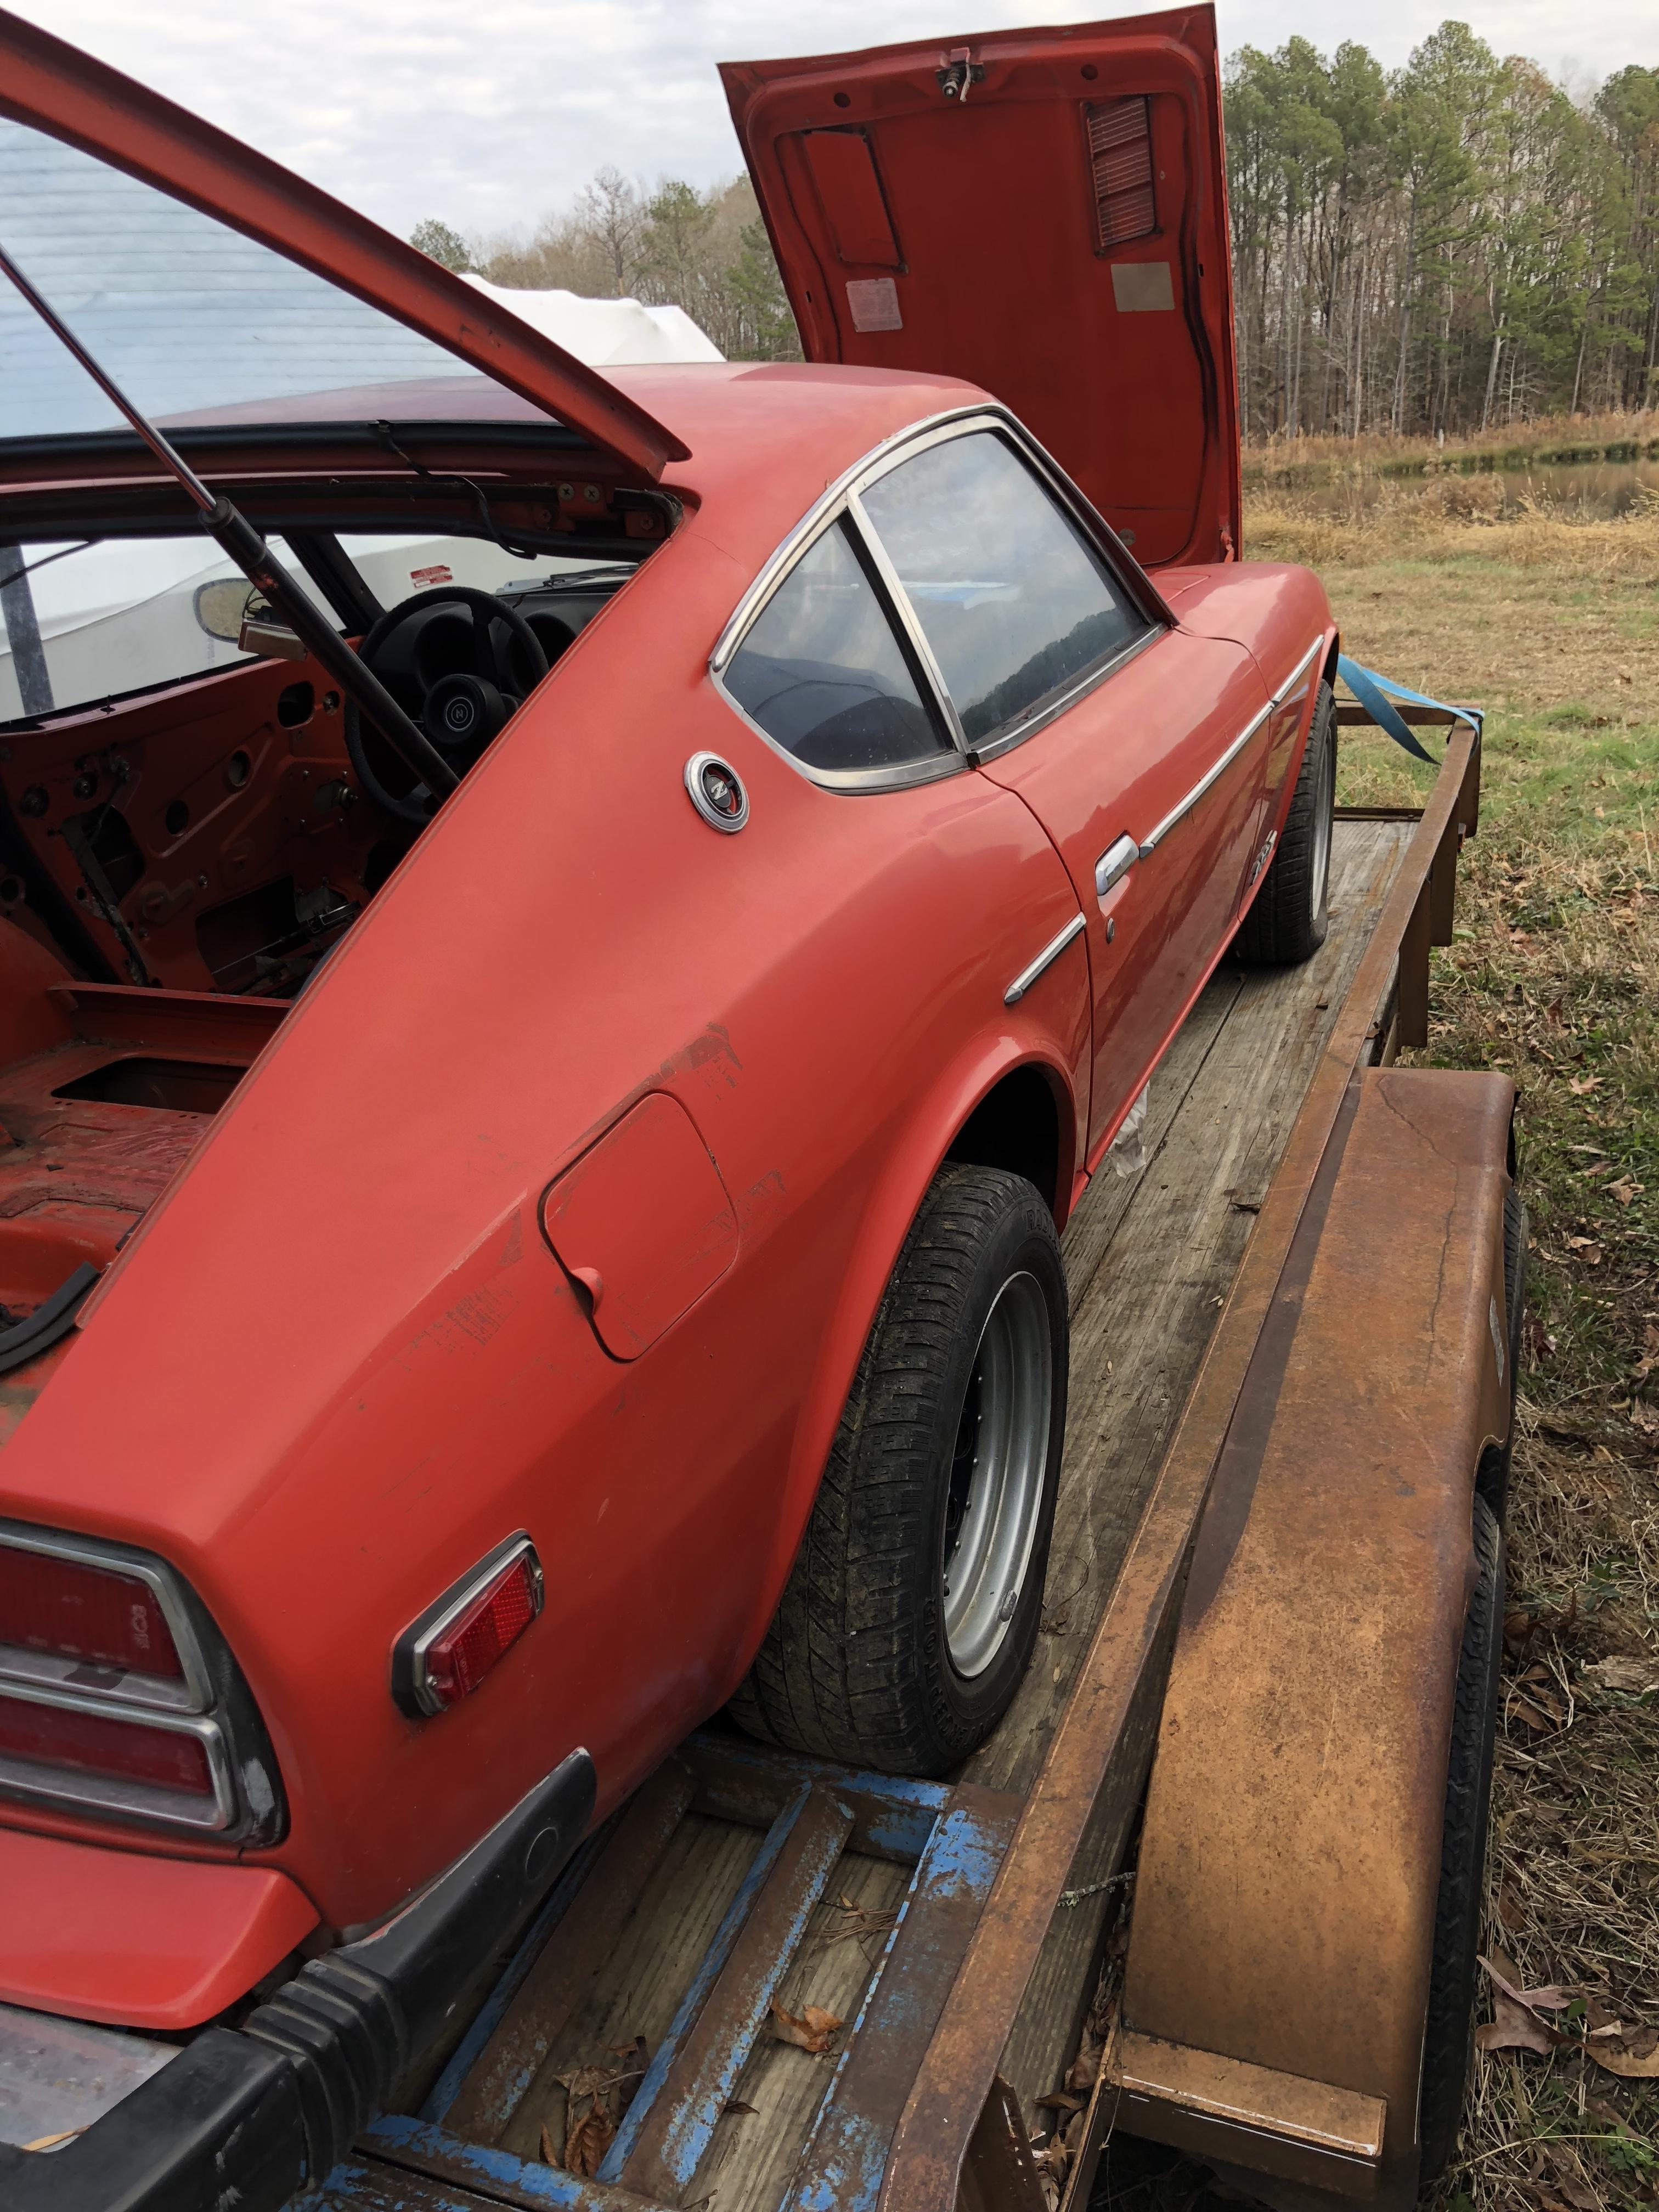
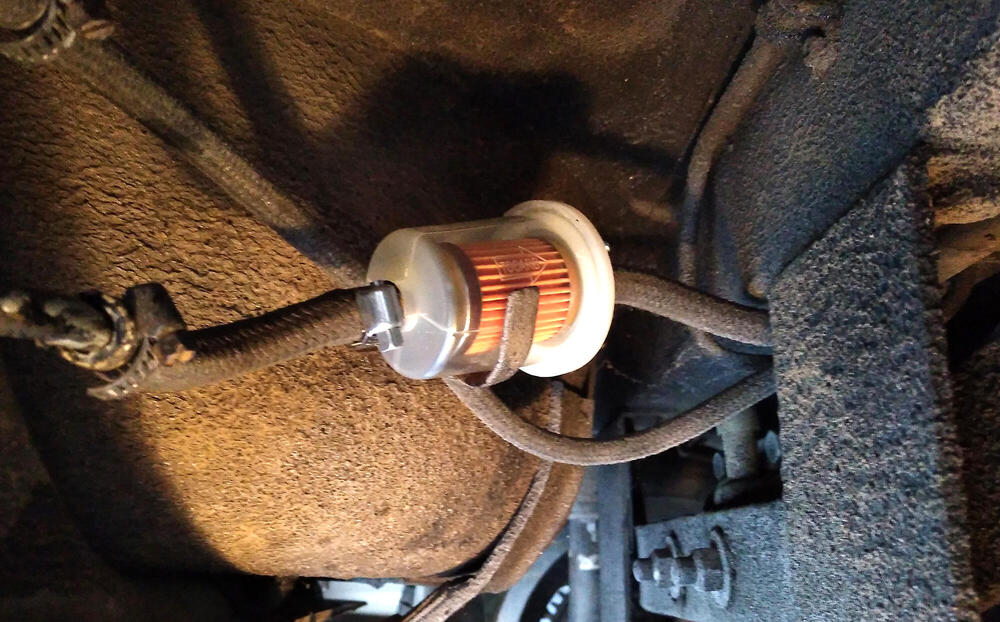
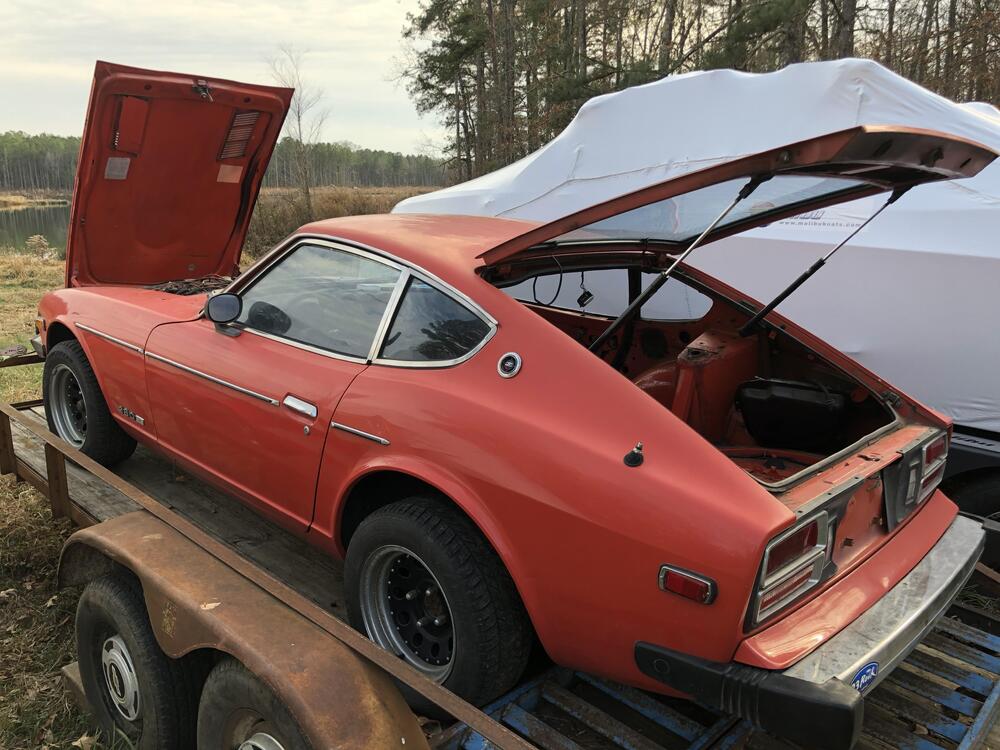
So I think I may have it sorted out. Don't want to speak too soon though... I installed an extra fuel filter inline next to the tank. I also installed a new primary fuel filter and the new fuel sender unit, o-ring and lock ring. I had to re-solder one of the connectors and use the heat gun on the rubber boots to get them soft enough to push over the terminals. I also blew out all the fuel lines with my air compressor turned down to 40-50 psi or so. Started the car after a bit of cranking to fill the filters, and it seemed to run...OK. Still missing and hunting somewhat, but I got it into a state where I could drive it around the neighborhood. After some more tinkering, it was alright, but then it died again the way it did last week. I coasted into the driveway and pulled the top off the rear carb fuel bowl: Dry as a bone. 😡 Really frustrating, but then I noticed that I forgot to put a hose clamp on the fuel pump inlet line. Also, it was kind of loose. I wonder if the fuel pump had been sucking air, creating a kind of vapor lock condition in the fuel lines? Regardless, I put a clamp on it, and the car seemed to run a lot better. I was able to drive it down the road a little ways and it didn't threaten to die at any time. I didn't want to get greedy so I came home and decided to wash it. It's the first bath it's had in almost 20 years. The paint cleaned up really well and looks fantastic; the painters did a great job with it. There are a couple of tiny water leaks but nothing major. I don't plan to drive it in the rain anyway. Current engine bay status: Yes, that's blue painter's tape protecting the left shock tower from getting scratched by the air filter wingnut.


 1 point
 -
1 pointTake a legth of hose and use it like a stethoscope, move it around and see if you can pin point the noise. You may here it good at the intake opening but see if you can here it somewhere else. Like around the manifold or injectors1 point
-
1 point
-
1 pointWe actually did that. Sprayed absolutely everywhere to no avail. I don’t think there are any leaks because the rpms drop drastically with the oil cap off1 point
-
1 pointThat was after the driving. I'm wondering about repeatability under no-load conditions. Just another clue. You don't have many right now.1 point
-
1 pointMy thoughts? If the two tachs were in series and the one in the dash worked fine, then I think there is an internal problem with the 510 tach. I mean, there's a slight possibility it has something to do with the ballast resistor, but I suspect the gauge itself. I also think there is nothing to be gleaned from the seeming "proportionality" of the tach readings. I think that's a red herring. Steve, If you want to send me that tach, I'll open it up and do some reverse engineering on the guts? If nothing else, it'll be a great story about a tach that traveled all over the country. "510 Tach Tour!"1 point
-
1 pointI don't think you need any fancy burping tools for these cars. Just run it, let it cool, and top it off a couple times. That's all you should need to do. The 280's used a recovery tank, but I don't think the 260's did. They were a dump on the ground system. So there would normally always be some air in the system. Hopefully just one pocket corralled at the top of the radiator, but some air.1 point
-
1 pointI've seen plenty of intermittent temp gauge senders, but they're usually random and not repeatable like yours seems to be. First thing I would do is be double dog sure that the coolant system is full. And next is that I would replace the sender unit. It's easy and cheap, so I would just put a new one in there and see what happens.1 point
-
1 point
-
How about calling it an oriented strand steering wheel. OSSW or just OSW.1 point
-
1 pointI doubt it's resistance in the ignition circuit. It would have to be something internal to the tachometer. I don't know enough about inductive loop tachometers to say what, though.1 point
-
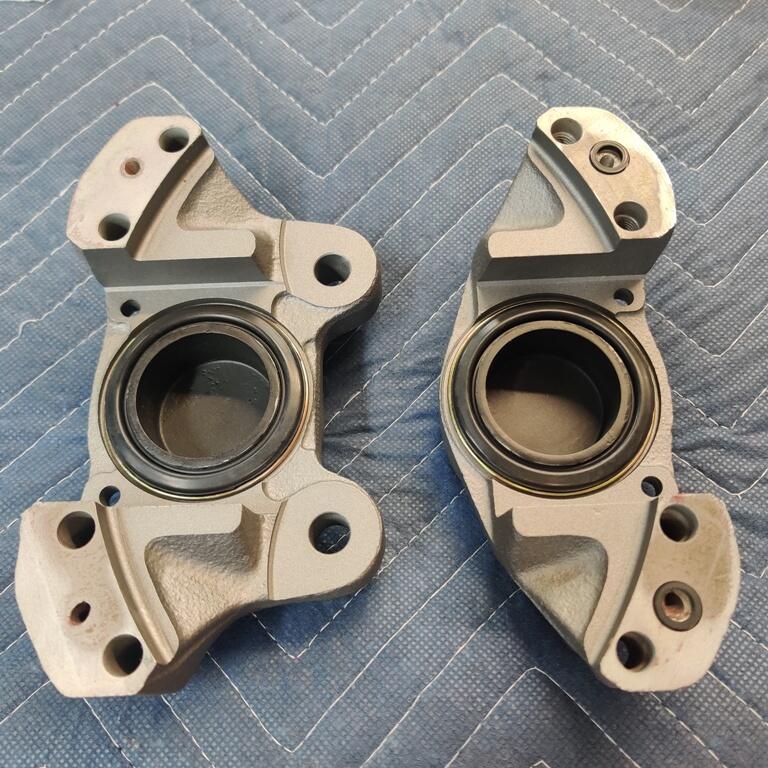
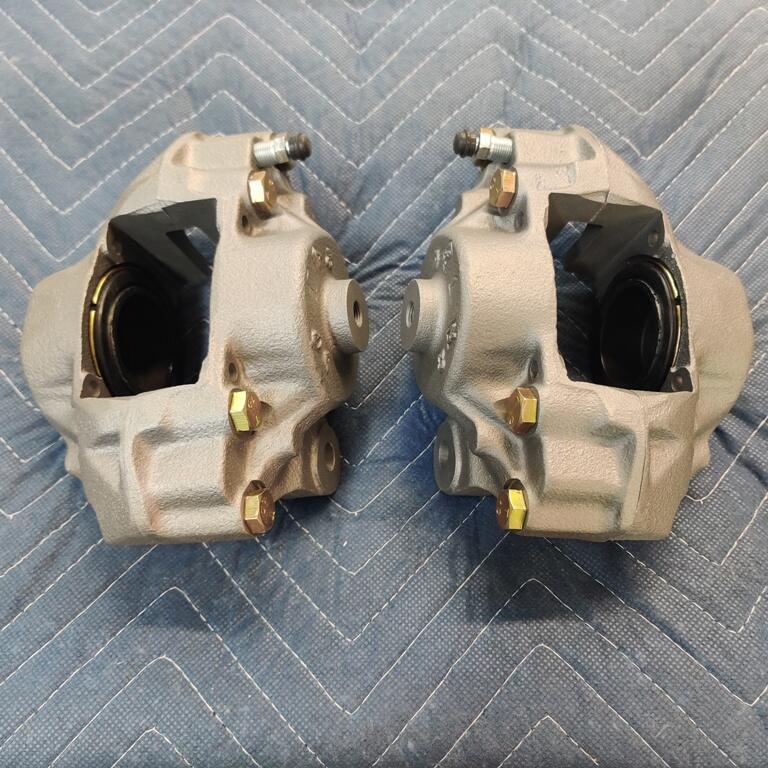
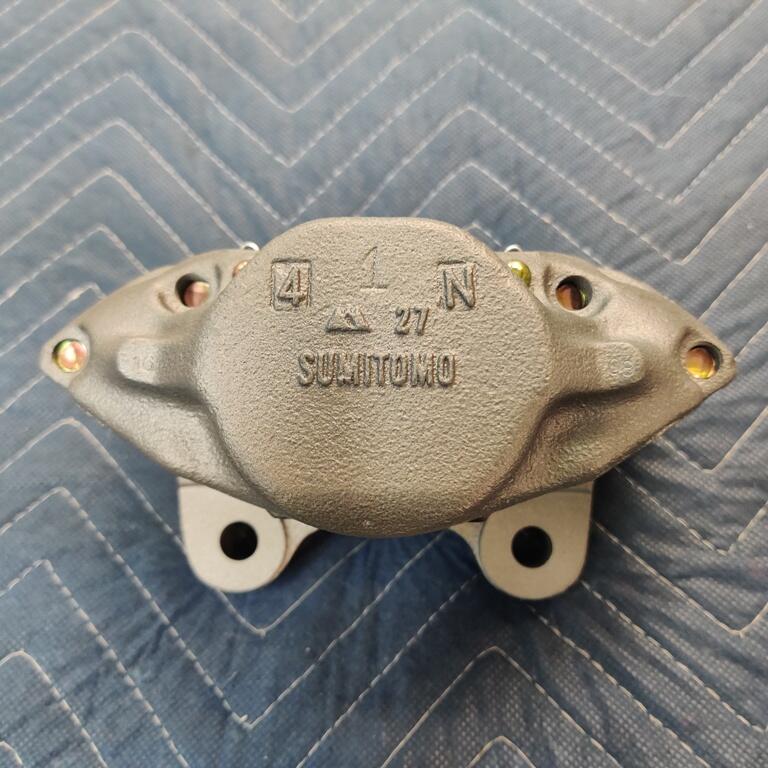
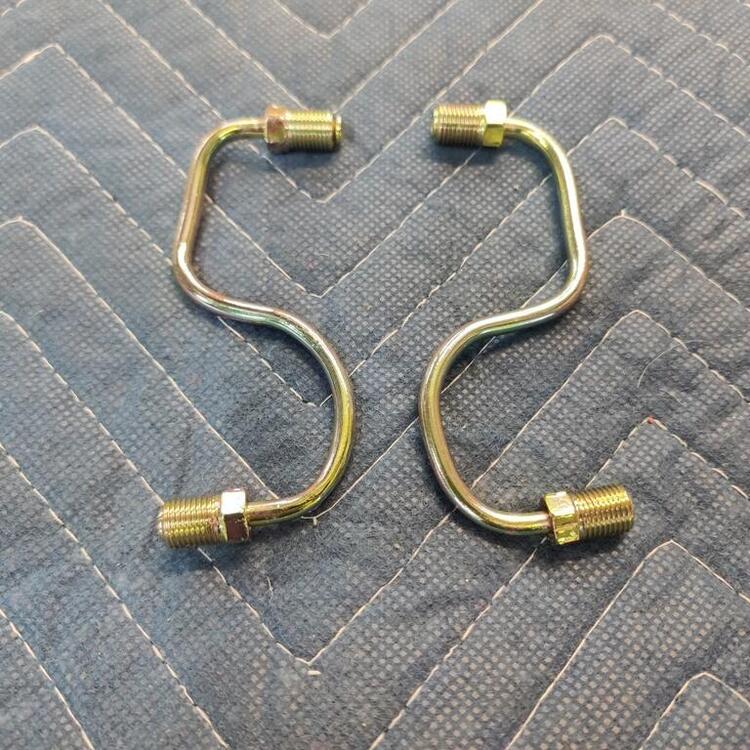
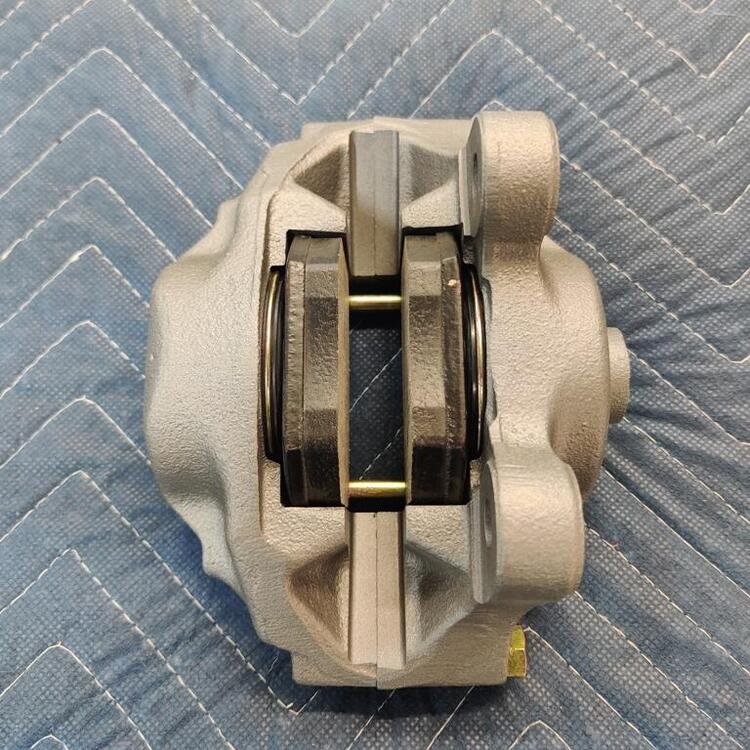
As you point out, the factory shop manual says not to remove the bridge bolts. See a thread I started in the brakes section for a pic of the crud I found in my caliper when I took it apart. O-rings to seal the bridge connection were not available as replacement parts from Nissan that I can tell. Some aftermarket caliper rebuild kits do include them. Some do not. If you don't take them apart after this many years, you are taking chances. In addition to the rust and crud inside the passageways, you are relying on 50 year old o-rings to hold their seal. A leaky caliper makes for a very bad mess - eating paint wherever brake fluid gets. I messed up a new Panasport wheel years ago because of a bridge seal that failed. NOS parts are always cool. But, I don't need them because I had my caliper to strut hard lines re-plated. They need a bit of tweaking which I will do when I install them. I sent the platers a brake master cylinder to brake compensator hard line that was like your NOS lines, with that green coating on it. It came back essentially the same. So, whatever that coating is, it won't accept zinc. Do you have any other NOS items that you won't be using?
 1 point
 -
1 point"Beware", indeedy. Which is why, in this age of mis/dis information, intentional or not, it is vital for the wary buyer to be able to communicate in a prompt and effective manner with any seller. And why any Seller worth his salt should promote such contacts, not hide out in disrespect for would-be customers. 'Nuff said. I reckon I'll save my custom for those who at least seem to care.1 point
-
1 pointAlso a friend who used to own a 260Z had his tachometer repaired at Bob's Speedometer. https://www.bobsspeedometer.com/ I think you have choices.1 point
-
1 pointI ran a couple of more tests. Reversed polarity - Tachometer did not register at all. Original polarity - Tachometer in car registers just as it should. Tachometer on multimeter put in 4 cylinder mode - 510 tachometer seems to be reading about 1/10 of the multimeter. The needle did appear to indicate proportionally.1 point
-
1 pointThey were in series. That would be the same current since neither should be a load. I might be able verify that with an oscilloscope.1 point
-
I cleaned the pins more thorough and replaced the flasher with this one CEC Industries EF32RL Flasher https://www.amazon.com/dp/B00JXLH7CG?ref=ppx_pop_mob_ap_share the flasher sound more noticeable 🙂 turn max air flow for heater, the ac fuse still warm but can be touch. The fuel gauge is much less heat, which is good. The fusible link is about 100F. turn on AC full blast and the AC and fuel gauge fuse is a tad warmer but still touchable. All other fuses similar room temperature and the good part is flasher fuse hasn’t blown yet. I’ll keep an eye on this for couple more days and see. at some point I probably upgrade the air blower to the Honda Civic or Kia Sportage ad many recommended. stay tuned folk.1 point
-
1 pointYes. One thing I didn't experiment with was polarity. I can run more tests tomorrow.1 point
-
1 pointIn looking at the 510 wiring diagram, for a manual transmission wagon, I think this is how the wiring is without the tachometer. BW comes off the ignition switch and goes to the fuse box. While one branch goes to a fuse holder, another branch goes to the ballast resistor via a fusible link. From the ballast resistor, the wire is BL. The BL wire goes to coil positive. When starting, the BL wire is hot from the ignition switch. With the tachometer, I think this might be how the wiring should be BW comes off the ignition switch and goes to the fuse box. While one branch goes to a fuse holder, another branch goes to the ballast resistor via a fusible link. From the ballast resistor, the wire is BG (maybe?). The BG wire should go to the dash for the tach and come out BL. The BL wire goes to coil positive. This may be backwards. The challenge is that I have yet to find a 510 wiring diagram that shows the tachometer and is very clear on the wiring. The one I used to find the BG wire color leaves much to be desired. It was created by a 3rd party. What looked to be a Datsun FSM BE section didn't even show the ballast resistor. It might require that I pay you a visit to work that out, @Patcon. B - Black L - Blue G - Green W - White @Patcon There is a place not too far from me that does car instrument repair. http://www.hampspeedometer.com/ You might want to see if they can test/fix the tachometer. Datsun_510_Wiring_Diagram_1971_Wagon.pdf1 point
-
1 pointWhile I said the wrong thing in the video, off camera I put the meter in 4 cylinder mode and found out that the 510 tach should have registered higher.1 point
-
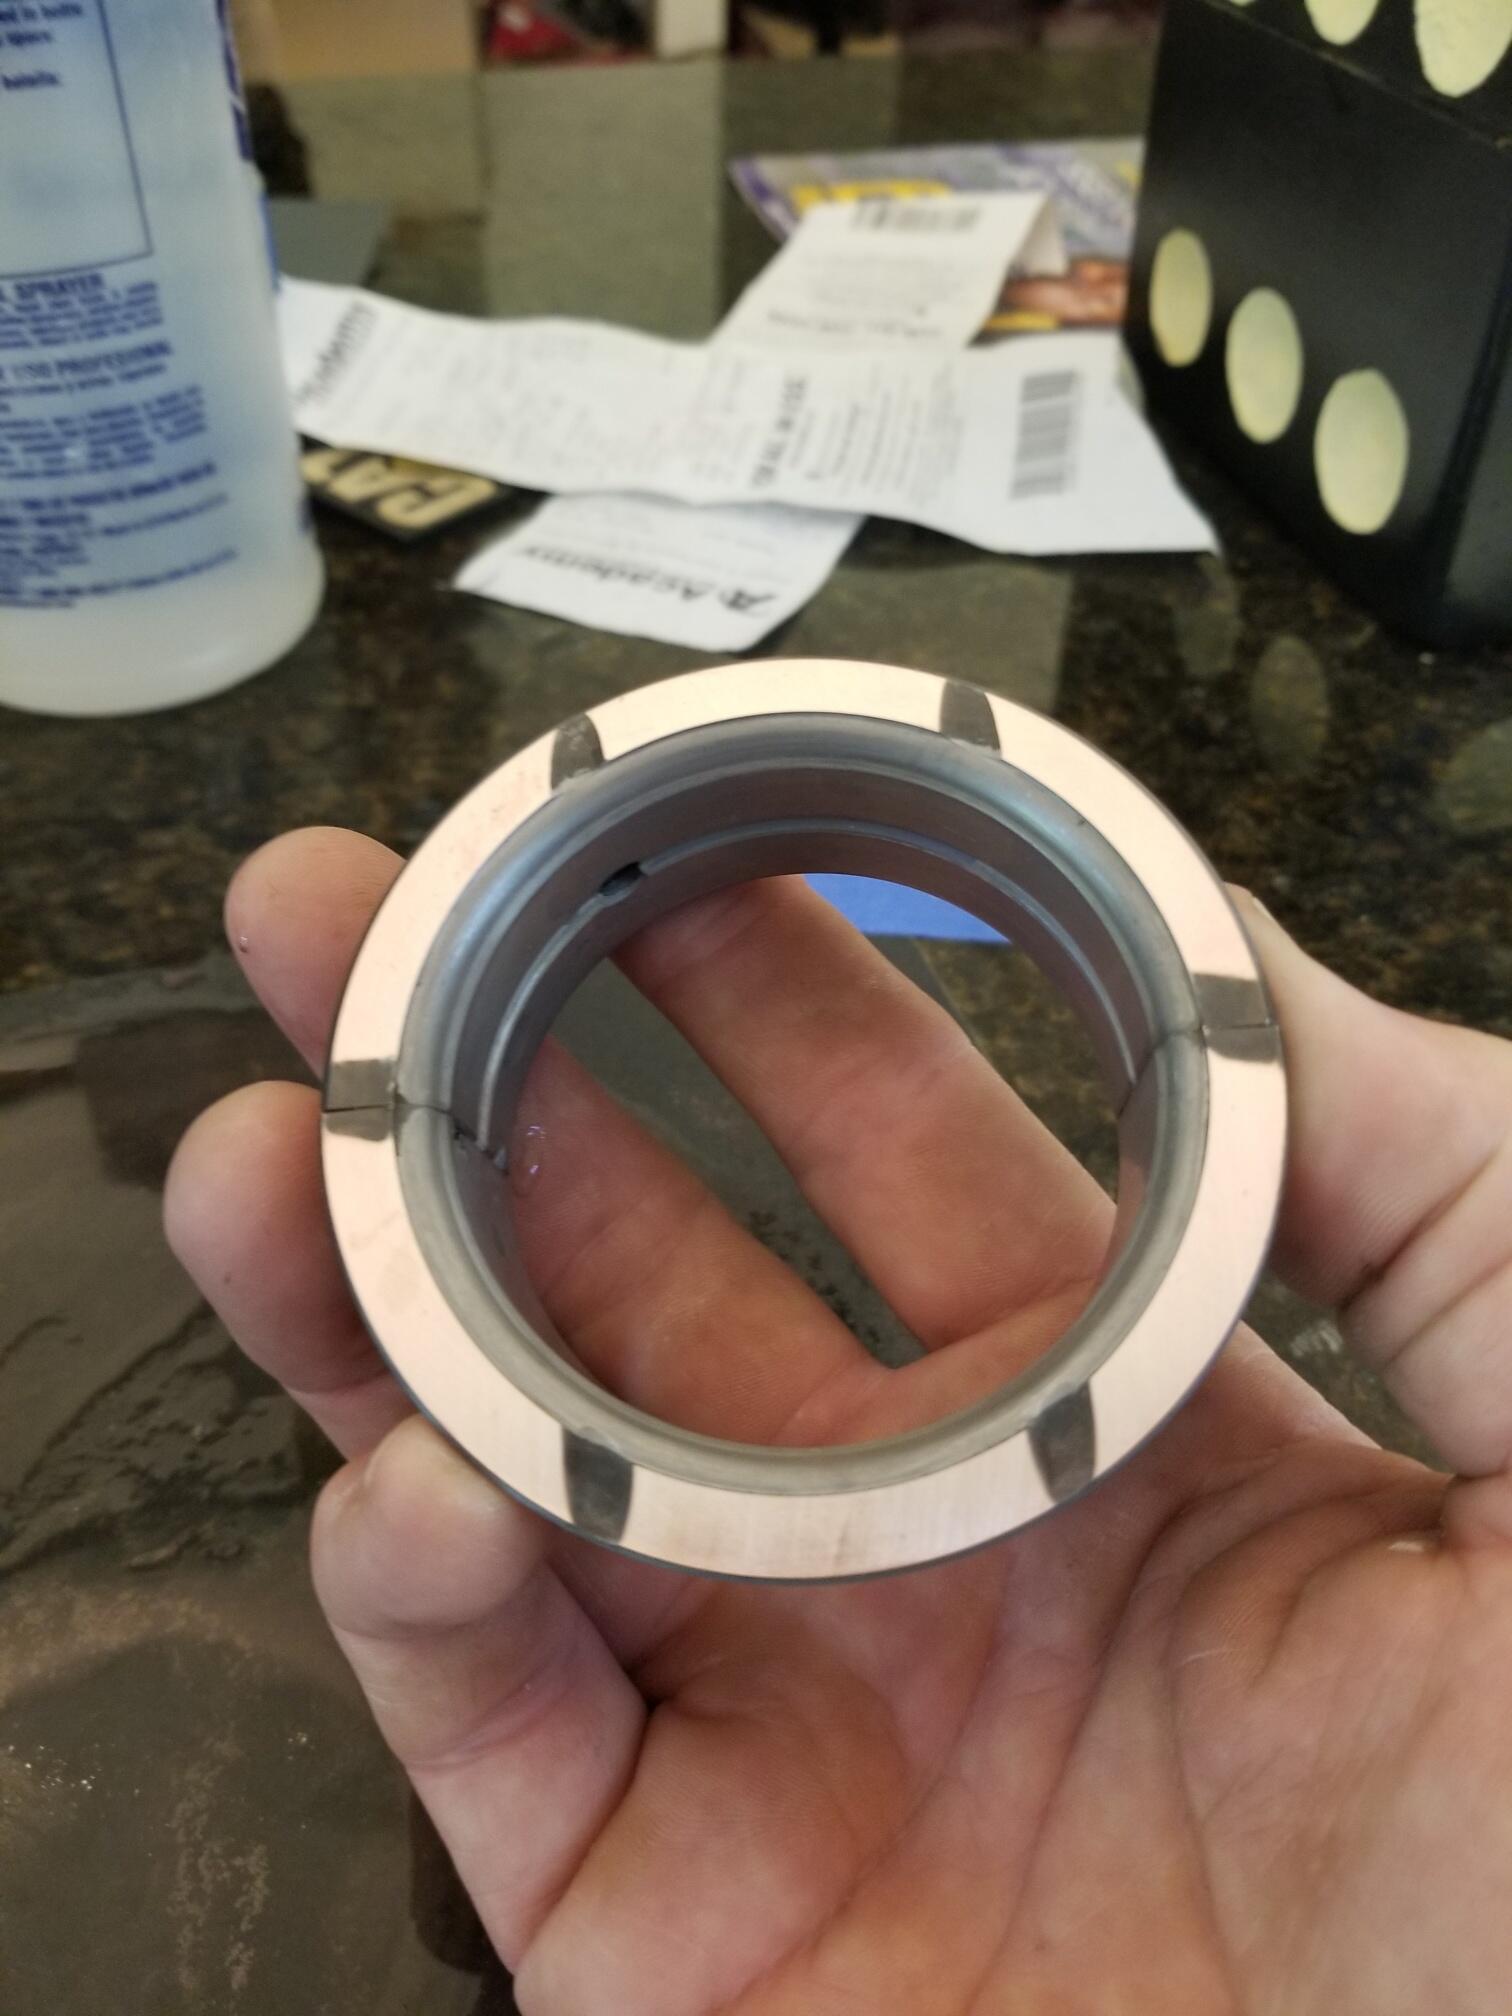
1 pointI've been stumped on the front counter shaft, it seems like the value changes based on where i measure the bearing to the faceplate, as if its not sitting flat in the housing... It might be how I am using the end of the digital caliper to take the measurement, there could be variable in where I am holding it. If you are looking for a way to torque down the main nut, i used an autozone inner tie rod tool rental. It worked like a charm, after that you should be ready to measure the gear end play.1 point
-
1 pointWhat happens if you just raise the RPM while sitting in neutral? Can you get the needle to go up and down without a load? It kind of looks like what you might expect if the radiator was not actually removing much heat. Is your heater core intact and connected or has somebody "bypassed" it? The bypass allows coolant to pass through the block and back to the pump without passing through the radiator. Effectively reduces pump capacity. Another thought is that the water pump impeller blades are shot and not moving much coolant.1 point
-
I get the impression from the various comments around the internet that people feel that there are more buyers than cars out there, therefore if a car is priced appropriately it will always sell. In other words there is a group of many buyers out there looking to buy. Maybe that's not the case and the number of buyers/collectors is actually limited. I also had the impression that the car probably had more value as a collector car than an enthusiast's car, like you're implying above. If I was a collector I would cringe at the driving video, each rev to 6000 RPM was subtracting value. But as an enthusiast it was fun to watch.1 point
-
1 point
-
1 pointNow I have to get some kleenex to wipe up the oil that I spilled on the floor. 😉1 point
-
The owner made too many costly decisions related to marketing the car. He spent a lot of money getting it running/driving - but stopped far short of spending enough on the cosmetics. One comment was that the undercarriage should have been cleaned up with dry ice blasting (before showing the car). Another was clean/clear and reinstalled all the hard fuel lines and original clamps. Both were sound advice. Although it was unintended, the Z was presented as an unfinished “Project”; where it should have been presented as a true survivor with 95%+ of its original parts still on the car. (still on the car!). A couple bidders saw it as a Diamond In The Rough, and they offered a fair price in today's market, given the need to spend even more on it. The secondary issue then was the need to fix the rust spots on the body, which could easily leave the car with mis-matched paint patches - repaint the entire car and it is no longer an “original paint” survivor… Damned if you do - damned if you don’t.1 point
-
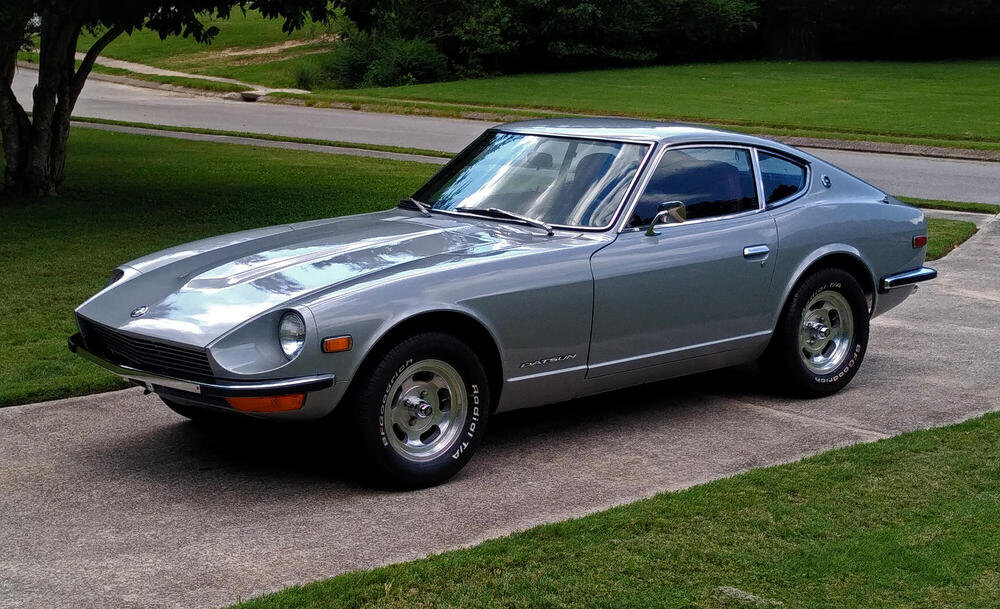
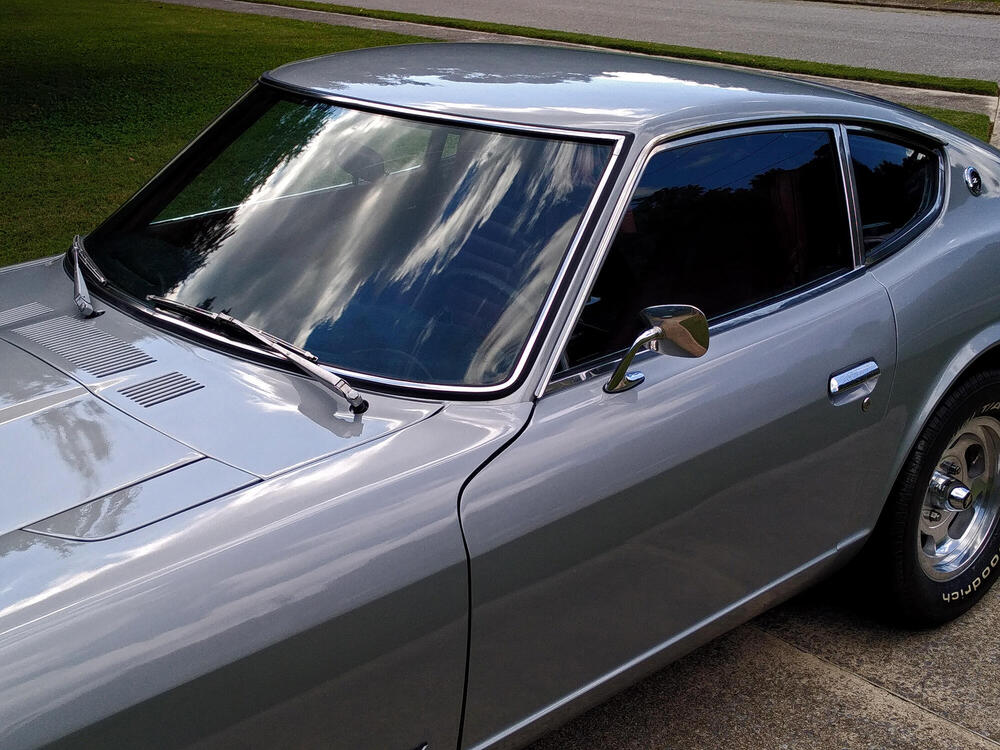
Maybe he had a bit too much fun in the driving video. I think on a one week auction your timing has to be pretty good. August is not a great time for selling either, I think. The people with the extra money are often spending it on vacation. Spring is when you want to sell. https://bringatrailer.com/listing/1970-datsun-240z-86/1 point
-
It was $50 Aussie for 5kg, it was just in a polystyrene cooler, and I used my welding gloves to handle it. 5kg was just enough to do all the flat surfaces1 point
-
The 'hoop' on my 4/70 steering wheel - as seen in the photos on the first post of this thread - is mild steel bar and measures at 7mm. 6.3mm seems a strange - non-standard - size? I would imagine it being far more likely that they would use a readily available standard size, no? I don't know where this talk about wood "powder" and even "sawdust" comes from. There is an easily-observed grain and structure to the wood material used. That grain follows the shape of the wheel circumferentially. There are no readily-seen end joins. In a way it is rather like wool, where short strands of carded wool are spun together to make a continuous thread. The wood fibre used here seems to have been processed in something of that nature. Yes, it is not a traditional wood-rim wheel in the way that your custom-made version is (we have already covered that) but it IS wood.1 point
-
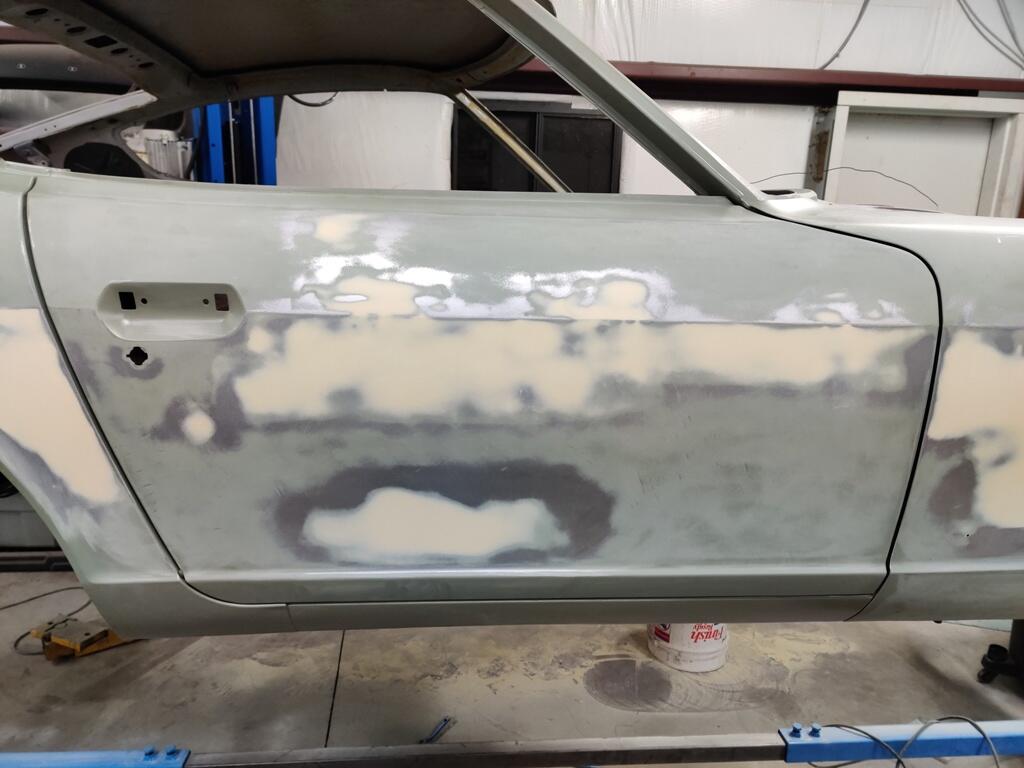
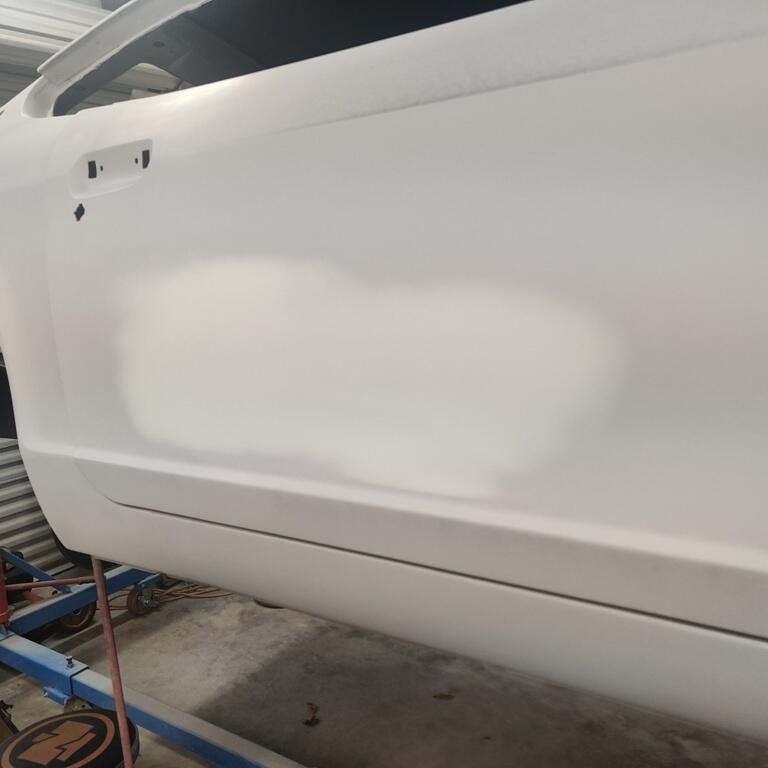
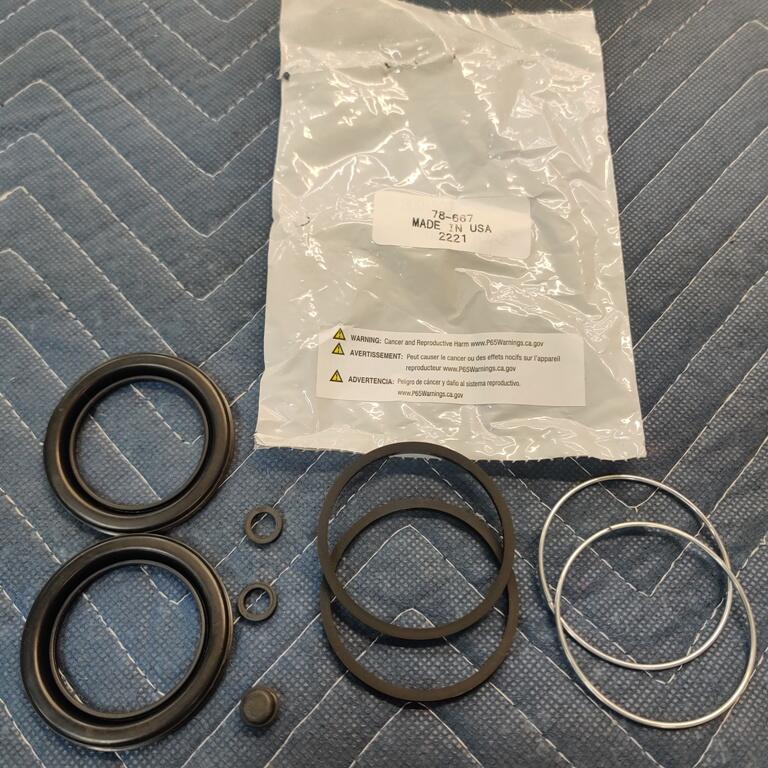
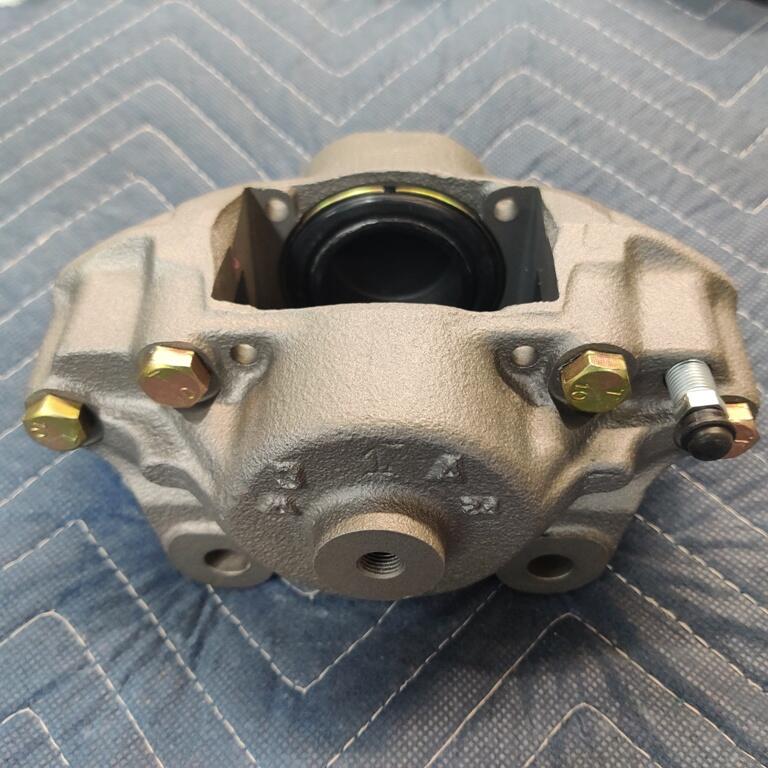
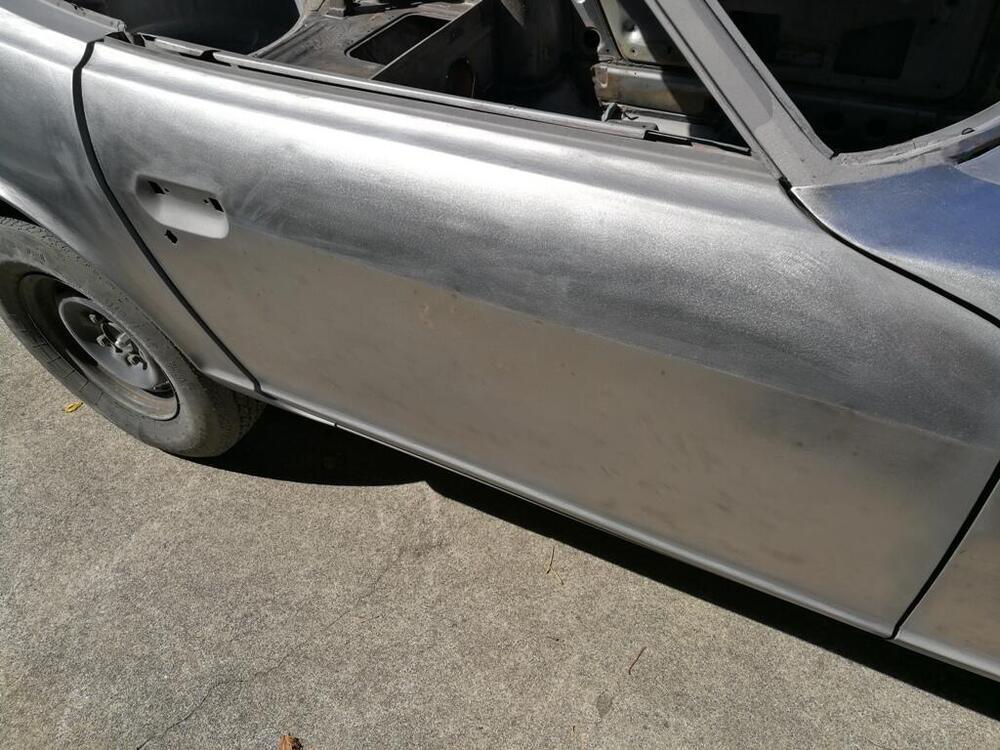
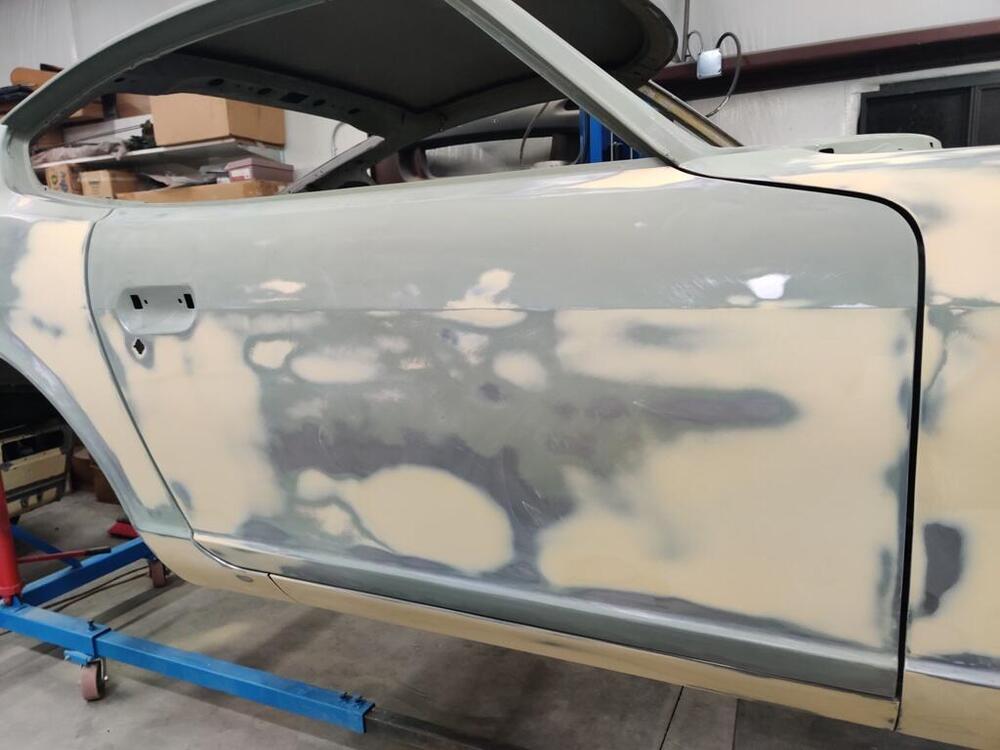
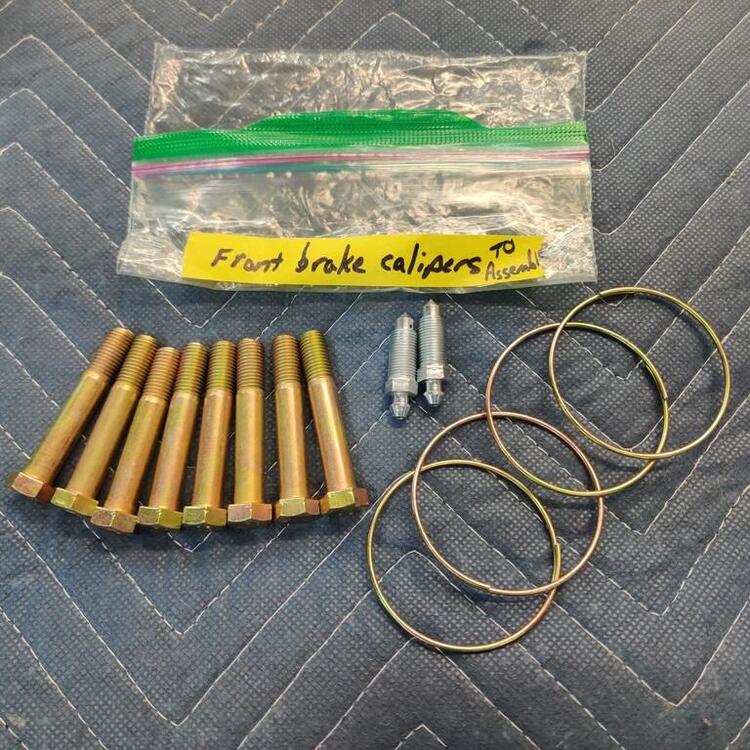
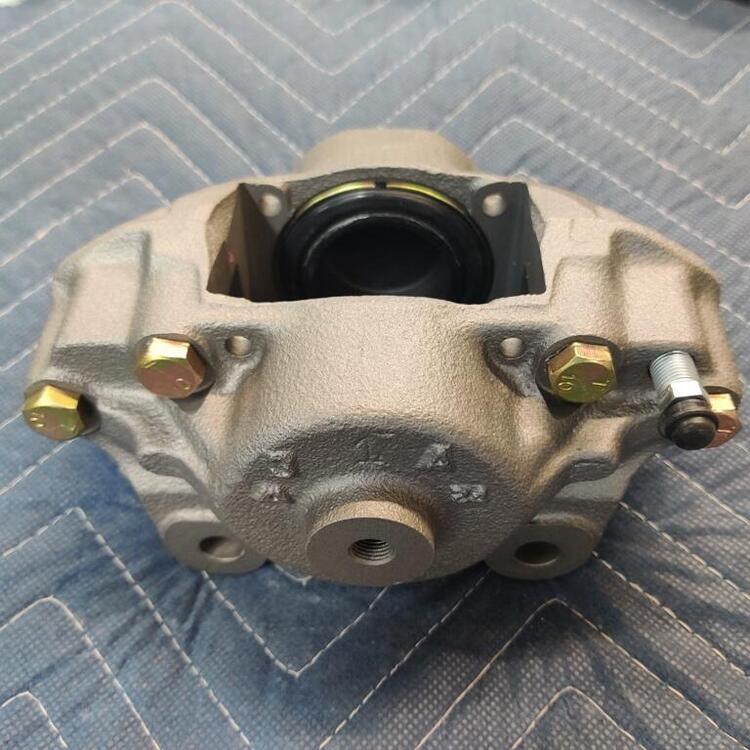
So, my latest learning from doing the bodywork on this car... This is a pretty important lesson to learn with regard to filler work. Here is how my passenger door looked in bare metal: The door wasn't sand blasted. Don't do that, by the way, of course. The paint was stripped off with a 36 grit disc on an air sander. Followed by 80 grit on a DA. Next pic shows body filler which was applied on top of epoxy primer. An obvious issue is that I have over sanded the filler and broken through the epoxy primer to bare metal. The instant you break through to bare metal, unless it is a high spot which will be pretty obvious, stop sanding. But, what I really want to point out is with a large panel, such as this passenger door, you can't assume it is flat enough to just skim coat with filler, sand, and spray a couple of high build primer coats on it and call it done. Note the bottom half of the door and that oval spot of body filler: After more filler applied and more sanding... note the oval spot is still there: In this pic, I have applied high build primer filler... and note the oval spot on the lower half of the door... this time with white body filler added. Are you starting to get a sense of the repetition here? right Almost a year ago, the bodywork on this door still wasn't right. So, here is what I have learned. Don't over sand. Other than possibly being a good workout, it wastes time and materials. Critically, for large panels, use a straight edge, or look at the reflection with a coat of wax and silicone remover on the panel, and check for any concaveness across the span of the door. It is exceedingly difficult to address the panel being ever so slightly concave after you have sprayed primer filler. You need to check it while it is bare metal, and again while it is in body filler stage. Get the panel flat while in the body filler stage. Do not move on to primer filler until the panel is flat. Use guide coat, and wax and silicone remover and check progress. Primer filler is not going to fill a concave panel. That is another thing I was doing that was wrong. A picture from today - note the white filler in the same location as the oval low spot in the pics above, and which can be seen in the video above also: I have learned a lot, but have done it the hard way. And it has cost hundreds of hours and hundreds of dollars in materials. The reflection looked really good prior to application of primer filler today, so I think this door is super close to done, at long last. While waiting for filler to dry, I also assembled my brake calipers today. The original hardware was re-plated, insides of pistons sand blasted zinc primed and painted, caliper halves sand blasted, zinc primed and painted with Eastwood cast iron look paint:


 1 point
 -
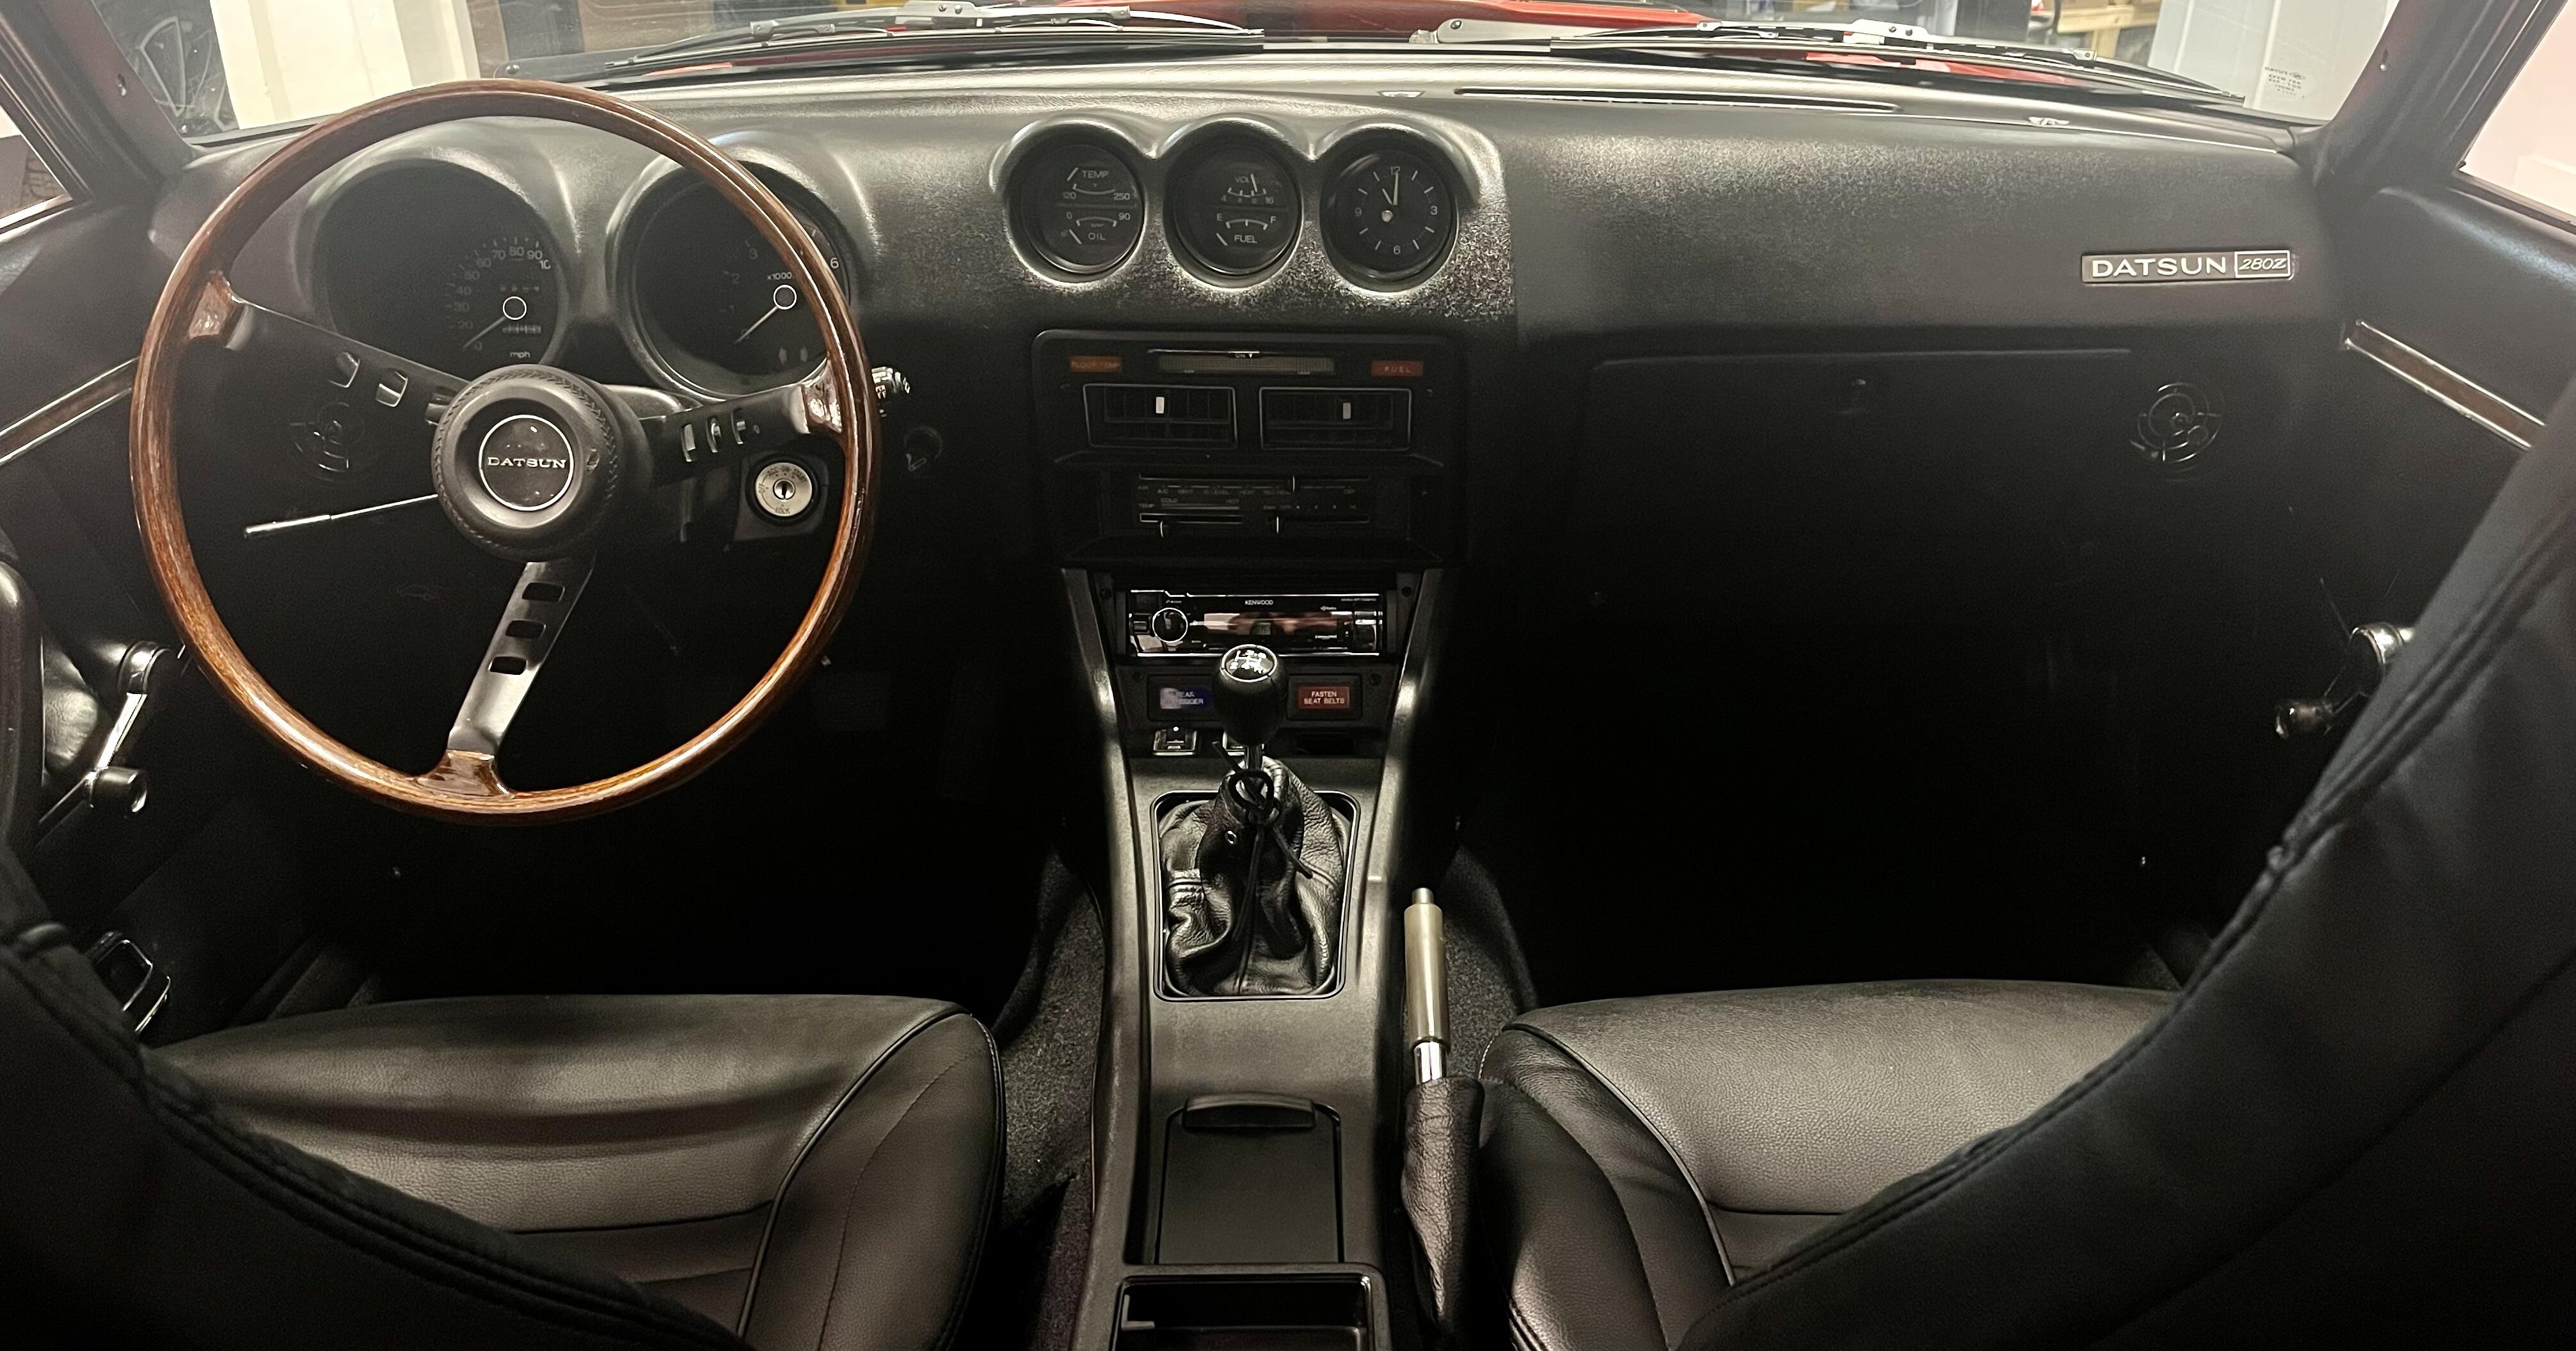
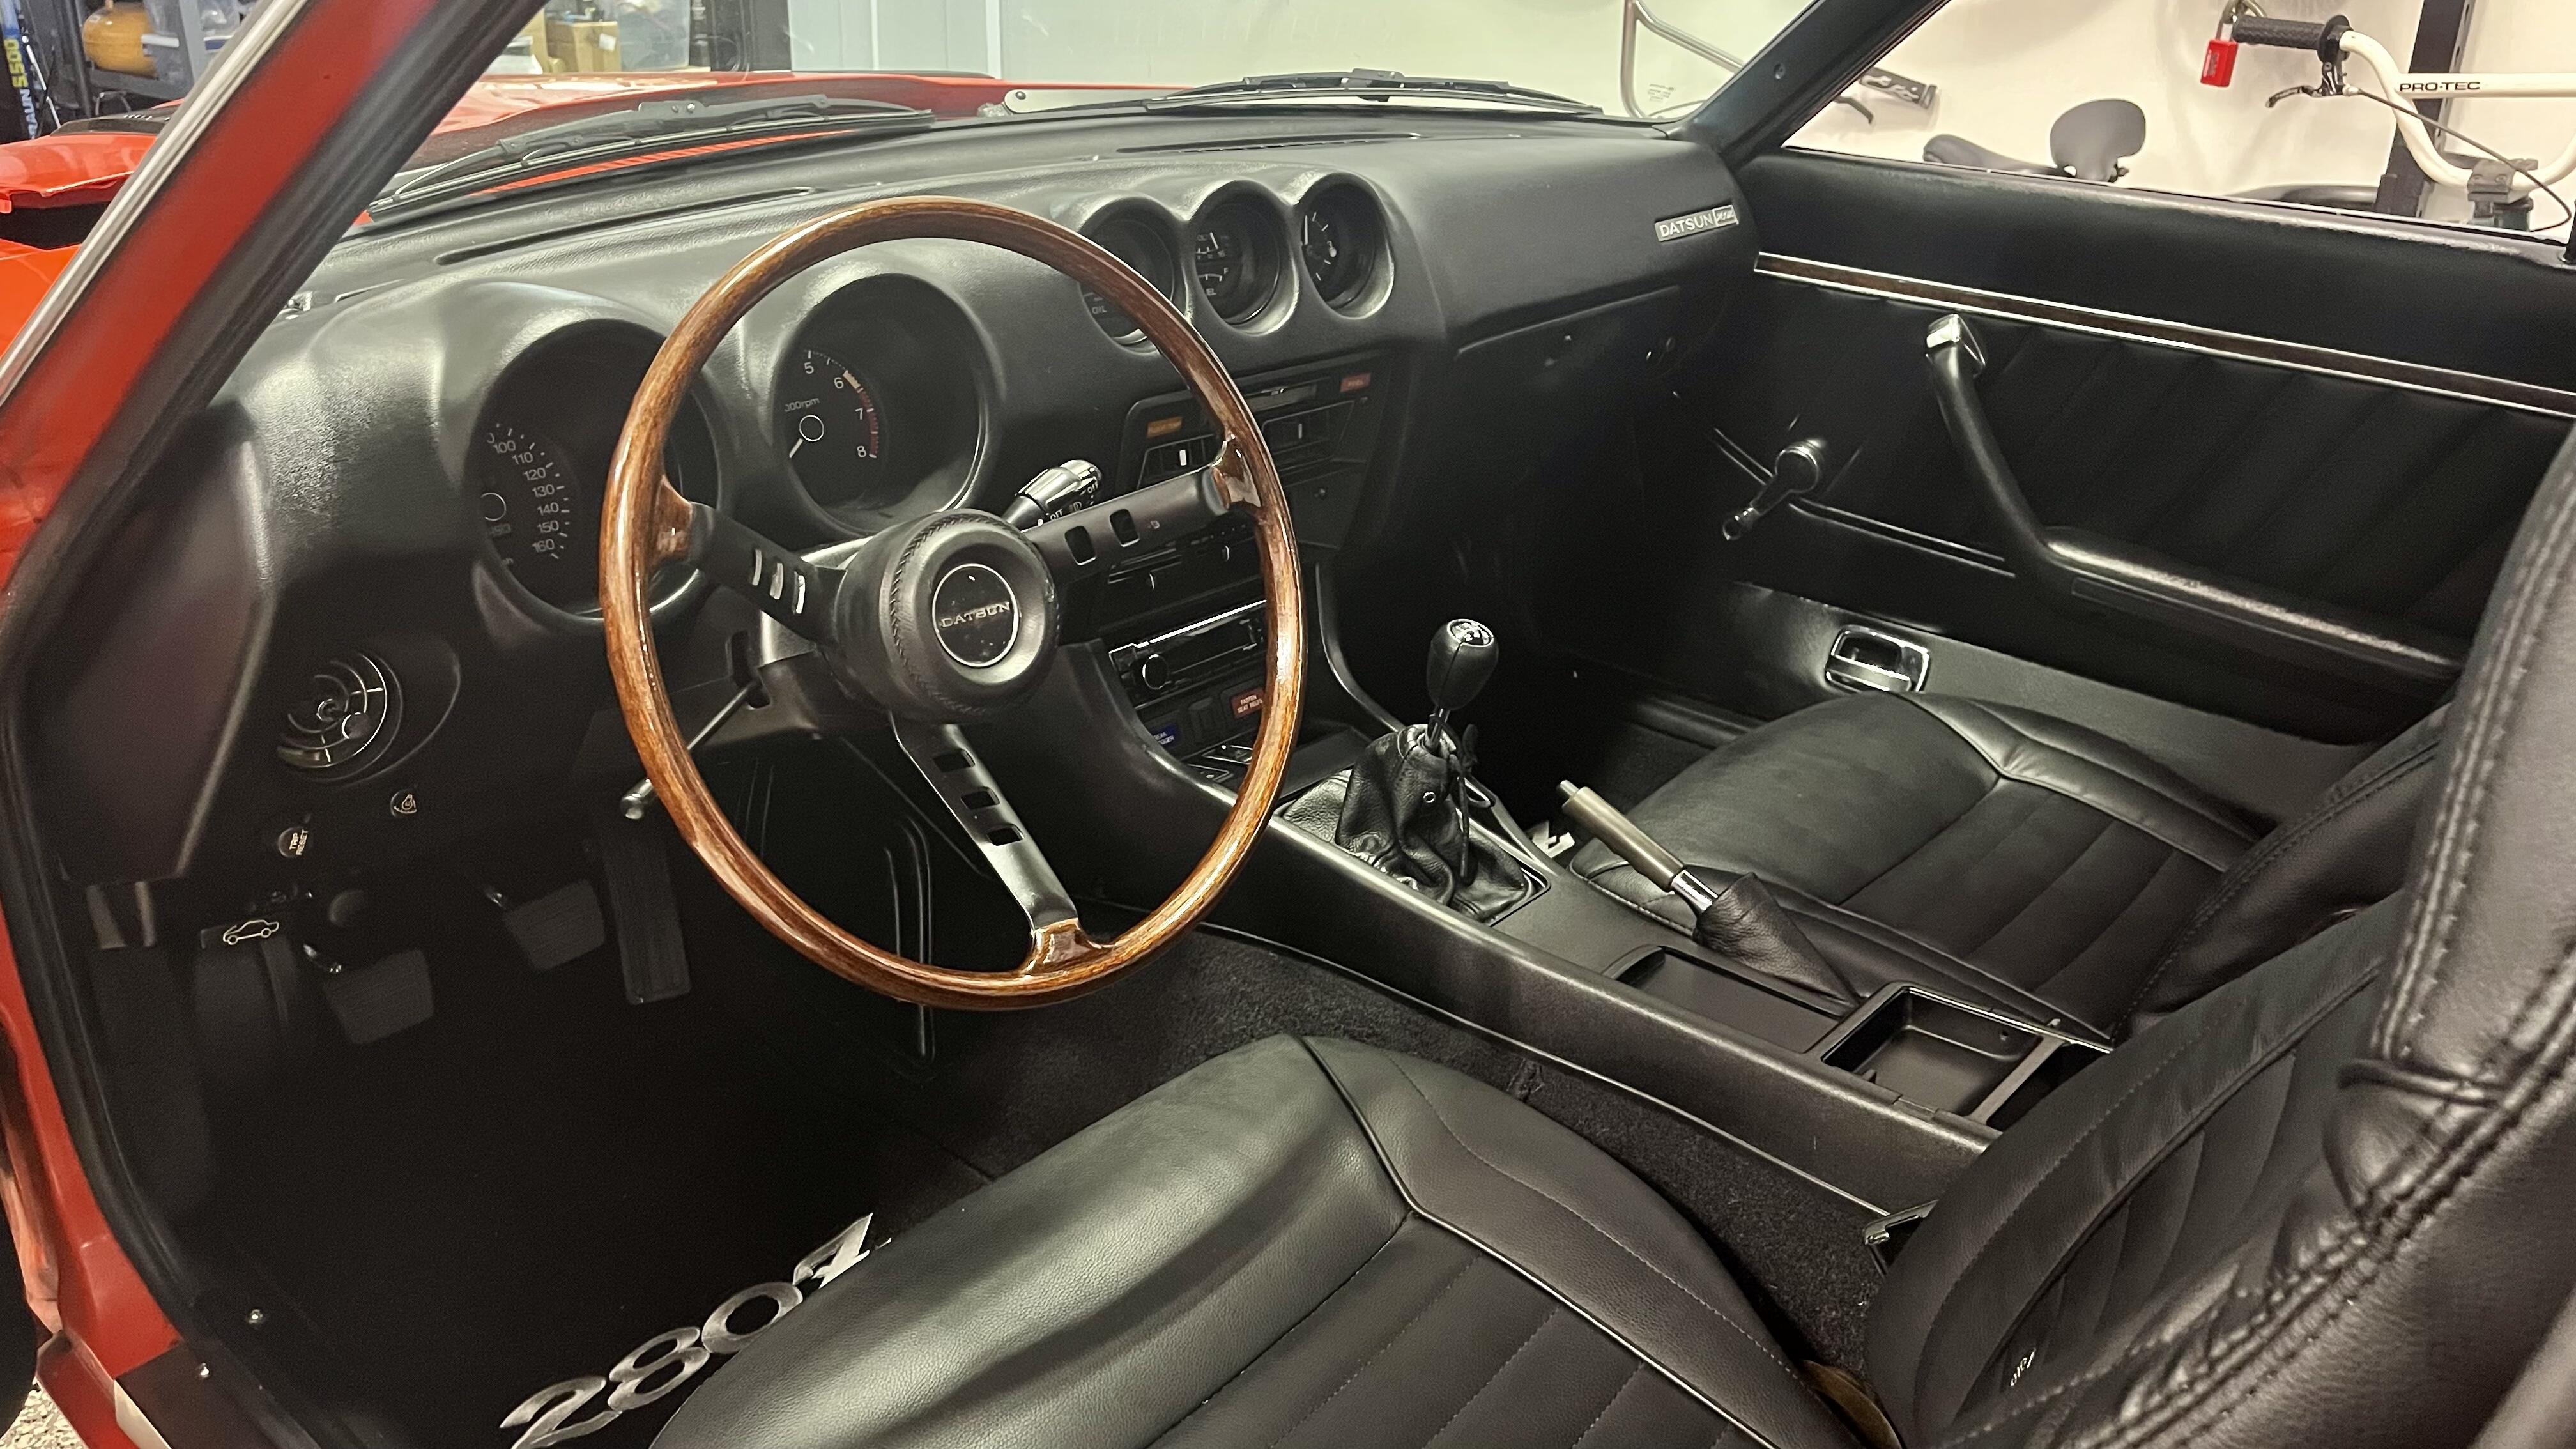
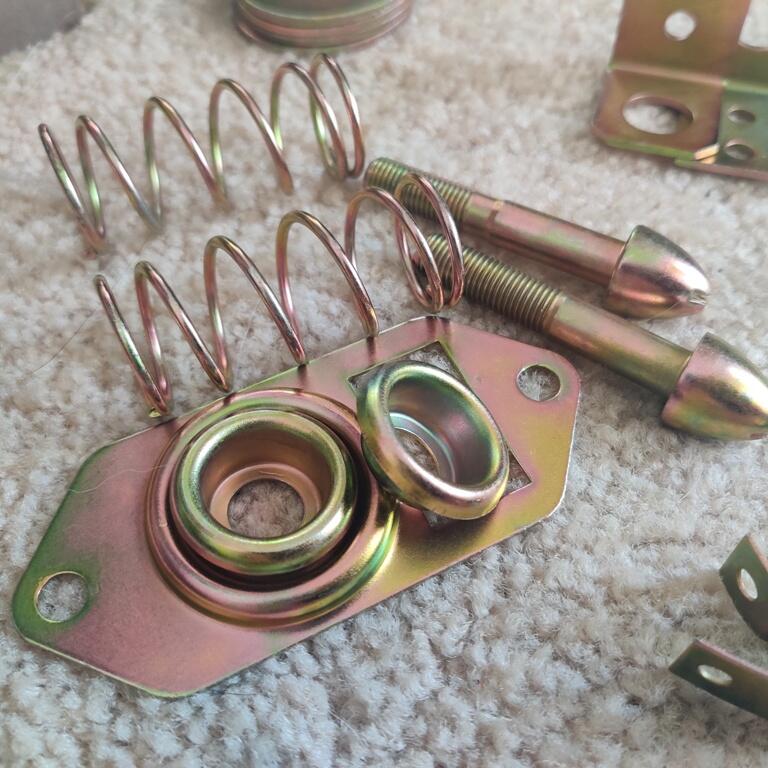
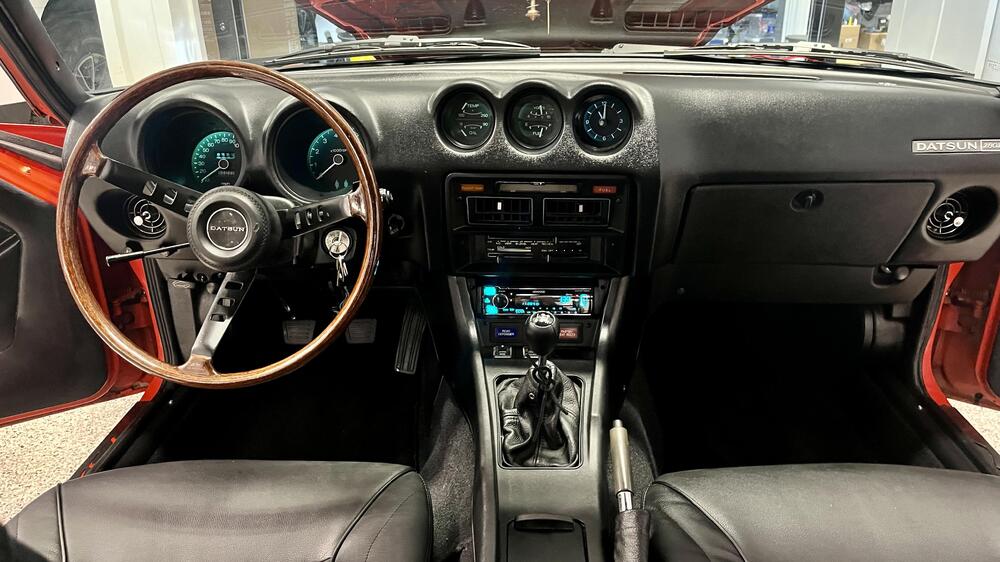
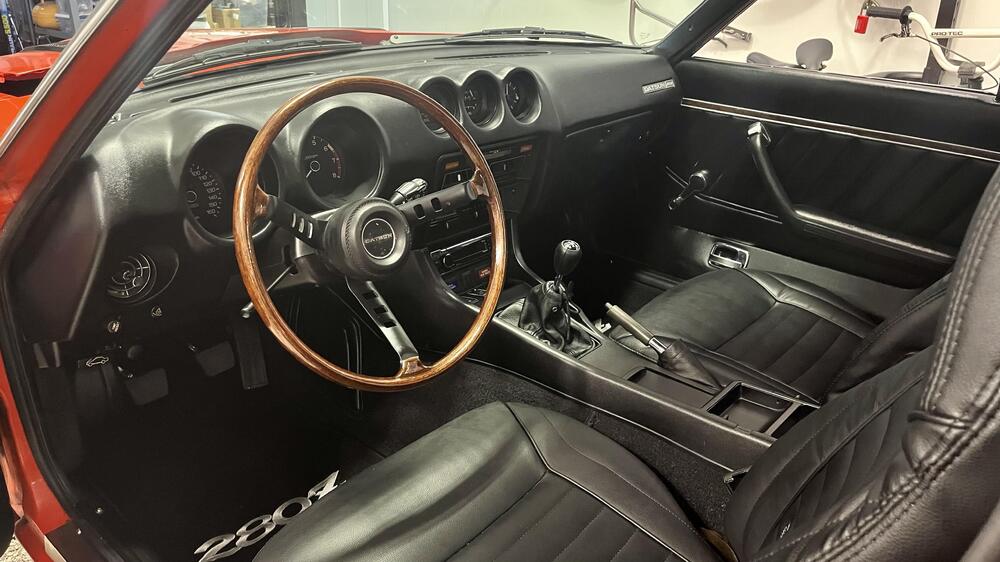
1 pointWrapping up the interior. I’m pretty happy with the outcome. It’s not perfect but it has come a long way. I wish I had great pics of the interior to show the before and after. The bottom line my car had no interior and no seats when I bought it. Everything is new or something I either bought or salvaged. The only interior pieces that I had were the plastic panels that go around the rear quarter windows. The headliner was also in good shape and required no work. There was no vinyl on the shock towers or wheel wells. I salvaged mine off a junked Z in a salvage yard. You can see in the before pics the interior was just bare metal. Still haven’t figured on the center console arm rest mechanism. I have all the parts (springs and wires ) just haven’t figured out how is works yet. I also need new sun visors, or to have mine refurbished.


 1 point
 -
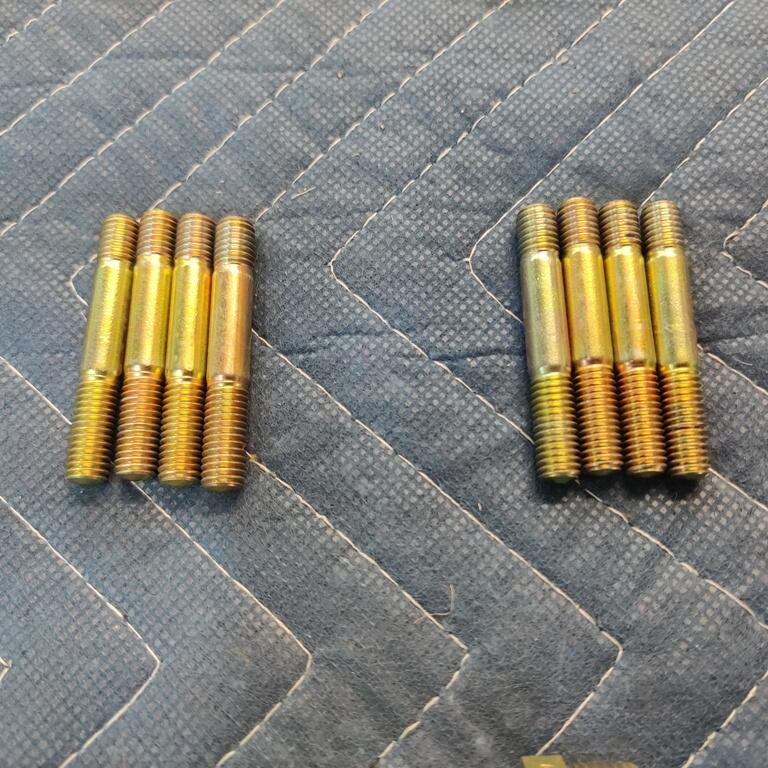
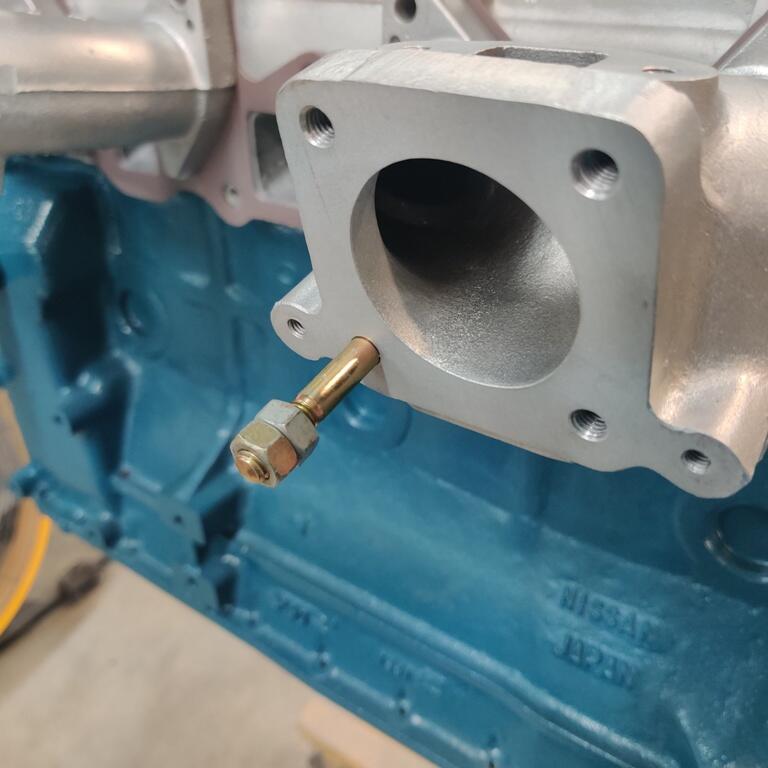
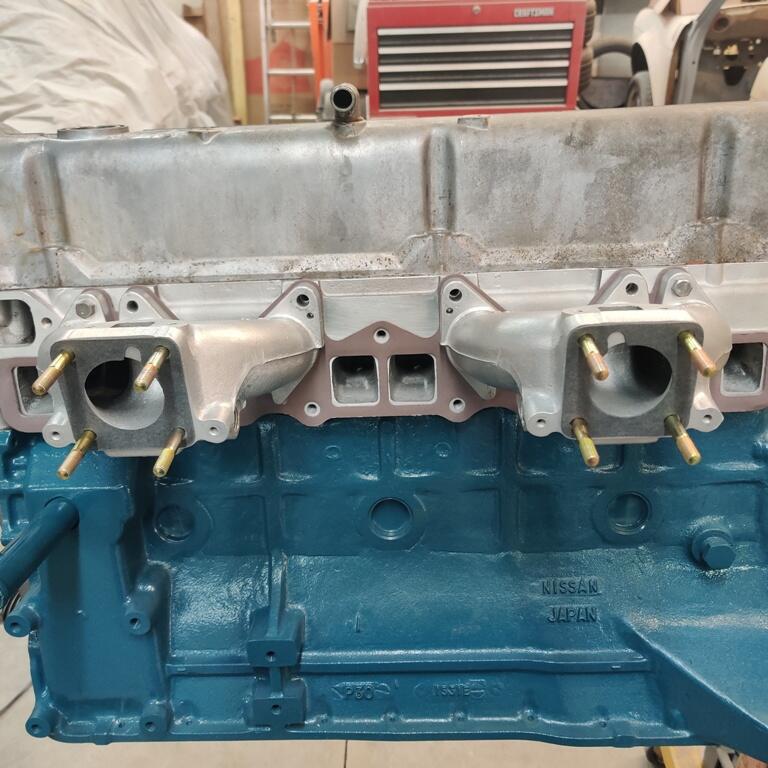
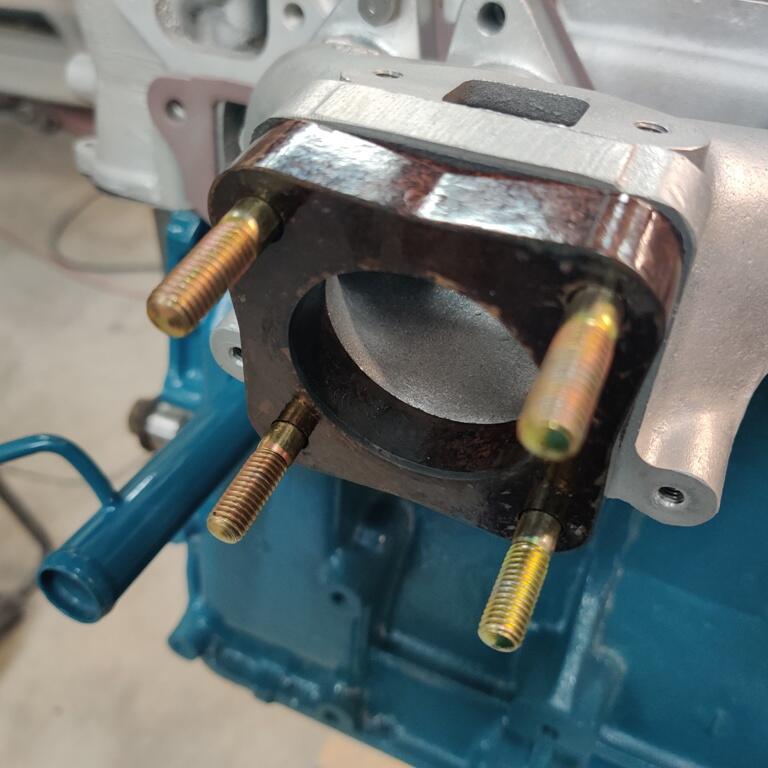
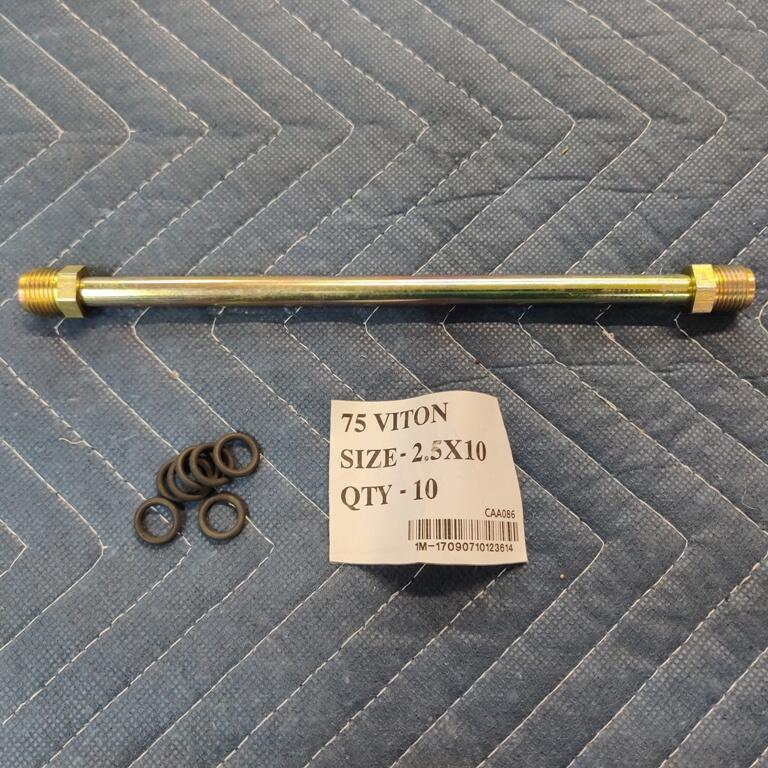
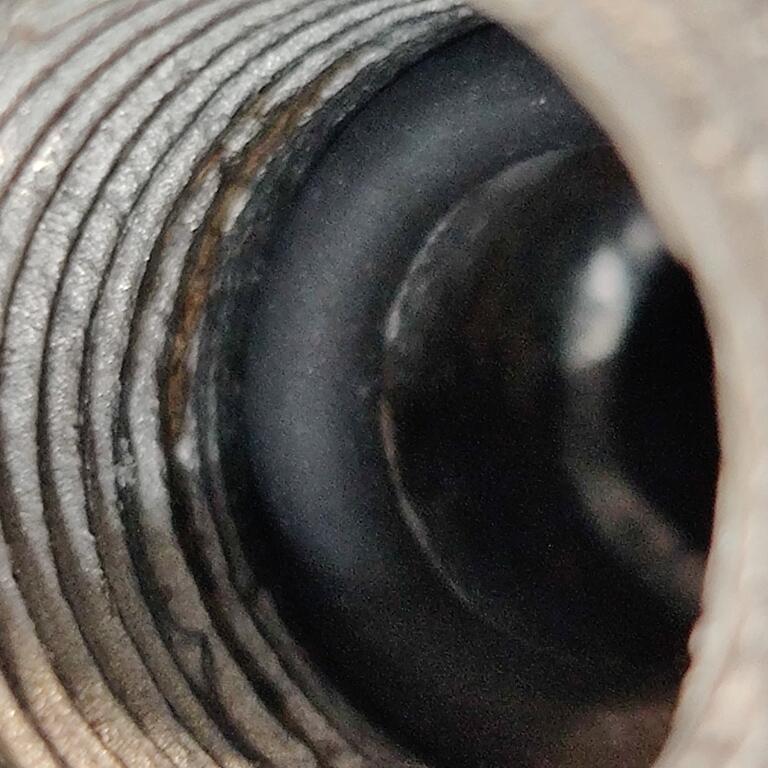
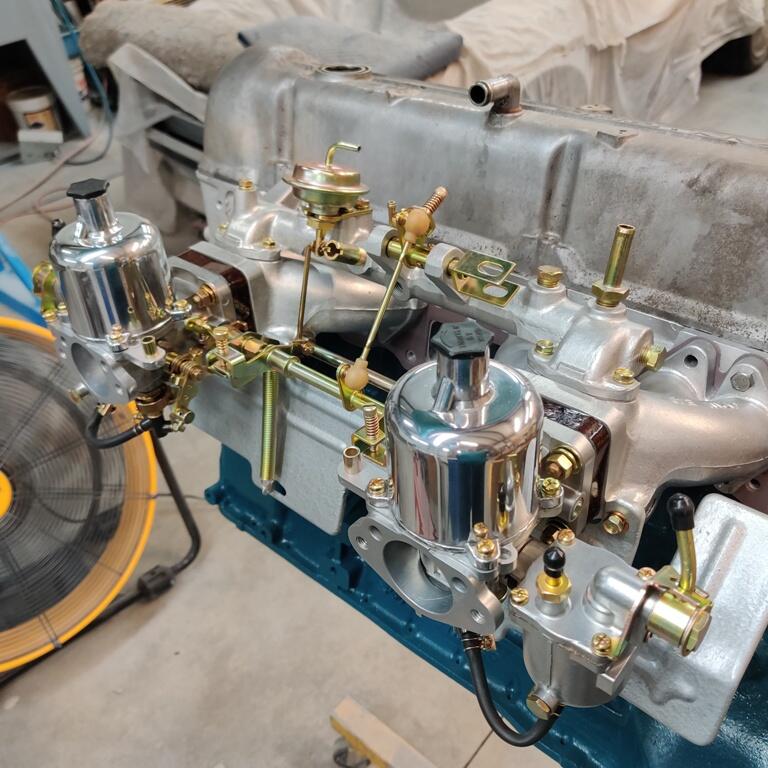
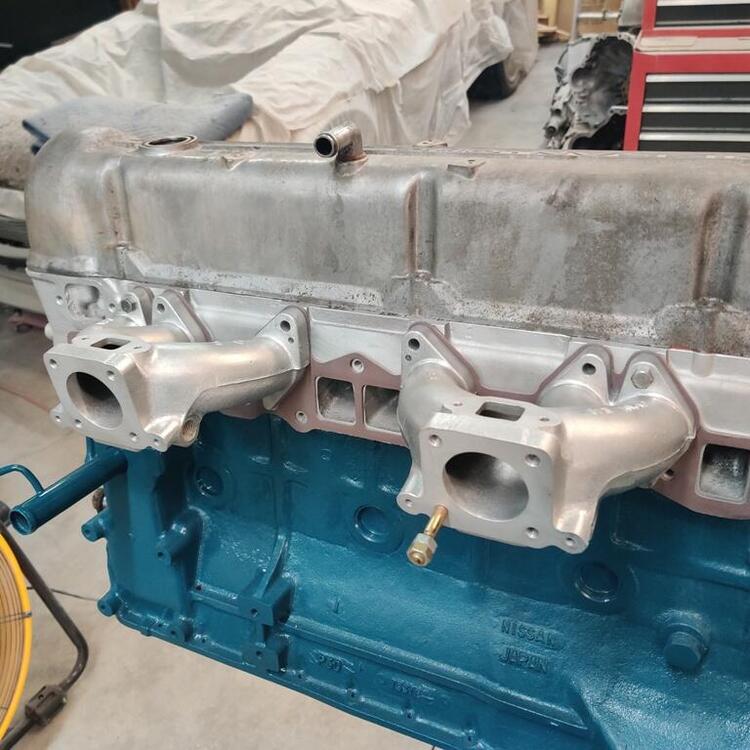
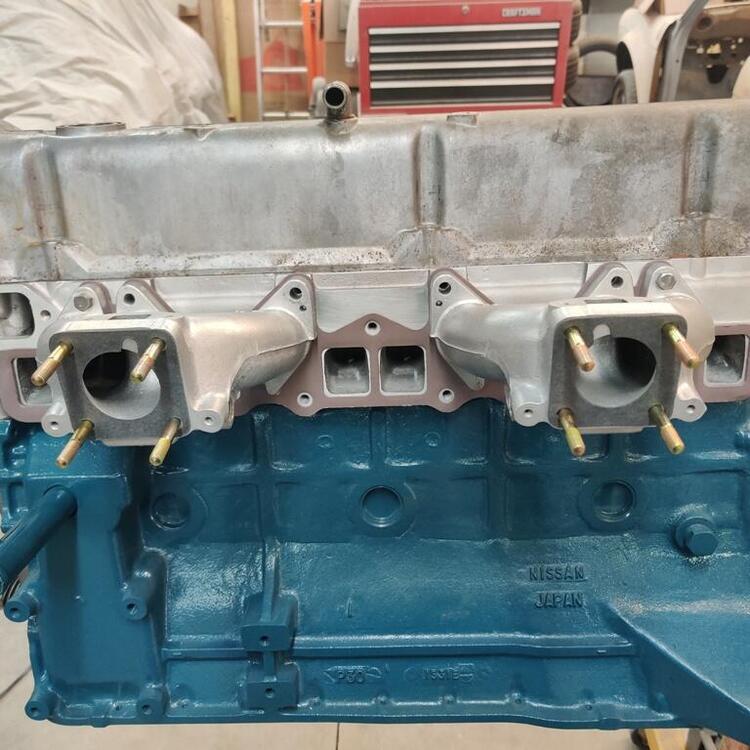
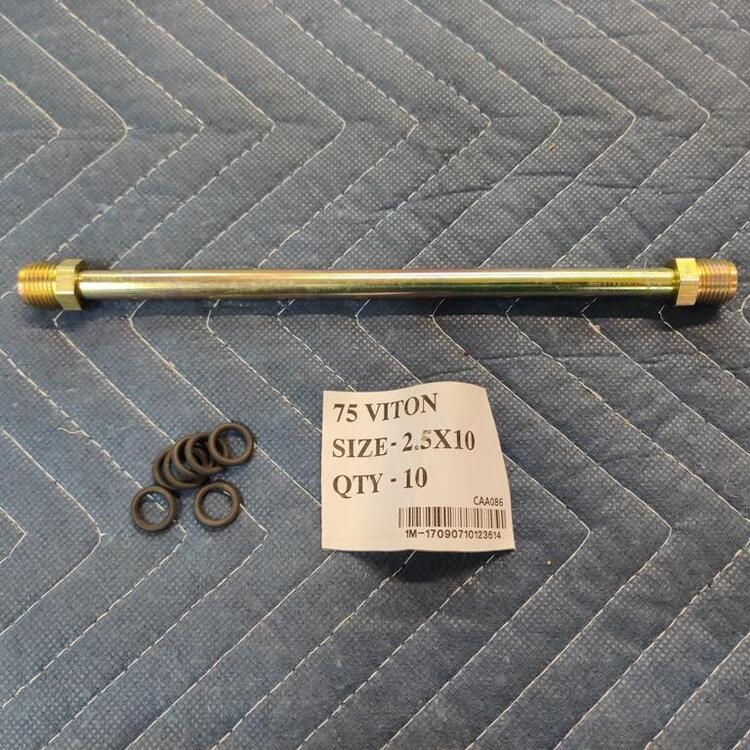
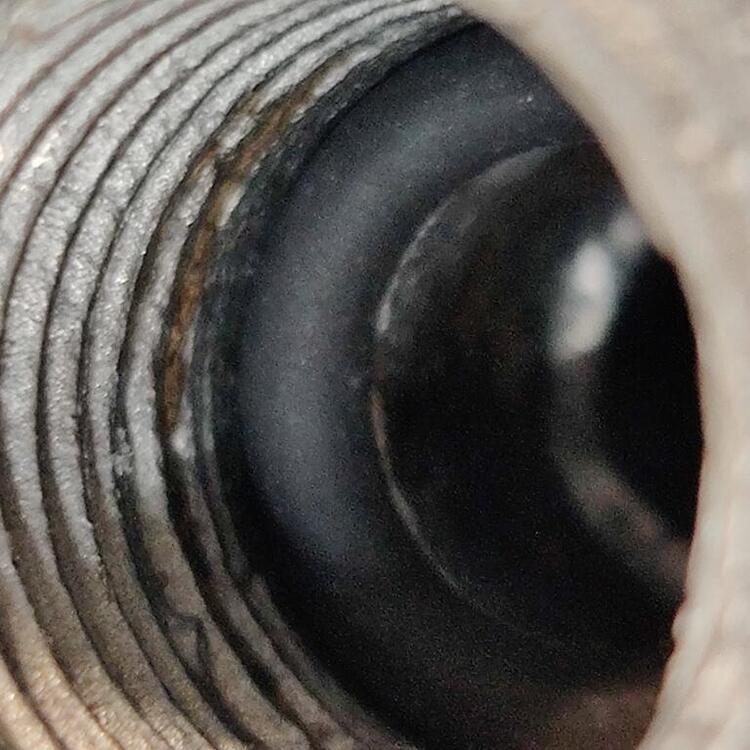
In addition to working on the doors and front fenders, making progress towards addressing the minor imperfections again today, I had some downtime waiting for 3M platinum finishing glaze (fine filler) to dry. So, I decided to pull the cover off of the engine - Ah ha! That (center pic, first row of pics, holding the manifold to the engine) is where my two intake bolts that were missing went! Unfortunately, they didn't make the trip to the plater. I am thinking there will have to be one more shipment to them for a few parts that I accidently left out. Assembly of the intake manifold. For those that do not know, studs can be installed using two nuts on the end of the stud tightened up against each other. Locked together, they won't spin and the outer one can be acted on with a wrench to wind the stud into position: Four studs in each intake manifold, gaskets and the heat insulator blocks installed. I rarely see people remove the coolant tube from the manifolds during restorations. It was a pain. I destroyed the old tube, and mangled the original fittings. But, the tube is basic, and a replacement is easily sourced. The outer diameter is 10 mm. The fittings at each end are very odd. I remember spending a lot of time searching the internet, trying to get info on them. Eventually, I figured it out. They are "Male Inverted Flair - Tube Nut - M16 Threads x 10mm Tube" The factory ones have a 19 mm size on the hex, but I couldn't find ones like that. The replacements are 16 mm hex. Additionally, what makes a water tight seal at each end of the pipe is an o-ring. Originals were hard as rocks, and crumbled. I was able to source some Viton O-rings that I am confident will work (see third pic in the row of pics below). There is an angled (chamfered) shelf that the o-ring seats against. The nut compresses against the o-ring. The chamfer forces the o-ring to push against the outer diameter of the shaft to create the water tight seal. First pic is 5.9X magnification of the o-ring in place. Second and third pics show the intake assembly. Unfortunately, the rubber fuel tubes got kinked a bit during storage. Will have to see if that resolves itself now that they are installed. I sanded the 3M glaze and applied 3 more coats of high build primer which I will sand tomorrow. Fingers crossed that I can finish the doors and fenders tomorrow.


 1 point
 -
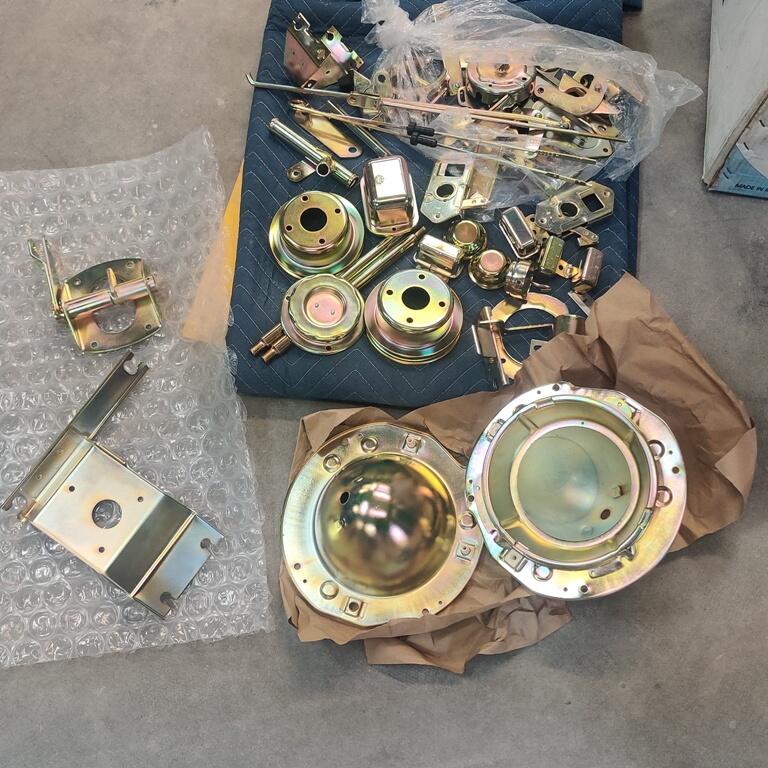
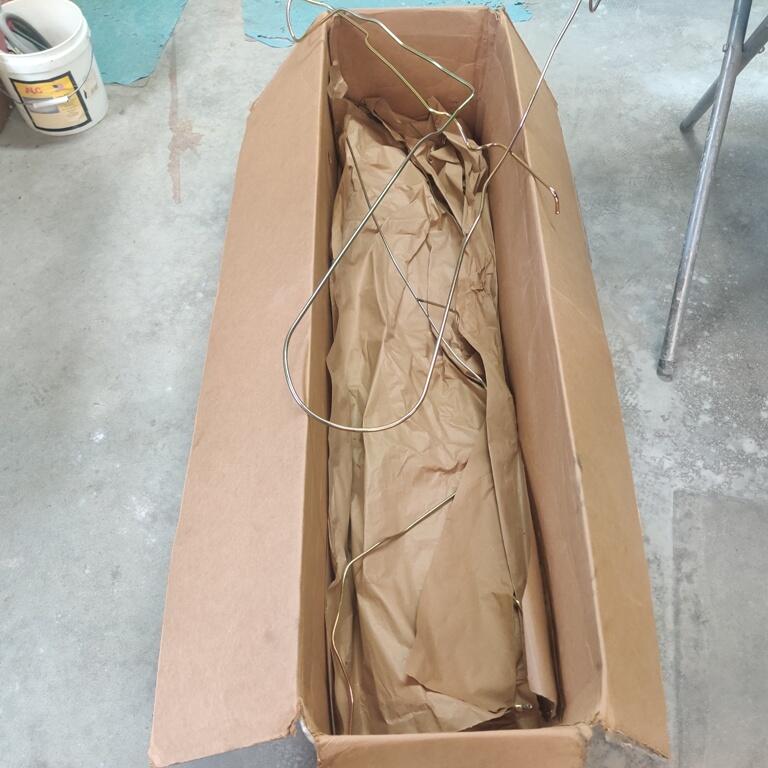
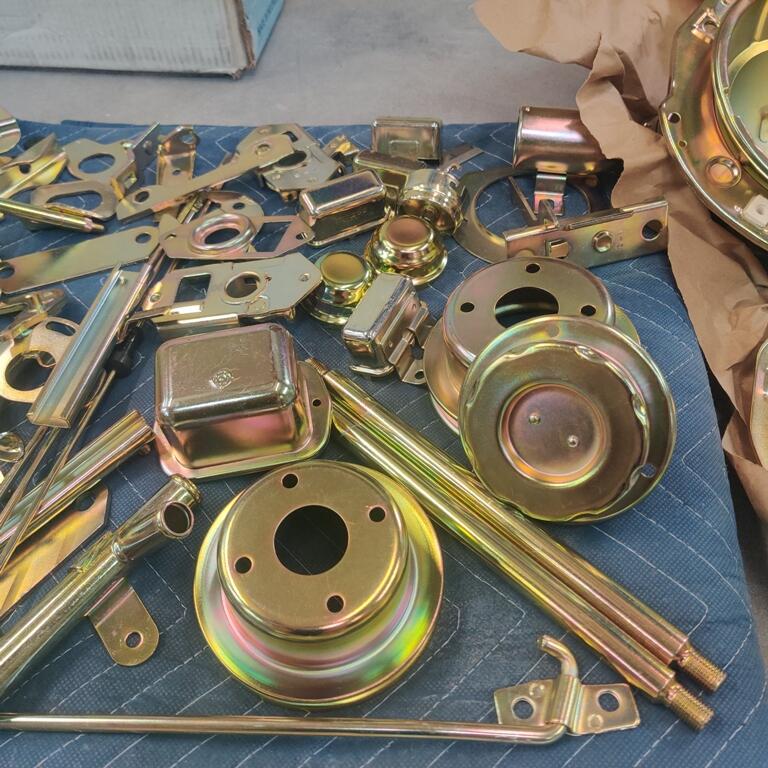
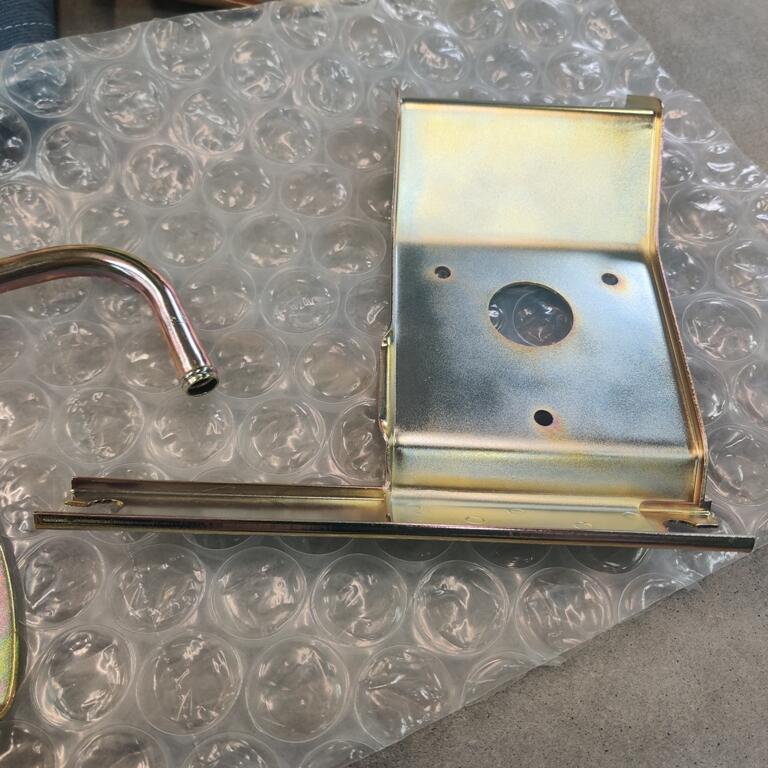
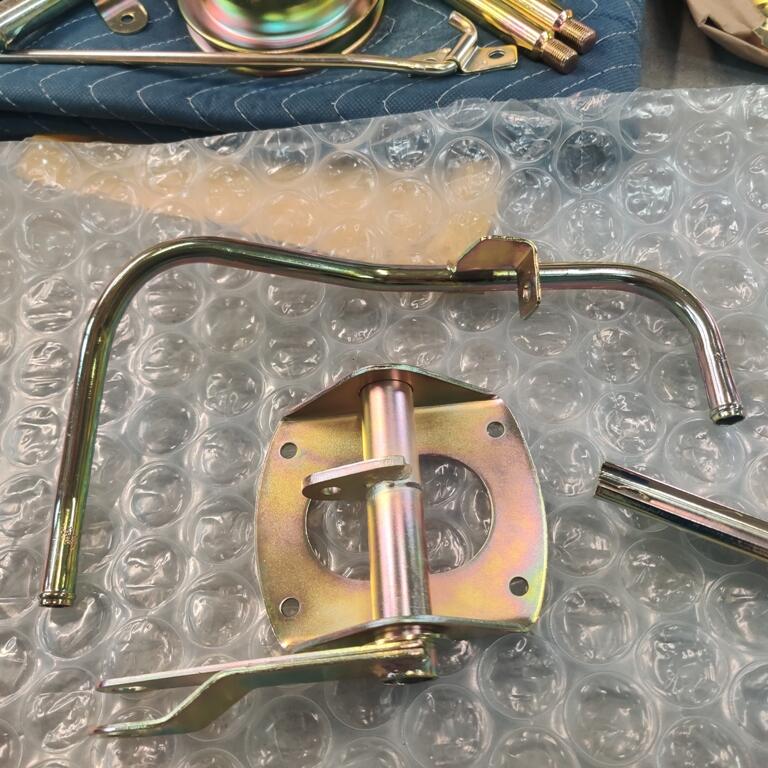
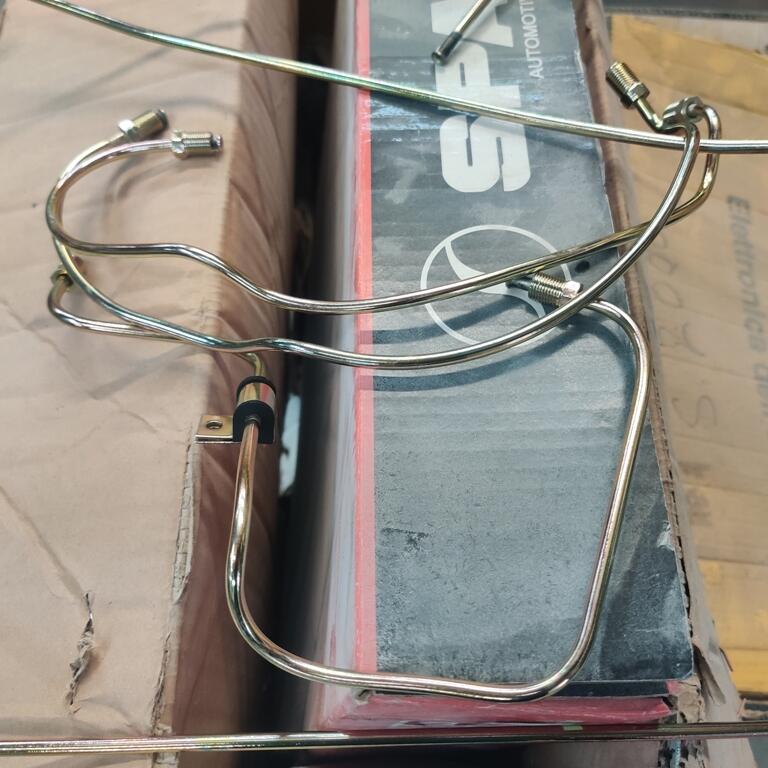
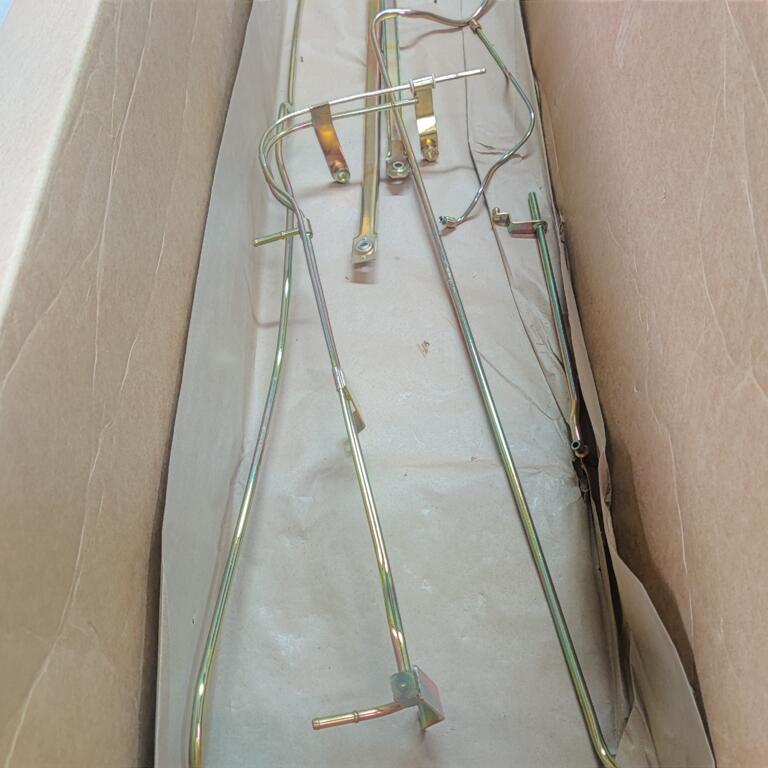
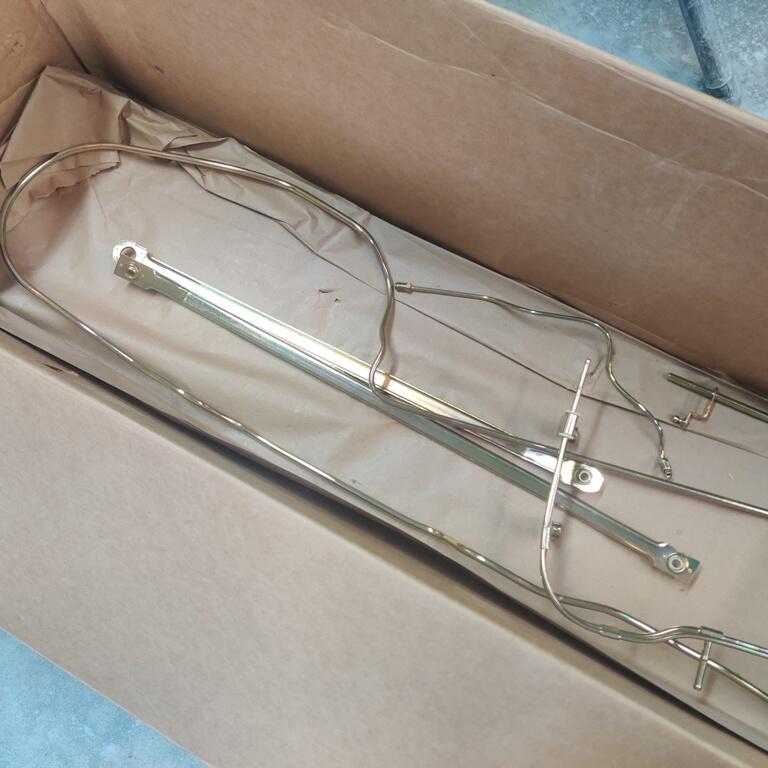
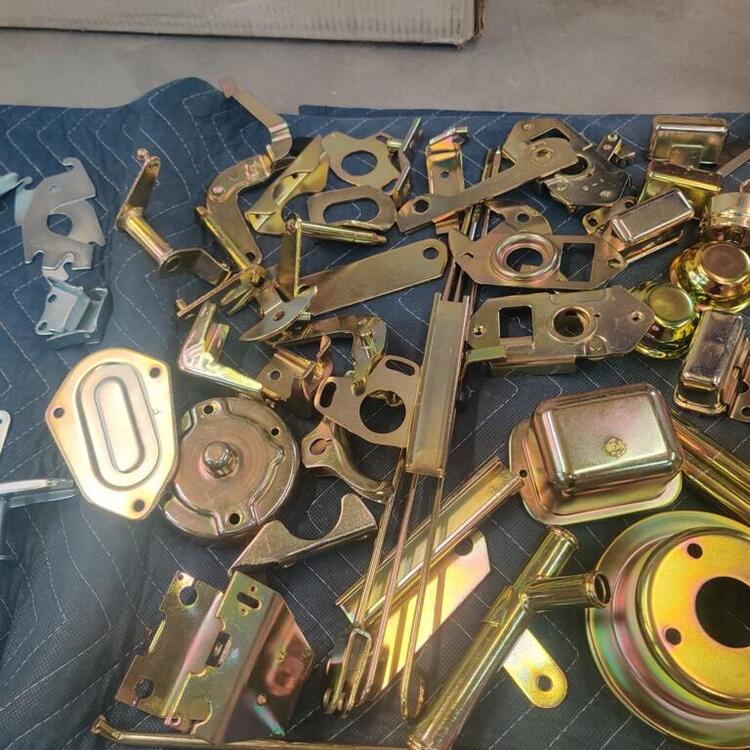
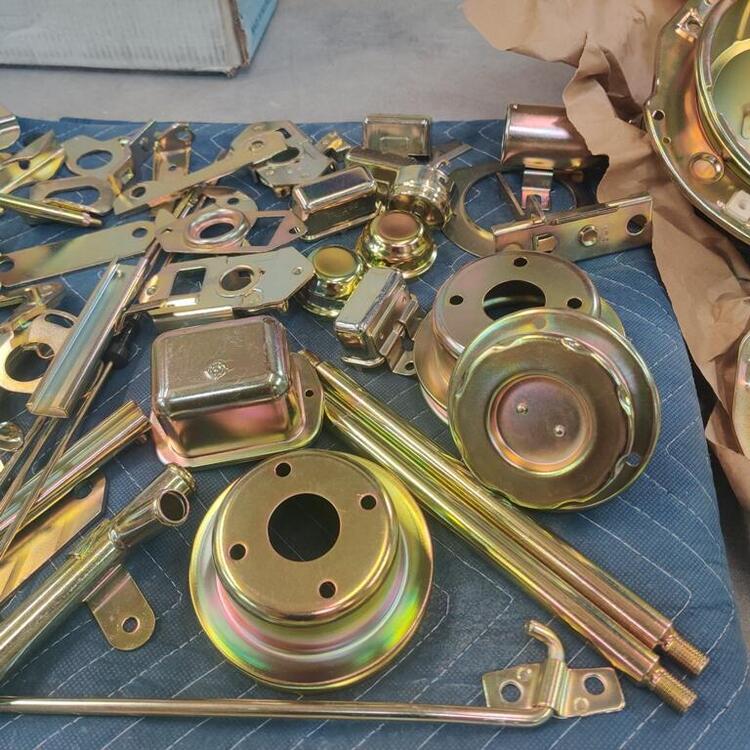
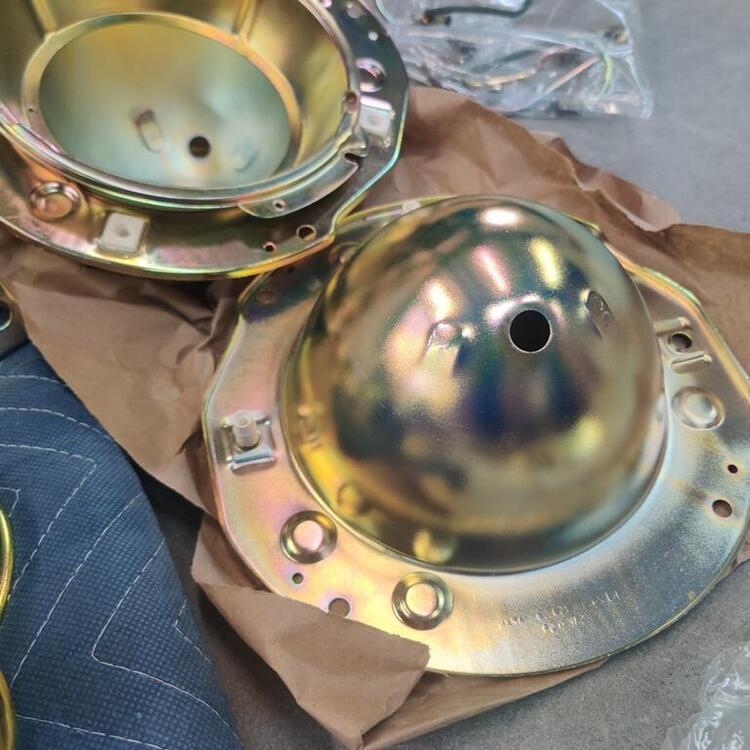
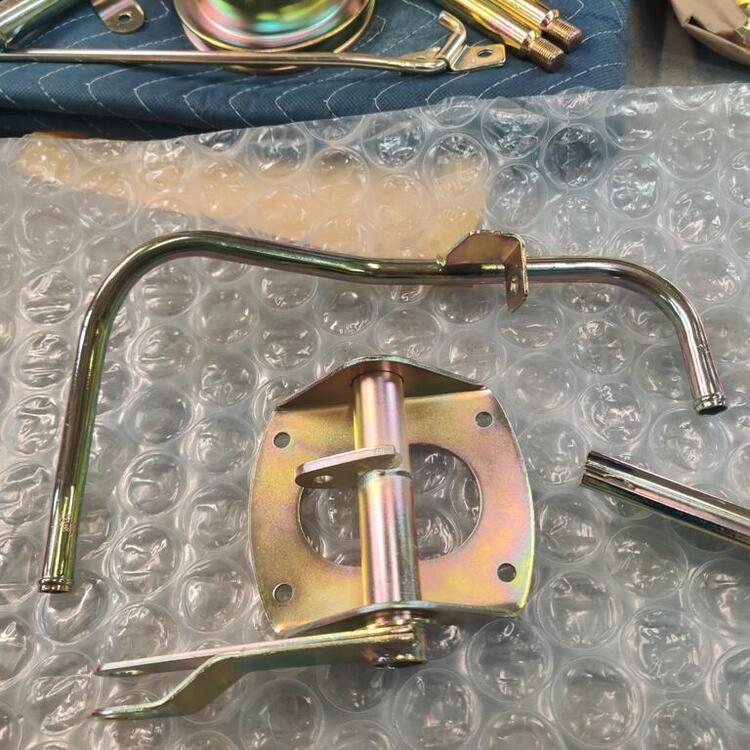
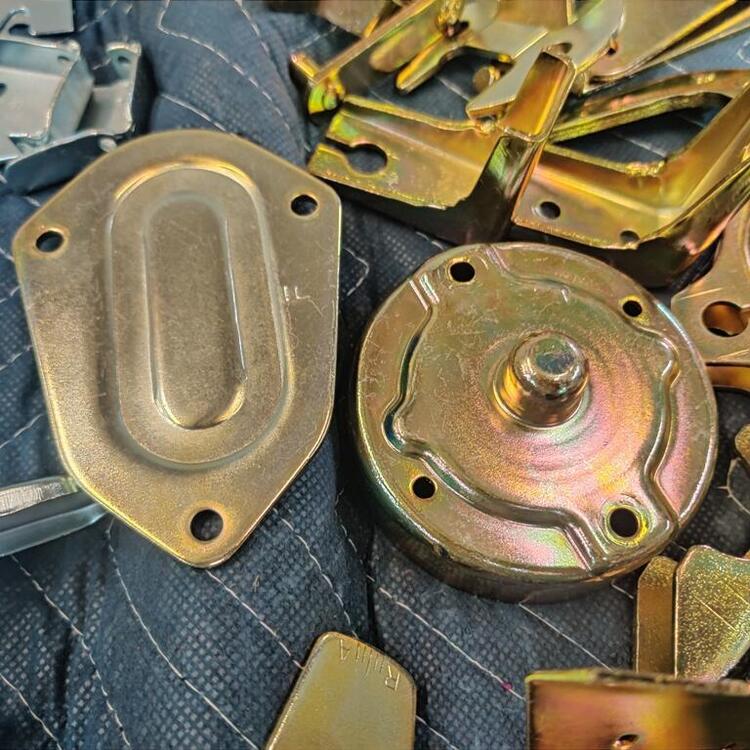
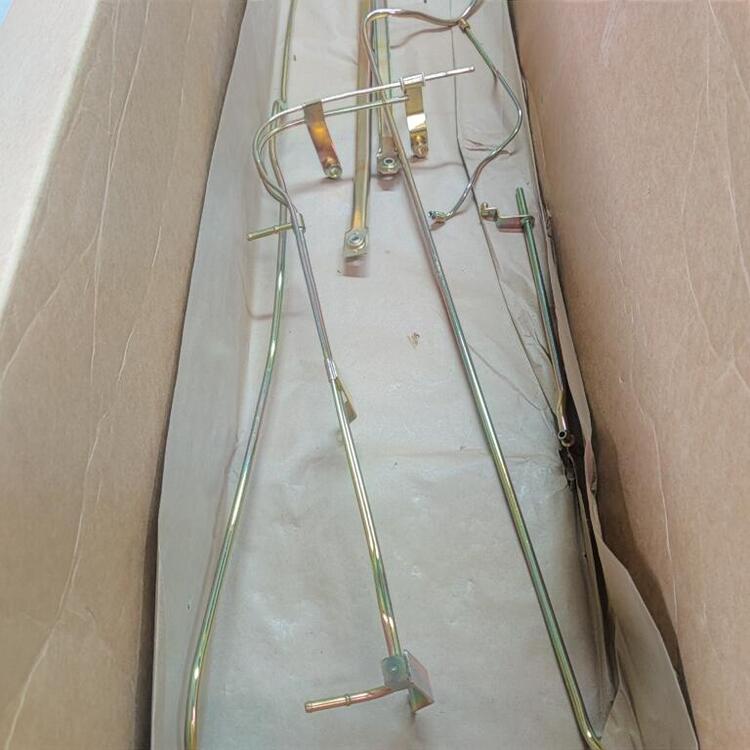
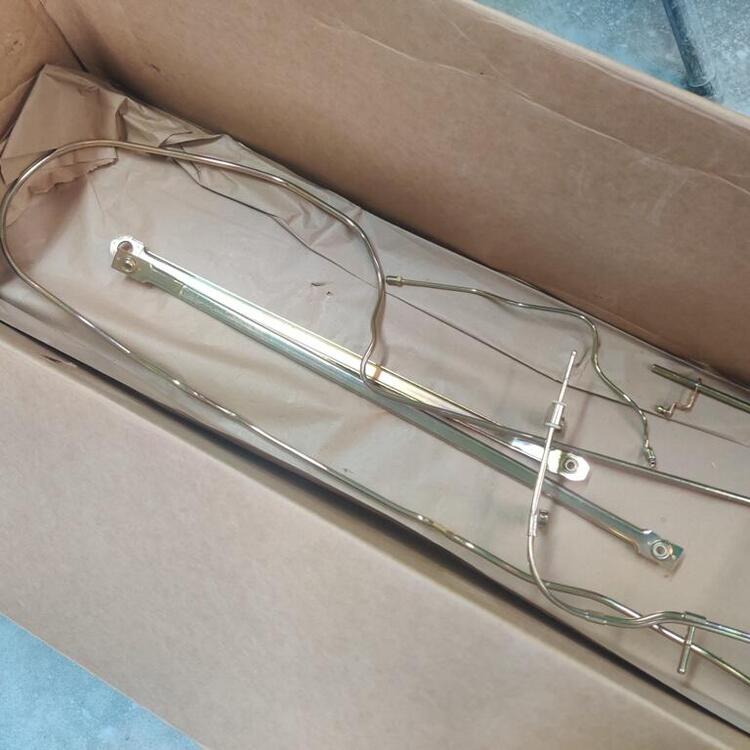
The rest of my parts have been plated - yay! The parts which are yellow are likely to be much more shiny than the finish from the factory. I think they came out quite nice though. Not sure why, but a couple of the hard lines got bent pretty significantly. I think I'll be able to straighten them out, but will likely have to wait until they are ready to go back on the car so I can see how they need to be bent to fix them.


 1 point
 -
I sanded for about 8 hours today. Most of the left side of the car is straight. The right side is not quite to the same quality just yet. I hope that 3 more coats of high build primer in the low spots will be enough to bring the surface up to where it needs to be. I feel like I am closing in on finishing the bodywork - which means I might only have another 50 hours to go! 🤣1 point
-
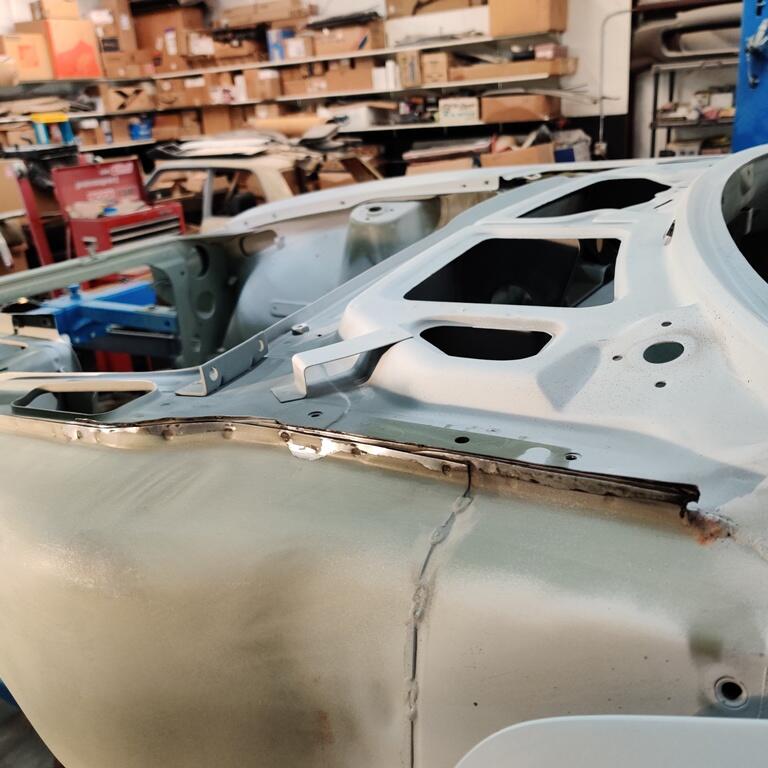
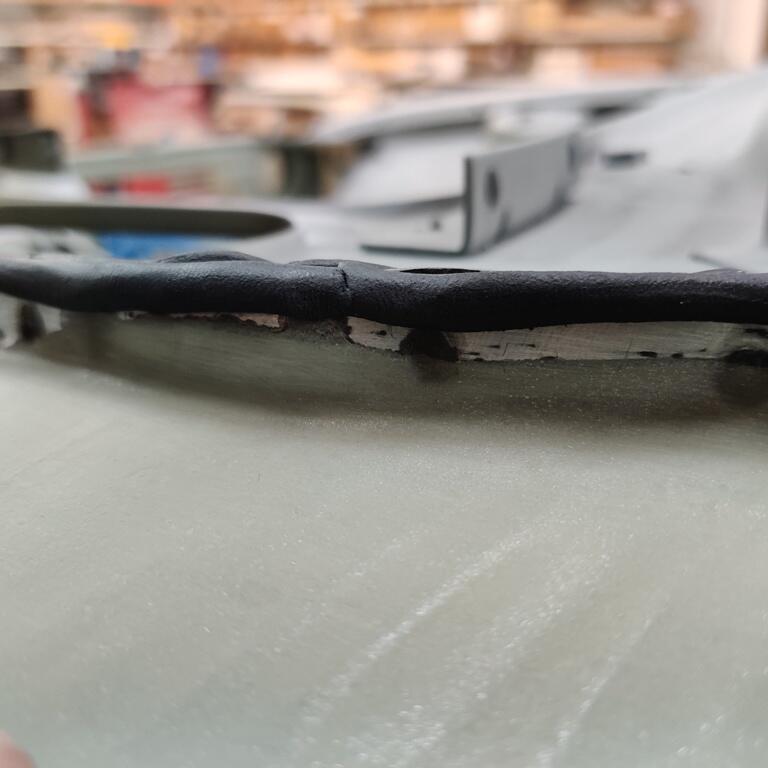
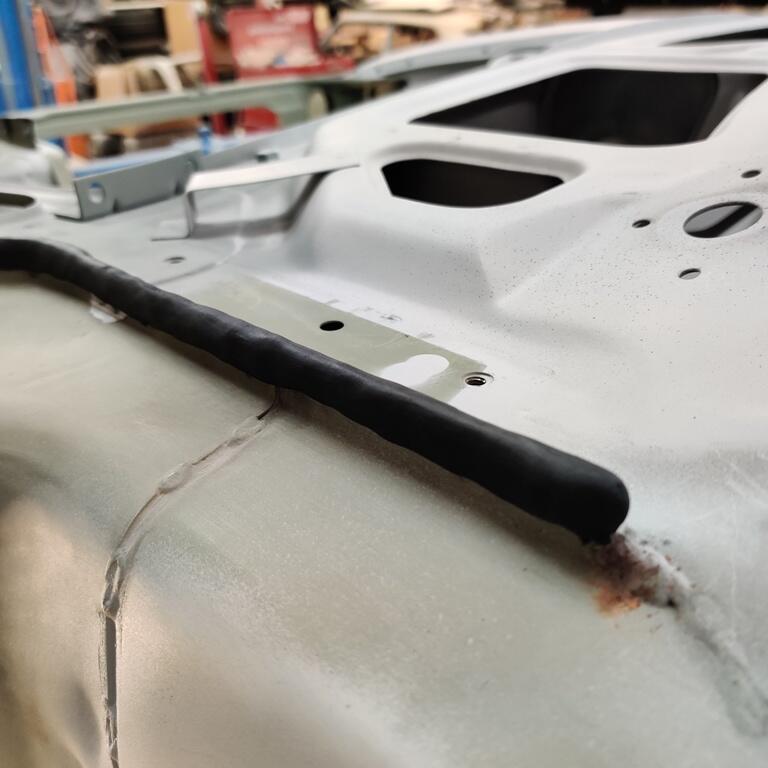
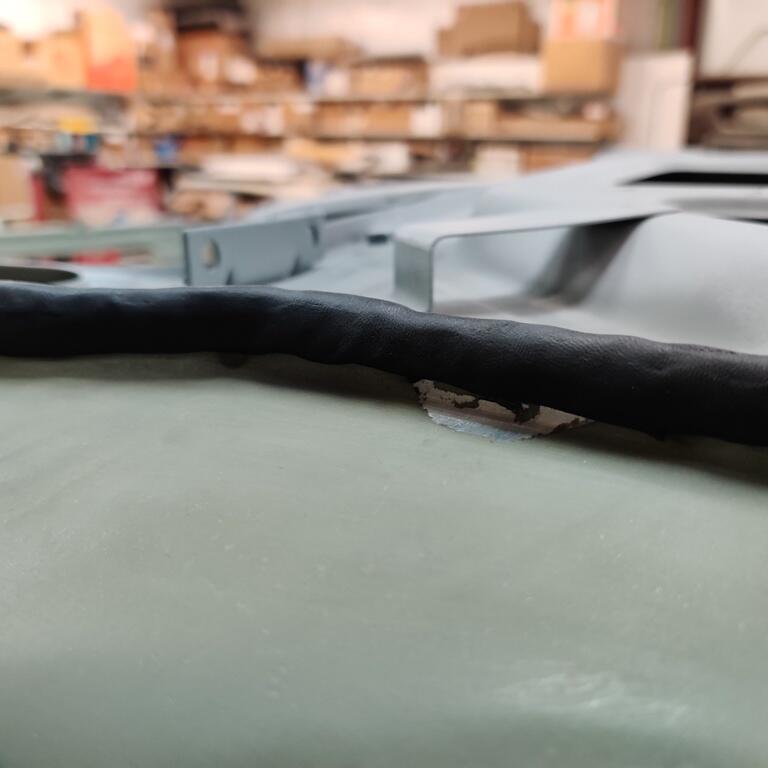
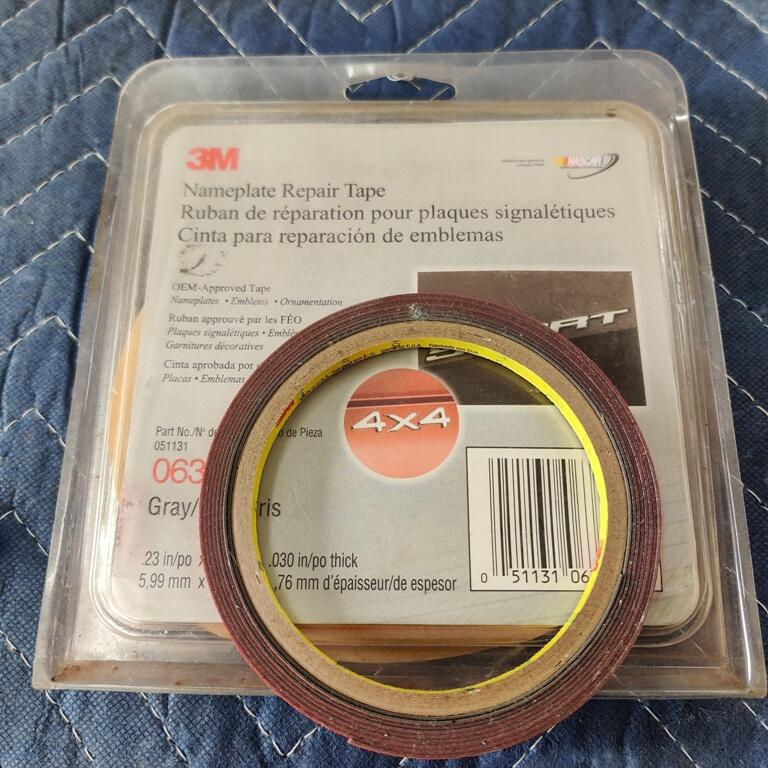
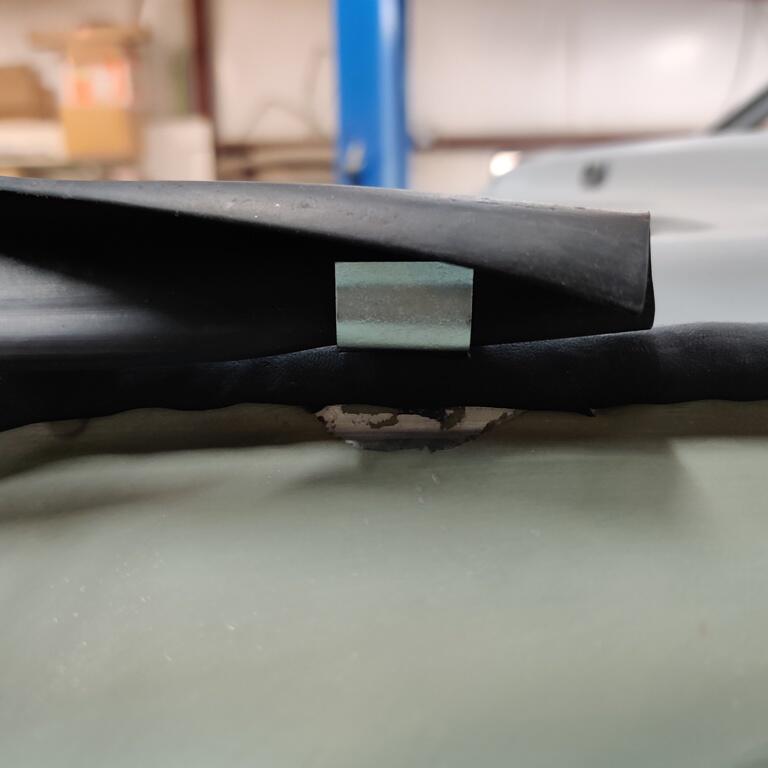
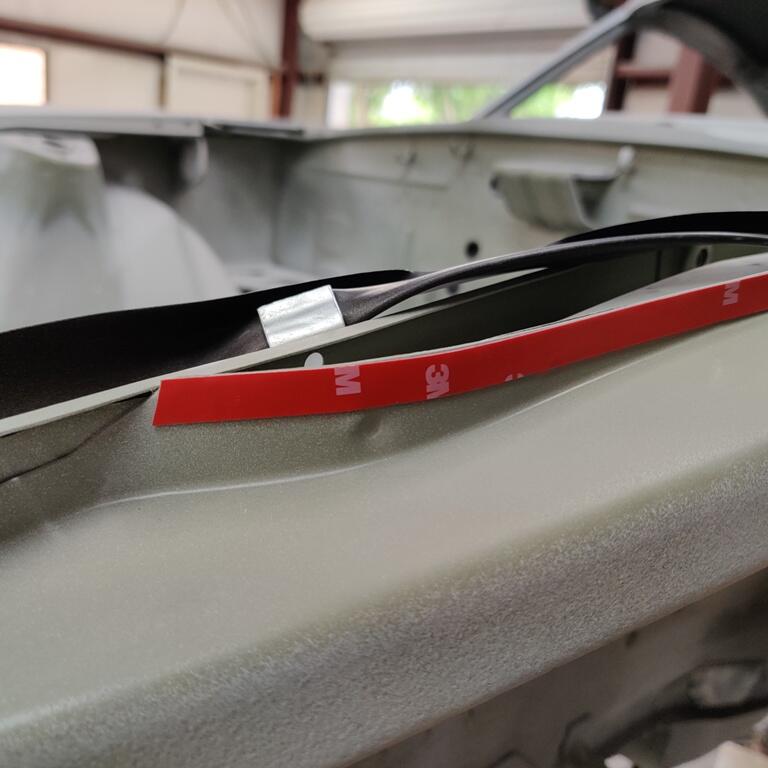
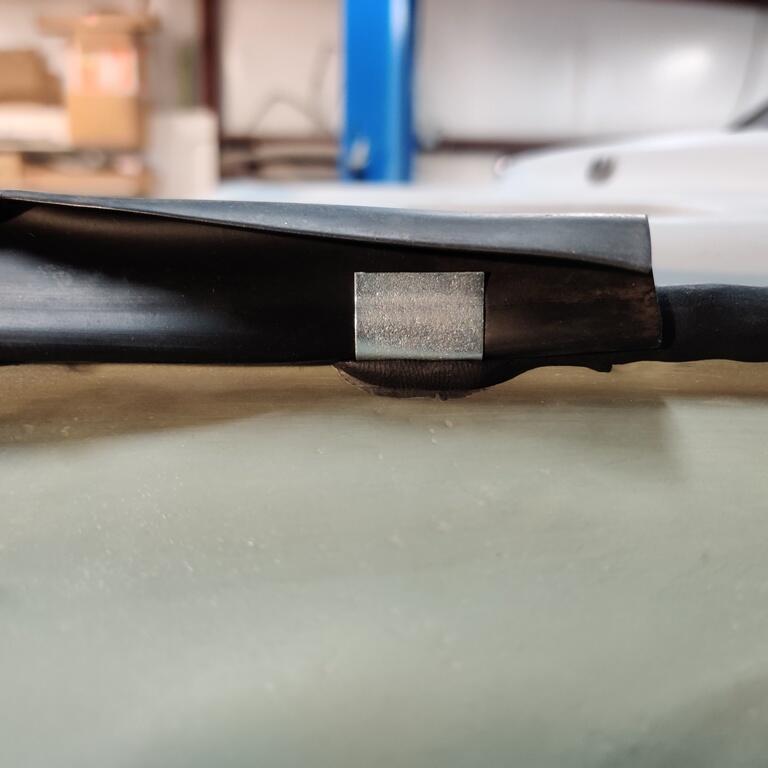
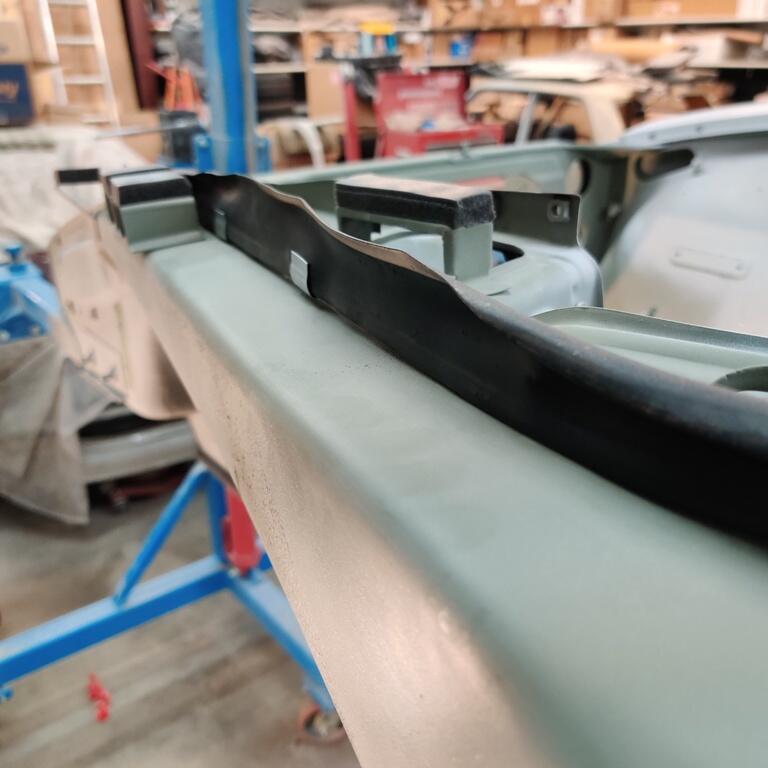
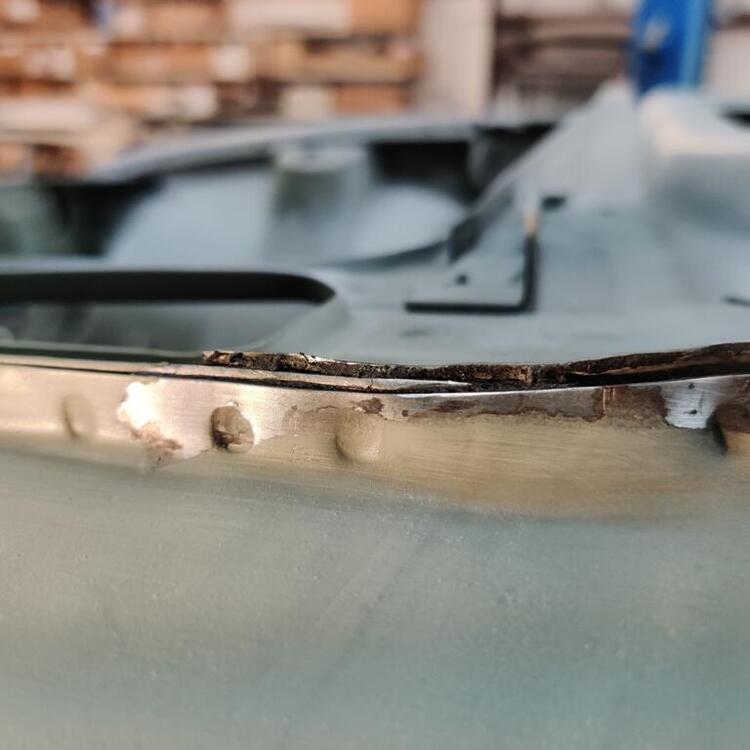
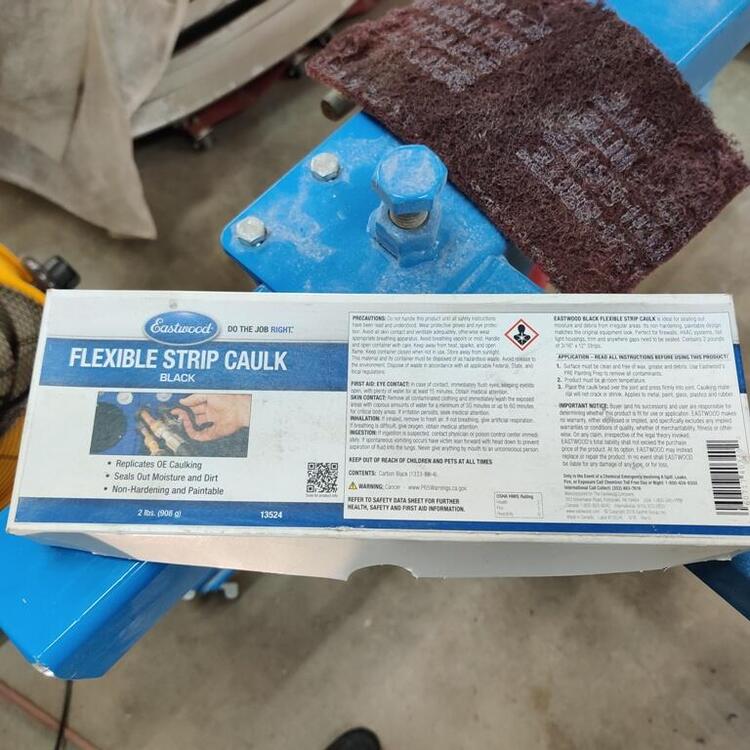
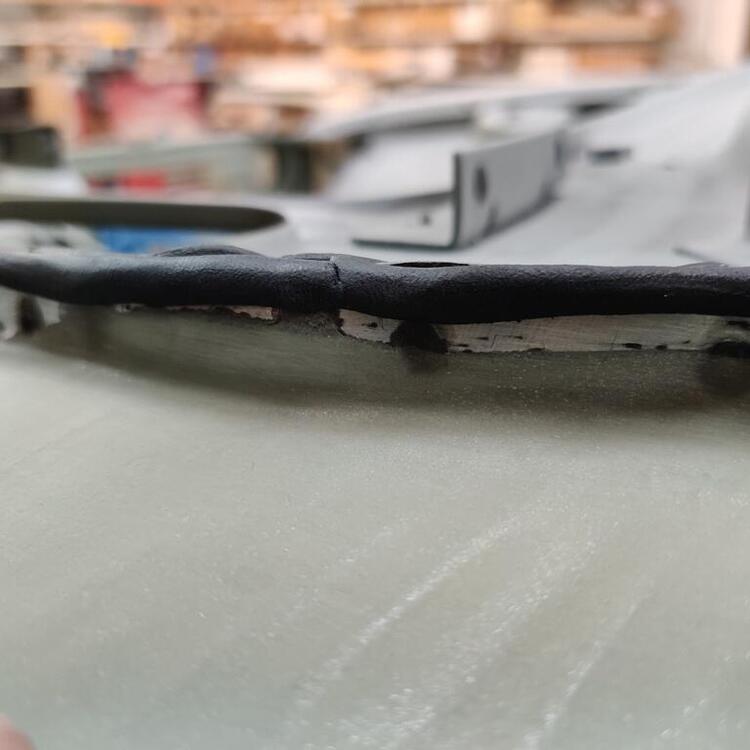
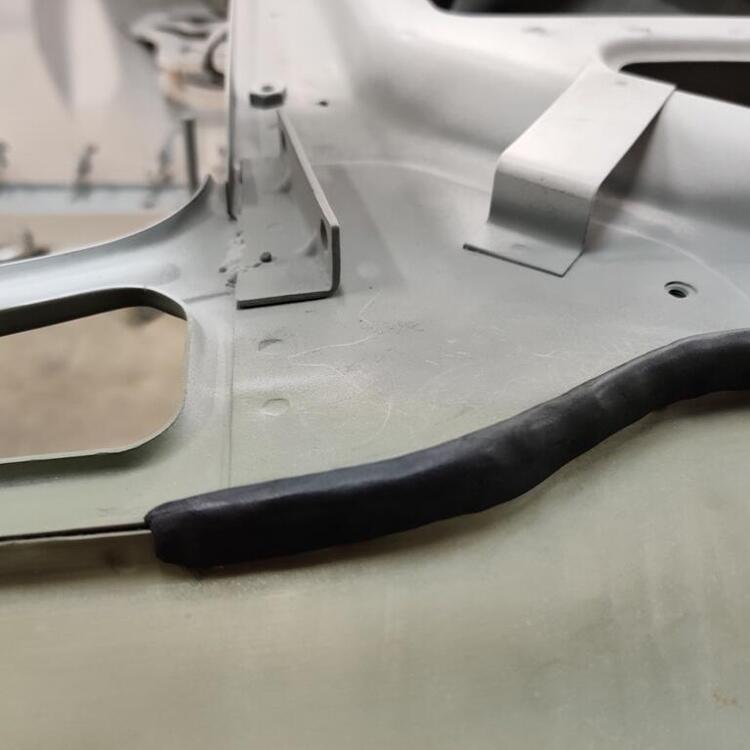
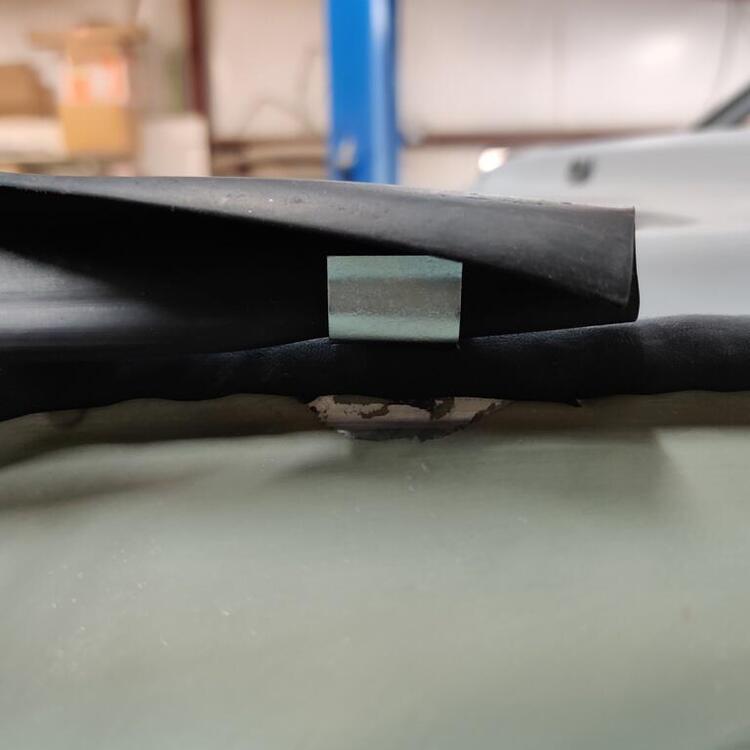
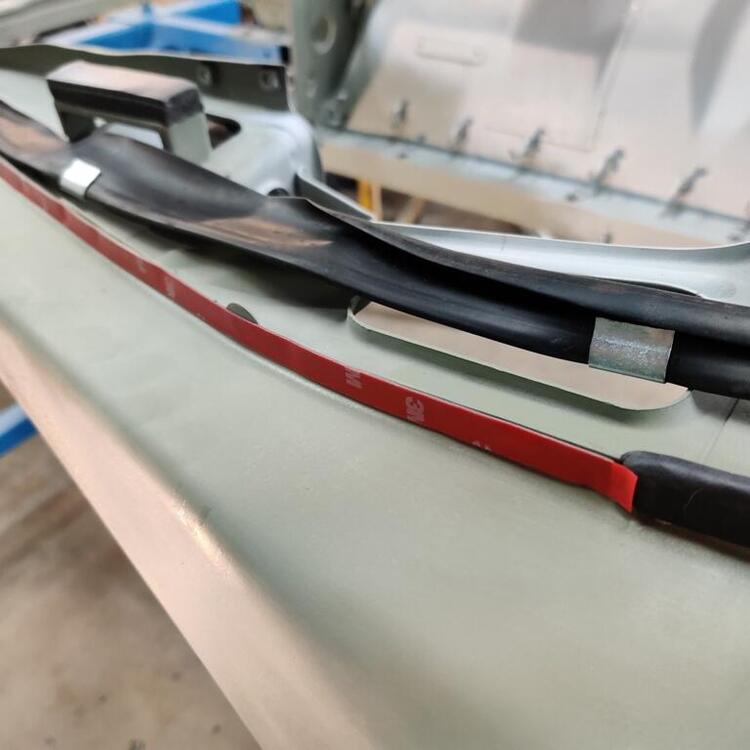
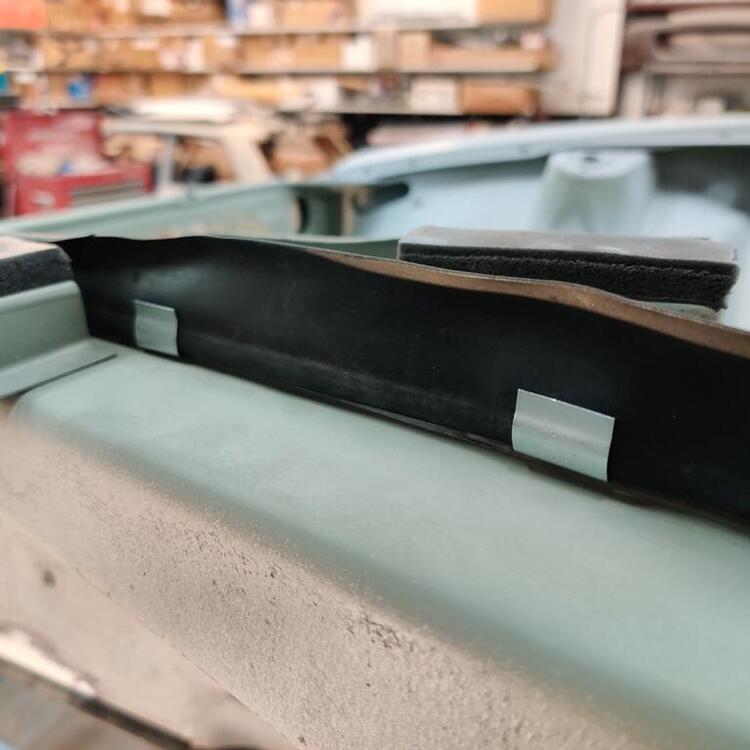
Some actual assembly has occurred. It's been almost four years since I bought the car, and so much of my time has been spent tearing it down, stripping, sanding, etc., but I finally got to put something back on the car! Pics showing the repainted driver side inner fender support, rubber seal to seal against the inside of the fender, along with original clips to hold it in place, and pics of newly plated outer fender hardware: I I'm not sure why the factory put a flexible sealer along the top edge of the pinch weld on the inner fender area, but I replicated it as best I could. It is interesting to note that underneath the old material was bare metal. I scrapped it away and used wax and silicone remover to clean the area. I then used Eastwood Flexible Strip Caulk to replicate the original. I added as many strips as were needed and then hand formed them together in one solid mass to cover up the pinch weld area (third pic is the finished product): Interestingly, you can see that the original material got pushed downward where the clip is located (see third pic here): Something I did that is a bit different than factory - I added some double sided 3m tape so that the rubber seal would be more securely fastened than would be otherwise with just the little "s" clips. In the third pic, you can see the caulk was displaced in a similar way when I pushed the clip "home" into position. The seal doesn't do a particularly good job of sealing the "upper shelf" area from dirt and debris coming from in the wheel well area, but it helps. Maybe with this 3M product the sealing occurring here will be slightly improved. Pic of the product I used, and rubber seal installed.


 1 point
 -
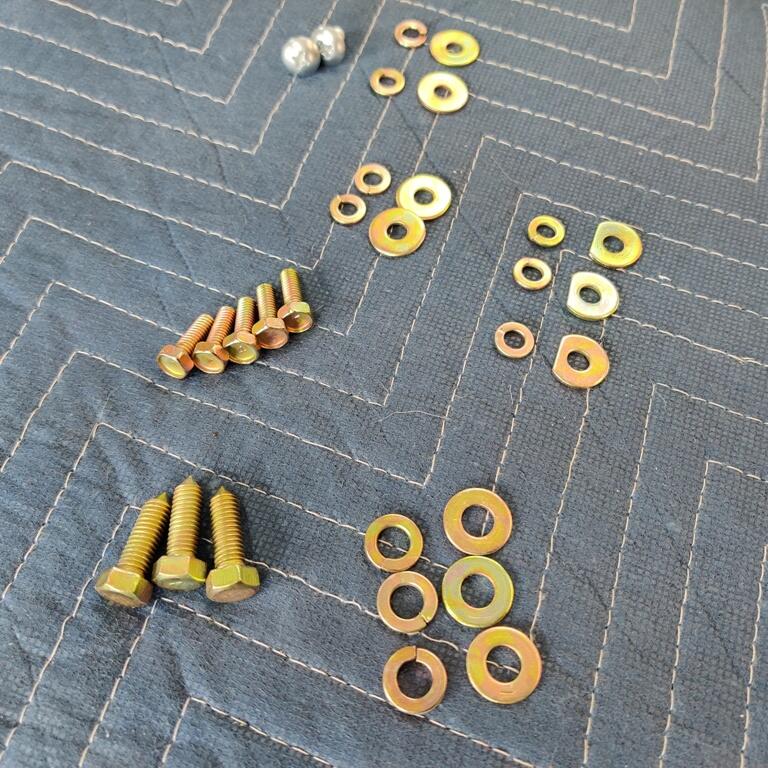
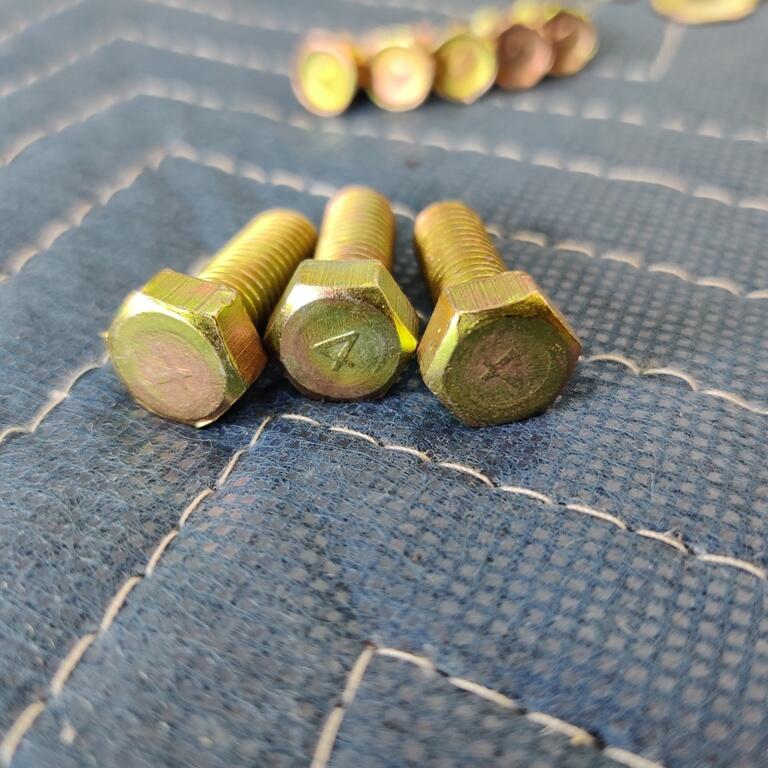
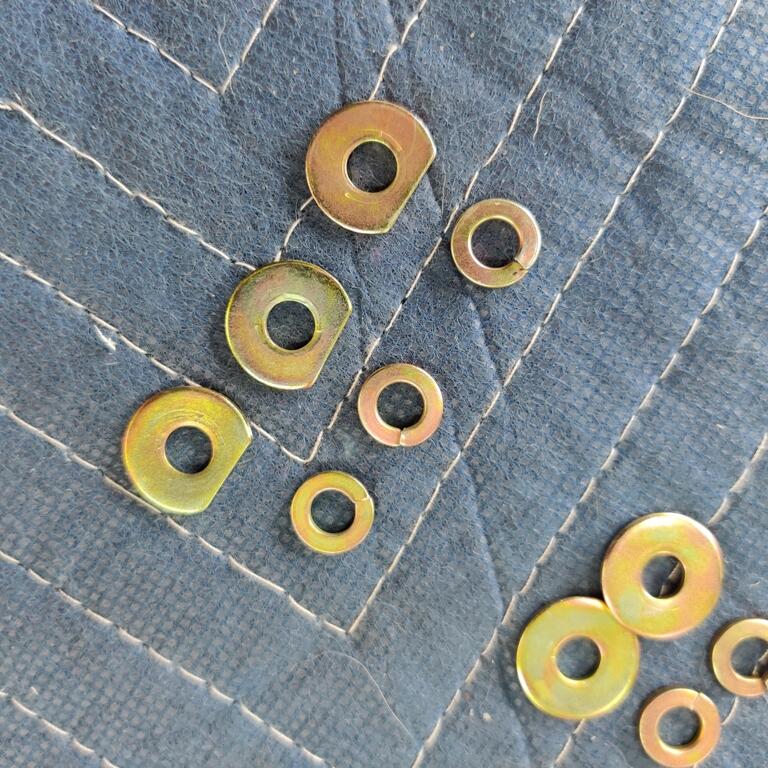
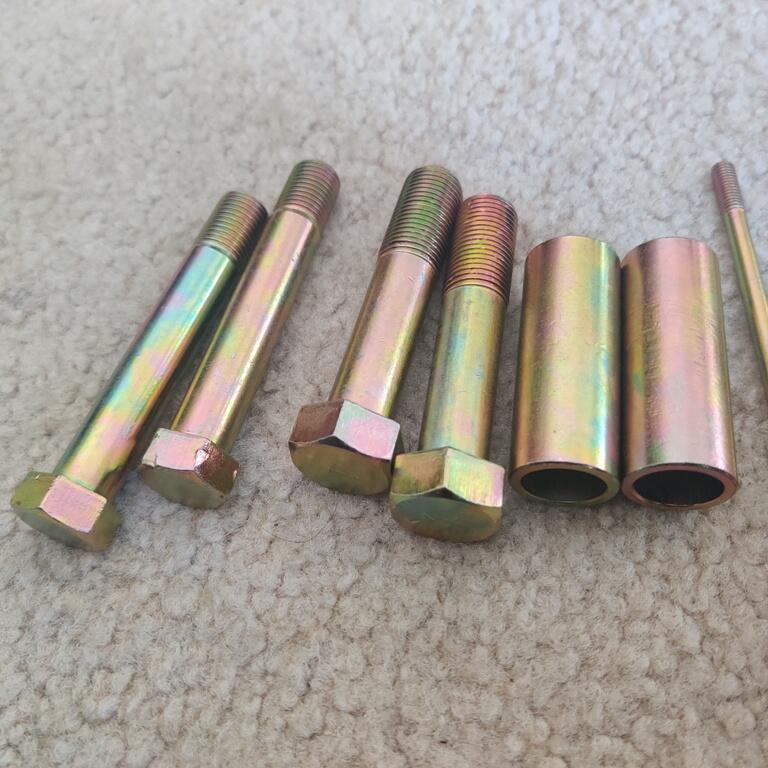
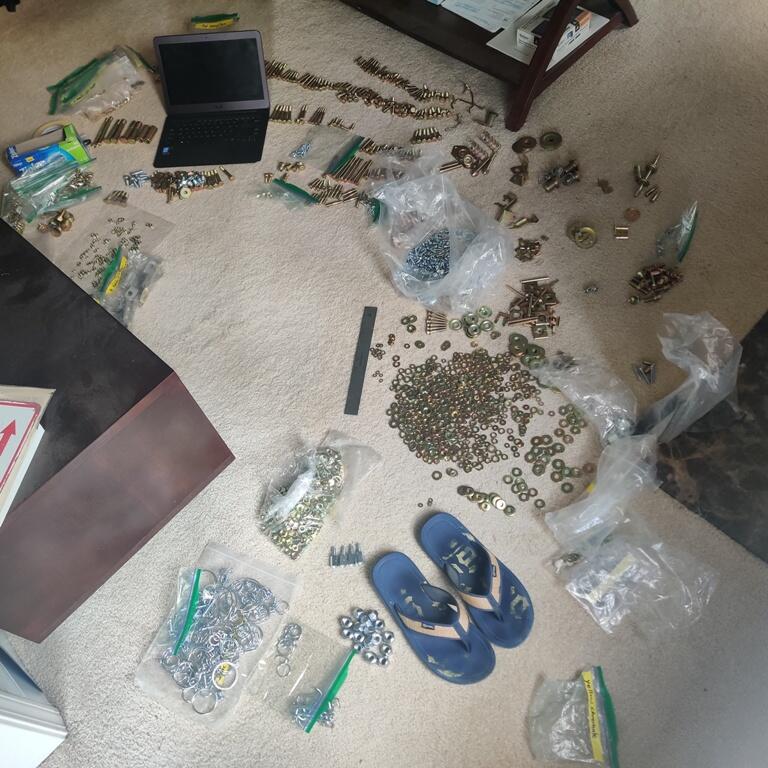
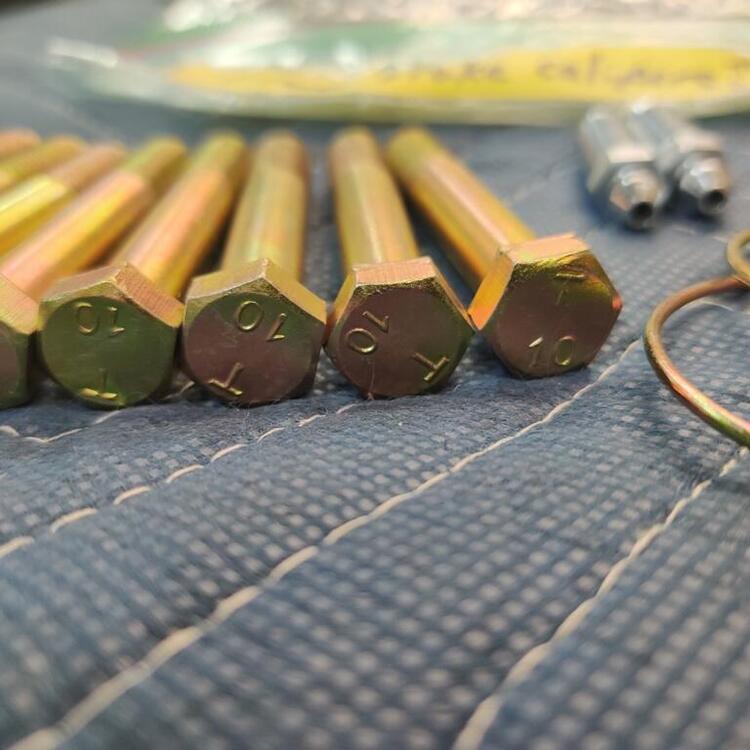
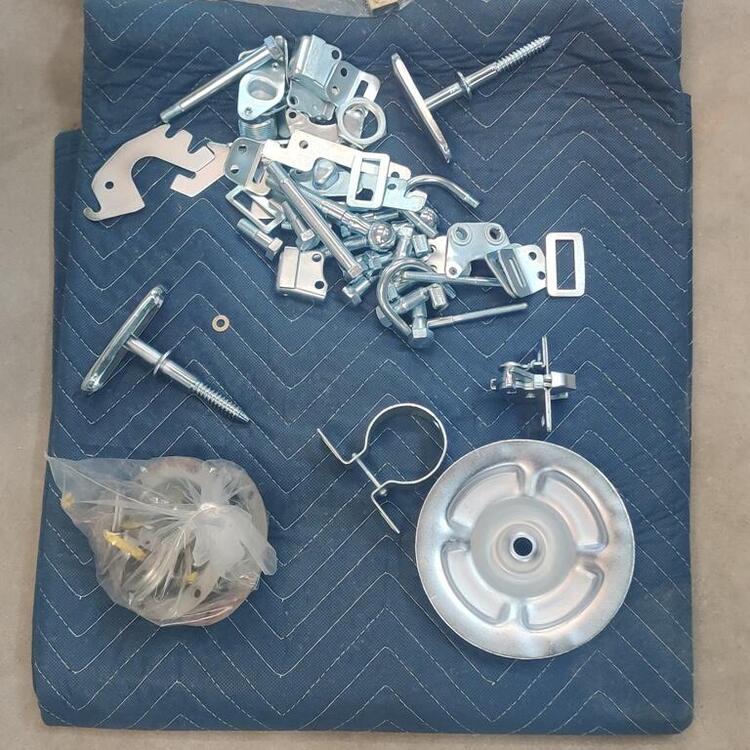
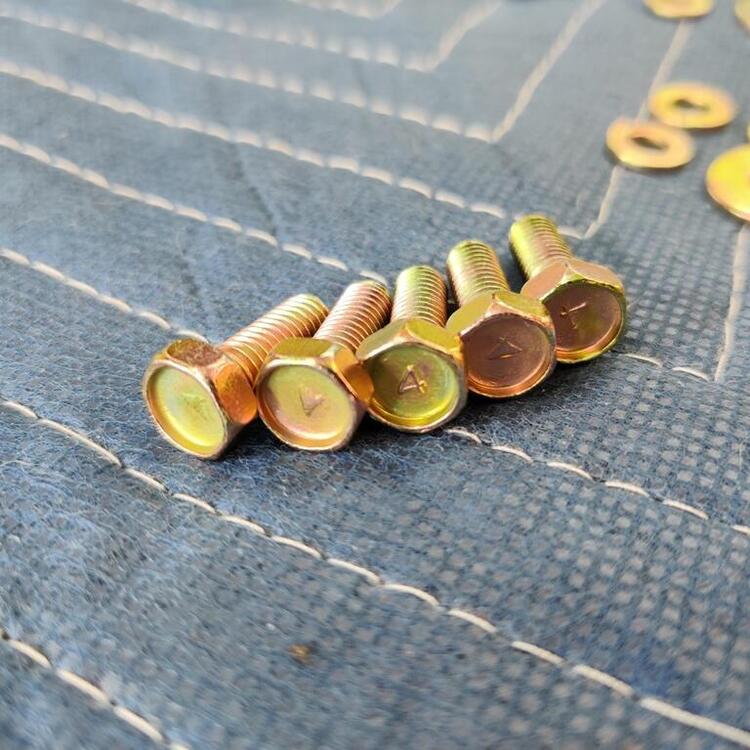
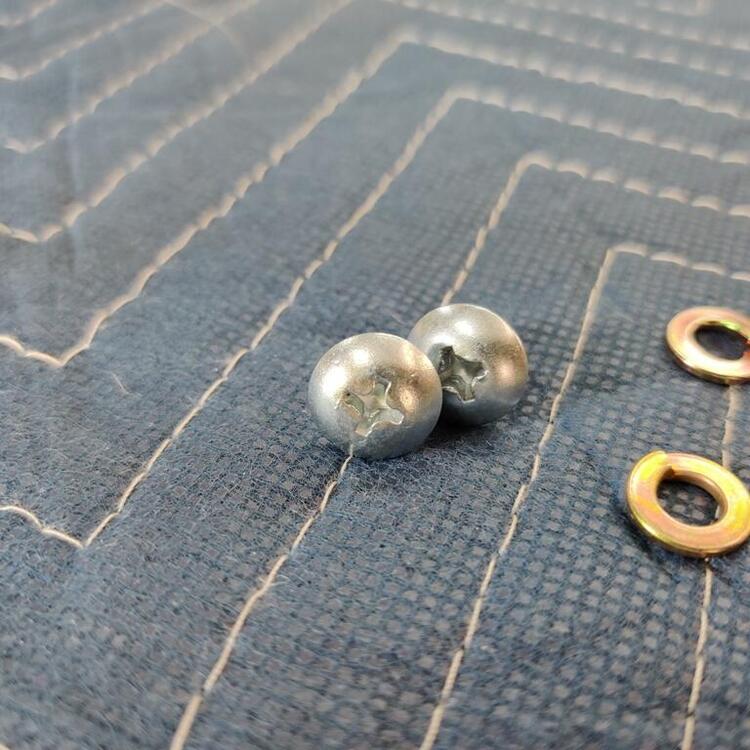
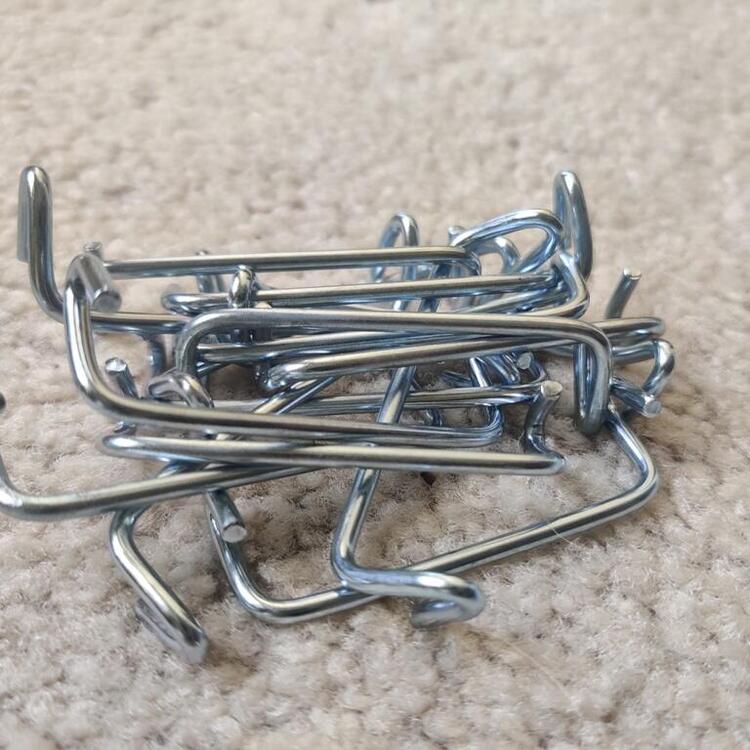
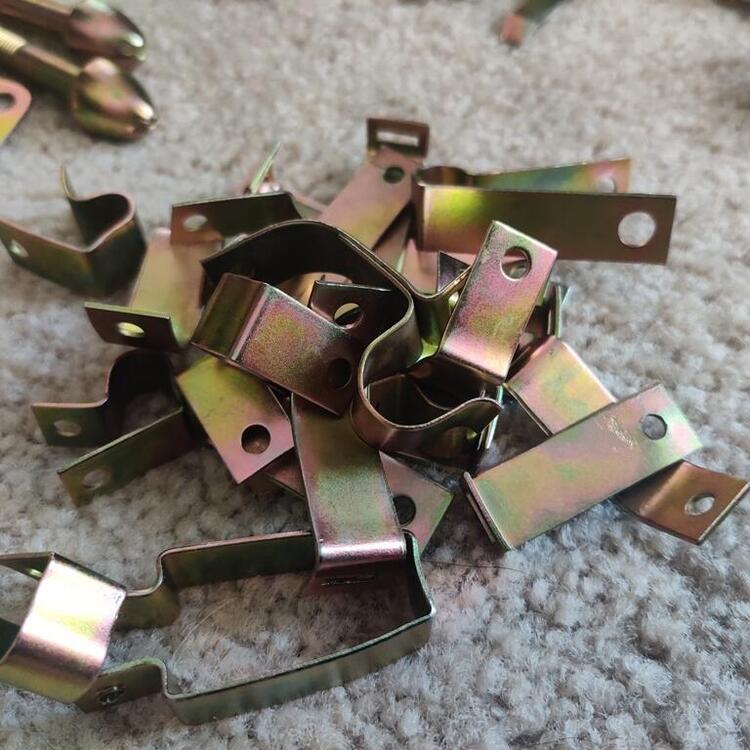
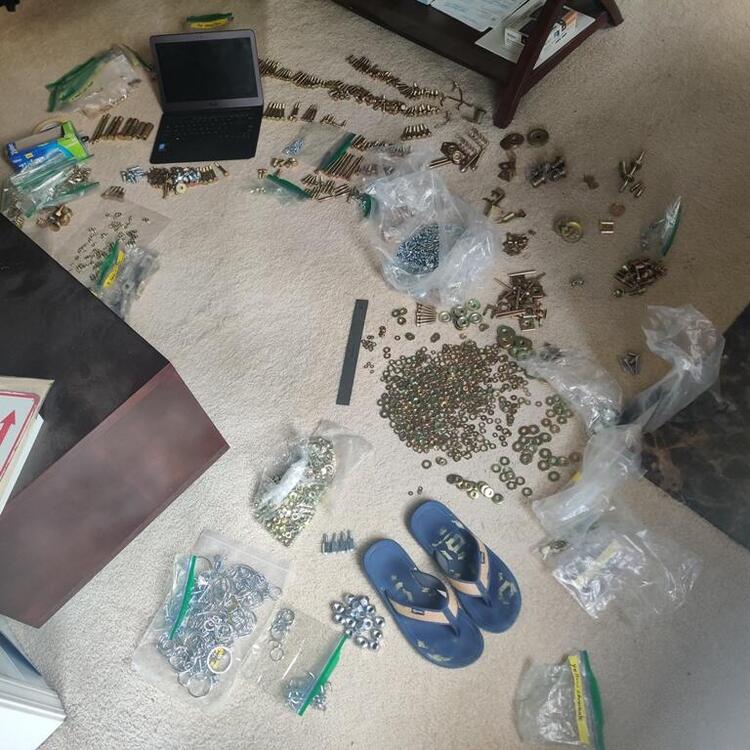
I guess I have taken a pretty long break. Looking back over the last couple of months, the progress has been little and the updates few. I have, however, been waiting on some hardware to be plated, and quite bit of it showed up on Saturday! I spent many hours on my living room floor hunting down fasteners using my spreadsheet and ruler, and putting them back into their respective zip lock bags with labels which identify where they go on the car. I have many hours to go! None of the larger parts have come back yet, but I was in desperate need of the fasteners for the hood, hood hinge plates, fenders, inner fender supports, cowl, inspection doors, and hatch hinges. Especially for the inner fender supports and the fenders, I am proceeding with my plan to do final assembly before paint, meaning these parts will not be coming off the car when it goes to the booth for paint - nor after. Final primer coats, sanding, etc. will be done with all fasteners torqued to spec. The inner fender supports and foam rubber seals push on the fenders when the fenders are bolted in place. The fender panels, therefore, "move" a little when bolted down. To get them as straight as possible, I need them fully secured when doing final sanding. So, here are a few pics. I am pleased with how most everything I have received looks. Part of what is special about this car is how little rust it had. That carries over to the fasteners as well. For me, there is substantial value here when it comes to the fasteners because they haven't suffered the rust pitting that many do. The olive drab doesn't match the factory color well, but it looks pretty nice as the only reasonable alternative I think. I didn't send anything else to get that color - I missed including a couple small brackets, but those look ok as original anyway. Only a small number of bolts do not look as shiny as I would prefer. And for some reason, hex nuts came out exceedingly shiny. I am hopeful that the large parts will come out nice.


 1 point