


Leaderboard
-
Mark Maras
Free Member4Points3,719Posts -
Patcon
 Subscriber
 2Points11,142Posts
 -
jonbill
Free Member2Points458Posts -
zKars
Subscriber1Points3,770Posts


Popular Content
Showing content with the highest reputation on 08/15/2020 in all areas
-
2 pointsIt looks like an unfinished project to me. The crack does look like a hacksaw cut but unless that cut was filled with weld the gap would close up eventually. "Seemed like a good idea at the time". We've all had them.2 points
-
2 pointsreal world, if you put a bpr8 in a stock Z engine it will foul badly, because combustion isn't hot enough to get the plug hot enough to self clean. if you put a bpr6 is a high compression tuned engine, the tip of the plug will melt because combustion is too hot. the right plug for the engine is one that doesn't foul and doesn't melt.2 points
-
1 point
-
For what it's worth I got the same part from ZCD and had the same issue. They sent me out a replacement which I will swap in eventually. I also remember that this problem didn't start immediately - it manifested after a few months...1 point
-
1 point
-
1 pointOdd to see a crack that way. The force is applied from the other side unless the lever was somehow install to the other side of the camshaft eccentric1 point
-
1 pointThe BA9 example I used was just an example of the ones that are not sensitive to polarity so I'm not sure if these are the brightest ones you can get. When I did my interior gauges I did a lot of experimentation on bulb color, and ended up trying quite a few different options. One thing to consider is the possibility of removing the green plastic filters inside of the gauges. With the filters still installed, you will be limited to the size of the bulb you can use as the filter will restrict the bulb length. I tried both green and white bulbs with and without the filters and in the end I removed the filters and just went with white bulbs. The really light up the gauges and for the first time I can actually see how fast I am going at night! Many people like the green glow and so you can achieve that by either leaving the green filters in place or by going with a green LED bulb. I believe that I have a spread sheet of all the bulbs that I used, both inside and out, and if I can find that I will be happy to post it. Finally, the bulbs can be dimmed but you will need to change the rheostat dimmer to a PWM type dimmer in order to dim the LED bulbs. I chose to use the original dimmer and I just keep them at the highest brightness level. Hope that helps. Mike.1 point
-
1 pointPerfect, thank you. Just visited Klassic Fab, they have the sills.1 point
-
1 pointYou should consider the paint work first. Prepping the car for paint should uncover any prior body damage. At that time, you can assess whether the car is worthy of your investment of time and money. If you decide the car is worth the investment, complete the paint work then move on to the interior. Are you planning to change the exterior color? If so, then a thorough repaint requires doors, hood, hatch and engine removal. Good luck (and add photos to your postings to let us know how the project progresses). Keith1 point
-
1 point
-
1 pointThis one? It looks oddly straight, more like an intentional cut. Looks like both sides.
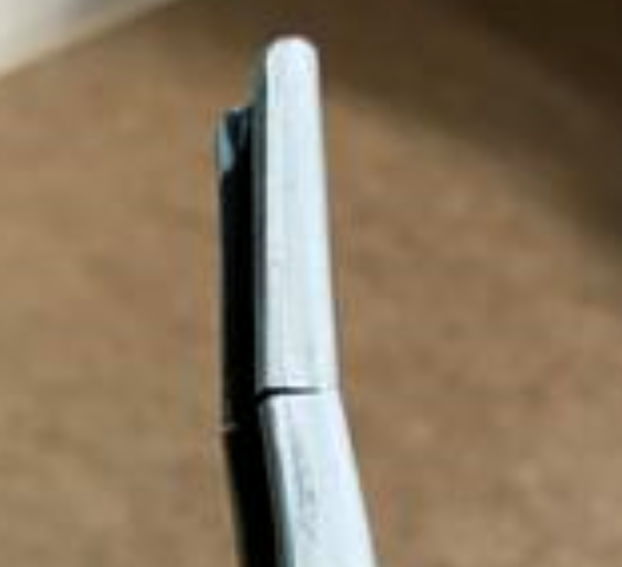 1 point
 -
1 point150 psi is better but it should be a little higher. Is there any valve noise (clatter or clicking) after the last valve adjustment? If not, I suspect the valve adj. is still too tight. I pull all the plugs during a compression test and hold the throttle wide open. After checking all the cylinders, recheck the first two again. They will usually be higher the second time around due to oil circulation.1 point
-
1 pointJust got done adjusting the valves, all the clearance were too tight, couldn't get the .007 gauge bottom of the lobes and the rockers. Set both intake and exhaust valves at .007 now the compression has gone up to 150 psl on all cylinders. Tomorrow I will go for a test drive1 point
-
1 pointThose compression #s should be 165 or above. Are you sure the valves are adjusted correctly? Just reread your first post. No specs on the cam? As in no lash adjustment specs?1 point


