


Leaderboard

 Subscriber


Popular Content
Showing content with the highest reputation on 07/12/2020 in all areas
-
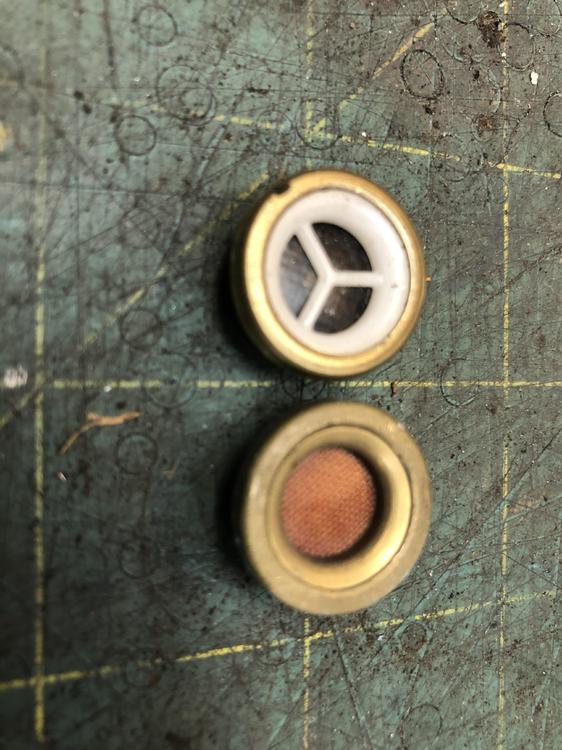
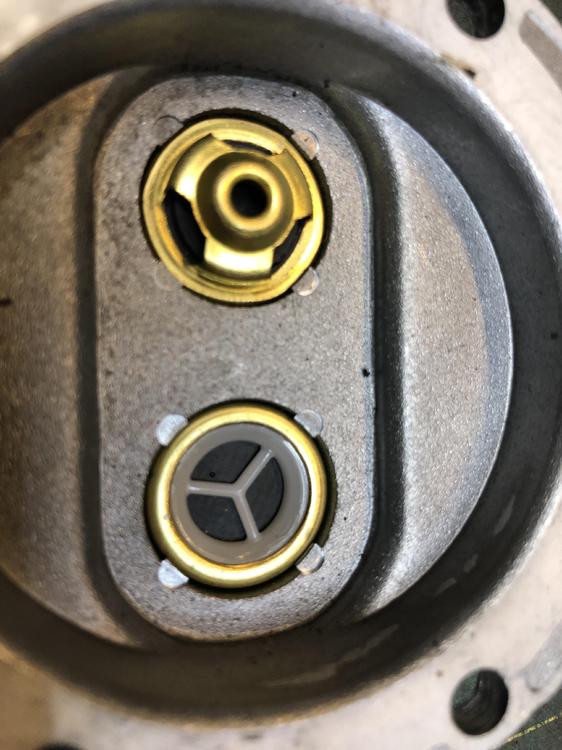
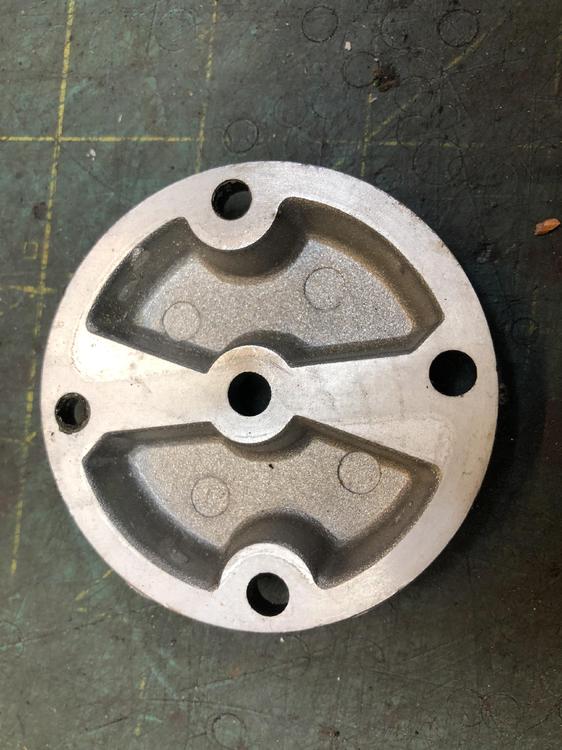
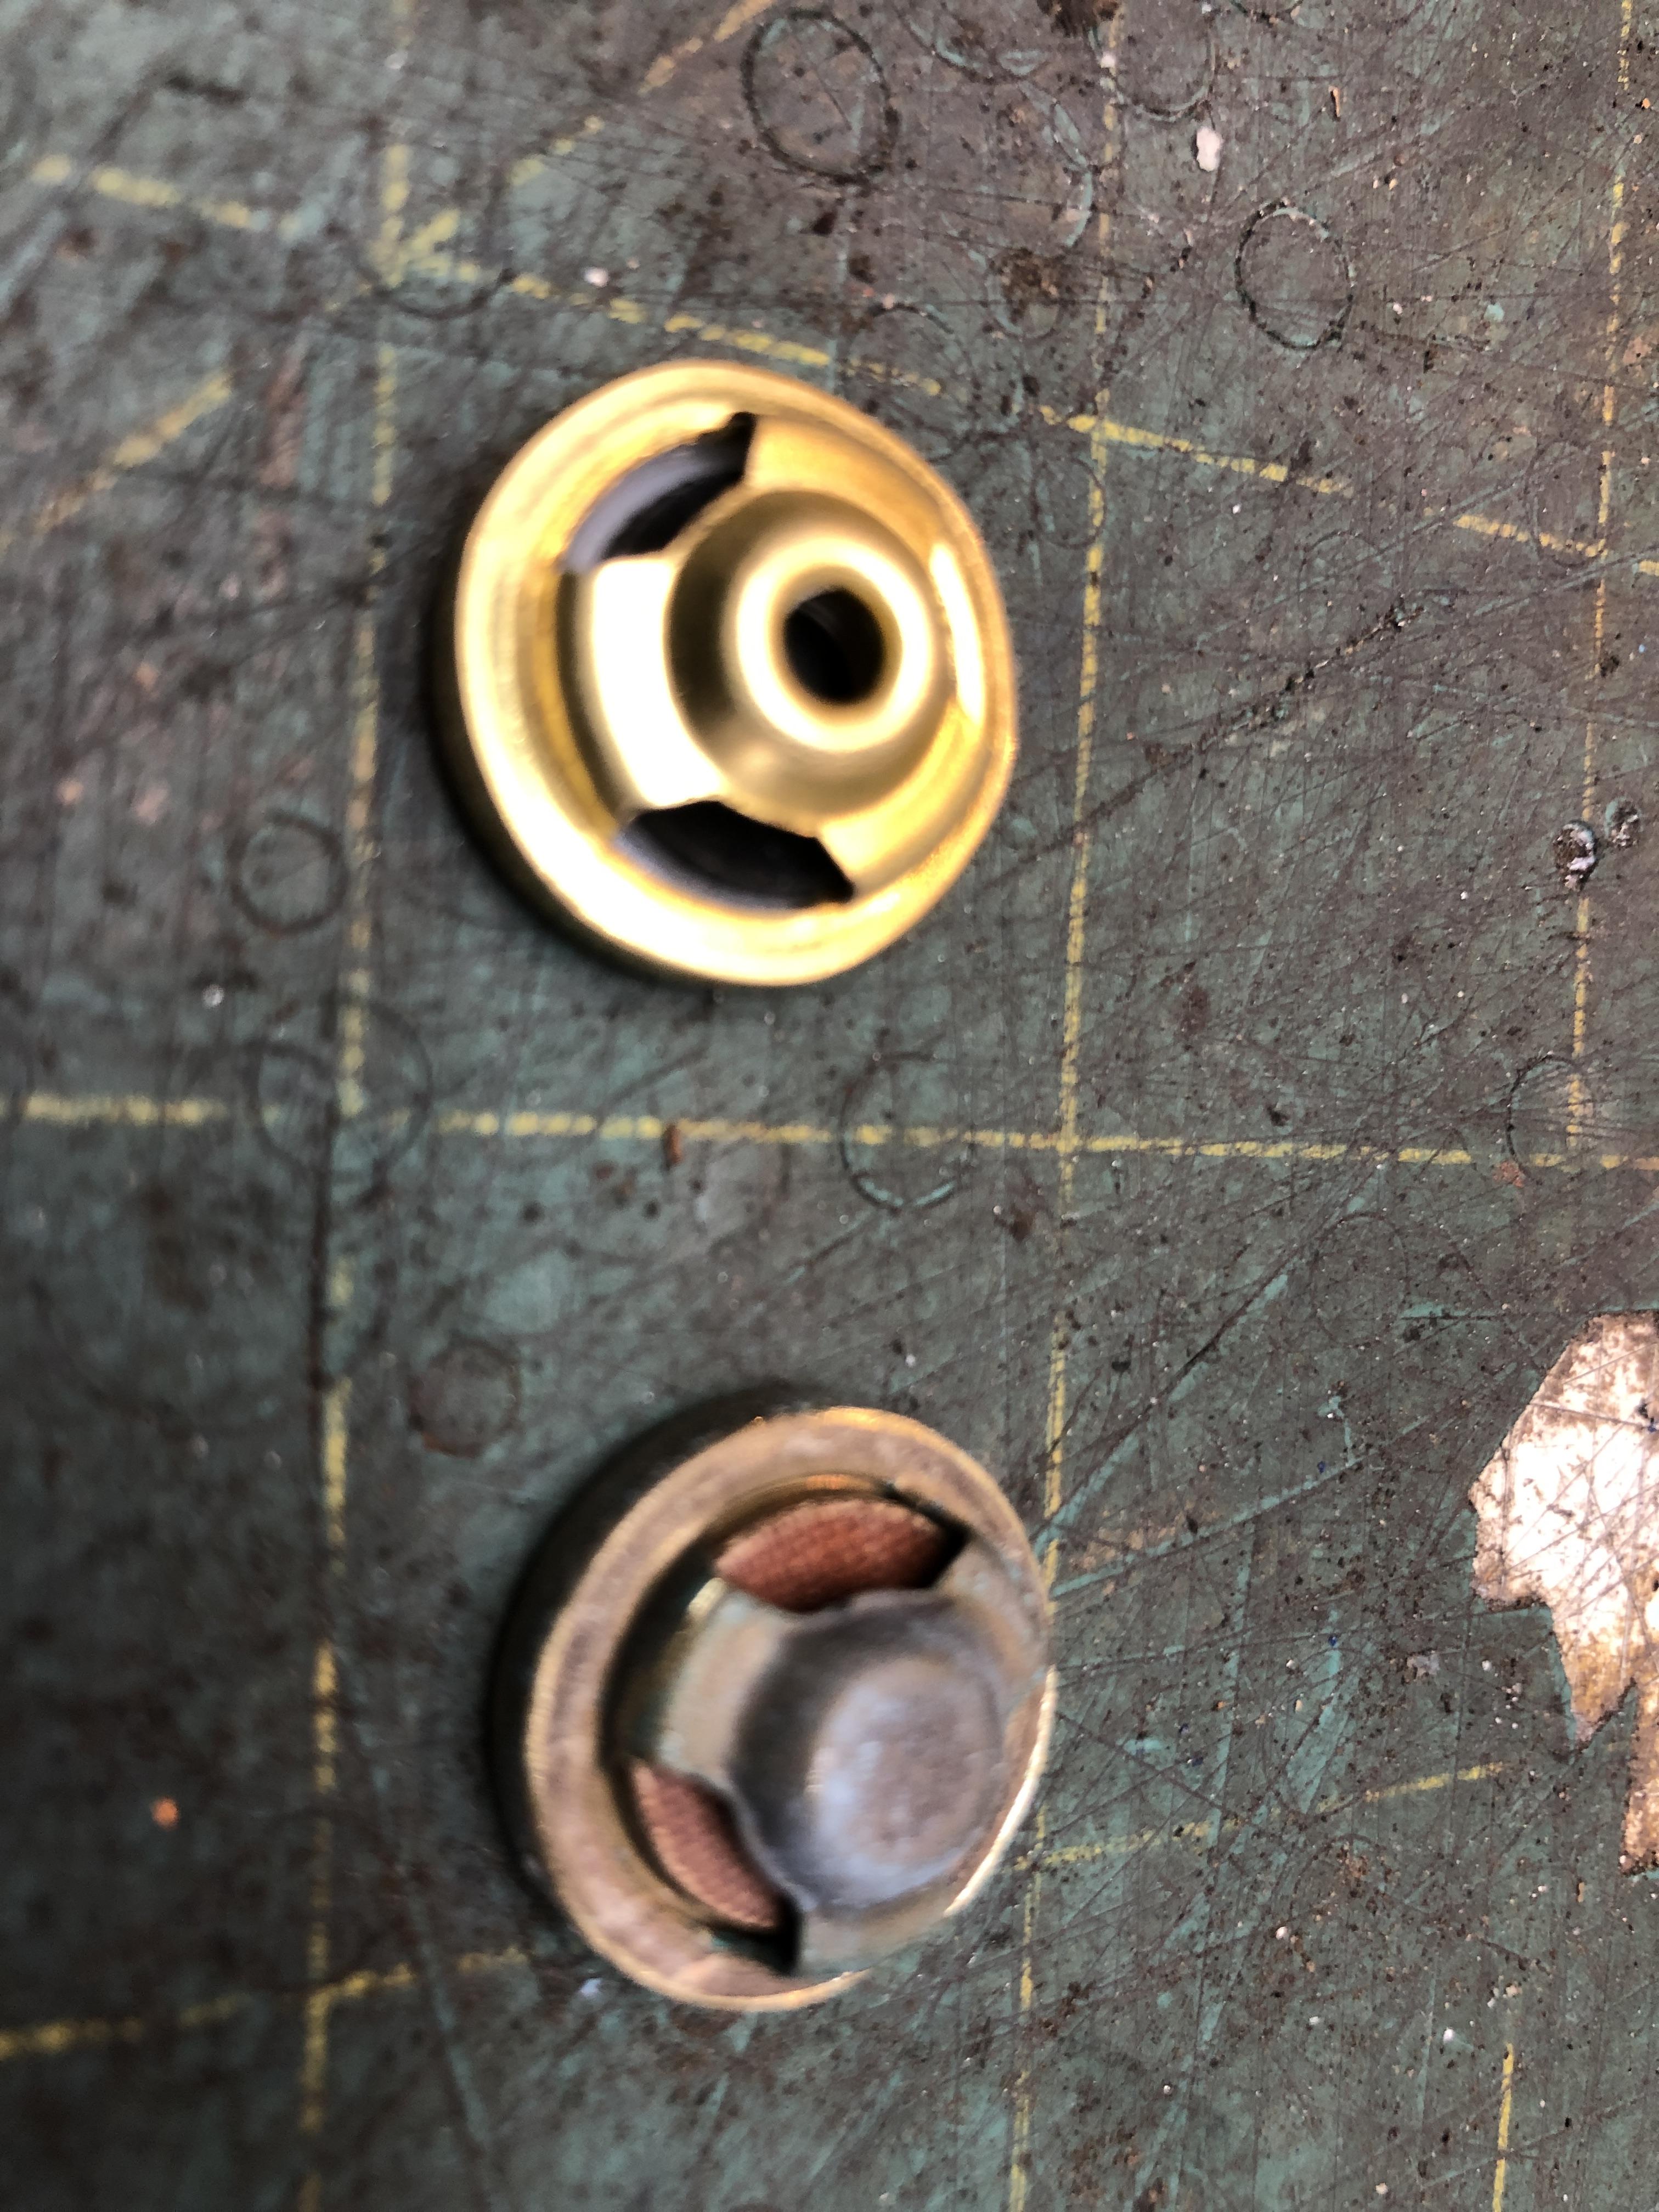
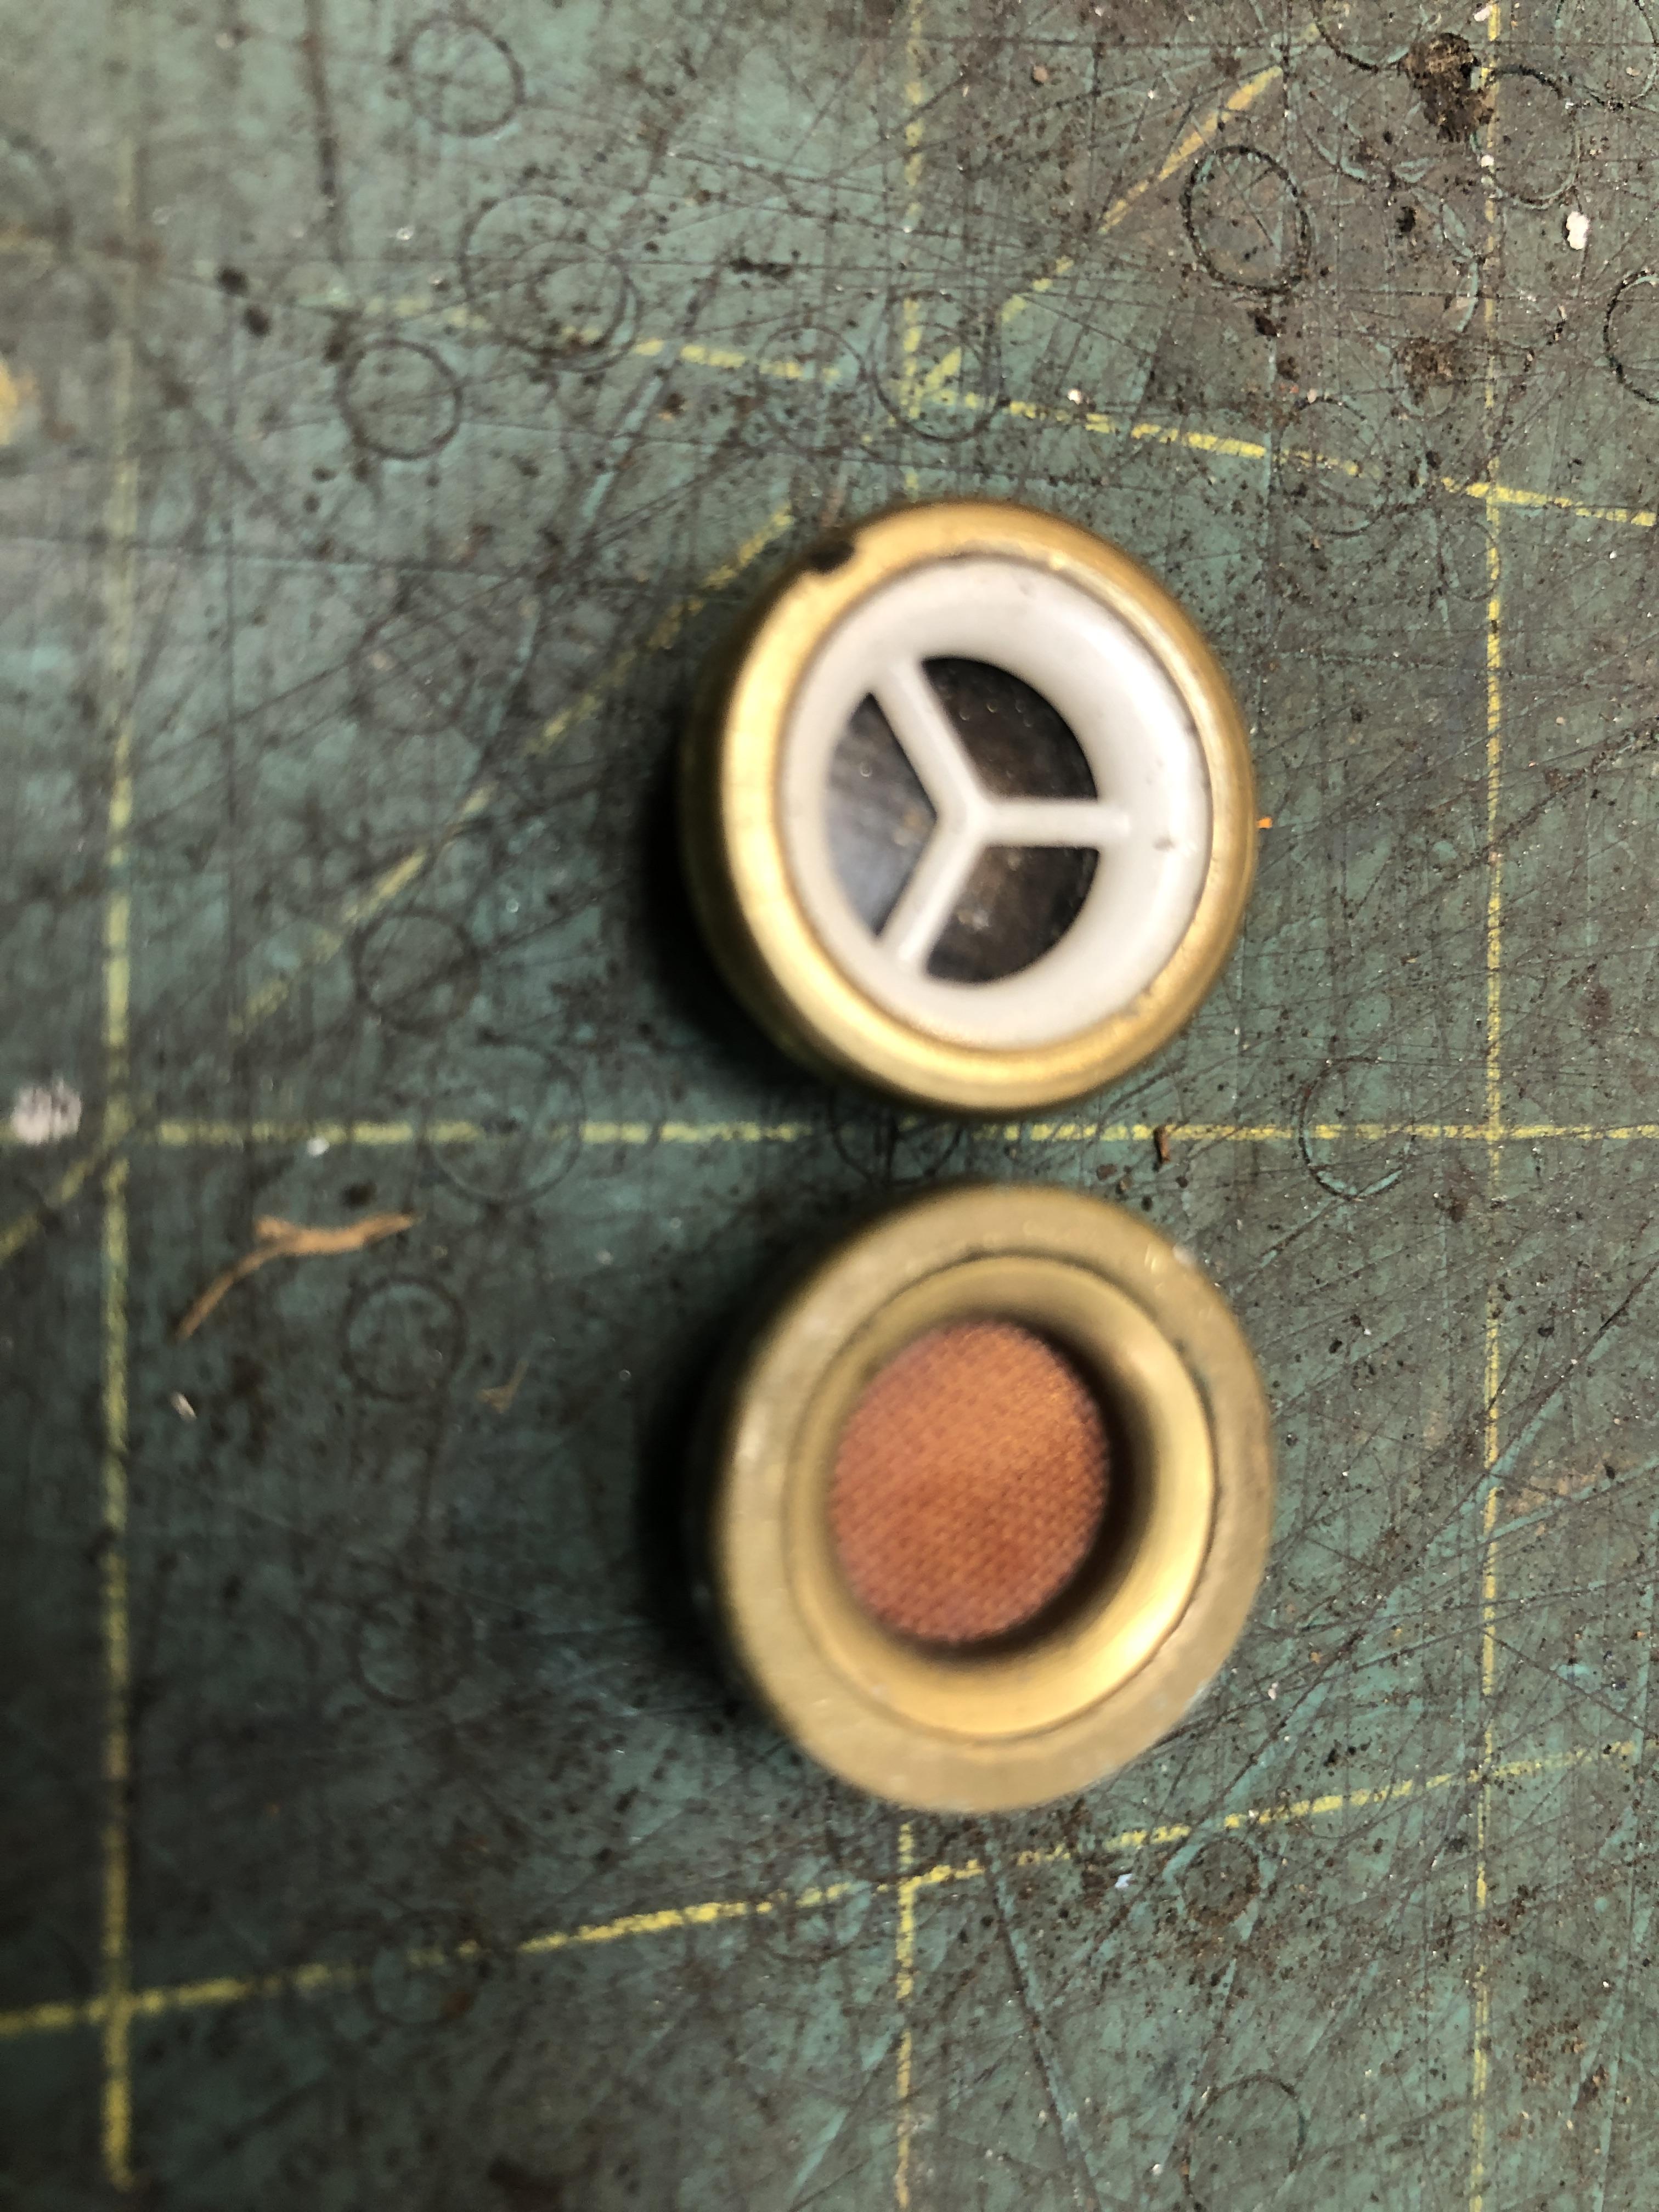
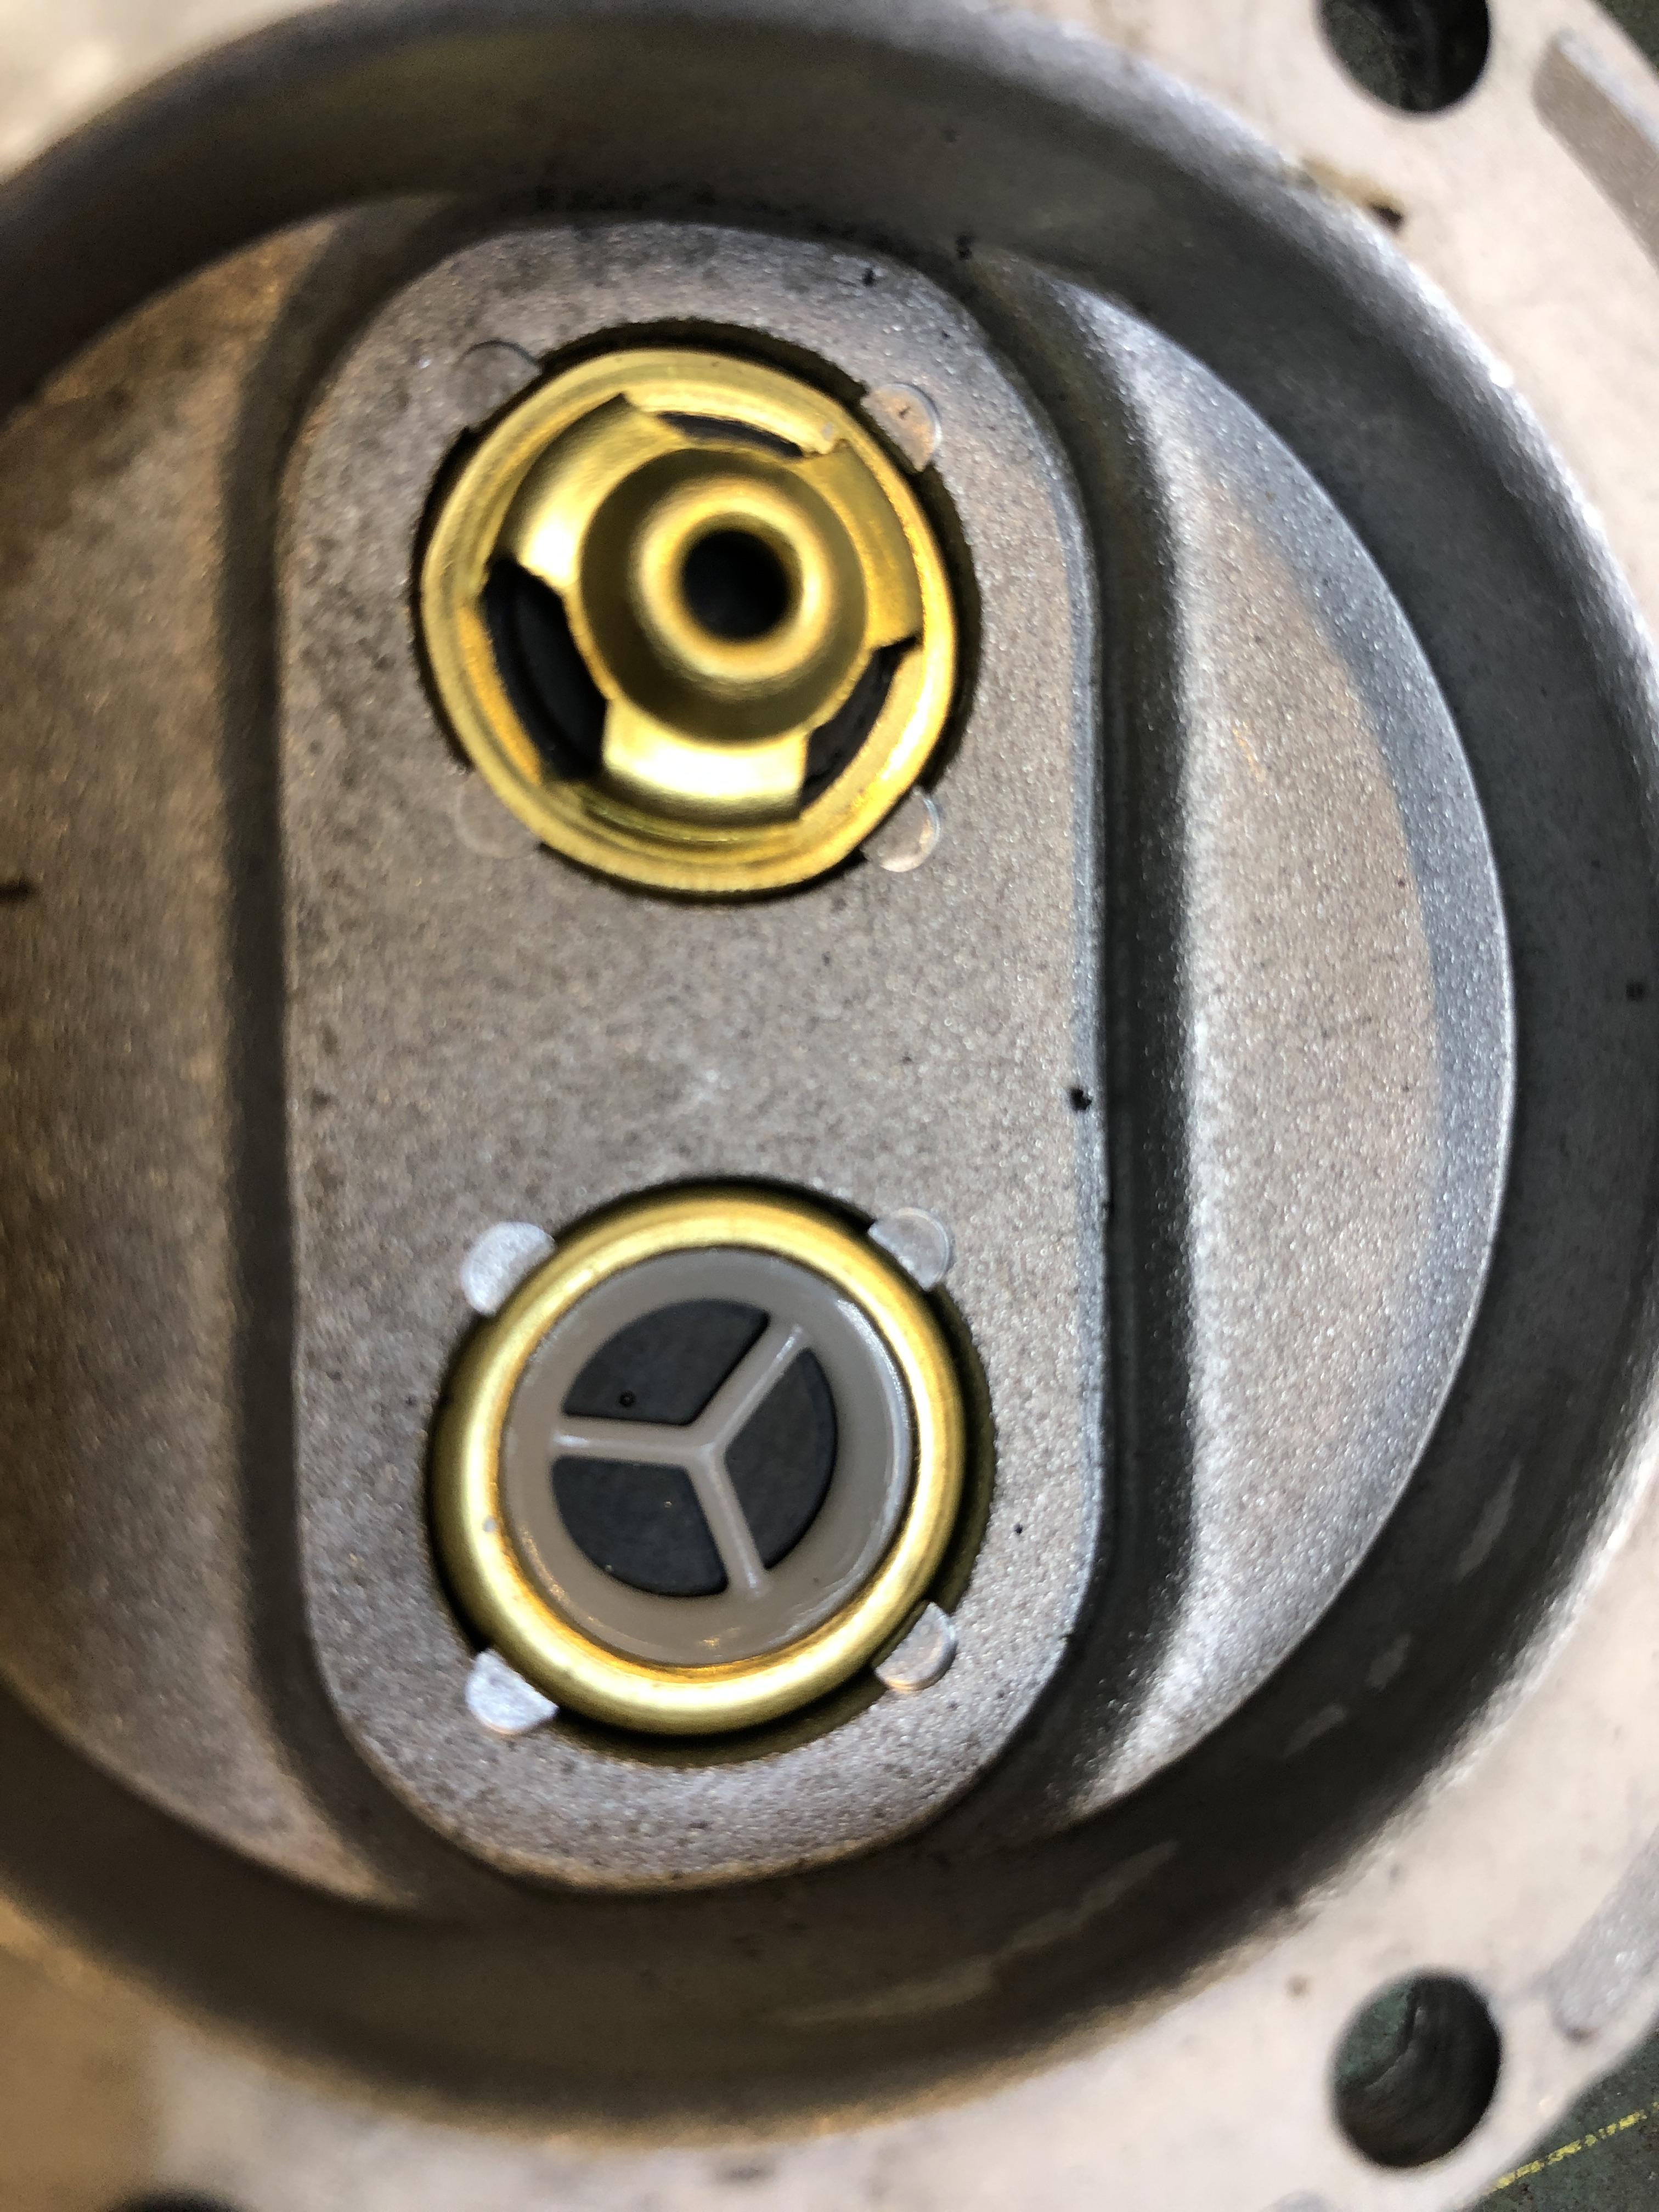
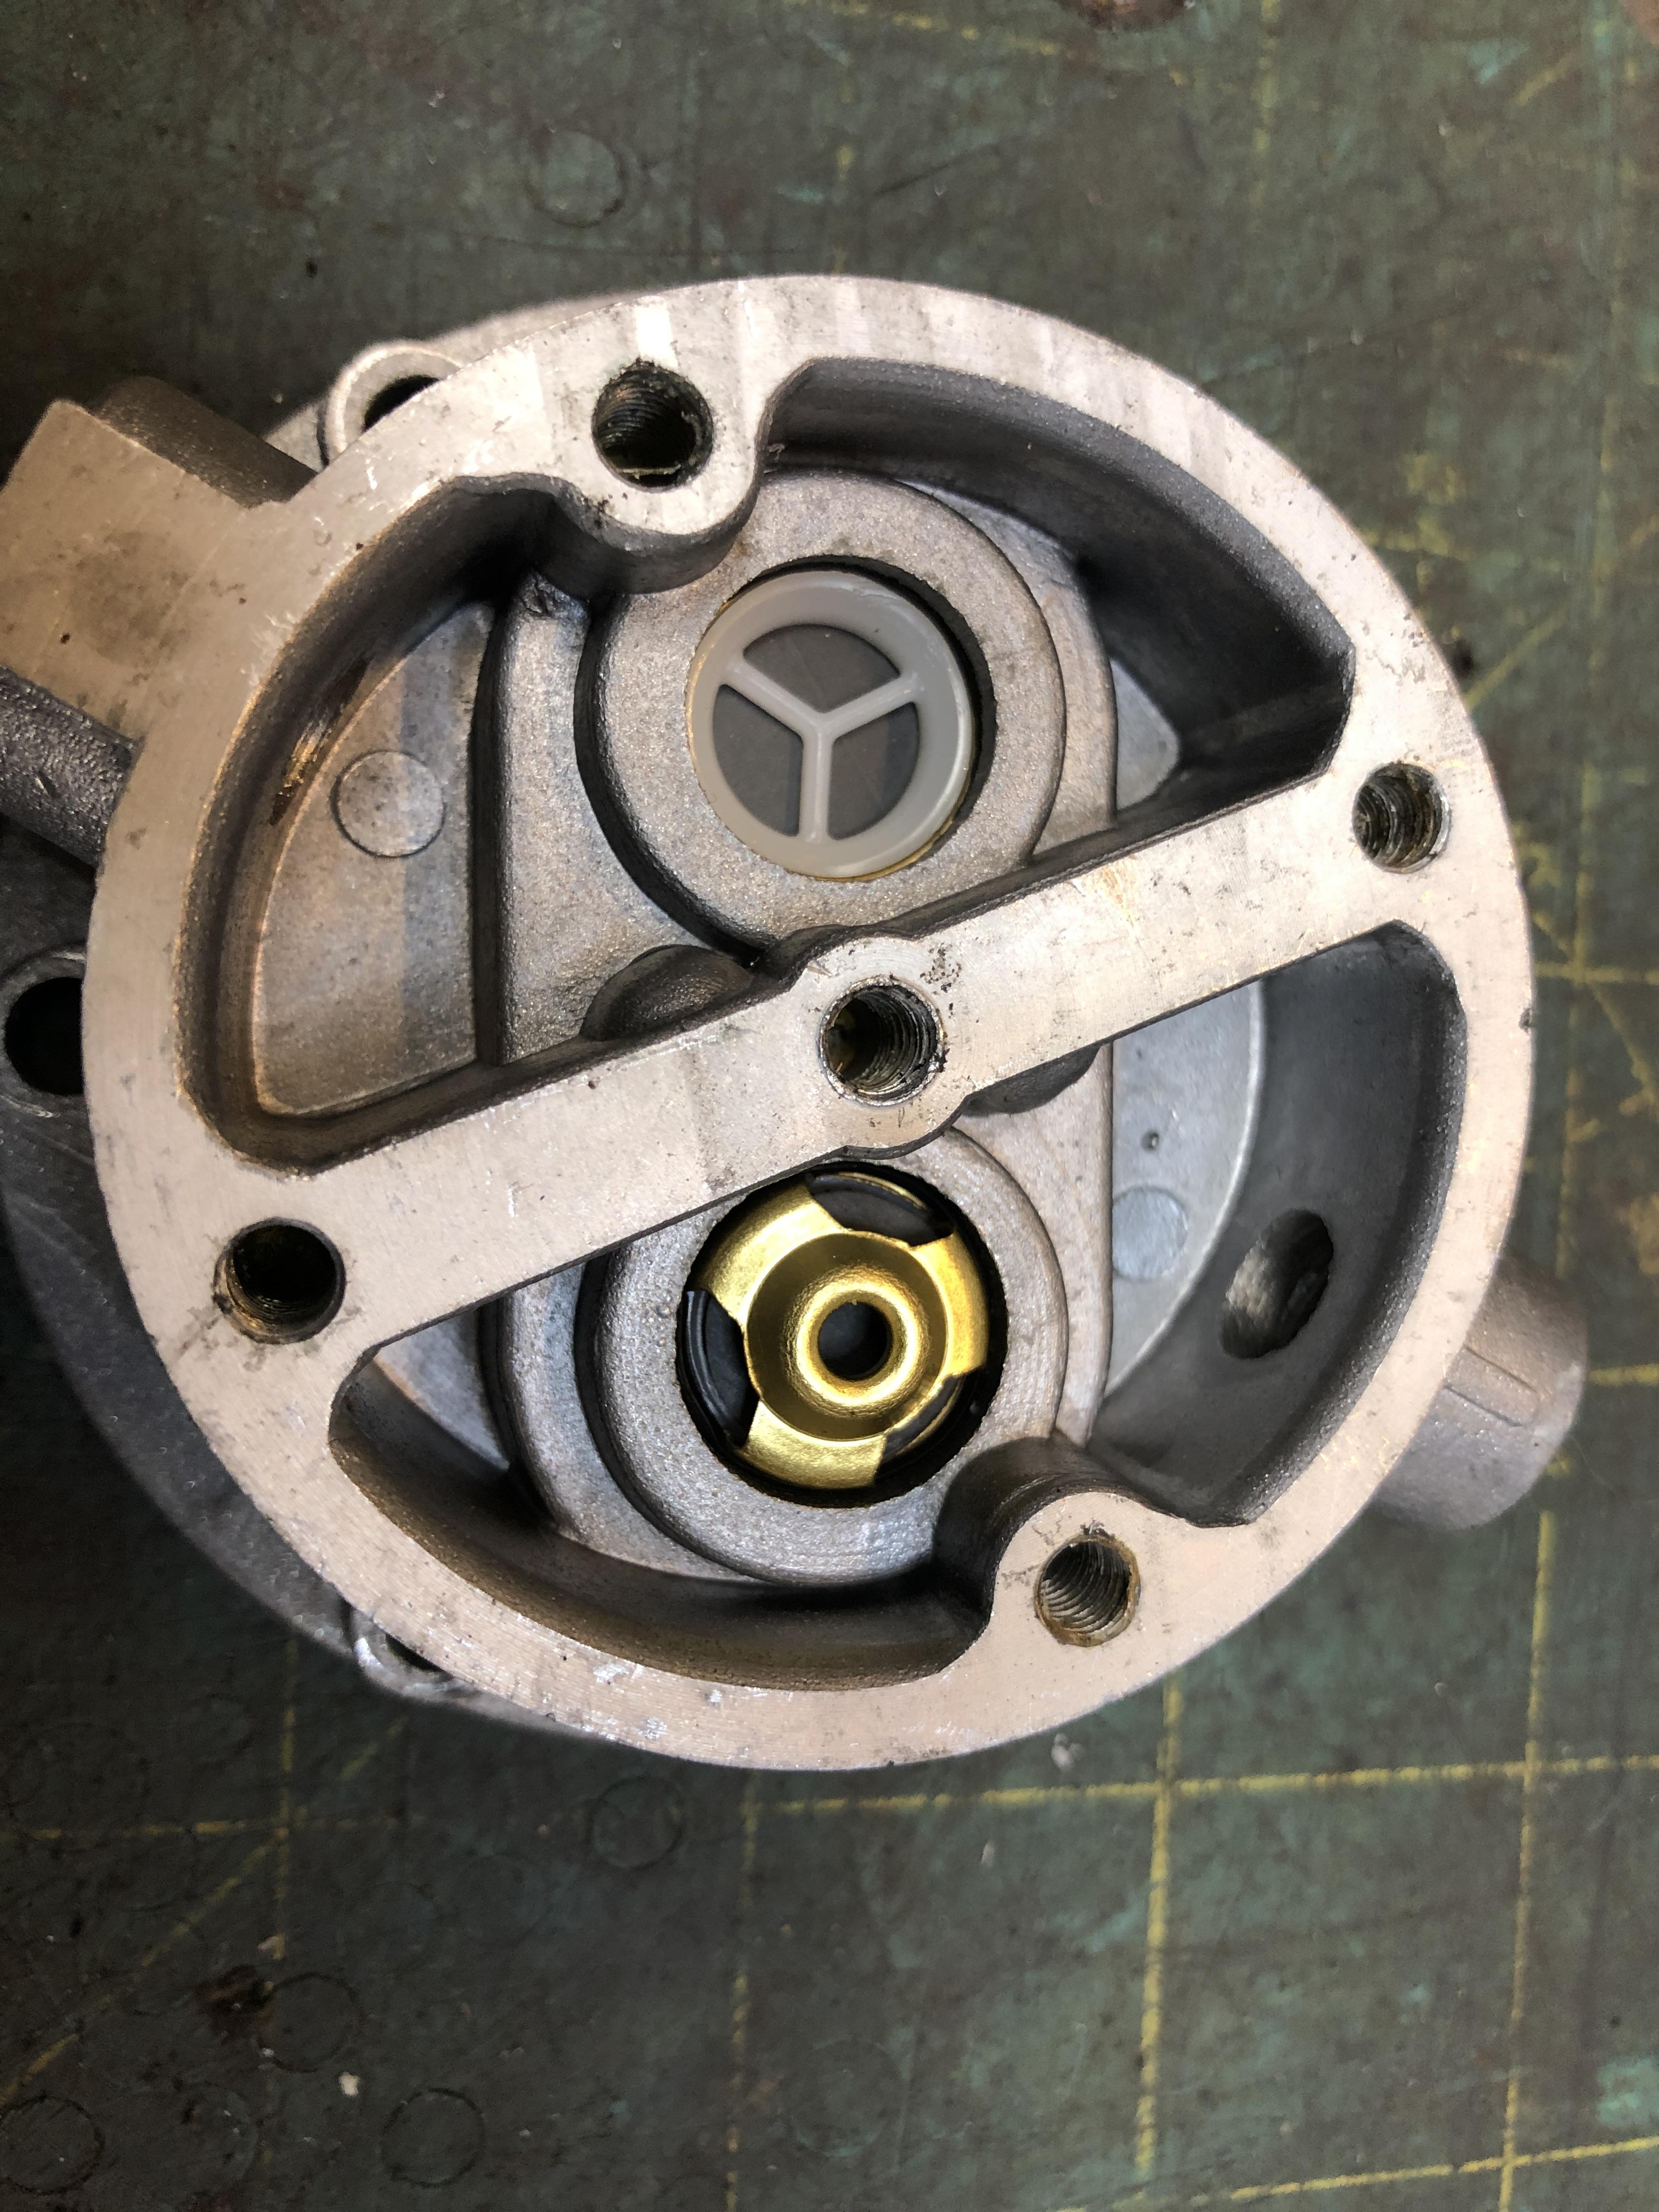
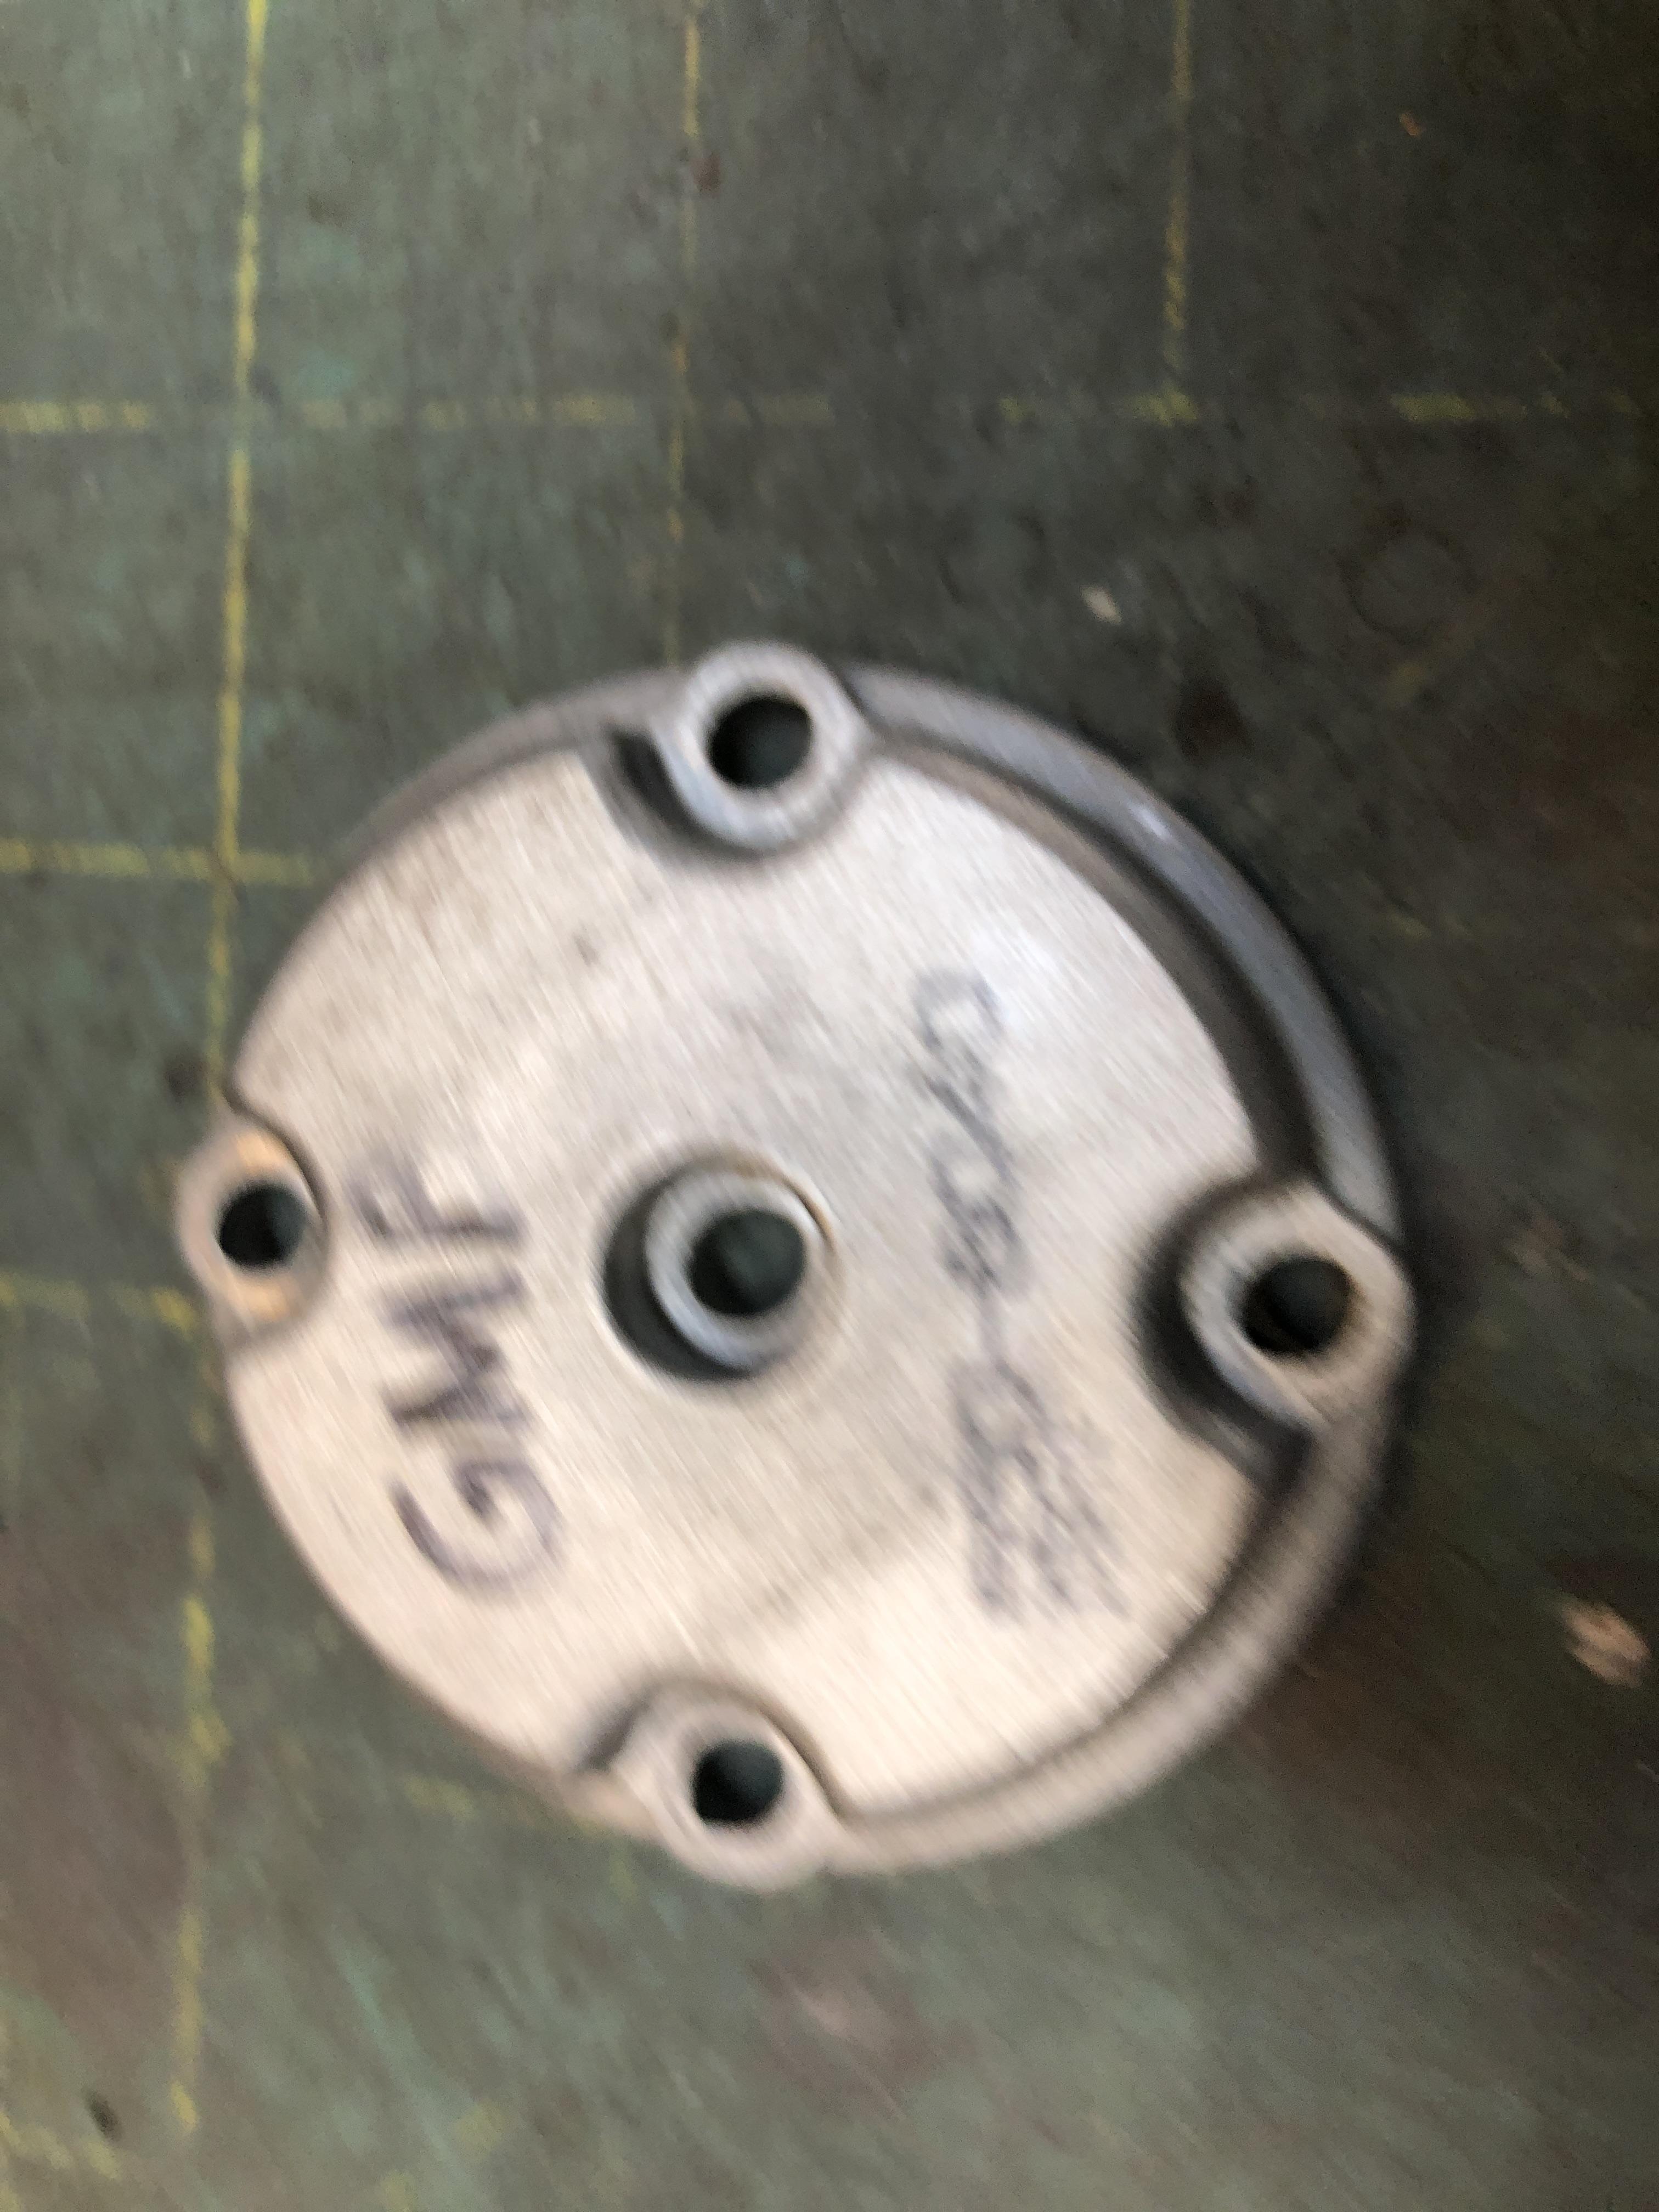
I've recently been through the wringer on mechanical fuel pumps. I LOVE the stock mechanical pumps and dearly wish to be able to use them more. Silent, plenty of volume to run triples etc up to 250 hp (my educated guess). Stock new pumps put out a CRAP load of volume even at cranking speeds. The cheap "offshore" GMB and Spectra fuel pumps that are out there that look like the stock Nikki/Ampco/Kyosan Densi pumps have been reported here and elsewhere are a ticket to very early failure. I can further attest to this experience. Had a fresh GMB make it about 10 km before leaving a customer/friend stranded. So after much investigation of the issue, I have good news. 1. The GMB and more expensive Spectra are identical inside. The diaphragm and check valves are visually and texturally identical. Might as well buy the GMB ($18.72 CAD on Rock Auto) 2. The problem is with the check valves. The design of the flapper is weak and shitty. The OEM diaphragms are thick and strong and seem fine. The failure is that they stop (or barely start ) being able to pull fuel from the tank. Any air gets in there and they loose prime. If you actuate the pump by hand on the bench in a vise with your finger over the intake, you can barely feel any suction. Do that with OEM pump and it will suck the skin off your finger tip. (Air intake only, no liquid). Now the really good news happens when you want to rebuild your old OEM Pump. Up till now it's been tough to find rebuild parts. I took apart about 20 OEM pumps (all three brands, 14 Z and 6 510 ) and noticed the following. 1. Diaphragms; Depending on age and use, some were fine, some were hard and/or cracked. No surprise. About 40/60 good/bad. 2. Upper diaphragm. Not even sure what the function is of the upper rubber diaphragm, but 100% were soft and reusable. Don't think they endure much hardship. Maybe one was a little stiffer than the others. I'm sure we could fill an long thread discussing what its for.... Please don't here. 3. Check Valves. The real surprise. 100% of them were 100% perfect and appeared nearly brand new. All were clean, no sign of crud buildup or damage or erosion/corrosion. These things are indestructible apparently and totally un-affected by fuel or time. 4. Lower seals. Where the rod passes through to the actuator. About 4 out of the 20 were still soft and usable. Lots of splits and hardness. Ok, knowing what we know about the new copies (GMB and Spectra) and the old faithfuls, and what's wrong and right about both species, is anyone seeing the possibilities here? OEM Body, check valves removed OEM check valves, front and back. Thick solid valve body. GMB check valves, front and back. Thin rubbery floppy material. GMB check valves are held in place with punched nibbins. Very hard to replace the valves. Well, easy to get out, but how do you keep new ones in? You'd have to drill and tap a pair of center holes to use the stock center hold down bracket thingy. Do-able, but.... Are these held in tightly against the gasket? Is there a gasket? Do they come loose with use and abuse? Inquiring minds need to know! GMB mid case with their check valves in place, top view back side of GMB upper hosing. Note different shape of center beam. Top of GMB pump housing. Fuzzy picture like the whole situation.


 2 points
 -
2 pointsI am always averse to changing an engineer's decision unless I know everything that went into the taking of that decision. The problem is usually understanding all the loads and in this case, knowing how the spindle was specified, metallurgically. If one were to remove the head and threaded end of the 5/8 bolt, they'd have a pin. Could be a pin for a shear application, as most pins are. It's fair to say, I think, that the failure mode for the spindle pin would be a double shear, or maybe a single shear with a moment. Exactly the kind of loads pins are made for. You can select the grade of that bolt/pin, 3, 5, 8, etc., and if you know the strength of the spindle pin, can do so to match. Other than that you have to rely on anecdotal evidence, and the problem with that is you never know all the facts such as static loads, impact forces, installation details, etc. that the part has experienced. My favorite example. Please bear with me a moment: We used to ship very expensive equipment upright, which meant it had to go by 747 freighter, which was expensive. Manufacturing wanted to ship it on its back, something it was never designed for. So one day they laid one on its back and shipped it somewhere and back again. It came back fine (looking) and so they declared the equipment could now be shipped flat, since they'd proven it worked. Scary. I believe we've all done things where we thought this will probably work, and it did! Does that mean it's a good idea? You'll never know. All you can say is, "Well, it hasn't failed yet." Purely for the fun of it, I am making new pins on the lathe. I too will be holding my breath for the first few miles. ?2 points
-
In the 2 or 3 I've done so far, the amount of suction is spectabulus (yes I invented a word, no beer involved) so there is no problem with getting fuel from tank with an air filled line. Only time will tell about real world performance and life. The only thing I screwed up was getting the check valves in the right way the first time. And maybe the second....2 points
-
The last "gotcha" is the tiny thin seal washer between the check valve and its seat in the housing. I was able to remove virtually NONE of the OEM ones. They were hard and stiff and stuck in real well. They were easy to scrap out, but were always destroyed in the process. So you may need to source or make some new ones. 3/4 OD (19mm) and about 18mm ID. Only about 0.05 thickness. A tiny ring of RTV would do as well.... You want that check valve sealed to the housings. NO LEAKS ALLOWED around the check valves.2 points
-
First thing to say about the "details" is that all the OEM pumps I took apart and scavenged parts from are identical as far as the location and size of the bolt circle that bolts the main body halves together and the top cap in place. So you can interchange just about any part with any part from any brand. The GMB and Spectra ALSO use the same bolt patterns. So you can interchange their bits with the OEM bits. There are small gotcha's here. Some of the upper caps are not interchangeable across all brands as the divider wall in the center is not in the same clocking with the bolt pattern. All you have to do is use a matching cover and middle housing from any one brand. Next is a small annoyance that the way the check valves are held into the middle housings is VERY different with the GMB/Spectra. Cheaper and crappier of course. They use a 4 point punch around the perimiter to trap the check valves into the housing. Hard to get them out, and if you did, you couldn't get your OEM check valves to stay in as you'd have a heck of a time re-punching around the edge to keep them tight and in place. Pictures coming. SO,. It actually makes sense to use the check valve housing and its matching cap from your old OEM pump and bolt it to the GMB/Spectra base housing. Keep all the good bits together. It does mean you have to do so sort of clean up of your OEM castings to match the new GMB castings if you care about that stuff2 points
-
What you do, is go buy the $19 GMB, replace its check valves with your old perfectly good OEM ones, and put that hybrid baby back in the car for millions of additional miles and smiles. (Please put the GMB check valves on the cement floor and crush them into dust with a large hammer, lest you get tempted to use them at a later date. Don't) You get a new diaphragm, new lower seal, your perfectly good check valves, and the new GMB upper diaphragm that all make up a nearly new unit, and should run for a few years pump. Ok, all is not perfect here, there are a couple of details you need to deal with, but its all manageable. I'll explain in a but once I take some pictures. I guess the risk is that the GMB diaphragm material will fail faster than the OEM (or the new Nikki ones you get with Nikki pumps for non Z's to steal their internals from, remember that thread?) that is still to be seen, but all in all, maybe we have a cheaper route to rebuilt pumps here.2 points
-
Unfortunately I didn't think to take any but here is exactly what I did: Estimated time to completion: 1 hour Open up the Z clock and remove the hands (get some wire cutters or very thin pliers and pull up on the center of the clock arms). They will fight you, but eventually pop off. Now you can unbolt the 3 facebolts and pull the faceplate & mounting piece off of the old clock mechanism. The faceplate is held to the mounting piece by 3 tabs which you bend a bit to separate the pieces. The new clock's center arm mechanism isn't long enough to reach through the face and mounting plate as-is due to a bit of a spacer built into those 3 faceplate tabs. Thin the width of the tabs out a bit (I used wire cutters) so that the tabs can go further into the mounting plate's tabs and end up being flush with the plate - then bend the tabs in holding the faceplate to the mounting bracket. NOTE: The mounting plate's 3 bolt holes in the center protrude outward. Be sure to mount the faceplate on the side without the protrusions (mounting flush) - the clock mechanism will mount to these. Glue the clock mechanism to the 3 bumps on the back of the mounting plate (i used superglue but you can use whatever you prefer) Open the new clock and note that the clock has a variety of wires all of these can be snipped except for the 2 that go to the battery (the others are for a light, the alarm feature, a speaker, etc) Remove the hands by pulling them straight up and remove the mechanism - put the hands to the side as we will add those at the end Now the only physical activity you will need to do for this - get a small saw and saw through the plastic clock outer shell so you can remove the AA battery housing. Be sure to remove as much plastic around the battery housing as possible. The original Z clock's can does not have much spare space, so be sure to make it as small as possible while maintaining the area where the battery clips into. Place the AA battery housing into the can, reattach the clock hands by simply pushing them back on the center bit (leave the red hand off as that's for the old alarm feature) I wrote the above as detailed as possible, but it is much simpler when you actually have both clocks in front of you. NOTE: Everything will work but there are VERY small tolerances for everything (the clock hands hover about a half millimeter above the face for example. As long as you remove enough of the surrounding plastic for the AA battery housing, you will also be able to close the clock and everything will look factory.1 point
-
1 point1 point1 pointI’m not so concerned about the slightly sloppy fit of a 5/8 bolt as remember the strut and bushing core tubes are torqued together by the bolt/pin and locked solid to one-another. The bushing rubber provides ALL the rotation at this joint. That’s why you torque this together with the car on the ground and driver weight in the seat. You want the rubber at its neutral position most of the time in use. The locking cross pin provides a way to prevent the spindle pin from rotating while torquing (you can do either end independantly without using the other end as a backup) and is a fail safe in case all the nuts fall off. I also just inspected a half dozen old crusty control arms that still have the bushings installed to see where the center bushing tubes have come to roost left/right offset wise after years of use, to see if the initial offset made any difference other than assembly with the strut housing ease. What I found was a bit surprising. The front bushing clearly shows the center tube still offset toward the outside of the control arm, but the rear bushing tubes where all darn close to centered now, maybe just a tad offset to the outside. Not sure if 6 controls arms is a representative sample..... A testament to the dominant direction of travel and forces applied differently? One set of new bushings I have laying around has the offset center tubes. No clue as to vintage. I have a set to install today, I’ll use the advice and experience detailed above. Thank you.
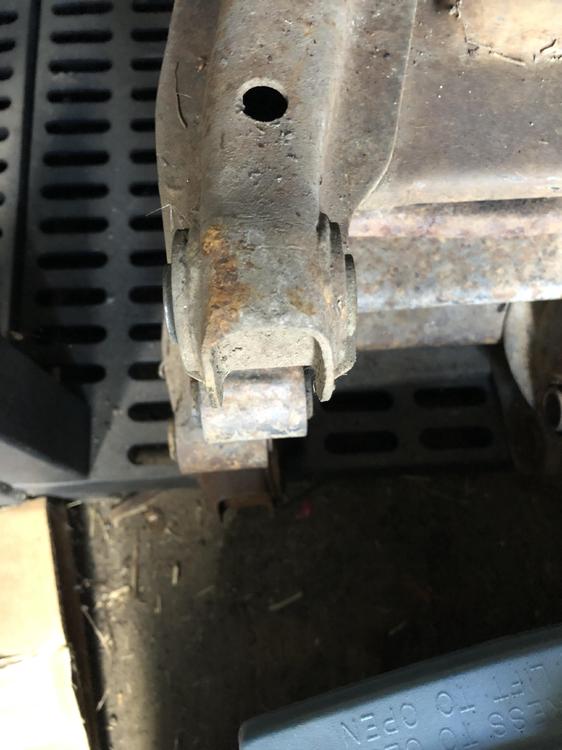
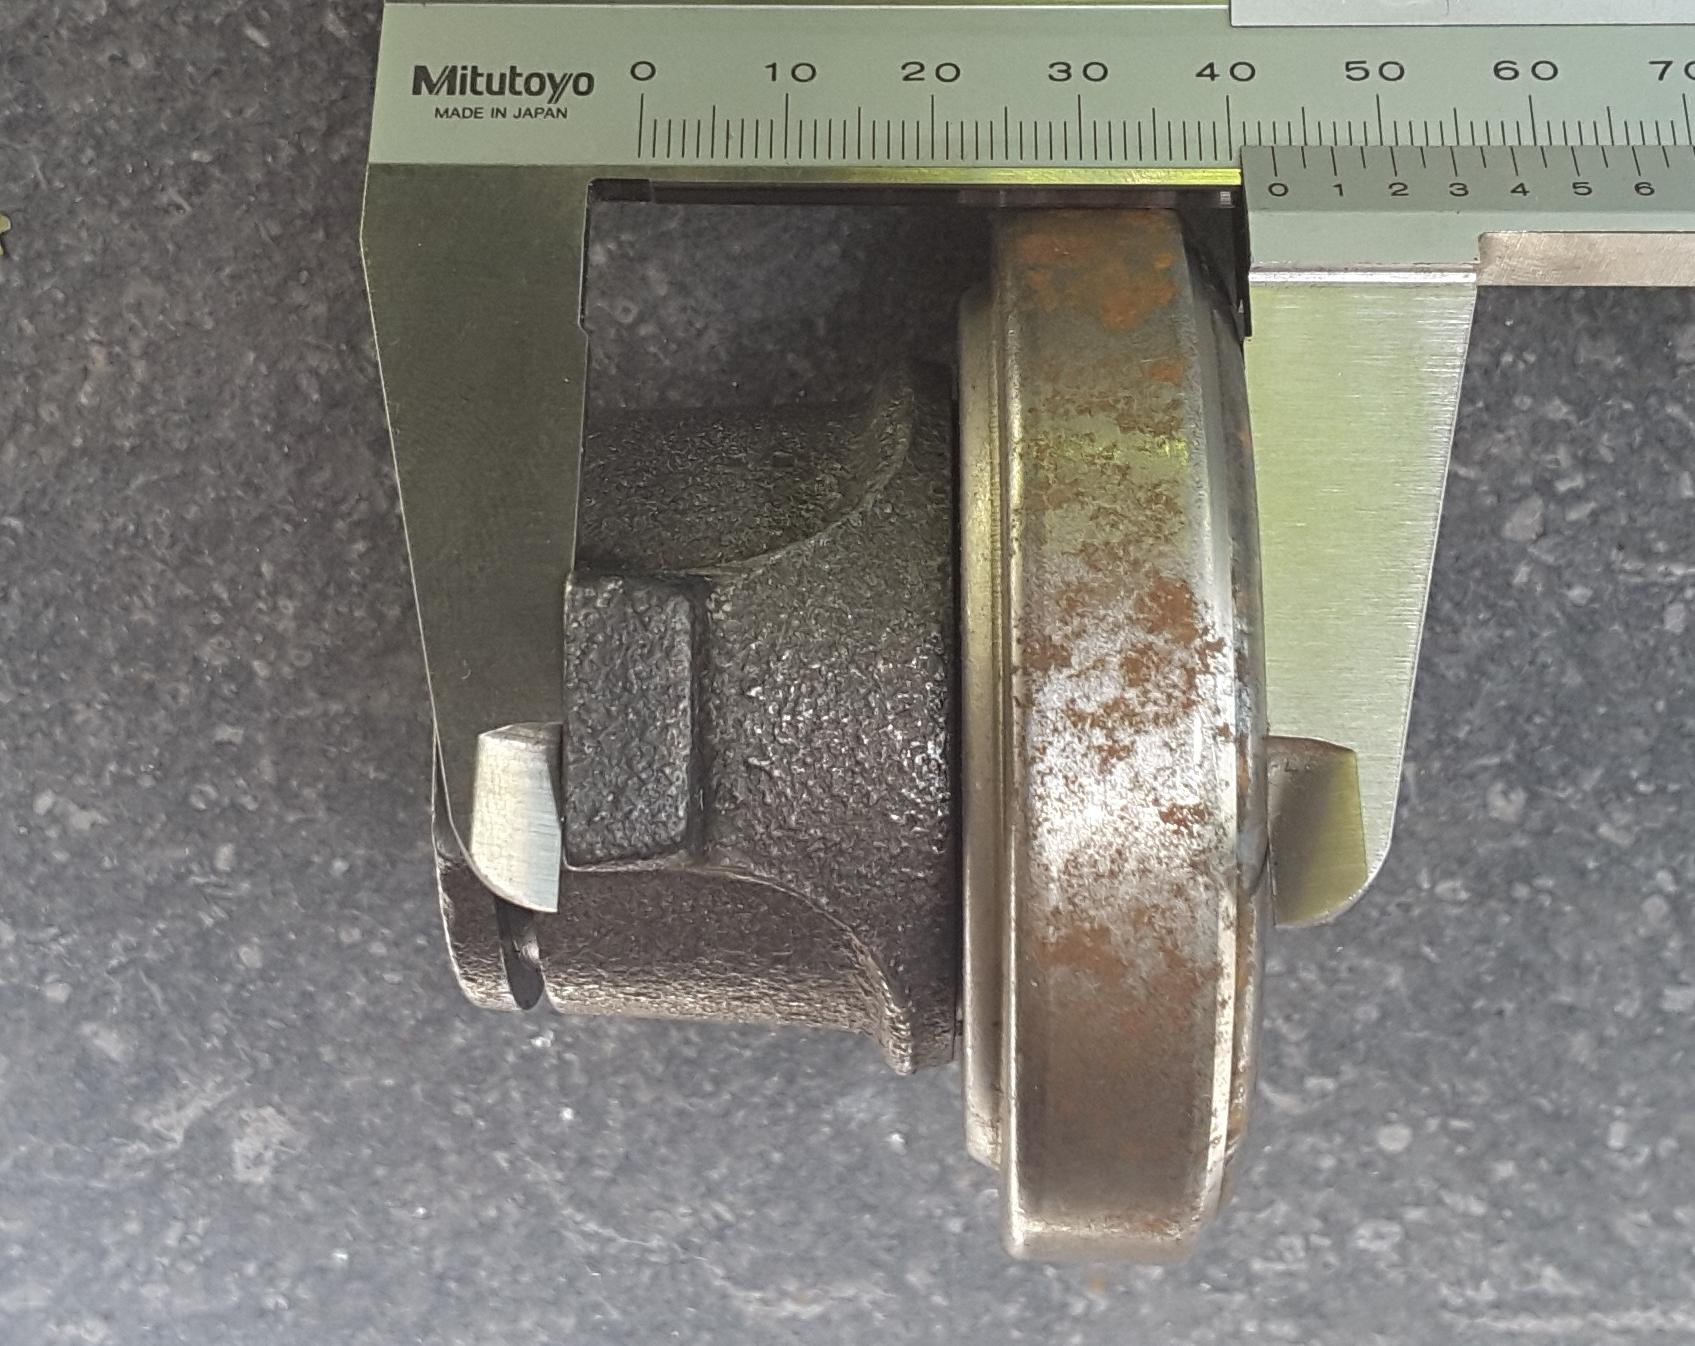
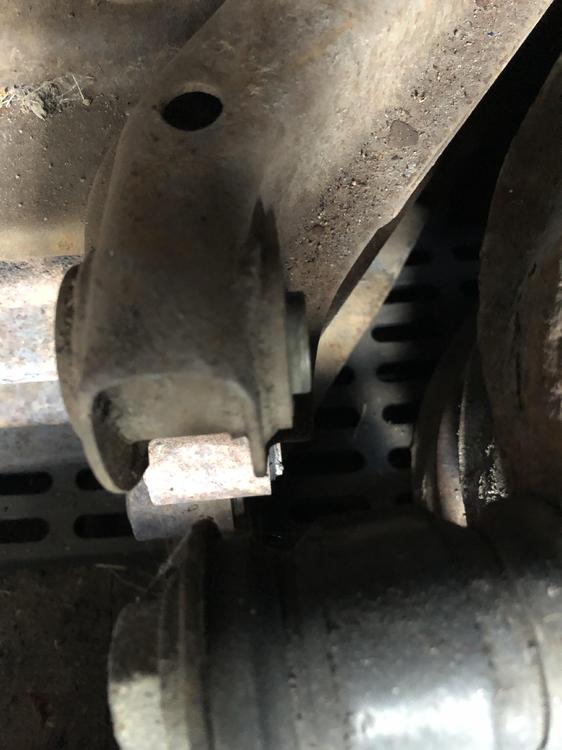 1 point1 point1 pointThat is not the original pivot ball. Looks like one out of the RB engined cars, Skyline R32 etc. P/N:30537-RS581 Yours should look like this. The pivot you have is correct. Part number: 30537-21010 You should measure 26mm from shoulder to top of ball. Btw: If you want to buy that pivot ball, you could try this to compensate for not reaching the 91mm measurement. You can use a couple of ID: 10mm washers on the pivot ball thread to extend the pivot ball. That and a spacer ring behind the thrust bearing to increase the length of the collar/throw out bearing combination. To do the thrust bearing you will need to remove the bearing and machine a ring. This is fixing symtoms, not what is causing them, but it could get you on your way. In the last two photos are my spare fork, throwout bearing and pivot out of a 300ZX. The throw out bearing/collar measure 42mm. That would mean a pressure plate on the bench would need to be 50mm. The 300ZX plus a lot of other datsuns/nissans with the F*71A B C transmissions use the same pivot ball.
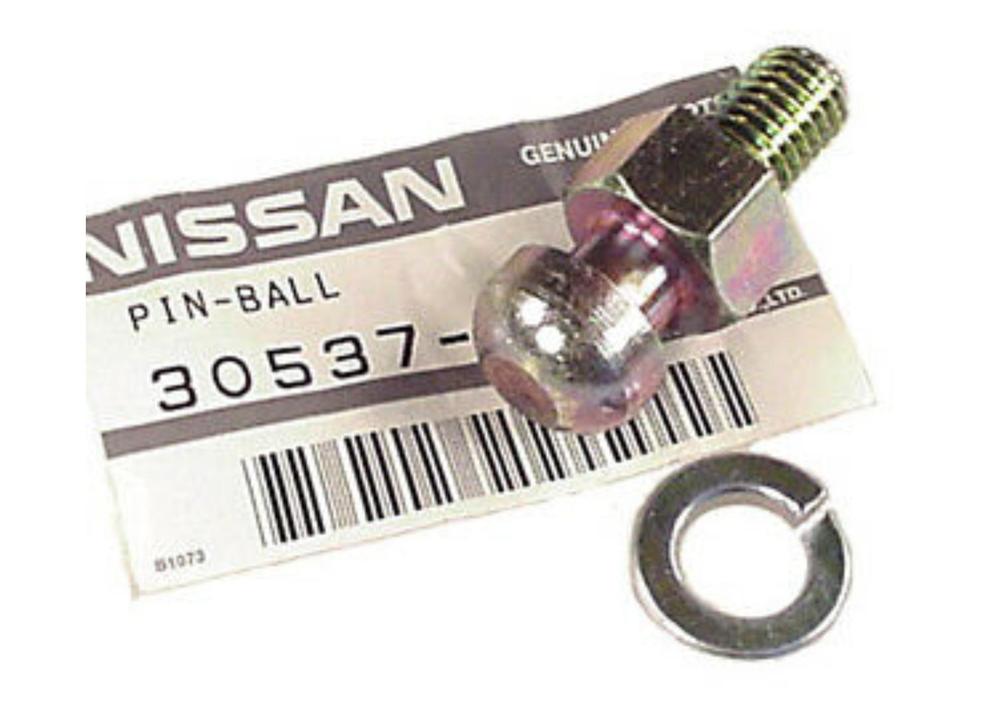


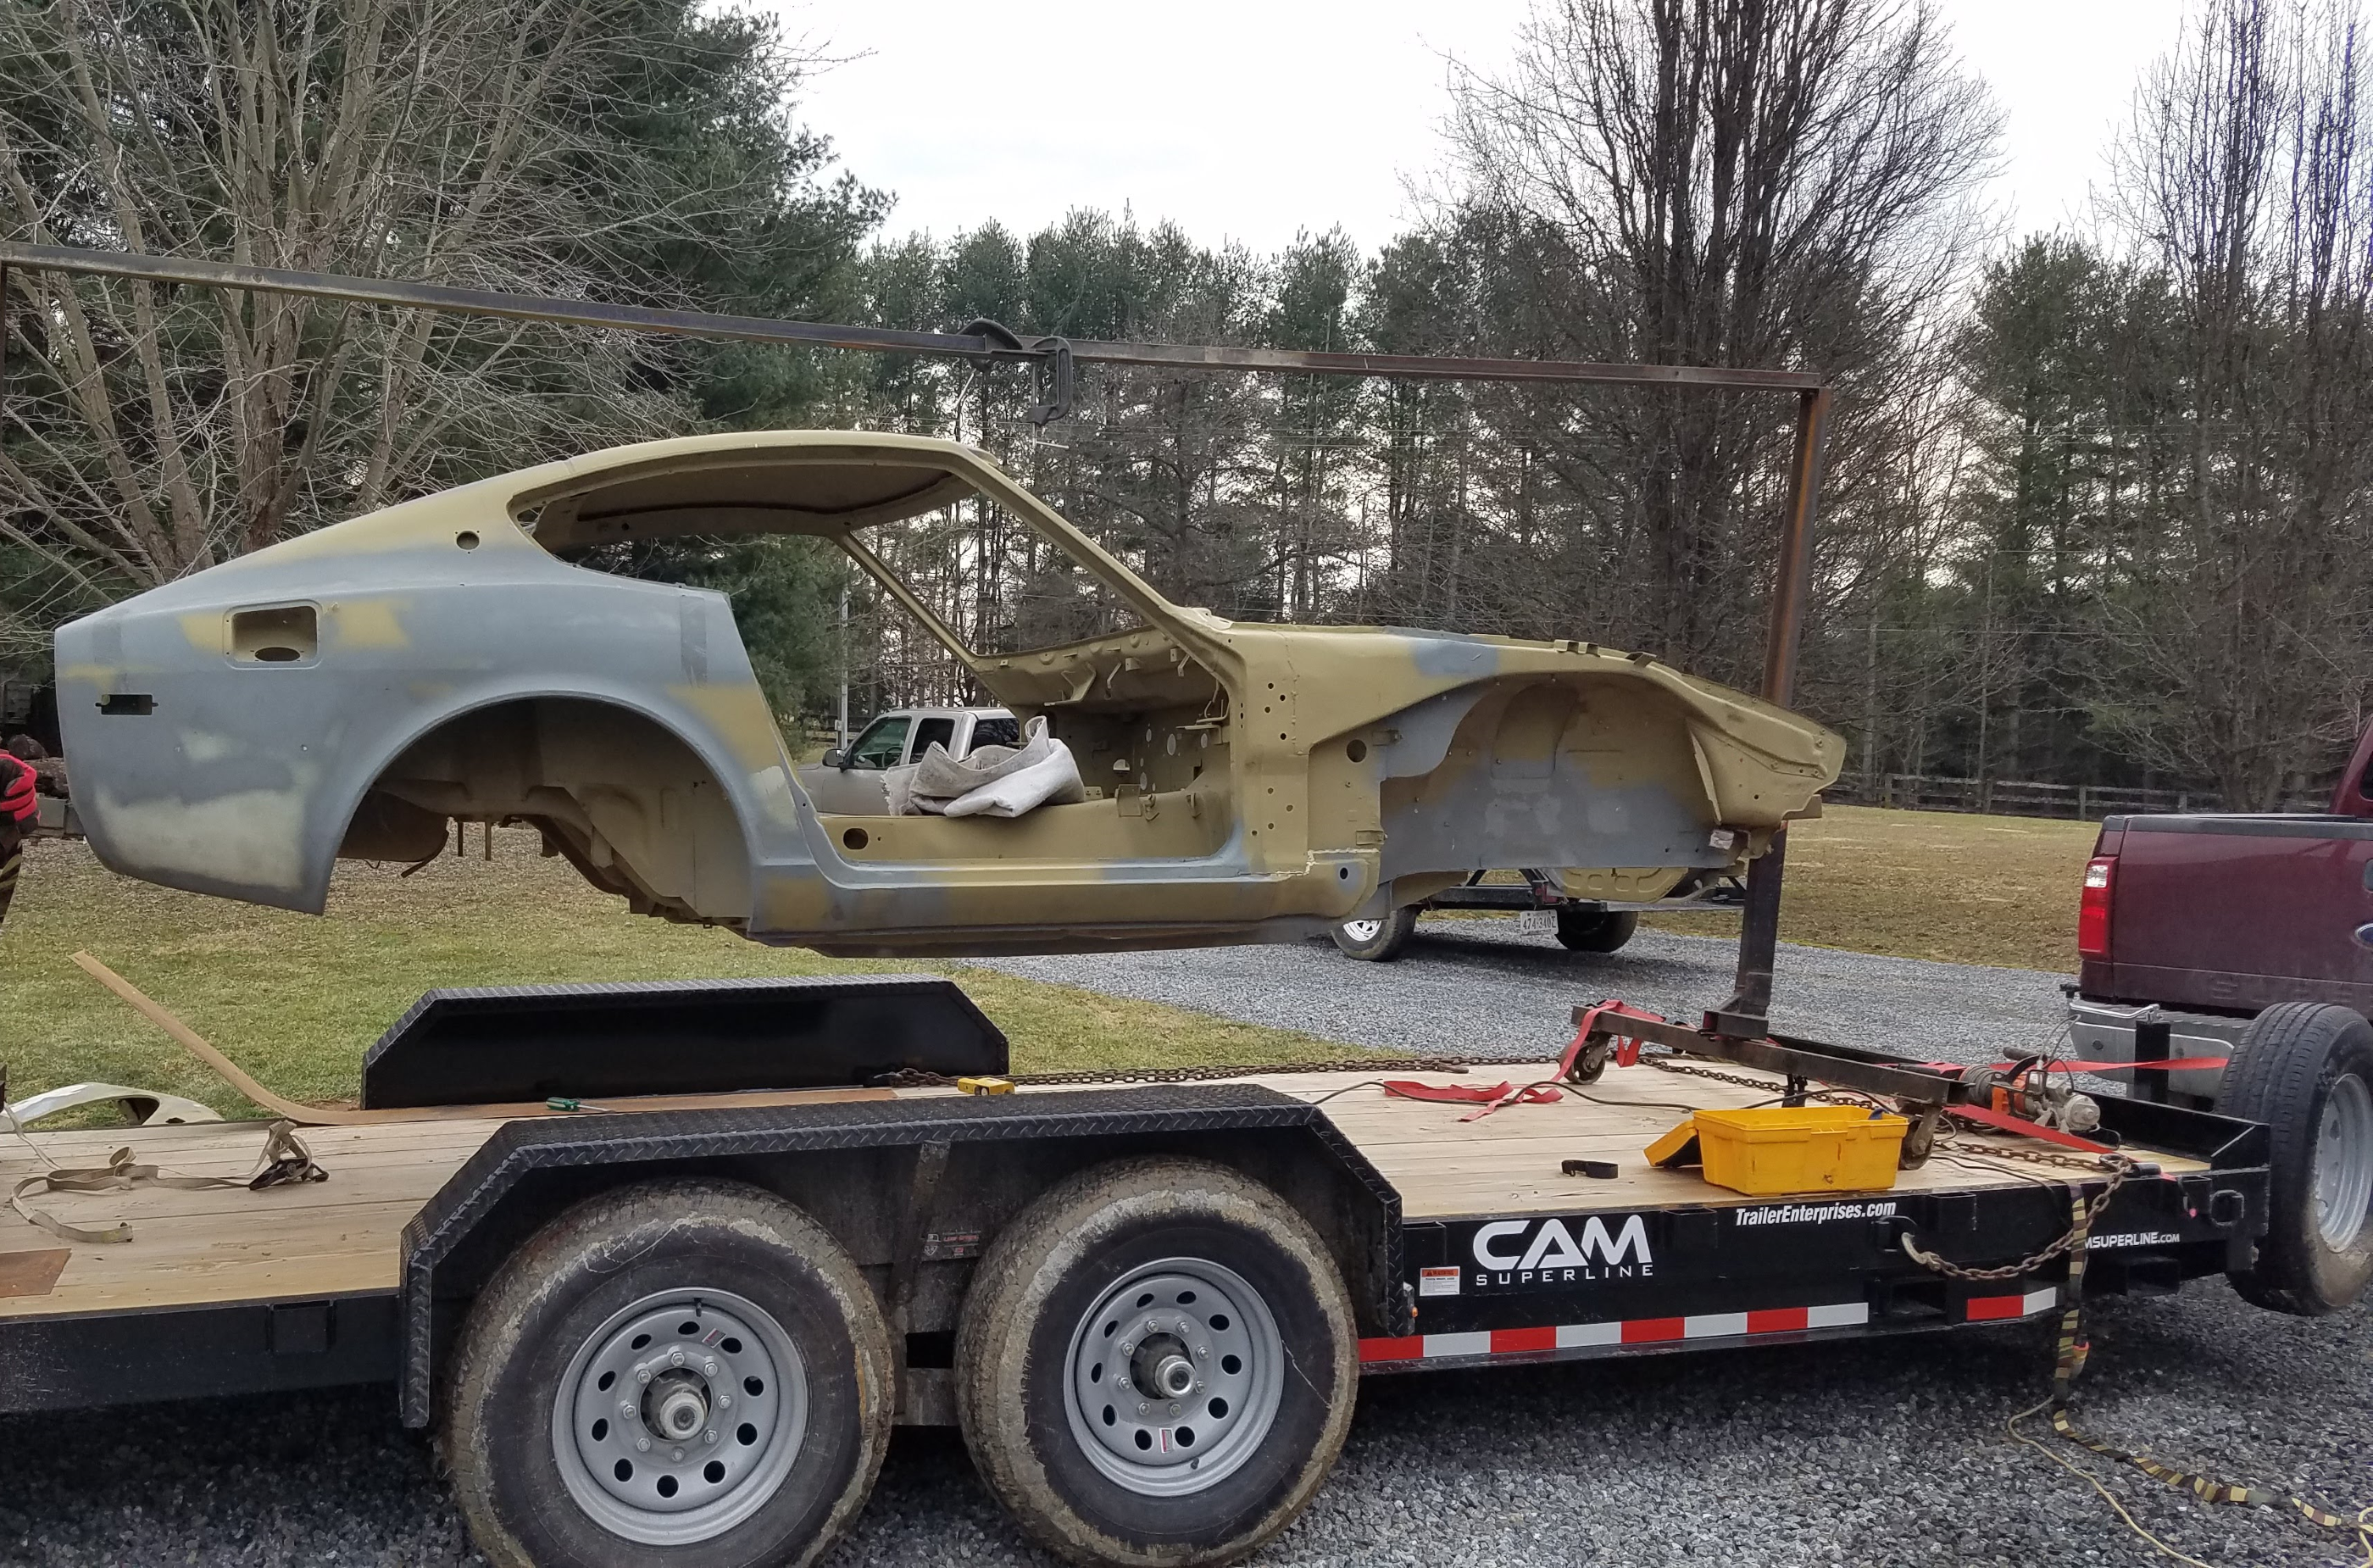
 1 pointMore waffle (being polite here). I have seen this before, probably know the source of this pile of s... Its like saying the Chevolet Covair fostered some characteristics similar to the Ford Model T. And the Model T fostered similar characteristics from a horse and cart. Thankfully I haven't brought the book, wasted my money.1 pointThanks Alan for the kind words, and to reinforce, this about the CSP311 is just un-researched waffle. Just more lazy "research", done in a few minutes. It took me months and months of transcribing kanji and translating, and cross referencing, (as well as what was written in English) to put the Silvia history together. Why didn't they get in touch....?1 point1 pointYeah, I think I'm in agreement with Captain Obvious on this one although I'm clearly a much less developed, lower life form that resides way down on the food chain . That very tightly fitted, locked in spindle pin is screaming "I'm done this way for a reason". If I ever need a new one I'll fork out the 40 clams and pack my lunch for a week.1 point1 pointWell I hadn't thought much about a sales prospect, but I didn't hate making these. However, I didn't make the internal threads yet* as I did not have the correct tooling. I've got that tooling (special taps) on order and if that tapping process doesn't turn out to be a disaster, then I could probably be convinced to make a couple for sale if people need. Of course, that tapping process (especially in stainless) could still turn out to be a disaster. I'll let you know after the taps arrive. * The astute viewer might ask "Then how does it look like your brass tip is threaded onto the antenna in your pic???" The answer is... I drilled it out so it just slips over the threads. Proof of concept for outside shape only. I'm not really worried about tapping brass. The stainless concerns me more.1 pointSo fraud, basically. I have often found it 'interesting' how quickly and freely Mr Larry Stepp ('Lstepp4re' on Bring-a-Trailer) and Mr Robert Jackson ('The240ZGuild' on Bring-a-Trailer) have been able to get their comments past the scrutiny of BaT administrators and published tout de suite. It's almost as though they were getting favourable treatment. Whenever I've tried to leave a comment I often find a long wait (if I'm lucky) or it just doesn't get published. And if it does get published, it only takes five individuals to get a comment flagged as 'Unconstructive' and deleted, so easily open to cliques who find a particular comment not to their advantage. Mr Larry Stepp, Mr Robert Jackson/'The 240Z Guild' and Mr Randy Nonnenburg/'Bring-A-Trailer' are all heavily featured in the same chapter of the new Pete Evanow book. Interesting...1 pointIts's been a while and I finished it a couple of weeks ago, but my fuel pump gave up and kept me buzy. This is probably one of the last weekends before it goes into hibernation and I took this photo when I came home. and here is a before and after. Im planning to have the brackets made from stainless steel. Most parts are now aluminium so I could make adjustments. If anyone is interested in a set, let me know.
 1 point


Important Information
By using this site, you agree to our Privacy Policy and Guidelines. We have placed cookies on your device to help make this website better. You can adjust your cookie settings, otherwise we'll assume you're okay to continue.