Leaderboard
-
grannyknot
Free Member6Points5,158Posts -
EuroDat
Free Member4Points3,309Posts -
Zedyone_kenobi
Free Member2Points3,440Posts -
26th-Z
Free Member2Points5,264Posts


Popular Content
Showing content with the highest reputation on 05/09/2016 in all areas
-
4 points
-
2 pointsI emailed Carl Beck last night, asked him if he had ever seen this before, "Hi Chris: NO - I’ve never seen that. That’s amazing. I guess a mistake was bound to happen at some point. Interesting how they “X” out the errors- and put a little NISSAN Logo above them. {NISSAN - hamburger}. Thanks for the pictures." Carl I hope this is like misprinted stamps that are worth millions of dollars, shall we start the bidding at $200,0002 points
-
2 points
-
I am thinking I want to get more F9 E tubes for the roadster and see how they run. OR buy two more F11 and see how the Z likes them. So many ways to tune these things. I will get those floats adjusted soon. I spent the week on the bathroom floor trying to potty train my 3 year old.... but I am happy to report we had brilliant SUCCESS!!!!2 points
-
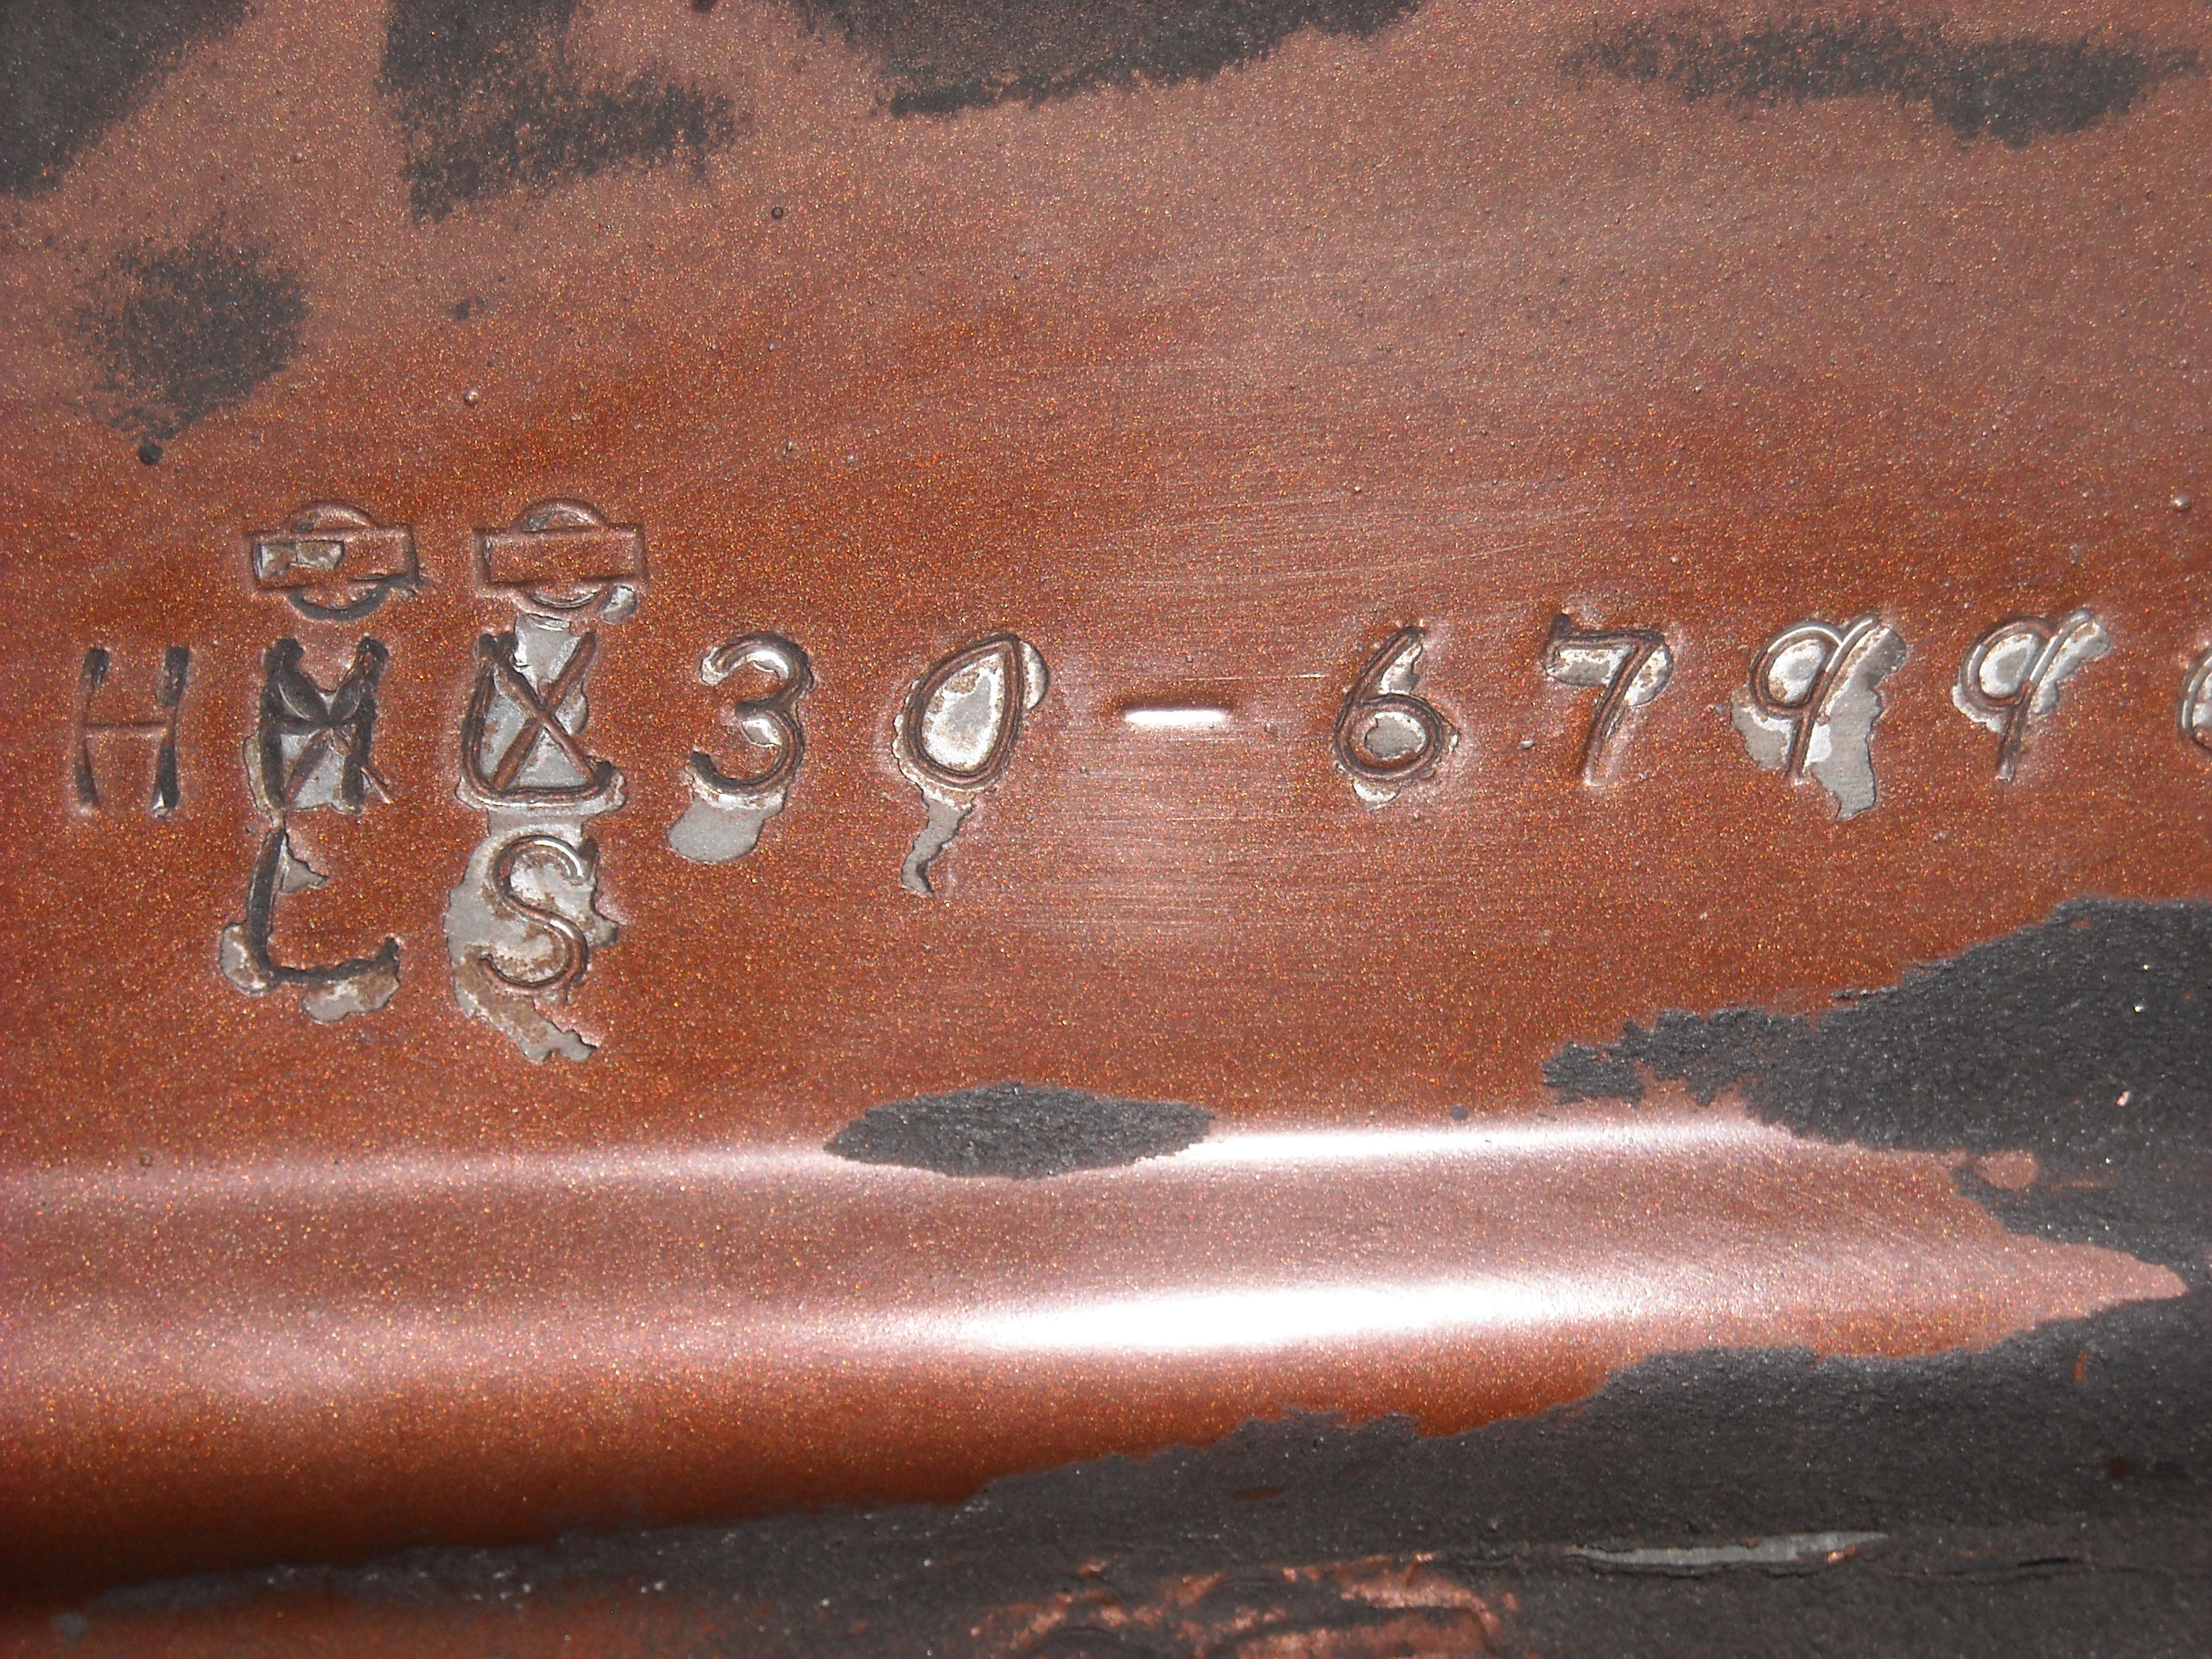
I have a 77 280 that came with the collapsible inflatable accordion spare and I recently completed a project to replace that collapsible spare with an always inflated newer "donut" mini spare. I bought a T115/70/14 donut spare tire and wheel from a junkyard. It had the correct lug pattern, but the inside diameter was too small to fit over the front brake calipers. It fit OK on the rear over the drums, but wouldn't work in the fronts. I came up with two options. 1) use that donut spare as is and if I ever had a flat on the front, I could put that spare on the rear and move my rear tire to the front, or 2) I could remount that donut spare tire onto an old Datsun wheel that would clear the front calipers. I chose the latter. There is some related discussion about wheel widths in this thread here: http://www.classiczcars.com/topic/49310-narrowest-stock-wheel/#comment-450080 Here's some pics of the project. Spare as it came from the junkyard: Then I bought a narrow older Datsun wheel. The one I picked up is a four inch wide wheel off a roadster. You could use a 4 1/2 early Z wheel, or even a 5 inch wide, but I wanted as narrow as possible. Here's the roadster wheel sand blasted: Markings inside the wheel. 4 x 14 and apparently from May 1965: Roadster wheel all cleaned up and POR-15 coated. Moved the tire from the original wheel to my new spare wheel. Here's my new spare with to the original accordion spare and at the top is the original wheel from the junkyard that the spare tire came on: You can see that the donut is a little bit larger in diameter than the uninflated accordion, but it fits into the spare well: Here's my new spare in it's home: T115/70 D 14 mounted on 4 inch wide Roadster wheel: I had to put the spare on the car and drive it a little just to make sure everything worked out according to plan. So I mounted the spare on the car and drove over to a local park as a test. Steering wheel didn't sit straight, and it drove a little wonky because of the large mismatch on sizes between corners, but it worked just fine for emergencies. And even though it's a little embarrassing looking, here's a pic for proof:1 point
-
A photo of the back end with all the gears removed. Well almost.
.thumb.JPG.80b7fb5159739a73feb0af26ced432f6.JPG) 1 point
1 point -
Here are some photo's of the oil gutter and the reverse checking assembly
.thumb.JPG.4d2e50eda44d3e8e24d26af35d4b11a4.JPG)
.thumb.JPG.b34479273da893846aa6489138913954.JPG)
.thumb.JPG.f40947aa94fefc56a6ea89b56f56ecdc.JPG)
 1 point
 -
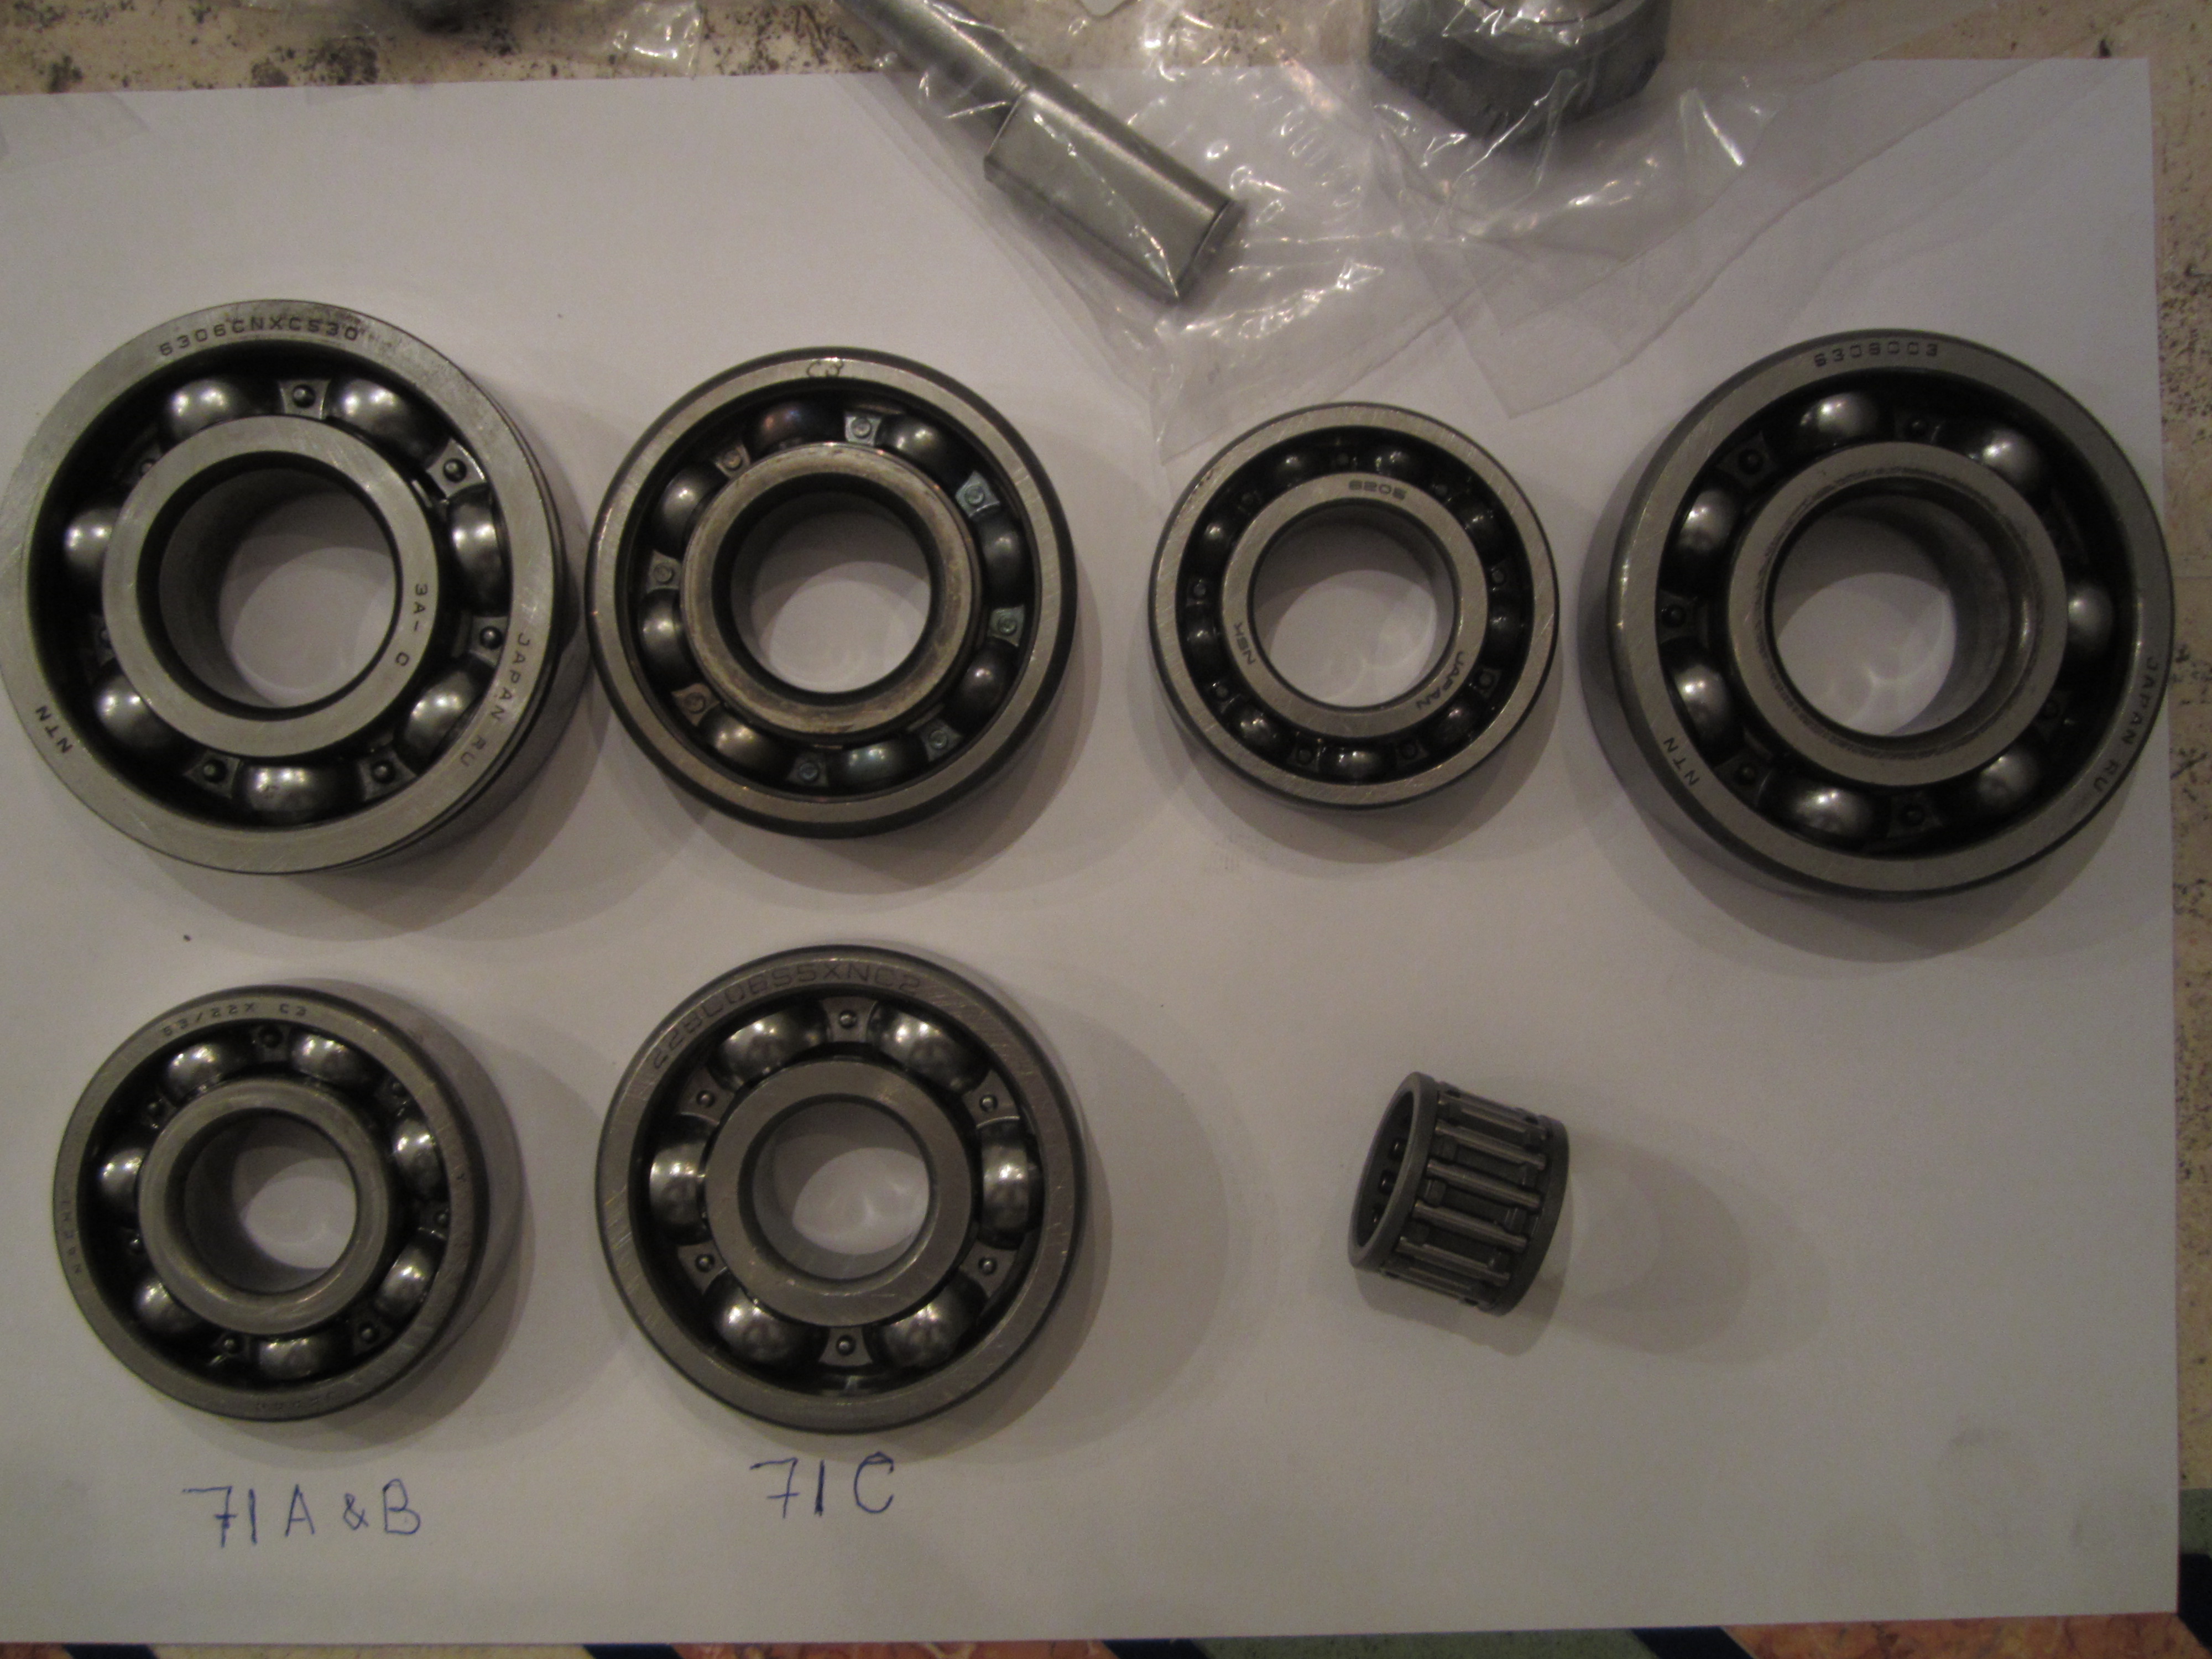
Here is the list of all the parts I used and a couple of extra parts to make it complete. I have incuded as much extra information as possible so other vendors can be used for parts like bearings and seals. You don't need to replace all the parts That will depend on the condition of the transmission. Don't be tempted to buy aftermarket synchros. Its very tempting, but you will very likly notice the difference. I was thinking it will be the (32276) 6306 C3, but the bearing under it (32219M) 6305 C3 on the countershaft was going to be my second bet. Both are in the transmission case adapter plate and seem to be vunerable. See the pfd for a detailed parts diagram on page 2. BTW. That mystery part is the reverse checking assembly. Its not mentioned on the parts diagrams, but it is in the 280ZX FSM. Make notes of things like the front cluster gear direction. It fits on both ways, but could cause a whine if it goes back on backwards. It will work both ways. Warming the front cluster gear up a LITTLE will help a lot with getting it off. Just hot enough that you can still hold it (60 degrees C). Makes it easier to pull off. You could be right about it being a 720 or it could be a 280ZX 2+2. The 720 2wd with the L20B engine had several sets of ratios. I think one was like the 280Z and the 280ZX 2+2, but the other one is very low in first gear: 3.592 - 2.057 - 1.361 - 1.0 - 0.813. There is also a possibility it could come from a 79/80 620 truck with the L16 or L20B engine. It supposably had 3.592 - 2.246 - 1.415 - 1.1 - 0.813. I'm no expert on trucks, but came across this info a lot and it doesn't seem to be rejected by the guys in the know on ratsun. Chas Tranny_Rebuild_FEB2012.pdf1 point
-
No worries, no offense taken. I was just feeling pretty good about this project overall (i.e. feeling like I'm not in over my head just yet) and your reply got me a tiny bit discouraged, so forgive me if I seemed a little too defensive in my reply. I felt like things were going swimmingly and you just had to remind me to not get cocky, haha. As for reading, I'm sticking to the FSM and looking over Dave's thread at the same time. What else were you referring me to read? This was the only mention of the "mystery part" I could find in that thread, btw: -- and I see now it's related to shifter return spring (though I think the FSM refers to this as a plunger) which I did remove as per the FSM instructions. I'm honestly trying to take this slow -- to be as methodical as I can -- I stopped where I did because I don't want to get lost. I suppose every man's got his limits, and I do genuinely appreciate you guys trying to keep me on track.1 point
-
Seems like you might get to a point where you think that you're moving too fast. If you do, I'd say you were right to think that. You've already found a mystery part, and probably came close to throwing away a very important shim. Dave WM spent a few posts, with pictures, talking about that mystery piece in his detailed thread. And the shim is described in the MT chapter. Just saying, you're on the edge. You had a transmission that worked well, just had some loose metal in it. You might end up with no loose metal and one that's noisy and difficult.1 point
-
The smog pump will have no effect on under hood temps. Don't bother. Check your fuel system to ensure correct volume and pressure specs. Change the filter at least. Possibly also replace the needle and seat in the carb where you see the overflow. This is either excess pressure or a poor needle seal.1 point
-
the unknown part to help prevent shifting from 5th to reverse on the down shift, part of the rear case. I mentioned that in my trans when I was wondering if the hole should be on the top or the bottom. should be as spring somewhere as well, hopefully still on the bolt. This mounts the side of the case, has a kind of diamond shaped housing held on with two nuts. The oil gutter is missing completely on yours so you will need. I will dig around and get that part number for you, you can order from courtesy Nissan. Check the rear housing see if there is a long trough that lead all the way back to the tail, it matches up with a hole in the plate that in you pic has nothing installed. start at about 4:30 for the talk on the oil gutter. I used some sealant that was advertised as for use in diff and transmissions. Tried not to use too much as it mostly will squeeze out anyway. You will of course want to get new seals all the way around, there are several, o rings too. Mine was leaking a lot at the shifter (inside) which prob is not a big deal as there is no real pressure and its not like its going to start dripping out, but still its easy to get at if you remove the striker rod and use it to knock out the steel plate on the back of the shifter. All this is covered in the video. Also you want to get a new front cover gasket of course. On thing I noticed what while tapping on the counter shaft nut its easy to slightly shift the entire counter shaft forward. I you do this just look at the alignment of the gears they should be fully meshed. even a tiny bit of movement you will see. look at them closely before any work gets started. To be sure I also measured the distance of the front counter shaft bear to front housing to confirm that the shim that was in there was still correct (this is covered in the FSM regarding what shim to use based on the measurement, use a caliper with the depth gauge). Oh Don't lose that shim (its prob stuck with oil to the front housing but will come loose). Looks like a large flat ring. BTW, I am a newb to this stuff as well, don't let it intimidate you, take your time, there are a lot of good folks here with good info that were very helpful to me that have done this before. The main thing I have found about working on any old tech (I do electronics as well) is to take your time, take pictures, document with notes, don't excessively force, and ask lot of questions if you get in a jam. Pay attention to how seals are installed, but generally speaking the seal lip (the open side of the seal) should go TOWARDS the media that your are trying to seal (oil/grease), at least that is what I have gotten after researching it. I know it prob obvious to mechanics but to a newb like me I was not sure.1 point
-
1 pointmaybe try posting that question here. very helpful people http://www.autobody101.com/forums/1 point
-
So I'm now retired. Big changes. We also relocated from the SF peninsula to the far East Bay, (Brentwood), about 70 miles. Drove the Z to it's new garage today in a light rain. It wasn't an easy start though, (literally). My battery was dead and wouldn't accept a charge. Had to buy and install a new one before I could drive her to her new home. She ran great and I declined a street race with a brand new Maserati coupe. Really? The guy wanted to race, "in heavy traffic", in the rain! We did both rev our engines inside the Caldecott tunnel. His engine sounded cooler, but my car got a lot more thumbs-up from people in other cars, (especially those who saw I wouldn't go along and do anything stupid. After about 10 miles he finally got bored and zoomed-off, zigging & zaggiing through traffic. Good riddance!. I'll need to wash her when the weather clears. Don't like the idea of salt and wet grit from the road coating everything... Pics of the Z in it's new garage to follow. Julio1 point
-
1 pointKira, if you decide to go with protective side molding, choose the adhesive type as opposed to the pop riveted mount style (no holes in the body and you can remove them if you ever change your mind). If you google Body Side Molding, you can find them from suppliers such as Cowlesproducts.com.1 point
-
1 point
-
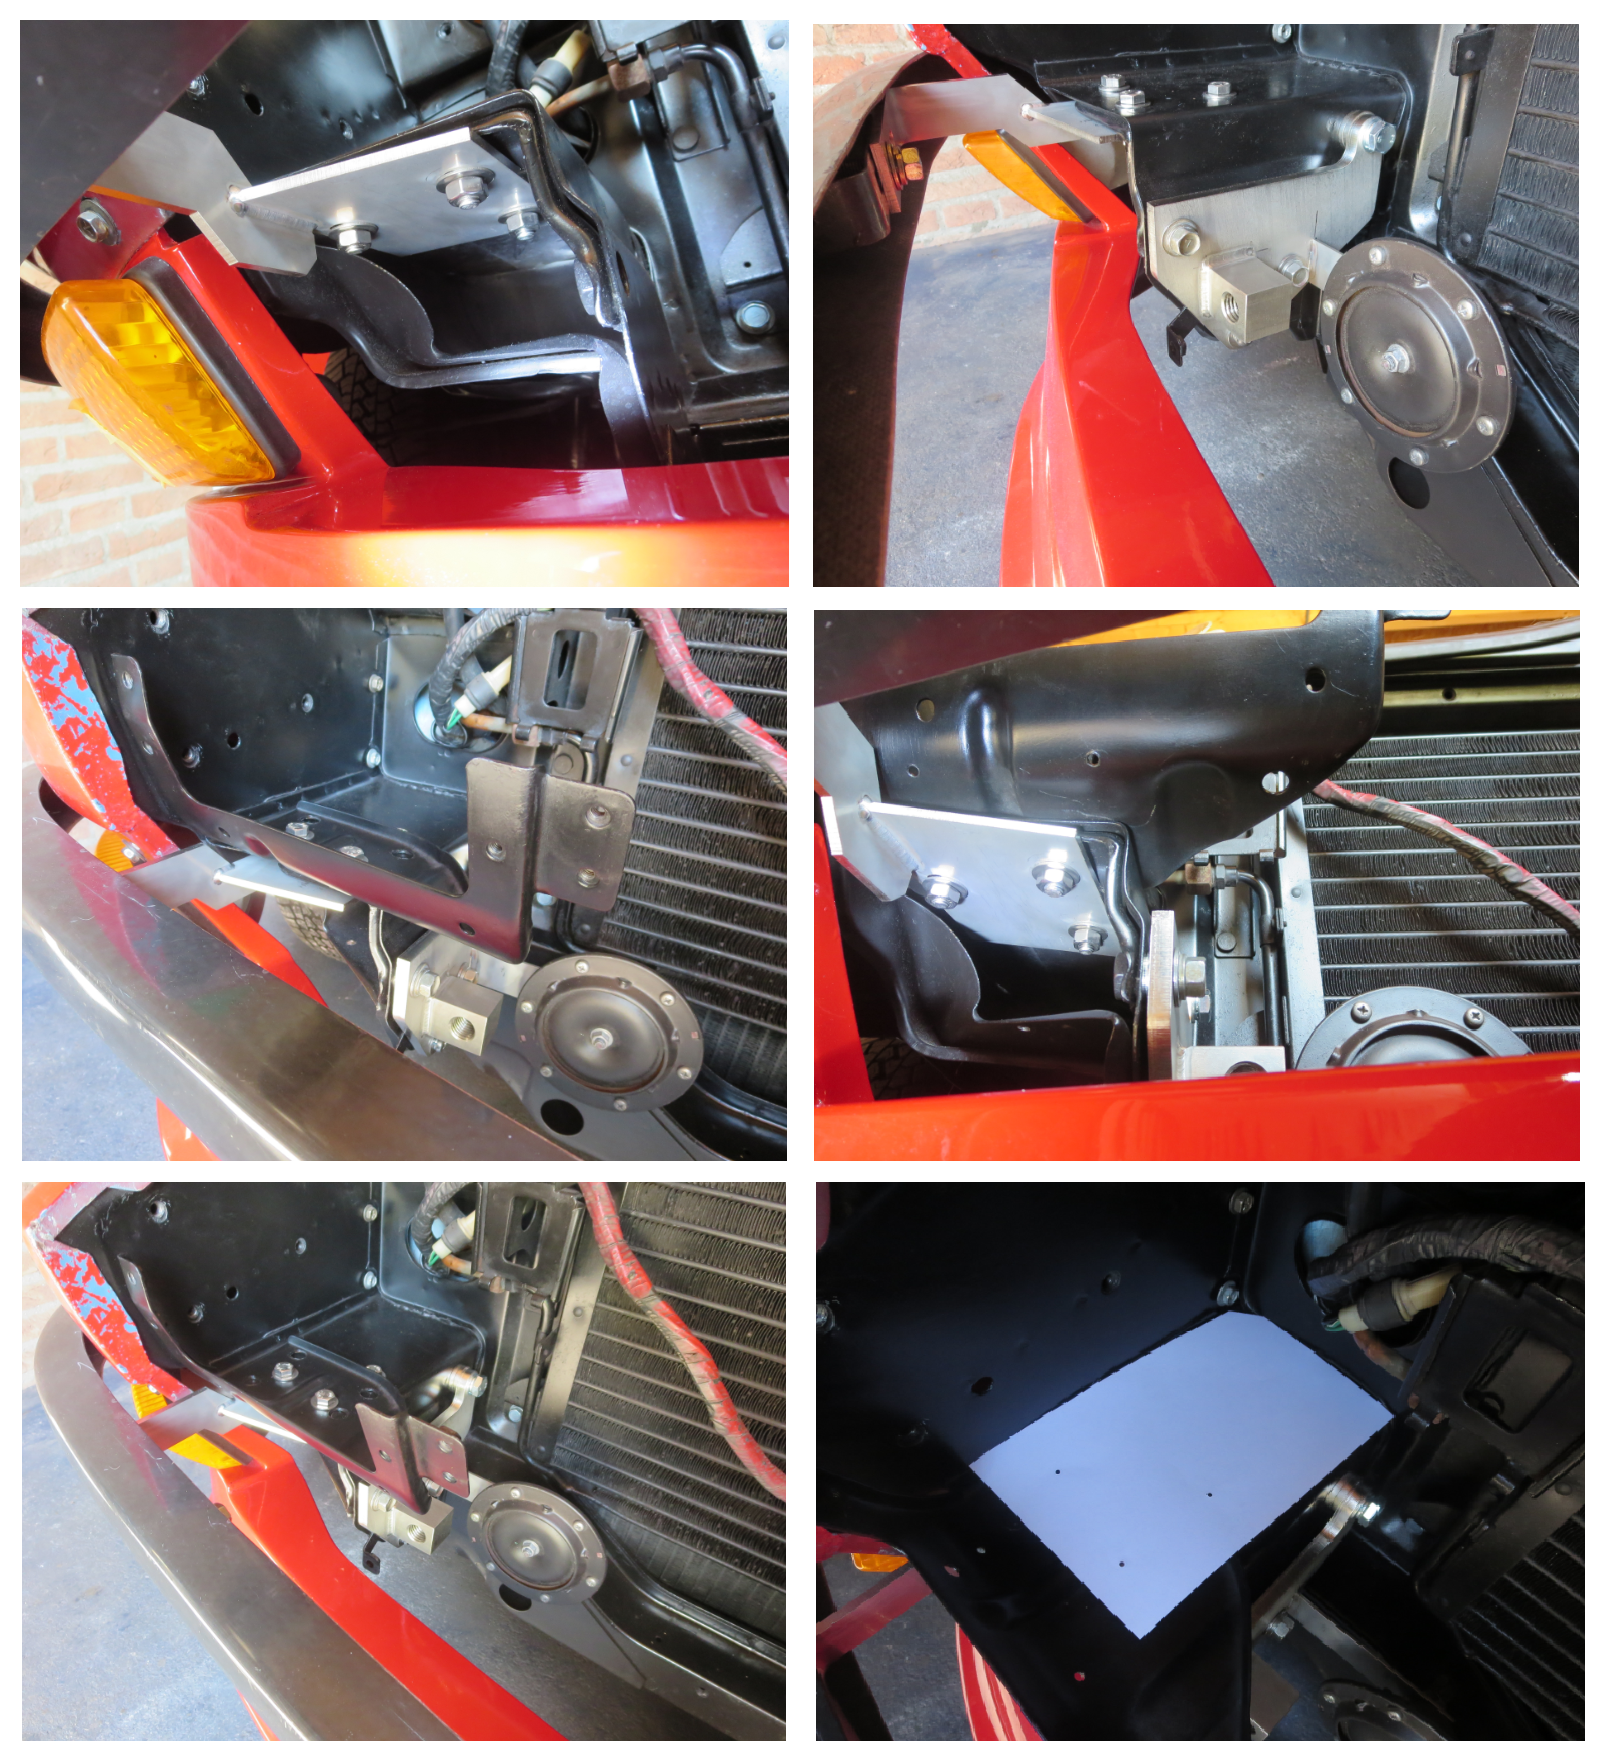
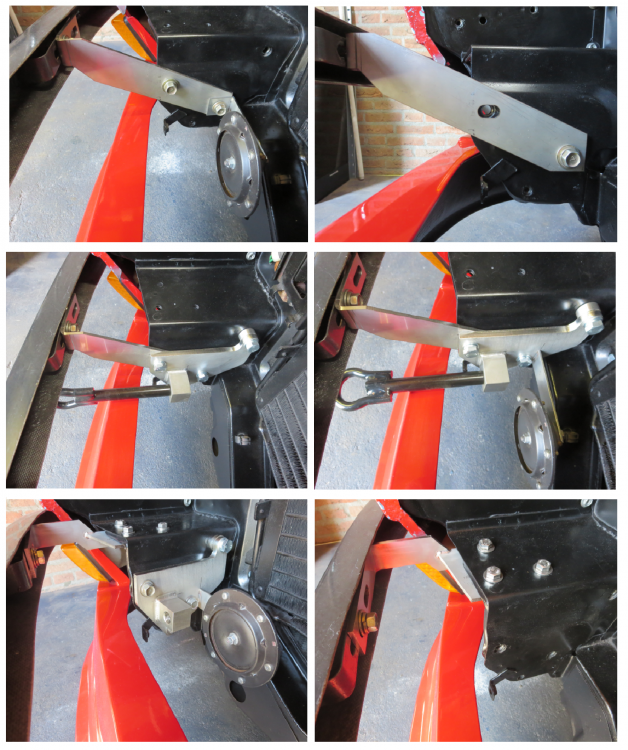
Its been a while since I last posted something here about the brackets. Mostly been busy in PM's with people interested in brackets, Tried some different combinations today. Now to put mine back together so I can drive it again.
 1 point
 -
That's a good point. Some PB blaster or solvent might soak in and loosen it up. Don't stick anything between the pieces and try to pry though. That will damage the sealing surface.1 point
-
Yes, retiring was my idea. I'm doing some part-time work till they find my replacement, but it under my terms. So nice not to fight the commute traffic every day... I'm really looking to spend more time driving the Datsun, as well as finally installing the 5-speed. Before that can happen, we need to finish moving into the new place. The house is on a 1/2 acre lot, and my 1st big project is to design & manage installation of hardscape in the large back yard. Part of the project is to also build a 16' x 22' workshop to house my wood, metal and automotive tools. I've always wanted a dedicated workshop! Next year I'm thinking of restoring another Datsun, perhaps a roadster.1 point

.JPG.c76d9c325883a876c6b36ffc7ca4bb83.JPG)
.JPG.08fe1dc39c81f5af00c7d65320197e41.JPG)
.JPG.a374f69dfa4bc0d7ceafa45c04d0e2fa.JPG)
.JPG.b10a3859817fc1414e3f411719aeb52f.JPG)