


Captain Obvious
Community Member
-
Joined
-
Last visited
Everything posted by Captain Obvious
-
Not sure that's going to work. The virus hits older folks harder than younger folks and the older folks have already had their kids. I'm no expert on the subject, but it seems to me that you don't change the gene pool by plucking out the folks who are no longer contributing to it.
-
I got my second yesterday. On the drive back home I could hear Bill Gates in my head every time I drove past a cell tower. It's awesome. Anyone know how long do you have to wait before the tracking device is activated? Is there anything I need to do, or is it activated remotely by someone else?
-
Site... So what's the verdict? Are you out there?
-
I think it comes down to the authenticity of the build. With the slope of the prices for the very early cars, my leaning would be to put on something as authentic as possible. In other words... A rebuilt set of original four screws round tops. My question would be... Even within the four screw carbs used 69-71, there were some subtle changes over the years. I don't have a good handle on those changes, but hopefully someone here does. As a side note... I've got a pair of four screw round tops here that I think might be from a very early car. I think they're from that supposedly "completely original" BAT car that didn't sell because it had the wrong carbs on it.
-
Well that all depends on the thickness of the mounting flange on the wheel itself as compared to the length of the lug nut shank. You never want the lug nuts to bottom out against the rotor. All that matters is that there is still some thread left once the lug nut bottoms out against the wheel and pinches the wheel against the rotor.
-
Haha!! I don't know that!!
-
Now go away, or I shall taunt you a second time! Injectors leaking air is a big deal. Take care of that and we'll see what happens next.
-
Good progress. One layer at a time. I wouldn't worry too much about the AFM numbers right now. I've seen a couple anomalous readings from AFM's that worked great on the car. Might not be a problem there. I gotta admit though that with so much going on a the same time that I'm getting a little lost on what you're working on... Is there one test that is giving you trouble that you need help with? Pick one and work through it? Then move on to the next?
-
"Well you have to know these things when you're a king, you know."
-
What he said, and you're right. One of those big red wires goes to the positive battery terminal, and the other goes to the negative. If you're looking for confirmation about which one goes where, the one that has low resistance to the ECU ground pins (5, 16, 17, 34, 35) should be connected to the battery negative. And the other one should be connected to the battery positive. So you guessed right before, or the car wouldn't run (and you would have probably fried your ECU), but just to double check, I'd measure some resistances. Also note that the big red wire that goes to the battery positive is supposed to have a fusible link on it. Yours probably turned to dust some years ago.
-
LOL. What is your name? What is your quest? What is the force generated by a 1oz out of balance driveshaft?
-
G;ad to help. I wish I had some way to move forward without having to pull the gauge out, I do have one idea though... If you can disconnect the gauge from the harness and measure the resistance between the pins on the gauge that go to 1) the power input and 2) the output to the sender unit. I believe the two colors in question are yellow/red and the yellow wires. Not on the harness side, but on the gauge side with the gauge unplugged. That resistance should be an additive total of the internal regulator switch plus the resistance of heating coil #2. If you can tell me that number, I can measure the resistance of heating coil #2 on a different gauge here at my place. No guarantee they are identical, but they should be in the same ballpark. Then using that info, we can determine the resistance of your switch. It should be very low resistance, and my theory is that yours will not be very low. Just one more thing to look at for now that might be easier than pulling the gauge out?
-
I'm not really sure how helpful this would be. Yes, it would feed current back through the system as you described, but I'm not sure how much needle movement there would be. It depends on the resistances of the heating coils and I don't remember the values offhand. I know the sender unit is about 90 Ohms, but I don't remember what the coil resistances are. It won't hurt anything to try that, but just not sure how much value there would be. I think you're going to to have to pull the gauge and clean up the regulator contacts. Start gentle... Strip of printer paper pulled through the contacts a couple times just to burnish the surfaces.
-
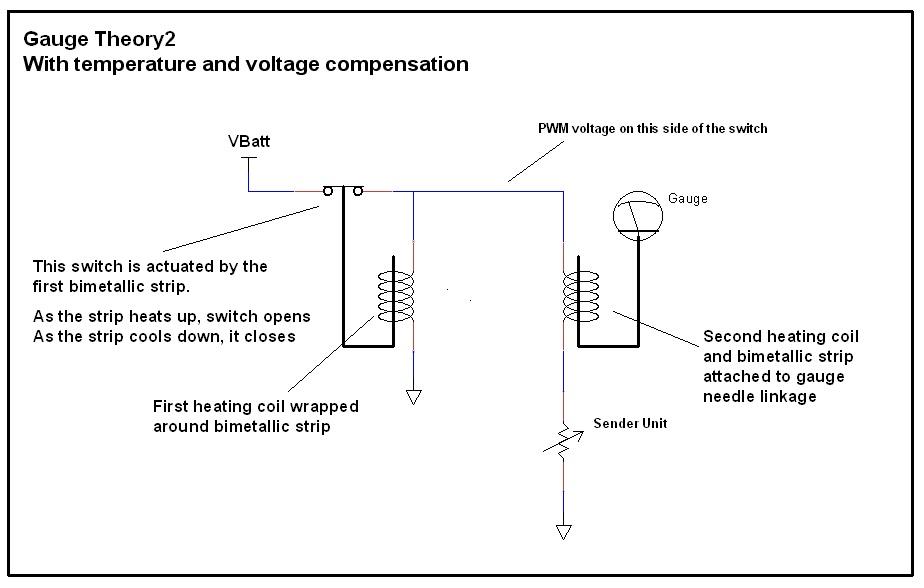
Here's a thread with a bunch of info about how those gauges work: https://www.classiczcars.com/forums/topic/64427-no-oil-pressure-after-rebuild/ I'm thinking you might be having a problem with the little regulator switch contacts inside the gauge. Source impedance too high, load drags the signal down, blah, blah, blah... That sort of thing. If the contacts get dirty, the voltage seen back at the sender unit will be lower than desired.
-
I don't know about the 240's but on the 260's and 280's I've never seen anything (factory) mounted in that spot.* I've theorized the possibility that they were considering putting power windows in and (again theorized) that is where they were going to put the switches. That is my theory which is mine and it belongs to me. * Of course that does not mean it never happened. It just means I've never seen anything.
-
Phew!! I bet you're more than a little relieved! Now you have something to consume all that free time you have.
-
Ooops! I assume it grew back?
-
Agree with the above... For a gasket that simple, I would just pick up some gasket material and make my own. So did you ever do an intake manifold vacuum test? Would be a good benchmark to see the improvements you're making as you go along.
-
In the olden days, they were adamant about getting the U-joints back together the same way they came apart because everything was balanced that way. In today's more consistent manufacturing plants, they don't seem to be as adamant. I didn't check the FSM... Do they mention anything about that?
-
What he said. And that gasket is definitely a very important one because it's on the high vacuum side. Same thing with the cold start valve. If they didn't put a gasket on the AAR connection, maybe they didn't put one on the cold start either? I'd use a tiny bit of RTV on those gaskets. Some details about that here: https://www.classiczcars.com/forums/topic/65119-tuning-with-an-airfuel-gauge/?page=2&tab=comments#comment-617333
-
Let's see... I think that would be 2 to the sixth power, or 64 different combinations. So happy hunting! LOL. In reality, I doubt that the configuration at one end of a shaft would have much impact on what's going on at the other, and I also doubt that what's going on with one shaft would have much impact on any of the other shafts. So if those assumptions are true, you could narrow it down to three sets of four combinations, or 12. I was going to suggest that the answer was 42 and just leave it at that...
-
LOL. My Barracuda was in the shop, so I was in a rented Stingray. And it was overheating. So I pulled into a Shell station.....
-
Good luck with it, and let us know how it goes. One fix at a time!
-
Is there room in one of the back panels to put a hole for the valve cover breather as well? Asking for a friend. @Av8ferg
-
Yup. Details are important and all that kind of stuff is killer on the system. And don't beat yourself up. The good part is you're finding stuff that needs to be addressed. happens to everybody! The mixed up nipples on the throttle body probably wasn't causing a big issue, but if the lines on the air regulator are leaking, that could be a big deal since some of those lines are on the high vacuum side. I believe the only function for the TVV is to enable or disable the EGR system in response to engine temperature. When the engine is cold, they disable the EGR system so it doesn't make an already struggling idle worse. And then once the engine warms up and the idle is strong and stable, they allow the EGR system to operate. If you have deleted the EGR, I don't think the TVV has any purpose anymore. However, about removing the TVV completely... The TVV screws into a heating plate that also warms the idle air regulator, and even if you aren't using the EGR system anymore, the heating plate still adds value to the AAR. So you can cap off the TVV stuff, but probably don't want to take it (and the heating plate) out completely.


