


jfa.series1
 Subscriber
-
Joined
-
Last visited
Everything posted by jfa.series1
-
 There should be a tube on the front carb right behind the dome - where the casting mounts to the manifold.
 -
Tim - grab the Supplemental manual off of Xenon for details on the heater and other dash areas. XenonS30
-
-
Do you have the link for the online catalogue? If so, look up your part numbers and then check with Courtesy Nissan Parts - courtesyparts.com to see if the part numbers are still available. Enter the p/n in the search box to check. if not, you may have to be satisfied with aftermarket items. You don't say what your problem with MSA is but I've had nothing but good experience and excellent customer service from them. Many of their items are actually genuine Nissan parts and you can expect some markup for their profitability.
-
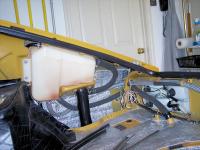
Here are some items for you: Reference manuals - XenonS30 Download the Engine Service Manual, the Supplement Chassis Manual, and the '72 Factory Service Manual (since the '71 is not available). Almost any good degreaser will work on the engine bay. Be sure to loosen the wiring harness from the bendable keepers to lift it off the frame in that rust area. Since you're used to "newer generation" vehicles, you might be surprised that there are no vacuum lines on the early Z's - only the brakes have a master vac unit. BTW - all your brakes will likely need to be dismantled and cleaned. Underhood fuel lines are not your only concern. Rubber vent lines are also at the back (see the pic) coming off the tank and will likely need attention. Don't rush into this area, I just want to alert you to another set of lines. You will have a rubber line that connects the tank to the steel fuel line and another that connects the steel return line to the tank. You're on track with the other items. Be sure the cam is getting a good oil flow before any prolonged running. Check out post #8 on this thread, it can help you avoid a lot of problems: http://www.classiczcars.com/forums/engine-drivetrain-s30/50285-starting-engine-first-time-6-yrs.html Jim
-
Welcome to the group. What a GREAT color on your car - of course I'm not biased, noooo... not biased one little bit. Look for some recent threads that have links to getting a long-stored car back to running condition. Be patient. Your pics show a really solid car - that bit of rust under the battery should clean up pretty easily, as will the ding in the fender. We'll all be looking for your updates and any help you need is only a post away.
-
That's a great looking car, you're going to have some real fun with it. The paint code decal is still in place on the radiator bulkhead and the exterior looks like the engine bay, altho a lot more fresh on the outside. There are several threads here to bring a stored car back to life, I'm sure someone else will probably have the links at hand. Be patient and enjoy your new find. We'll be looking for your progress updates.
-
Hello Martin, And add yet another welcome to the club. That's a pretty car you have there, even with a couple of warts that you mentioned. Its hard to find a "perfect" 240Z and working to correct a few things can be a form of therapy while learning about your car. We look forward to your updates and you always know where to come with any questions. Jim
-
The spacers are not needed for a street car, would only be a benefit to a heavily tracked car.
-
Great story and a seriously fine looking car!!!
-
When you say cut, I presume you are talking about trimming off the excess length of the side portion of the outer seal. The center portion is an inverted "U", it looks like you have it positioned correctly - no cutting on this one. The side strips have a different cross section (no bulb), why - only a long dead Nissan engineer could tell us. After you get the top/center section securely installed, butt the side strip to it with the bottom flap on the outside. Secure with adhesive and trim where the metal rain rail ends. Hope this correctly answers your question.
-
I plugged the following assumptions into a wheel offset calculator: stock wheel width 5" and zero offset, new wheel width 6", +6mm offset and got this back: inner clearance reduced by 19mm (about 3/4"), outer position extended by 7mm. If the Panasports are 7" wide the new numbers are: inner reduction 31mm, outer extension 19mm. That's why EuroDat asked about the true wheel size - it makes a difference. Those 225's will probably rub on the lowered car. 1010TIRES.COM - Wheel Offset Calculator
-
Passenger seats were mounted to the body exactly like the driver side - 4 bolts pointing down from the adjustment slider, inserted thru the floorboard mounts, secured with plastic spacers, lock washers, nuts. At least that is the situation on my car.
-
Check topside that you have disconnected the carb linkage - its in the FSM. This allows the back of the engine to drop enough for the tranny to pull back cleanly.
-
I just did a quick check of the online catalogue and it shows a P/N change during the 240Z series (40206-E4100 --> 40206-E4101) but no effective date. Beginning in 08/1973 which should be the beginning of the '74 models of the 260Z the P/N went to 40206-N3100. Hope this helps resolve your question as to getting the correct parts.
-
Old Z's are well known to have a rear-end clunk that is caused by a broken differential mount - it is above the forward-facing "tail" of the diffy. The rubber insulator ages out over time and simply cracks open, allowing the diffy tail to rise and "clunk" under initial loading. This is an easy and low cost item to replace and should not be considered a deal breaker.
-
The online catalogue confirms your P/N for models up thru 72/06. For 72/07 and after it is 68100-N3300. What is the exact build date on your car?
-
Super sweet looking ride. Looks like you did really good!!!
-
+1 on zKars comments - your wheel may be beyond recovery, at least at a reasonable cost. You didn't say you're looking for a replacement but if so, I also have a completely refinished Series 1 wheel available for sale. You can PM me if interested and I'll send you pictures and details of the work on it.
-
If you don't have it already, pull the '71 Supplemental Chassis Manual down from XenonS30. It has excellent detail on your wiring with all your color codes. XenonS30
-
Here's an older thread with some info. http://www.classiczcars.com/forums/body-paint-s30/47334-weatherstrip-kit.html
-
FYI - stock rubber bushings are still available thru Nissan. I previously replaced mine with poly but all the noise quickly had me swapping back to new stock ones.
-
Just because there are no adjustments on the rear suspension does not mean you don't have an alignment problem. Putting the car onto a modern alignment rack will check all four wheels and prove the point. Worn bushings might not be the problem - some part of the suspension might be bent.
-
Michael - thanks for the brief photo lesson. I understand the multi-stop bracketing and found that my Corel supports HDR. Now for some reading and experimenting. Jim
-
Please explain HDR to a layman. I use Corel Paintshop Pro to tweak my photos, I suspect HDR is an effect that might also be in my software.
