
Zed Head
Community Member
-
Joined
-
Last visited
Everything posted by Zed Head
-
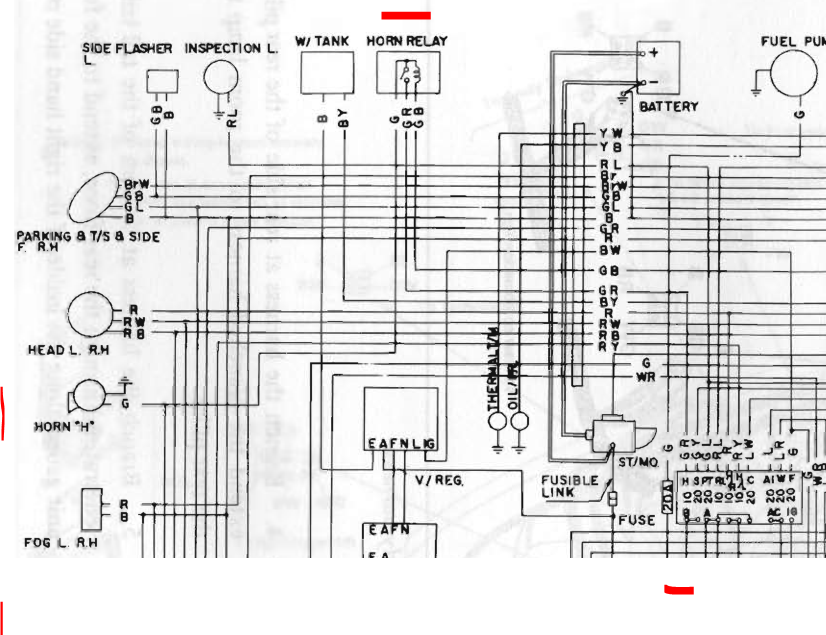
There does appear to a fuse for the horn at the fuse panel. Worth checking first. Have to say though, that I can't understand the horn relay wiring diagram provided by Nissan. They show the solenoid, the switch and the horn all connected to the same spot in the relay. And the relay sends power back to the combo switch. Since the horn is grounded at its mount that would have the horn on all the time. Odd. Unless it's set up to work like a transistor. GB provides power to actuate the horn through the switch and the fuse. Using the same ground circuit, the horn itself.
-
Detonation breaks the ring lands, and the edges of the pistons. Powerful explosions on the tops of the pistons. Once you get a fracture it can propagate. I have a vision of somebody not realizing what that engine noise was and just driving and driving with timing mis-set or low octane fuel. Basically beating the heck out of the piston tops. I filled my 1969 GTO with low octane and it was torture putting around at part-throttle waiting for the needle to get close to E. Should have siphoned it out. I had the intelligence of a high-school kid though. Could be that over-heating was involved. That might warp the head and blow the head gasket, which would explain the new head. It might have had damaged pistons when the new head was installed.
-
You can make your horn beep with a piece of wire, or a screwdriver, from its state of disassembly in your picture, if it's connected properly and they work (they're behind the grill). The power is there, and the horn button and its metal parts just provide the ground. This is not the problem you started with, but good that you redefined it. Could be that the horns themselves are disconnected.
-
Somebody on Hybridz had a turn signal problem and it turned out to be a bad bulb. I got distracted with the meter readings showing power and no power, but still not clear what's being measured. There is also one other huge problem. 10.27 volts is a dirt-dead battery. Edit - I heard the "bloop" while writing and there's SteveJ. On the 10.27 volts - the flasher needs current. 10.27 might not be enough voltage to drive it. Could be just a simple battery charge will do.
-
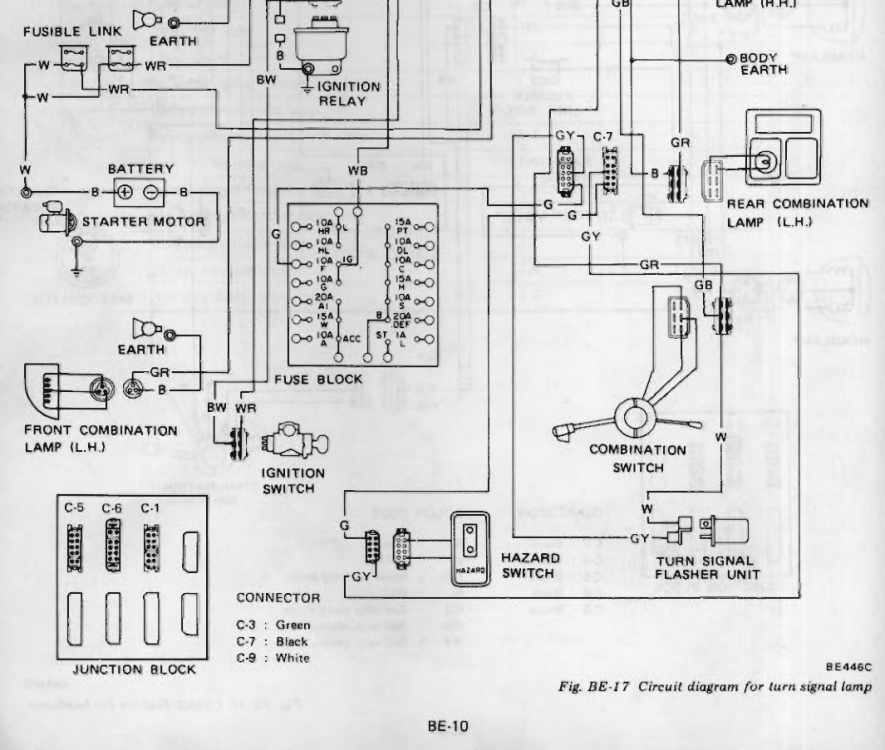
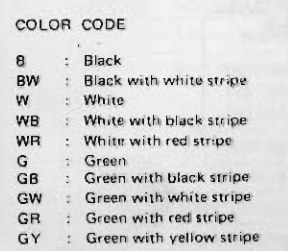
That was my point. There's no green wire involved in the turn signal system, according to the diagram. Why put your probe on green if it's not involved? Green-red, green-black, and white are the wires on the harness side. I don't know what color they are on the signal side. But for wiring diagram discussions, it would be best to use the colors shown in the diagram. Without their own 1978 signal nobody knows what green is supposed to do. I have a 78 signal, but it's in a box in the garage.
-
The ID numbers are but the parts themselves may not be to spec. The head was probably skimmed, raising the compression ratio, for example. You have a custom engine now, F54, P79, etc. are irrelevant.
-
Already miss knowing that he's there to set bad advice right, confirm good advice, or to just add something significant to a topic, from his years of experience. He was active on all three of the forums I roam around and his posts were always worth reading.
-
There's your problem, maybe. Better have that head checked. Check combustion chamber volume. Calculate compression ratio. ID the cam profiles. Surprising that the PO would change the head at 5,383 miles. He was either trying to hop it up, or he damaged something. Looks like you have some good parts but you should probably make sure that all of them will work well together.
-
-
You mention green but the two outlet wires are Green/Red and Green/Black. I would go to the FSM before the forums. Note the flasher. It works by getting hot from current flow, opening the circuit, then cooling and closing the circuit. Click, click, click. Might be a possibility. Also note that of the 6 only 3 are turn signal.
-
I think that it would be fair and appropriate to contact Datsun Spirit and see what they say. Post #13 says that he built the short block. Finding rings in the pan means that the piston must have broken all the way up to the ring lands. That's a big deal. #5 and 6 are the detonation cylinders though. A perfect engine with a bad tune will still detonate and break things. One tank of low octane a hot day and some hills could do it also. But at least confirm that you didn't get scammed with paperwork for a different short block. Could be that Datsun Spirit did not actually build that engine. Just trying to be fair overall. If this was a California Datsun engine we'd be tearing in to Al right now.
-
Nissan calls it a sleeve but many people call it a collar. Outside versus inside. It goes on the outside of the bearing, so collar seems more appropriate You were looking at clutches in a different post. If you get a new pressure plate (clutch cover) you need to make sure the sleeve/collar matches the plate. Some kits come with a sleeve, some don't. If you use your old pressure use the old sleeve. You can press the bearing out and keep the sleeve.
-
-
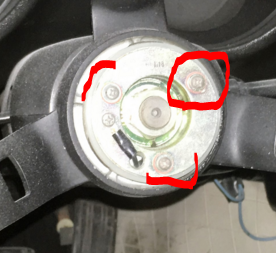
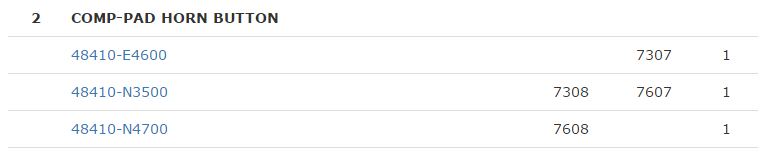
Actually, all of the Z horn buttons look like giant marshmallows. So if you just want a functional button, the 77 will probably do. BUT. I just re-read your first post. I think that the button and the internals are an assembly. So you will be using the horn button if you want a horn that beeps. I think. http://www.thezstore.com/page/TZS/PROD/50-3154
-
I think that she's planning to buy a 77 horn button assembly. The diagram shows an exploded view but the button contains all of those parts. So, as site says, if the three holes match, the button and its parts will work. I think it will work, but won't look quite right. You can always resell it though, when you find the right one.
-
That's a possibility. Check out the "Help Identify this part..." thread. Horn buttons, early and late. You have all of them. I suggested you as a source of knowledge.
-
#19 seems to be the bottom piece of the assembly, and they're the same. So it looks like you might be able to use the compete horn assembly. But I think that the 280Z "button" is bigger than 240Z. It might look like a giant marshmallow in the middle of your 240Z wheel. Look at part #2 on the #1 wheel page. They show the progression of horn buttons. Which also seems to imply that all of those buttons will work on the early wheel. So, guessing, it looks like those parts will work. Cliff/siteunseen would know. He has early and late cars. Quite a collection. But he started beers hours ago and it's late over there. Might have to wait.
-
I was wondering if you were going to crank it up. I would test for shorts with a meter or test probe first. Check from the power supply side to ground of things that only get power when the key is On. Something will show continuity to ground that shouldn't. The charge wire, white-red, from the alternator is hot as soon as you connect the battery, so not IGN controlled.
-
Most people stretch the 3/8". 8 mm is super close to 5/16" (.315" and .3125"), but 10 mm is between 3/8" and 7/16". .375", .393", and .437". The basic problem is is that they're metric sized fittings. Can't you just lube it up and press it on? Or is the filter nipple too big?
-
-
Found the old thread i was thinking of. She may not have followed through but others did.
-
Very sad if true, but is there a link or some other source? Many John Coffey's on Facebook. Nothing on Benton Performance or Beta Motorsport pages.
-
Removing old tank lining might be where dry ice comes in handy. Make it brittle then throw the nuts and bolts in and break it up.
-
Pretty sure that FastWoman did this, and kept her big bumpers. I think that she has a 78, but I don't remember seeing any pictures. On my 76 the bumper moves inside the rubber end trim, so they'd end up projecting ahead of the bumper. 78 has the accordion style pieces. but after 38 years they may not be flexible anymore. Wish somebody made rubber replacements or modified ends.
-
The instructions for RED-KOTE say it's solvent-based, and they recommend MEK or similar for clean-up. In the solvents world, gasoline would be considered a "non-polar" solvent, and MEK "polar". They're different ends of the spectrum. Just some trivia to explain why it might work to pour a gallon of MEK in to the tank and slosh it around. If it doesn't dissolve it completely, it might swell and soften it enough to break in to chunks. It might be an air cure material, like linseed oil, which would stop it from dissolving but still leave its susceptibility to MEK. They even talk about using MEK to remove other coatings. Edit - looks like RED-KOTE is not a cross-linked or cured material (see MSDS below). So it should dissolve completely in MEK. Sorry Dave, that you spent all that time with the heat gun and blackened char, although yours might not have been RED-KOTE, maybe one of the others. Anyway, were it my problem I'd scrape a chunk out and see how it handled some MEK before throwing a gallon in the tank. p.s. 2-Butanone is another name for MEK. So, about 50-50 acetone-MEK is what they dissolve 27% RED-KOTE in. Edit 2 - on second look it does have a crosslinking agent, at low concentration. So it would probably swell a lot, like gelatin, in MEK. Still an improvement in getting it out. But maybe why the rad guys wouldn't touch it. "Red-Kote is a solvent-based polymer coating " "15. For clean-up use methyl ethyl ketone, acetone or a quality lacquer thinner with no alcohol in it. " "Remove old coatings completely first, using MEK, acetone or other solvent " http://www.damonq.com/techsheets/red-kote.pdf http://damonq.com/MSDSSheets/DMN0142.pdf