
Zed Head
Community Member
-
Joined
-
Last visited
Everything posted by Zed Head
-
That's a good point on aftermarket. What brand is the new one? The engagement point should get narrower as the disc wears in. There are other factors also, like thickness of the marcel spring and just general tightness of tolerances for the disc and pressure plate. The slave cylinder self-adjusts becuase it stays as full as the clutch fork lets it. The piston in the cylinder is pushed back by the clutch fork and pushed forward by a spring inside. So it stays full and ready for action. If it refills through the hole in the MC, as described. I've mentioned this before, but one way to get very close to correct on the initial pedal linkage adjustment is to turn the rod clevis out until the clevis pin slides in easily with the pedal all the way up, pulled up by its own spring. Then you can add a few turns to tighten it even more or take out play from wear. If you had to pull/push the rod or pedal back or forward or get the pin in, it's probably not right.
-
People new to engines often are somewhat oblivious to measurements. The actual numbers are very important. And sometimes the definitions of terms can be confusing. How did you "make sure" the timing was right? And what is "pulse"? As SteveJ noted, how did you check spark? How did you "try" to spray starter fluid? It either went in the manifold or it didn't. You and Djanssen have a lot in common. You both should probably go back to square one and check that the parts are correctly oriented. People have been putting these engines together the wrong way for many years. Engine Mechanical chapter, engine assembly section. Check the marks and orientations, the notch and groove, the rotor position, the timing mark, all of that. A good engine assembler will know that his engine is going to start because there are marks on all of the important parts. You just have to line them all up. Like ducks.
-
Oops. You really need to find that notch. The notch is placed so that you'll know exactly where TDC of #1 is. And TDC is what timing is referenced to. If the notch is wrong, your damper may be failing. Besides that, without the notch you won't be able to set timing. And timing is very important on these engines, they have a tendency to knock/detonate. You can't just turn the distributor until t sounds right, like an old US V8 engine.
-
You could still have some play in the pedal linkage, or air in the hydraulics. And the clevis pin and other parts have been known to wear. Congrats. You never did give a good telling of how you got the transmission installed, after getting a transmission jack. Did it slide right in or was there more cursing?
-
If you didn't find the notch on the pulley and set it to zero it may still be wrong. You can be off by one gear tooth. There's a procedure in the FSM, Engine Mechanical chapter, Assembly section that describes all of this, with pictures. Whoever put the engine together was not using the manual, apparently..
-
The mark on the pulley is actually a notch in the metal, it's not painted on. I don't see it in your picture. I would slowly rotate the engine until I found the notch. It should be close. The cam lobe should be up as you show, but not necessarily straight up. Pull the distributor and see if you've jammed it on to the spindle incorrectly. One side is smaller than the other, but wear can make things loose. People have also found that the gear can slip to where the distributor is not actually engaged with the spindle. Grab the rotor with your hand and see if you can spin it. It should be locked tight to the spindle.
-
I'd show some pictures of the port work. Even better, post pictures of stock ports alongside for comparison. Maybe even some measurements, like of the intake port diameters. You've raised the question of Rebello provenance (sorry, been watching Antique Roadshow) so some pictures might help you out. Plus, I'd like to see them.
-
Actually, I think that any wear allows more movement (of course) and intereference. The shift fork bushings, the coupler sleeve groove, any moving surfaces between the shift lever and the synchros, and the detent balls. You could even get interference and divot formation after the coupler sleeve has locked in to position. One of those "how far is far enough" dilemmas. A transmission guy could probably spend some time tuning the shifting mechanism itself. Once the sleeve is in place and the inserts have dropped in to their slots the job is done. The shift fork wear pads have changed over the years. Plastic and bronze/brass have been used. There's probably a wear spec. out there somewhere. Next tear-down!
-
Here's some shifter stuff. MSA says that there are two styles of 1978 transmissions. An A and a B. I assume that their little brackets fit on the ears, extending them so that the really long lower lever's tip will ride at the right spot. I wonder if there are other differences. http://www.thezstore.com/page/TZS/PROD/20-1054 http://www.thezstore.com/page/TZS/PROD/20-1050 Don't forget, if the lower nylon bushing is worn the lever will move farther, causing more interference. Even wear on the inside will allow the metal rod to move farther. A tighter bushing might help.
-
The valves will be closed.
-
Never mind. Good luck.
-
Hmmm... Well here's something to worry about then - maybe the nut on the shaft really is coming loose and the ZX shifter is just allowing it to work. Pushng the synchro sleeve farther so that it grabs the gear,which is trying to get away. I don't know how you'd diagnose that. Maybe a bore scope through the speedo gear hole. Better keep an ear on things. OR, the long shaft lever is for 4 speeds only. If you get some good measurements I can see if I have a long shaft or short shaft wide-ratio bent lever, that worked with my early wide-ratio 5 speed. That carpet needed chewing! Puppy's trying to tell you something.
-
Pretty sure they stopped using the "wide-ratio" in 1980. The 1979 ZX has the 280Z wide-ratio, but after that they're all close-ratio. I have a close-ratio transmission from 1981 2+2 5 speed in my car. But it does have the .773 5th gear ratio of the 1980 ZX. Maybe an early 81 or a transplant. Still, I think that the exhaust hangers and the speedo bolt will tell the story. I don't think that there are any wide-ratio 5 speeds out there with the later ZX tail shaft housing. Could be wrong of course, especially considering KDMatt's recent oddball box,, but I can't see why Nissan would make a partial transition to the ZX boxes. Of course, we all know that after 35+ years, year of car loses importance also. Count those hangers, check that bolt.
-
Notice also in EuroDat's picture that the fork is centered in the hole, like yours. I took my picture from above reaching down with my camera. The car was drive-ready, in the garage. If I draw a mental arc in my mental image of Chas's pciture I get a mental 58 mm to the bolt head. Yours is going to be fine, I can feel it. Where's Dave's magical prediction?
-
Actually....not sure it's clear what year transmission this is. How many exhaust hangers?
-
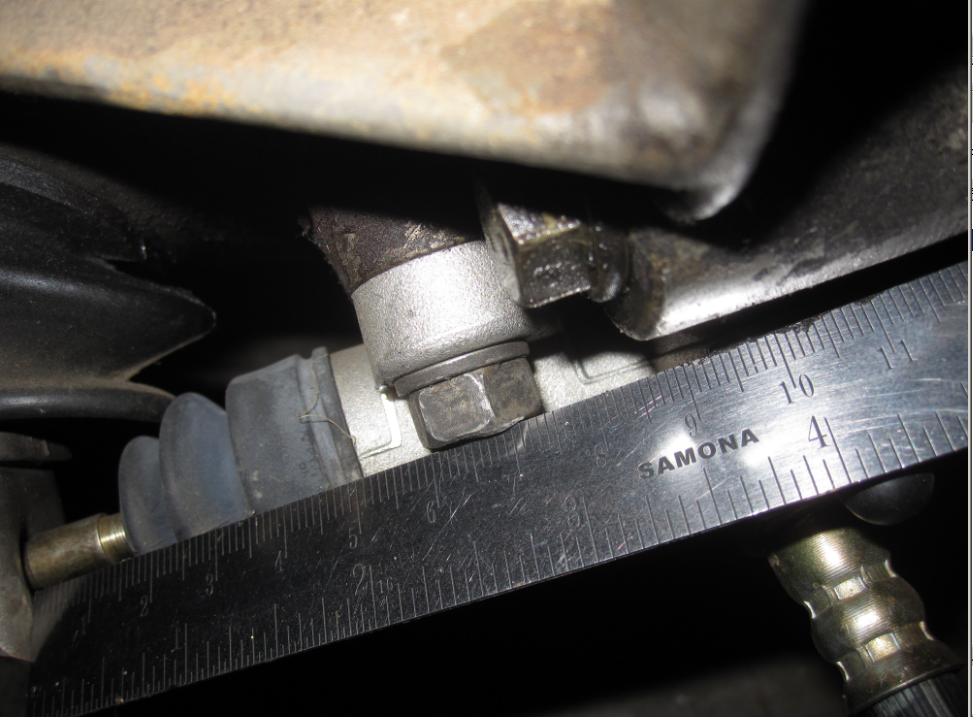
If you had the wrong TOB collar you could have problems, either getting the clutch to disengage or to engage fully. Your slave piston starting pont doesn't look bad. Bleeding the clutch is very easy and you can tell if it's working by turning the shaft by hand, with a helper on the pedal. I took a measurement of my fork distance from a reference point, just for people to check if they run in to a clutch problem. It tells you if the fork angle is right. About 58 mm to the head of the bolt. I also have extra room in the slave cylinder to push the piston back like you're doing.
-
-
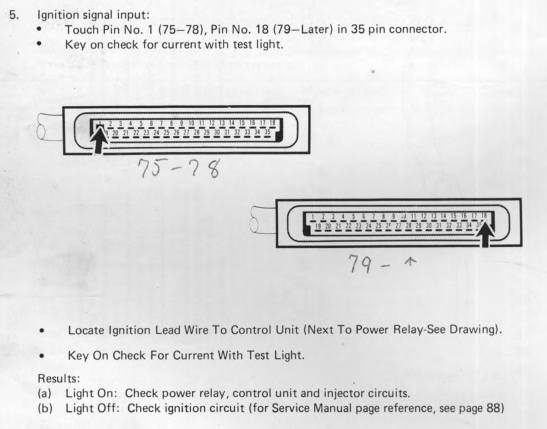
1.2 ohms is pretty good. So you have spark ,and you have connection to Pin 1. So we're in to the odd possibilities. Like cam timing or ignition timing is off, or the ECU isn't getting what it needs through Pin 1 even though it's corrected right. I've had two cars that wouldn't start with the tachometer disconnected. Is your tachometer installed and connected? Look at Post #45 here. Some good timing things to check. If it won't start with a good blast of starting fluid in the intake manifold it's not the ECU's fault.
-
What type of ignition system are you using? Distributor type, points, electronic, Crane, MSD, etc. The spark will just go to the closest electrode to the rotor when it's triggered. So your spark is getting triggered when the rotor is closest to #5. By moving plug #1 wire to the #5 spot, you've set everything to where it should be to time from #1 wire. You can study your triggering mechanism to see exactly when the spark should be happening and make decisions from that point. Could be that your triggering device in the distributor is moved.
-
With the key off, you can connect a jumper wire from the coil negative to ground, Then check Pin 1's continuity to ground. If Pin 1 shows continuity, then there's a complete circuit. Or, you can just check for voltage at Pin 1 with the key On. Power will pass from the battery through the coil to the negative terminal and down the circuit to Pin 1. Use the Fuel Injection Guide to make sure you're measuring Pin 1.
-
So you got it to start with starter fluid? Your life would be so much easier if you would take some measurements. I remember the old ways from the old days though, Filling my crankcase with gasoline as I cranked and cranked the engine with the "new" carb" that had no float valve, but I knew the carb was good, my friend gave it to me. Grinding the springs off of my new clutch disc because it was installed backward and I didn't want to take it off again, and I knew that wasn't the problem. Got a great workout though from removing and reinstalling the transmission about ten times. Good times man, good times.
-
If you're going to break it all down again to transmission on the floor, you might just take the pressure plate off again and slip the clutch disc over the splines. Make sure it will actually engage as far as it needs to. You might have the shaft jammed up against it so it won't turn but not getting insertion. Measure the diameter of the clutch tool and the main shaft nose and make sure that they're the same. Also, check that the disc wasn't installed backward. I think that the spline entrance of the disc is sloped to allow easy insertion the proper way but might be squared off on the back side, making it difficult. Before you break it down though, take actual measurements of the gap at various places. When you're in a hurry it's easy to make a guess, but an accurate number might tell something. For example, the nose of the main shaft is only so long, not even an inch, I believe. So if you're more than an inch out you haven't even made contact with the pilot bushing yet. The gap can only be less than the shaft insertion distance in to the bushing if that was the problem.
-
One of the simplest things that you can do is to check continuity between the coil's negative terminal and Pin 1 of the ECU connection. You'll have the connector sitting in front of you before you can even take the ECU out. But not starting with starting fluid is a significant sign that you're not getting proper spark. Starting fluid (the real stuff, not WD-40 or brake fluid) is very flammable. If the engine won't at least pop a few times then it's not getting to where the spark is, or there's no spark under cylinder pressure. I wouldn't do any fuel related stuff until I got a few pops with starting fluid. Remove one of the hose to the intake manifold and squirt fluid directly into the manifold. Ignition is a completely separate thing from fuel. Also, you're not really "showing your work" (like math class). You said "appears connected" which could mean that you just eyeballed a few things. That's not good enough. C-.
-
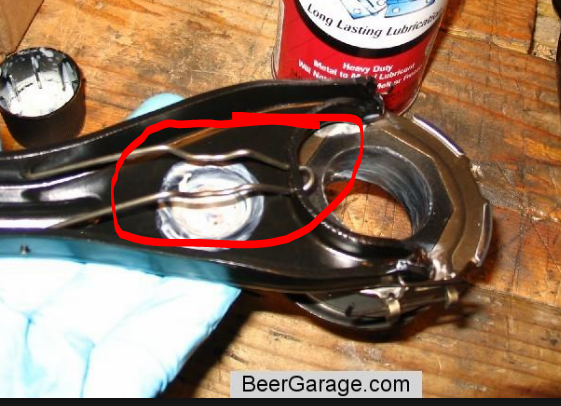
Yes, put it in gear, apply a spinning force while trying to get things in. Visualize the throwout bearing, the fork and pivot pin and you'll see that the fork should be centered in the hole. The bearing sits on the front cover nose and the pivot pin holds the center of the fork. You might not have the spring clips clipped over the pivot pin. Stole a picture from the beergarage. The installation procedure is "place over pin top and press until it clicks and locks in place". If it's on correctly it will be hard to remove. Another thought - the fork is on the pin correctly but the TOB has slipped off of the front cover nose and is jammed between the nose and the pressure plate. That should put the fork end up though, not down, although if you were twisting things, who knows.
-
Also just noticed that your clutch fork is hanging. If it's sitting on the pivot ball right with the clip holding it correctly, it will be in the center of that hole.