Zed Head
Free Member
-
Joined
-
Last visited
-
Currently
Viewing Topic: R200 long nose 3.7 LSD SIDE YOKE ISSUE
Everything posted by Zed Head
-
 The smoking gun. What grade of fuel have you been using?
 -
Another way of saying it is that the front mount is too far forward when you use that mustache bar. Somebody had a similar problem very recently, but with an R180. When you said "hitting" it made it sound like an obstruction issue. I think that you meant :"landing" or "locating" or "ending up". The holes don't align. I've read of people flipping the front mount. Don't know how much it buys you, but I think it helps for some applications.
-
-
Actually the timesert will be under tensile force after torquing, pulling up on the cylinder head threads. And the seating surface of the pivot on the cylinder head, after torquing, should prevent rocking or side movement. That's probably the most important consideration. Be sure the timesert is below the surface of the head after insertion. The pivot should't seat on the top of the timesert.
-
That's pretty funny. I misunderstood the question myself. The most useful answer, although not a direct answer, computing all supplied details is - the 1975 spare tire is already a tubeless rim and tire combination. If it has a tube it's because somebody put one in afterward. To the side bar though - I don't think that running a tubeless tire on a tube type rim is done all the time. The rim has to be designed and sealed to prevent leaks. There's no need to do that if the manufacturer knows there will be a tube in there.
-
You'll end up with a low compression ratio. The P79 head has a larger combustion chamber and those ZCD pistons are dished. They'll fit but lower engine performance. Do you have something against forged pistons or are you trying to save money? Do you need oversize? Rockauto has the basic cast pistons that seem to work for a lot of people. http://www.rockauto.com/en/catalog/nissan,1982,280zx,2.8l+l6,1209350,engine,piston+/+piston+ring+kit,14008 I've read somewhere that Datsun Spirit can get pistons. https://datsunspirit.com/
-
Jeff G's #7 post shows a lot more than just ovaling two holes. And the part is "wrong" because it's an R180 bar in an R200 application. It's a 1975 280Z which he says came with an R200, and it's well after the diff-moving redesign. He messed up the R200 bar but still has it so should be able to set the bars side-by-side to see the differences.. Might have noticed something before the 6 hour session. In this case two wrongs make a doubly wrong. It's the wrong wrong bar. But it's also possible that some other part is out of alignment, since everything was removed. Might try assembling things with the old bushingless R200 bar and see if it sits in the right spot. The washers will still hold it in place but let it hang lower and be misaligned. But you'll be able to see if things are off at the bar or somewhere else.
-
You're right. That oil filter needs new paint. Good luck!
-
Z Car Source has been a mystery to me, just an internet name that sells parts. Interesting that there's actually a person or persons behind the name that will actually give advice. Bad, in your case. Did you talk by phone, or text, or email...? And, by the way, those aren't what we would call control arms. Although I think that Nissan might call them links, maybe of the transverse kind. Most people think of control arms as the part between the body and the wheel hub. (Actually, that whole statement about control arms doesn't really jibe with the mustache bar issue. Not clear where control arms entered the picture.)
-
Tubes can generally be inserted in to any tire and rim combination. You have to be sure that there are no sharp points or edges on the rim, or the inside of the tire though. And, as you mentioned, finding a tube with the valve stem in the right spot is important to avoid twisting the tube. Finding the right tube might be difficult. Chickenman says it's done all the time so he'll probably have a manufacturer and model number. You might have some luck searching the tire size and "tube" on the internet. I just went through a similar exercise with a wheelbarrow tire. I taped up the inside of the rim with duct tape, but had to use a poor fitting valve stem. I'll just limit my top speed to 2 mph instead of letting it rip at 3.
-
I don't think that coil gets power from the TIU, Both the TIU and the coil might get power from the same circuit though. The TIU just sits at the end of the coil primary circuit (the wire from the negative coil terminal) and opens and closes it based on the signal it gets from the green and red wires from the distributor. You can connect those green and red wires to any of a number of ignition modules. Points also sit at the end of the coil primary circuit. But points use a mechanical method, the lobes on the shaft, to open and close the circuit. Points are kind of like a TIU inside the distributor cap. Some thoughts that might help you figure out how to make a system work.
-
Howdy folks. A materials person here. Don't overlook that "PU" covers a huuuuuuugge range of physical properties, from goo to rock-hard. These guys seem to have addressed the issue. Don't know if they got it right or not, but they are aware. https://whiteheadperformance.com/product/whiteline-differential-moustache-bar-bushing-kit-w91045-datsun-240z-260z-280z/ If I had the free cash I'd try a set just to see what they ended up with. I reduced the diff warbling with my PU bushings significantly by extending the length of the inner sleeve for the mustache bar mount. For whatever reason, many PU mustache bar bushings have a shorter inner metal sleeve than the PU bushing, which compresses the PU against the washers, creating a solid path to the cabin for the diff noise. I used washers to extend the sleeve. Many of the aftermarket parts out there require a little bit of finishing work, in my opinion, to get them how you like them.
-
Not really clear if you're looking to go through the almost new 5 speed or the old 4 speed. Either way, this doesn't answer your question about Michigna or Michigan, but might be worth consideration considering you spent the money on a stroker. You'll have a spare front case. http://zhome.com/ZCMnL/tech/240SX5spd/transmission.htm
-
If it was just a big-end diameter issue you'd expect the rods to bind when installed individually. Could be that there's another issue leading to binding when the pistons are in the bore. Bent rods() causing side loads, surfaces not machined perpendicular (side loads, same effect as bent rod), etc. You might pull the piston and torque the caps on with them outside of the bore to see if it's just the bearing surface.
-
It's described at the bottom of this page from atlanticz. It has the positive of making it easy to run the fuel pump, using just the ignition key. http://atlanticz.ca/zclub/techtips/fuelpump/moreinfo.htm The Engine Fuel chapter of the 1978 FSM has a full description of how the fuel pump control works, with charts and diagrams. The ECU didn't get involved with pump control until late in the ZX models.
-
Apparently there is a flaw in the design of the fuel pump control system for 1978 and maybe beyond. If the oil pressure switch is disconnected it will trigger the pump control relay when the key is on. So, odds are, either your oil pressure switch is disconnected or defective. The switch is combined with the oil pressure sender, by the oil filter. You might check there first.
-
It's used for surface prep of stone or concrete. That type of business might carry it. It's also a component of vomit. Have a tank-cleaning party with lots of booze. Do shots.
-
That's some good observing. Reminds me of a problem I had with my fuel pump relay, where it would not power the pump when I tried to start it. Luckily for me I have a relay bypass switch to run the pump. I posted on it in the past and even took a picture of the solenoid coils. CO said they looked burnt. In 76 the pump relay is combined with the EFI relay. You said though, that you could hear the pump running. So, that doesn't really fit with bad power to the pump. Seems more like a floater in the tank, clogging the inlet. Didn't' know that water in the gas was part of the original problem. Maybe she does have some little vandals in the neighborhood. Might be worth time to drain the tank and check. I remember her quest for a locking cap.
-
Auto-ranging is convenient. And auto-"polarity" identifying. Don't know what the official name is but you you can use the leads backward and the meter will just add the appropriate negative sign if you get them switched.
-
Fluke 115, because it's cheap but high quality. The tachometer function of some of the other meters is nice. You can use the Hz function on the 115 though and do some math to calculate engine RPM if you need to. The Fluke 88 is designed for automotive. Fluke makes nice stuff.
-
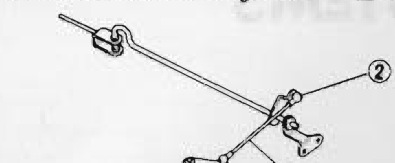
I see now. Went out and looked at some of my spare parts also. I'm 99.9% sure that the rod slides through those rings. No need to bend them open, they're just there as stops/locators for the rod. There's probably corrosion underneath, just like on the exposed surface of the rod,keeping them stuck in place. If I were removing it, I'd spray it with WD-40 and shine up the rest of the rod a bit with Scotchbrite,then tap it through the standoffs and the two retaining rings. If you're restoring it for appearance sake then your dilemma is removing the corrosion without marking up the rod. You might also stick a flat bladed screwdriver in to the gap and open them up just slightly, within the elastic limits of the metal. The rod will probably slide easily through them then. I'm sure it's meant to slide through though.
-
It could just be me, but I can't picture what you're describing. Is it on this picture?
-
Should be fine. If I recall right, Redline even says on the label that it's okay to blend it with plain old "normal" diff oil. It is in their FAQs for sure. At the bottom. https://www.redlineoil.com/techinfo_faq.aspx
-
I wonder if they used elephant oil n the struts and that's why it smells like it does. It does smell kind of like circus.
-
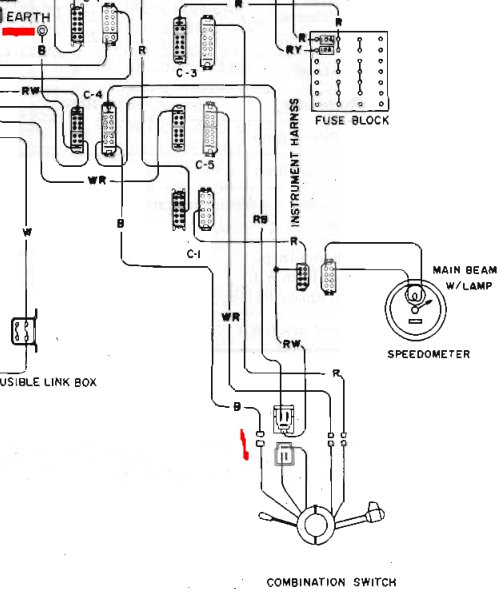
You're saying "the" headlight upgrade but it looks like "a" headlight upgrade. In other words, it's not one of Dave Irwin's kits. Just to be clear. So you don't have a reference for how the work was done. There are lots of different ways to add relays to the system. It looks like you're not aware that the high and low beams are controlled through a switch that controls the path to ground. Without the ground through the high/low beam switch no current will flow and the lights won't light. The switch is at the base of the turn signal stalk. Could be it's just unplugged at the steering column.