Leaderboard
-
Captain Obvious
Free Member5Points10,081Posts -

siteunseen
Free Member4Points15,115Posts -
Mark Maras
Free Member4Points3,719Posts -
Jeff G 78
Free Member4Points3,007Posts


Popular Content
Showing content with the highest reputation on 10/20/2023 in Posts
-
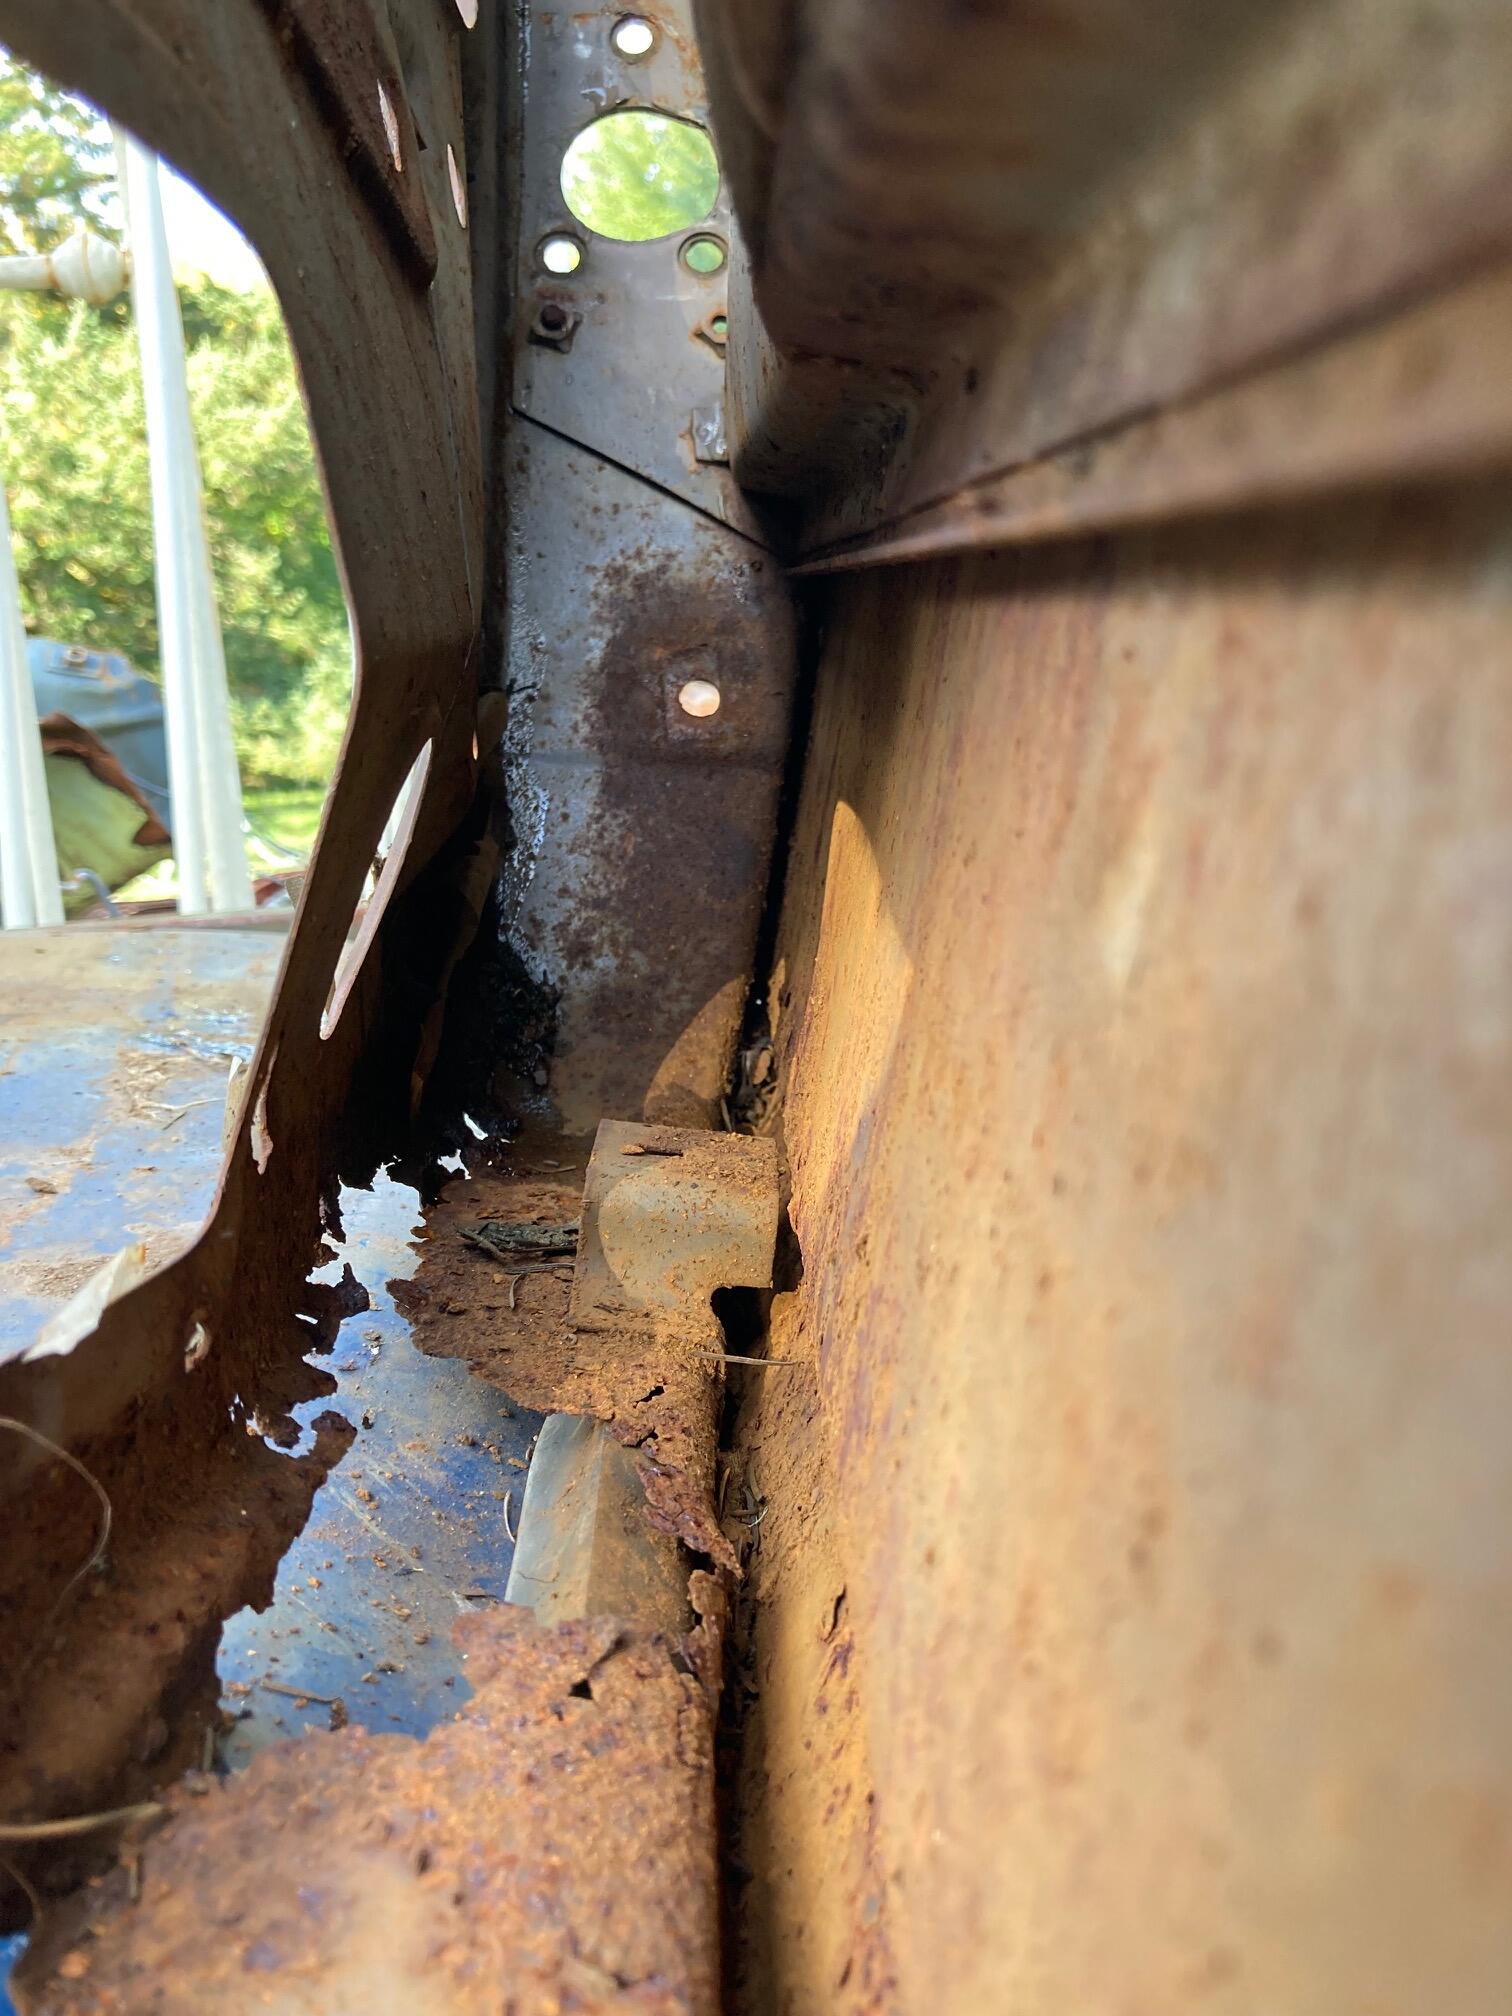
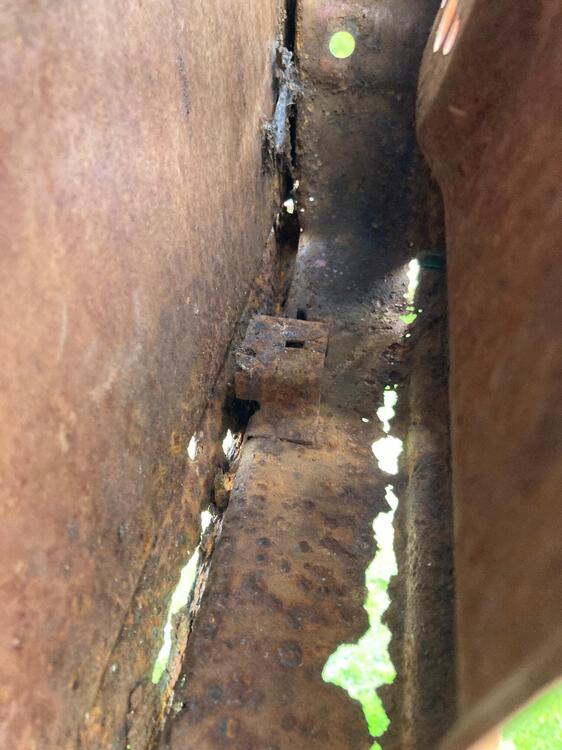
3 pointsMy mistake before. The pad sits in the rear portion of the door. Slightly forward of where the the lock cut out is. There is a raised bracket that has a rectangle hole in it for the spring clip. I hope these pic's help. Pardon the rust.
 3 points
 -
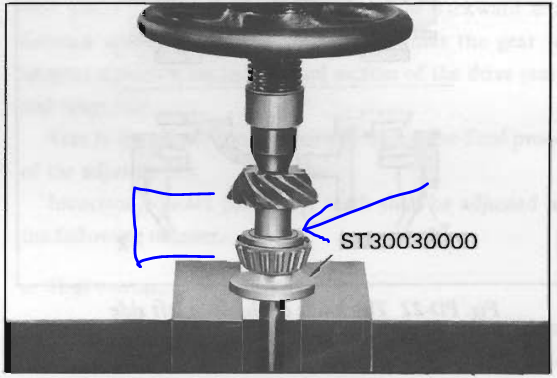
I'm no engine builder expert, but I've always installed the bushing to even with the bottom of the chamfer like you and Patcon. And I greased them a little as well. With the same stuff I put on the throw out bearing collar. High moly I believe? About installing... Block of wood and a mallet to get it started. Continuing like that until flush with the flywheel surface, and then tapped "gently" with an appropriately sized dowel (wood or plastic) and aforementioned mallet to get it down the the bottom of the chamfer.3 points
-
@jalexquijano If you'd like someone in Panama City to check out your carbs there's a JDM shop there. Also, look into any British or Volvo repair shop that has an older mechanic. Volvos used Hitachi SUs (I think) and any older British mechanic should know SUs inside and out..2 points
-
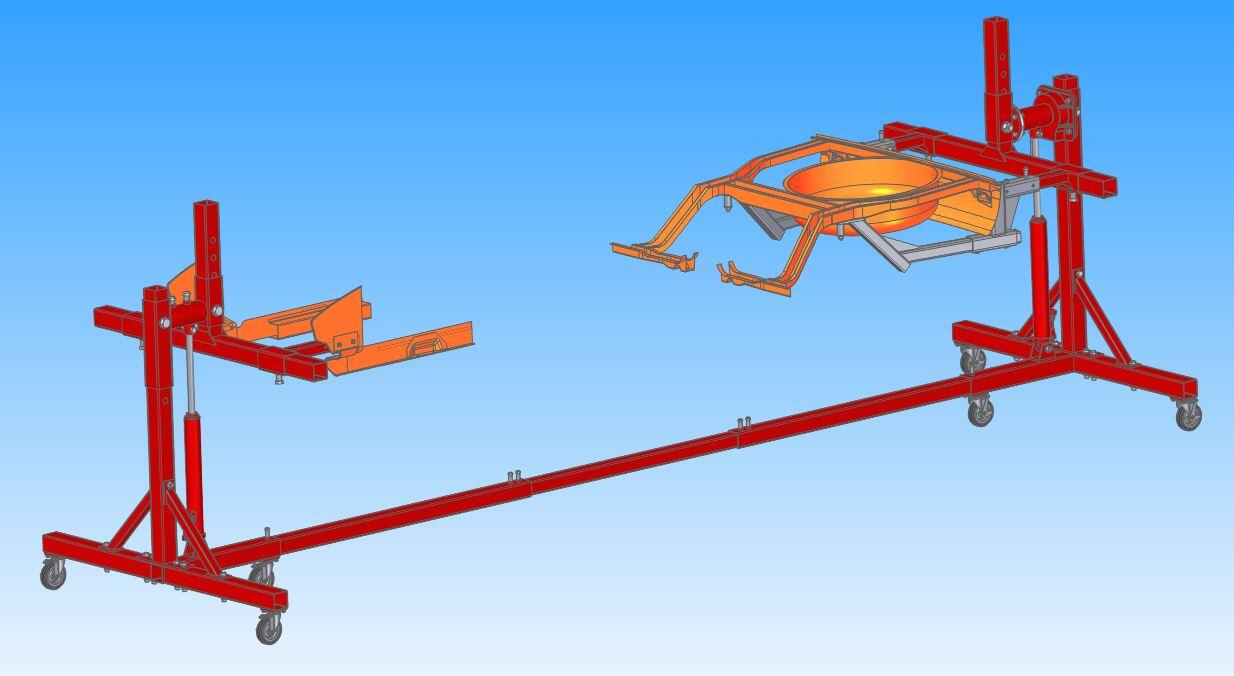
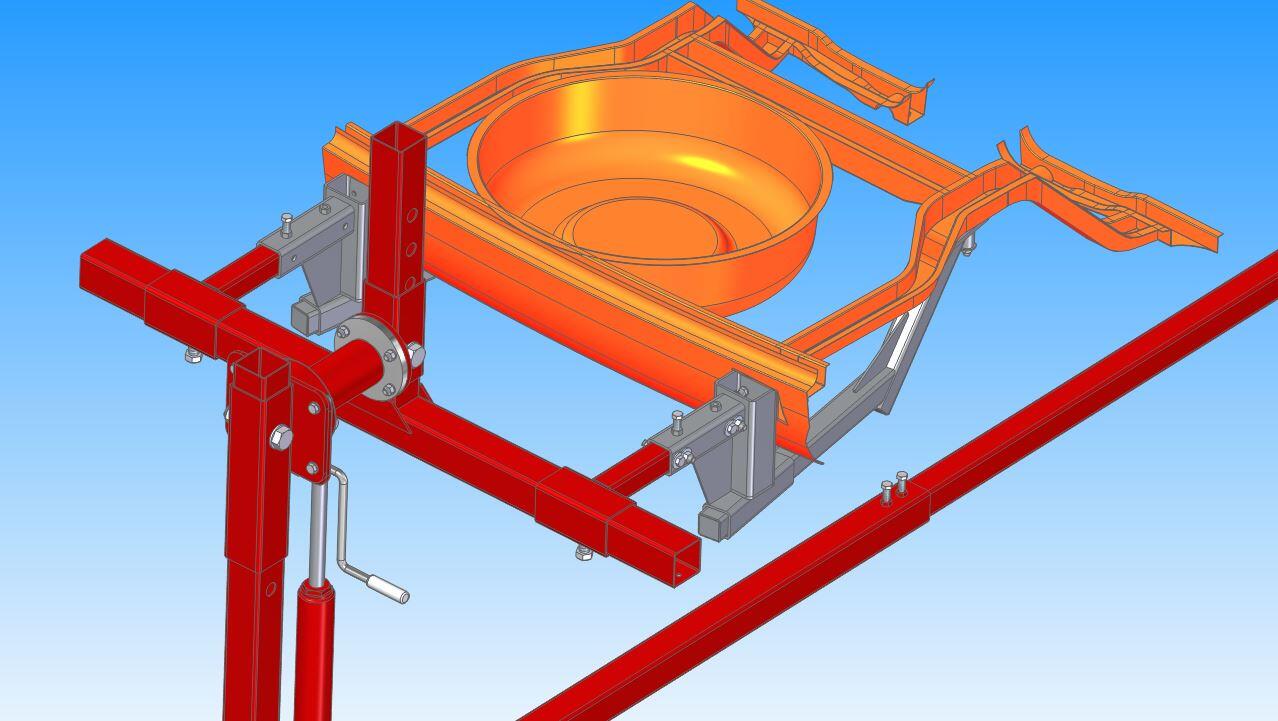
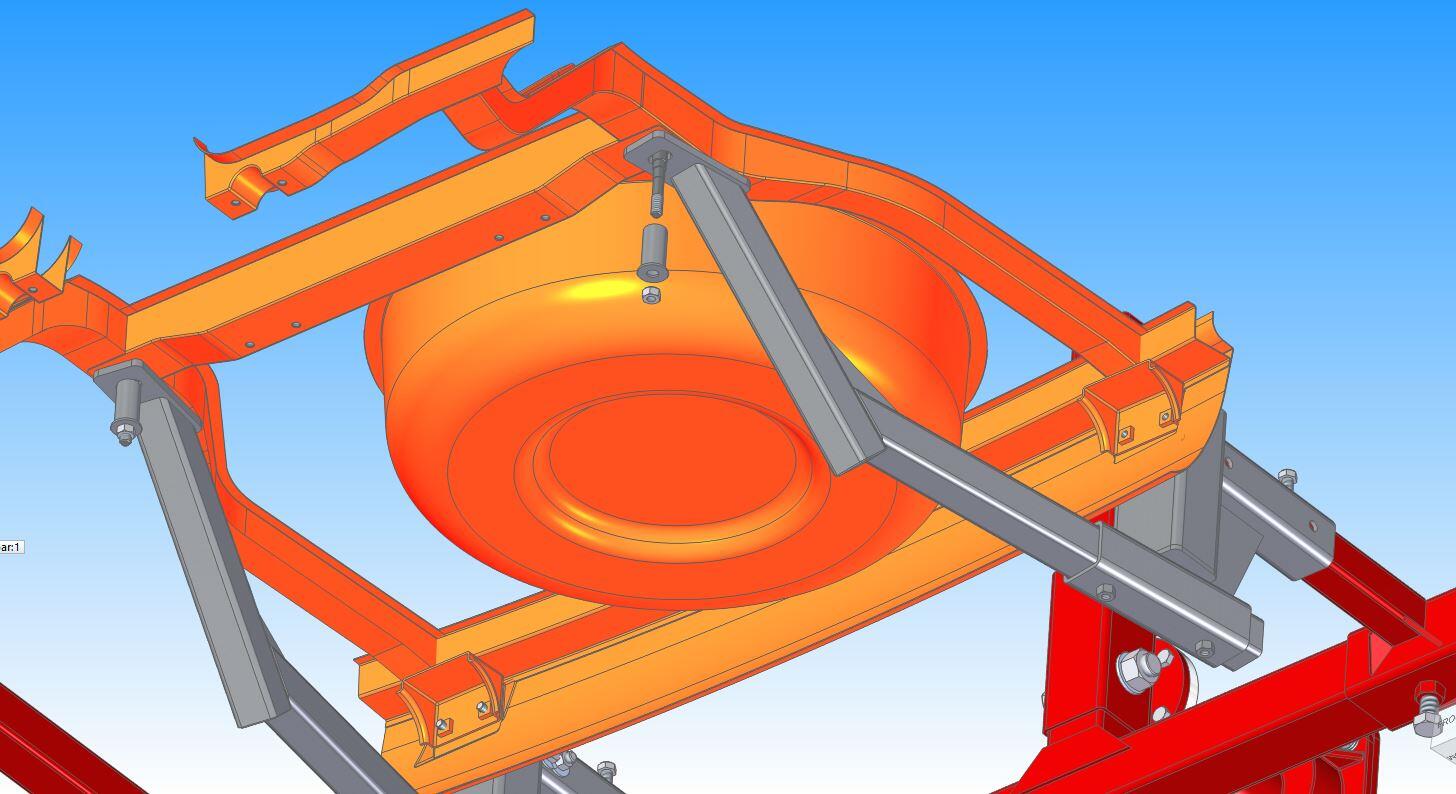
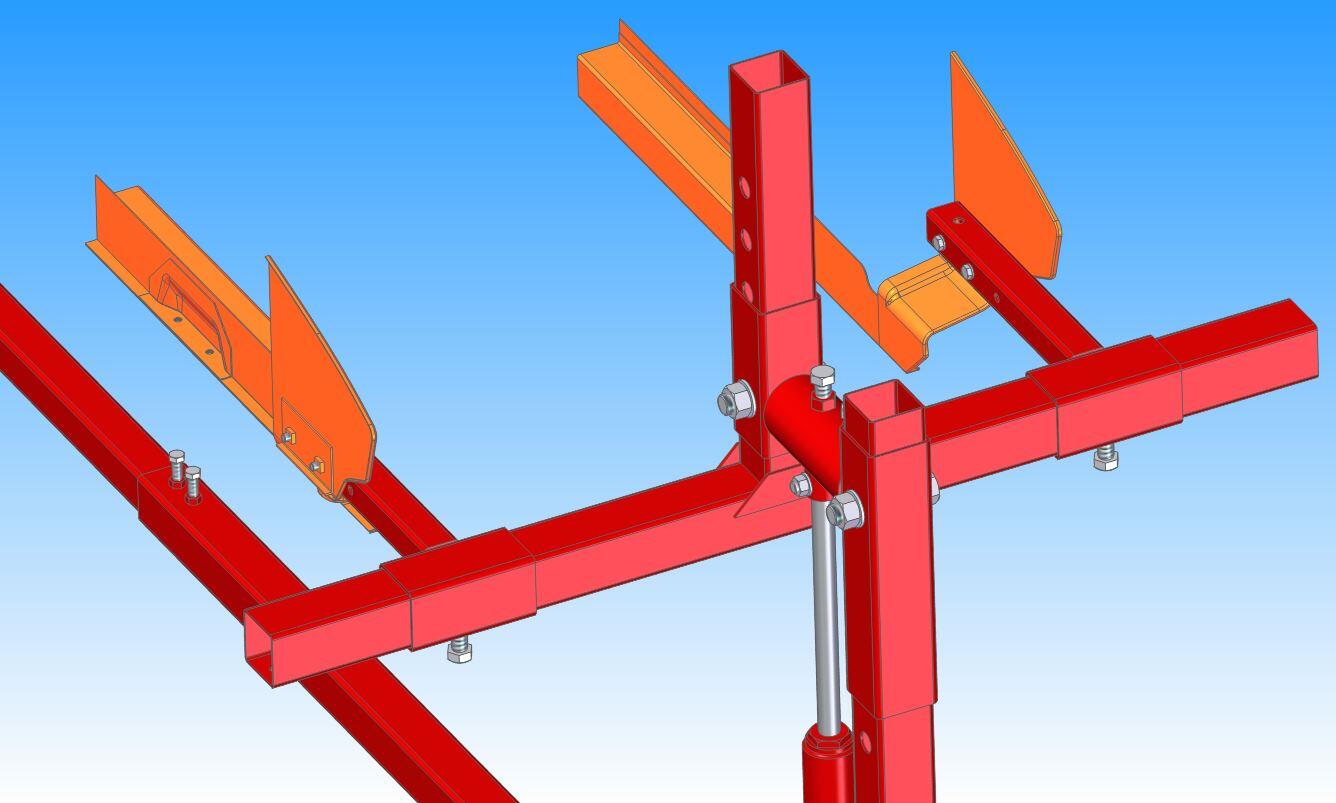
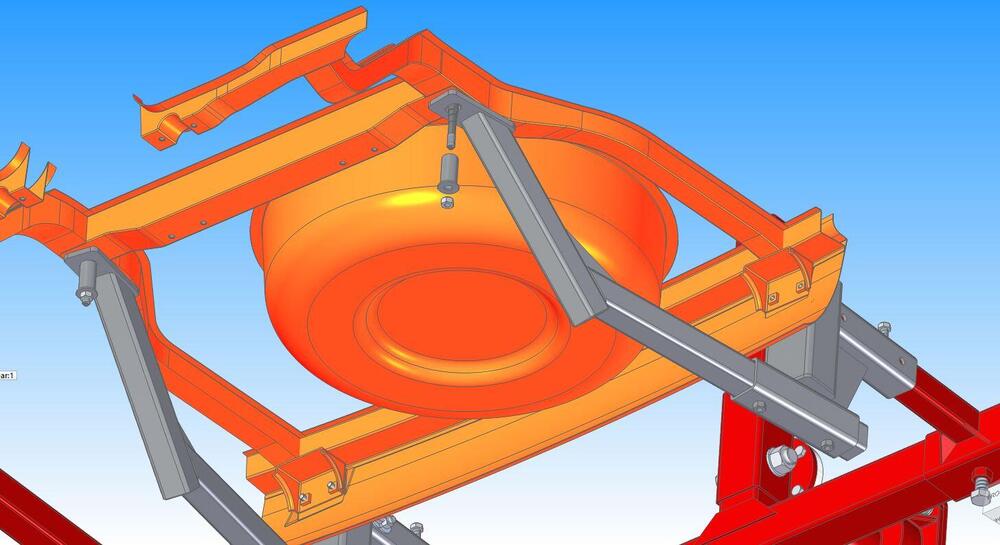
2 pointsI have decided to add extension to the brackets I am having fabricated for the rear rotisserie mounts. I will be picking up the ends of the diff mount x-member in addition to the bumper mounts. I added to my 3D partial chassis model to check fit on the x-member and verify clearance around the spare tire tub. The parts should be ready to do a test fit on the car near the end of next week. They will only be tacked together for the test, and if all goes well they will be welded up the following week. Here are a few images showing the concept.


 2 points
 -
I read through this whole thread again. I have the following thoughts and suggestions. In my opinion, your plugs are fouled with carbon / fuel, not oil. Maybe I would change my mind or confirm my opinion if I could touch and smell the plugs. Who knows. When I look at your spark plug photos, I think 4, 5, and 6 all look carbon fouled in varying degrees. 1, 2, 3 don't look great either, but I think they look weird probably due to the heat range plug you are using. With your compression numbers, and assuming I am right about the plug fouling source, I would assume your engine is fine enough to run correctly. I would stop thinking about oil rings, oil seals, etc, etc....at least until you thoroughly follow some other paths first. 1) In my earlier post, I suggested finding a better mechanic. I still stand by that. 2) Take steps to make sure you have a perfectly functioning ignition system. Start with valve timing....camshaft sprocket, oil pump shaft, distributor all being in the correct position. Next make sure your plugs are connected to your distributor cap and spark plugs in the right firing order. Next make sure that you are getting spark at each spark plug. Also, I would suggest going back to stock heat range NGK plugs. 3) Next, you need to get your carburetors adjusted correctly. If you are having to turn the mixture adjustment screw down 3.5 turns then your float levels are absolutely not adjusted correctly. If the float chamber levels are not correct, then it is possible, likely even that your mixture screw adjustments do absolutely nothing to affect mixture. You have Z therapy carbs. They are great carbs. They almost certainly have stock nozzles and probably SM needles (but it doesn't really matter which needles....you can get any of them to work well enough and not exhibit the symptoms you are having). In broad terms...your carb for cylinders 4, 5, and 6 is richer than the carb for 1, 2, 3. So...how can you get your carburetors adjusted correctly? a) One option is to find a great mechanic who is willing to read, research, focus first on float levels, and really learn how to adjust these carburetors. I read a lot of people saying it is easy. I agree it is easy when you have done it successfully and know what to do. The first time I really learned how though, it took days of trial and error....especially with the float levels. I prefer to take the domes off, turn the mixture screws down 10 turns, and set the fuel to the top of the nozzle hole. Others have different ways. All ways can work. And, getting the tab to the float tab that rubs against the needle jet to the right curvature so it engages smoothly and doesn't get caught is a big learning curve. So, can you find someone willing to go through this learning process and provide you with perfectly adjusted carbs? Probably not. b) This is what I would do. Contact one of the great Z car shops (start with Z Car Garage) in the united states and ask them if you can ship your carburetor assembly (carbs, balance tube, etc) to them (dry out fuel first). Let them know you want them to tune your carb on a stock 240z or stock 260z (yes, I know your z engine has been stroked to 260z but you have a pretty much stock camshaft, etc). Tell them you want to be able to reinstall and run it. Key is to get the float levels adjusted. Yes, you may need to final tune with turns of the mixture screw, but you should be 90% there. I would also suggest purchasing a color tune device which will let you visualize how rich or lean each carburetor is running. Those are my thoughts. I wish you the best and hope you get to enjoy your car someday soon. J2 points
-
I will take a look at the trim mounting scheme and take a couple pics of the later design. I don't know if the 77-78 design will fit other years, but maybe we can figure it out. I do know that the 77-78 doors are very different in a lot of ways, but I'm not sure if the window trim is one of them.2 points
-
I set them at the back edge of the chamfer. I have always lightly greased the tip of the input shaft. I didn't think it would hurt...2 points
-
The valve seat came loose? Did it beat the piston to death or did you shut it down when you heard the racket? There are cylinder head repair shops all around my part of Alabama so I'd think you could find something close by. If it were mine I would go by the oldest machine shop you can find and explain your problem. You might save $$$ taking the head off and have them replace the seats, probably old bronze now, and grind your valve edges. Install new valve seals too. Put the head back on yourself. That way your Z stays in your garage.2 points
-
I learned the "quick and dirty" adjustment way. It was right up my shady tree mechanical way of thinking. Once I read it a few times then did a couple, all that carb talk made sense. And to @Jeff G 78 height difference in the '72 carbs I robbed float lid off a spare set I had and made both lids rear carb float level. The rears have shorter ears to compensate for acceleration. Going up a steep mountain one time I the front carb ran low and I was only running on the back carb, cylinders 4, 5 and 6. I had a 3 cylinder 240Z for a minute.2 points
-
Got the last window seal done today - passenger 1/4 glass & frame seals. Cleaned up & painted the bracket weld areas on the frame as with the DS2 points
-
If the carbs are '72 3-screws, they will have different float heights between the two carbs, though the fuel height will be the same. There are a few ways of measuring. I posted some pics years ago on here where I cut clear water bottles and marked the proper heights on the plastic. I then set the top half of the float bowl onto the plastic so I could tell exactly when the floats closed the inlets. I found that to work better than trying to measure the float height with the top half inverted. I'll see if I can find my post later tonight and edit this post with the link. The fuel level tool is ideal, but they are unobtanium, so your choices are to measure the float, or measure the fuel level with a clear plastic bottle.2 points
-
1 pointI have one but it will only work about half the time. The ears are too large sometimes especially if the bushing is set in deeply. Then there is no room to hook the rear edge of the bushing1 point
-
Could you take a photo of your Pertronix coil (3ohm or 1.5ohm) wiring plus the resistor if you are using one. Also which Pertronix you purchased. I would like to look at that. I have installed 2 of those so far. One is on mine.1 point
-
1 pointI used the bread method on a RX7 a few years back. I'll never use anything else in the future.1 point
-
1 pointGottcha, from that first photo it looked like the rear axis was much higher than the front. Nice rig.1 point
-
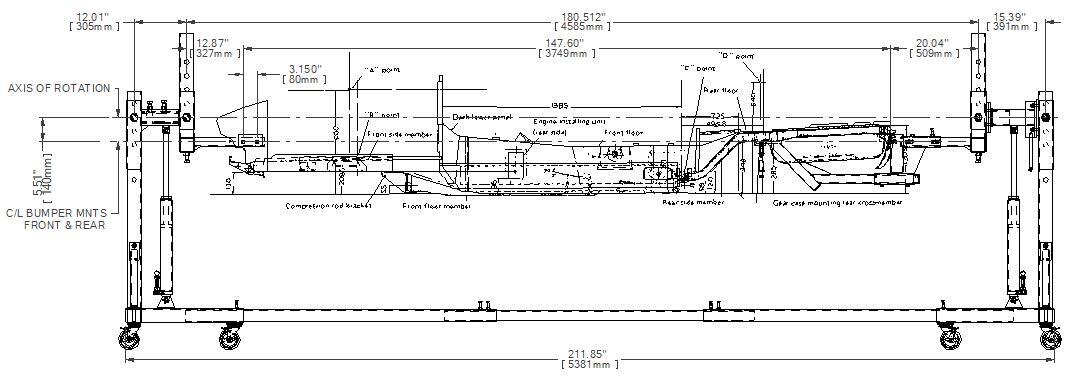
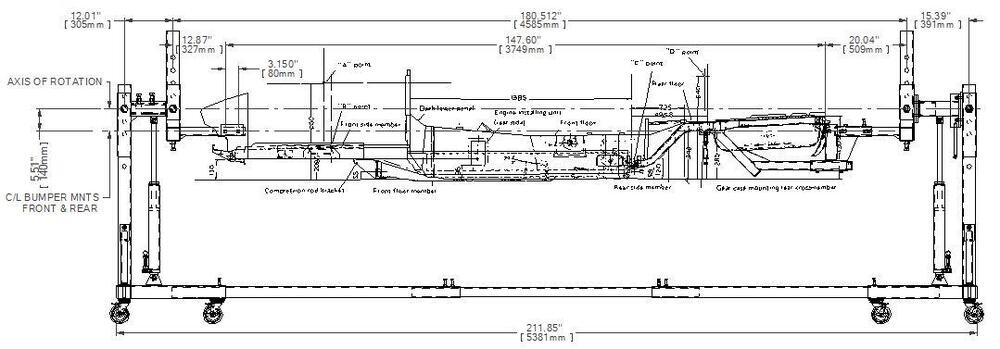
1 pointHere is a drawing showing the difference in height from the mounting points to the axis of rotation. Assuming my measurements are good. Lol Thanks to Nissan for the chassis drawing in the 1970 FSM.
 1 point
 -
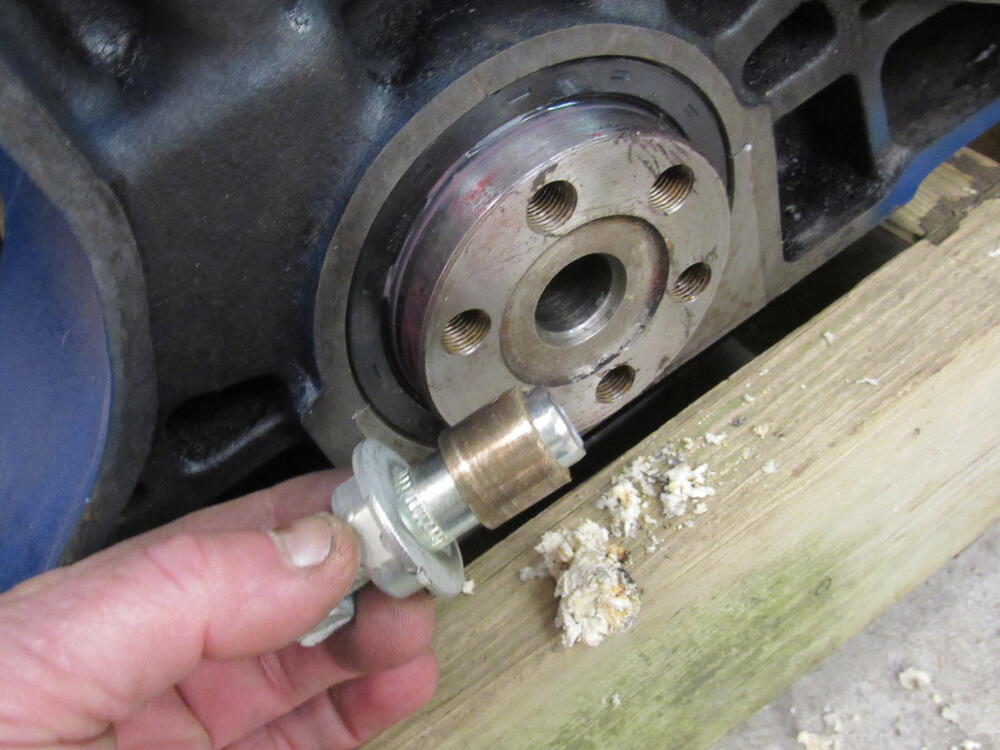
1 pointThere is a thread on the forum right now about installing the pilot bearing in the crank and it reminded me that I still had to do that job on Dave's engine. In the past I have always used the hydraulic method using bearing grease but this time I thought I would try using bread instead of grease, I was surprised at how well it worked. The best thing is it is so much easier to clean up. Not only was the old bushing worn but it was also installed too far back.

 1 point
 -
Sold for asking price. The car will most likely be stripped for parts for some early restorations at a Midwest Z shop. Not sure what they do with rusted out shells, my only guess is cut them up and store the good sections. Is anyone interested in a set of five 7/70 4.5 wheels and early D hubcaps that need restoration? There are assorted date sets on ebay right now.
 1 point
 -
What I’ve found is, (with the flamethrower coil especially) if you don’t have anywhere for the spark to go, it “finds” a way to ground either through the cap or arcing anywhere it can. I once did something similar in the dark and had a “plasma ball engine bay” :D So now I always disconnect the positive and / or negative off the coil first.1 point
-
The 76 frame should fit in a door for sure. The rubber seal is the only difference as far as I can tell. I have a feeling, the later frames will also fit even though there are many other door differences, but I have never tried that combination of parts. The parts catalog would tell you if a '76 and '77 frame is the same. If it is, then the '77 - '78 frame will fit in any Z door.1 point
-
I've had so many Z's, they all start to blend together, but I believe they added the rubber door seal in 1976, not '77. Way back in 1982, I bought my first two Z's, a '72 240 and a '76 280 out of a field. I recall at the time, the '76 had the seal and the '72 did not.1 point
-
I agree. Can’t see how grease would hurt. A Little. Last question, how to install? I don’t want to pound on the face of it and deform it to reduce the ID. No way I want the shaft tip bound up in the mess I make installing it. I have a bunch of real trans input shafts that i use for clutch alignment tools (HATE the plastic ones, WAY to sloppy). Seems like a natural for installing the bushings, but the ID Change is a chamfer not a nice square shoulder so that might spread the end making it too loose or hard to install all the way. Some are tighter than others. I seem to need to make a nice driver tool with a double step. One to touch the face of the bushing, and the other 4mm (6.5-7??) back and large enough to stop the insertion at exactly the right depth against the crank face. Or just whack it with a punch……1 point
-
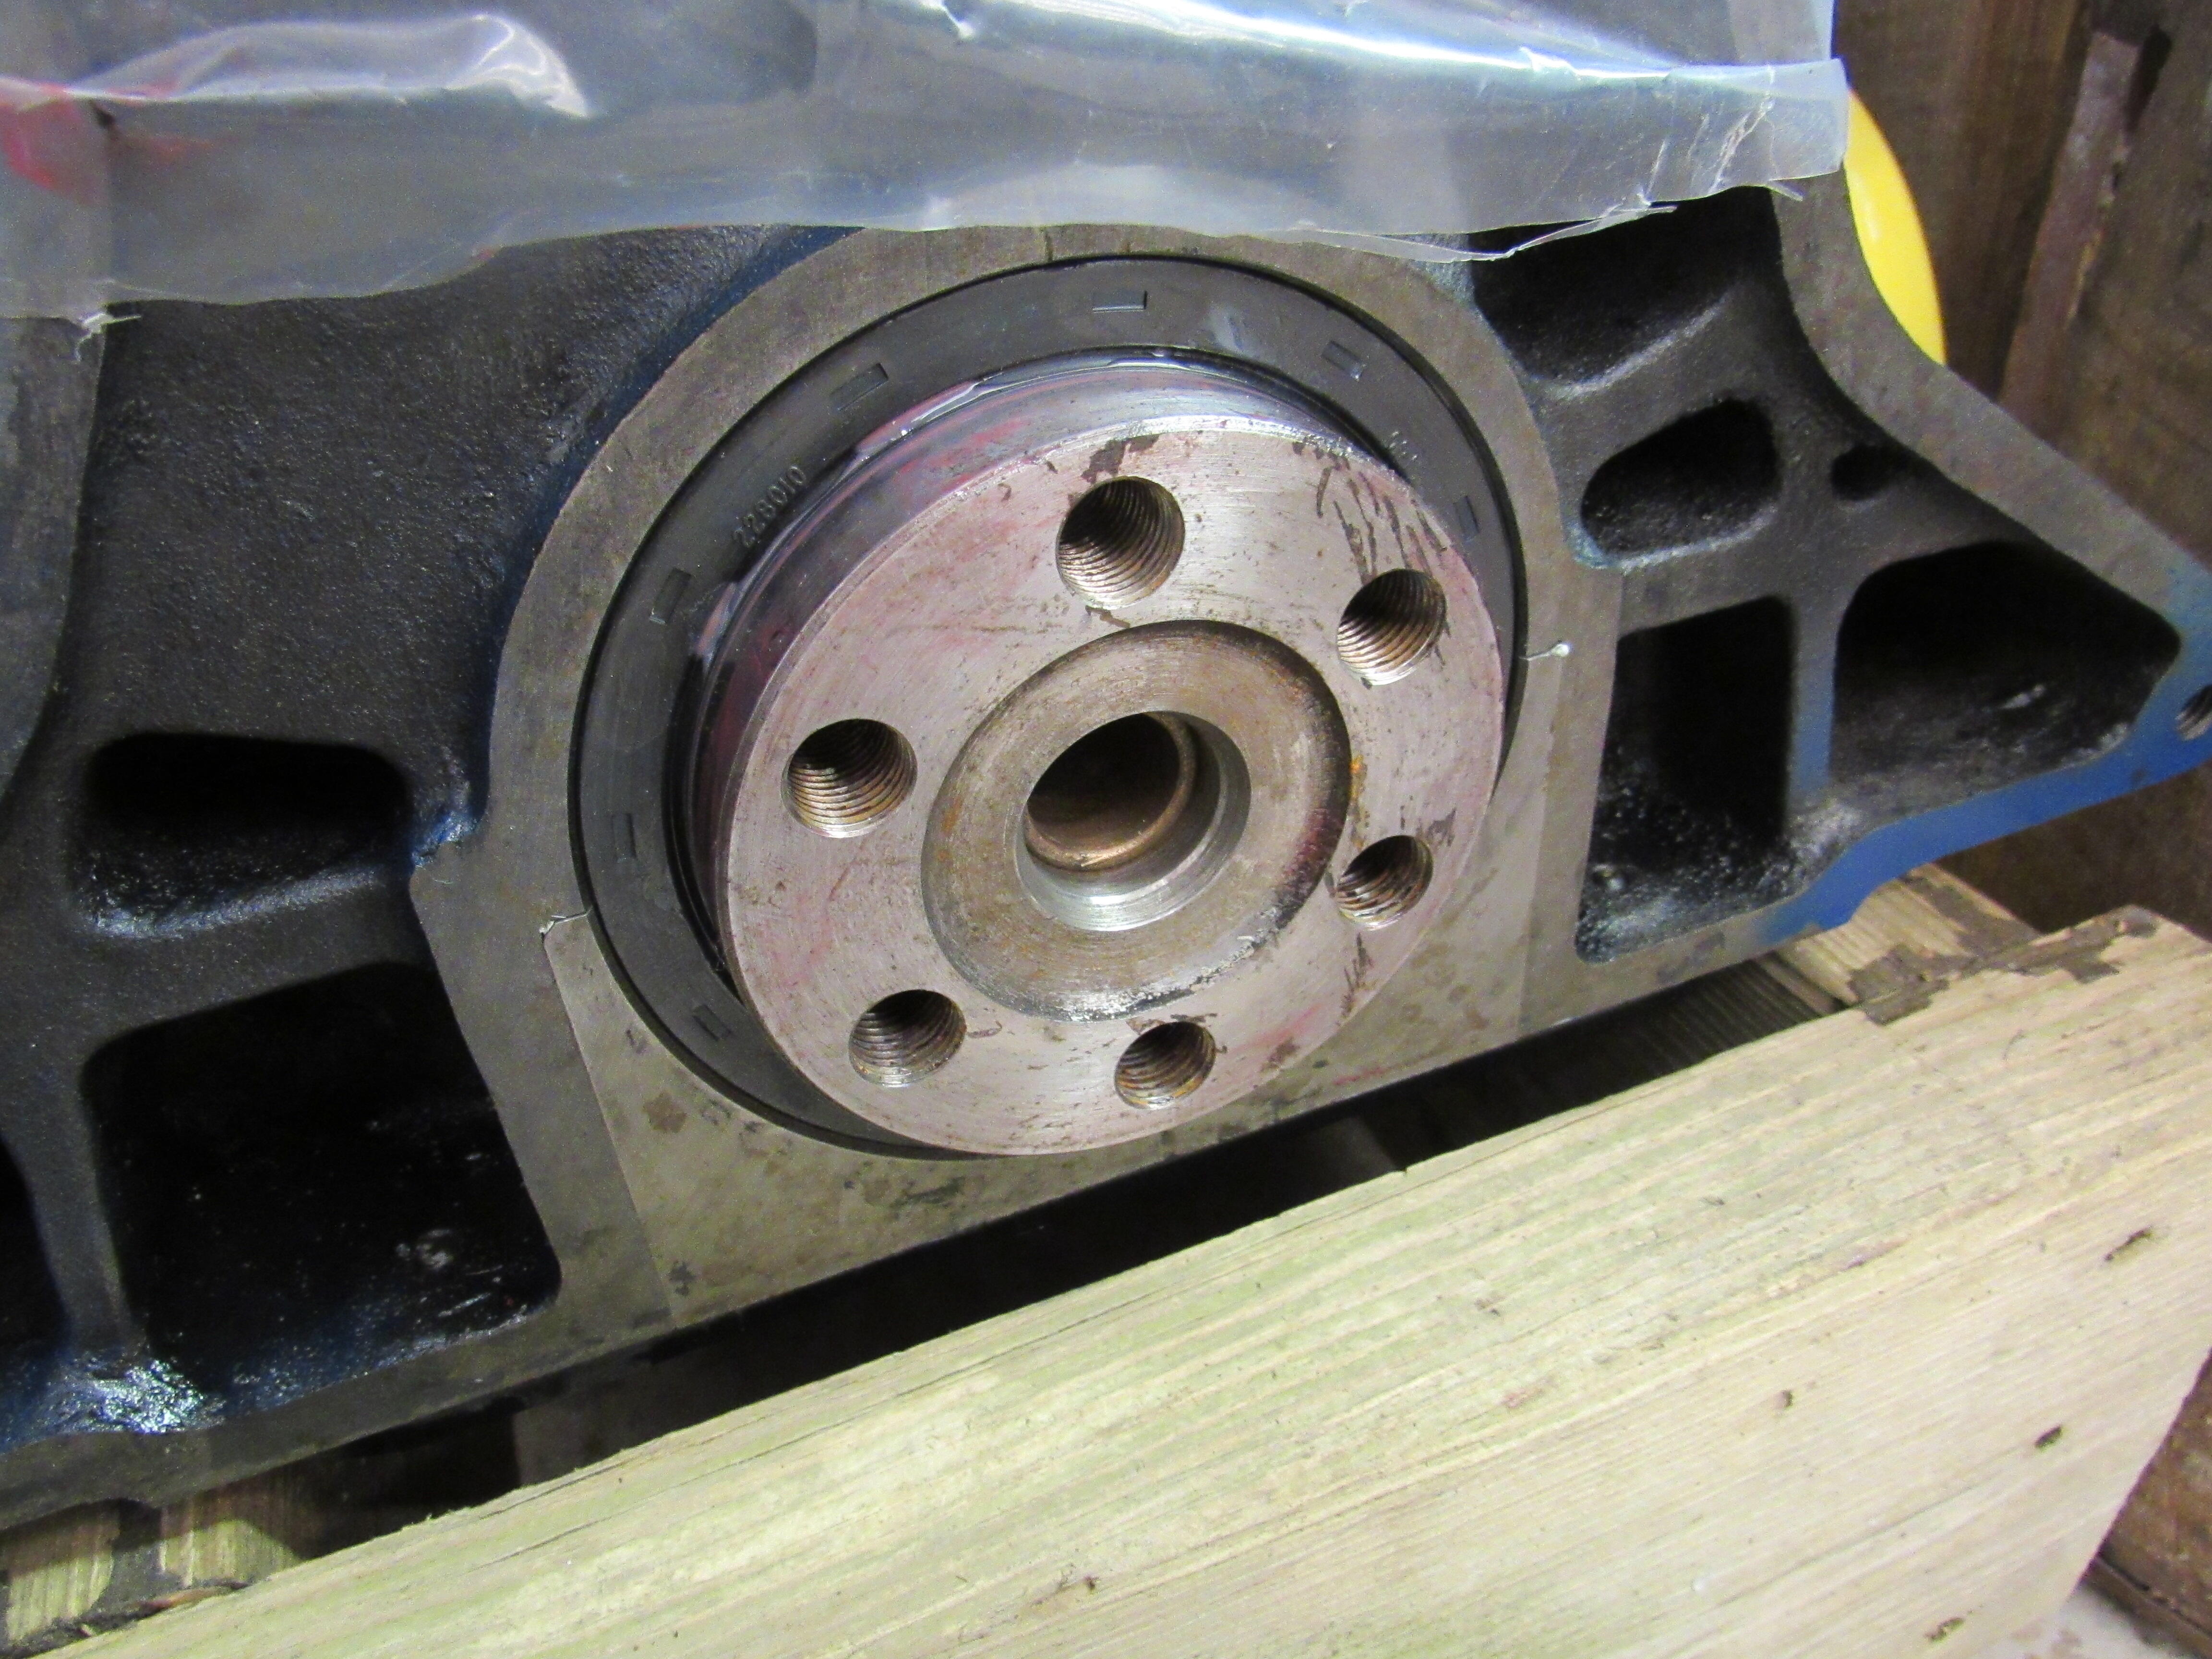
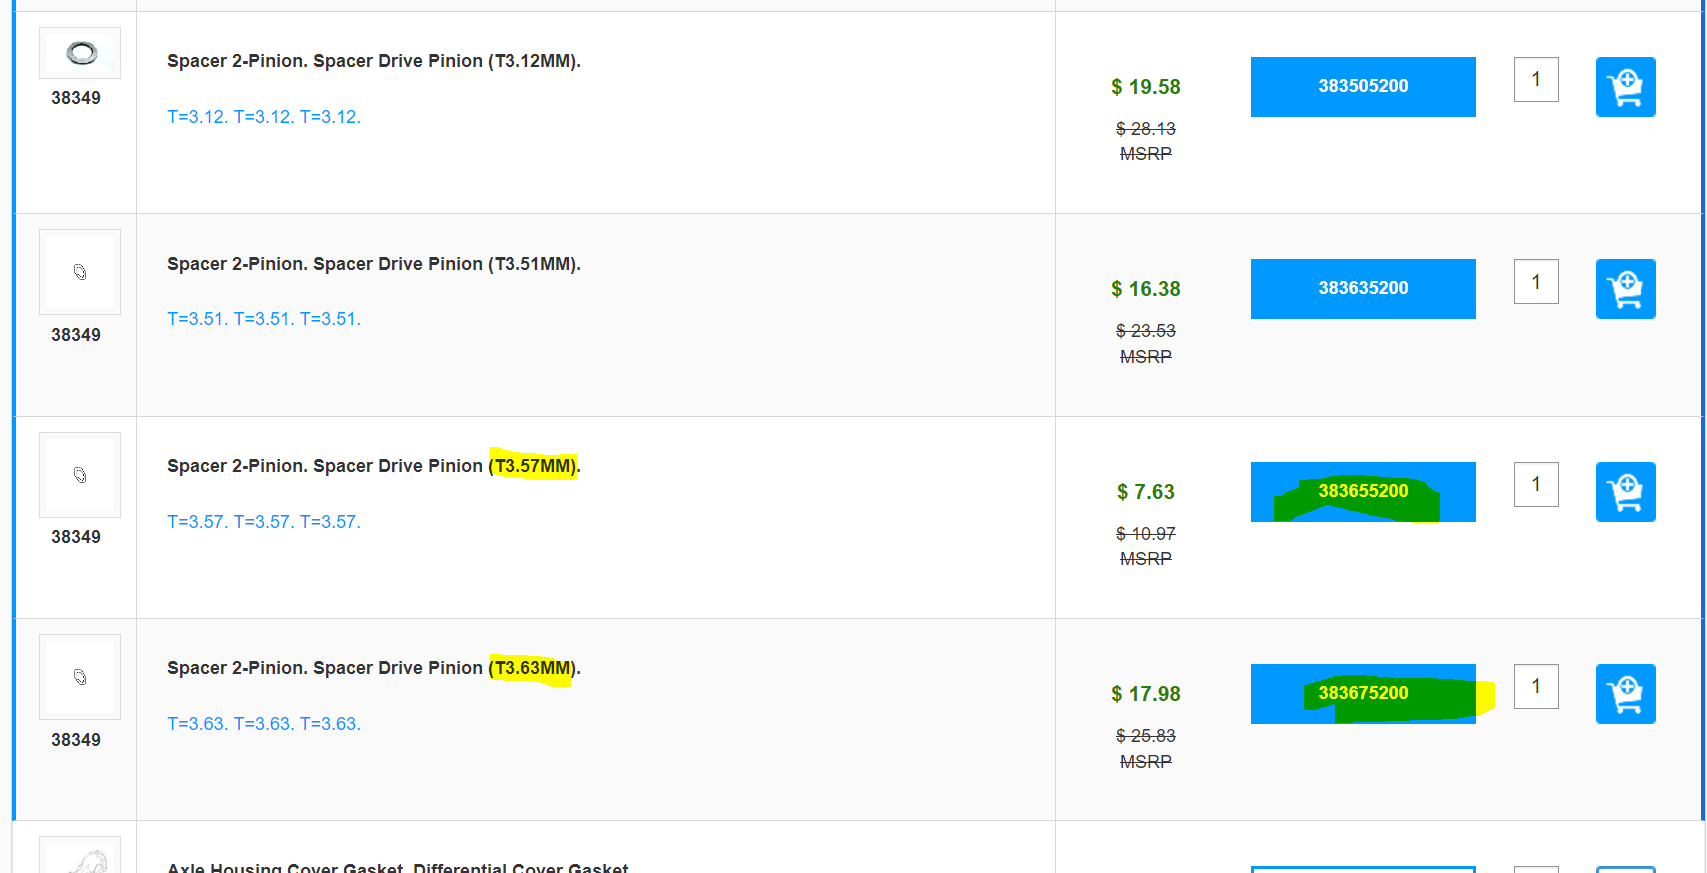
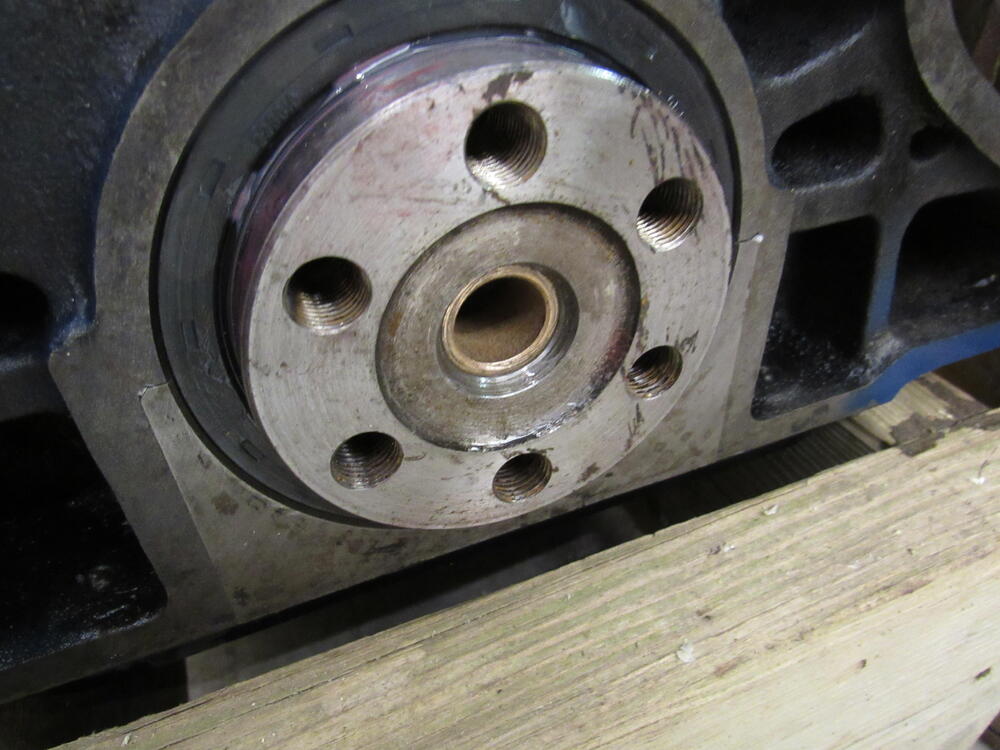
I have waited until I was in the right mood to pick up this project of fixing my back lash issue, and tonight, I was able to take this on. I removed the side flanges, then the one ring gear bolt, so the carrier would come out of the case, and then pressed out the pinion shaft. Rather than removing this bearing (the one in the pic) from the pinion shaft to get access to the washer/spacer (blue arrow) which is sandwiched between the bearing and the gear, I was able to user vernier calipers to measure the washer/spacer thickness. My measurement was about 0.141", (between 140 and 141 thousandths, really). Converting to mm, 0.141" is 3.5814 mm. Looking at what is available on a Subaru website, I found these part numbers: Since my measurement is nearly the same as the 383655200 spacer, it would appear that I only have one spacer which is thicker as an option available. 3.57 mm is equal to 0.1405". 3.63 mm is equal to 0.1429". So, order that one, swap it out, reassemble, and recheck gear lash?
 1 point
 -
It appears you've got the carbs balanced. The mixture screws at the bottom of the carbs are the secondary mixture adjustment. The primary mixture adjustments are the float levels. I'd check those next. They don't have to be exact, just close.1 point
-
The shape of the Z causes a low pressure are at the rear of the car, especially with the windows down. Any opening at the back of the car will introduce fumes, Power antenna drain, vent line grommets, taillight harness grommet, tail lights, hatch panel and latch, etc1 point
-
After an exhaustive search for K&N E-2910 air filters, I contacted K&N directly. They are NLA as of earlier this year. Where you-all getting your stock air filters from? Nissan likely still has stock ones, but anyone finding aftermarket anywhere?0 points