


Leaderboard
-

Paulytunes
 Subscriber
 7Points107Posts
 -
conedodger
Free Member5Points12,513Posts -

siteunseen
Free Member4Points15,115Posts -
EuroDat
Free Member4Points3,309Posts


Popular Content
Showing content with the highest reputation on 08/05/2023 in all areas
-
...and after a ~20 minute test drive, everything seems operating as it should. Now on to resolving the known issues and corrections.5 points
-
4 pointsOh man i'd forgotten about this. https://mubi.com/en/us/films/vanishing-point4 points
-
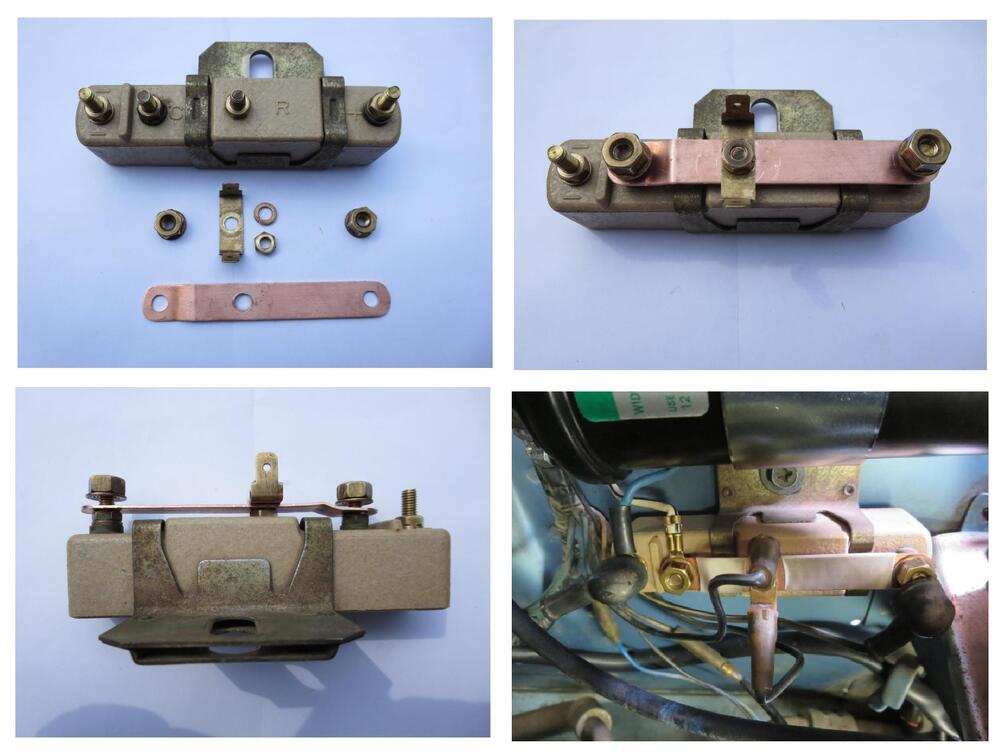
Well, I had some time this morning, so I bypassed the resistor. That seems to have done the trick!!! No more stalling after a high RPM pull. Thanks so much for all the help! This forum is awesome!! I am going to go for a morning test drive to verify.2 points
-
Yeah, happier with the overall fit on this one. I was thinking about the upper clearance. With a hanger on the front of the muffler, the whole rear pipe/ muffler will get pushed very slightly outward & down a smidge. That will center the tailpipe a little better also. Still close though, so I may put some Volvo/FoMoCo heat shielding up above it.2 points
-
Mine dit the same thing, and I DON'T drive it hard. Ended up making them out of HDPE from work. They have been in the car since 2014. The instructions look exactly like the ones I have in my map and I ordered them from MSA.2 points
-
2 pointsAlright update #2-- I took the stepped washers to work and milled another 1/16" off the thickness and reinstalled/torqued them onto the manifolds. Performed a smoke test and NO LEAKS! In fact the only visible smoke was coming out of the intake entrance near the passenger headlight and after 5 minutes of "smoking" there was the tiniest bit coming out from under the air meter under the plastic cover. I'll do the yogurt cup test next but I'm definitely sealed up enough to dial in the idle speed and idle/air mixture and maybe even pass emissions. I also want to experiment with the 1k pot on the coolant temp circuit.2 points
-
It's not increased tension (the rod is under compression during forward braking on the Z's), it's the side/bending load on the tip of the rod as the suspension moves that fatigues it. The kit is supposed to allow the rod end to move around the pivot plane of the mounting plate area. Looking at the parts in that picture it looks like the designer did not get the shape right on the combination of parts. It's meant to move but the pivot point is extended out by the thickness of the aluminum cup. And/or the hole in the aluminum cup is too small and the rod binds up as the angle changes, you can imagine it just by looking at the picture. Seems like a person could/should just open up that hole and it would work like it was meant to. Somebody messed up. If you ever have the front end apart and want to see what happens, leave the rod disconnected from the control arm and move it through the range of motion it would see while the suspension moves. And Delrin is a polyacetal (polyoxymethylene) not polyethylene. It's known for dimensional stability but apparently not so good under high loads. Could also be poor molding if it was injection molded. It's used often for small gears and things like that. Just some thoughts/observations/opinions. I broke a rod after installing PU bushings. Had a month or two of creaking and groaning over uneven ground to think about it before it popped.
 1 point
 -
1 point1 pointIll have a look for the old one. I had one original still in good condition to copy from. If I can find it I can get some copies done, but it will take a couple of weeks because our machinist is on holiday, and we "untrained" engineers are not allowed to play in his workshop😁1 pointHi Paul, I would bypass the resistor or bridge it over if you are looking for the original look. I bridged mine in the photos. The condensor should not be an issue, it's more a noise supressor than anything else. Like Zed Head said. It could be a heat issue. You could try and mount the HEI module with the heat sink plate next to the coil. Then you have the shortest circuit to the coil and good grounds in the area. Once you know it works, then you can more to fitting the module in the original position. The HEI will get hot, and the flame thrower in no exception, but heat is not a good thing in these units. The high resistance the resisitor is generating will not let the HEI function as it was designed. Not helping. Btw: My TIU was overheating when failing. Like yours it would leave me stranded on the side of the road. A quick spray with very cold circuit cleaner would bring it back to life almost instantly. A passenger (my wife) could spray it and the engine would come back on after a second or two.
 1 pointHmm, i was wondering how strong it is and how long it lasts. Let's see i might give it a try anyway. Were the ones from MSA from the same manufacturer? (Kontrolle Automotive in Fremont, CA)? thanks mate for your support! I have a forwarding address in the US, but it just wasn't worth the effort in this case. but will happily come back to you if i ever need this in future. Thank you!1 pointBy the way if you ever need help shipping stuff to Switzerland, pm me. If I can help, I will C1 pointI bought one of those kits from MSA years ago and installed them, I used the included metal C for the measurement, 2 yrs later the white nylon bushings were split and cracked. I don't know if I got a set from a bad batch or what but I just went back to rubber on both sides.1 pointHave you checked the ground from the module mounting point with a meter? Your drawing shows a wire but the area under the dash is not full of good grounding spots. It's often pretty crusty under there too. One of the few things that can cause quick heat buildup is electricity. p.s. heat could be causing the module to fail. Higher PRM passes more current through the module. More current = more heat. Not sure if a bad ground could cause more heat but it might.1 point1 pointHi Yarb, yes the transmission has been drained and refilled. No water, thank goodness. Next project is getting the interior back together. Thanks for the comment.1 point1 pointI'm installing a pair of Corbeau seats myself at the moment so I'll keep the thin headed mounting bolts in mind but here is the kicker, the guy that replaced the floor pans welded the rear seat mounts on pointing in the wrong direction. I need raccoon hands to remove the original seat and bolt in the new.
 1 point1 pointAs Darren McGavin says "Mind Power"😄 Everything that isn't a fastener goes on one cookie pan, then after sorting, the second sheet only has threaded pieces and then the sandwich baggies come out. All the lock washers in one baggie, flat washers in another, 3/4" M6 in another, etc. One baggie will be oddball and specialty fasteners that don't fit in other categories, it takes a couple of hours to do the sort but saves lots of frustrations later on. Also sometimes I take pics of the part just removed with all the fasteners arranged next to it. After doing so many of these cars a lot of pieces on the cookie sheets look so familiar I just pick them out and put them where they belong and best move I ever made was buying that rusted out green 240z years ago that I parted. Every fastener on that car went to the platers and is now part of the "slush fund" so if I'm missing something or it's too badly damaged I can draw from that box.1 pointI use Kroon Classic oil here in the netherlands, they recommend 15w40 , 20w50 seems way to thick to me for a stock L24 to L28... Classic Multigrade 15W-40 productinformatie. - Kroon-Oil Lucas oil seems to have a 10w40 to I see1 point


Important Information
By using this site, you agree to our Privacy Policy and Guidelines. We have placed cookies on your device to help make this website better. You can adjust your cookie settings, otherwise we'll assume you're okay to continue.