Leaderboard
.JPG.cfcada9cf1c1b502df3f5f2f2ca3ff36.JPG)


Popular Content
Showing content with the highest reputation on 02/11/2022 in Posts
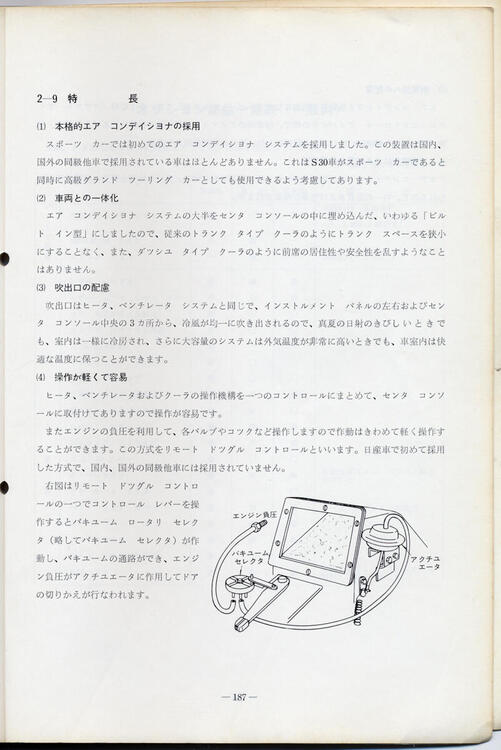
-
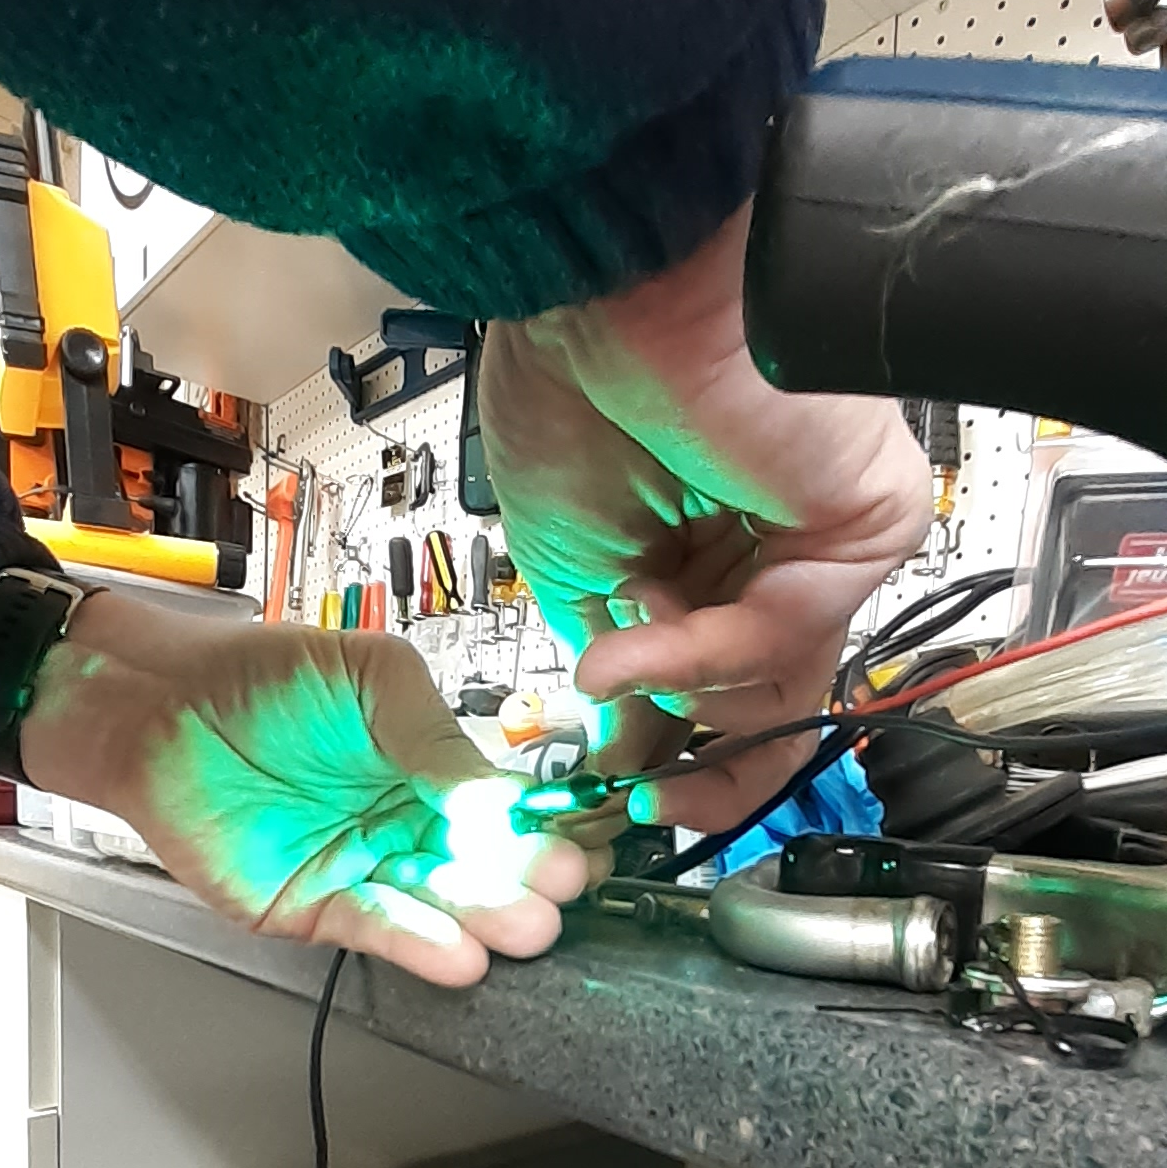
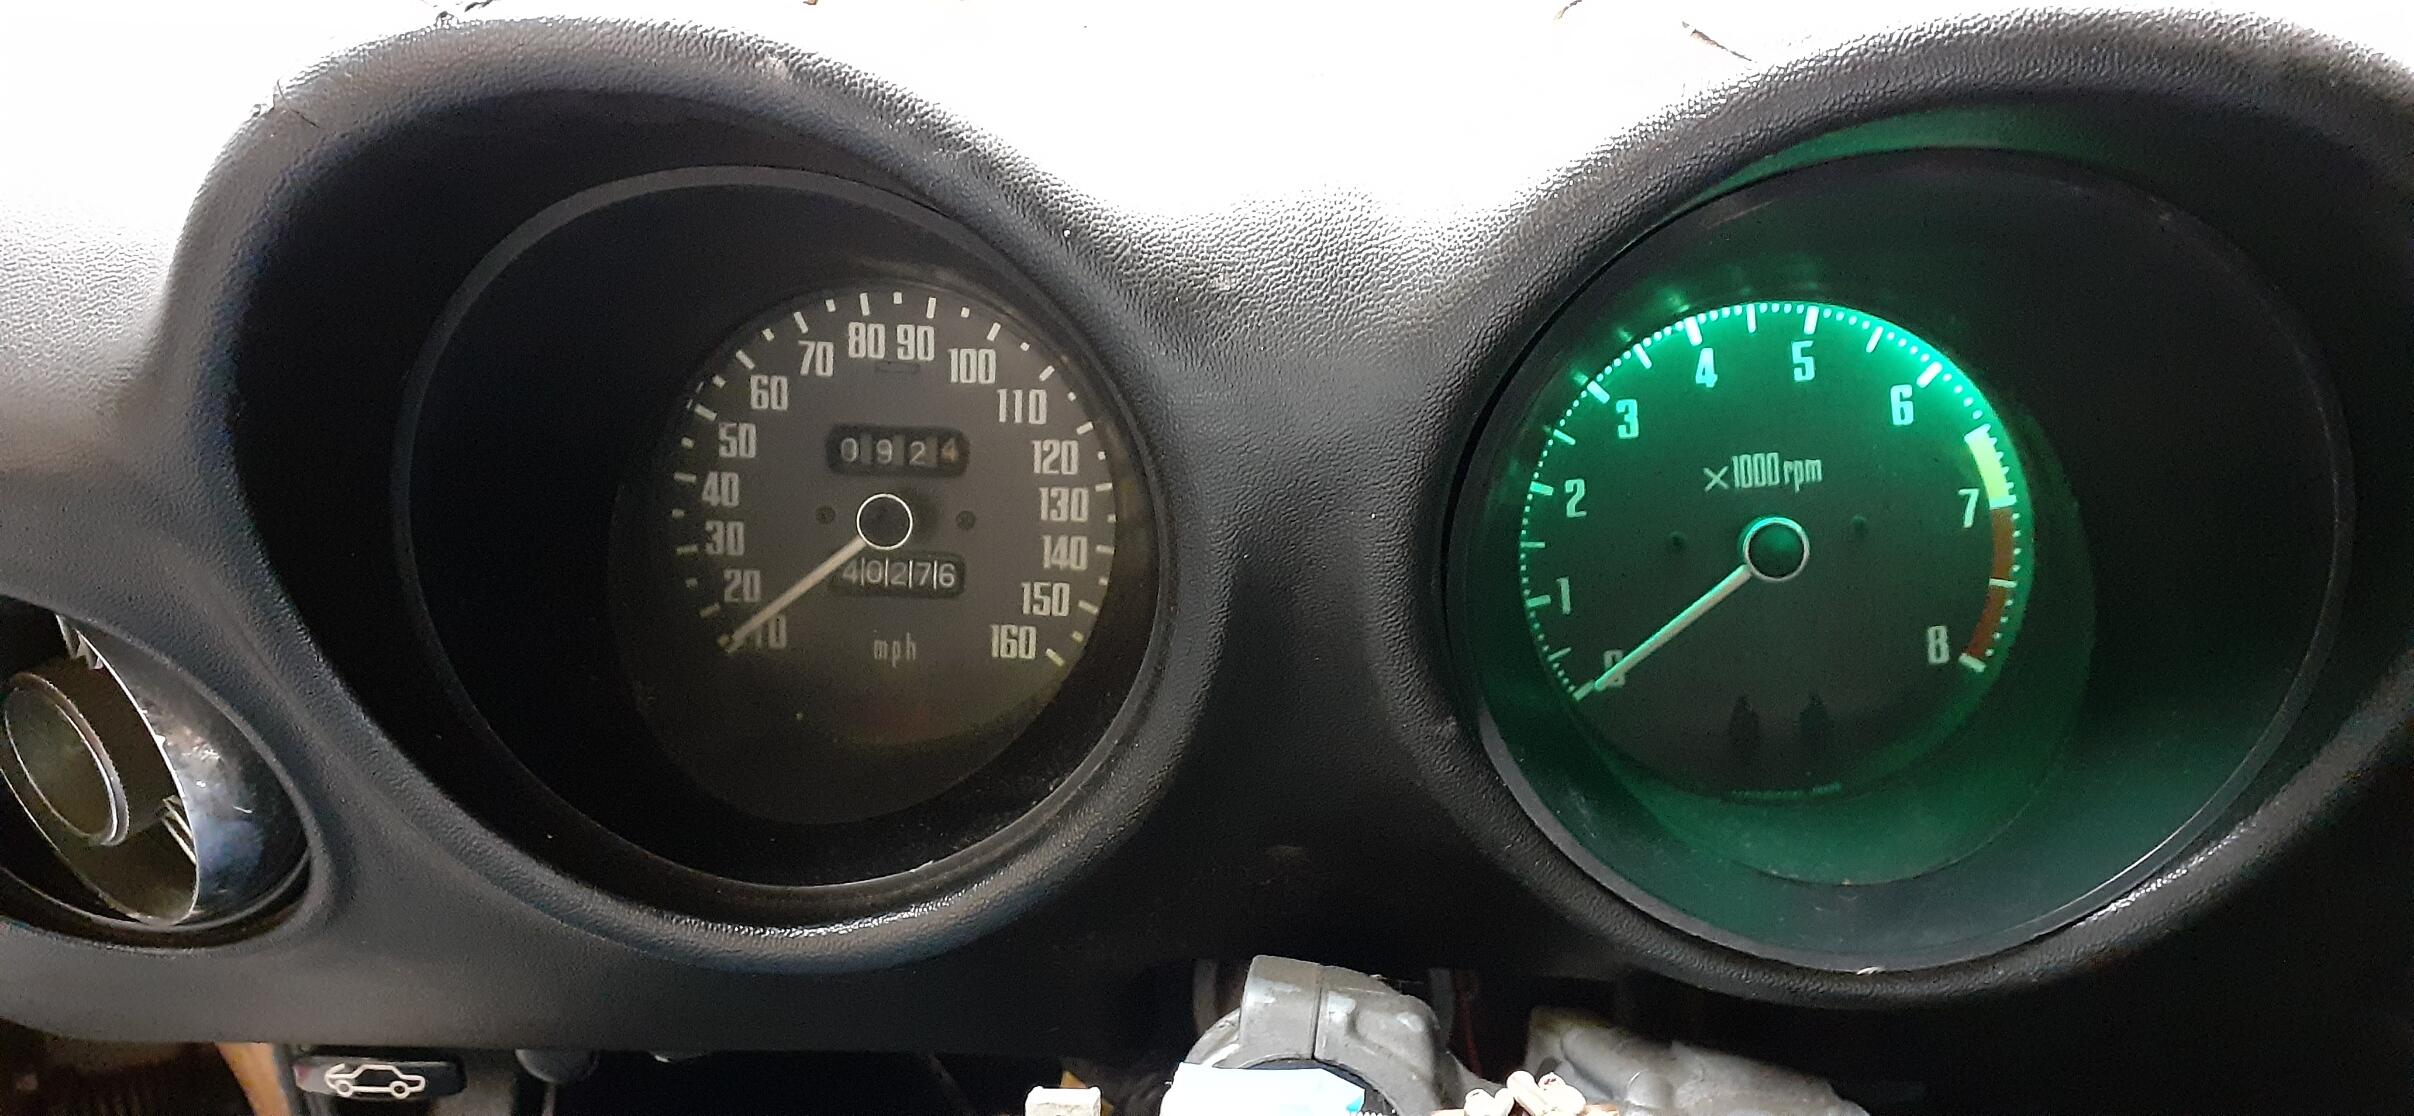
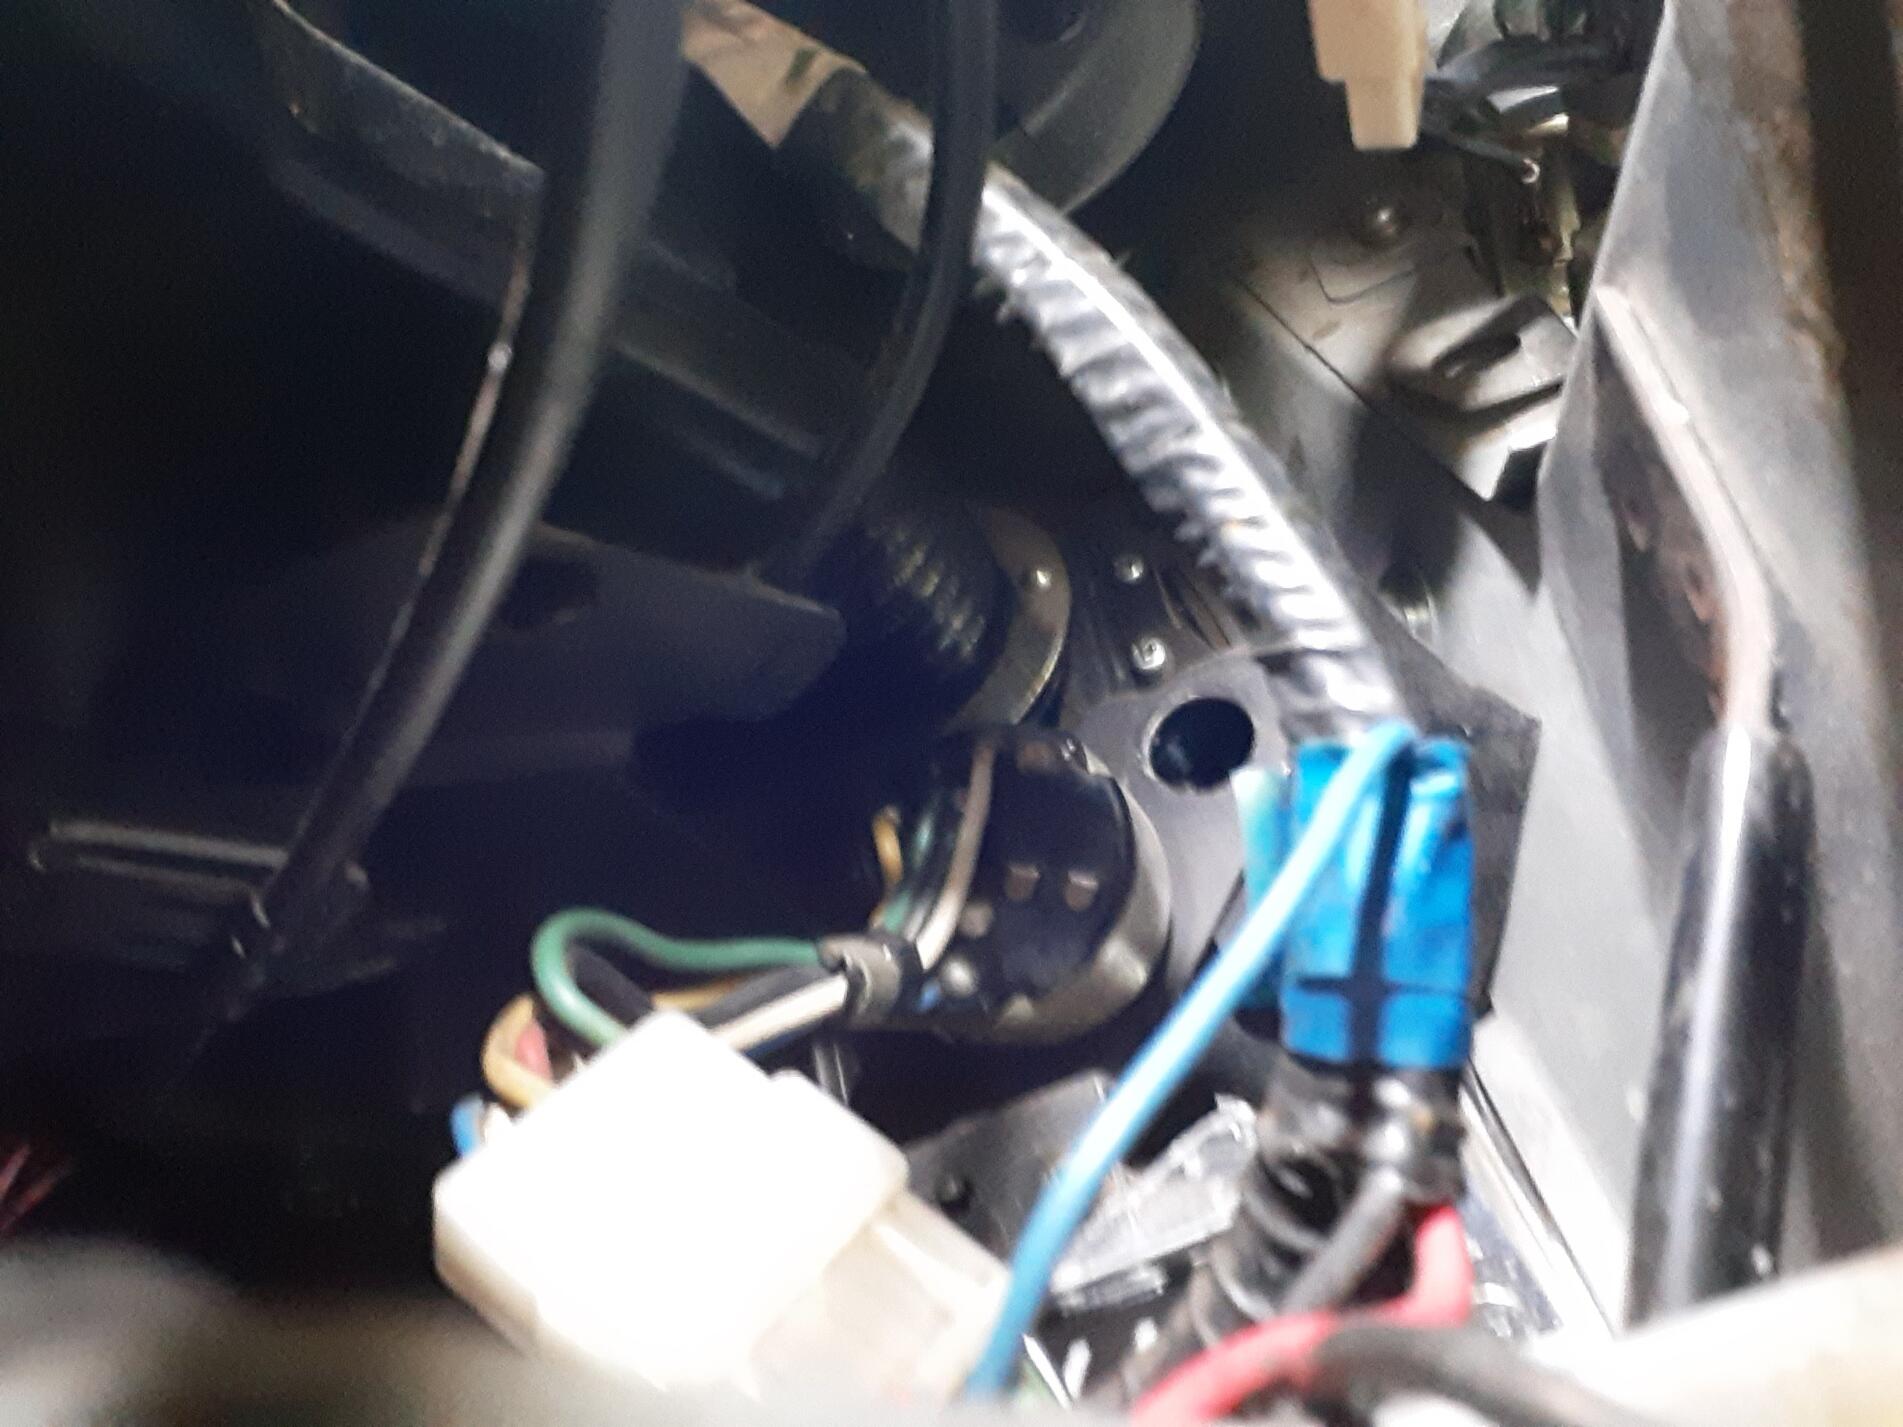
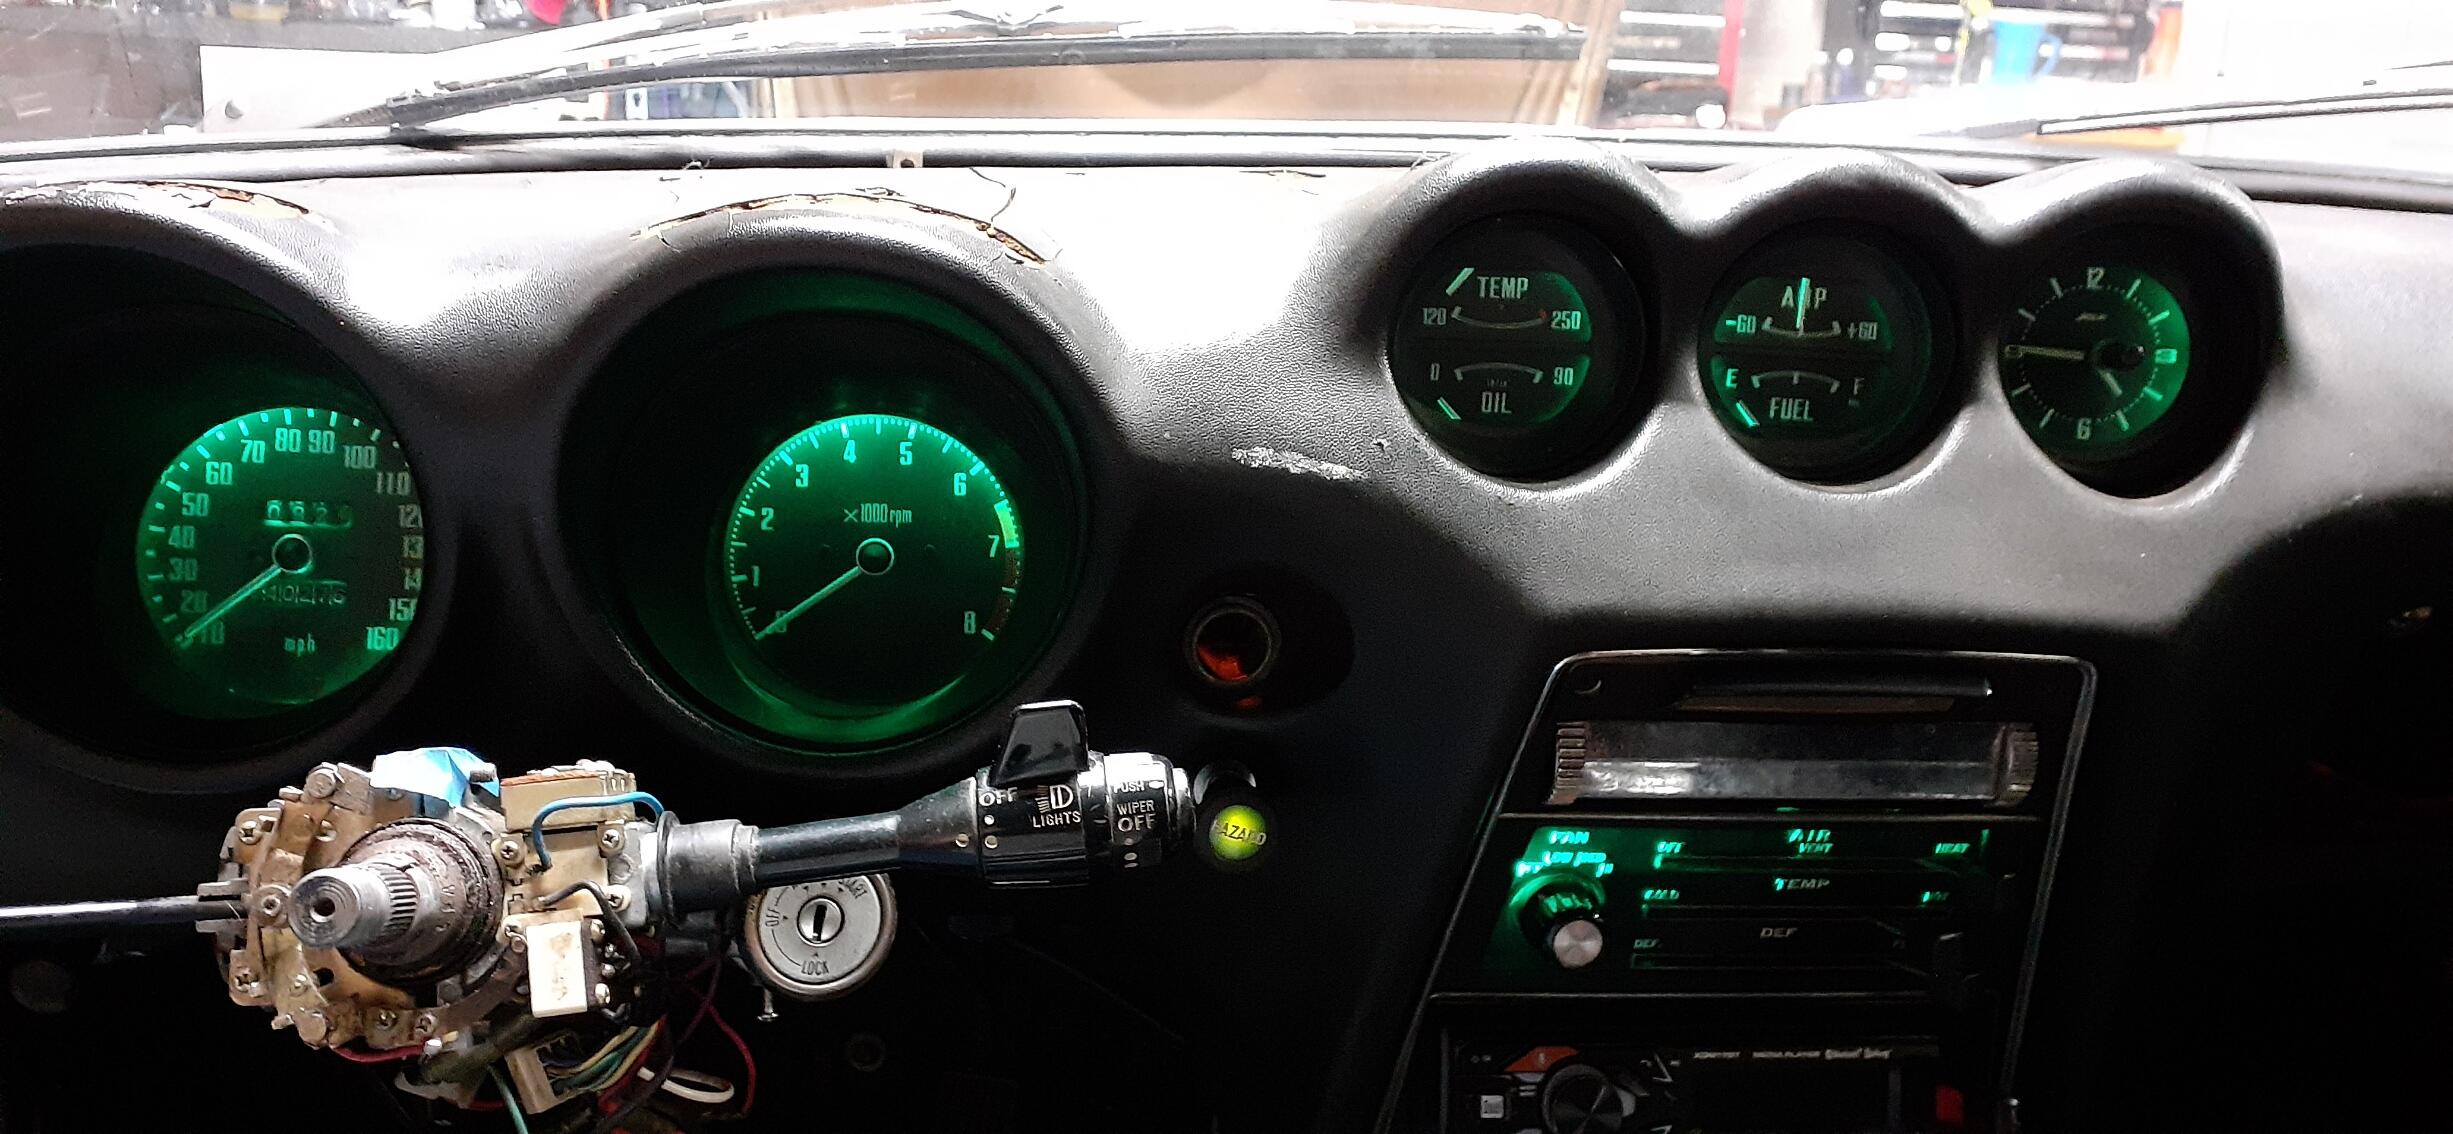
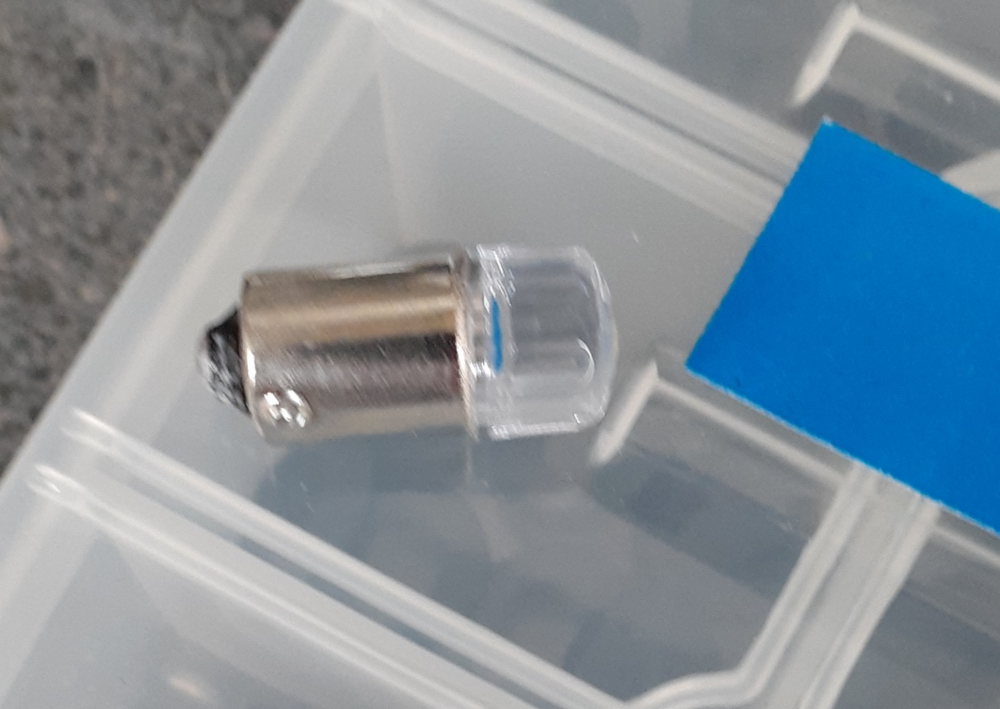
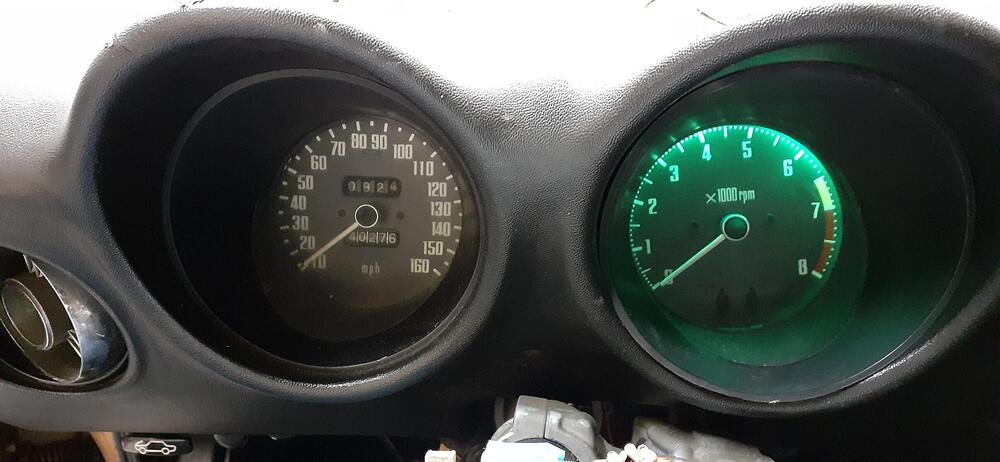
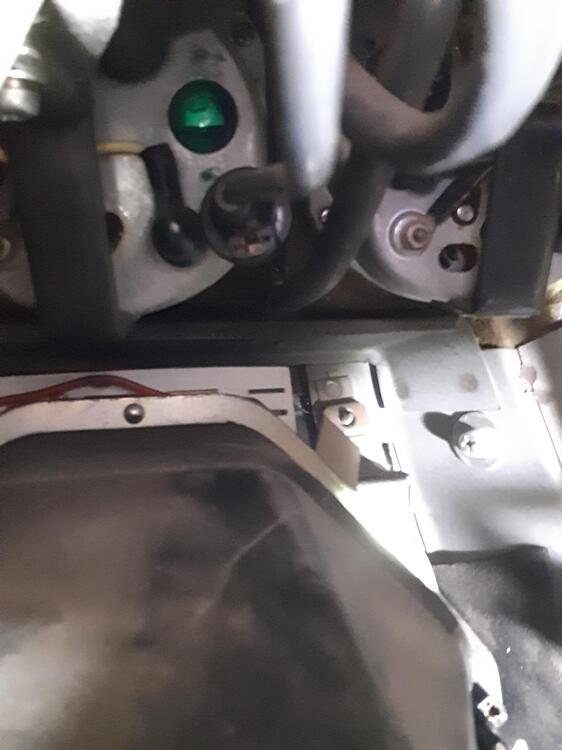
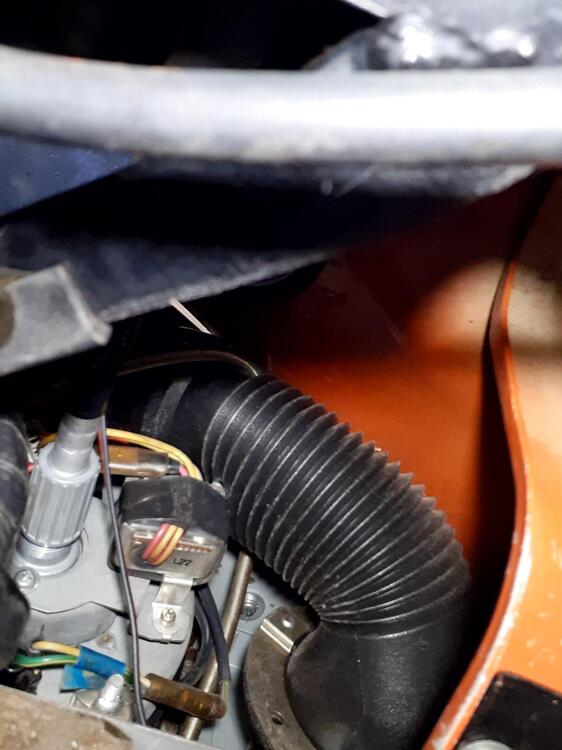
4 pointsOkay, the gauge bulbs have been converted to LED. The bulbs I got today worked well. https://www.amazon.com/dp/B092VNXS6H These are green LEDs, and they are small enough that they work with the green lenses in the gauges. Prior to installing them, I ran a test with my power supply. And since the tach was handy, I did the bulbs for it and did a test lighting. So for the center gauges, I didn't want to take out the vent control panel. I manipulated the lights from the hole for the tach, from the glovebox side, and from the top. By the way a small light and a cell phone camera can go a long way to orient you to get to areas you can't see. The last photo was taken through the top of the dash with the camera in selfie mode. Far and away, the biggest challenge was the speedometer. The top bulb is a bear and a half to reach without pulling the speedometer, but I managed to get to it just with removing one wingnut and loosening the other. The bulb in question is above the module on the back of the speedometer and is partially blocked by the vent hose. Here's the wing nut that I loosened...mostly because I wasn't sure I'd be able to get it back on. And I think the results justify the effort. Pro tip on removing the old bulbs. Have a small screwdriver handy. The blade should be about 1/8 inches (3mm) wide. Press down on the bulb with one hand while leveraging the screwdriver blade against the tab on the bulb and the bulb housing. Once you get it moved away from the left, you can use the screwdriver blade to push the tab to finish rotated fully to be removed. I was pretty worn out when I was done, so re-assembly will be tomorrow, and I hope to have a new door seal arrive so it can go in, too.


 4 points
 -
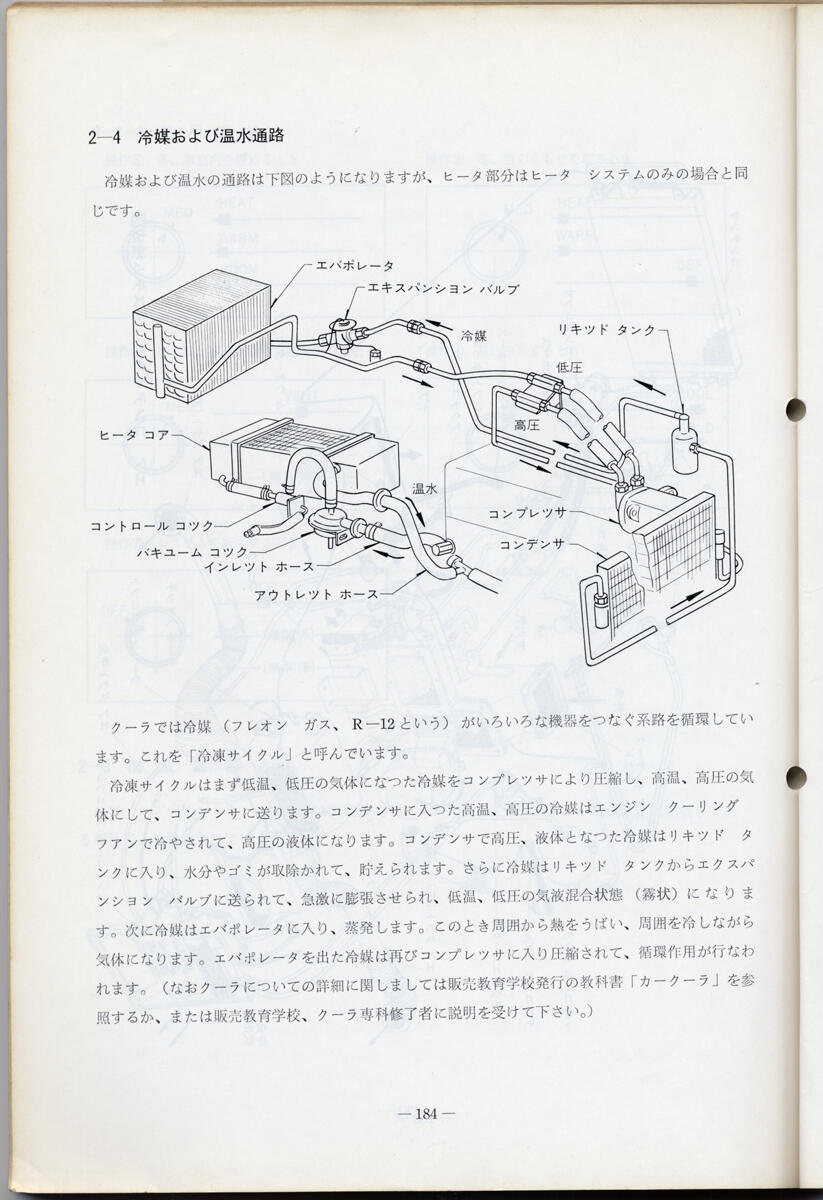
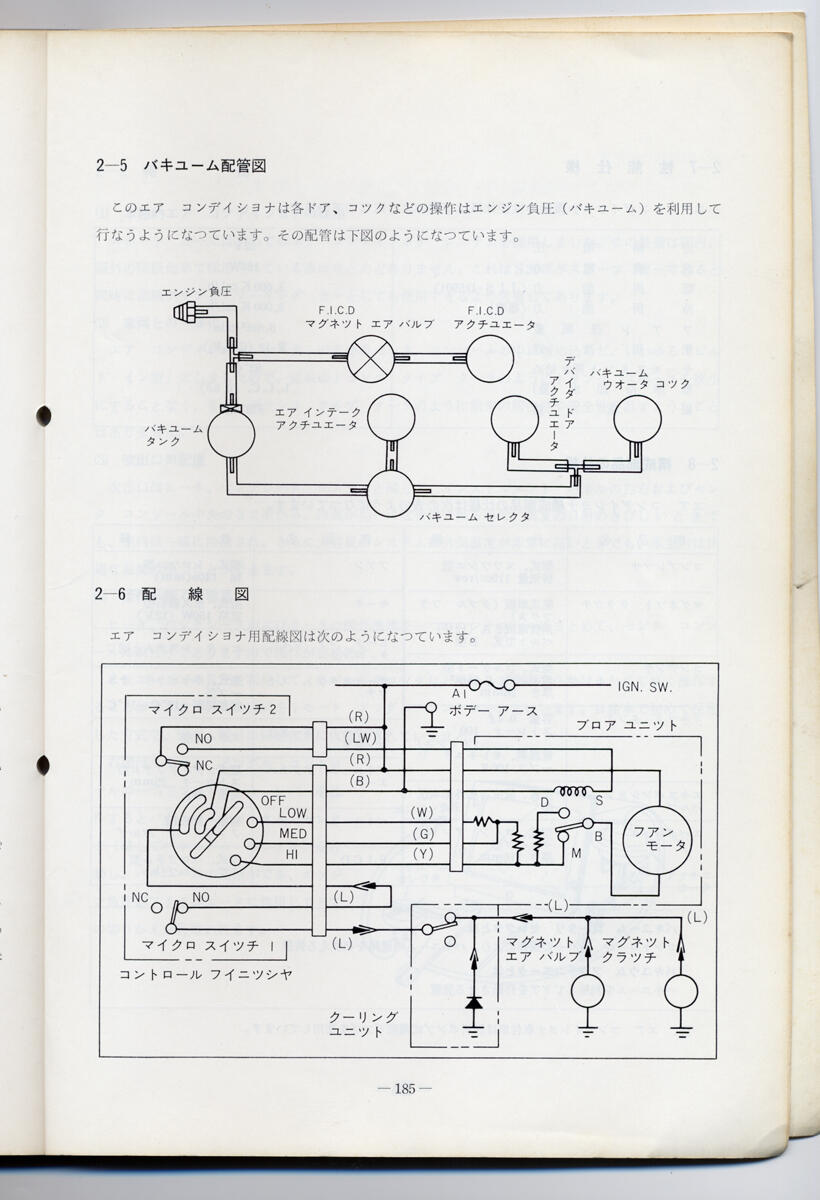
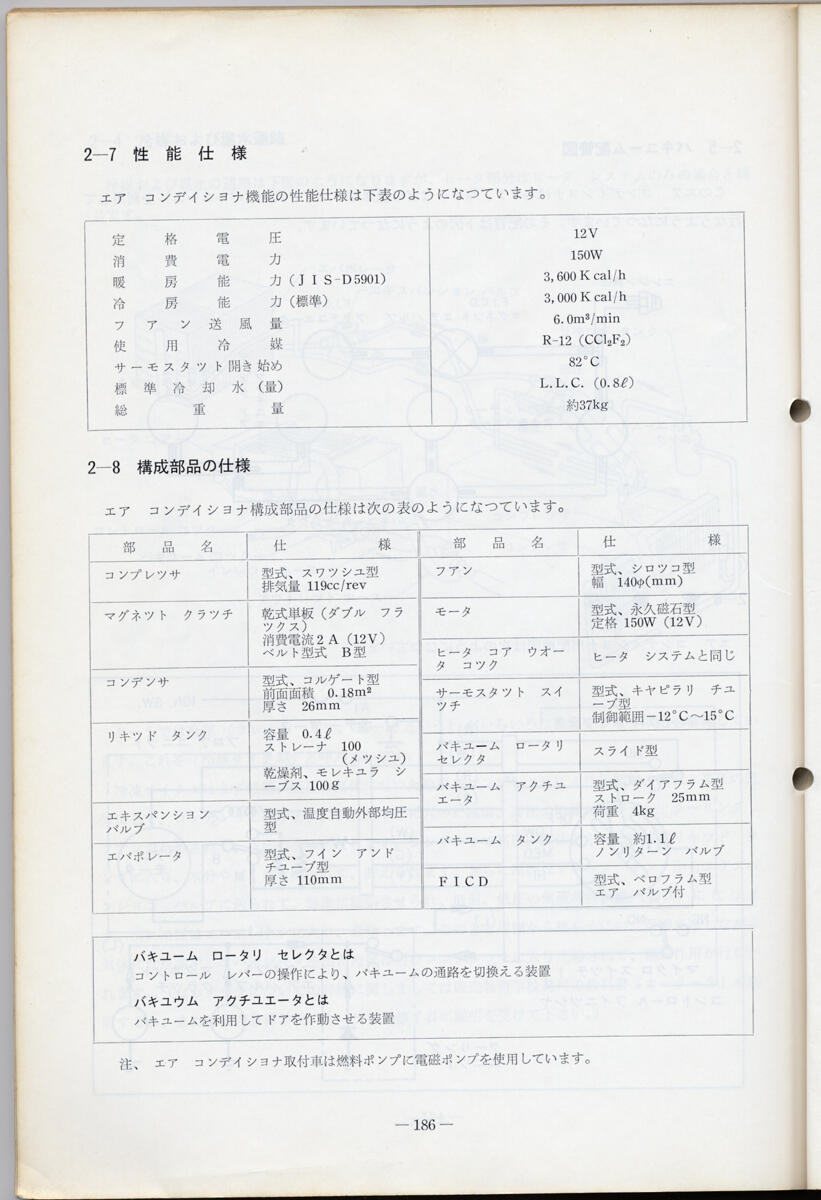
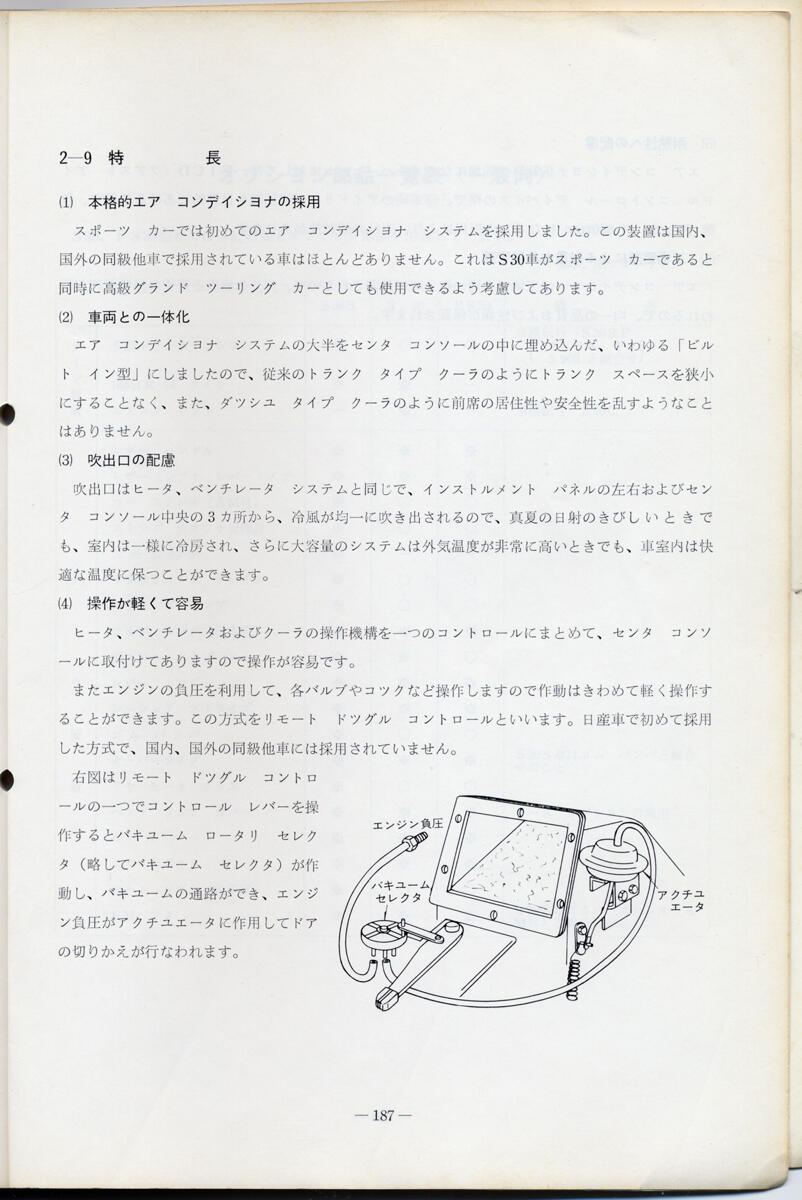
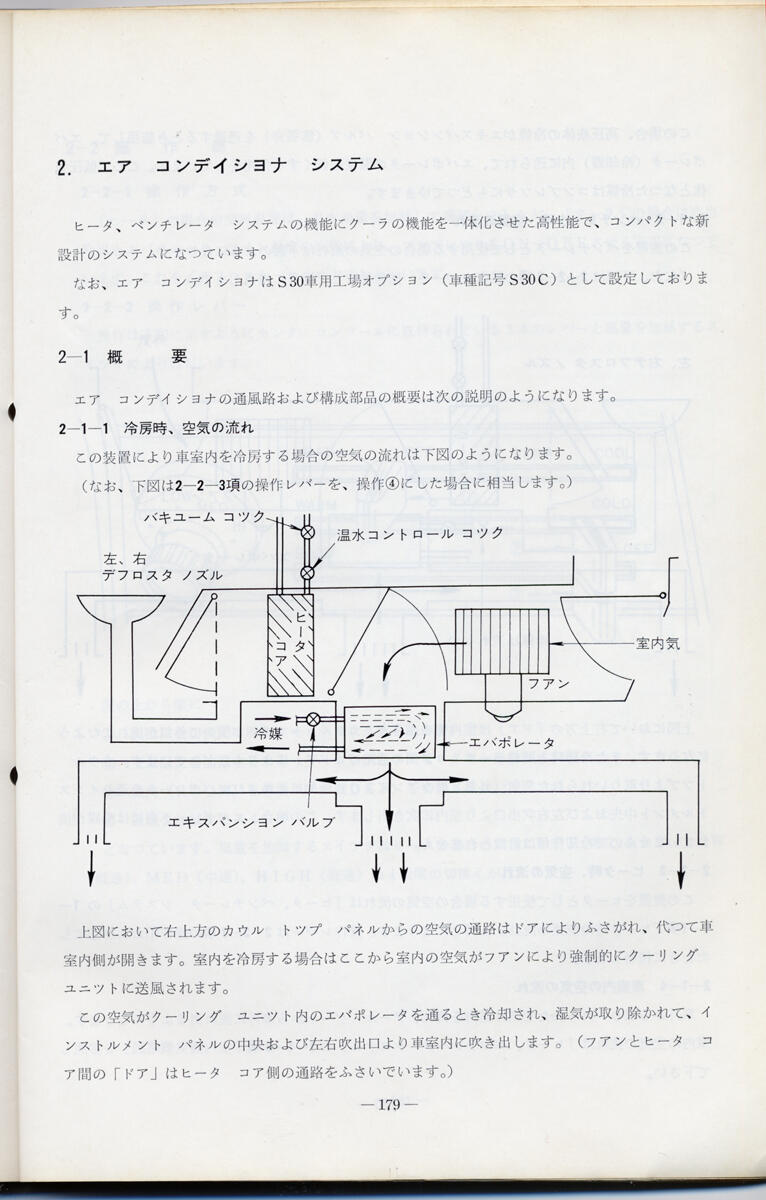
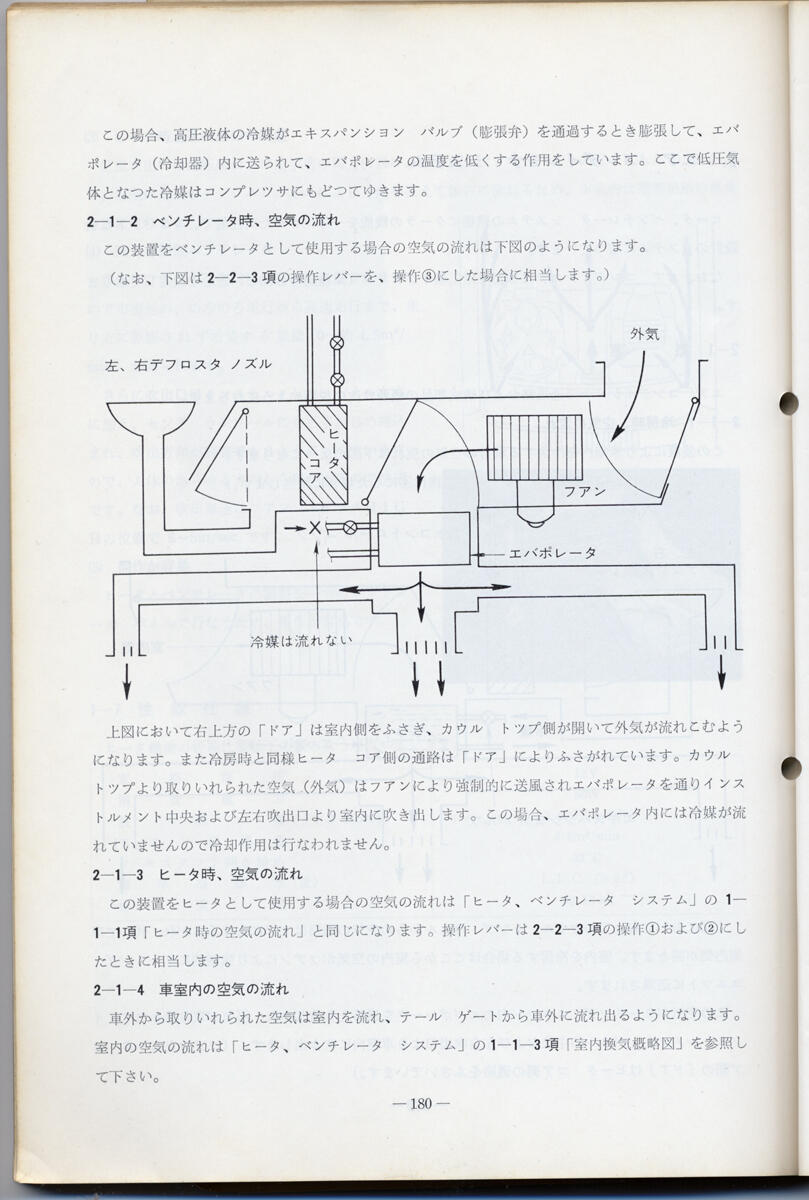
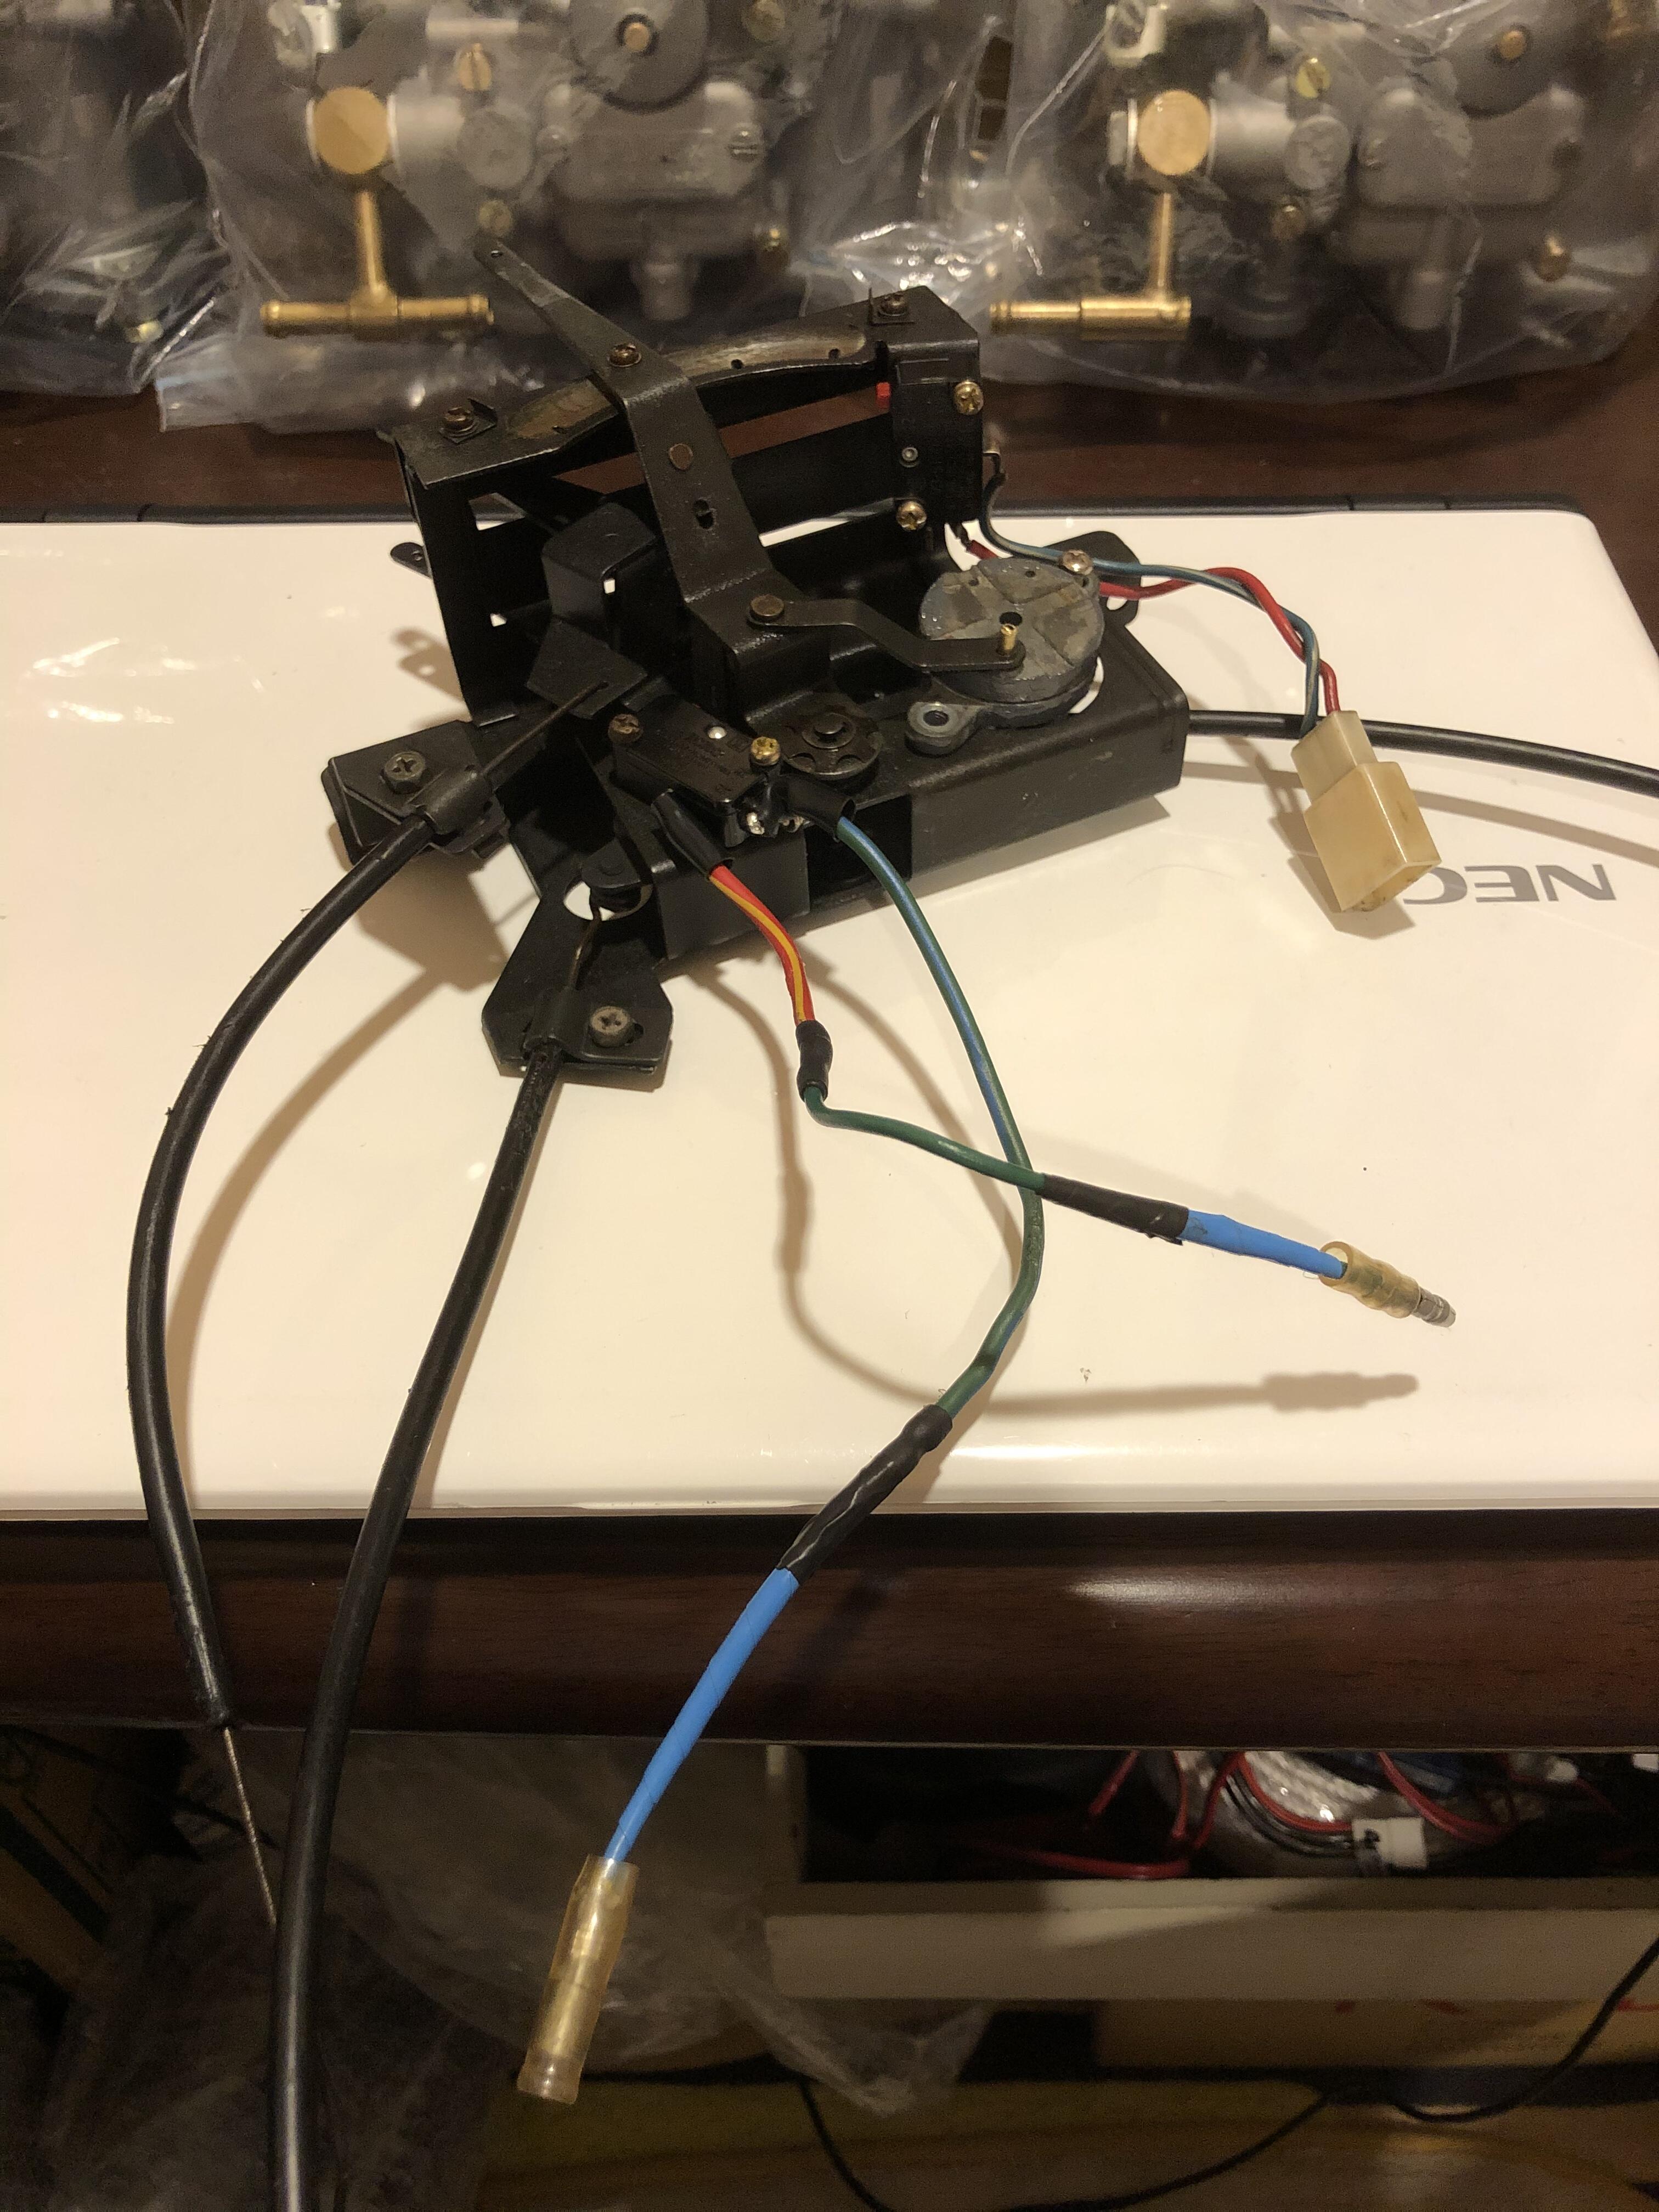
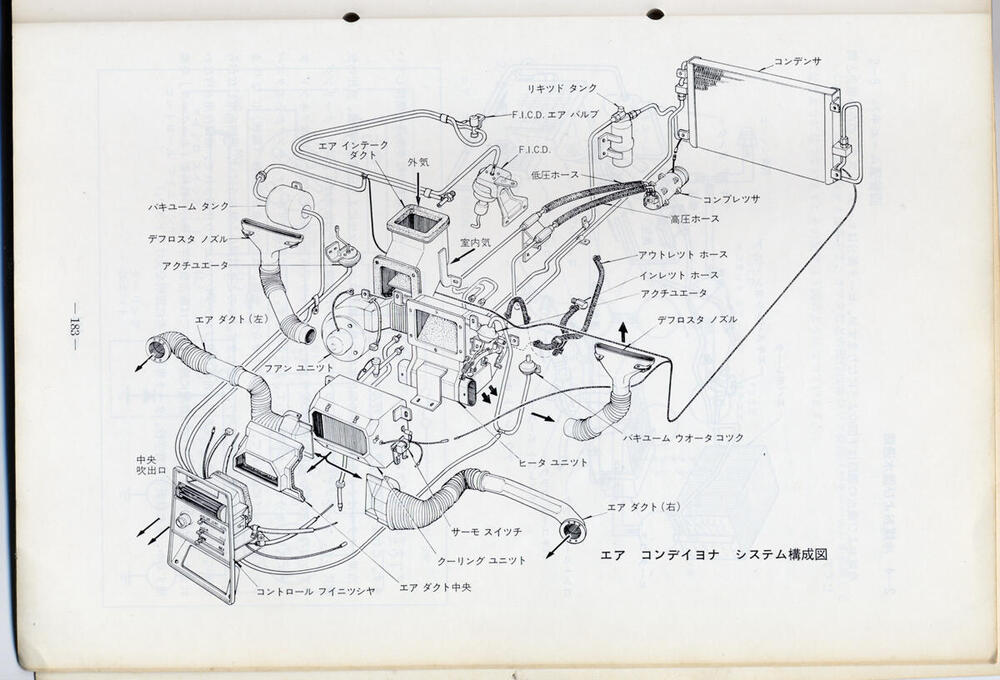
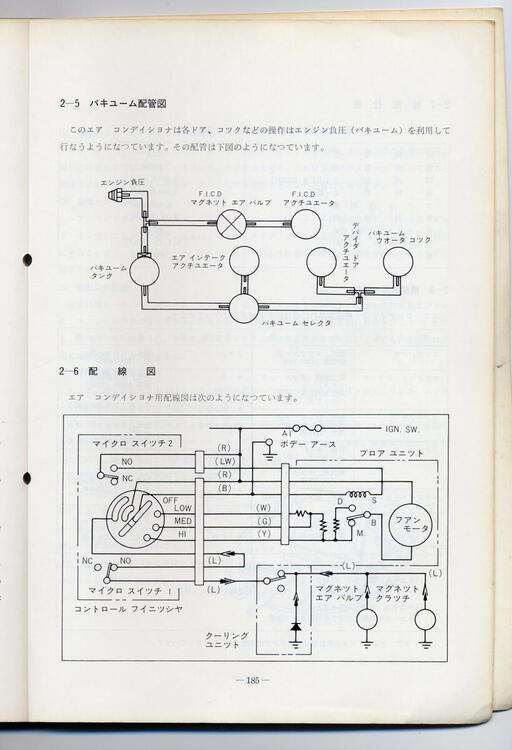
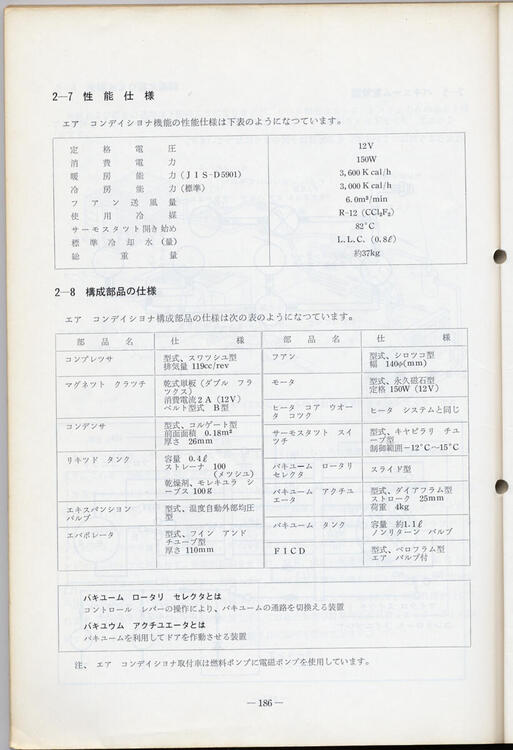
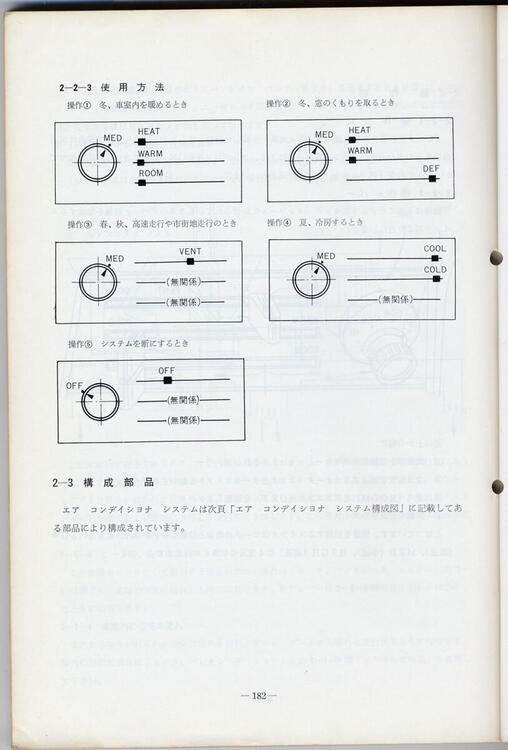
3 pointsNot wishing to steal Kats' thunder here, but I have previously posted scanned pages from the aircon section of the 1969 'Z1' Nissan Service Shuho booklet and perhaps this is a good time to post them again. It seems to me that many early Z enthusiasts do not know that factory aircon was part of the original 270KK/'Maru Z'/S30-series design, even though the tell-tales are there for us to see on every early car - Export or Domestic. I'm surprised more people do not notice them... A true 'Fully Loaded' early Z with all the bells and whistles would have been quite something in late 1969. World Class.

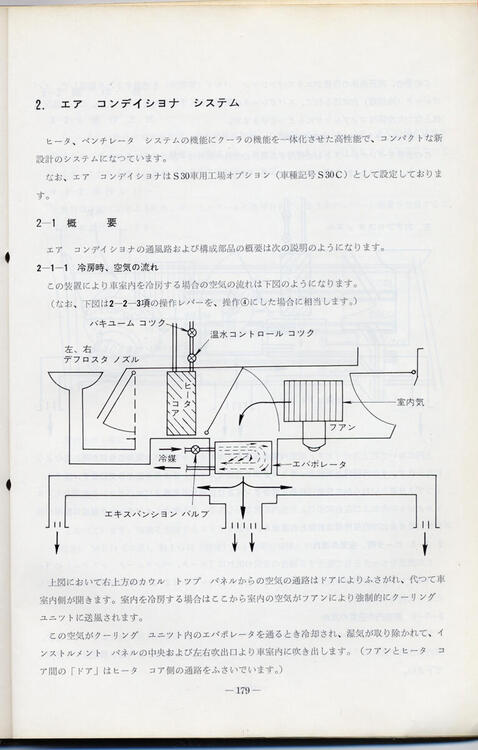
 3 points
 -
3 pointsAs related to me by Uemura san, the pierced dimples 'cheesegrater' deck area is the top half of an important transverse structural (triangular) box section in the bodyshell. The reason for the pierced dimples is simply to aid strength, and to help avoid 'oil canning' should any load be put on the top surface of the deck. Nothing to do with weight saving. The vertical front face has square-pierced pressings for the same reason (strength), with the earliest examples lacking a partial doubler plate over the transmission tunnel which was soon added to beef up that area. The subsequent integral tool box design pretty much did the same job, killing two birds with one stone.3 points
-
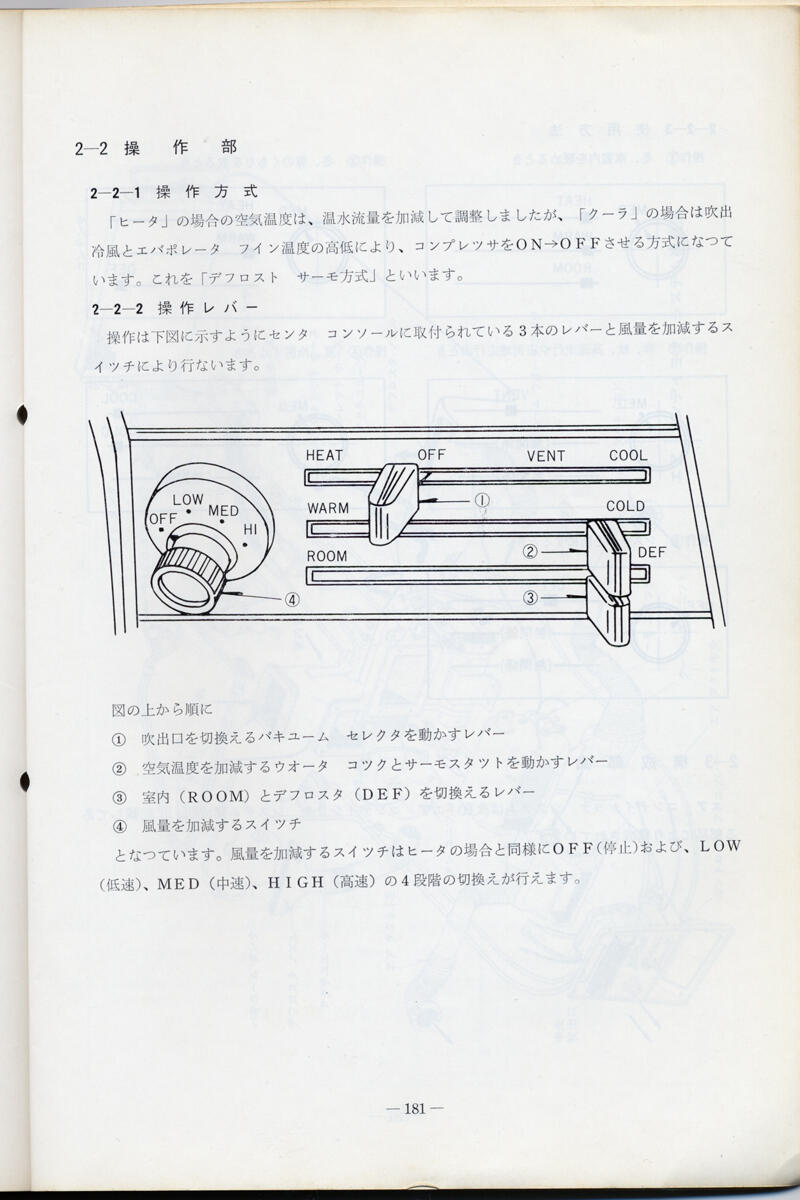
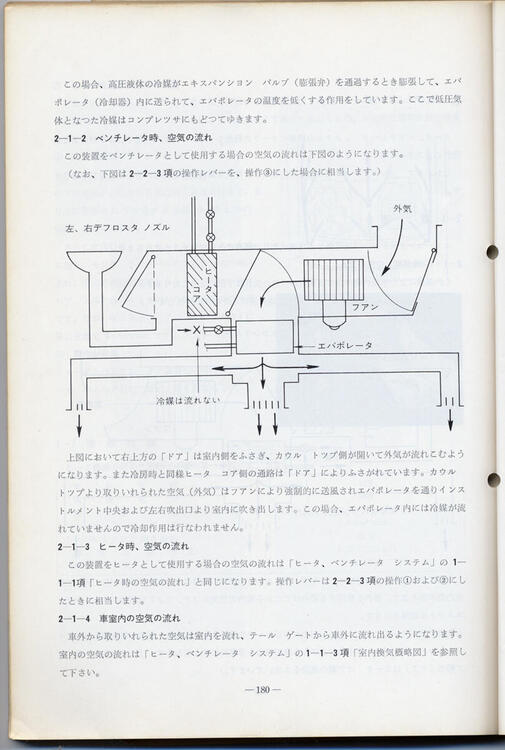
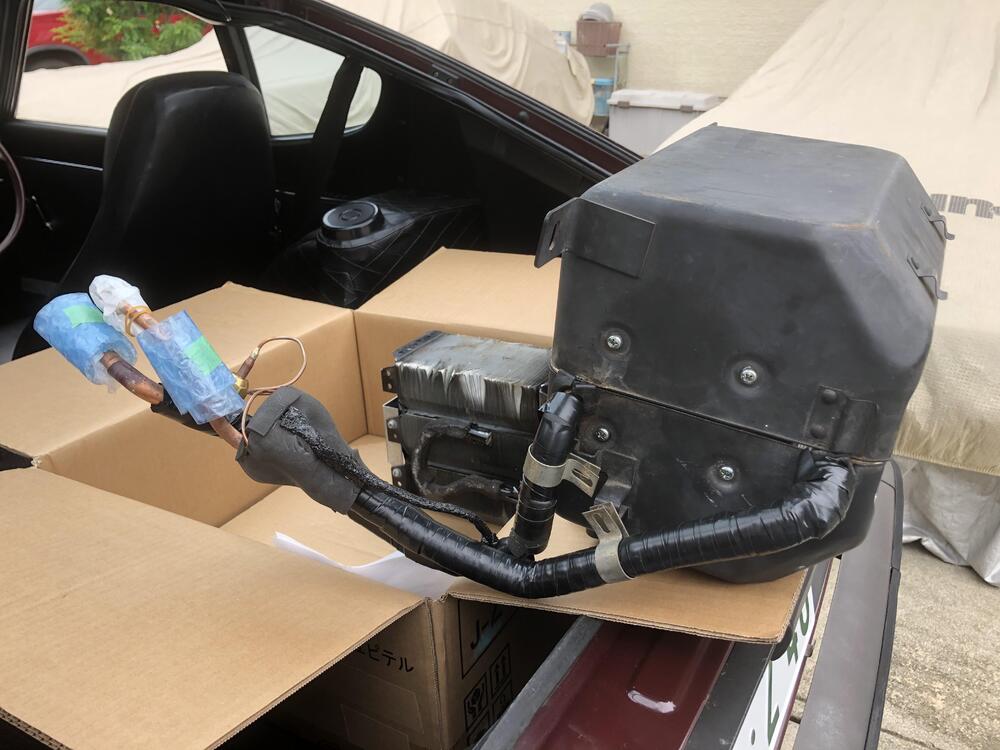
3 pointsI am also thinking about “Nissan genuine air-con “ which was offered only in Fairlady Z series . I assume no Datsun 240Z was offered it from the factory, but look at pieces of the components, I am convinced that Nissan engineers were considering it would have been also available for LHD export market . I have been collecting parts for whole system and mostly done. Some parts are just fit into the existing components and some other parts needs just a little work . That is why our LHD 240Z has some “ not used “ brackets on the heater box , pre-cut on the fire wall insulator pad . So , “PLS30” with a factory in-dash air con system , a combination of sportier performance with comfortable cabin would have made the car to be a gorgeous GT . Surprisingly S20 has a special crank pulley for air-con with a part number E4200 ( Z432 oriented) , but I can’t see other air-con parts specifically made for Z432 . Nissan never officially offered air -con for Z432 . But I have seen some Z432 have the system using from Fairlady ZL system . In 1970 , it could have been around 6000 USD ( based on 1 USD for 360 JPY) , no more bargain price? What do you think? Kats


 3 points
 -
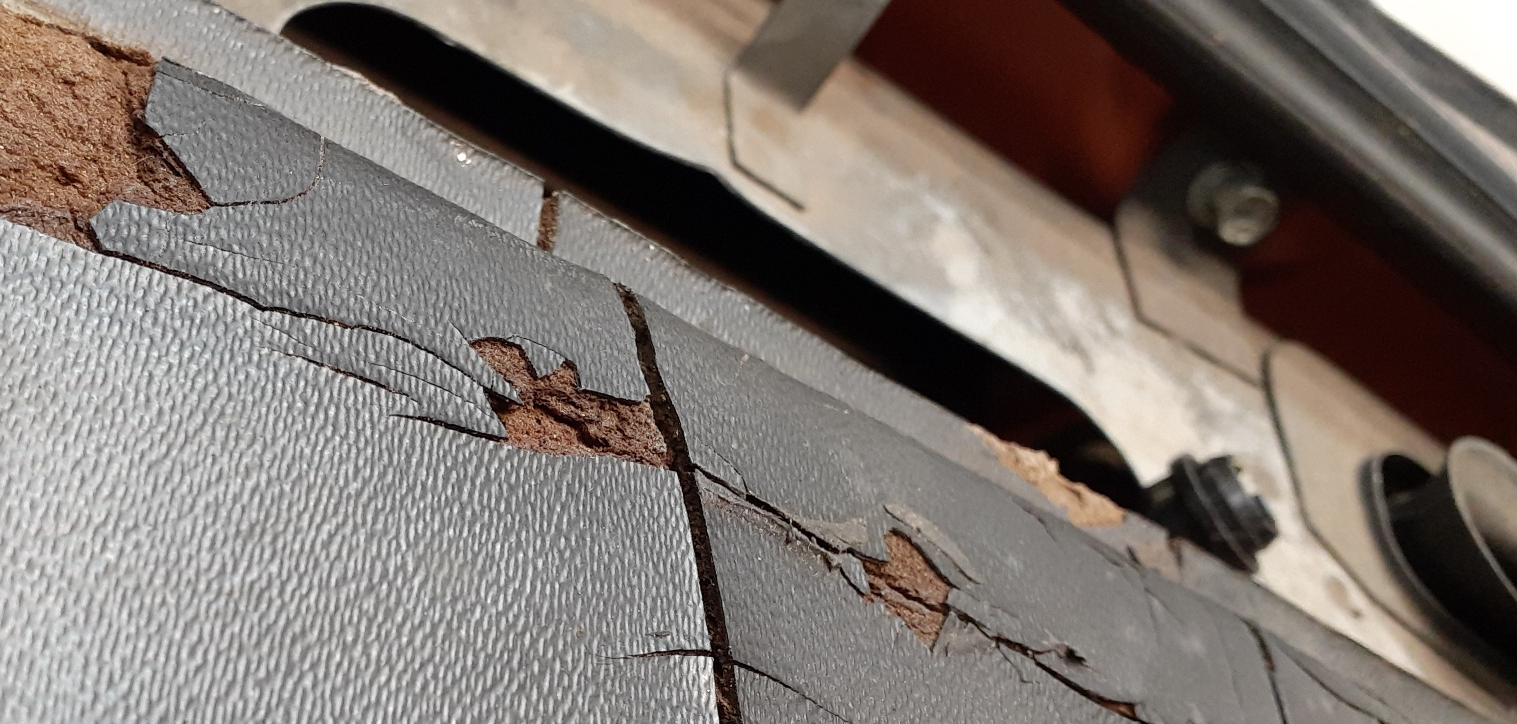
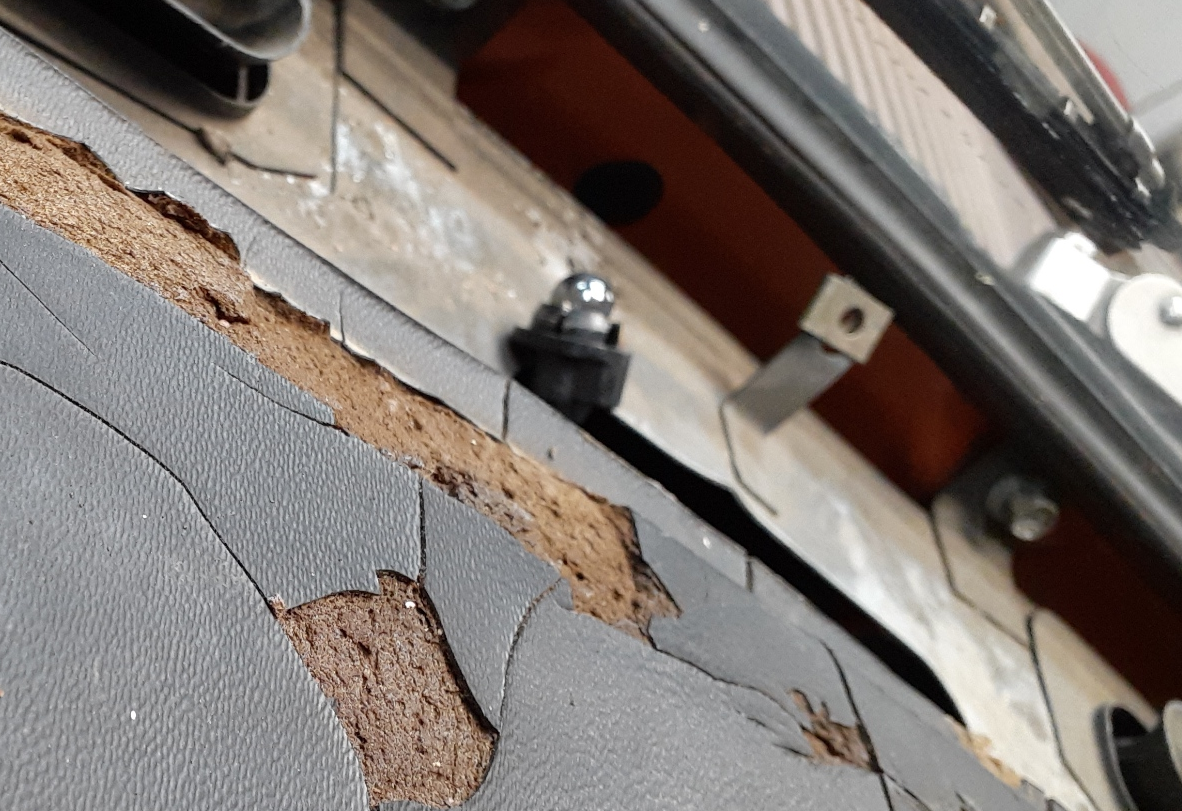
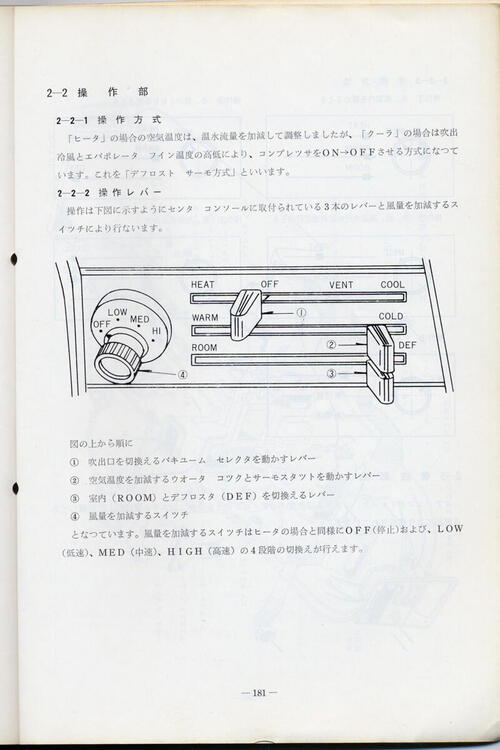
2 pointsYou probably want to put that car on a lift at a reputable garage and check out the underside for damage and rust throughout the entire car. Looks like a lot of bondo on the rear deck lid just to start.2 points
-
2 pointsI don't think it's stealing any thunder. I appreciate you re-posting the pages from the manual. It's always good to compare the photos to the manual, too, since it can be a challenge to track the errata in manuals.2 points
-
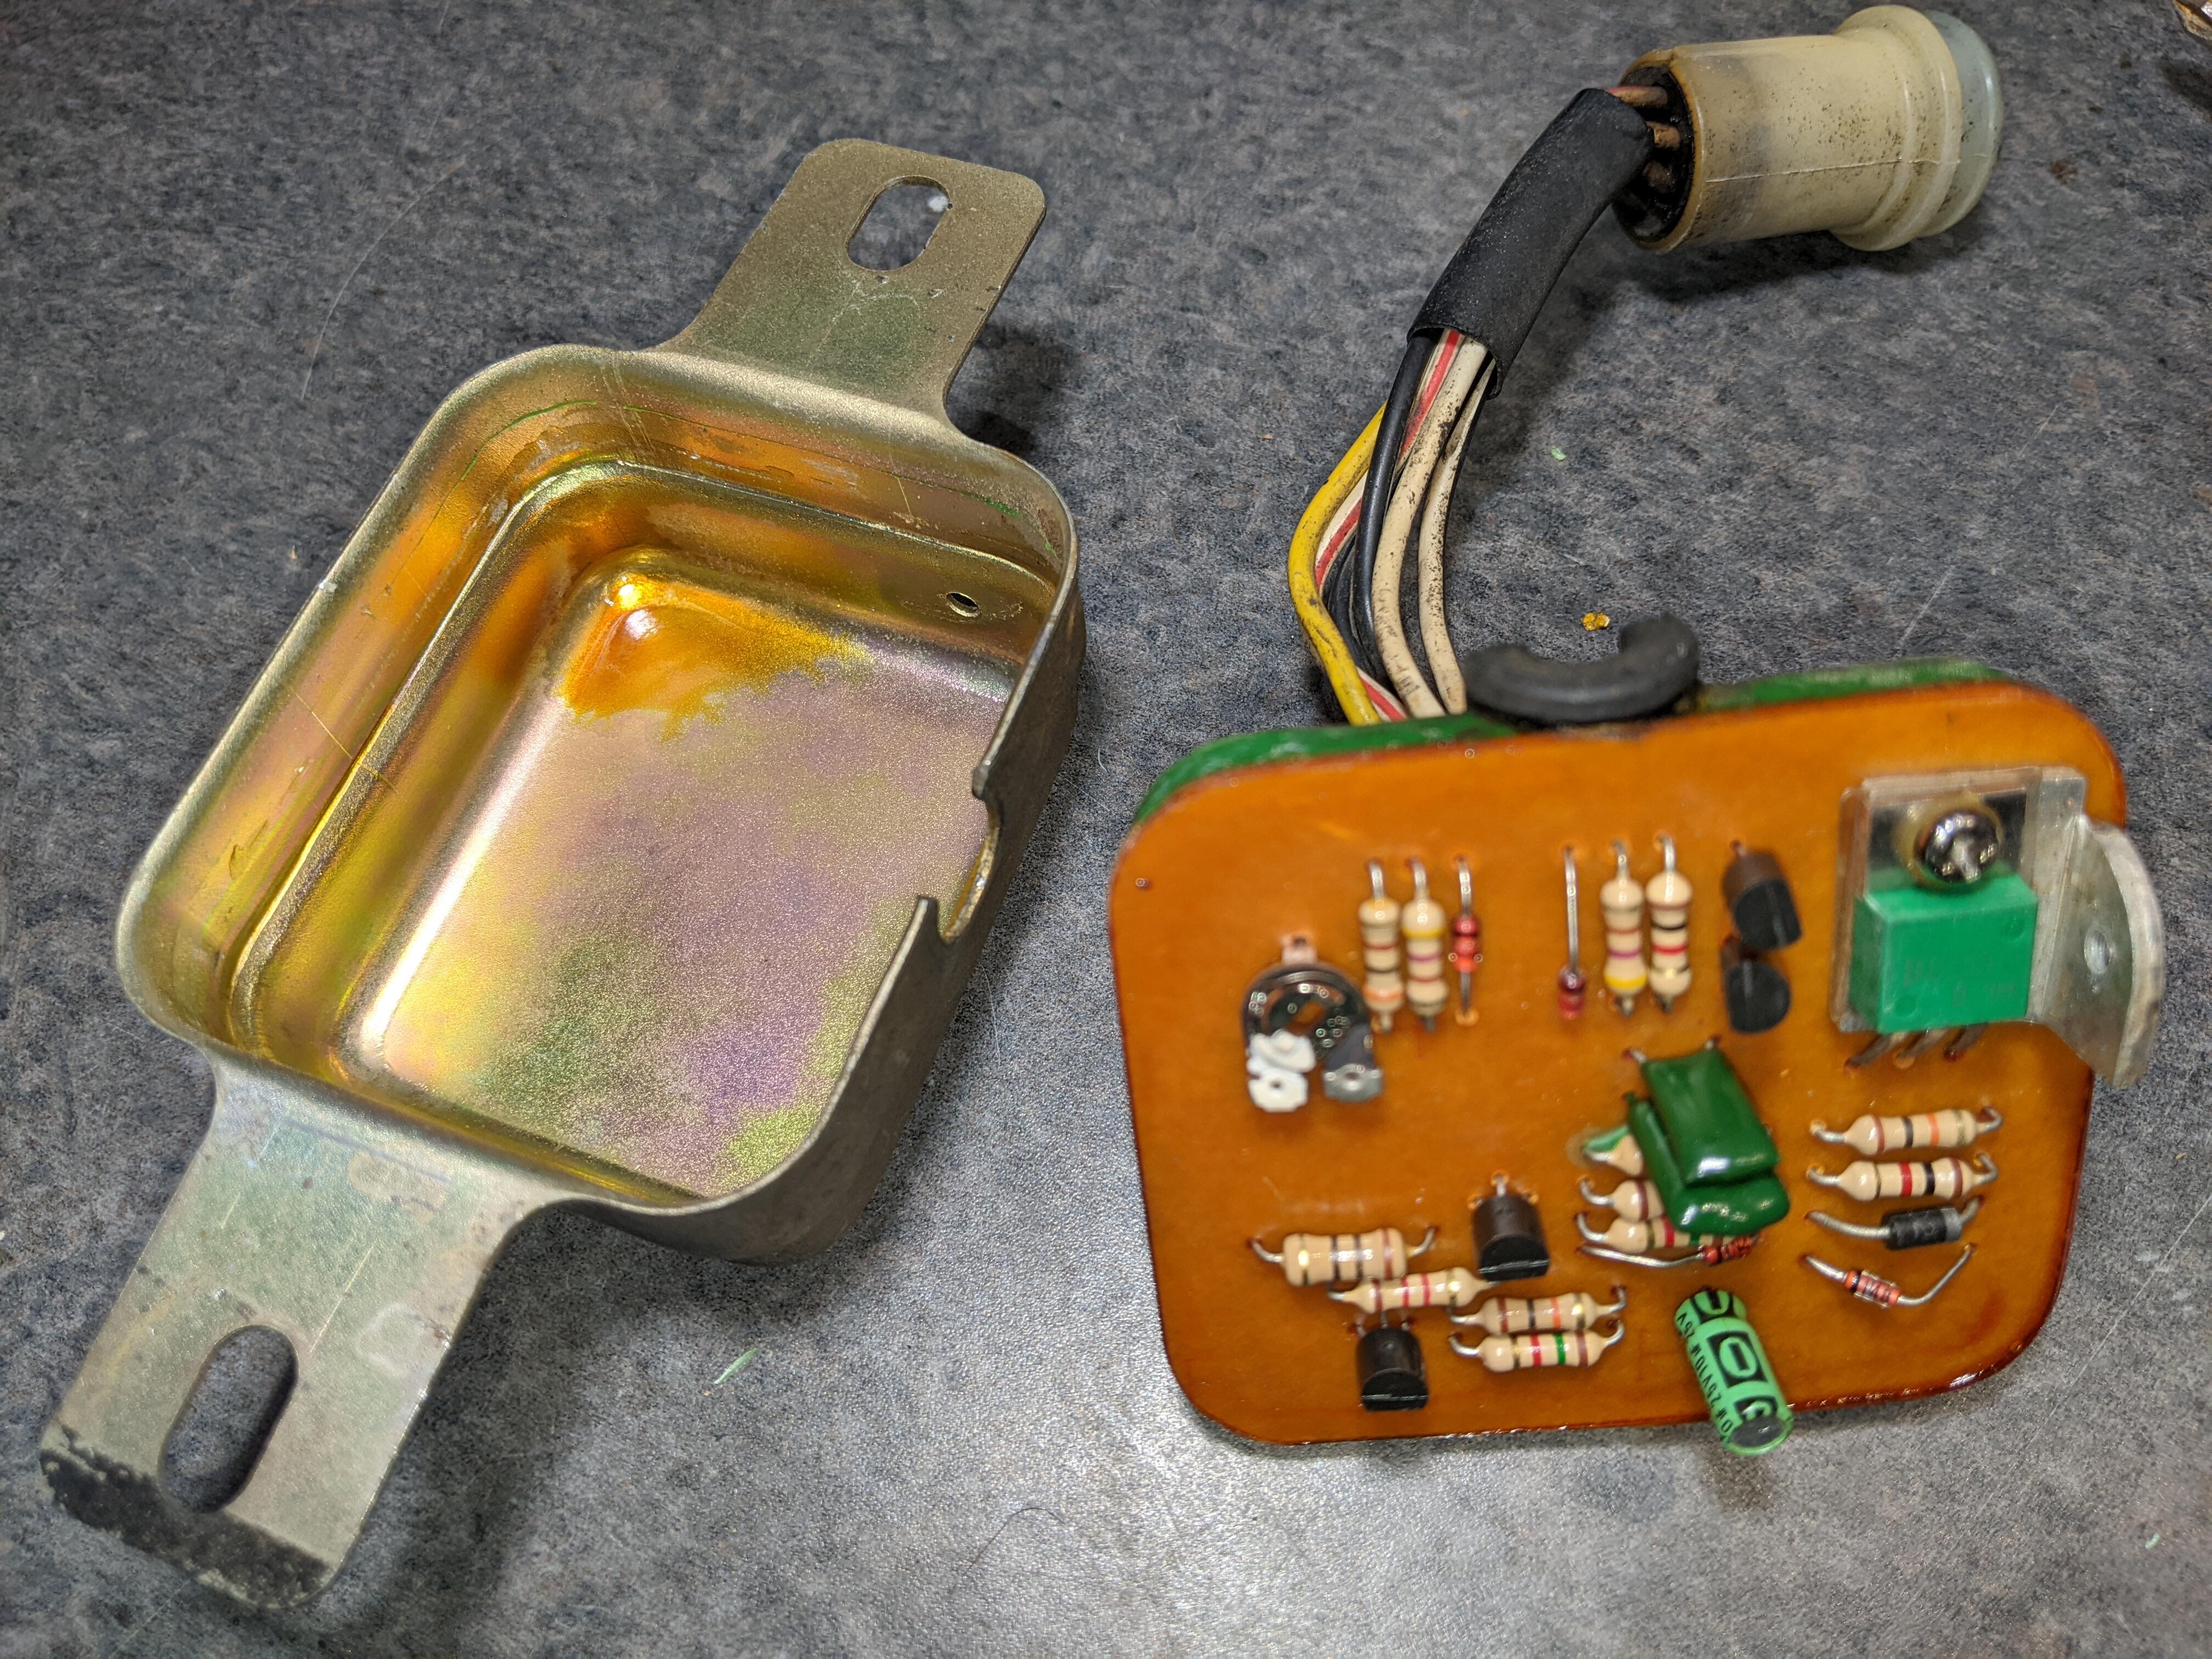
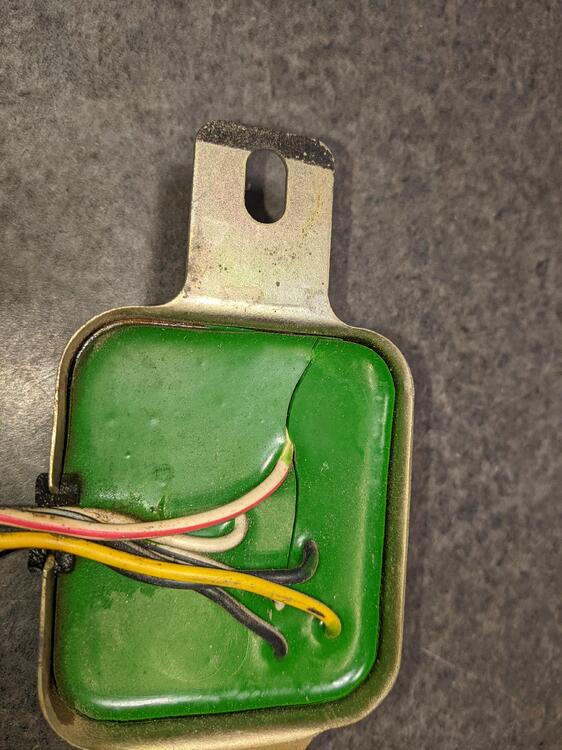
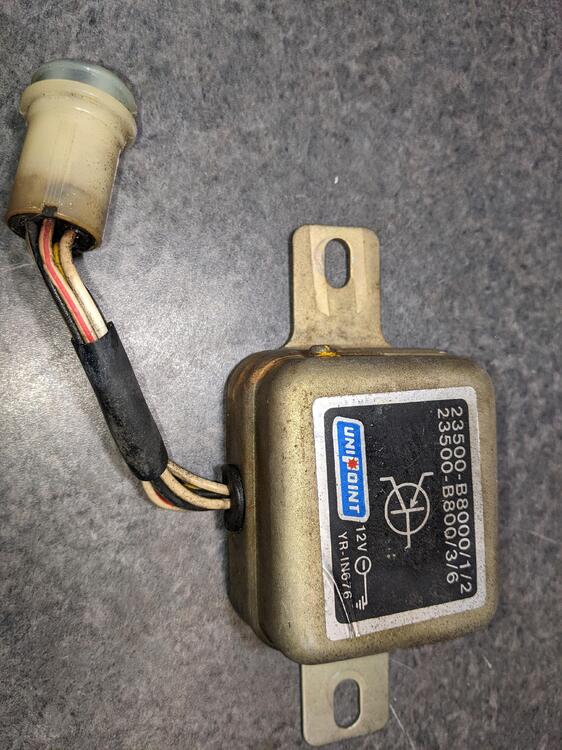
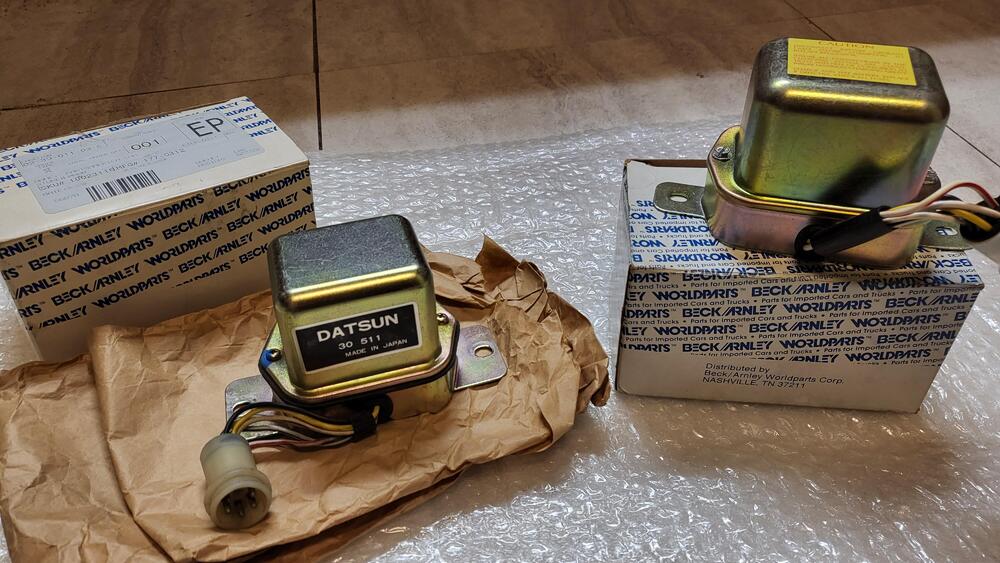
2 pointsOK, ZH, if this is my VR, it looks beautiful and also solid state. Nothing to corrode, or clean? That's one of the simplest PCBs I've ever seen... couple of resistors, couple of capacitors... and perhaps an adjustment screw there at the paint mark? The PCB base was already cracked. And I'll say that pulling the PCB out of its case, after removing the 1 securing screw, felt damaging to the unit or at least its seal. So, I'll install S30Driver's unit and see if the intermittent problem resolves (cheap test @ $60). A few days of driving it and results will be obvious. If spikes persist, I'd seal this thing back up well, including the crack in the front, and reinstall the original. But then, its alternator time? My alternator is likely the newest part on my car (installed in 2011).

 2 points
 -
2 pointsThank you again @SteveJ. I ordered up the LED lights and wow what a difference this makes. I no longer have the flickering issue with my non-blinking lights and I bet my wires are much happier with the lower amp draw.2 points
-
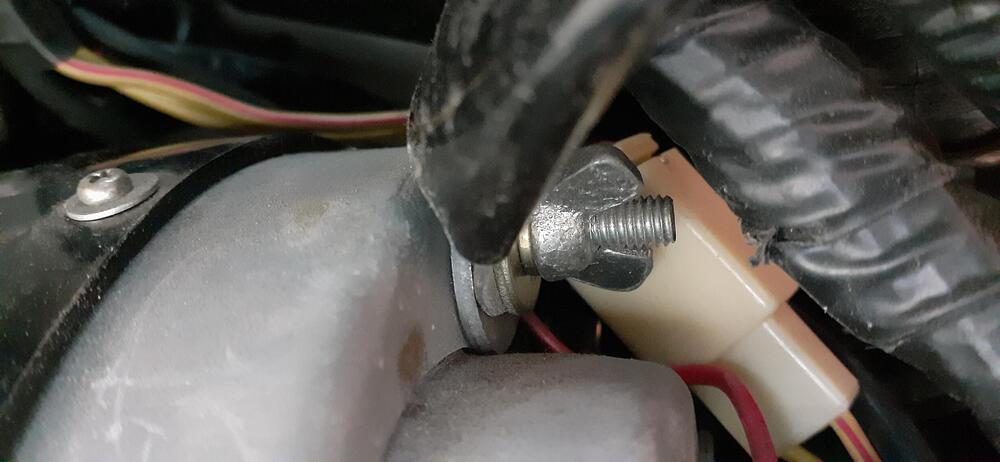
2 pointsThank you for the photos, @kats. Matsuosan talked about the AC in the 240Z when he was at ZCON in 2018. I can't remember if it was during his presentation or when I was helping him with making the slides for it. He said he received push-back from the engineers because he wanted the evaporator to fit behind the center stack. I don't think I ever saw the eventual solution. If you have a chance, could you post more photos of the AC components?2 points
-
2 points
-
1 pointSince the middle of May, I started getting the garage organized. It had not been a real priority in years, and it showed. Working from home made it easier to spend time in the evenings, and the portable air conditioning unit made it a lot more tolerable as temperatures got up to summer norms. Some weekends were spent working on the garage. Some were spent going to car meets (and other car activities), and some were spent working on other people's cars. May turned into June, and June turned into July. Finally the garage was in a condition where I could unbury the 73. I bought the 73 in late June 1993. I wanted to learn how to work on cars. Well, I got a lot of lessons the hard way, and the car paid for it. The car did get some use in the late 90s when it was pressed into service while my daily driver at the time was getting a new head gasket, but eventually I had to move to a house in 2002 that had a one-car garage, frequently trapping the car. A few years later, we moved into a house with 3 bays, but then I bought the 260Z. The 260Z was in pretty good shape. It does look better than the 73, and I put some money and effort into some of its problem areas. Then it was time for the 2010 Mitty. Datsun was featured, with Peter Brock as the Grand Marshal and John Morton racing a spec Miata in BRE livery. The 260Z and 240Z started giving me trouble early in the week, and both continued through the Mitty weekend. The 73 was in worse shape as it stopped running. I didn't know it at the time, but the Crane ignition gave up the ghost after about 13 years of providing a good spark. Anyway, the 260Z was running better, and it received most of the attention and most of the hobby car budget. The 240Z wasn't completely ignored. It got a ZX distributor swap, some stainless steel bumpers, and new seat covers (though the seats were not reassembled) among other things, but it sat...and sat...and sat. Then it got worse. I broke the temperature sender in the 260Z. I stole the one from the 240Z, and replaced it with the broken unit. The driver side door lock in the 260Z broke in 2018. I stole the door lock from the 240Z, and the door stayed stripped down. The last theft was taking off the ZX distributor last year to put it on the 260Z to replace a distributor with a wobbly shaft. The good news is that the parts theft ended there.1 point
-
1 pointAs the title states, I'm trying to confirm if a 77 280 front bumper is a bolt-on replacement for a 76 280. Jai (Redwing) needs a front bumper, ckurtz2 has one that needs a home. Jai has seen pics of it, wants to go ahead with the deal, but her insurance co. wants to be sure it's an easy (bolt-on) swap with no modifications. Any info on the subject would be appreciated. Thanks. Mark1 point
-
1 pointYes, mine are missing too. In the case of early cars, I think 70/71, the headlight cases are FRP. So it's not actually metal to metal on them, but all should have them.
 1 point
 -
1 pointI think the shock mounts are completely different. Here's the image for the 75/76 Here's the image for the 77/78 I would doubt they interchange easily.1 point
-
1 pointAnd I was just going through the thread on my 73 and came across this photo. I think @Pat Carr's photo is hard to beat since he has owned the car since 79.
 1 point
 -
1 pointI put an ammeter on the 240Z after I finished with my gauge bulbs last night. It was 2.5A with just the running lights and 6A with the headlights. Now I need to put lower amperage fuses in the fuse box to better protect the wiring.1 point
-
At least take the cover off to see how corroded things are inside. Pleeeeeaaassse.1 point
-
1 point
-
I have 2 new, never used ones available. The one on the right if I remember, came from ZcarDepot : $45 plus shipping The one on the left nos : $60 plus shipping (only because it says Datsun on it ... lol)
 1 point
 -
1 pointS20 - wow that would be a great project- but certainly manageable. A long time ago I *briefly* considered converting a clapped out KPGC10 from RHD to LHD, but I quickly came to my senses. An S30 conversion would be much more straightforward. Assuming you had all the prerequisite pieces- engine, mount, bellhousing, etc - there is not too much to fabricate. Custom Manifold, probably. Maybe a little electrical redesign. What else? (edit: I'm just talking making an HLS30 with an S20 powerplant, of course. If the goal was an LHD Z432-spec, then there are a few more things to do)1 point
-
maybe this is common knowledge but if not, I found the part 21200-ET01A is a perfect fit (just remove the rubber gasket it comes with) 82c T stat for use in then L28. this one was in stock at the local dealership if you are in a hurry. it looks like 21200-P7901 is the one you find when searching1 point
-
1 pointBlue-on-blue early PLS30U phantom? That sounds like a fun project!1 point
-
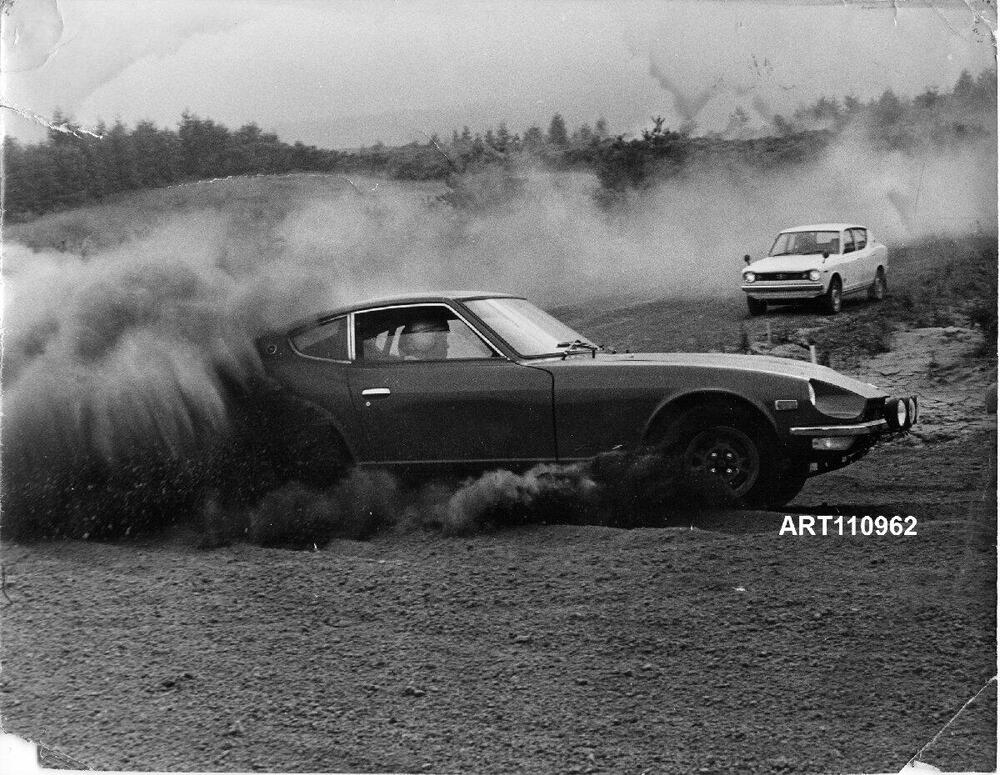
1 pointGreat photos! As far as I am aware, 8D-420 was never given a road registration and was purely used as a Works rally team test car in Japan, and mostly on Nissan's off-road/rally test ground near Mount Asama. One of its interesting features was a full six point roll bar. Apparently the front bars dropping down from over the doors and following the A pillars were felt to be too intrusive (certainly for occupant legroom and comfort, but possibly impairing vision too) and were dropped for the following cars, so they only used the main hoop and two vertical drops. None of the early lightweight rally 'test' cars survived, to my knowledge. Some parts were recycled back into the system at Oppama, with 'shells 'written off' the ledgers and broken up to keep the accountants happy. Nothing would make me happier than the discovery of another long-thought-lost example, but the possibility seems very remote. One from the collection: Testing on the Mount Asama course.
 1 point
 -
1 pointI would love to put an S20 engine in my Safari Gold 240z. But I'm afraid of what it would cost to make it happen. I've seen long blocks advertised for as much as $80k AUD. That's before all the ancillaries and supporting parts required.1 point
-
1 point