


Leaderboard


 Subscriber
Popular Content
Showing content with the highest reputation on 10/09/2019 in all areas
-
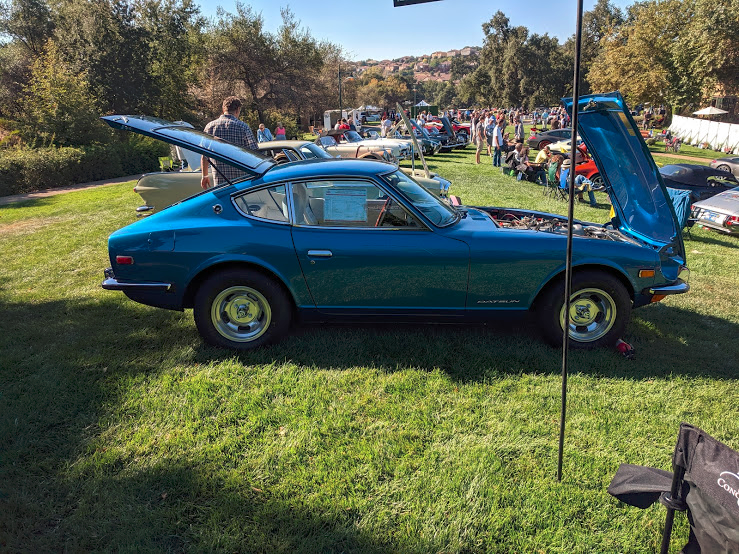
2 pointsOK, tried my hand at my first Concours (not counting ZCON). Entered the Neillo Concours at the Serano country club in El Dorado Hills, CA this last Sunday. Drove my '73 240Z (restored my Motorman7) up from my home in the East Bay suburbs of San Francisco, about 100 miles one way, mostly on Interstate 80. I was in the Foreign Sports Cars, 1963 to 1979, Under $5,000 class. There were only 2 cars in the category, mine and a Volvo 1800. No MGs or Triumphs, which surprised me. All the Concours in N. California are judges by the SCCA San Francisco Region, which does not provide judging sheets ever. So other than what feedback you can get from the judges when they are at your car, you never get any information of how or why they scored your car. I do know that they subtracted points for one of my headlights (original Koitos) that did not have a working low beam, probably took off points for a pinhole leak they noticed on the radiator, and a loose Datsun emblem on the hood. So I came in 2nd to a '66 Volvo 1800 from a fellow who had survived the Paradise CA fire last year, and had photos showing the Volvo on a trailer being towed through clouds of orange smoke. (His very nice wife told us of the 5 hour traffic jam trying to get out of Paradise with the fire on their heels!) He also had photos of his burned out house and his 5 other destroyed classic cars there. Sort of hard to beat that for tie breaker points... I'm guessing the judges did not know anymore about Volvos than Datsuns, and can only judge on paint quality, cleanliness, obvious problems, the light and safety checks. Originality is likely hard to know for judges not familiar with a brand or model. So I got 2nd place. Out of 200 cars (heavy with Bentleys, Porches, antique Rolls Royces etc) mine was the only Japanese car there. When getting my 2nd place trophy at the reviewing stand (on foot, only first place winners got to drive past) they said something about hoping for more Japanese "Domestic" cars at their events. There were some cheers from the audience in the reviewing stands when they announced a Datsun getting a trophy. So there is that. (no cheers for the Volvo...:-) Made me wish they had a Peoples Choice award! This was the last Concours of the year in N. California, so I think I'll keep trying for a while. And I'm thinking of volunteering to be a SCCA judge and see if we can get more involvement with the Japanese car community. "If you can't beat em, join 'em"
 2 points
 -
1 pointThe purpose of this thread is to discuss Z-cars at Concours events. I know that individual Concours events have been mentioned here on classiczcars.com, but I was hoping to set up a thread that might encompass all of them so that the subject is not so scattered. The goal is to have a Concours thread where people could offer tips, voice their thoughts and opinions, promote local Concours events, and of course show some awesome pictures. First off, entering your Z car in a Concours show is really a mixed bag for us Z owners. I remember excitedly talking with bobc about this subject the first time I was accepted into a Concours show. With sage advice, he told me not to get too excited about it. He told me, “most Concours judges have no idea what to look for in a Japanese vehicle. If you tell the judges that the Z cars came from Japan with blacked out engine bays and V-8s, they would believe youâ€. Of course I dismissed this comment. Lo and behold, at my second Concours show, the winning Z car entry had blacked out engine bay, a lot of chromed engine parts, and was not even painted a standard Z car color. Oh well, I was warned:ermm:. I still enter the Concours events but try not to get my hopes up too high. The other side of this coin is that Concours events can be quite a wonderful event for the Z owner. At one local Concours event, I was one of the few individuals personally interviewed at the event (broadcast throughout the show on the golf course), I received a car identification placard (brushed aluminum) that is nicer than just about any trophy I have received, and the people that I met and spoke with were great. Not to mention an exceptional goody bag, first class photos and web PR, parking on the fairway with an ocean view, and car positioned near the show entrance so that virtually everyone in attendance would walk by and see the car. I thought I had died and gone to car show heaven:bunny:. Doubt I will ever be in a better show than that. Along with the great shows and bad shows, there is one issue that us Z-car owners continue face with car events. This issue seems to be….…should I say it…..discrimination. Take a look at the judged categories for most major Car shows. Of course you have a wide array of US car categories; Ford, Chevy, muscle cars, etc. There is typically a European car category or specifically German and Italian, or Jaguar, Porsche and Ferrari . But do you find Asian or Japanese car categories? Rarely. It’s almost as if Nissan and Toyota don’t exist. I find that very odd, and they have been selling cars for quite some time. Anyway, not sure if we will ever get a clear answer as to why Asian cars are not in the mix, but definitely feeling a little discrimination. Along this line, I will be displaying my Z in the upcoming La Jolla Concours. The only category that my car fit in was the “Preservation†category. Oh well, whatever it takes. Anyway, just thought I’d set this up and see where it goes. Rich1 point
-
1 point
-
With respect, I think the answer - for your 1971 production HLS30U model - was clearly given by Kats further up the thread. The highest probability is that your car did NOT come with one as-delivered from the factory, but could accommodate the fitting of one if that's what you want to do.1 point
-
1 pointI just had mine done at Southern Bumper in College Park, GA for $1090.00...bumpers and guards. Mine are 1973...where do I get the over rider rubbers....? Every place I see says theirs are for 70 - 72 only. BTW... I sent 4 rear bumper ends and asked them to pick the best pair for replating. They did all 4, so I have a set if anyone needs them.1 point
-
1 point
-
I was really thinking hard about bidding on the car towards the end of the auction since it's only 5 hours south on I-25 of where I live here in Colorado. But as soon as I got ready to place the $1,100.00 bid, I just knew that my wife would kill me since I already have 4 other 240Z project cars.1 point
-
Thanks Alan for correcting me , I have learned a new thing . I am curious about Australia cars in the same time period . What made Nissan decide some destinations have the pan and others don’t . Doesn’t seem there was a serious issue to do that . Cost matter ? Or weight saving? Kats1 point
-
1 pointYour fork looks right. Get A measurement. Diseazd gave the simple straight-up picture and I linked a bunch of threads about it. 92 mm is the key. No need to guess or put things back together without knowing. Put the stack together and measure from the surface the fork touches to the bottom of the pressure plate.1 point
-
1 point72/240z = 39 5/8th" this car has had a minor front end collision, 77/280z = 39 1/4" no front end damage that I can see.1 pointThe turn signals say 240, but those are clearly 280 bumpers!!1 point1 pointBELOW: A picture from Amelia - Race Cars 1963 to 1972 BELOW: One of my favorite pictures - a fellow 240Z Enthusiast {RIGHT} helping me re-polish the Mag.'s - after the car was put on the show field in a very early morning fog. The moisture in the air just flashes the polished Mag's to a dull silver. THANKS WILL!! BTW - we didn't see anyone pitching it to help the poor guy that brought that Ferrari... Z Car People are great! BELOW: Peter Brock and I spent some time on the Beach at Amelia Island - This is just one of my personal favorites... I was telling Mr. Brock to hold his stomach in - like this! We were laughing so hard a friend had to take the picture three times. The wind was blowing about 30 knots that day as well! BELOW: A picture from the Mirror Lake Concours d'Elegance, in Lakeland, Florida. Note the Group 44 cars down front. The TR-6 is the car that Paul Newman drove.1 point1 pointYou don't say whether it is BOTH sides of the hood or just one. If it is both sides, you need to move both hinges downwards in order to get the hood to "level" out with regards to the sugar scoops. Look at the hinge closely and you'll note that there are 3 screws for each of the hinges. These screws provide not only front to back adjustment but also up and down, and to a limited degree side to side (although this is not a parallel side to side adjustment) You've already done some adjustment so we need to back track a bit. First of all look at the general alignment of the hood, and here I'm referencing how the hood fits in the opening between the fenders and to the cowl. Don't look at flush with, but rather evenly spaced on each of the 3 sides. This is your first adjustment that needs to be made. Is the spacing to either side of the hood even with the other side? Is the space even from the top of the hood (closest to the windshield) to the bottom (by the sugar scoops)? How about at the cowl, is the space the same (approximately) as the side space? How does the bottom of the hood line up, as seen from the top, with the sugar scoops? If all those are "ok", and here is a subjective term, because if one side is at 3/8" and the other is 7/16" then it's up to you how anal you want to be as far as aligning it. Then again if one side is 1/2" and the other is barely 1/8", then it isn't in the opening properly and you could possibly have problems. Also with the overall fit. It could be that at the top you have 7/16" on both sides of the top of the hood and on both bottom sides you have 5/16", meaning that the opening tapers down by an 1/8". You can get in there and play with the fender mount, and do a LOT of work, but in reality it's going to be frustrating to get it to align PERFECTLY. Adjustment to the space between the hood and cowl is done by the back and forward placement of the hinges. Side to side is more complex and can involve spacers on one side or the other of the hinge bracket at the hood, or in extreme situations the hinge mount on the side fender. Uneven spacing along the sides of the hood generally shows up on BOTH sides of the hood at the same time, with one side showing the opposite of the other. i.e. the top is narrow on the right side while being too wide on the left top, AND the spacing is too wide on the bottom right and too narrow on the bottom left. If you have spacing differences on one side but NOT the other, then it's more than likely the fender on the uneven side as opposed to the hood. The main key here, the spacing around the hood's 3 sides (cowl and two fenders) should be approximately even. If it is, then you're properly aligned within the opening. Now we can move on to FLUSH. Flush involves looking at the fender and the hood surfaces and how they relate to one another. Let me forewarn you that you're not going to get them to line up exactly. If you'll note the fender has a slope TOWARDS the engine compartment while the hood has a slope towards the fender. What you need to do is level the hood with regards to the fender in such a manner as to not make it look like a STEP. Before you can align the hood to the fender and sugar scoop, make sure the sugar scoop outline is in fact aligned to the fender. I have seen Z's where the sugar scoop is actually out of line with regards to the fender, i.e. the scoops top edge "dives" down from the top edge of the fender. This is going to make it next to impossible to align the front (or bottom) of the hood to the sugar scoops, since it's top edge isn't in two separate pieces and it should be what you align your scoops to, and not the other way around. However, if the scoops are properly mounted then the generally profile of the fender / scoop should match the profile of the hood. Ok, presuming no problems with scoop to fender. If at the top of the hood (by the cowl) it is flush with the cowl and the top of the fenders and the inspection panels, then you're fine. If not, check the hood latch pin first. This is the MAIN component that will pull down the hood to the level it needs to be. Take note that the rubber bumper stops on the side of the cowl do in fact push on the hood, and you need to adjust them as well. What I do is to first lower the bump stops below the level I'm working to. Then using the hood latch I adjust the hood until it rides even with the cowl and the fenders, or the "best" fit I can. Then I adjust the bump stops UP to support the hood and not push up on the corners. Then moving down the hood. The edges should line up with the fenders all the way down to the sugar scoops. Your post says that at the front is where you're having a problem. Again presuming both sides. Open the hood, look at the hinge and note that you can adjust it front to back as mentioned before, or within a given range up and down as well as how and where it pivots. Sometimes the adjustment to get it lined up in front by the sugar scoops involves bringing the front edge of both hinges down a bit, while leaving the back edge of the hinges at the same height. This essentially shifts the pivot point (where the scissors cross) downwards and hence lowers just the front part of the hood while generally NOT moving the back edge of the hood down. (it will change it's angle slightly, but not a lot, as a lot is NOT required). You'll have to do both hinges evenly in order to align both sugarscoops. Loosen the back bolt just enough that it will alow the hinge bracket to shift, but not move freely. Then loosen the front bolts. Be careful here, it might involve closing the hood, reaching up and behind the grill in order to get to the hinge mounting bolts (that is NOT the ones that mount the hood to the hinge, but rather the ones that mount the hinge to the car). loosen them, carefully open the hood, push down gently until you can feel or see the front edge of the hinge shift, then tighten everything back up and check for fit. You'll do this several times until it finally does what you need / want it to. Now, you also have a small amount of adjustment on the hinge to hood mounting bolts, although this is usually a very small amount in relation to the hinge base adjustment. Hopefully this helped clarify it. (sorry for the length, but panel adjustment is somewhat of an art.) Enrique Scanlon1 point


Important Information
By using this site, you agree to our Privacy Policy and Guidelines. We have placed cookies on your device to help make this website better. You can adjust your cookie settings, otherwise we'll assume you're okay to continue.