Leaderboard
-

wheee!
Free Member5Points4,607Posts -
zKars
 Subscriber
 4Points3,770Posts
 -
conedodger
Free Member4Points12,513Posts -
Captain Obvious
Free Member3Points10,081Posts


Popular Content
Showing content with the highest reputation on 07/26/2018 in Posts
-
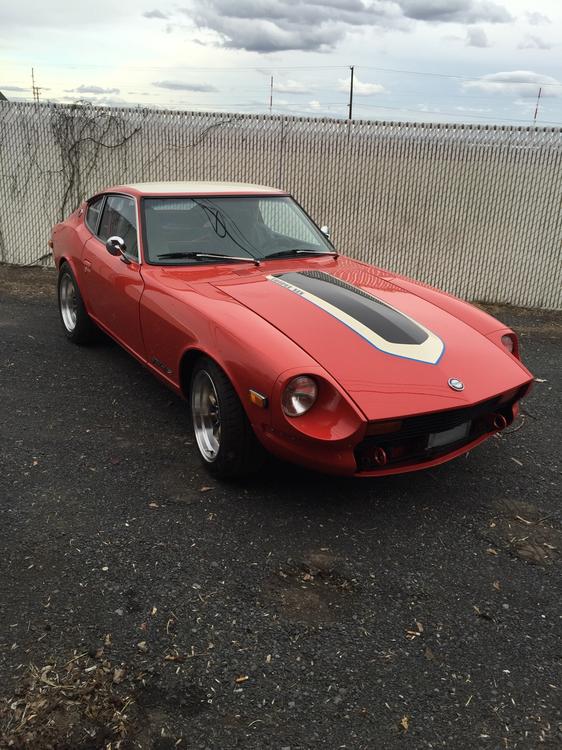
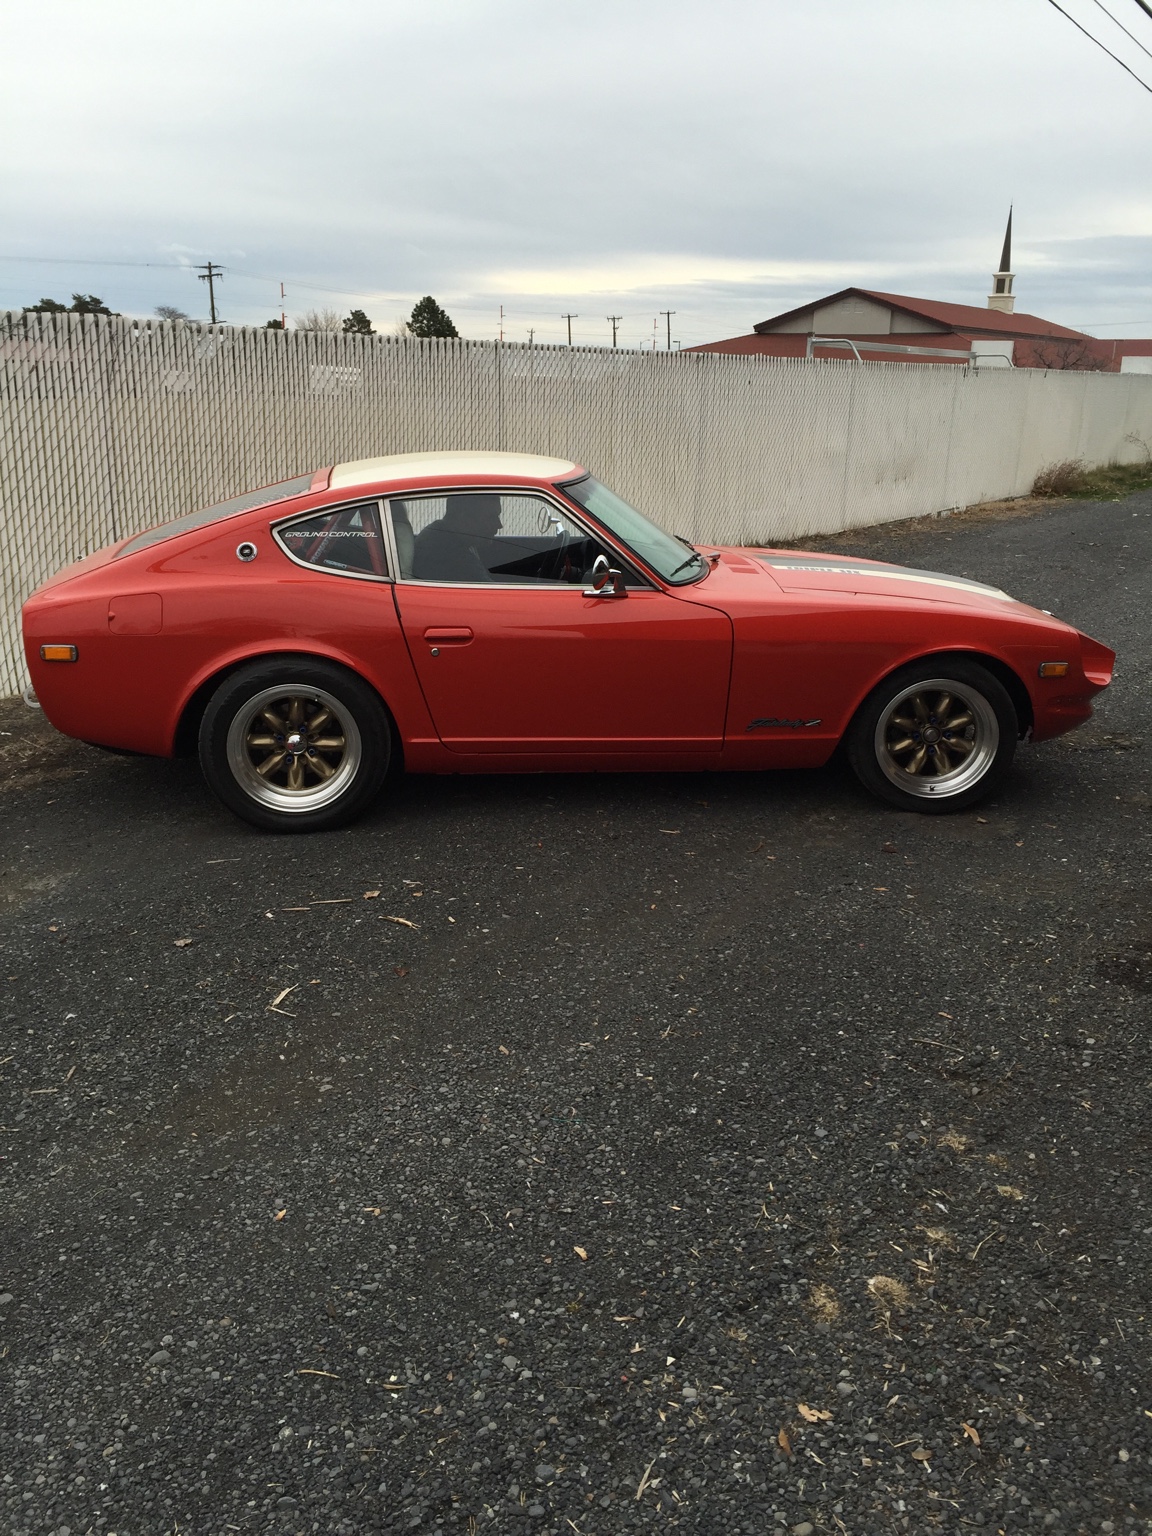
3 pointsI’m really loving this setup and colour combo. The fluorescent lights cast the green a little more yellow than it is, but ... wow!


 3 points
 -
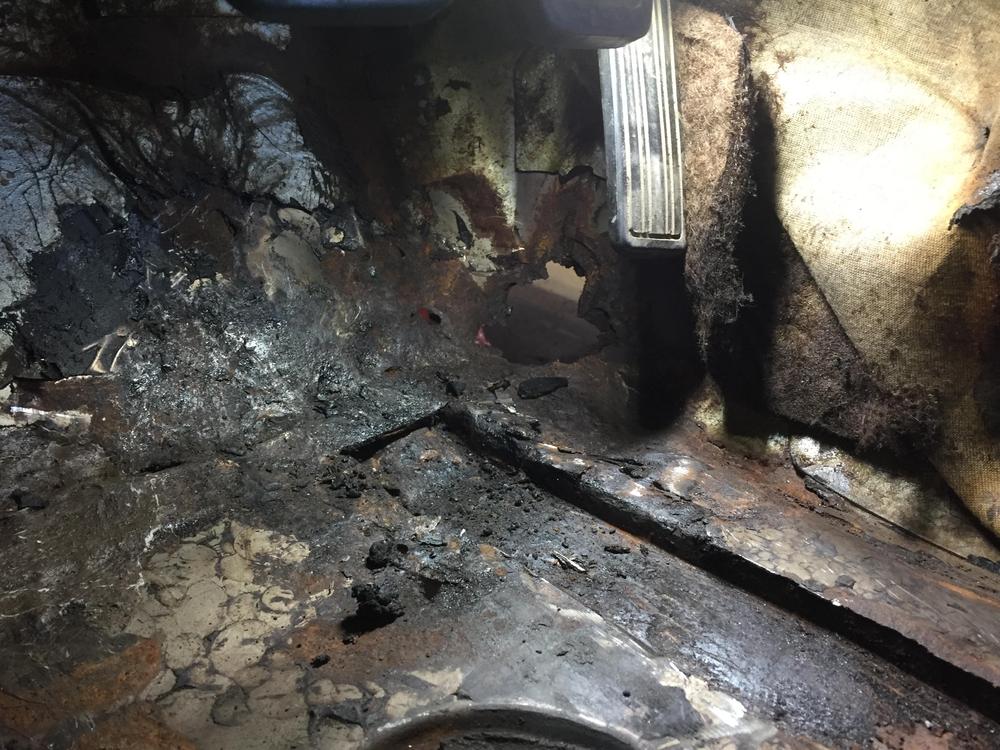
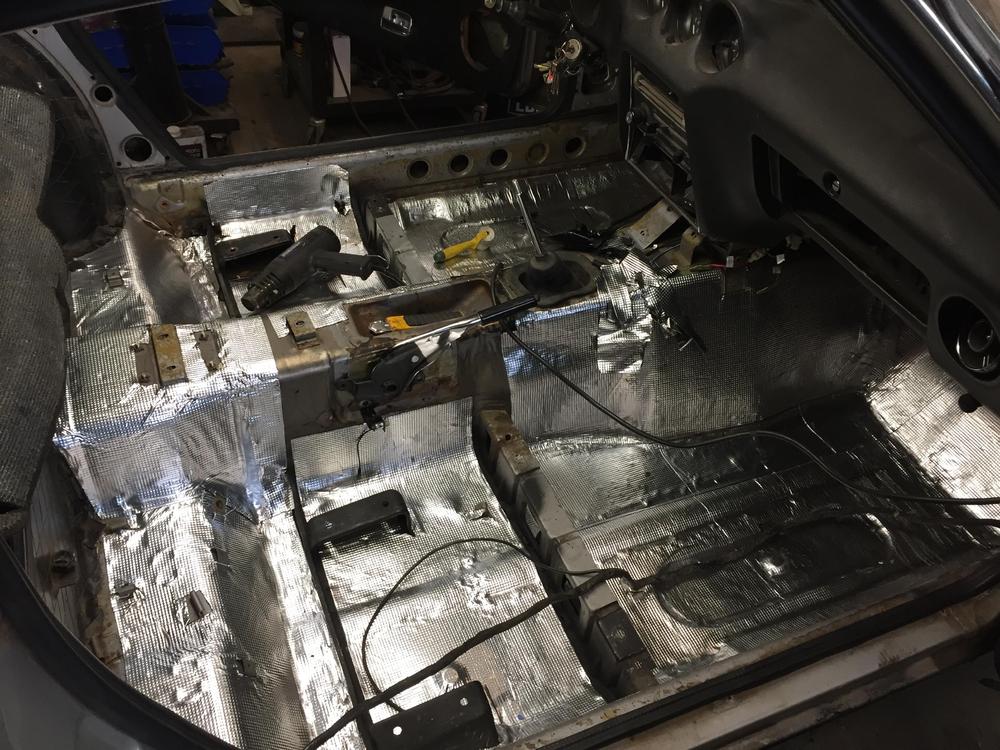
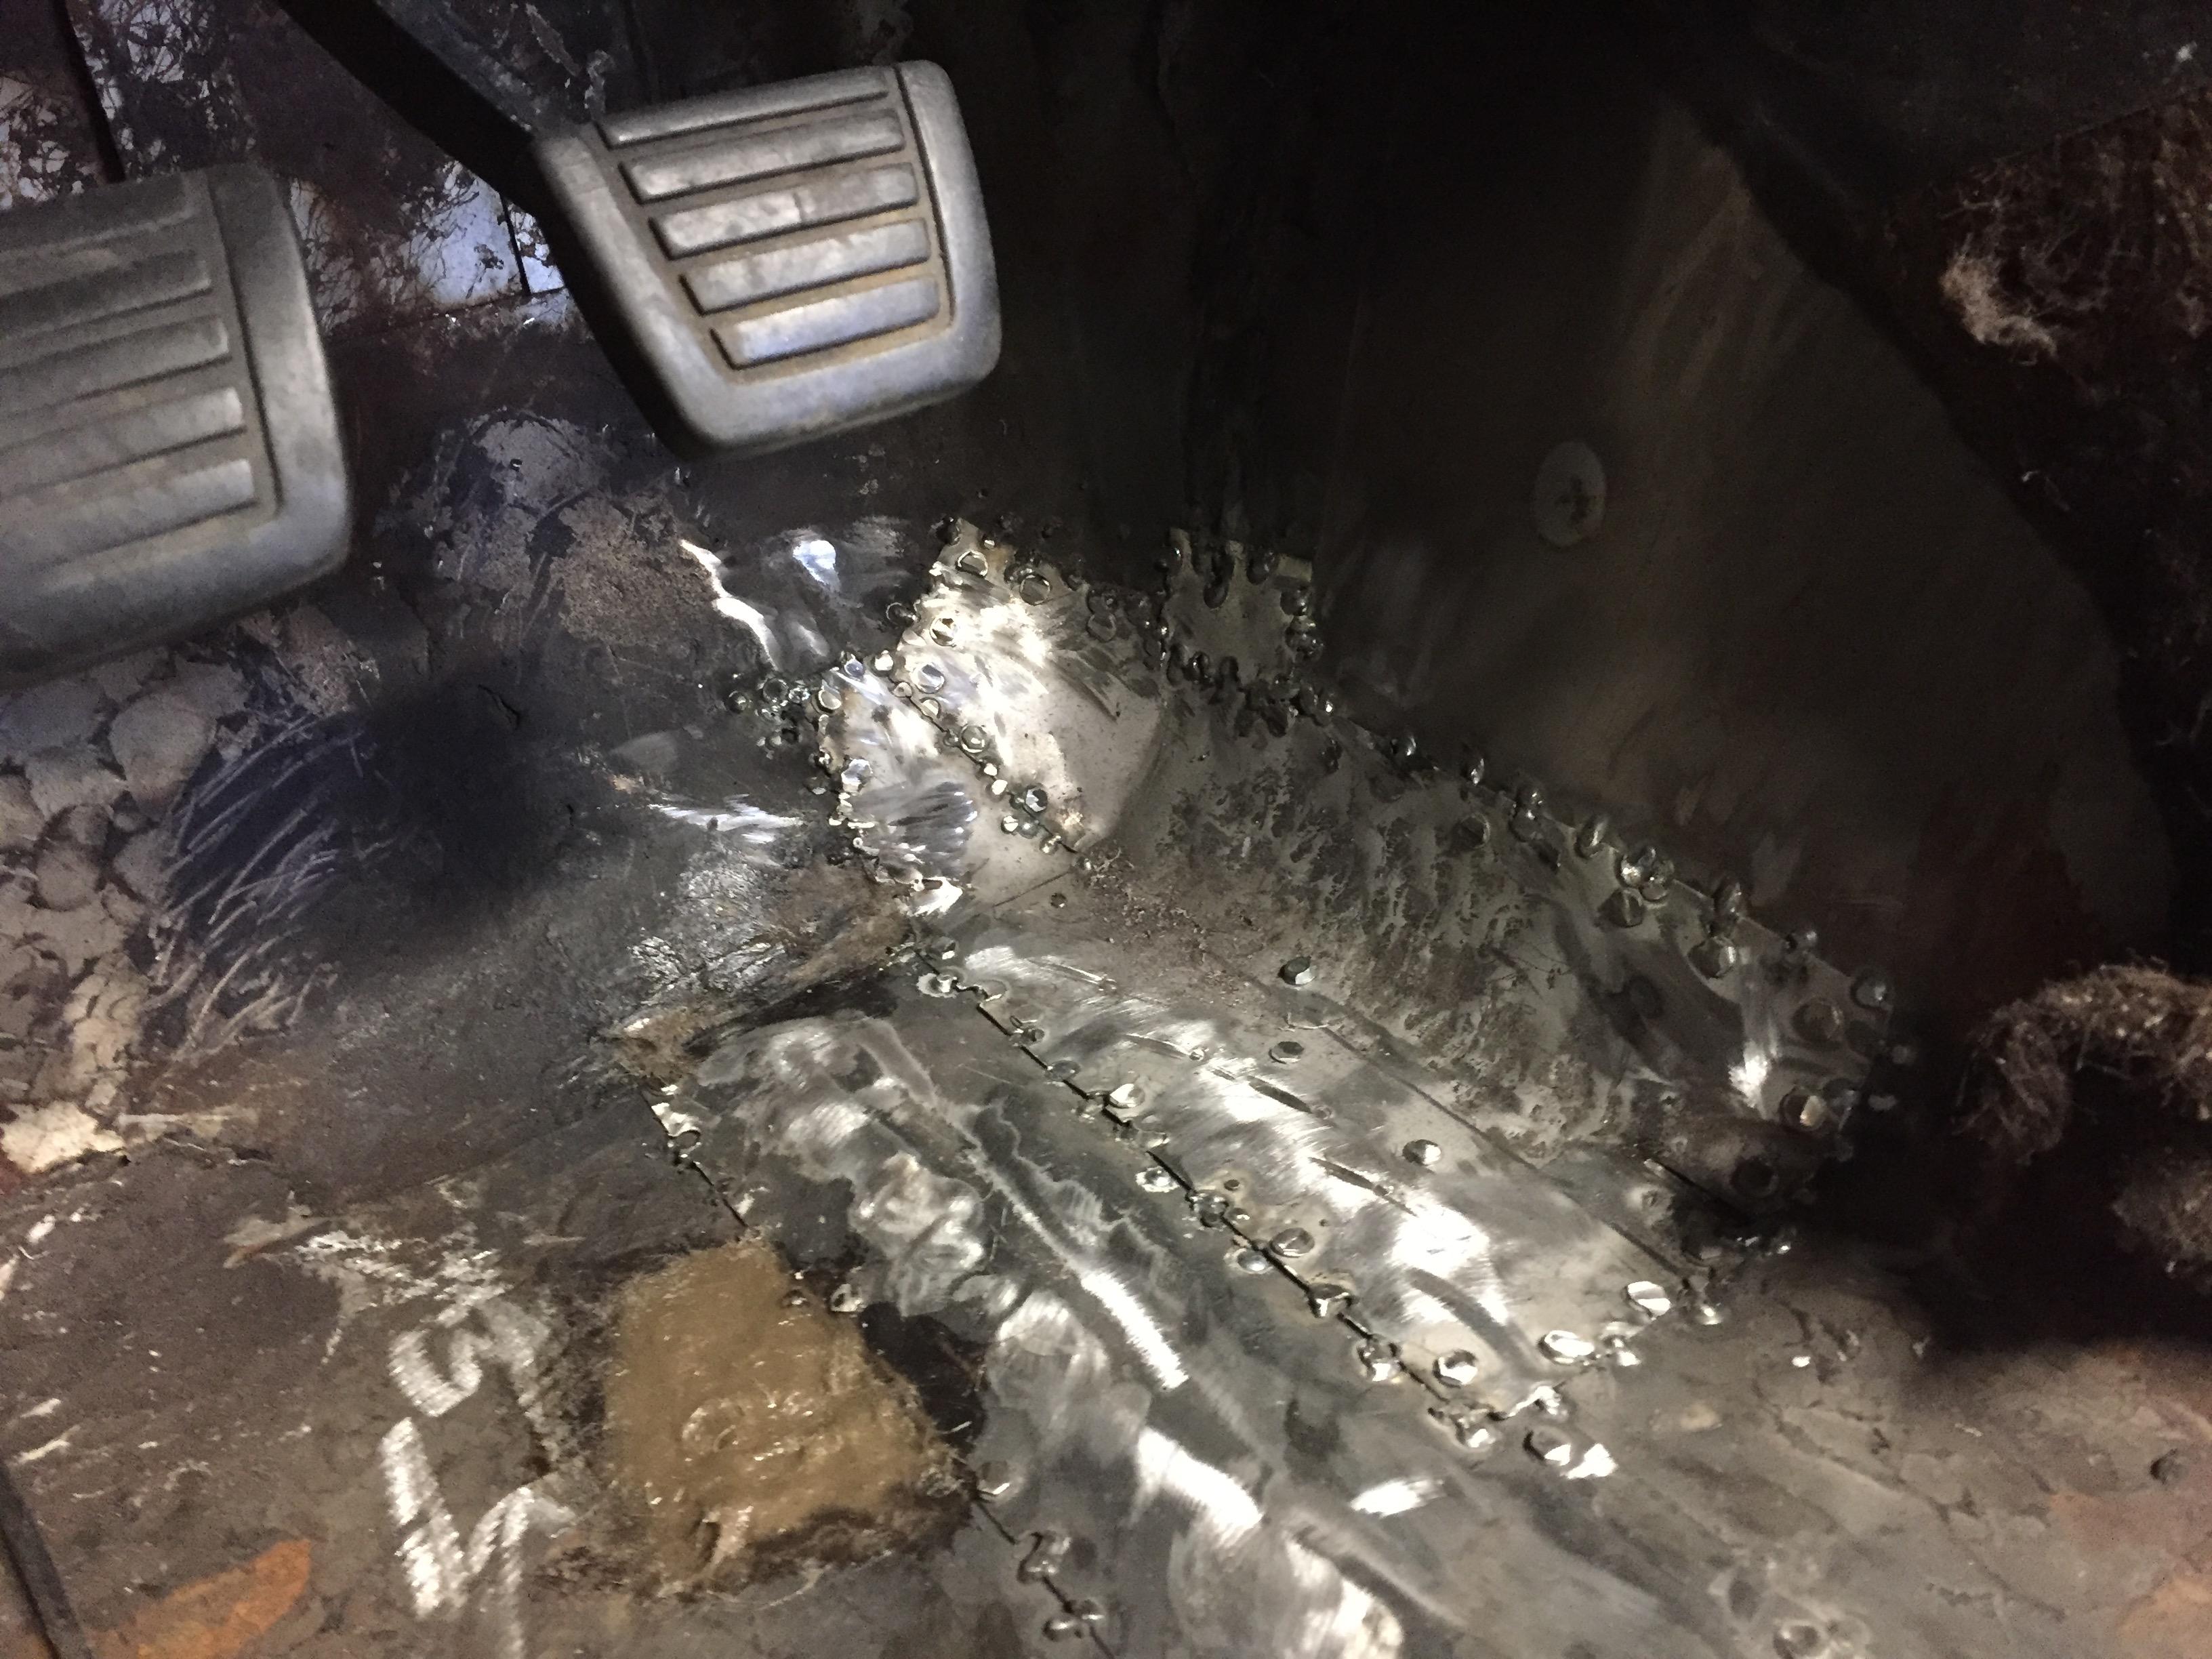
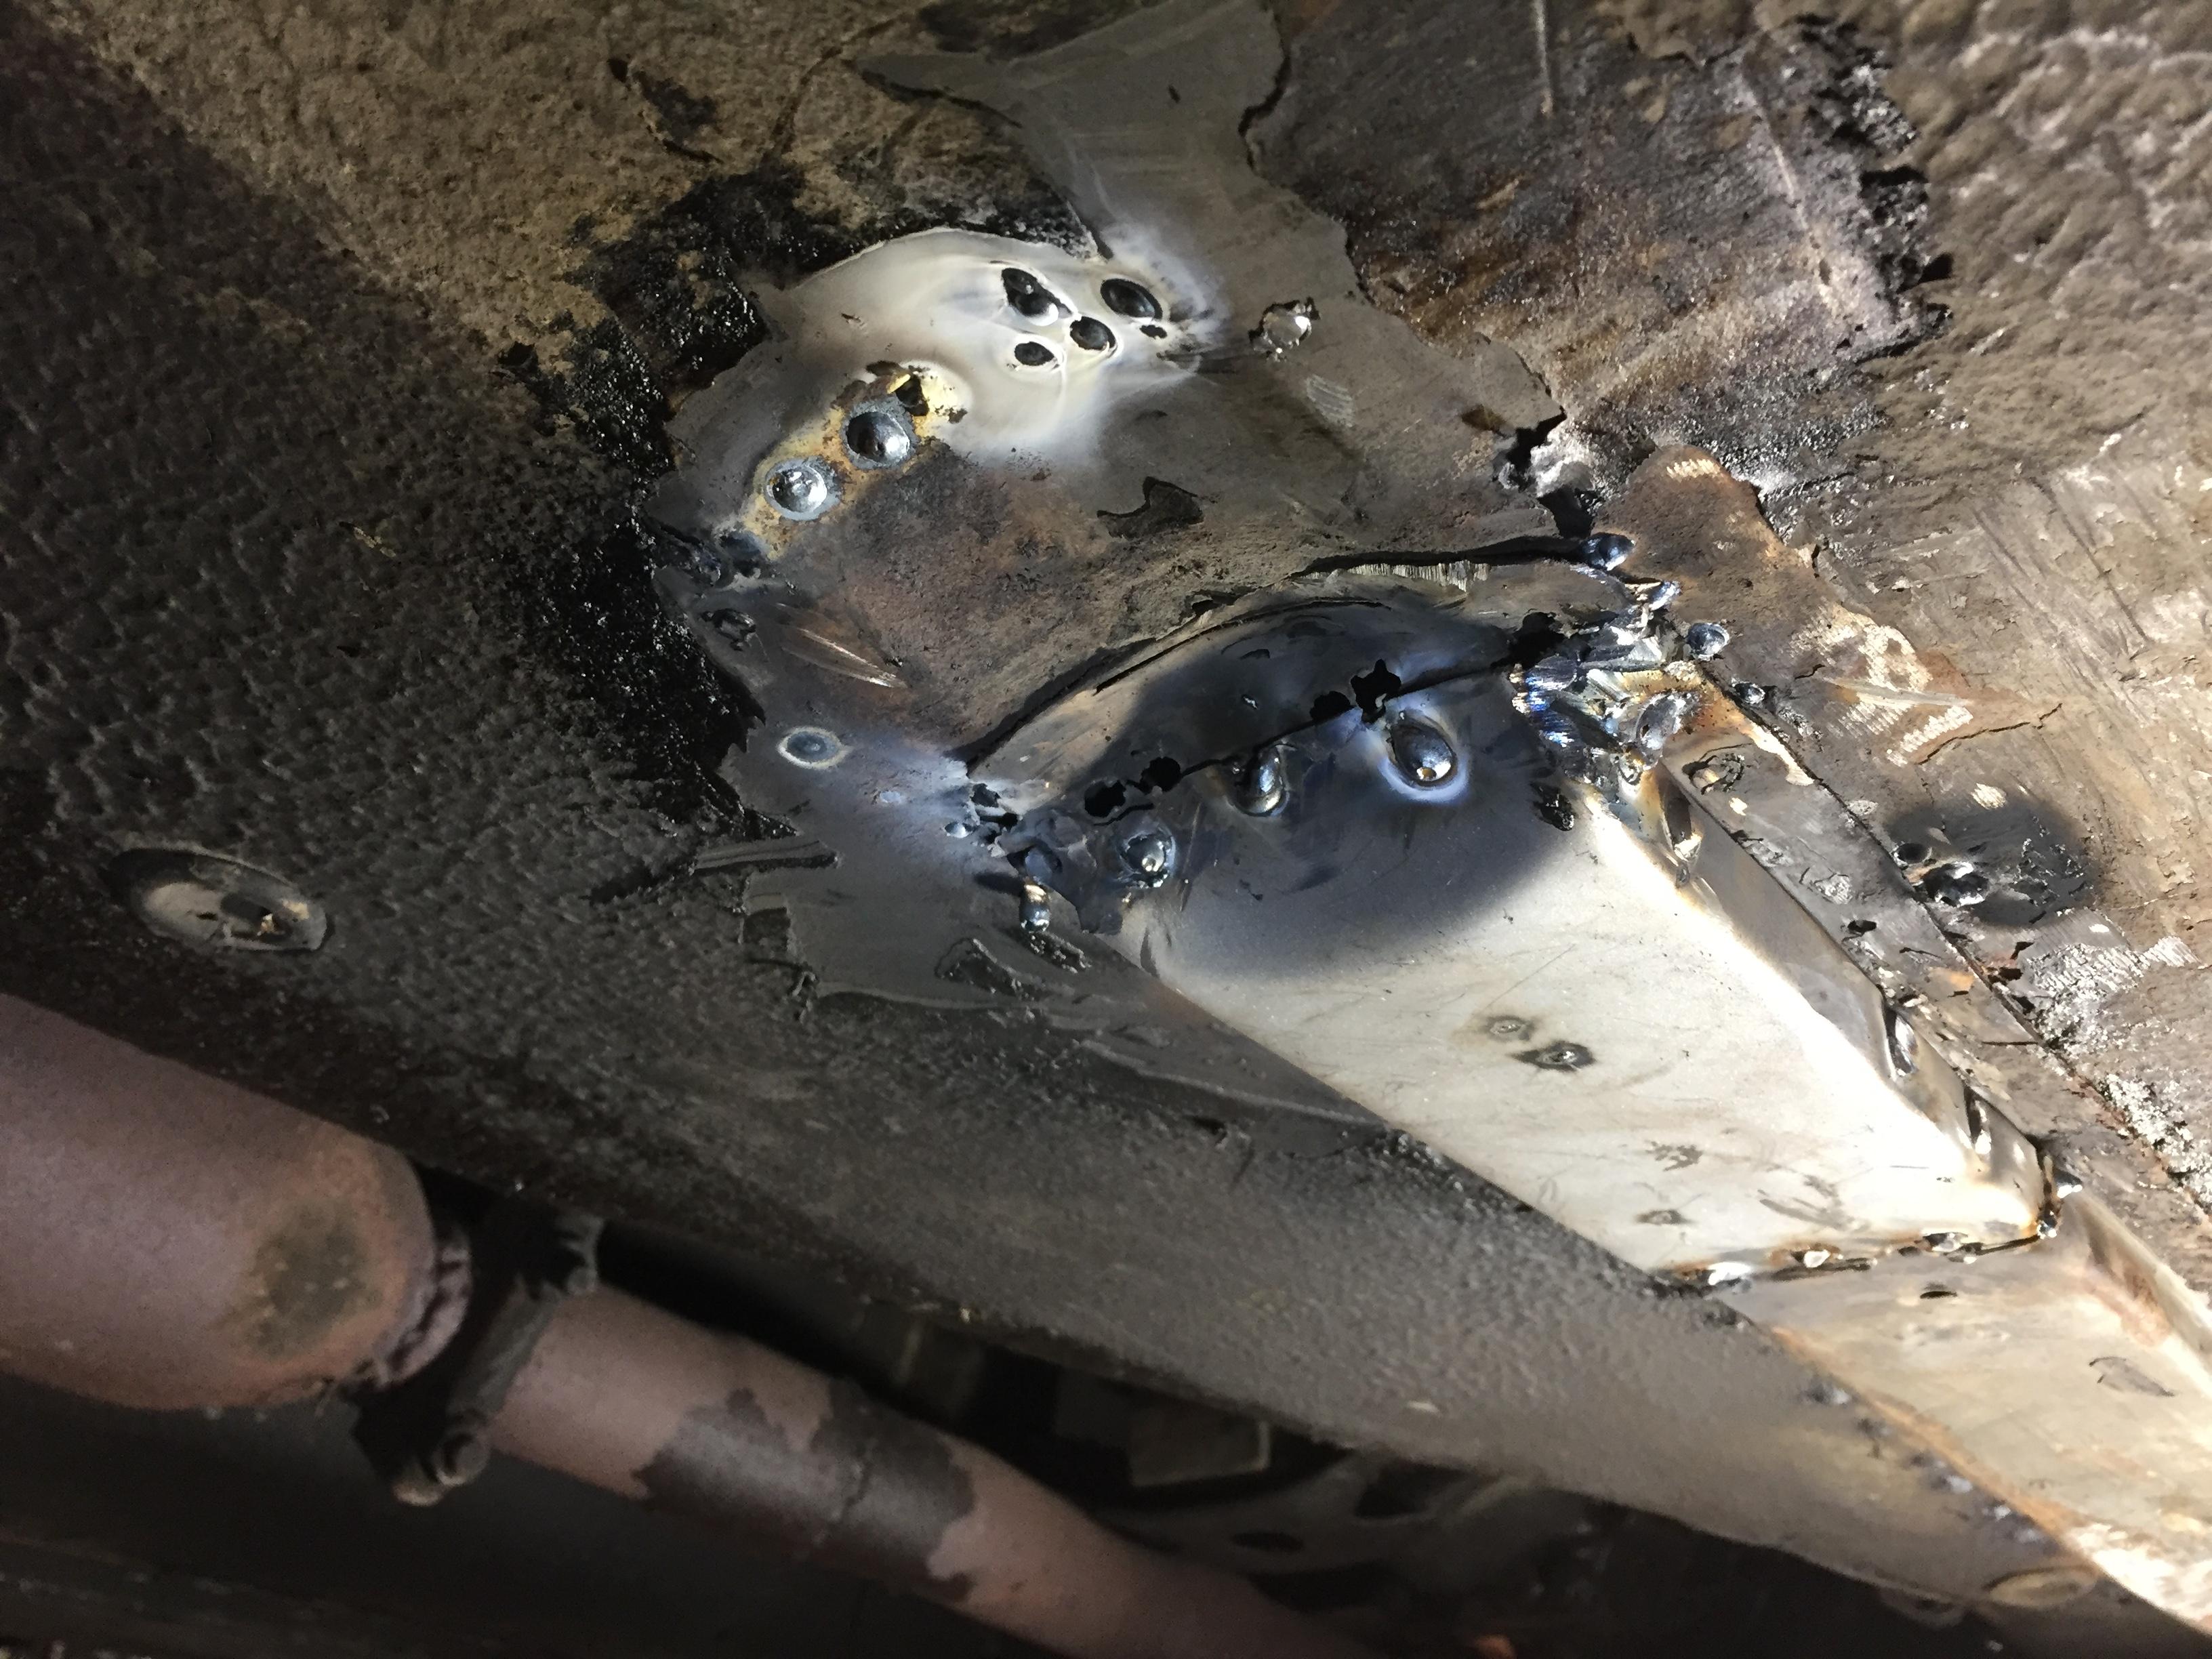
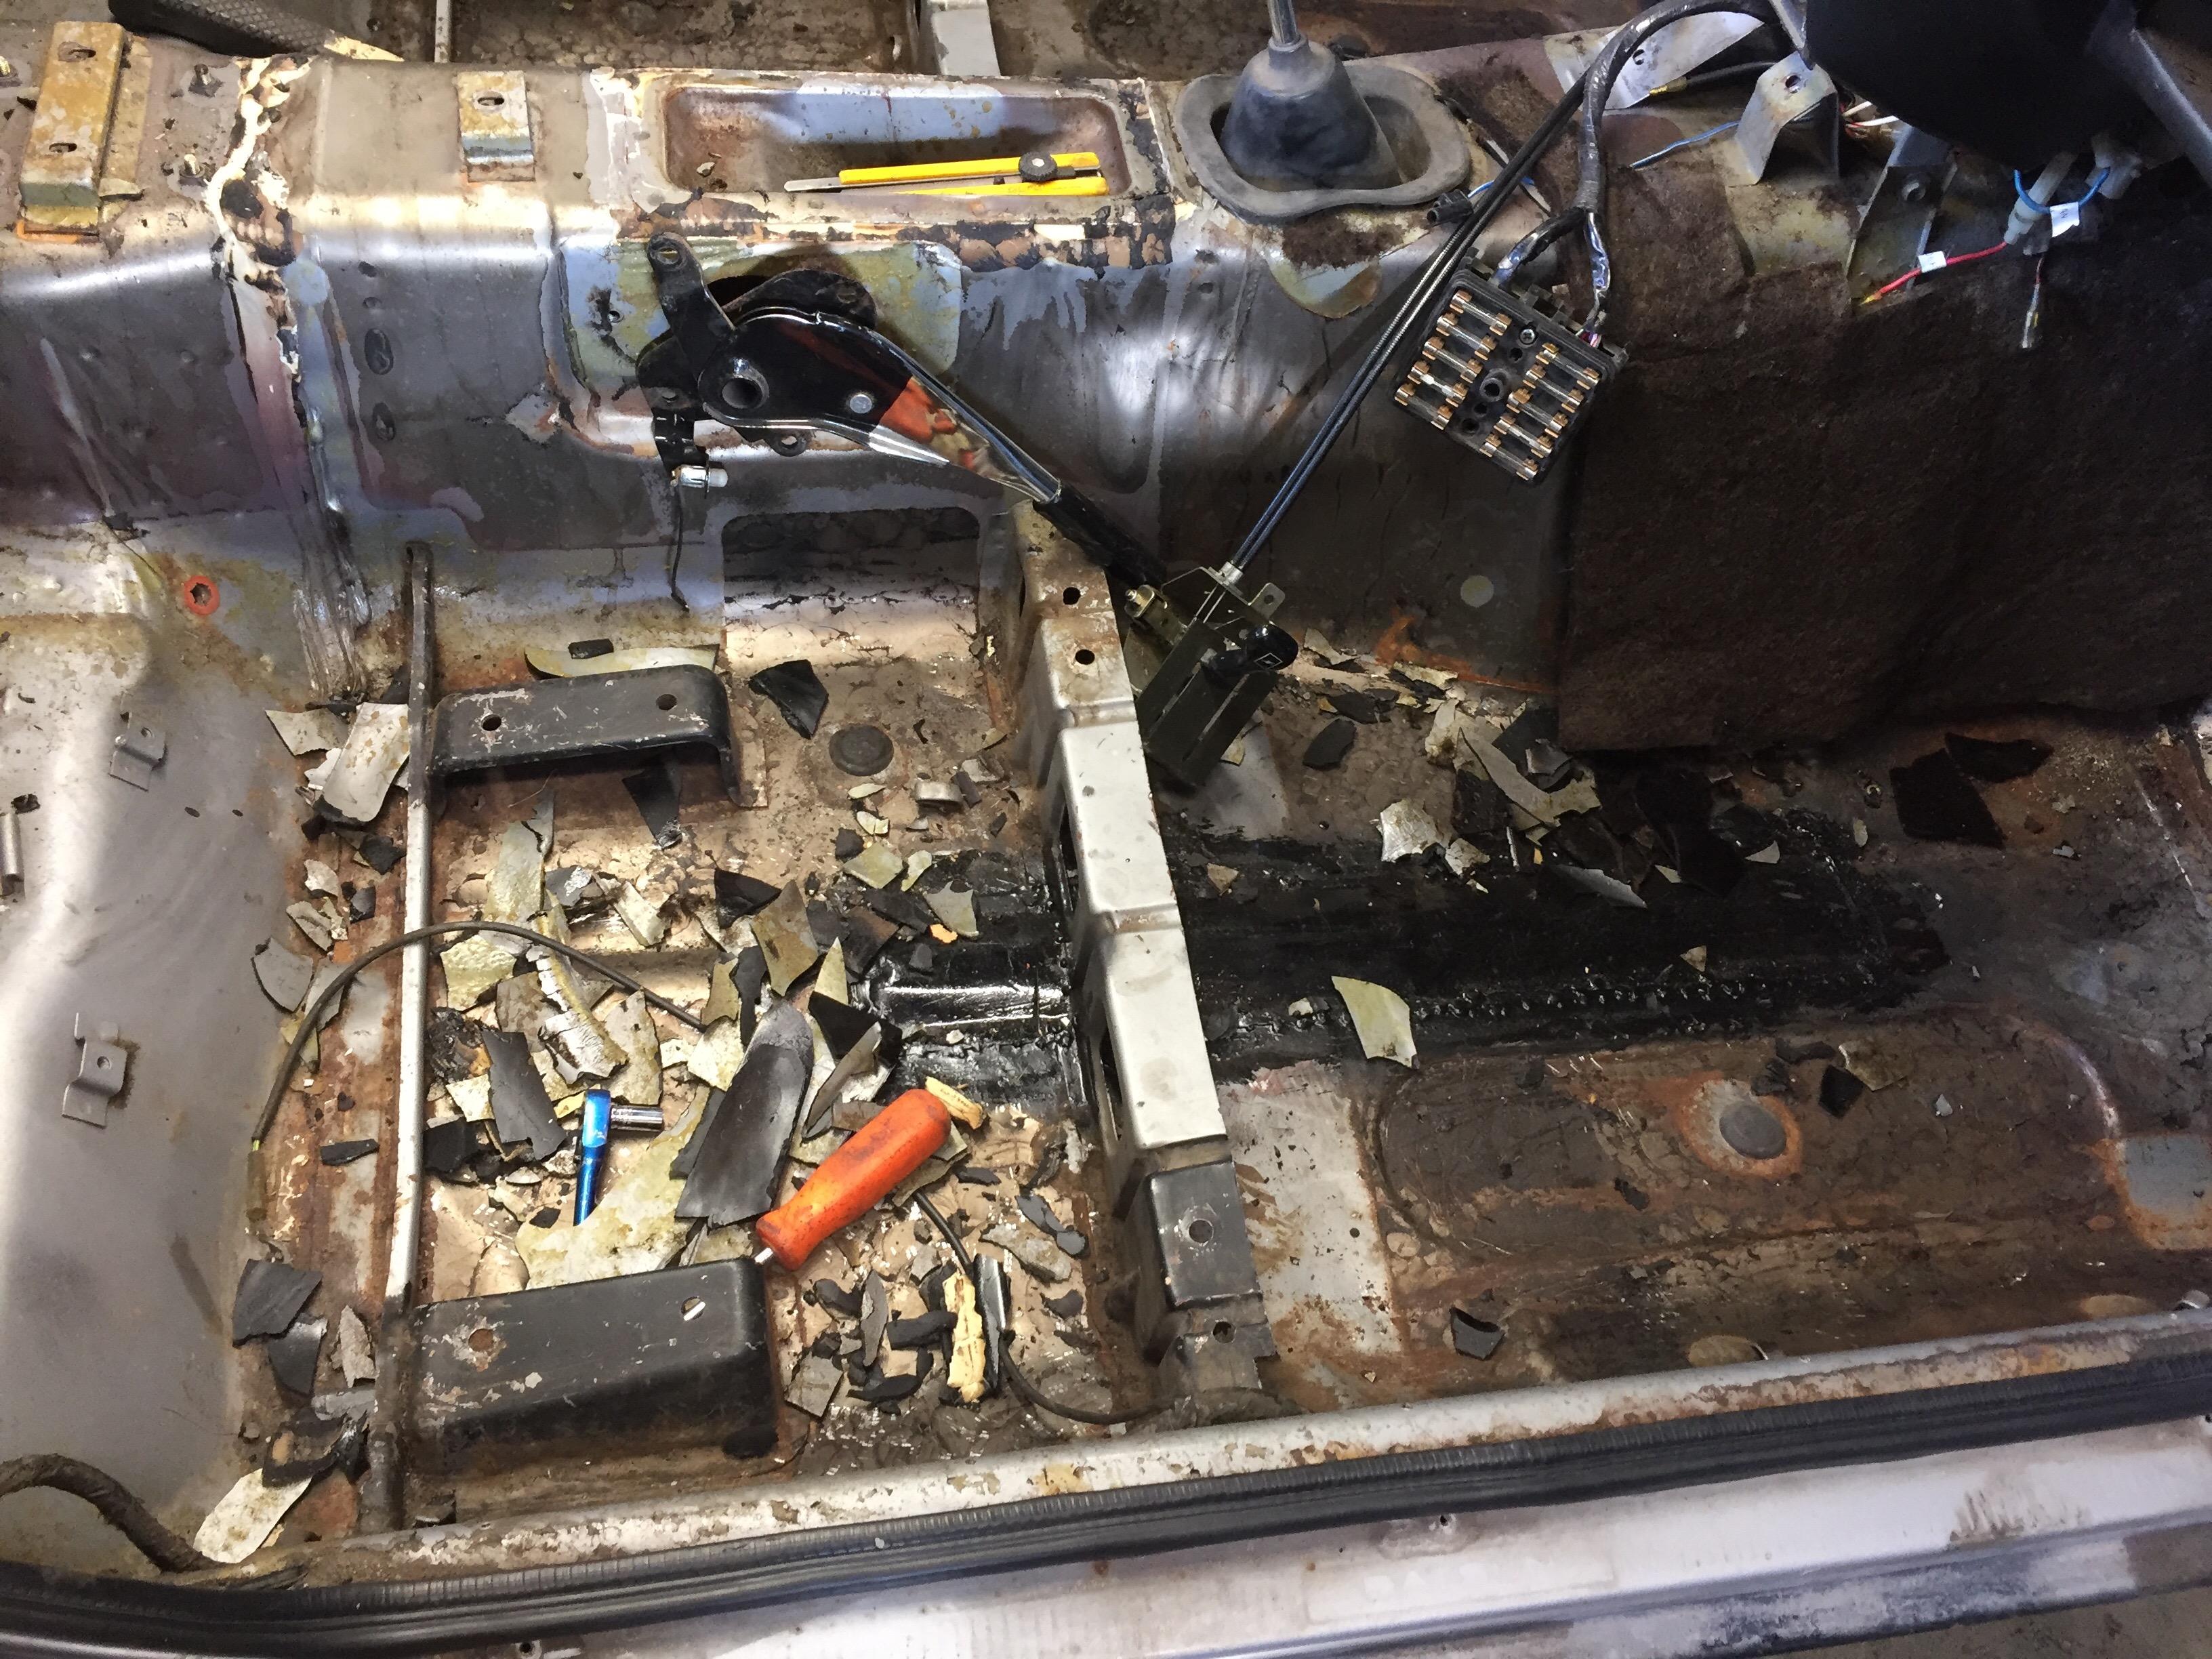
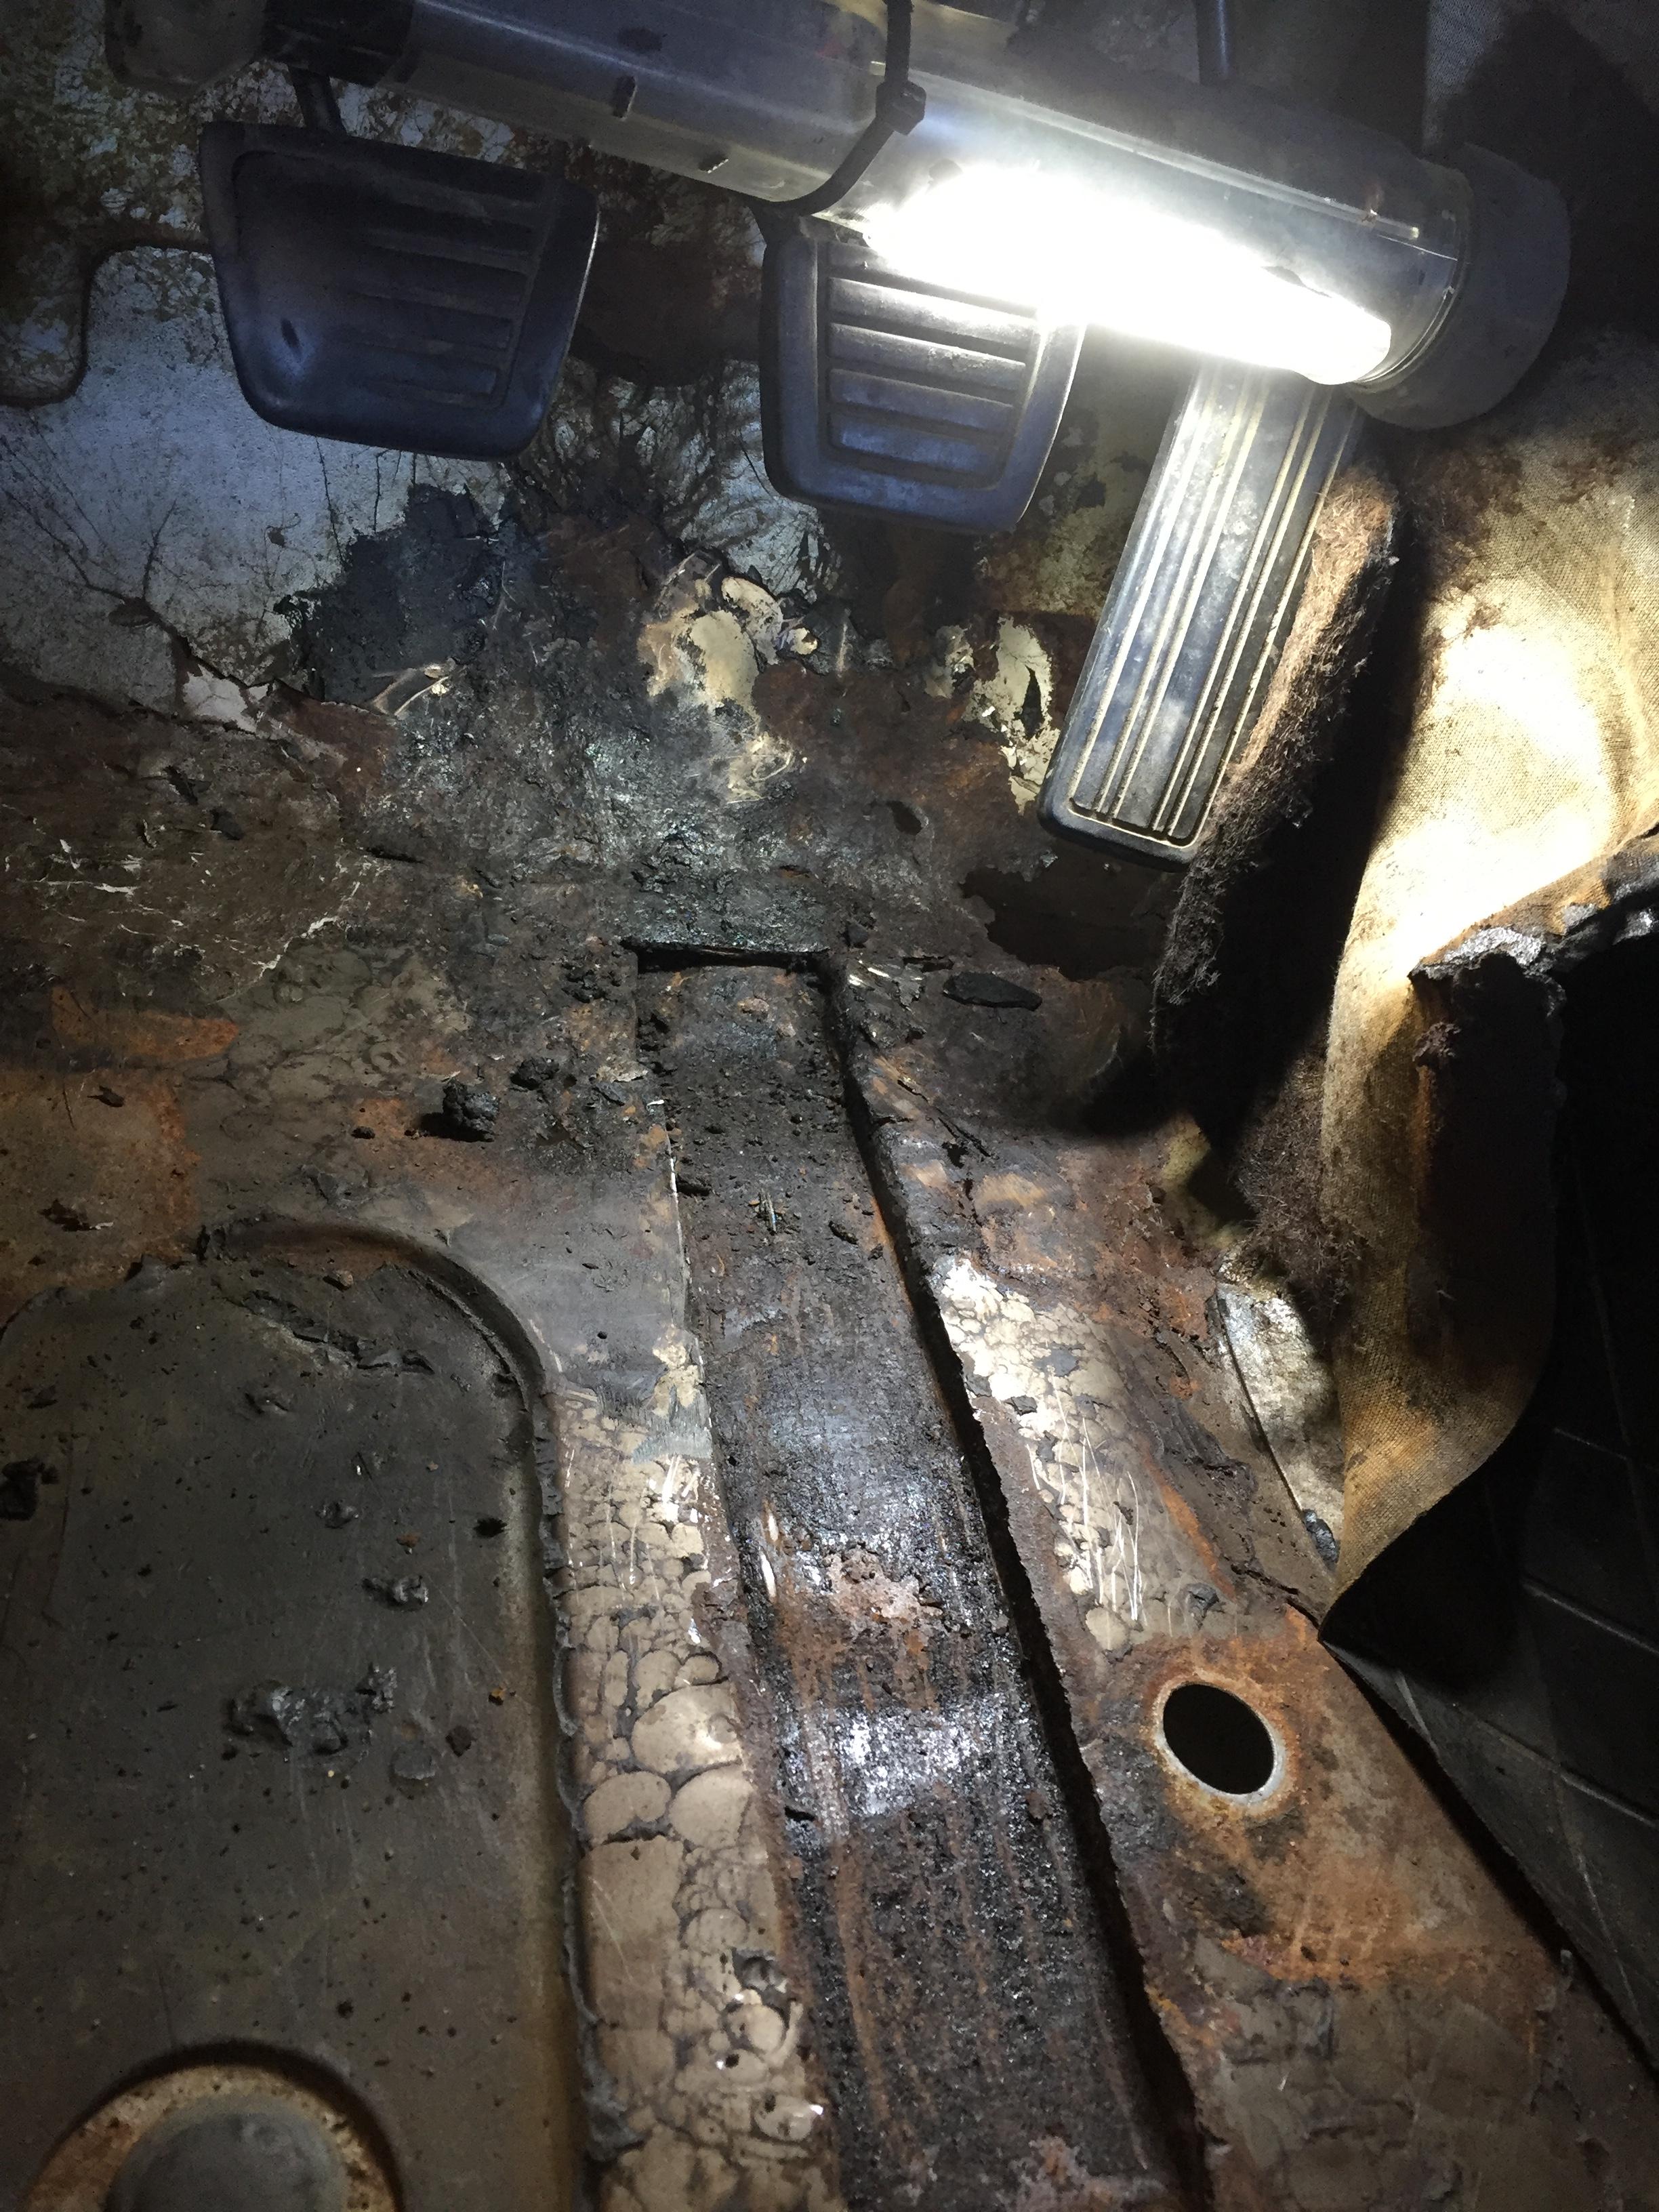
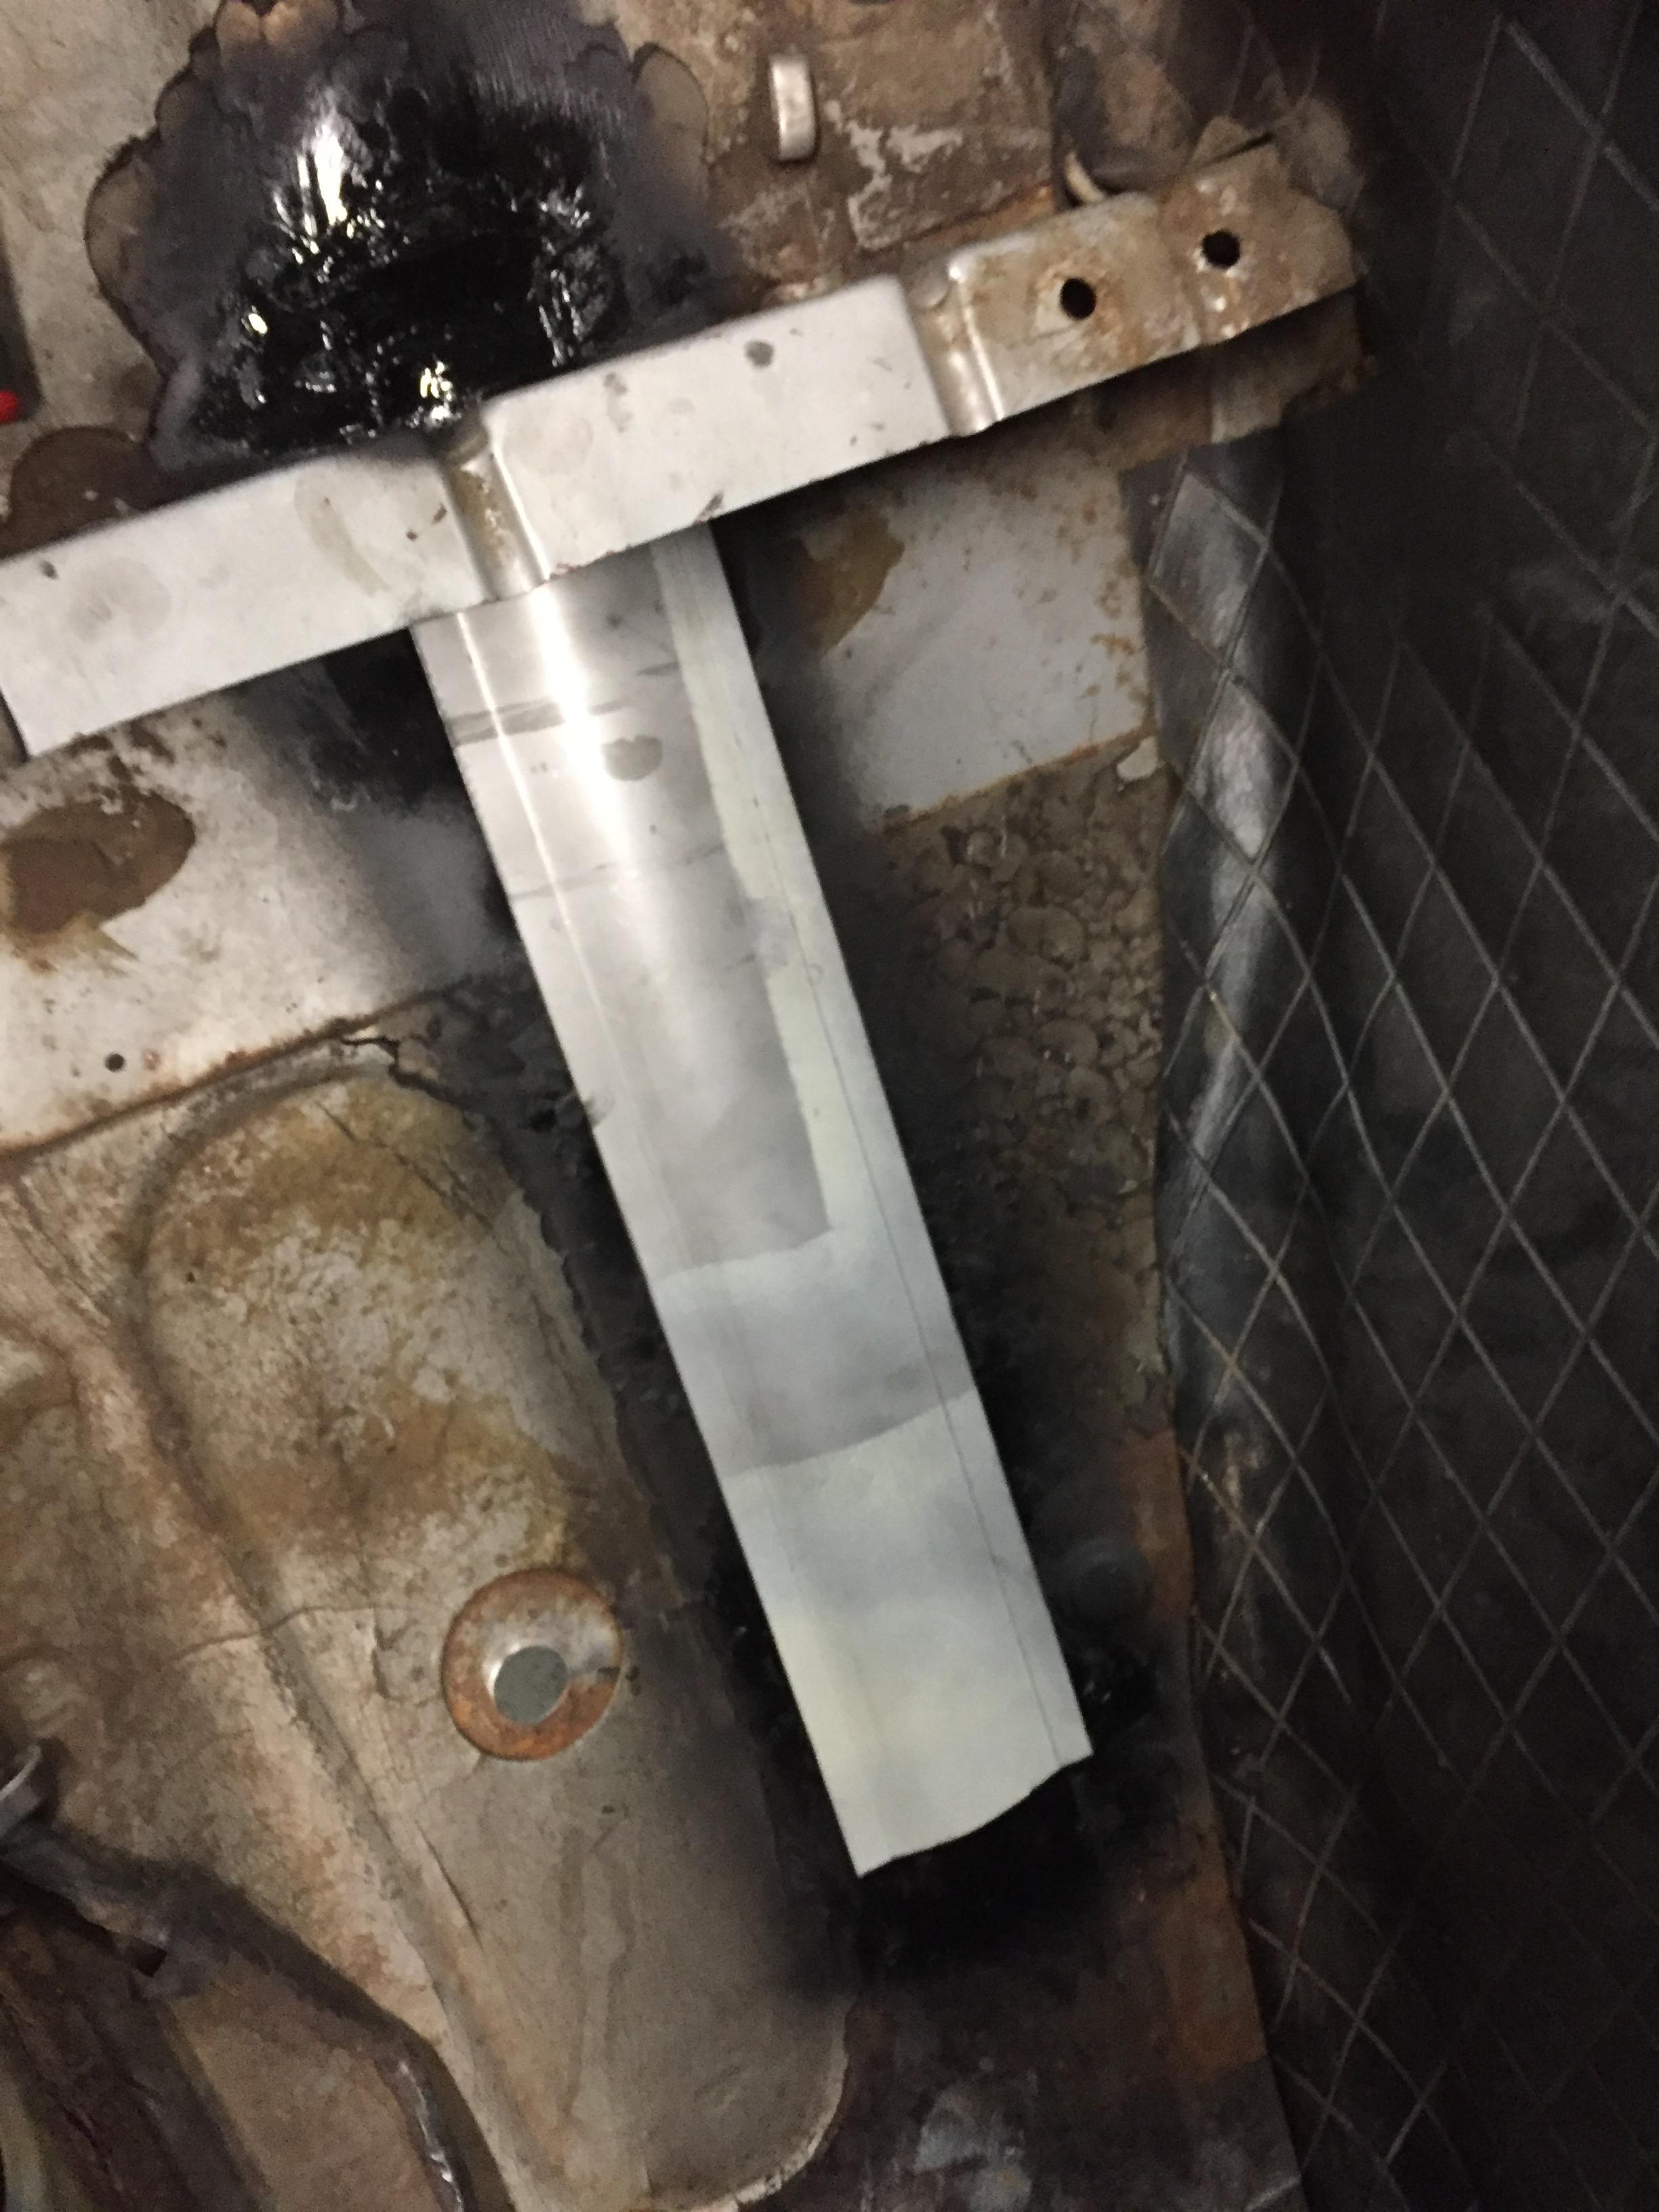
More progress. As Wheee mentioned earilier this is turning into a build thread. I decided to investigate the pushed up floors and bent/caved frame rails, and to uncover what the PO had done to fill some holes. Turns out the floors are actually in pretty good shape! I was able to "massage" the floors back down to be flat-ish, and repaired the frame rail bumps and caves. There are only a few small actual holes in the floor around the gas pedal and a both outer corners of the floor/firewall bend. Other than the top of the drivers side frame rail that had to be replaced, it was a pretty easy job with a few patches and welding a couple of plates. The PO had literally FILLED the inside of the frame rail with thick tar like undercoating as the top metal was peeled right off. here is what I found after mining a lot of tar with a torch and a scraper. Having the top peeled off like that make flattening the frame rail a piece of cake! Just hammer/dolly it down flat. Most of the mess on the floors you see here is old tar. Cleaned up, other than the hole in the corner, it was just fine. Here is the holes and top of the frame rail are patched. The inside was pickled with phosphoric acid and Eastwood internal frame coating. The patch on the frame rail has the same domed top as the original floor. The passenger side was much better. The frame rail was fine except for the very end. I used the same approach as the driver side to straighten the frame rail. I cut windows in top where the worst dings were, and punched the dents out downward. Then I made the same domed cap as the driver side and just covered it all. i also removed all the old sound deadening tar mat. Naturally, the floors where still pretty well bonded, but the trans tunnel tar mat was COMPLETELY separated from the metal. It was firmly attached to the jute mating however... Now to re-coat the floors, new sound deadening mat, and put it all back together. Plan on driving this thing to the Edmonton Z club show this Sunday. This should encourage buyers now that it is running, strong, and licensed. Any rust you see is just 'surface' rust. The dark stuff is remains of the tar mat. Notice even the top of the rockers is near perfect.


 3 points
 -
1 pointHey everyone just joined I have a 75 260z I will get more pictures soon Sent from my iPhone using Classic Zcar Club mobile

 1 point
 -
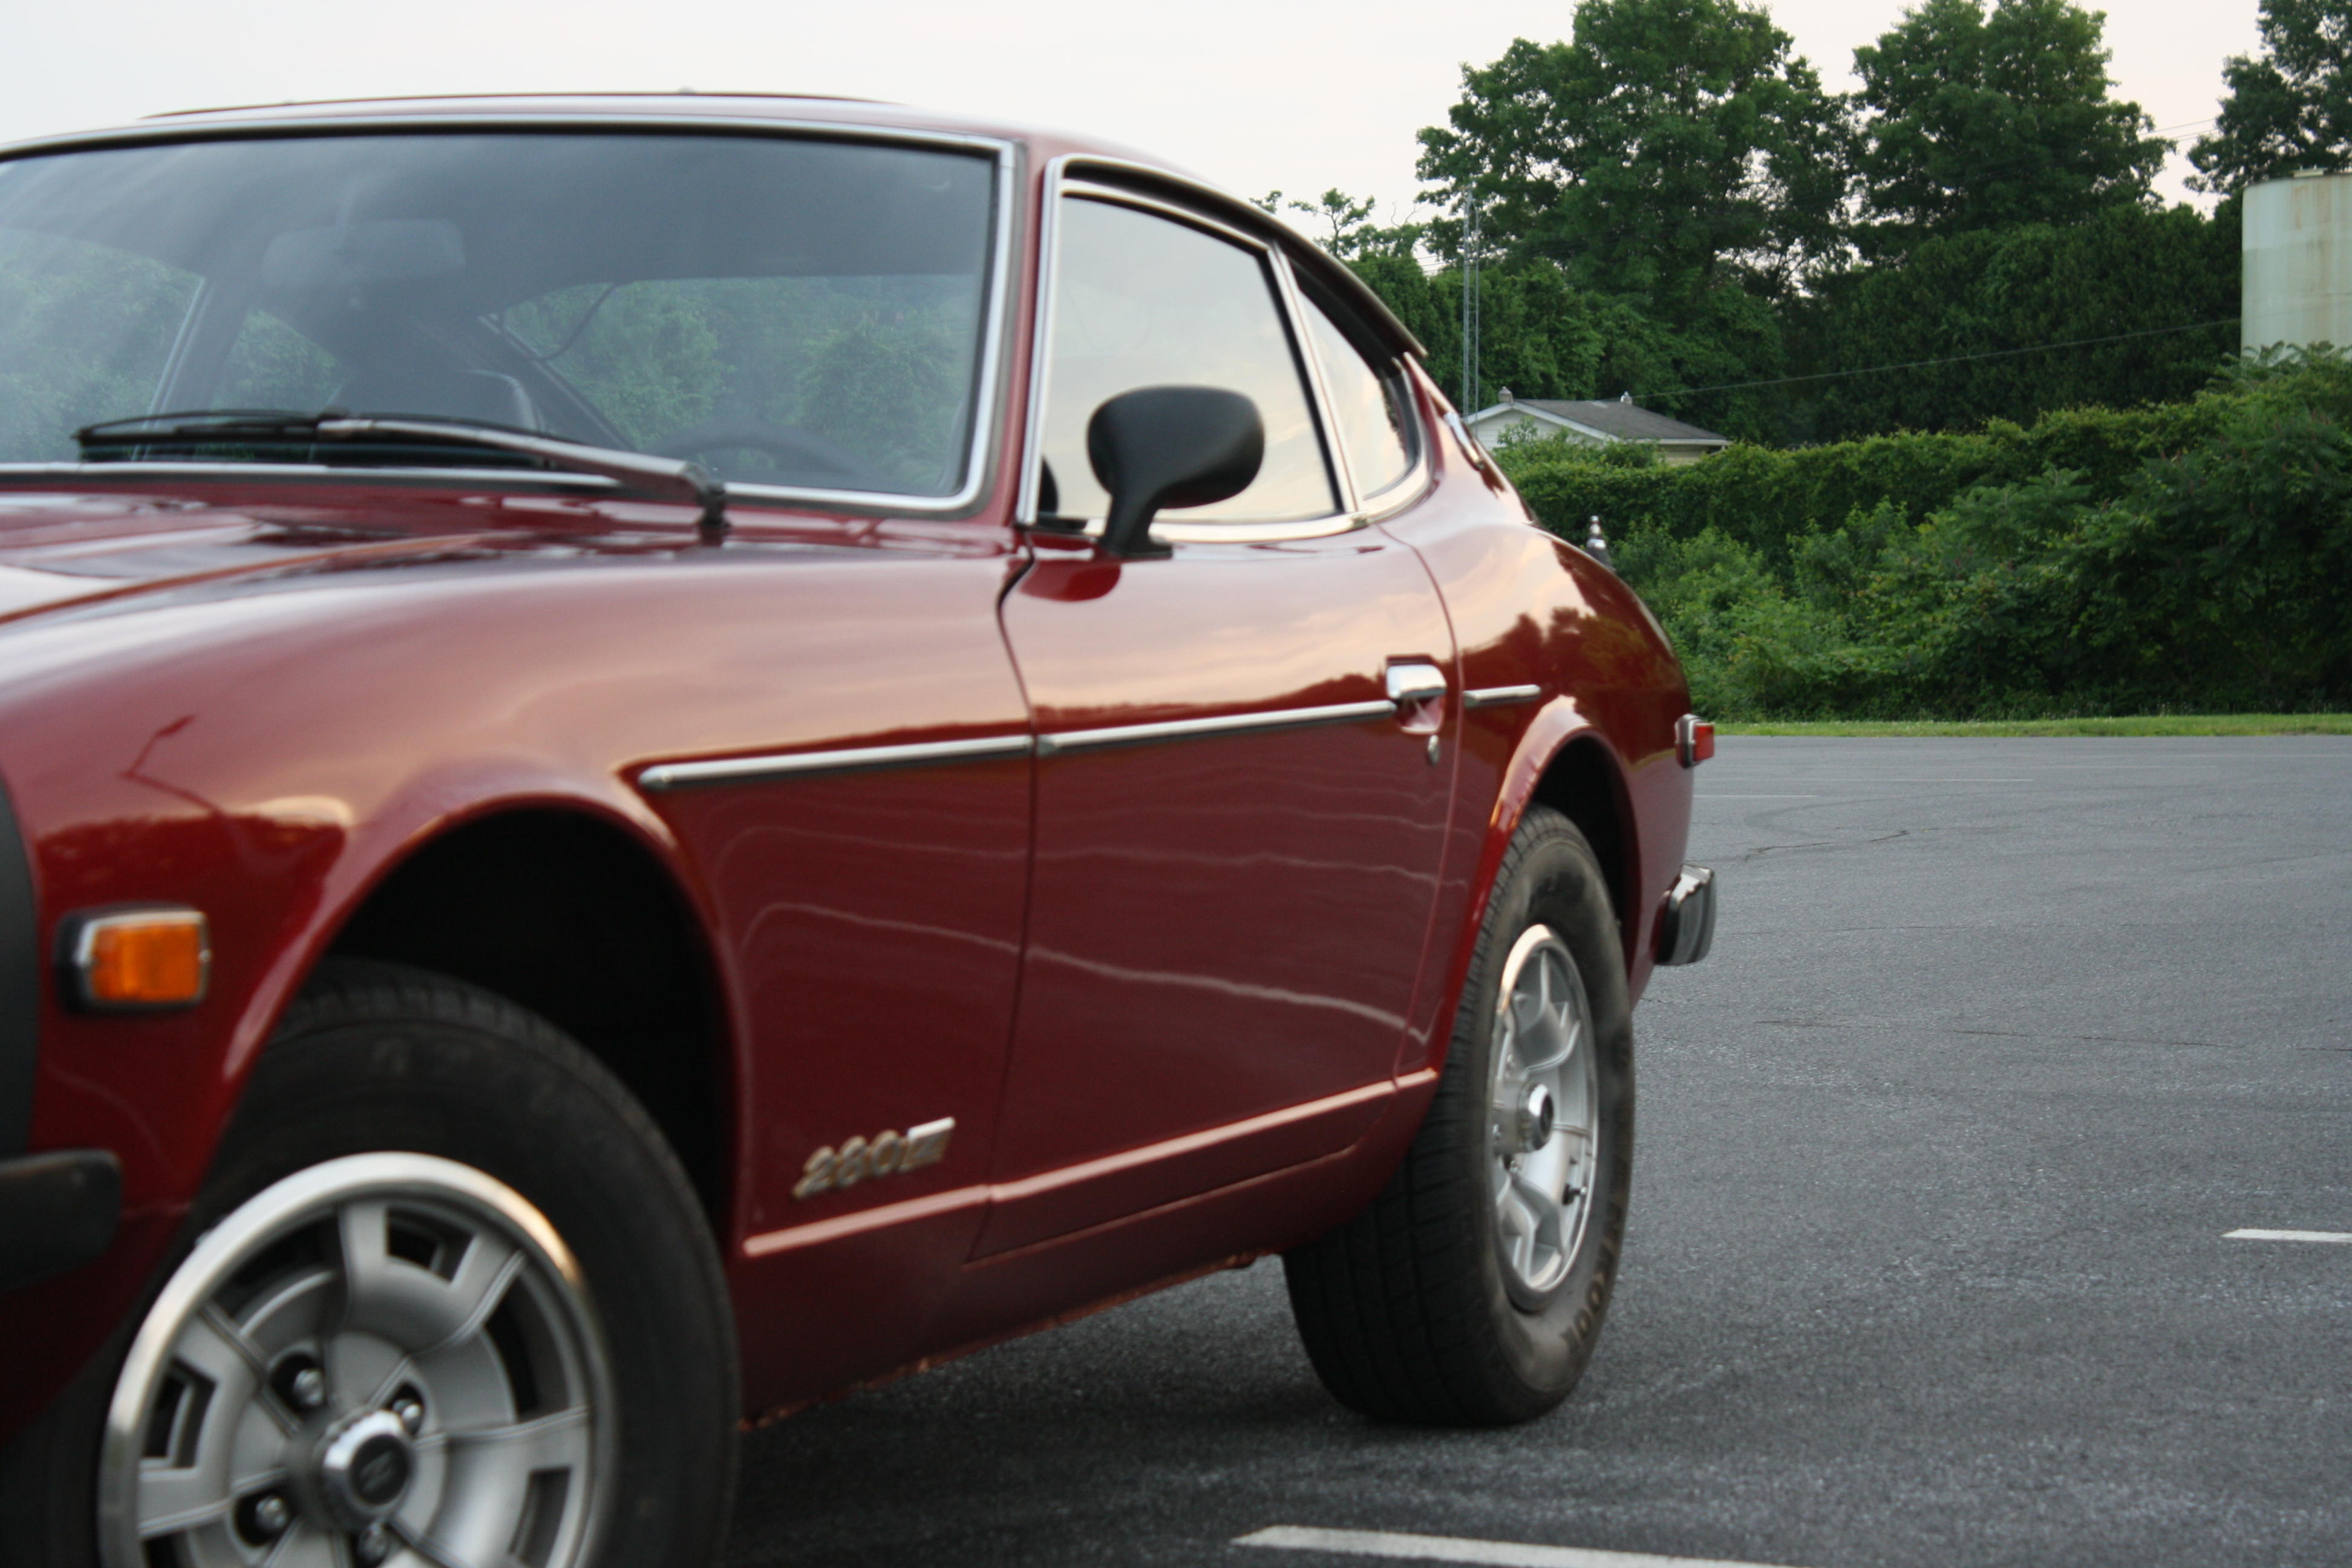
I hate to move this car, but I really need to. My wife can't ride in it due to her back for one thing. The other is that I have the urge to spend some money on it with a Datsun Spirit engine and a rear suspension rebuild. Sounds great, but I'd rather spend the money elsewhere right now. I believe 6K to be a bargain price in an effort to move it quickly. Car is in central PA. Fuller details and photos in the Craigslist ad: https://harrisburg.craigslist.org/cto/d/1977-datsun-280z-price-drop/6620690663.html


 1 point
 -
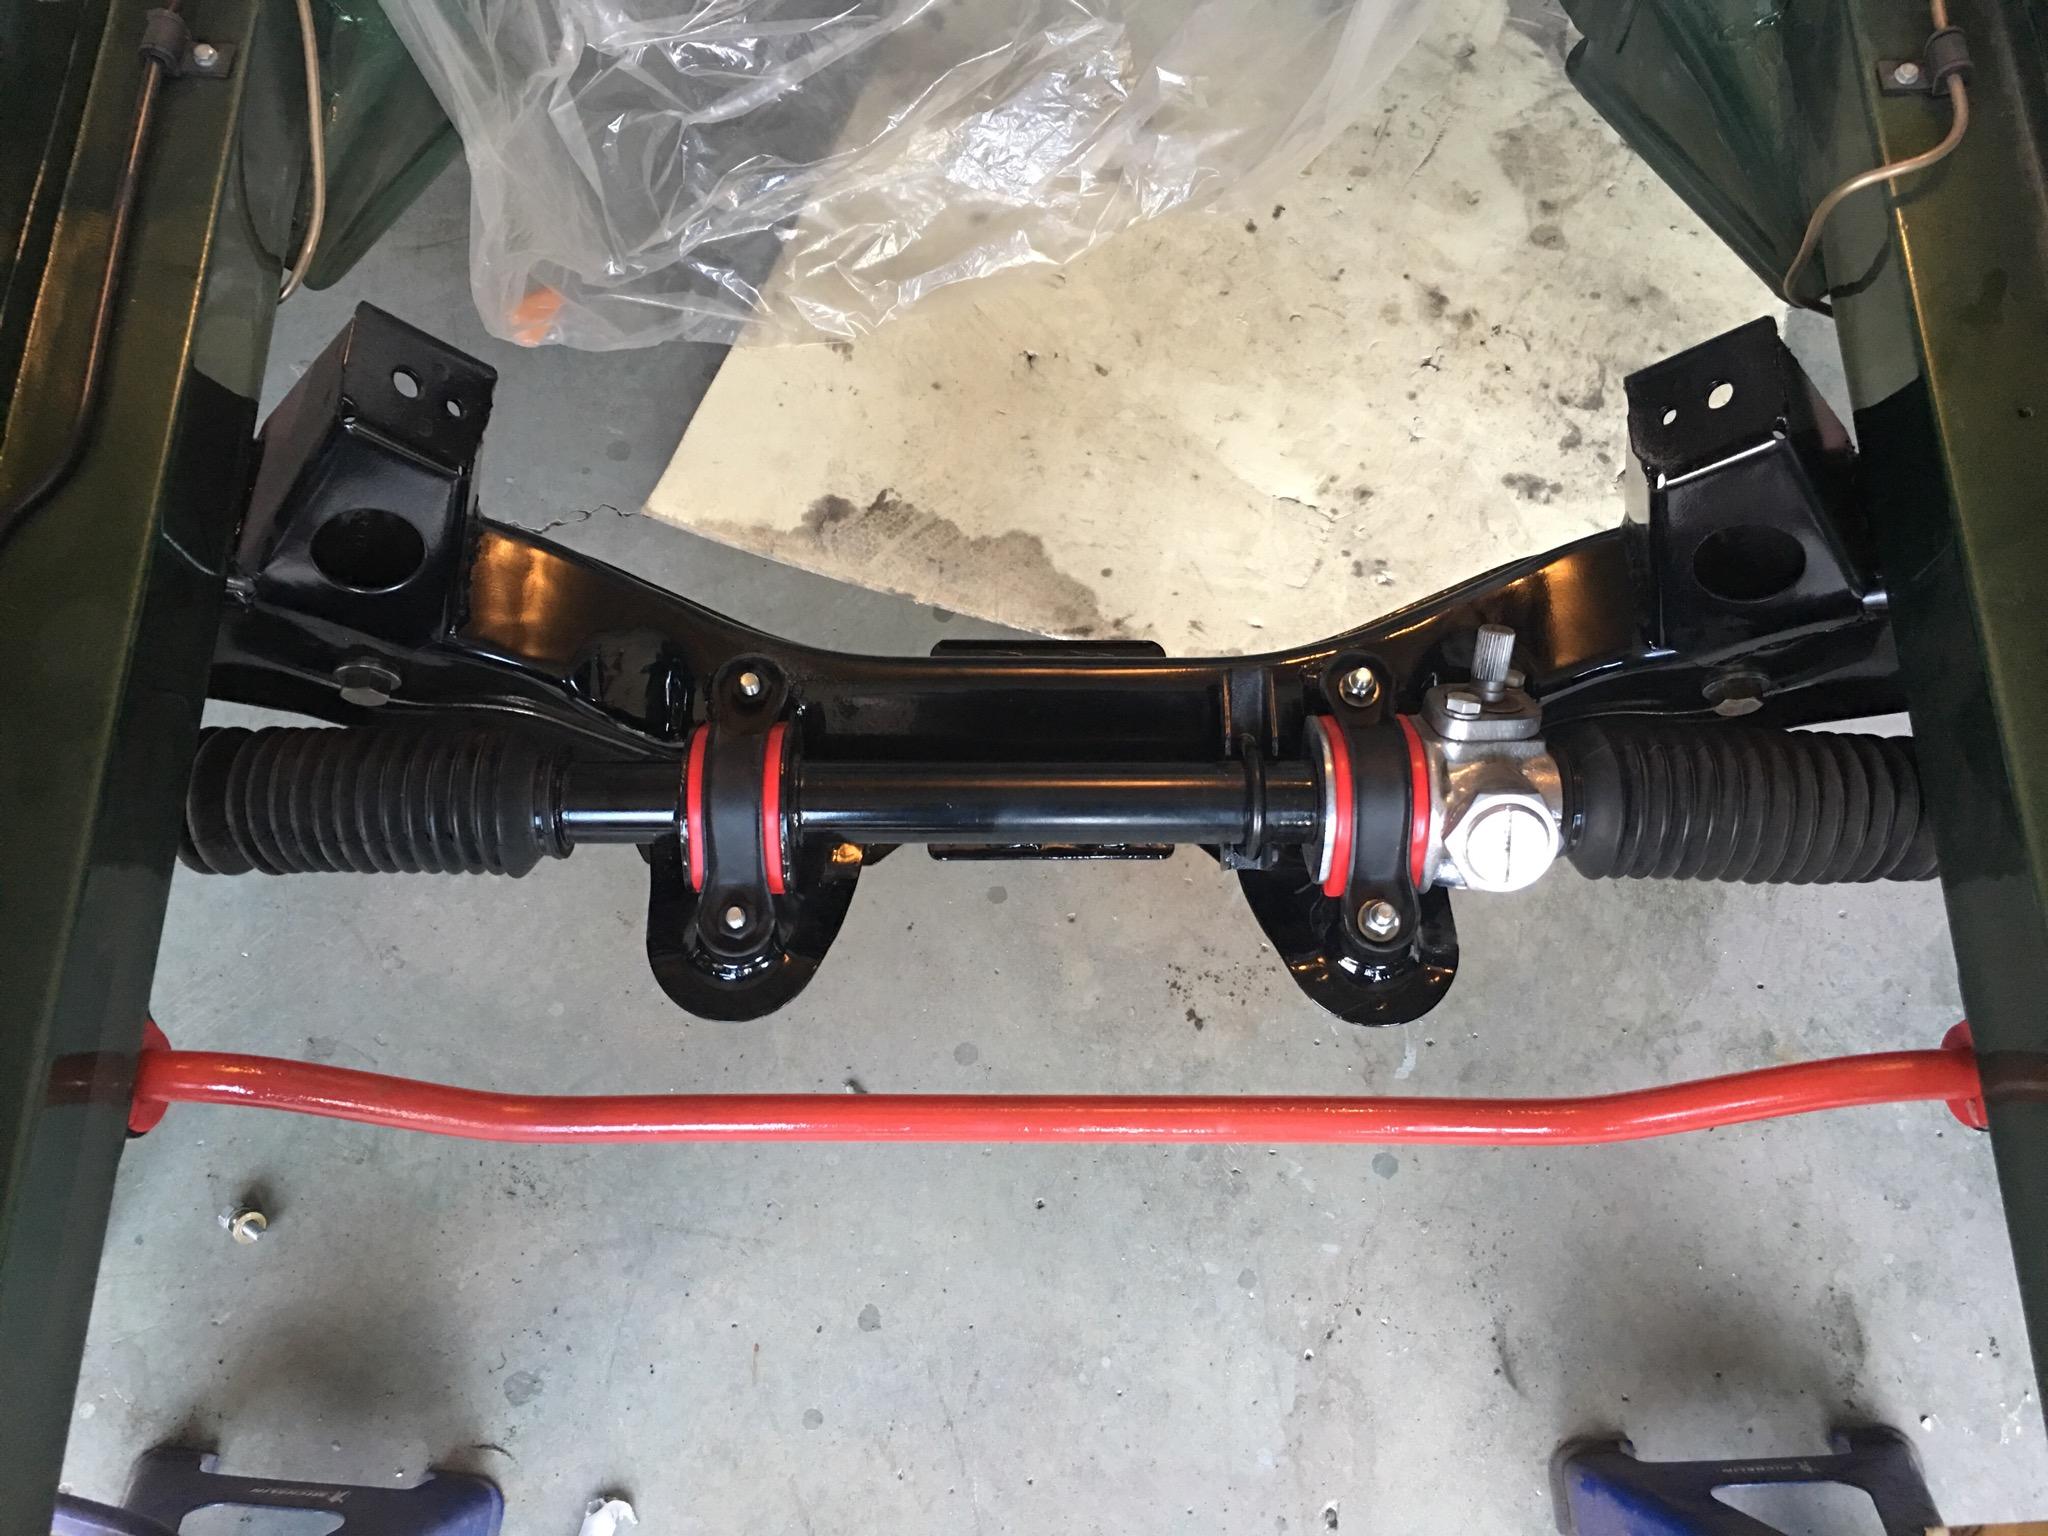
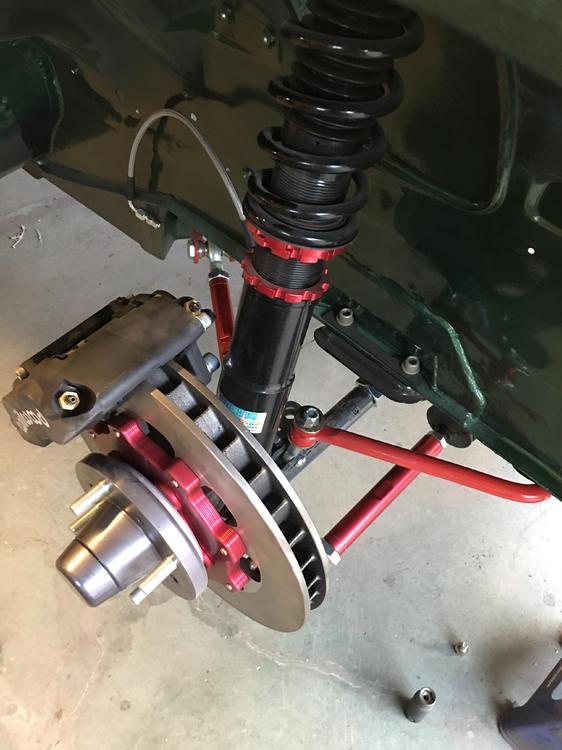
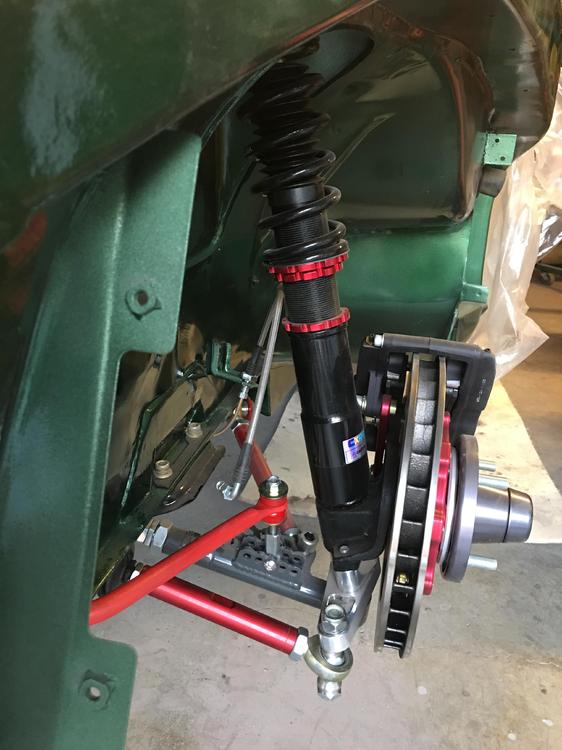
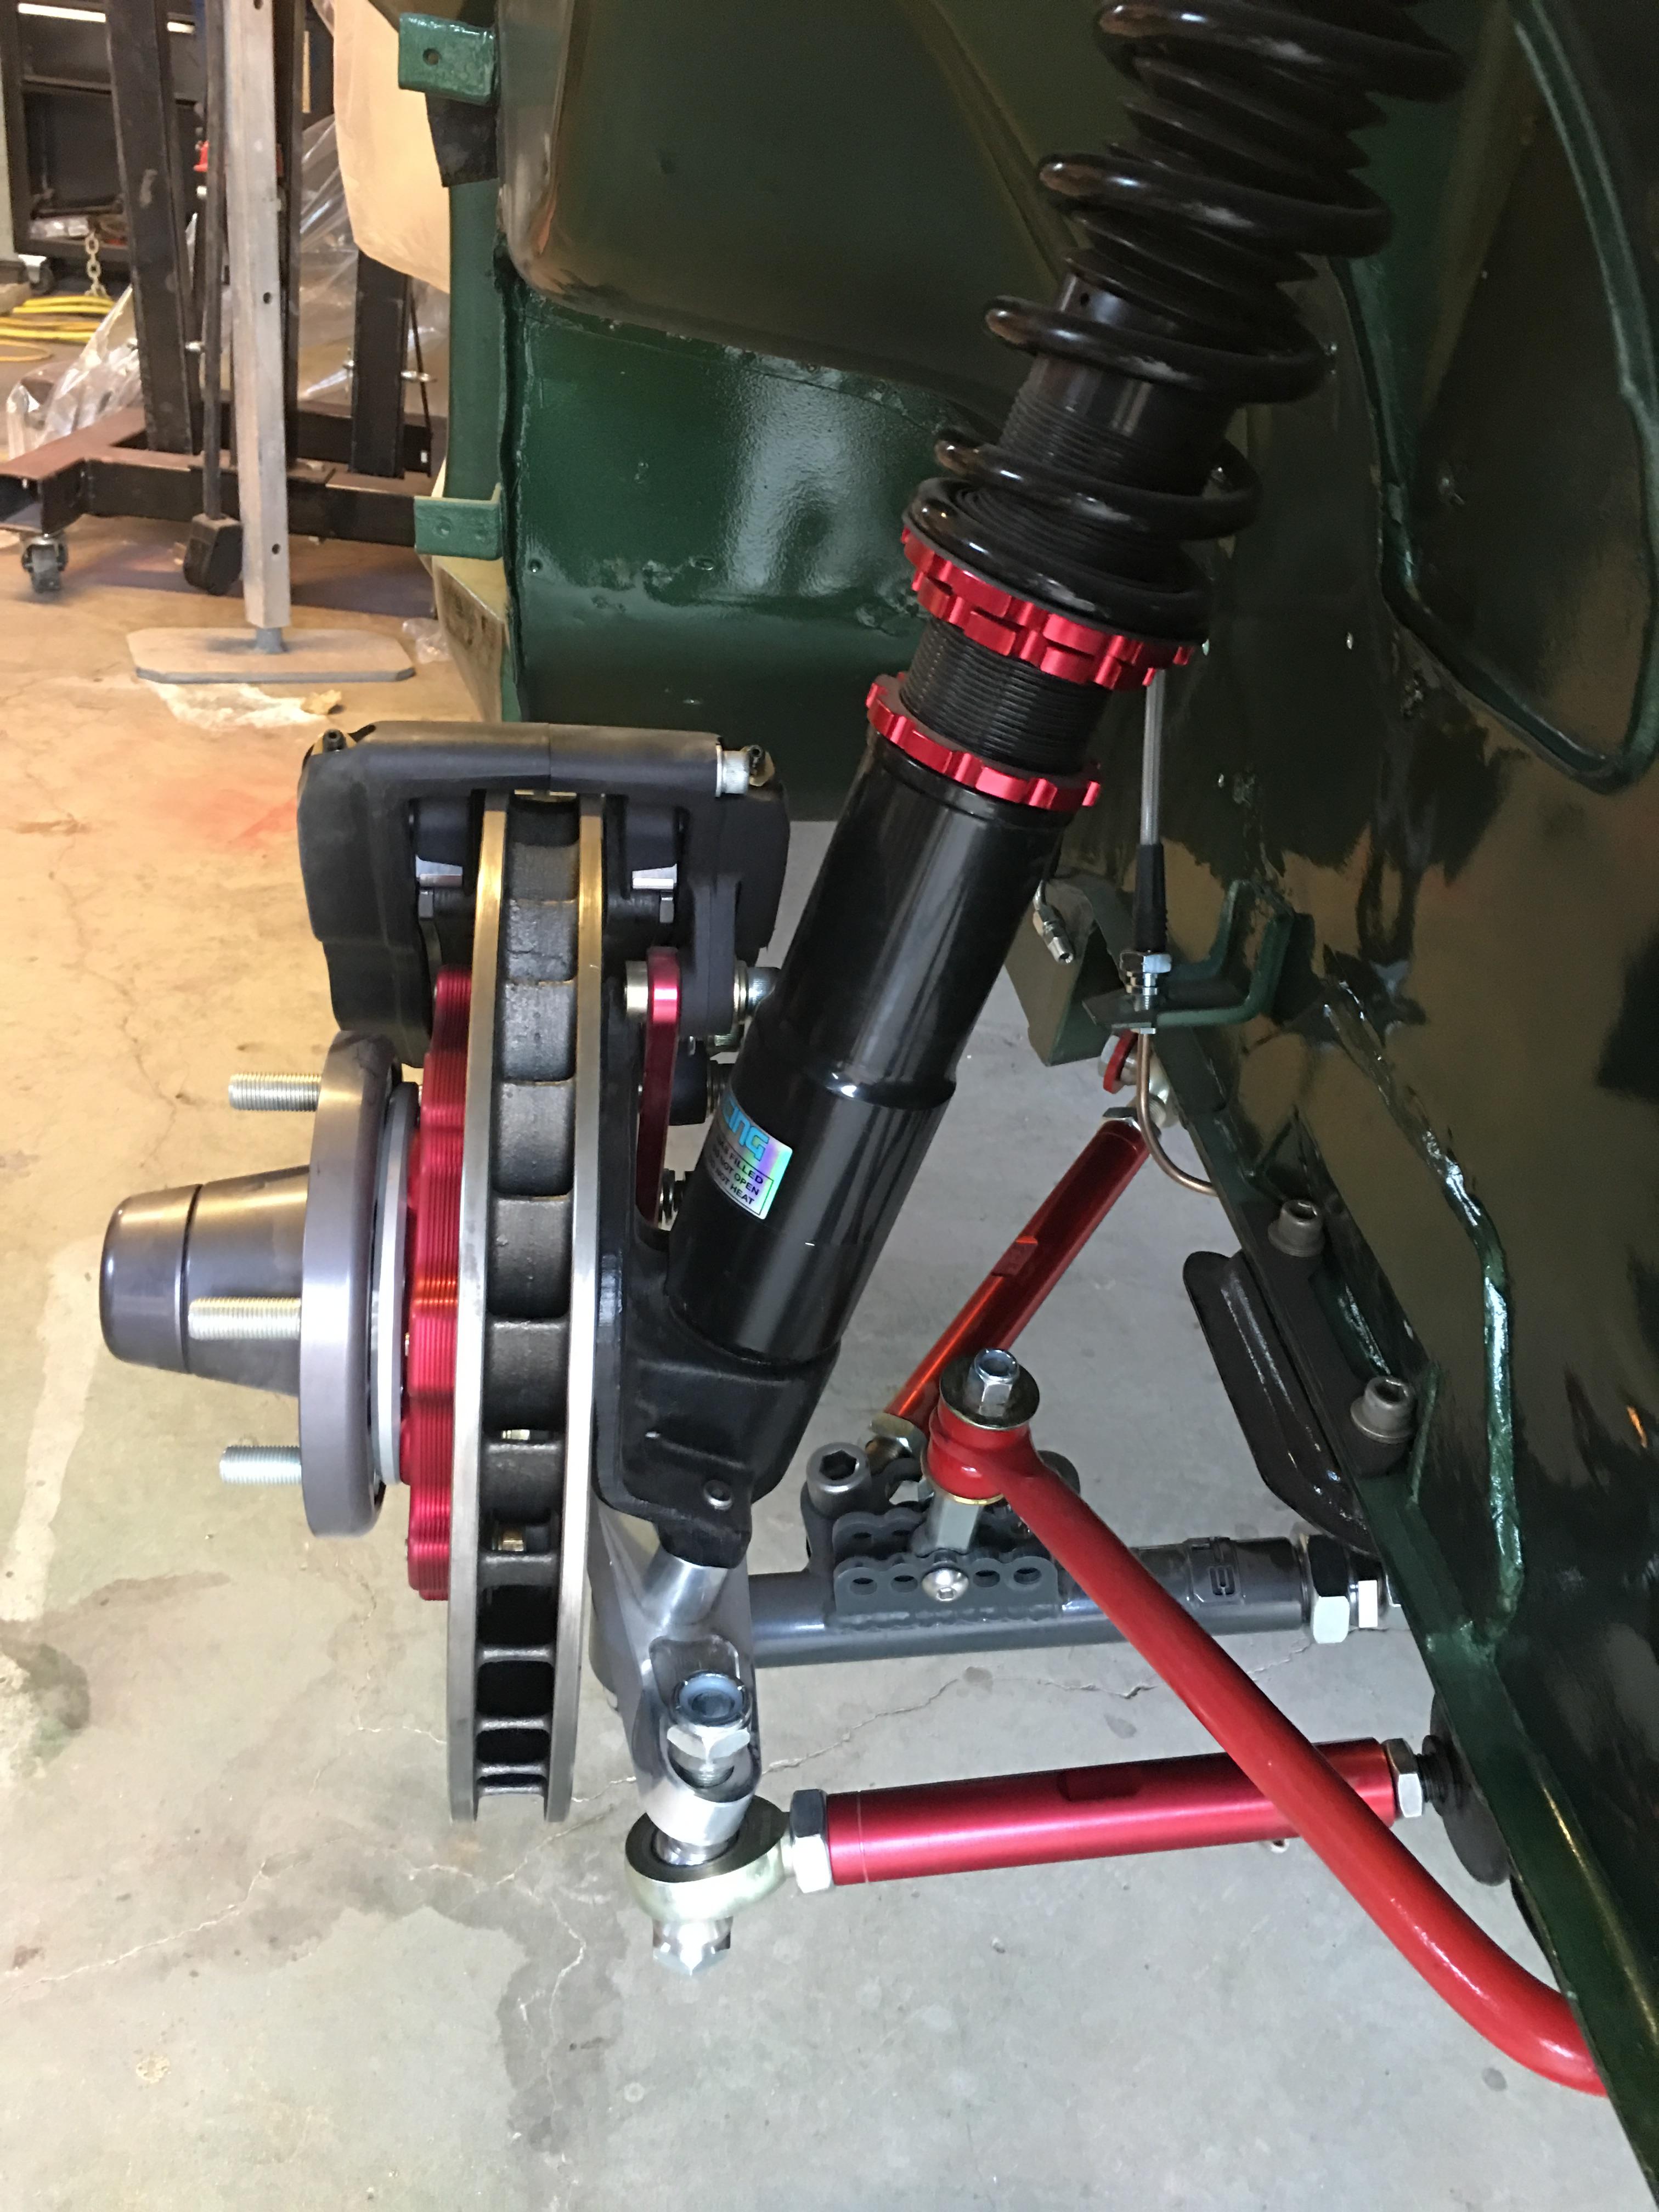
1 pointTechno Toy Tuning lower front control arm, Arizona Z Car shortened steering knuckle with roll centre adjuster, stock rebuilt steering rack and powder coated anti sway bar, TTT outer and inner tie rod ends, AZC big brake system, TTT tension rods, TTT billet front hubs, and CX racing coil overs on custom welded front struts.1 point
-
1 point
-
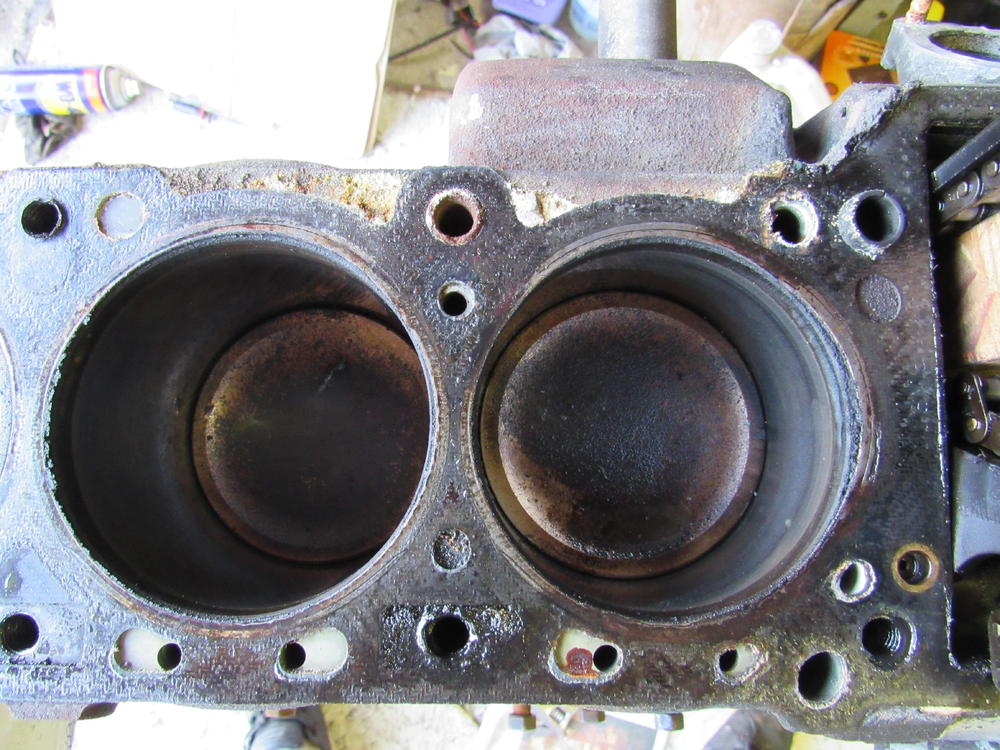
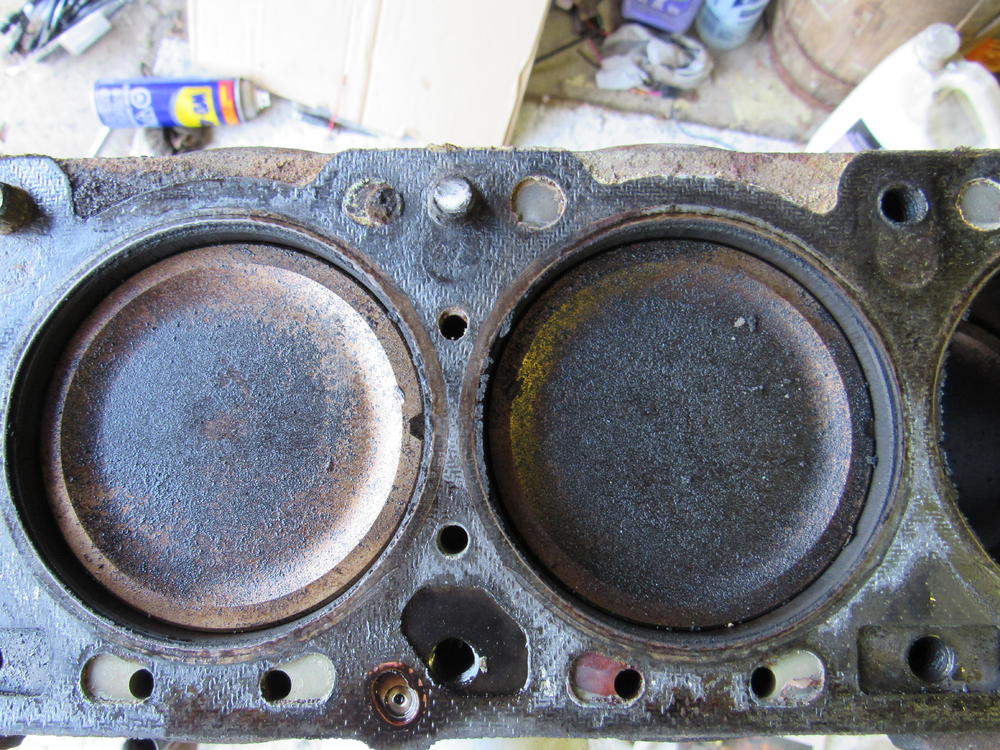
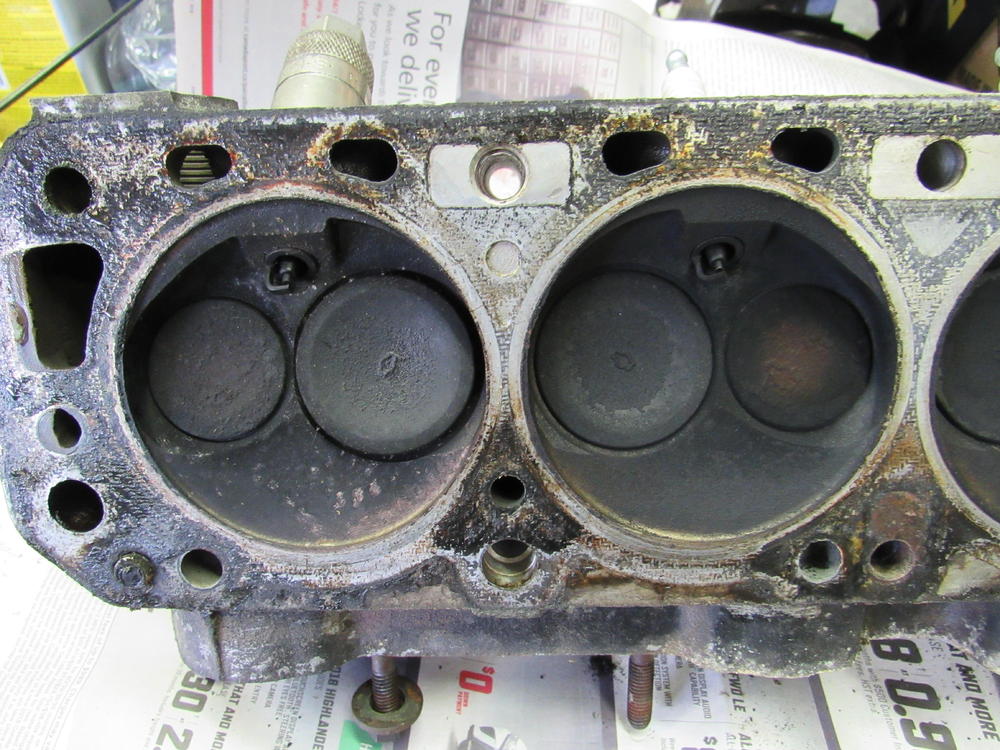
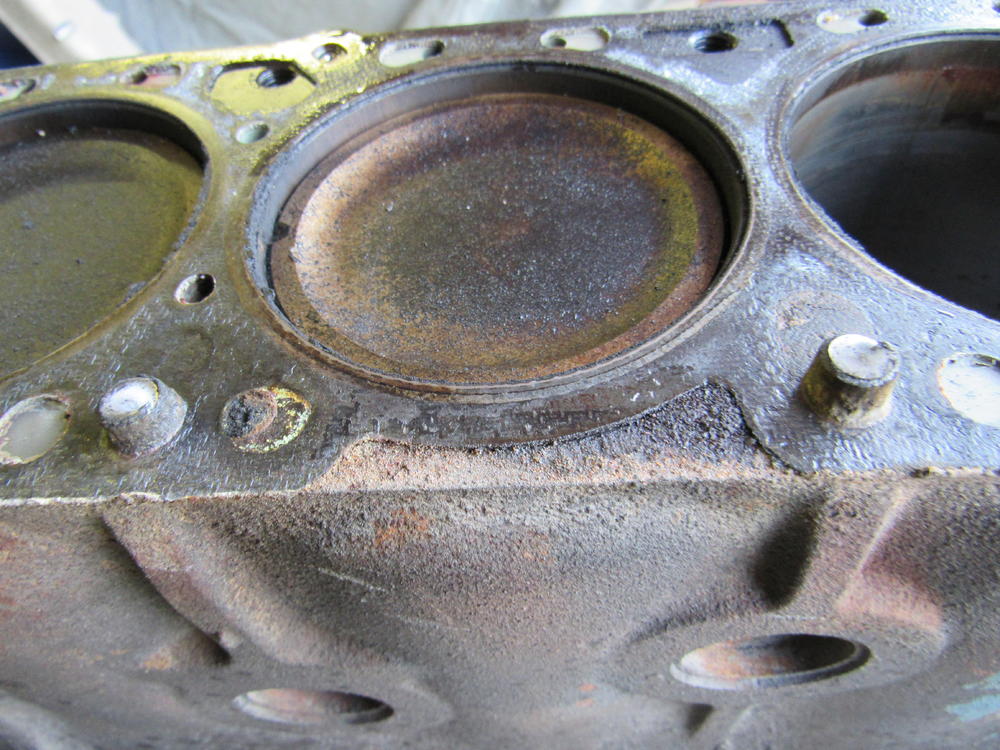
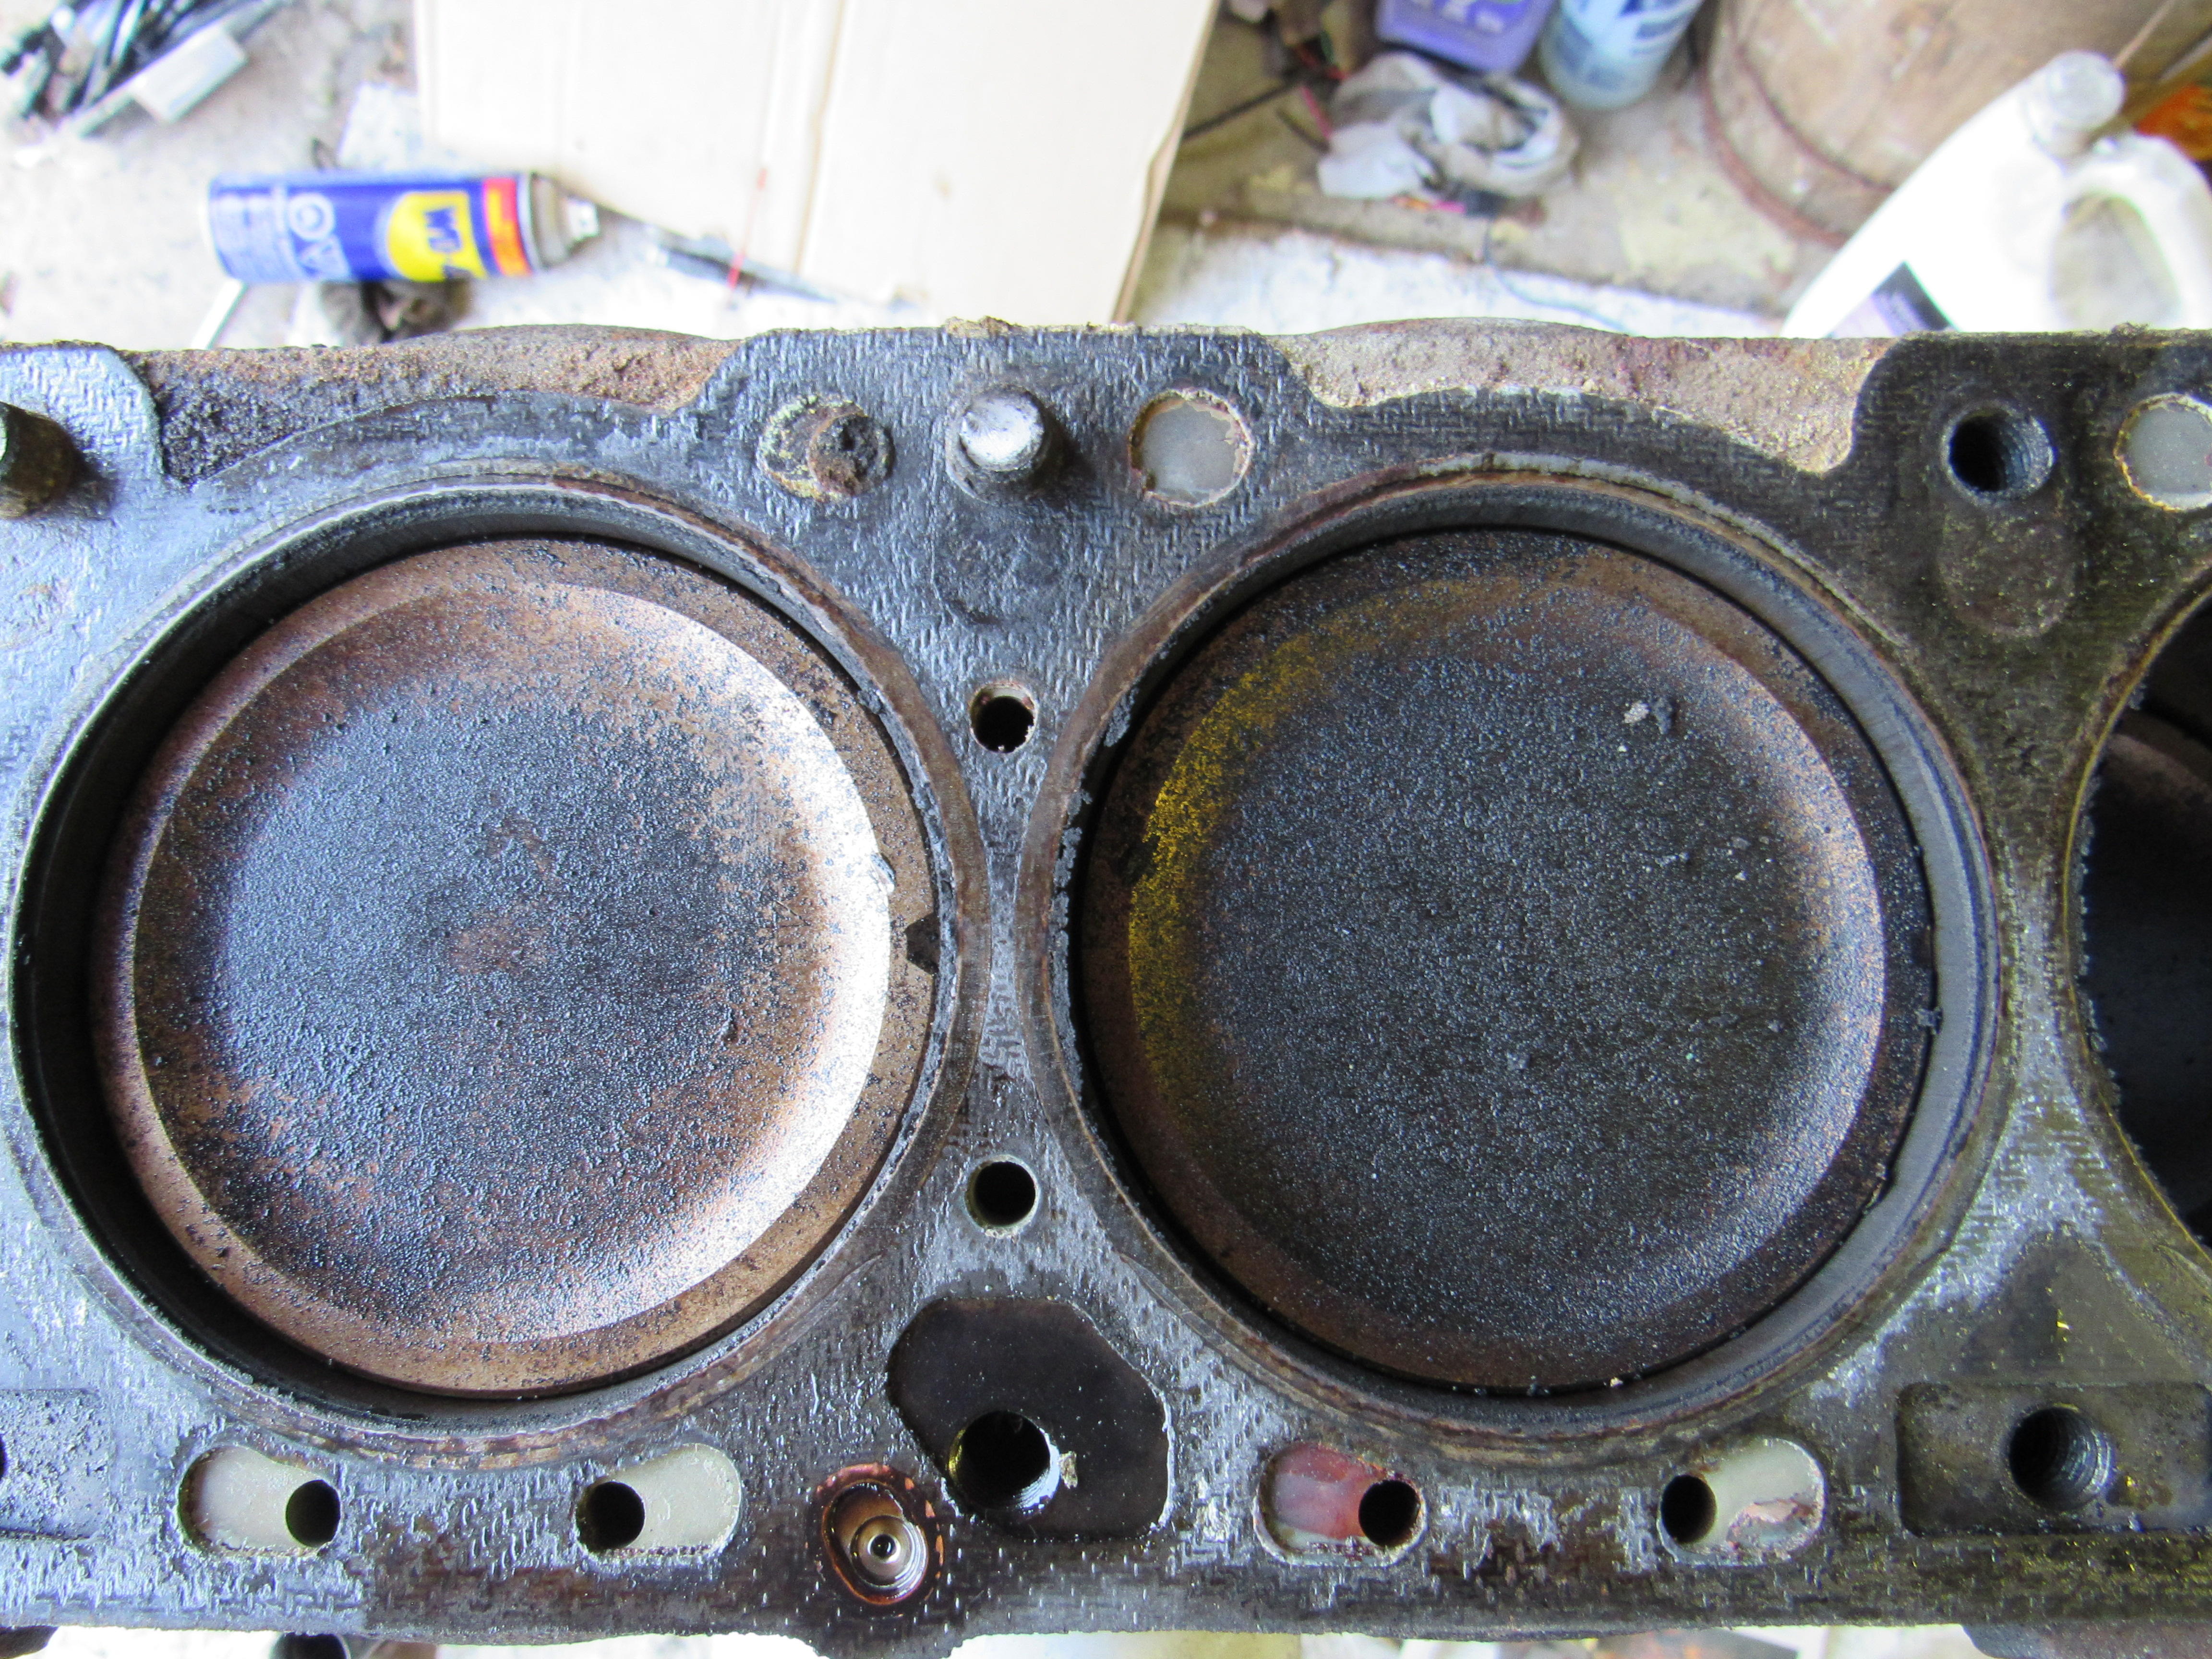
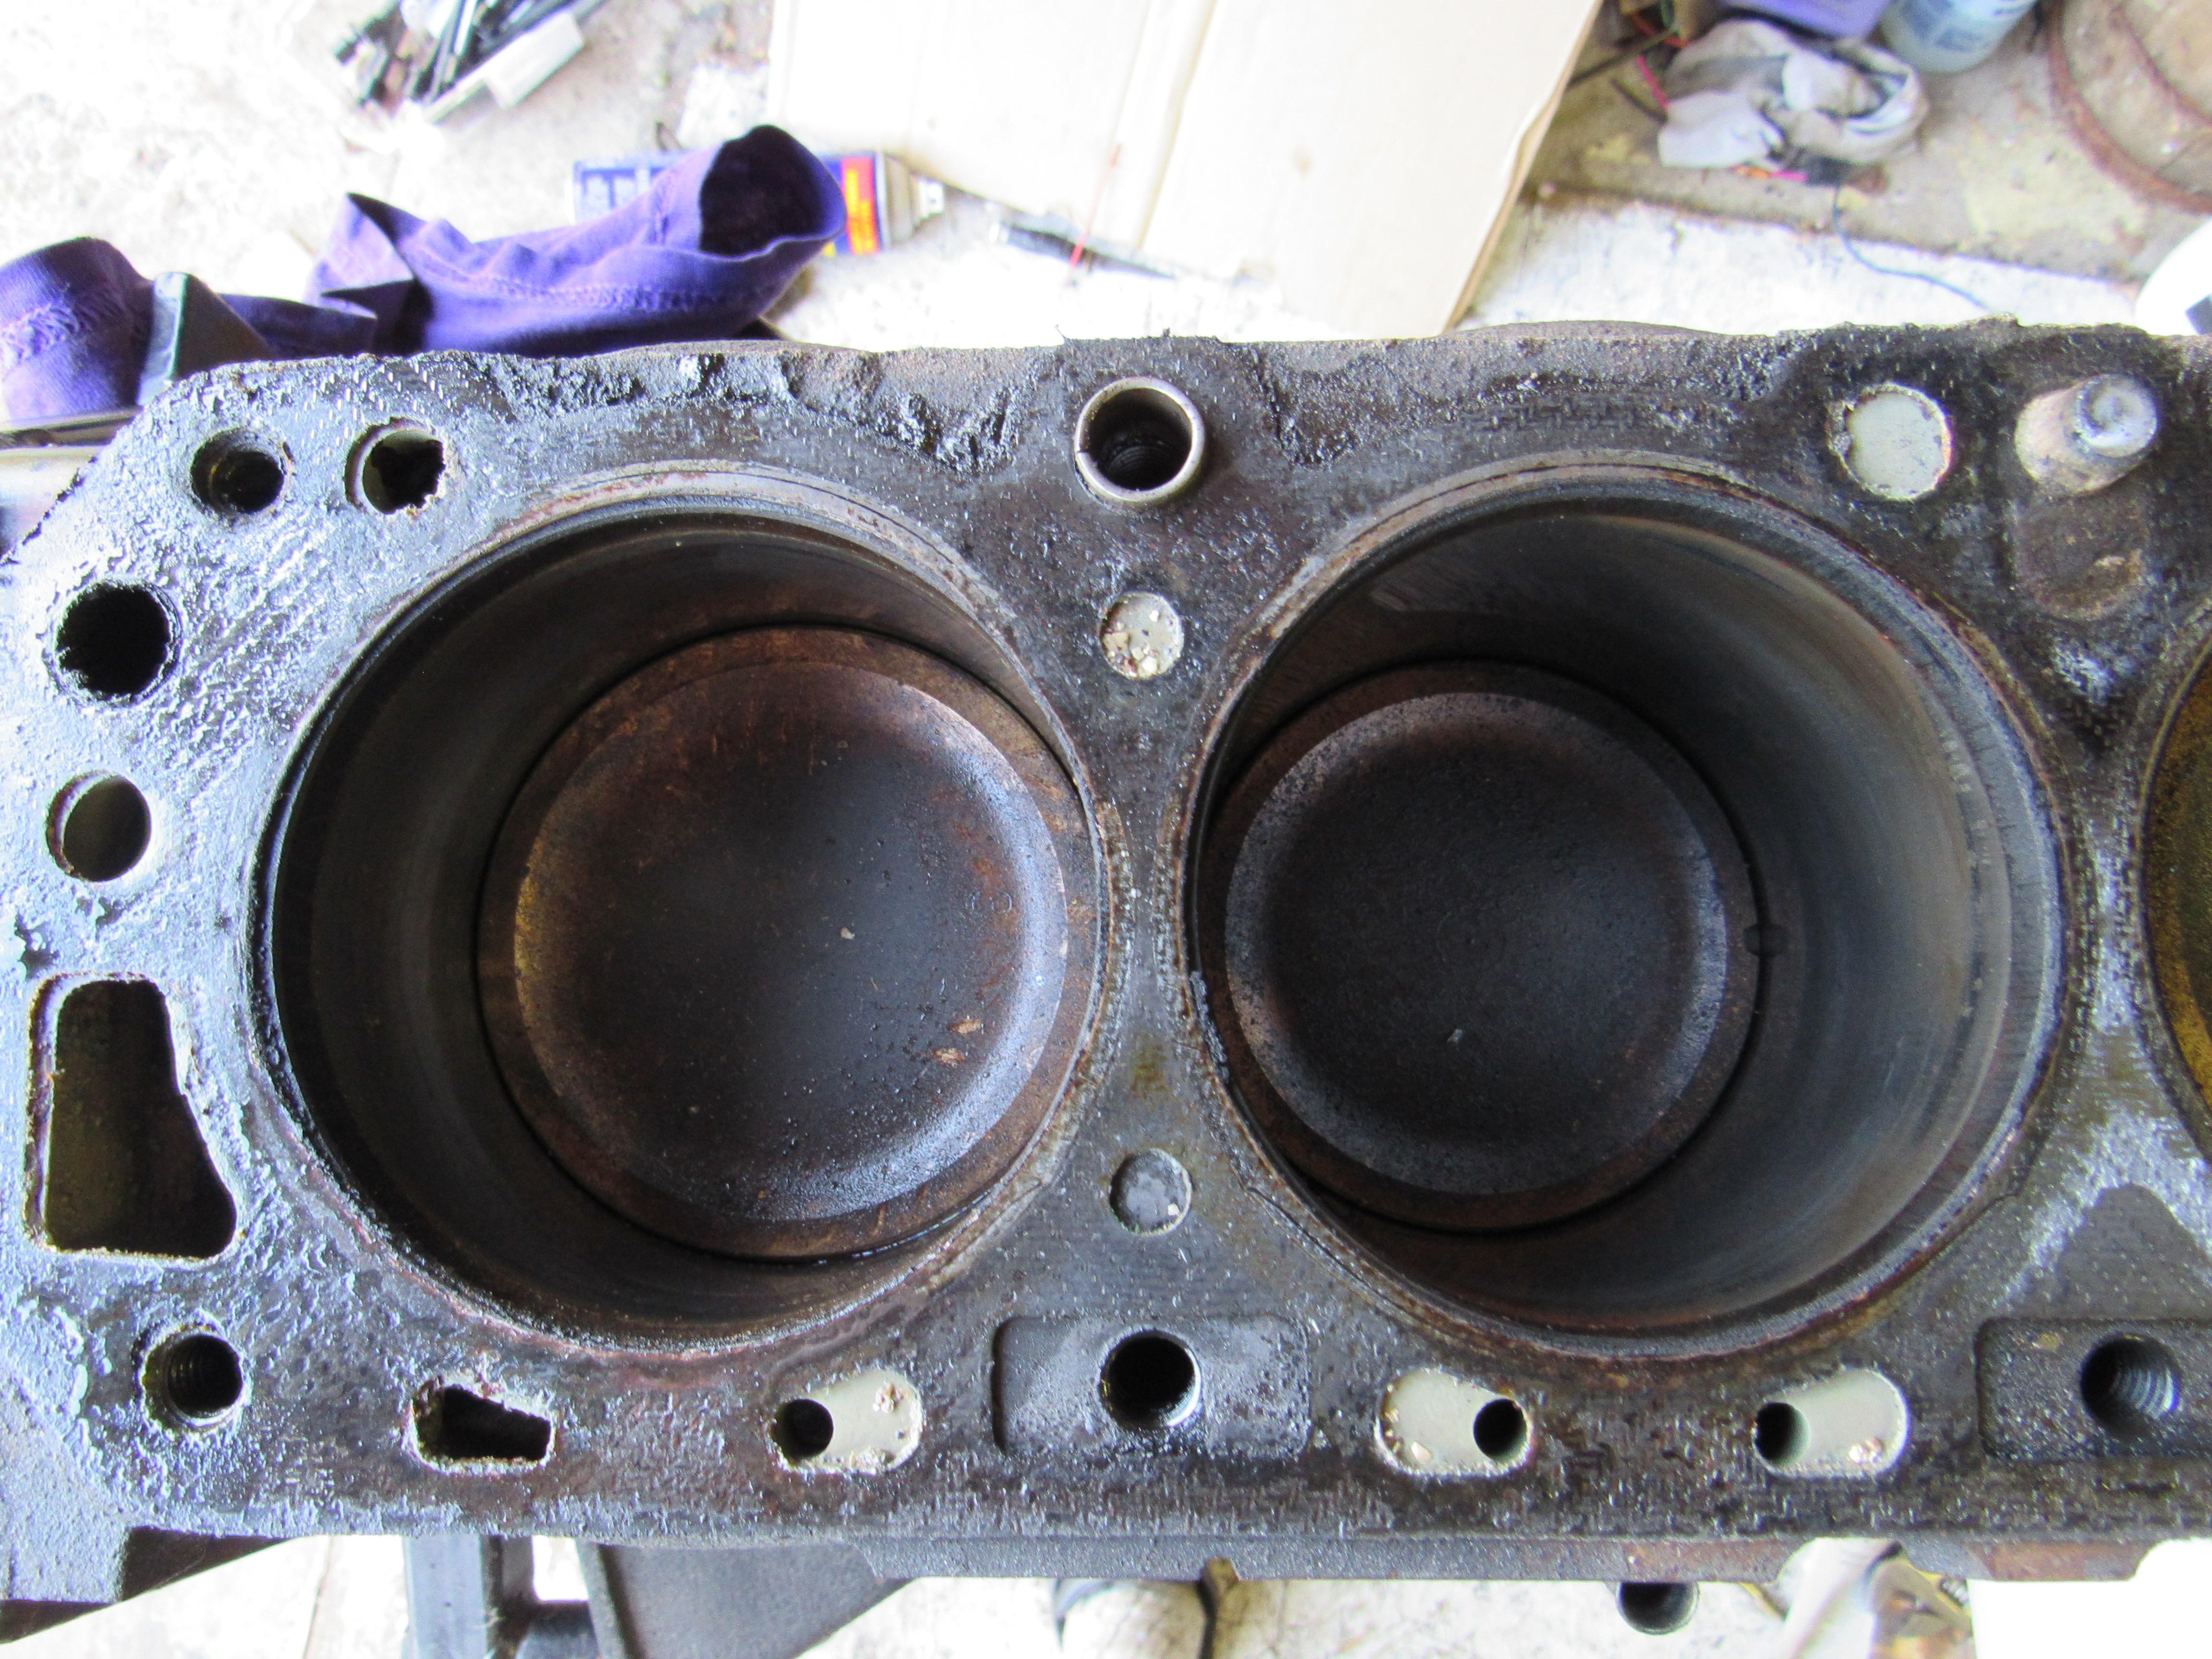
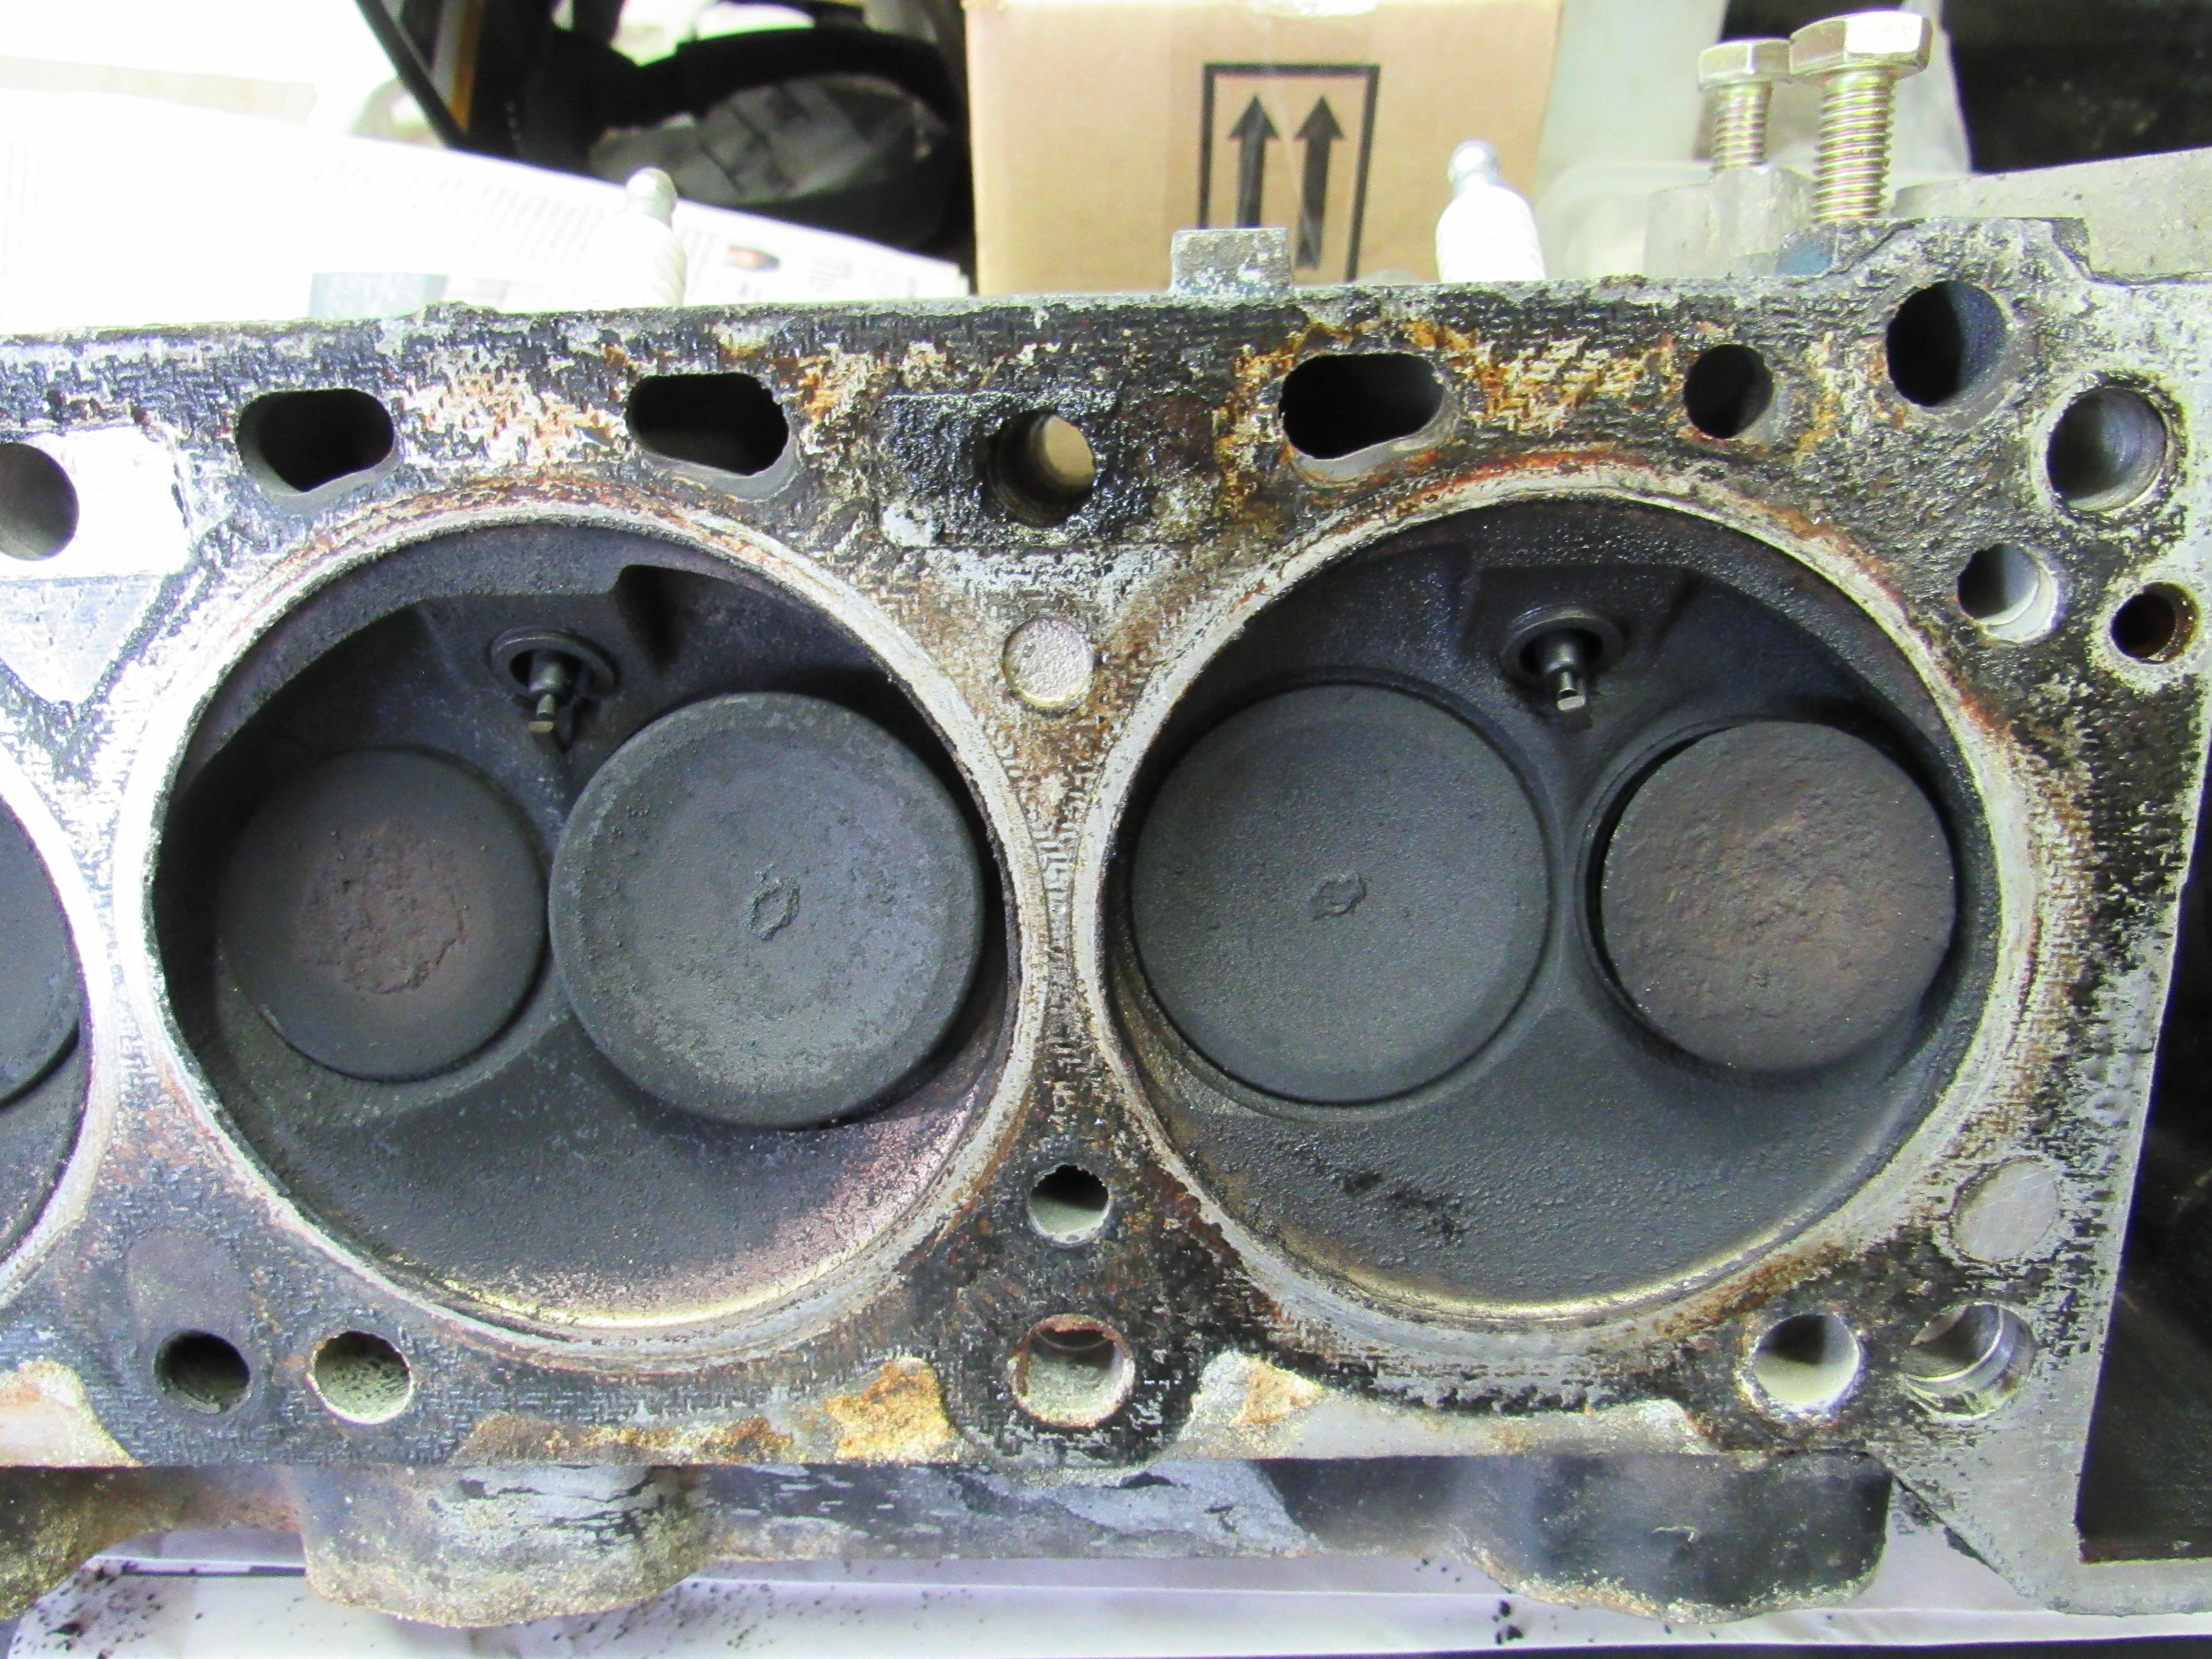
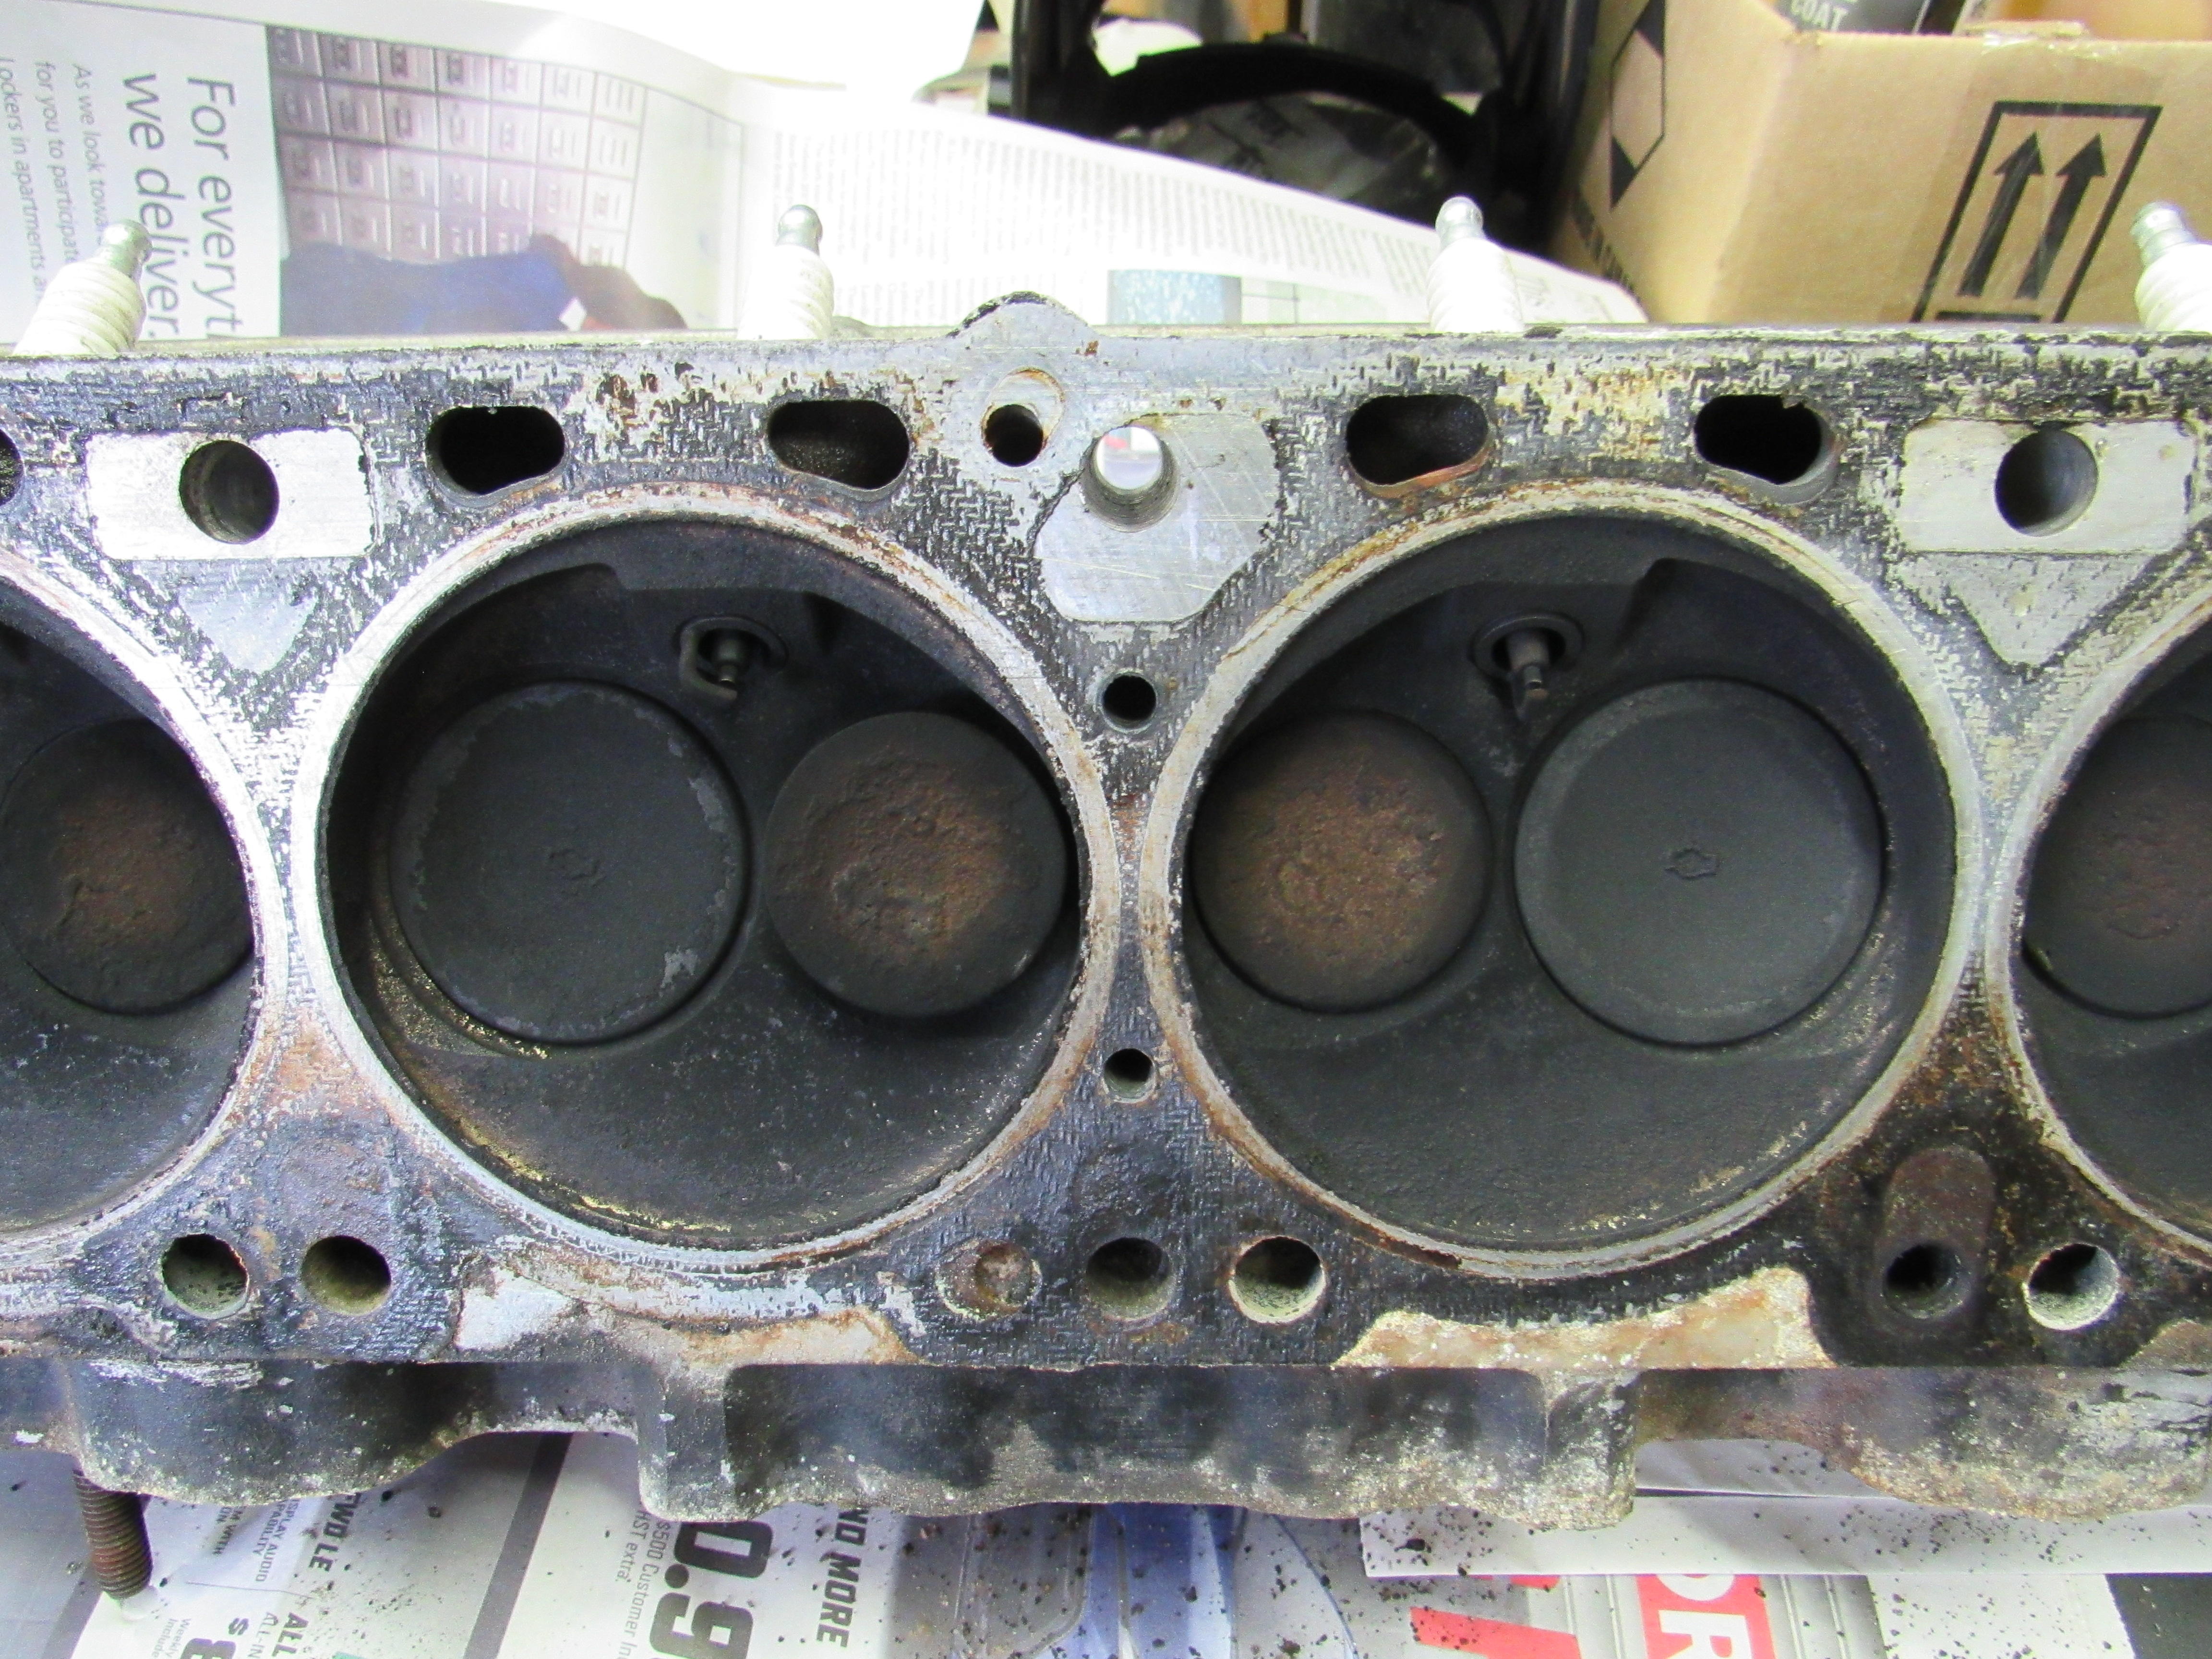
All right, I got the head off the engine today, pistons look very clean for over a 100k miles, valves are pretty caked with carbon. I have never had a head bolt break on me before and two head bolts broke on this engine, one on either side of #4 cylinder, also there there are four other bolts that broke, 2 in the timing cover and 2 in the front of the block. There is about 7-8 other bolts that have broken of on the body so far, never had such bad luck. I did sit for 20 something years. pics go from front to back on the block and the head, last pic in the broken studs. Should I attempt to weld nuts on to the stubs of the head bolts or should I just take the block to and engine builder or someone who does this all the time?


 1 point
 -
1 pointDo you have the 3.9 R180? I've never been clear on what ratios the 240's come with. The early 240 4 speeds were 3.592 first gear. 3.592 x 3.9 = 14.00.1 point
-
Shiny Silver floors. Also flat, strong and waterproof.
 1 point
 -
1 pointI concur! Just wait till you get it all painted and out in the sun. You might find yourself just staring at it.1 point
-
Zed Head, first let me apologize for putting this up on the wrong forum. I got page 11 from this form. It came from a 1973 240z to 1974 260z fuel system modification manual I found scrolling through this forum. The manual has to do with the "V-3" Modification program Datsun introduced for a fuel system modification to add an electric fuel pump to the original manual fuel pump system. I've attached the whole manual for your reference. I agree 100% that a wiring diagram would've been easier. Unfortunately no wiring diagram was provided with this fuel system modification. But after looking through some of these forms I've figured out where the two wires in question go. The Yellow wire goes to the Voltage regular and the black wire goes to the starter solenoid. At least I hope so! I will confirm my findings later tonight when I go home and check the car. As for who I am, I'm a Datsun/Nissan enthusiast just like you! I've owned and driven Z cars since I got my drivers license. Thanks! Dan 1973 240z 1974 260z fuel system modifications.pdf1 point
-
1 point
-
1 pointMark I don't think it is too far off the mark (pun). In his suggestion: The exposed annular fuel ring will be 1mm higher so it will be slightly richer due to less energy needed to lift the fuel, but the narrower taper of the needle 1mm higher will either have no effect or slightly contribute a mild leaning as the exposed annular ring will be narrowed. 2.5 turns down is simply a recommended starting point for a factory fresh stock 240z at sea level at 20C. There are also recommendations for changes to this height for altitude and temperature. From experience, there are additional changes in fuel height and in needle type to accommodate engine volume changes, compression changes, cam changes, etc. Just adjust until plugs look good and driving under all loads (idle, city cruise, highway cruise, acceleration) is adequate. In addition to changing needles, you can put weights and stronger springs in the carb bodies to make the pistons rise less for the same engine vacuum. This can help tune towards WOT from cruise.1 point
-
1 pointThat's bad research. They are identical except for the exhaust port liners.1 point
-
1 pointOoooo... Someone has had some CAD training! Nice pics! Are you thinking you'll CNC these out of a chunk of solid material, or are you thinking you'll have something cast? Also, some other thoughts: So is there a really, really good reason for the placement of the throttle shaft bearings and the associated mounting bosses? At quick glance, it appears that you could share the same manifold between front and rear positions if you could standardize the location of the throttle shaft mounting bosses. You really couldn't live with that front throttle shaft cantilevered another inch further forward for the sake of completely getting rid of a unique part? Maybe split the difference in bearing locations between first and third? In other words... I know the center manifold needs to be unique, but it sure looks like you ought to be able to share the same base unit between the other two. Also, are the holes for attaching the mounting bar between the three manifolds... Are they all the way through into the intake tubes? If they are all the way through, you'll need to make sure they are vacuum tight even on the locations for the mounting bracket. If they are blind, you won't have to worry about sealing them. Sorry. Forgot to ask. Is this a design review?1 point
-
So the two prongs on the 78 are supposed to be on-off, and variable resistance. You're saying the 78 style sensor you got from rockauto does not operate like that? There's always the Fiero.1 point
-
Well it's too late for me now, but if I were still looking, I would certainly take a look at your car. All things considered, it looks like it may be a better starting point to build on than what I ended up with. But that's water over the dam for me... I better stop thinking about it. (So how much rust is there on the wheel arch? Did they miss that area with the rust preventative spray or what?) So I'm absolutely no car buying or selling expert, but when it comes to Z's, it seems there are a couple different camps of buyers. 1) Those who want an early car - Your car cannot ever satisfy that family of buyers with a 280. They want a 240 only, and the earlier the better. 2) Those who don't car much about the year but want something that looks exotic. Customized. Fender flares, wheels, and lots of bling - Your car does not fit this category either. 2a) A sub category of the above would be those who are planning to rip it apart and turn it into something exotic looking. That group would be mostly concerned with price. 3) Those who want a factory stock car - Your car would be closest to this family, but unfortunately most of the buyers in this category are also in category #1 who want an early car. In other words... Everyone wants a factory stock 240. The demand for a factory stock 280 is much less. 4) Those who don't care much about anything except for the fact that they can get in and drive on day one without having to mess with it - Your car may also fit this category. All that said, maybe you're marketing it wrong... I wouldn't talk about the things that are wrong. I would tout the stock originality (original numbers matching and even has the original wheels and shift knob) and the fact that "if you're looking for something you can jump into and drive today, without having to mess with it." I would call it "a survivor". My cut is 5%.1 point
-
It has the early fan and E31 head but not the 2400 valve cover. Based on the car's originality I'm guessing that they used up the 2400 covers before this one was built. I have some spares it's supposed to have one. Rust? Yes. Left shock tower has a little, some under the battery tray, both inner fenders by the firewall panel and both rear wheel arches. It's better than most Zs here in PA. I've fixed much worse. Chuck1 point
-
1 point
-
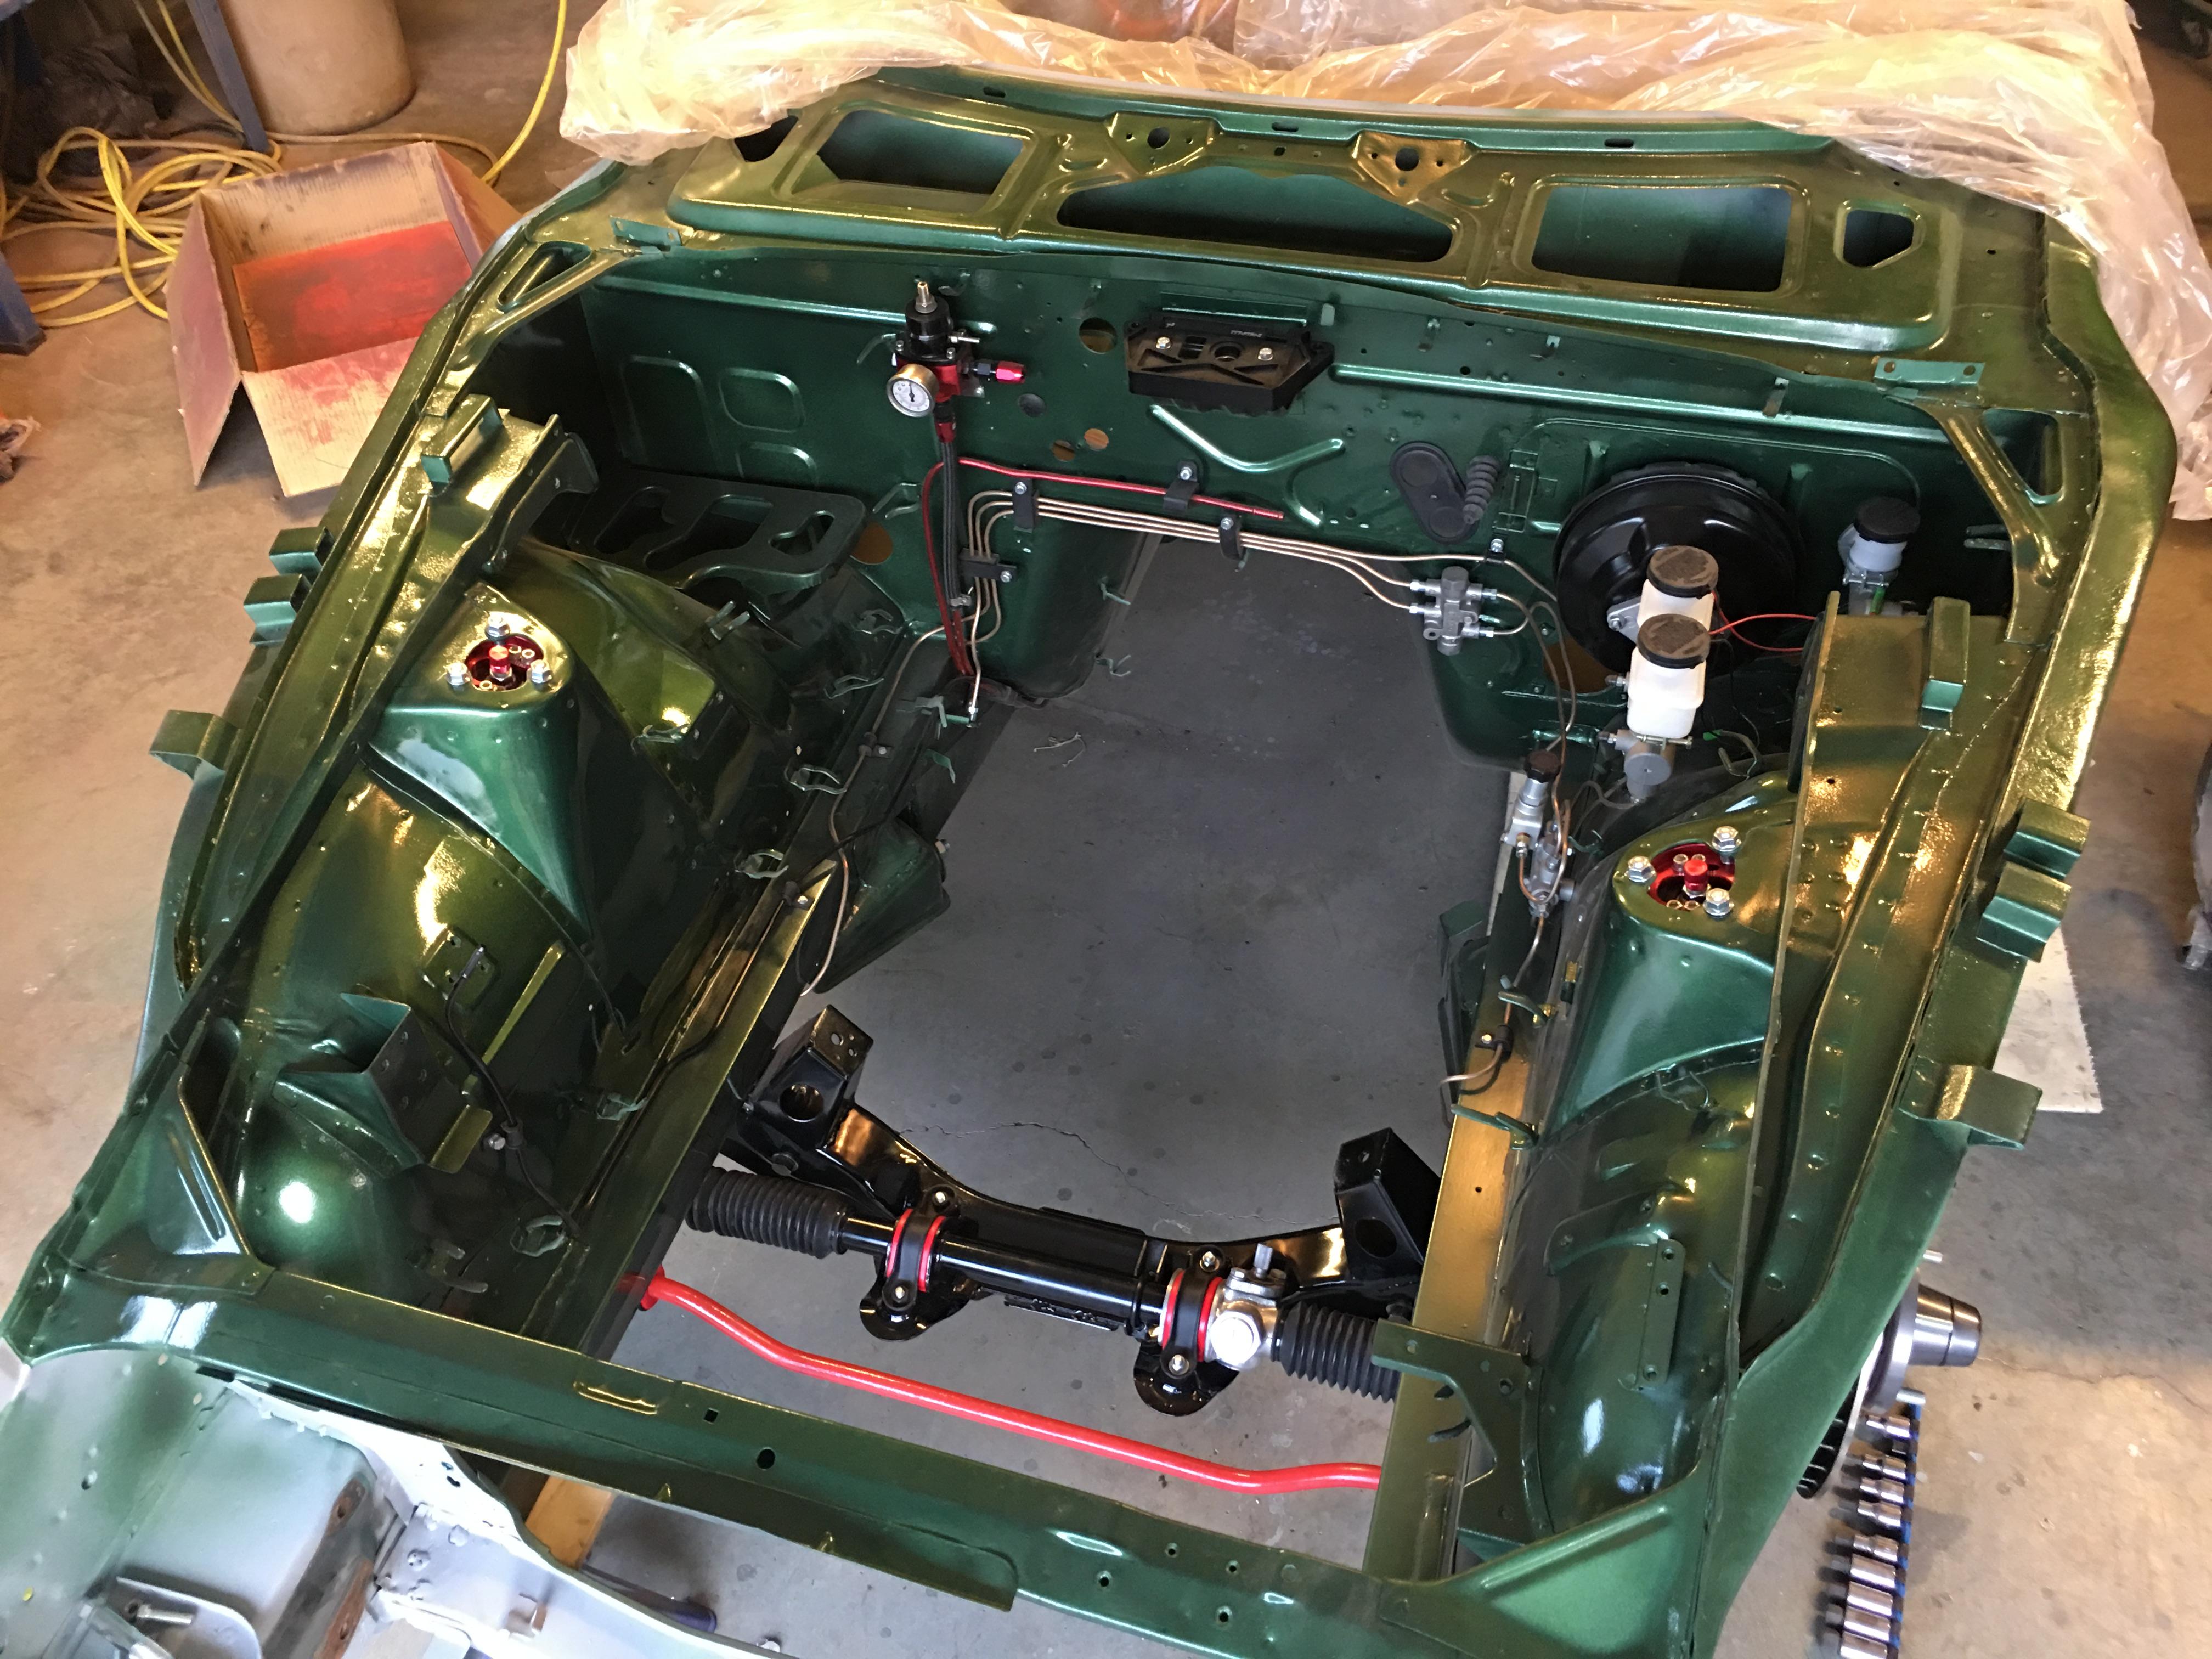
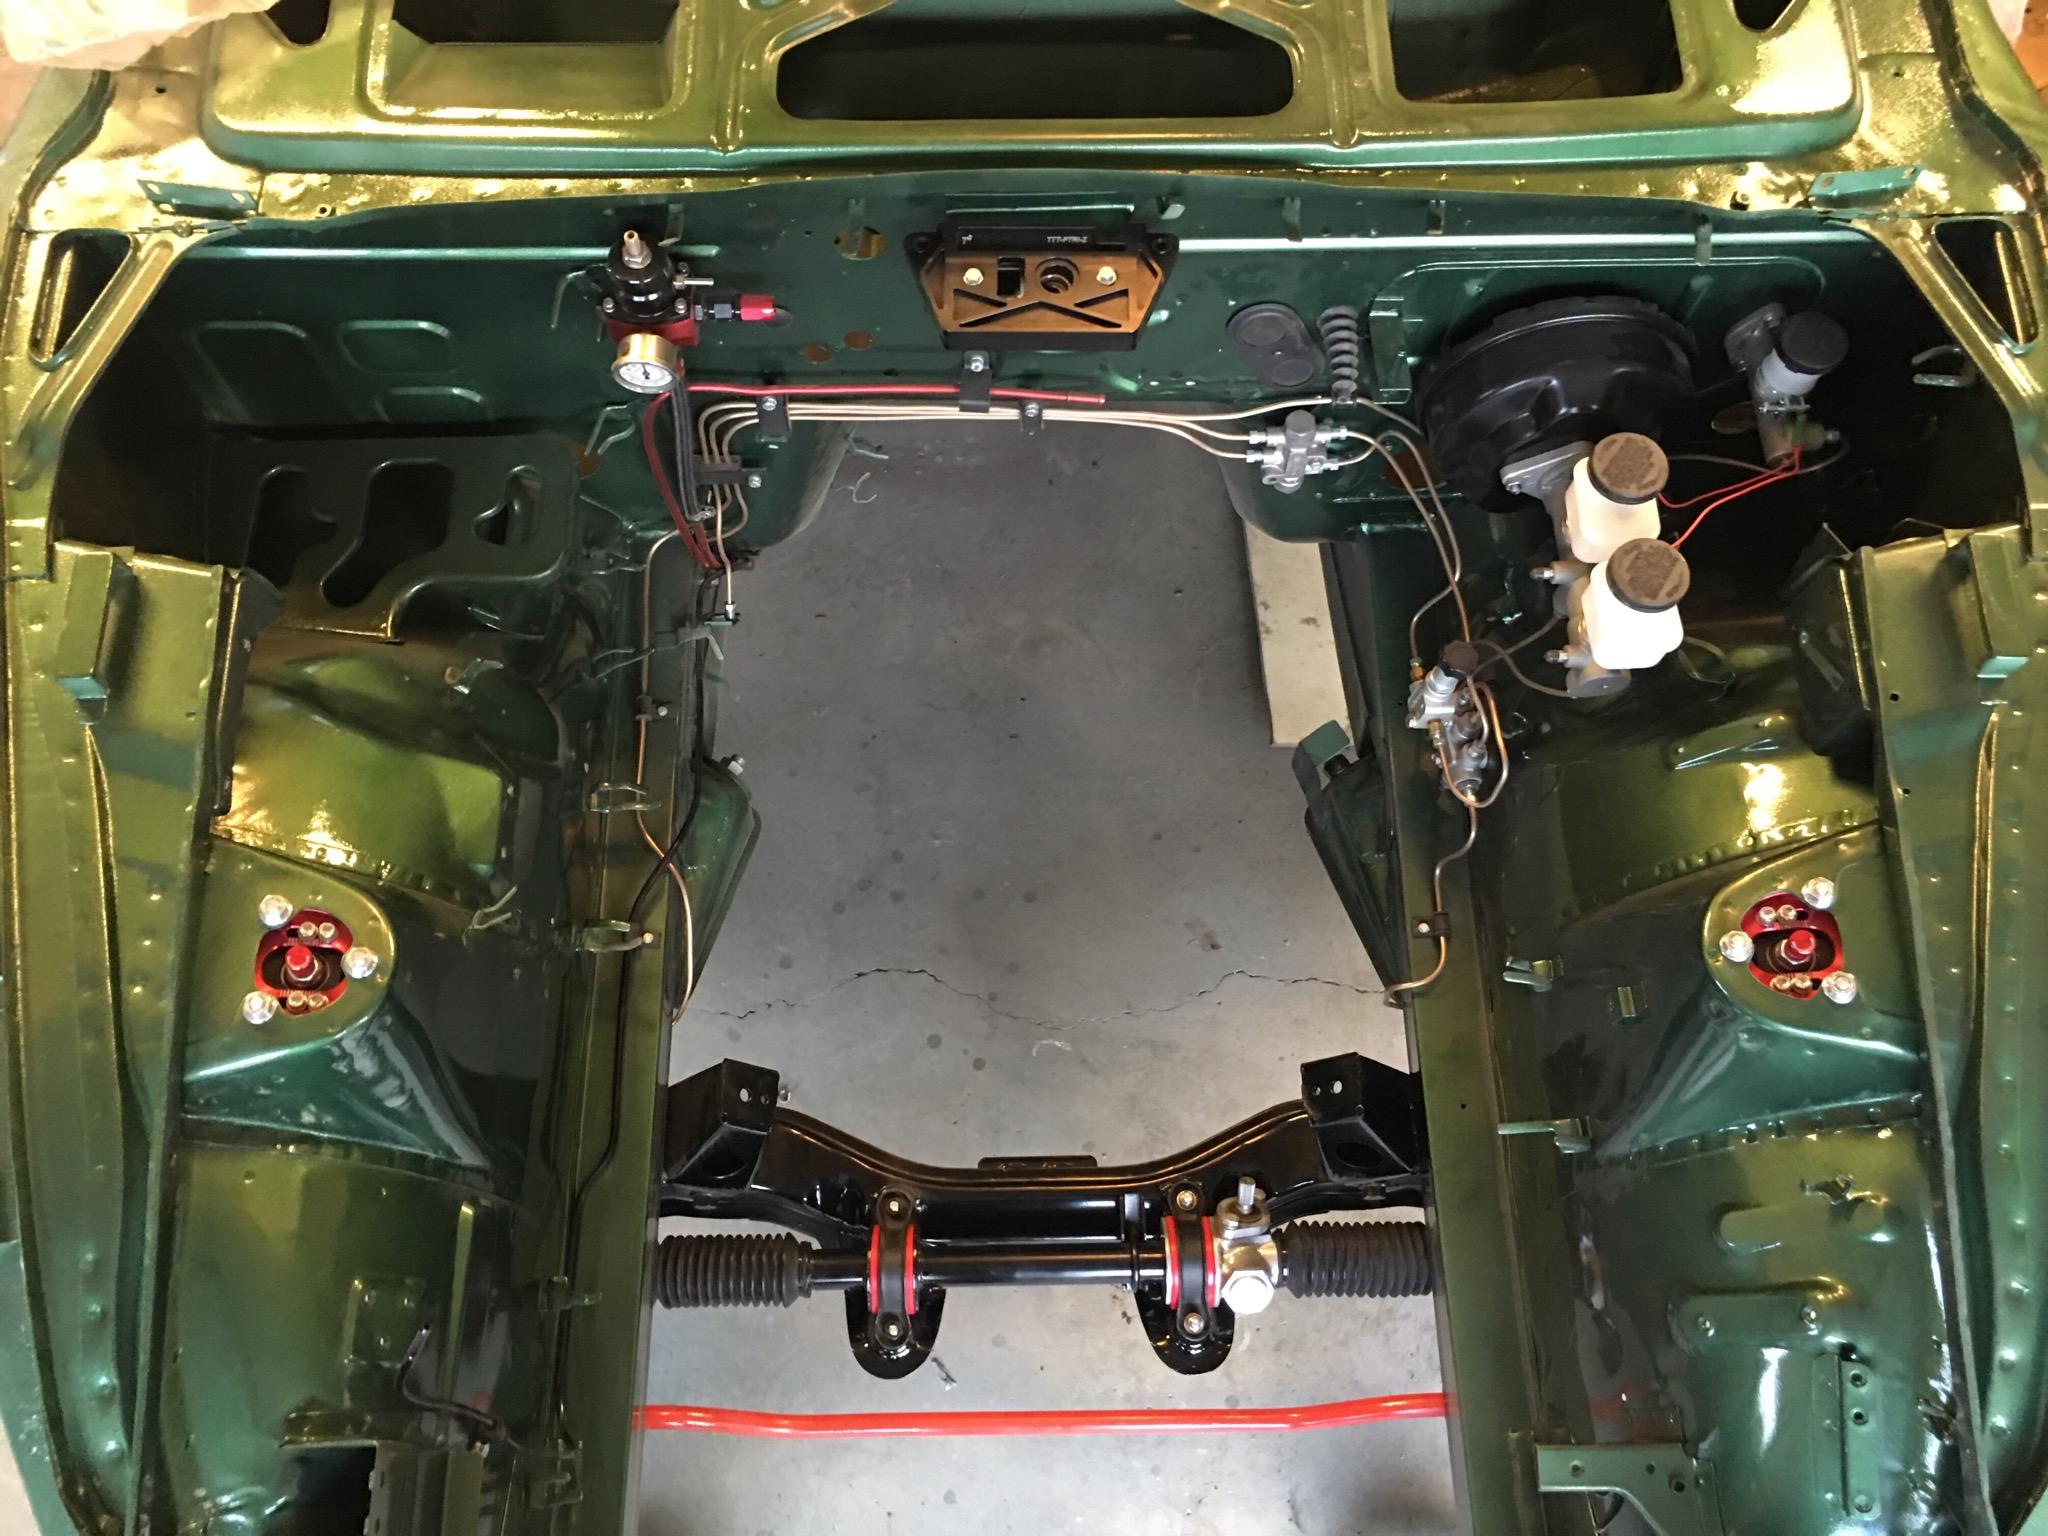
Another dramatic change has been the installation of the rear ST anti roll bar. This single item really has transformed the cars handling dramatically, it’s quite silly how well the car now handles considering the platform is nearly 48 years old. B roads really have been made so much more fun and the overall package has transformed just with this item. The front bar is still waiting to be fitted as we have decided it will be prudent to reinforce the chassis legs before installation given how chunky the new bar is. The overall suspension package now is however fantastic, its amazed a few people how well it negotiates corners. Thankfully the replacement of the lower steering column UJ has removed a huge amount of slack out of the steering and made it far more responsive much to my delight, the car really engages you and provides lots of positive feedback when you want to press on! Long term the only addition I can see will be strut bars to help out further when funds allow. We are very much shaking down the car given the huge amount of custom work that has been completed and various unknown parts installed. So far on the to do list is a vibration that comes in at around 60 & 80 while cruising, I’m not sure if this could be a propshaft balance issue having been told how precise this needs to be but will be investigated. Fourth gear syncro is also fairly high up the list as you cannot rush it and some attention to the gearbox however otherwise she’s running better than ever. The car is a far cry from the one that we purchased 2 years ago, with the exception of the half shafts I think everything drivetrain related has now been replaced. I think it’s only the brake master cylinder left in the engine bay before all major items have been replaced as well. Depending on my schedule the car is going to have a thorough check over in the next month or two and be looked at more seriously to get it running spot on and check that we’ve caught everything. At this point I cannot say a big enough thank you to Iain at Passion Engineering (and his dad who pitched in as well), while it’s taken me 5-6 months for me to plan everything out and source all of the parts his engineering skills have made this part of the project a reality. Due to time and space I didn’t get to attempt a few of the jobs which I would have very much liked to have tackled myself, however when it comes to some of the bigger jobs such as the fabrication and repair of items his skills are second to none. He also bent over backwards in his efforts to try and get the car Le Mans ready, working full weekends and putting in lots of extra hours to get it just right. Sadly some unforeseen issues stopped us but that’s meant to finished product was not compromised in any way. I’ve mentioned all of the key items above however its all of the little details where he excels such as my hidden fan override switch under the dash (without altering the car in any way) and rerouting on the rocker cover breather to be more discrete that makes all the difference. As you can well imagine I’m completely broke on the Datsun fund this year. That doesn’t stop future plans though and in the pipeline I’m still hoping to get a 4 pot vented brake setup up front to compliment the rear drums with new performance shoes. I’ve also been aware for some time that the exhaust system midpipe and tailpipe is very much homemade and horrible. Having properly investigated we’ve identified that near the tailpipe the diameter shrinks from about 2.5 to 1.5 which is really choking the engine I would imagine and needs to go. Currently toying with speaking to Z story about a new JDM muffler and midpipe to go with the current headers or even go the whole hog and replace the whole system which I’d love to if it can be justified. All being well we also have plans to sneak an AFR gauge into the factory gauge setup in place of the clock to keep things looking factory but being more functional. Aesthetics wise the project has taken somewhat of a turn with reality dawning that this is too nice a car to make it look like a race car despite my aspirations, I quite enjoy the fact that everyone thinks it’s just a standard 240Z with the exception of my crazy bosozuku style gear shifter. It’s only when you start talking to people that they realize all of the work that’s gone on under the skin. I may therefore continue to show restraint against spoilers and the like…. There’s been several stories and experiences as ever in the meantime and lots of little extra details however I’ve already written lots so I’ll leave it for now, enjoy the photos instead if you’ve made it this far. IMG-7113 by Mark Woodrow, on Flickr IMG-7112 by Mark Woodrow, on Flickr IMG-7115 by Mark Woodrow, on Flickr IMG-7116 by Mark Woodrow, on Flickr A quick view of all of the area's you don't get to see. It would be good to clean up the fuel tank straps! (Follow link to video on Flickr) IMG-7111 by Mark Woodrow, on Flickr IMG-7467 by Mark Woodrow, on Flickr IMG-7316 by Mark Woodrow, on Flickr IMG-7470 by Mark Woodrow, on Flickr IMG-7325 by Mark Woodrow, on Flickr IMG-7475 by Mark Woodrow, on Flickr1 point
-
Wish I could give credit and details on this one.
 1 point
 -
1 pointAlso, if you think your car is running lean on acceleration, try putting an 80wt oil (thick) in the carb dampers to see how enriching the transition works. If you think your car is running rich on acceleration, try putting ATF (thin) in the carb dampers. 30wt oil is the recommended oil for your climate.1 point


.thumb.jpg.c6884110f2b3405d0a425d12937a14bf.jpg)