Leaderboard
-

siteunseen
Free Member4Points15,115Posts -
Mike B
Free Member2Points2,195Posts -
KDMatt
Free Member2Points697Posts -
rossiz
Free Member2Points1,109Posts


Popular Content
Showing content with the highest reputation on 05/25/2016 in all areas
-
2 points
-
Ok guys, I got it! The aquarium tubing was a big help on that stubborn valve -- I gave it a few good whacks and sure enough one of the keepers straight up flew across the garage. I got really lucky -- almost lost the little bugger, but I got it. I had a few more stubborn ones along the way, but I really got the rubber-mallet + socket/extension whack down to a science by the time I was down to the last couple of valves. I see what you mean now Chas -- that the sound changes once you've got the keepers broken loose. It's subtle but I was able to pick it up... by the time I was down to the last 2 or 3 I could detect it enough to just know that the keepers would be free if I compressed the valve springs. I drained out all the oil and put some fresh 10w30 in there -- it's idling SO smoothly now, and no more big plumes of smoke out the back!!! Even seems to rev a little nicer too. Only concern I've got is that I seem to have picked up a tiny bit of valve/cam noise ... Nothing overbearing or loud -- not even overwhelmingly "ticky" ... just a little more noise. Granted, I used to run at least a quart of Lucas oil additive in there before, so my engine oil was SUPER thick. I imagine that now that I'm running a correct (thinner) weight, it might just be a bit noisier. I imagine it's about on par with where my old 3-series used to be, noise-wise. Dunno. I imagine it would be super obvious if I messed something up, right? I can shoot a video tomorrow. Thanks for all your help, team!!2 points
-
2 pointsI have several low VIN HLS30s, so I'd love it if they get to $100K in my lifetime, but I'm not so sure. I think the "more unique S30Zs" in Japan (Z432R, Z432, 240ZG) have much higher values because they are specialty models with low production numbers. The early HLS30s have many low volume early parts that were quickly phased out as production changes were made, but I don't think that and a low VIN make them as significant as the specialty JDM models. There is a premium for a correct early HLS30 with the early parts still intact but not multiples of what a nicely restored later car would be worth. A low VIN car that is missing most of the early production parts loses most of the premium it would otherwise have over a later car. I think the 30 some Nissan USA "restoration program" cars from the miid 90's will be worth more than most low VIN cars, except for maybe the lowest VINs like HLS30-00013 or lower or a really complete original survivor low VIN car. By the way, I noticed that the relisted auction for the HLS30-00064 car is no reserve now and currently at $44,200, so if the bids are real it should sell now. It will be interesting to see what it sells for.2 points
-
1 pointDo I get a cookie or something for breaking 500? I think my goofy arse has the high score? I'm working on 500!1 point
-
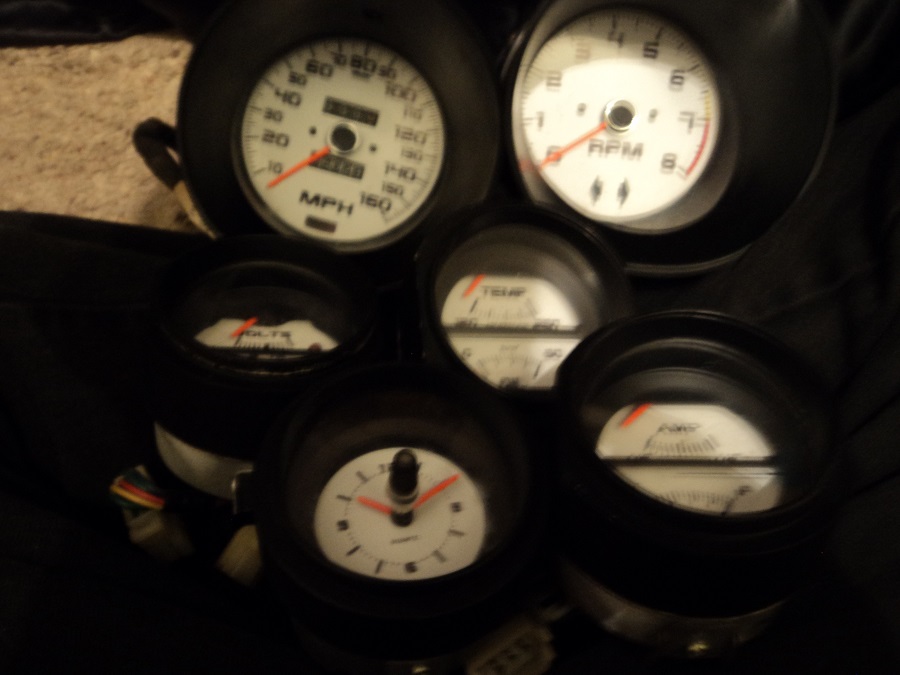
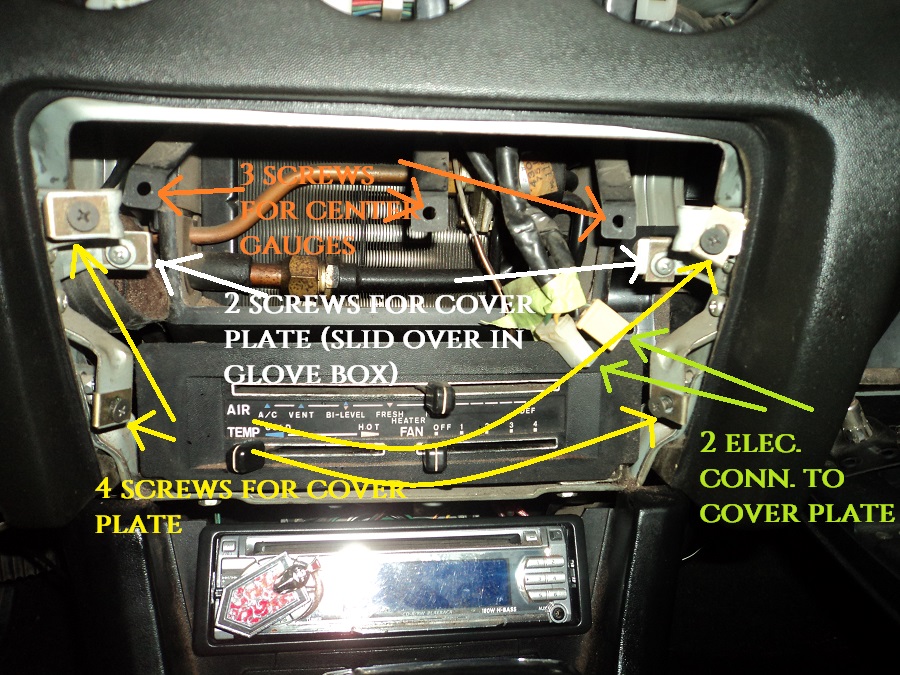
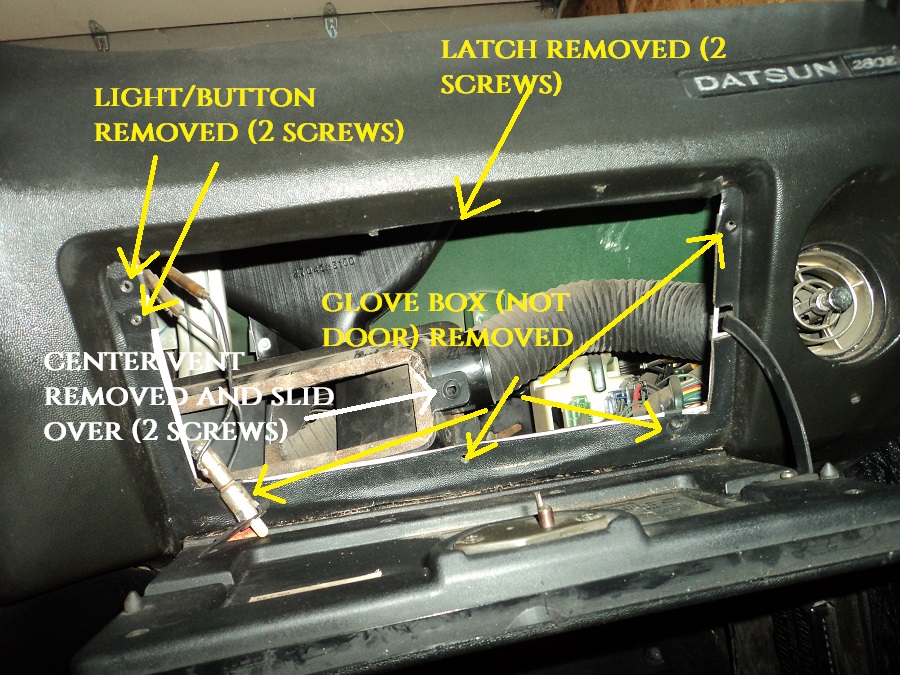
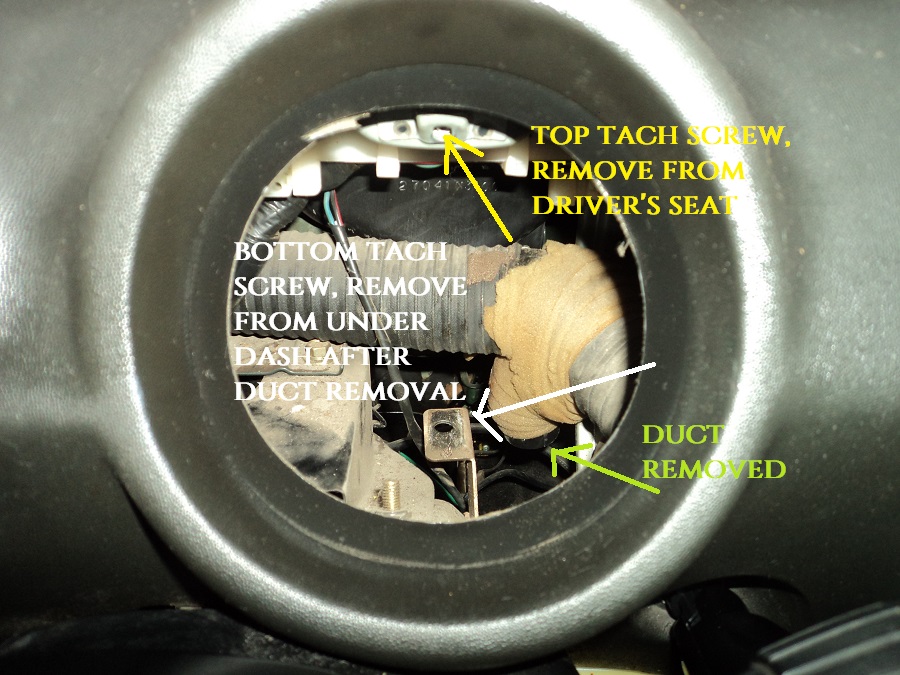
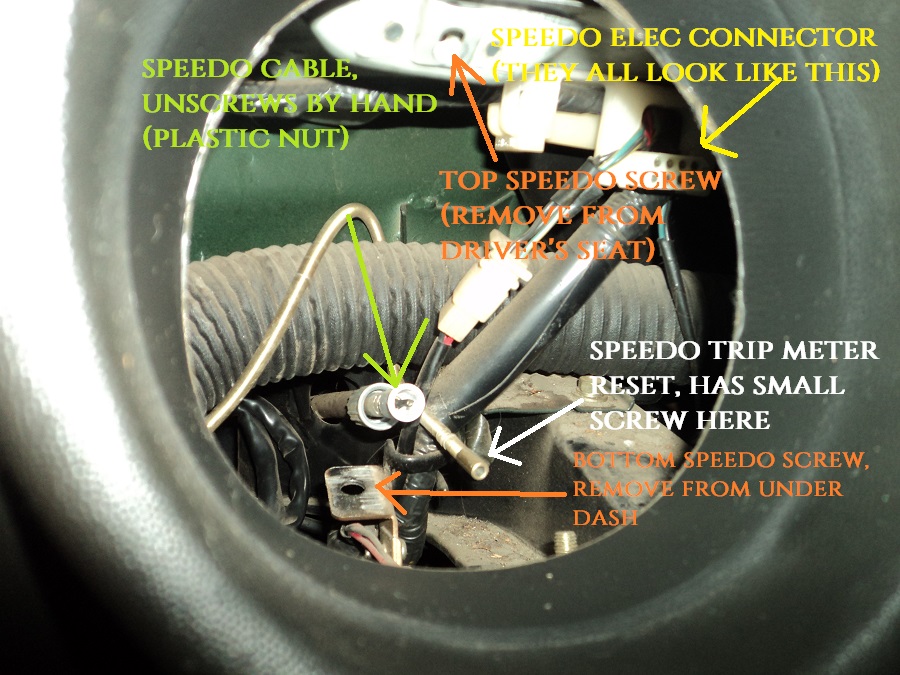
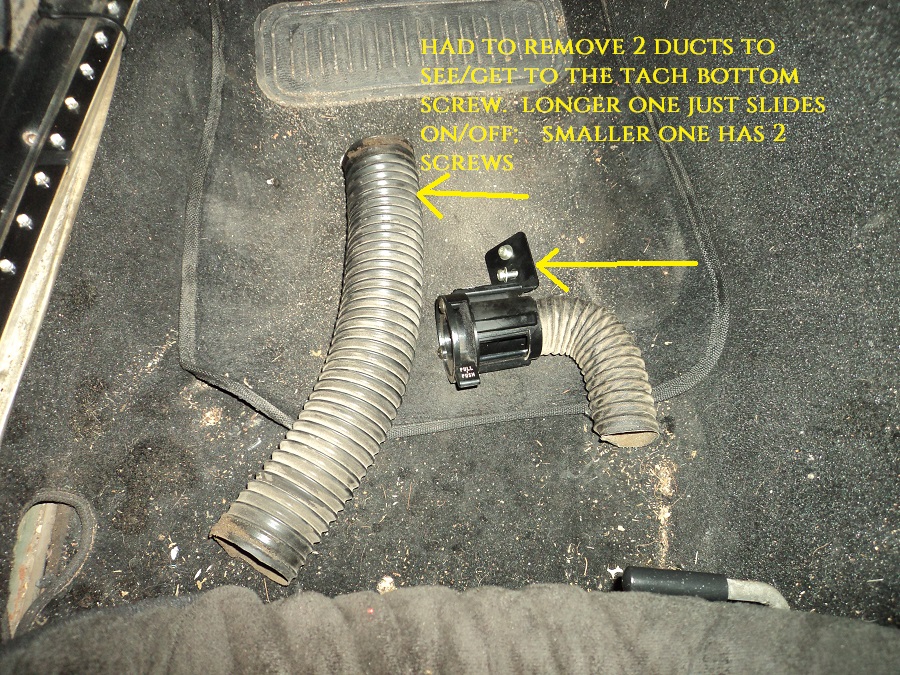
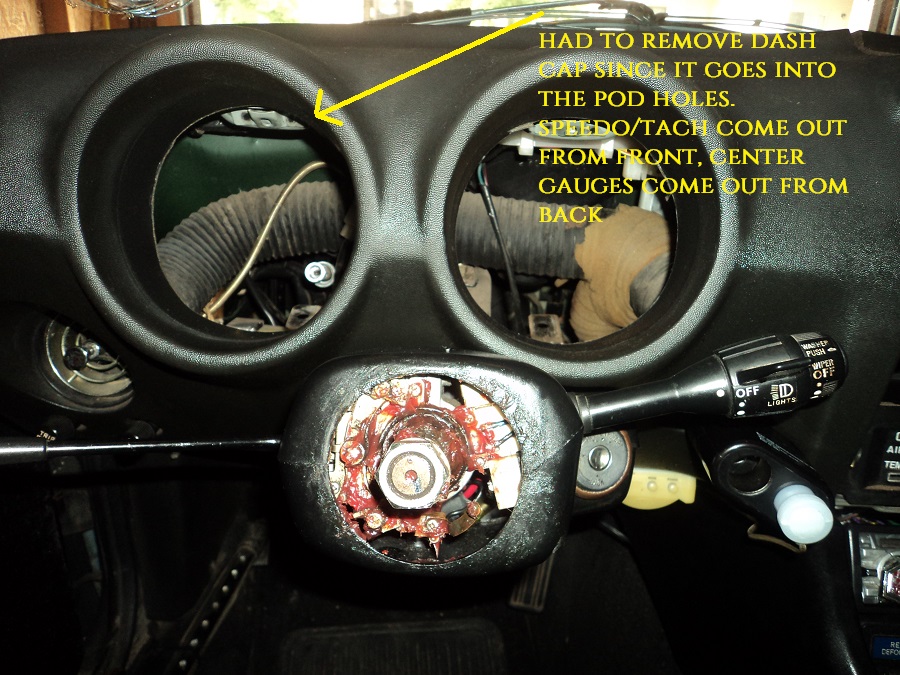
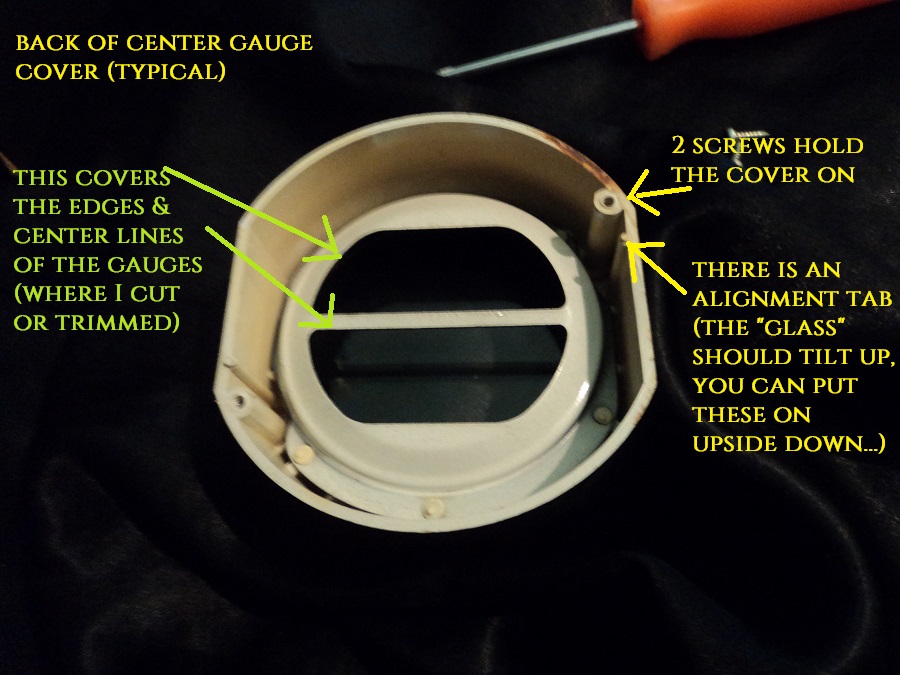
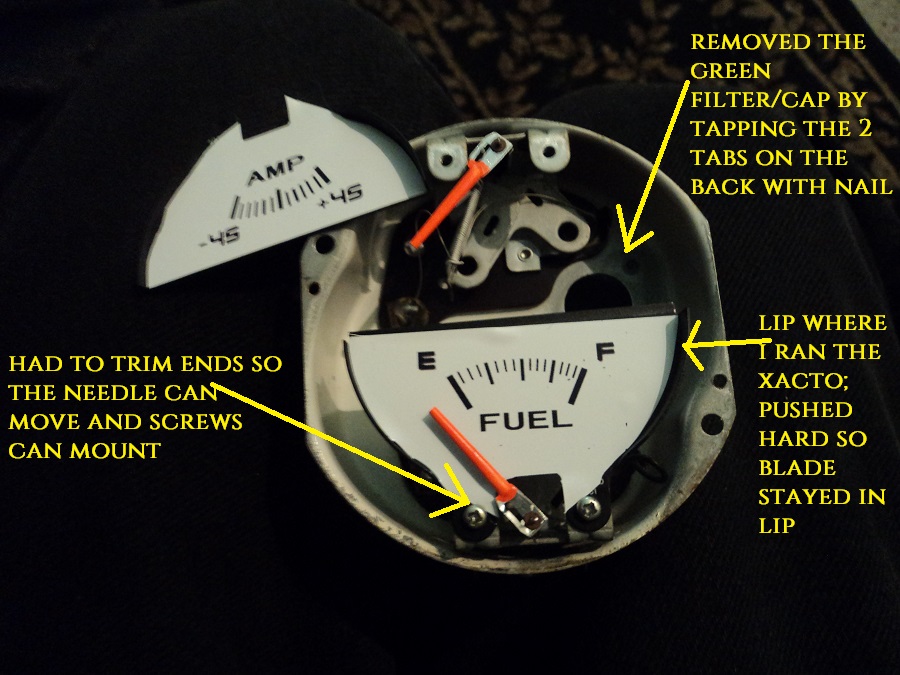
1 pointI had a set of white face overlays from the z connexion for awhile, but was deterred based on the difficulty of the task. Well I went ahead and went for it, and got it all done in a few hours without any major troubles. Sorry the picture quality sucks. I will do better for an installed picture... I am waiting on new bulbs to arrive before installing them, and making sure they work. More on that later.... For anyone contemplating this job, or removing gauges, etc.. Here is what I did and found: (I've never done this type of work before in the dash FYI) I have a dash cap/cover. I had to remove it it to get the speedo and tach out. They come out towards the driver. Luckily mine wasn't glued down to the dash. I didn't remove the column plastic cover, but I should have and will need to remove it to re-install the dash cap. It is a tight fit near the column. You do not need to remove the dash to get at the gauges. 1. Look at the FSM. it has great images, instructions and details of the dash and gauges. Also my Chilton's had the same image of the dash. 2. Disconnect battery (always). 3. Remove 4 screws on the sides of the HVAC cover plate, disconnect the wire connectors. I had 2 connectors. 4. Remove the 2 screws holding the center vent in place, they are also located on the sides. Remove the ducts from the center vent (If still connected...) I had 2, one on each side. (I try to put the screws back where they go for easy recall). 5. I had to remove the glove box to get the center vent out of the way. I could not get the center vent out through the middle opening. I removed the screws for the latch, the the light, and the glove box "holster". I didn't remove the actual glove box door. I supported it so it didn't hang down low freely. i slid the center vent to the side. 6. Each gauge has one screw on the bottom which connects the "hanging" bracket to the car. For the 3 center gauges, just remove this lower screw, massage the gauge back, and down, and disconnect the electrical connector for each. They are on tight, but came off pretty easily by squeezing the side tabs by hand. Electrical connectors are right behind the pod hole for each. The center gauge (fuel/volts) has 2 electrical connectors: one mounted and one loose) (See above photo) 7. Remove the steering wheel. Really makes the Speedo and tach removal easier. Not sure if they will even come out without doing this. 8. Remove the dash cap, if you have one. I don't think the speedo and tach will come out with a dash cover on, the cover overlaps them in the round ports. 9. Remove the screw at the top of the speedo and tach, respectively. You can get these 2 out easily from the driver's seat. 10. Lay down some blankets/pillows/old coats. Get a good flashlight and phillips screwdriver. You will be in an odd position to get the bottom 2 bolts out for the speedo and tach. Haha. Watch out for the steering wheel shaft if you removed the steering wheel. It hurts. 11. On your back, under the dash, there is one screw holding the speedo on, and one screw holding the tach on. I had to remove a duct vent to see the tach one. (The one that can be opened/closed and is screwed to a bracket under the dash, didn't know it was there before...) They bolt to a bracket and are not too hard to get once you see them. 12. Back in the driver's seat, do the tach first, reach under and push the tach forward. Undo the electrical connector. Again, same type as the center guages, I held both sides to make sure I didn't crack anything, but got them out by hand pretty easily. Push the tach out towards the driver. 13. Now the speedo. Without the tach, you can see the tripmeter cable. It has a very small screw holding it near the back of the gauge. Try not the strip it, it's on there pretty tightly. Now unscrew the speedo cable by hand. Now remove the electrical connector, same as all the other ones. Push out from the back towards the driver. (See the photos above) 14. Take a moment to appreciate what you just did. I reveled in the fact that I was holding some gauges that had not been touched by human hands in 40 years!!! Success!!! FOR GAUGE FACE INSTALLATION: There are other write ups for this around that are good. Basically you have to remove the screws holding the clear cover on. And the screws holding the faces on (unless you want to try removing the needles, no thanks...) You have press down hard on these as to not strip them. Don't ask me how I know.... I highly recommend practicing first. I had a spare gauge from the junkyard. And the kit I bought had spare overlays, depending on if you wanted volts or amps. A new Xacto blade is also a must...The overlays are close, but I ran the blade along the edges/lip of each face to prevent lifting. I had to cut the overlays in half for the 3 center gauges. They come as one overlay, but can't be installed as one, due to the needles. Do your best to get a straight and centered cut. Remember the gauge face had a divider that will cover the cut. I used the stock metal gauge face as a template, and a cutting edge. NEW Xacto blade!!! NOTE: I USED A "PRACTICE" SPARE JUNKYARD GAUGE. THE SPARE WAS AN OIL/TEMP ONE, BUT MY SPARE OVERLAYS WERE FUEL/CHARGE. THAT IS WHY THERE IS NO RED CHARGE LIGHT. I JUST WANTED TO PRACTICE. I MARKED THE GAUGE SO I WOULDN"T USE IT These overlays are vinyl and good quality. But you can only re position them once, maybe twice before they aren't that sticky. I started on the middle, since I had a straight edge cut. Then pressed down and out, towards the edges. Then cut the edges by pressing the knife into the "corner" of the stock face. It has a lip. These lips are covered when installed, so don't worry about perfection. Again, a NEW Xacto blade is paramount to get good cuts. A bad cut will tear the overlay. Even if they are not EXACTLY positioned perfectly, as long as they work it should be fine. I don't think the difference between a gas level of 10 vs 10.1 gallons will matter much. You get the idea... Don't forget to cut the hold for the charge indicator light also. I did an "X" from the back, then put the Xacto in there and turned it round and round. Got a nice round hole. You have to remove the clock hands. They just pull off, straight up. The clock overlay was slightly smaller, and didn't quite reach the edges. But it is not very noticeable with the face cover on. I also put a few drops of sewing machine oil (clear) on the clock gears to see if it will get it working. I turned the clock thing by hand, spinning the spinny thing that drives it, and it does in fact turn and move the hands, but we'll see if it starts working again... I verified that the time changed when spinning the spinny thing. This is the technical term! Haha The Speedo and Tach needles need to come off, as well as the two small screws in the center of the faces. Remember where they are at when removing, I did both of mine at zero. I did this by hand. Pulled straight up (the black round covers came off the first try...) I kind of expected the needles to break, but they didn't , and I didn't seem to bend the needle pin either. I pulled up pretty hard with my finger and thumb, then it popped off. I thought it went flying, but it had stabbed me in the finger under the nail. Watch out!.. Don't get blood on the white faces. Unless you like that sort of thing, might be a unique touch... Haha We'll see when I install how they work.. Some use a fork or similar tool to remove them, I like to use my "feel". I painted the needles orange with model car paint. Look great, dried quick. Use one of the very small q-tip looking brushes specifically for model cars. Put a piece of paper or something under the needle, over the gauge in case you miss or drip for the center 3 gauges. The speedo and tach and clock needles/hands are off, so painting them requires a steady hand and something to lean them on to dry. I used a plastic coffee container lid, leaning the end of the needle on the lip of the lid.. Installing the speedo and tach overlays is tough, getting everything aligned. But use the center hole, and screw holes as a guide. Also the speedo and tach have the brights and turn signal cutouts too. I was happy with the placement results. Not perfect, but nothing is. I wanted the turn signal arrows to be aligned more than the center screw holes. I had to pick which one, as it did not seem that they would both align exactly. With the screws back in, you can't tell. But tightening the screws with the overlay underneath will twist/distort the overlay by the screw. FYI. The speedo has a very small "needle" that the indicator needle rests on at zero. I pried it back slightly from the back, smoothed the overlay to it, then pressed it from the back, punching through the overlay. It easily punched through. I was pleasantly surprised by this. The needles go back on the same way, straight down. Don't press too hard. Don't forget to pop (or glue) the black round caps back on there. Screw the screws in. Not too tight or you will distort the overlay vinyl. I put the needles back on at zero, which I where I removed them. Some suggest putting them on at the max, then letting them return to zero. Not sure about this, we'll see if what I did worked... Main points: It's not super difficult. Follow the FSM images and instructions, they are exact EXCEPT for the center vent and the speedo/tach needle removal is not in there... The dash doesn't need to be removed. The dash cap does, if you are doing the speedo and tach. Clean/dust the stock face plates good. I have a few bubbles from specks of dirt. Live and learn... Might poke them with a needle to get the air out.... Practicing on a spare guage is VERY helpful, as is installing one of the spare overlays. A sharp Xacto knife is nearly a must have. Change the bulbs while they are out. I ordered some blue incandescent bulbs online. I don't want to rewire or mess with LEDs right now. Remove the green "cap filters" if you want. They just pop out when you tap the tabs, with a nail or something. Don't tap out the ones for things like turn signals, brake, etc...These will come out easier if you do this while the faces are out. I didn't decide to change the bulb color until later, so I will have to remove the speedo and tach faces again to get the green filter cap out. Unless I can figure something else out. I REALLY don't want to press my luck and remove the needles again.... Well I hope I haven't missed anything. It is a tough job for sure, but more tedious than difficult. Dealing with small, fragile parts like these requires patience, and a steady hand. Hope to get these installed this week when the bulbs arrive... I'll be back...


 1 point
 -
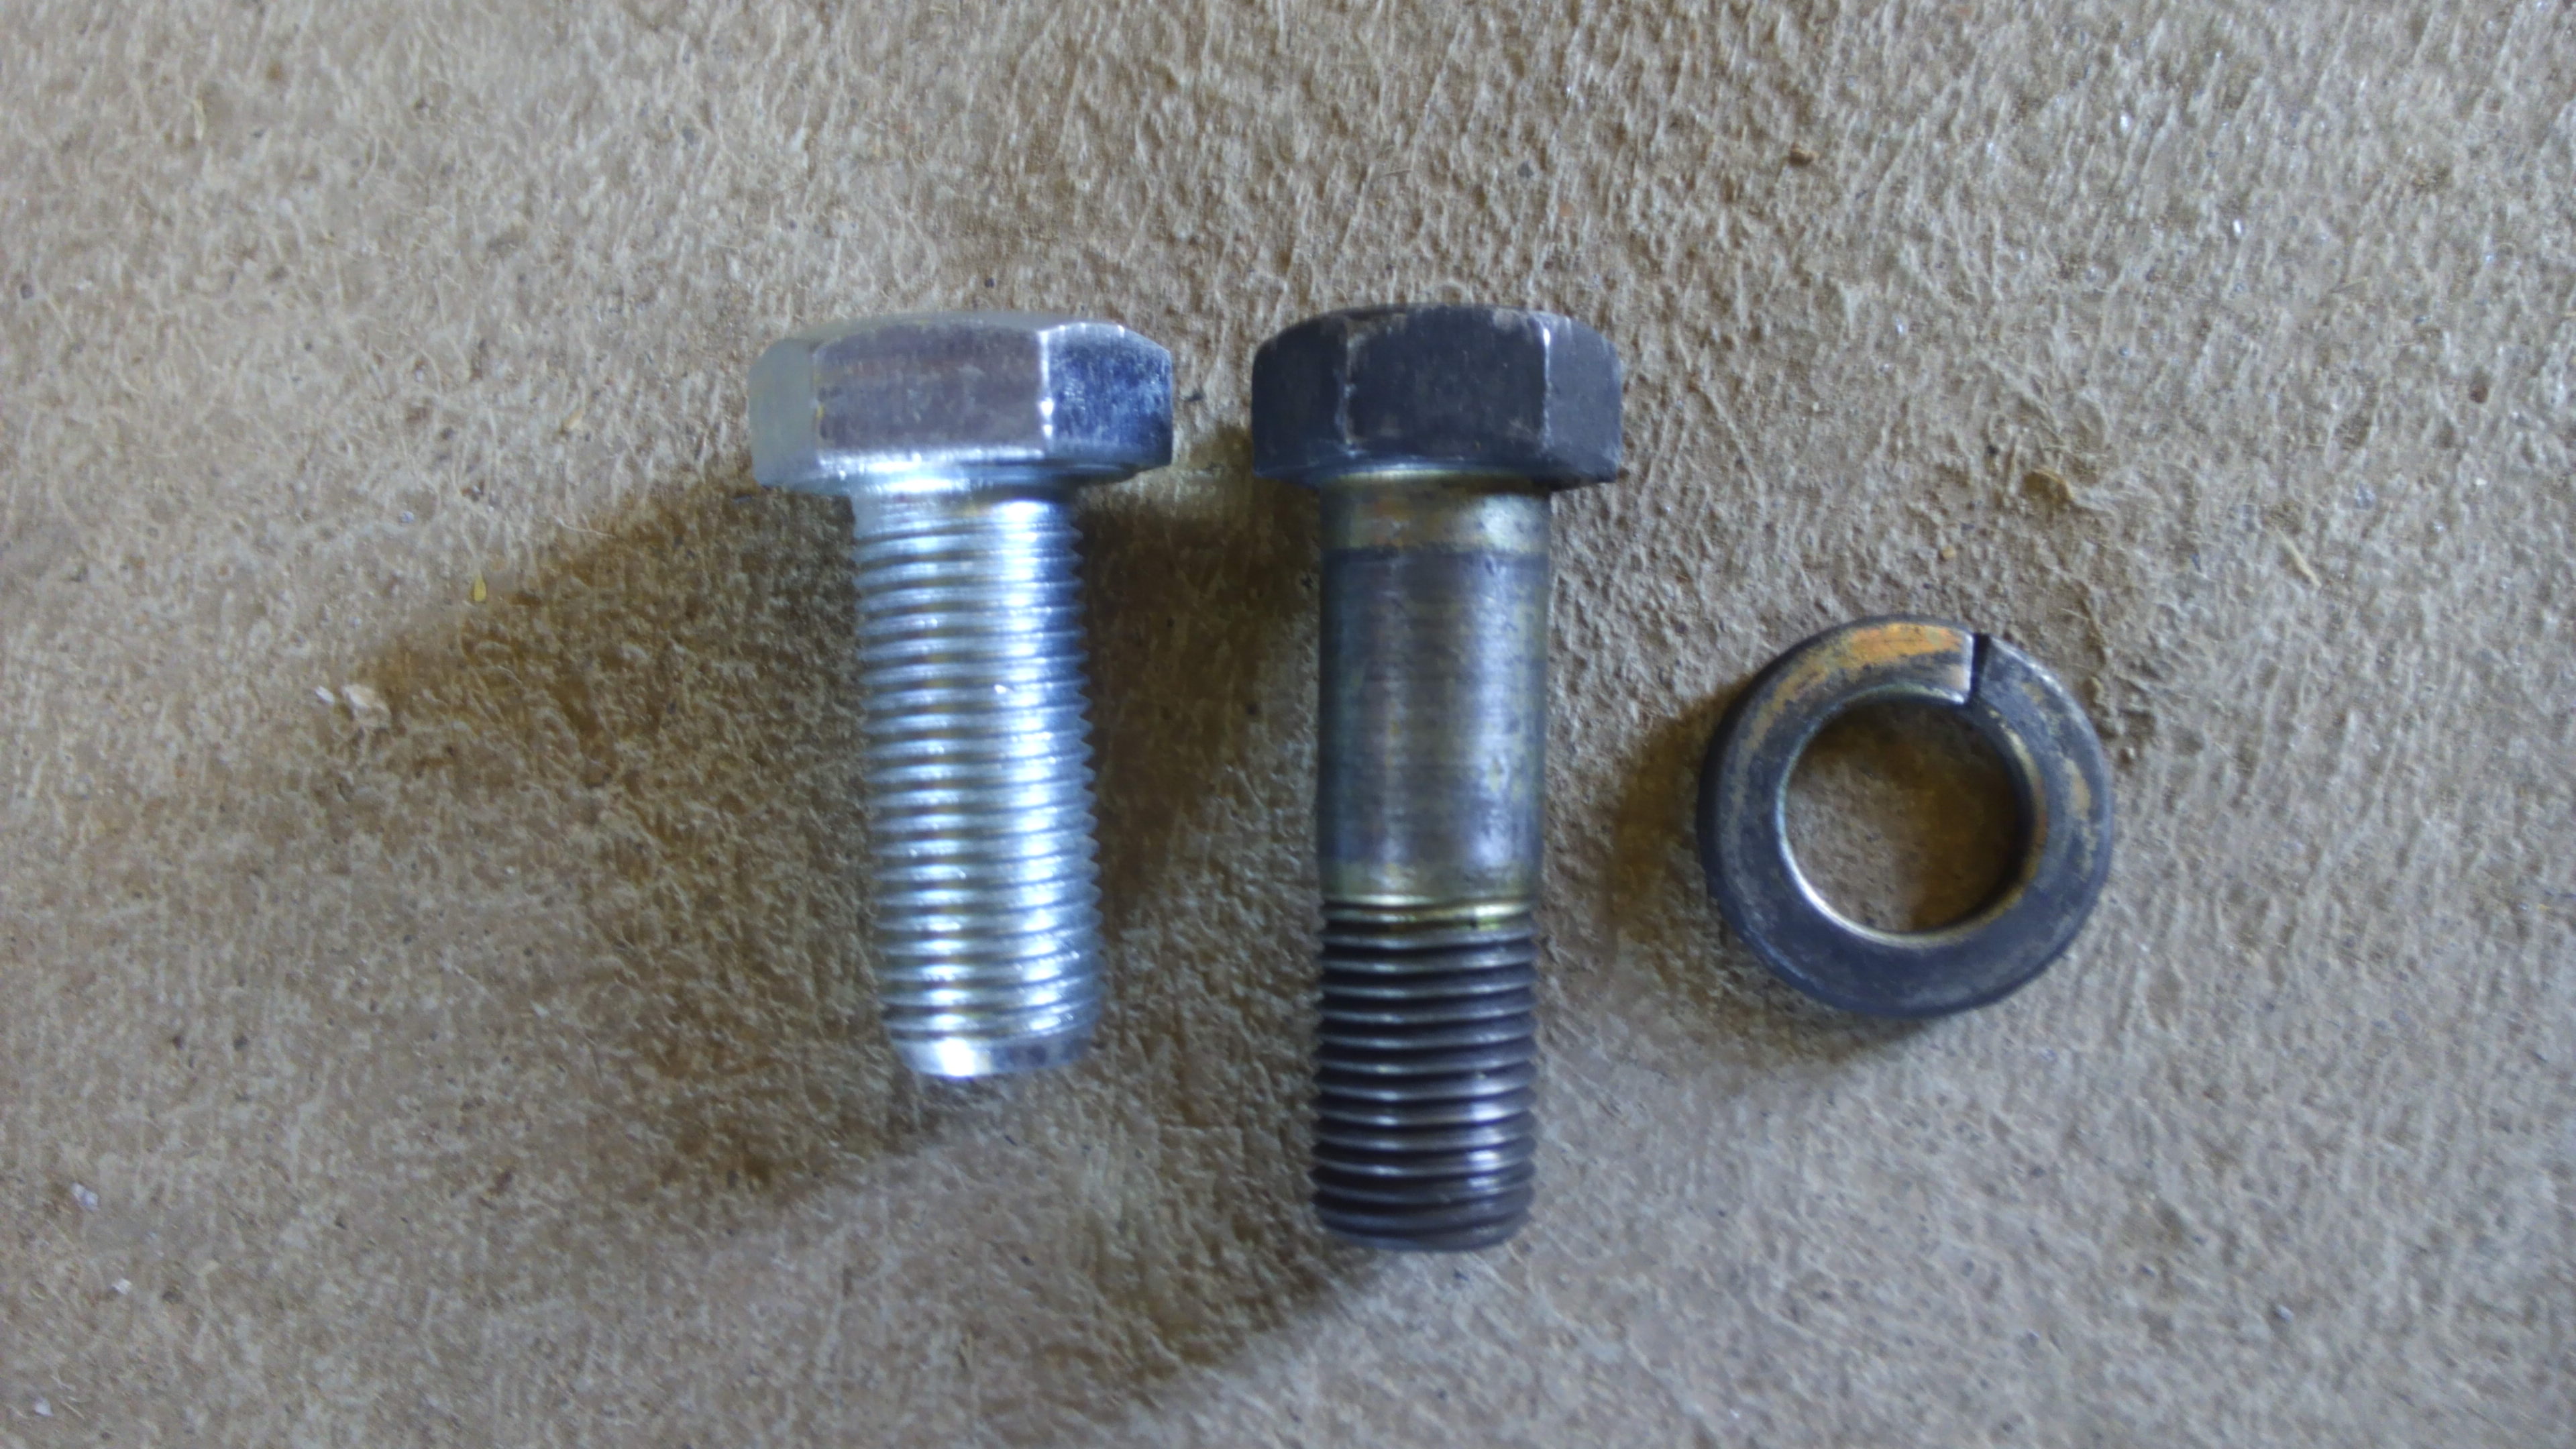
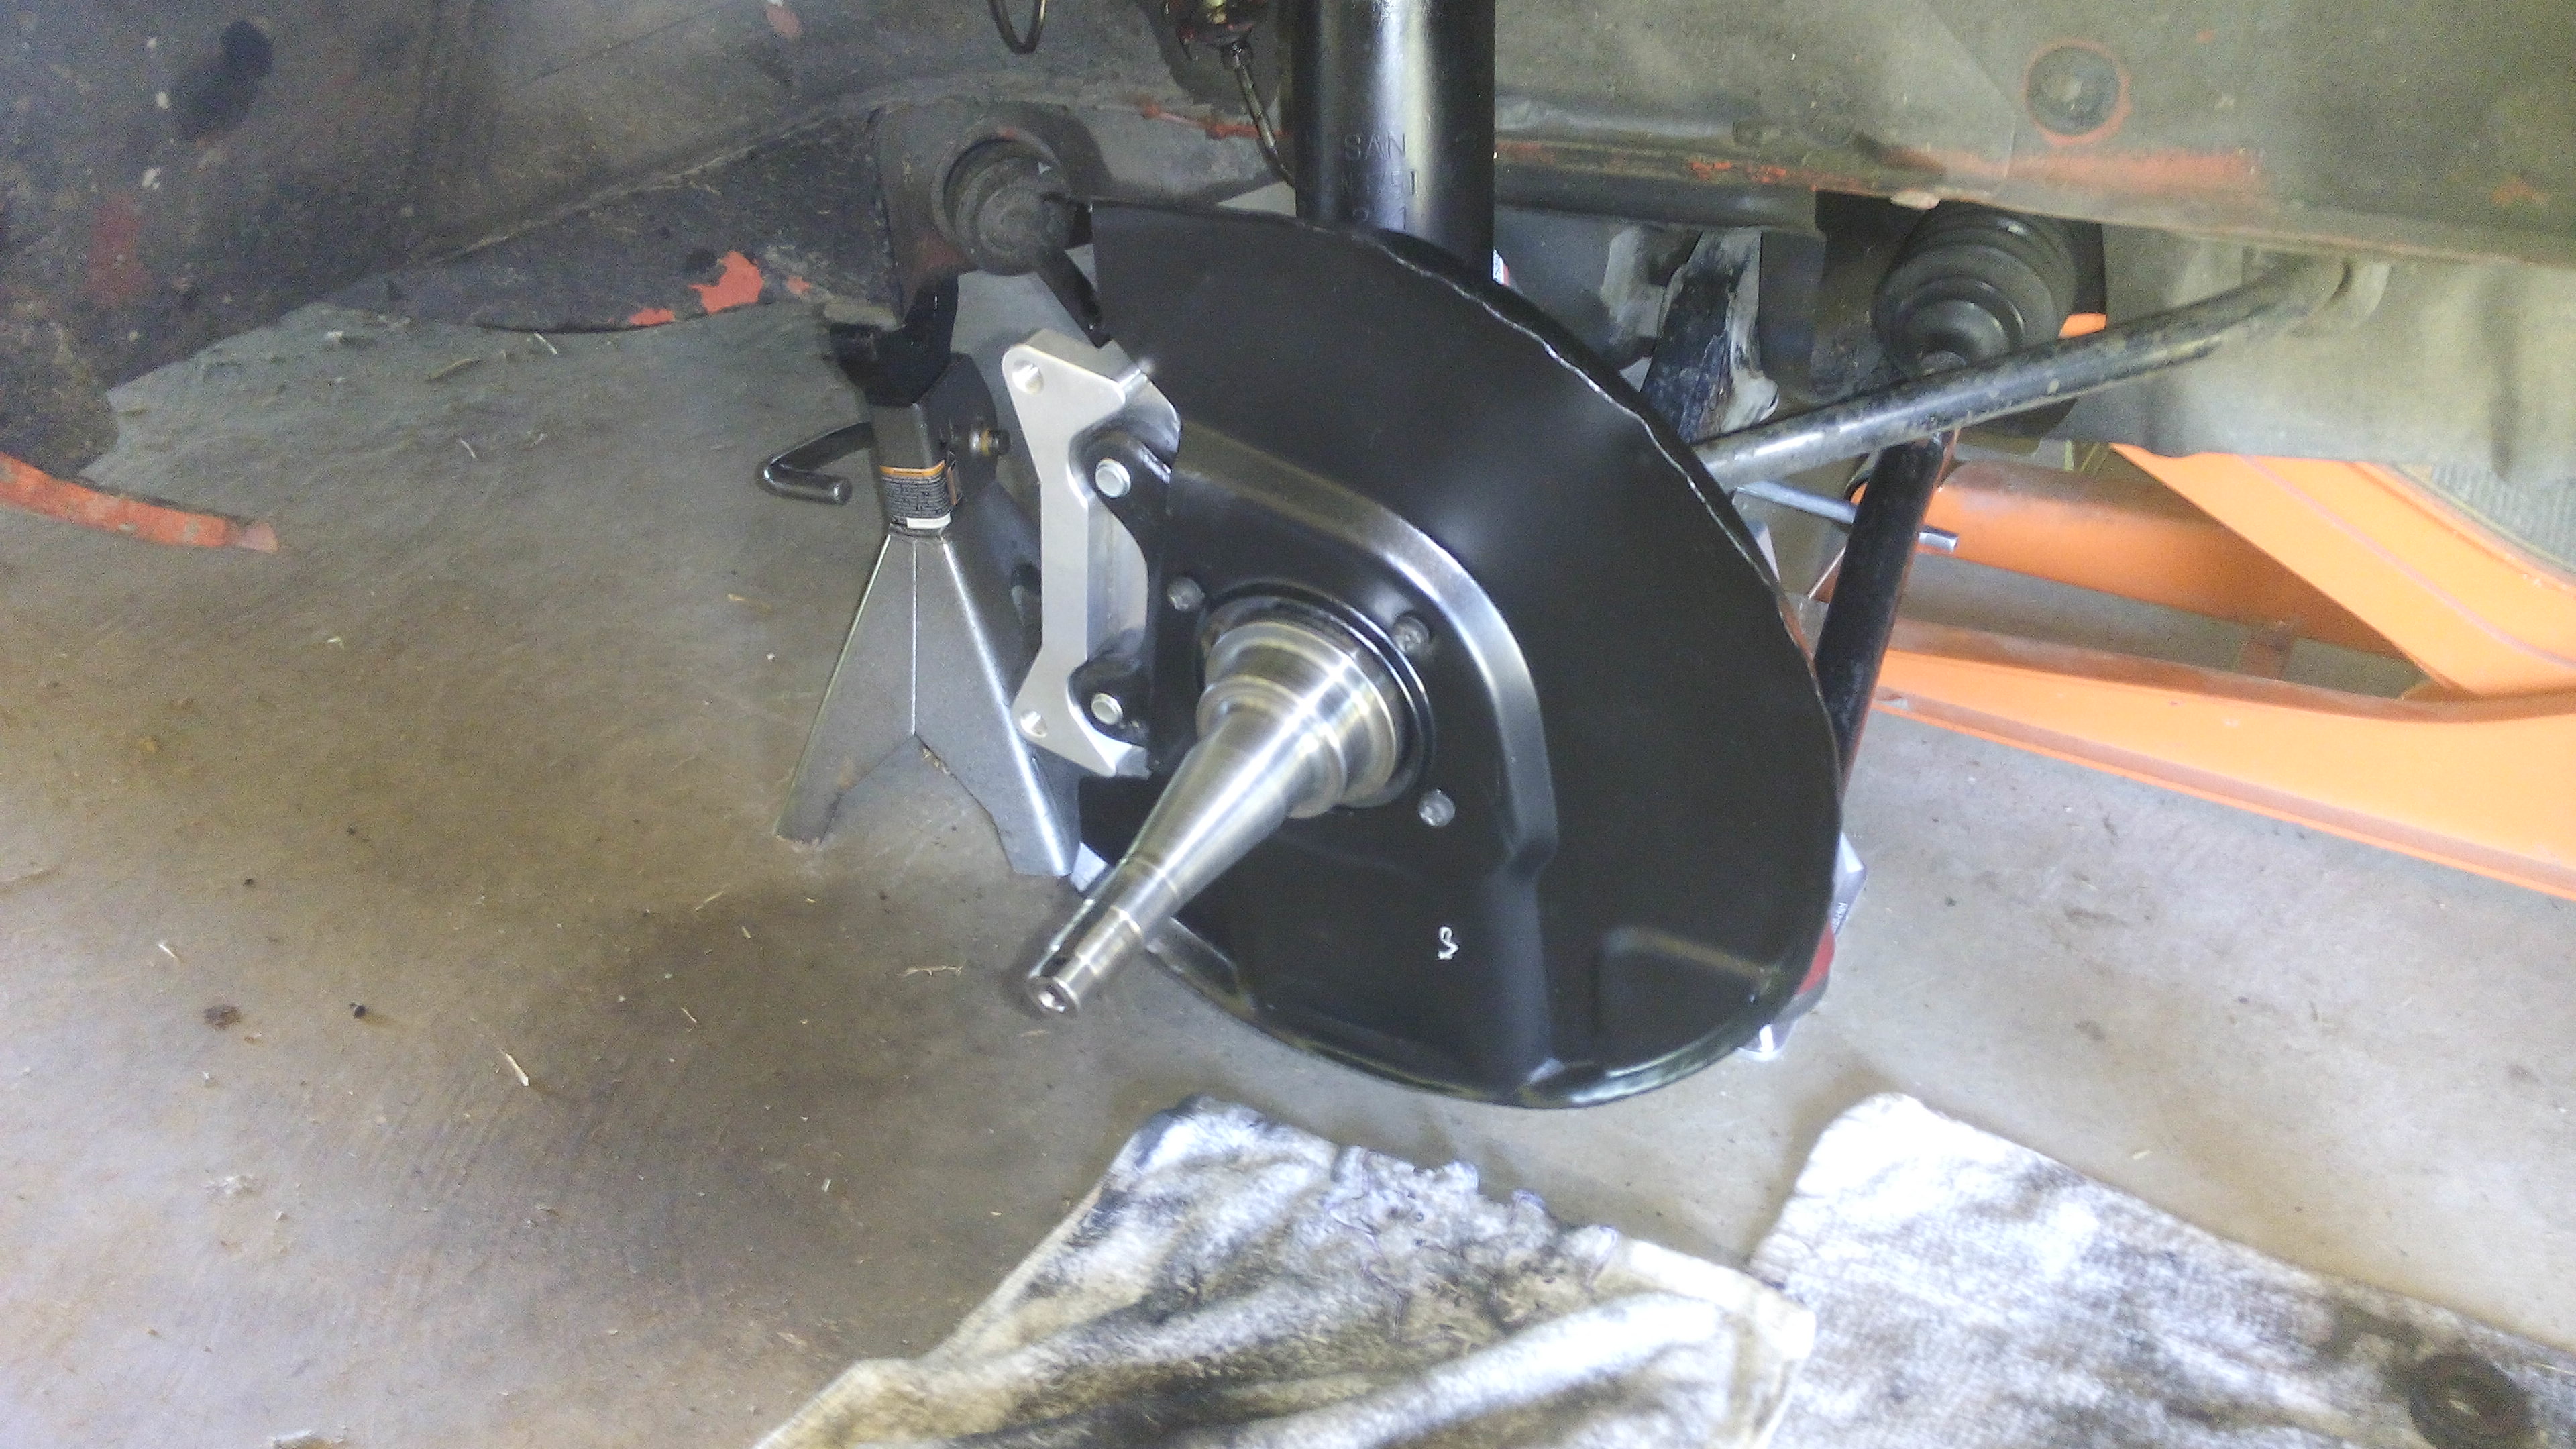
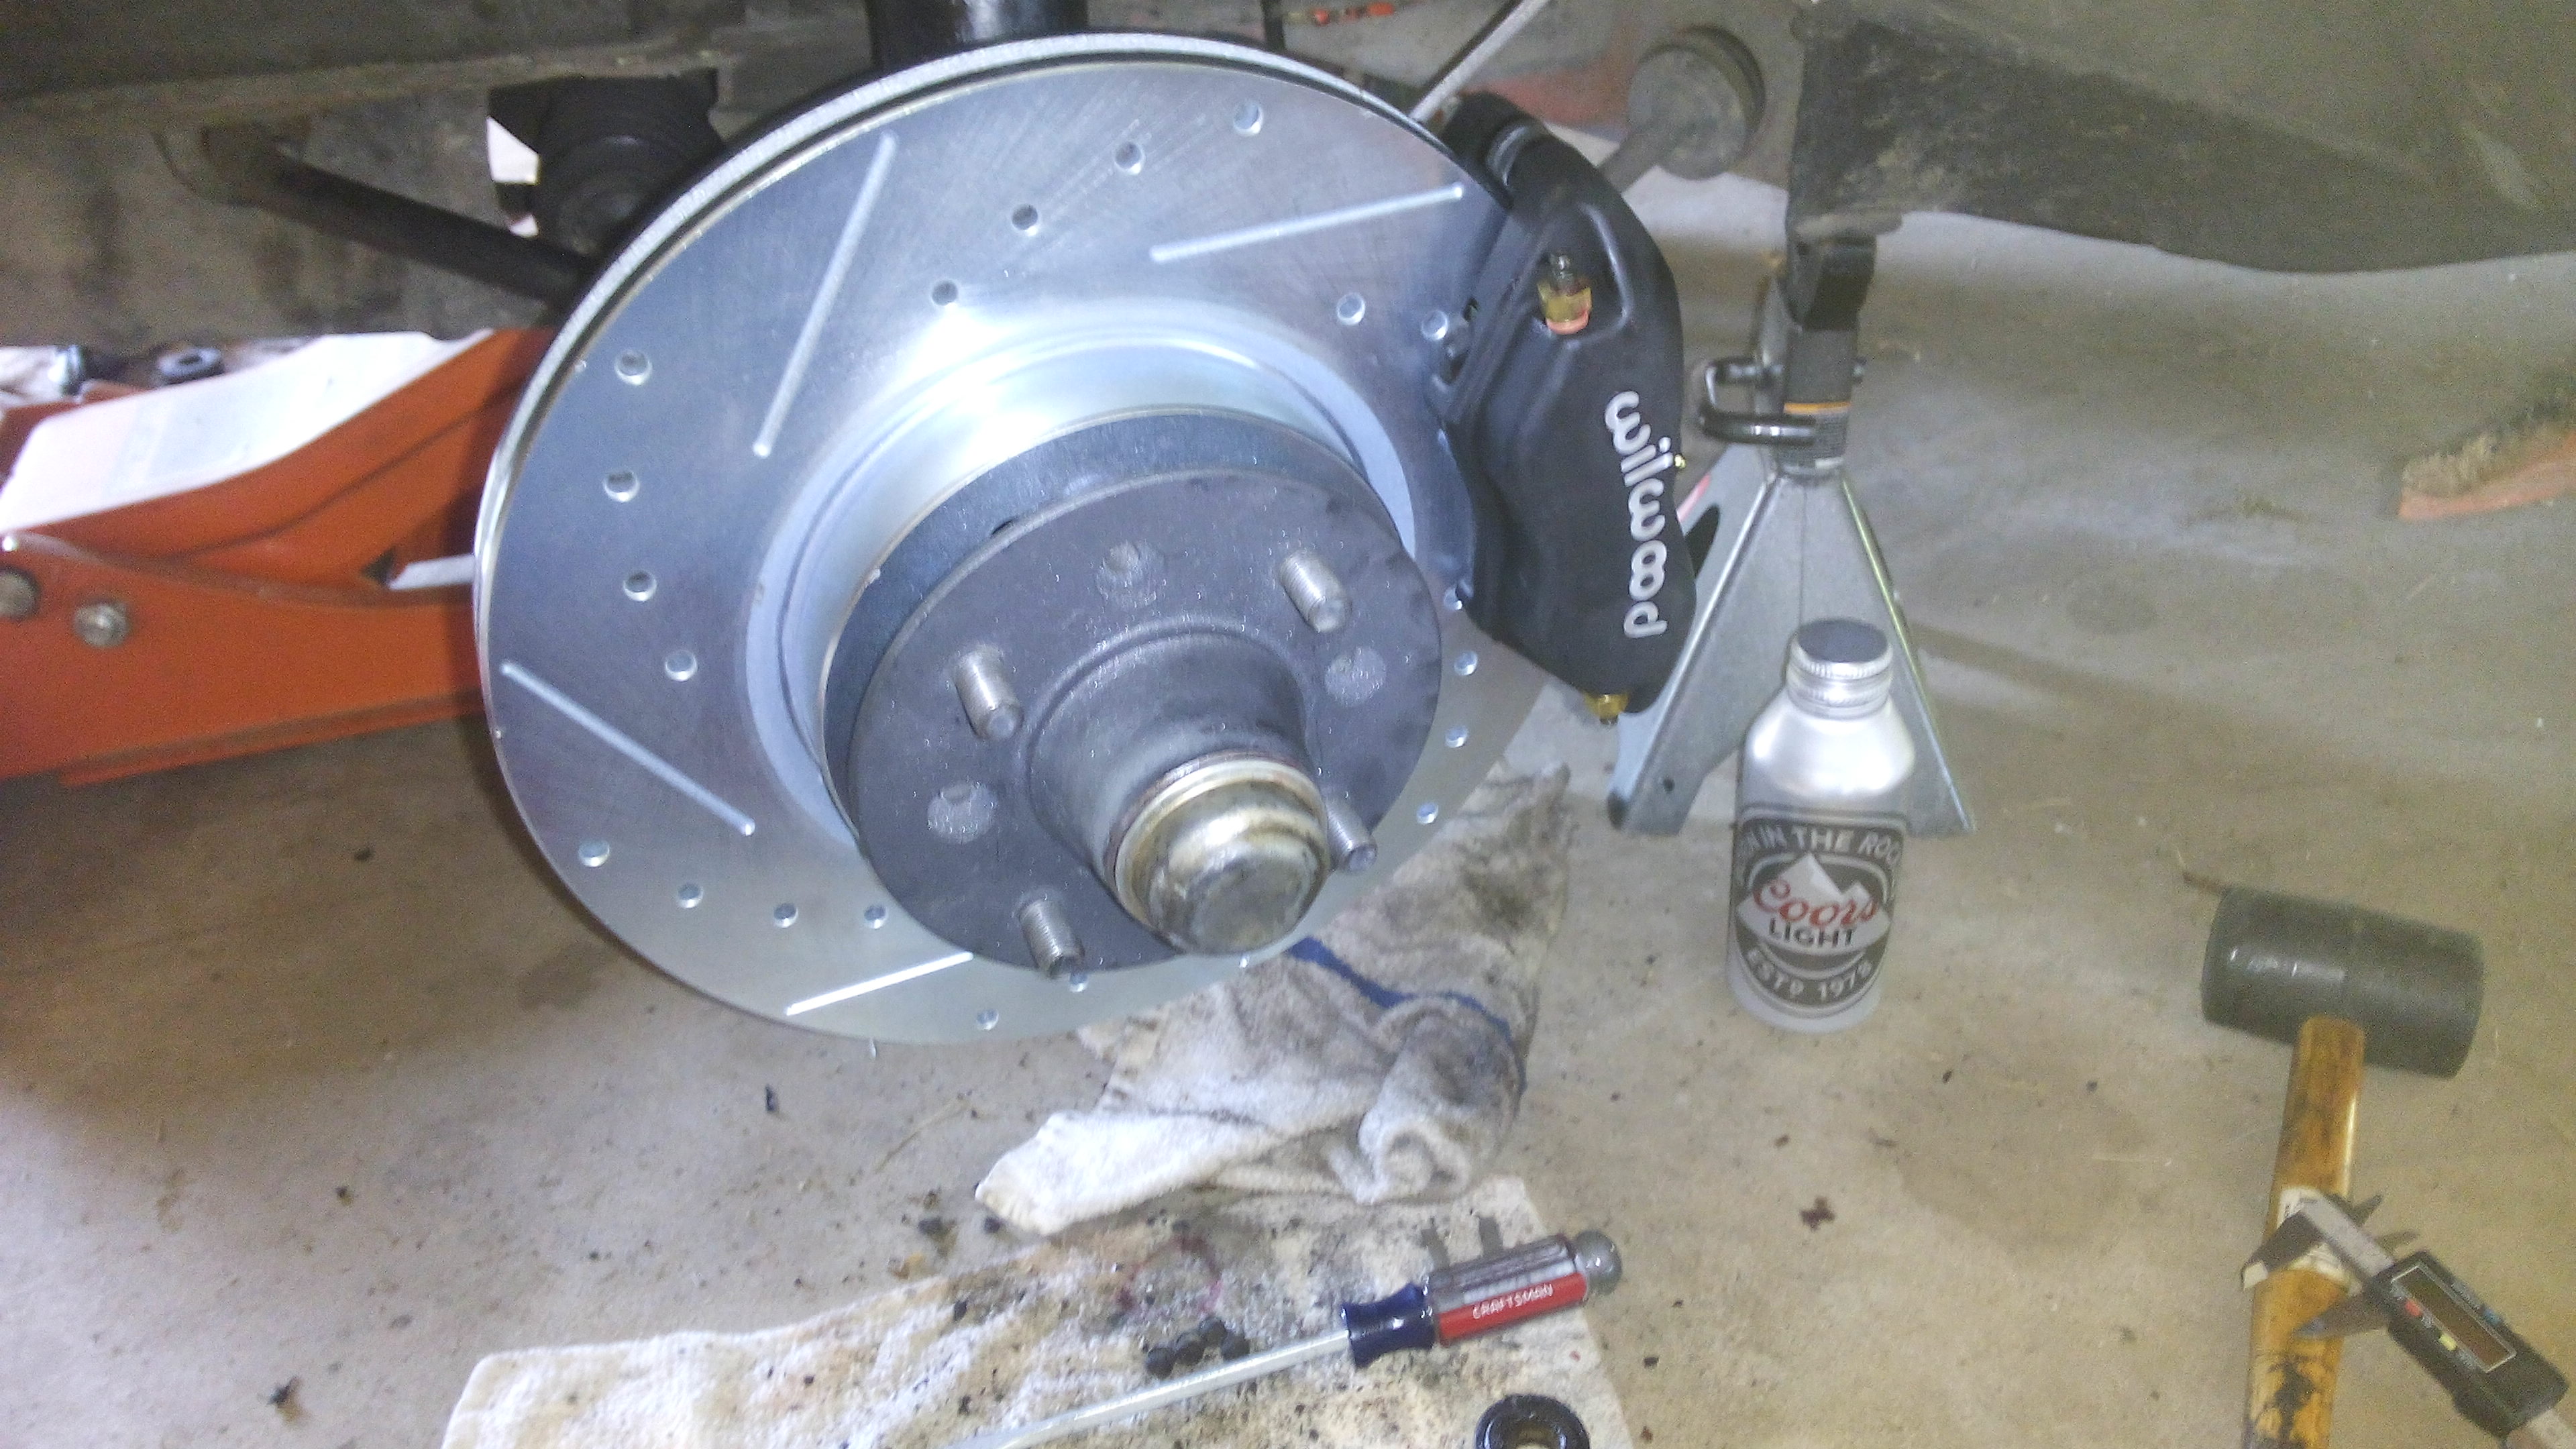
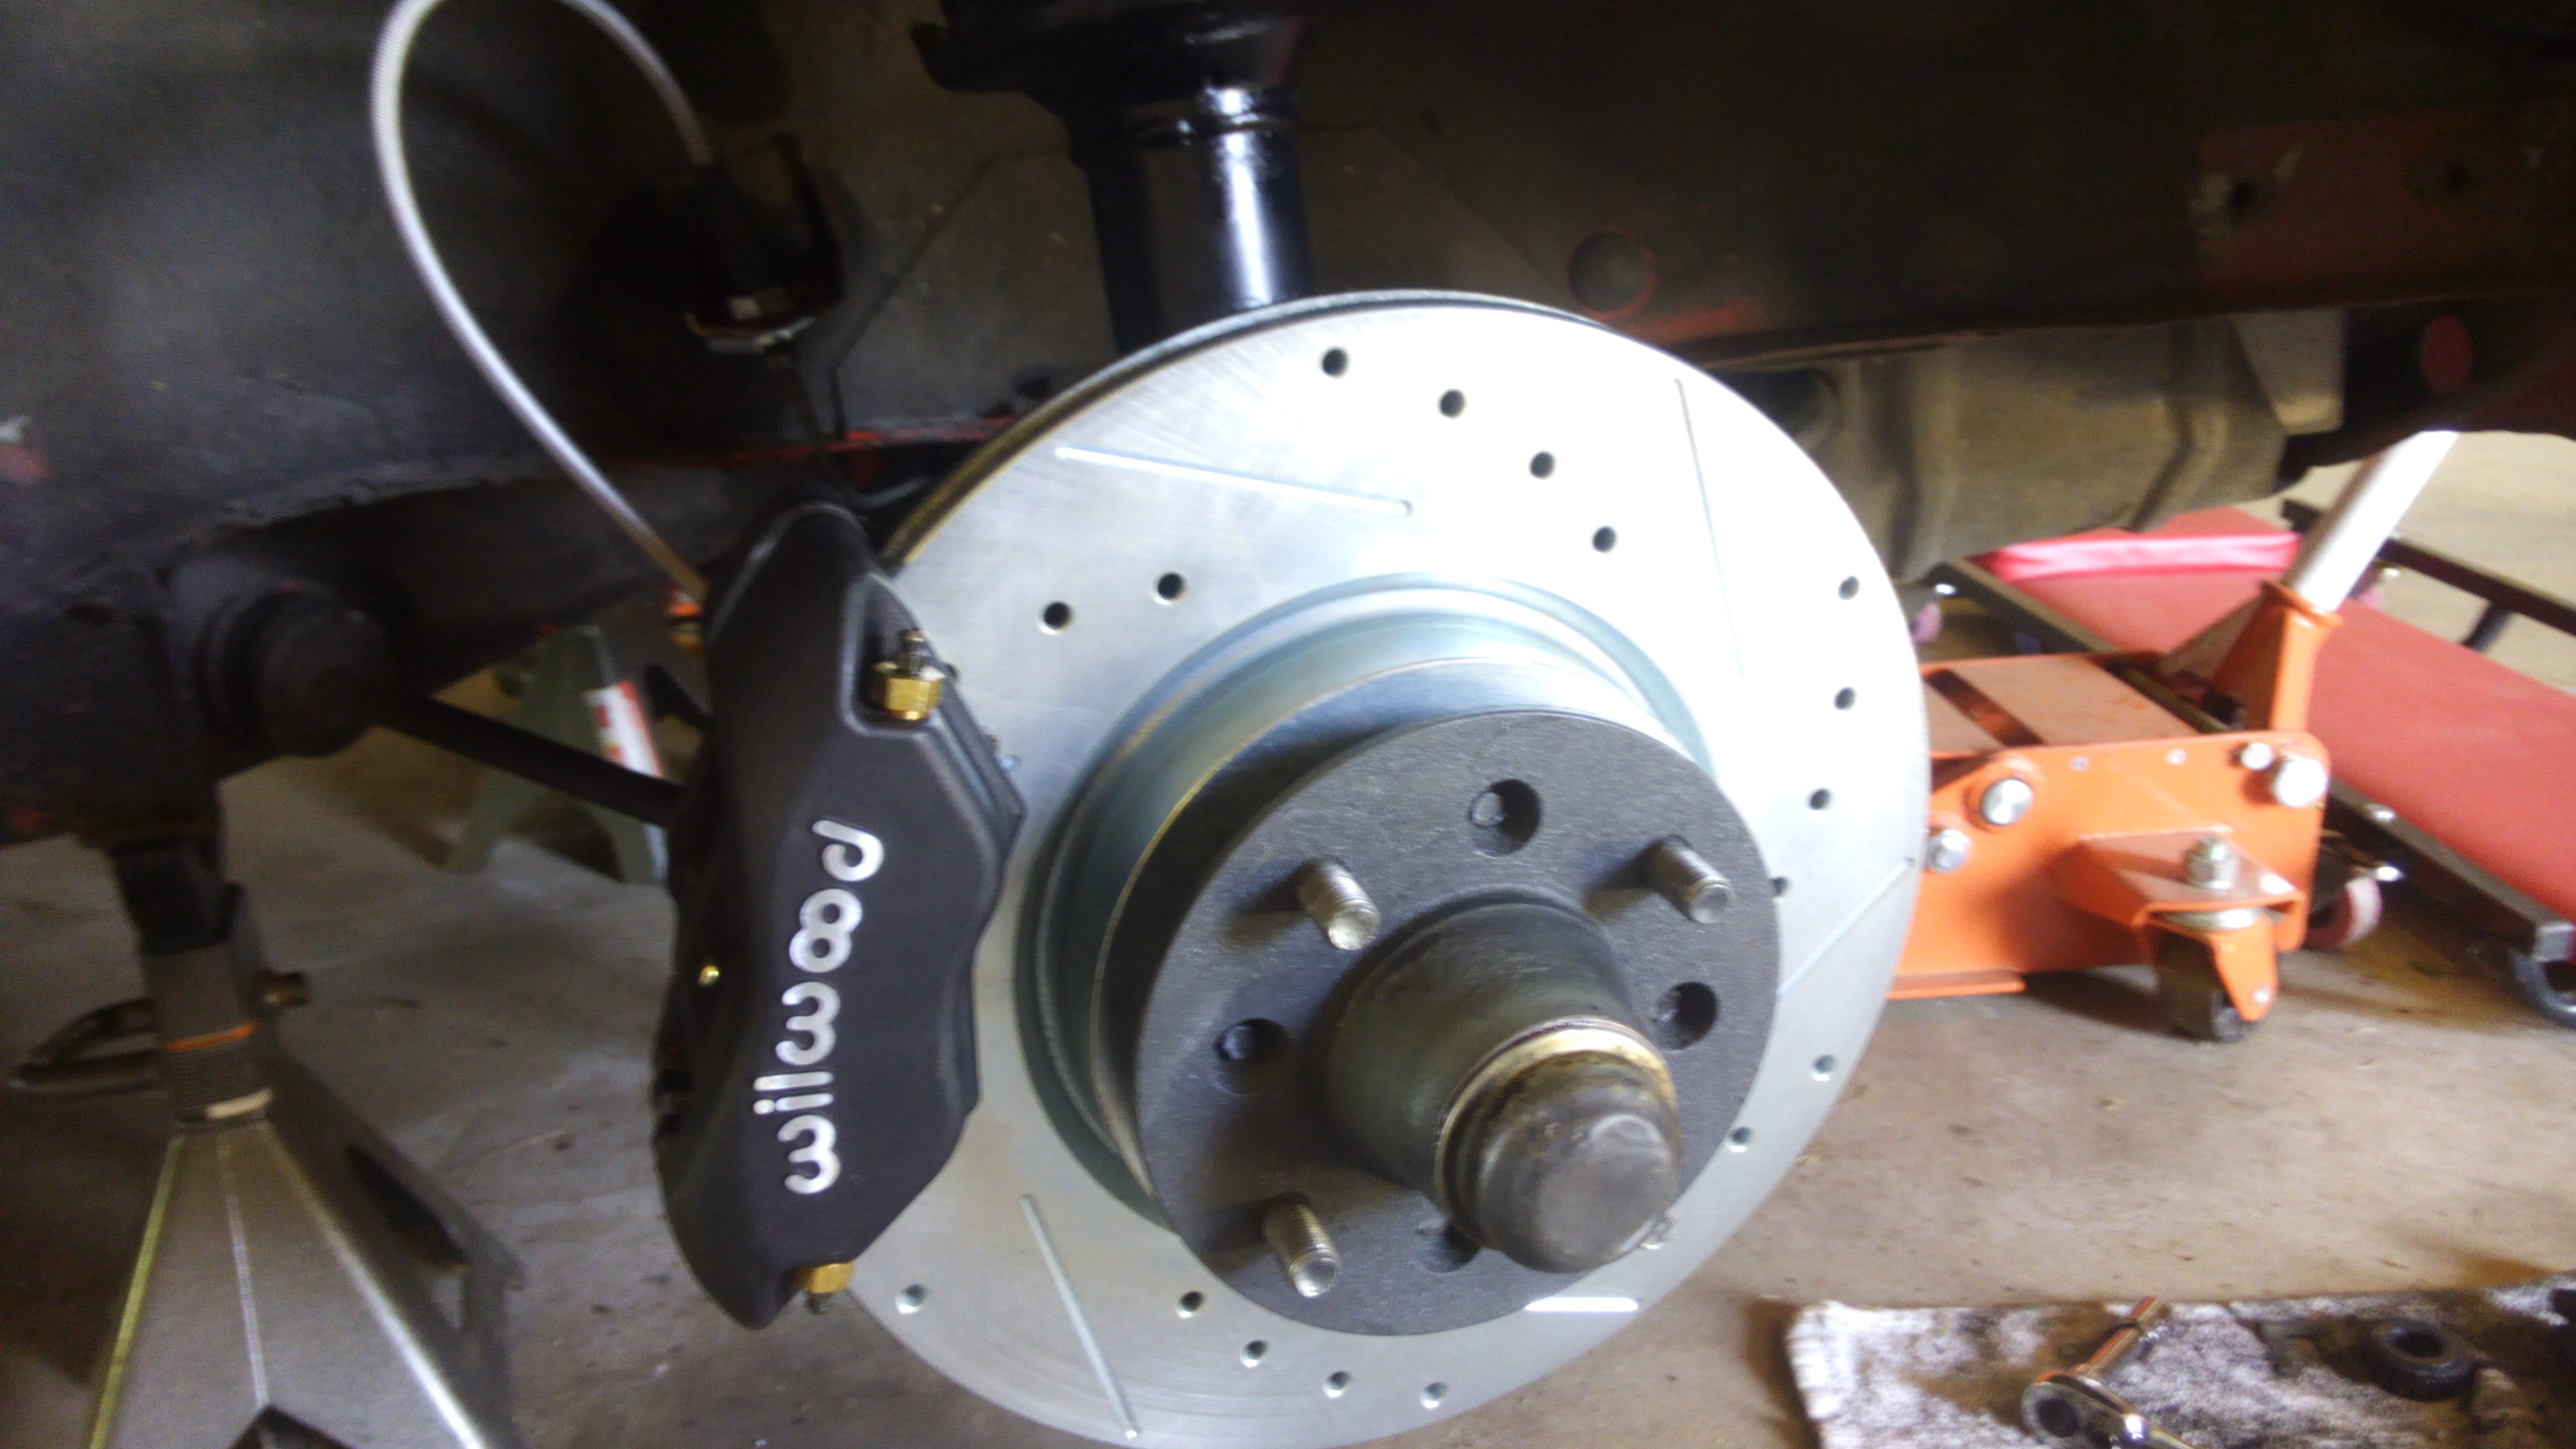
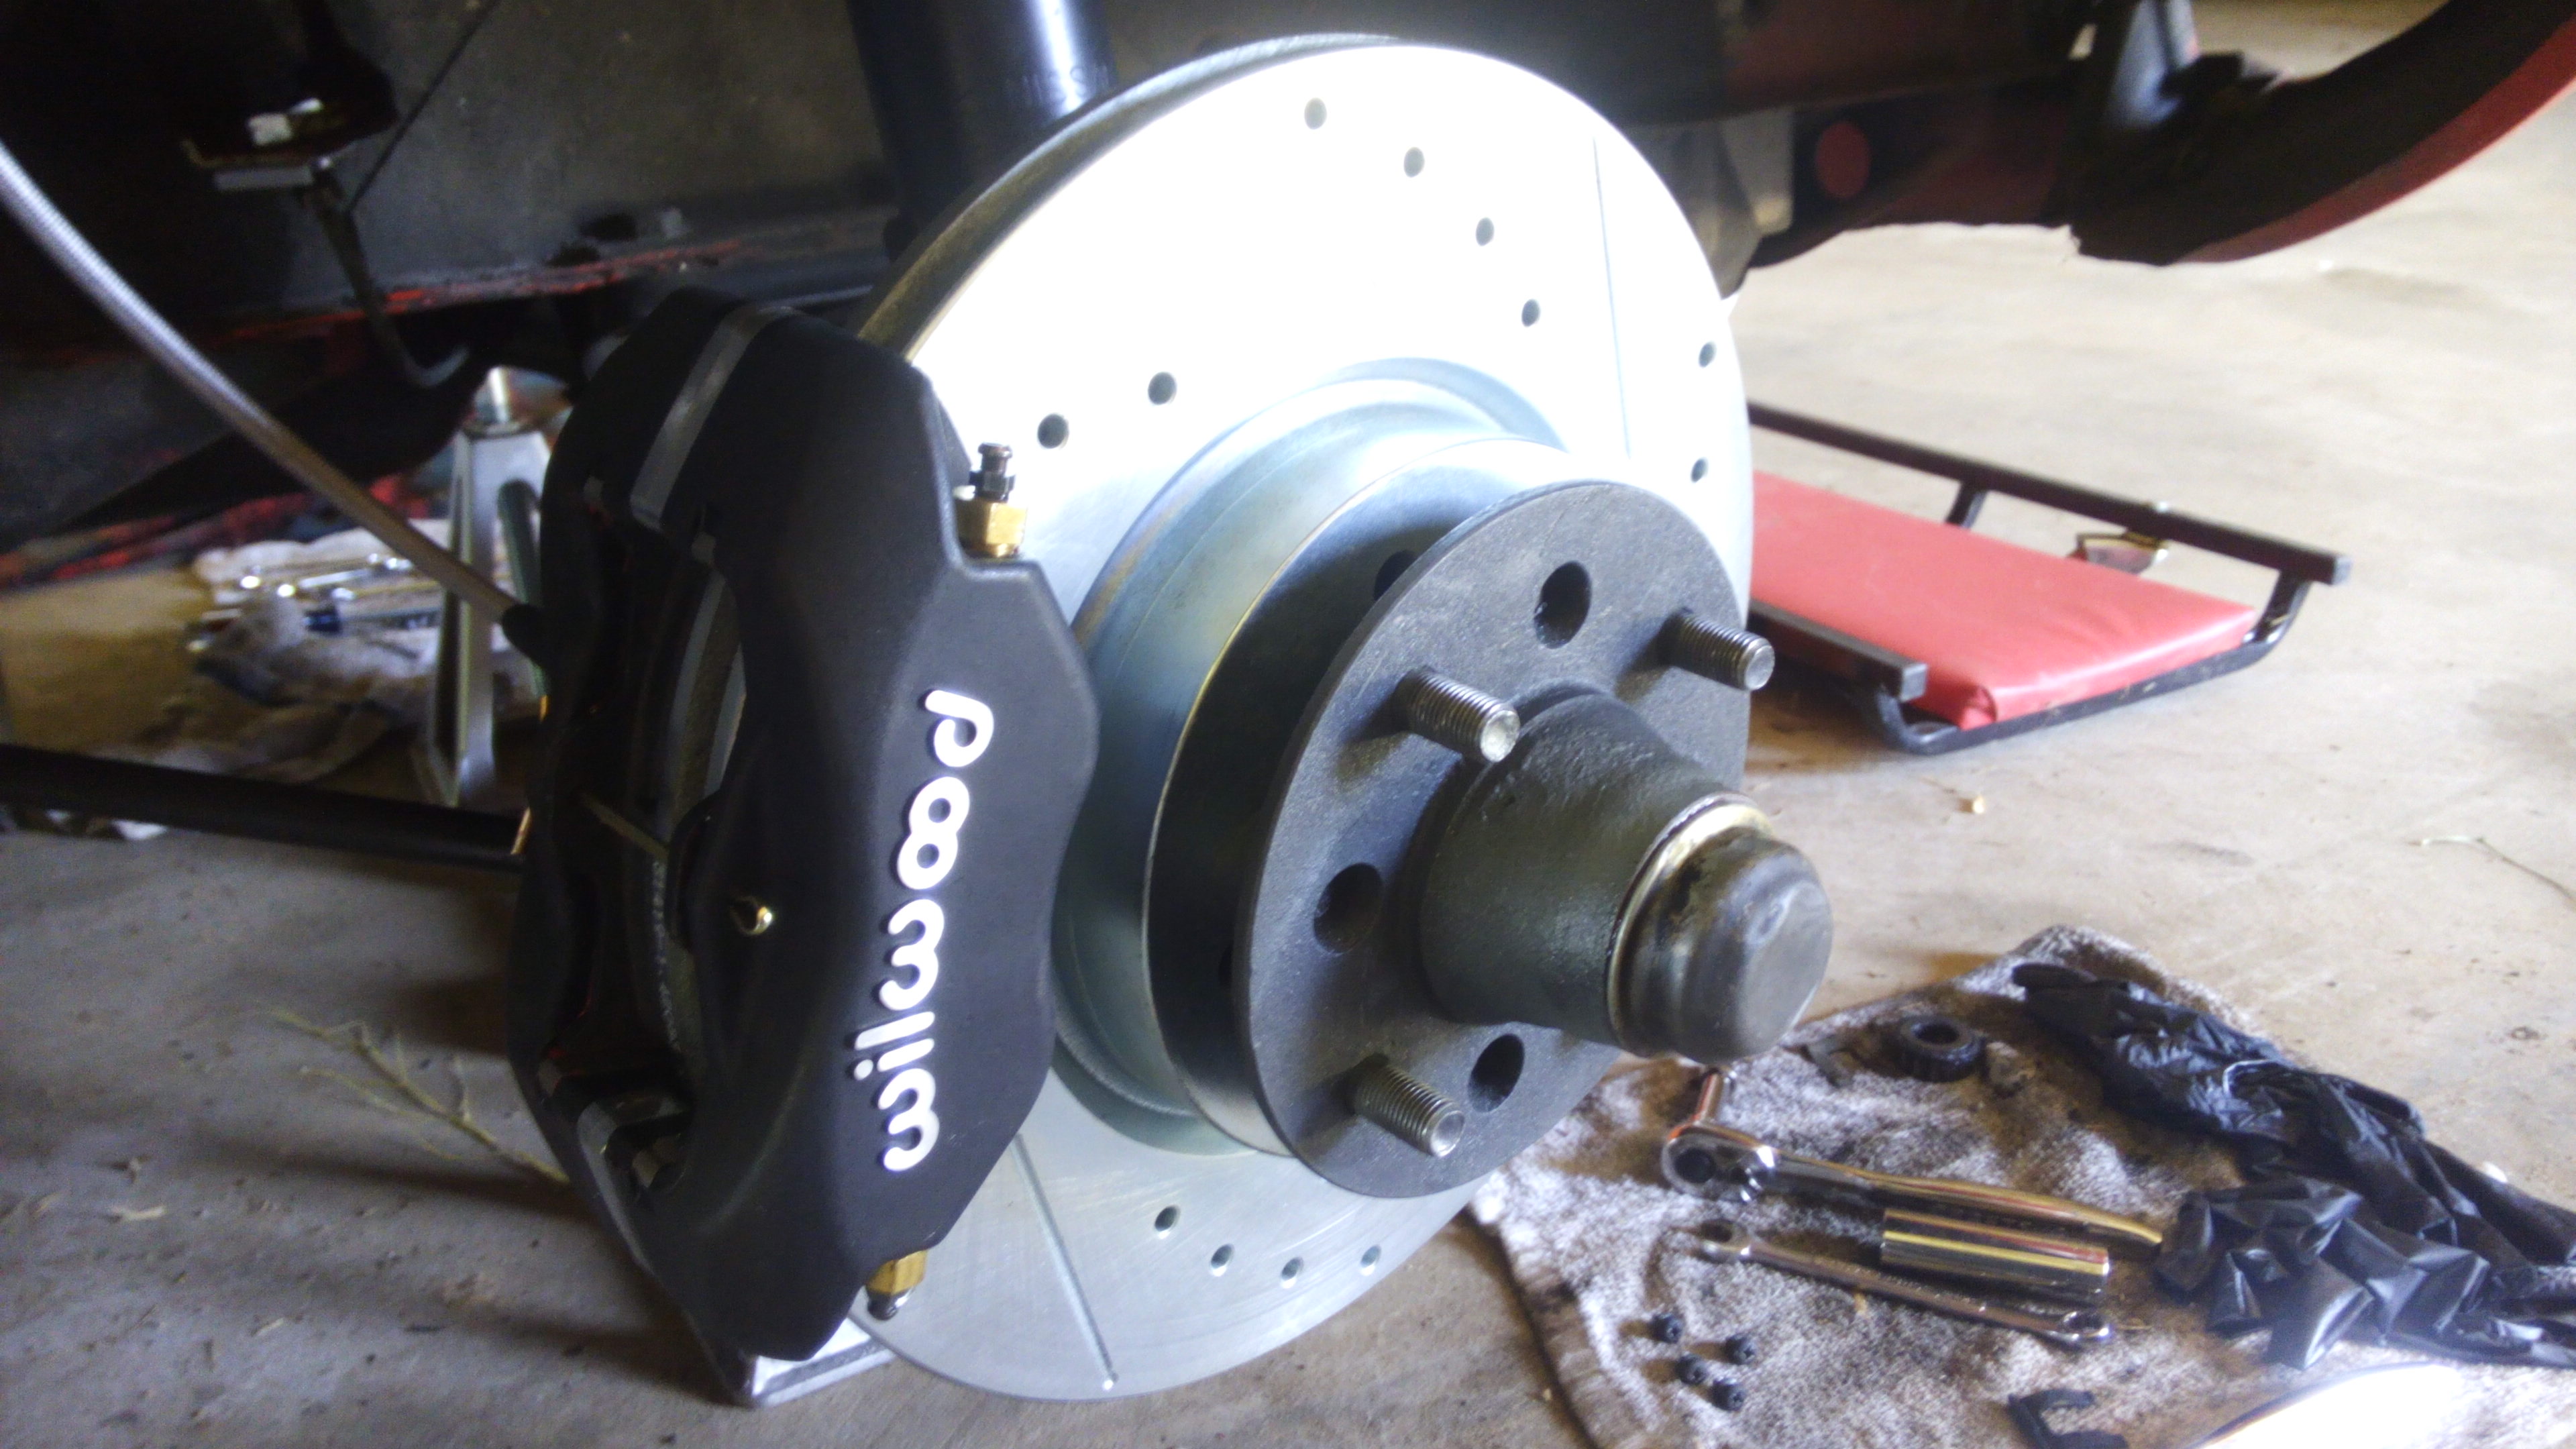
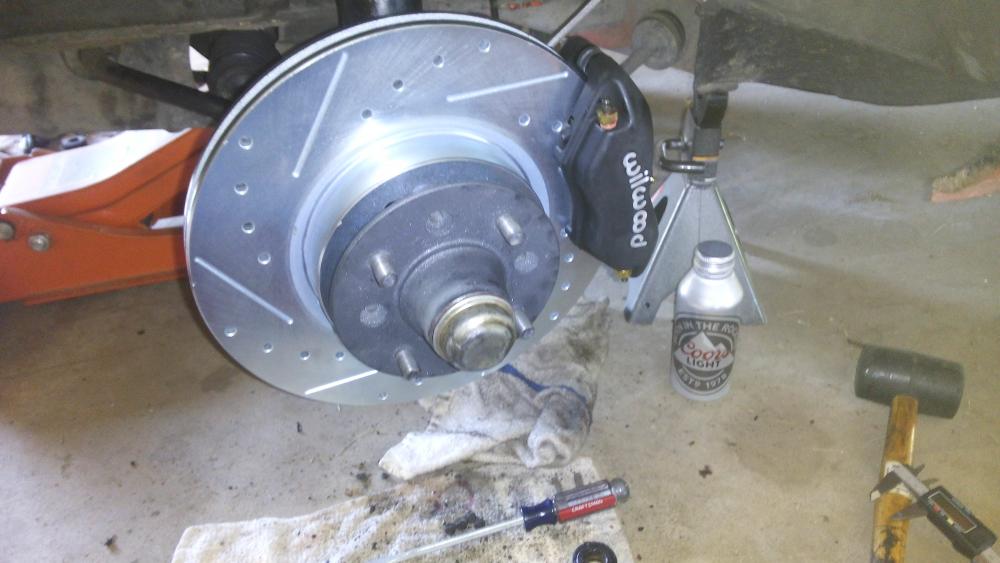
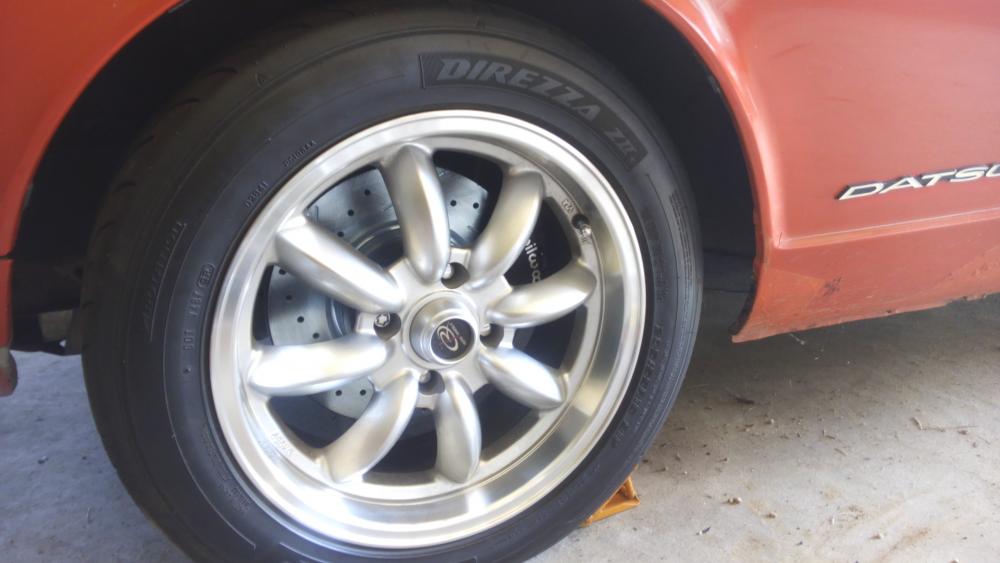
1 pointLate last fall, I had some discretionary cash and purchased a front Wilwood brake upgrade kit from Silvermine. Also a 15/16" master cylinder upgrade to compensate for the larger calipers. I knew I had an issue with a slightly warped rotor which was my main reason leading to the front brake refresh. The install went relatively smoothly, replaced the wheel bearings & races with Timken's while I was in there, and refreshed the hubs. Tried to modify & retain the original dust shields, but they interfere with the new, larger vented rotors so will have to get some new ones made up from aluminum or stainless as I don't like running without them on a street driven car. Two issues I ran into with this kit were .... Silvermine states you use the stock caliper bolts to mount the machined adapters - you cannot. The stock bolts are too long by 9mm and the non-threaded part of the bolt would prevent you from tightening the bolt to the adapter & spindle ears. To Silvermine's credit, I called Edan & he offered to send me some replacement bolts if I could give him the measurements. I opted to source them from Fastnal. The correct bolt is M12 x 1.25 x 30mm grade 10.9 (part number 11114852) The stock bolts are 39mm in length and even if you could thread them in all the way, they would contact the Wilwood calipers. The stock lock washers work fine with the new bolts. The supplied bolts for the caliper to bracket are of course fine. The second problem was centering the calipers on the rotors. In my case the inboard pad was tight against the rotor & a measurment showed centering to be about .030" off. (I could not turn the rotors with everything tightened to spec) No shim provision is included in the kit. Rather than roasting the new rotors on one side, I decided to center the calipers. Shimming can be done to either the caliper ears & bracket or the spindle ears & bracket depending on which direction is needed to center the caliper. I aquired some thin SS washers and installed them on the caliper ears and both sides were correctly centered. Bled the brakes, checked for leaks, and enjoyed the firm pedal, smooth stopping power, and extra bling of the new brakes. I did this about 12 days ago and after 150 miles, all is well. A nice upgrade. Stock vs Required bolt Caliper adapters installed with correct bolt Centering caliper (don't drink that Coors light, it was an empty to hold waste bleed fluid)


 1 point
 -
1 pointWater and beer. That's all a man needs. A little nooky is good too but with enough beer I don't care.1 point
-
1 pointSorry Cliff, let me re-phrase .... I used up a big huge chunk of my favorite beverage money1 point
-
I can just imagine the screws backing out or even the spot welds coming undone on some of the rides I seen at stop lights with 1000 watt stereos. My hearing is bad enough as it is (one ZZ top concert at the Hollywood Sportatorium) did damage enough.1 point
-
1 pointI have some mustang mirrors to go on my 78 . I am selling those because they wont be used.1 point
-
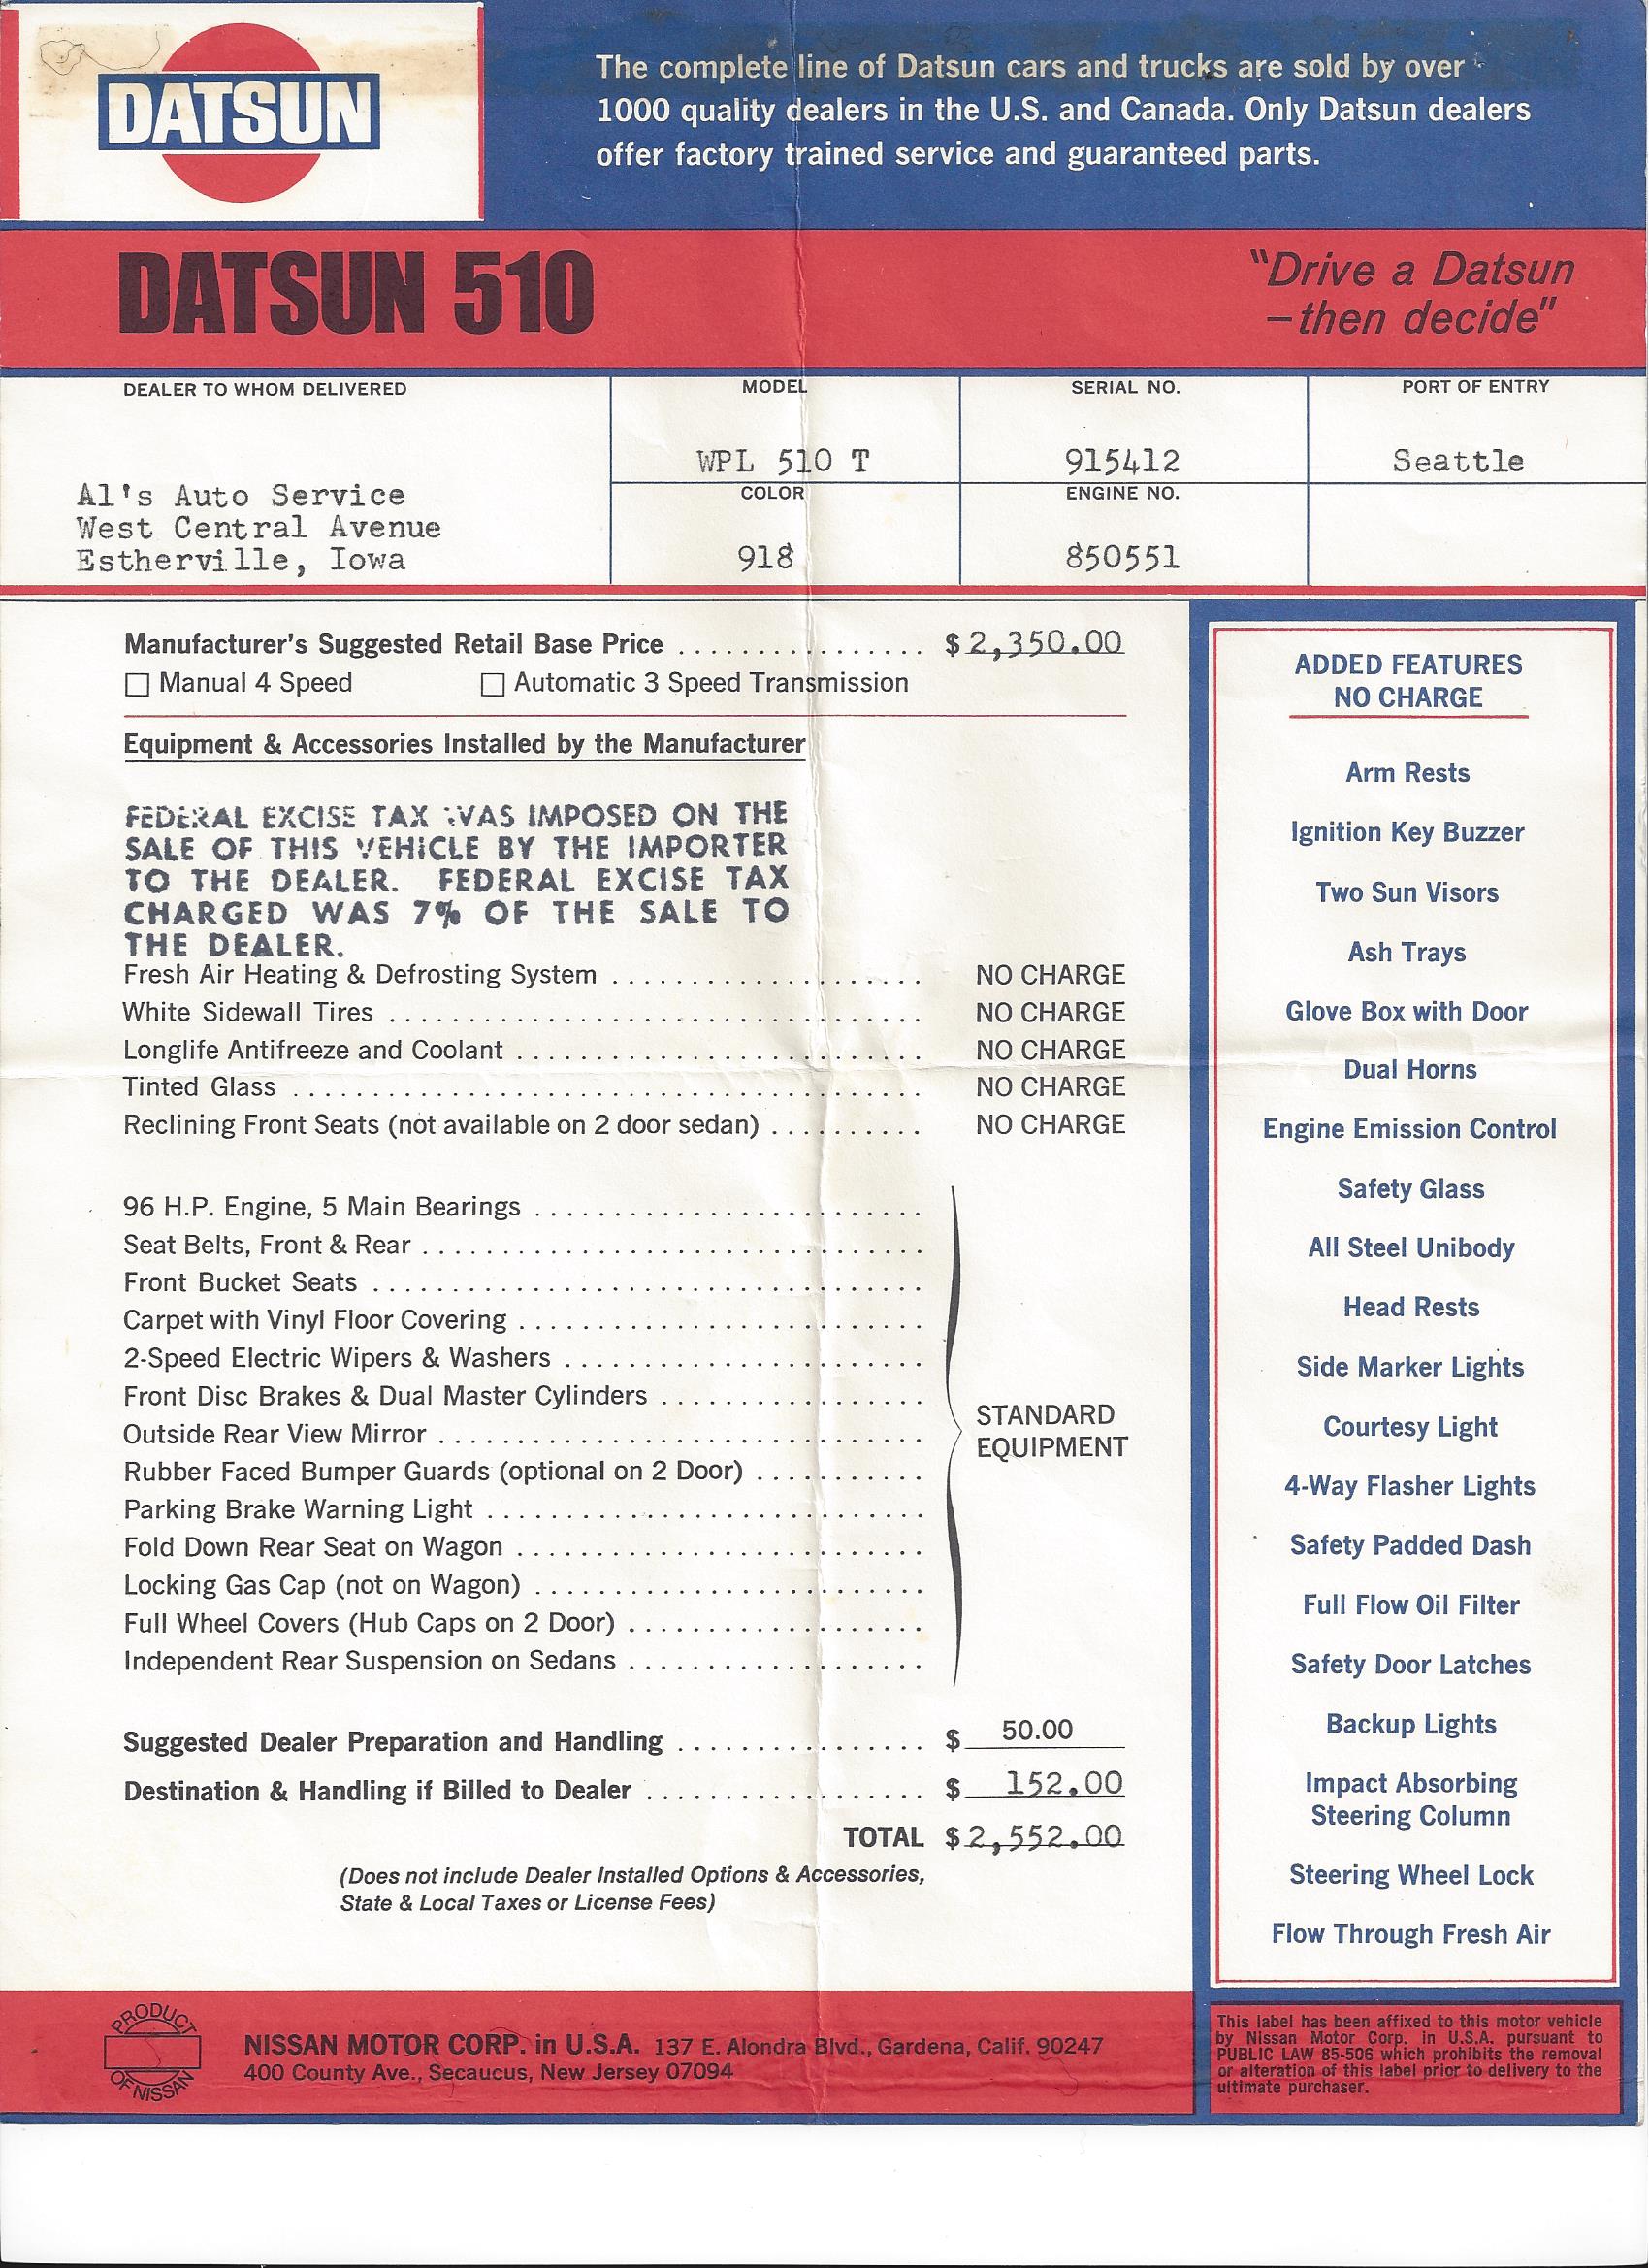
1 pointSorry I did mention it was a 204Z but the VIN is HLS30-08996 August of 1970 Build date. So almost could be a 1970. I'll go with the "oldest Auto on the road in the US" if I ever sell it and dare someone to prove it isn't! Speaking of 510's here is my family's window sticker for our 510 wagon. It was a 1971 purchased June 30, 1971. Car I learned to drive with and would get another if I had a chance but would have to be orange!
 1 point
 -
1 pointI think I am 7 years in right now. the car is jambed out and ready to start putting some suspension back in and lines and such. If I got really serious I could be done in a year and a half but I have a large family and am self employed so these projects take a long time. If I live long enough that's good. If I don't then it's "all gain"...1 point
-
1 pointFWIW I bought a "last until I'm dead" Kobalt super nice upright 60 or 80 gallon? can't remember, $600. Harbour freight pressurized media pot, $100. With all the stuff that air compressor runs I feel like I'm ahead on those purchases. The Datsun Z cars turned me into my Dad, which ain't a bad thing. I'm the guys dad in Fast Times with the "ultimate set of tools" that's a TV repairman.1 point
-
1 pointI 2nd Travel'n Man's comments on David Premo. I called David looking for help with a heat soak issue I've been fighting for years and not only did he immediately nail the fix he also suggested a jet change that really helped the top end power. This guy clearly knows how to tune Mikuni's.1 point
-
100 miles this morning without a hiccup. 8^) I believes I got it!1 point
-
Gah! And where were you with this advice a year ago!?! That's genius.1 point
-
Sloshing around dangerous chemicals while wearing masks. In the middle of summer. Sounds like a scene from Breaking Bad!1 point
-
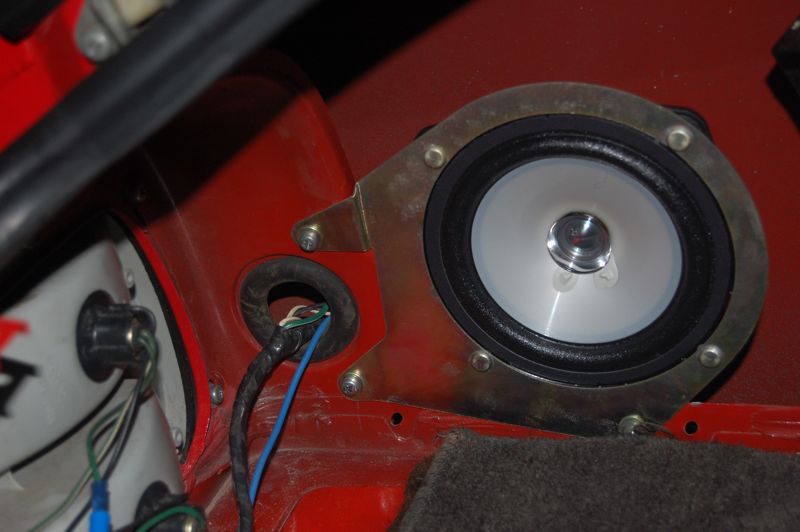
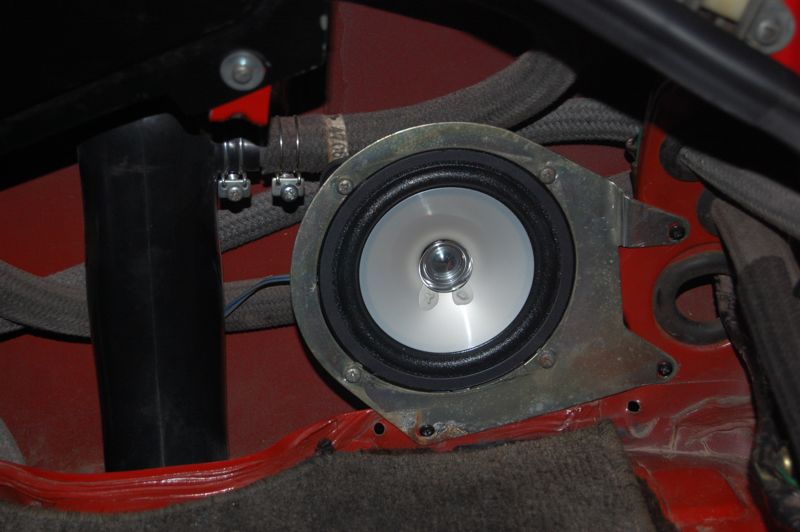
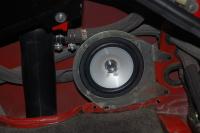
The single speaker in the 240Z was on the left side, as shown here (with a Kenwood speaker in the stock bracket): I re-bent a second stock bracket to put a second speaker on the right side (same Kenwood installed):

 1 point