
Zed Head
Community Member
-
Joined
-
Last visited
Everything posted by Zed Head
-
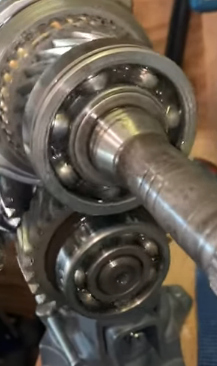
Yikes, that's a scary video. I'll bet you were sweating, maybe still are, wondering about pulling it out. But, it's just metal a seal instead of plastic. It looks like it might actually be more of a metal shield to keep crap out. I didn't se any grease, so pulling it will give more lubrication. Can you see the other side? The sealed bearings are sealed on both sides. As Dave said though, the retainer and races hold the bearings in place. The retainer, the metal piece with the bumps in it, is actually also a spacer, keeping the balls separate so that the inner race stays centered and the balls can't get torqued out. Without that piece the balls all end up on one side with a big gap on the other.
-
Underneath the plastic seal is a bearing just like these, from your video, with the retainer wrapped around the balls in the races. You can actually get those exact bearings in a sealed form if you wanted them. Some people use a sealed bearing for the countershaft bearing. Maybe it keeps it quieter. I'm not so sure it's a huge deal, really. There are holes in the adapter plate, at the bottom, I think that allow oil flow. The bearing is loaded with grease before they seal it. But if you peel the seal out you won't hurt anything.
-
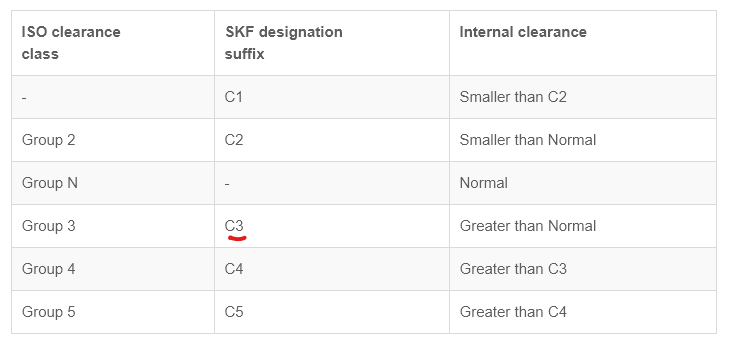
Thanks Chas. Yes, I chose the wrong word. Lazy on my part. But, the SKF guide says that C3 clearance is greater than normal. So, loose. Who knows, maybe a rebuilder should drop the clearance back to normal, since the internal bearings seem to fail often. Maybe they're too loose. https://www.skf.com/cn/en/products/bearings-units-housings/principles/general-bearing-knowledge/bearing-basics/internal-clearance/index.html
-
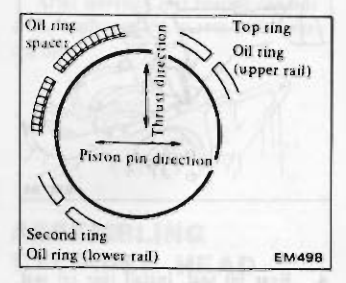
I'd guess that the fact they never specified front or back, only thrust direction, means that it doesn't matter. Looks like they're just saying "don't line your gaps up with the thrust direction, make sure top and bottom ring gaps are opposing, and put the spacer gap between the two." They used the same picture all the way through 1983, even with the turbo engine. p.s. I see that I confused the oil ring discussion with the overall ring gap discussion. Sorry about that. Still, it's looking like it doesn't matter much. Space the gaps out and expect them to move during usage. p.s. #2 - it would still be neat to see where the rings are in a high mileage engine. The dynamics might cause them all to end up in a similar position. A "resting" place after their walks.
-
Is there grease inside? Supposedly they are filled with super duper grease designed specifically for the bearing. The purpose is to keep them lubricated when they are used in areas that can't be reached for regular maintenance. The bearings are C3 tolerance which is loose, to allow crud to slip out, as I understand things. but, this reference says it's to allow expansion. Trivia... https://www.bearing-king.co.uk/article/why-are-your-bearings-c3 More stuff. I'm learning. https://www.skf.com/cn/en/products/bearings-units-housings/principles/general-bearing-knowledge/bearing-basics/internal-clearance/index.html
-
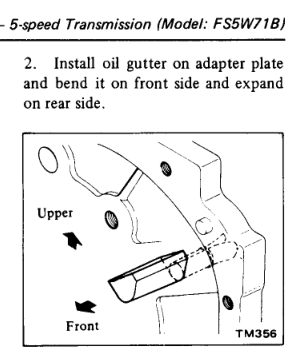
grannkyknot has also rebuilt a 5 speed. EuroDat posted some pictures in his thread. I opened up the 1982 FSM and found a similar issue where they don't show it in the diagram but do describe it in the reassembly text. It's an odd little chunk of folded stamped metal. You could probably make your own pretty easily. I don't think that there's much engineering in it.

-
My thoroughness is letting my coffee get cold... https://fpsdistribution.com/articles/piston-ring-gaps-preventing-engine-damage/ " Aligning Ring Gaps Unless pegged, all piston rings slowly rotate round in their grooves while the engine is running. For this reason, it isn’t important to make sure the ring gaps are aligned – though you may find it easier for fitting if you stagger the ring gaps before you apply a ring clamp. However, no harm will be done if the gaps temporarily align in service.
-
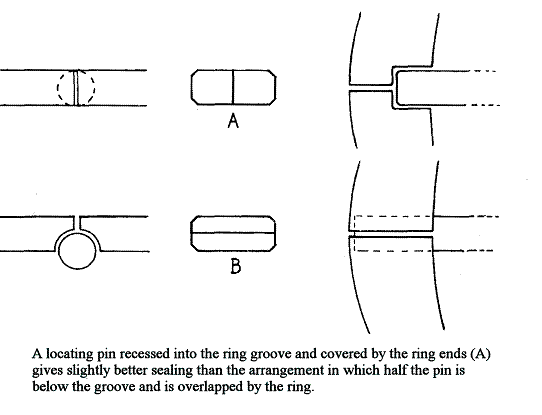
My point was about what happens, not what was designed to happen. Many two-stroke engine pistons have a peg in the groove and the ring ends are shaped to fit the peg. that's a design meant not to walk. http://m.2strokeengine.net/gordonjennings/twostroketunershandbook.php
-
It would be interesting to see where they are on an engine being disassembled. I think that they "walk" over time anyway. I thought that the starting offset was more just to improve the odds of not grooving a cylinder wall or getting poor sealing. I don't know though.
-
That's pretty high up there in RPM. Curious about the hp/tq? Usually they're reported separately. Which is which? And where/when? The curves would be nice to see.
-
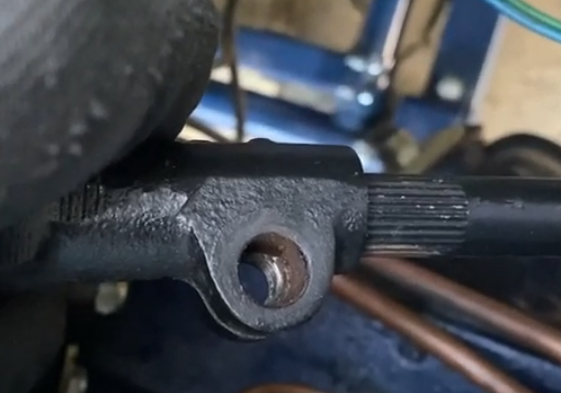
So did the clamping bolt fall out and the shaft was working its way free? Sorry, I like to know the answer first then back fill with the details. Edit - so I watched the third video and see that it was loose with the bolt in. I didn't see the fix though. I think that you could probably push your steering wheel in to get more bite on the clamp. It probably has a gap up there somewhere inthe cabin. I have vague memories of realizing that the shaft and wheel could be pulled in to the cabin once the coupler was detached. From when I replaced the the coupler with a urethane unit. I think that that is how I made space to get the old one out and the new one in. It might be a wrong memory though.
-
Just an experiment. Copy and paste. Let's see if it worked. Last edited: Today at 3:49 PM AliK, Today at 3:32 PM #1
-
Here's a couple. I think that Motorsport might be showing more than they actually have. https://www.thezstore.com/page/TZS/PROD/10-2041A https://zcardepot.com/products/lash-pad-cap-valve-rocker-arm-guide-oem?_pos=1&_sid=2e26d0517&_ss=r
-
How did you know that you needed the 8920, and how did you wire it up? Many people can't get the 280Z tach to work with the 6AL even with the 8920. Give some wiring data and you'll be adding to the thread's usefulness.
-
There are a few other things you can check without taking it apart. The roll pins that hold the shift fork to the shaft. Sometimes they can wear or break or wallow out their holes. Make sure the forks are tight on the shafts. I looked at your video but didn't see the oil gutter. If it's gone the reverse gear or maybe the idler will get dry. Check the straight cut reverse gears for chips. They don't really matter but it gives an idea of abuse. The gutter is a mmysterious thing, it's only shown in the 4 speed drawing but it exists on all of them. It's a trough that catches oil and transfers it through the adapter plate.


-
I thought you said that the first head was cracked. Now the second head is cracked also? Or is it warped? Is it a used head, or a reconditioned head? Don't know. Seems like he would have checked the second head before installing it.
-
Timing... Be careful with the oil gutter on the other side. It gets bent often.

-
@Mark Maras and @EuroDat and @zKars probably know for sure. I can't remember what might be holding the back half on. I'm pretty sure though that you can get the front half off without removing the back half. If you wanted to split that case off of the adapter plate while you're waiting. It might be that you need to rotate the shift lever to get the reverse lockout mechanism free on the back case. That was the "spring thing' that you removed. Look inside the hole and you might see what's getting hung up.
-
I looked back and found your old thread about the different head. Not really sure what you're saying here, but it sounds like you think that you have a leak at the head gasket. There are several other ways to get coolant in the oil. It might be that your other head was not actually cracked, if coolant in the oil is why you thought that it was. If you've had two heads that do the same thing the problem might be with the block, or the timing chain cover. The water pump passages can corrode and leak in to the crankcase.
-
The ECU opens all of the injectors at the same time, and they're grounded through only two transistors. So, unlikely to be the cause of misfires. There are many other potential causes of misfire. Describe more about what you mean and there might be some ideas. Here's a list if you decide to get another ECU anyway.
-
Sorry to hear about your Dad Cliff, January was not too long ago. Seems like forever with the 'rona going on. Mine just turned 90. What year is that El Camino? The old ones are better than the new anyway. Post a picture. Probably has a 350 in it? Those small blocks are known to flatten cam lobes. Lots of popping back through the intake when you give it gas.
-
Getting these things to run well is just a collection of small things. Crank open the idle speed screw and let it run and warm up while you check things. A piece of water hose is a good directional antenna for your ear. If it has oil and water it will probably be fine no matter how bad it runs. They're pretty tough engines. Watch oil pressure and temperature. Check your timing. Rev the engine and see if timing advances. You can spend hours doing "stuff". I used to have a 6 foot piece of flexible plastic drainpipe that I put over the exhaust pipe and ran under the garage door.
-
Lastly, finally, one more, sometimes an ignition module can put out a spark that is only strong enough for starting fluid. Make sure you have a strong spark.
-
Finally, don't forget that all air entering the intake system must pass through the AFM. The PCV system needs to be intact, all of the hoses need to be connected, and the big hoses at the AFM need to be hole free. The engine crankcase has to be completely sealed, no little air filters on the valve cover either. Any extra air can make the mixture too lean.
-
Could the injectors and their hoses still have old bad fuel in them? Looks like you cleaned the tank and have had the pump running. But if you look at how the rail is set up the injectors and their hoses are dead zones as the new fuel passes by them. Don't know how long you've been trying but it might be that you just need to get some good fresh gasoline down to the injectors.