Leaderboard
-
JDMjunkies.ch
Community Member3Points657Posts -
Terrapin Z
Supporting Member2Points1,357Posts -
Captain Obvious
Community Member2Points10,148Posts -

dutchzcarguy
Community Member1Points2,710Posts


Popular Content
Showing content with the highest reputation on 08/19/2025 in all areas
-
2 pointsI think it can be unbolted with the fenders on. just enough room with a swivel, a bent wrench, some friends and a 6 pack. lol The backing plates can be retrieved if they fall, use a stick magnet, you might have to remove the ECU, Holding them in place while starting the bolts is another circus act. get some friends back over and a 12 pack. haha!!2 points
-
Over the last few days, I was busy in my workshop, getting some small tasks completed on my Z project. Time for a little update. After installing the partial gearbox to test fit the brackets and stuff, I realized that the gear lever is too much in the front of the hole: A quick look into the manual made it clear: I had mounted the lever the wrong way. So, gear box rear-end out, gear lever corrected: And back in, this time, correctly: Then I spent a lot of time at the rear end of the car. I had to clean the holes for the three taillight panels, so that the plastic rivets would lock properly. After that i re-installed the taillights, and ensured the sealing rubbers were set correctly, using my "string-trick": Next i have to finish the slightly worn chrome / metal trim around the taillight panels and get them back on: While working at the rear, i decided to install all those fasteners, stoppers, alignment pieces, guides, etc. Like those rubber spacers: And trunk dampers. I have a NOS set of everything, so the installed ones are only temporary, to not mess up the new ones: And the last bit at the rear end was to align the trunk / hatch. The body shop had installed some spacers to get it straight, but after all the parts got installed, I had to remove them again and massage a few areas lightly to have it all aligned: Next? Seat rails. I had those Bride seat rails from my Histrix lying around for a while and wanted to test-fit them. I'm most probably going to use something different setup in the end, but I wanted to ensure that the distance and position of the seat mounting brackets was right after all the bodywork. I thought the best way was to use the original seat rail mounting studs and spacers. Since I had several highly-damaged OEM seats, I hammered out the fasteners and used the plastic spacers after grinding away the factory spot-welds on the bolts. This worked unexpectedly well, so now I can do some trials with different seats, rails and setups - to figure out what will go into the car in the end. Next: I realized that I didn't have any upper rear number plate light in my part collection. Luckily, Florian from Datsun-Autowerk was kind enough to send me one of his broken ones including some other parts (more on that in a following post), for trials. After puzzling and glueing all the parts together... I could mock it up all together and drill the required holes. Fun-fact: I always thought that slight "dent" in the gray metal piece was a production fault of the reproduction panel, but it's actually there to make space for the number plate lighting bolt. After the holes were done and cleaned, I got the upper plastic part installed. And then the whole thing with the lens. Note all bolts and the light itself are temporary units for the mock-up only, final parts will be correct and fresh. Looks good if you ask me! Special thanks to the person who gave me the hint with the holes (I wasn't able to find the mail anymore, but you know who you are!) And then? Spoiler-Alert. Again. After i realized that the currently installed spoiler is beyond repair, I remembered that I had another one lying around. But it was bent in all directions and super wobbly: But all the brackets were still in good shape, so I gave them a little wire wheel brush and corrosion protection: I placed them on our terrace, which tends to get quite hot now in summer And let it take the heat every day. My thought was that the Polyurethane gets weak and goes either back in its natural shape by itself, or can be massaged. At the end, some areas turned out to be pretty stiff, even with heat and required some proper bending over my special bending bench :-) It didn't really work out. It's way better than in the beginning, but still super wobbly. I thought if i'd install it on the car, it might straighten itself a bit. Let's see. I have my doubts. The good thing is, there seems to be another spoiler on the horizon :-) I've seen worse ones, but yeah. Not good enough for me: I also went through my plated fasteners and sorted them a bit. I got various boxes over the years from various collectors and Z-specialists, so it was about time to ensure I find what I'm looking for :-) The to-do list gets smaller by the week. And there's not much left from my side, but some tricky bits. I guess I've earned my favorite Japanese "Hitachino Nest" beer for today.2 points
-
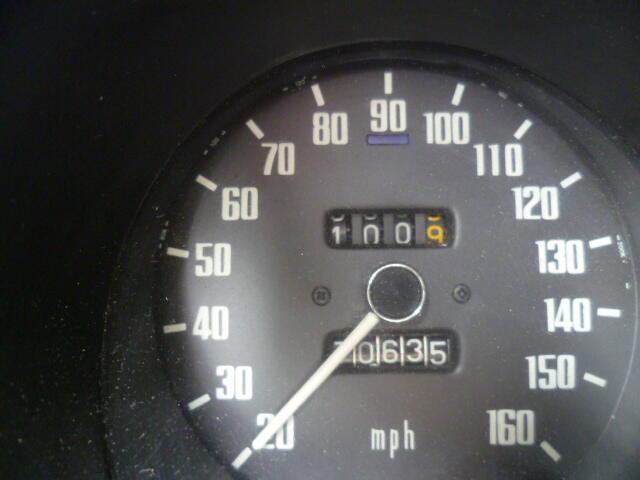
2 pointsCountdown!! I got 100 miles on it: And those 100 test miles made it clear that I need front struts:
 2 points
 -
1 point
-
1 pointI'm on HS30-H side here when it comes to Factory Nissan JAPAN Plating. The official Nissan documentation clearly shows Zinc plating plus Cadmium plating was banned in Japan by that time, so why would anyone believe it was anything else than Zinc plating (or yellow / blue passivating, as it's called here) On the other hand, the Z-restoration program was executed by selected workshops with support from NMC USA! According to the Z-head document in the previous post, it appears that those were indeed replated with Cadmium in the USA by some private shops. At least according to that checklist. Which is kind of interesting that the restored cars are different from the factory cars. Which is also a bit strange. Because there is a bit of difference in appearance between cad and zinc, so why would they choose something different - especially much more poisonous?? Maybe missing knowledge? Or was it cost saving?1 point
-
1 pointCorrect……Always do one carb at a time….piston and dome are precision matched. One more thing, make sure the needles haven’t been bent.1 point
-
1 pointYou say: switched tops but maybe you must switch top and piston on the other bottom part.. btw always keep the parts of 2 carbs ALWAYS apart.. they look the same but are very fine tuned parts..1 point
-
1 pointI spoke with Marc Jones (former Datsun Alley owner) looking for some parts and he was telling me about his involvement in the project. Buddy of mine bought a 70 shell for his turbo built. He had alot of information and knowledge about the project.1 point
-
1 pointSpeaking of NOS parts, I can remember my local dealer calling me to see If I wanted any of our regions NOS parts. They had a list of the available parts and called to let know that it would be my last chance to get them due to the restoration program requesting them. I will try to find my parts receipt to get a date. Also just to make sure we don't double up on research I have requested information from Les at Classic Datsun such as Ser#, Color, which of the 10 Z Stores they went to, etc... JLP1 point