Leaderboard
-
inline6
 Subscriber
 7Points1,282Posts
 -
hotsho111
Free Member4Points74Posts -
Patcon
Subscriber3Points11,142Posts -
HusseinHolland
Free Member2Points1,031Posts


Popular Content
Showing content with the highest reputation on 09/22/2023 in Posts
-
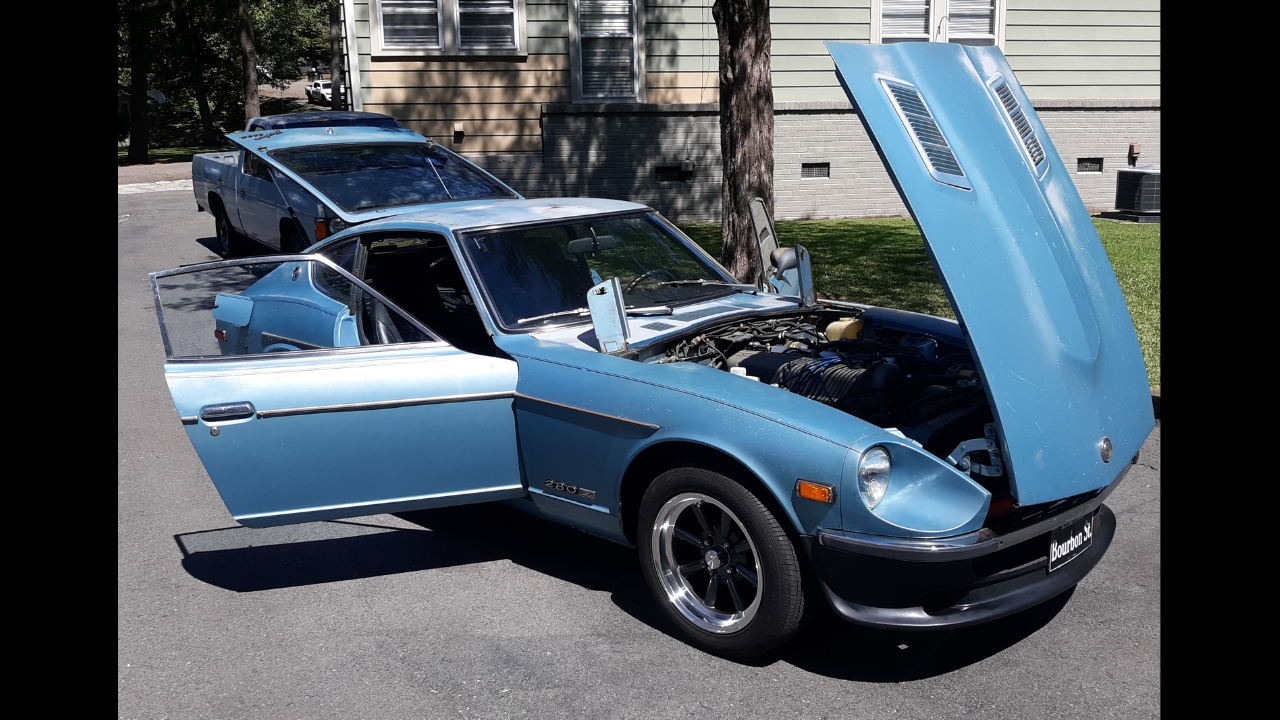
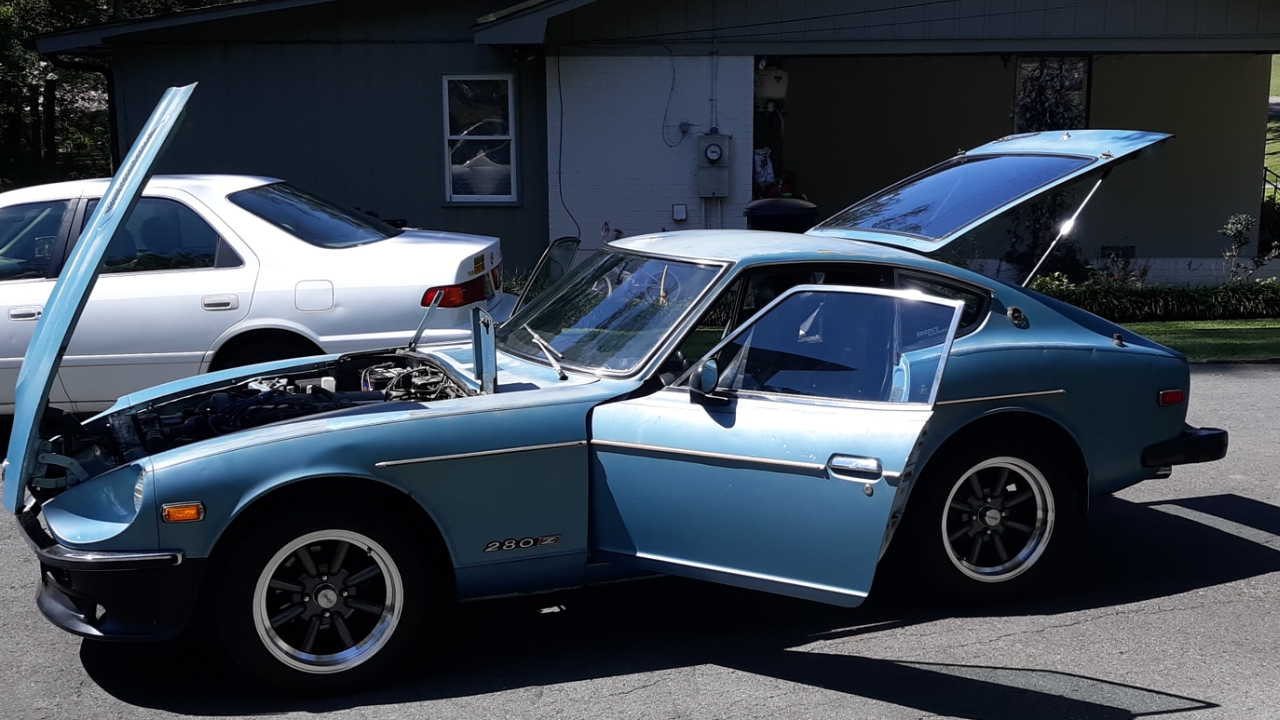
There has been a crazy amount of hours and money to get the body to this point: Color code is 901 silver. Paint is Glasurit.7 points
-
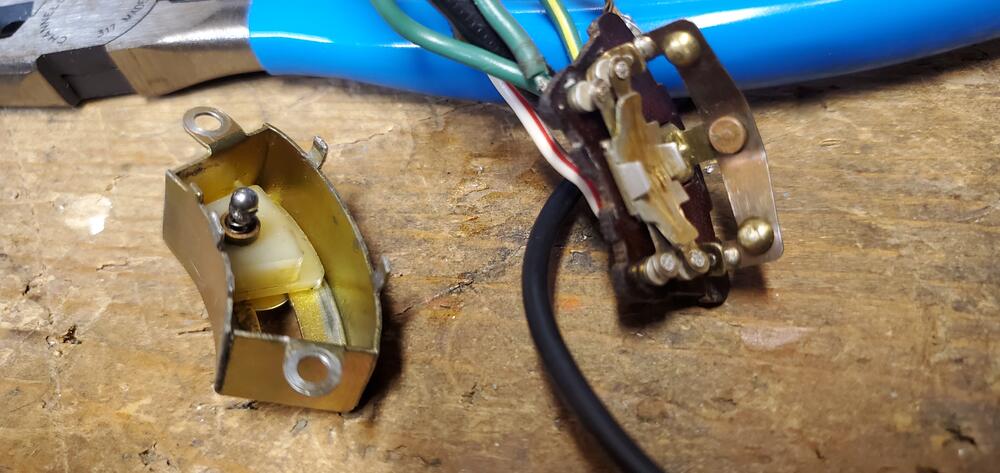
4 pointsPicked up this set https://www.amazon.com/dp/B0BS95X63W?psc=1&ref=ppx_yo2ov_dt_b_product_details so I had a few sizes and the 3mm side was right on the money (and actually 3mm from my calipers). Cleaned and tested everything else for proper contuinity, and using a little dialectric grease to hold the ball on the spring it went together pretty smoothly. Sorry about the slightly blurry picture. Soldered a few of the top connections and good to go!
 4 points
 -
2 pointsIf I were doing a resto & feeding a new harness, I would bite the bullet. Cutting a $49 grommet to fit around the old harness, I just can't bring myself to do it. I ordered an assortment of (ugly) generic grommets that cover the 60-70mm size range.2 points
-
Rarely seen a 240z with this kind of PERFECT panel gaps! You did a extraordinary job!! My hawk eyes only saw one little imperfection.. No not worth mentioning.. (0:35 min) PLEASE ignore because i think this is the best 240z bodywork i have seen EVER!!! I think you are (Like as me sometimes) a perfectionist, and that's not always easy... We call this: een muggezifter! (translated: a nitpicker or critic.) YOU ARE DOEING A WONDERFUL JOB! 👏2 points
-
It looks like I will be busy under the 280Z this weekend. I just got a deposit to sell my daily driver, so I need to get my Z reliable enough to drive to work for a while. I still need to get the new exhaust finished, drop the trans and replace the rear main seal, trans output shaft seal, speedo cable seals, and go through everything else that might need attention. I haven't driven it much at all in the past 13 years. Wish me luck.2 points
-
1 pointFor @Yarb, I will be documenting and de-pinning the connectors to get the grommet on the harness. I'm not cutting anything I don't have to cut.1 point
-
1 point
-
1 point$45, Free Shipping and no Tax. True a bit pricy. I think the more you run into parts that are NLA and are wearable items you find yourself paying a lot extra for these Zcars. I ordered one for mine today. I’ll pass on the quality and how it compares to factory.1 point
-
I agree the paint looks exceptional. The panels are really smooth and the body line is nice and crisp!1 point
-
You must be a happy, you picked the right shop, beautiful.1 point
-
1 point
-
If someone needs a crank shaft lengthened, I don't mind doing it for them. However, it would require them to dissasemble the window regulator, pay for round trip shipping, and most importantly, not raise a fuss if I screw up the job. I didn't show my second modified spline shaft but the small rod extending out of one end of the part snapped off while in the lathe, but I was able to use the threaded rod to replace it.1 point
-
1 point
-
Dog's in good health just older and tired BUT the ride to the other side of my small town in the Z was so neat and funny. He sits so low in the seat all that people see is his head which is 2 eyeballs a nose and ears. He has huge ears and they were flying around like a hairless duck. 😄 It was great. I did loose a front centercap though. Crossed a few train tracks at a good rate of speed so no big deal. Can hardly wait to get him out more now the sun has set away from here. What a miserable summer we all had.

 1 point
 -
I thought of another mis-fire problem and the solution. Like Mark, it was related to the plugs. I used, and still use, NGK BPR6ES plugs. The issue I routinely run into with them, is that the end of the plug where wire snaps on, is threaded on to the plug, and is often loose. Several years ago (2015), a random issue with mis-fire throughout the range dogged me for a year or better, and when I finally discovered that one of the end caps was loose on a couple of plugs. Tightened them up, and the mis-fire went away. The BPR6ES-11 plugs that also spec'ed for 280's with EFI, don't have the threaded end cap. I described this WAY back in 2015. The thread lionk is below if you want to see pics. EDIT EDIT : just doing a bit of a good search. NGK plugs BPR6ES #7131 have the threaded caps, #4008 have solid caps! Jim, stop buying #7131 BPR6ES plugs you old idiot! BTW, Don’t order the Denso #4008 plugs by mistake. They are NOT the same….. Just saying…..1 point
-
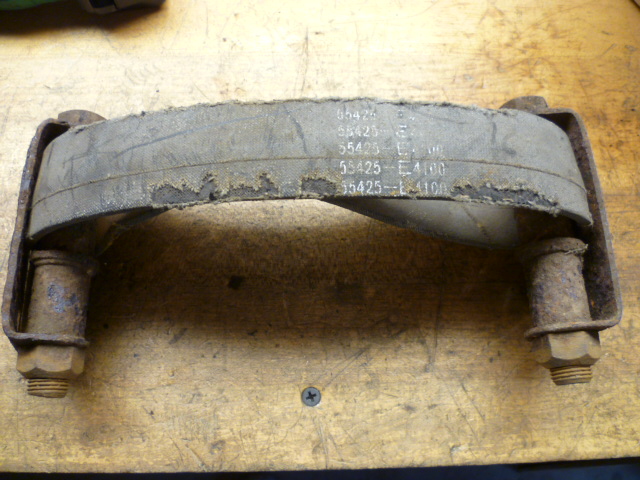
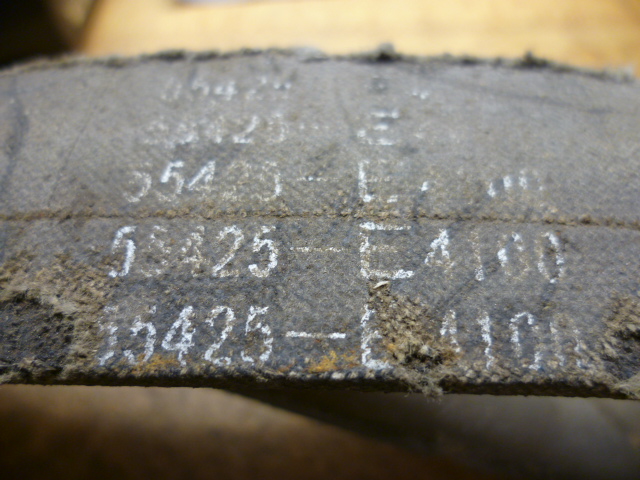
1 pointNot sure it really matters, but I think the 55425-N4300 is the strap for the 280's with the R200 diff. if you've got a 240, then I believe you want the 55425-E4100. My measurements indicate that the two straps are different lengths.
 1 point
 -
1 pointThe Isuzu valve was nice because it was all one piece and the metal tube is 5/16" / 8 mm. cut the tube and slide it in. I posted a picture in a previous thread. I can't remember the year, I think it was late 80's. Unfortunately, not really common to find them in the yards.1 point
-
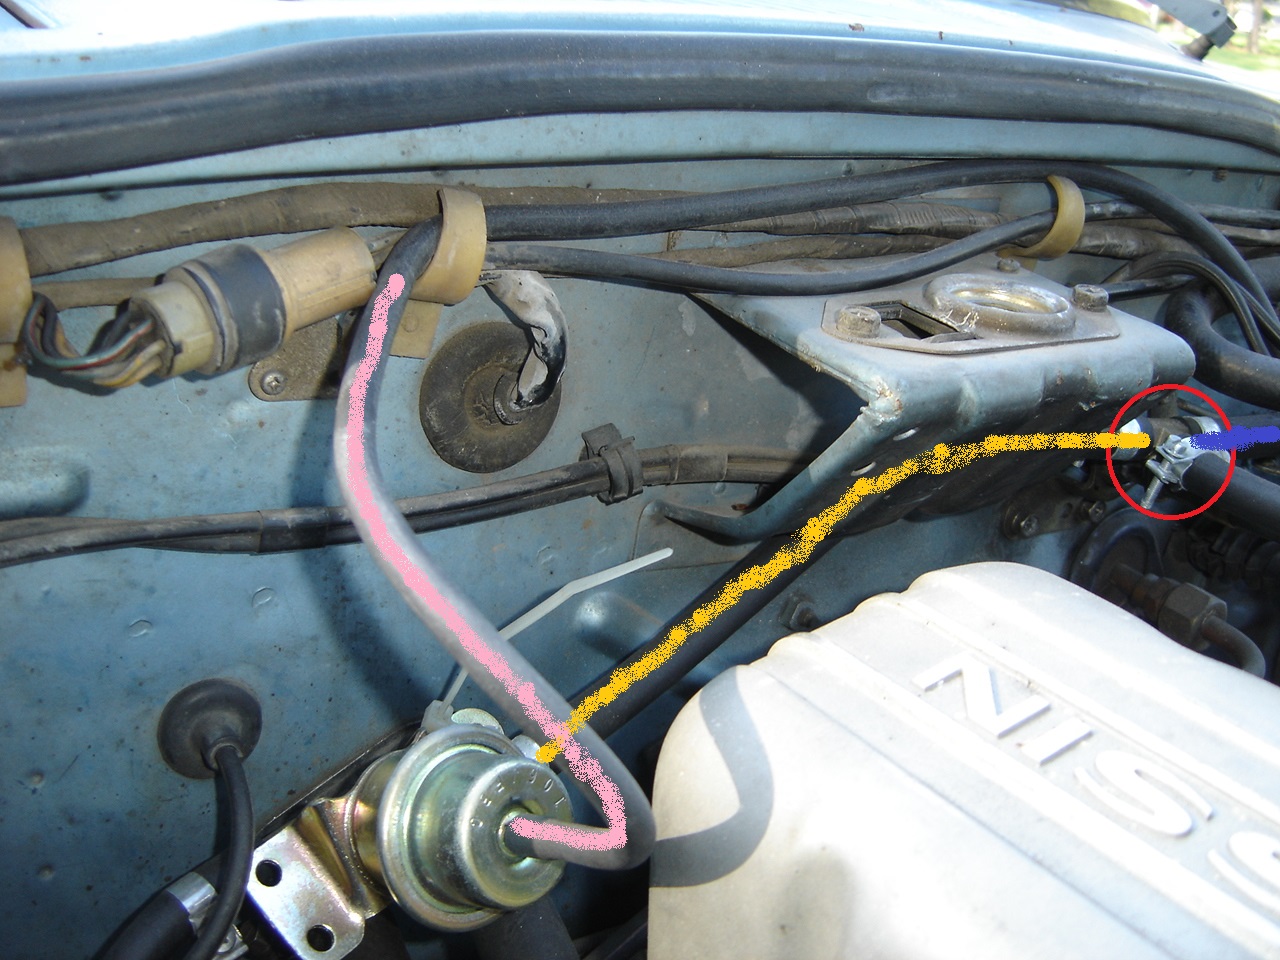
1 pointI've installed a 1978 FPR on the passenger's side firewall. The couple of aftermarket ones I tried leaked down. I ran a T out the rail end closest to the windshield, one side going to the CSV the other to the FPR. I've cleaned it up a little since this picture was made. No zip-tie. Don't use a low pressure glass fuel filter like I have at the front end of my rail. It was a temporary way of checking for trash after I relined my fuel tank

 1 point
 -
1 pointI bought a 12x12 sheet of closed cell silicone from Amazon that is the same thickness as the 240z gasket. I ended up changing the hole size on that from the sample and making about eight paper templates before deciding on a final one. An X-acto knife goes through that silicone like butter. The ZX bracket was sandblasted and I used the same blue paint I used on the block, which I purchased from Motorsport. The silver paint is Eastwood Alumablast. I used a Timken 6203-2RS deep groove bearing (17x40x12mm). I have painted all of my aluminum parts in the engine bay. I have learned that radiator fluid additives can completely ruin the finish on nice aluminum parts so the only things I leave raw in the engine bay are brass and stainless steel. For the quarter windows, I used Goo Gone to get them cleaned after taking them apart. The rubber is all new from Precision (not very precise, if you ask me). I polished the steel with Barkeeper’s Friend and then stainless steel polish. It has a faint brushed finish rather than a mirror finish, but that’s intentional. The broken joints in the frame were glued with JB weld and clamped, because I didn’t feel like breaking out the welder for a single spot weld. However, the rubber, being not precise (see above), might have ruined that joint. I can’t completely tell and am not taking it apart to find out. It doesn’t matter because the car holds it together. Weather strip is held in with black 3M weather strip adhesive and the various gaps were filled with black RTV. It looks like it’s supposed to be like that.1 point
-
1 pointThis is what I did. I cut it open with a metal saw and after blasting it there was no issue with welding it back together. I wore an correct mask for lead during the blasting and while welding.1 point
-
1 pointThere is some bracketry inside the tank so you will need to avoid those pieces. I think if I were going to cut on the top side. I would make a fairly big access hole. Doesn't matter to me if I weld a 6" patch back in or a 12' patch. It's about the same difference...1 point