Leaderboard
-
Captain Obvious
Free Member9Points10,081Posts -
HusseinHolland
Free Member5Points1,031Posts -
chaseincats
Free Member3Points1,035Posts -

Dave WM
Free Member1Points3,591Posts


Popular Content
Showing content with the highest reputation on 06/04/2023 in all areas
-
3 pointsThe only time folks should mess with the AFM is if they have a widrband sensor to tune it with IMO3 points
-
2 pointsI'm not sure I mentioned it on here yet. A neighbor who is also a car nut noted that a good friend of his up in RI has a 2006 350Z w/6 speed that will not pass inspection due to rust in the rear subframe. He suggested that I would perhaps be interested in the car to use as a donor. That is the ideal way to go, as I will have all the EMS, modules, etc., and everything else that I might need. The price he is asking is less than I would pay for a CD009 trans & VQ35DE motor, and he's going to deliver it in a couple weeks 🙂. Apex Engineered makes a front subframe designed to properly locate the Nissan V6, so I will likely go that route & then fabricate whatever else I need from there.2 points
-
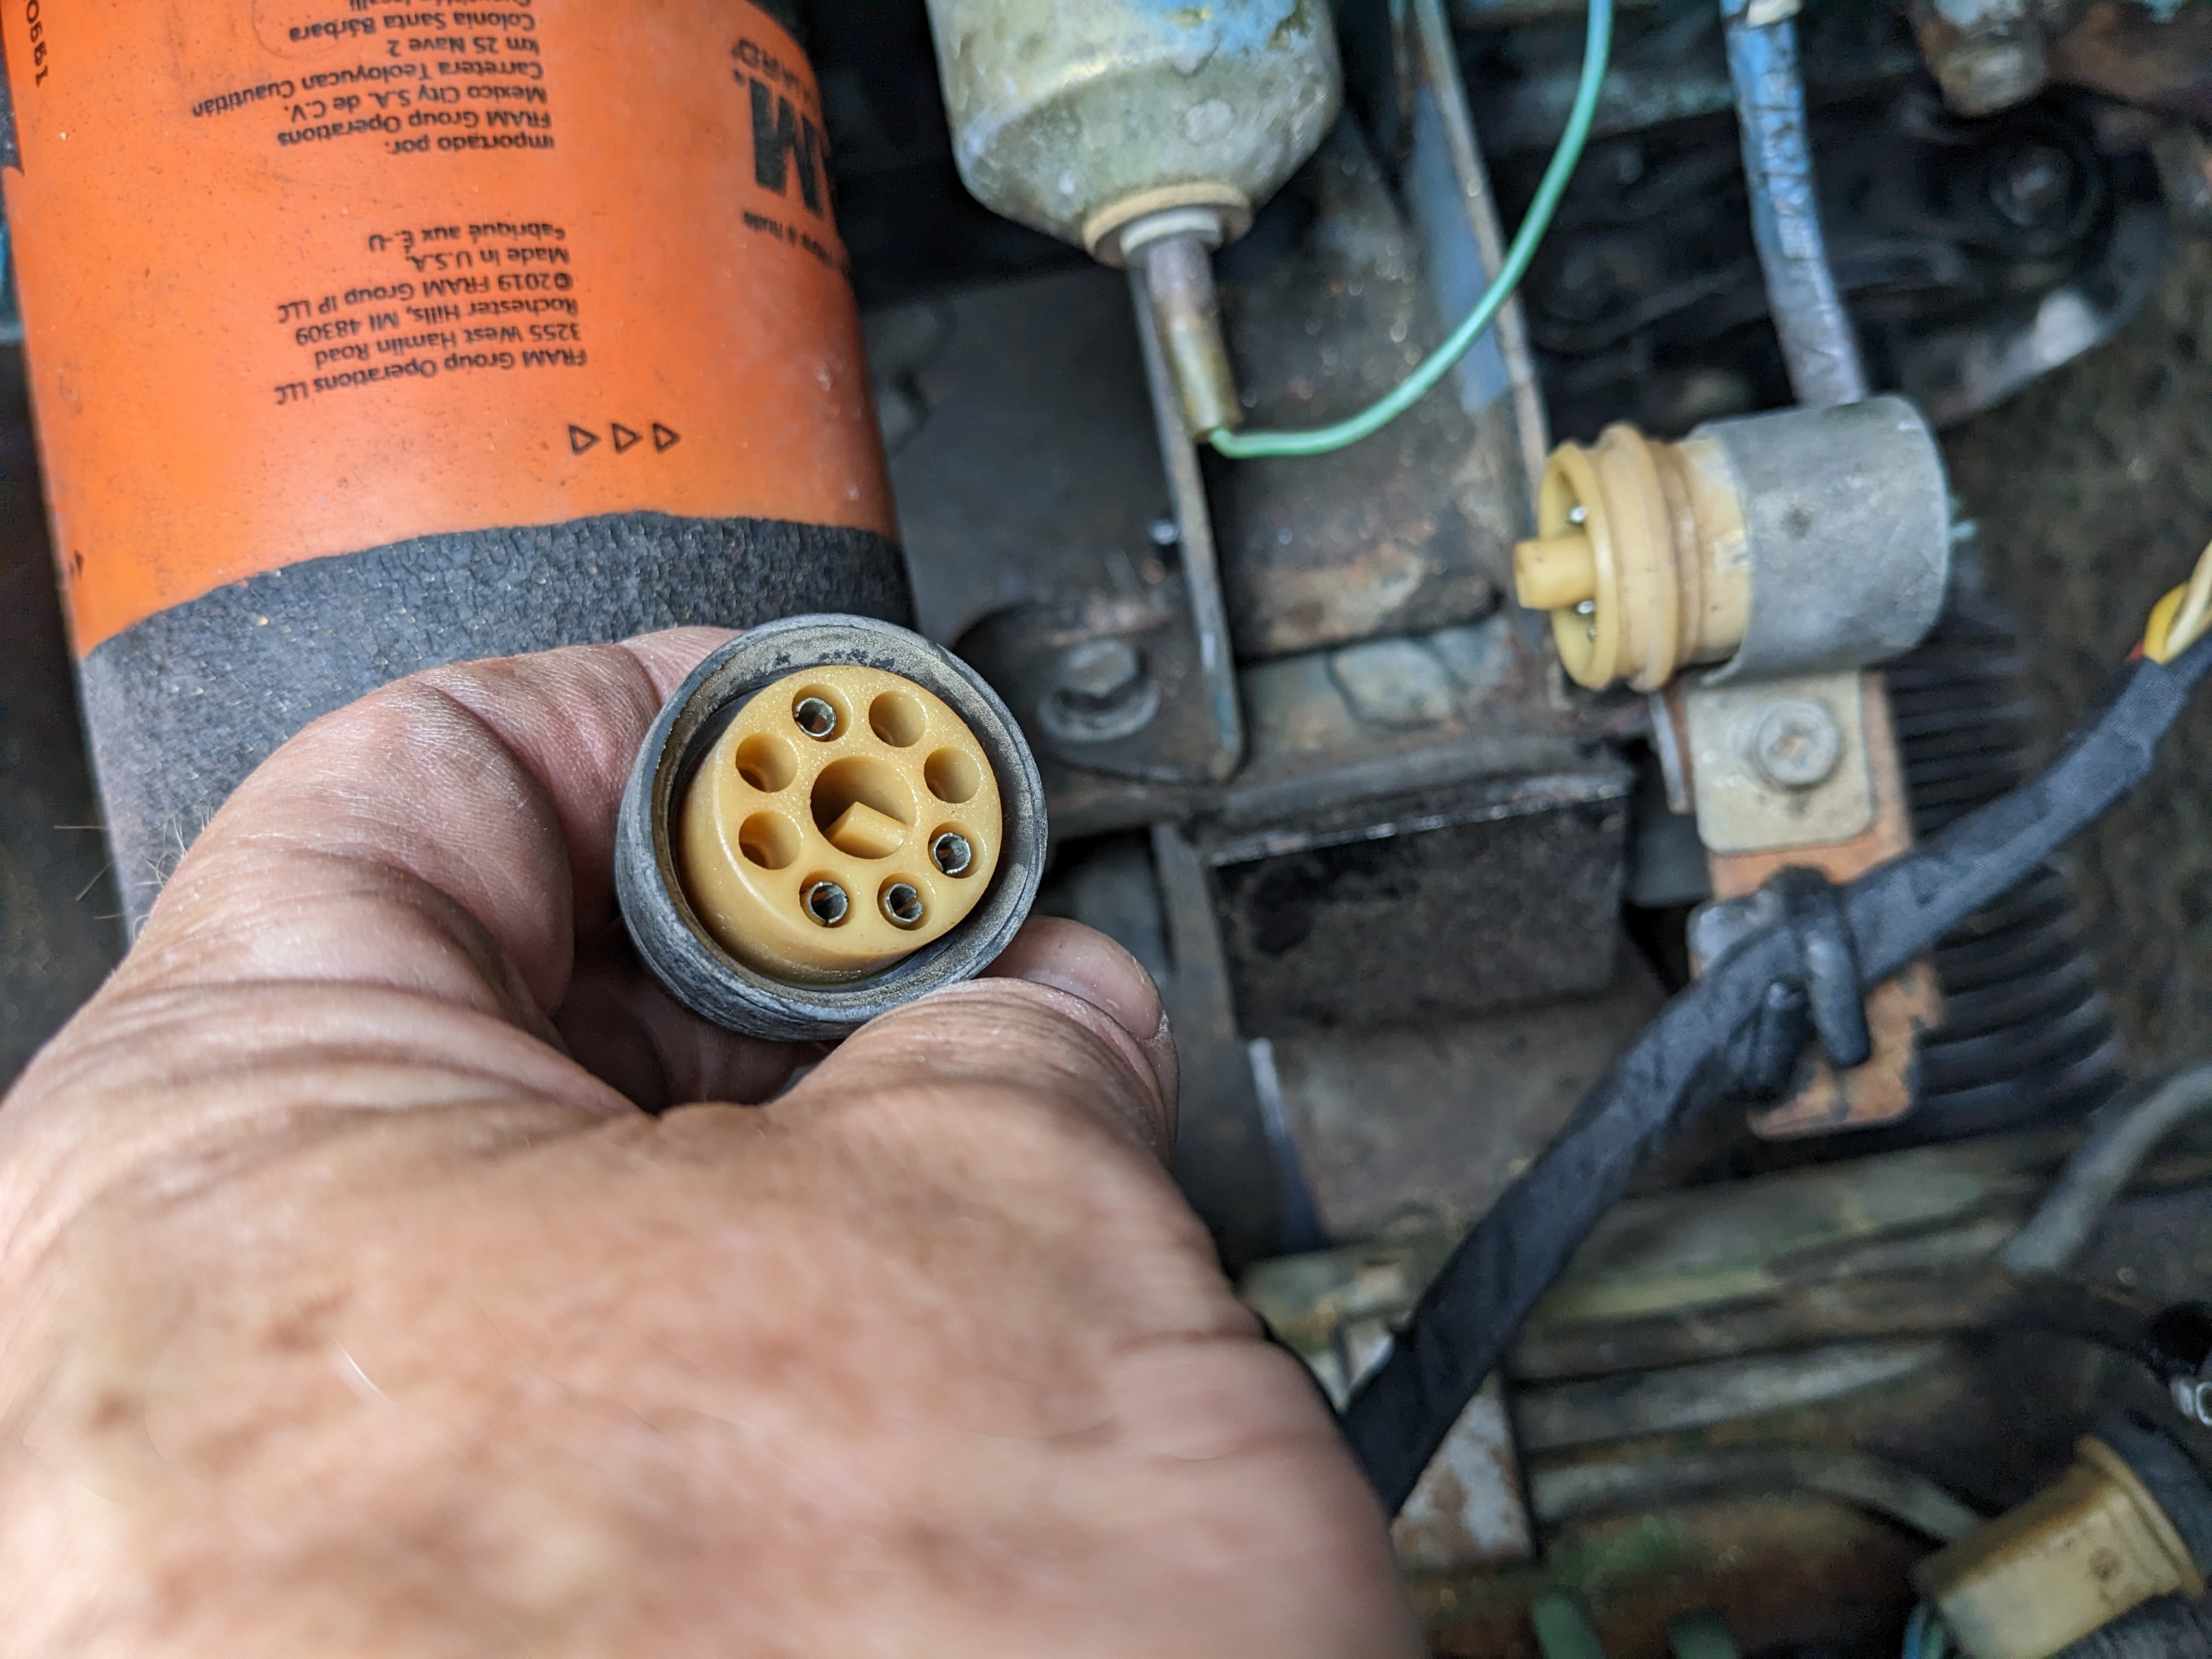
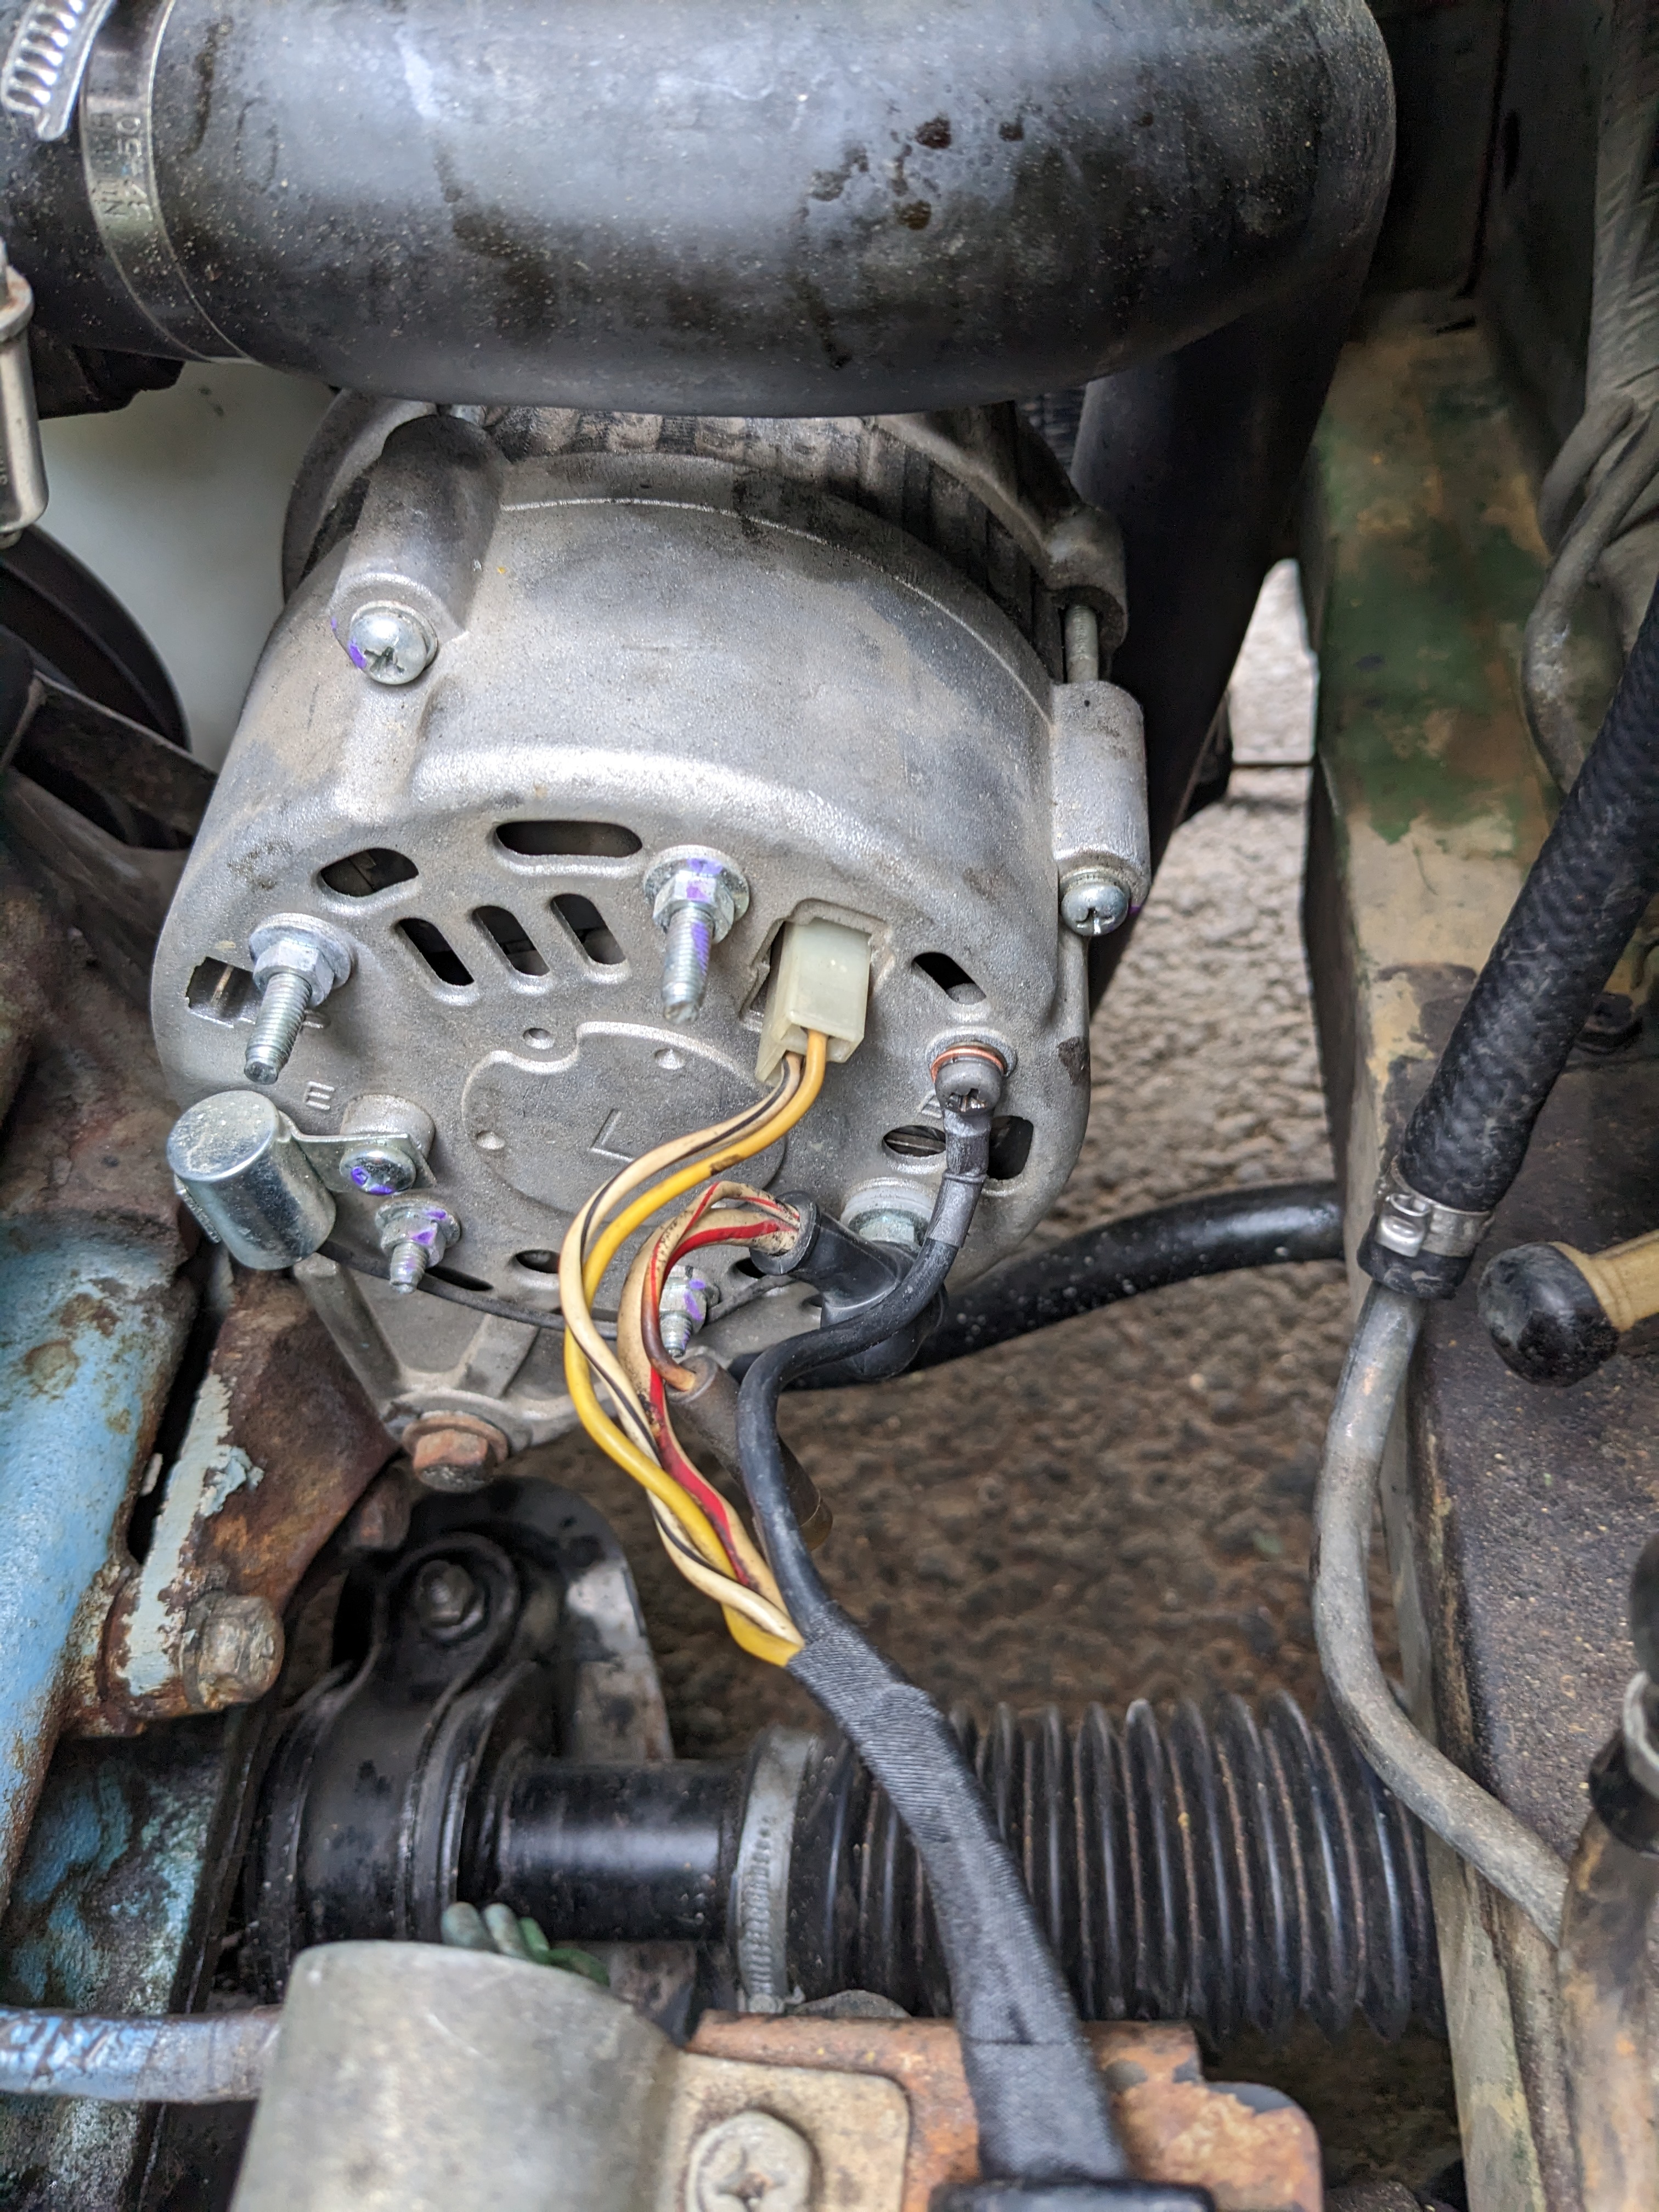
Those connectors are Yazaki. Good catch on the alternator wire. Glad you caught that one before it became more of a problem!2 points
-
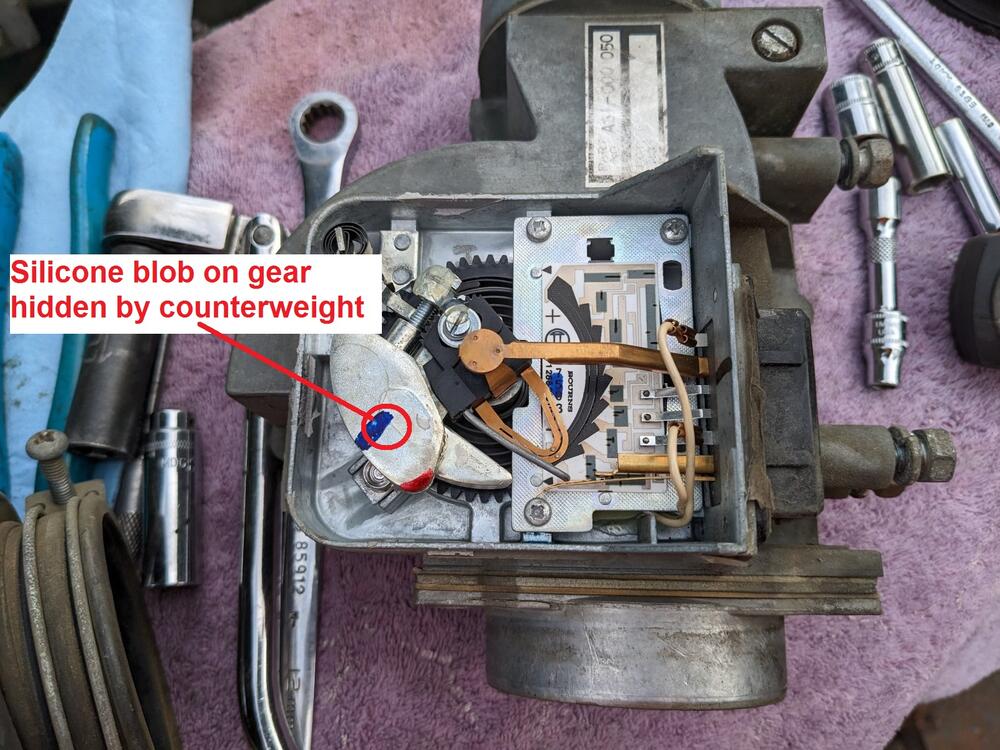
2 pointsActually there are a couple different spots that can be messed with on the AFM and the one you pictured is not commonly messed with (thankfully). The most common adjustment is to muck with the spring tension by moving the big black gear. There should be a silicone blob on the locking screw for the gear. In you pic, it would be hidden behind the counterweight. If you rotate the vane arm open some, it'll expose the blob I'm talking about. If it's still there. Swing the arm and look here:
 2 points
 -
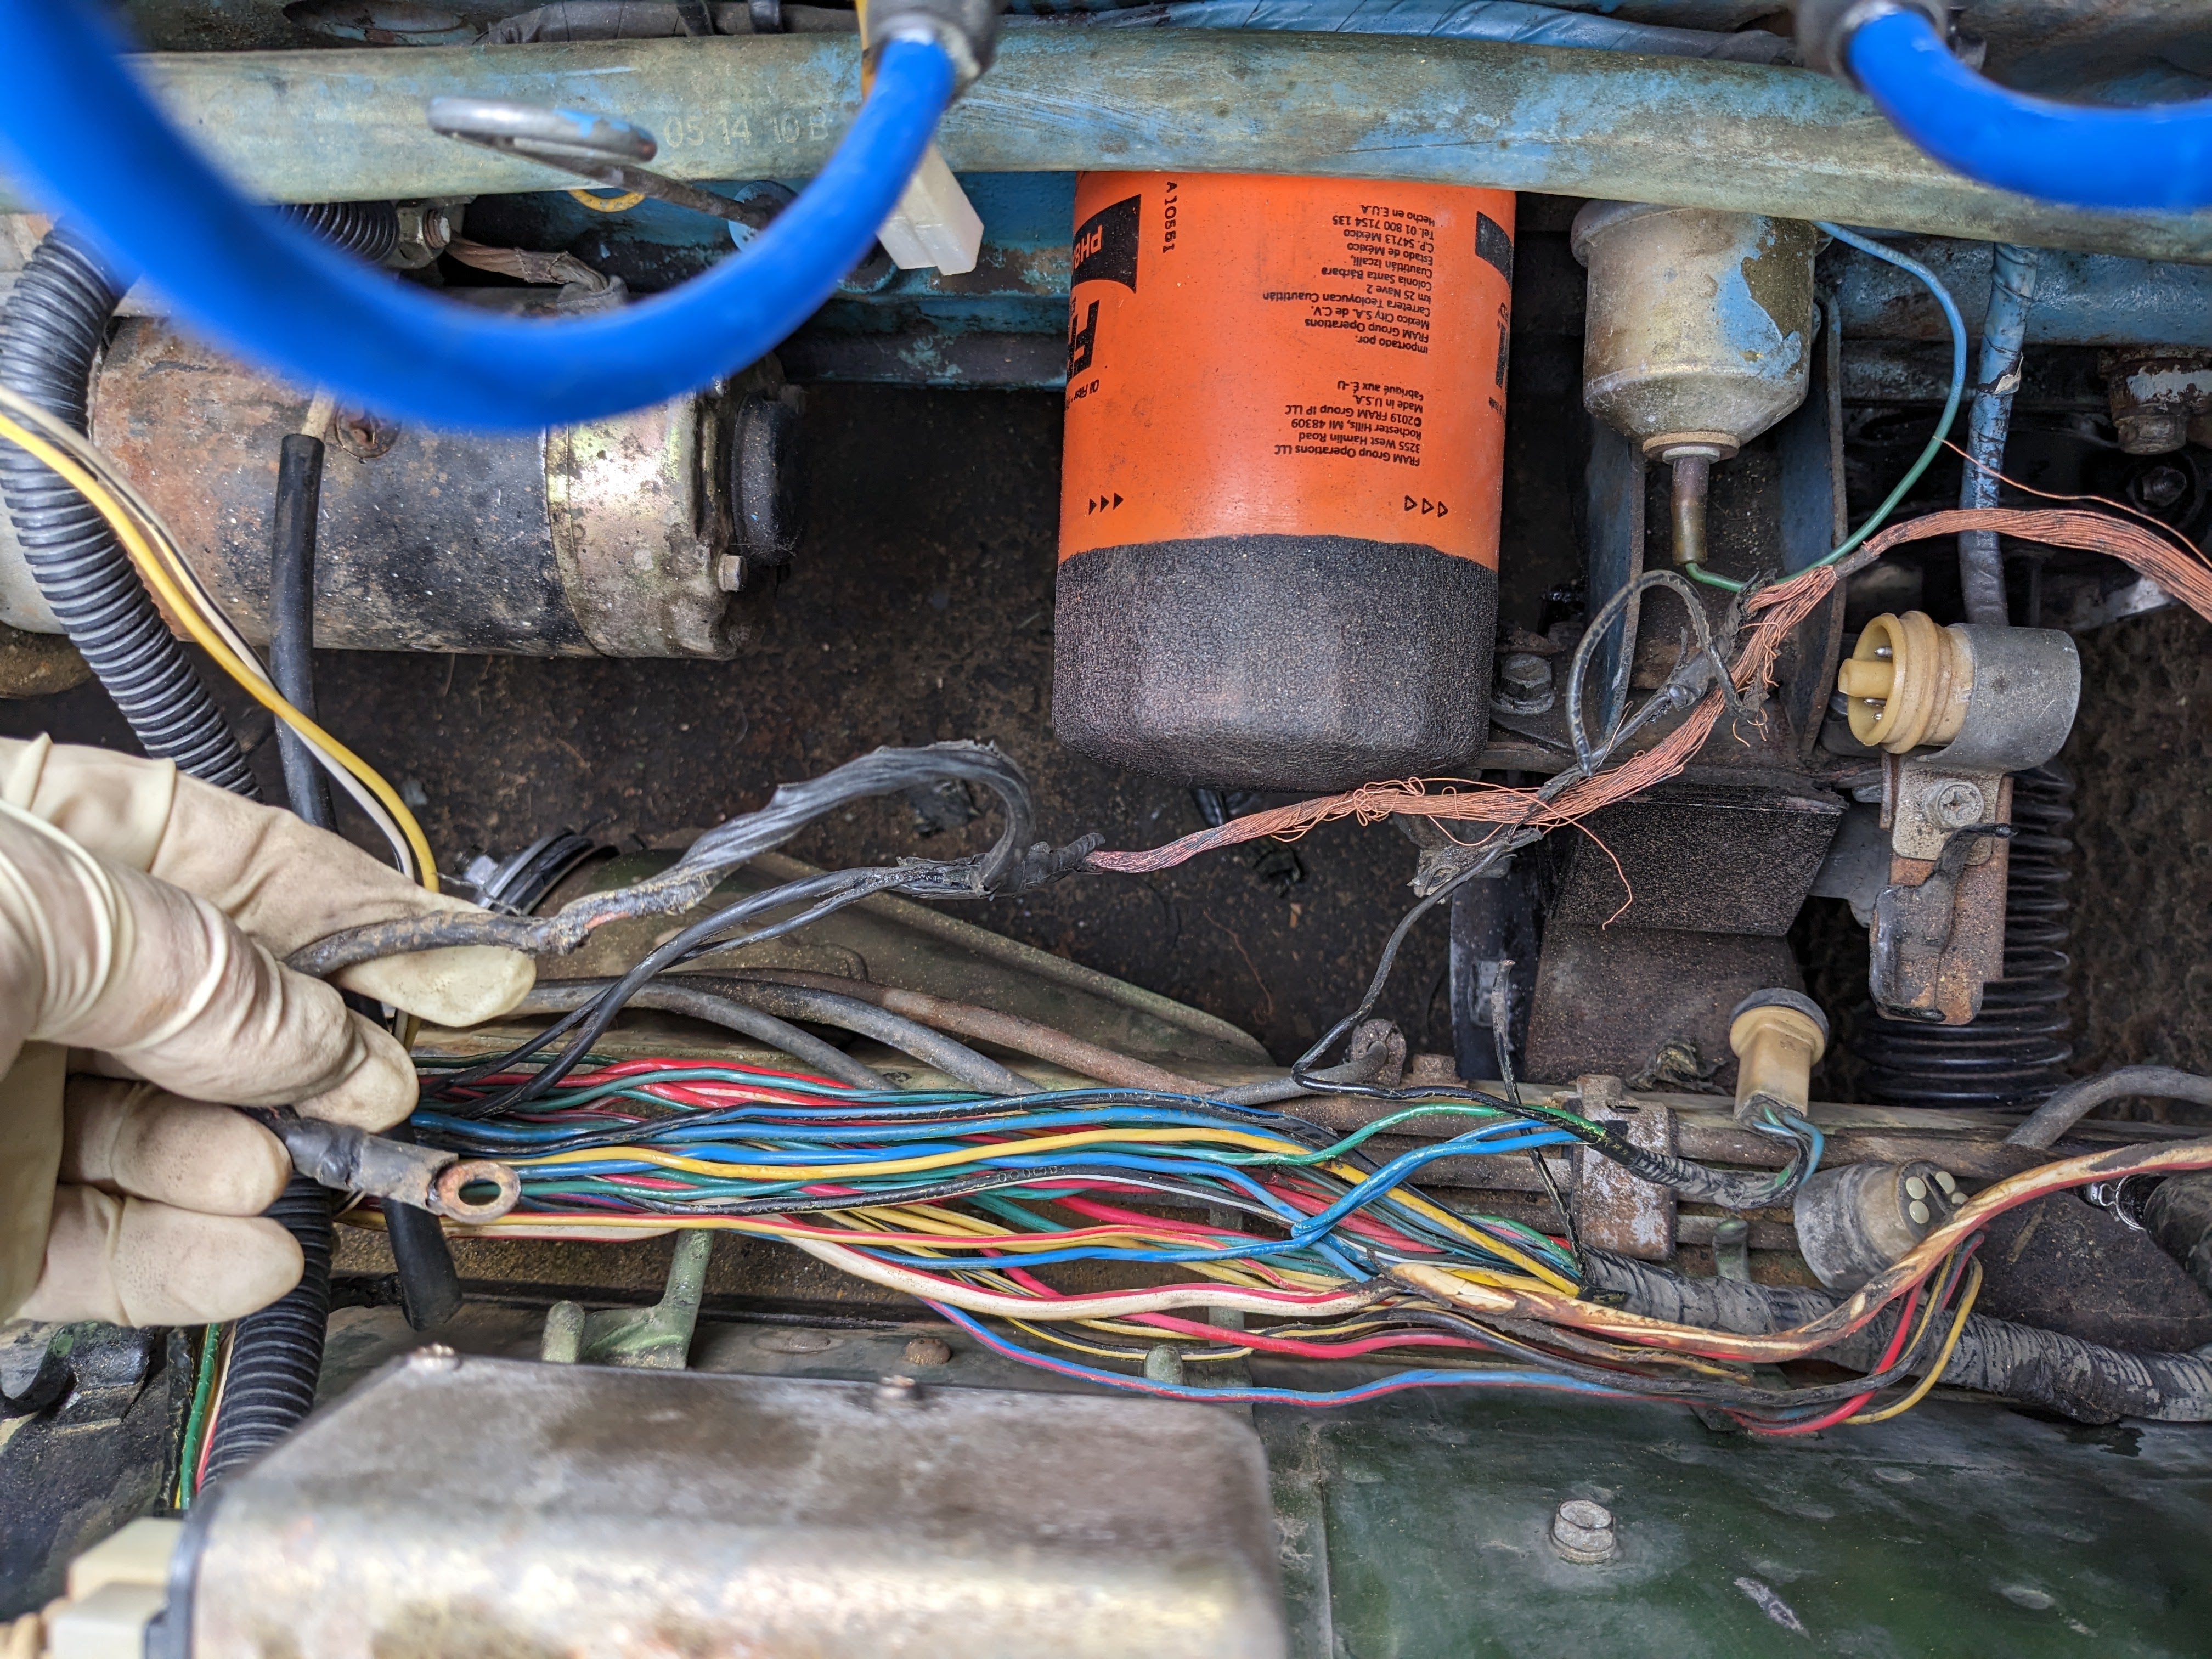
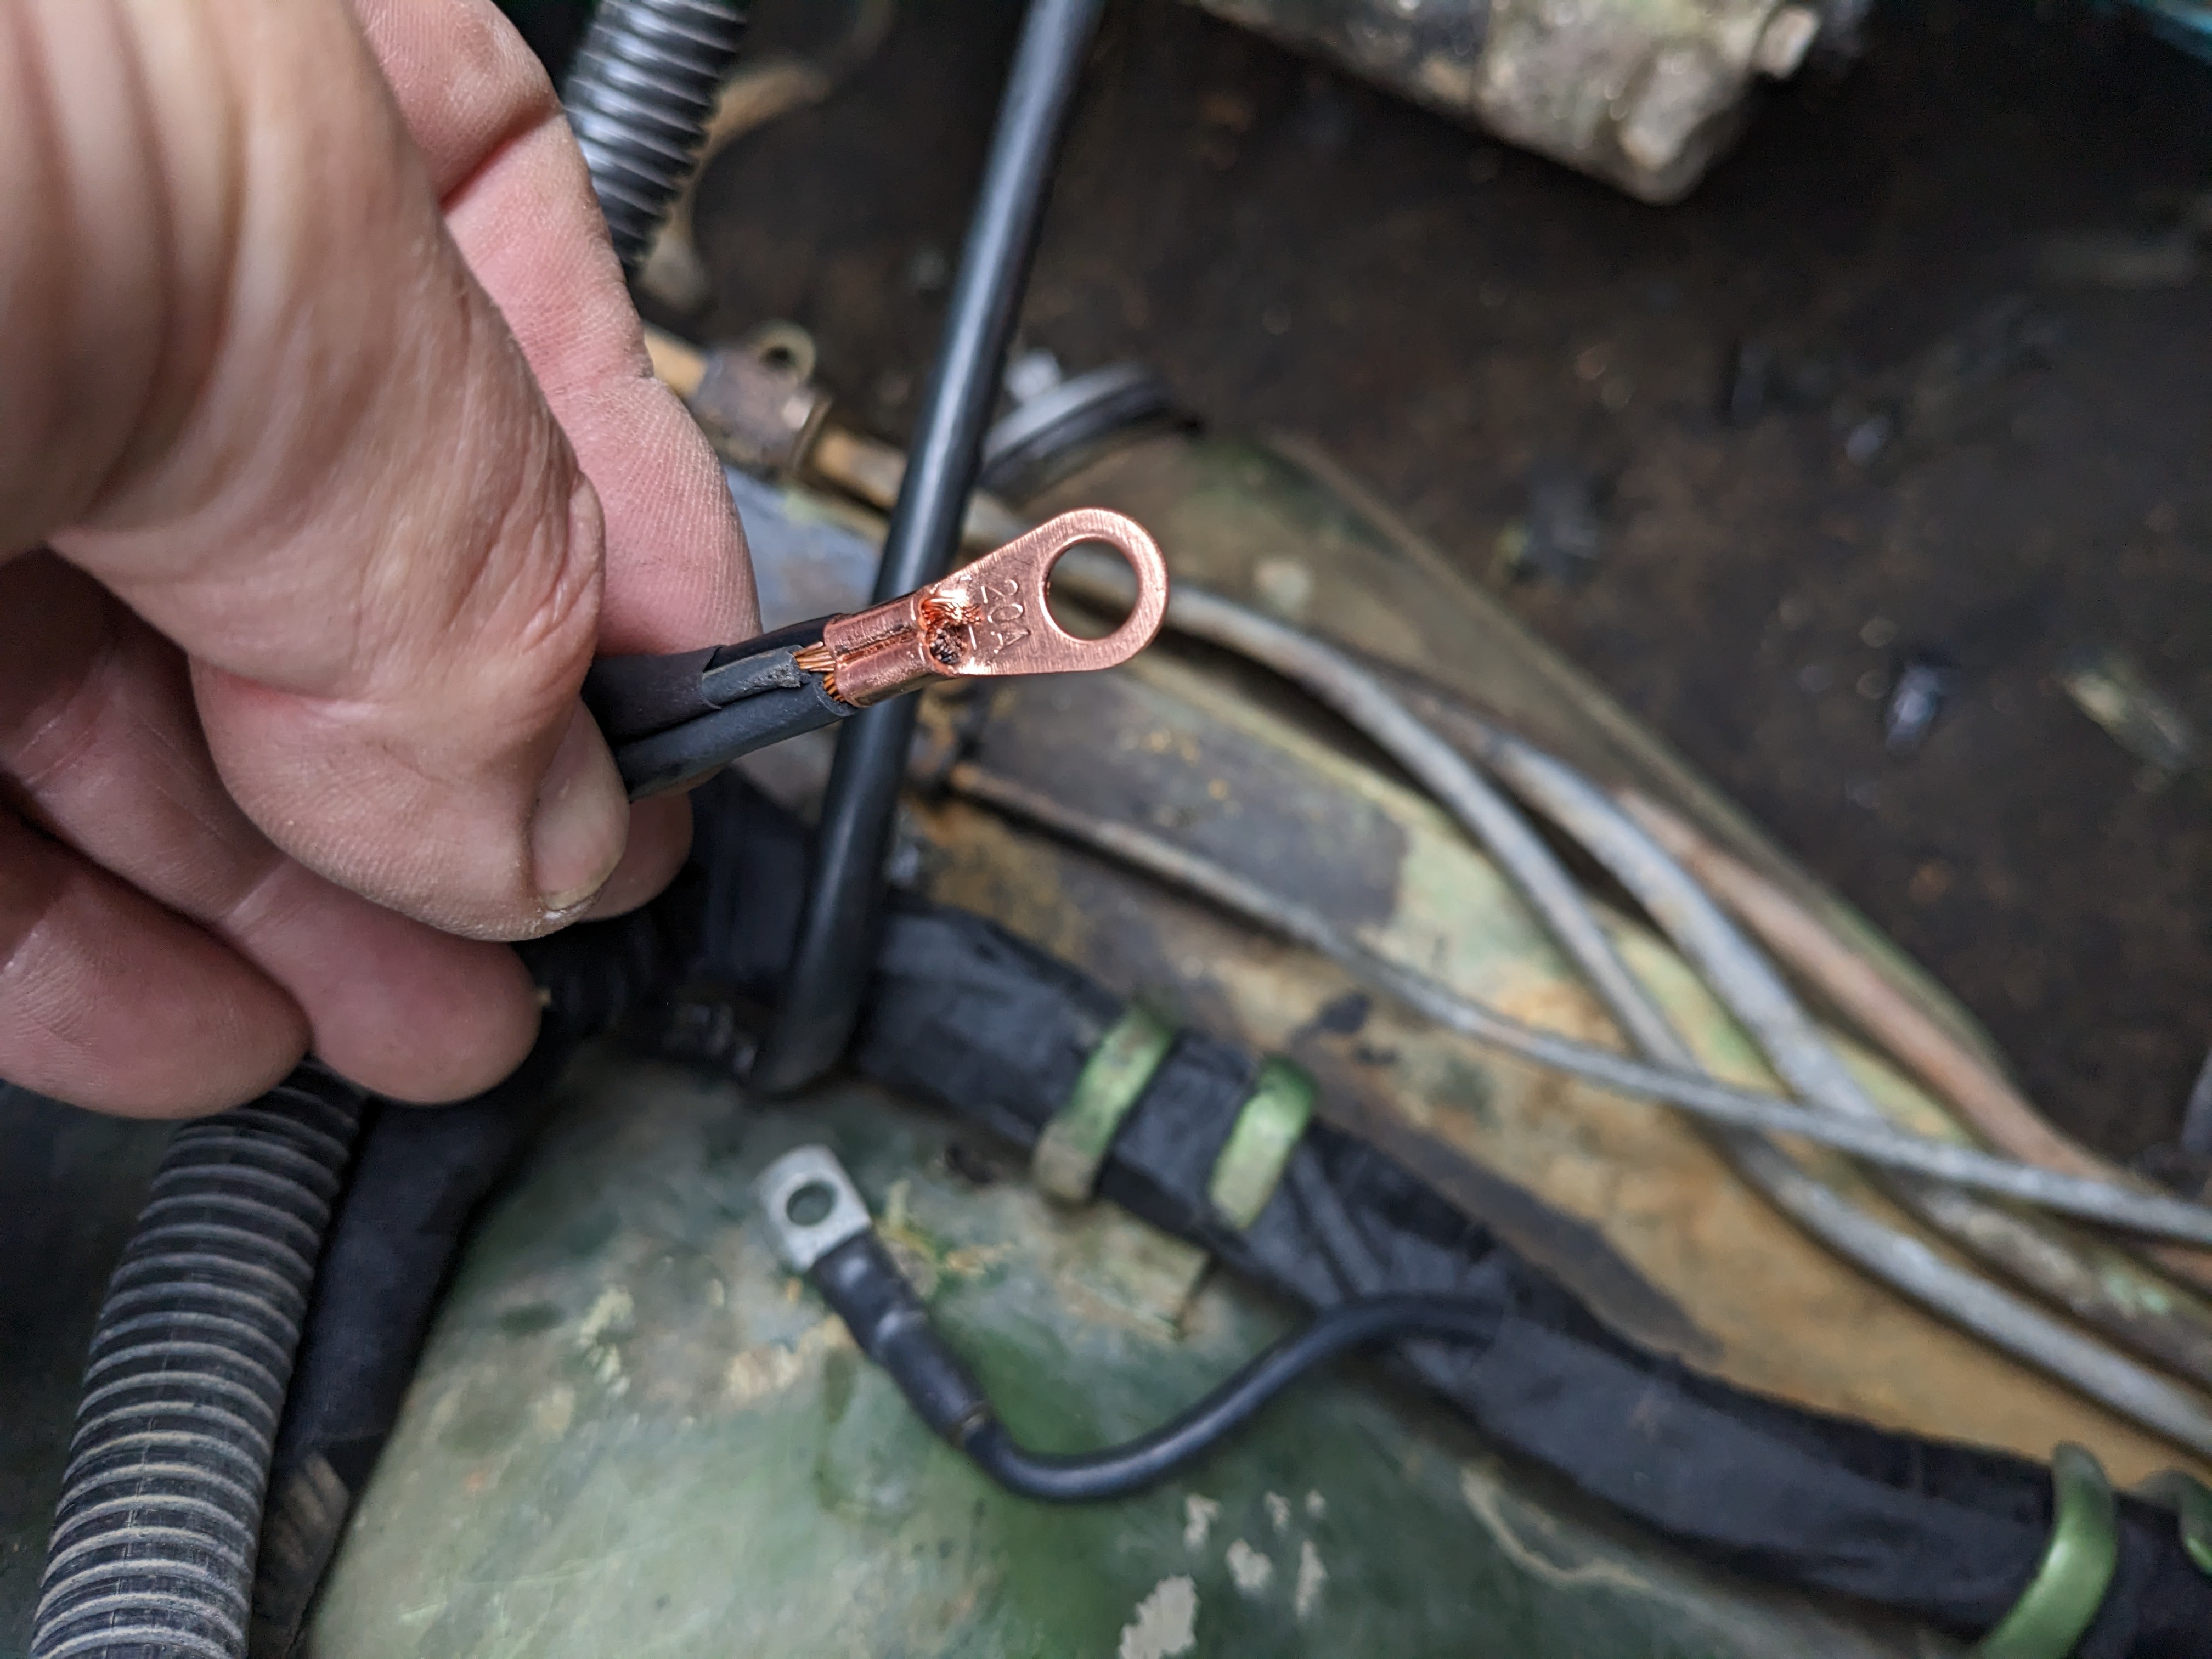
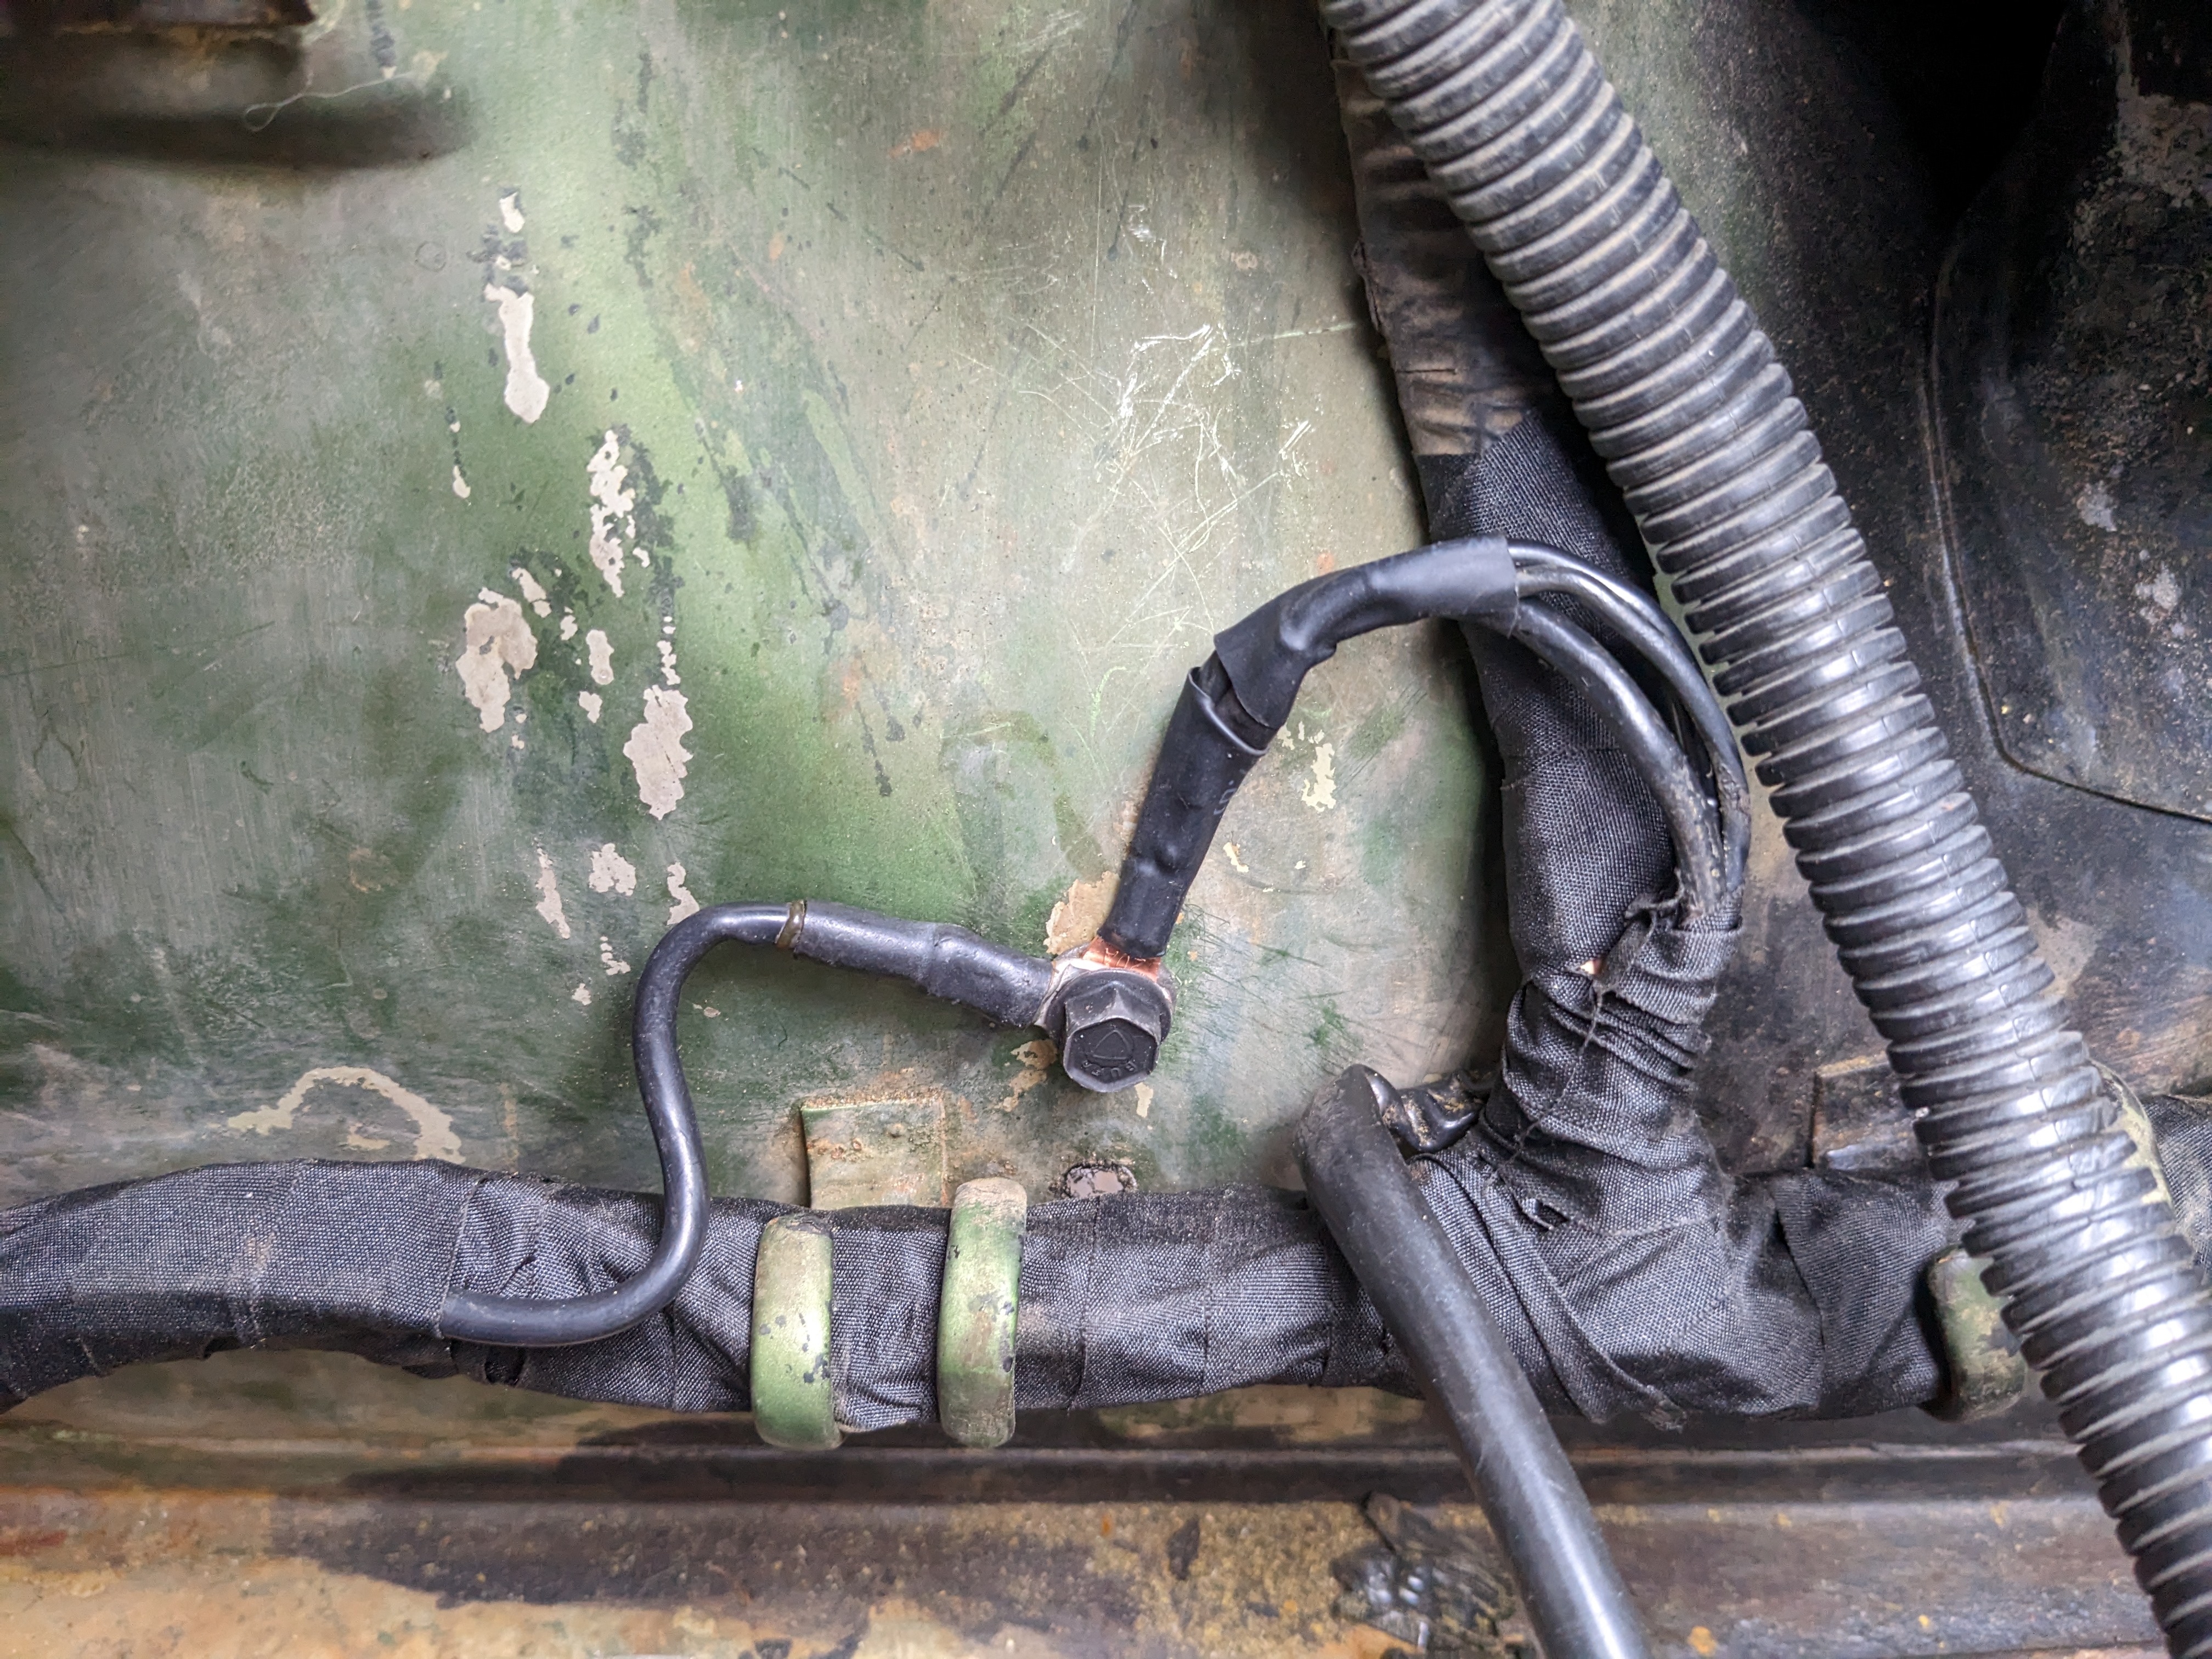
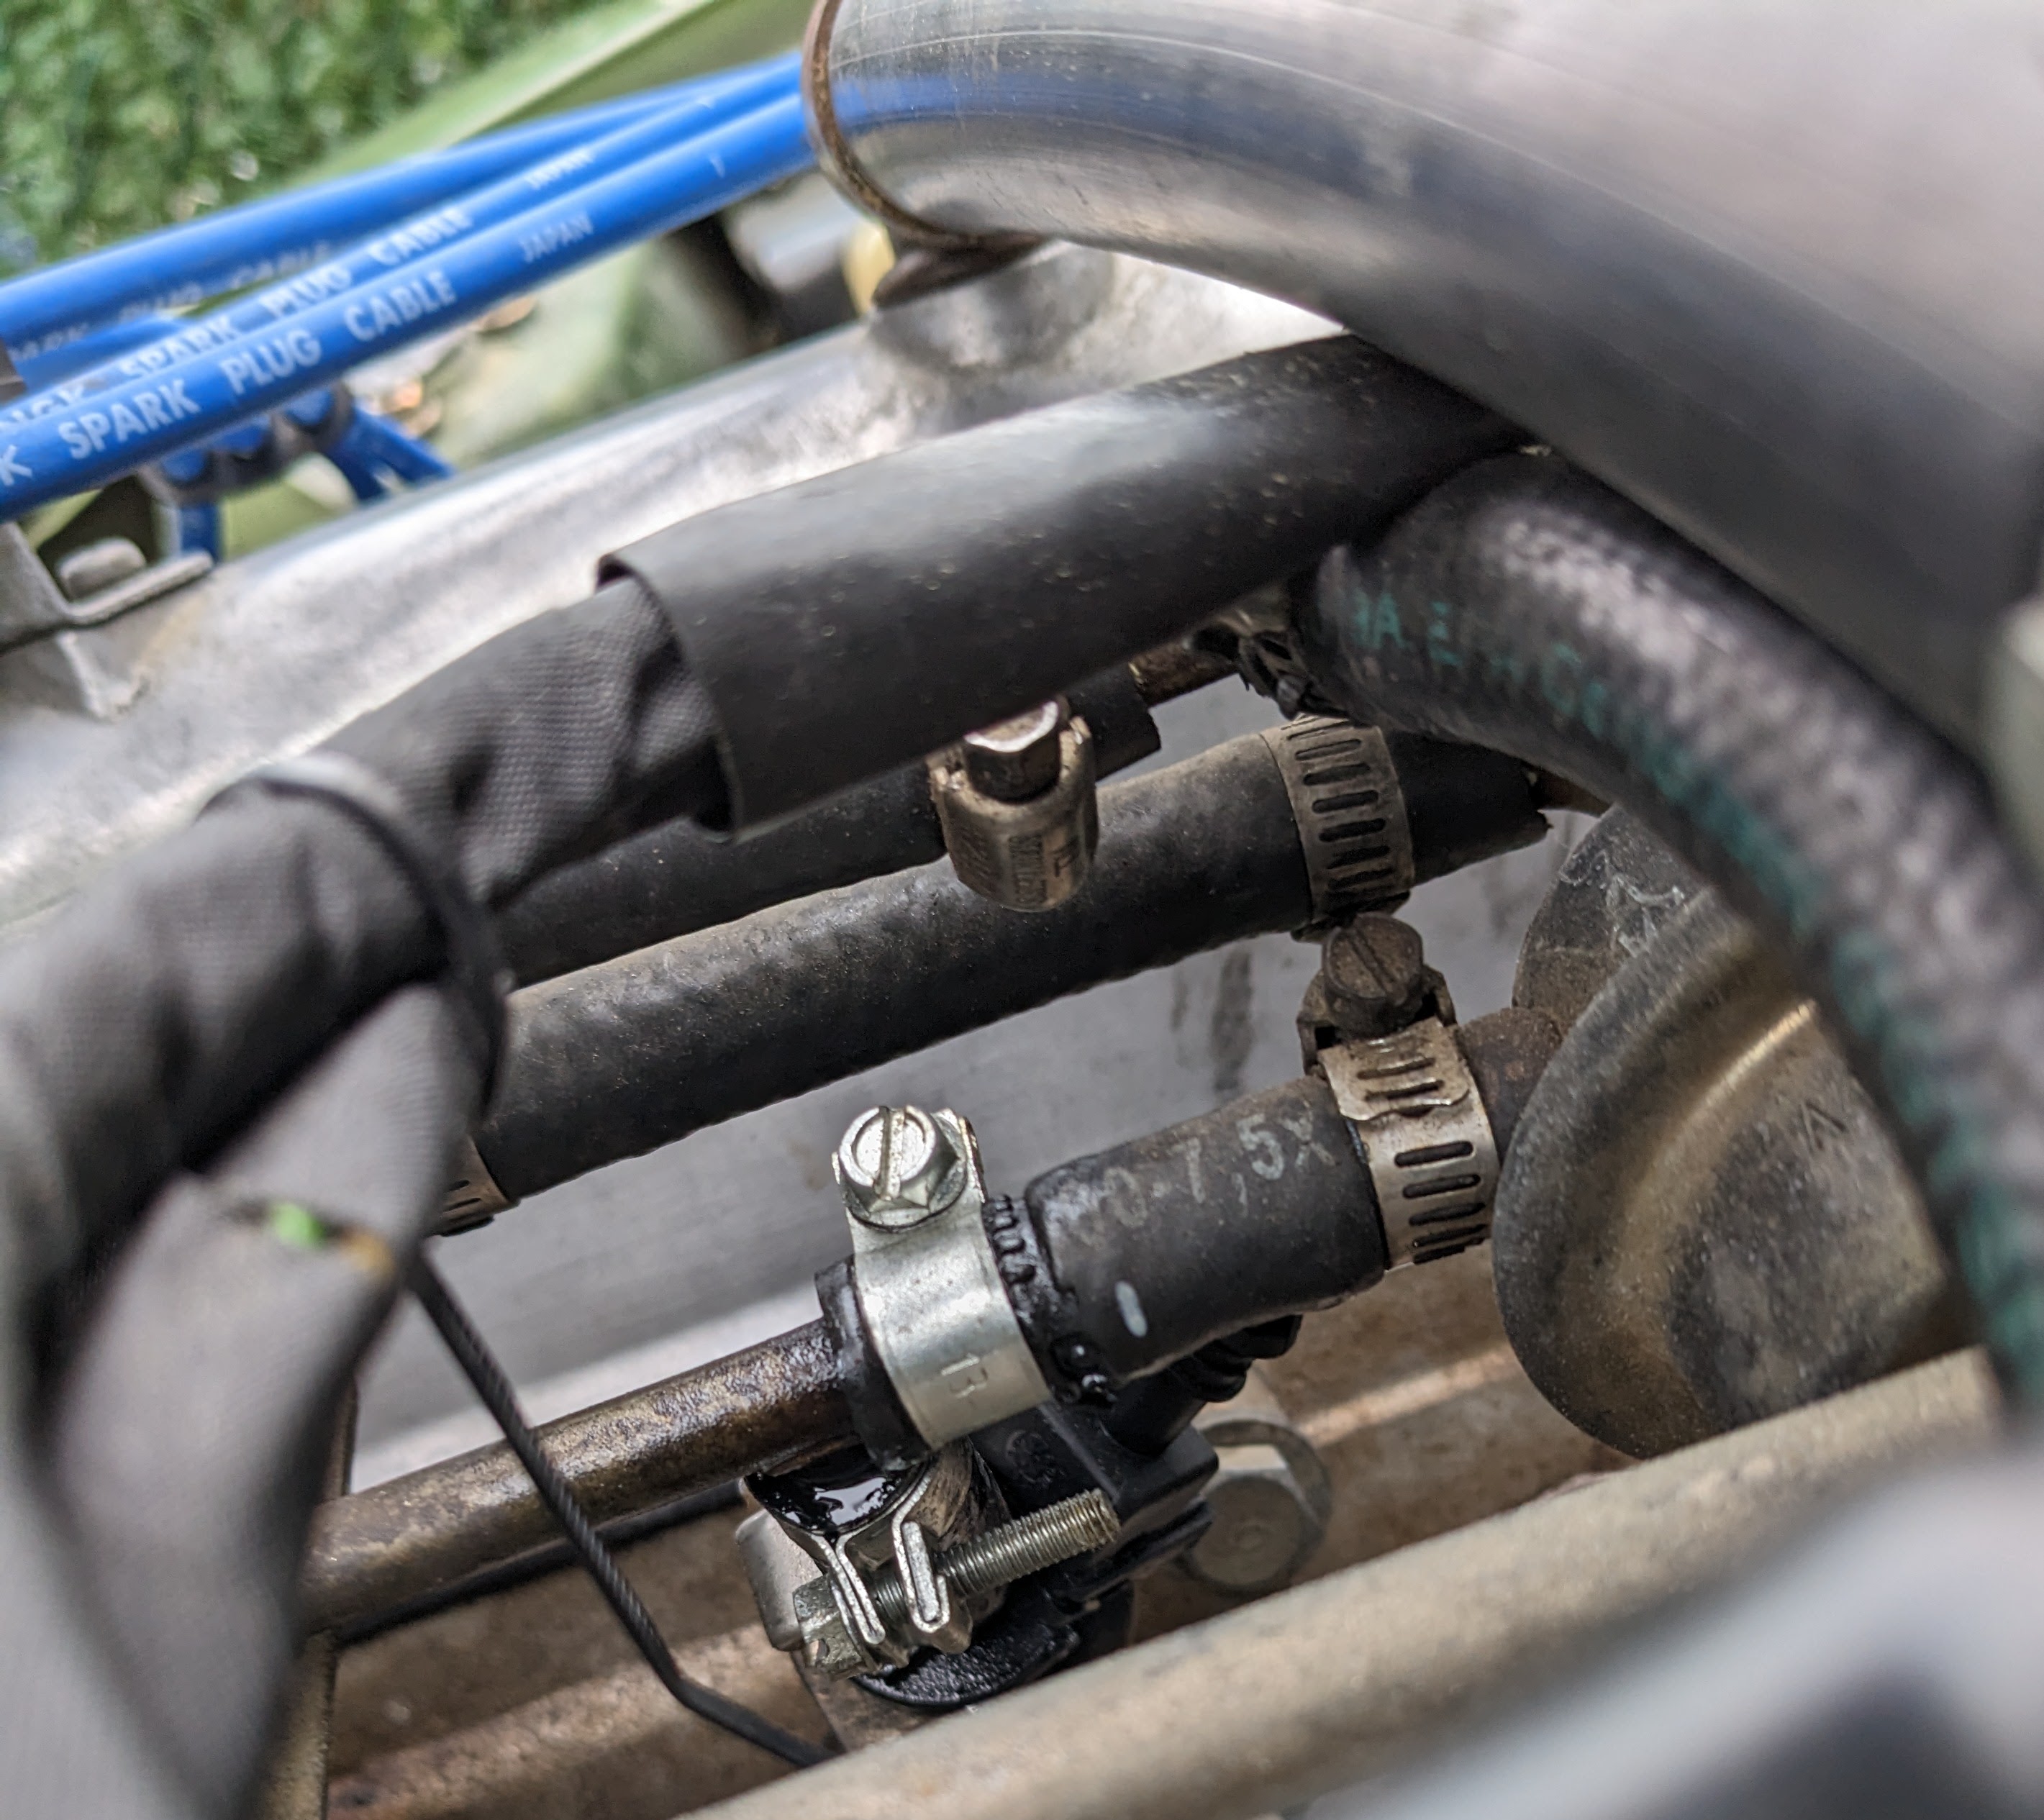
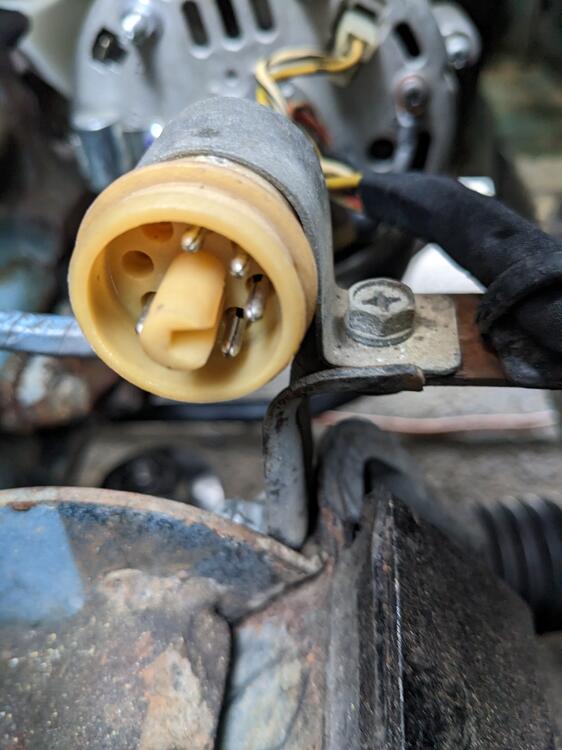
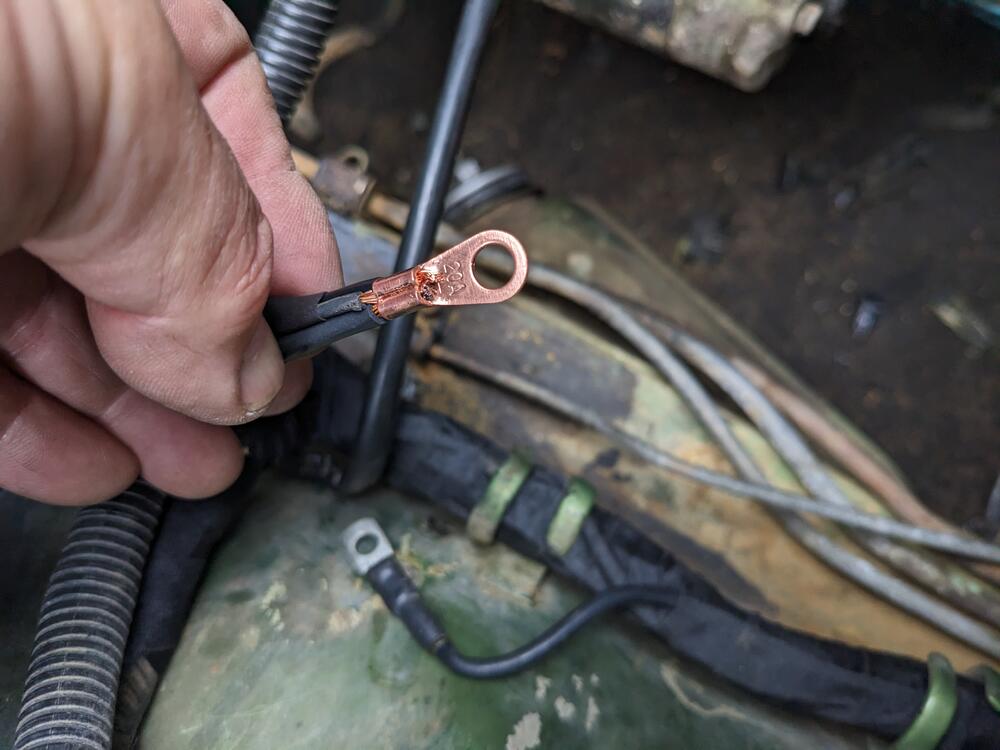
So, the ambient temps dropped back into the 60's today, and I could not duplicate the problem. I did look at the wiring & tighten the spade. Not sure how much that matters when it's relying on the round pins on the bridge connector. I took that apart & cleaned both sides with contact cleaner. I'd really like to replace these pins. Does anyone know what series/brand they are (Yakazi, Furukawa, etc.,)? The oil pressure gauge worked again after this, so I have to consider that these contacts are less than ideal now. I could see that there were issues with the hanrness along the frame rail, so I stripped out the ground wire to the alternator, which had clearly overheated at some point. Thankfully it hadn't shorted or melted through the insulation of any other wires besides the smaller grounds that splice into it. The connector at the inner fender was not tight at all. One of the heavy gauge black wires goes/comes from inside the cabin, not sure offhand what circuit it is grounding, but the connection was not good at all. made a new ground cable for the alternator, and tied in the 2 smaller ground wires that were previously connected into a separate ground. At the other end, I separated the grounds that came from the cabin & added a separate eyelet Alternator end wrapping that up, I ran the engine & immediately smelled gas - #3 injector hose clamp was not fully tight at the rail. I will need to redo all those at some point. I hate the open slot hose clamps, they are not appropriate and always cut into the hose


 2 points
 -
1 pointI recently messed with my timing. its a L28 and when I checked it it was ay 15 Deg before TDC at 800 rpm. Ran great there, lots of torque between 3500-4500 RPM snd would flatten around 5000 RPM. I've been chasing a rich running engine so I thought I'd mess with the timing a bit. I adjusted it to 12 Deg and not the perforce has shifted greatly/. Noe the engine runs flat after about 3300 rpm. Less power, less torque. Your post makes me wonder if Im a tooth off too, but I put mine all together on a stand a was pretty sure it was spot on. Going to move the timing 1 deg between test drives. This is called the redneck Dino.1 point
-
Old topic, but just had issues with my gauge. Wanted to share. Pulled the gauge and, and heard a rattle. opened it up and one of the mounting tabs for the front plastic lens broke off and was wedged in mechanical assembly. Removed the piece and gauge is working like a champ again.1 point
-
I see that as the far more riskier option than using my chassis. unless the chassis shell is blasted and in epoxy you wont be able to tell whether there is rust. secondly you gents drive on the wrong side of the road! by the time you convert the currency its roughly the same cost for the shop to do it1 point
-
1 pointno tweeking other than to lean up the idle air bypass screw which IIRC only effects A/F mix at idle. I have some other AFM's I plan to test out, spares, just to see if they do any different.1 point
-
Yes... Yazaki YPC series. Best deal I could find is a guy (named waterloo_specialties) on ebay selling them in batches of 100. It's 100 male-female pairs for a reasonable price. 100 pairs ought to be a lifetime supply. https://www.ebay.com/itm/194976406675?hash=item2d657fdc93:g:K8gAAOSwEWViVya7&amdata=enc%3AAQAIAAAA4GTFG2OldlywISj0sy430UEdRG8xS7Y6%2FczZktJgokfvlm7opKNgOBWINU1dpP20TzMs%2FuMkIkuZQtGVTfRVzf3mVDICx%2F6uRZWJuQwfCEhx7u65AybljdykNewfADKEUggF%2B2gqdvIUodYa%2FWmBqDd%2BqFe4ZJ0d0xFV2UUjsNC3jI7VqL%2FRxuSjms5jTz4SNMPm8z1dCFp67%2FVWR81Sbng6nutXaKgH1n26xDZxXMlBVM6vPd%2BCetwupwNZlCdhFLjiUWNUL5QYbwS3c27YpcBDcqt4C8%2B6kWlG28qZb2eD|tkp%3ABk9SR4yYp-mQYg I bought 100 pairs a while ago and have been very happy with the whole ordeal.1 point
-
1 pointYes, and yes. It could be off one tooth, and as long as you can adjust for it by moving the distributor, the end result is "it's OK that way".1 point
-
It's not water soluble. (see updated post below) Label says "Hydrotreated light petroleum distillates" and "Solvent-refined heavy paraffinic petroleum distillates". So I don't know what "Hydrotreated" means, but despite the use of the reference to water, it's not water soluble. (see updated post below) I looked up the MSDS documents as best I could and they are as generic and ambiguous as what you usually find. I see what you did there.1 point
-
1 point
-
Oh, and I meant to complain about your hose clamps a while ago and forgot. So I'm glad to hear you don't like them either. Get some of the originals. They're stainless and don't cut into the rubber tubing. I don't recommend the aftermarket stuff that looks like the originals. They're not stainless. Get originals.1 point
-
Runs very smoothly now - this is idle during warmup https://youtu.be/_dLoJwT2UqY1 point
-
1 pointI'd not seen this live version before, thanks @dutchzcarguy. Great song, great band and what a great performance. I bought the Moontan album when it came out back in 1973. And yes, this song is on my road trip mix playlist.1 point
-
1 pointOne of the best rock and roll groups ever, and FROM THE NETHERLANDS !!!!!! WATCH THIS !! It's a song from ... 1973 !! The band was playing from 1961 till 2021 !!! that's 60 years!! and look the energy that the drummer still has!! WOW!1 point
-
I think I agree with Mark. Your car looks about what I expected post blasting from what we've seen up until now. I have done this several times now and there is always a bunch more metal work then you really expect. If you can afford to sub out the metal work, I would do it. I've been working on my current project Z for 12 years and have a good bit yet to go. I would encourage you to take the most direct path you can afford to a complete car that you can afford. Then go make some memories with your kids. If you can afford to sub the paint you might should do that too. It's much nicer to have a running car then a long term project. My 2 cents...1 point
-
1 pointThis might be helpful. https://www.atlanticz.ca/zclub/techtips/EFI&fuel.htm I bought a '76 that would crank and idle but wouldn't take fuel. $1,000 for a perfect car with faded paint and carpet that had a spider web on the sweeper vain. Cleaned that and ran like new.1 point
-
1 pointAnd once the cover was off, the problem was obvious. Here's a pic of the damper vane. I'm back lighting the gap between the movable vane and the case / body of the AFM. This is a pic when there is very little air throughput and the vane in the "mostly closed" position: And here's a pic of the damper vane at about mid-scale. Note how the vane is rubbing against the inside of the case: And then here is the damper vane "beyond" the sticky spot. Note that there is a gap again: So mystery solved.... The case is bent. Pushed in at that spot. Like someone dropped it or hit it with something big enough to dent the case. Note that I looked it over thoroughly from the outside and did not detect the dent. I did find an anomaly on the outside of the case, but it's quite subtle. Here's a pic of the outside of the case after some "block sanding" in an attempt to highlight the problem area. The clean spots were wiped by the sanding, but the darker spots (still dirty) did not: So, mystery solved!!! I'm going to try to fix it, but ran out of time today. I'm thinking that a few well aimed taps with a ball peen hammer might push the dent back out enough for the damper vane to clear the case.


 1 point