Jump to content
Remove Ads

Leaderboard

Popular Content

Showing content with the highest reputation on 05/26/2023 in all areas

  1. We’ll never pass up a chance to tell the people in your life that you value them. My father told always tell your loved ones, you love them every chance you get because it might be your last. My good buddy Yarb has embraced this philosophy [emoji6] 2 weeks ago a friend of the family lost those 34 yr old son suddenly. Fell asleep at the wheel late at night, hit a tree and died instantly. Stay strong Cliff!
  2. Found it. It's on page 8.
  3. Burn it like a bushing. Burn it! burn! burn!
  4. Well for me, the "old standby" method is using a razor knife to cut a slit into the rubber hose allowing it to be pulled off the barbs. That and a lot of swearing. The swearing is especially important when you get down to the bottom and are digging around inside the ferrule with the tip of the razor knife. But the problem with that old standby method is that no matter how much swearing is employed and despite how careful you are (I am?) with the razor, you always cut a little too deep and put cut lines into the barbs of the injectors. Memory says I've seen pictures and instructions put out by Datsun that warn exactly NOT to do it that way because of the inevitable damage, but that's the same old memory that says I've seen many recommendations for grinding the tubing off. As for the purpose of the ferrule? I'm thinking it's primarily there to prevent the tubing from being inserted too far onto the barb. It might also provide some support to the end of the tubing to prevent fraying and cracking over the years, but mostly for insertion depth. And as for how to get new tubing on? The service manual says to just put a little gasoline into the end of the new tube (as lubrication) and push it on. No clamp required. So I will try the soldering iron method for removal. Since the reinforcing threads inside the tubing are polyester, it makes a lot of sense. I have high hopes.
  5. And just in case, here's an out-in-left-field issue I had to deal with a few years back when I lost my lights:
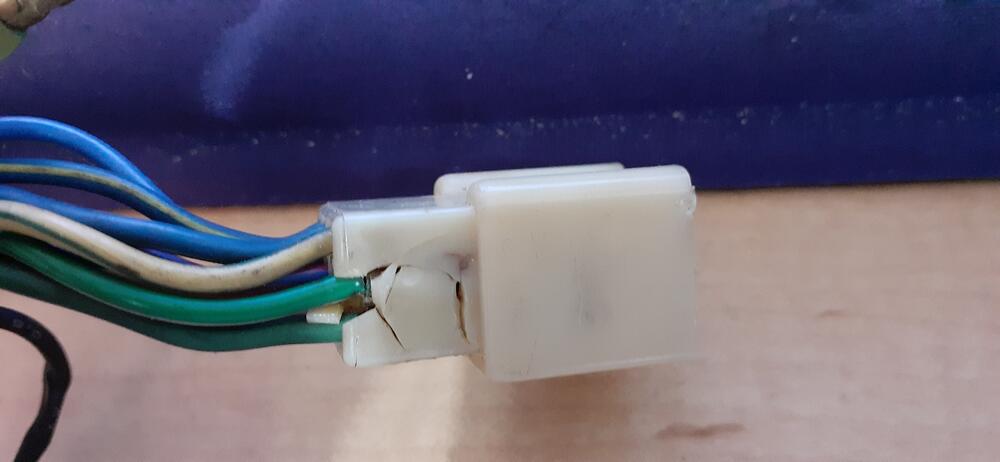
  6. There is a problem with the 73-76 cars, and the 77-78 cars are only marginally better. The 20A fuse is too big to protect the wiring, especially with all of the connectors. The weakest connector is the 9-pin connector between the combo switch and dash harness. (The connector is different in the 77-78, but I've seen the problem there, too.) It will overheat with too much current flowing through it. Here is an example of a damaged one that I happen to have handy. The green wires you see are the ones for the parking light circuit. I hope the damage is obvious. The connection got so hot, the plastic started to melt. A solution: Replace the connector. You can find it at http://www.vintageconnections.com/ You may want to buy the pin removal tools. No matter what, it's a PITA to de-pin the old connector IMHO. Replace the side markers and gauge lights with LEDs. If you replace the front and rear markers, you'll also need to change to electronic turn signal flasher relays. Note: You can't just buy any LED bulbs for the gauge lights. Another user on this site found polarity independent bulbs that fit well. I will attach a suggested list of LED bulbs. Change the fuse for the parking lights to 10A. The reason why this solution works is that the current draw through the circuit has been reduced. That reduces the heat through the connector. If there is a short in the circuit, the fuse will blow before there is too much current flowing through the vulnerable connector. LED bulb list.txt
  7. My n42 had bronze seats. The n47 on my 9/76 build date 1977 has steel seats.
  8. If you ever need to cover a hole, don't use duct tape. Use foil tape. It is actually the correct tape to use for ducts too. 🙂 It sticks great and will not fall apart like duct tape does. We use it all the time on prototype vehicles. I always use it on race cars to cover stick-on wheel weights so they don't fall off from the brake heat.
  9. In the spirit of @siteunseen, I had to search. One of the earliest mentions of the drain hole that I could find was by @Zs-ondabrainin 2008.
  10. Forgot one hole: There's a drain hole for the power antenna. It's near the exhaust.
  11. If you replace the head gasket it'd be a chance to pull the front cover off and check the timing chain and guides, tensioner too. Maybe a new water pump since they're available and not very much money. Check the rubber on the motor mounts in the engine bay. Those are fairly cheap too.
  12. I should have included valve seals but i meant changing the valve seats to prevent premature wear due to the lack of lead in today's fuel.
  13. Yah, I know….but I would know. I don’t know what it is with me but I am trying and like to keep everything as stock looking as possible….I guess it’s a sickness! 🤪
  14. I did raptor liner with body color over it. I am really happy with how it turned out. Maybe one day the other side will get paint!
Remove Ads

Important Information

By using this site, you agree to our Privacy Policy and Guidelines. We have placed cookies on your device to help make this website better. You can adjust your cookie settings, otherwise we'll assume you're okay to continue.