Leaderboard
-
zspert
Free Member3Points383Posts -
Patcon
 Subscriber
 2Points11,142Posts
 -

dutchzcarguy
Free Member2Points2,677Posts -
JDMjunkies.ch
Free Member2Points637Posts


Popular Content
Showing content with the highest reputation on 11/26/2022 in all areas
-
I managed to get another load of rare old, but new (NOS = New-Old-Stock) parts for the 240Z. Most of the parts are something i wouldn't have bought new since they're just small bits and pieces, but when i got the chance to obtain the whole lot, i couldn't refuse. This is what i got delivered today: First of all: A clutch disk: Then a set of complete headlight bucket assemblies. You might remember i got the rubber seals for these included in last weeks delivery, and today also the chrome trim rings arrived: Some more rare body panels: The two reinforcment corners that start at the firewall and extend under the hood on each side to the fenders. I don't think i'll need those, but it's good to have them in case the bodyshop needs those: There were also a set of gaskets. The one on the left is for the big original air filter. the red one for the fuel pump. the two black ones are for the water pump and the other one obviously for the exhaust downpipe. Last week i got some of the side marker parts, and this weeks i got the chrome trims and rubber seals for them (two top items). Additionally i also got the rare bumper mounted turn signals for the Eurpean spec 240Z including the rubber seals (bottom two items): A set of filters came with the delivery too: Oil filter, and fuel filters: And an original water pump: Something rare is this fusebox. and a fuse remover tool. I don't know i think this is not the correct one for the 240Z as it has too many fuses. so i will probably sell it. A set of chrome bumper trims or whatever they're called. I think they're US-Spec but have to double check in my manuals. Will also go up for sale if i don't need them. They also came along with a set of original rubber covers for them. I also got a set of strut inserts for the 240Z. Strangely the included papers mentions a PL510 and other cars, but the box says GS30 and S30 "Hard" so i have to double check ne numbers too. And then i got a load of small fastners, mounts, shims, bits and pieces. Those are always good to have. some of them are really rare and useful, others seem a bit strange and unfamiliar. Overall it's a great lot, even though it wasn't cheap. I still have to double check all the part numbers and see if they're right for my car. I have my doubts in some cases. But that's not an issue, i just put them up for sale 🙂 At the end, i'm sure this will save my arse once or twice when i put together the car and realize a certain small piece is missing and worth replacing, only to find it in this lot 🙂 Another friend gifted me this Coin with a Japanese lettering and a 240Z on it. It's a bit strange because it seems to show a "regular" S30 chassis (see the grille?) but the text says "Fairlady" (top) and 240 Z-G (bottom). The backside says "Award". I don't know where this comes from. but i found a few googlin japanese "240Z fairlady coin" etc. One sales ad had the following text included: It's a coin you get when you collect dozens of old arcade coins. This coin is over 30 years old. Owners and fans of Z30 and 240G, what do you think? If somebody knows more i'd love to learn what this is about.. What's next? I have a week off the coming days and i plan to get my EK9 read for next season, so i can put it in hibernation during the winter and focus on the Z again.2 points
-
Almost 600 Hp and 350 ft lb of torque. Impressive numbers. Still alot of cash though!2 points
-
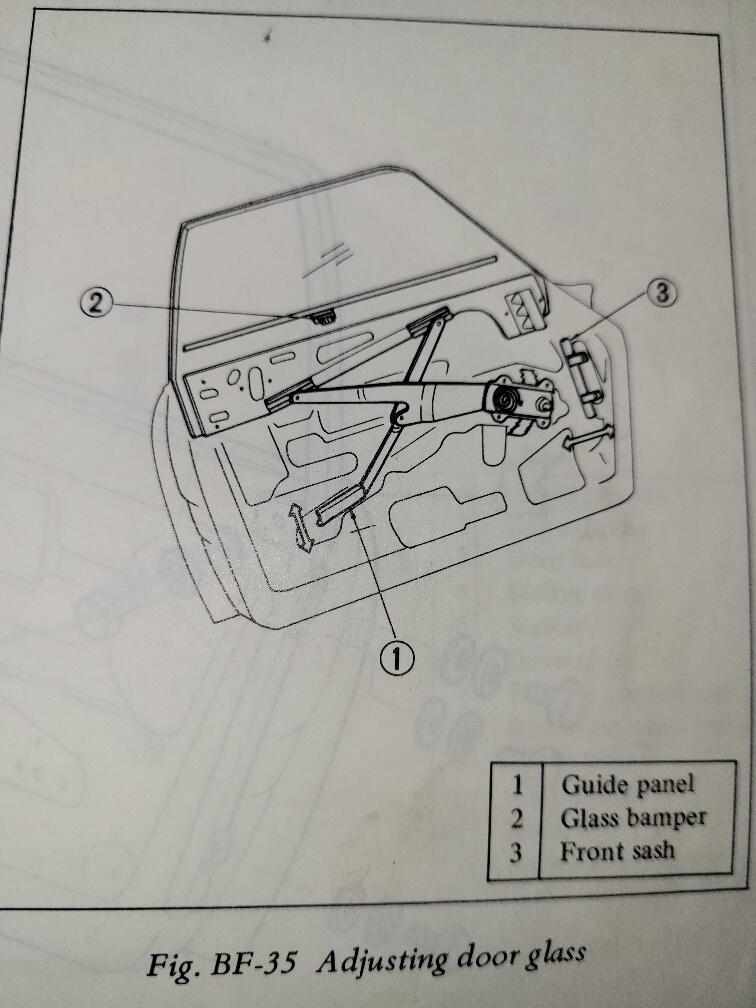
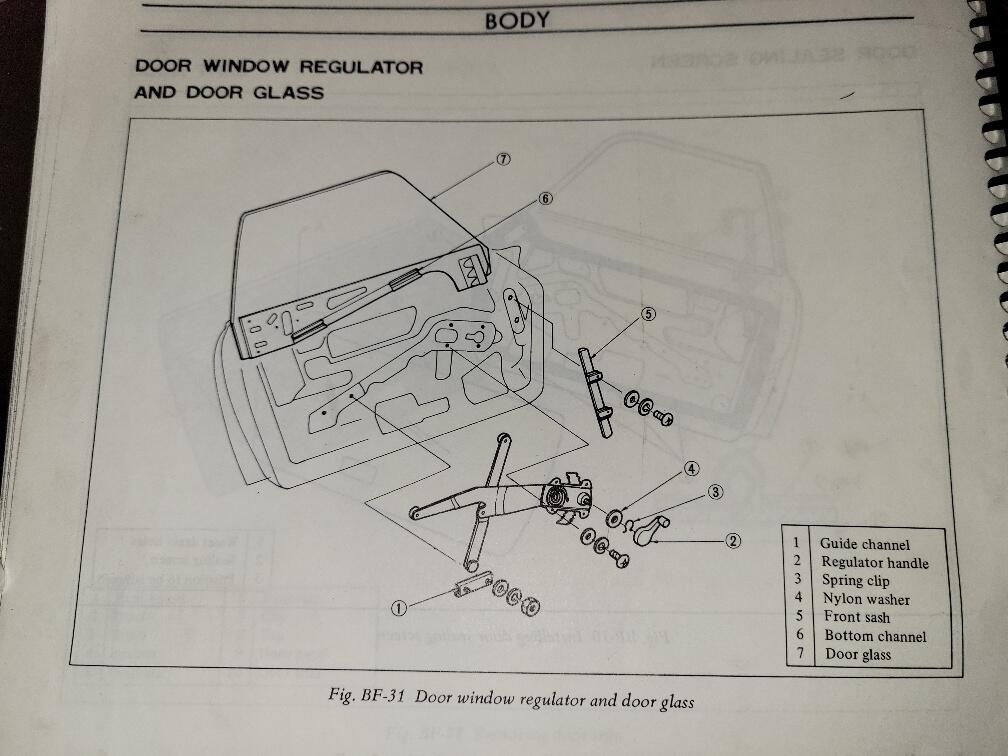
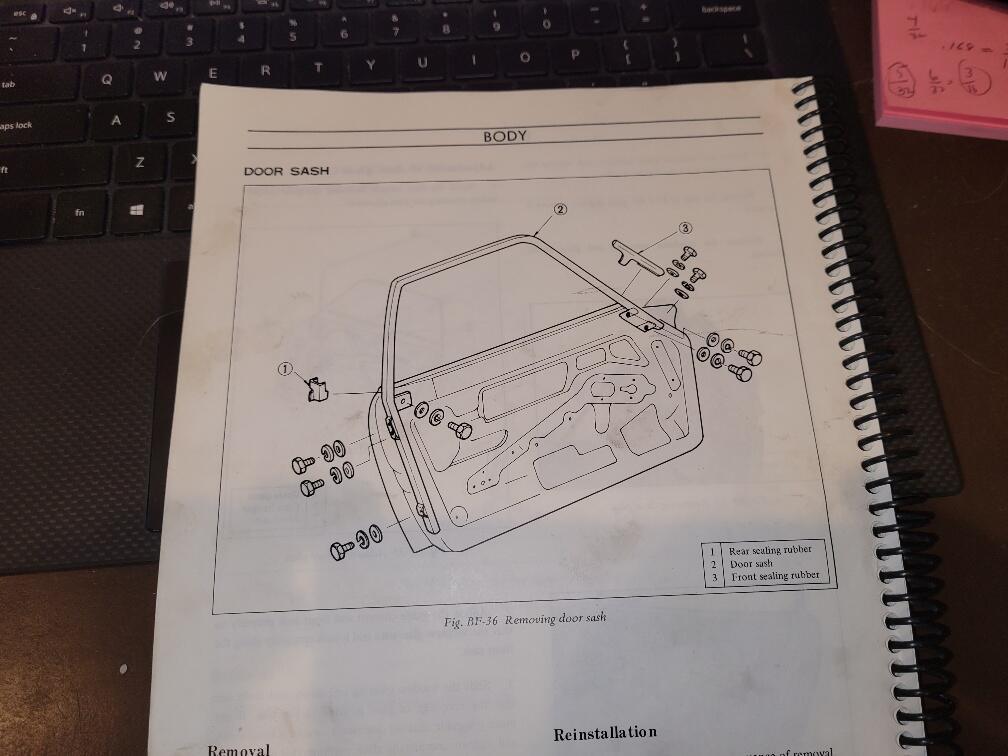
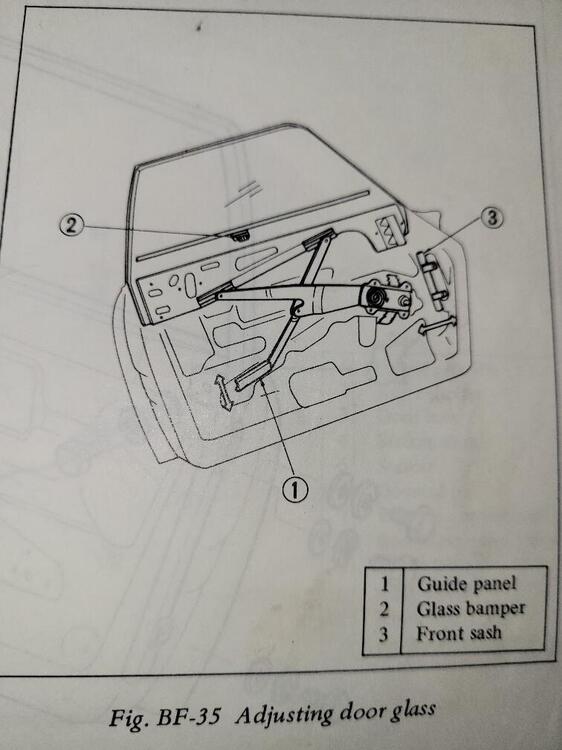
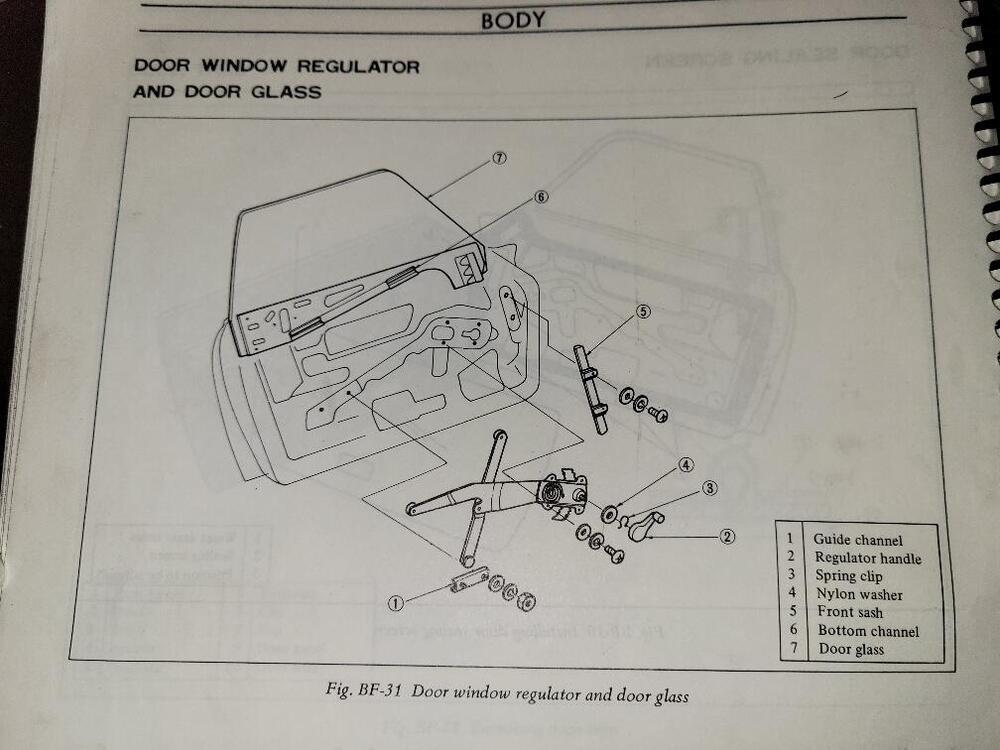
1 pointI Have installed a few windows in British cars and this is my second opportunity with a 240Z. So, I don’t have a tremendous amount of experience, but I think this will provide a bit more detail that may help you. Outlined below is a procedure that worked well for me and I hope will help you. Please feel free to correct/improve the process for the next guy. Door Glass Install Install the outside rear view mirror. I installed insulation and sound deadener. I think this helps with noise and temperature control and it also gives the door a bit of added weight improving the feel of the door. I put white lithium grease on the rollers and channels, and on just about anything else that moved before installing anything. I installed the door locking mechanism, and all of its associated parts exterior door handle, key lock, and interior door handle. I removed the door sash (frame/channel that surrounds the glass) to make it easier. I installed the window regulator. To move the regulator I attached a vise grip to the knurled winder mechanism, be careful not to crush the grooves. At this point my troubles began. From what I read I thought that the front sash (front channel about 12 inches long) and the guide channel were supposed to be installed. I tried installing the glass by reversing what the service manual describes for removing the glass. Tilting it and sliding the front roller into its channel. I wasted hours and lost ½ a pint of blood and got nowhere. When the front roller was in the channel it would come out as I tried to install the rear roller, or the front sash guide. So, I walked away had a cup of coffee and decided to take a look at the entire mechanism. I was alone on this task so it is easy to get worn out hunched, and holding the glass, etc. Here is what I came up with and the glass was installed in less than 30 minutes. The first (6) six steps are valid and was my starting point. The front sash (approximately 12 inch long channel for the plastic slide at the front of the glass) and the guide channel (approximately 4 inch channel mid door toward the door lock) are not installed at this point. I think this would be a good time to remind you that you should install the outside rear view window before going any further. It’s painful to do it after installing the glass, don’t ask how I know that it is painful. Getting the window into the car can be tricky. The manual suggests: front first and down on an angle. If you are concerned about your paint I would protect it with at least a strip of tape on all edges of the door. Watch the outside of the window as it enters the door as there are screws (at the front tip of the window where the slide is located), that can get hung up on the door. The window sits closest to the door skin, in between the skin and the window regulator. At this point I re-installed the window sash with one screw in each or the two top corners. There are 3 rollers. Two of the rollers face the window. One faces the interior of the car. One of the two rollers that face the window will be on your left as you face the interior of the door. The 2nd roller will be on your right. The right most roller is mounted on an arm that has the third roller (facing the interior of the car) attached at the opposite end of the arm. This roller (facing the interior of the car) should be sitting down, toward the bottom of the door, before you try to install either of the other rollers. If it is not in this position it will be more difficult to position it later on because it will get hung up on the regulator and the interior door sheet metal. Seating the regulator rollers into the window channel Wind the regulator almost all the way down. Now slowly wind the regulator up and watch the rear channel, toward the door lock. I believe this step is easier if this roller enters the channel from the right side (nearest to the door hinge) of the channel. When it is close to the regulator roller slide the glass forward or back to allow the roller to enter the channel. Once the roller is in place slide the glass a bit more to insure that the roller stays in the channel. Slowly wind the regulator almost to the bottom of the door. I believe this step is easier if this 2nd roller enters its channel from the left side of the channel, nearest the door lock. Remember the third roller must be lower than the other two rollers. Watch the front channel of the glass. When it is close to the level of the regulator front roller stop and move the glass forward toward the door hinge, make sure you don’t move the glass so much that the first roller comes out of its channel. Push the roller into the channel and slide the glass toward the rear (toward the door lock) to keep the roller in the channel. To move the roller toward the channel you might try pushing down on the opposite side of the arm where the 3rd roller is located. You might also need to grab the glass and move it forward (toward the door hinge) corner up toward the top of the door. Slowly wind the regulator up about half way, when the remaining roller is accessible slide the guide channel on to the roller. Move the guide channel toward its mounting holes to get the guide studs in position. You may need to wind the regulator up or down slightly to get the guide channel studs to their mounting holes in the door. When one is in the hole place a nut on it to insure that it stays put. By winding the window up/down you should be able to manipulate the guide channel’s 2nd stud into its mounting hole. Now from the top (right side facing the door interior) push the front sash down and guide it onto the plastic window slide. Push it down and move the window to the front or rear so you can place the screws through the door and into the front sash. Tighten (finger tight) everything and using the window regulator roll the window up and down. If everything is moving smoothly then tighten everything and bandage any wounds.
 1 point
 -
1 pointAwesome. Thanks for the photo @zKars I’ll pop that off and see what it’s like inside. And see if I can source the right plug. I think that would allow for no thread tape, right? If not, the brass option should work too. Thanks @Racer X I had another leak up front from some stripped water pump bolts, going to pop off the timing cover to fix that with some helicoil. And while I’m at it, doing the head gasket. SMH. Happy thanksgiving!1 point
-
$10+postage. Send me a PM and we’ll conclude the deal offline.1 point
-
1 pointIf the coolant does not come out after removing the bolt.. hit it with a ice pic!!... or something 😉 (often lot of dirt in there..)1 point
-
The 240 and 260Z's came wired for electric fuel pump. If your car had the dealer installed electric pump they would have also added a couple of relays into the circuit that are documented in a separate tech bulletin that's somewhere on here. If your car never had the dealer installed pump the wires are there for an electric pump. I changed my 240 to electric pump and buil my own "tray" for the pump and then found the plug up in the console area that you jump across the 2 wires in the plug to activate the circuit, it is keyed to go live with the ignition switch in run. My current pump is pretty load when the car is off with the ignition switch in the run position and it kind of shifts down when it gets the loop pressurized so I wait for that sound shift before I crank. Probably 5 to 6 seconds max crank when cold with full choke and around freezing temps outside.1 point
-
1 point
-
1 pointI have some new King bearings I will not be using. I'll check tomorrow for the undersize.1 point
-
Congratulations to Mark G for his second MARRS ITS championship and for setting the ITS lap record . Mark you done good!

 1 point
 -
When the marketing geniuses at Datsun US dreamed up the Z Store program, so many years ago, they were completely clueless about the restoration process and probably didn't give a damn given the rarefied atmosphere they enjoyed. It wasn't until the program was turned over to those who would have to make it work that it was realized how few 240 parts were still on the parts shelves. For example, there were only 60 or so dashes, windshields and back lites remaining in stock. There was NO soft trim. So much for the 200 or so examples the geniuses wanted to run through the program. What to do? Pierre knew about me and my, at that time, very modest offerings, so he had the Datsun procurement people get in touch so the ball could get rolling, like yesterday!! I was in almost weekly conference with 2 and much later 3 individuals at Datsun. Pierre, Les and I had quite a few conversations as well. During that time there was some back and forth about a book that would, among other Z car related topics, address what the early 70s were like at the Datsun dealers during those golden years. Fast forward a lot of years and I get a call from a publisher asking if I would like to help them sell a new Z car book. Deep discount for volume, official endorsement, etc. I asked for a copy and a few days later it appeared. Turns out it was written by one of the chaps I had so many phone conversations with back in the day. Upon reading I found it to be far less than it might have been and while I was listed as a recommended vendor it also had what looked to me like a broad, multi page, endorsement of our friend in OK. Thinking that the author might have been conned by the fellow in question I sent him, the author, an email. I asked him if he remembered me and thanked him for giving my business a recommendation. I also gave him a brief on the Guild backstory. No, don't know you from Adam and the 240 Guild seems to be a very solid operation with significant bona fides. I left it there. It's taken me a very long time to establish the reputation I enjoy. Those like the character in question make my job just that much more difficult.1 point
-
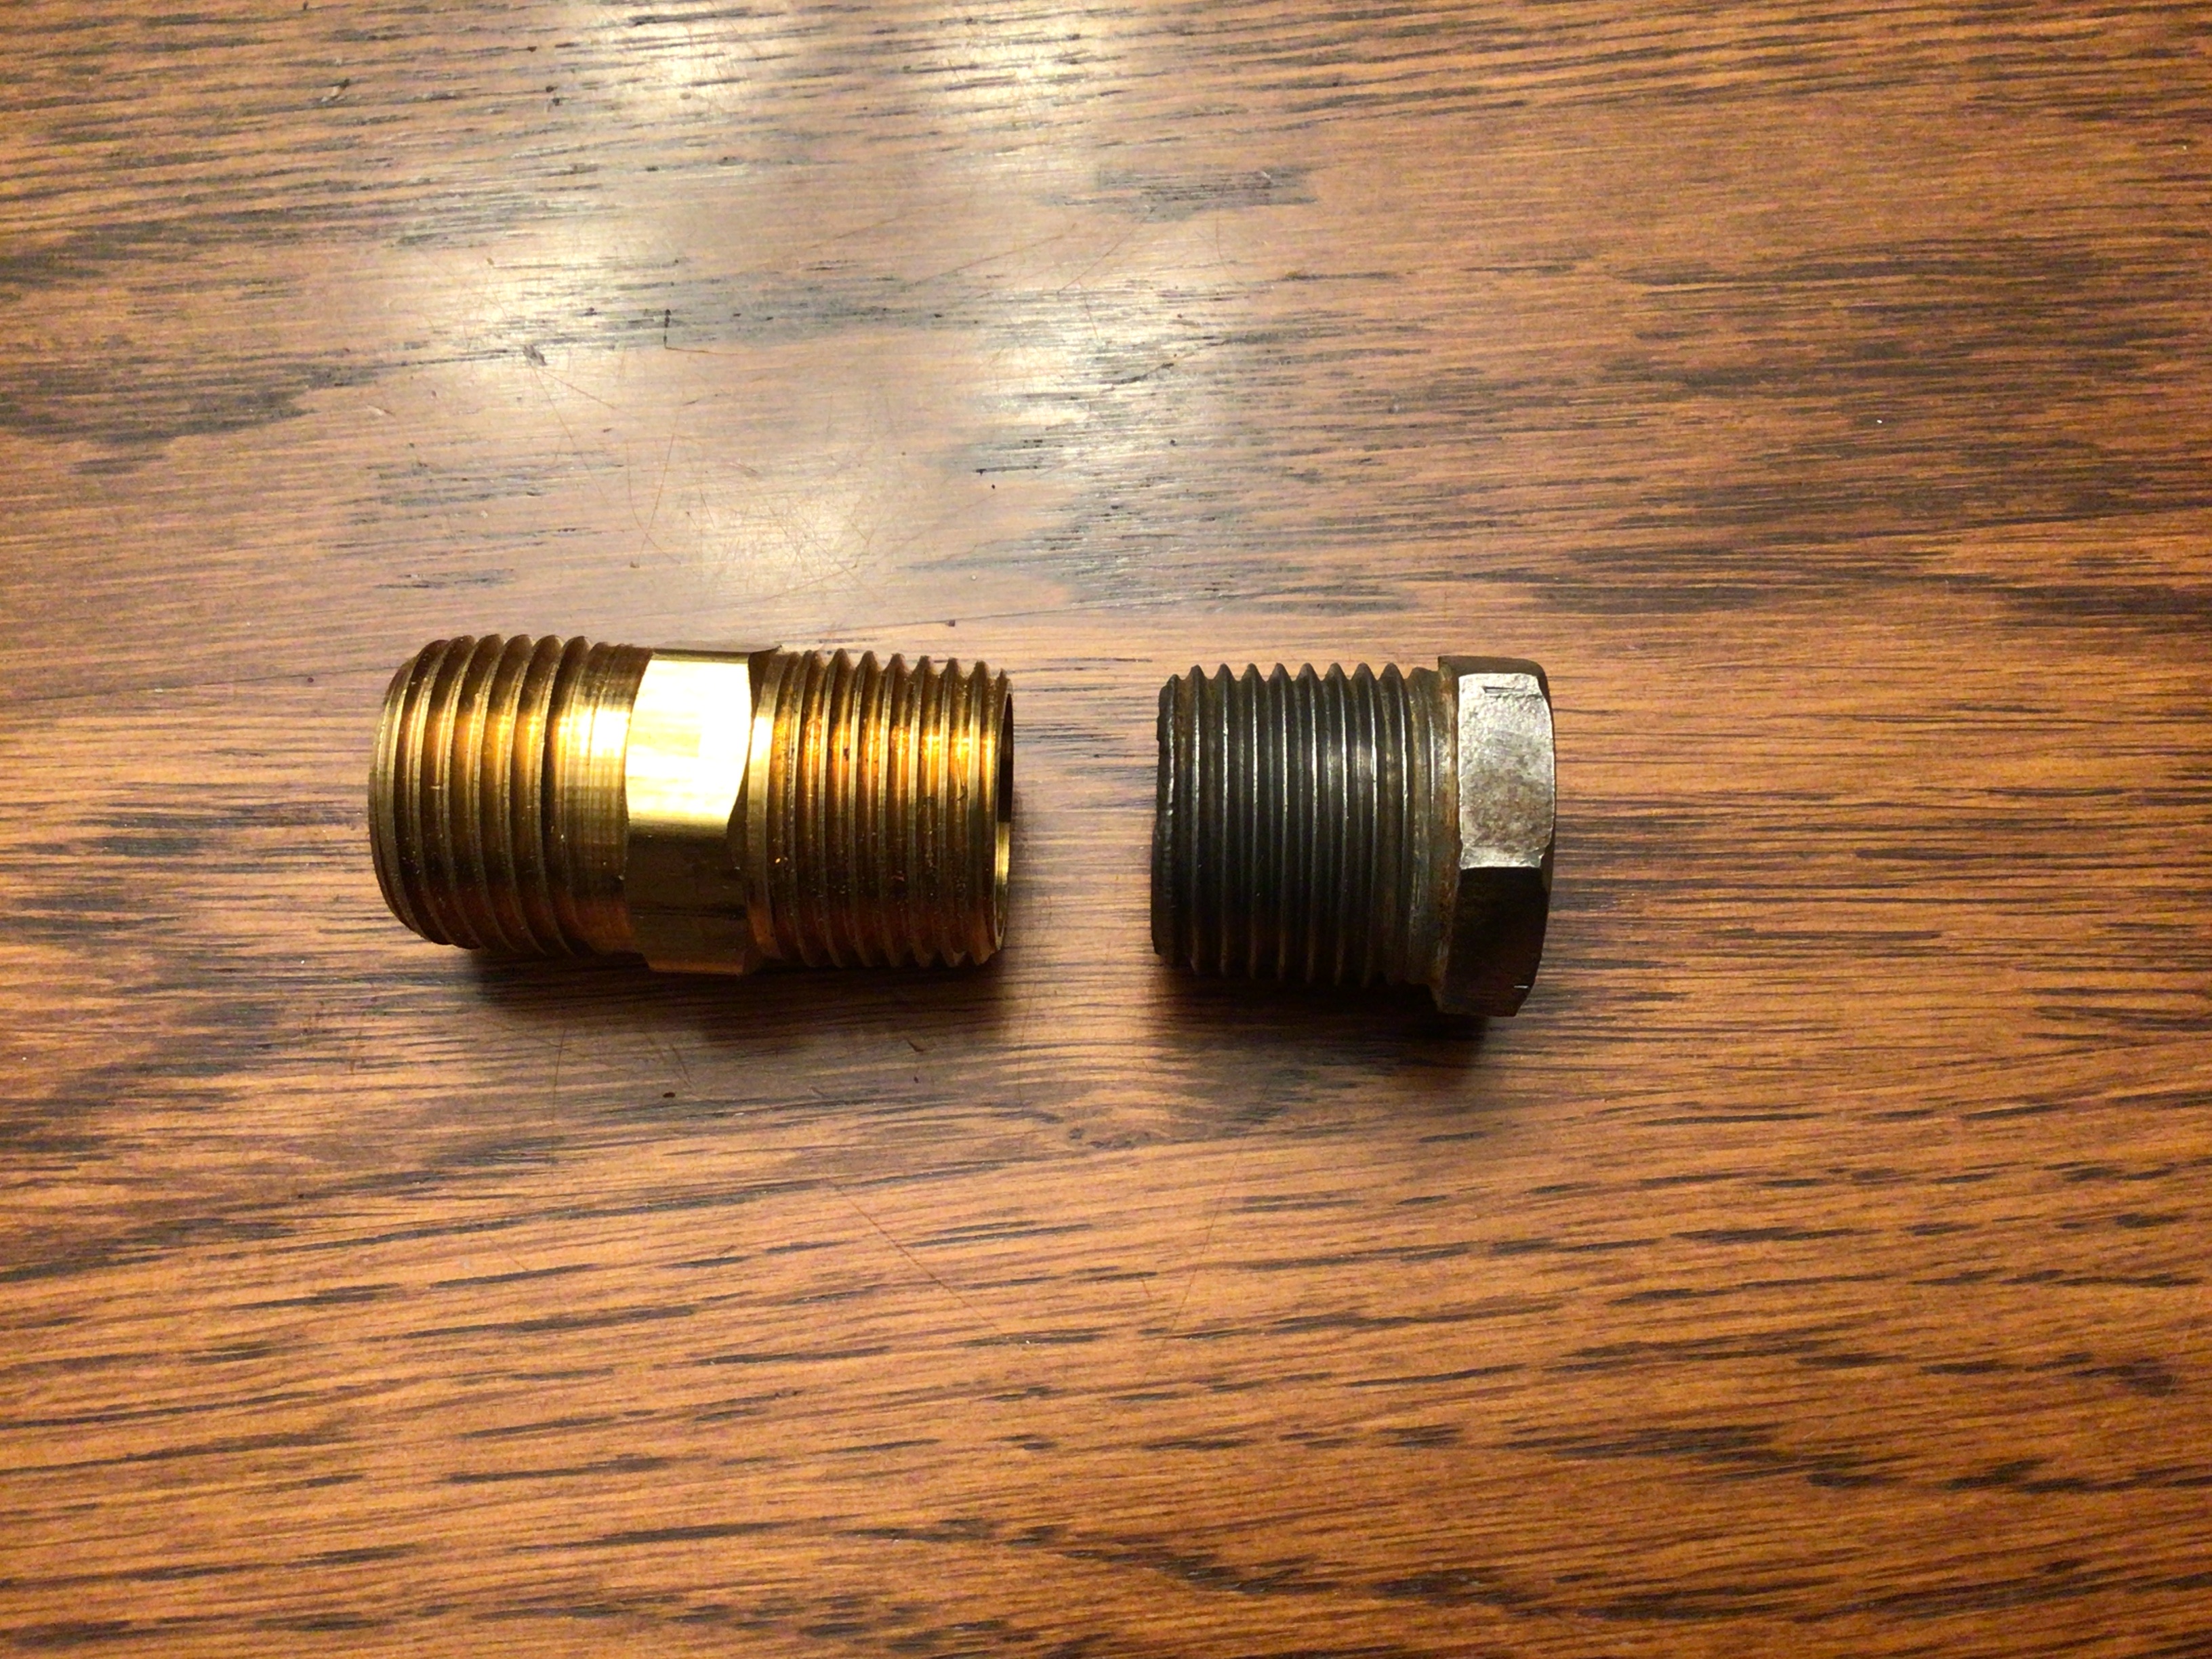
1 pointThat is the block drain. The plug or whatever in the picture is not the stock one, who knows what someone used in the past. Remove whatever is there (it will drain 99% of the coolant so be prepared, drain the rad first) and see what you have. That hole is 1/2” BSPT threads. In this case, since NPT is the same thread per inch as BSPT (14), you may get a 1/2 NPT plug to fit and seal if you have trouble sourcing a 1/2” BSPT plug. 1/2” NPT on the left, correct block plug with 1/2” BSPT on the right.
 1 point
 -
1 point18 years! (Is that "awhile?) Re-tap to 1 size bigger if possible (metric prefered as most is metric) or recoil it. Or if there is enough dept, make the hole deeper and extent the thread and use a longer bolt! 🙂 If the bolt is M5 you use a drill 0,8 times 5 = 4,0 mm ( M6 is 6 x 0,8 =4,8 or 4,5 if you don't have 4,8mm) You could weld it shut and re-drill/tap but that's a specialist's work.. I would use a good recoil.1 point
-
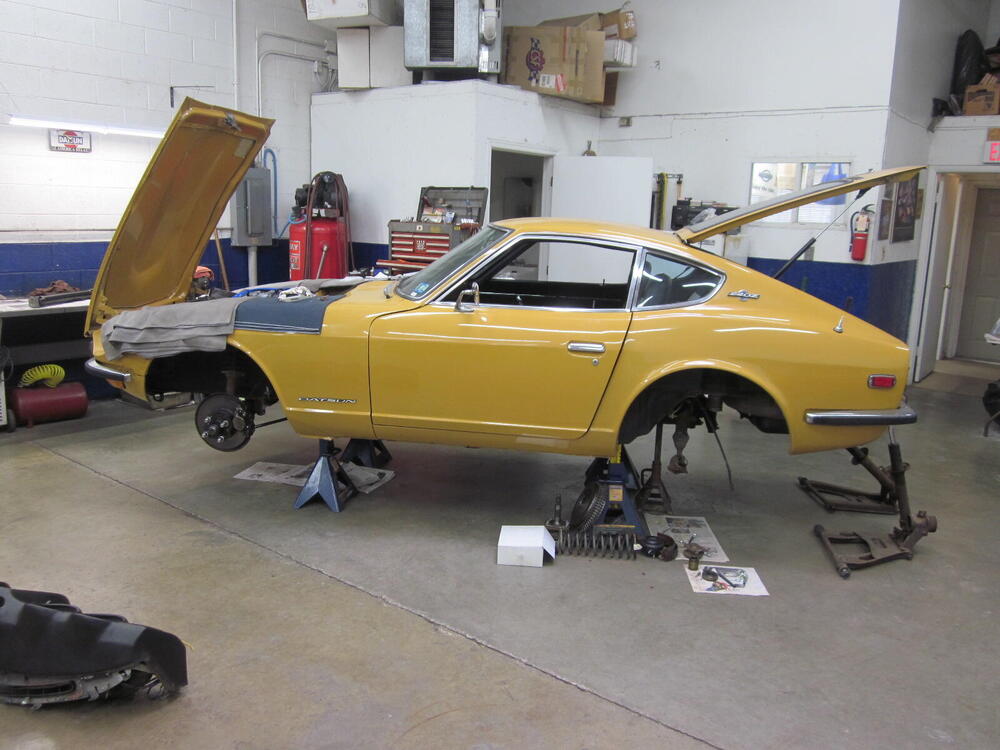
A couple of pix of the 1/71 the unicorn I have in my shop

 1 point
 -
1 point