


Leaderboard
-
240ZBUILTBYME
Free Member2Points237Posts -
conedodger
Free Member1Points12,516Posts -
Matthew Abate
Free Member1Points1,204Posts -
Mike W
Free Member1Points453Posts


Popular Content
Showing content with the highest reputation on 09/18/2020 in all areas
-
Hi all Really looking forward to starting this project and getting all of your input and advice along the way! Im new to this forum, Ive spent lots of time lurking though! I have been posting on the australian forum but traffic is quite low on there so hoping to get quicker input on here. I did also consider hybridz but I think my resto will be more in line with classiczcars as Im not transplanting a V10 into mine... Names Ryan, I am the long time owner of a 1971 240z here in Perth Western Australia. Vin is HS30-001063 I have owned the car for 10 years. When I bought the car it was in rough condition, tried to get it running to enjoy for a while but the previous owner had neglected it too much. So I decided not to waste money or time and wait for a ground up resto. Then it took me 8 years to find a decent space to start the resto (my dads new shed). I started the tear down in late 2018 but then had my son so it went on the back burner for another 1.5 years. Now I am almost finished the tear down and excited to get some real work done. Unfortunately I have another baby due in November! Damn! Lol I have also started a YouTube channel to document the restoration. At the moment they’re pretty boring dismantle videos but I plan to make them better quality and more exciting in the future. http://www.youtube.com/channel/UCHZhre0vm7sL2Kl7hUQFVkg About the car: History unknown, bought it from a very energetic guy who pretty much ran it into the ground, was completely neglected and unmaintained. I knew I wanted to do a full restomod however, so this was not an issue for me. Car has a L20 engine and may be an originally automatic gearbox, hence the L20 swap and that the gear lever barely lines up with the hole in the trans tunnel. L20 will be thrown in the bin. Car is green originally and has had a terrible quality respray. Car had a relatively minor front end collsion, bent sugar scoop/front bumper support and some light repairs to radiator support Basically everything on the car needs replacing/restoration, nothing is reusable in a sense I can just rebolt it on the restored car. Plans for the car: Due to the car not having the original engine I see no point in going back to stock original. may as well create the car I want, so many things will not be stock - Color change, unsure as to color just yet, was leaning toward white but recently I have been liking safari gold - L28 stroked out - Triple Weber set up but thinking of keeping SU's initially to save some $$$ - BC Coilovers, techno toy tuning 3 point strut brace in front and 3 point apex engineering strut brace in rear - Initially all suspension components will be restored and reused to save $$$ (however I havent ruled out installing some pretty techno toy tuning/ apex engineering components at a later date) - Brake upgrade to front and disc upgrade to rear. not going big brakes as I dont like big rims on the 240z - Custom interior - I am an upholsterer by trade and am going to be doing the interior myself and upgrading some it. Think Alcantara and leather - wheels are undecided but something of the period, watanabes/rotas etc - Fender Mirrors for that classic japanese sports car look - Majority of the chrome will be painted in a satin black, I am not a chrome fan unfortunately.... (I know this will upset many of you) - Exterior besides the lack of chrome will be very stock, no flares etc, thinking about maybe doing a BRE style lower lip air dam thingy Here are some photos just before I started stripping it

 1 point
 -
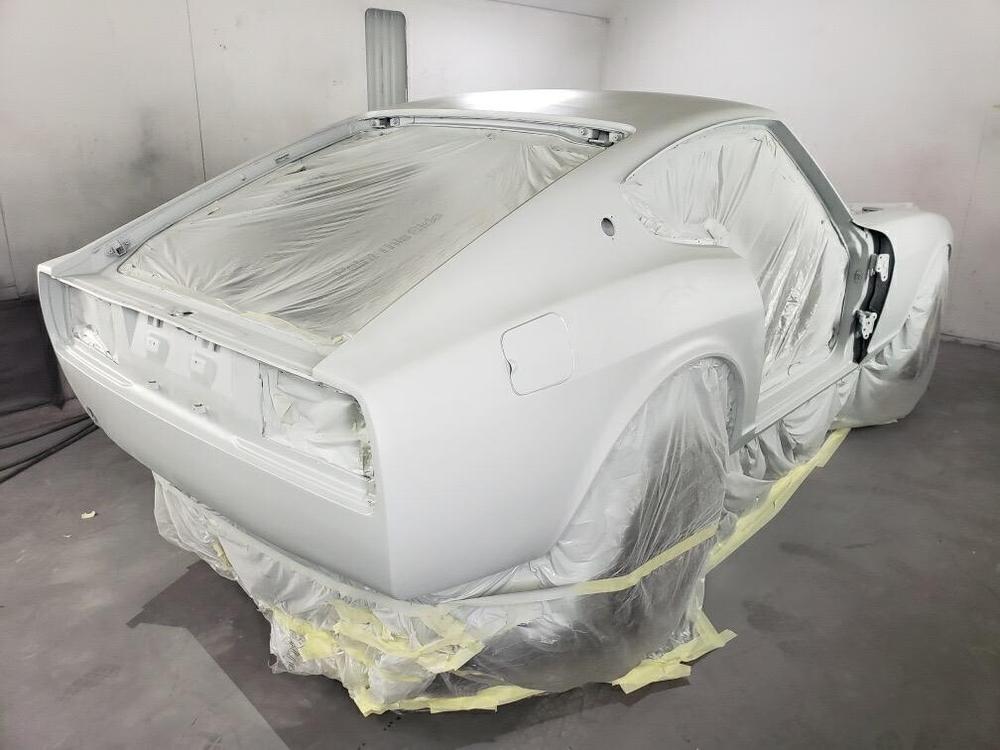
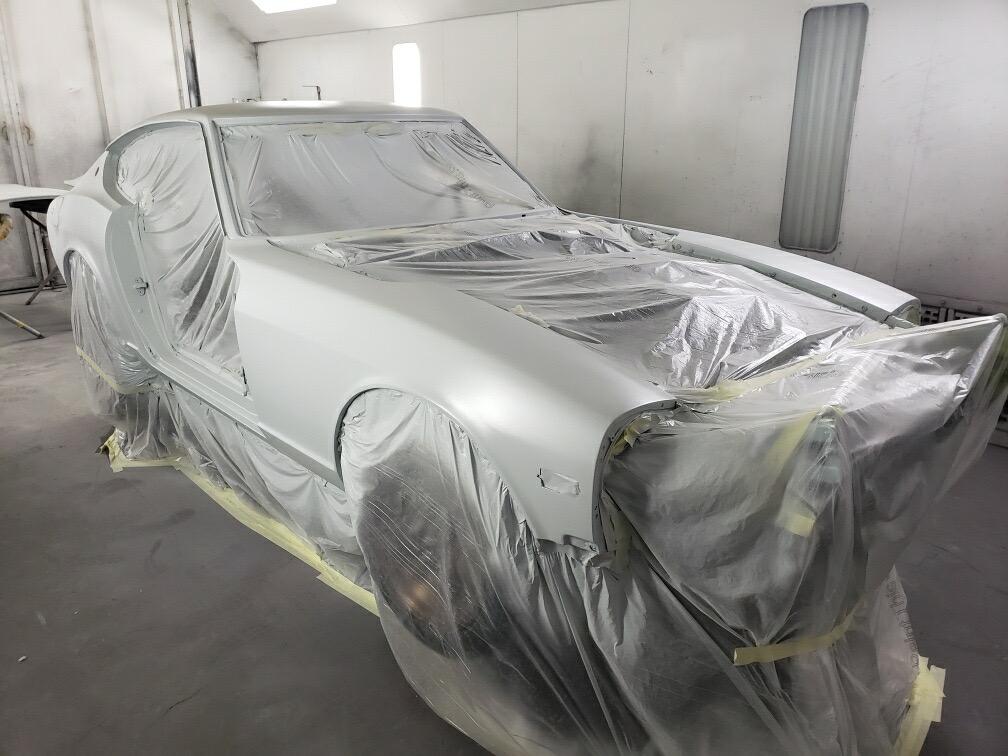
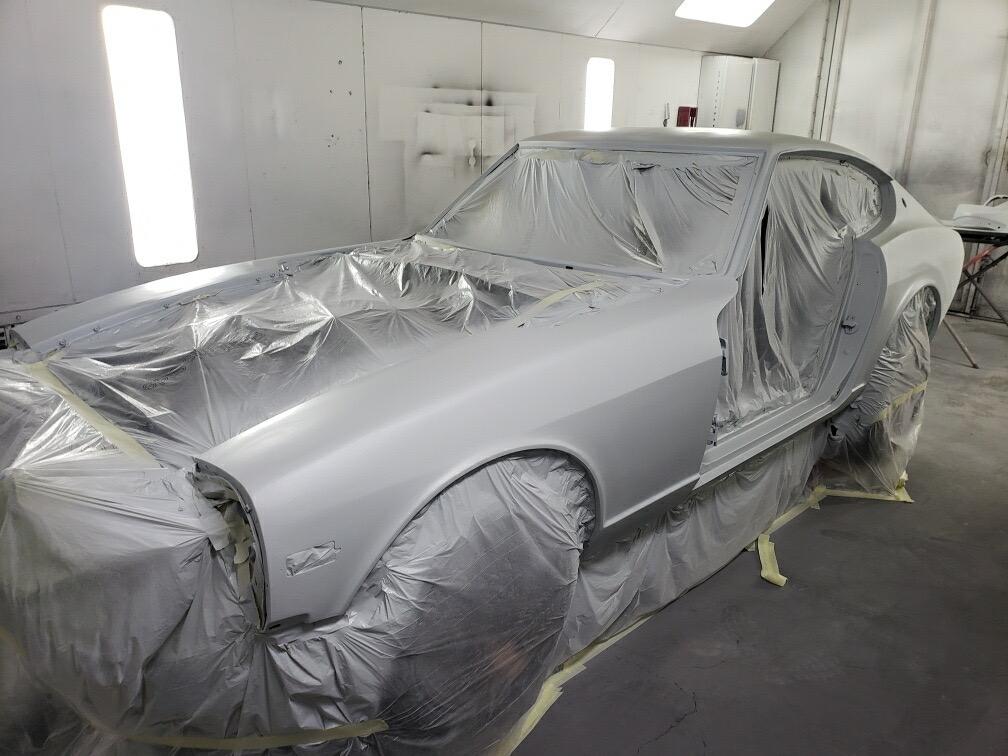
More progress. Final primer of body. Paint next week. Happy with how bodywork turned out. Lots of hours spent on it.


 1 point
 -
1 pointThunderstorms and rain last night. That should put the hurt on the fires and scrub some of the smoke from the air.1 point
-
1 pointyou do not need the zx module with a msd 6al unit that just creates 2 different signals . wire the zx dissy direct from the 6al unit from the ford plug that comes with the msd to the 2 wires inside the dissy . I am not home,but look up the correct way to splice the color wire in order. I made a small metal plate to blank off the hole on the side of the zx dissy when I removed the nissan module. I could never get my tach working with the tach adaptor. I tried resistors and adaptors also . my z is a early 74 260 car and I mounted a small tack in the car. maybe one day I will looked into that again.1 point
-
@jfa.series1 Got the heat shield today. All painted up nice too! Thx!1 point
-
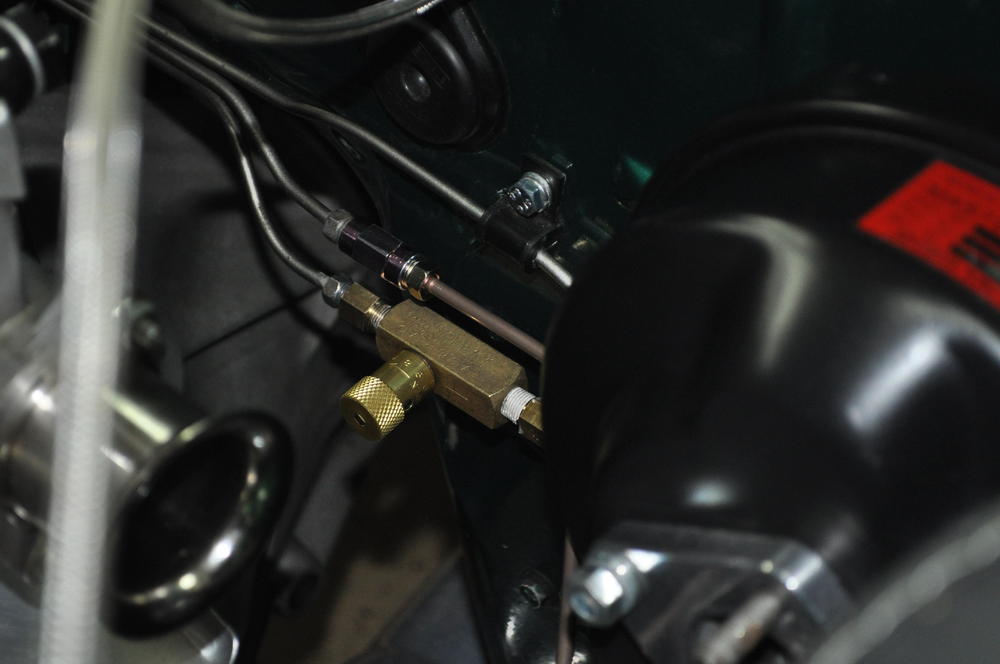
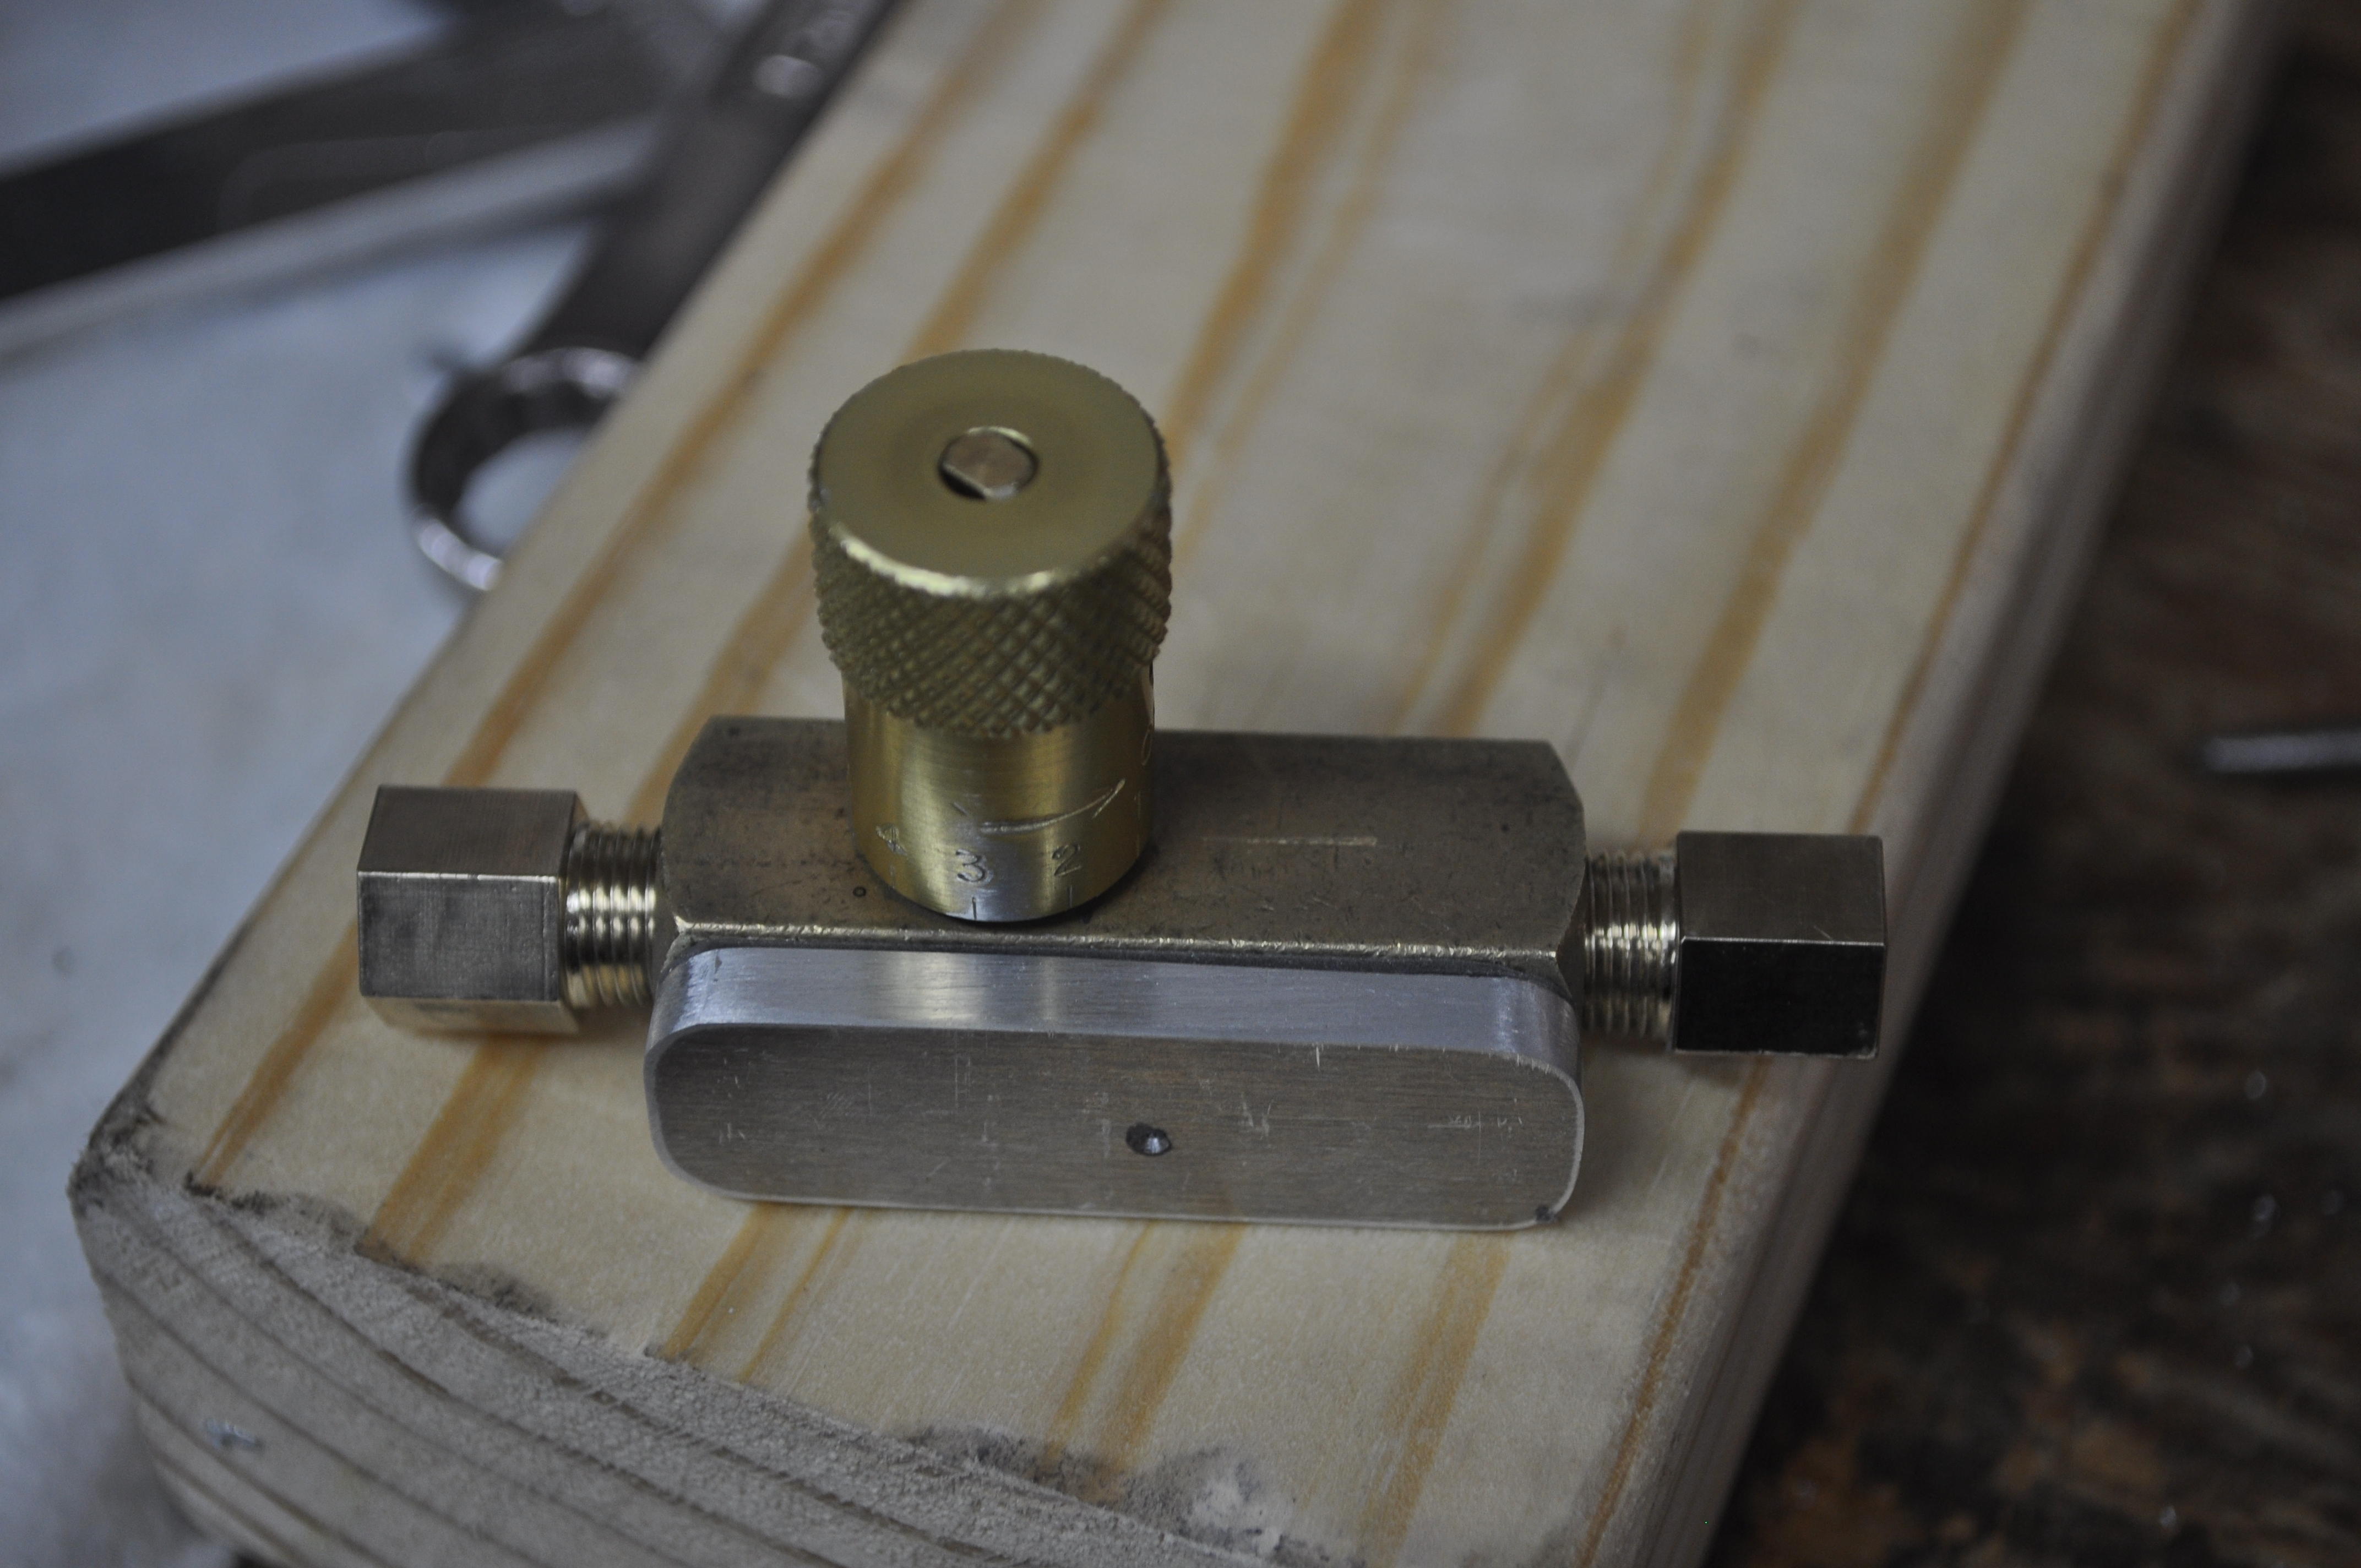
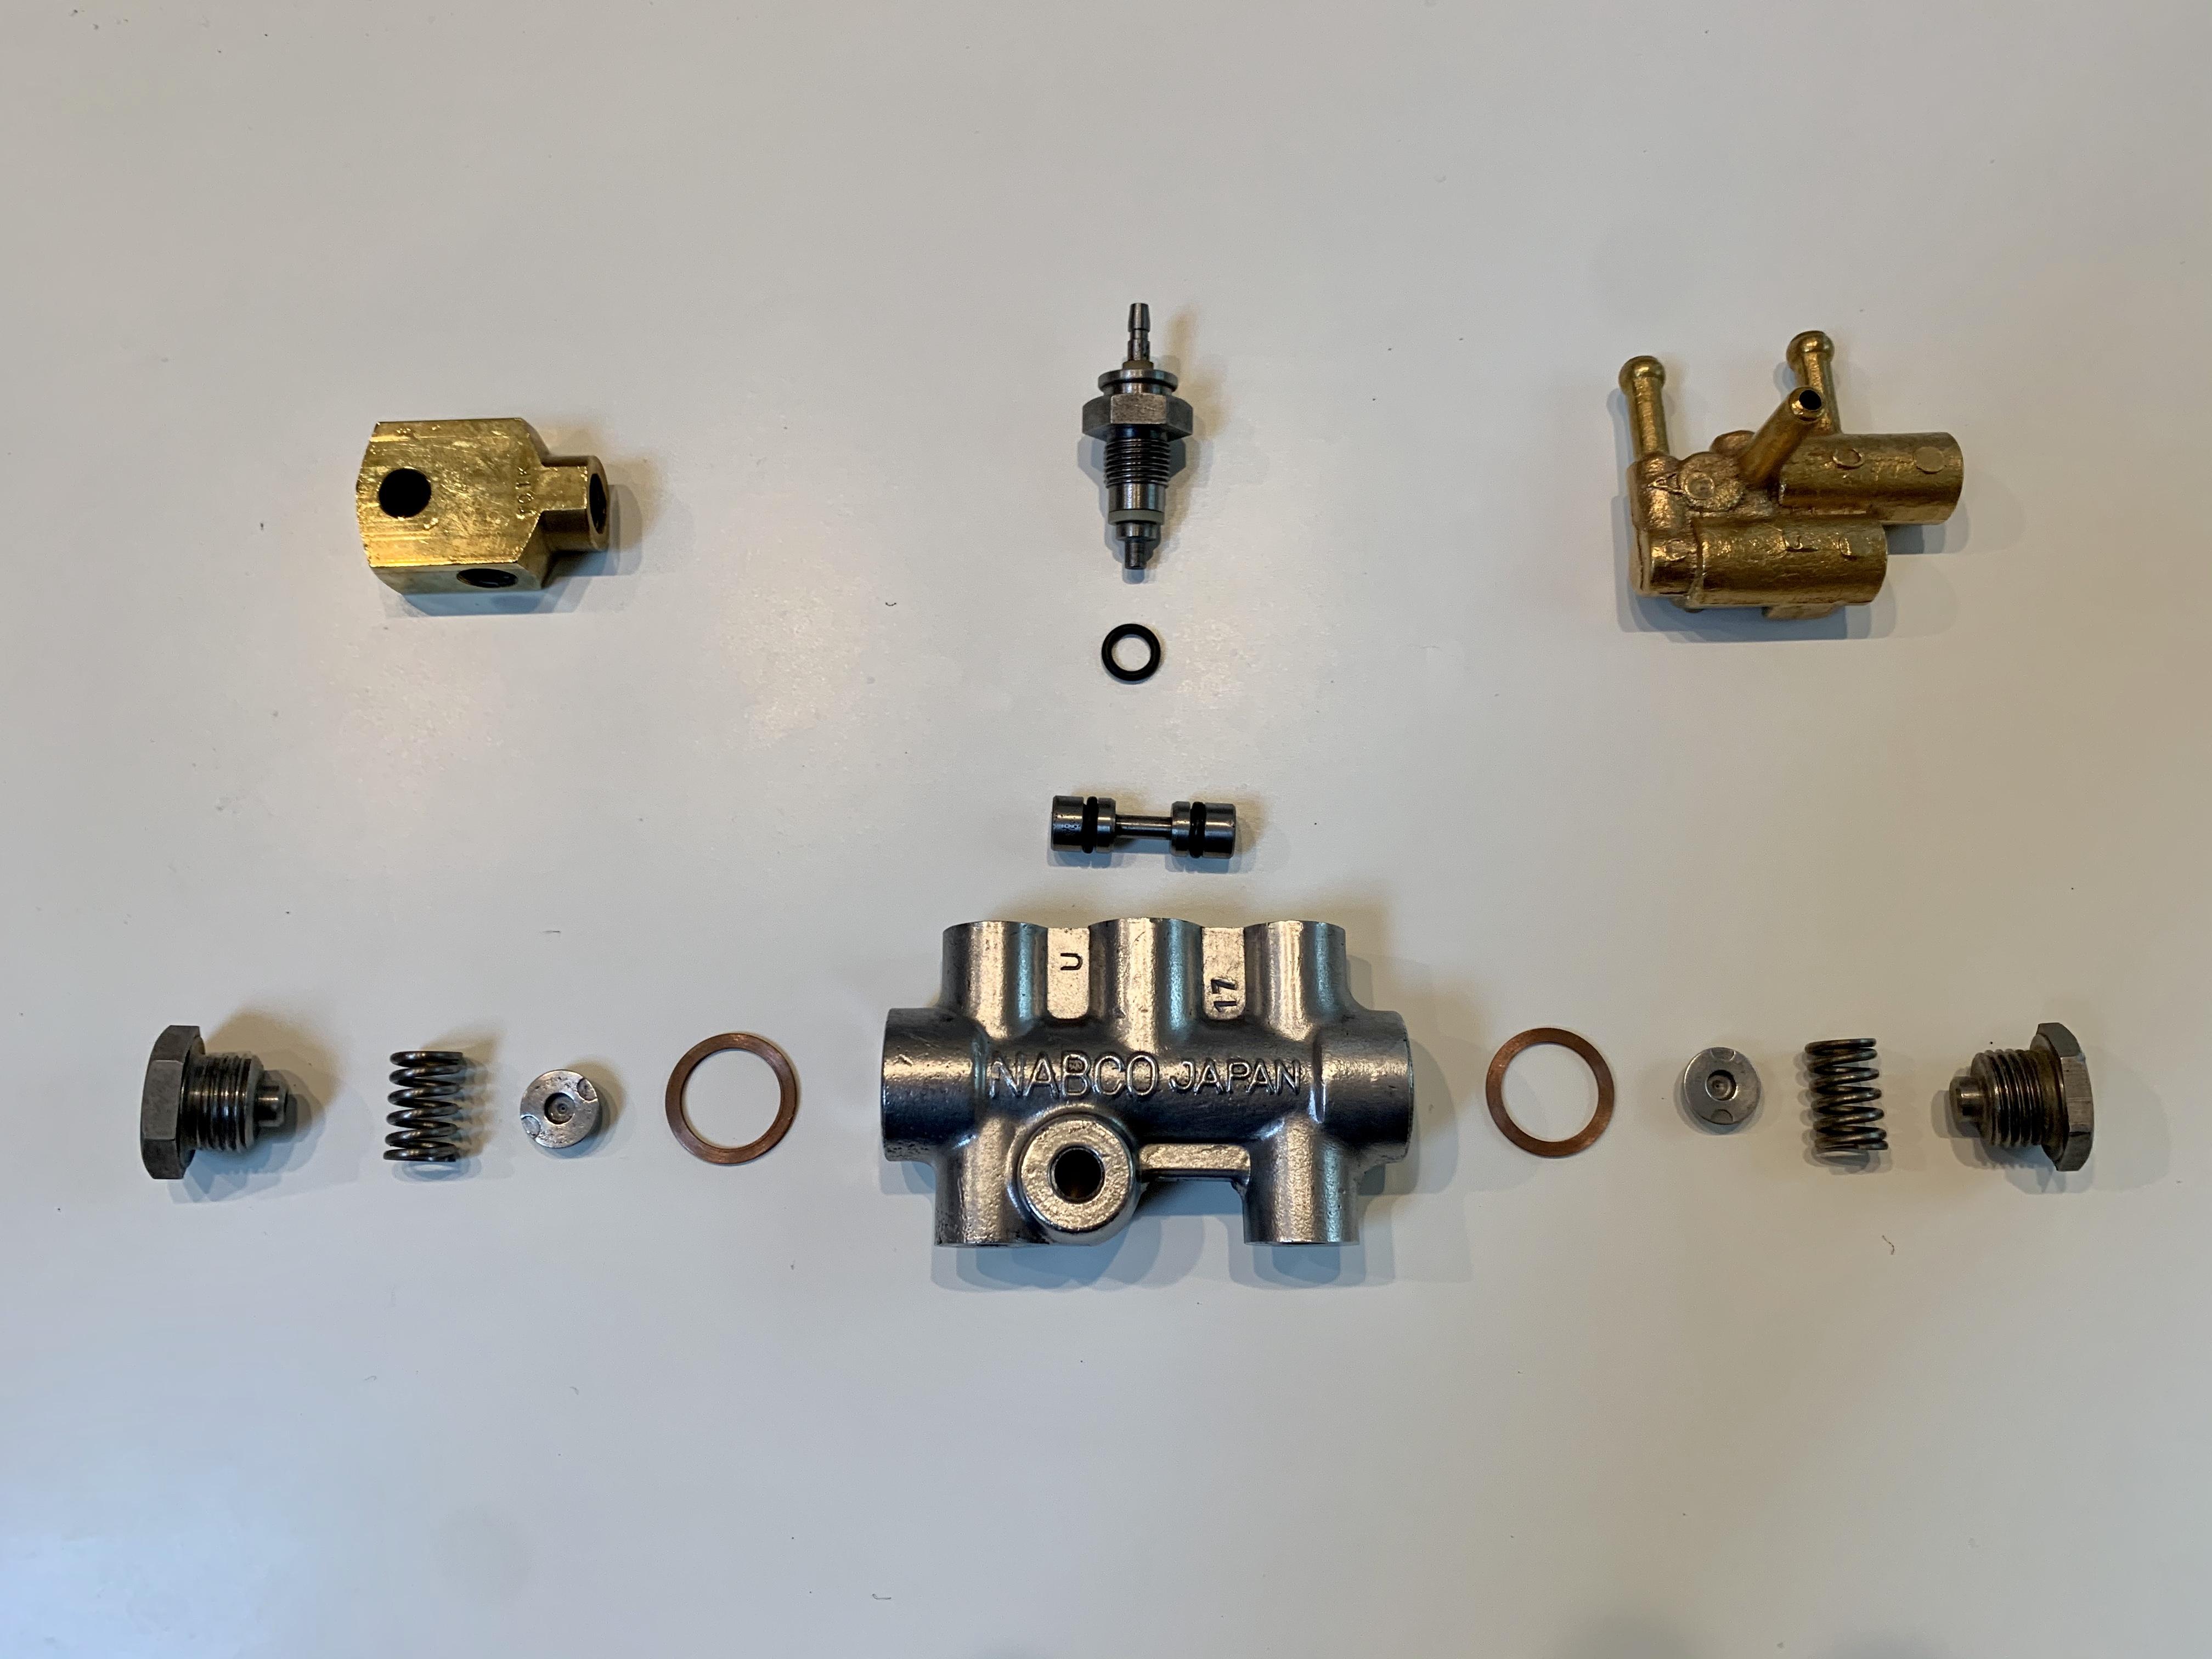
1 pointI encountered the same issue when I changed to a big brake kit from Arizona Z car including the change to discs on the rear. In my opinion the Wilwood prop valve is big and clunky and I wanted something more compact that ideally could be installed in the same position as the OEM fixed prop valve. So I ended up using this: https://www.speedwaymotors.com/Speedway-Compact-Adjustable-Brake-Proportioning-Valve,1979.html It's really small and adjustable but does require conversion fittings to adapt to metric lines. Alternatively you could change the fittings on the lines themselves to match the threads on the prop valve. I ended up having to make a new line from the splitter to the prop valve as the original one was a little short and I had to devise a way to mount it to the firewall in the same OEM location, but it all worked out. Here's a few pictures of my install. The valve works great and I have it adjusted so I get an optimal bias between the fronts and rears. Hope this helps.


 1 point
 -
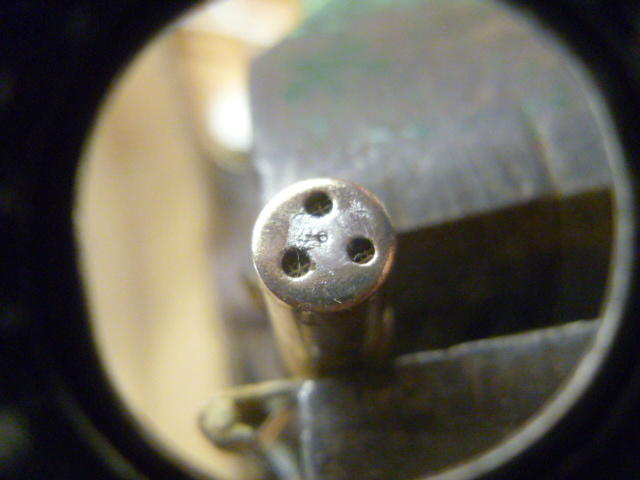
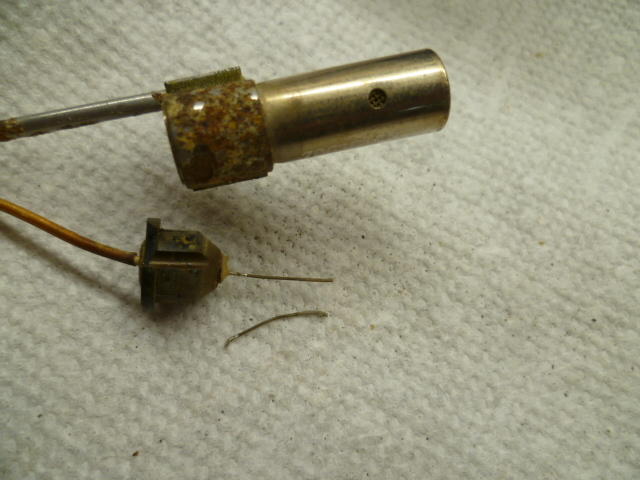
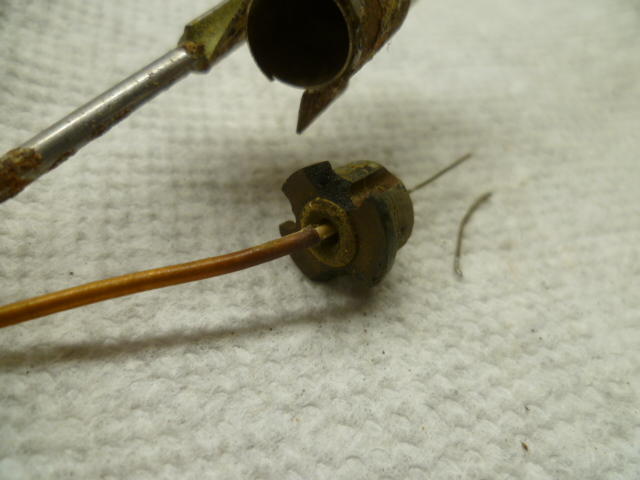
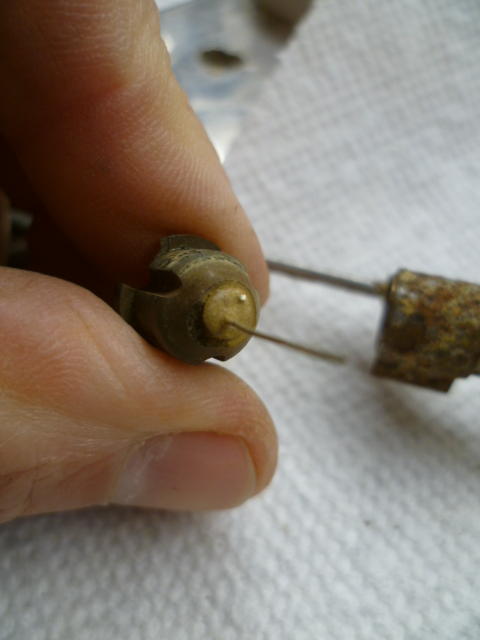
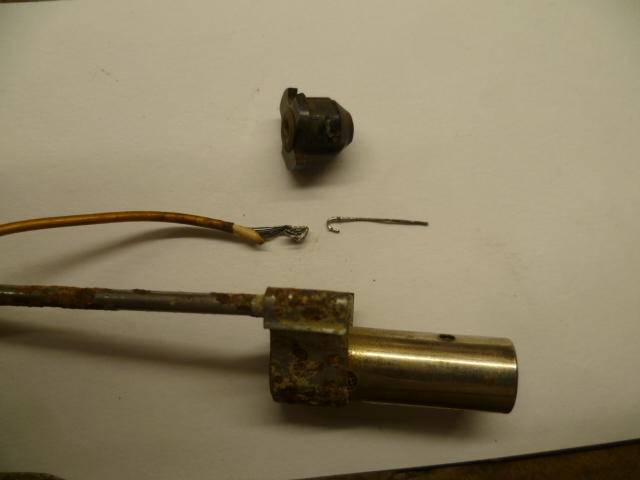
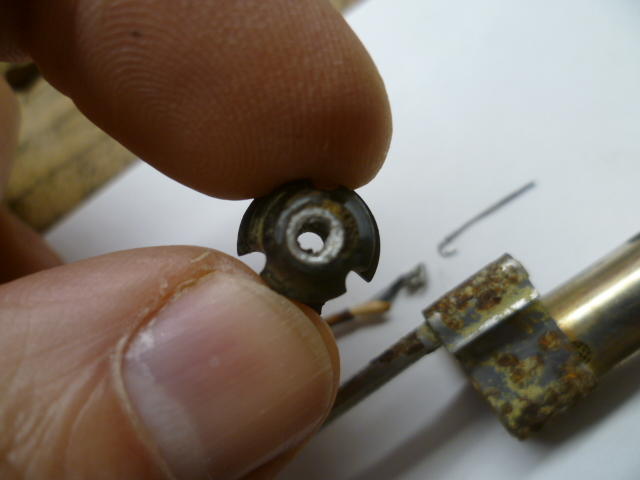
Couple days ago I picked up a spare fuel sending unit to mess around with. First thing I did was checked the thermistor, and it's open circuit. So unfortunately no help there with analyzing a working one, but at least I get to see the thing with my own two eyes. So since the thermistor was already dead, I figured no harm in starting the autopsy. Desoldered the end lead: And pulled (what's left of) the thermistor out of the can. The thermistor nugget itself is completely vaporized. Just like what you guys found, all that was left was the two leads: I still contend that there is nothing interesting inside the black plastic end plug. Here's some shots of the two ends: A And for confirmation, I took it apart. It's just a brass ferrule with flared over ends so it stays in place inside the black plastic cap. And then they use that brass tube as a connection point to solder the flexible wire to one of the thermistor leads. Looks like this. They just bent the ends of the two wires into "U" shapes and hooked them together and then soldered the whole thing together: Here's the hollow brass tube after the solder has been removed: So there's no mystery hidden inside that plastic cap. It's just transition from yellow lead wire to the thermistor lead. @Dave WM If you're going to do another thermistor swap, you don't have to splice the wire to the old stub. You can just solder it into the ferrule.
 1 point
 -
1 point
-
1 pointCSV is the cold start valve, on my rail it is fed from a dedicated port on the fuel rail. you are correct on the 78 fpr, mine is mounted on the firewall with injector hose from the output of the rail. The other side goes to the fuel return line.1 point


Important Information
By using this site, you agree to our Privacy Policy and Guidelines. We have placed cookies on your device to help make this website better. You can adjust your cookie settings, otherwise we'll assume you're okay to continue.