


Leaderboard
-
cmillermorris
 Subscriber
 3Points22Posts
 -
duffymahoney
Free Member2Points961Posts -
chaseincats
Free Member2Points1,035Posts -
jfa.series1
Subscriber2Points2,734Posts


Popular Content
Showing content with the highest reputation on 08/29/2020 in all areas
-
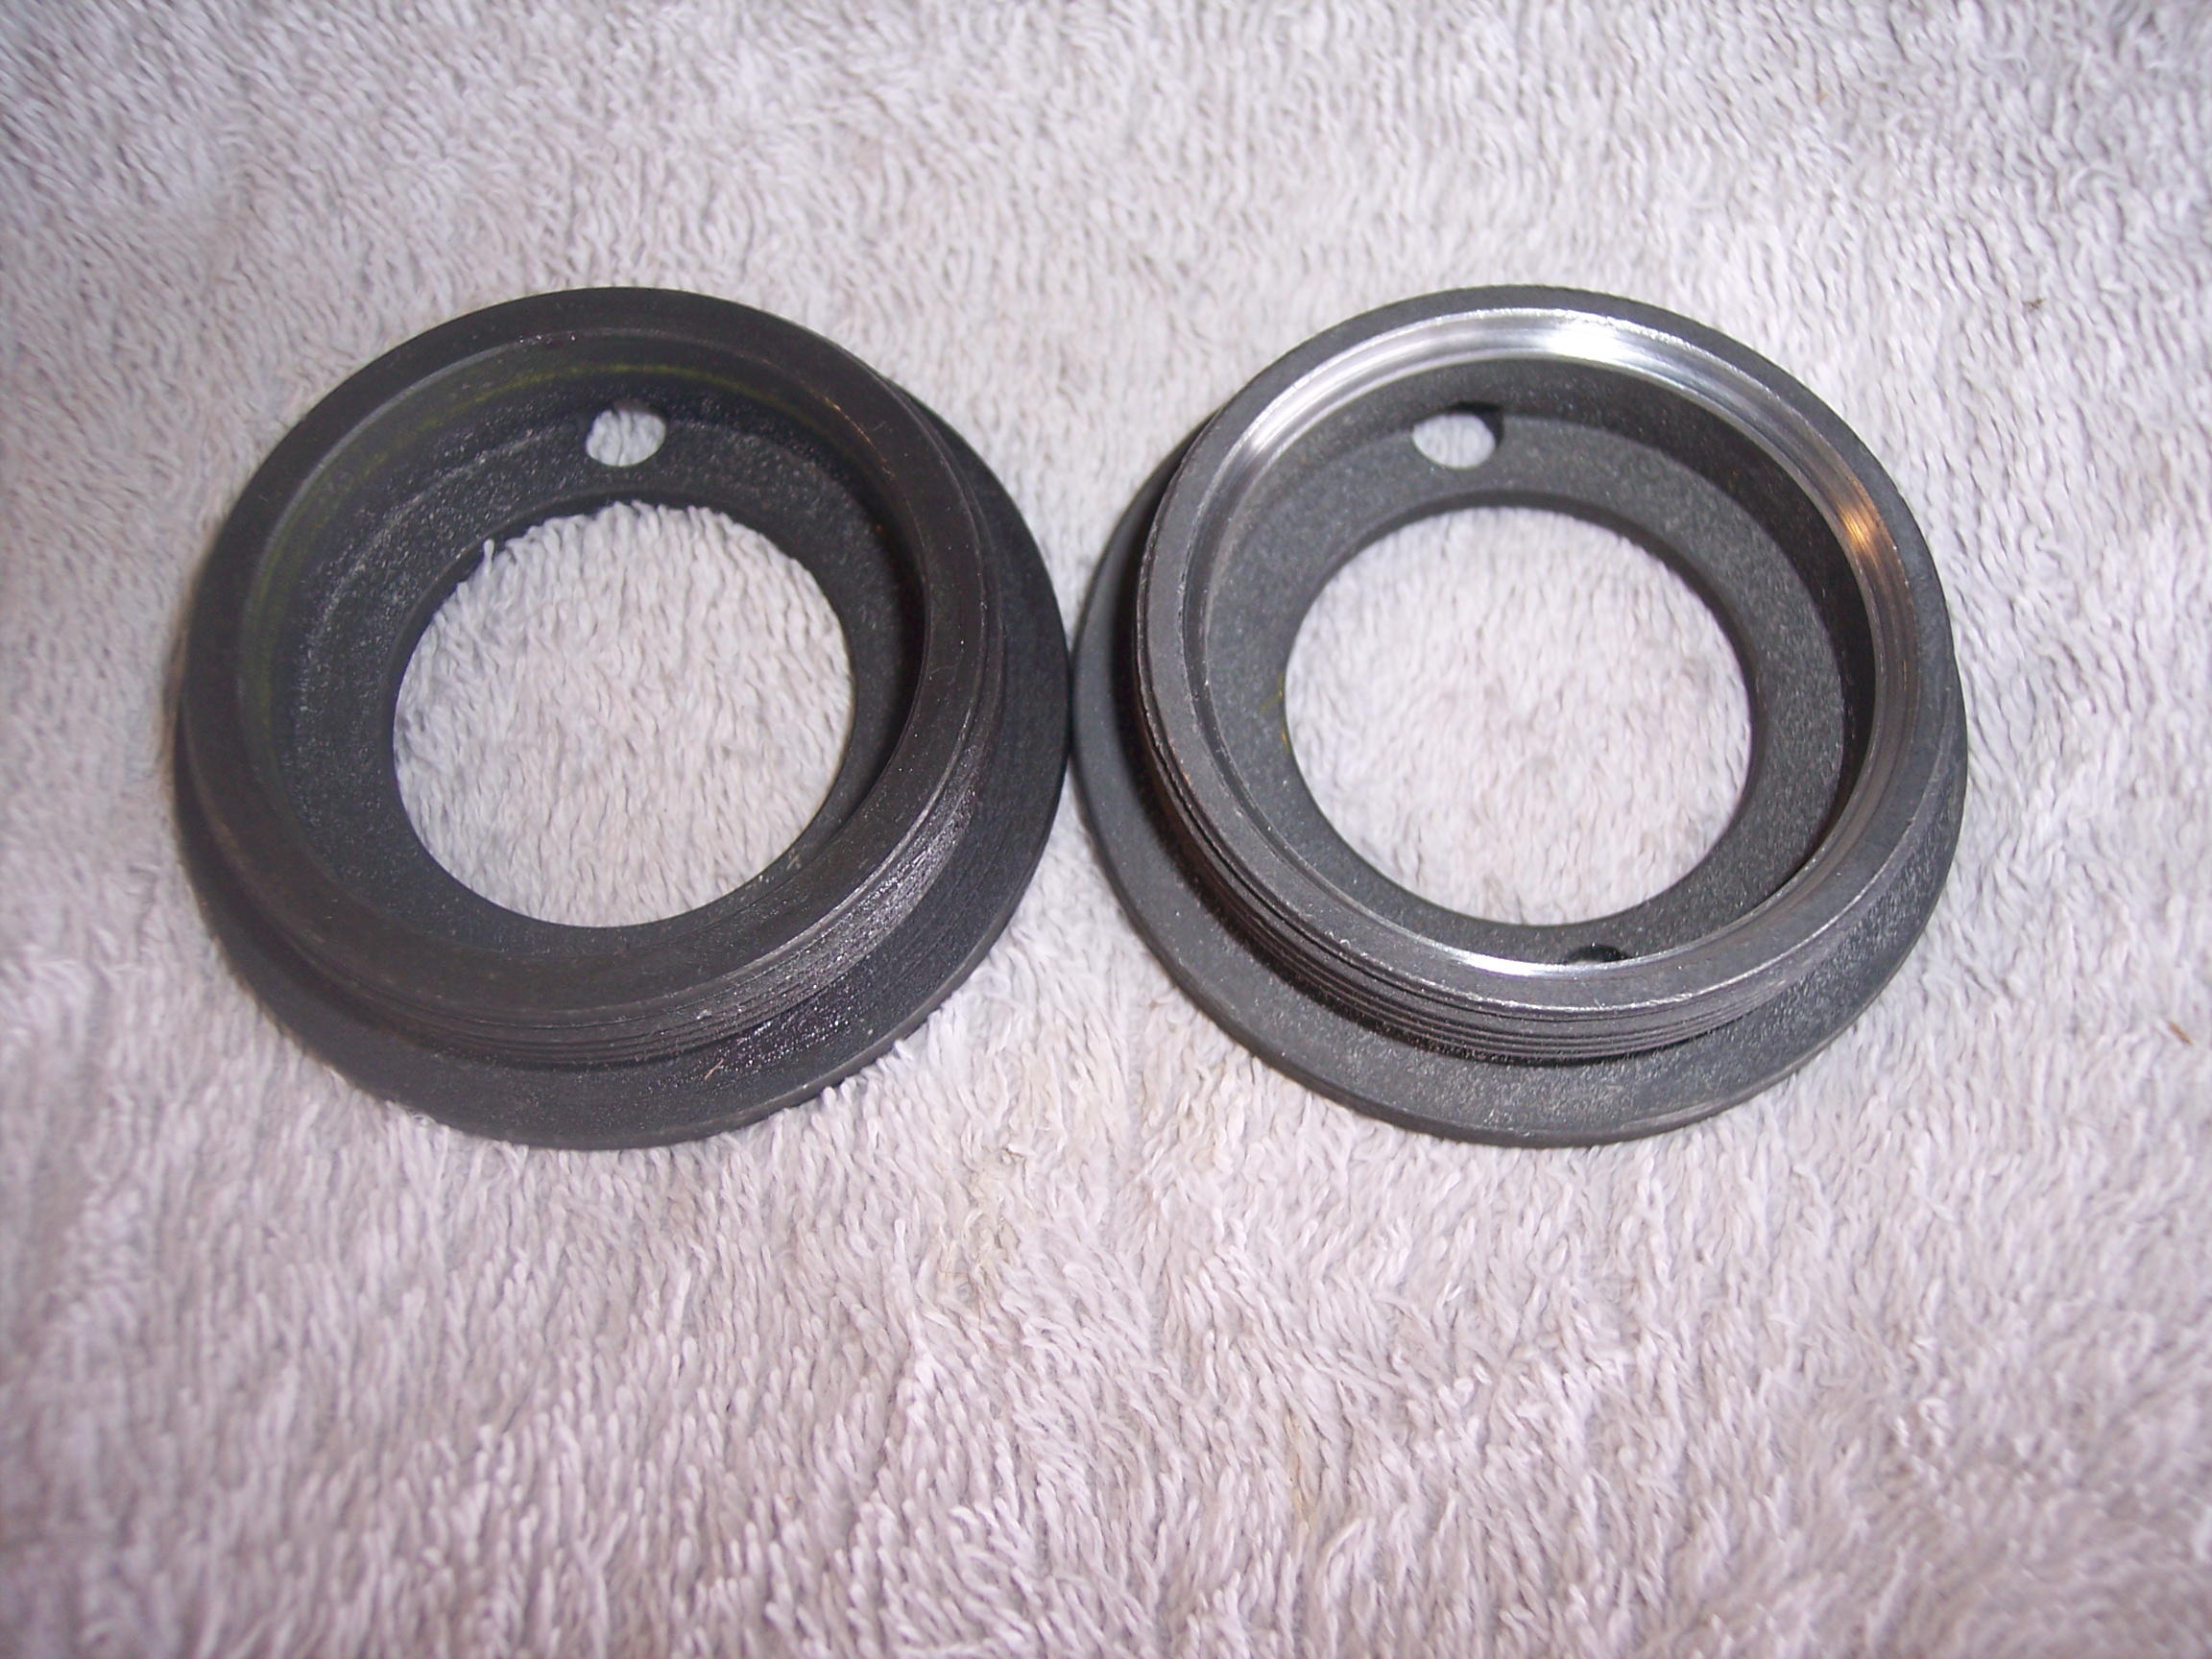
2 pointsA very big thanks for outstanding customer service from MSA and KONI! Like a few others, I could not get the gland nut to adequately thread into place because the shock was not seating properly. My struts are squeaky clean inside with no foreign debris. As recommended above, I contacted MSA about the issue. @Joseph@TheZStore quickly responded and identified a Nissan mfg. anomaly where the bottom cap on the strut has an internal shoulder. Chipped paint on the bottom of the new KONI shock confirmed the interference. MSA had modified gland nuts on hand for this problem and sent a pair to me at no cost. Note the machined internal relief shoulder on the gland nut on the right vs. stock on the left. The relief allowed the gland nut threads to fully engage and get the gap well under 4mm. One front strut down this morning, one to go for tomorrow and then on to the rears. Jim
 2 points
 -
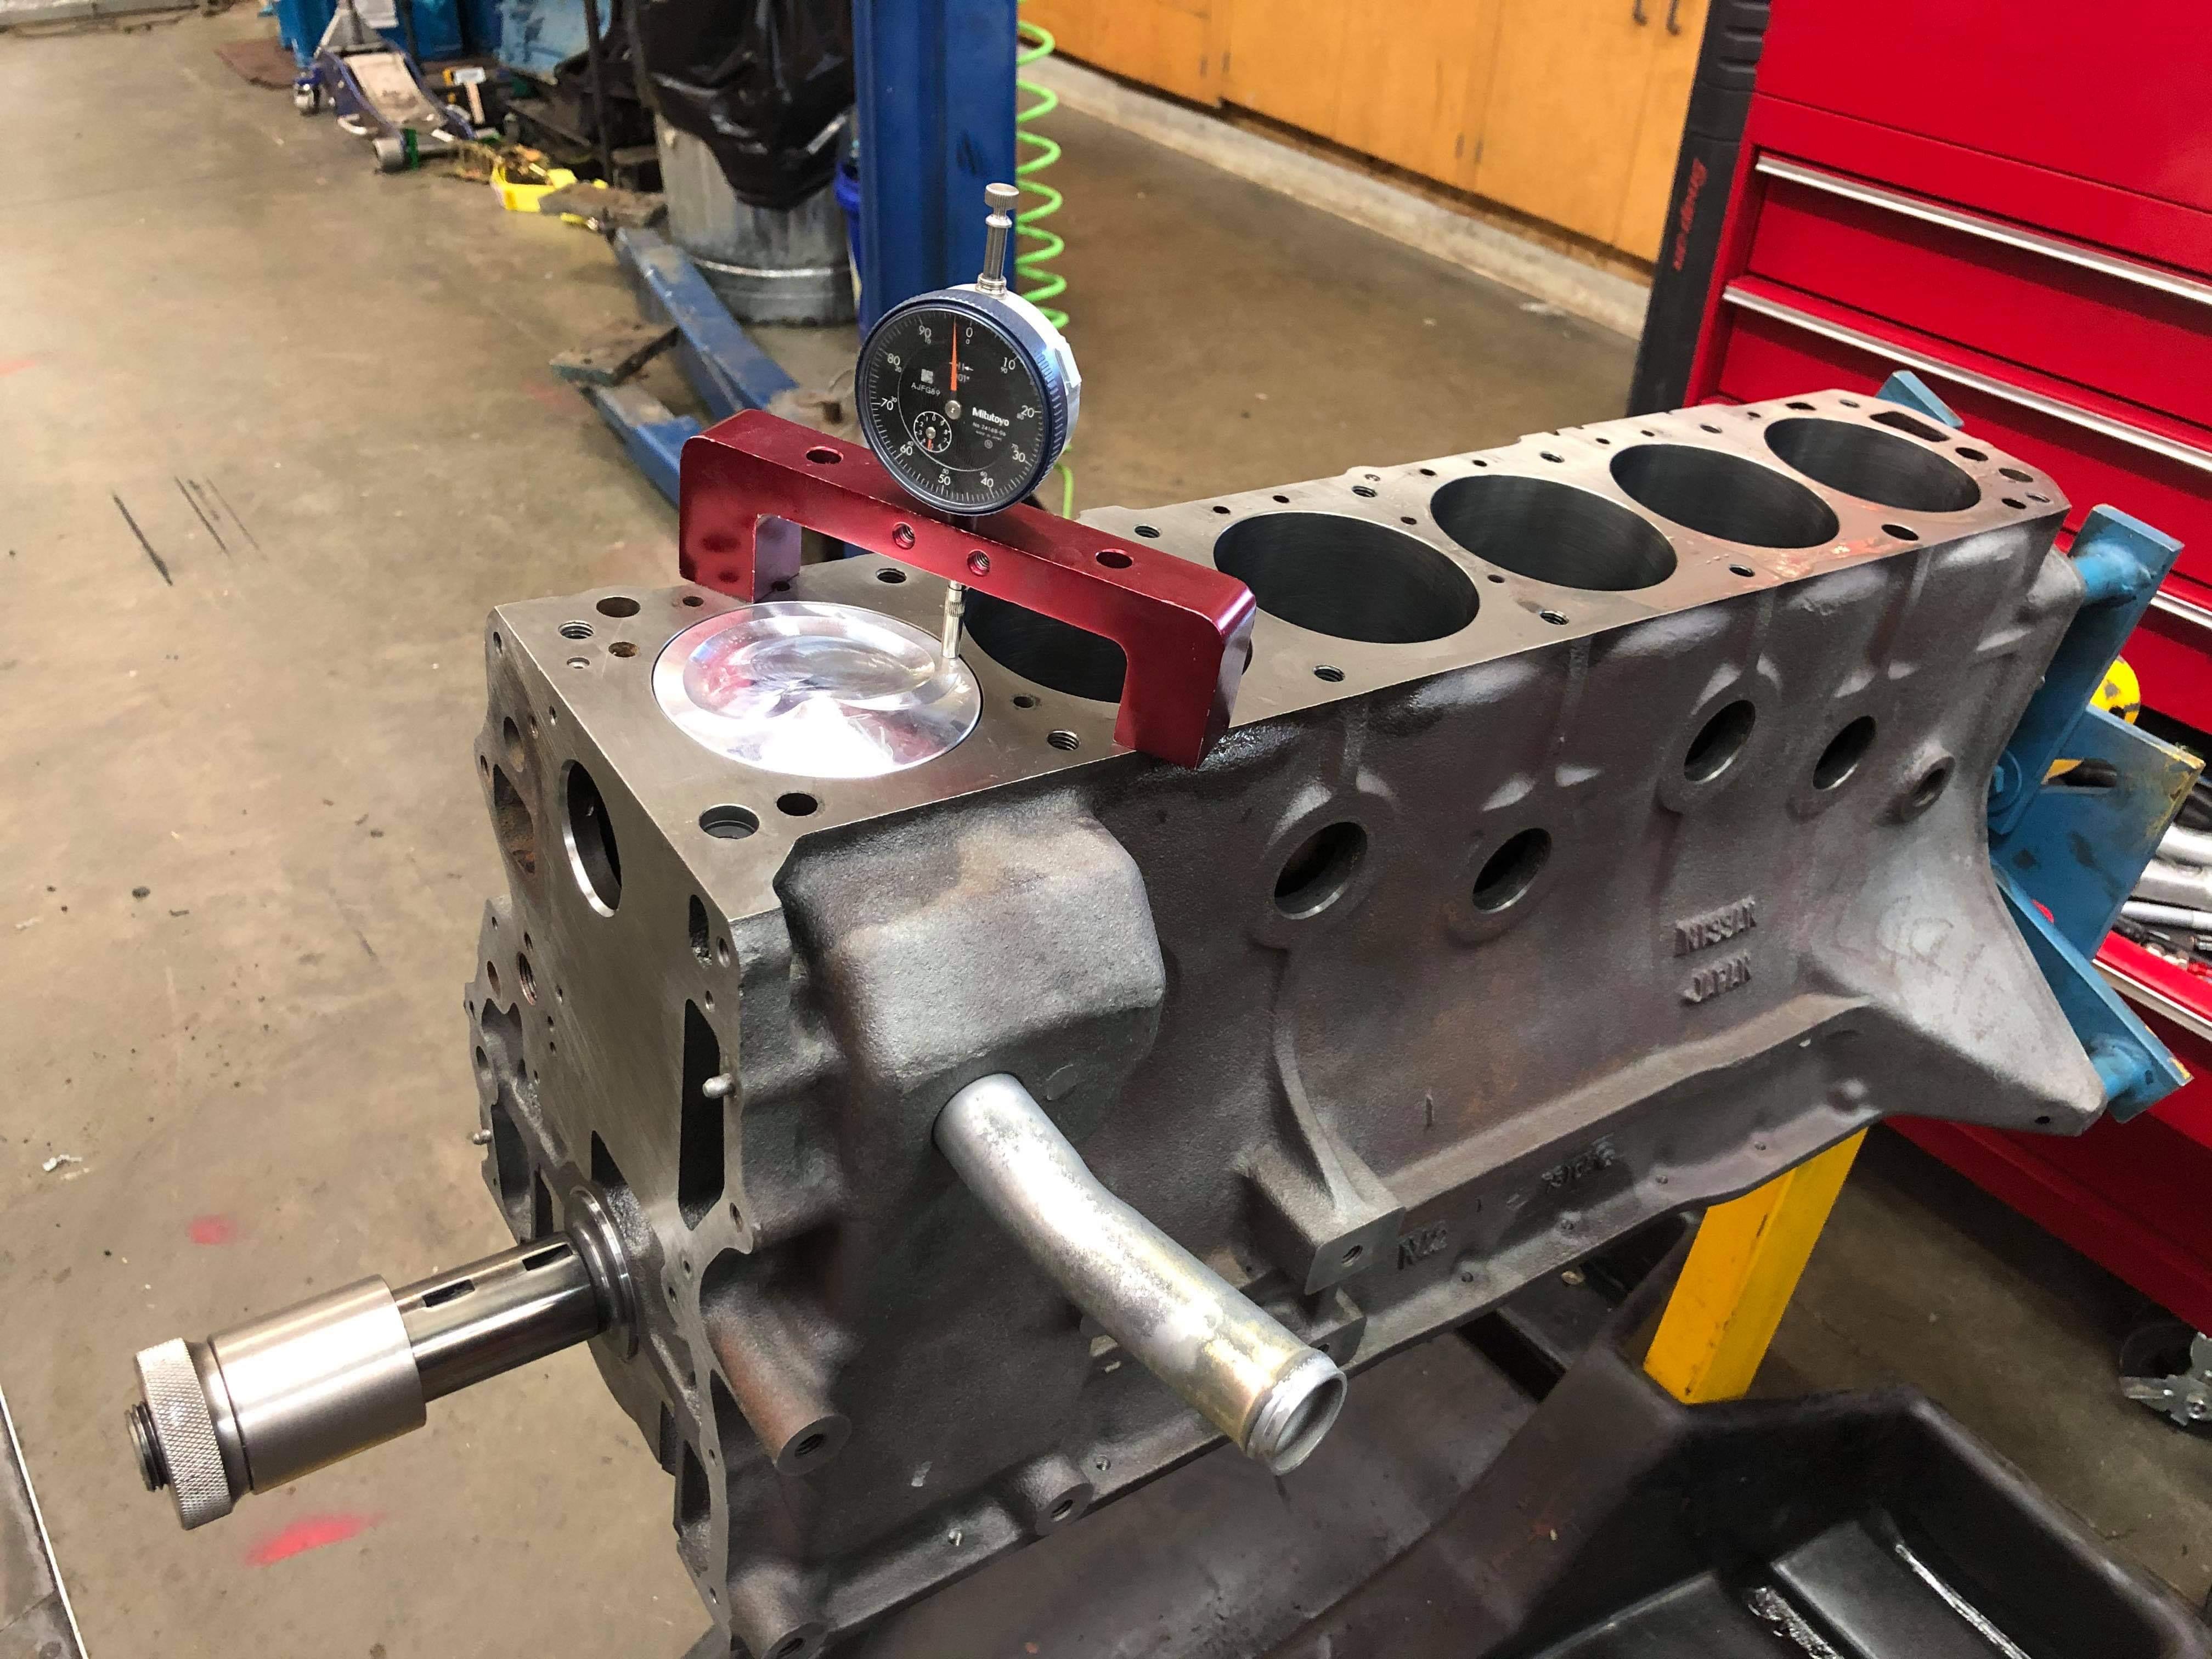
2 pointsMy 3.1ish stroker build ran into a small issue. The block will need to be clearanced a little more. The extra long stroked LD crank (84.6) is to blame. The engine can be rotated, and it just barely touches about one time out of three. That’s just the .002” of bearing clearance rocking one way or another. Deck height is within .002” of each other. Andrew Kazanis is a L series wizard. Hopefully when he retires he will build Datsun motors and especially do more head work.

 2 points
 -
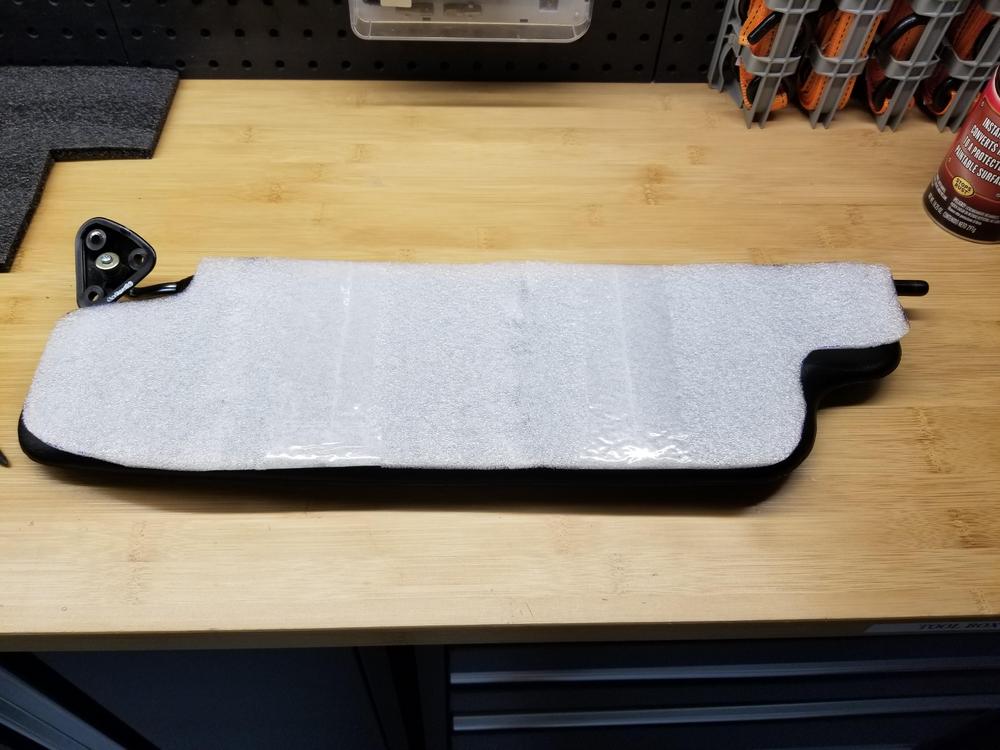
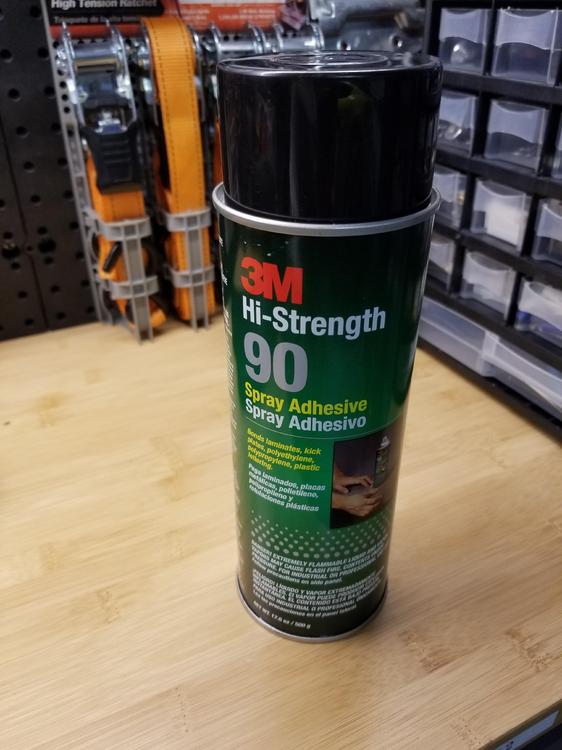
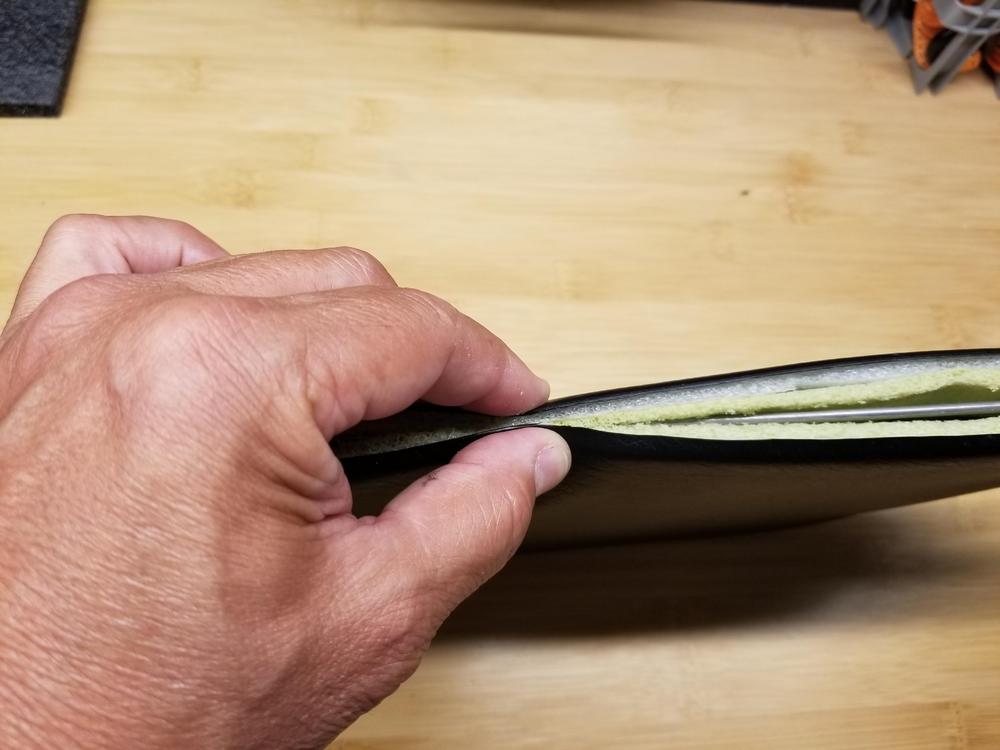
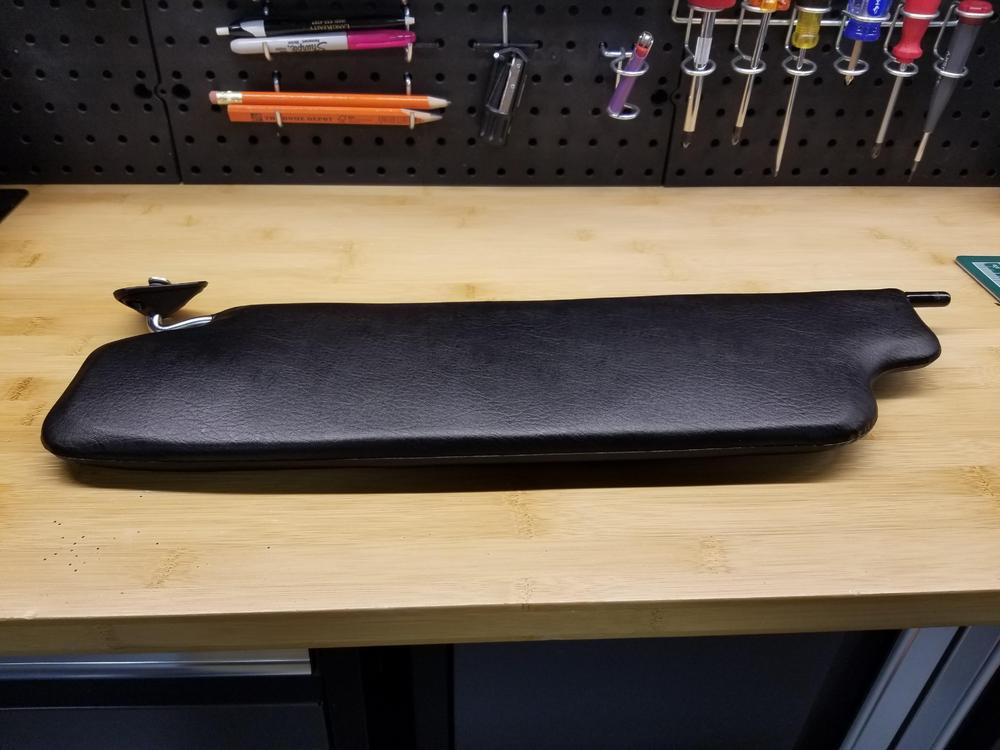
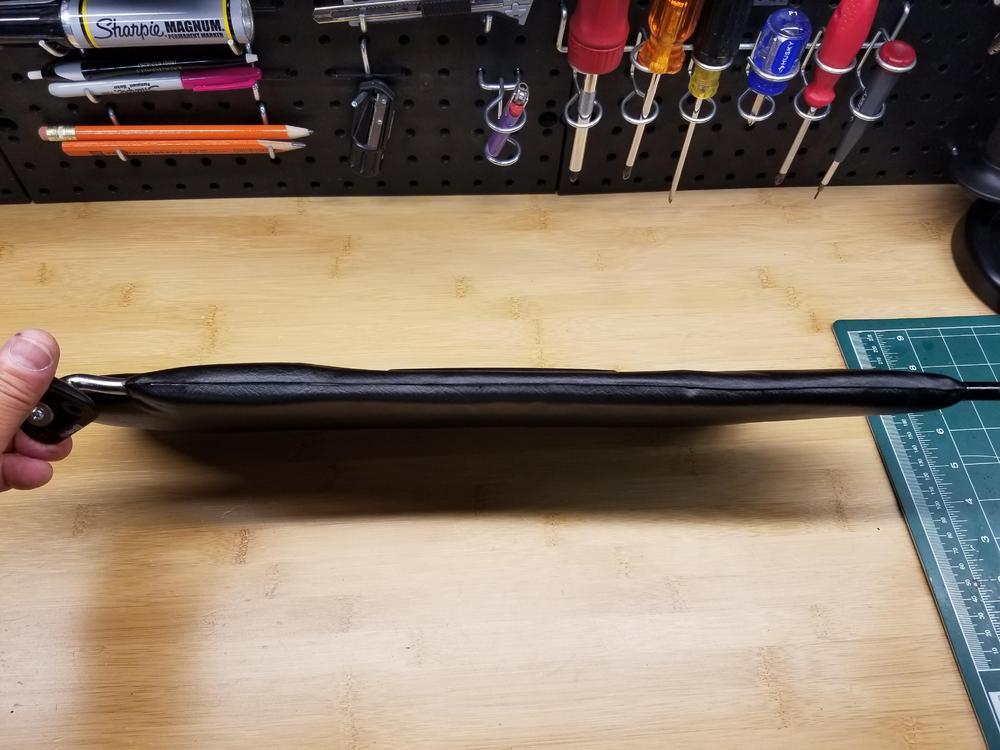
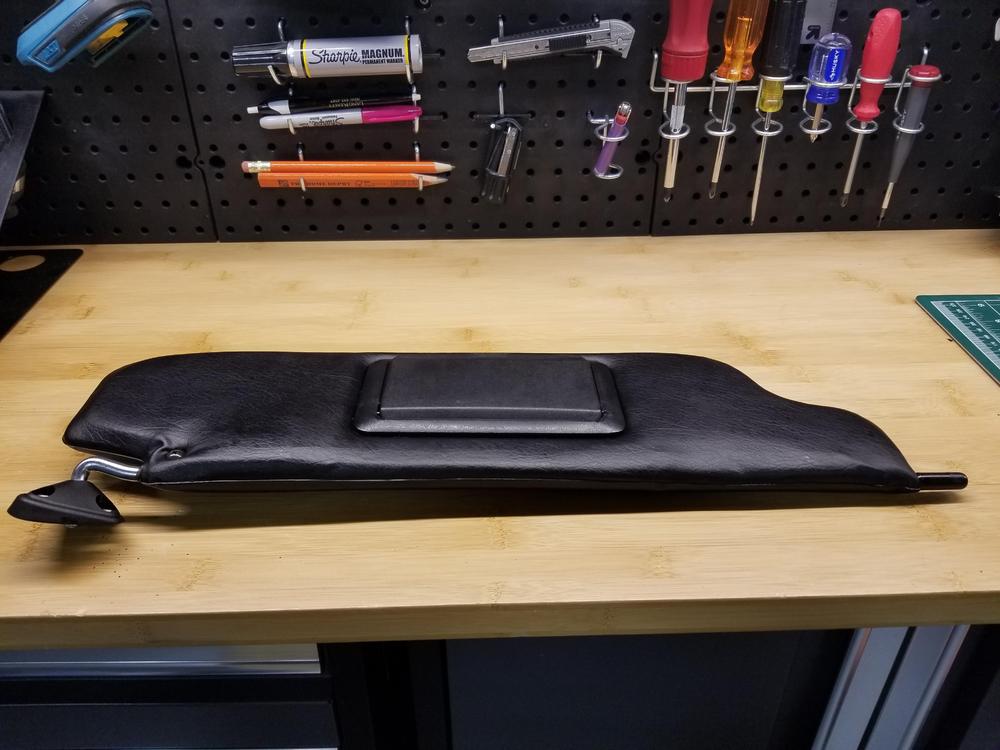
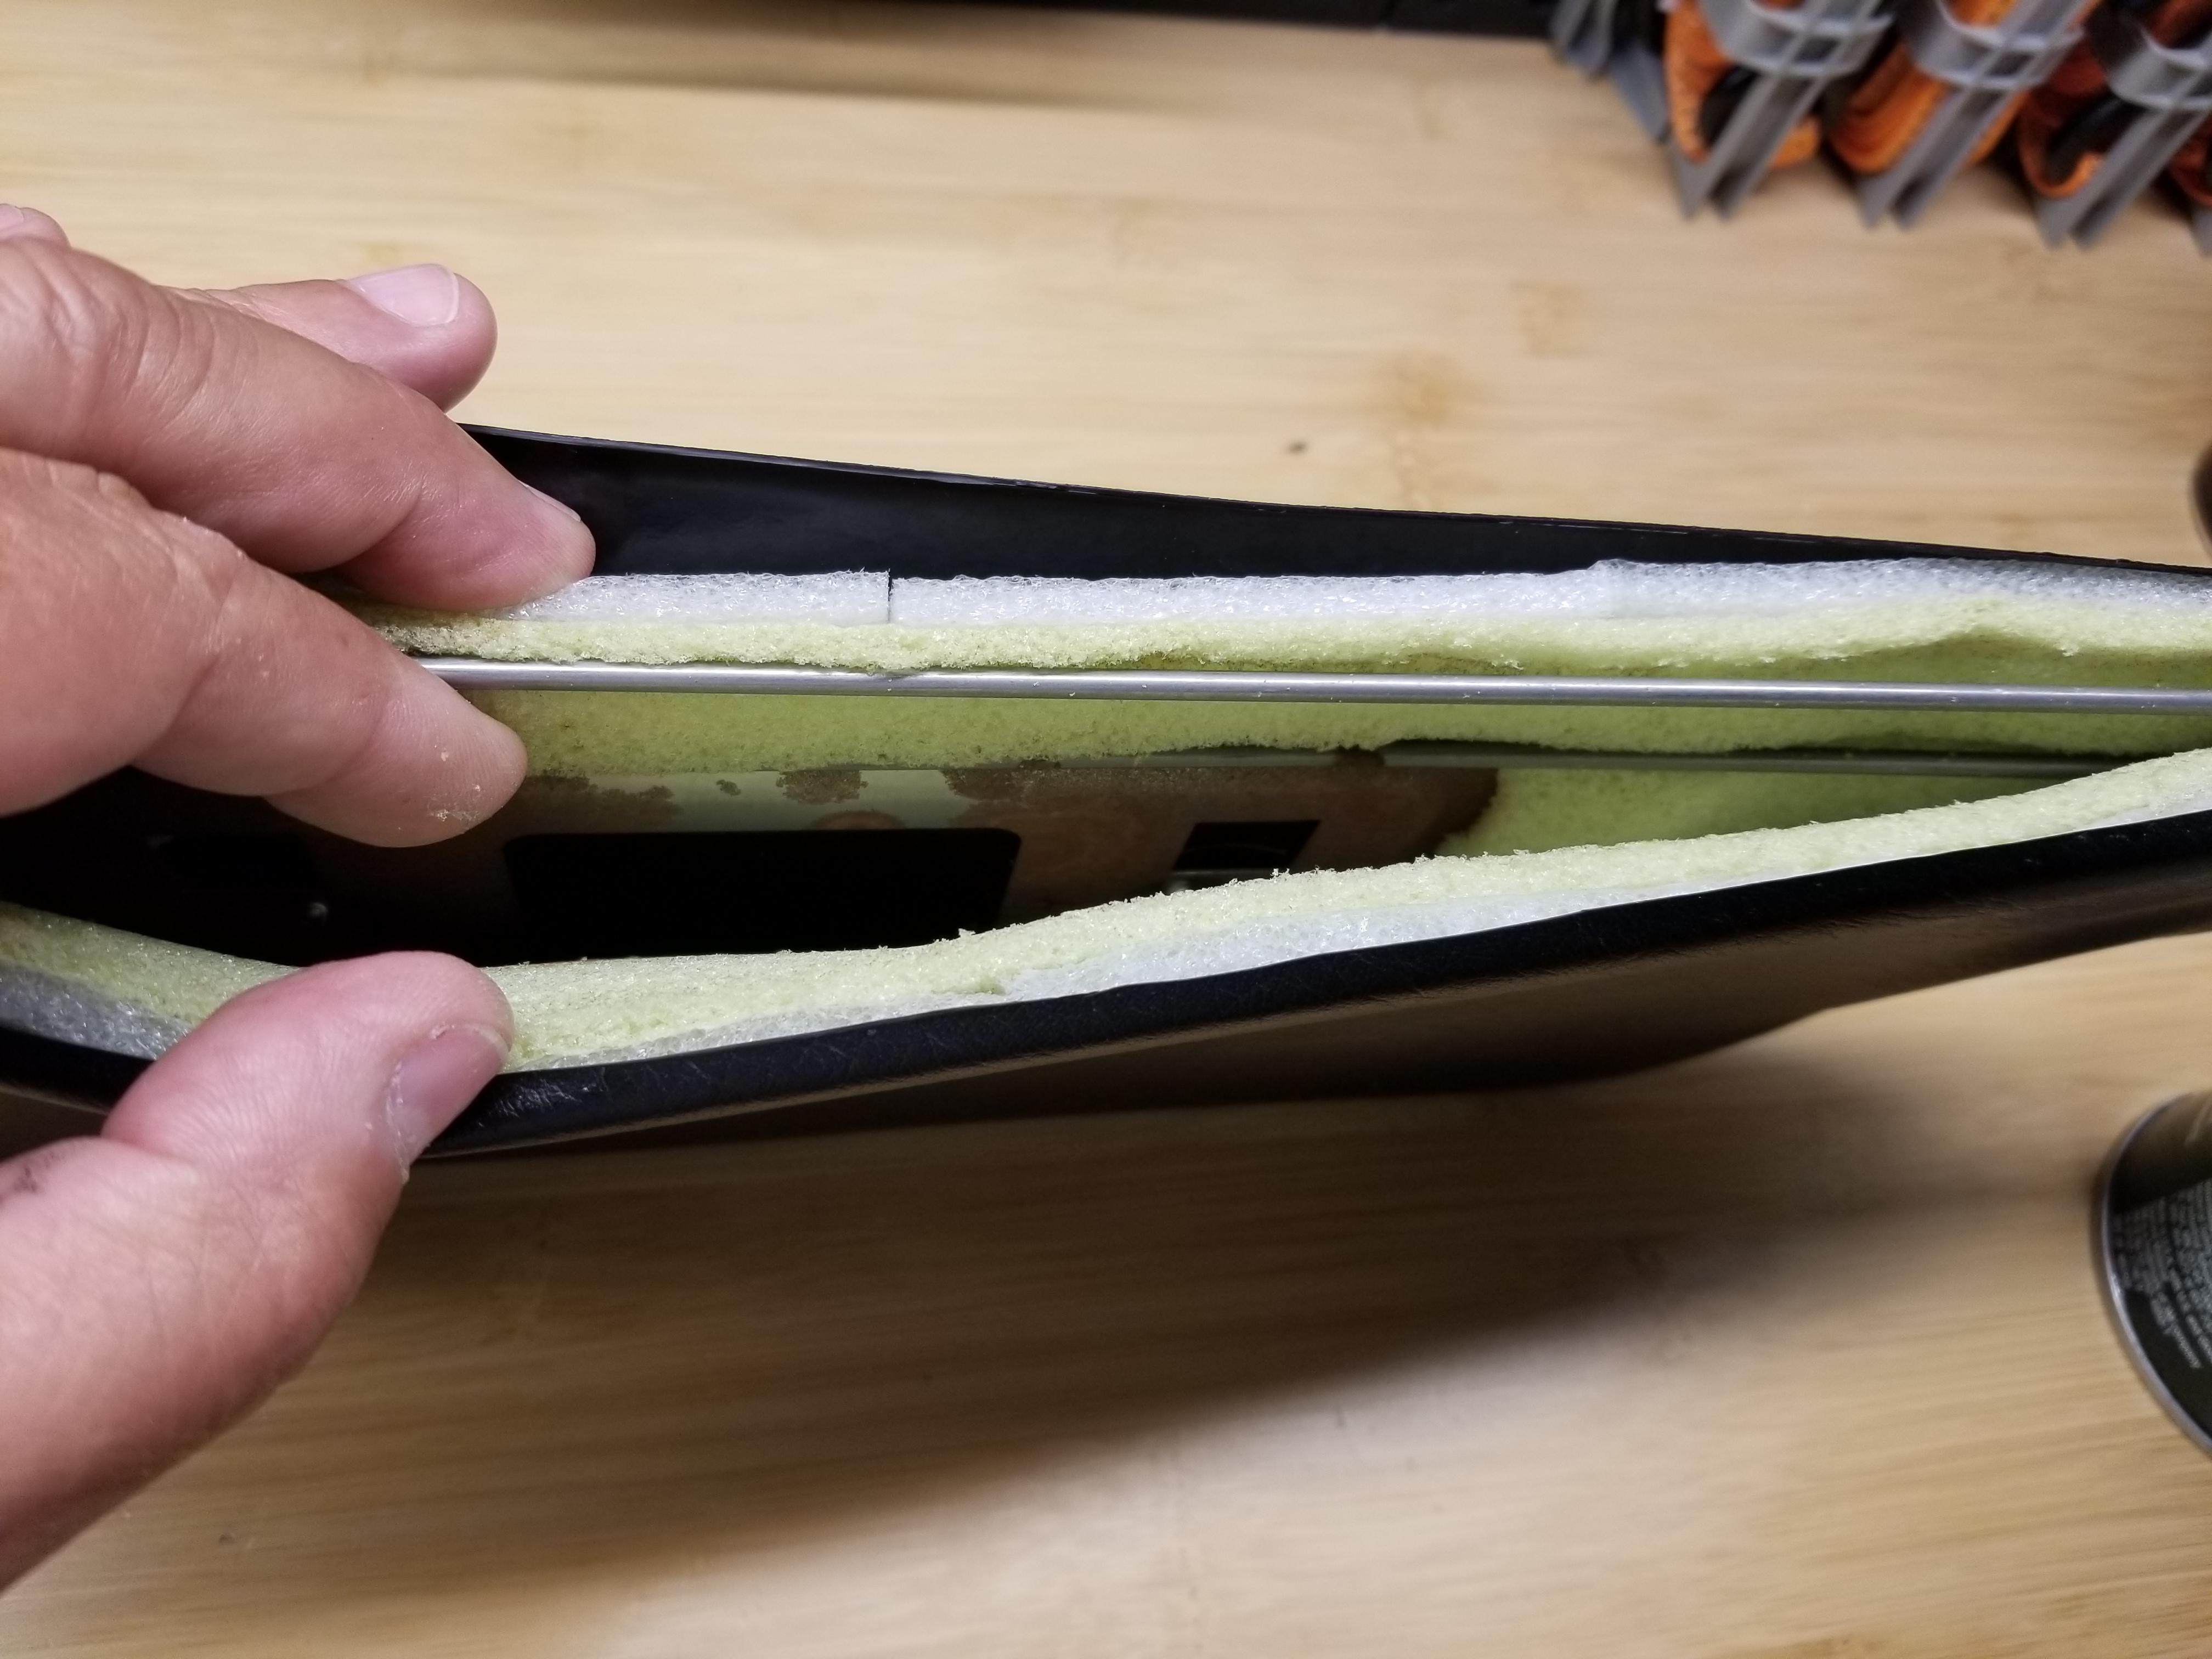
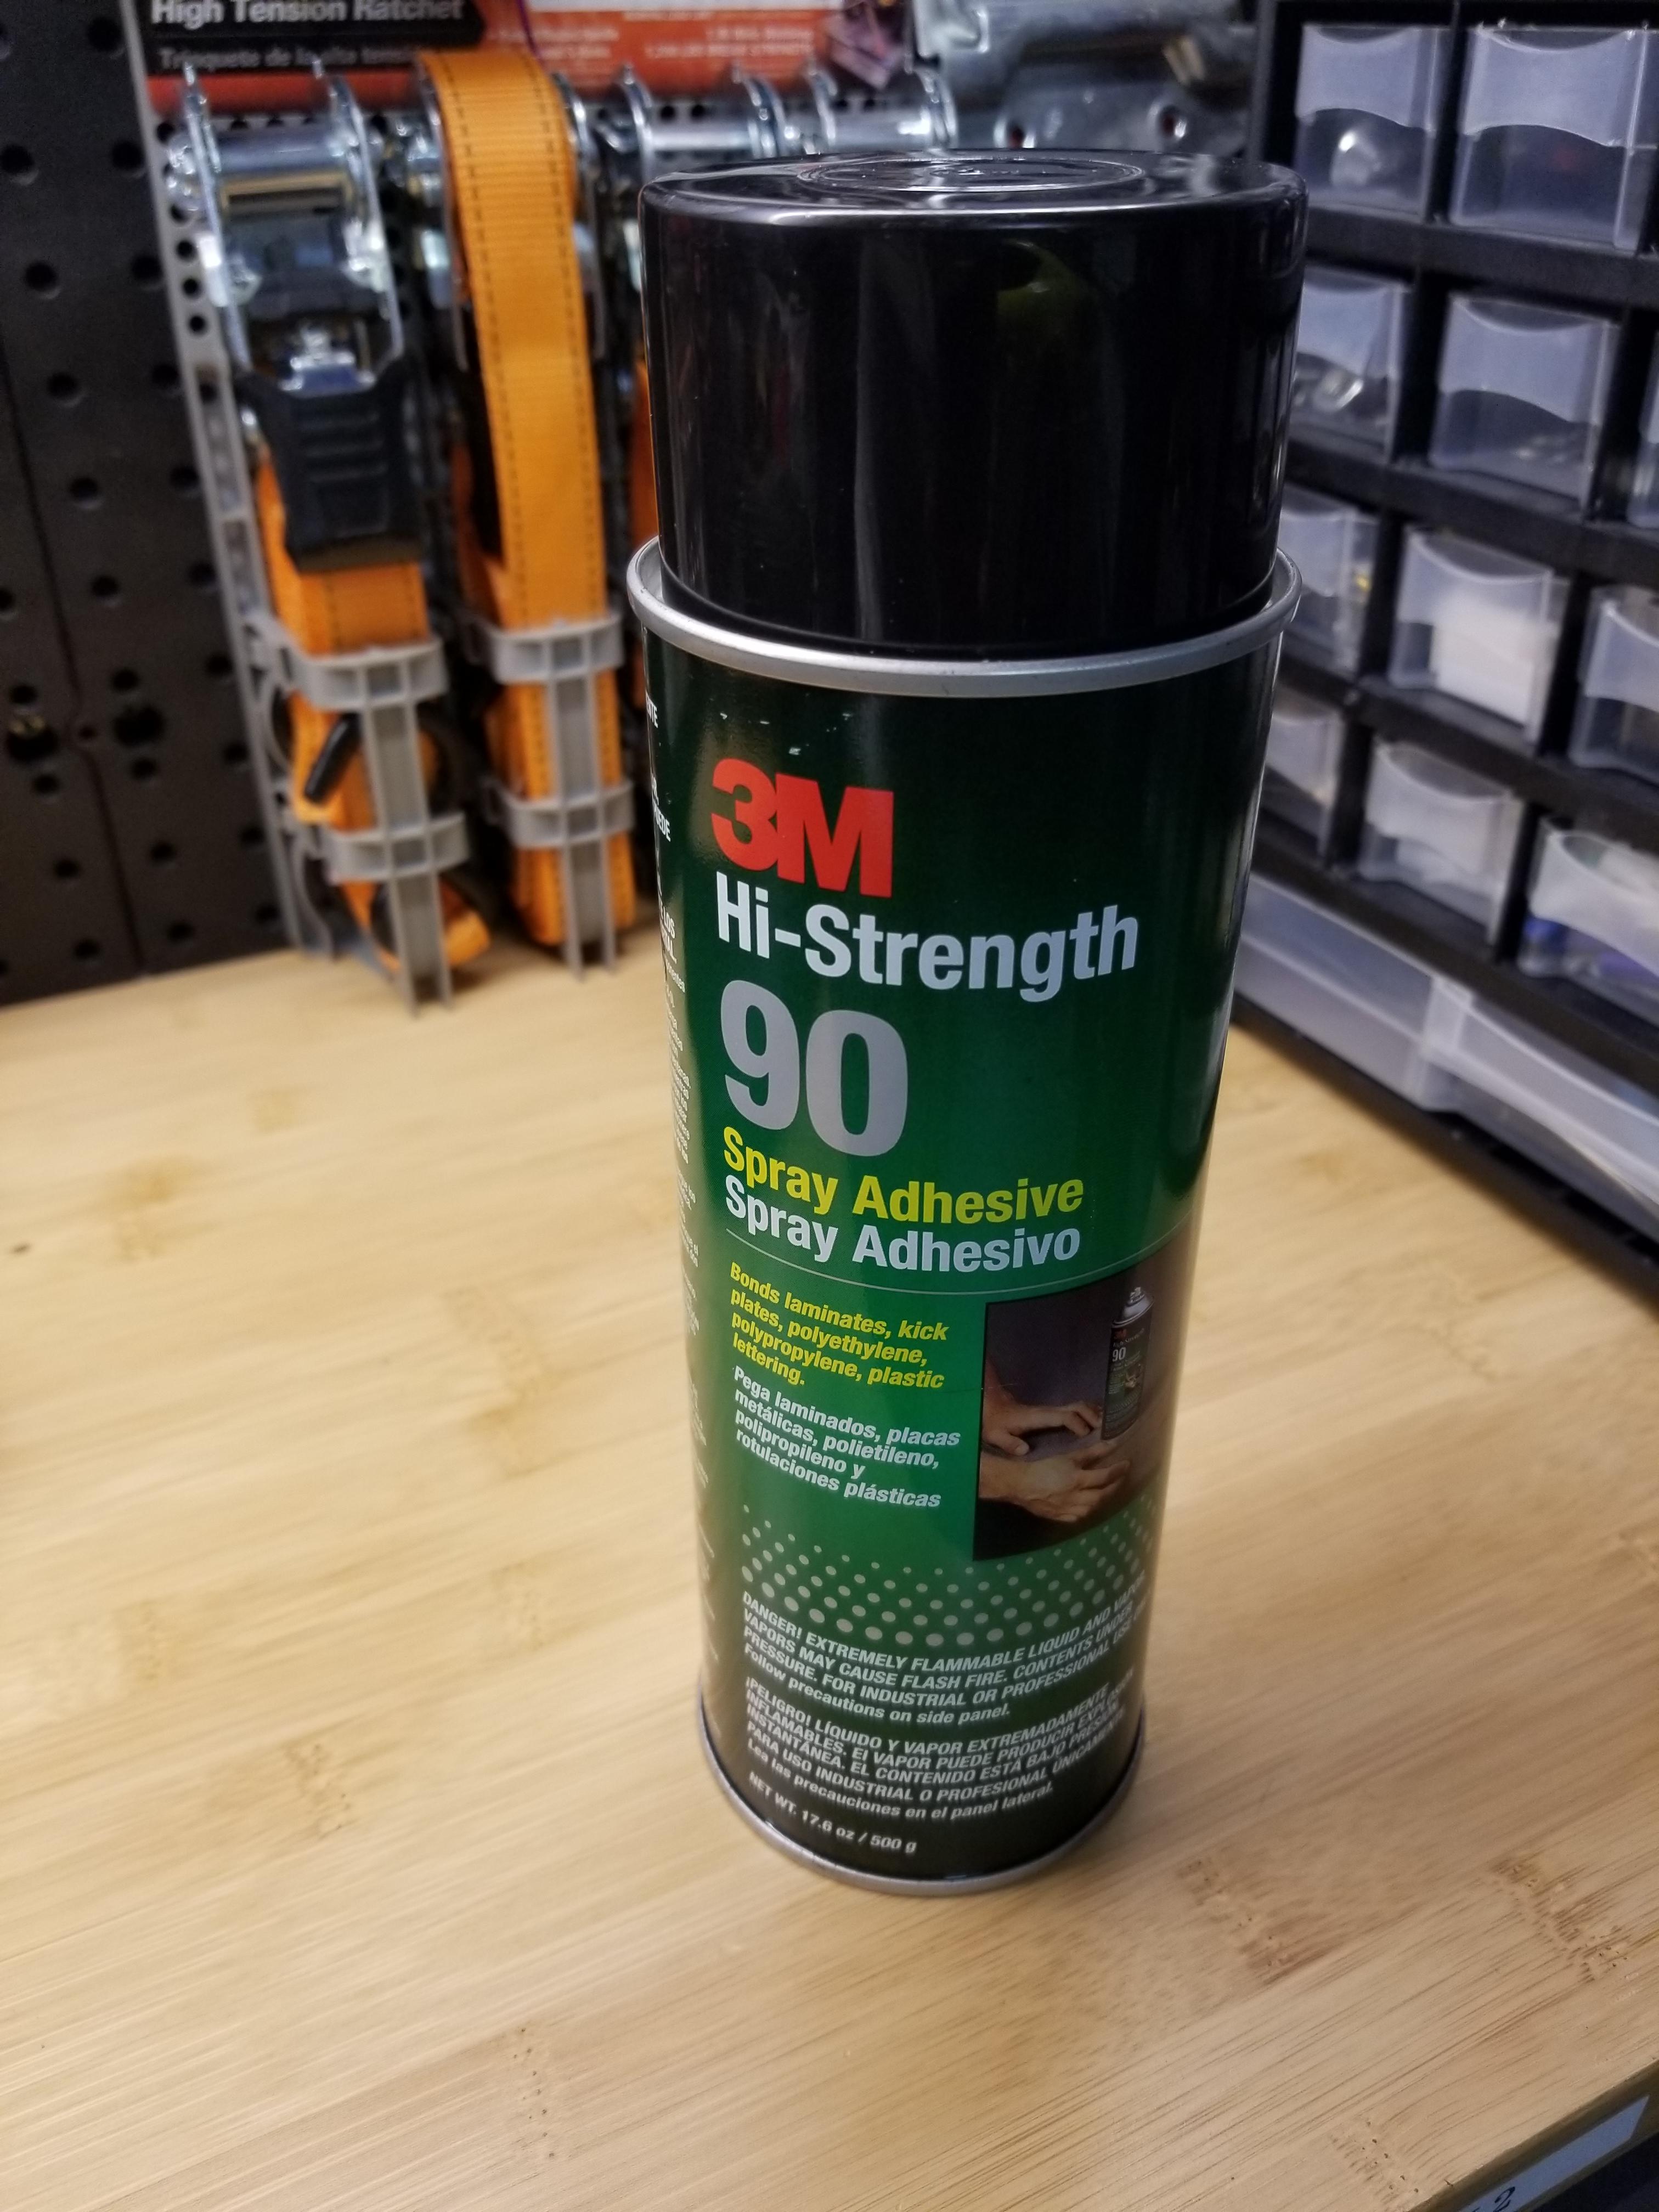
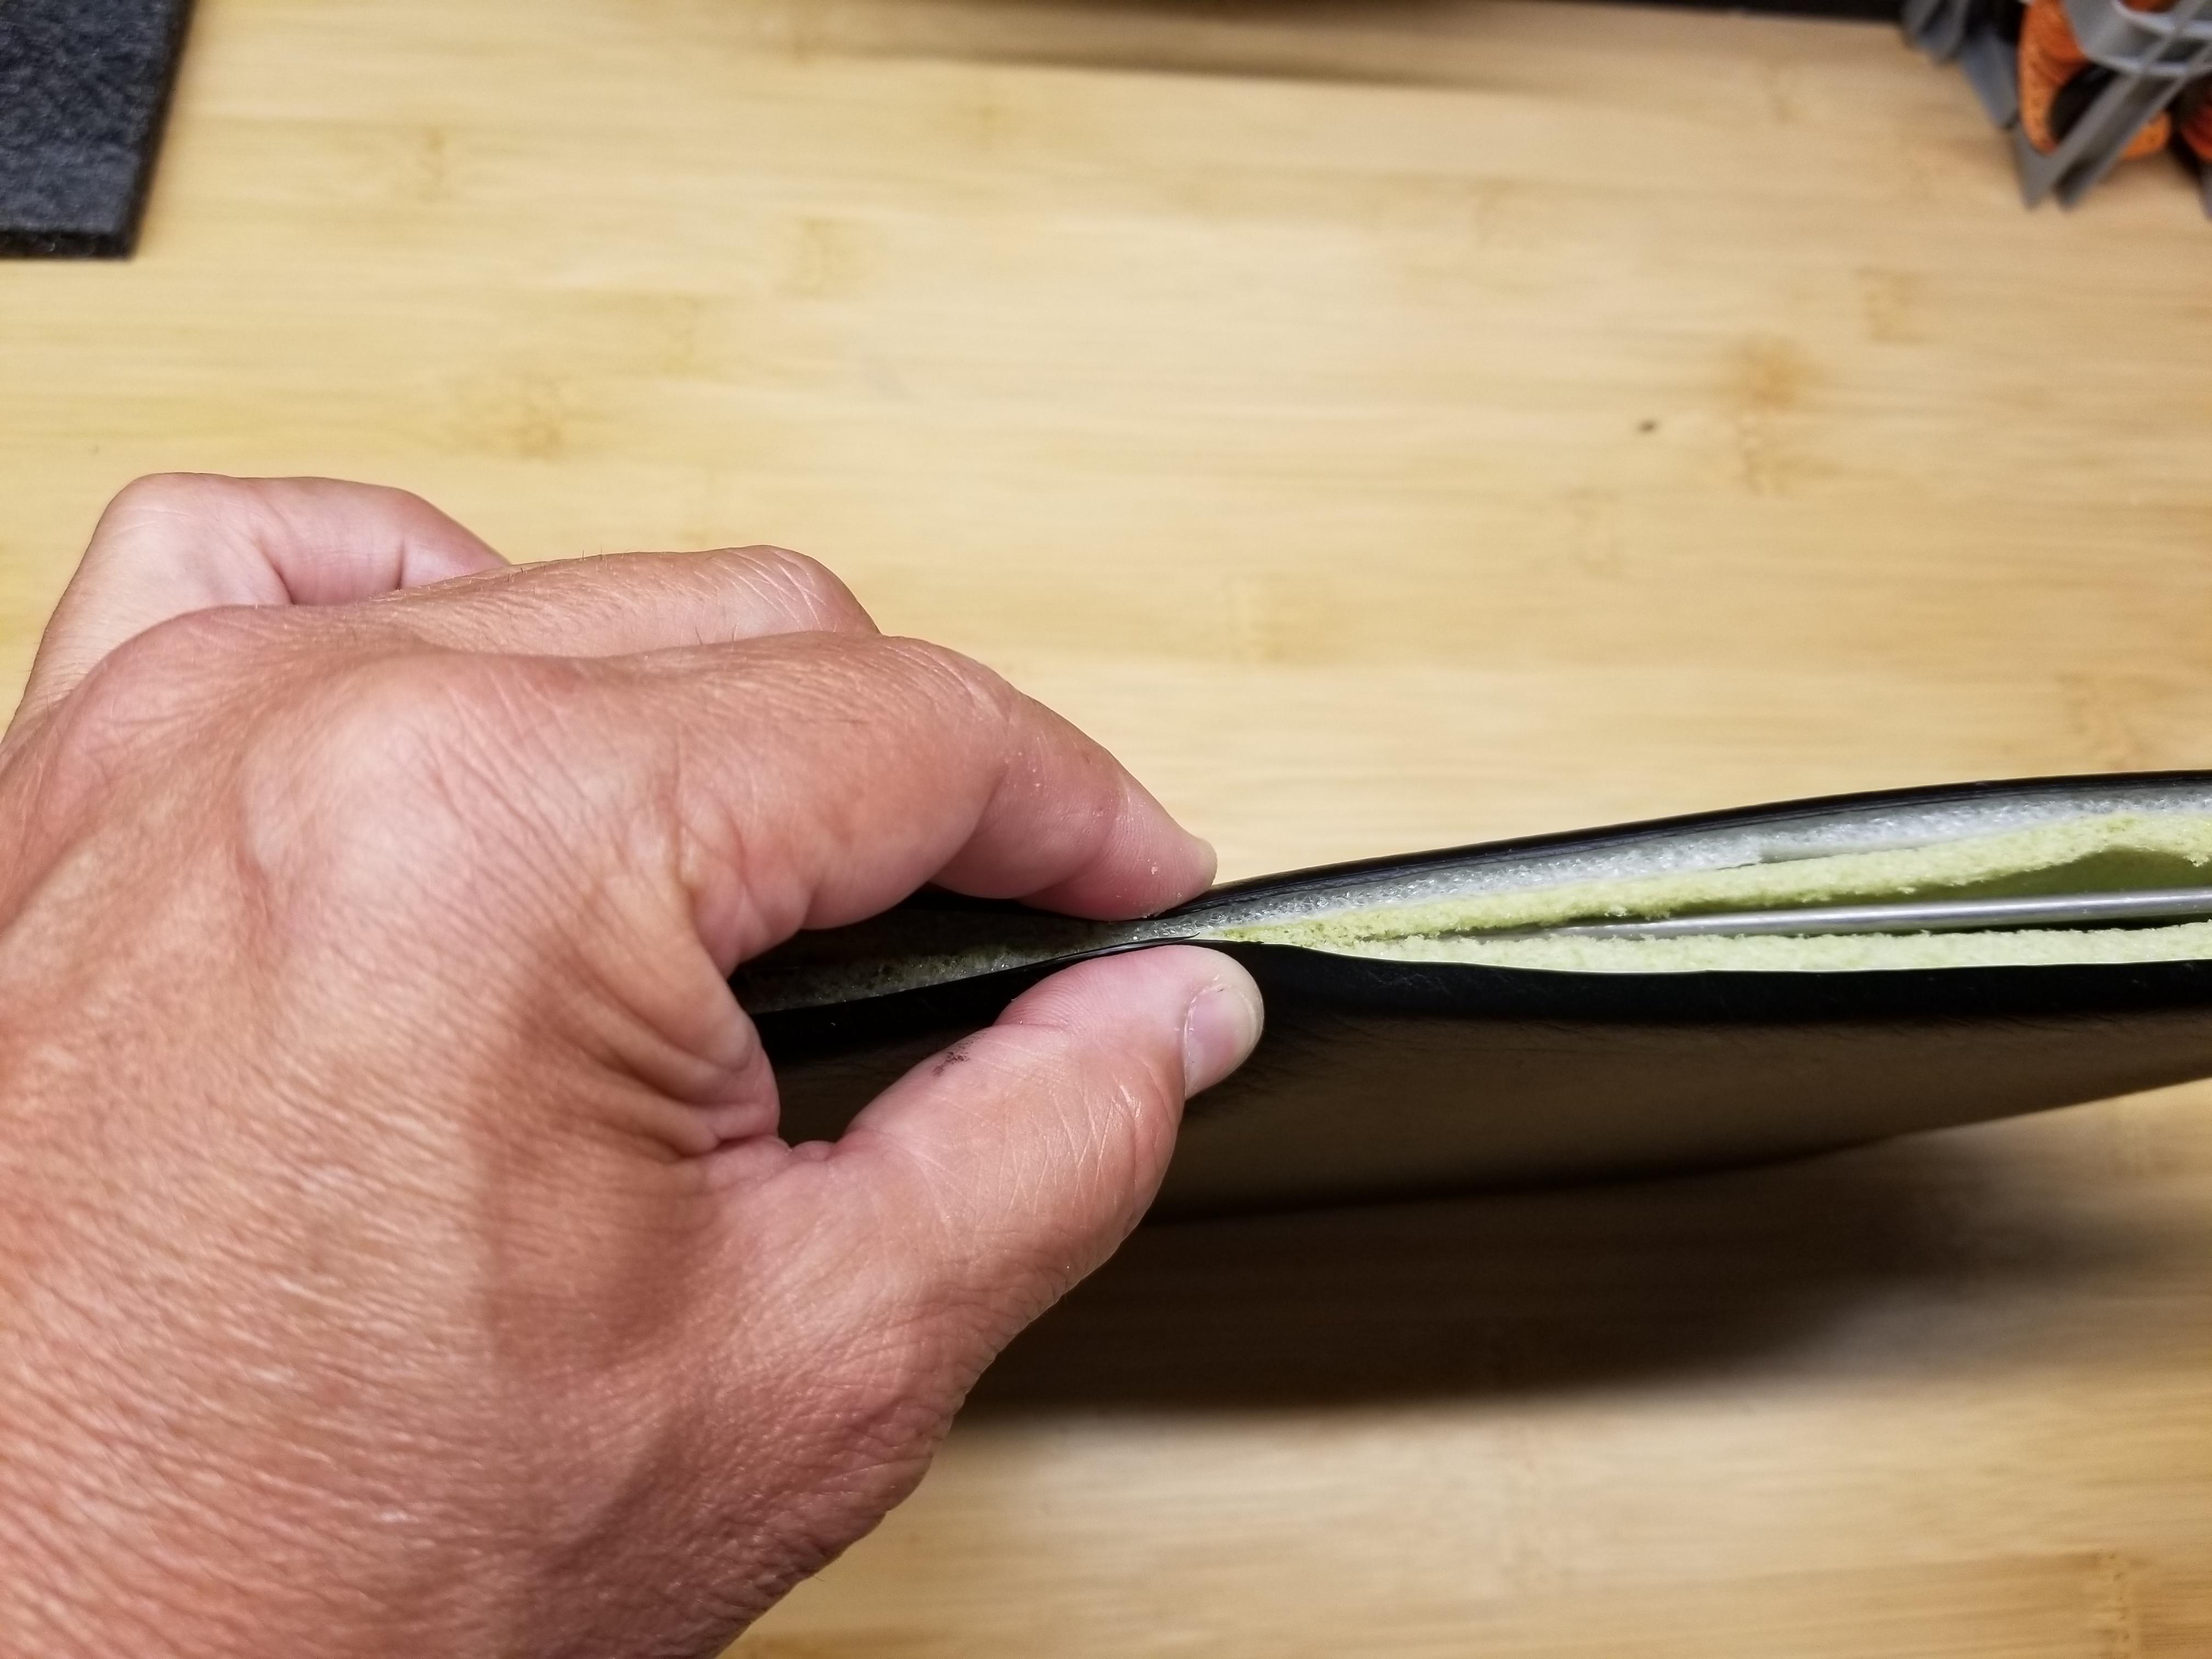
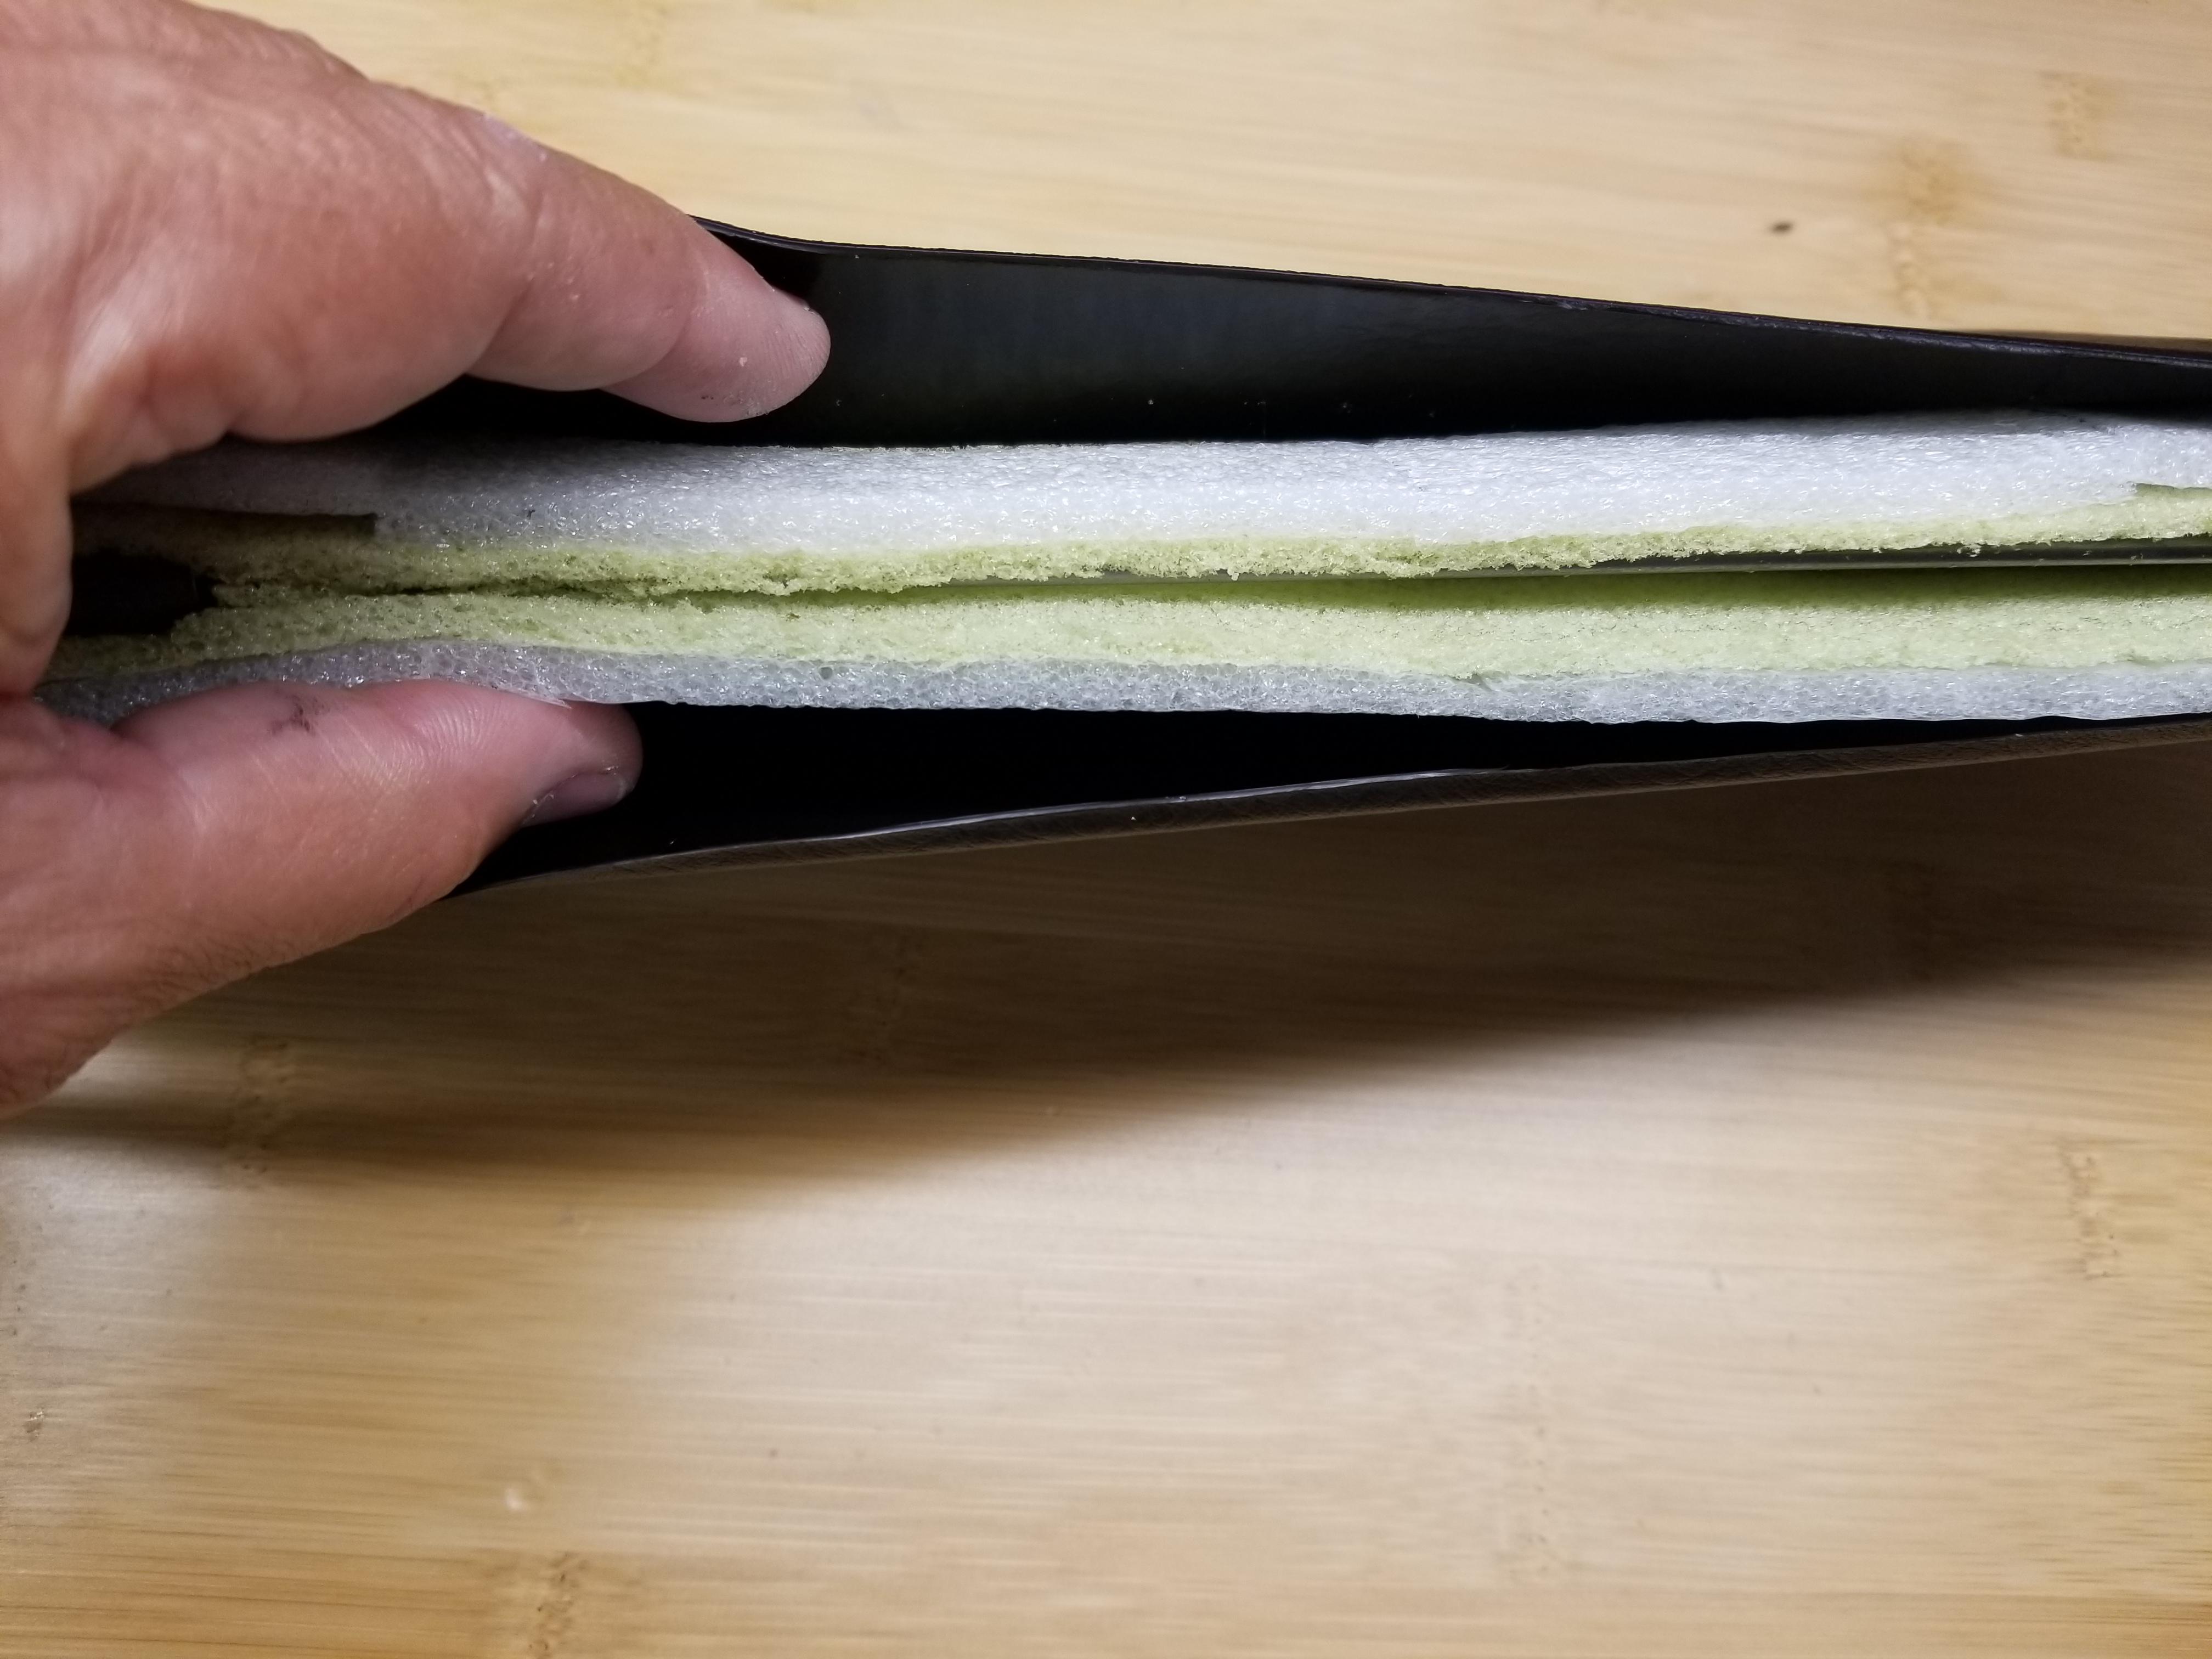
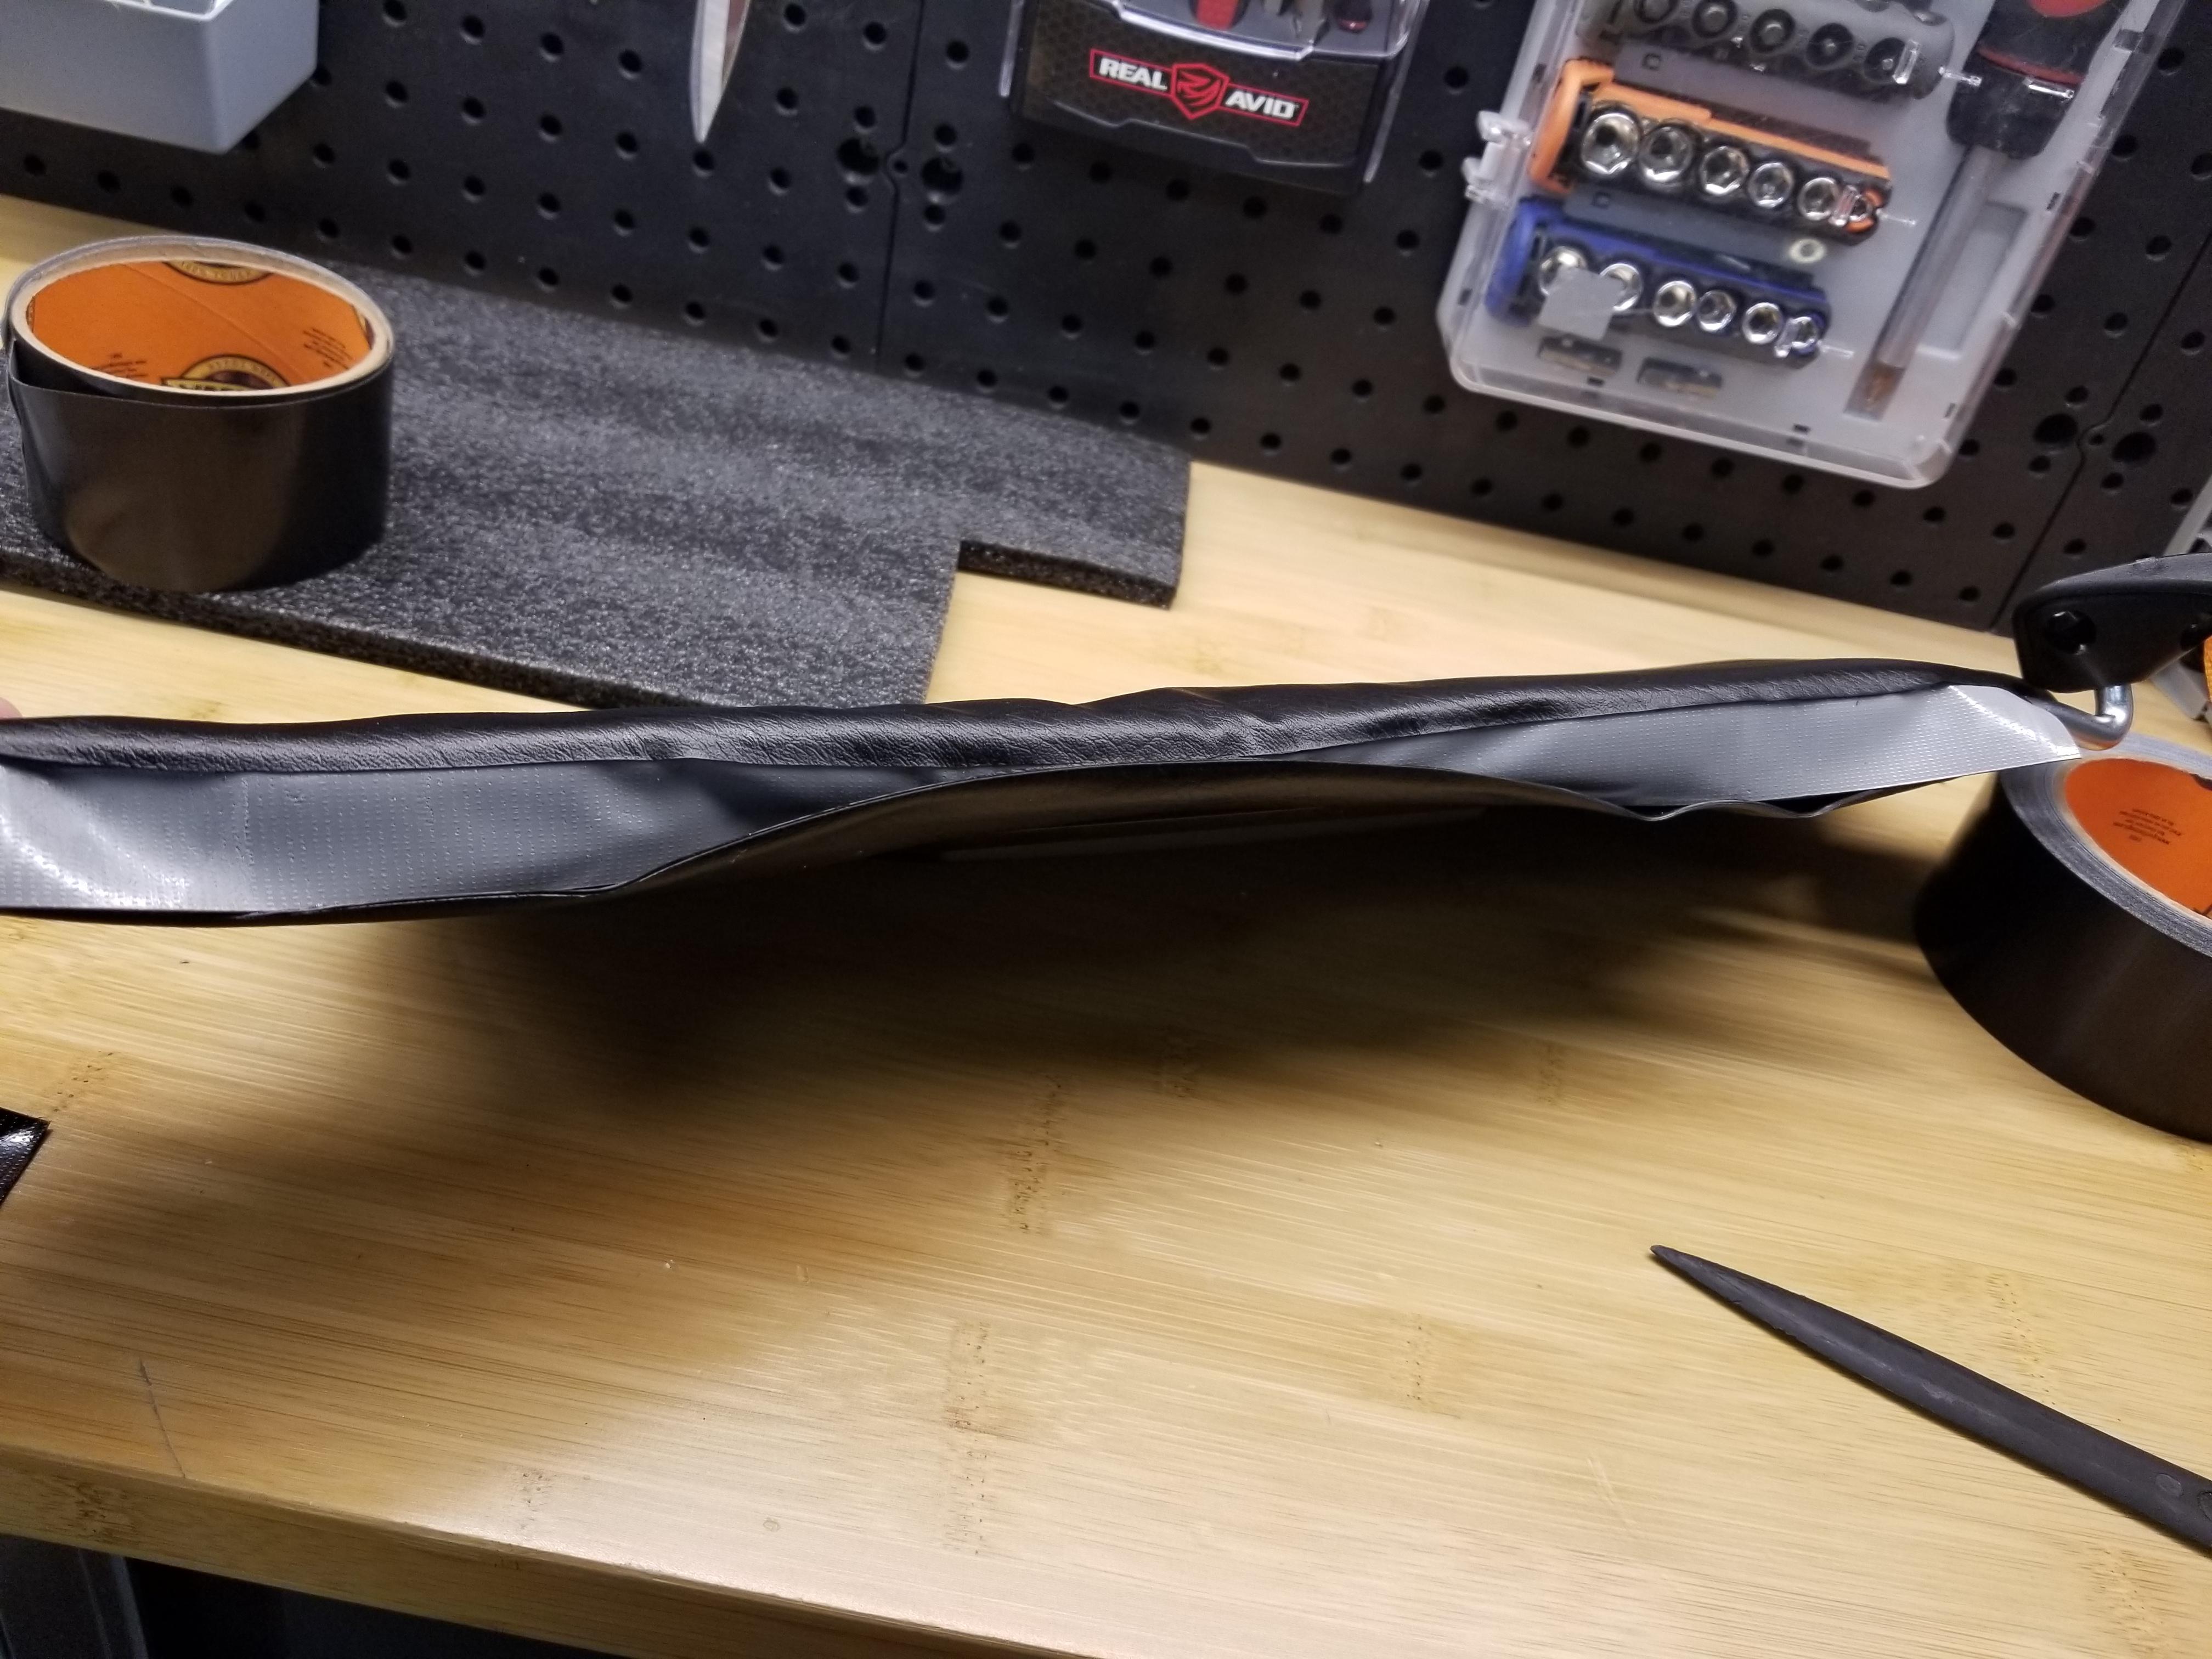
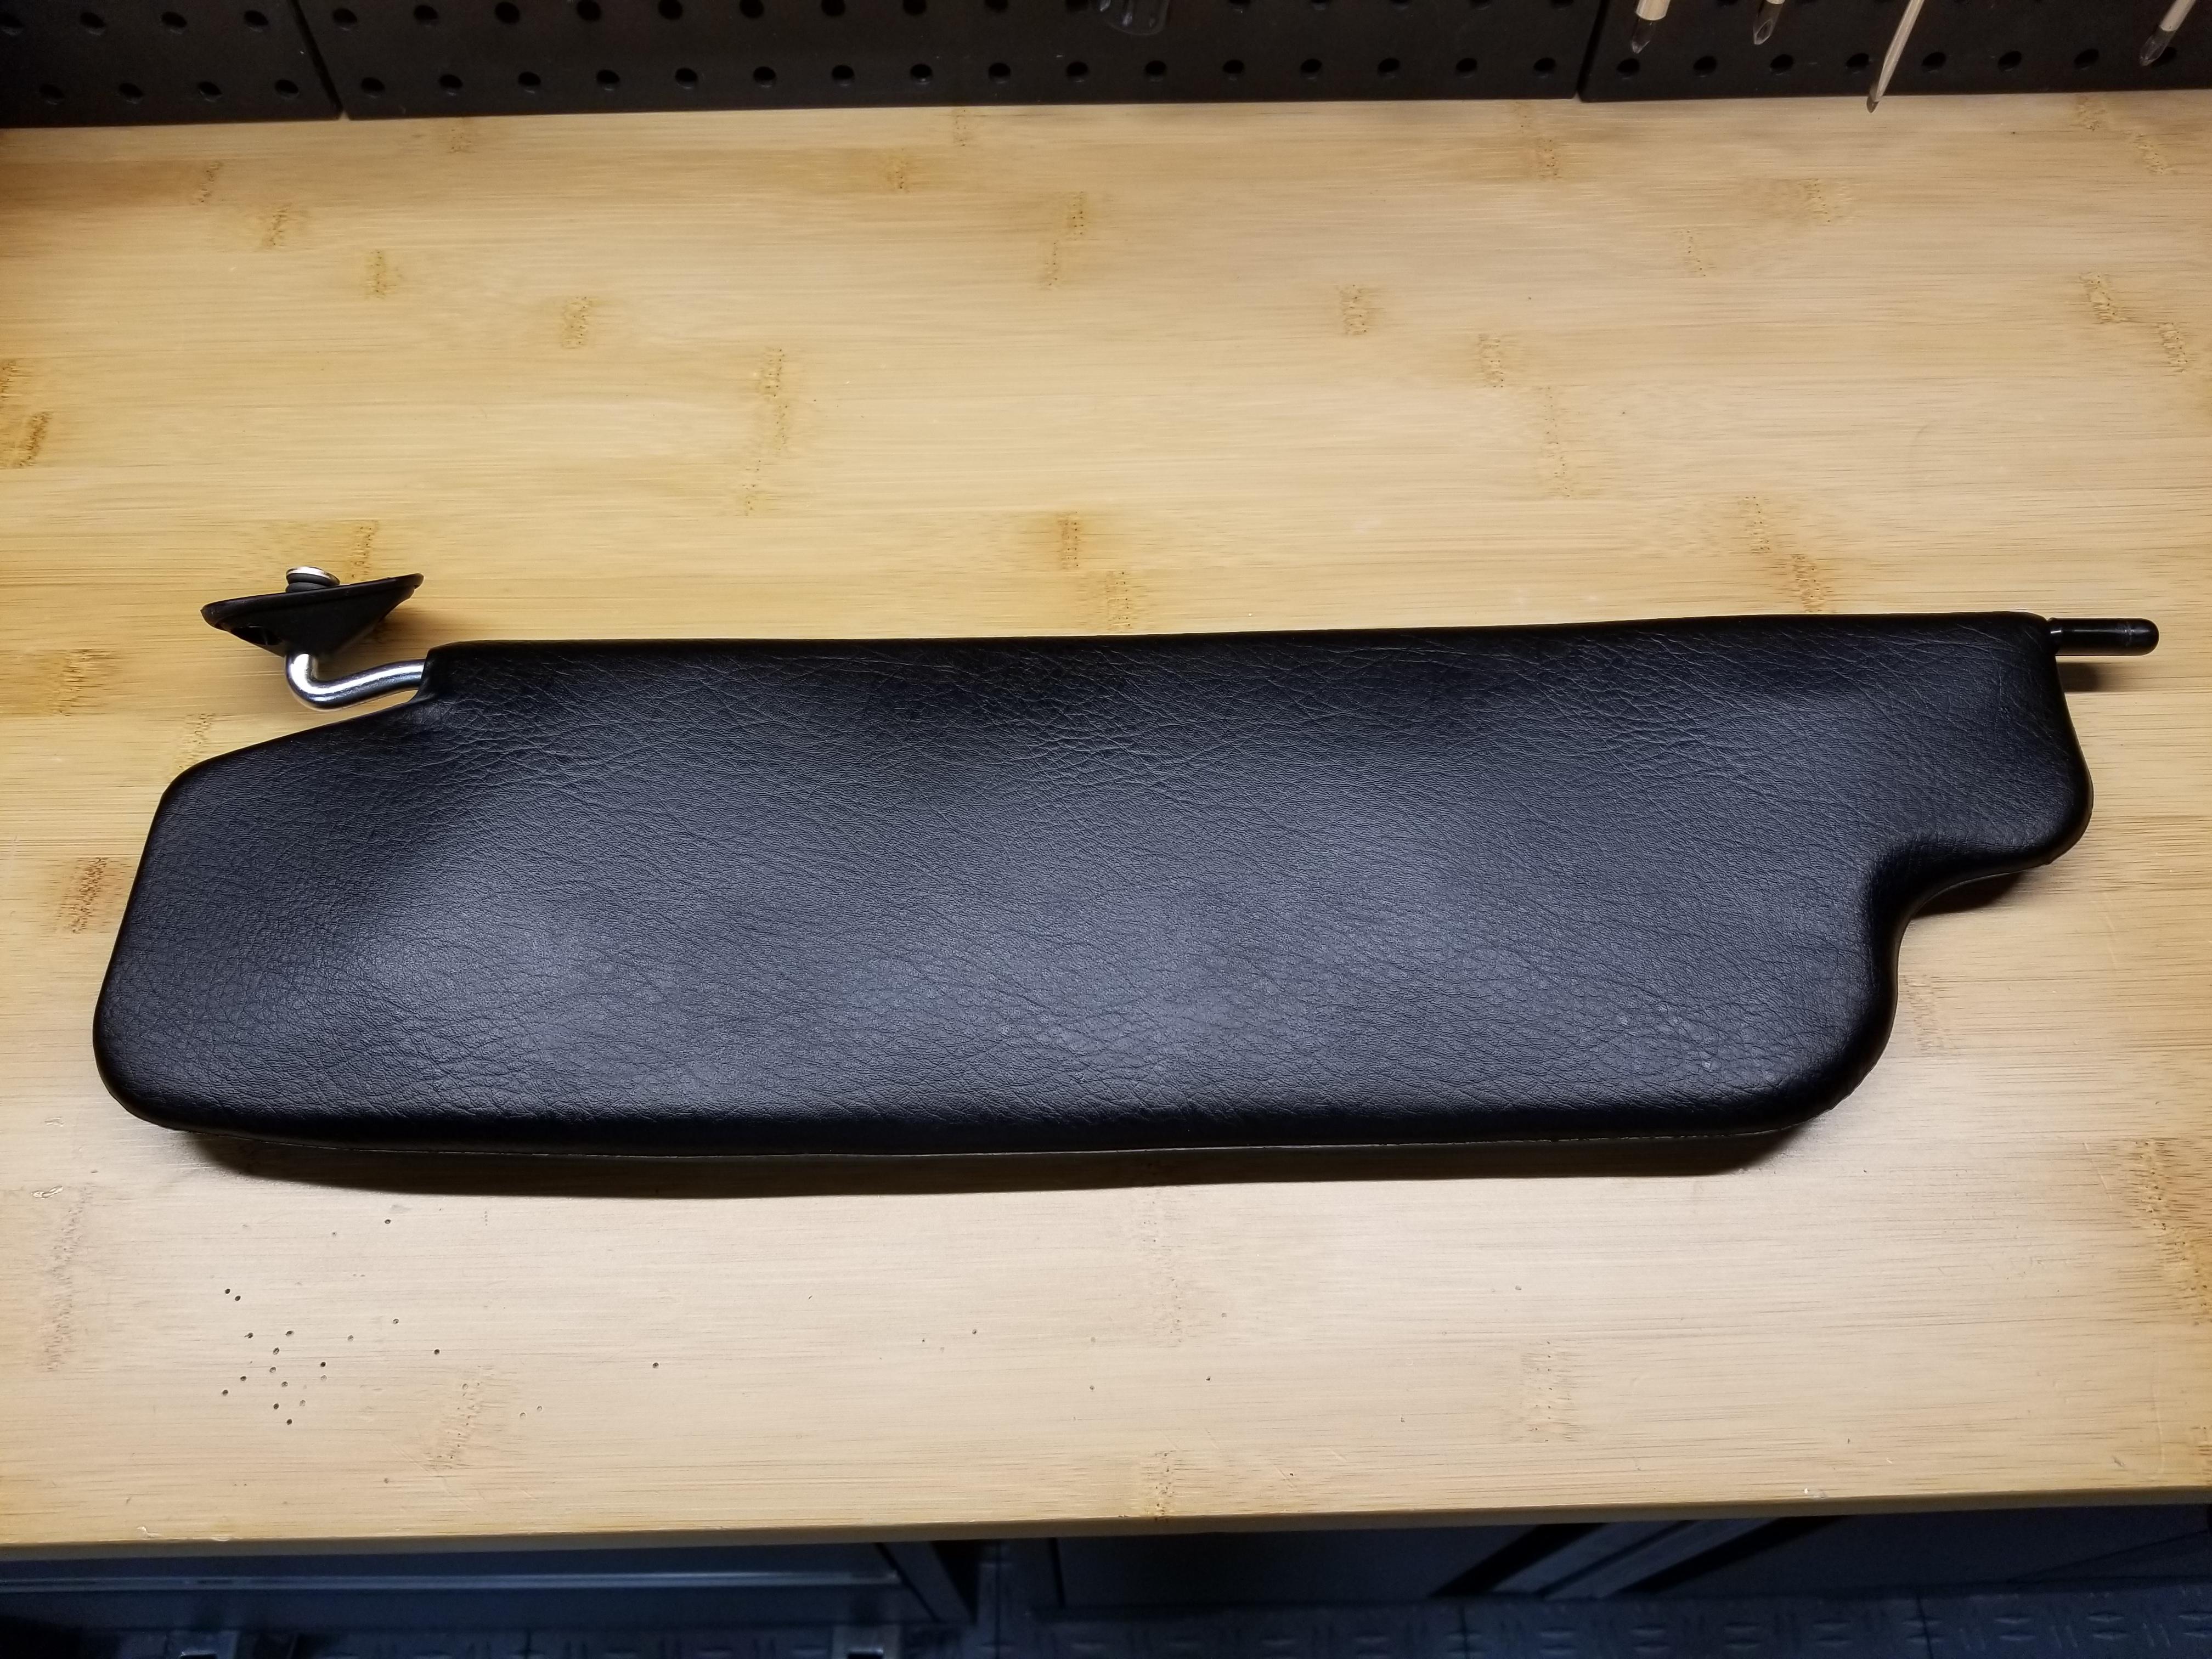
1 pointAfter looking at my original "saggy" sunvisors for a few years (and with lots of "sheltering at home" time) I decided to try a "fix". The vynil skins themselves are in great shape but it seemed as if the internal stuffing had deteriorated over 40 odd years and there were wrinkles here and there on the visors. I didn't want to change the original vynil for leather (visor repair kits on the market) so I decided to cut them open along the forwardmost seam with a fine scalpel blade, staying on one side of the seam so I could later close the seam almost invisibly. To my surprise the foam layer inside was pretty intact and the cause of the wrinkles on the outside was just loose, saggy vynil. I cut out a filler panel for each side out of closed cell foam, 2.5mm thick and carefully fitted and glued it to the existing foam with 3M spray glue. Closing the seam again was tricky but all I could come up with was using a strip of Gorilla tape (that stuff really sticks). I placed half the strip along the inside of the top half of the vynil and slowly pulled the bottom half over the exposed tape until a precise closure was achieved. The result is a nice firm visor with an almost invisible seam. See pics below. PS: I've only done the passenger side (which has the vanity mirror and is a little trickier) because I ran out of the foam. I will do the driver side once I get the foam and will post any details that I might change for improvement. Original "saggy" visors (I know, they're way better than most!!) New foam filler (white) fitted and glued to each side of the original green foam: Trim the foam edges so approximating the vinyl edges can be achieved with just a little stretch: Gorilla tape on the inside of the top half and then bringing the bottom half of the vynil over the bottom half of the tape until the edges are precisely closed (start in the middle): Final result:


 1 point
 -
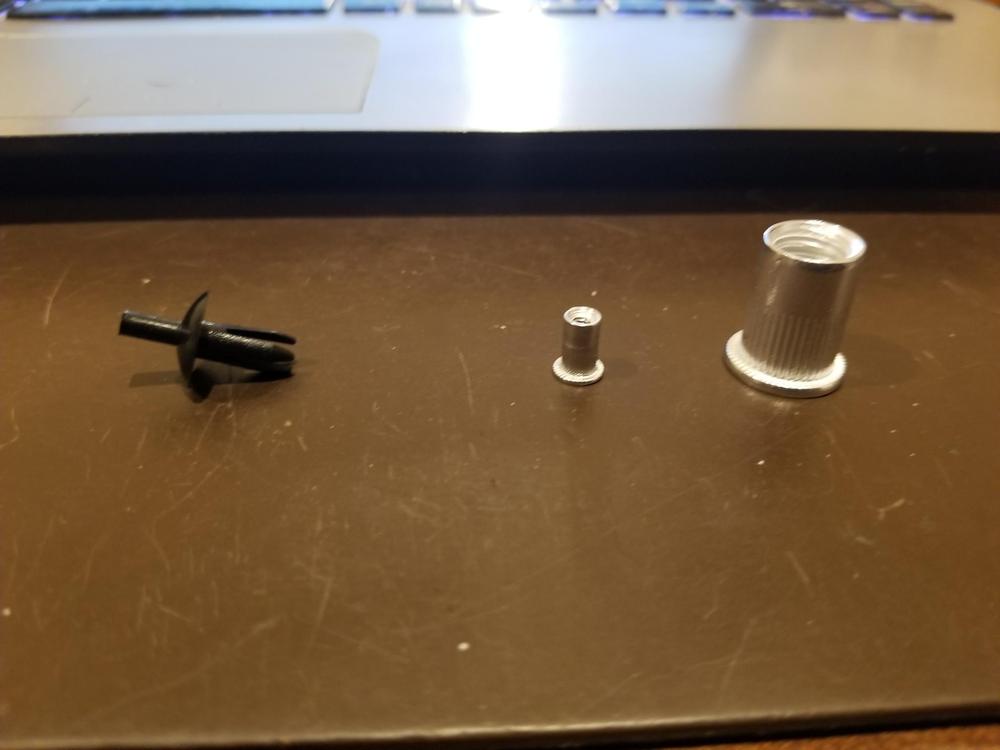
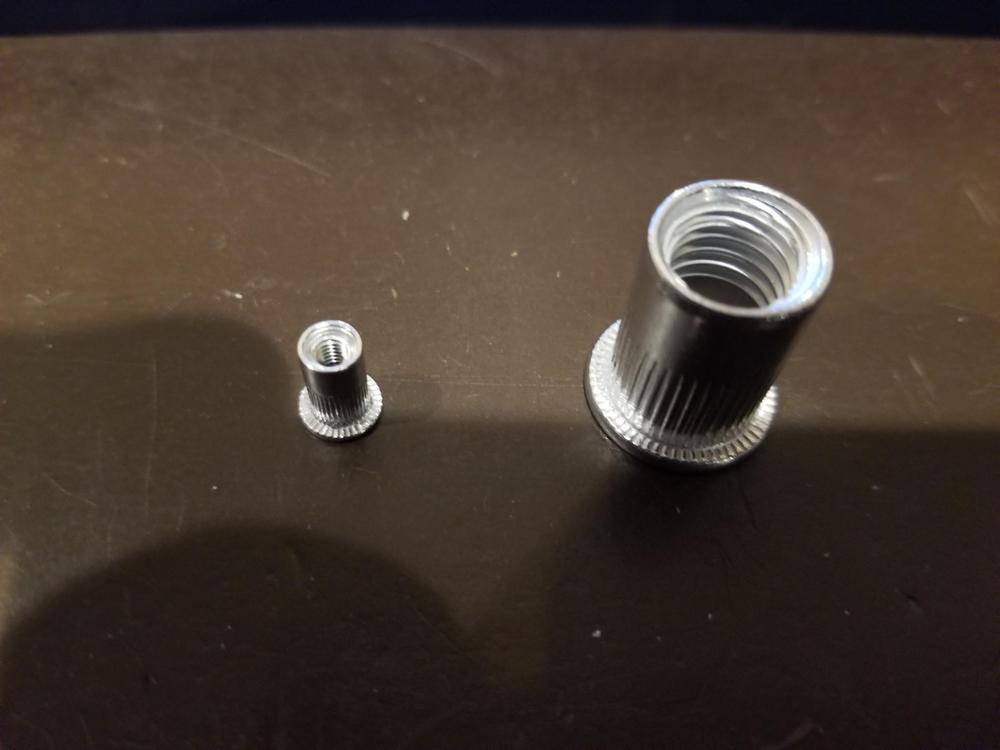
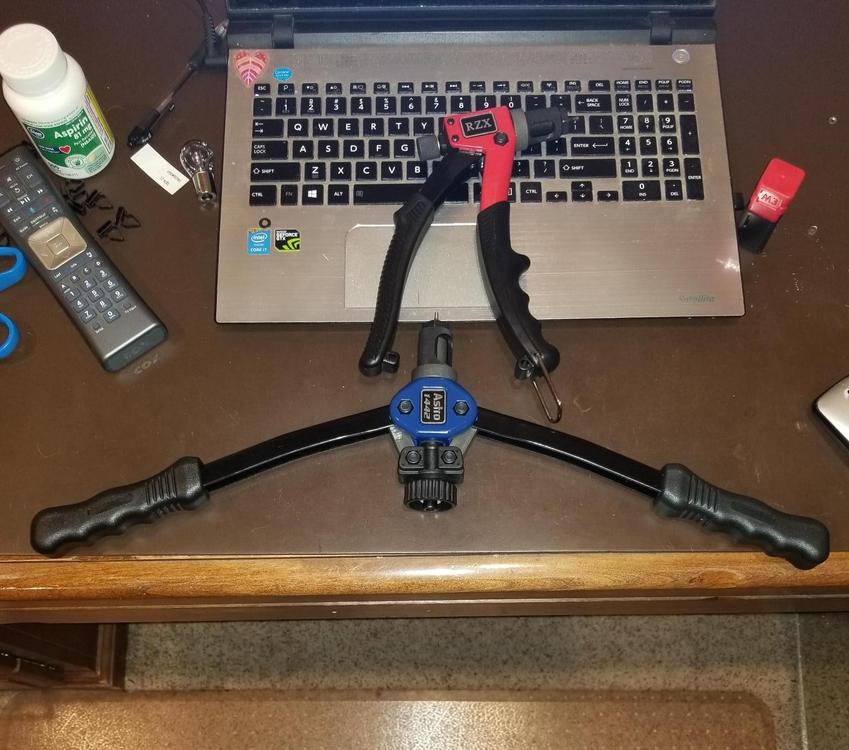
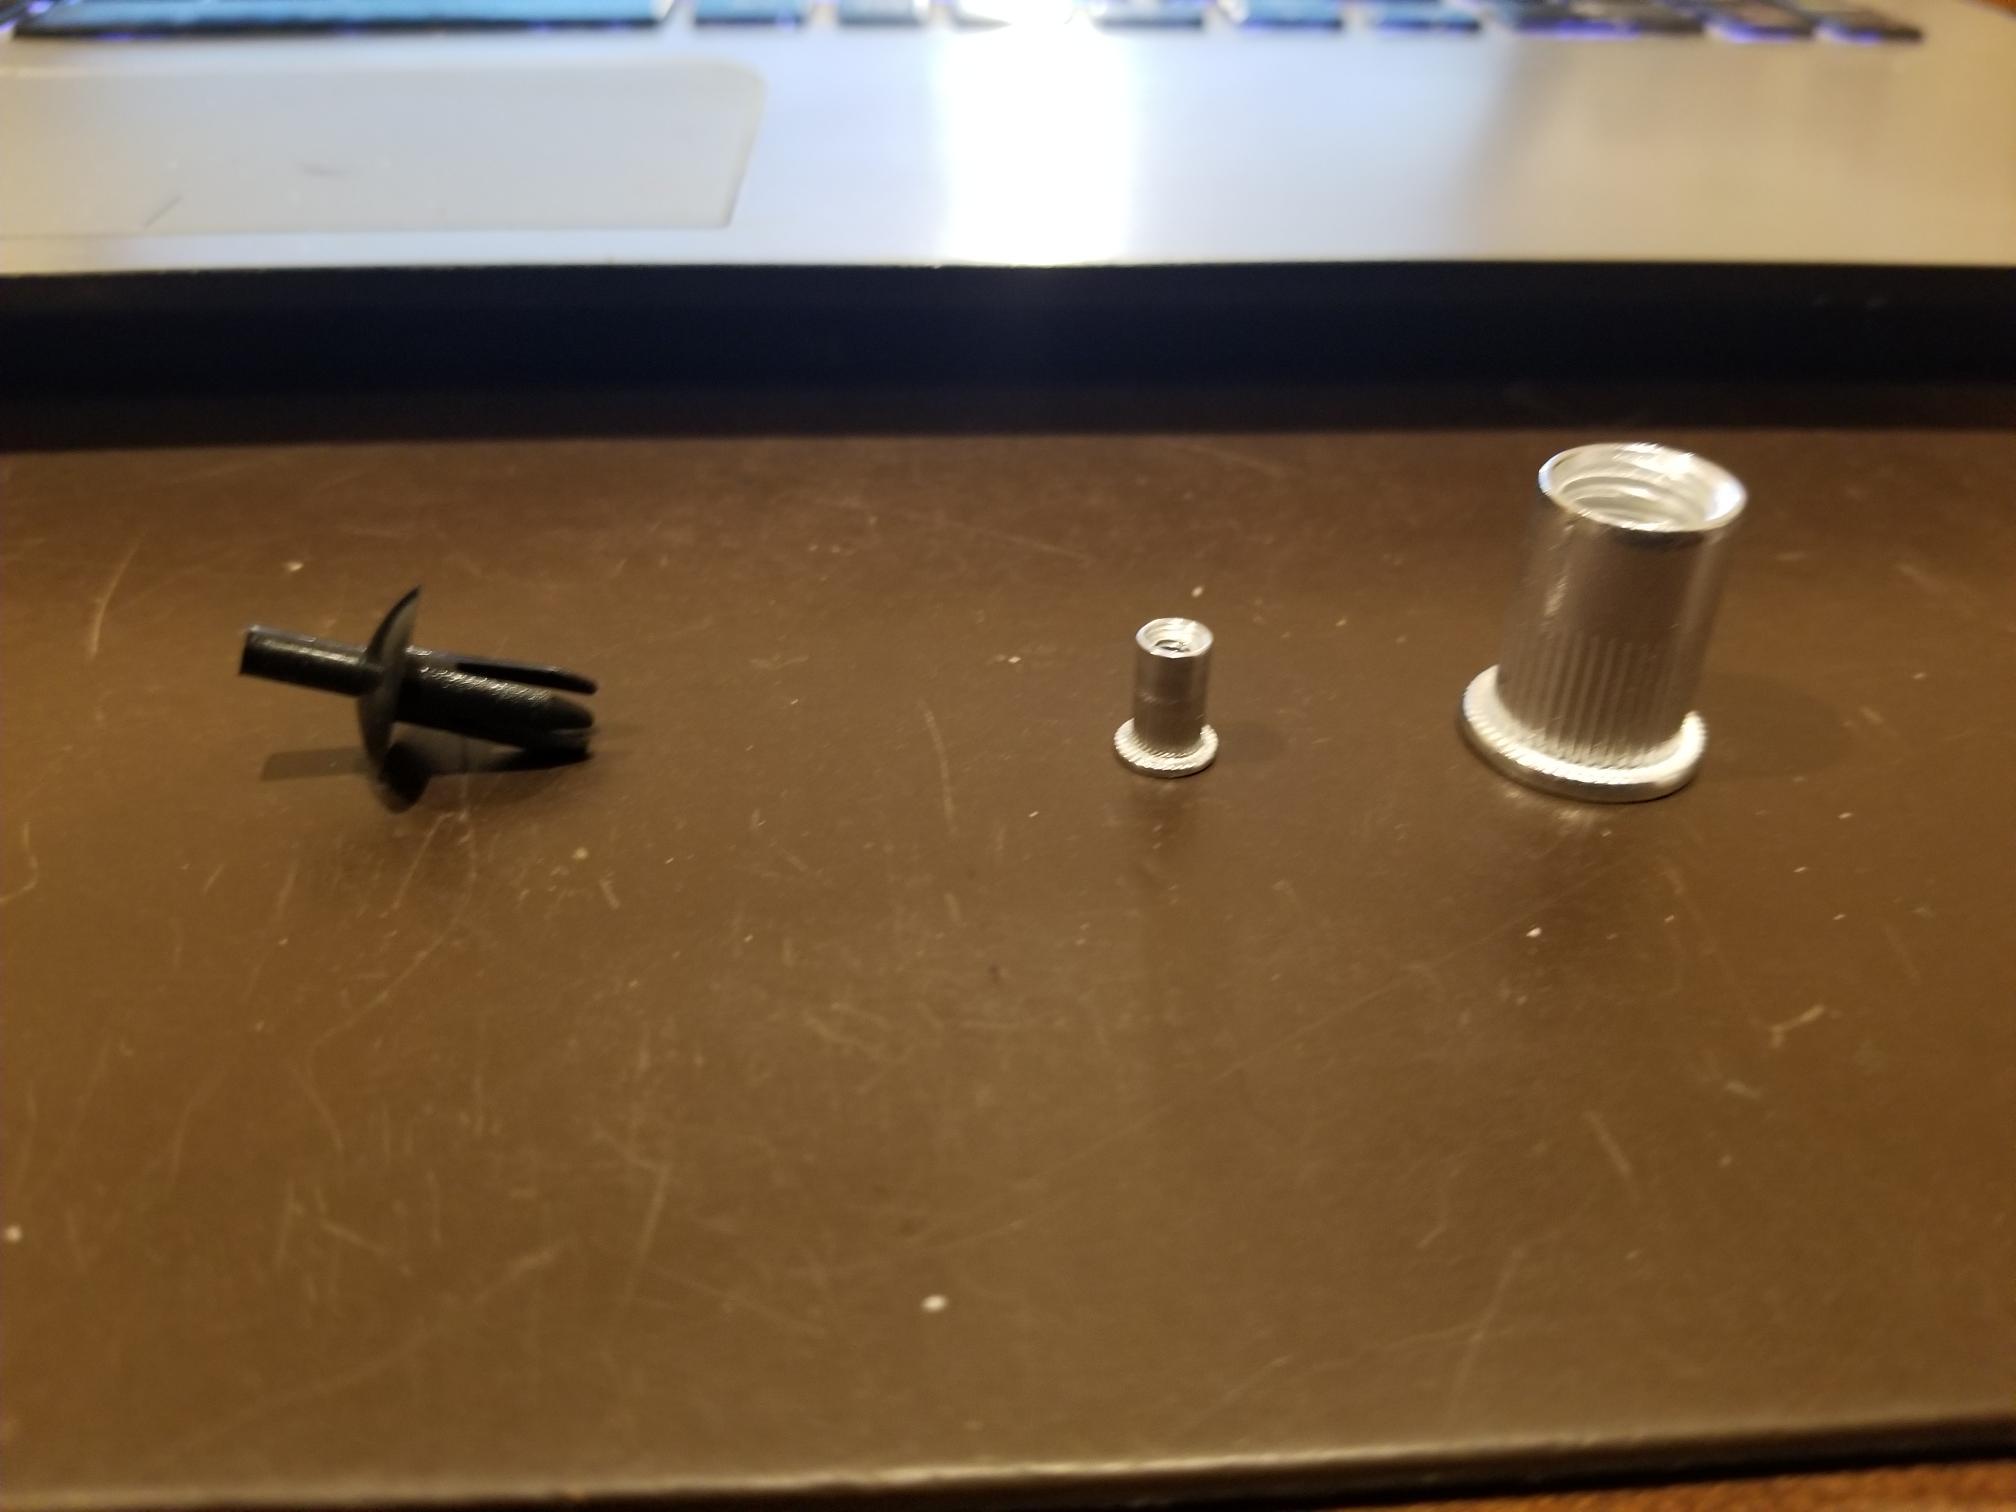
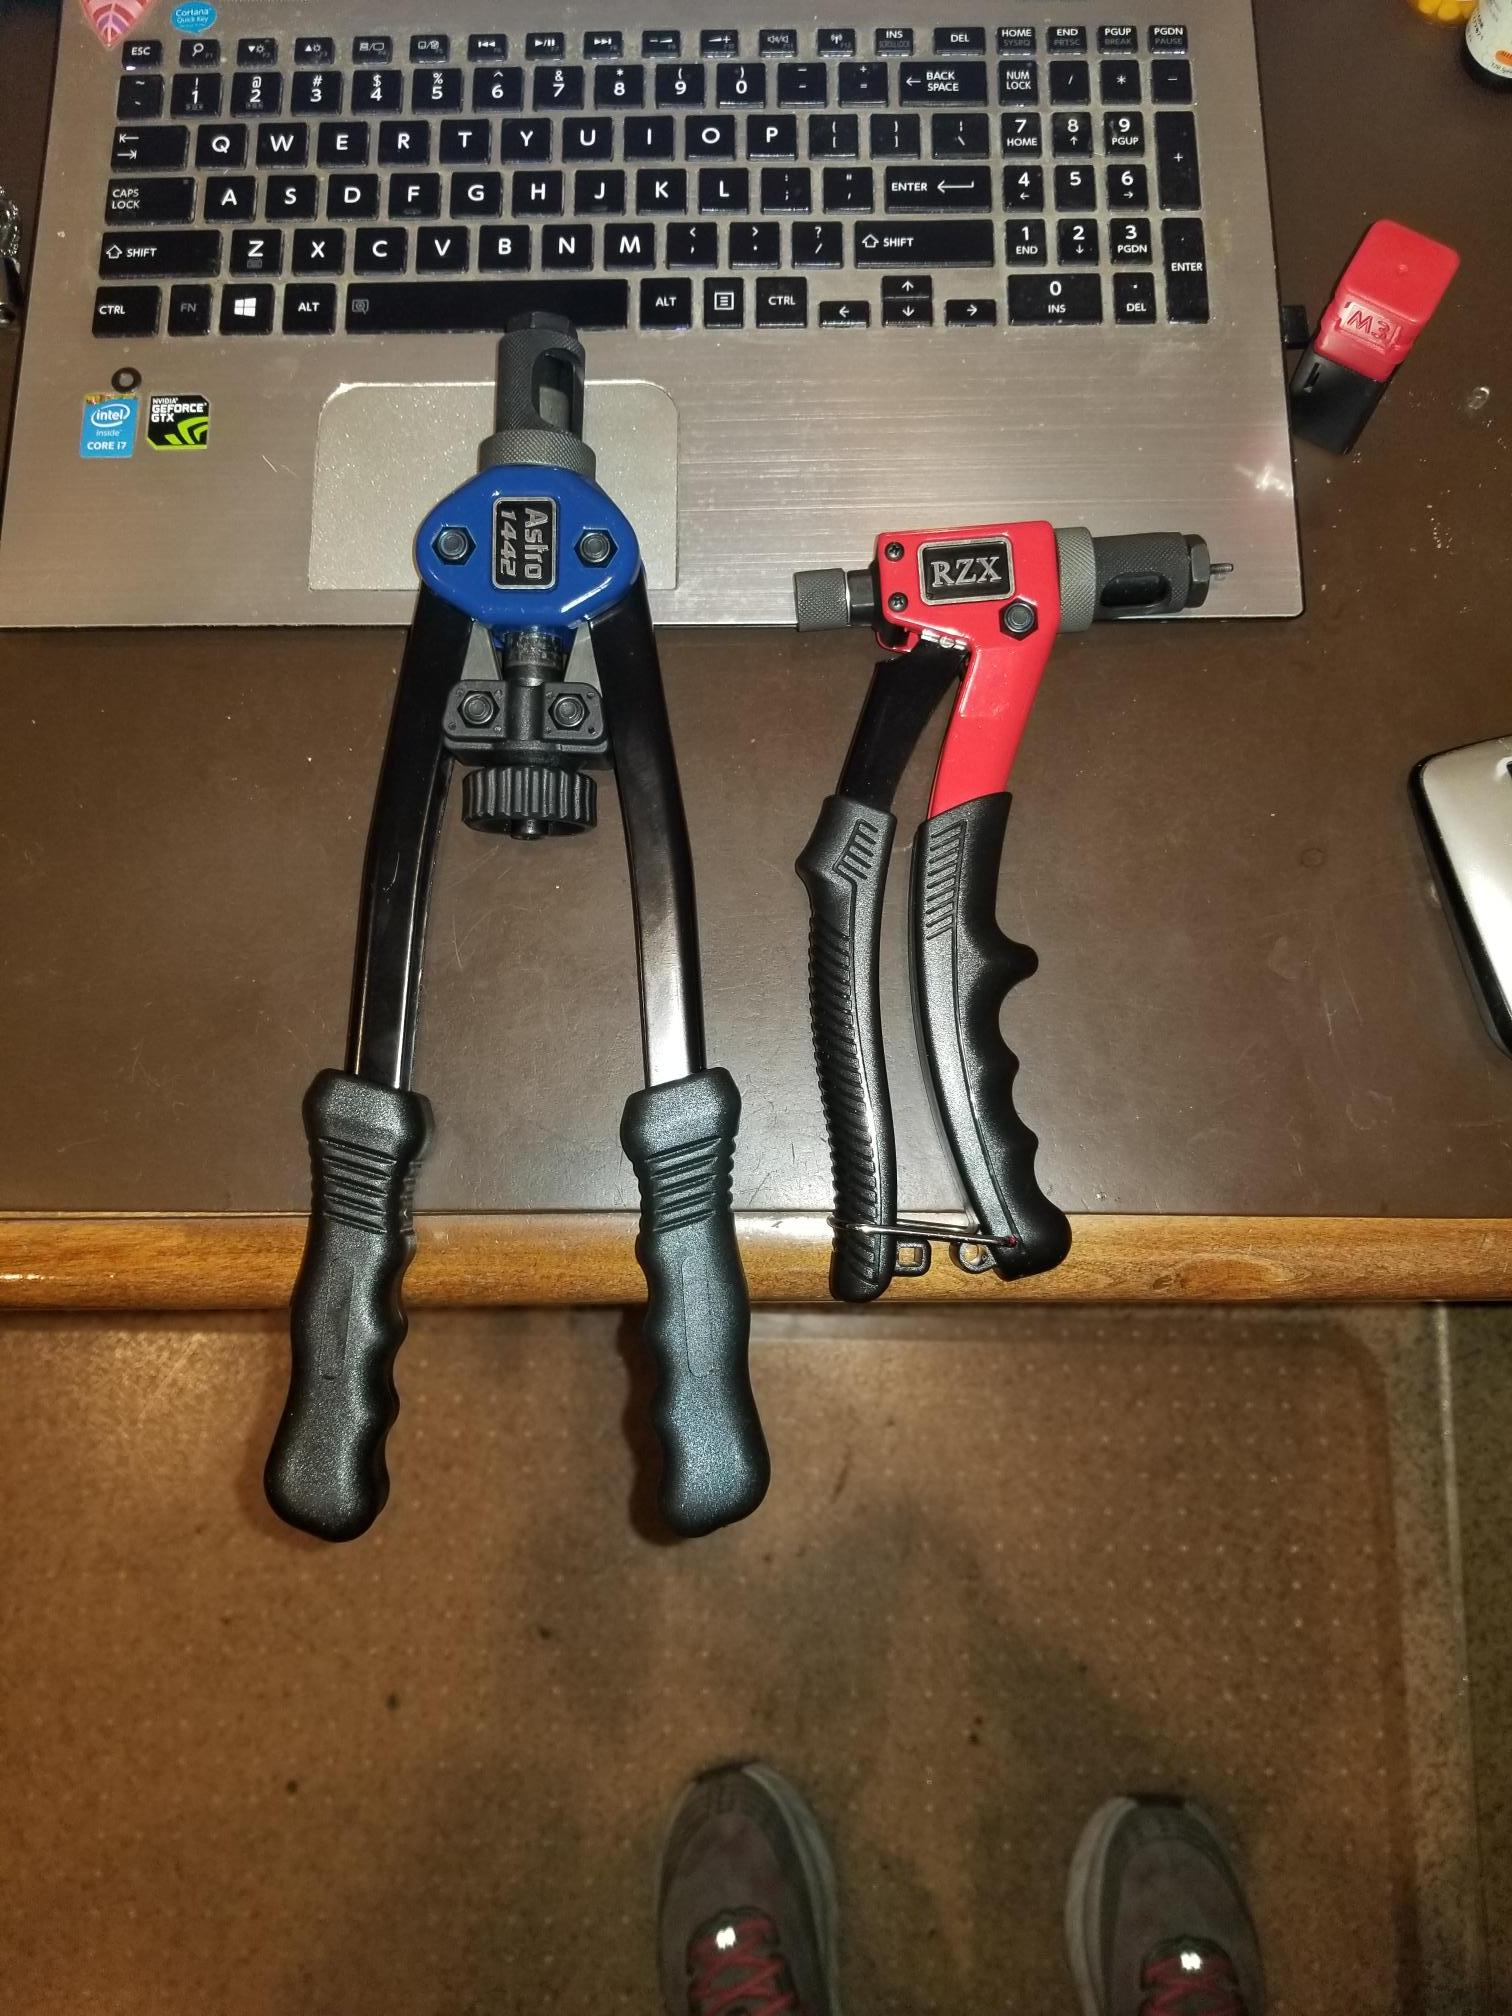
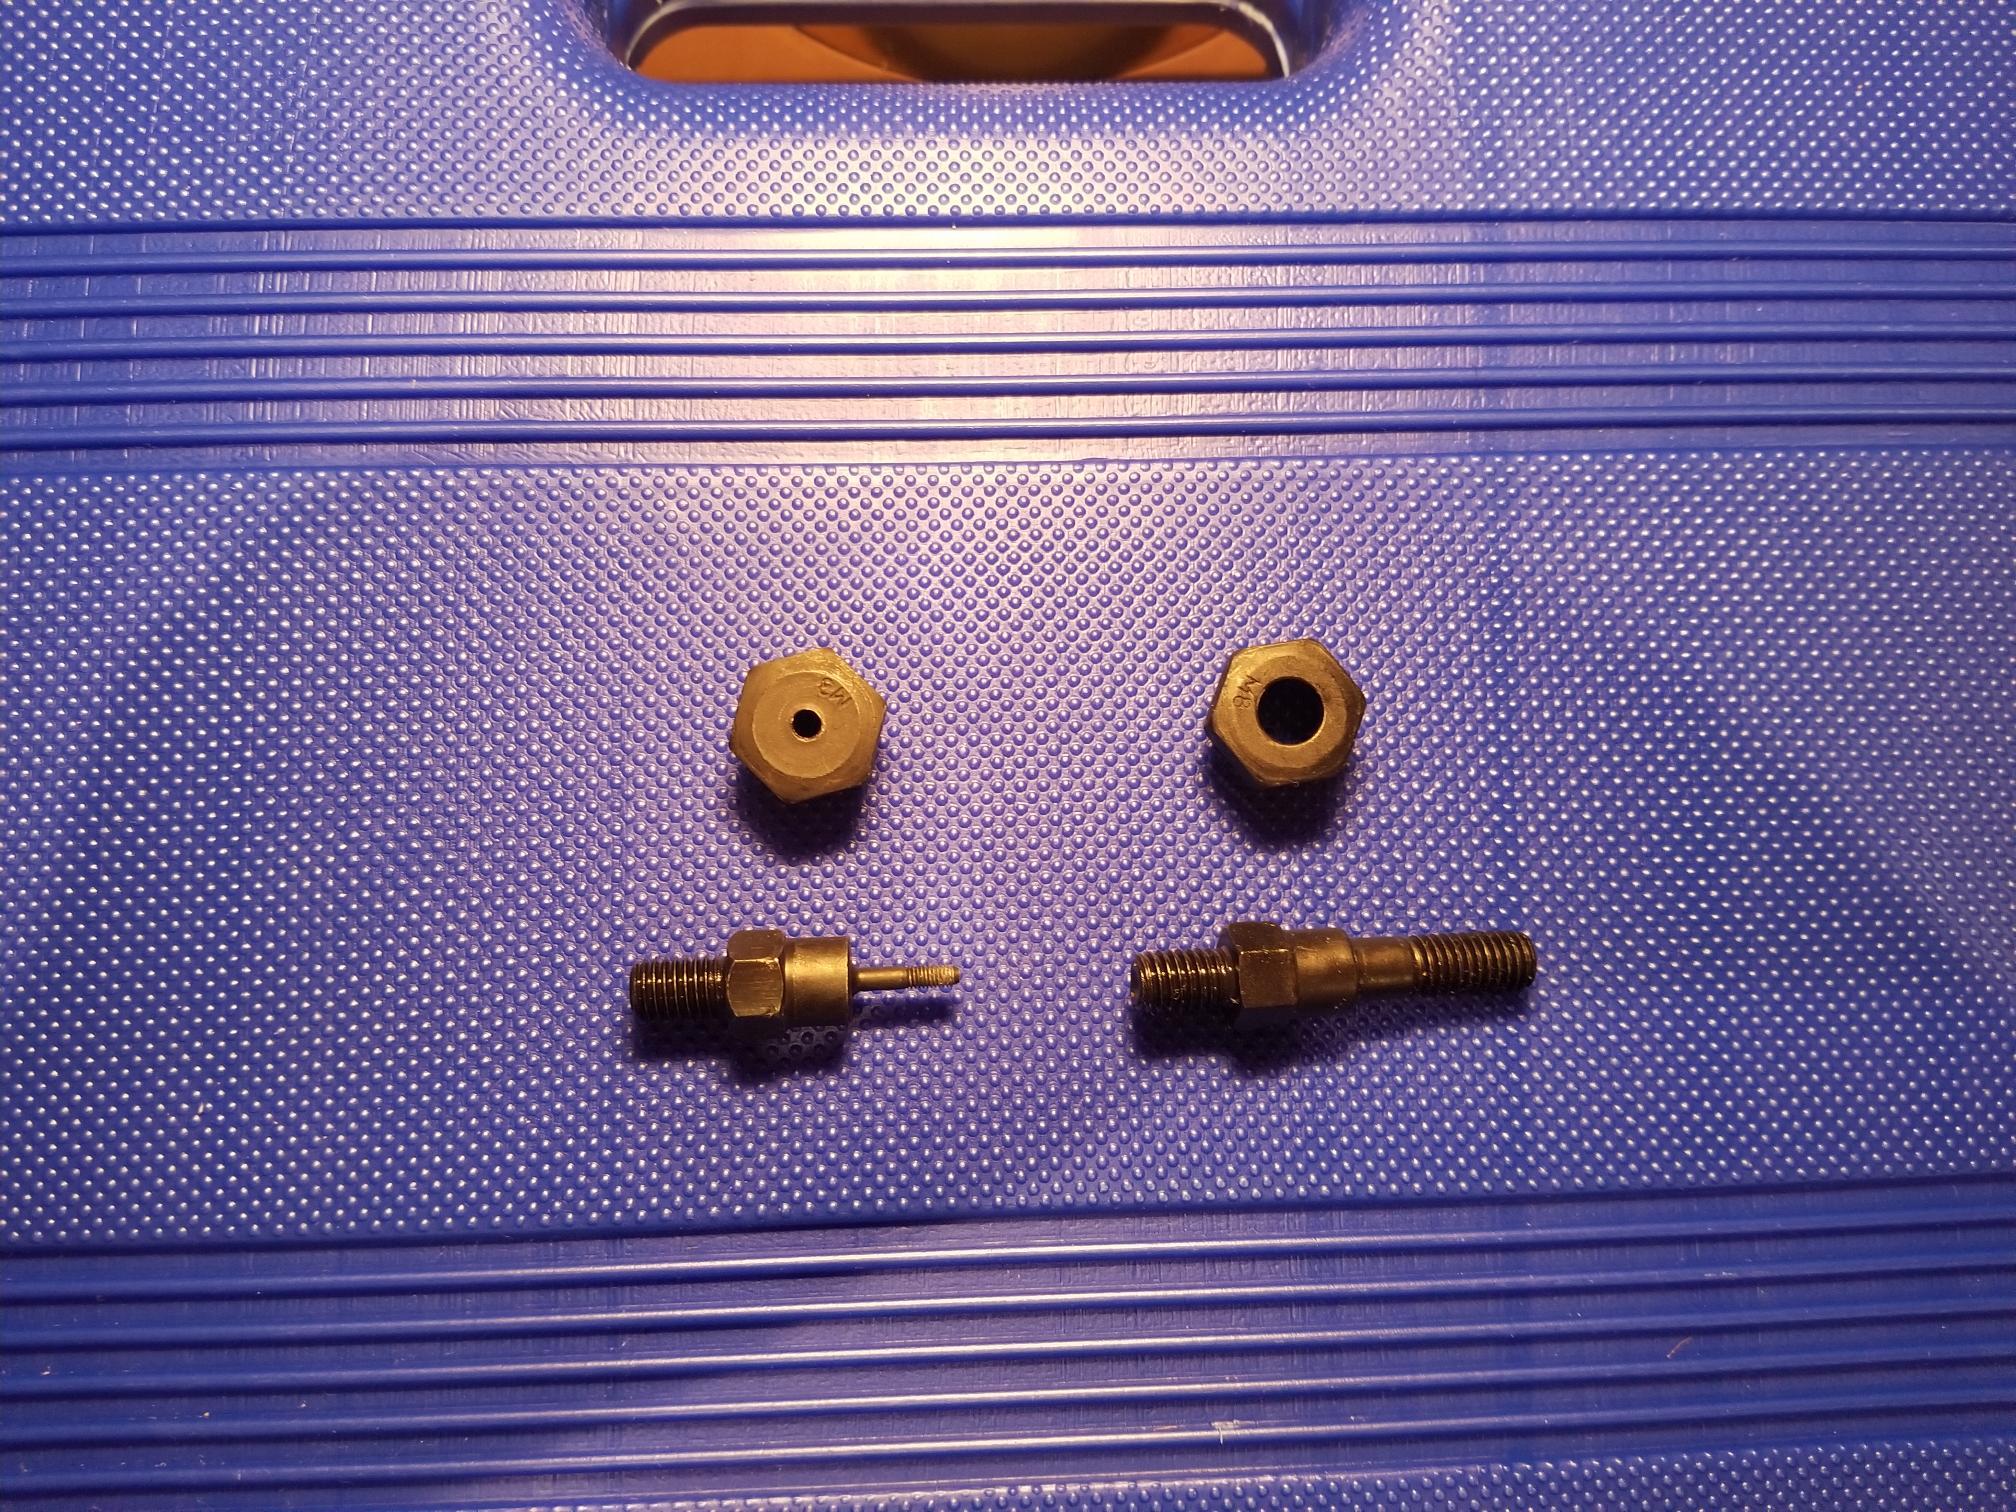
1 pointI am in the process of installing the bucket’s interior. Often times I find that parts need to installed, removed, adjusted/repaired and then re-installed. A while back I bought plastic rivets for interior. Two sizes are required. The taillight panel requires 8. I believe they are $3.00 each. The interior plastic requires approximately 40. These are larger and come in bags of 10 at approximately $7.00 a bag. I don’t think that they are available at your local hardware store so there is shipping cost and worst of all for me time delay. So, the cost of these plastic rivets is annoyingly expensive (approximately $50+) considering it is just a fastener. These rivets are neat but in my opinion there are a few issues. To remove one you poke the plastic inset pin through the rivet. In a blind situation the pin goes into the bowels of the chassis never to be found. Without the center pin the rivet is useless so it is a throw away. Some suggest using a nail, or a cotter pin or something else. If I did, I would have a bunch of these alternatives rusting away and clinking and clattering away somewhere within the bucket. A bit of this is tongue in cheek – but mostly not. The second issue is that these plastic rivets cannot be tightened. Oddly enough on some of the plastic panels one of the fasteners is an actual 4mm screw. I think they did this because – they could. The material the panel was being attached to was thick enough to accept threads. Where the plastic panels attach to the remainder of the body the material is too thin to accept a thread so they used the plastic rivet. In addition to the single use aspect of the plastic rivet the panels wind up becoming loose or squeaking especially after 40+ years. I recently stumbled across a post discussing “internal rivets”. ZCARS (forum member) offered an alternative called a Riv-Nut. I was not aware of this device, but became intrigued with the solution. I suppose most of you have experience with this, so this might be a bit boring, but for the uninitiated I hope this will help you in the future. I am a novice when it comes to the use of this device or the install process. These are my opinions and experiences, and should not be considered the end all. If there are errors – they are not intentional and I would appreciate your corrections/improvements. Riv-Nut goes by a number of other names: Rivet nut, nutsert, blind nut. It is installed in a fashion similar to a common rivet. It’s purpose is to provide a means of creating the equivalent of threads for a screw in thin metal, and it additionally works when you cannot get behind the material, for example in the middle of a panel where there is no access to the backside. I could have used this countless times in the past. Often times this problem is solved with a nut that is tac welded to the back of the material. This does not work well for the DIYer. Many have no experience or equipment to weld, sometimes you cant get to the back of an area, and in some cases the material does not accommodate a welding solution. Of course, I have used sheet metal screws in the past. I hate screwing anything with a point on it into a blind area, and sheet metal screws do not like to be unscrewed and refastened many times. There is a fastener I don’t recall its name but you slide it over the edge of a hole. It creates the equivalent of a thread to hold a sheet metal screw. I have even used something similar with a captured nut embedded for a screw. This however only works at an edge. The Riv-nut is, in my opinion, an elegant solution – Thank you ZCARS. Here is a photo of a plastic rivet (on the left, and riv-nuts on the right #3, #10 Above image you can see the threads inside the riv-nut .How it works - The tool has a main body with some sort of handle or arms to apply pressure. There is a part called a mandrel which attaches to the tool. The mandrel is specific to the size of the Riv-Nut involved. The size of the hole is not the same size as the bolt or screw to be installed. Install the mandrel on the main body of the tool. The end of the mandrel that is exposed is threaded. Inside the riv-nut are threads. You screw the riv-nut onto the mandrel. Next you put the riv-nut through the material (just like a common rivet). While holding the riv-nut in place in the hole you apply pressure by squeezing the handle. Different tools have different handles. To provide more leverage, necessary for larger bolts, some tools have longer arms and require two handed operation. Other tools look like a common rivet gun and operate using a single hand. At much higher cost there are air powered versions, some attach to a drill others use just a mandrel and two wrenches. All of them have some sort of mechanism that applies pressure to the mandrel threaded end and withdraws the mandrel from the material which causes outward force, which then collapses the outer part of the riv-nut trapping the material. Obviously the portion of the riv-nut that collapses cannot be associated with the threads in the riv-nut. If you look at the outside of the riv-nut there is a collar which rests against the outside of the material that you are attaching to the riv-nut. There is a knurled portion of the riv-nut next to the collar. The threads of the riv-nut begin where the knurled portion stops. The knurled area is the part of the riv-nut that collapses against the blindside (backside) of the material. You then unscrew the mandrel from the riv-nut. There is a bit of technique involved which is gained through experience. You don’t snap the riv-nut like a common rivet. Recall that the tool is threaded on to the riv-nut. You need those threads in tact. If the riv-nut snaps it is because one of two things has happened. Either the threads on the riv-nut have given way or the threads on the mandrel have given way. So, you only want to collapse the riv-nut enough to grab the material surrounding it. Now there are different types of riv-nuts: aluminum and steel for example. Using a 3mm mandrel is a fairly delicate operation. I used aluminum riv-nuts. I thought that I would rather have the riv-nut break rather than the mandrel. Also, since I was only attaching light plastic panels the amount of holding force required was minimal. The main difference between aluminum and steel riv-nuts is holding force. So, the material of the riv-nut and the size of the riv-nut affect the holding power. When a riv-nut is destroyed during installation you need to remove it by drilling it out. When an aluminum riv-nut fails you can see the remnants of the threads on the mandrel. They need to be removed. There are a number of very good videos and printed descriptions that will do a far better job of describing the process then this post, but I thought this might get you interested enough to consider this solution. There are a number of different tools to install riv-nuts. They come in different sizes and shapes and of course at a range of price points, from $15 to many hundreds of dollars. My research led me to buy an astro-pneumatic 1442. It costs around $90. It has many very good reviews. It will accommodate a number of different size fasteners including metric (#5- #8) and a number of SAE screw sizes. I believe this is a great long term choice for me. Having said that Astro-Pneumatic does not offer a #3 or a #4 mandrel. I called Astro and they confirmed that they do not offer smaller mandrels. Most of the holes involved for these plastic panels are 5mm (diameter). This requires a 3mm riv-nut. Turns out most of the more robust tools do not offer a 3mm option. You could drill the holes to accept a larger diameter fastener, I wanted to leave myself the option of going back to plastic rivets if necessary so I decided to invest in a second tool. The 1442 requires two hands. It is medium size 13 inch handles. The handles open wide to give you more leverage. Some of the places that you will want to install a 3mm riv-nut require a tool with a smaller profile. A smaller tool will cost between $15-$30 approximately. In fact if you are using aluminum riv-nuts that are small, then a small profile, inexpensive tool might be the smart choice. Now here is an interesting data point. It turns out that #3 and #4 mandrels that are part of some less expensive sets actually fit the astro 1442. I actually bought a cheaper kit and used its mandrels on the astro 1442. So, in retrospect I would still buy the astro 1442 – it works very well, and it appears to be quite robust. I think it handles small and large riv-nuts in aluminum or steel very well. I would then enhance its capability by purchasing a #3 and a #4 mandrel. The smaller, one handed tool, is not a necessity, but I think it will help in tight places. I think it will probably have a shorter lifespan, but I do not think that it will be utilized as often as the astro. 13 inch Astro 1442 (Left), RZX 8 inch (Right) both are in their closed position Above: Astro 1442 and RZX in Open position #3 mandrel (left), #8 mandrel (right) Update 8/31/20 So it has only been a short while but I have installed a number of RiV-Nuts. Most of them were 3mm and the remainder were 4mm. All were Aluminum. I can not comment on the performance of these tools using steel rivets. I was very impressed with the performance of BOTH tools ( the Astro-Pneumatic 1442 ANd the RZX. The RZX single handed tool worked much better than I exppected it would. Some of the nut-serts have to be installed in the hatch area with the tool facing the sky. Using a 2 handed tool would have been impossible there just isn't enough room, but the RZX performed excellently. With the 1442 and a 3mm nut-sert some experience is required to know har far to close the handles. Too much pressure and you snap the aluminum insert. The RZX reliably worked when closing the hand grip all the way. As I said I have no experience with the RZX and steel Riv-Nuts, but I believe both tools are good additions to my tool set.


 1 point
 -
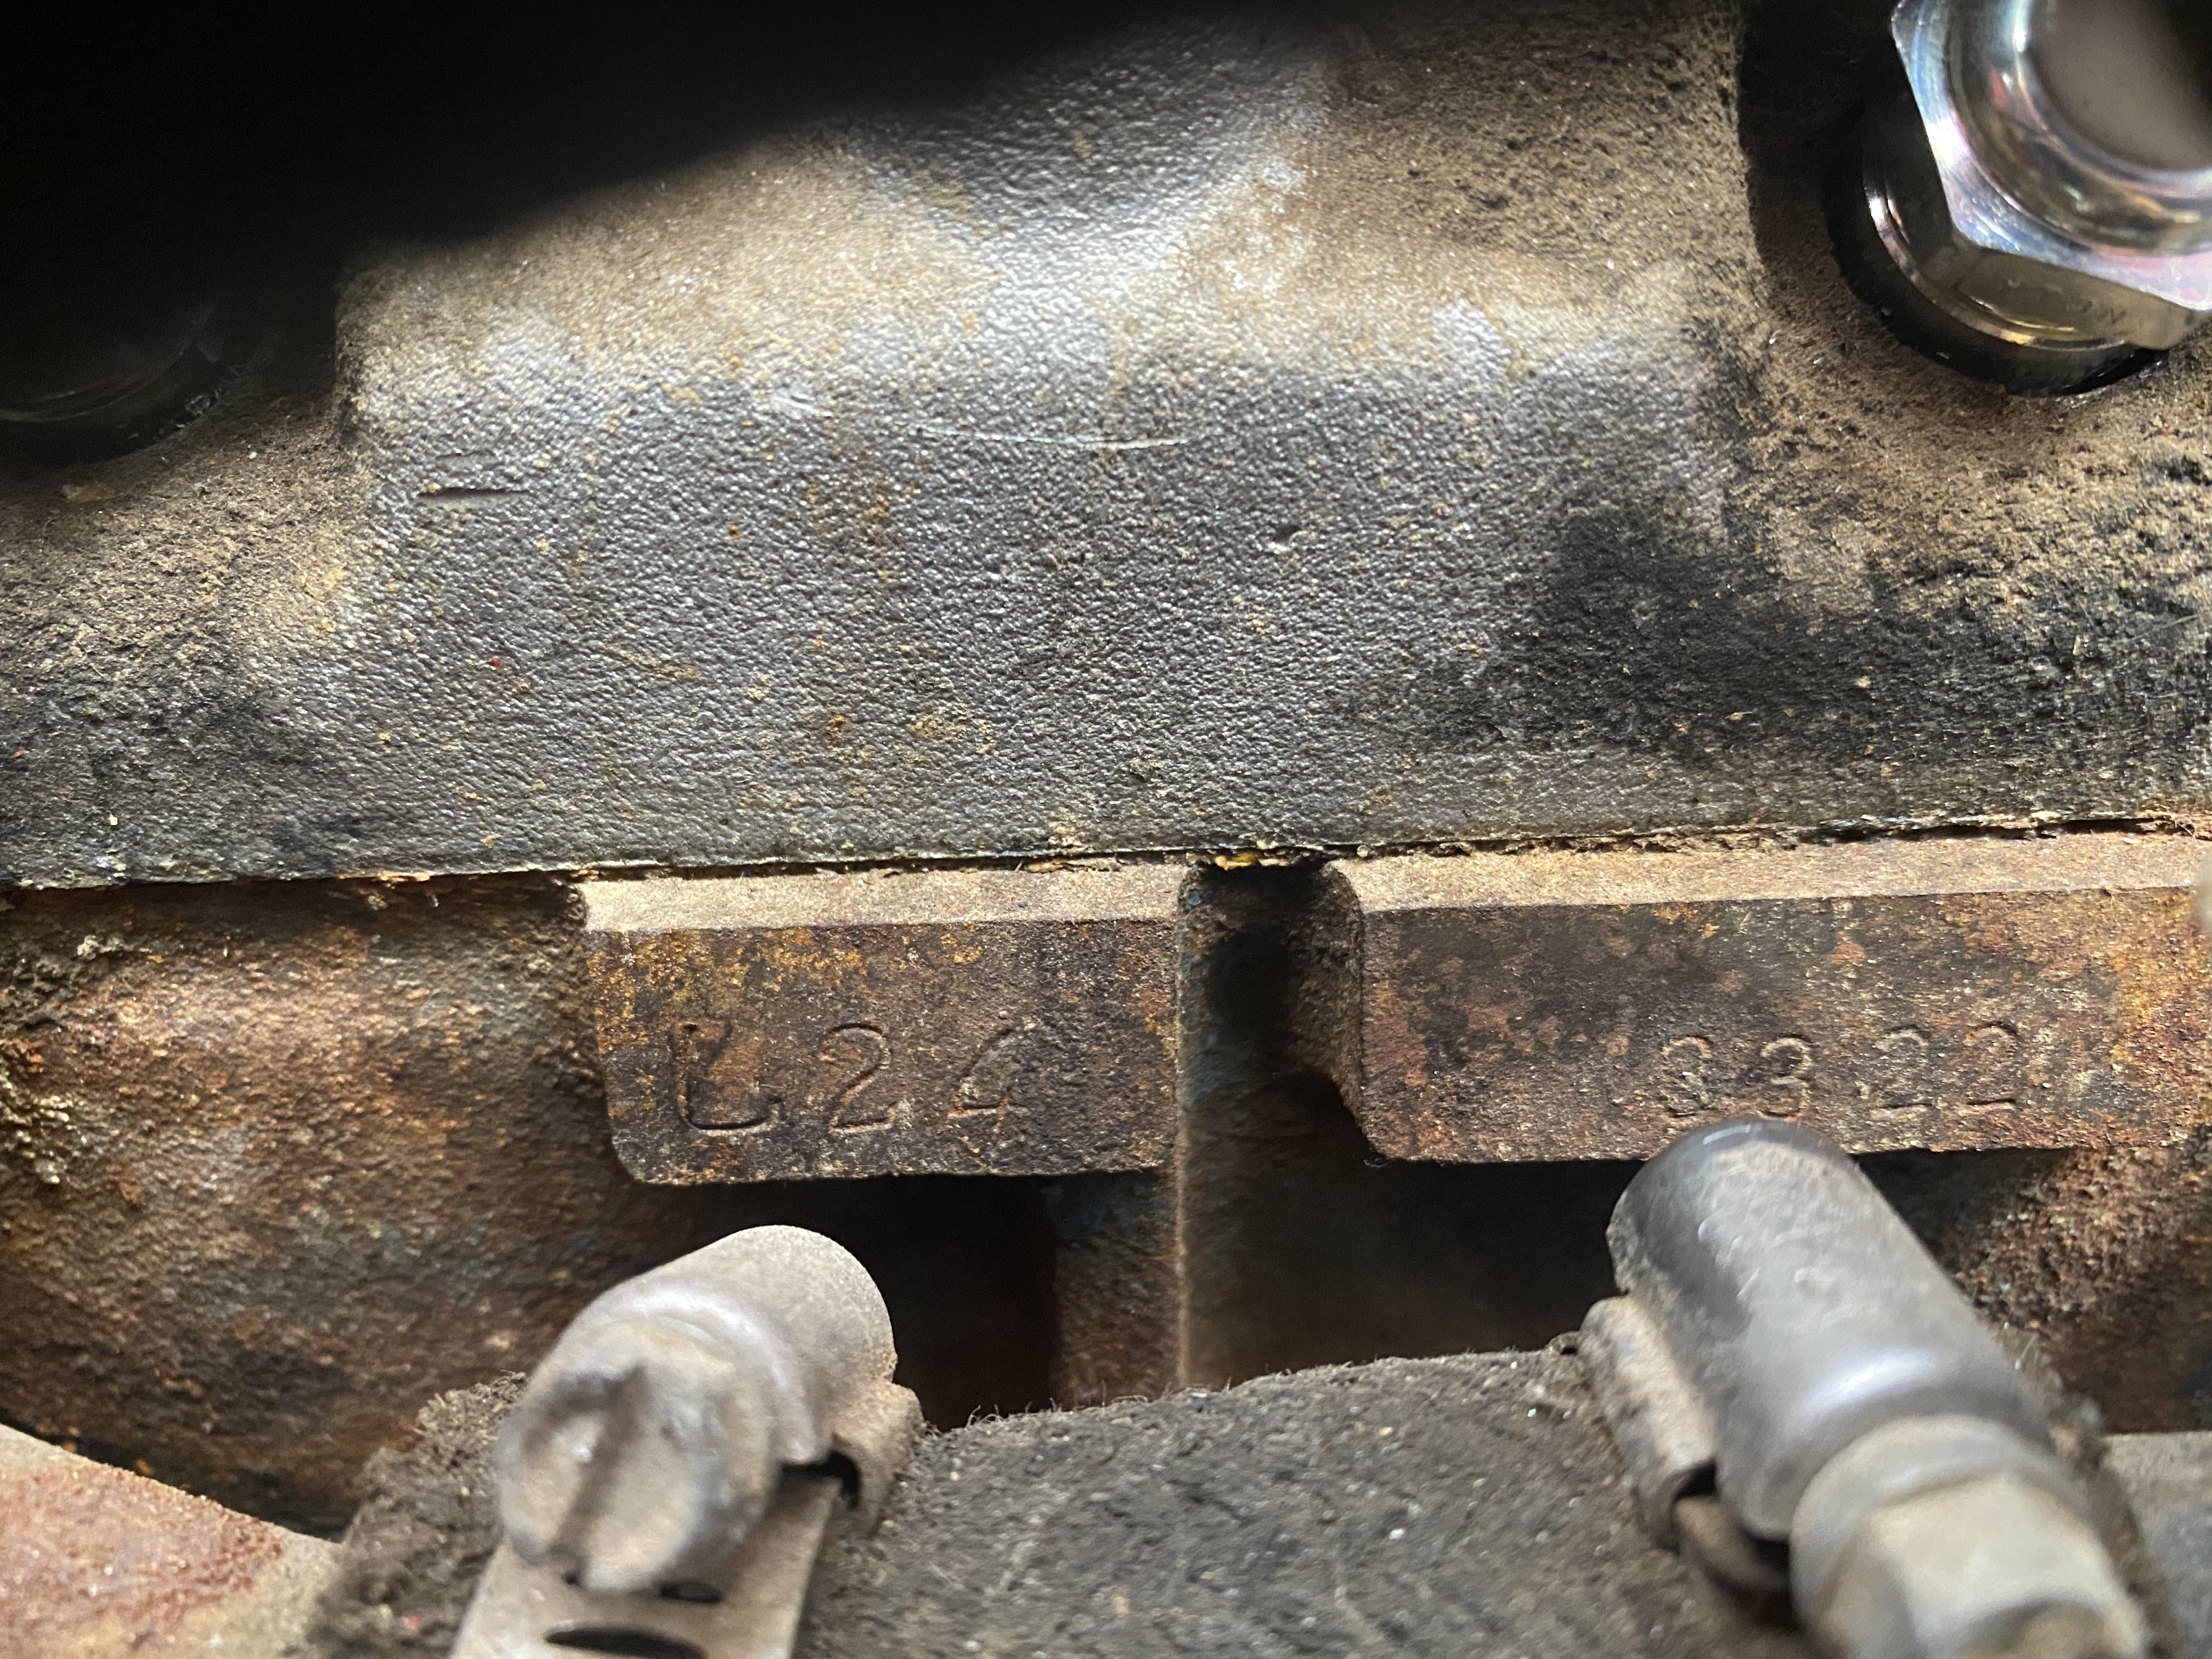
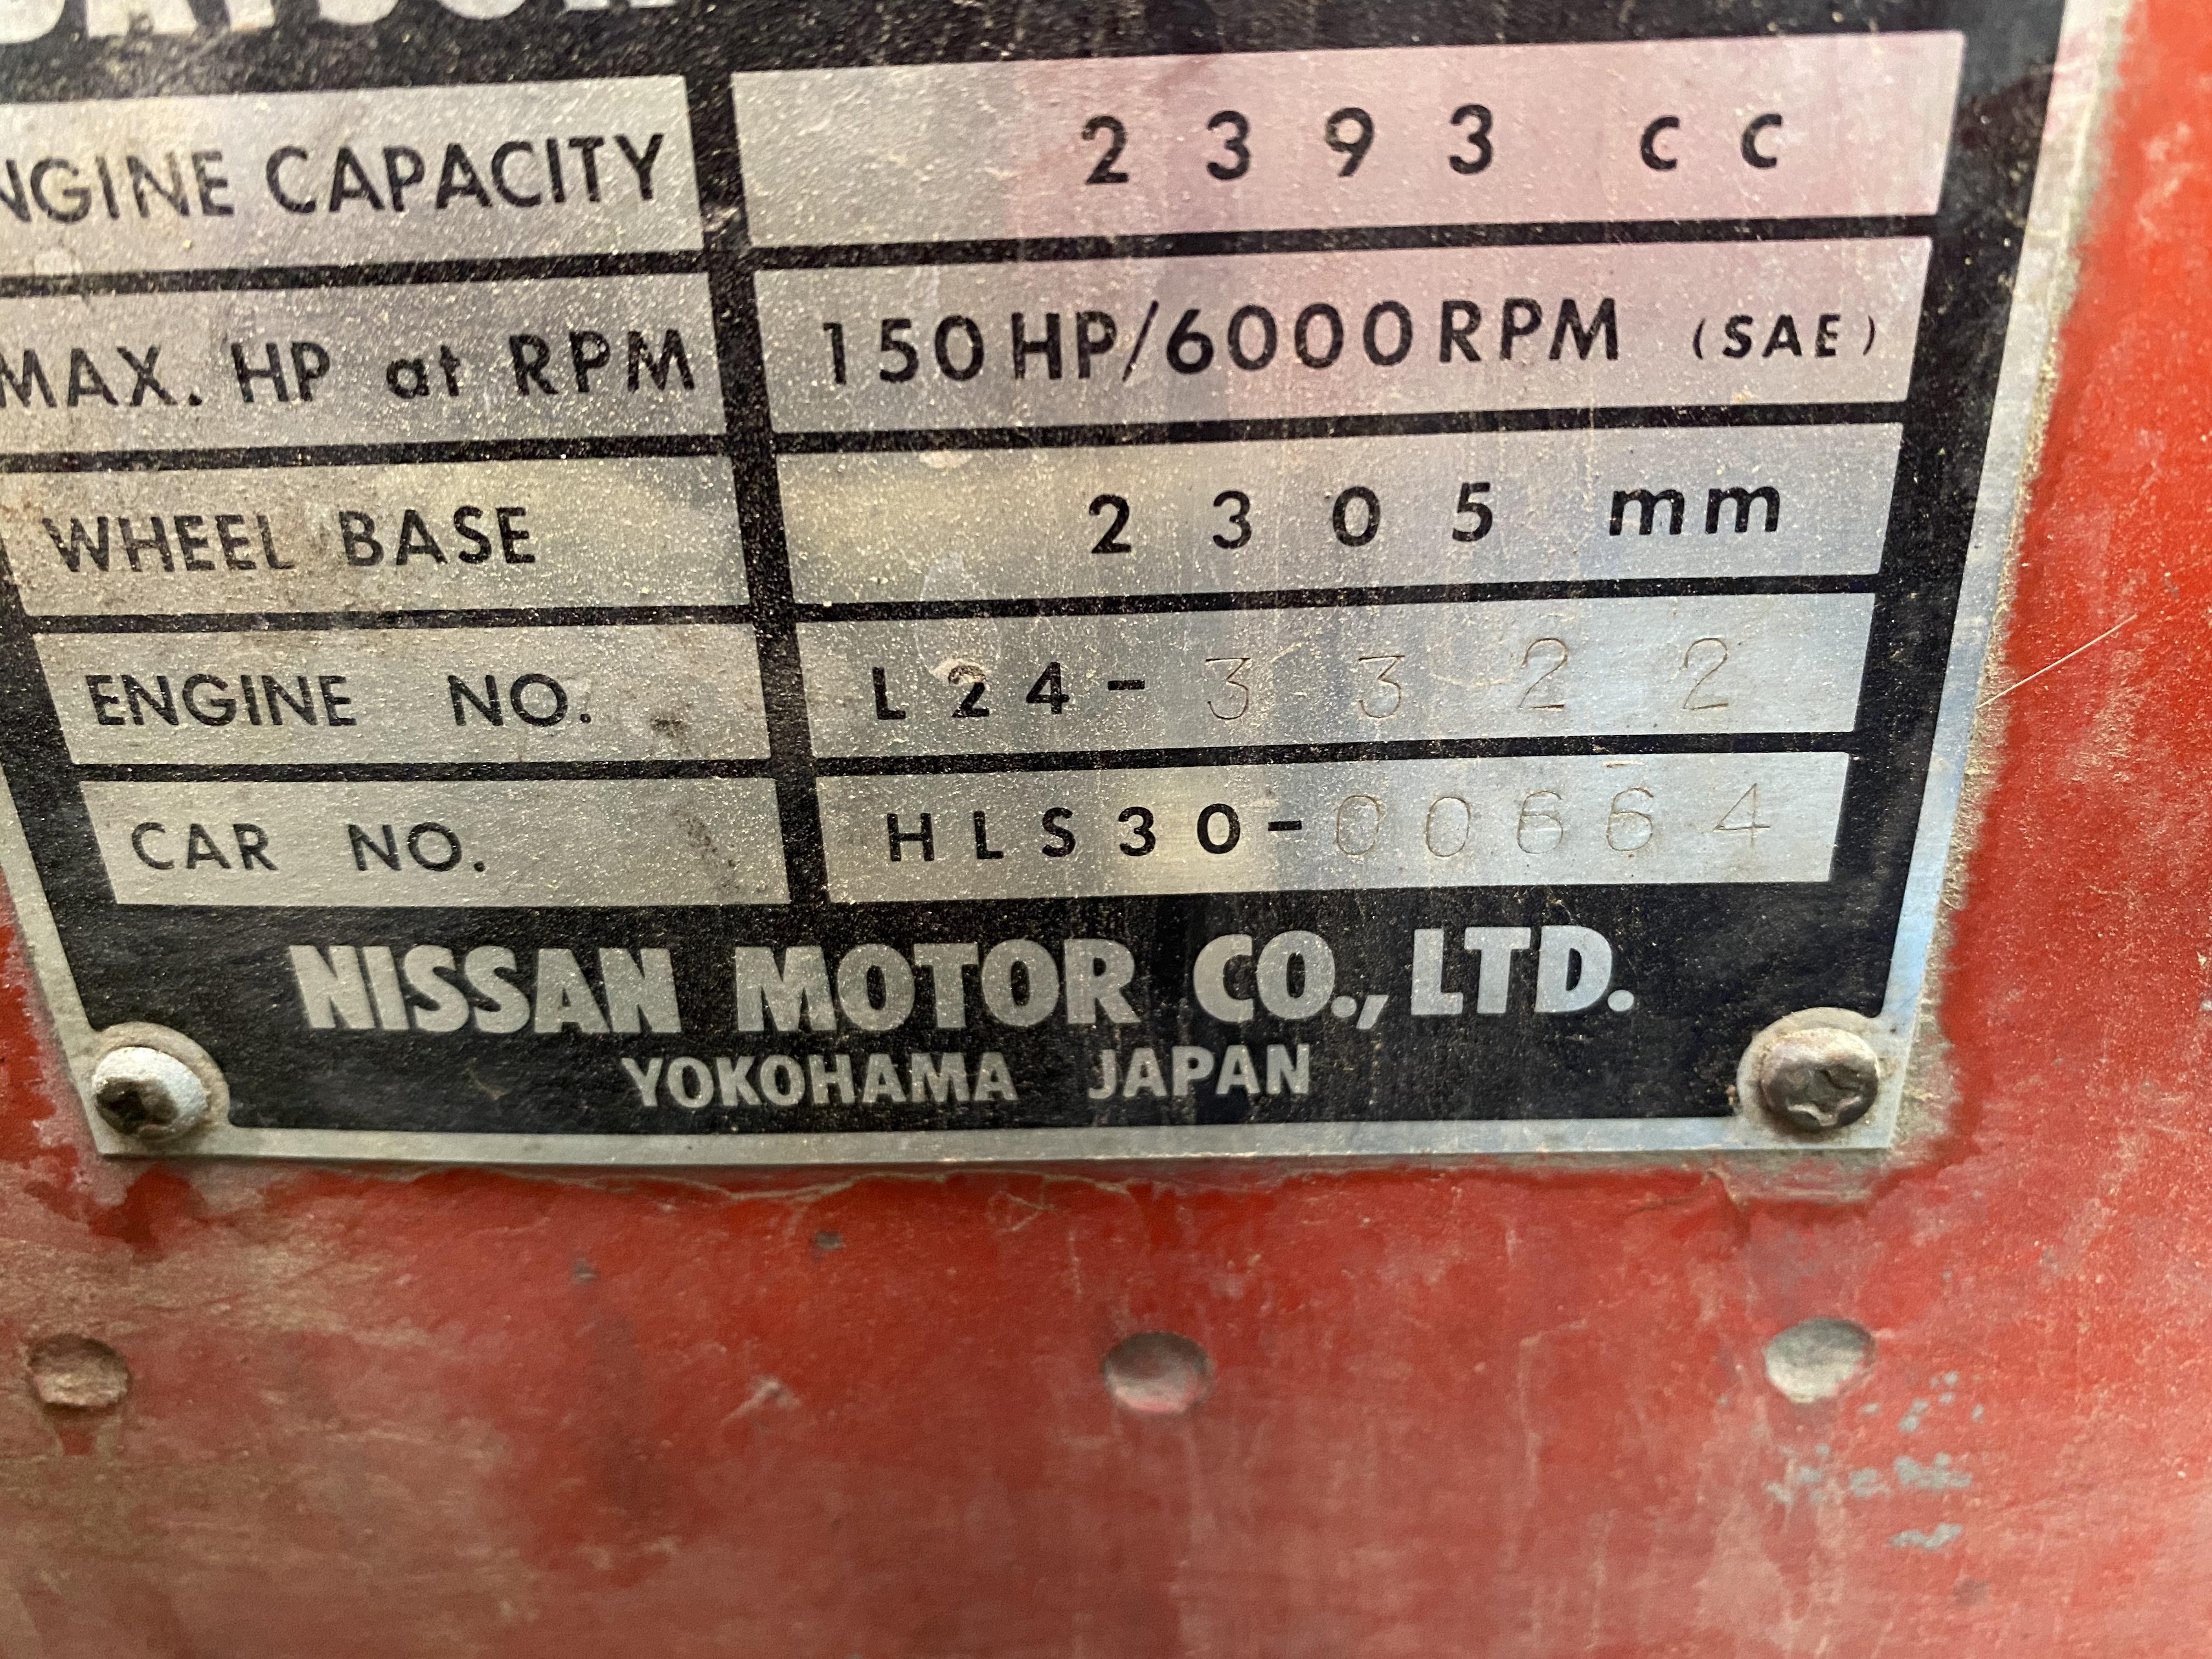
1 pointI recently acquired a 1970 240Z #00664. The car is all original condition with a documented 74k on odometer. The car has sat for 20 years and unfortunately the frame rail is rusted through(Assuming from the battery tray) I am looking for some advice on how to handle the frame rail. Should I find a donor car and cut the rail out and weld the new one in or should I look at some aftermarket frame rail replacements? I would like to keep this car as a survivor car(Still has the green distributor cap) but looking for advice on the right route to take.1 point
-
1 pointSo I found a 260Z donor car. Will that work? I did some research online and I am getting some conflicting reports. One article I read said Nissan stiffened the car in 74 by extending the frame rails, any truth to this?1 point
-
Update for you: I was wrong about a burned out tach light - the bulbs are just too dim to illuminate the area where the redline+ bit is. The turn signal lights still aren't working however. I ended up using a test light to verify that I am indeed getting a light pulse to the harness connector for the signals and I am. I did some research online and found out that the indicator lights (unlike the illumination lights) are indeed 1 wire and not 2. So I'm guessing that means they aren't grounding properly to the housing (or the housing's ground is missing, right)? Update: Got the lights working. For those who have the same issue, the tach grounds to the body via the tach mount screw on the underside of the dash. Sand it down a bit and crank that screw and that should fix your grounding issue.1 point
-
The fuel pouring out of the overflow on the float bowl is a big clue that you've got a float valve problem, and it's stuck open now, but it could also stick shut. This worked for me once. Use the back end of the screw driver to whack the float bowl to see if you can jar it loose for at least long enough to get you home, then take off the float bowl covers and clean it up/out. If you're having problems with the float valve, that's the place to start for your drivability issue. I've had mine stick open and stick shut. Either way will cause the car to buck and hiccup. You gotta clean them up and reset the float levels once you are done. You could spray carb cleaner down and around the valve and work it to see if you can loosen it up. Blow through the inlet on the top of the bowl to verify the valve is opening and closing appropriately. Next place to check is the choke cables. Are they still set right, or did one of them come loose,, leaving the nozzle too far down/up. Sounds weird, but it's happened to me. After the above, recheck your timing, then take if for a ride. If you still have problems, go after the ignition components.1 point
-
1 pointI think a choice like that is a good idea. A really wide pan head philips would probably be my choice1 point
-
Yeah, those are what are on my car. It makes sense that the sub harness and sensor connectors have matching colors. That said - if the bullet connectors are flip-flopped in the main harness, suddenly that little trick's helpfulness goes out the window haha. @SteveJ Yeah, that's what I ended up doing - checking the main harness wire colors then just following the wire to the plug rather than looking at the sub-harness wire colors1 point
-
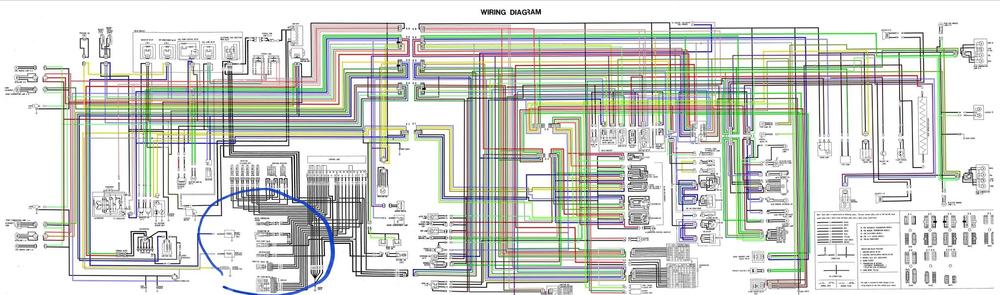
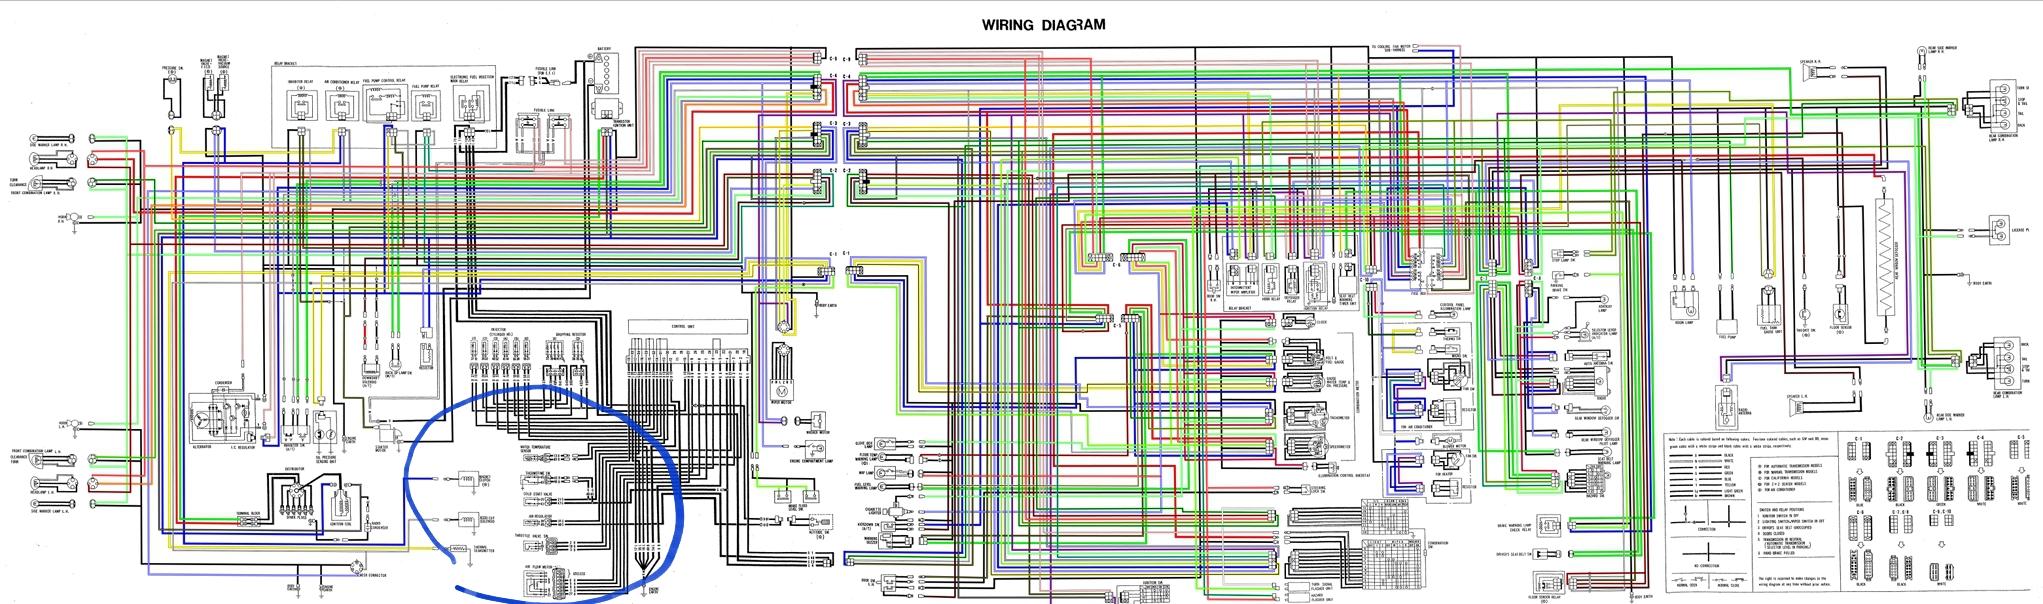
It is in the wiring diagram. You can find it here in Resources - downloads - wiring diagrams. The FSM in section EF - Engine fuel only shows the ECU terminal numbers for diagnostics. The diagrams start from page EF-24 and show the different tests in that section of the FSM.
 1 point
 -
1 pointFor anyone getting lulled in to believing that the situation in the USA is normal. These curves should be very similar, at least. You can't fake deaths. "Fake deaths" isn't a thing, although it might be tried, no surprise. Over three times as many people are dying of COVID-19 in the USA as in our"comparables". Modern developed countries. We used to be one.
 1 point
 -
1 point
-
1 pointI think they might be NLA. there was a discussion similar to this a couple weeks back. But I have late cars, maybe someone has some stashed away.1 point
-
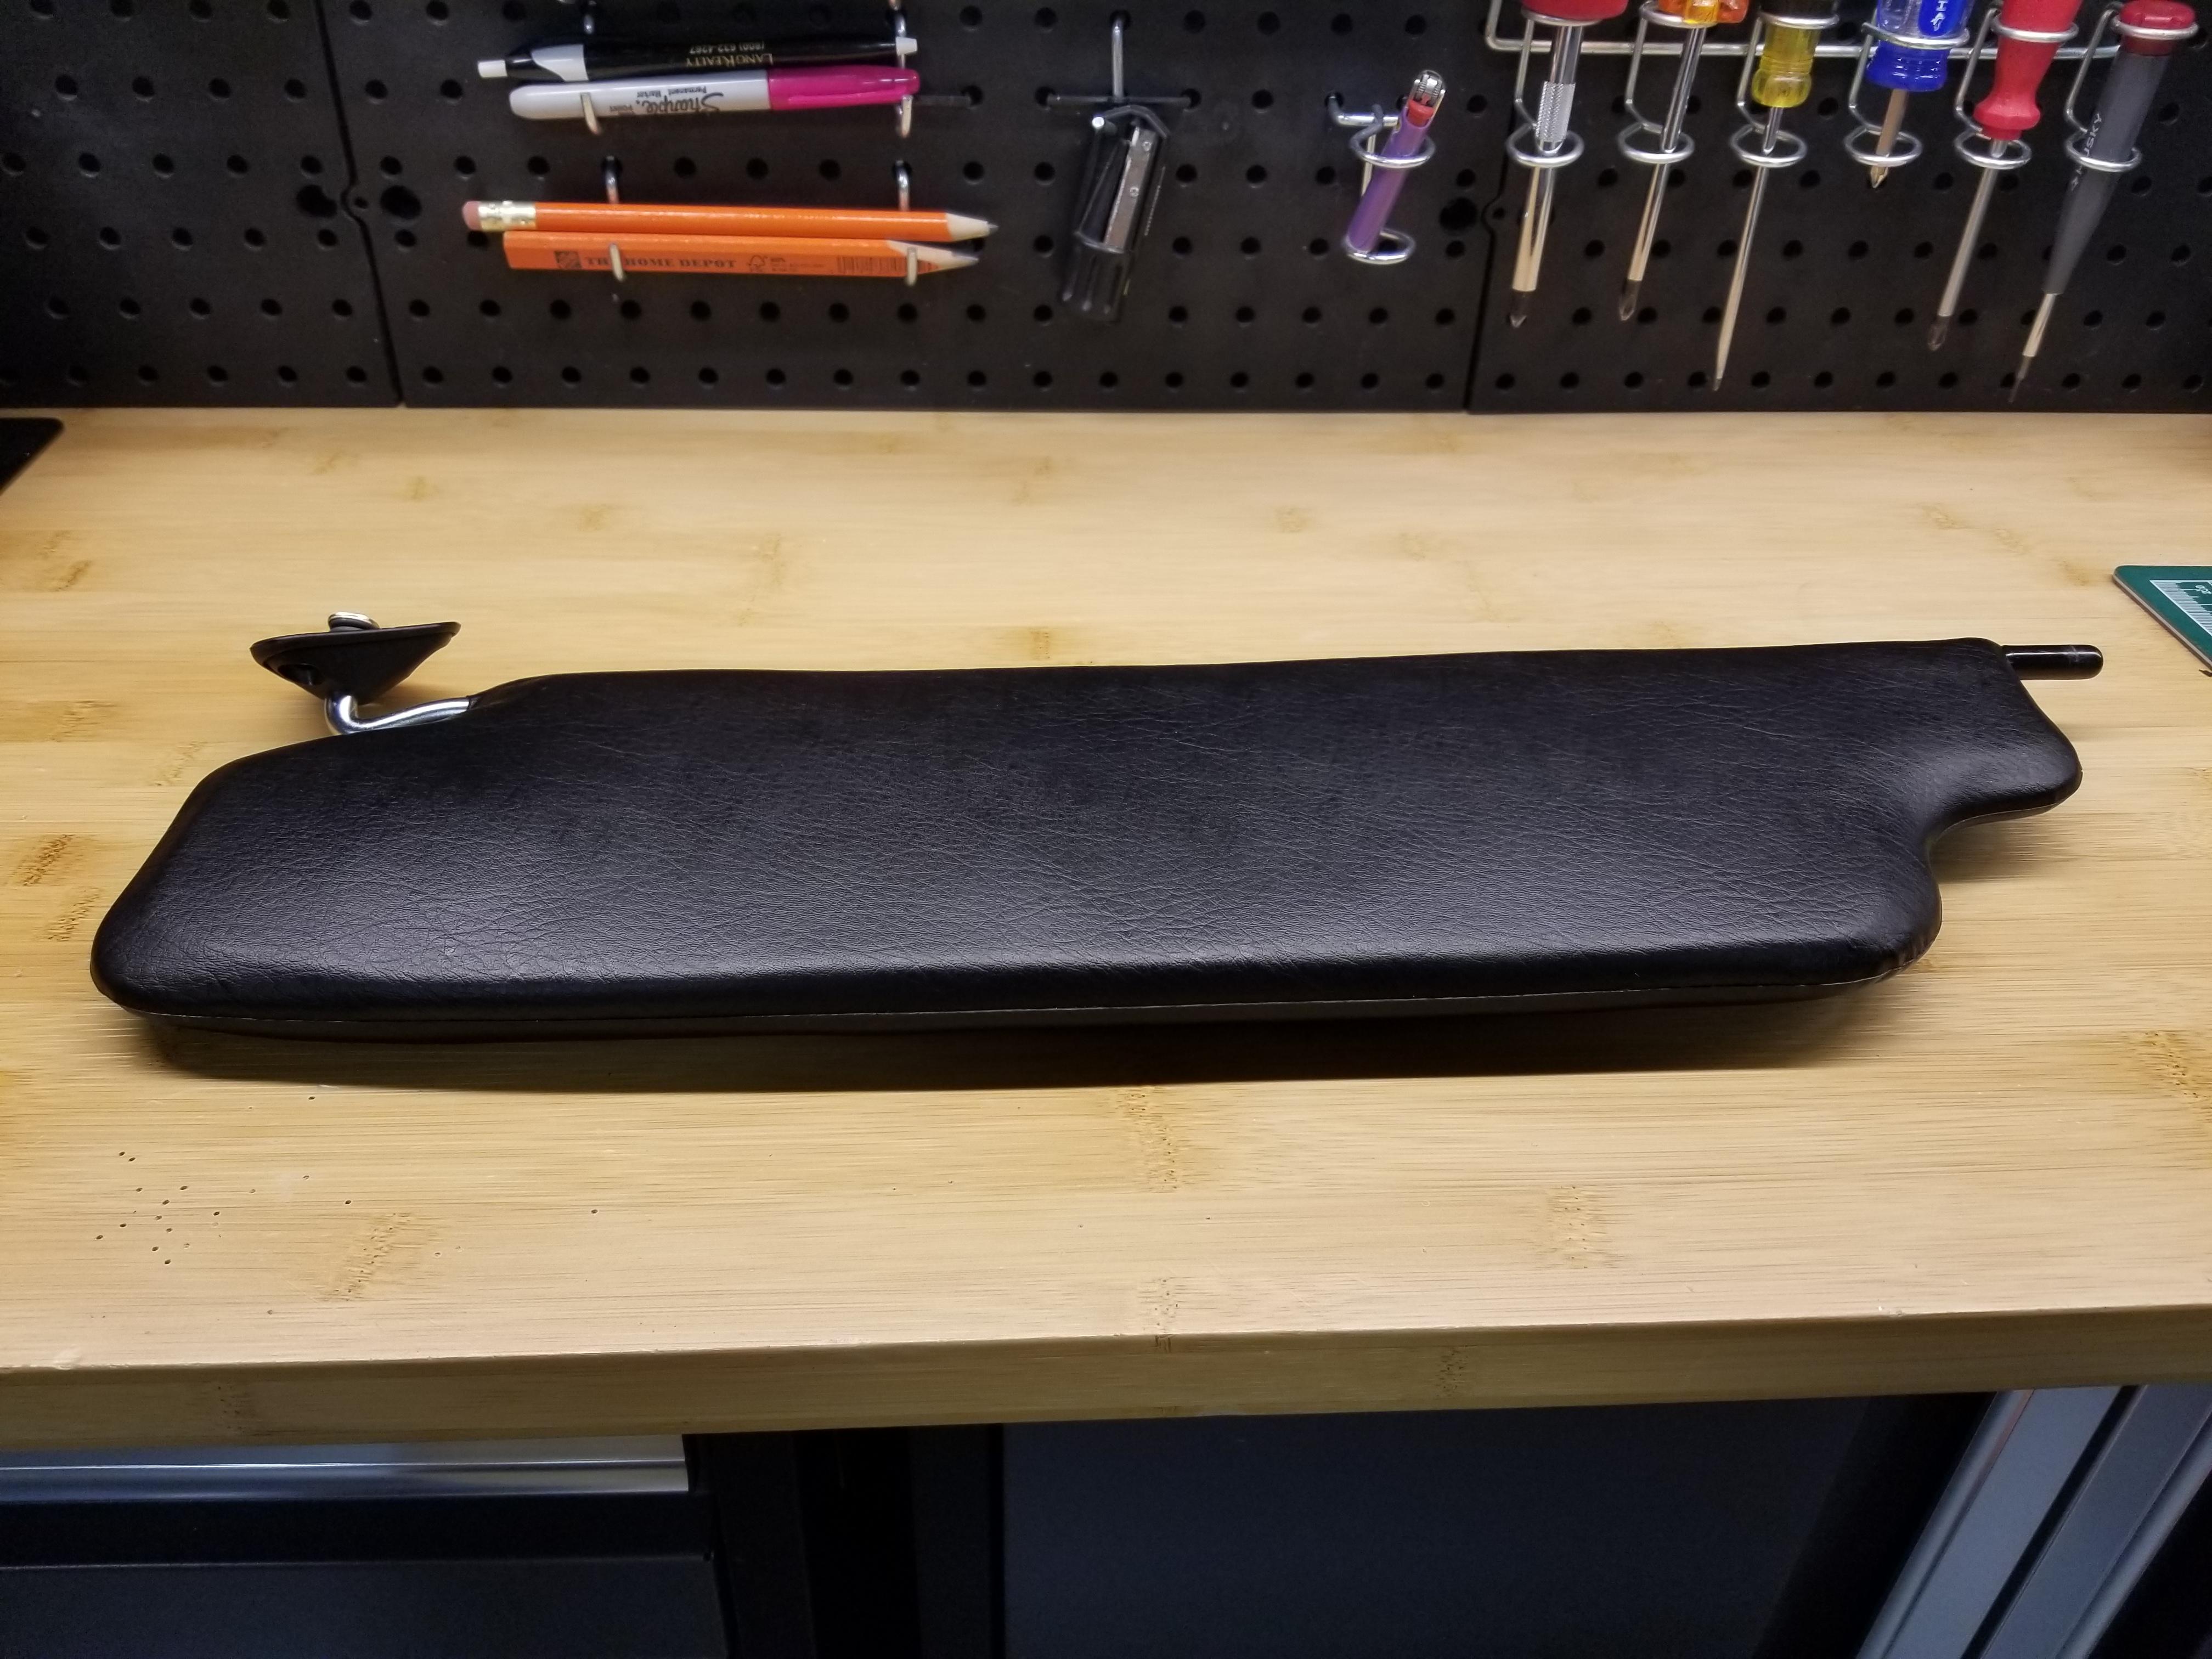
1 point1 point1 pointNot being satisfied with the "plump" look that resulted from my first attempt, I decided to be more radical and opened the visors again, took out all the foam I had added and all the factory green foam pads as well. I started with the now totally empty visor skins and prepared a "sandwich" consisting of a single piece of black 10mm thick high density foam precisely cut to shape, covered with a single layer of 2mm sheet of the same foam on each side. I beveled the edges a bit before reinserting into the visor skins. Closed up the same way as before. I'm super satisfied with the much improved flatness and stock appearance. Sent from my SM-N950U using Tapatalk1 point


Important Information
By using this site, you agree to our Privacy Policy and Guidelines. We have placed cookies on your device to help make this website better. You can adjust your cookie settings, otherwise we'll assume you're okay to continue.